

Sub-Zero Integrated Refrigeration, 700TR, 700TCI, 736TR, IC-27R Use & Care Manual

Integrated Refrigeration Use & Care Guide

INTEGRATED REFRIGERATION
Contents
4 Integrated Features
5 Electronic Controls
6 Storage
9 Operation
11 Care Recommendations
12 Troubleshooting
15 Sub-Zero Warranty
Customer Care
The model and serial number are printed on the enclosed
product registration card. Both numbers are also listed on
the product rating plate. Refer to page 4 for rating plate
location. For warranty purposes, you will also need the date
of installation and name of your authorized Sub-Zero dealer.
Record this information below for future reference.
If your product ever needs attention, be sure to use a
Sub-Zero factory certied service provider recommended
by our customer care center, or select one from our list of
providers available at subzero.com/locator. All factory certied service providers are carefully selected and thoroughly
trained by us.
SERVICE INFORMATION
Model Number
Serial Number
Date of Installation
Certied Service Name
Certied Service Number
Authorized Dealer
Dealer Number
Important Note
To ensure this product is installed and operated as safely
and efciently as possible, take note of the following types
of highlighted information throughout this guide:
IMPORTANT NOTE highlights information that is especially
important.
CAUTION indicates a situation where minor injury or product
damage may occur if instructions are not followed.
WARNING states a hazard that may cause serious injury or
death if precautions are not followed.
IMPORTANT NOTE: Throughout this guide, dimensions in
parentheses are millimeters unless otherwise specied.
2 | Sub-Zero Customer Care 800.222.7820

Thank You
Thank you for your purchase. We look forward to being part of your home for decades to
come. As a third-generation family-owned company, we take a very personal stake in the
preservation of your family’s food. We built our business and our reputation on helping
families serve the freshest food possible.
With your purchase, you receive one of the strongest warranties in the appliance industry.
Take a moment to read the full warranty statement on page 15. It’s also important to
register your Sub-Zero to ensure that you don’t miss out on exclusive owner benets,
such as; assurance that you will be taken care of in the unlikely event that service
becomes necessary during the warranty period, and a proof-of-purchase record in case
of a home insurance claim. You may register by one of the following options:
• Mail in the completed Sub-Zero product registration card.
• Register online at subzero.com/register and create a personalized My Sub-Zero/Wolf
account using the serial number on your product.
• Register by phone by calling Sub-Zero Customer Care at 800-222-7820.
As a Sub-Zero owner, you can count on ongoing support, day in and day out. Our customer care center is available 24 hours a day, seven days a week and staffed by knowledgeable product experts at our factory in Madison, Wisconsin. Should the need arise,
simply call 800-222-7820 and speak with one of our product experts. They will help
troubleshoot any issues you might have.
We are condent this guide will answer your questions about the features, operation, and
maintenance of your Sub-Zero, but if you have additional questions, please contact us at
800-222-7820 or visit us online at subzero.com.
subzero.com | 3
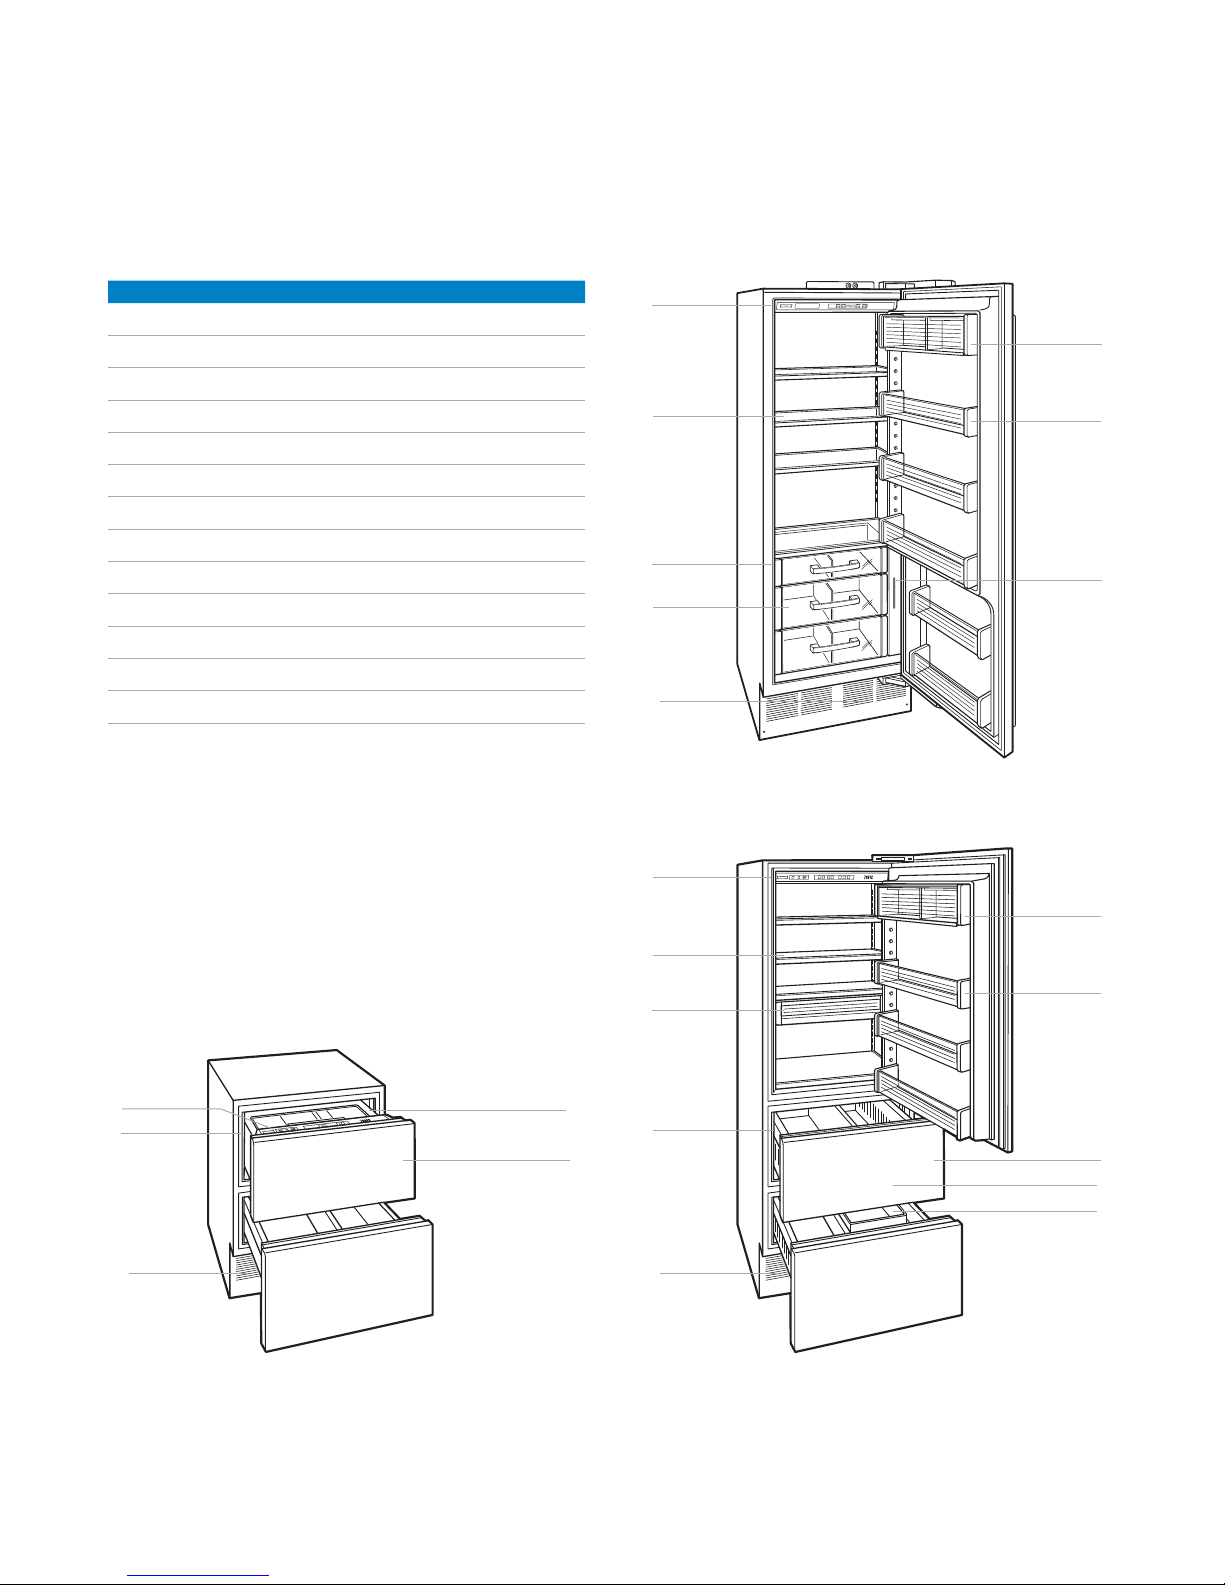
INTEGRATED FEATURES
Integrated Features
FEATURE
1
Product Rating Plate
2
Electronic Control Panel and Display
3
Freshness Cards (column models)
4
Door Shelves
5
Dairy Compartment
6
Glass Shelves
7
Deli Drawer
8
Refrigerator Drawers
9
Storage Drawers
10
Crisper Cover
11
Automatic Ice Maker
12
Ice Container
13
Condenser (behind kickplate)
PG
2
5
6
6
6
6
7
7
8
8
9
8
13
2
5
6
1
8
13
4
3
Column all refrigerator.
2
1
13
Drawer all refrigerator.
2
5
6
7
10
1
9
13
4
9
11
12
Tall combination.
4 | Sub-Zero Customer Care 800.222.7820

ELECTRONIC CONTROLS
Control Panel
FUNCTION
COLDER
WARMER
ICE Turns power to ice maker on or off. Use to disable
ALARM Activates or deactivates door/drawer alarm. An
POWER Turns unit on or off. When power is off, ‘OFF’ will
Adjusts tem per ature in one-degree increments.
Combination units have separate temperature controls for refrigerator and freezer. Temper atures are
preset at 38°F (3°C) and 0°F (-18°C).
ice maker during extended vacations.
audible chime indicates door/drawer has been left
ajar for more than 30 seconds.
appear in control panel display. Turning power off at
the control panel eliminates the need to unplug or
turn power off at the circuit breaker during service
or extended vacations.
Display
INDICATOR
SERVICE Illuminates or ashes when electronic control
system has detected a temperature or ice maker
problem, or if the condenser needs to be cleaned.
ICE Illuminates when ice maker system is activated.
Illuminates when door alarm is activated.
Control panel and display (model 700TCI shown).
subzero.com | 5
STORAGE
Keeping Food At Its Best
This Sub-Zero features a unique dual refrigeration system
to keep food fresher longer.
With the Sub-Zero dual refrigeration system, individual
refrigerator and freezer systems have been designed to
maintain accurate, consistent temperatures and proper
humidity levels for longer food life expectancy. Dual refrigeration eliminates transfer of fresh food odors to frozen food
and ice and does not freeze the moisture out of the air in
the fresh food section.
Refrigerator Storage
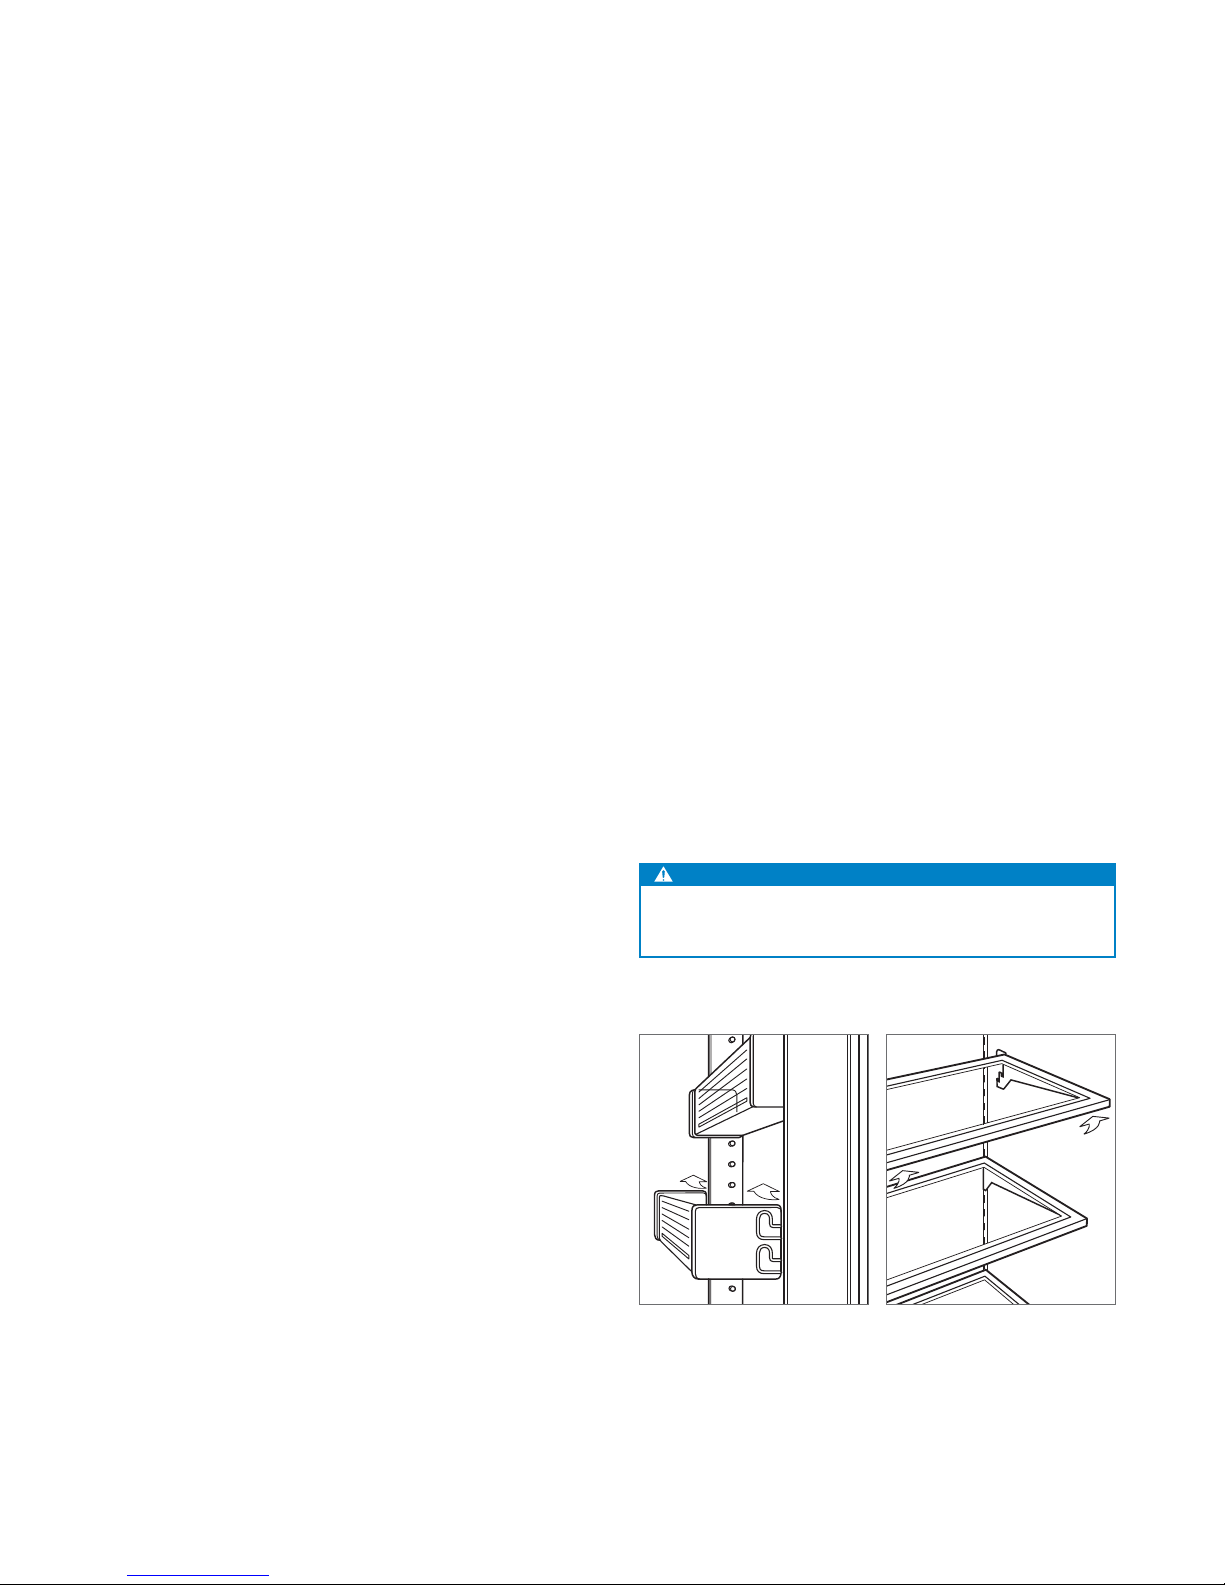
DOOR SHELVES
To remove a door shelf or the dairy compartment, lift from
the bottom and slide out. To reinstall, place in the desired
position and slide the shelf down onto the guides. Refer to
the illustration below.
IMPORTANT NOTE: If door opening is limited to 90°, door
shelves may need to be removed before removing a storage
drawer or glass shelf.
GLASS SHELVES
To remove or adjust a glass shelf, tilt up, then lift up and out.
To reposition, insert shelf in the tracks along the back wall,
then lower the front until it locks into position. Refer to the
illustration below.
The stationary glass shelf at the bottom of the compartment
should be placed with beveled edge facing front. Rear support legs space the shelf away from the back wall to ensure
proper air ow through the unit.
IMPORTANT NOTE: Use care when handling glass shelves to
prevent breakage or scratching the interior.
CAUTION
Glass shelves should warm to room temperature before
immersing in warm water.
Door shelf removal.
Glass shelf removal.
6 | Sub-Zero Customer Care 800.222.7820
STORAGE
Refrigerator Storage
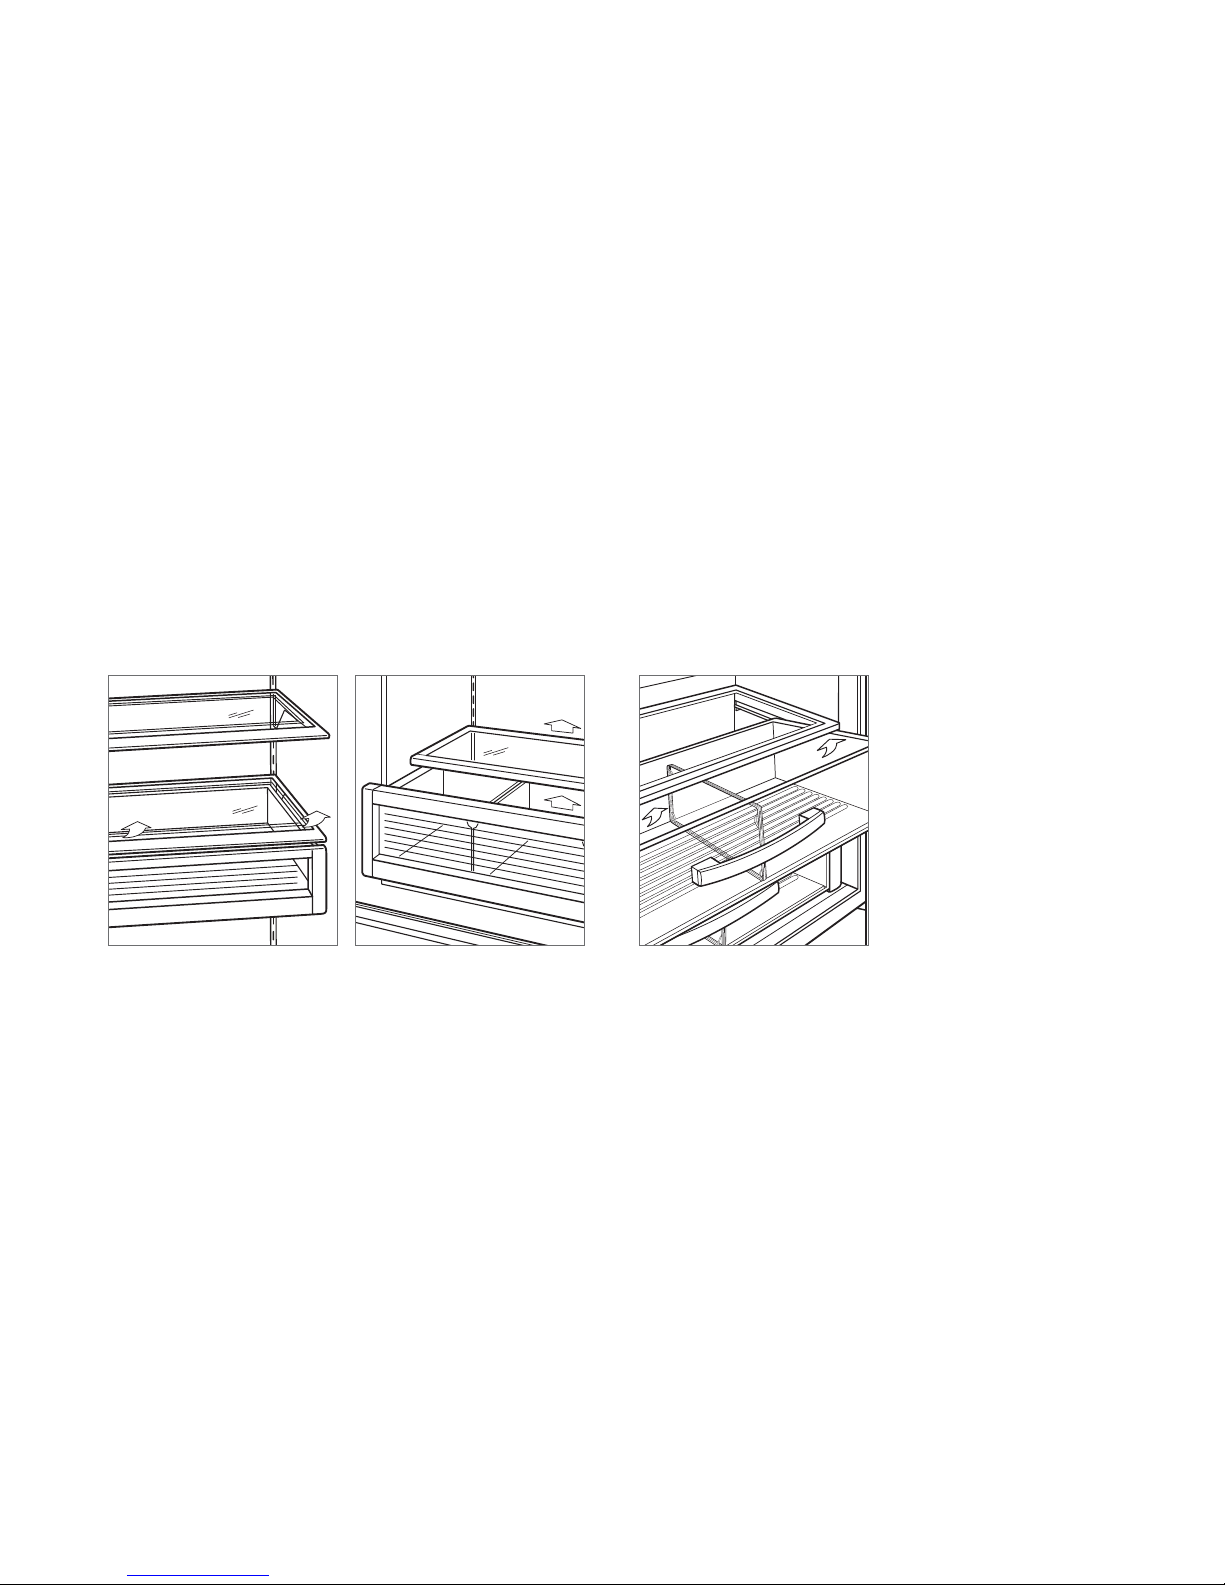
DELI DRAWER AND SHELF
Models 700TR, 700TCI and 736TR | To remove the deli
drawer and shelf assembly, tilt up, then lift up and out. To
reposition, insert assembly in the tracks along the back wall,
then lower the front until it locks into position. Refer to the
illustration below.
CRISPER
Model 736TCI | To remove the crisper, lift the glass shelf
off side supports, then remove crisper bin from support
assembly. To reinstall, place crisper bin into assembly then
reinstall glass shelf. Refer to the illustration below.
REFRIGERATOR DRAWERS
Model IC-27R | To remove, pull the refrigerator drawer
forward until it stops. Lift the front of the drawer slightly,
then pull forward. To reinstall, push drawer slides in. Align
the drawer with slides and push back until it stops. Press
down on the front of the drawer to engage the slides. Refer
to the illustration below.
If door opening is limited to 90°, the shallow door shelves
must be removed before removing a drawer.
To remove a drawer divider, pull straight up. To reinstall,
align tabs on the divider with notches in the drawer and
slide down.
Deli drawer and shelf removal. Crisper removal.
Refrigerator drawer removal.
subzero.com | 7
STORAGE
Freezer Storage
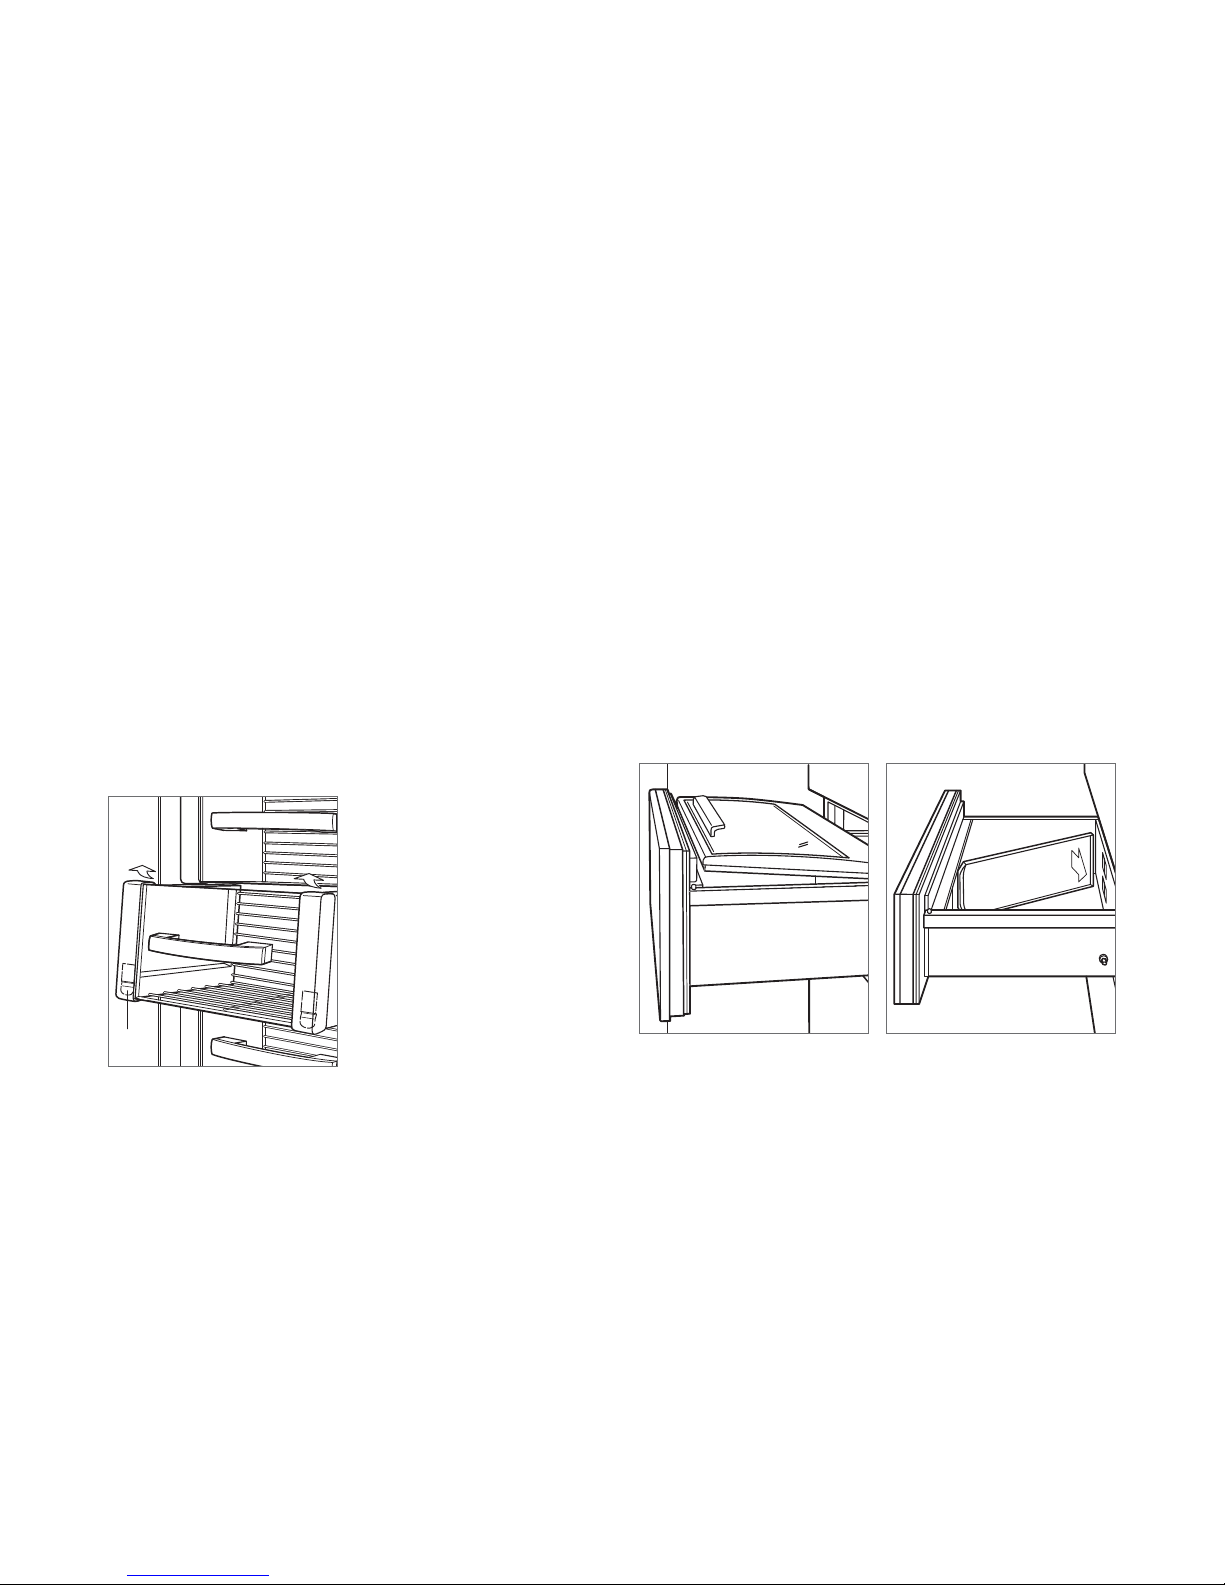
FREEZER DRAWERS
Column | To remove, pull the freezer drawer forward until
it stops. Pull the two metal clips located behind the bottom
two corners of the drawer forward, then lift up and out. To
reinstall, push drawer slides in. Align the drawer with slides
and push back until it stops. Press down on the front of the
drawer to engage slides. Refer to the illustration below.
If door opening is limited to 90°, the shallow door shelves
must be removed before removing a drawer.
ICE CONTAINER
Column | To remove the ice container, pull the top freezer
drawer forward until it stops and lift container out.
Tall and drawer | To remove the ice container, pull the
lower storage drawer forward until it stops and lift container
out.
Storage Drawers
CRISPER COVER
Tall and drawer | To remove the crisper cover, pull the
refrigerator storage drawer forward until it stops. Lift the
front of the crisper cover and pull it up and out. Refer to the
illustration below.
DRAWER DIVIDER
Upper storage drawer | To remove the divider, pull it for-
ward and release the back edge from notches in the drawer.
Lift up and out. Reverse to reinstall. Refer to the illustration
below.
Lower storage drawer | For models with an ice maker, the
divider is not removable. For models without an ice maker,
the center divider can be removed by extracting three
screws located on the back of the drawer.
TA B
Freezer drawer removal.
8 | Sub-Zero Customer Care 800.222.7820
Crisper cover.
Drawer divider.
OPERATION
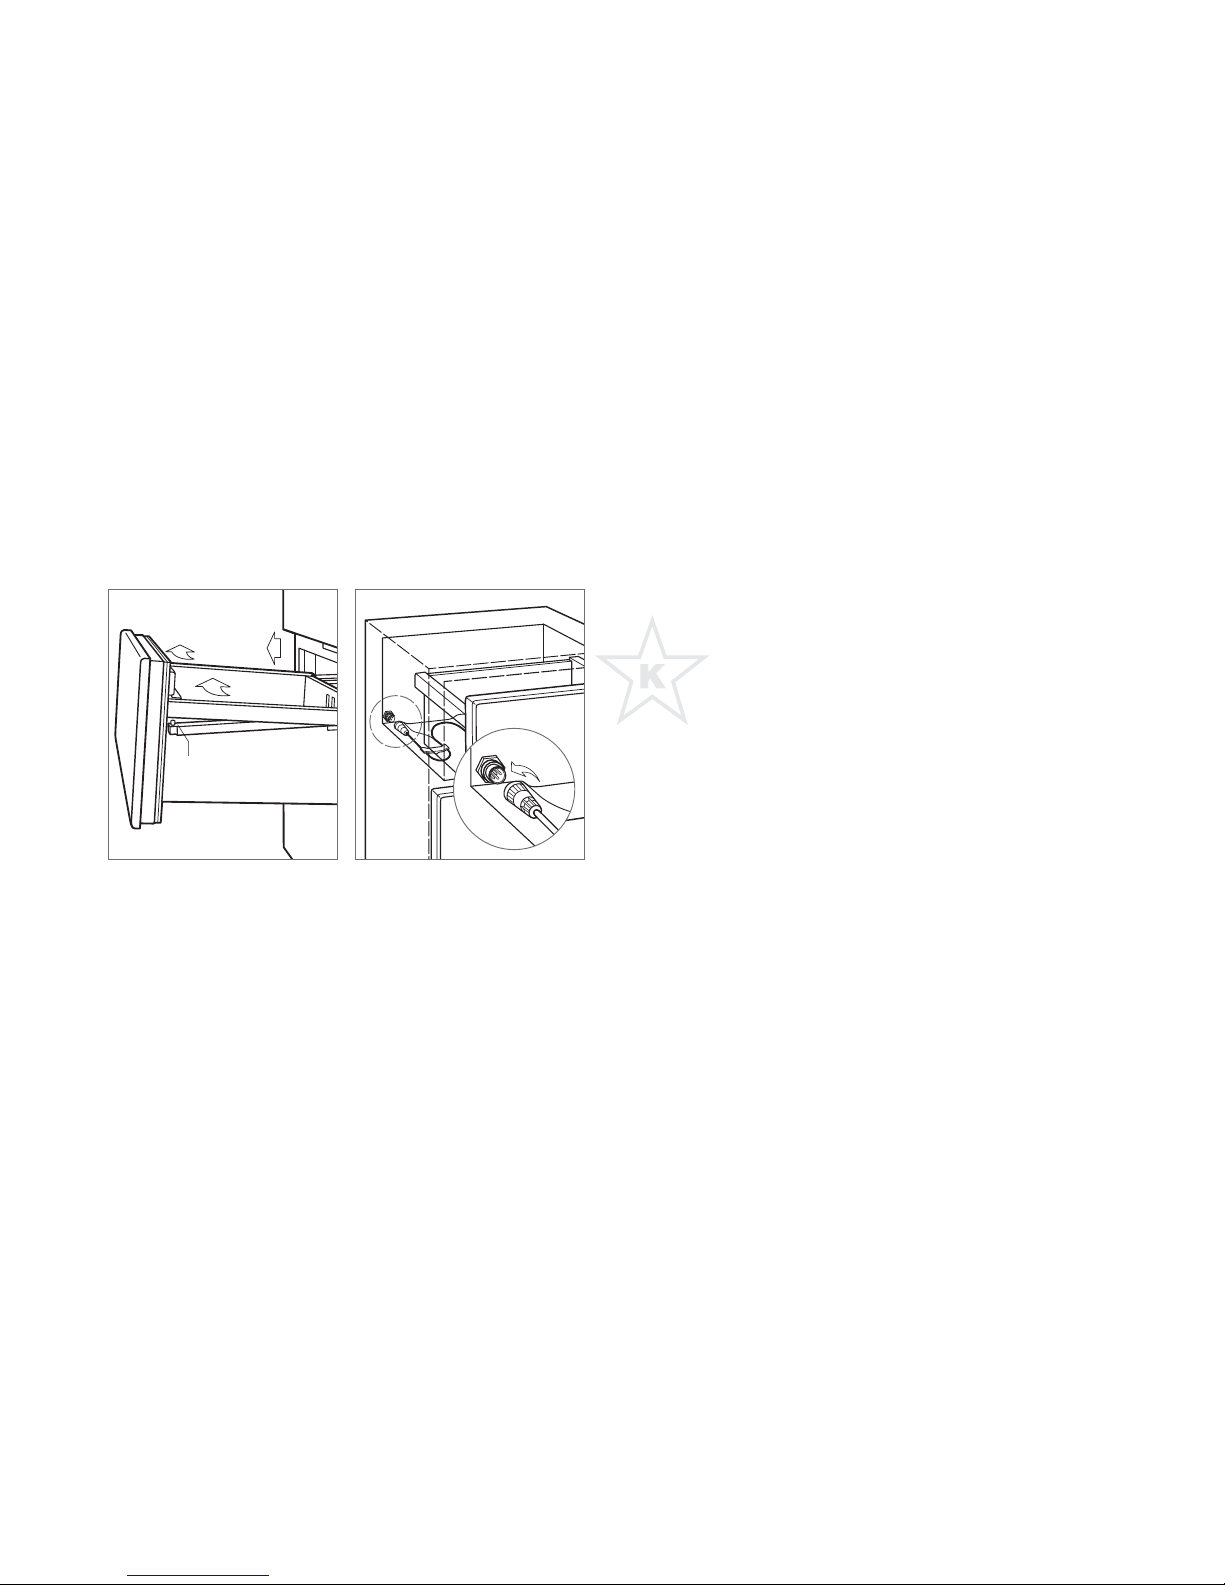
Storage Drawers
DRAWER REMOVAL
To remove, pull the storage drawer forward until it stops.
Lift the front of the drawer slightly and pull straight out. To
reinstall, place drawer onto the slides, then align the holes at
the front of the drawer with the pegs on the slides. Refer to
the illustration below.
For drawer models, the upper drawer has a control cable
that must be disconnected before removing the drawer.
Refer to the illustration below.
PEG
Storage drawer removal.
Control cable (drawer models).
Ice Maker Operation
To initiate ice production, touch ICE on the control panel. To
deactivate, touch ICE again. After initial start-up, discard the
rst few batches of ice. The ice may contain impurities from
new plumbing connections.
The ice maker will cycle (eight cubes) every two hours. If ice
is not used regularly it may fuse together. To avoid, discard
ice and allow ice maker to replenish.
For column models, the ice maker must be turned off at the
control panel when the ice container is removed. For tall and
drawer models, the ice maker is deactivated when the ice
container is removed. Ice production will resume when the
container is reinstalled.
Sabbath
This appliance is certied by Star-K to meet strict religious
regulations in conjunction with specic instructions found
on www.star-k.org.
Column and tall models may require a wire harness kit to initiate Sabbath mode. The kit is available through your authorized Sub-Zero dealer. For local dealer information, visit the
nd a showroom section of our website, subzero.com.
To initiate Sabbath mode, while the unit is on, touch POWER
on the control panel. ‘OFF’ appears in the control panel display. Touch and hold POWER for 10 seconds until the lights
turn off, indicating Sabbath mode has been initiated. Lights,
ice maker (if applicable) and door alarm will be disabled. To
return to normal operating conditions, touch POWER.
subzero.com | 9

OPERATION
Interior Lighting
WARNING
Turn power off at the control panel before replacing light
bulbs. Wear protective gloves when handling bulbs.
OVERHEAD LIGHTING
Column and tall | Overhead lighting uses 40-watt bulbs.
To access bulbs, remove the light shield by releasing the
locking clip from each side of the light shield. Hold the
bottom of the shield then slide back until the slots are
aligned with the wall studs. To reinstall, align slots with
studs then slide forward. Once in position, rotate locking
clips back into position. Refer to the illustrations below.
REFRIGERATOR DRAWER LIGHTING
Column | Drawer lighting uses 40-watt bulbs. To access
bulbs, remove the drawer and glass shelf, then slide light
shield up to remove. To reinstall light shield, place over
bulbs then slide down into position. Reinstall drawer and
glass shelf. Refer to the illustration below.
STORAGE DRAWER LIGHTING
Tall and drawer | Drawer lighting uses a 25-watt bulb. The
bulb is recessed into the top of each drawer compartment.
To access the bulb, pull the drawer forward until it stops or
remove completely by lifting up and out. Refer to the illustration below.
RECESSED BULB
SHIELD
Overhead lighting—column.
LOCKING CLIPLIGHT
SHIELD
Overhead lighting—tall.
LOCKING CLIPLIGHT
Refrigerator drawer lighting.
Storage drawer lighting.
10 | Sub-Zero Customer Care 800.222.7820

CARE RECOMMENDATIONS
Cleaning
INTERIOR CLEANING
To clean interior surfaces and all removable parts, wash with
a mild solution of soap, water and baking soda. Rinse and
dry thoroughly. Avoid getting water on lights and control
panel.
CAUTION
Do not use vinegar, rubbing alcohol or other alcoholbased cleaners on any interior surface.
STAINLESS STEEL EXTERIOR
Use a nonabrasive stainless steel cleaner and apply with a
soft lint-free cloth. To bring out the natural luster, lightly wipe
surface with a water-dampened microber cloth followed by
a dry polishing chamois. Always follow the grain of stainless
steel.
CONDENSER CLEANING
CAUTION
Before cleaning the condenser, turn power off at the
control panel. Wear gloves to avoid injury from sharp
condenser ns.
The condenser is located at the bottom of the unit, behind
the kickplate. Remove the kickplate by removing four
screws. Use a soft bristle brush and vacuum to remove dust
and lint from the condenser. Clean the condenser every
three to six months. Refer to the illustration below.
IMPORTANT NOTE: To avoid damaging the condenser,
vacuum in the direction of the ns.
CAUTION
Failure to clean the condenser could result in temperature loss, mechanical failure or damage.
VACATIONS
For extended vacations, turn power off at the control panel.
Empty the unit and block doors open slightly to let fresh air
in and keep the interior dry.
CONDENSER
Condenser location.
subzero.com | 11

TROUBLESHOOTING
Troubleshooting
SERVICE INDICATOR
‘SERVICE’ ashes in control panel display.
• Verify condenser is clean.
• Turn unit off at the control panel, then on. If indicator
continues to ash, contact Sub-Zero factory certied
service.
UNIT OPERATION
No lights or cooling.
• Verify power is on.
• Verify electrical power to unit and home circuit breaker
is on.
No lights in refrigerator or freezer.
• Door/drawer may have been left ajar which has disabled
lights to eliminate excess heat. If lights are out, close
door/drawer for one hour. If lights are still out, contact
Sub-Zero factory certied service.
Frost, condensation or ice build up inside unit.
• Verify condenser is clean.
• Verify door/drawer is closing properly.
• Verify door/drawer has not been left ajar.
• Verify door/drawer gasket does not have rips or tears. If
it does, contact Sub-Zero factory certied service.
• If icing is heavy, turn unit off and use a hair dryer to melt
ice. Hair dryer should be set on low and kept moving
at all times. Once ice has melted, wipe up water with a
cloth or paper towel.
High temperatures, unit runs excessively or unit giving off
too much heat.
• Verify condenser is clean.
• Verify door/drawer is closing properly.
• Verify door/drawer has not been left ajar.
• Increased ambient temperatures may cause compres-
sors to run longer.
• If temperature display shows 38° and 0°, but is not
cooling, unit may be in showroom mode. Contact
Sub-Zero Customer Care at 800-222-7820.
12 | Sub-Zero Customer Care 800.222.7820

TROUBLESHOOTING
Troubleshooting
ICE PRODUCTION
No ice.
• Verify ‘ICE’ appears in control panel display.
• Verify ice maker has been on for at least 24 hours.
• Verify freezer temperature near 0°F.
• Verify ice container is properly installed.
• Verify ice maker arm in down position.
• Verify water is being supplied to unit.
Blue or green ice.
• Possible copper supply line corrosion. Contact plumber
to clean or replace.
Black ecks in cubes.
• Stop use and contact Sub-Zero factory certied service.
Bad taste.
• Defrost freezer and clean with soap and water.
ODOR
• Unit should be cleaned before using for the rst time.
This will clear any odors that may have been trapped
during shipping.
• Clean unit and shelving thoroughly.
• Uncovered food could create odor which may require
cleaning.
• Place coffee grounds or charcoal briquettes in freezer to
absorb odor.
Hollow cubes.
• Clean condenser. Contact Sub-Zero factory certied
service if unresolved.
subzero.com | 13

TROUBLESHOOTING
Troubleshooting
SERVICE
• Maintain the quality built into your product by contacting
Sub-Zero factory certied service. For the name of the
nearest Sub-Zero factory certied service, check the
contact & support section of our website, subzero.com
or call Sub-Zero customer care at 800-222-7820.
• When contacting service, you will need the model and
serial number of your unit. Both numbers are listed on
the product rating plate. Refer to page 4 for rating plate
location.
• For warranty purposes, you will also need the date
of installation and name of your authorized Sub-Zero
dealer. This information should be recorded on page 2.
Sub-Zero, Sub-Zero & Design, Dual Refrigeration, Constant Care, The Living Kitchen, Great American Kitchens The Fine Art of Kitchen Design, and Ingredients are registered trademarks and service marks of Sub-Zero, Inc. Wolf, Wolf & Design, Wolf Gourmet, W & Design and the color red as applied to knobs are registered trademarks and service marks of Wolf
Appliance, Inc. (collectively, the “Company Marks.”) All other trademarks or registered trademarks are property of their respective owners in the United States and other countries.
14 | Sub-Zero Customer Care 800.222.7820
 Loading...