


2012
Forester
Quick Reference Guide

Complete U.S. specications and illustrations may
not have been available at time of publication.
Specications are based on the latest product
information available at time of publication. Some
images shown are for illustration purposes only.
Some equipment shown may be optional at
extra cost. Specic options may be available
only in combination with other options. Specic
combinations of equipment or features may vary
from time to time and by geographic area. Certain
accessories and equipment may not be available at
the time of publication.
This Quick Reference Guide applies to all Forester
models. Therefore, some explanations may be for
equipment not installed on your vehicle. Subaru
of America, Inc., reserves the right to change or
discontinue at any time, without notice, prices,
colors, materials, equipment, accessories,
specications, models and packages without
incurring any obligation to make the same or
similar changes on vehicles previously sold. Colors
shown may vary due to reproduction process.
For detailed operating and safety information,
please consult the Owner’s Manual.
Subaru, Outback, Legacy, Forester, Impreza,
WRX, WRX/STI, BOXER, SI-DRIVE, Lineartronic,
Alcantara, Circle Surround, HD Radio, XM and Sirius
are registered trademarks.
All rights reserved. Contents may not be reprinted or
electronically reproduced in whole or in part without
prior written approval of Subaru of America, Inc.
© 2011 Subaru of America, Inc.
Table of Contents
Getting Started
Instrument Panel
Gauges
Personalize
Controls
While Operating
Safety/In Case of Emergency
Additional Information
2 - 3
4 - 5
6 - 9
10 - 11
12 - 27
28 - 29
30 - 31
32 - 33

Remote Keyless Entry
Lock/Arm
t1SFTTUPMPDLBMMEPPSTBOE
rear gate.
t*GBOZPGUIFEPPSTPSUIFSFBS
gate are not fully closed, an
electronic chirp will sound ve
times and the hazard lights will
ash ve times to alert you that
the doors or the rear gate are
not properly closed.
t5PBDUJWBUFUIFWFIJDMFýOEFS
function, press three times
(within ve seconds). If you are
within 30 feet of the vehicle,
the horn will sound one time
and the hazard lights will ash
three times.
Unlock/Disarm
t1SFTTPODFUPVOMPDLUIF
driver’s door.
t1SFTTUXJDFXJUIJOýWF
seconds) to unlock all doors.
t8IFOUIFi6OMPDL%JTBSNw
button is pressed, the dome
and map lights will illuminate
if the dome light switch is in
the middle position.
Unlocking the
Rear Gate
Press the button to unlock
the rear gate.
2

Seating
Ins
tru
e
t
Gau
Per
ali
e
Con
tro
ls
Whi
le
Saf
ety
/
In
Cas
Add
iti
o
a
l
3
3
Get
g
Get
ting
S
d
Started
up jus
Started
Getting
Started
Started
Getting
Getting
tarte
tin
Instrument
Panel
Panel
m
2
n
Heated Seats
(if equipped)
Press the switch in the
corresponding direction for
the desired seat temperature.
To turn off the seat heater,
slightly press in the opposite
direction of the current position.
Folding the
Rear Seat
Lower the headrests. Pull up on
the release knob on the seat side
that you want to fold down. To
return the seatback to its original
position, raise the seatback until
it locks into place making sure
that it is securely locked.
3
1
10-Way Power Driver’s Seat
(if equipped)
1. Forward/Backward, Angle and Height
Move the switch toward the front or rear to move
the seat forward or backward. Pull the switch up
or push down on the front of the switch to adjust
the angle of the seat cushion. Pulling the switch
straight up or pushing the switch straight down
will adjust the height of the entire seat cushion.
2. Seatback
Move the switch in the corresponding direction
to adjust the angle of the seatback.
3. Lumbar Support
Press the front part of the switch to increase
lumbar support; press the rear part of the switch
to decrease lumbar support.
Gauges
ges
Personalize Controls While
son
ve
ch
n
n.
n
itc
t
Operating
Operating
of Emergency
of Emergency
z
Safety / In Case
3
3
e
Information
Information
Additional
n
Instrument Panel
pg. 12 pg. 6-9 pg. 27pg. 28pg. 10 pg. 26pg. 12
4

Started
Get
tin
g
S
d
Ins
tru
e
t
Gau
Per
ali
e
Con
tro
ls
Whi
le
Saf
ety
/
In
Cas
Add
iti
o
a
l
Getting
tarte
Instrument
Instrument
Panel
Panel
Panel
m
n
Gauges
ges
Personalize Controls While
son
z
pg. 14-19 pg. 20-25pg. 13
Clock
1S
FTTUIFiwCVUUPOUPBEWBODFUJNFPSUIF
iowCVUUPOUPSFWFSTFUIFUJNF7FIJDMFTXJUIB
navigation system please refer to the separate
i0QFSBUJOH*OTUSVDUJPOTGPS/BWJHBUJPO4ZTUFNw
Operating
Operating
Safety / In Case
of Emergency
of Emergency
e
Information
Information
Additional
n
5
5
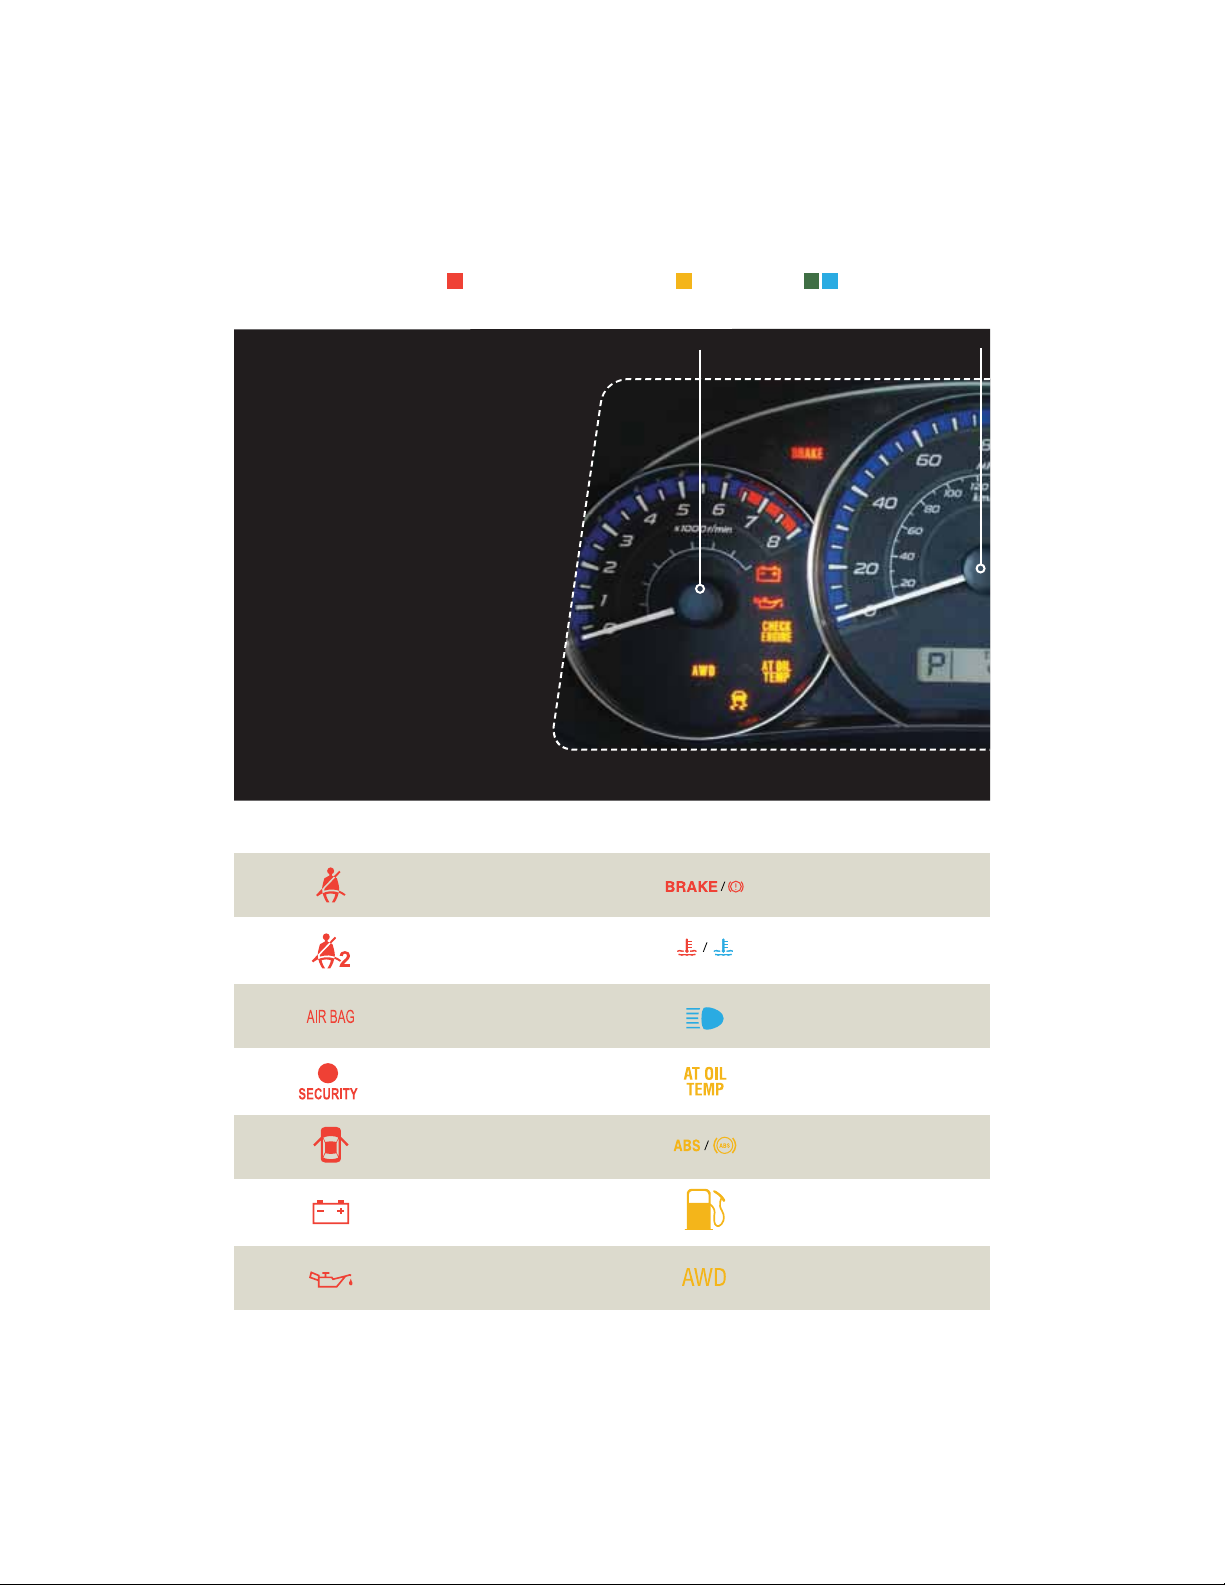
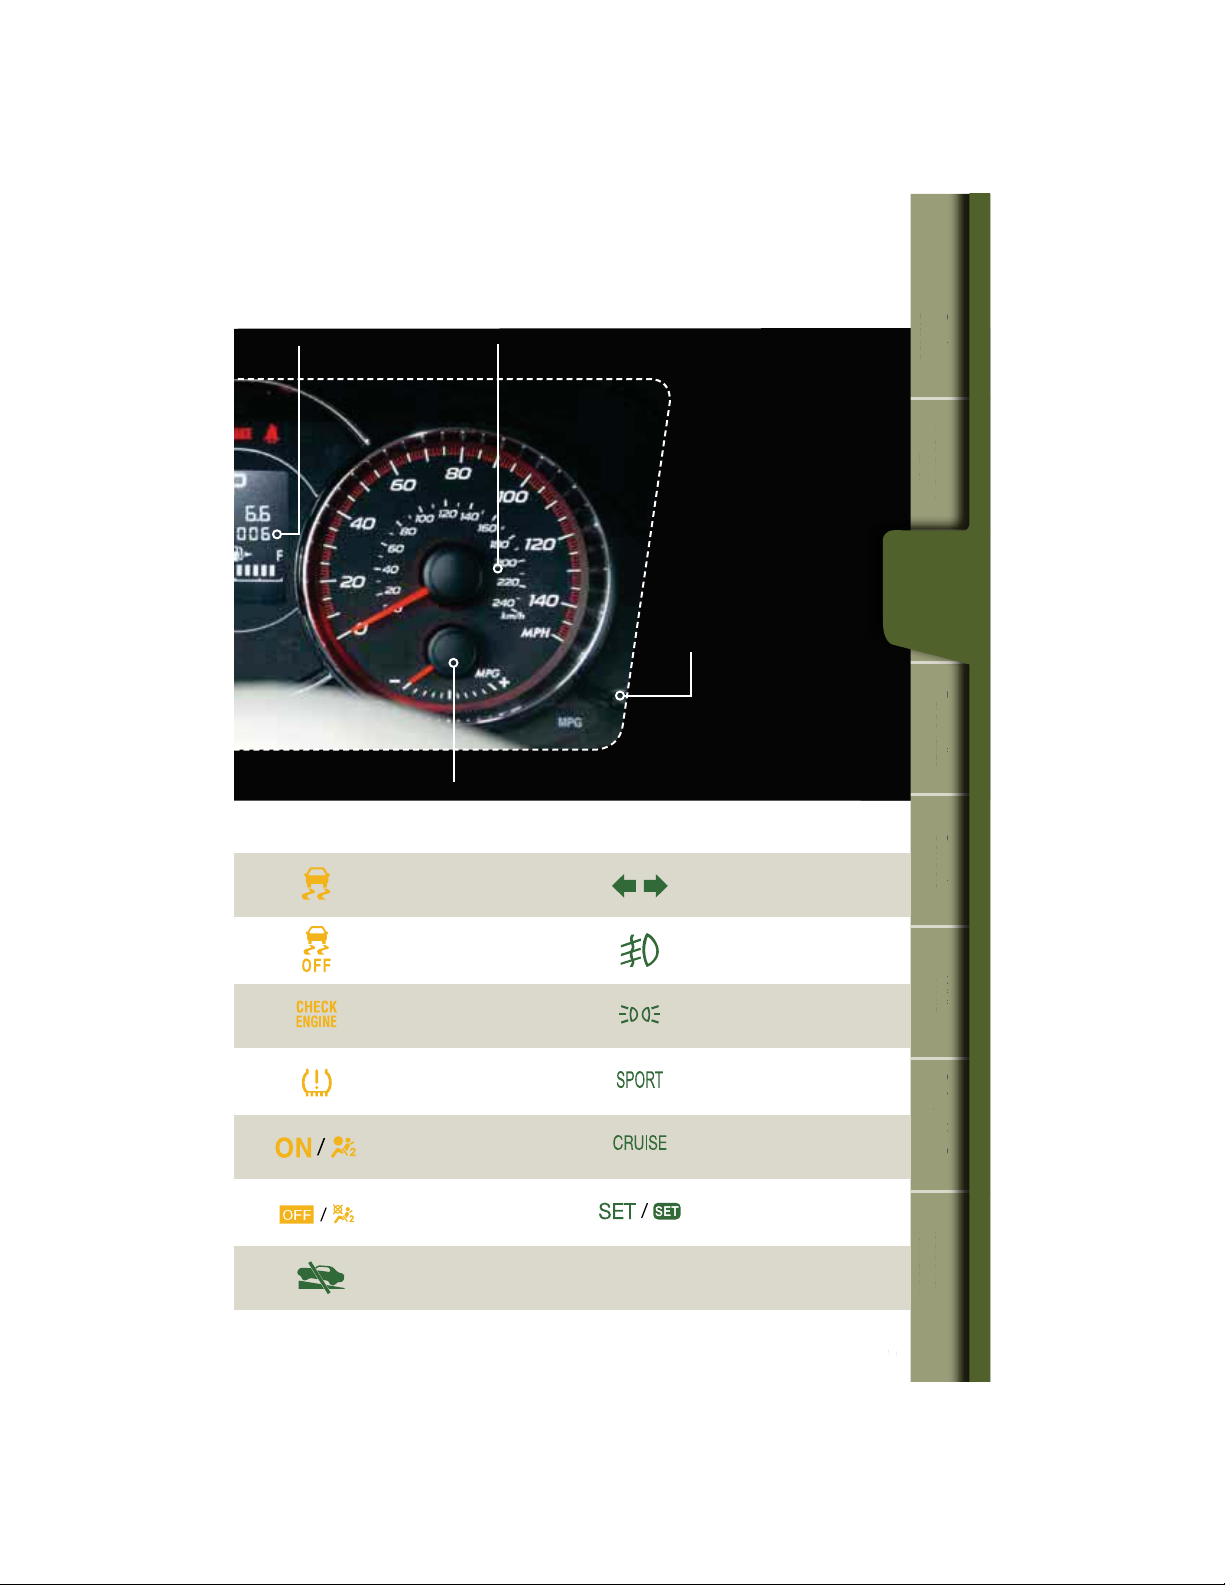
Gauges
Immediate Attention
Caution Informational
Forester 2.5X
Forester 2.5X Premium
Forester 2.5X Limited
Seatbelt warning
Tachometer
Speedometer
Brake system
Front passenger
seatbelt warning
SRS airbag system
Security indicator light
Door open
Charge warning
Oil pressure warning
6
Hot coolant temperature /
Cold coolant temperature
High beam indicator light
AT OIL TEMP
(Automatic Transmission)
ABS warning
Low fuel
All-Wheel Drive
(Automatic Transmission)

Trip meter and odometer
Get
tin
g
S
d
Ins
tru
e
t
Per
ali
e
Con
tro
ls
Whi
le
Saf
ety
/
In
Cas
Add
iti
o
a
l
Trip meter A/B selection and trip meter reset knob
Vehicle Dynamics
Control/Vehicle Dynamics
Control operation
Fuel Gauge
Turn signals
Started
Getting
tarte
Instrument
Panel
Panel
m
n
Gauges
Gauges
Gauges
Personalize Controls While
son
z
Vehicle Dynamics Control OFF
$)&$,&/(*/&
Malfunction indicator
Tire pressure warning light
'SPOUQBTTFOHFSBJSCBH0/
Front passenger airbag OFF
Incline Start Assist warning
(Manual Transmission)
Front fog light indicator
light (if equipped)
Headlight indicator light
SPORT mode
(Automatic Transmission)
Cruise control
indicator light
Cruise control set
indicator light
Operating
Operating
Safety / In Case
of Emergency
of Emergency
e
Information
Information
Additional
n
7
Gauges
Forester 2.5X Touring
Forester 2.5XT Touring
Temperature Gauge
Trip meter A/B selection and trip
Immediate Attention
meter reset knob
Caution Informational
Tachometer
Fuel Gauge
Seatbelt warning
Front passenger
seatbelt warning
SRS airbag system
Security indicator light
Door open
Charge warning
Oil pressure warning
8
Brake system
High beam indicator light
Automatic headlight beam
leveler warning
AT OIL TEMP
(Automatic Transmission)
ABS warning
Low fuel
All-Wheel Drive
(Automatic Transmission)
Started
Get
tin
g
S
d
Ins
tru
e
t
Per
ali
e
Con
tro
ls
Whi
le
Saf
ety
/
In
Cas
Add
iti
o
a
l
Getting
tarte
Trip meter and odometer
Vehicle Dynamics
Control/Vehicle Dynamics
Control operation
Vehicle Dynamics Control OFF
Speedometer
ECO Gauge
Information display
switching knob
Turn signals
Front fog light indicator
light (if equipped)
Instrument
Panel
Panel
m
n
Gauges
Gauges
Gauges
Personalize Controls While
son
z
Operating
Operating
$)&$,&/(*/&
Malfunction indicator
Tire pressure warning light
'SPOUQBTTFOHFSBJSCBH0/
Front passenger airbag OFF
Incline Start Assist warning
(Manual Transmission)
Headlight indicator light
SPORT mode
(Automatic Transmission)
Cruise control
indicator light
Cruise control set
indicator light
Safety / In Case
of Emergency
of Emergency
e
Information
Information
Additional
n
9
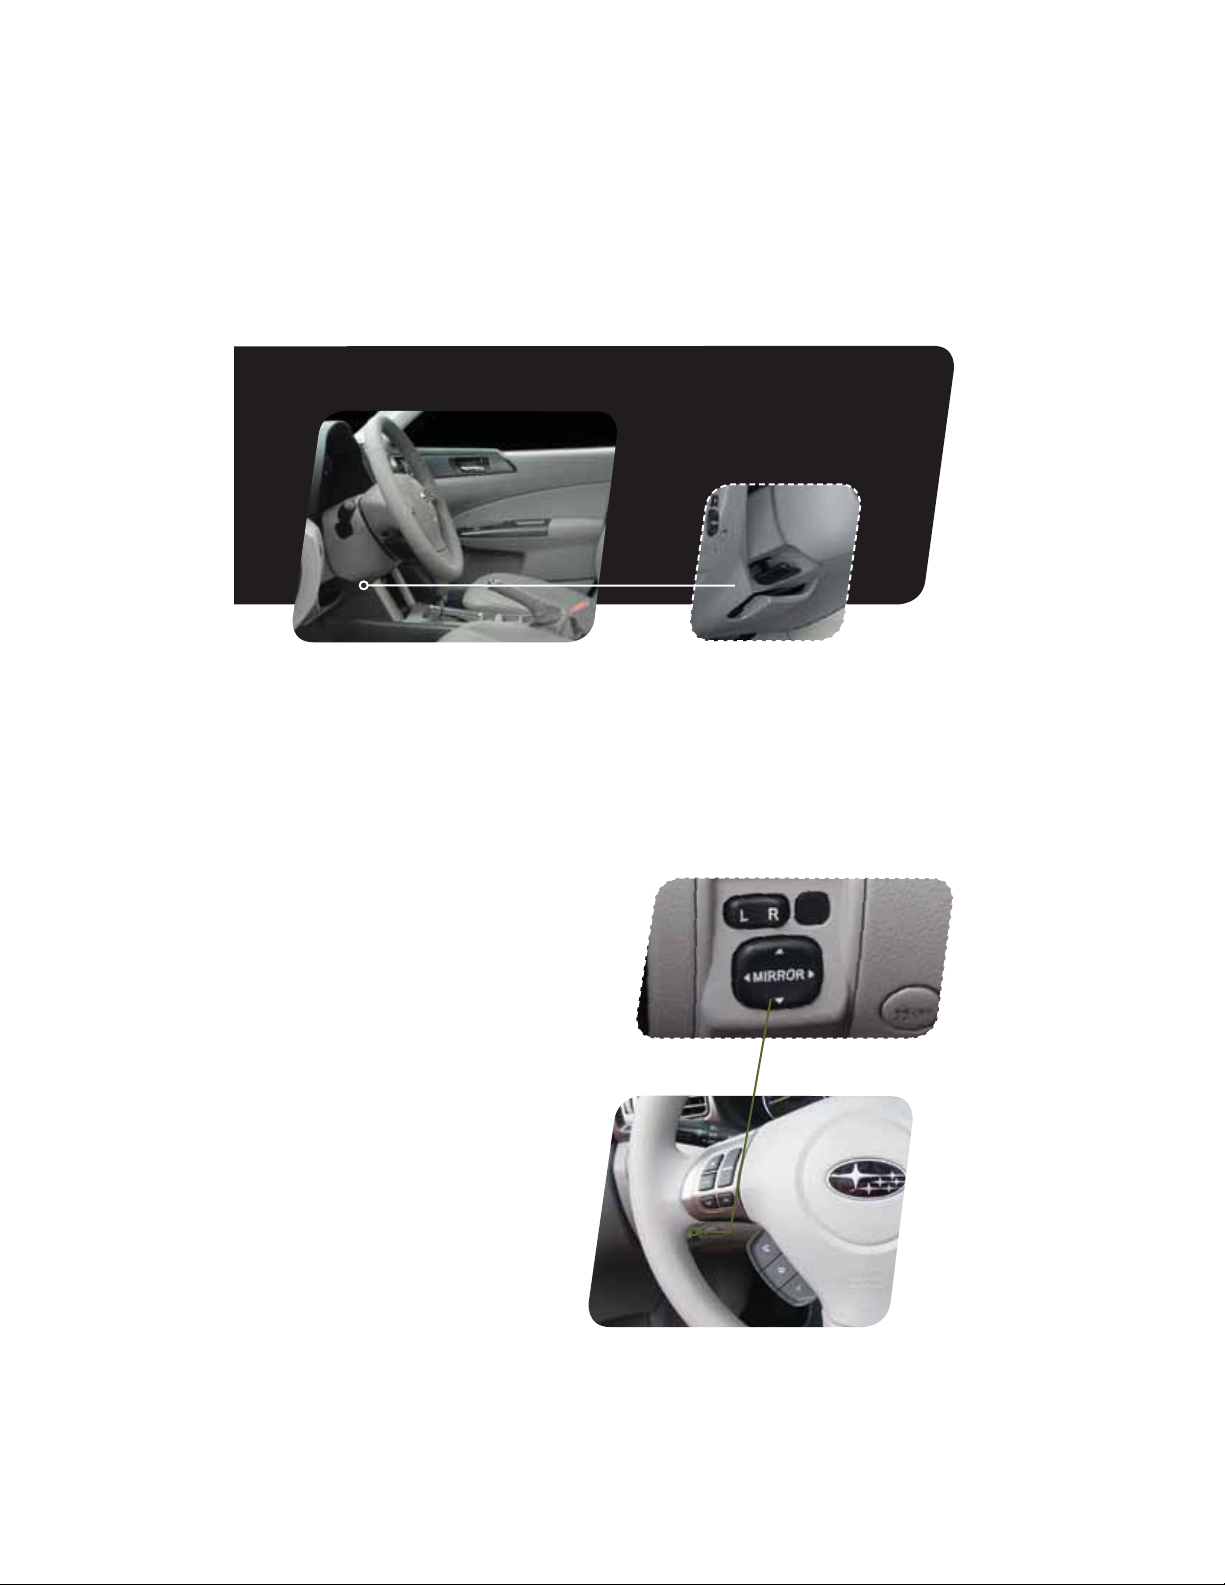
Personalize
Tilt and Telescopic
Steering Column
Push the lever down rmly to adjust the height
and lengthwise position of the column; rmly
push the lever back up to lock the column in
place. Do not adjust while driving.
Power Exterior Mirrors
1VTIUIFNJSSPSTFMFDUJPOTXJUDIUPUIFi-w
TJEFUPBEKVTUUIFMFGUIBOENJSSPSPSUPUIFi3w
side to adjust the right-hand mirror. Push and
hold the direction mirror control switch in the
direction you want to move the mirror. Push
the mirror selection switch back to the middle
to prevent unintended operation.
10

Started
Get
tin
g
S
d
Ins
tru
e
t
Gau
P
e
Con
tro
ls
Whi
le
Saf
ety
/
In
Cas
Add
iti
o
a
l
Getting
tarte
Instrument
Panel
Panel
m
n
Gauges
ges
Personalize
Personalize Controls While
ersonaliz
1
2
Power Moonroof (if equipped)
With the moonroof in the fully closed
position, press the switch
moonroof. Press the switch
moonroof. To stop the moonroof in a midway
position while opening or closing, momentarily
press the switch to the
1
to fully open the
2
to close the
1
side or 2 side.
Operating
Operating
Safety / In Case
of Emergency
of Emergency
e
Information
Information
Additional
n
11
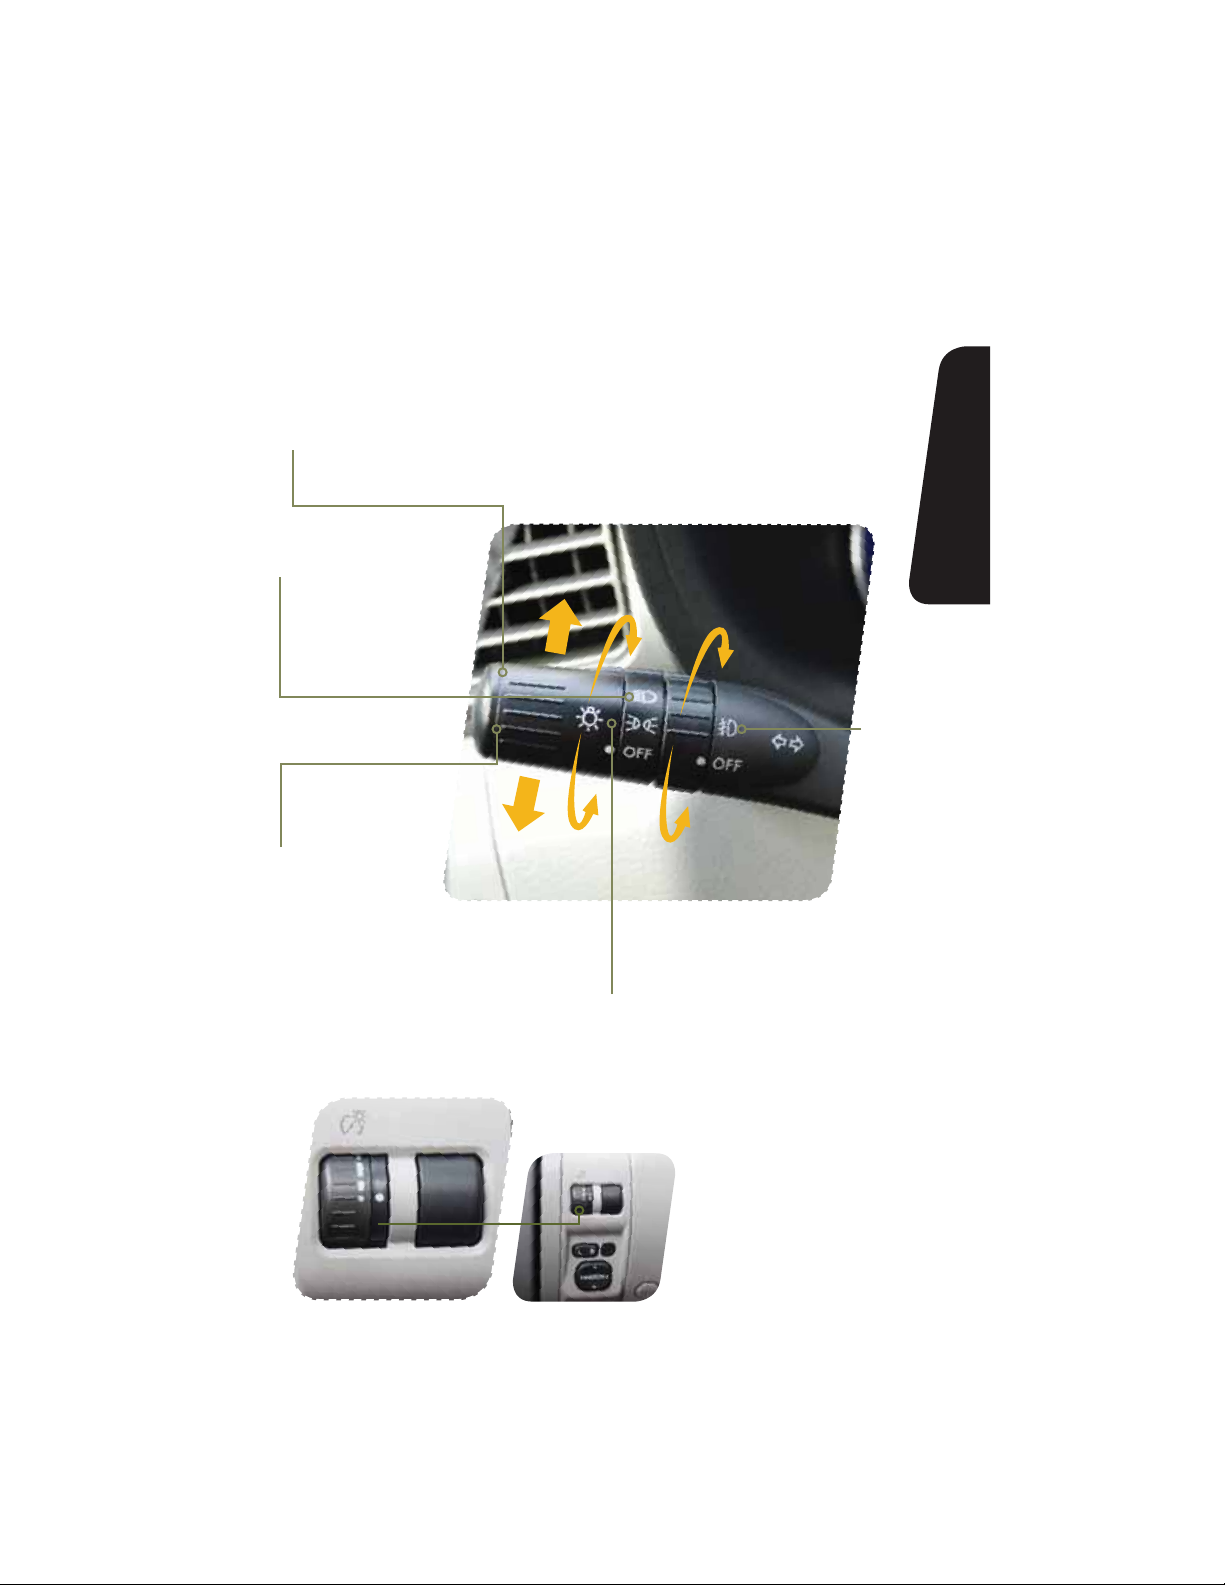
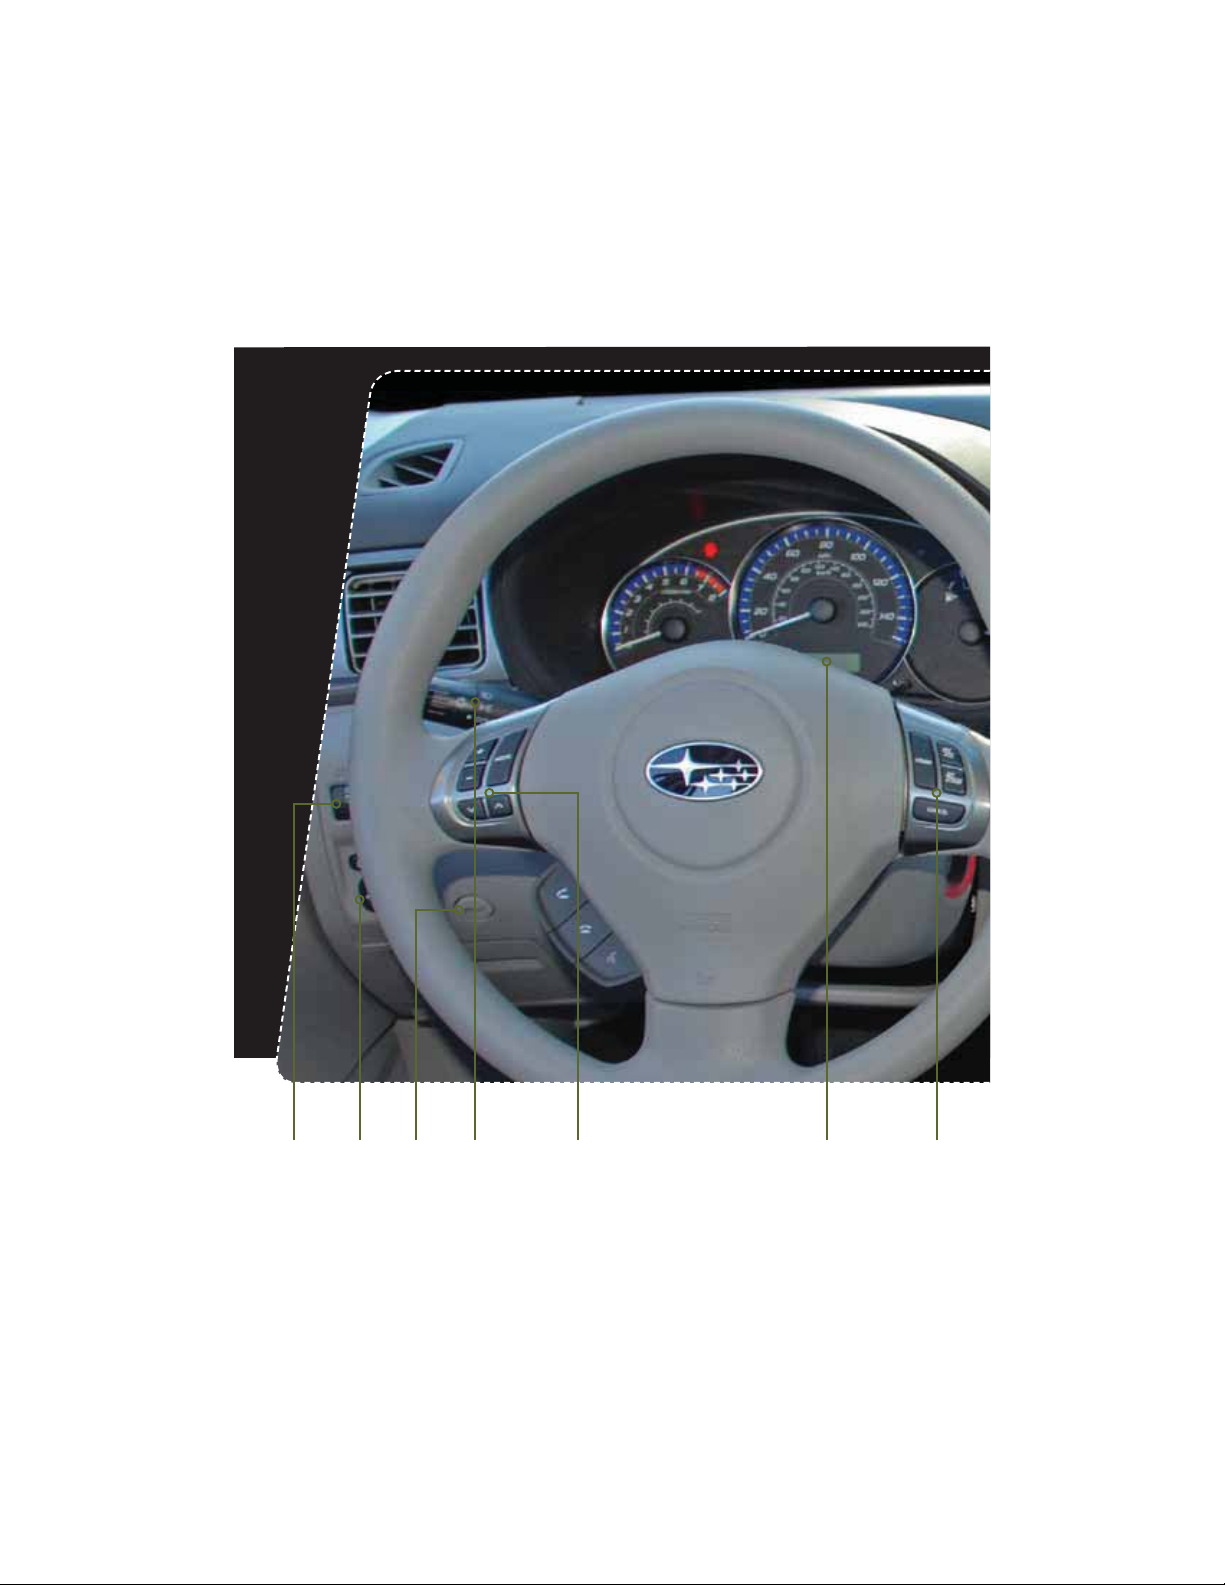
Controls
Light Controls
Push up for right
turn signal.
Turns on headlights,
instrument panel
illumination, parking
lights, taillights and
license plate lights.
Push down for
left turn signal.
Turns on
fog lights
(if equipped).
12
Turns on instrument panel lights,
tail lights, parking lights and license
plate lights.
While the light switch is
on, rotate the dial downward
to dim the instrument panel
illumination. Rotate the
dial upward to make the
illumination brighter. When the
dial is fully rotated upward, the
instrument panel illumination
becomes full bright.

Started
Get
tin
g
S
d
Ins
tru
e
t
Gau
Per
ali
e
Con
Whi
le
Saf
ety
/
In
Cas
Add
iti
o
a
l
Getting
tarte
Instrument
Panel
Panel
m
n
OFF
INT.
1
2
LOW
3
HIGH
Windshield Wipers
To turn on the wipers, press the wiper control lever down
one level for intermittent, two levels for low, or three levels for
IJHITQFFE3FUVSOUIFMFWFSUPUIFi0''wQPTJUJPOUPTUPQ
the wipers. For a single wipe move the lever up. To spray
washer uid, pull and hold the lever toward you.
To operate the rear wiper, rotate the end of the knob upward
to the intermittent, continuous, or wash position. When the
rear wiper is off, rotate the knob downward to wash and
wipe the rear window.
Daytime Running Lights
Daytime running lights are standard on your vehicle. Only a
reduced brightness high beam will be automatically turned
on when the engine has started and the parking brake is
GVMMZSFMFBTFEBOEUIFMJHIUTXJUDIJTJOUIFi0''wPSi w
position. The brightness of the illumination of the high beam
headlights is reduced by the daytime running light system.
You must always switch on your headlights when it’s dark
outside by turning the light switch to the
position.
Gauges
ges
Personalize Controls While
son
z
Controls
trols
Operating
Operating
Safety / In Case
of Emergency
of Emergency
e
Information
Information
Additional
n
13

Controls
6
5
Manual Climate Control
(if equipped)
1. Temperature Control Dial
Rotate the temperature control dial from
blue for cool, to red for warm.
2. Air Conditioning Button
1SFTTUIFi"$wCVUUPOUPBDUJWBUFUIF
air conditioning. Press it again to turn off
the air conditioning.
14
3. Recirculated / Outside Air Button
Press the air inlet selection button to
prevent outside air from being drawn into
the passenger compartment. If the button
is pushed in, press it again to draw outside
BJSJOUPUIFDPNQBSUNFOU5013&7&/5
8*/%4)*&-%'0((*/(%0/05
3&."*/*/5)&3&$*3$6-"5&%.0%&
'03"/&95&/%&%1&3*0%0'5*.&
4. Fan Speed Control Dial
Rotate the fan speed control dial to select
one of four fan speeds.

Started
Get
tin
g
S
d
Ins
tru
e
t
Gau
Per
ali
e
Con
Whi
le
Saf
ety
/
In
Cas
Add
iti
o
a
l
Getting
tarte
Instrument
Panel
Panel
m
n
Gauges
ges
4
2
5. Rear Window Defogger Button
Press the rear window defogger button
to turn on the defogger. The defogger
will automatically shut off after about
15 minutes. If the window clears
before that time, you can press the
button again to turn it off.
6. Air Flow Control Dial
The air ow control dial allows you to
choose the direction of air ow. Rotate
the dial for the desired air ow position.
1
3
Defrost / Defog
To clear the windshield and front door
windows of fog or frost, rotate the air
ow control dial to the defrost position,
set the temperature control to the red
position, and set the fan speed control
to the fastest speed.
Personalize Controls While
son
z
Controls
trols
Operating
Operating
Safety / In Case
of Emergency
of Emergency
e
Information
Information
Additional
n
15

Controls
3
Automatic Climate Control
(if equipped)
1. Air Flow Control Dial
On the automatic setting, the system
determines the air ow location to achieve
the desired temperature or you can manually
choose the direction of air ow. Rotate the
dial for the desired air ow position.
Defrost / Defog
To clear the windshield and front door
windows of fog or frost, rotate the air ow
control dial to the defrost position, set the
temperature control to the red position,
and set the fan speed control of the
fastest speed.
5
1
2
2. Rear Window Defogger Button
Press the rear window defogger button
to turn on the defogger. The defogger
will automatically shut off after about 15
minutes. If the window clears before that
time, you can press the button again to
turn it off.
3. Fan Speed Control Dial
On the automatic setting, the system
determines the fan speed to achieve the
desired temperature or you can manually
rotate the fan speed control dial to select
one of seven fan speeds.
16

Started
Get
tin
g
S
d
Ins
tru
e
t
Gau
Per
ali
e
Con
Whi
le
Saf
ety
/
In
Cas
Add
iti
o
a
l
Getting
tarte
4. Air Conditioning Button
1SFTTUIFi"$wCVUUPOUPBDUJWBUFUIF
air conditioning. Press it again to turn
off the air conditioning.
5. Recirculated / Outside Air Button
In the automatic mode, the system
will determine if recirculated air
is needed to achieve a desired
temperature. In manual mode,
press the air inlet selection button to
prevent outside air from being drawn
into the passenger compartment.
If the button is pushed in, press
it again to draw outside air into
6
8
UIFDPNQBSUNFOU5013&7&/5
8*/%4)*&-%'0((*/(%0/05
3&."*/*/5)&3&$*3$6-"5&%
.0%&'03"/&95&/%&%1&3*0%
OF TIME.
6. Temperature Control Dial
Rotate the temperature control dial
from 65 for cool to 85 for warm.
Instrument
Panel
Panel
m
n
Gauges
ges
Personalize Controls While
son
z
Controls
trols
Operating
Operating
Safety / In Case
of Emergency
of Emergency
e
Information
Information
Additional
n
17

Controls
1
6
2
Automatic Climate Control
(if equipped)
1. Automatic On and Off
This system automatically controls
outlet air temperature, fan speed, air
ow distribution, air inlet control, and air
conditioner compressor operation. Press
i"650wUPBDUJWBUF1SFTTi0''wUPUVSO
off the system.
2. Temperature Control Dial
Rotate the dial clockwise to increase the
temperature or rotate the dial clockwise
to decrease the temperature and maintain
a comfortable climate within the driver
and passenger compartment. The
temperature is displayed digitally on
the screen. Separate temperature
3
settings can be adjusted for the driver’s
side and passenger’s side.
Operation in Manual Mode
3. Recirculated / Outside Air Button
Press the air inlet selection button to
prevent outside air from being drawn
into the passenger compartment. Press
the button again to allow outside air
JOUPUIFDPNQBSUNFOU5013&7&/5
8*/%4)*&-%'0((*/(%0/05
3&."*/*/5)&3&$*3$6-"5&%.0%&
'03"/&95&/%&%1&3*0%0'5*.&
4
18

Started
Get
tin
g
S
d
Ins
tru
e
t
Gau
Per
ali
e
Con
Whi
le
Saf
ety
/
In
Cas
Add
iti
o
a
l
Getting
tarte
Instrument
Panel
Panel
m
n
8
Gauges
9
2
ges
Personalize Controls While
son
5
4. Fan Speed Control Buttons
Press the fan speed control buttons
to select seven different fan
speed positions.
5. Air Flow Mode Selection Button
Press the button to select the desired
air ow mode. The selected air ow
NPEFoFJUIFSWFOUJMBUJPOCJMFWFM
IFBUPSIFBUEFGSPTUoJTTIPXOPO
the display.
6. Dual Mode Button
1SFTTUIFi%6"-wCVUUPOUPBDUJWBUF
or deactivate the dual mode. Dual
mode makes it possible to have
separate temperature settings for the
driver’s side and passenger’s side.
7
7. Air Conditioner Button
1SFTTUIFi"$wCVUUPOUPBDUJWBUFUIF
air conditioning. Press it again to turn
off the air conditioning.
8. Defroster Button
Press the button to defrost or
dehumidify the windshield and front
door windows.
9. Rear Window Defogger Button
Press the button to turn on the
defogger. It will automatically shut off
after about 15 minutes. If the window
clears before that time, you can
press the button again to turn it off.
z
Controls
trols
Operating
Operating
Safety / In Case
of Emergency
of Emergency
e
Information
Information
Additional
n
19

Controls
11
8
9
3
7
1
5 5
13
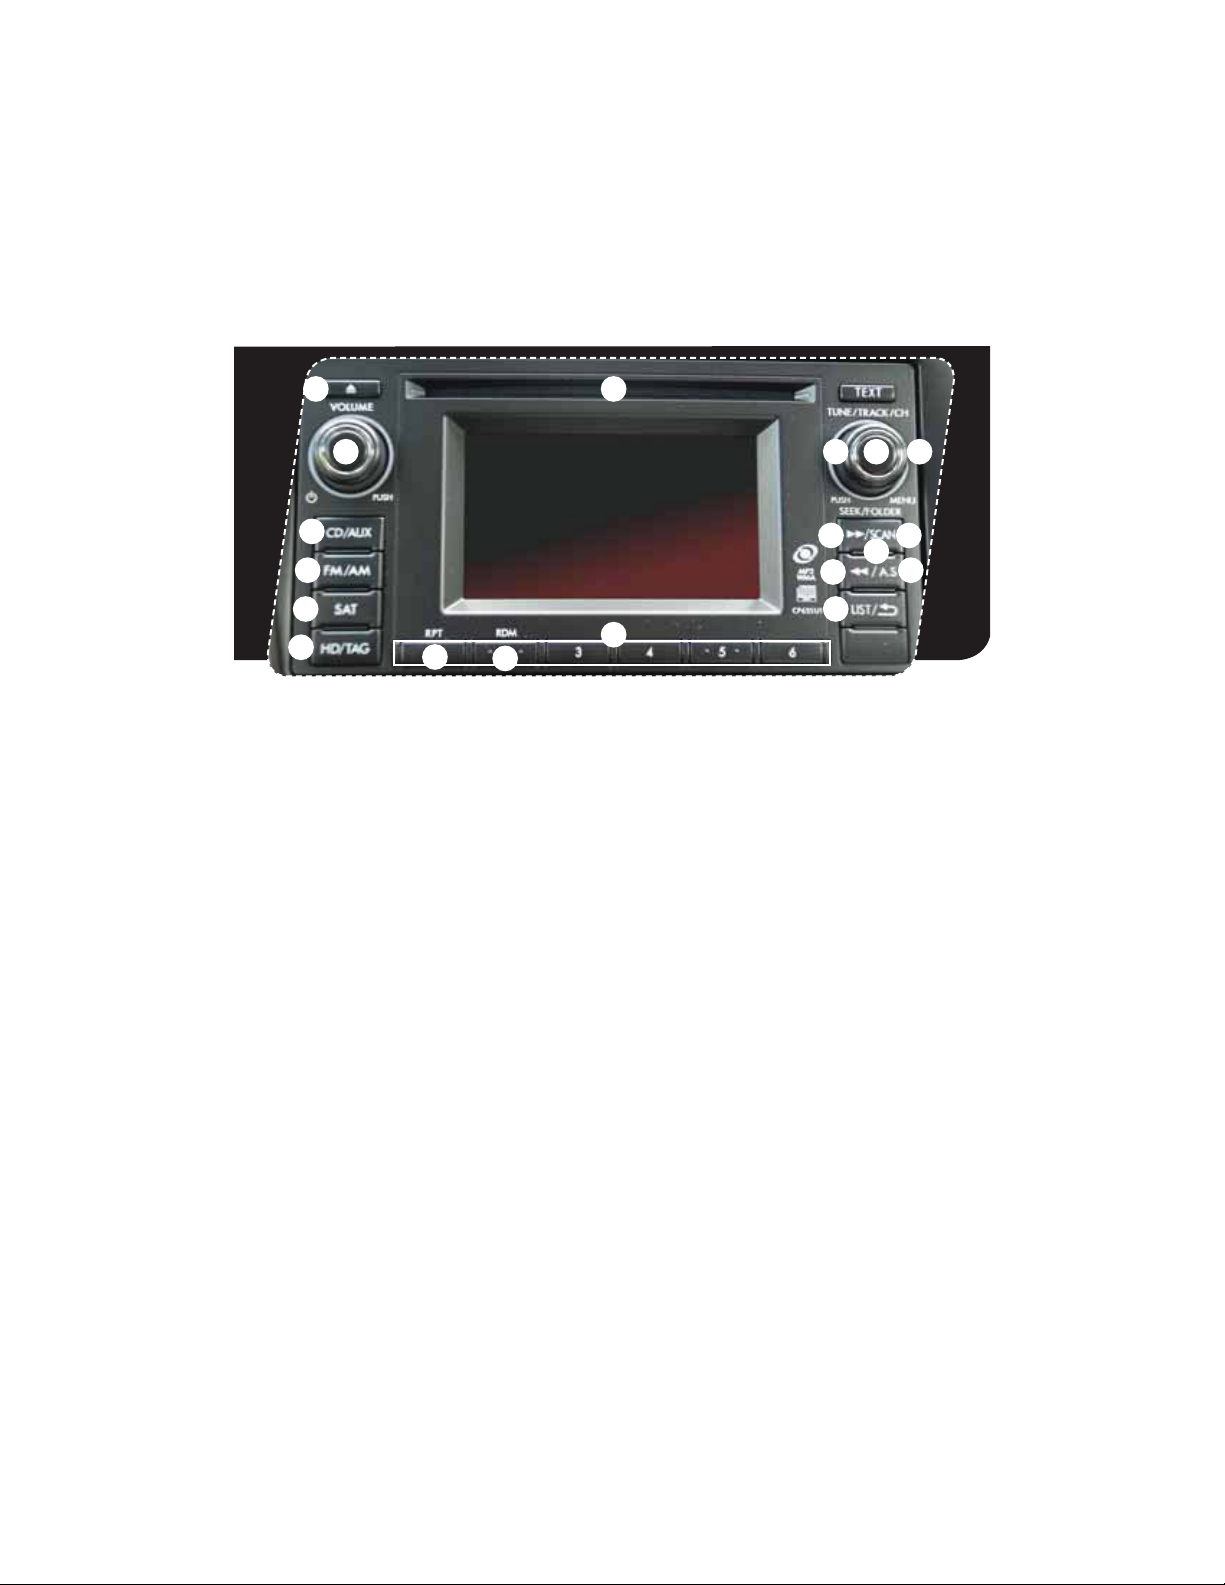
AM/FM Stereo with Single
Disc CD/MP3/WMA Player
(if equipped)
Radio Functions
1. Power / Volume Control
Press the power / volume control knob
for on or off; rotate the knob to control
the volume.
2. Bass, Middle, Treble, Fader and Balance
&BDIQSFTTPGUIFi56/&53"$,$)w
button will cycle you through Bass,
Midrange, Treble, Fade or Balance. Rotate
UIFi56/&53"$,$)wLOPCUPBEKVTU
the desired level.
3. FM / AM
1SFTTUIFi'.".wCVUUPOUPDIPPTF
FM1, FM2, FM3 or AM reception.
4. Tune / Track
3PUBUFUIFi56/&53"$,$)w
knob clockwise to increase the
tuning frequency; rotate the knob
counter-clockwise to decrease it.
1617
10
14
15
15
5. Seek
6. Presets
7. Satellite Radio
13
1SFTTUIFSJHIUPSMFGUBSSPXPGUIFi4&&,w
button to pick up the next highest or
lowest frequency.
You can save up to six favorite stations
GPSFBDICBOEo'.'.'.BOE".
Select a frequency and press one of the
preset buttons until a conrmation beep
is heard.
An optional satellite radio tuner and
antenna can be connected to this audio
unit. You can hear satellite radio programs
CZQSFTTJOHUIFi4"5wCVUUPOBGUFS
connecting optional equipment. To receive
satellite radio service, it is necessary to
enter into a separate contract with a
satellite radio provider.
42612
20

Started
Get
tin
g
S
d
Ins
tru
e
t
Gau
Per
ali
e
Con
Whi
le
Saf
ety
/
In
Cas
Add
iti
o
a
l
Getting
tarte
CD Player Functions
8. Load
Insert a disc into the slot. The CD
will automatically be drawn in and
will begin play at the rst track.
9. Play CD
1SFTTUIFi$%"69wCVUUPOBOE
playback will begin.
10. Repeat / Random
1SFTTUIFi3153%.wCVUUPOPODF
to repeat the current track; press
twice to repeat the current folder.
1SFTTBOEIPMEUIFi3153%.w
button once to randomize tracks
on a CD; press twice to randomize
all tracks in a folder; press a third
time to randomize the entire disc.
11. Eject
Press the button to eject the disc.
12. Forward / Reverse
3PUBUFUIFi56/&53"$,$)w
knob clockwise to skip to the
beginning of the next track; rotate
the knob counter-clockwise to
skip to the beginning of the
current track. Rotate the knob
counter-clockwise again to go to
the previous selection.
13. Fast Forward / Fast Reverse
Press and hold the right arrow
PGUIFi4&&,wCVUUPOGPSNPSF
than one second to fast forward.
Release the button to stop. To fast
reverse, press and hold the left
arrow for more than one second
and release the button to stop.
14. Scan
1SFTTUIFi4$"/wCVUUPOUP
begin previewing the rst 10
seconds of each track on the
EJTD/PSNBMQMBZCBDLXJMM
resume after all tracks have
been scanned. Press the
i4$"/wCVUUPOBHBJOUPTUPQ
scanning and listen to the track
being previewed.
MP3/WMA Formatted CD
Player Functions
15. Folder Selection
Press the up arrow of the
i'0-%&3wCVUUPOUPTFMFDUUIF
next folder. Press the down arrow
to go back to the rst music le.
Quickly press the down arrow
again to go back to the previous
folder.
16. Page Scroll
1SFTTUIFi5&95wCVUUPOUPTFMFDU
title display. Press and hold again
to scroll through the title, 8
characters at a time. Up to a
maximum of 64 characters.
17. Display
1SFTTBOEIPMEUIFi5&95wCVUUPO
during playback to change the
display to show the play time, disc
title, artist name and track title. If
the disc is formatted with MP3/
8."TQSFTTUIFi5&95wCVUUPOUP
change the display to show play
time, folder name and le name.
Instrument
Panel
Panel
m
n
Gauges
ges
Personalize Controls While
son
z
Controls
trols
Operating
Operating
Safety / In Case
of Emergency
of Emergency
e
Information
Information
Additional
n
21
1

Controls
12
1
10
3
7
8
5 5
14 14
AM/FM Stereo with Single
Disc CD/MP3/WMA Player
(if equipped)
Radio Functions
1. Power / Volume Control
Press the power / volume control knob
for on or off; rotate the knob to control
the volume.
2. Bass, Middle, Treble, Fader and Balance
&BDIQSFTTPGUIFi56/&53"$,$)w
button will cycle you through Bass,
Midrange, Treble, Fade or Balance. Rotate
UIFi56/&53"$,$)wLOPCUPBEKVTU
the desired level.
3. FM / AM
1SFTTUIFi'.".wCVUUPOUPDIPPTF
FM1, FM2, FM3 or AM reception.
4. Tune / Track
3PUBUFUIFi56/&53"$,$)w
knob clockwise to increase the
tuning frequency; rotate the knob
counterclockwise to decrease it.
9
16
6
5. Seek
1SFTTUIFSJHIUPSMFGUBSSPXPGUIFi4&&,w
button to pick up the next highest or
lowest frequency.
6. Presets
You can save up to six favorite stations
GPSFBDICBOEo'.'.'.BOE".
Select a frequency and press one of the
preset buttons until a conrmation beep
is heard.
7. Satellite Radio
An optional satellite radio tuner and
antenna can be connected to this audio
unit. You can hear satellite radio programs
CZQSFTTJOHUIFi4"5wCVUUPOBGUFS
connecting optional equipment. To receive
satellite radio service, it is necessary to
enter into a separate contract with a
satellite radio provider.
1817
13
42
11
15
22

Started
Get
tin
g
S
d
Ins
tru
e
t
Gau
Per
ali
e
Con
Whi
le
Saf
ety
/
In
Cas
Add
iti
o
a
l
Getting
tarte
8. PTY / CAT
1SFTTUIFi15:$"5wCVUUPOUP
change to program type selection
mode. The PTY group that you are
currently listening to is displayed
for 10 seconds.
CD Player Functions
9. Load
Insert a disc into the slot. The CD
will automatically be drawn in and
will begin play at the rst track.
10. Play CD
1SFTTUIFi$%"69wCVUUPOBOE
playback will begin.
11. Repeat / Random
1SFTTUIFi3153%.wCVUUPOPODF
to repeat the current track; press
twice to repeat the current folder.
1SFTTBOEIPMEUIFi3153%.w
button once to randomize tracks
on a CD; press twice to randomize
the entire disc.
12. Eject
Press the button to eject the disc.
13. Forward / Reverse
3PUBUFUIFi56/&53"$,
$)wLOPCDMPDLXJTFUPTLJQUP
the beginning of the next track;
rotate the knob counterclockwise
to skip to the beginning of the
current track. Rotate the knob
counterclockwise again to go to
the previous selection.
14. Fast Forward / Fast Reverse
Press and hold the right arrow
PGUIFi4&&,wCVUUPOGPSNPSF
than one second to fast forward.
Release the button to stop. To fast
reverse, press and hold the left
arrow for more than one second
and release the button to stop.
15. Scan
1SFTTUIFi4$"/wCVUUPOUPCFHJO
previewing the rst 10 seconds
PGFBDIUSBDLPOUIFEJTD/PSNBM
playback will resume after all
tracks have been scanned. Press
UIFi4$"/wCVUUPOBHBJOUPTUPQ
scanning and listen to the track
being previewed.
MP3/WMA Formatted CD
Player Functions
16. Folder Selection
Press the up arrow of the
i'0-%&3wCVUUPOUPTFMFDUUIF
next folder. Press the down arrow
to go back to the rst music le.
Quickly press the down arrow
again to go back to the previous
folder.
17. Page Scroll
1SFTTUIFi5&95wCVUUPOUPTFMFDU
title display. Press and hold again
to scroll through the title,
8 characters at a time up to a
maximum of 64 characters.
18. Display
1SFTTBOEIPMEUIFi5&95wCVUUPO
during playback to change the
display to show the play time, disc
title, artist name and track title. If
the disc is formatted with MP3/
8."TQSFTTUIFi5&95wCVUUPOUP
change the display to show play
time, folder name and le name.
Instrument
Panel
Panel
m
n
Gauges
ges
Personalize Controls While
son
z
Controls
trols
Operating
Operating
Safety / In Case
of Emergency
of Emergency
e
Information
Information
Additional
n
23
Controls
14 10
1
11
3
7
9
12
13
AM/FM Stereo, HD Radio™
with Single Disc CD/MP3/
WMA Player (if equipped)
Radio Functions
1. Power / Volume Control
Press the power / volume control knob
for on or off; rotate the knob to control
the volume.
2. Bass, Mid, Treble, Fader and Balance
1SFTTUIFi56/&53"$,$)wCVUUPO
to display the setting menu. Using the
i56/&53"$,$)wEJBMZPVDBOBEKVTU
the settings on the Bass, Mid, Treble,
Balance and Fader.
3. FM / AM
1SFTTUIFi'.".wCVUUPOUP
choose FM1, FM2, FM-AS, AM or
AM-AS reception.
4. Tune / Track
3PUBUFUIFi56/&53"$,$)w
knob clockwise to increase the
tuning frequency; rotate the knob
counterclockwise to decrease it.
4 2
5
5
8
6
5. Seek
1SFTTUIFSJHIUPSMFGUBSSPXPGUIFi4&&,w
button to pick up the next highest or
lowest frequency.
6. Presets
You can save up to six favorite stations for
FBDICBOEo'.'.'.BOE".
Select a frequency and press one of the
preset buttons until a conrmation beep
is heard.
7. Satellite Radio
An optional satellite radio tuner and
antenna can be connected to this audio
unit. You can hear satellite radio programs
CZQSFTTJOHUIFi4"5wCVUUPOBGUFS
connecting optional equipment. To receive
satellite radio service, it is necessary to
enter into a separate contract with a
satellite radio provider.
17
15
16
16
24

Started
Get
tin
g
S
d
Ins
tru
e
t
Gau
Per
ali
e
Con
Whi
le
Saf
ety
/
In
Cas
Add
iti
o
a
l
Getting
tarte
8. PTY / CAT
1SFTTUIFi-*45wCVUUPOUPDIBOHF
to program type selection mode.
The PTY group that you are
currently listening to is displayed
for 10 seconds.
9. HD/TAG
1SFTTUIFi)%5"(wCVUUPOXIJMF
receiving FM radio (except analog
broadcasts) to hear the
stations digitally.
CD Player Functions
10. Load
Insert a disc into the slot. The CD
will automatically be drawn in and
will begin play at the rst track.
11. Play CD
1SFTTUIFi$%"69wCVUUPOBOE
playback will begin.
12. Repeat
1SFTTUIFi315wCVUUPOPODFUP
repeat the current track; press
twice to repeat the
current folder.
13. Random
1SFTTBOEIPMEUIFi3%.wCVUUPO
once to randomize the entire
disc; press twice to randomize all
tracks in a folder.
14. Eject
Press the button to eject the disc.
15. Forward / Reverse
3PUBUFUIFi56/&53"$,
$)wLOPCDMPDLXJTFUPTLJQUP
the beginning of the next track;
rotate the knob counterclockwise
to skip to the beginning of the
current track. Rotate the knob
counterclockwise again to go to
the previous selection.
16. Fast Forward / Fast Reverse
Press and hold the right arrow of
UIFi4&&,wCVUUPOUPGBTUGPSXBSE
Release the button to stop. To fast
reverse, press and hold the left
arrow; release the button to stop.
MP3/WMA Formatted CD
Player Functions
17. Folder Selection
Press the right arrow of the
i'0-%&3wCVUUPOUPTFMFDUUIF
next folder. Press the left arrow
to go back to the rst music le.
Quickly press the left arrow again
to go back to the previous folder.
Instrument
Panel
Panel
m
n
Gauges
ges
Personalize Controls While
son
z
Controls
trols
Operating
Operating
Safety / In Case
of Emergency
of Emergency
25
e
Information
Information
Additional
n

Controls
Steering Wheel Audio Controls (if equipped)
t1SFTTUIFiwCVUUPOUP
increase the volume.
1SFTTUIFiwCVUUPOUP
reduce the volume.
t8JUIBOZPGUIFSBEJPNPEFTTFMFDUFEQVTIUIFVQ
button or the down button to nd the desired frequency.
In CD mode, push the up button or the down button to
skip forward or back a track.
t1SFTTUIFCVUUPOUPTFMFDUUIF
EFTJSFEBVEJPNPEFo'.
AM, SAT, CD, AUX, MEDIA.
Auxiliary Input Jack
The aux jack is located in the center
console. You can connect a portable
music player to the auxiliary jack and
hear the music stored on it through
UIFWFIJDMFTQFBLFST1SFTTUIFi$%
"69wCVUUPOMPDBUFEPOUIFBVEJP
system; to select the auxiliary mode.
26
USB Storage Device /
®
(if equipped)
iPod
You can connect a USB equipped
portable music player to the USB
connector and hear the music stored
on it through the vehicle speakers.
1SFTTUIFi$%"69wCVUUPOMPDBUFEPO
the audio system repeatedly until the
USB / iPod® mode is selected.
Get
tin
g
S
d
Ins
tru
e
t
Gau
Per
ali
e
Con
Whi
le
Saf
ety
/
In
Cas
Add
iti
o
a
l
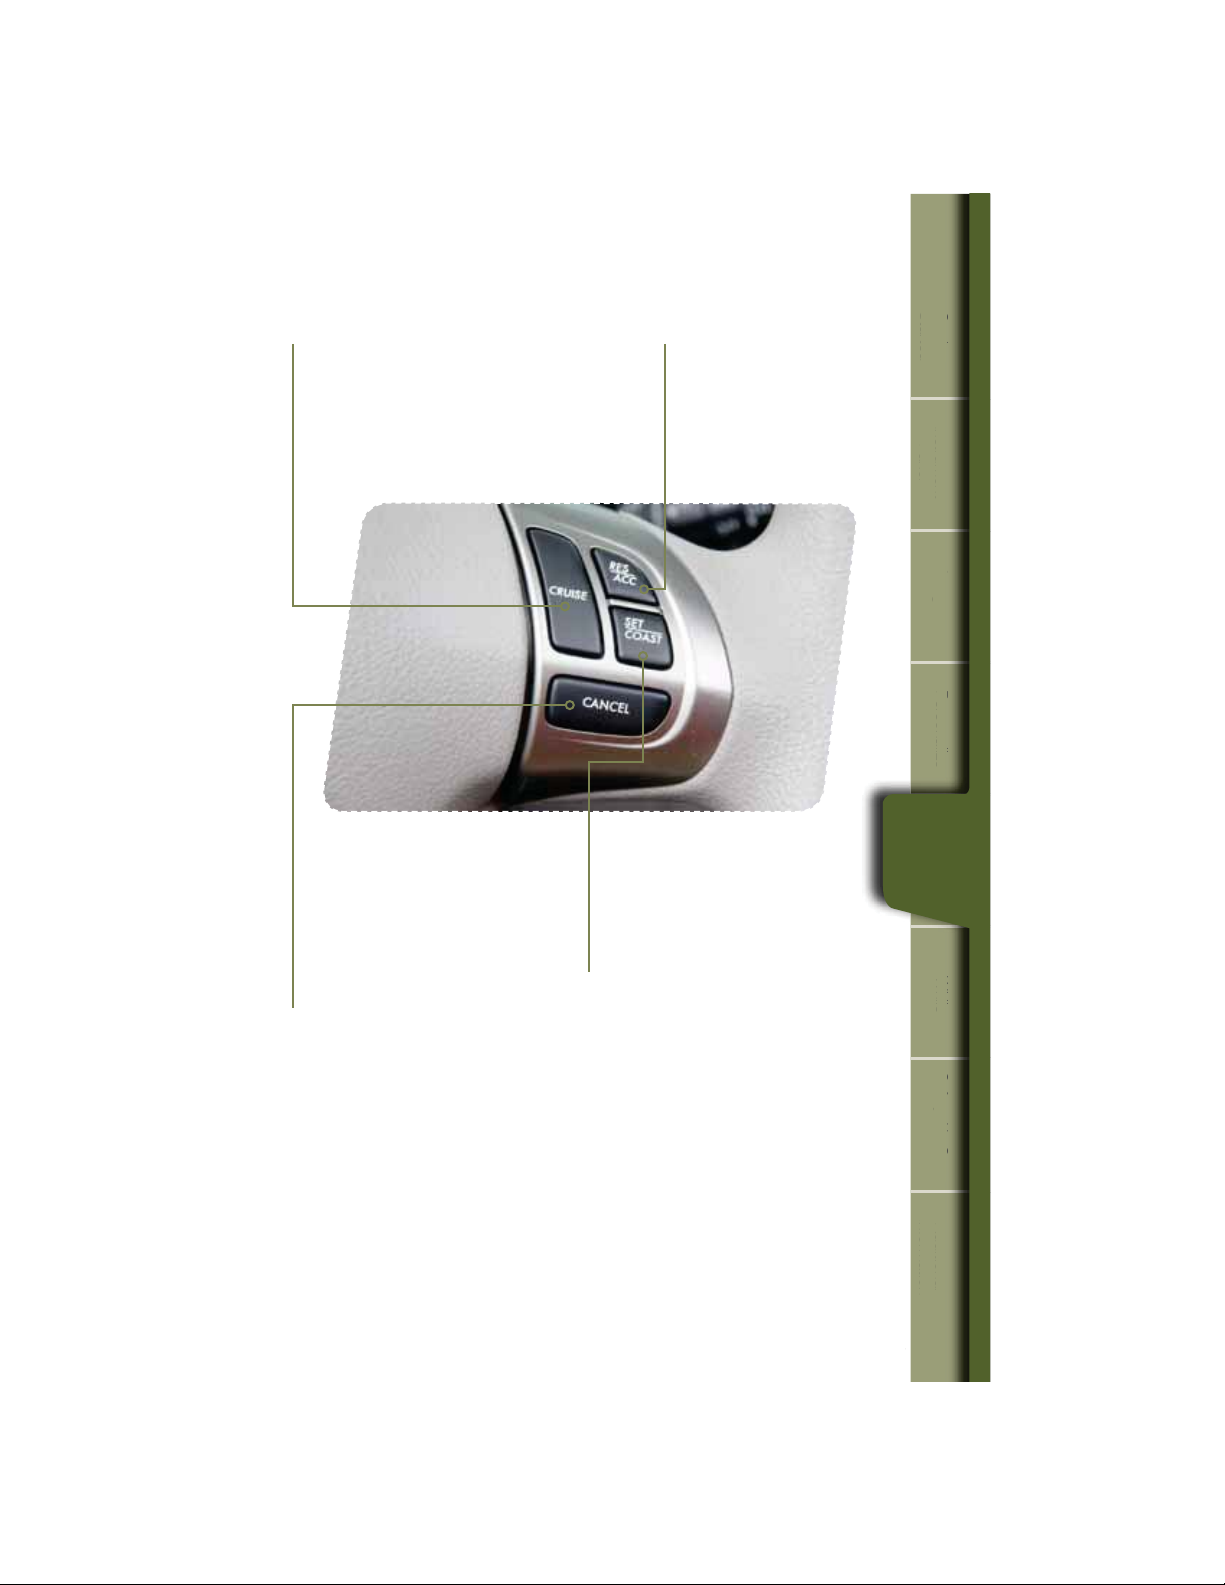
Cruise Control
Started
Getting
tarte
t5PBDUJWBUFUIFDSVJTFDPOUSPMQSFTTUIF
i$36*4&wCVUUPO5IFi$36*4&wJOEJDBUPS
light on the instrument panel will turn on.
To deactivate cruise control, press the
i$36*4&wCVUUPOBHBJO
t5PDBODFMUIFDSVJTFDPOUSPM
push the brake pedal or press
UIFi$"/$&-wCVUUPO*GZPVIBWF
a manual transmission, you can
push in the clutch pedal.
t5PSFTVNFZPVSTQFFEBGUFS
DBODFMJOHQSFTTUIFi3&4
"$$wCVUUPO
t1SFTTUIFBDDFMFSBUPSQFEBMVOUJM
your vehicle reaches the desired
TQFFE1SFTTUIFi4&5$0"45w
button. Ease off the accelerator
pedal. Your vehicle will maintain
the desired speed.
Instrument
Panel
Panel
m
n
Gauges
ges
Personalize Controls While
son
z
Controls
trols
Operating
Operating
Increase speed
1SFTTUIFi3&4"$$wCVUUPO
hold until your vehicle reaches
the desired speed, and release.
To increase speed using the
accelerator pedal, press the
pedal until you reach the desired
TQFFE1SFTTUIFi4&5$0"45w
button to set the speed.
Decrease speed
1SFTTUIFi4&5$0"45wCVUUPO
hold until your vehicle slows to the
desired speed, and release. To
decrease the speed using the brake
pedal, press the pedal to release
cruise control temporarily. When
the speed decreases to the desired
TQFFEQSFTTUIFi4&5$0"45w
button to set the speed.
Safety / In Case
of Emergency
of Emergency
e
Information
Information
Additional
n
27
While Operating
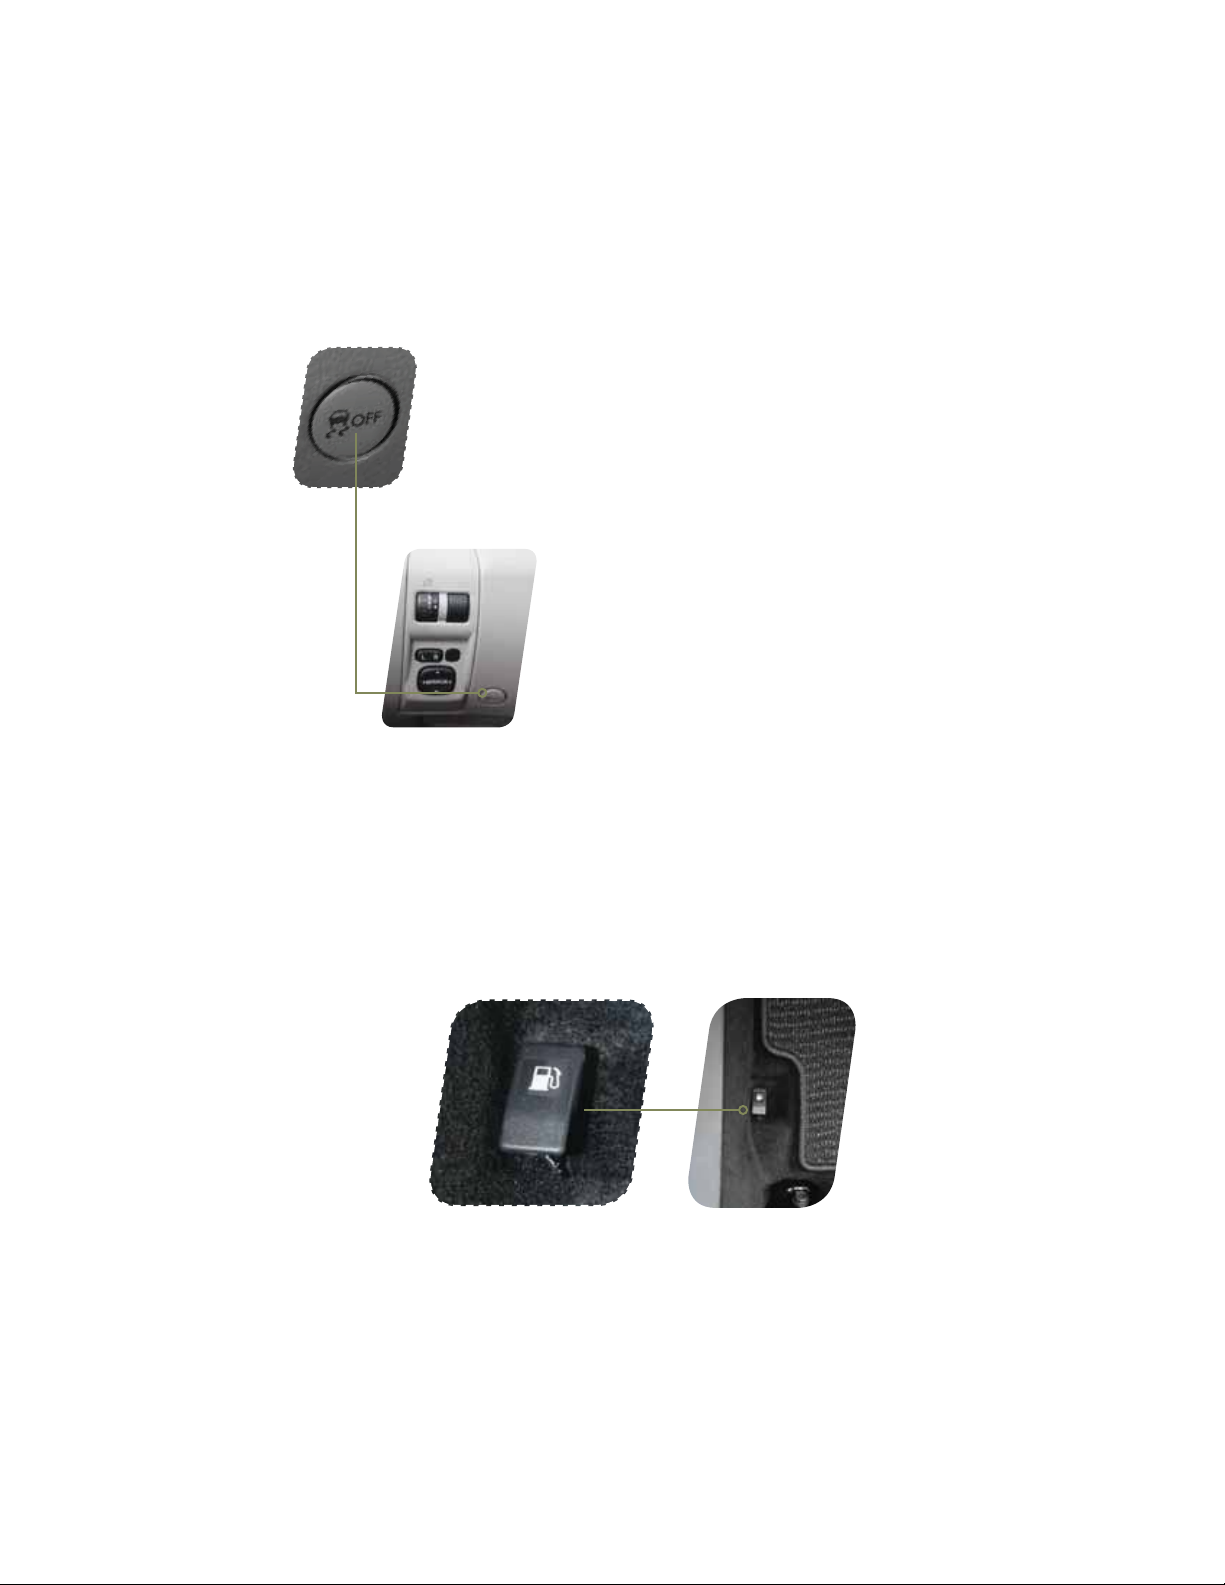
Vehicle Dynamics Control OFF Switch
Pressing the switch to deactivate the Vehicle Dynamics Control
system can help in the following situations:
t"TUBOEJOHTUBSUPOBTUFFQMZTMPQJOHSPBEXJUIBTOPXZ
gravel-covered, or otherwise slippery surface.
t8IFOUIFWFIJDMFTXIFFMTBSFTUVDLJONVEPSEFFQTOPX
Fuel Filler Lid Release
28
28
The vehicle is equipped with a fuel ller lid release.
To open the fuel ller lid, pull the fuel ller lever up and release.
 Loading...