

Page 1
User Guide
Issue 1, September 2007
This User Guide is applicable for serial numbers:
M233-00151 and later
Copyright © 2007 by Studio Technologies, Inc., all rights reserved
www.studio-tech.com
50336-0907, Issue 1
Page 2

This page intentionally left blank.
Page 3

Table of Contents
Introduction ................................................................... 5
System Features ........................................................... 6
Installation and Setup ................................................... 12
Configuration ................................................................ 17
Operation ...................................................................... 28
Advanced Operation ..................................................... 33
Technical Notes ............................................................. 34
Specifications ................................................................ 45
Appendix A .................................................................... 46
Block Diagram
Model 233 User Guide Issue 1, September 2007
Studio Technologies, Inc. Page 3
Page 4

This page intentionally left blank.
Issue 1, September 2007 Model 233 User Guide
Page 4 Studio Technologies, Inc.
Page 5
Introduction
What This User Guide Covers
This User Guide is designed to assist you
when installing, configuring, and using
the Model 233 Announcer’s Console. Additional background technical information
is also provided. A product block diagram
is included at the end of this guide.
System Overview
The Model 233 Announcer’s Console is
designed to serve as the audio control
“hub” for announcers, commentators, and
production personnel. The tabletop unit is
suited for numerous applications including on-air television and radio broadcasting. The Model 233 will also perform an
outstanding role in stadium announce
applications. The Model 233 is compatible
with essentially all broadcast and production audio system environments. Standard
connectors are used to interface microphone, headphone, on-air, talkback, line
input, and intercom signals.
Whether it’s the mic preamplifier, audio
switching, talkback signals, intercom interfacing, or headphone cue feed, superior
audio quality is maintained throughout. A
microprocessor provides the Model 233’s
logic power, allowing precise control of
the unit’s operation. With extensive flexibility built in, creating the desired operating
configuration is a simple matter. While the
operating features of the unit can be carefully tailored, the user is presented with an
easy-to-use set of controls and indicators.
A wide range of resources, great performance, and simplicity during use—these
are the hallmarks of the Model 233.
The Model 233 is a truly “next-generation
and then some” product. Exhaustive research into the needs and desires of field
production personnel was integral to its
creation. Providing a veritable “tool kit”
of features, the unit supports a wide variety
of applications that include on-air television
and radio broadcasting, stadium announcement, and simultaneous interpretation. In
addition, with the unit’s broad range
Model 233 User Guide Issue 1, September 2007
Studio Technologies, Inc. Page 5
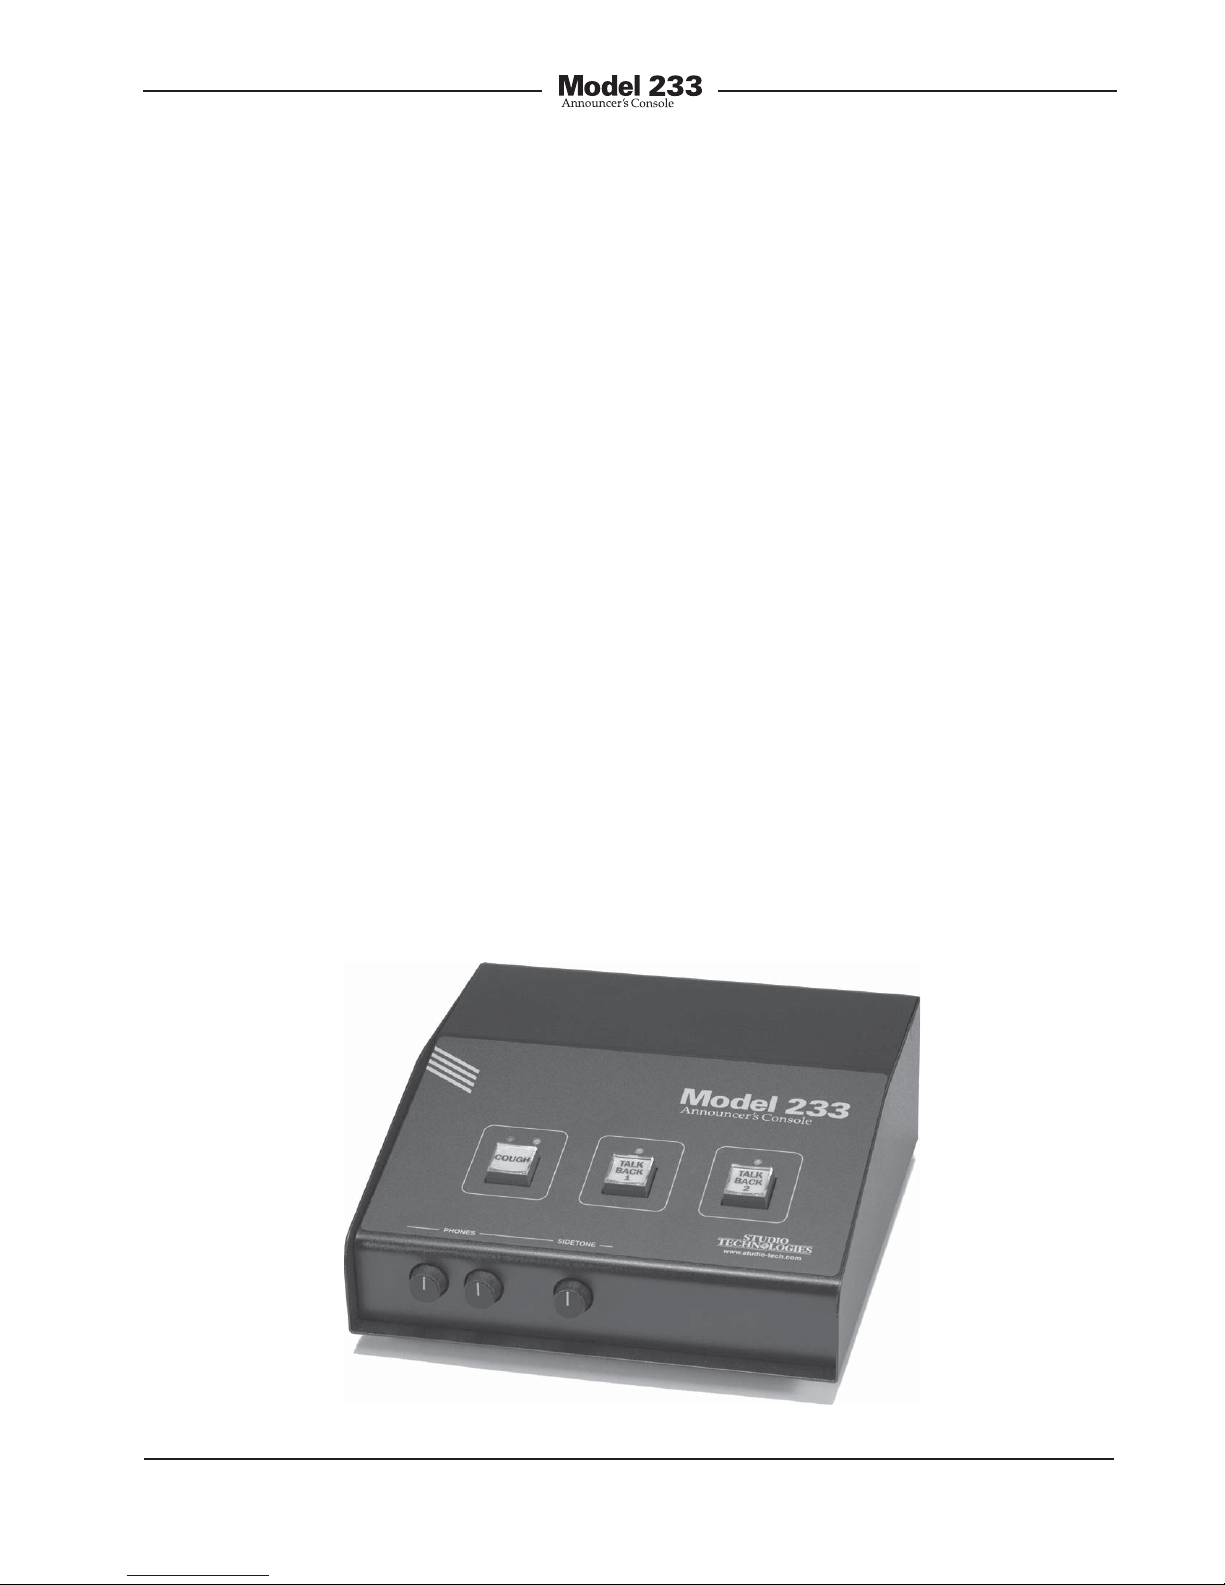
Figure 1. Model 233 front panel
Page 6
Figure 2. Model 233 back panel
of capabilities many other specialized
“behind-the-scenes” applications can
also be implemented.
System Features
Microphone Input
A high-performance microphone preamplifier circuit provides low-noise/low-distortion
amplification over a 20 to 60 dB gain range.
The gain is adjustable in 10 dB steps. The
input is compatible with balanced dynamic
and condenser microphones. The microphone power source is 48 volts nominal
and meets the worldwide P48 phantom
standard. An LED indicator serves as an
aid for optimizing the preamplifier’s gain
setting. The output of the microphone preamplifier is used by the main output as well
as being routed to the compressor circuit
that supports the talkback functions.
Main Output
The Model 233 provides a main output that
is designed to serve as the on-air, stadium
announcement, or other primary audio
feed. Nominally –2 dBu, it is designed as a
fully professional interface with high output
capability, low distortion, and low noise.
The output circuitry features a highperformance output transformer
expressly designed for professional
audio applications.
Talkback Functions
The talkback functions are intended
to provide personnel associated with
production trucks, control rooms, liveperformance, and sports venues with
talent-originated cue signals. The Model
233 contains two pushbutton switches
that control the talkback functions. Associated with each pushbutton switch is a
dedicated line-level talkback output. Each
pushbutton switch can also be configured
to send audio to one specific channel
associated with the Model 233’s dualchannel intercom interface.
The line-level talkback outputs are
transformer-coupled with a +4 dBu
nominal signal level. They contain resistors in series with the output connectors,
allowing line-level talkback outputs from
multiple units to be directly “summed.”
For non-on-air applications, a special
Model 233 feature set can be enabled by
placing the unit in its “production” mode.
This software-based mode allows the
Issue 1, September 2007 Model 233 User Guide
Page 6 Studio Technologies, Inc.
Page 7

main output to be used as an additional
talkback output. This feature makes the
unit even more powerful when used in liveevent applications, such as serving as a
master console for an orchestra conductor
or production director.
With all the available talkback flexibility,
the exact needs of many specific applications can easily be met. And, of course,
whatever configuration is implemented,
the audio quality will be excellent.
Dynamic Range Control
To enhance the Model 233’s talkback
functions, a studio-quality compressor
circuit is provided to control the dynamic
range of the signal coming from the microphone preamplifier. Far from a simple
“clipper,” the circuit utilizes a sophisticated
laser-trimmed voltage-controlled-amplifier
(VCA) integrated circuit for quiet, lowdistortion level control.
The signal from the compressor is always
used by the talkback functions. For flexibility, the audio source for the main output
can be selected to be either the direct
output of the microphone preamplifier or
the output of the compressor. For on-air
applications the signal coming directly
from the microphone preamp would be
correct. But having dynamic range control
of the signal going to the main output can
offer increased performance for selected
applications. These could include stadium
announcement locations, award show
conductor positions, and use with nonprofessional announcers during sports
events.
User Controls and Status
Indicators
Three pushbutton switches, four LED
indicators, and three rotary controls
provide users with a clear, easy-to-use
interface. One pushbutton switch controls
the status of the main output. This is the
audio output intended for on-air, stadium
announcement, or other primary uses.
Two LEDs display the on/off status of the
main output. Two additional pushbutton
switches control the status of the talkback
functions. These are the audio cue signals
used to communicate with producers,
directors, “spotters,” or other behind-thescenes production personnel. A status
LED is associated with each talkback
button. Three rotary controls allow the
user to adjust the level of the headphone
output. Two of the controls are associated
with externally connected cue signals. The
third control is associated with the Model
233’s sidetone function, allowing the user
to monitor the signal associated with the
unit’s microphone input.
Flexibility
A large part of the Model 233’s unique
power is the ability to configure the operation of the main output and talkback
functions. To meet the needs of the many
specific broadcast and production applications, a variety of button operating
modes is available. The main output
button can be selected to operate from
among four modes. In the “push-to-mute”
mode the button performs a momentary mute of the main output. In this way
a “cough” button function is created,
something typically required for television
sports broadcasting. In the “push-to-talk”
mode the button provides a momentary
active function for the main output. This
mode would be appropriate for applications such as stadium announcement. An
alternate action “latching” configuration
allows the button to enable or disable the
main output as desired. This is useful in
Model 233 User Guide Issue 1, September 2007
Studio Technologies, Inc. Page 7
Page 8

radio broadcasting, announce-booth, or
voice-over applications. The fourth mode
provides a hybrid function, supporting
both push-to-talk and tap-to-enable/tap-todisable operation. This operation is similar
to that found in many broadcast intercom
system user stations.
The two buttons associated with the talkback functions can be configured to operate from either of two modes. One of the
modes supports a “push-to-talk” function.
This is typically used for on-air broadcast
applications. The other mode provides a
hybrid function, the operation of which is
discussed in the previous paragraph. The
hybrid mode is especially useful when the
Model 233 is used in a production-support
application.
The main button mode configures how the
main output, when it is in the “latched” on
state, responds to talkback activity. One
choice momentarily turns off the main
output when talkback is active, returning
the main output to the on state when the
talkback function has ended. The other
choice “unlatches” the main output in
response to a talkback function.
Cue Sources
The Model 233 supports the connection
of up to four external audio sources, each
of which can be selected for routing to
the stereo headphone output. The sources
are line input 1, line input 2, intercom
channel 1, and intercom channel 2. Each
source can be individually assigned to
the left channel, the right channel, or both
the left and right channels. This allows a
wide variety of stereo and mono headphone mixes to be created.
For application flexibility, two line-level
audio sources can be connected to the
Model 233. Possible signal sources
include off-air receivers, wireless IFB systems, and audio consoles. The connected
signals can be from two independent
sources, or could be from a stereo audio
feed such as would be associated with a
broadcast music event. Two level trim potentiometers, located on the bottom of the
unit, allow signals with wide nominal audio
levels to be cleanly interfaced.
Audio signals associated with a singleor dual-channel intercom system can
be routed to the headphone output. The
Model 233’s intercom interface is compatible with standard party-line intercom
systems from manufacturers such as
RTS™ and Clear-Com®. A broadcast-type
IFB (interrupted foldback) circuit can also
be connected to the intercom input. This
“listen only” signal is often found in television broadcast applications.
Sidetone
The Model 233 includes an integrated
sidetone function that allows the output
of the compressor circuit associated with
the microphone preamplifier to be routed
to the stereo headphone output. This
provides a confidence signal to the user,
allowing them to hear exactly what is
being sent to the main and, if desired,
talkback outputs. This sidetone signal
can be a critical element when creating
an effective communications environment.
In on-air television and radio broadcast
settings the Model 233 user’s own microphone audio signal is typically returned
to the headphone output by way of a cue
audio source. But there are cases where
this signal is not available, such as when
“mix minus” cue feeds are utilized. This
type of cue feed includes everything but
the user audio, a requirement when significant time delays, typically associated
Issue 1, September 2007 Model 233 User Guide
Page 8 Studio Technologies, Inc.
Page 9

with satellite transmission systems, are
present. In effect the Model 233’s sidetone
function adds the “minus” part to a “mix
minus” cue.
Several configurable parameters allow
the sidetone function to be tailored to the
needs of a specific Model 233 installation.
The sidetone function can be configured
to route audio to the left, right, or left and
right headphone outputs. It can also be
completely disabled. Sidetone can also
be configured to be active only when
the main output is active, or to be active
anytime the main output or either of the
talkback outputs is active.
Headphone Output
Three rotary controls are provided for
user adjustment of the headphone output.
Two of the controls adjust the levels of the
externally connected sources. The third
control is used to set the level of the sidetone function.
For flexibility the actual functioning of the
two controls associated with the external
sources is configurable. For traditional
on-air sports applications they can be
selected to the dual level control mode
which provides independent control of the
left and right channel volume. For use with
stereo cue signals, or to support user preference, the level/balance mode can be
selected. In this mode one control adjusts
the overall level of both the left and right
channels, while the other allows adjustment of the left/right level balance. To help
minimize the chance of broadcast cues
being missed, both level control modes
can be configured so that a minimum
headphone output level is maintained.
Alternately, the headphone output can be
set to fully mute when these controls are
at their minimum position.
A headphone control reverse mode is
provided specifically for on-air television
applications where a headset with boom
microphone is used. The reverse mode
ensures that no matter which headset
orientation is used by the talent, the two
“pots” controlling the external sources will
always work intuitively. This will result in a
comfortable work environment, allowing
the “left” control to impact the level to the
talent’s left ear while the “right” control
impacts the right.
The sidetone level control is dedicated to
adjusting the level of the mic audio signal
that’s routed to the headphone outputs.
Configuration switches allow which of the
headphone outputs—left, right, or both—
will receive the sidetone signal. When the
sidetone level control is set to its minimum
position the sidetone level is always set to
be fully muted.
Provision has been made to support applications where a monaural cue feed is
desired. A configuration switch allows the
summing (combining) of the selected left
and right headphone sources. In addition
to creating a dual-channel mono output it
also allows the level controls to be configured as a simple 3-channel mixer.
The headphone output is optimized to
meet the needs of contemporary headphones and headsets. Specifically, the
output circuits act as voltage, rather than
power, drivers. In this configuration they
can provide high output levels with very
low distortion and noise, along with minimal current consumption. The output circuits are configured to safely drive stereo
or mono loads. This ensures that all types
of headphones, headsets, and earpieces
can be directly connected.
Model 233 User Guide Issue 1, September 2007
Studio Technologies, Inc. Page 9
Page 10

Intercom Interface
Of special note is the Model 233’s sophisticated intercom interface. It’s designed
to work correctly with industry-standard
single- and dual-channel party-line intercom systems, including those from RTS
and Clear-Com. An intercom line connected to the Model 233 can serve three functions: providing cue audio signals to the
headphone output, allowing talkback audio
to be sent to intercom users, and acting
as a Model 233 power source. Audio signals present on the single- or dual-channel
intercom line can be flexibly routed to the
stereo headphone output. Talkback audio,
controlled by the two talkback pushbutton
switches, can be sent to either or both of
the intercom channels. Trim potentiometers, located on the bottom of the unit, allow adjustment of the talkback-to-intercom
sidetone (null) level.
Other announcer console products can
exhibit talkback-to-intercom-related audio
oscillations (“squeals”) that end up in the
headphone output. A unique Model 233
feature ensures that this will never occur.
This is accomplished by means of a special
“auto-terminate” circuit that becomes active
whenever an intercom line is not connected
to the Model 233.
Audio Quality and Protection
The Model 233’s circuitry is carefully
tailored to provide excellent audio performance. Professional-quality components
are featured throughout. For reliability all
audio routing is performed using solid-state
devices under microcontroller direction. In
all critical audio paths, “clickless” electronic
switches provide noise-free control. All
audio inputs and outputs make extensive
use of protection components. This limits
the chance of damage from ESD and other
undesirable, yet real-world, hazards.
Power Sources
The Model 233 can derive its operating
power from an intercom line or an external
24 volt DC source. For redundancy, both
power sources can be connected simultaneously. An internal switch-mode power
supply ensures that all Model 233 features
are available, including phantom power,
when the unit is powered by either source.
Auxiliary Relay
Model 233 resources include a generalpurpose relay, allowing specialized configurations to be created. Under software control, the relay can be configured to follow
the state of the main output, talkback 1,
or talkback 2 buttons. Taking advantage
of the back-panel locations provided for
additional XLR-type connectors, a technician may easily create functions such as
an “on-air” indicator or implement a loudspeaker muting during talkback function.
Special configuration modes are even
included to allow direct control of the relay
using the talkback 1 or talkback 2 buttons
without impacting any of the Model 233’s
audio signals.
Tally Output
Another unique Model 233 feature is the
tally output. It provides an indication, in
the form of a current-limited DC signal,
of the status of the main output. Whenever
the main output is active the tally output
is active. This 3.5 volt nominal, 12 milliamperes maximum, signal is capable of directly lighting an LED indicator or triggering
an external control system. The tally output
is provided specifically for specialized applications such as television award show
broadcasts where remote monitoring and
control of the main output is required.
Issue 1, September 2007 Model 233 User Guide
Page 10 Studio Technologies, Inc.
Page 11

Configuration
Model 233 configurations are made using
a number of DIP-type switches and four
trim potentiometers. One 8-position switch
array is used to set the gain of the microphone preamplifier, the on/off status of
phantom power, and control of the headphone output mode. A 12-position switch
array configures which of the four cue
audio sources, as well as the sidetone audio, are routed to the headphone outputs.
In addition, the last two sections of the
12-position switch array are used to select whether talkback audio will be routed
to the intercom interface. Two 8-position
switch arrays communicate the desired
operating modes to the microprocessor.
Two rotary “trim pots” are used to adjust
the sensitivity of the line inputs. Two additional rotary trim pots are provided to
adjust the sidetone (null) level for the intercom interface’s talkback functions.
All switches and trim pots are accessible
via the bottom of the Model 233’s enclosure; the unit does not have to be disassembled. Changes made to any of the
configuration parameters become active
immediately. To prevent access to the
configuration controls a security panel,
included with each unit, is attached to the
bottom of the enclosure.
Connectors
The Model 233 uses standard connectors
throughout. The microphone input, line
inputs, and intercom interface functions
use 3-pin female XLR-type connectors.
The main and line-level talkback output
functions use 3-pin male XLR connectors.
The headphone output utilizes a ¼-inch
3-conductor jack. The external source of
24 volt DC power is connected by way of a
2.1 x 5.5 mm “locking” coaxial power jack.
Additional Connector Locations
In the world of broadcast, production, and
public address audio it’s fair to say that
applications vary widely. To this end, up to
three additional XLR-type connectors can
be easily mounted into the Model 233’s
back panel. Multiple 3-position “headers”
located on the Model 233’s circuit board
provide technician-access to literally every
input and output connection. In addition,
some additional features, including the
remote control inputs and tally output, are
accessible using 3-position headers. Using
a factory-available interface cable kit, these
headers allow a Model 233 to be optimized
to meet the exact needs of specific applications. For example, some applications may
prefer to use a multi-pin XLR-type connector to interface with a headset. This could
be easily accomplished by adding the
appropriate 6- or 7-pin XLR-type connector and making a few simple connections.
Other applications may benefit from having “mult” or “loop-through” connections,
something easily incorporated into a
Model 233.
Multi-Pin Headset Connectors
As previously mentioned, some applications are best supported using headsets
that interface using a multi-pin connector.
In most of these cases the desired connectors are 6- or 7-pin male XLR-type wired to
an industry-standard pin-out scheme. Studio Technologies offers headset connector
assemblies that allow fast and painless installation into a spare connector location in
the Model 233’s back panel. Details about
these optional assemblies are available on
the Studio Technologies website.
Model 233 User Guide Issue 1, September 2007
Studio Technologies, Inc. Page 11
Page 12

Options
The Model 233’s standard resources are
more than sufficient to directly support a
large number of applications. But in the
“real world” of audio and intercommunications special needs always seem to arise.
To that end, Studio Technologies offers
a number of option cards. In addition to
passive or active components, each card
contains an integral connector, allowing
simple installation into a spare connector
location on the Model 233’s back panel.
For interest, the resources provided by
some of these option cards are worth
describing.
Installation and
Setup
In this section interconnections will be
made using the input and output connectors located on the Model 233’s back panel. Microphone, line-level audio sources,
intercom, main output, and line-level talkback output signals are interfaced by way
of 3-pin XLR-type connectors. A ¼-inch
3-conductor phone jack is provided for the
headphone output. A 2.1 x 5.5 mm coaxial
jack allows connection of an external 24
volt DC power source.
• The direct microphone output card
provides access to the dynamic or condenser microphone that is connected
to the Model 233’s mic input. Passive
components, along with the auxiliary
relay contact, create a “click-free”
microphone-level audio signal.
• The remote switch input card uses a
4-pin XLR connector to provide access
to the Model 233’s remote switch inputs.
Other general-purpose option cards
provide 3-pin XLR, 4-pin XLR, and 8-pin
EtherCon® connectors. With the range
of option cards available it’s hard to imagine an application that can’t be served.
But you’re welcome to try to “stump the
chumps” in the Studio Technologies
technical support department! But first
please check the complete list of the
available option cards listed on the Studio
Technologies website.
System Components
The following is included in the shipping
carton: Model 233 Announcer’s Console,
user guide, button label sheet, and 24 volt
DC power supply. For units shipped to destinations in Japan and North America the
power supply will have a nominal AC mains
input of 120 volts. For all other destinations
a power supply compatible with 220/240
volt AC mains will be included.
Microphone Input
The Model 233 is compatible with balanced
dynamic and condenser microphones.
Depending on the application, the microphone may be part of a headset, or be an
independent handheld or stand-mounted
model. The Model 233’s nominal 48 volt
power source will support essentially all
phantom-powered microphones. The quality of the Model 233’s microphone preamplifier and associated circuitry is such that
special applications may benefit from using
“high-end” microphones. If selected appropriately, models from manufacturers such
as AKG, Beyerdynamic, Crown, Neumann,
Sennheiser, and Shure will perform very
well in Model 233 applications.
Issue 1, September 2007 Model 233 User Guide
Page 12 Studio Technologies, Inc.
Page 13

The selected microphone is interconnected by way of a 3-pin female XLR-type
connector which is located on the Model
233’s back panel. The mating connector
(male) should be wired so that pin 2 is
signal high (+ or hot), pin 3 is signal low
(– or cold), and pin 1 is shield. It’s possible
that an unbalanced microphone will also
work correctly but is not recommended.
However, if this is necessary the mating
connector (male) should be wired so that
pin 2 is signal high (+ or hot), and signal
common/shield is connected to both pins
1 and 3.
The Model 233 is not compatible with unbalanced “electret”-type microphones that
require a source of low-voltage DC for operation. These microphones, sometimes
found in low-cost headsets, are not generally suitable for on-air or other demanding
applications.
As of the writing date of this user guide,
the Sennheiser HMD25 headset remains
popular for on-air broadcast use. A fine
product, it works very well with the Model
233. Note that adding the suffix “-XQ” to
the headset’s part number (HMD25-XQ)
specifies a 3-pin male XLR-type connector
for the dynamic microphone and a ¼-inch
3-conductor plug for the stereo headphones. This configuration is very useful,
allowing the headset to work directly “out
of the box” with the Model 233.
If the writer may digress for a moment to
recount a story… an audio dealer once
shared a secret with me concerning headsets. He loved selling the “lower-end” (less
expensive) headset models, which he did
by the veritable “boatload.” Why? Because
these usually broke soon after going into
service! He knew that on a regular basis
he’d receive orders for more of them.
Had these users, from the beginning,
purchased only premium-quality headsets,
their total cost of ownership would have
been much less. Enough said…
Headphone Output
The Model 233’s headphone output is
compatible with stereo or mono headphones, headsets, or earpieces. Connecting devices with a nominal impedance
of 100 ohms or greater is preferred. This
shouldn’t be an issue as essentially all
contemporary devices already meet this
condition.
Devices are connected to the headphone
output by way of a ¼-inch 3-conductor
phone jack located on the Model 233’s
back panel. As is standard for stereo
headphones, the left channel is connected
to the “tip” lead of the ¼-inch headphone
jack. The right channel is connected to
the “ring” lead of the jack. Common
for both channels is connected to the
“sleeve” lead.
Devices with ¼-inch 2-conductor “mono”
plugs can also be used with the Model
233’s headphone output. In this arrangement only the tip lead (left channel) will
be active. The 2-conductor plug will
physically connect (“short”) the ring lead
(right channel) to the sleeve lead (common). Technically this won’t damage the
circuitry associated with the right-channel
headphone output. (51 ohm protection
resistors are electrically in series with the
headphone output circuits.) However,
energy will be wasted if an audio signal
coming out of the right channel goes into
a “dead” short. There is a simple means
of eliminating this issue; when configuring
the headphone sources simply do not
assign any to the right channel headphone output. Refer to the Configuration
section of this user guide for details.
Model 233 User Guide Issue 1, September 2007
Studio Technologies, Inc. Page 13
Page 14

Main Output
The Model 233’s main output is intended to
be the “on-air” or primary signal that typically connects to the input of an audio console. The output is transformer balanced
with a nominal signal level of –2 dBu. The
actual level will depend upon the gain setting of the microphone preamplifier, sensitivity of the microphone, and how loudly
the user speaks into the microphone. The
transformer used in the main output is intended for professional audio applications.
Its source impedance is very low and can
drive lengthy cable runs without difficulty.
It is capable of driving loads as low as 600
ohms but performs best with loads of 2 k
ohms or greater. (This should not prove to
be an issue as virtually all contemporary
audio equipment has a relatively high input
impedance.) As the secondary winding of
the output transformer connects directly to
the main output connector, care should be
taken so that a DC voltage is never present
on the interconnecting cable.
The main output is interfaced by means of
a 3-pin male XLR-type connector located
on the Model 233’s back panel. The interconnecting cable’s mating connector
(female) should be wired so that signal
high (+ or hot) is on pin 2 and signal low
(– or cold) is on pin 3. The cable’s shield
can be connected to pin 1, but it will have
no function. Also, the cable’s shield must
not be terminated on the metal “shell” connection of the mating connector. To limit
the chance of grounding interaction between the Model 233 and connected equipment, pin 1 on the main output’s connector
is isolated from any point in the Model 233.
The fact that pin 1 “floats” will minimize the
chance of hums, noises, or buzzes being
present on the equipment connected to
the main output.
Line-Level Talkback Outputs
The two line-level talkback outputs are
intended to be connected to control
rooms, production trailers, or other locations where talent-originated voice cues
are required. The outputs are transformer
balanced with a nominal level of +4 dBu.
To enhance talkback audio quality, a compressor circuit controls the dynamic range
of the signal coming from the microphone
preamplifier.
For protection against accidental connection to cables that have DC power present,
the line-level talkback outputs are capacitor coupled. In series with the talkback
output leads are 300 ohm resistors, making the effective output impedance approximately 600 ohms. These resistors
create a passive summing network, allowing talkback outputs on multiple Model
233 units to be connected (“bridged”)
together.
The line-level talkback outputs are connected by way of two 3-pin male XLRtype connectors which are located on
the Model 233’s back panel. The mating
connectors (female) should be prepared
so that signal high (+ or hot) is provided
on pin 2. Signal low (– or cold) should
be provided on pin 3. The cables’ shields
can be connected to pin 1. But, like the
main output, in order to minimize the
chance that ground-interaction problems
will arise, pin 1 on the line-level talkback
output connectors are isolated from the
Model 233’s chassis and circuitry. By
making pin 1 “float,” often-feared “ground
loop” problems shouldn’t arise. Note that
the metal shell of the mating connector
must also be “floating.”
The line-level talkback outputs are intended to drive the lengthy cable runs that
Issue 1, September 2007 Model 233 User Guide
Page 14 Studio Technologies, Inc.
Page 15

are often part of broadcast and production
audio applications. While the output circuitry is not intended to be “on-air” quality,
overall audio performance should be very
good. Devices connected to the line-level
talkback outputs can range from amplified
loudspeakers, analog inputs on intercom
systems, and input channels associated
with audio consoles. Connecting the outputs to devices that allow easy control of
the signal level can be helpful. For example, connecting to spare input modules on
an audio console provides the flexibility to
add gain or attenuate as required. Dedicated talkback-associated outputs on the
audio console can then be routed to the
final destination(s).
As previously mentioned, the line-level
talkback outputs on multiple Model 233
units can be directly connected together.
Using a simple “Y” or “W” cable, this passive summing (adding together or “bridging”) of talkback signals allows one audio
cable to serve as a master talkback path.
A side effect from using this passive summing technique is that signal attenuation
will occur. The audio quality won’t suffer,
but an audio “pad” is created. If two linelevel talkback outputs are connected together, a signal attenuation of 6 dB can be
expected. Connecting three talkback outputs together will result in 9.5 dB of attenuation. And four talkback outputs “multed”
together will lead to 12 dB of attenuation.
In most cases this attenuation won’t pose
a problem. Typically a device that receives
the talkback signal, such as an amplified
loudspeaker, will have an adjustable input
sensitivity so this attenuation won’t prove
to be a problem.
Line Inputs
The Model 233 allows two line-level audio
sources to be connected. These sources
can be individually routed to the left channel, right channel, or both the left and right
channel of the headphone outputs. The
inputs are balanced, transformer-coupled
with a nominal impedance of 10 k ohms.
Capacitors, in series with the transformer’s
input leads, prevent a DC voltage present
on a connected source from impacting
performance. The line inputs are compatible with signals that have a nominal level
of –12 dBV to +6 dBu. Two trim potentiometers, located on the bottom of the
Model 233’s enclosure, allow signals over
this wide nominal level range to be effectively utilized.
Audio sources are connected to the line
inputs by way of 3-pin female XLR-type
connectors which are located on the unit’s
back panel. Prepare the mating connectors (males) so that pin 2 is signal high
(+ or hot), pin 3 is low (– or cold), and pin
1 is shield. If connecting a source in this
manner results in hum or noise, it’s possible that removing the shield connection
from pin 1 can eliminate the issue. With
an unbalanced source connect pin 2 to
signal high (+ or hot) and both pins 1 and
3 to shield. If connecting an unbalanced
source in this manner results in hum or
noise, connect pin 2 to high (+ or hot) and
pin 3 to shield; leave pin 1 unterminated.
Intercom Interface
The Model 233’s intercom interface is
designed to directly connect with standard
single- and dual-channel party-line intercom lines. The one or two audio signals
provided by the intercom line can serve as
audio sources for the headphone outputs.
Each signal can be individually assigned
to the left channel, the right channel,
or both the left and right channels. The
Model 233 can also be configured to send
talkback audio to either or both of the
Model 233 User Guide Issue 1, September 2007
Studio Technologies, Inc. Page 15
Page 16

intercom channels. In addition, the intercom line can provide the DC power required to operate the Model 233’s circuitry.
An intercom line is connected to the
Model 233 by way of a 3-pin female XLRtype connector which is located on the
back panel. The mating connector (male)
should be wired so that common is on
pin 1, DC with channel 1 audio is on pin
2, and channel 2 audio is on pin 3. With
single-channel intercom lines common is
on pin 1, DC power is on pin 2, and audio
is connected to pin 3.
The Model 233’s intercom interface is
directly compatible with broadcast and
production party-line intercom lines associated with systems from manufactures
such as RTS and Clear-Com. Intercom
lines associated with other systems
should be equally compatible. RTS TW
series systems are normally interfaced
using 3-pin XLR-type connectors. These
connectors are wired with common on
pin 1, DC power and channel 1 audio on
pin 2, and channel 2 audio on pin 3. With
many Clear-Com systems, common is on
pin 1, DC power is provided on pin 2, and
audio is provided on pin 3.
The DC power supplied by the connected
intercom line is generally sufficient to
operate the Model 233’s circuitry. The
acceptable input range is 24 to 32 volts,
with a required current of 125 milliamperes. Note that the specified input voltage is given when measured directly at
the Model 233’s intercom input connector (with the connector terminated on the
Model 233) and not at the source of the
intercom system’s power.
External Power Input
An external source of 24 volt DC power can
be connected to the Model 233 by way of
a 2.1 x 5.5 mm coaxial power jack which
is located on the back panel of the unit.
The center pin of the jack is the positive
(+) connection. While the requirement for
the external source is nominally 24 volts,
correct operation will take place over a 20
to 30 volt range. The Model 233 requires
90 milliamperes at 24 volts DC for correct
operation. Included with each Model 233
is a 24 volt DC external power supply. The
power supply’s DC output cable has been
terminated with a Switchcraft® S760K
coaxial power plug. This “locking” type of
plug correctly mates with the Model 233’s
24 Vdc input jack. The locking feature is important, allowing the external power source
to be securely attached to the Model 233.
As previously discussed in this user guide,
an intercom line connected to the Model
233 can serve as the unit’s power source.
Alternately, an external 24 volt DC source
can be connected. For redundancy, the intercom line and the external source can be
connected at the same time. If one of them
becomes inoperative the remaining source
will provide power for the Model 233.
The Model 233’s circuitry establishes the
priority in which the unit draws its operating
power. If an external source of 24 volt DC
power is connected, it will always serve as
the primary source. This minimizes the impact that the unit’s power draw could have
on a connected intercom line. If no external
source of 24 volt DC is connected then
power will be drawn from the intercom line.
And, of course, no matter which source is
providing power full operation of the intercom interface can take place.
Issue 1, September 2007 Model 233 User Guide
Page 16 Studio Technologies, Inc.
Page 17

Pushbutton Labeling
The three pushbutton switches used in
the Model 233 were selected for several
reasons. Foremost was the fact that they
are highly reliable, using gold-plated contacts for long life in less-than-ideal environments. A second reason was that applying
customized labels to the button caps
would be very simple. The labels, text
printed on clear material, are placed under
the clear caps on the top of the buttons.
From the factory the left button is labeled
COUGH, the center button is labeled
TALKBACK 1, and the right button is
labeled TALKBACK 2. This was selected
to be appropriate for many on-air applications in English-speaking locations. But
it’s expected that these may need to be
changed to meet the needs of specific
applications.
As a “head start” for some applications,
a clear sheet with a number of commonly
used button designations printed on it is
included in the shipping carton. These
were created at the factory using a standard personal computer graphics program
and laser printed onto 3M CG3300 transparency film. The desired button labels
can be cut out with a pair of scissors, following the printed guide lines that indicate
the required size.
The clear lens on top of each button cap
can be removed with a fingernail or small
screwdriver. Be certain not to scratch the
button if a screwdriver or other small tool
is used. The clear label can be removed
and replaced. The button cap is then
snapped back into the top of the button
housing using finger-pressure only. No
tool is required to replace the button cap.
If you need to make your own labels the
process is quite simple. Use a personal
computer to create the desired text. The
finished label size should be 0.625-inches
(15.8 mm) square. The completed artwork
can then be printed on transparency film
sheets using a laser or inkjet printer. These
sheets are readily available from most
office supply stores. A pair of scissors or
an X-ACTO® knife will complete the task.
Configuration
For the Model 233 to support the needs
of specific applications a number of
operating parameters must be configured.
These include microphone preamplifier
gain, phantom power on/off, headphone
source and output mode selection, and
operating modes. One 12-position and
three 8-position DIP-type switch assemblies
are used to establish the desired configuration. These switch assemblies are referred
to as SW1 through SW4, with individual
switches designated as SW1-1, SW1-2,
etc. The switch assemblies are accessed
through openings in the bottom of the
Model 233’s enclosure. The enclosure
does not have to be disassembled to
gain access to the switches.
To prevent unauthorized personnel from
changing the configuration settings, a security plate is attached to the bottom of the
Model 233’s enclosure. For convenience,
attached to the security plate is a configuration settings label. It provides a summary
of the configurable parameters and related
information. Refer to Appendix A for a
representative view of the label. The security plate is held in place by means of four
rubber bumpers (“feet”) that have built-in
screws. Using your fingers, remove the four
bumpers so that the plate can be removed.
Refer to Figure 3 for a detailed view of the
configuration switch assemblies.
Model 233 User Guide Issue 1, September 2007
Studio Technologies, Inc. Page 17
Page 18

Figure 4. Microphone preamplifier gain switch
settings
Figure 3. Bottom view of Model 233 showing
configuration switches, trim pots, and
compressor active LED
Microphone Preamplifier Gain
and Phantom Power
Five switches are used to set the gain of
the microphone preamplifier. One switch
is used to select the on/off status of the
phantom power supply.
Microphone Preamplifier Gain
Switches SW1-1 through SW1-5 are used to
select the gain of the microphone preamplifier. The choices are 20, 30, 40, 50, and 60
dB. Only one switch should be enabled at a
time. There’s no problem changing the gain
setting while the unit is operating. Audio
clicks or pops might occur during gain transitions, but this shouldn’t be a major issue
as long as associated monitor loudspeakers are temporarily attenuated or muted.
Selecting the correct amount of gain for an
application might take a little experimentation. The goal is to bring the microphone’s
signal up to line level, nominally –2 dBu,
on the Model 233’s main output. Operating
at this signal level will help to ensure the
delivery of “clean” audio to the connected
device. The output of the Model 233’s microphone preamplifier is used by both the
main output and, by way of the compressor
circuit, the talkback functions. So creating
a nice “hot” signal will help maintain audio
quality, specifically the signal-to-noise ratio,
when driving the often-lengthy cable runs.
Unfortunately, there’s no “perfect” gain
setting that this guide can recommend.
The two issues that impact the setting are
output sensitivity of the connected microphone and the acoustical output level of the
microphone’s user. With some headset microphones, such as the Sennheiser HMD25,
selecting an initial setting of 40 dB is appropriate. Users who speak loudly might need
to have the gain reduced to 30 dB. Quiet
users might need 50 dB of gain.
An LED indicator is provided as an aid
in correctly setting the gain of the microphone preamplifier. Red in color, this LED
is located adjacent to switch assembly 1.
Issue 1, September 2007 Model 233 User Guide
Page 18 Studio Technologies, Inc.
Page 19

It is visible by observing the bottom of the
Model 233’s enclosure when the security
plate has been removed. Technically, this
red LED lights whenever the compressor
circuitry is controlling the dynamic range
of the signal coming from the microphone
preamplifier. The threshold is set to be 2 dB
above the Model 233’s nominal internal
operating level. So a good “rule of thumb”
is to adjust the gain of the microphone
preamplifier so that the compressor active
LED lights (“flashes”) when the connected
microphone is sending signal peaks.
During normal operation the LED should
not remain fully lit when typical audio signals are present on the mic input.
It’s important to remember that the compressor active LED is used to assist in setting the mic preamplifier gain to the optimal
value. It doesn’t necessarily indicate that the
main output’s signal is being compressed.
Unless specifically configured to perform
otherwise, the output of the compressor is
only used for the talkback output functions.
a line-level signal is connected to the
microphone input. This could occur with
a special Model 233 application. But with a
microphone connected as the input source
one should never use the 0 dB setting.
The issue is that with no gain added to the
microphone input signal the relative noise
floor on the circuitry associated with the
main output and talkback functions will be
much too high. These circuits are designed
for handling line-level signals, expecting to
receive audio from the output of the microphone preamplifier. In conclusion, the 0 dB
gain setting doesn’t highlight a problem,
but simply reflects the unit’s gain structure.
Phantom Power On/Off
The Model 233 can provide nominal 48 volt
phantom power to the microphone input.
Switch SW1-8 controls whether or not phantom power is active. By phantom power’s
very nature it could be left applied to the
microphone input at all times. But generally
people prefer to turn it off unless required
for a specific microphone.
It’s expected that the 20 and 60 dB gain
settings will not often be used. But there
are always exceptions and that’s why they
were included. It’s possible that with a very
“hot” microphone, such as a phantompowered condenser-type, 20 dB of gain
could be correct. It’s also possible that a
Figure 5. Phantom power switch settings
microphone with a very low level output,
such as a ribbon-type, would need 60 dB
of gain. But in general, the 30, 40, and
50 dB gain settings will serve most
applications.
Headphone Source Selection
Switch assembly SW2 is used to configure
the sources that are routed to the stereo headphone output. Five headphone
Note that if no gain switch is set to its active (on) position the Model 233’s preamplifier will operate at unity (0 dB) gain. In this
mode the preamplifier will remain stable,
but is intended only for use during factory
testing. A valid exception would be where
Model 233 User Guide Issue 1, September 2007
Studio Technologies, Inc. Page 19
sources are available: line input 1, line input 2, intercom channel 1, intercom channel 2, and sidetone. Each of these sources
can be assigned to the left, right, or both
the left and right channels of the stereo
headphone output.
Page 20

Figure 6. Left and right channel headphone
source selection settings
The line inputs are interfaced using two
connectors also located on the back panel. Associated with line inputs 1 and 2 are
level trim potentiometers. They are provided so that audio sources with a wide
range of nominal levels can be effectively
used as cue sources. Please refer to the
Advanced Operation section of this user
guide for details on using the trim pots.
Audio associated with intercom channels
1 and 2 is provided by way of the intercom
interface whose connector is also located
on the back panel. Two trim pots are
associated with the intercom channels.
They allow adjustment of the intercom
sidetone (null) level. This impacts the
amount of talkback audio signal that is
returned to a headphone output when a
talkback-to-intercom function is active.
The sidetone audio source comes from
the output of the compressor circuit associated with the microphone preamplifier.
This allows an announcer or other Model
233 user to receive a confirmation signal
of what is coming out of the main, and if
configured, talkback outputs.
As previously discussed, each of the available input sources can be assigned to
the headphone output’s left channel, right
channel, or both the left and right channels. The Model 233’s circuitry allows any
combination of input assignments to be
made. For example, consider the situation
where a single-channel intercom line, with
audio present only on pin 3, is connected.
In this case it may be desirable to assign
this intercom audio source to both the left
and right channels. This would entail setting switches SW2-4 and SW2-9 to their
on positions. All other switches would
remain in their off positions.
A more complex application might have
a broadcast-type 2-channel IFB circuit
connected to the intercom input and a
line-level audio signal from a golf event
“spotter” connected to line input 1. In
a case such as this, it would be typical
for IFB channel 1 to be assigned to the
headphone’s left channel, IFB channel
2 assigned to the right channel, and line
input 1 also assigned to the right channel.
This would allow both IFB channel 2 and
“spotter” audio to be heard in the headphone’s right-channel output. To achieve
this would require that switches SW2-3,
Issue 1, September 2007 Model 233 User Guide
Page 20 Studio Technologies, Inc.
Page 21

SW2-6, and SW2-9 be placed in their on
positions.
Note that in some cases a user may wish
to wear a headset or a pair of headphones
in a left/right orientation opposite of what’s
usual. In this situation the transducer
designated for the left ear would actually
supply audio to the user’s right ear, and
vice versa. A specific application where
this occurs is when on-air talent needs to
have a headset’s boom microphone come
across the right side of their face, rather
than the more-typical left side. In this case
it’s important to select the left- and rightchannel headphone source assignment
accordingly. With the Model 233’s flexible
source selection there’s no reason why
users, such as on-air talent, shouldn’t
have their cue sources assigned correctly.
Special applications may benefit by
using the Model 233 in a 3-channel headphone output mixer mode. This is accomplished by first configuring the headphone
output to monaural. (Details on how to
accomplish this are described later in this
section of the user guide.) Next the cue
source whose level is to be adjusted by
the rotary control on the far left side of the
front panel is assigned to the left channel.
Finally, the cue source whose level is to be
adjusted by the center control is assigned
to the right channel. During operation the
user will create their desired cue mix using
these two front-panel controls.
There may also be cases where a monaural “single-muff” headset or headphone
will be connected to the Model 233’s
headphone output. In this case the
desired source must be routed only to
the left channel. This is because the
2-conductor plug that’s typically associated with a mono headset or headphone
will connect only to the tip lead (left channel) of the headphone output. Signals
assigned to the right channel will not be
heard by the user.
Headphone Output Mode
Switch SW1-6 allows a monaural headphone output to be created. This is accomplished by summing (adding) the selected
left- and right-channel cue signals. The
combined signals are sent to both the leftand right-channel headphone output driver
circuits. The outputs of these circuits connect, by way of 51 ohm series protection
resistors, to the headphone output jack.
Figure 7. Headphone output mode settings
The headphone output monaural mode
feature was specifically included so that
a 3-channel headphone mixer mode can
be created. By enabling the mono mode,
the three front-panel user level controls
(“pots”) can be used to create the desired
“mix” of signals being sent to the headphone outputs. Many, many applications,
especially in production settings, can
benefit from this capability. The desired
cue sources must be carefully assigned
to take advantage of the monaural mode.
The first cue source should be assigned,
using the DIP-type switches, to the far left
channel. Its output level will be adjusted
by the left control. The second cue source
should be assigned to the right channel.
Its output level will be adjusted by the far
right control. A third cue signal, sidetone,
can also be enabled. The sidetone level
Model 233 User Guide Issue 1, September 2007
Studio Technologies, Inc. Page 21
Page 22

control, located on the far right, will be
used to adjust its level.
There is one limitation related to the headphone output mode. It’s the fact that the
output will be 2-channel monaural. Whatever signal is present on the headphone
output’s left channel will also be present
on the right channel. (The exception is if
the right-channel output is disabled.) A
stereo headphone mix can’t be created.
But in most cases this limitation won’t
overshadow the benefit of being able to
create the mix. For signal-flow clarification
please review the block diagram located
at the end of this user guide.
Operating Modes
The sixteen switches associated with
switch assemblies SW3 and SW4 are
used to configure the Model 233’s operating modes. Technically, these switches
“talk” to the microcontroller integrated
circuit and associated software that give
the Model 233 its “smarts.” The software
has been carefully designed to provide
a number of different ways in which the
unit can function. It’s critical to carefully
review the available options and choose
the ones that best meet the needs of a
specific application. Note that switches
can be changed even while the Model 233
is powered up and operating. The unit’s
operating characteristics will change in
“real-time” in response to configuration
changes.
In addition to the switch assemblies SW3
and SW4, the last two positions of switch
assembly SW2 are used for configuration.
Specifically, SW2-11 and SW2-12 are used
for the talkback to intercom functions.
Main Output Button Mode
Switches SW3-1 and SW3-2 configure
how the main output button functions.
Figure 8. Main output button mode settings
There are four available modes:
• Push to mute: In this mode the main
output is normally active. The main
output will mute whenever the button
is pressed and held. This is the “cough”
mode typically used for on-air sports
broadcasting applications.
• Push to talk: In this mode the main output is normally muted. The main output
will become active whenever the button
is pressed and held.
• Alternate action: In this mode the main
output will change between its active
and muted state whenever the button
is pressed. Upon power up the main
output will be in its muted state.
• Hybrid: This mode is a combination
of push to talk and alternate action. It’s
similar to the way talk buttons function
on user stations associated with broadcast and production intercom systems.
If the button is pressed and held, the
main output will become active until the
button is released. If the button is momentarily “tapped” the main output will
change state. Upon power up the main
output will be in its muted state.
Issue 1, September 2007 Model 233 User Guide
Page 22 Studio Technologies, Inc.
Page 23

Talkback 1 Button Mode
Switch SW3-3 configures how the talkback
1 button functions.
Figure 9. Talkback 1 button mode settings
Two modes are available:
• Push to talk: In this mode the talkback
1 button is normally off. The function
becomes active whenever the button is
pressed and held.
• Hybrid: This mode is a combination of
push to talk and alternate action. If the
button is pressed and held, the talkback
1 button will become active until the
button is released. If the button is momentarily “tapped” the state will change.
Upon power up the talkback 1 button
will be in its off state.
Talkback 2 Button Mode
Switch SW3-4 configures the way the talkback 2 button functions.
Figure 10. Talkback 2 button mode settings
Two modes are available:
• Push to talk: In this mode the talkback 2
button function is normally off. The function will become active whenever the
button is pressed and held.
• Hybrid: This mode is a combination of
push to talk and alternate action. If the
button is pressed and held, the talkback
2 button will become active until the
button is released. If the button is momentarily “tapped” the state will change.
Upon power up the talkback 2 button
will be in its off state.
Talkback 1 Button Function
Switch SW3-5 configures the overall
operation of the button associated with
talkback 1.
Figure 11. Talkback 1 function mode settings
Two modes are available:
• Disabled: In this mode the talkback 1
button is disabled. The talkback 1 linelevel output and, if configured, talkback
to intercom pin 2 function, will never be
active. An exception is if the auxiliary
relay is configured to follow the status
of the talkback 1 button. In this case the
talkback 1 button will only control the
relay.
Model 233 User Guide Issue 1, September 2007
Studio Technologies, Inc. Page 23
• Enabled: In this mode the talkback 1
button will operate normally. Whenever
the button is active the line-level output
and, if configured, the talkback to intercom pin 2 function, will be active.
Page 24

Talkback 2 Button Function
Switch SW3-6 configures the overall
operation of the button associated with
talkback 2.
Figure 12. Talkback 2 function mode settings
Two modes are available:
• Disabled: In this mode the talkback 2
button is disabled. The talkback 2 linelevel output and, if configured, talkback
to intercom pin 3 function, will never be
active. An exception is if the auxiliary
relay is configured to follow the status
of the talkback 2 button. In this case the
talkback 2 button will only control the
relay.
• Enabled: In this mode the talkback 2
button will operate normally. Whenever
the button is active the line-level output
and, if configured, the talkback to intercom pin 3 function, will be active.
Figure 13. Main output source settings
applications could include on-air broadcast situations where nonprofessional
talent is present. Controlling the dynamic
range of the audio signals on the main
output can limit the chance of cable crosstalk and equipment overload. Another
typical application where using the output
of the compressor would be appropriate
when the Model 233’s system mode is
selected for production. In this case the
main output would be used as an additional talkback output and dynamic range
control would be beneficial.
Sidetone Mode
Switch SW3-8 configures the way the
sidetone function operates.
Main Output Source
Switch SW3-7 is used to select which
audio source is routed to the main output.
The choices are the output of the microphone preamplifier or the output of the
compressor circuit. For most on-air applications the output of the microphone
preamplifier is the desired source. This
will provide the most natural audio quality
with the potential for a large amount
of dynamic range.
In some applications it may be desirable
for the output of the compressor circuit to
be routed to the main output. Appropriate
Issue 1, September 2007 Model 233 User Guide
Page 24 Studio Technologies, Inc.
Figure 14. Sidetone mode settings
Two modes are available:
• Main Button: In this mode the sidetone
function will only be active when the
main output is active.
• Main and Talkback Buttons: In this mode
the sidetone function will be active whenever the main, talkback 1, or talkback 2
outputs are active.
Page 25

Headphone Output Operating Modes
The user is provided with three rotary level
controls (“pots”) that are associated with
the headphone output. Switches SW4-1,
SW4-2, and SW4-3 are used to configure
the way two of the controls, the one located on the far left and the one located in
the center, function. (These settings don’t
impact operation of the sidetone level control which is located on the far right.) With
just these three switches a wide range of
operating modes can be configured. Carefully reviewing the capabilities of the available functions may prove worthwhile.
Dual-Channel or Stereo Mode
Switch SW4-1 is used to select whether
the control located on the far left and
the control located in the center provide
a dual-channel (“level/level”) or stereo
(“level/balance”) mode of operation. In
the level/level mode these two controls
operate independently, each controlling
the level of one of the headphone output
channels. This mode is generally used
for on-air broadcast applications where
independent cue signals are provided to
the left- and right-headphone channels. In
the level/balance mode the control on the
far left sets the overall output level for both
headphone channels. The center control
is used to adjust the balance (the relative
levels) of the left and right channels. This
mode is generally best suited for applications where a stereo cue source is being
provided.
Reverse Left/Right Mode
Switch SW4-2 is used to select whether
two of the rotary controls are in the normal or reverse left/right mode of operation. When selected to the normal mode,
and level/level mode is also selected, the
control on the far left adjusts the level of
headphone output’s left channel. (This is
the signal that appears on the tip lead of
the ¼-inch 3-conductor jack.) The center
control adjusts the level of the right channel. When selected to the normal mode,
and the level/balance mode is also selected, turning the balance control in the
counterclockwise direction increases the
perceived level of the left channel, and
vice versa.
As you may have already guessed, when
selecting the reverse left/right mode of operation everything is reversed! To be more
specific, when selected for reverse mode,
and the level/level mode is also selected,
the control on the far left adjusts the
headphone output’s right channel (output
jack’s ring lead) while the control in the
center adjusts the left channel. When selected to the reverse mode, and the level/
balance mode is also selected, turning the
balance control in the counterclockwise
direction increases the perceived level of
the right channel, and vice versa.
The reverse mode is provided specifically
for cases where a headset’s left and right
earpieces are placed on a user’s head in
a reverse orientation. This ensures that the
Figure 15. Headphone control mode settings
Model 233 User Guide Issue 1, September 2007
Studio Technologies, Inc. Page 25
Figure 16. Headphone control operation settings
Page 26

user is provided with a consistent
and easy-to-use set of headphone level
controls.
Minimum Level Mode
Switch SW4-3 is used to configure the
minimum headphone output level for the
controls located on the far left and center.
(This setting doesn’t impact operation of
the sidetone level control which is located
on the far right.) In the –40 dB mode the
minimum output level for the control on
the far left and the control in the center is
40 dB below maximum; the outputs will
never fully mute. This ensures that any
cue audio signals present on the selected
Model 233 inputs will always be present
on the headphone output. In most on-air
broadcast applications this is the appropriate setting.
When the full mute mode is selected and
the level/level mode is also selected, moving the control on the far left or the control
in the center to their fully counterclockwise
positions will cause their associated channel to fully mute. (This is identical to how
the sidetone control, located on the far
right, always functions.)
When the full mute mode is selected and
the level/balance mode is also selected,
turning the control configured for level
to its fully counterclockwise position will
cause both headphone channels to mute.
Turning the control assigned to be the balance control to either its fully clockwise or
fully counterclockwise position will cause
the appropriate channel to mute.
Selecting the full mute mode may be
appropriate for applications where minimizing the chance of audio “leakage” is
important. This could occur when the
connected headset or headphones are
at times placed on a desk or tabletop.
Main Button Mode
Switch SW4-4 is used to configure how
the main button responds to talkback activity. Specifically it applies only when the
system is selected to the on-air mode and
the main output button mode has been
configured for alternate action or hybrid.
When the main button mode is set to normal and a talkback function is active, the
main output will, if “latched” on, be temporarily placed in its off (muted) state. When
the talkback function is no longer active
the main output will return to its previous
latched on state.
When the talkback forces main button
to unlatch mode is selected, and a talkback function becomes active, the main
output will, if latched on, be placed in its
off (muted) state and the latch condition
forced off. When the talkback function is
no longer active the main output will remain in the latched off state.
Figure 17. Headphone output minimum level
settings
Issue 1, September 2007 Model 233 User Guide
Page 26 Studio Technologies, Inc.
The differences in how the main button
modes impact operation and user comfort
are relatively subtle. The nuances of both
Figure 18. Main button mode settings
Page 27

modes should be considered before a
final selection is made. If possible, experimenting with both modes in a test environment might prove to be very helpful.
Relay Mode
Switch SW4-5 and SW4-6 configure the
operating mode of the auxiliary relay.
Figure 19. Auxiliary relay control mode settings
Four modes are available:
• Relay disabled: In this mode the relay is
disabled and will never change state.
• Follows main output status: In this mode
the relay will follow the state of the main
output. Specifically, the relay will change
state (energize) whenever the main output is active.
• Follows talkback 1 button status: In this
mode the relay will follow the state of the
talkback 1 button. Specifically, the relay
will change state (energize) whenever
the button is active.
• Follows talkback 2 button status: In this
mode the relay will follow the state of the
talkback 2 button. Specifically, the relay
will change (energize) state whenever
the button is active.
System Mode
Switch SW4-8 is used to configure the
overall operating mode of the Model 233.
Understanding how the two modes impact
overall system operation will ensure that
correct operation and maximum usability will occur. When selected to the on-air
mode, the main output will mute whenever
a talkback function is active. The LED indicators associated with the main output will
light accordingly. The on-air mode should
be selected for all on-air broadcast applications. It’s imperative that the main output
be muted whenever on-air talent is using
one of the talkback functions to communicate with production personnel.
When configured for the production mode,
the main output is never muted in response
to a talkback function being active. The
main output will be controlled only by the
main output pushbutton. This mode allows
the main output to be used, for example,
as an additional talkback output. In this
way, the main output and talkback output functions can be used independently
with neither impacting the other. This also
allows all three buttons to be used simultaneously. Note that as is always the case
the audio source for the main output is,
depending on its configuration, either the
output of the microphone preamplifier or
the output of the compressor.
In summary, when selected for the correct
application, both the system modes can
prove equally effective. A thorough study
Model 233 User Guide Issue 1, September 2007
Studio Technologies, Inc. Page 27
Figure 20. System mode settings
Page 28

of how they impact the Model 233’s
operation can lead to many interesting
and powerful uses.
Talkback to Intercom Functions
The last two switches in switch assembly
SW2 are used to configure the talkback
to intercom functions.
Figure 22. Talkback 2 to intercom pin 3 settings
Talkback 1 to Intercom Function Mode
Switch SW2-11 configures whether the
talkback 1 button will allow talkback
audio to be sent to pin 2 of the intercom
interface.
Figure 21. Talkback 1 to intercom pin 2 settings
Two modes are available:
• Disabled: In this mode the talkback 1
button will not allow talkback audio
to be sent to pin 2 of the intercom
interface.
• Talkback 1 to intercom interface pin 2:
In this mode the talkback 1 button will
control the routing of talkback audio to
pin 2 of the intercom interface. Pin 2 is
channel 1 of an RTS intercom system.
Talkback 2 to Intercom Function Mode
Switch SW3-12 configures whether the
talkback 2 button will allow talkback
audio to be sent to pin 3 of the intercom
interface.
Two modes are available:
• Disabled: In this mode the talkback 2
button will not allow talkback audio
to be sent to pin 3 of the intercom
interface.
• Talkback 2 to intercom interface pin 3:
In this mode the talkback 2 button will
control the routing of talkback audio to
pin 3 of the intercom interface. Pin 3 is
channel 2 of an RTS TW intercom system. For a single-channel Clear-Com
intercom system pin 3 is channel 1.
Conclusion
Once the eighteen switches have been set
to the desired Model 233’s operating configuration, it may be time to reattach the
security plate. The exception is if the trim
pots associated with the line inputs and
intercom sidetone (null) need to be adjusted. Details are provided later in this user
guide. The plate attaches using the four
rubber bumpers. They should be handtightened only; no tools are to be used.
Operation
At this point the desired input, output, and
power connections should have been
made. The button labels may have been
revised. After carefully reviewing the application, the configuration switches should
have been set. Normal operation of the
Model 233 can now begin. The unit will
begin functioning as soon as a power
source is connected. As previously discussed, power for the Model 233 can be
provided by an intercom line or an external source of 24 volt DC. It’s important to
highlight the fact that the Model 233 is an
active device. Audio signals will not be
Issue 1, September 2007 Model 233 User Guide
Page 28 Studio Technologies, Inc.
Page 29

present on the outputs unless power has
been supplied. Specifically, the microphone does not passively “cut through”
to the main output connector!
Upon Model 233 power up, the four status
LEDs will light in succession as a firmware
“boot up” indication. The unit will then
begin normal operation. Depending on
the selected configuration, one LED associated with the state of the main output
may be lit. The user is now presented with
three buttons, four LEDs, and three rotary
controls. These are simple to operate and
understand, as will be described in the following paragraphs.
If the Model 233’s system mode is configured for production the red LED will never
light. This is to reflect the fact that the main
output button has now taken on a function
similar to that of one of the talkback buttons. To clarify, when the Model 233 is set
to the production mode the red LED will
never light while the green LED will light
whenever the main output is active.
Main Output Button Modes
If the Model 233 is set for the on-air mode:
• Push to mute: If this mode is selected
the main output is normally active. The
main output will mute whenever the button is pressed and held.
Pushbutton Switches and
Status LEDs
Three pushbutton switches are used to
control the main output and the talkback
functions. The way each operates depends on the selected configuration. Four
LED indicators are located adjacent to the
buttons. They reflect the status of the main
output and talkback functions.
Main Output Button and LED Indicators
The button on the left, factory labeled as
COUGH, functions according to the selected configuration. Two LED indicators,
located directly above the button, are
associated with the status of the button
and/or the main output. If the Model 233 is
set to the on-air mode the green LED, located on the right, is lit whenever the main
output is active. This could be considered
as an “on-air” or mic active indicator. At
the least it should serve as a “careful what
you say” warning! The red LED, located
on the left, will be lit whenever the main
output is muted. This indicates that it’s
safe to speak as one sees fit.
• Push to talk: If this mode is selected
the main output is normally muted. The
main output will become active whenever the button is pressed and held.
• Alternate action: If this mode is selected
the main output will alternate between
its active and muted states whenever
the button is pressed. Upon power up
the main output will be in its muted
state.
• Hybrid: This mode is a combination
of push to talk and alternate action. It
is similar to the way that talk buttons
function on user stations associated
with broadcast or production intercom
systems. If the button is pressed and
held the main output will become active and remain active until the button
is released. If the button is momentarily
“tapped” the main output will change
state. Upon Model 233 power up the
main output will be in its muted state.
Talkback activity will always cause the
main output to be placed in its off state.
If the main output was in the “latched” on
Model 233 User Guide Issue 1, September 2007
Studio Technologies, Inc. Page 29
Page 30

state when talkback began, once talkback activity ends that state will resume;
the main output will again be in its on
(“latched”) state.
Talkback 1 Button and LED Indicator
The button in the center, factory labeled
TALKBACK 1, controls the function(s) associated with talkback 1. The manner in
which the button functions depends on
the way it was configured. An LED indicator, green in color, is located directly
above the button. It lights whenever talkback 1 is active. If the talkback 1 function
mode has been configured for disabled, it
will light only if the auxiliary relay has been
assigned to follow the talkback 1 button.
If the Model 233 has been selected to the
on-air system mode, whenever talkback 1
is active the main output will be placed in
the muted state. If the Model 233 is set to
the production system mode the status of
talkback 1 will not impact the main output.
Talkback 1 Button Modes
• Push to talk: If this mode is selected
the function(s) associated with the
talkback 1 button is normally off. The
function(s) will become active whenever
the button is pressed and held.
how it was configured. An LED indicator,
green in color, is located directly above
the button. It lights whenever talkback 2
is active. If the talkback 2 function mode
has been configured for disabled, it will
light only if the auxiliary relay has been
assigned to follow the talkback 2 button.
If the Model 233 is selected to the on-air
system mode, whenever talkback 2 is active the main output will be placed in the
muted state. If the Model 233 is set to the
production system mode the status of talkback 2 will not impact the main output.
Talkback Output 2 Button Modes
• Push to talk: If this mode is selected
the function(s) associated with the
talkback 2 button is normally off. The
function(s) will become active whenever
the button is pressed and held.
• Hybrid: This mode is a combination
of push to talk and alternate action.
If the button is pressed and held, the
function(s) associated with the talkback
2 button will become active until the
button is released. If the button is momentarily “tapped” the function(s) will
change state. Upon Model 233 power
up talkback 2 will be in its off state.
• Hybrid: This mode is a combination
of push to talk and alternate action.
If the button is pressed and held, the
function(s) associated with the talkback
1 button will become active until the
button is released. If the button is momentarily “tapped” the function(s) will
change state. Upon Model 233 power
up talkback 1 will be in its off state.
Talkback 2 Button and LED Indicator
The button on the right, factory labeled
TALKBACK 2, controls the function(s)
associated with talkback 2. The manner
in which the button functions depends on
Issue 1, September 2007 Model 233 User Guide
Page 30 Studio Technologies, Inc.
Headphone Output Level Controls
Three rotary controls (“pots”) are located
on the Model 233’s front panel and are
associated with the stereo headphone
output. The manner in which the controls
function depend on the selected configuration. The control on the far right is
associated with the sidetone function.
It’s operation will be discussed in a later
section. One configuration parameter sets
the control on the far left and the control
in the center to operate in a level/level or
a level/balance mode. Another parameter
allows the left/right assignment of the
Page 31

controls to be reversed. A third parameter
selects whether the headphone output
channels will maintain a minimum output
level or can be fully muted. In most cases
the headphone output will be configured
for stereo, rather than monaural, operation.
The following paragraphs will describe how
these controls will function in that scenario.
Level/Level Mode
When set to the level/level mode, the control on the far left and the control in the
center operate independently. Each control
sets the output level of one channel of the
headphone output. If configured to the
normal mode, the control on the far left is
used to adjust the level of the headphone
output’s left channel. The control in the
center is used to adjust the level of the
right channel. If configured to the reverse
left/right mode, the control on the far left
adjusts the headphone output’s right channel. The control in the center adjusts the
left channel.
When in the level/level mode, and the minimum output level is set for –40 dB, turning
each control to its fully counterclockwise
position will place its respective output
level 40 dB below its maximum. This setting ensures that talent will never be fully
“isolated” from potentially important cue
signals. If present on one of the Model
233’s inputs and assigned to the headphone channels, some audio signal will
always be present on the headphone
output. If set to the full mute mode, turning
each control to its fully counterclockwise
position will cause its respective output to
fully mute.
The Model 233’s level controls have a
mechanical step (detent) that is located
at the halfway (50%) position of their rotation range. This is intended to serve as
an aid to Model 233 users. In an ideal
installation, setting the far left and center
controls to their detent position will result in
a comfortable headphone output level. The
user, in response to a changing operating
environment, can then move the controls to
get more or less level as desired. The detent position will always remain as a useful
reference point. To achieve this condition
the audio level on the connected line inputs
may have to be calibrated as required. This
is somewhat counter to the usual mentality of just providing the user with whatever
level comes up by default. Spending a few
extra minutes “trimming” the audio levels
can result in much happier and more productive talent. As previously mentioned, a
level trim potentiometer is associated with
each line input. These may be helpful in
achieving the desired adjustment range
of these two level controls. Refer to the
Technical Notes section of this user guide
for details.
Level/Balance Mode
When set to the level/balance mode, the
control on the far left and the control in the
center operate together to adjust the headphone output level. The control on the far
left adjusts the overall level of both the left
and right channels. The balance control,
located in the center, adjusts the relative
left/right level balance. In this mode the
controls operate in a manner reminiscent
of a consumer audio amplifier or receiver.
If set to the normal mode, rotating the balance control in the counterclockwise direction reduces the level of the right channel,
providing the user with more perceived
level in the left channel. If set to the reverse
mode, rotating the balance control in the
counterclockwise direction reduces the
level of the left channel, providing the user
with more perceived level in the right
channel.
Model 233 User Guide Issue 1, September 2007
Studio Technologies, Inc. Page 31
Page 32

When in the level/balance mode and the
minimum output level is set to –40 dB,
turning the level control to its fully counterclockwise position will place both headphone output channels to 40 dB below
maximum. This ensures that talent will
never be fully “isolated” from potentially
important cue signals. In addition, rotating the balance control to either its fully
clockwise or fully counterclockwise position will cause the applicable channel to
be 40 dB below its maximum. If set to the
full mute mode, turning the level control
to its fully counterclockwise position will
cause both the left and right channels to
fully mute. In addition, rotating the balance
control to either its fully clockwise or fully
counterclockwise position will cause the
applicable channel to fully mute.
Both of these controls have a mechanical
step (detent) that is located at the halfway
(50%) position of its rotation range. The
balance control will typically be set to its
center, detent position, making the level
of the left and right channels equal. In an
ideal installation, the level control can also
be set to its detent position and provide a
comfortable headphone output level. This
will allow the user, in response to their
preference or a changing environment, to
adjust the level and balance controls as
desired. The detent positions will always
remain as a useful reference point. To
achieve this condition the audio levels on
the connected line inputs must be adjusted as required. Spending a few extra
minutes “trimming” the connected audio
levels, rather than just providing whatever happens to come up, should prove
worthwhile. The result will be talent that is
more relaxed, and an overall production
that works more smoothly. As previously
mentioned, a level trim potentiometer is
associated with each line input. If the line
inputs are utilized as cue sources, adjusting the trim pots may be helpful in achieving the desired adjustment range of the
level controls. Refer to the Technical Notes
section of this user guide for details.
Monaural Headphone Output Level
Control Operation
As previously discussed, the headphone
output can be set for monaural operation.
This option is specifically provided so
that a headphone mix mode can be created. If this has been enabled, the three
front-panel level controls are used as a
cue source mixer. Independent cue inputs
will be assigned to the control on the far
left and the control in the center channel,
serving as two of the mix sources. How
these two controls respond when placed
in their fully counterclockwise position will
depend on the configuration. By default
the output level will be 40 dB below its
maximum level. An alternate configuration
will make the outputs mute. The control on
the far right, sidetone, will always maintain
the same function. It is used to add signal
associated with the microphone input to
the headphone output as desired.
Sidetone Operation
As previously covered in this user guide,
a sidetone function can be configured.
Sidetone is defined as the user’s own
voice signal being returned to them as
a headphone cue source. This helps the
user create a more effective performance
as well as possibly receiving an “on-air” or
“you’re live” indication. Depending on how
it was configured, sidetone audio will be
sent to the left headphone output, the right
headphone output, or both the left and
right headphone outputs. In addition, the
side tone function can be configured so
that it is active only when the main output
is active, or whenever the main output or
Issue 1, September 2007 Model 233 User Guide
Page 32 Studio Technologies, Inc.
Page 33

one of the talkback outputs is active. The
level control on the far right adjusts the
side-tone level. When the sidetone level
control is in its fully counterclockwise position the sidetone signal will always be fully
muted.
Astute readers will realize that sidetone audio can also be provided from the intercom
cue sources during Model 233 talkback to
intercom activity. This “passive” sidetone
is created in the intercom interface’s analog talk/listen hybrid sidetone (null) circuit.
Trim pots allow the intercom sidetone level
to be adjusted over a limited range. To
get maximum performance when either or
both intercom channels are used as a cue
source one simple calibration process may
need to be performed. This involves adjusting the sidetone (null) trim pots to their
fully counterclockwise positions, providing
minimum sidetone level. This will reduce
the level “build up” that would occur when
both the main and the intercom sidetone
audio signals are sent to the headphone
output. The goal is for the sidetone level to
remain as constant as possible, no matter
what function—main output, talkback-toline-level-output, or talkback-to-intercom—
is active.
–12 dBV to +6 dBu can be effectively used
as cue sources. Unfortunately, there are no
definitive rules regarding how best to adjust
the trim pots, but some suggestions may
prove to be valuable. Depending on how
the line inputs are utilized, the trim pots
can be used to either adjust the absolute
level of each line input signal, or to adjust the relative level of the signals when
compared to other sources. The following
examples may provide some clarification.
Let’s begin with an application that has
a stereo cue source connected to the line
inputs. The cue source selection switches
are configured to create a stereo headphone output with line input 1 assigned
to the left channel and line input 2 assigned
to the right channel. Begin the trim pot
adjustment process by moving the user
level controls (located on the front panel)
to their detent (50% of rotation) positions.
Then, with the stereo cue source providing signal at its normal level, adjust the
trim pots to provide a comfortable level
Advanced
Operation
Adjusting the Line Input
Trim Pots
As has been previously mentioned, associated with the two line inputs are trim pots
that allow the input levels to be adjusted.
The two trim pots are accessible by way of
round openings in the bottom of the Model
233’s enclosure. By adjusting these trim
pots, signals with a nominal signal level of
Model 233 User Guide Issue 1, September 2007
Studio Technologies, Inc. Page 33
Figure 23. Bottom view showing line input and
talkback-to-intercom sidetone trim pots
Page 34

to the connected headphones. The user
can now, in response to changing conditions, adjust the front-panel level controls
as desired. Returning the controls to their
detent positions will always provide the
“reference” level to the headphone output.
A second example has the intercom input
and line input 1 both providing cue sources. Pin 2 of the intercom circuit supplies
program-with-interrupt audio that is routed
to the headphone output’s left channel. Pin 3 of the intercom circuit supplies
program-only audio that is routed to the
right channel. Line input 1 is connected to
an audio source associated with a sportsevent “spotter” position. This source is
routed to the headphone output’s right
channel. The input trim pot associated
with line input 1 can now serve a critical
role—adjusting the relative level of the
“spotter” audio as compared to the level
of intercom pin 3. The trim pot allows the
desired “mix” to be created, providing the
user with an effective cue signal.
Intercom Interface Sidetone
Adjustment
Associated with the talkback-to-intercom
functions are sidetone trim potentiometers
that are used to adjust the talkback levels
that are returned by way of the intercom
line cue audio source circuitry. These two
trim pots are part of the analog hybrid circuit that separates (nulls) talkback audio
from receive (listen) audio. If audio from
either or both of the intercom channels is
to be used as a headphone source, and
talkback to these intercom channels has
been configured, the sidetone trim pots
may need to be adjusted.
One trim pot is associated with the sidetone level for each channel of the intercom interface. Both are accessible on
the bottom of the Model 233’s enclosure,
adjacent to the trim pots associated with
the line-level inputs. Adjusting them is very
simple, requiring only a pair of ears and a
screwdriver.
With the Model 233 configured as previously described, activate one of the talkback-to-intercom functions. Audio from
the connected microphone may be heard
in the configured headphone output
channel(s). Adjust the trim pot associated
with the active intercom channel so that
the desired sidetone level, relative to the
intercom receive level, is achieved. The
adjustment range is approximately 18 dB,
with the sidetone level increasing as the
trim pot is rotated in its clockwise direction. Now change to the other intercom
channel and adjust its sidetone trim pot
as desired.
Using the Model 233’s sidetone function, talkback audio will be routed to the
headphone outputs by means of active
circuitry. If this is enabled be certain to
place the two intercom sidetone trim pots
to their fully counterclockwise positions.
This will minimize the increase in sidetone
level that will occur when both the main
sidetone and the sidetone associated with
talkback-to-intercom functions are active.
Technical Notes
Grounding and Shielding
As previously discussed in this user guide,
the pin 1 connections on the 3-pin male
XLR-type connectors associated with the
main and line-level talkback outputs are
“floating,” i.e., not connected to anything
within the Model 233’s enclosure. Some
audio experts might take offense to this,
grousing that this should have been left
Issue 1, September 2007 Model 233 User Guide
Page 34 Studio Technologies, Inc.
Page 35

to the user or installer to be connected or
disconnected as desired. However repeated field testing found that floating pin 1 on
these outputs was the key to maintaining
quiet audio. From Fenway Park, to the
Orange Bowl, and then northwest to Husker Stadium, lifting pin 1 always did the trick.
A simple solution is available if an application does require that a ground be available on the main and line-level talkback
outputs’ interconnecting cables. All Model
233 XLR-type connectors have a ground
connection that is made to the interfacing
connector’s metal “shell.” And most XLRtype connectors have a pin or connection
point available to access its metal shell. By
connecting the cable shield to the mating
connector’s shell terminal, the common
connection typically found on audio interconnections is created.
Intercom Channel Crosstalk
By the very nature of its design, a
2-channel party-line intercom circuit is
prone to exhibit crosstalk. This occurs
because the audio paths are unbalanced
(“single-ended”) and are typically transported on a single shielded twisted-pair
audio cable. The primary causes of the
crosstalk are the common signal return
wire and the capacitance between the
wires in the cable pair. The greater the
capacitance, due to cable type and length,
the more crosstalk there will be. It’s not
surprising to find in sports broadcasting
venues that audio from one channel can
be heard “bleeding” into the other channel.
Does this generally create a problem? No.
But it can be a bit unnerving.
There are several ways of reducing intercom channel crosstalk. Probably the easiest way is to use cable pairs that are not
twisted. Twisted pairs are great for differential (balanced) signals, but not so great
for unbalanced transmission. This is generally because the more twists in a pair the
greater the effective cable capacitance.
In a stadium or arena setting, choosing
standard “telco” pairs may actually work
better than “high-performance” audio or
data cable!
Another option is to use two cable pairs
for each intercom circuit. If the pairs are
not shielded the wiring is simple. Common
would be connected to one side of each
pair, and then signal from each channel
would connect to the other side of the
pairs. If the pairs also contain shields the
wiring could be done somewhat differently. One option is to connect common
to both cable shields, intercom channel 1
(DC with audio) to one full pair, and intercom channel 2 to the second full pair. A
better option might be to have common
connect to both shields and one side of
the pair that serves channel 2.
Intercom Audio Levels
The Model 233 was designed to function
well with intercom lines associated with
standard broadcast and production “partyline” intercom systems. These systems
provide DC power and one or two channels of audio over standard 3-conductor
cables that terminate with 3-pin XLR-type
connectors. Establishing the correct
“listen” and “talk” levels was critical in
achieving good audio performance. In
North America the two most common
intercom systems are those from RTS
and Clear-Com. From tests performed
in Studio Technologies’ lab, the nominal
RTS TW-series audio level is approximately –10 dBu. The dynamic range control
provided by belt-packs such as the BP325
Model 233 User Guide Issue 1, September 2007
Studio Technologies, Inc. Page 35
Page 36

was very good, limiting the maximum
level to at most 10 dB above the nominal.
The nominal audio level associated with
a Clear-Com system was harder to characterize. It appeared to be a few dB less
than –10 dBu, but the dynamic range was
much larger. Level peaks of 10 to 20 dB
over nominal were easy to produce.
This objective data led to the following
Model 233 design decisions: When audio
from intercom channels 1 and 2 was used
as headphone cue sources level sensitivity selection switches or trim pots were not
required. The level range available on the
Model 233’s front-panel controls proved
to be sufficient for the user to be able to
establish the desired listening level.
When talkback audio was routed to the
intercom channels a single audio level
proved to work well with both RTS and
Clear-Com systems. This was mainly
possible due to the excellent dynamicrange-control provided by the compressor
circuit. Its threshold (2 dB above Model
233 internal nominal level) and compression ratio (5:1) resulted in excellent talkback-to-intercom audio. So in the end,
no level or compatibility switches of any
kind were required to achieve the desired
“listen” and “talk” performance.
The above paragraphs may elicit howls
of protests from a host of engineers and
intercom system experts. But for years
we’ve heard differing reports as to the
actual nominal audio levels for RTS and
Clear-Com systems. The “in-the-know
cats” agreed that RTS TW intercom (and
IFB) was –10 dBu, a value that we confirmed in our tests. But the nominal level
for Clear-Com was variously reported as
–20, –15, –12, –10, and “you know, the
Clear-Com level!” It’s most likely that early
Clear-Com systems did use a nominal
level of approximately –20 dB. But after
making controlled tests, the contemporary
Clear-Com equipment seemed to be much
closer to –10 dBu. And with the limited
dynamic-range control that we experienced, the actual level during operation
may vary widely. That’s why intercom
interface sensitivity or compatibility switches, or rotary controls were not included
in the Model 233. But just in case a
change is ever required intercom-interface
gain levels are set using several ¼-watt
1%-tolerance resistors. If necessary, these
can be changed by a qualified technician.
In conclusion, the engineers at Studio
Technologies are always open to learning more. Additional information from the
field concerning such topics as intercom
system levels, impedance matching, and
DC power sourcing would be welcomed.
Stopping by our offices for an in-person
chat would be also great. Bringing along
a bit of road “swag” would be appreciated. Just park the production trailers in the
alley behind our warehouse—plenty
of power is available!
Connecting an IFB Circuit
A broadcast-standard “wet” (DC with audio) IFB circuit can be directly connected
to the Model 233’s intercom input. Originated by sources such as the RTS 4000series IFB system or IFB interface devices
from Studio Technologies, the connected
IFB circuit can provide two channels of
cue audio as well as DC power to operate the Model 233. No Model 233 talkback
audio can be effectively sent to the IFB
circuit due to its one-way nature. It’s a lowsource-impedance/high-input-impedance
circuit arrangement.
Issue 1, September 2007 Model 233 User Guide
Page 36 Studio Technologies, Inc.
Page 37

The power supplied by an IFB circuit,
normally in the range of 28 to 32 volts DC,
is usually sufficient to operate the Model
233’s circuitry. The acceptable input range
is 24 to 32 volts, with a required current
of 125 milliamperes. Note that the specified input voltage is given when measured
directly at the Model 233’s IFB input connector, not at the source of the IFB circuit.
In North American field and in-studio
broadcast applications it is common to
find RTS 4000-series IFB equipment being used to provide the IFB circuits. The
Model 233 can be directly connected to,
and function correctly with, one of these
circuits. For reliable operation, especially
when using lengthy cable runs, it’s strongly recommended that no other device be
connected to a 4000-series IFB circuit that
is specified for connection to a Model 233.
This requirement is due to the currentlimited DC source that is supplied by the
4010 IFB Controller.
Phantom Power
The Model 233 provides a 48 volt nominal
source of “phantom power” to support
condenser-type microphones. It’s designed to meet the P48 requirements as
specified in the IEC 61938 standard. The
circuitry is very simple: two 6.81 k ohm,
1%-tolerance resistors provide a path from
a 48 volt DC source to pins 2 and 3 of the
microphone input connector. The resistors
and the power source work together to
provide the required 48 ±4 volts, up to
a maximum current of 10 milliamperes.
products, an interesting phenomenon was
discovered regarding acceptable sources.
To meet worldwide requirements, using
a compact switch-mode “universal input”
power supply seemed to be an excellent
solution. Supplying one of these with each
Model 233 would have allowed operation
anywhere in the world. Whether connecting to 100 volts, 60 Hz in Japan or 240
volts, 50 Hz in Australia, all would be well.
Unfortunately, things did not work out as
planned! It turned out that all of the compact switch-mode power supplies that
were tested induced a great deal of noise
into their DC output. This noise, especially
noticeable in the negative lead of their DC
output, fed right into the common lead of
the intercom circuit. From what could be
determined, noise current would travel
from the power supply, through intercom
input pin 1, and on to the intercom line’s
source’s ground connection. Making the
problem more insidious was the fact that
only when the intercom line’s interconnecting cable was sufficiently long did
the problem become noticeable. In the
“lab” where 10-foot long test cables were
used, the audio from the intercom line was
extremely quiet. But testing with 500 or
1000 feet of interconnecting cable resulted
in an annoying “buzz” on the intercom
audio channels.
Many hours were spent trying to eliminate
this problem. But, unfortunately, no solution was found. It was a humbling experience that only a few visits to the local
tavern made us feel better about.
External Power Sources
As has been previously discussed, an
external source of 24 volt DC can be used
to power the Model 233. While developing the 200-series of announcer console
Model 233 User Guide Issue 1, September 2007
Studio Technologies, Inc. Page 37
The solution turned out to be very simple,
but not without other ramifications. By
changing to a low-cost transformer-based
(“linear”) 24 volt DC power supply the
problem disappeared. With no highfrequency switching noise to get into
Page 38

the intercom line, everything worked well.
But a new problem arose when it came
to finding an external linear power supply
for Model 233 users worldwide. For locations that are served by 100 or 120 volts,
60 Hz a 24 volt DC linear “wall-wart” power supply was readily available. This is the
power supply that is provided with Model
233 units shipped to North America or
Japan. But as of this writing, no “perfect”
24 volt DC linear power source has been
located that would serve 220/240 volts,
50 Hz applications. So a compromise had
to be made. For these applications a universal input switch-mode power supply is
included with each Model 233. It’s far from
an ideal solution, leading to noise on the
intercom line’s audio channels when long
cable runs are present. But at least users
will have an “emergency” power source if
nothing else is available.
In conclusion, users where the AC mains
source is 220/240 volts should consider
locating an alternate 24 volt DC power
source. Several options are available that
could make the task simple. It’s expected
that a more sophisticated “medical-grade”
switch-mode power supply will have much
better control of induced noise. It’s highly
likely that using one of these supplies will
provide good results. As the Model 233’s
current requirement is 90 milliamperes at
24 volts, a typical medical-grade power
supply should be able to power multiple
units. Another solution would be to obtain
two of the more commonly available
12 volt DC linear power supplies, connecting their outputs in “series” to create
a 24 volt DC source. While not a glamorous solution, it is technically correct and
should prove cost effective. If this arrangement is implemented remember that the
center pin of the 2.1 x 5.5 mm coaxial jack
is used for the positive (+) connection.
Symptoms of Insufficient
Power
A core part of the Model 233’s internal
circuitry is a switch-mode power supply
that produces +48 volts, +12 volts,
+5 volts, and –12 volts. This power supply
circuit works very well as long as it is
“fed” with sufficient input voltage and current. “Sufficient” is defined as a minimum
of 24 volts on the intercom input and
20 volts on the external 24 volt DC input.
The necessary current, 125 milliamperes
for the intercom line and 90 milliamperes
for the external source, must be supplied
over their respective voltage ranges.
It’s worth discussing what will happen if
any of these power sources fall below their
specified minimum. Typically, if the Model
233 is being powered by an external 24
volt nominal power source, normal operation will continue until the input falls to
the 18-20 volt range. As the input voltage
drops below this range the Model 233’s
internal power supply will have reduced
stability, operating in this manner until its
low-voltage shutdown circuit halts operation. Note that as the input voltage moves
down from 24 volts the input current will
rise proportionately to make up for the
loss of power.
Using the intercom line to provide Model
233 power shouldn’t prove to be a problem. Power supplies associated with
broadcast and production intercom systems are designed to support multiple
belt-pack and related devices. In the “big
scheme of things,” connecting a Model
233 shouldn’t add a significant load.
Issue 1, September 2007 Model 233 User Guide
Page 38 Studio Technologies, Inc.
Page 39

LED Colors
As previously described, two LED indicators are associated with the main output
and are located directly above the main
output pushbutton switch. The red LED,
located on the left, is lit whenever the
main output is muted. The green LED,
located on the right, is lit whenever the
main output is active. The thought process behind the color choices was that
red would relate to the main output being
muted (“stop”) while green would relate
to the main output being active (“go”). It’s
possible that these color choices may not
meet the needs of all users and applications. For example, it’s reported that one
European broadcaster typically uses these
two colors in the opposite fashion. Their
choice is to have the red LED lit whenever
the main output is active, warning the talent that they are “on-air.” The green LED
is lit whenever the main output is muted,
indicating to the talent that it’s “safe” to
say whatever they wish, about whomever
they wish to say it about!
For consistency, the LED associated with
each talkback button was selected to be
green. They light whenever their associated talkback output is active. It’s possible
that some applications may benefit from
revising these LED colors too. While red
is certainly one possible choice, other colors are also a possibility including amber,
orange, or blue—these days there are lots
of choices available. The only limitation
is the amount of current available to light
each LED. Using series resistors of no less
than 560 ohms will ensure correct Model
233 operation.
A qualified technician can easily revise the
LED colors to meet an application’s exact
needs. The process would begin by disassembling the Model 233’s enclosure and
detaching the pushbutton/LED printed
circuit board assembly. The LEDs would
then be unsoldered, removed, and reinstalled (or replaced) in the desired locations. To control the LED current and set
the brightness, a resistor is electrically in
series with each LED. An 820 ohm, ¼-watt
resistor is associated with the red LED
while a 560 ohm, ¼-watt resistor is associated with each green LED. These resistors would also have to be unsoldered,
removed, and reinstalled. Then the unit
would be reassembled and tested to confirm that the changes function as desired.
For additional information about changing the LED colors, please contact Studio
Technologies’ technical support.
Travel Case
For portable applications it may be desirable to store and transport each Model
233 in a protective case. After much travel
with prototype announcer console units,
Studio Technologies personnel learned
to appreciate the Pelican Model 1450
case. Purchased with the foam interior
option, it does an excellent job of holding
one Model 233, its associated 24 volt DC
power supply, and documentation. Some
applications may benefit from selecting a
larger case that would also hold a related
headset, cables, etc. A larger case could
also be selected that would hold multiple
Model 233 units. Pelican sells their products through a dealer network, many of
which can be located via a web search.
Additional Connectors
Three spare connector locations are
provided on the Model 233’s back panel.
From the factory they contain blank
plates that can be readily removed and
replaced with a variety of XLR-type connectors. These spare connector locations
Model 233 User Guide Issue 1, September 2007
Studio Technologies, Inc. Page 39
Page 40

are specifically included so that a Model
233 can be customized to meet the many
specific needs that arise in broadcast and
related audio applications. Expected uses
for these locations include adding a 6- or
7-pin XLR-type connector to allow direct
connection of a broadcast headset. Other
uses include creating “loop through” or
“mult” functions for the line-level talkback
output or intercom interface connections.
The spare connector locations are compatible with the Neutrik DL-series of
connectors. For flexibility, versions are
available that provide from three to seven
contacts. For example, a compatible 3-pin
female connector would be Neutrik part
number NC3FD-L-1. To support headsets
the NC6FDS-L-1 is often used. This is a
6-pin female connector with the unique
Switchcraft 6-pin arrangement. The hardware that secures the blank plates to the
Model 233’s back panel is also intended
to secure the replacement connectors.
If connectors are added to the Model
233’s spare connector locations adding
labels to those connectors can be helpful.
For a great look it is recommended that
Brother® P-Touch ¼-inch (6 mm) labels
be created. Tape material that prints white
text on a black background works out
well for the Model 233. The Brother label
cassette number TX-3151, white on black,
is appropriate for use with many of their
printers.
In addition to the spare connector locations on the back panel, provision has
been made to allow easy interconnection
with the Model 233’s printed-circuit-boardmounted input and output connectors.
This was accomplished by including
numerous 3-position male “header” connectors on the Model 233’s circuit board.
These headers, on 0.1-inch centers, are
wired in parallel with the Model 233’s connectors. This “no solder” solution makes
customizing a Model 233 a simple process. The headers, located on the Model
233’s printed circuit board, are Molex®
part number 22-23-2031. They mate with
Molex housing number 22-01-3037. To
make the interconnection, separate crimp
terminals are attached to loose wires and
then “snapped” into the housing. Molex
part number 08-50-0114 specifies crimp
terminals that are appropriate for wires of
22 to 30 gauge. These parts are available
worldwide from sources such as Digi-Key,
website www.digikey.com.
To make the process of connecting to the
Model 233’s headers a simple task an
interface cable kit, part number 31087, is
available from Studio Technologies. Each
kit includes five cable assemblies and a
length of heat-shrinkable tubing. Each
cable assembly consists of a mating connector with three color-coded wires attached. These wires, nominally 12 inches
in length, allow convenient soldering to a
connector slated to be installed in a spare
location on the Model 233’s back panel.
For reference, the wire color for pin 1 is
gray, pin 2 is yellow, and pin 3 is blue.
The heat-shrinkable tubing is provided
so that the connector solder cups can be
insulated from each other. It will also provide some strain relief to the solder joints.
Be certain to slip the desired length of tubing over the wire prior to soldering a connection! (If this writer had a dollar for every
time he forgot to put tubing on a wire (or
slip on a connector shell) before making
a solder connection…)
The Model 233’s enclosure must be
disassembled prior to installing connectors in the spare locations. Four hex-head
machine screws, two on the bottom front
Issue 1, September 2007 Model 233 User Guide
Page 40 Studio Technologies, Inc.
Page 41

of the enclosure and two on the back
panel, must be removed. A 5/64-inch hex
driver is required. The cover can then
be carefully separated from the chassis,
remaining attached by means of a flexible
cable assembly. This “flex-cable” assembly links the main printed circuit board
assembly with the board assembly that
contains the pushbuttons and LED indicators. Ensure that the flex cable is not
damaged while the Model 233 is being
customized. For easier access, the pushbutton/LED board assembly can also be
easily removed.
The 3-position headers on the Model
233’s main circuit board assembly are
located close to their related input or output connectors. The following list provides
the printed circuit board reference numbers and associated functions.
P4: External 24 volt DC input, pin 1
common, pin 2 +24 volts, pin 3 not used.
Back-panel 2.1 x 5.5 mm jack has +24
volts on center pin. Header P13 is used
by the back-panel 24 Vdc jack assembly
and is electrically in parallel with P4.
P9: Line-level talkback output 2, pin 1
common, pin 2 high, pin 3 low. Careful!
Back-panel 3-pin male XLR has pin 1
floating, pin 2 high, pin 3 low.
P10: Line input 1, pin 1 common, pin 2
high, pin 3 low.
P11: Line input 2, pin 1 common, pin 2
high, pin 3 low.
P12: Intercom interface, pin 1 common,
pin 2 DC with channel 1 audio, pin 3
channel 2 audio. Follows back-panel 3-pin
female XLR pin assignment.
P14: Pushbutton backlighting, pin 1
common, pin 2 button lamps, pin 3 current
limited 24 volts from external 24 volt DC
input.
P15: Auxiliary relay contact B, pin 1
normally closed, pin 2 common, pin 3
normally open.
P16: Auxiliary relay contact A, pin 1
normally closed, pin 2 common, pin 3
normally open.
P17: Internal power supply rails, pin 1
common, pin 2 +12 Vdc, pin 3 –12 Vdc.
P5: Headphone output, pin 1 common,
pin 2 tip (left), pin 3 ring (right).
P6: Microphone input, pin 1 common,
pin 2 high, pin 3 low. Follows back-panel
3-pin female XLR pin assignment.
P7: Main output, pin 1 common, pin 2
high, pin 3 low. Careful! Back-panel 3-pin
male XLR has pin 1 floating, pin 2 high,
pin 3 low.
P8: Line-level talkback output 1, pin 1
common, pin 2 high, pin 3 low. Careful!
Back-panel 3-pin male XLR has pin 1
floating, pin 2 high, pin 3 low.
P18: Remote talkback switch connections,
pin 1 common, pin 2 talkback button 1,
pin 3 talkback button 2.
P19: Remote main output/tally output
connections, pin 1 common, pin 2 main
output button, pin 3 tally output (+3.5 volt
DC, 12 milliampere maximum).
Pushbutton Backlighting
For special applications, provision as been
made to allow illumination (“backlighting”)
of the three pushbutton switches. This
may prove useful for applications where
adequate room lighting is not available.
It can also serve in custom Model 233
Model 233 User Guide Issue 1, September 2007
Studio Technologies, Inc. Page 41
Page 42

configurations. Note that this is an advanced feature, intended only to be
implemented by a qualified technician.
From the outset several limitations must
be discussed. The first is that button backlighting is not intended to serve tally applications. (A common connection to power
all three lamps is provided; independent
access to the lamp connections on each
button is not provided.) It is strictly intended to provide a moderate amount of
illumination to the button’s lens and associated labeling. The second restriction
is that power for the backlighting function
cannot be provided by an intercom line—
it was felt that there may not be enough
current available from this source to power
both the Model 233 and light the lamps.
However, power from the external 24 volt
DC source can be used. This requires that
this power source be connected whenever
backlighting is desired.
From the factory, lamps (“bulbs”) are not
installed in the pushbutton housings.
They are pluggable T-1 bi-pin type and
are simple to install. The mating socket is
accessed by removing the button’s lens
caps, graphic label, and back frosted
lens. Compatible incandescent lamps with
a nominal rating of 18 volts, 28 mA are
available from Studio Technologies (part
number 12030). Bulbs with other nominal
voltages should also be available from
electronics parts vendors. While compatible LED-based lamps are probably also
available, incandescent lamps, when powered below their rated current and voltage,
can provide extremely long and reliable
operation.
A 3-position header connector, labeled
P14, is located on the Model 233’s main
printed circuit board. It provides access to,
and a means to power, the three lamps.
Pin 1 of the header is connected to the
common point of the Model 233’s circuitry,
which is also connected to one contact on
all the lamps. Pin 2 of the header is connected to the other contact on the lamps.
Pin 3 is connected, by means of a current
limiting resistor, to the external 24 volt DC
source. If lamps were obtained from Studio Technologies then adding a “jumper”
from pin 2 to pin 3 is all that is required to
get things going. A standard 0.1-inchcenter jumper, commonly used on electronic equipment, is all that is required. A
200 ohm, 2 watt resistor is electronically
in series between the external 24 volt DC
input and pin 3 of the header. When used
with the lamps available from Studio Technologies, the resistor limits the lamp current to approximately 65 mA. This lights
the lamps to a moderate intensity. If a
different type of lamp is installed, its power
source should be connected to pins 1
(common) and 2 (lamps) of the header.
Remote Control/Tally
Connections
Provision has been made on the Model
233’s printed circuit board assembly to
allow external switches or contact closures
to control the main output and talkback
button functions. In addition, a DC “tally”
output signal provides an indication of the
status of the main output. Two 3-position
headers provide access to the circuitry
associated with these functions.
P18:
Pin 1 is connected to the common point
of the Model 233’s circuitry. Pin 2 is connected to the circuitry associated with the
talkback 1 button. Pin 3 is connected to
the circuitry associated with the talkback 2
button.
Issue 1, September 2007 Model 233 User Guide
Page 42 Studio Technologies, Inc.
Page 43

P19:
Pin 1 is connected to the common point of
the Model 233’s circuitry. Pin 2 is connected to the circuitry associated with the main
output pushbutton. Pin 3 is connected to
circuitry associated with the tally output.
An LED indicator lights whenever the
compressor’s threshold has been reached
and the circuit is actively controlling the
dynamic range. This LED is provided as
an aid when setting the gain of the microphone preamplifier.
The remote switch input circuits are “active
low,” with a 10 k ohm resistor connected to
+5 volts acting as a pull up. A combination
of resistors and capacitors provide ESD
protection. The tally output is nominally
3.5 volts DC and is current limited to 12
milliamperes. This output can directly drive
LED indicators. Using a series resistor in
the range of 150 to 330 ohms is recommended. This will limit the current while
still providing adequate LED light output.
Compressor Circuit
In this section some general information
about the Model 233’s compressor circuit
will be provided. As previously discussed,
the output of the microphone preamplifier
circuit is connected to a studio-quality compressor circuit. The output of the compressor is used by the talkback functions and, if
configured, the main output. (In most cases
the main output will utilize the signal coming directly out of the microphone preamplifier.) The gain element in the compressor
circuit is a laser-trimmed voltage-controlledamplifier integrated circuit. It provides accurate, low-noise, low-distortion performance.
The threshold of the compressor circuit is
2 dB above the Model 233’s nominal internal operating level of –2 dBu. A 5:1 compression ratio is implemented and, like the
threshold level, is not field adjustable. The
threshold and ratio settings were selected
so that excellent talkback audio would be
provided. By controlling the dynamic range,
intelligibility can be improved and overloading of connected devices can be avoided.
Auxiliary Relay
The Model 233 provides an auxiliary relay
for use in specialized applications. Some
“head scratching” or “brainstorming”
should lead to a number of interesting
ways to take advantage of this unique
resource. To implement any auxiliary relay
application does require the services of a
qualified technician. This is because the
Model 233’s enclosure must be disassembled and the desired wiring scheme
implemented. The relay operates under
software control, following the configuration selected using two of the DIP-type
switches. Four operating modes are available: relay disabled, relay follows main
output status, relay follows talkback 1
status, and relay follows talkback 2 status.
These choices were previously discussed
in this user guide and should be reviewed.
The relay provides two “form-C” contacts,
each consisting of a common, normally
open (not shorted), and normally closed
(shorted) connection. Obviously the two
form-C contacts change state in unison;
two independent relay functions are not
provided. These relay contacts are accessible on the Model 233’s main printed
circuit board assembly by way of two
3-position header connectors labeled P15
and P16. The contacts are titled A and
B, but there is no significance between
the two. With both headers pin 1 is normally closed, pin 2 is common, and pin
3 is normally open. For additional details
on connecting to the 3-position headers
Model 233 User Guide Issue 1, September 2007
Studio Technologies, Inc. Page 43
Page 44

please refer to the Additional Connectors
section in the Technical Notes area of this
user guide.
Specifications
General Audio:
Frequency Response: 20 Hz-20 kHz, ±0.1 dB,
mic in/main out
Distortion (THD+N): 0.008%, measured at 1 kHz,
mic in/main out
S/N Ratio: 80 dB, referenced to –46 dBu mic in/
–2 dBu main out
Connectors:
Mic In, Line In 1 & 2, Intercom Interface: 3-pin
female XLR-type
Main Out, Talkback Out 1 & 2: 3-pin male
XLR-type
Headphone Out: ¼-inch 3-conductor phone jack
24 Vdc Power In: 2.1 x 5.5 mm coaxial power jack
with locking bushing, compatible with Switchcraft
S760K plug
Spare Connector Locations: 3
Allows up to three Neutrik NC*D-L-1 connectors
to be installed (*=3F, 3M, 5F, 5M, 6F, 6FS, etc.)
Microphone Input/Preamplifier:
Typ e: electronically balanced
Input Impedance: 2 k ohms
Gain Range: 20 to 60 dB, adjustable in 10 dB
steps
Compatibility: dynamic or phantom-powered mics
Phantom Power: 48 Vdc, nominal, meets
IEC 61938
Compressor:
Threshold: 2 dB above nominal level
Attack/Release Time: 2 mSec/100 mSec
Slope: 5:1
Status LED: compressor active
Line Inputs: 2
Typ e: balanced, transformer-coupled
Impedance: 10 k ohms
Nominal Level: –12 dBV to +6 dBu, adjustable
Intercom Interface:
Typ e: 2-channel, unbalanced (pin 1 common; pin 2
DC with channel 1 audio; pin 3 channel 2 audio)
Compatibility: single- and dual-channel intercom
systems such as from RTS™ and Clear-Com®
Impedance: 10 k ohms
Nominal Receive Level: –10 dBu
Nominal Talkback Level: –10 dBu
Sidetone (Null): 0 to –18 dB, adjustable
Main Output:
Typ e: balanced, transformer-coupled
Nominal Level: –2 dBu
Maximum Level: +20 dBu into 2 k ohms
Impedance: 100 ohms
Line-Level Talkback Outputs: 2
Typ e: transformer-coupled with series capacitors
and isolation resistors
Impedance: 600 ohms
Nominal Level: +4 dBu
Maximum Level: +11 dBu (compressor restricts
maximum)
Headphone Output: 1, stereo
Compatibility: intended for connection to mono
or stereo headphones or headsets with nominal
impedance of 100 ohms or greater
Typ e: voltage driver
Maximum Output Voltage: 8 Vpp, 150 ohm load
Auxiliary Relay:
Function: software configurable
Contacts: 2, form C (Common, Normally Closed,
Normally Open)
Rating: 1 A, 30 W (resistive)
Access: requires user-implemented connector
scheme
Tally Output: 3.5 Vdc, 12 mA maximum, nominal
Power Sources:
Intercom Interface: 24-32 Vdc, 125 mA
External: 24 Vdc, 90 mA @ 24 Vdc; acceptable
range 20-30 Vdc. Units shipped to North America
and Japan include a 120 V input/24 Vdc output
power supply. Units shipped to all other locations
include a universal input/24 Vdc output power
supply.
Dimensions (Overall):
8.1 inches wide (20.6 cm)
3.3 inches high (8.4 cm)
8.5 inches deep (22.4 cm)
Weight: 4.5 pounds (2.1 kg)
Specifications and information contained in this
User Guide subject to change without notice.
Issue 1, September 2007 Model 233 User Guide
Page 44 Studio Technologies, Inc.
Page 45

Appendix A
A label is attached to the security plate on the bottom of the unit. It provides a summary
of the configurable parameters and related information. The actual label size 4.80 inches
by 5.90 inches.
Issue 1, September 2007 Model 233 User Guide
Page 45 Studio Technologies, Inc.
Page 46

Page 47

 Loading...