

Page 1

Model 770
Model 770 Audio Mixer/IFB Controller
User Guide
Issue 1, October 1997
This User Guide is applicable for serial numbers SN-00151 and later.
© 1997 by Studio Technologies, Inc., all rights reserved
5520 West Touhy Avenue
Skokie, Illinois 60077 U.S.A.
Telephone (847) 676-9177
Fax (847) 982-0747
www.studio-tech.com
50301-1097, Issue 1
Page 2

Page 3

Model 770
Table of Contents
Foreword
Introduction .................................................................. 7
System Features.......................................................... 8
Installation .................................................................... 11
Configuration ............................................................... 21
Operation ..................................................................... 28
Technical Notes ........................................................... 38
Specifications............................................................... 41
Block Diagrams
Model 770 User Guide Issue 1, October 1997
Studio Technologies, Inc. Page 3
Page 4

Model 770
This page intentionally left blank.
Issue 1, October 1997 Model 770 User Guide
Page 4 Studio Technologies, Inc.
Page 5

Model 770
Foreword
It was a great pleasure to have had the chance to design the Model 770, a unique product
for a specialized application. Our goal was to take a set of requirements that were essentially at odds with each other and combine them into a rational product. We had to make
the Model 770 meet a highly specific application, be flexible to configure and use, be
feature-rich yet easy to operate, have good sonic performance, with everything combined
in a compact and reliable package.
Many broadcast professionals contributed their time, expertise, and good ideas to help
shape the Model 770. Without their help the unit would definitely not be as tweaked out
as it is. A hearty thanks to all of you!
Many people at Studio Technologies contributed toward making the Model 770 a reality.
Fred Roeck did the mechanical design and prepared the production documentation.
Carrie Loving designed the graphics and provided engineering CAD support. Al Lux designed the printed circuit boards. Mitch Budniak, Ace Consulting Engineer, designed the
power supply and did several overall reality reviews. Joe Urbanczyk designed the computerized test routines for the Audio Precision System One and worked on agency approvals. Larry Leviton wrote the software that drives the itty-bitty micro-controller in the telco
interface sectionall in a few hundred bytes of C! Minas Serbekian and his crew built the
prototype units, ensuring that the final design was "manufacturable."
Please contact me with your questions, comments, and suggestions. I can be reached by
voice at (847) 676-9177, fax at (847) 982-0747, or via E-mail at gkapes@studio-tech.com.
Sincerely,
Gordon Kapes
President
Model 770 User Guide Issue 1, October 1997
Studio Technologies, Inc. Page 5
Page 6

Model 770
This page intentionally left blank.
Issue 1, October 1997 Model 770 User Guide
Page 6 Studio Technologies, Inc.
Page 7
Model 770
Model 770
Introduction
Now for the first time mobile broadcast
applications can have both an audio mixer
and an IFB controller in one compact,
highly integrated package. Designed
expressly for electronic-news-gathering
(ENG) vehicles, the Model 770 doesnt
sacrifice features and performance to
achieve its two rack-space size. Using its
experience in on-air and IFB audio,
Studio Technologies was able to design
a product that has an extensive set of
features to meet the special needs of
fast-paced news-gathering operations,
while maintaining excellent overall audio
performance.
The Model 770 consists of three main
sections: mixer, IFB, and monitor. Each
section performs in a manner which meets
or exceeds those provided by stand
alone products. In addition, by integrating audio mixer and IFB functions into one
unit, capabilities are provided that have
previously been unavailable.
What This User Guide Covers
This User Guide is designed to assist you
when installing, configuring, and using the
Model 770 Audio Mixer/IFB Controller. A
limited amount of background technical
information is also provided. A packet
containing Model 770 schematic diagrams
is not shipped with each Model 770, but is
available from the factory upon request.
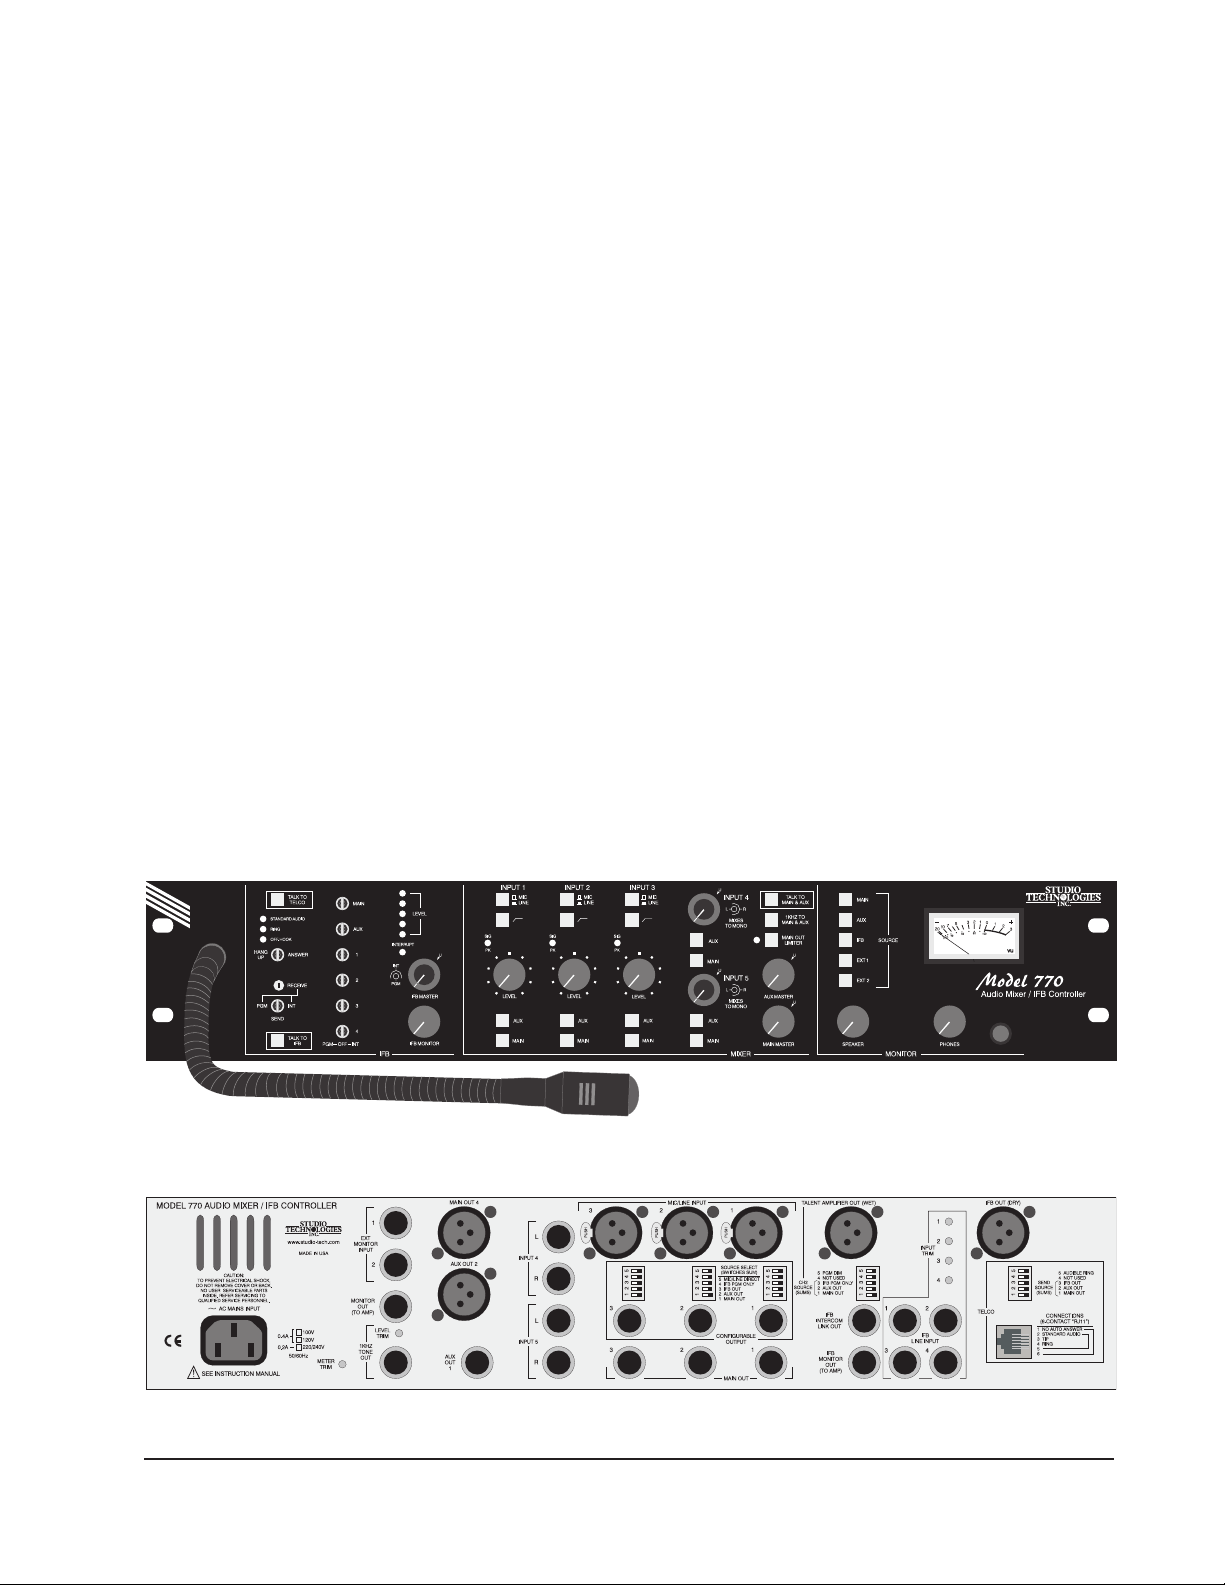
Figure 1. View of Model 770 Front Panel
Figure 2. View of Model 770 Back Panel
Model 770 User Guide Issue 1, October 1997
Studio Technologies, Inc. Page 7
Page 8

Model 770
System Features
Mixer Section
Mic/Line Inputs
Three transformer-coupled input channels
are provided for connection to microphone or line-level signals. The circuitry
is ruggedized for reliability under tough
operating conditions. Features provided
for each input channel include selectable
input sensitivity, low-cut filter, and level
control. For operator assistance, a bi-color
LED provides signal present and peak
level indication. Two push-button switches
control the routing of the input signal to
the main and auxiliary (AUX) audio buses.
For convenience the three mic/line input
sensitivity buttons, like all the Model 770s
operator controls, are located on the front
panel.
Stereo Line Inputs
Two stereo line-level input channels are
provided and are intended for connection
with audio signals associated with video
playback. To support real world broadcast applications the stereo inputs automatically mix, using individual level controls, to monaural. Two buttons are part of
each input channel, controlling the routing
of the signals to the main and AUX audio
buses.
voltage-controlled amplifier (VCA) integrated circuit for quiet, low-distortion
operation. For installation flexibility, four
output circuits provide access to the main
bus: three are electronically balanced; the
fourth is transformer-balanced.
AUX Output
The Model 770 provides a second monaural audio bus. The AUX bus allows special
applications to be easily supported, such
as creating a mix-minus feed or serving
as a second output for on-air use. Signals
from the mic/line and stereo line input
channels section can be assigned to the
AUX bus. Access to the AUX bus is provided by means of one electronically
balanced and one transformer-balanced
output.
Configurable Outputs
Three monaural, electronically balanced,
line-level outputs are provided and can
serve in a wide range of installation-specific applications. DIP switches, located
on the back panel, are used to select
from the five available signal sources:
main output, AUX output, IFB output, IFB
program only output, and mic/line input
channel direct. The DIP switches can be
set to provide additional outputs, create
a summed output from the sources, or to
provide direct outputs from the mic/line
input channels.
Main Output
Signals from the mic/line and stereo line
input channels combine to create a monaural signal, called the main output bus. A
studio-quality, limiter/compressor circuit is
provided to control the dynamic range of
the main audio bus. Far from a simple
clipper, the limiter/compressor circuit
utilizes a sophisticated laser-trimmed
Issue 1, October 1997 Model 770 User Guide
Page 8 Studio Technologies, Inc.
IFB Section
The IFB section provides an extensive set
of resources to create and maintain one
channel of excellent-quality IFB audio. A
full set of controls and indicators make
operation fast and simple. A front-panelmounted gooseneck microphone allows
an operator to make local interrupts. IFB
Page 9

Model 770
audio level is displayed by a 5-segment
LED meter, while interrupt activity is displayed by an LED indicator.
Unique to the Model 770 is the ability to
use each of the IFB sections seven possible audio sources as a program or an
interrupt source. A voice-operated (VOX)
circuit monitors the interrupt bus for signal
activity. Whenever a signal meets the
requisite parameters, it is connected to
the IFB output. Using a carefully designed
fast-attack/slow-release circuit results in
very good interrupt audio performance.
Whenever interrupt is active, the program
source can be configured to either fully
mute, or be reduced in level (dimmed)
by 10dB. While a full mute is normally
desired, the dim mode can serve special
applications, such as sports events.
The IFB section doesnt take a back seat
when it comes to audio quality. Sophisticated ramping analog switches are used
to ensure click-free audio. Studio-quality
limiter/compressor circuits serve the interrupt audio signal and the gooseneck
microphone. These circuits help to minimize level variations, making talent cues
more intelligible and reducing the risk of
abnormally high signal levels from reaching the talents ears.
Audio Sources
Seven audio signals can be selected to
serve as IFB program or interrupt sources:
the mixer sections main and AUX bus,
four external line-level inputs, and an
internal telephone interface. More than
one input can be simultaneously selected
to create a mix of signals for program or
interrupt audio. Without external patching
or connections, the Model 770s main and
AUX audio buses can be directly assigned
as program or interrupt sources. Four
external line-level inputs allow a variety of
audio sources to be connected. For assistance during installation, input level trim
pots, located on the back panel, allow the
nominal +4 input level to be adjusted
over a ±8dB range.
Telephone Interface
The Model 770 contains a telephone
interface that, using an 8-bit micro-controller integrated circuit, is powerful yet simple
to use. Overall, the telephone interface is
designed to receive audio signals for use
by the IFB section, or to send out audio
from the IFB or mixer sections. A frontpanel switch selects if receive audio will
serve as a program or interrupt source,
or if the telco interface will send audio.
The receive level of the telephone interface
is adjustable using a trim pot located on
the front panel. DIP switches, located on
the back panel, allow the selection of main
bus, AUX bus, or IFB audio as the send
source. For operator assistance, a pushbutton switch allows voice signals from
the gooseneck microphone to be sent out
the telephone interface. This talk-to-telco
function is extremely useful, especially
when an IFB connection is initially being
established with a remote facility.
The telephone interface is unique in that it
allows two very different telephone lines
to be correctly interfaced, meeting the
needs of contemporary installations. The
two operating modes make the interface
compatible with telephone lines or standard audio signals. When set to the telco
mode, the interface is compatible with
2-wire loop-start DC-biased (wet) tipand-ring circuits. When set to the standard
audio mode, the interface is directly compatible with audio signals provided by
many cellular or satellite telephones.
Model 770 User Guide Issue 1, October 1997
Studio Technologies, Inc. Page 9
Page 10

Model 770
Becoming increasingly common for use
in IFB applications, these telephones often
dont provide a wet interface, but do
exhibit the audio levels of a conventional
telephone line.
When the interface is set to the telco
mode, full loop current monitoring and
control is implemented. A front-panel
switch allows the telephone line to be
seized (answered) or disconnected (hung
up). The interface will automatically hang
up if a telephone-company-provided
disconnect signal is received. An audible
signal and LED indicator are active whenever ringing voltage is present. An autoanswer function is also provided.
When the interface is set to the standard
audio mode, the loop-current-specific
features are disabled, and the interface
operates as a transformer-coupled balanced audio input. The input level sensitivity is optimized for use with telephone-type
audio signals.
The line output is transformer coupled,
with a nominal level of +4dBu. Well protected from damage due to externally
generated signals, it is suitable for connection to devices remote from the Model
770. The intercom link output allows the
direct connection of IFB audio into broadcast intercom systems. The output impedance and signal level was carefully designed to eliminate the need for external
pads, isolation resistors, or blocking
capacitors.
While the Model 770s monitor section
allows switch-selectable monitoring of the
IFB signal, for efficient broadcast operation it is often imperative that the IFB
signal be monitored continuously. This is
why the IFB section provides a separate
line-level monitor output and associated
level control. With this output, the operator
can have a monitor loudspeaker dedicated exclusively to IFB.
Monitor Section
IFB Outputs
The IFB section contains four outputs:
talent amplifier, line, intercom link, and
monitor. The talent amplifier output is a
wet output that supports the connection
of belt pack modules from Studio Technologies. A single XLR-type cable links
the talent amplifier output with up to four
Model 32 or Model 33 Talent Amplifiers.
The talent amplifier output provides DC
power, along with two audio channels.
The first audio channel provides IFB audio, while the second is configurable.
Using DIP switches, located on the back
panel, three audio sources are available:
the mixer sections main and AUX bus,
and IFB program only. This allows a broad
range of applications to be supported.
Issue 1, October 1997 Model 770 User Guide
Page 10 Studio Technologies, Inc.
The Model 770s monitor section provides
separate outputs, along with an associated level control, to allow connection of
a monitor amplifier and headphones. In
addition to monitoring the main, AUX,
and IFB audio buses, provision has been
made for monitoring two external audio
sources. These monaural inputs are intended to be connected to off-air, microwave, or satellite receivers.
Multiple sources can be simultaneously
selected for monitoring. This can prove
useful by allowing, for example, an operator to simultaneously monitor a local mix
and an externally provided mix-minus
signal.
A mechanical VU-type meter provides a
user-friendly indication of audio-signal
Page 11

Model 770
levels. Fanatics for addressing the details,
Studio Technologies has even eliminated
the issue of burned-out meter-scale illumination by implementing a solid-state, LEDbased lighting scheme.
A 1kHz sine-wave signal is provided for
alignment and reference use. While the
1kHz tone can be assigned to the main
and AUX output buses, a direct line-level
output is also provided. This allows the
1kHz tone to be used as a setup or test
signal without interfering with normal
operation of the main and AUX audio
buses.
Talk Back
The Model 770 includes a talk back
function. A push-button switch allows
audio from the gooseneck microphone
to be routed to the main and AUX outputs.
Mounting, Connectors, and Mains
Power
While the Model 770 is loaded with features, it only requires two spaces in a
standard 19-inch rack. XLR-type and
¼-inch 3-conductor audio connectors are
used for audio interconnection. A standard
modular (RJ11) telephone jack is used by
the telco interface. Mains power is factory
configured for 100, 120, or 220/240V,
50/60Hz.
Installation
During normal operation, no access to the
back panel of the Model 770 is required.
However, there are six trim potentiometers
that may need to be adjusted prior to the
Model 770 going into service. Refer to the
Configuration section of this guide for
details.
Locating the Unit
Physical access and mechanical noise
are the primary factors when choosing a
mounting location. By its very nature as
an audio mixer and IFB controller, an
operator will need easy access to all the
controls and the gooseneck microphone.
The gooseneck microphone is located on
the left side of the front panel so be careful
that there isnt a cooling fan blowing
directly onto it. Also, a good sight line to
the VU meter, located on the right side
of the front panel, is important.
As a device that contains high gain audio
stages, hum and noise pickup is possible
through the chassis and associated cabling. Locating the unit away from devices
that radiate strong AC fields is an excellent
idea.
While not likely, it is possible that the
Model 770s toroidal power transformer
may radiate energy into adjacent equipment. It is located at the right, bottom rear
corner of the unit, and may need to be
physically isolated from sensitive equipment, especially videotape recorders.
In this section you will be installing the
Model 770 Audio Mixer/IFB Controller in
an equipment rack. Input and output
connections for the mixer, IFB, and monitor sections will be made using the Model
770s multitude of jacks. AC mains power
will then be connected.
Model 770 User Guide Issue 1, October 1997
Studio Technologies, Inc. Page 11
Mounting
The Model 770 is intended for mounting in
a standard 19-inch equipment rack, requiring 3.5 inches vertically (two standard rack
spaces). It weights approximately 13.5
pounds (6.1kg), and operates on mains
power of 100, 120, or 200/240V, 50/60Hz.
Page 12

Model 770
The unit is secured to the front mounting
rails of an equipment rack using two
mounting screws per side.
Connections
The Model 770s input, output, and
telco connections are made using 3-pin
XLR-type male and female connectors,
¼-inch 3-conductor phone jacks, and one
6-position modular telephone-type jack.
Caution: For reliable audio interconnection, the phone plugs you use must
comply with industry-standard RS-453.
Switchcraft No. 297 or Neutrik NP3C
are highly recommended.
Mixer Section
Mic/Line Inputs
The Model 770 contains three input channels that are compatible with microphone
or line-level sources. Each of the three
Mic/Line inputs use a single 3-pin female
XLR-type connector. Prepare the mating
connectors (males) so that pin 2 is signal
high (+ or hot), pin 3 is low ( or cold),
and pin 1 is shield.
It is expected that the mic/line inputs will
be wired to an input/output connector
panel located on the side or rear of the
vehicle. Its also nice to have one or two
of the inputs multed to connectors inside
the vehicle, allowing the rapid connection
of microphone or line-level signals. To
minimize noise and other problems, it is
recommended that the mic/line signals
are not wired by way of points on an audio
patch bay.
Stereo Line Inputs
connection to sources located within
the vehicle, specifically the audio output
channels of videotape machines. Note that
the left and right inputs associated with the
stereo line inputs are always mixed, by
way of level controls, to monaural. The
electronically balanced input circuitry has
extremely low noise and high commonmode rejection, but no extra protection
from overvoltage or static. (Dont get us
wrongthe stereo line input circuitry is
better than whats found on most audio
mixers available todaytheyre just not as
tough as the mic/line inputs!) The stereo
line input circuitry is intended for connection to balanced or unbalanced, line-level
signals with a nominal operating level of
+4dBu.
Each stereo line input channel uses two
¼-inch 3-conductor phone jacks. Prepare
the mating connectors (plugs) so that tip
is signal high (+ or hot), ring is low ( or
cold), and sleeve is shield. With an unbalanced source connect the tip to high
(+ or hot), and both the ring and sleeve
to shield. If connecting to an unbalanced
source in this manner results in hum or
noise, connect tip to high (+ or hot) and
ring to shield; leave the sleeve unterminated. For flexibility of use it is recommended that the stereo line input connections be routed through points on a
patch bay.
Main OutputsGeneral Information
The Model 770 contains four outputs
associated with the main audio bus. Main
Outputs 1, 2, and 3 are electronically
balanced, have a nominal level of +4dBu,
and are capable of driving balanced or
unbalanced loads of 600 ohms or greater.
The Model 770 contains two stereo linelevel input channels. They are intended for
Issue 1, October 1997 Model 770 User Guide
Page 12 Studio Technologies, Inc.
Page 13

Model 770
Note: While the electronically balanced
output circuits are capable of driving
loads of 600 ohms or greater, the output level will drop slightly as the load
impedance approaches 600 ohms. A
0.5dB difference in output level can
be expected as the load impedance
changes from 10k ohms to 600 ohms.
This applies to all of the electronically
balanced output circuits provided on
the Model 770.
Main Output 4 is transformer balanced,
with a nominal level of +4dBu. It is capable of driving full level into a balanced
or unbalanced load of 2k ohms or greater.
Main Outputs 1, 2, and 3
Main Outputs 1, 2, and 3 are intended for
connection only to devices located within
the vehicle. It is recommended that either
Main Output 1, 2, or 3 be used as the onair source. Each output utilizes a ¼-inch
3-conductor phone jack for interconnection. Prepare the mating connectors
(plugs) so that tip is signal high (+ or hot),
ring is low ( or cold), and sleeve is shield.
Whether these outputs are wired via a
patch bay will depend on the specific
installation.
While balanced operation is preferred,
unbalanced operation is not a problem
for the output circuitry. To connect to an
unbalanced load connect the tip to high
(+ or hot), and both the ring and sleeve
to shield. For optimal unbalanced operation, it is important to connect both ring
and sleeve together directly on the plug
that mates with the Model 770, and not at
the other end of the cable.
Main Output 4
Main Output 4 has been optimized for
connection to devices located external
to the vehicle. This ruggedized, transformer-coupled output has a nominal level
of +4dBu. A 3-pin male XLR-type connector is used for interconnection. Prepare the
mating connector (female) so that pin 2
is high (+ or hot), pin 3 is low ( or cold),
and pin 1 is shield. It is recommended that
Main Output 4 be wired, via a patch bay,
to the vehicles input/output connector
panel.
Main Output 4 was specifically designed
to provide a fully isolated output with good
sonic performance. It was NOT designed
to drive full level into 600 ohm loads! While
a 600 ohm load can be connected without
damage, a 2dB level drop should be
expected. Used with 2k ohm or greater
loads, Main Output 4 will provide its full
specified performance.
AUX OutputsGeneral Information
The Model 770 contains two outputs
associated with the AUX audio bus. AUX
Output 1 is electronically balanced, has a
nominal level of +4dBu, and is capable of
driving balanced or unbalanced loads of
600 ohms or greater. AUX Output 2 is
transformer balanced, with a nominal level
of +4dBu. It is capable of driving full level
into a balanced or unbalanced load of 2k
ohms or greater.
AUX Output 1
AUX Output 1 is intended for connection
to devices located only within the vehicle.
The output utilizes a ¼-inch 3-conductor
phone jack for interconnection. Prepare
the mating connector (plug) so that tip is
signal high (+ or hot), ring is low ( or
cold), and sleeve is shield. This output
Model 770 User Guide Issue 1, October 1997
Studio Technologies, Inc. Page 13
Page 14

Model 770
should be wired via a patch bay to allow
ready access.
While balanced operation is preferred,
unbalanced operation is not a problem
for the output circuit. To connect to an
unbalanced load connect the tip to high
(+ or hot), and both the ring and sleeve to
shield. For optimal unbalanced operation,
it is important to connect both the ring and
sleeve together directly on the plug that
mates with the Model 770, and not at the
other end of the cable.
AUX Output 2
AUX Output 2 has been optimized for
connection to devices located external
to the vehicle. This ruggedized, transformer-coupled output has a nominal level
of +4dBu. A 3-pin male XLR-type connector is used for interconnection. Prepare the
mating connector (female) so that pin 2 is
high (+ or hot), pin 3 is low ( or cold),
and pin 1 is shield. It is recommended that
AUX Output 2 be wired, via a patch bay, to
the vehicles input/output connector panel.
AUX Output 2 was specifically designed
to provide a fully isolated output with good
sonic performance. It was NOT designed
to drive full level into 600 ohm loads! While
a 600 ohm load can be connected without
damage, a 2dB level drop should be
expected. Used with 2k ohm or greater
loads, AUX Output 2 will provide its full
specified performance.
Configurable Outputs
Each of the three configurable outputs
is electronically balanced, has a nominal
level of +4dBu, and is capable of driving
balanced or unbalanced loads of 600
ohms or greater. The outputs are intended
for connection to devices located only
within the vehicle. DIP switches are associated with each configurable output. Details
on using these switches can be found in
the Configuration section of this guide.
Each of the configurable outputs is accessible via a ¼-inch 3-conductor phone jack.
Prepare the mating connectors (plugs) so
that tip is signal high (+ or hot), ring is low
( or cold), and sleeve is shield. To connect to an unbalanced load connect the
tip to high (+ or hot), and both the ring
and sleeve to shield.
It is highly recommended that the configurable outputs be routed via a patch bay.
Or, if there are no immediate needs for
these outputs, be certain to terminate
them on a patch bay for future use.
IFB Section
IFB Line Inputs
The Model 770s IFB section allows four
line-level audio sources to be connected.
These sources can serve as program or
interrupt audio signals, their function being
selectable by the operator using frontpanel controls. The direct-coupled, electronically balanced input circuitry is
intended for connection to sources located within the vehicle. The nominal input
level is +4dBu, but a trim potentiometer
associated with each input gives a ±8dB
input sensitivity range. The Configuration
section of this guide has details on using
the trim pots.
Each of the four IFB line inputs use a
¼-inch 3-conductor phone jack for interconnection. Prepare the mating connectors (plugs) so that tip is signal high (+ or
hot), ring is low ( or cold), and sleeve is
shield. With an unbalanced source connect the plugs tip to high (+ or hot), and
Issue 1, October 1997 Model 770 User Guide
Page 14 Studio Technologies, Inc.
Page 15

Model 770
both the ring and sleeve to shield. If connecting to an unbalanced source in this
manner results in hum or noise, connect
tip to high (+ or hot), and ring to shield;
leave the sleeve unterminated. For flexibility it is recommended that at least one of
the IFB line input connections be routed
through a patch bay.
Telephone Interface
The Model 770s IFB section contains a
sophisticated telephone interface which
allows connection to a telephone line or
standard audio signal. Using the telco
interface, an audio signal can be brought
in for use as a program or interrupt
source. The telco interface can also be
used to send out audio signals. We define
a telephone line as a signal having a DC
bias current associated with it. This type of
signal is sometimes referred to as wet.
We define a standard audio signal as one
that is isolated from any source of DC
voltage; sometimes being referred to as a
dry signal. While this sounds confusing,
contemporary applications sometimes
refer to both types of signals as telco.
To a large production vehicle that pulls up
to do a two-week golf tournament, a telco
line is wet, being provided by the local
telephone company on an RJ11 jack. To
a mobile ENG vehicle, a telco signal might
come from a cellular or satellite telephone
which often provides a dry audio signal.
A unique means of interfacing signals to
the telco interface is utilized. While most
people would consider that the Model 770
has an RJ11 jack on its back panel, its
actually a 6-position modular jack with all
6 positions used for electrical connections;
two are used to connect to the telephone
line or standard audio signal, two to select
telco or standard audio mode, and two to
defeat the auto-answer function. This
connection method wasnt selected to
make life difficult, but to allow a range of
signal types to be connected to the telco
interface, while simultaneously having the
interfaces operating mode automatically
selected. This eliminates the need for
operating mode selection switches from
being located on the front or back panel.
The next paragraphs detail how this
works.
To show you where were coming from,
it may be helpful to provide some background information on what most people
refer to as an RJ11 jack. The term RJ
comes from the connection section of Part
68 of the United States FCC rules, created
in the late 1970s. A number of RJ-types
are specified, including RJ11, as well as
others such as RJ12, RJ21, and RJ48.
The different RJ-types specify in great
detail the authorized mechanical and
electrical means for telephone companies
to provide service to customers. The wellknown RJ11 actually refers to an analog
telephone lines tip and ring connections
being terminated on pins 3 and 4 of a
6-position modular jack; pins 1, 2, 5, and
6 are not utilized and do not have to be
physically present. So the physical telephone-type jack that most people refer
to as an RJ11 is really just a 6-position
device with an unspecified number of
contacts inserted. Our discussion ends
with this fact: The jack used by the Model
770s telco interface is similar to an RJ11,
but uses all 6-positions for connections.
To access all the functions of the Model
770 telco interface requires a 6-conductor
modular jack and cord. But most real
world telephone jacks and interconnecting cords have only two or four of the six
positions implemented. For this reason a
Model 770 User Guide Issue 1, October 1997
Studio Technologies, Inc. Page 15
Page 16

Model 770
6-conductor jack, along with a 6-conductor cord, is included with each Model 770.
(However, the reality is that in most Model
770 applications, access to four of the six
contacts in the interfaces jack is sufficient.
Using a 4-conductor jack and cable will
provide access to the telco/standard input
and the wet/standard audio mode select
function. The last two contacts in the telco
interfaces 6-conductor jack allows the
auto-answer function to be disabled, a
condition that is less frequently required.)
Now down to the nitty gritty of making
connections! A 6-position modular jack is
most often organized as three pairs. Well
use this terminology in our explanation.
Pair 1, pins 3 and 4, of the 6-position
modular jack are used to connect to the
telco or standard audio signal. Pair 2, pins
2 and 5, of the jack are used to control
the input mode; shorting pins 2 and 5
together places the telco interface in the
standard audio mode. Pair 3, pins 1 and
6, of the jack are used to control the autoanswer mode; shorting pins 1 and 6
together causes the interface not to automatically answer when a ringing telephone-line signal is present. A typical
6-position modular jack will have the
following terminal colors:
Pin No. Wire Color Alternate Color
1 White W-GN
2 Black W-OR
3 Red BL-W
4 Green W-BL
5 Yellow OR-W
6 Blue GN-W
The question that you may be rightfully
thinking is: Why doesnt the Model 770
simply have switches to select between
telco and standard audio mode, and to
defeat the auto answer function? This
would be adequate if only one source was
going to be connected to the telco interface, but thats not the reality for most
broadcast settings. A number of telco
signals may be available in a single vehicle, each requiring the ability to be
connected to the Model 770s telco interface at a moments notice. By terminating
these various signals onto 6-position
modular jacks, or a modular-jack patch
panel, they can be quickly patched into
the Model 770s telco interface. By connecting jumper wires across pins 2 & 5
and 1 & 6 of the source jacks as required,
the telco interface will automatically configure to the correct operating mode as that
source is connected.
If you are going to use a modular-jack
patch panel, be careful to select one
that has all six contacts available in
each jackmany will only provide
access to two or four.
When selecting your telco sources it
may be useful to review the characteristics of the Model 770s telco interface.
When set to the telephone-line mode, a
DC-biased signal (often 48V), with
high-voltage ringing, is expected to be
connected. The telco interface is transformer-isolated, and very well protected
from damage due to static and transients.
It has a nominal audio impedance of 600
ohms to match the requirements of a
normal telephone line. When set to the
standard audio mode, no DC ringing
voltage is expected. Transformer-coupling
is still present, as is the 600 ohm impedance. The receive and transmit audio
levels are still matched to the requirements of telephone devices, not the much
hotter +4dBu professional audio level!
Issue 1, October 1997 Model 770 User Guide
Page 16 Studio Technologies, Inc.
Page 17

Model 770
An input audio signal is expected to be in
the range of 15dBu nominal.
In this paragraph well provide examples
of two hypothetical sources, and how they
might be connected to the Model 770s
telco interface. The first source is a signal
from a satellite telephone system. Its a
wet telco signal because it has a DC
voltage present, with standard high-voltage ringing to indicate that a call is coming in. From an operational standpoint
auto-answer is not desired. In this case
connect tip and ring from the satellite
telephone system to pins 3 and 4 (red and
green) of the source modular jack, and
connect a jumper wire across pins 1 and
6 (white and blue). Now when this jack is
connected to the Model 770s telco interface, of course using a 6-conductor cord,
the telco interfaces operating mode will
remain in telco, but auto-answer will be
defeated. Our second example is a signal
is a cell-phone fax adapter. Its a dry
audio signal, not having a DC voltage
associated with it. In this case the signal
is terminated on pins 3 and 4 (red and
green) of the source modular jack, and a
jumper wire is connected across pins 2
and 5 (black and yellow). When this jack
is connected to the Model 770s telco
interface the operating mode will automatically switch to standard audio.
Talent Amplifier Output
The talent amplifier output is designed to
supply power and audio signals for up to
four Studio Technologies Model 32 or
Model 33 Talent Amplifiers. The term
wet is associated with the talent amplifier
output because, along with analog audio
signals, DC power is present . The talent
amplifier output uses a single male XLRtype connector for interconnection; pin 1
is common, pin 2 is +22Vdc modulated
with IFB audio, and pin 3 is dry audio.
The audio signal associated with pin 3 is
configured using DIP switches located on
the back panel. Refer to the Configuration
section of this guide for details.
It is expected that the talent amplifier
output will be wired to the vehicles input/
output connector panel. As the Model 32
and 33 Talent Amplifier units have loop
thru connectors, an input/output panel
does not need numerous mults of the
signaltwo should be sufficient. As DC
power is present, it is recommended that
the talent amplifier output signal not be
wired by way of a patch bay.
IFB Line Output
The IFB line output has been optimized
for connection to devices located external
to the vehicle. This ruggedized, transformer-coupled output has a nominal level
of +4dBu. It is considered a dry output
as DC power is not present. It is expected
that the IFB line output be wired, via the
patch bay, to the vehicles input/output
connector panel. A 3-pin male XLR-type
connector is used for interconnection.
Prepare the mating connector (female)
so that pin 2 is high (+ or hot), pin 3 is
low ( or cold), and pin 1 is shield.
Should a line-level IFB signal need to be
connected to a device located within the
vehicle, such as a wireless IFB transmitter,
it is better to use one of the configurable
outputs, rather than the IFB line output.
Sonically there is little difference, except
that the IFB line output is a well-protected,
transformer-isolated output that is best
kept available exclusively for connecting to
devices external to the vehicle. In this way
externally generated noise, static, or
Model 770 User Guide Issue 1, October 1997
Studio Technologies, Inc. Page 17
Page 18

Model 770
ground loops will be isolated, protecting
the Model 770 and related equipment that
is located inside the vehicle.
The IFB line output was designed to provide a fully isolated output with decent
sonic performance. It was NOT designed
to drive full level into 600 ohm loads! While
a 600 ohm load can be connected without
damage, a 3-4dB level drop should be
expected. Used with 2k ohm or greater
loads, the IFB line output will provide its
full specified performance.
IFB Monitor Output
The IFB monitor output is designed for
connection to an audio power amplifier
associated with a monitor loudspeaker. In
mobile applications it may prove common
for an amplified speaker, such as from
Fostex, to be connected. The IFB monitor
output is similar to the monitor output
associated with the Model 770s monitor
section. The difference lies with the signal
source. While the monitor sections monitor output allows the audio source to be
selected from among five choices, the
audio source for the IFB monitor output is
always the IFB signal. By having two
monitor outputs, an operator can monitor
his or her desired source, while ensuring
that important talent cues will not be
missed.
The IFB monitor output is electronically
balanced, line-level, and can drive a balanced or unbalanced load of 600 ohms
or greater. A ¼-inch 3-conductor phone
jack is utilized for interconnection. Prepare
the mating connector (plug) so that tip is
signal high (+ or high), ring is low ( or
cold), and sleeve is shield. To connect to
an unbalanced load connect the plugs tip
to high (+ or hot), and both the ring and
sleeve to shield. Whether this output is
wired via a patch bay will depend on the
specific installation.
Intercom Link Output
The ability to have IFB audio available on
an intercom system can be very useful for
smaller broadcast applications. But often
an intercom power supply or user station
with a line-level program input isnt available for injecting the signal into the
system. The intercom link output is designed expressly to allow the Model 770s
IFB audio signal to be directly connected
to the bus of an intercom system. The
output is a current source with an impedance of 10k ohms, is DC isolated, and has
a level optimized for RTS/Telex intercom
systems. (Note that RTS/Telex specifies
a nominal audio operating level of 0dBu,
but their equipment performs more like
10dBu nominal systems.)
It is important to understand that the
intercom link output is a current source,
rather than a voltage source. Most intercom systems, such as those from RTS/
Telex, utilize a 200 ohm intercom bus
impedance and expect devices that connect to the bus to maintain a source
impedance of 10k ohms or higher.
Connecting a standard, low-impedance
output circuit directly to an intercom bus
will not provide an acceptable audio
feed. An additional problem is that the
output circuit may be damaged by the
DC that is present on the intercom bus.
The Model 770s intercom link output has
the correct characteristics to meet the
challengemaintaining the correct impedance and being isolated from DC voltage.
The intercom link output is accessible via
a ¼-inch 3-conductor jack. Prepare the
Issue 1, October 1997 Model 770 User Guide
Page 18 Studio Technologies, Inc.
Page 19

Model 770
mating connector (plug) so that tip is
connected to the desired channel of the
intercom system, and sleeve is connected
to intercom system common; leave the
ring unterminated.
It is common in smaller broadcast application to use the RTS/Telex PS15 Power
Supply. The PS15 provides capacitorcoupled access, by means of a ¼-inch
3-conductor jack, to the two intercom
buses. To connect the Model 770s intercom link output to the PS15 is incredibly
simple. Prepare an interconnecting cable
using two ¼-inch 3-conductor plugs that
are wired in this fashion: Sleeve connected
to sleeve, tip on the Model 770 end to tip
on the PS15 end; leave the ring leads
unconnected. This cable will connect IFB
audio into channel 1 of the intercom system. To connect IFB audio into channel 2
of the intercom system: Tip on the Model
770 end to ring on the PS15 end.
In applications where a PS15 isnt used,
the intercom link output can be directly
connected to the bus of an intercom
system. For example, the XLR connectors
associated with RTS/Telex systems use
pin 1 for common, pin 2 for DC with channel 1 audio, and pin 3 for channel 2 audio.
In this scenario, an interconnecting cable
would have the tip lead of the ¼-inch plug
connected to XLR pin 2 or 3 (depending
on the channel desired), and sleeve to
XLR pin 1.
While the intercom link output was designed to allow a direct connection to an
intercom bus or power supply, there are
other applications where it can be useful.
The secret is to change the intercom link
outputs current signal into a voltage. But
be warned, a very sophisticated method of
conversion is required...Not! All you need
is a single 200 ohm resistor connected
across the tip and sleeve of the mating
plug! This resistor terminates the current
output into its expected load. Using Ohms
Law you know that E(voltage) = I(current)
R(resistance), so a voltage is produced
across the resistor. You end up with a nice
unbalanced audio source with a nominal
level of 18dBu.
This unbalanced output can be directly
connected to the program input on an
intercom power supply, such as the RTS/
Telex PS31. Its actually better to connect
to an intercom system in this manner,
rather than directly to the intercom bus, as
the PS31 has a program input level control
which would allow the level of the IFB
signal to be adjusted for user preference.
Dont minimize the usefulness of converting the intercom link output to an unbalanced IFB audio source. You can use it to
connect to an intercom system, or to other
gear that needs an IFB feed. The important parameter is that it has a nominal level
of 18dBu, rather than +4dBu as found
with the Model 770s other audio outputs.
While some equipment is specified to
have an input compatible with 0, +4,
or line-level audio signals, they are really
not designed to be connected to signals
this hot. As an example, take the MS-222
Master Intercom Station from Clear-Com.
It has a program input that is specified for
microphone or line-level, with a rated input
level of 0dB in the line position. But try to
connect a signal with a nominal level of
0dBu and see what happens. Its so loud
youd think you were blowing up the input
stage! But connect our nominal 18dBu
signal and all is well. (By the way, we have
no beef with Clear-Com in general. They
make many fine products.)
Model 770 User Guide Issue 1, October 1997
Studio Technologies, Inc. Page 19
Page 20

Model 770
Monitor Section
External Monitor Inputs
Two external audio signals can be connected, allowing them to be monitored
independently of the internal audio signals. It is intended that the external monitor inputs will be connected to outputs
associated with off-air, microwave, or
satellite receivers. The inputs are monaural, electronically balanced, have a nominal level of +4dBu, and interface using
¼-inch 3-conductor phone jacks.
Prepare the mating connectors (plugs)
so that tip is signal high (+ or hot), ring is
low ( or cold), and sleeve is shield. With
an unbalanced source connect the plugs
tip to high (+ or hot), and both the ring
and sleeve to shield. If connecting to an
unbalanced source in this manner results
in hum or noise, connect tip to high (+ or
hot) and ring to shield; leave the sleeve
unterminated.
Monitor Output
The monitor output is designed for connection to an audio power amplifier associated with a monitor loudspeaker. In
mobile applications it may prove common
for a loudspeaker with an internal amplifier, such as from Fostex, to be connected
to the Model 770s monitor output. The
output is electronically balanced, line-level,
and can drive a balanced or unbalanced
load of 600 ohms or greater.
The monitor output utilizes a ¼-inch
3-conductor phone jack for interconnection. Prepare the mating connector (plug)
so that tip is signal high (+ or hot), ring is
low ( or cold), and sleeve is shield. To
connect to an unbalanced load connect
the plugs tip to high (+ or hot), and both
the ring and sleeve to shield. Whether this
output is wired via a patch bay will depend
on the specific installation.
1kHz Direct Output
Direct access to a continuous 1kHz tone
signal is provided by means of a line-level
output. As one of the unique features of
the Model 770, it should definitely be
utilized! This output is intended to be
connected to the audio input associated
with a video/audio switchers bars and
tone position. For maximum flexibility,
it is recommended that this signal be
routed via a patch bay. In this way it
can be accessed for test and calibration
purposes.
The electronically balanced, nominal
+4dBu output is accessible via a ¼-inch
3-conductor phone jack. The circuitry is
capable of driving a balanced or unbalanced load of 600 ohms or greater.
Prepare the mating connector (plug) so
that tip is signal high (+ or hot), ring is
low ( or cold), and sleeve is shield. To
connect to an unbalanced load connect
the tip to high (+ or hot), and both the
ring and sleeve to shield.
A trim potentiometer is used to set the
precise output level of the 1kHz direct
output. Refer to the Configuration section
of this guide for details.
Connecting AC Mains Power
The Model 770 is factory configured to
operate from AC mains power of either
100, 120, or 220/240V, 50/60Hz. In most
cases, units shipped to North America are
factory configured for 120V operation
and are supplied with an internal 0.2A,
5 x 20mm fast-acting fuse. Units configured for 100V also utilize a 0.2A fuse.
Issue 1, October 1997 Model 770 User Guide
Page 20 Studio Technologies, Inc.
Page 21

Model 770
Units configured for 220/240V operation
are supplied with a 0.1A, 5 x 20mm fastacting fuse.
Before connecting the Model 770 to mains
power, determine the actual mains voltage
and confirm that the Model 770 has been
configured correctly. As could be expected, an incorrect mains configuration
could seriously damage the unit. Should it
be necessary to change the units operating voltage contact Studio Technologies
technical support for details.
The Model 770 uses an IEC standard
connector to mate with the AC mains cord.
Normally the cord supplied has a NorthAmerican standard plug on one end and
an IEC connector on the other. In nonNorth American applications the appropriate plug must be attached. The wire colors
in the mains cord conform to the internationally recognized CEE color code and
should be wired accordingly:
Connection Wire Color
Neutral (N) Light Blue
Live (L) Brown
Earth/Ground (E) Green/Yellow
Because the Model 770 contains no power
switch it will begin operating as soon as
AC mains power is connected.
Configuration
As in life, power leads to responsibility.
The Model 770 is no exception as its
features, flexibility, and operational power
leads to a number of configuration issues
that must be reviewed once installation
has been completed. All are quite simple
and will only need to be addressed once.
Figure 3. Detail of back panel showing mains
power and voltage configuration chart
Configurable Outputs
The Model 770 contains three configurable
outputs. Their uniqueness may make them
seem a bit confusing at first glance. However, they arent too far out, simply being electronically balanced output circuits
whose input source is selectable, rather
than being fixed. The hardest part of using
the configurable outputs is deciding which
audio source, or sources, should be
assigned to which output! By carefully
reviewing the choices, and how their
selection may benefit an installation, the
power of these humble outputs should
become apparent. These three outputs
may well eliminate the need for external
distribution amplifiers, combining amplifiers, or microphone preamplifiers.
Model 770 User Guide Issue 1, October 1997
Studio Technologies, Inc. Page 21
Page 22

Model 770
The five choices are main output, AUX
output, IFB output, IFB program only
output, and mic/line direct:
Main output is the same signal that
connects to the mixer sections main
outputs.
AUX output is the same signal that
connects to the mixer sections AUX
outputs.
IFB output is the final output from the
IFB section. It consists of both program
and interrupt audio. The program audio
will, depending on the configuration,
mute or dim when interrupt is active.
IFB program only is provided by the IFB
section, and consists only of the program audio signal; no interrupt audio
signals are present. No muting or dimming of the program audio signal
takes place, even when interrupt is
active.
Mic/line direct is a signal that is derived
from its associated mic/line input channel. The signal is the same as that
connected to the front panel bus assignment switches; post input preamplifier and low-cut filter. Configurable
output 1 has access to the signal from
mic/line input 1; configurable output 2
has access to the signal from mic/line
input 2; etc.
Using the five DIP switches associated
with each configurable output, simply
select the source or sources desired. Note
the word sourcesmore than one
source can be selected! As an example,
selecting switch 1, main out, and switch 2,
AUX out, will produce a combined version
of the main and AUX outputs. Selecting,
as another example, switch 1, main out,
Figure 4. Detail of back panel configurable
output section (typical of 3)
for configurable output 1, will result in
another main output, viola, main output 5!
It would be the authors choice to use the
configurable outputs in this way: Configurable output 1 set for a summed version of
the main and AUX outputs, configurable
output 2 set for IFB program only, and
configurable output 3 set for mic/line
direct. Terminated on a patch bay, these
three outputs could prove quite handy for
those once-in-a-blue-moon situations
that seem to occur about once a month!
Issue 1, October 1997 Model 770 User Guide
Page 22 Studio Technologies, Inc.
Page 23

Model 770
The mic/line direct output may prove
especially helpful, providing a mic/line
amplifier for general purpose or emergency use. In special situations, a signal
of virtually any audio level could be
bumped to nominal +4dBu.
VU Meter Calibration
A trim potentiometer allows calibration of
the monitor sections VU meter. The range
of this trim pot allows 0 on the meter to
represent an output signal level of +1 to
+7dBu. From the factory, the VU meter
is calibrated so that 0 VU represents an
output level of +4dBu on main output 1,
when loaded with 100k ohms. In certain
cases it may be a good idea to check the
meter calibration, such as when main
output 1 is loaded with 600 ohms, or when
either main output 2, 3, or 4 is going to
serve as the primary output.
While not difficult, meter calibration is a
bit tedious:
1. Ensure that mains power is connected
to the Model 770.
2. Place the main output limiter/compressor to the off state by placing the
button labeled LIMITER to the out
position.
3. Connect the 1kHz tone to the output
buses by placing the button labeled
1KHZ TO MAIN & AUX to the on (in)
position.
Figure 5. Detail of back panel showing meter
calibration trim pot
4. Select MAIN as the monitor source.
5. Designate main output 1, 2, 3, or, in
rare circumstances, 4 as the desired
primary output. This is the output that
the meter will be calibrated against.
6. Confirm that the designated main
output is terminated with its normal
load impedance.
7. Using an appropriate adapter cable,
connect an audio level meter directly
across the designated main output.
Ensure that the meter connection does
not remove the normal load. The level
meter must be a precision device thats
intended for audio usea generalpurpose voltmeter is not adequate!
8. Carefully observing the audio level
meter, set the main bus master output
control so that the output level is precisely +4dBu.
Model 770 User Guide Issue 1, October 1997
Studio Technologies, Inc. Page 23
Page 24

Model 770
9. Observing the Model 770s VU meter,
adjust the meter trim pot to give 0 VU.
The pot is accessible on the back
panel, to the right of the mains power
connector.
IFB Line Input Configuration
A trim potentiometer is associated with
each of the four IFB line inputs. The trim
pots are accessible on the back panel,
directly above the IFB line input jacks.
The pots are provided simply to allow
the relative levels of the input signals to
be equalized. This will allow minimal level
changes when an operator is switching
among the various IFB audio sources.
Calibration is quite simple and doesnt
require a down to the tenth of a dB
adjustment regimen.
1. Ensure that mains power is connected
to the Model 770.
6. Adjust the trim pot associated with IFB
line input 1 so that the meter displays
0 VU (or a little hotter) when signal
peaks occur.
7. Repeat this procedure, starting at
step 5, for IFB line inputs 2, 3, and 4.
If this procedure has been successful,
selecting any of the audio sources as
program material will provide the same
perceived output level. Remember, the
goal is not to have things look right on
2. Have audio present, at its normal level,
on the IFB line inputs. An audio tone is
acceptable, but typical audio material
is preferred.
3. On the front panel, set the IFB program
master output level potentiometer to
the unity gain position. This position
is physically marked with a graphic
letter U.
4. On the monitor section, located on the
far right side of the front panel, set the
monitor source for IFB.
5. Select IFB line input 1 as the IFB program audio source. Ensure that line
inputs 2, 3, and 4, the telco interface,
and main and AUX source switches
are set to their off (center) off position.
Figure 6. Detail of back panel showing IFB line
input configuration section
Issue 1, October 1997 Model 770 User Guide
Page 24 Studio Technologies, Inc.
Page 25

Model 770
the meter, but to supply talent and support
personnel with excellent cue audio. Thats
what its all about!
IFB Telco Interface
Configuration
Telephone Interface Send Audio Source
One of the nice features of the Model
770s telco interface is the ability to send
an audio signal out the interface. Switches
on the back panel allow the audio source
to be selected, with the choices being the
mixer sections main and AUX outputs,
and the IFB output. Sections 1 , 2, and 3
of the DIP switch located directly above
the telco interfaces modular jack are used
to select the source. (Should the need
arise, more that one source can be selected simultaneously.) Unless there is
a specific need to select main or AUX,
enabling IFB audio as the source should
prove to be the most useful. There may
also be cases where no send audio
source is desired. In this case simply turn
all three switches to their off positions.
Telephone Interface Audible Ringing
A piezoelectric sounder, located inside the
Model 770s enclosure, can be enabled
to provide an audible indication when
ringing voltage is present on the telco
interface. When enabled, a square-wave
signal is sent to the sounder in cadence
with the ringing voltage. Not terribly loud,
it is intended to give the operator a little
auditory nudge that the telephone line
is ringing. Position 5 of the DIP switch
located directly above the telco interfaces
modular jack is used to enable the audible
ringer. As may be expected, in the on
position the audible ringer in enabled.
In most applications having the audible
ringer enabled is preferable, but exceptions do exist. The author was told of news
events involving the President of the
United States where disabling the audible
ringer would be a wise move. Having an
audible ringing signal occur during the
middle of a news conference would be
seriously frowned upon!
IFB Program Mute/Dim
Configuration
In traditional news-oriented IFB systems
program audio is fully muted whenever
interrupt is active. In other applications,
such as live sports, it may be desirable
to dim (attenuate) the program audio
whenever interrupt is active. One switch
on the Model 770s back panel allows the
program audio configuration to be selected for either full muting or 10dB dim.
Figure 7. Detail of back panel showing IFB
telco interface configuration section
Model 770 User Guide Issue 1, October 1997
Studio Technologies, Inc. Page 25
Position 5 of the DIP switch that is located
directly below the talent amplifier output
Page 26

Model 770
connector is used to select this mode.
When the switch is in the off position
program audio is fully muted. In the on
position program audio dims by 10dB.
Note that any function that uses the IFB
program only signal, such as the talent
amplifier output, are not affected by either
the mute or dim action; interrupt activity
does not impact the level of the IFB program only signal.
IFB Talent Amplifier Output
Configuration
The talent amplifier output associated with
the IFB section supports two discrete
audio output channels. Channel 1 audio,
along with DC power, is carried on pin 2
of the output XLR connector; channel 2
audio is carried on pin 3. The source of
channel 1 audio is internally configured to
be IFB audio and cannot be changed. The
source of channel 2 audio is selectable,
with the choices being main output, AUX
output, and IFB program only; of course
selecting no audio source is valid also:
Main output is the same signal that
connects to the output circuitry associated with the mixer sections main
outputs.
AUX output is the same signal that
connects to the output circuitry associated with the mixer sections AUX
outputs.
IFB program only is provided by the
IFB section, and consists of the program audio signal only; no interrupt
audio signals are present. No muting
or dimming of the program audio
signal takes place, even when interrupt
is active.
Issue 1, October 1997 Model 770 User Guide
Page 26 Studio Technologies, Inc.
Figure 8. Detail of back panel showing PGM
dim/mute and talent amplifier output
Positions 1, 2, and 3 of the DIP switch that
is located directly below the talent amplifier output connector are used to select
the source for channel 2. Simply select
the source desired, or leave all three
switches in their off position to have channel 2 be a quiet output. Note that more
than one source can be selected at the
same timelet your imagination run wild
with the possibilities!
The ability to select the talent amplifier
output channel 2 audio source is very
useful, greatly expanding the capability
Page 27

Model 770
of the Model 770s single IFB channel.
An example would be where on-air talent
and a field producer were equipped with
Model 32 Talent Amplifiers. The talent
would listen to IFB audio on channel 1.
By assigning main audio to channel 2, the
field producer could normally monitor the
main bus of the mixer section, while having the ability to quickly switch to the IFB
signal on channel 1. Note that the same
3-conductor cable would be supporting
both the talent the field producers Model
32 Talent Amplifiers!
Another example would be to assign IFB
program only audio to channel 2. Separate Model 32 Talent Amplifiers could be
provided to a field reporter and the guests
to be interviewed. By setting the source
switch on the Model 32 to channel 2,
interviewees would hear program audio,
without unfamiliar and unwanted IFB
audio.
pot is adjusted to give an output level of
+4dBu.
If the 1kHz direct output is to be used in
an installation, its important that its output
level be adjusted to precisely match the
requirements of the system. Also note that
while the output circuitry is capable of
driving loads of 600 ohms or greater, the
output level will drop slightly as the load
impedance approaches 600 ohms.
A third example could be for a sports
event where a separate non-interrupt
signal needs to be monitored at all times.
Assigning the mixer sections AUX audio
bus to channel 2, and providing a Model
33 Talent Amplifier to the on-air talent
would achieve this. A mix of the IFB signal
and AUX audio could easily be created
by using the Model 33s level controls.
1kHz Direct Output
The 1kHz direct output is a line-level
output that provides direct access to the
1kHz tone signal. A trim potentiometer
allows adjustment of the output level from
approximately +3 to +7dBu. The trim pot
is located on the back panel, directly
above the 1kHz direct outputs ¼-inch
phone jack. At the factory this output is
loaded with 100k ohms, and then the trim
Figure 9. Detail of back panel showing 1kHz
tone direct output configuration
Model 770 User Guide Issue 1, October 1997
Studio Technologies, Inc. Page 27
Page 28

Model 770
In practice, calibrating the output level is
quite simple:
1. Confirm that the 1kHz direct output
is terminated with its normal load
impedance.
2. Ensure that the Model 770 is connected to mains power.
3. Using an appropriate adapter cable,
connect an audio level meter directly
across the 1kHz direct output. Ensure
that your connection does not remove
the normal load! The level meter must
be a precision device thats intended
for audio usea general-purpose
voltmeter is not adequate!
4. Carefully observing the level meter,
adjust the trim pot to give the desired
output level.
Operation
While the Model 770 Audio Mixer/IFB
Controller is quite simple to operate, there
are nuances to its design that make a
detailed discussion worthwhile. Well start
with the individual sections that make up
the Model 770. Then well review how the
sections work together to become your
audio master control.
Mixer Section
Mic/Line Inputs
Three identical input channels are provided, each being compatible with a
microphone or line-level signal. A detailed description of one mic/line channel
follows:
Input Sensitivity
The mic/line button is used to select the
sensitivity of the input circuitry. In the mic
Figure 10. Detail of front panel showing mic/
line input channel (typical of 3)
(out) position, the expected nominal input
level is 55 to 35dBu. In the line (in)
position, a 40dB pad is inserted into the
circuit, making the expected nominal input
level 15 to +5dBu. The input circuitry is
compatible with a wide range of signal
levels and is protected from overload.
Low-Cut Filter
The button associated with the bent line
graphic symbol is used to select the lowcut filter function. (If you are a stickler for
semantics, its actually a high-pass filter
Issue 1, October 1997 Model 770 User Guide
Page 28 Studio Technologies, Inc.
Page 29

Model 770
function!) In the off (out) position the filter
is not placed in the audio path, leaving
the signal essentially flat. In the on (in)
position the signal is routed through the
filter circuit, removing low-frequency
energy.
The filter is useful for eliminating wind
noise, traffic rumble, and AC mains hum.
It was carefully designed to give a steep
slope (18dB/octave), with the 3dB point
at 85Hz. For most voice applications the
filter can be left activated. For wide-bandwidth signals, such as music, the filter
should be used only as necessary.
Changing the on/off status of the low-cut
filter will result in little or no noise being
added to the audio signal. While it is better
to set the filters button to the desired
position prior to being live, it can certainly be used at any time.
Status LED
A bi-color LED acts as a user-confidence
indication of the overall signal level in the
mic/line input channels circuitry. The LED
will light with the color green as a signal
present indicator, showing that the input
signal, along with the gain of the input
preamplifier, is at least 18dB below the
nominal internal operating level. The LED
will light with the color red as a peak
signal indicator, showing that the input
signal, along with the gain of the preamplifier, is within 6dB of the circuitrys maximum level.
Level Control
The rotary control is used to adjust the
gain of the input preamplifier circuit. In the
fully counterclockwise position the preamplifier gain is set to its minimum, and full
attenuation is achieved. This means that
no signal continues on to the next stage
of the mic/line input circuitry and, if configured, to the configurable output on the
back panel. As the level control is rotated
in the clockwise direction the gain of the
preamplifier increases.
Bus Assignment
Located below the level control are two
buttons, labeled MAIN and AUX. These
buttons control the connection of the
audio signal to the main and AUX audio
buses.
Main Bus Assignment
The button labeled MAIN controls the
assignment of the audio signal to the main
audio bus. In the off (out) position, signal
is not connected to the main bus; in the
on (in) position, the signal is connected
to the main audio bus.
AUX Bus Assignment
The button labeled AUX controls the
assignment of the audio signal to the AUX
audio bus. In the off (out) position, signal
is not connected to the AUX bus. In the on
(in) position, the signal is connected to the
AUX audio bus.
Stereo Line Inputs
The Model 770 contains two identical
stereo line input channels. They are
unique in that the left and right signals
associated with each stereo input are
automatically mixed to monaural, by way
of level controls, in preparation for assignment to the mono mixing buses. The input
circuitry was designed for compatibility
with signals that have a nominal level of
+4dBu. However, nominal signal levels
of 10 to +10dBu are perfectly acceptable. A description of one of the stereo
line input channels is provided.
Model 770 User Guide Issue 1, October 1997
Studio Technologies, Inc. Page 29
Page 30

Model 770
Bus Assignment
The signal from the mono summing amplifier is sent to the main and AUX bus assignment buttons. These two buttons
operate in the same fashion as described
for the mic/line input channels.
Master Output
The Model 770s master output section
contains a number of buttons and controls
associated with the main and AUX audio
buses.
Main and AUX Master Level Controls
Two controls are used to set the overall
level of the main and AUX audio buses.
On the front panel, note the small arrow
graphic symbol and the letter U, located
at the 1-oclock rotation position. This
indicates the approximate setting for the
level controls to give unity gain, and is
the position where the controls should
normally be set. Refer to the 1kHz to main
and AUX paragraph in this section for
how best to set the controls.
Limiter/Compressor
Figure 11. Detail of front panel showing stereo
line inputs
A studio-quality limiter/compressor circuit
is associated with the main audio bus. A
push-button switch selects the its status;
Level Controls
Two level controls are used to set the
amount of input signal that is sent to the
monaural summing (mixing) circuitry. The
inner knob controls the level of the left
channel input signal; the outer knob controls the right channel input signal. On the
front panel, note the small arrow graphic
symbol and the letter U, located at
approximately the 1-oclock rotation
when the button is in the out position the
limiter/compressor is disabled. When the
button is in the on (in) position, high signal
levels on the main audio bus will be automatically attenuated.
A green LED, located to the left of the
status button, displays the operating
condition of the limiter/compressor. It
lights whenever signal attenuation is
taking place.
position. This indicates the approximate
setting for the level controls to give unity
gain.
Issue 1, October 1997 Model 770 User Guide
Page 30 Studio Technologies, Inc.
Page 31

Model 770
Talk to Main and AUX
A button allows audio from the gooseneck
microphone to be connected to the main
and AUX buses, creating a talk back
function for cueing, slating, and setup use.
The monitor output and IFB monitor output both are automatically muted whenever the talk to main and AUX function is
active. Note that the voice audio signal will
be added (summed) with whatever signals
are also present on the buses.
IFB Section
The IFB section is located on the left side
of the Model 770s front panel.
Program and Interrupt Bus Operation
Figure 12. Detail of front panel showing
master output section
1kHz to Main and AUX
A 1kHz tone signal can be connected to
the main and AUX buses, serving as a
reference signal for local and remote use.
A push-button switch selects its status;
when the switch is in the in position tone is
connected. The tone level is factory set to
precisely match the Model 770s internal
operating level. When the tone is connected to the main and AUX buses, the
main and AUX master level controls can
be adjusted to give 0 level on the meter.
Probably the most complicated part of
the Model 770 is how the IFB section
creates the IFB signal. Actually, it really
quite simple, but may take users a few
moments of quiet meditation before the
mental light bulb goes on! Once someone gets the chance to use the controls
and experiment routing signals, all should
become clear.
The first topic that must be covered is how
the Model 770 defines program audio and
interrupt audio. Program audio is a signal
that connects to the IFB output during
normal operation. Interrupt audio is a
signal whose mere presence causes it to
be connected to the IFB output, as well as
causing muting or dimming (attenuating)
of the program audio. Internal to the
Model 770s IFB section are two audio
buses (highways); program and interrupt. The program audio bus has a mute/
dim circuit associated with it. The interrupt
bus has a special voice detection circuit
associated with it. Commonly known as
a VOX circuit, it generates a logic signal
Model 770 User Guide Issue 1, October 1997
Studio Technologies, Inc. Page 31
Page 32

Model 770
whenever energy in the voice band is
present with sufficient level. Clickless
electronic switches control the routing
of program and audio signals to the IFB
output.
With the Model 770 any of seven audio
sources can be assigned as a program
or interrupt audio source; mixer main bus
audio, mixer AUX bus audio, IFB line
inputs 1-4, and telco interface receive
audio. Any signal assigned as program
audio will be connected to the IFB output
whenever there is no signal present on the
interrupt bus. If voice energy is detected
on the interrupt bus, it is connected to the
IFB output, and the program audio signal
is muted or dimmed. Once voice audio is
no longer present on the interrupt bus, the
interrupt bus is disconnected from the IFB
output and the program bus is again
connected.
Semantics are what leads to the confusion
when learning to use the Model 770. When
users start describing the actual signals
that will be presented to the IFB section,
all clarity seems to disappear! On the
Model 770, how does a user assign a
signal to give the desire cueing perfor-
mance? First lets start with some ex-
amples of audio signals that may be
encountered. It is common for an inter-
rupt signal to originate from a control
room located in a major city, such as
New York. This may be a program or mix-
minus signal that gets interrupted in the
aforementioned control room. Its really a
combination of program and interrupt. In
a second example a program signal may
come from an off-air receiver, with no
cues present. A third example could be
the output of a 2-way radio that a director
is using to cue the talent.
The best way to determine whether these
signals should be assigned as program
or interrupt is to decide what you want to
do with them, as related to the IFB output.
Decide if each signal must always to be
heard by the talent, or if another signal
needs to have priority over it. Signals that
must have priority over others need to be
assigned as interrupt audio. Signals that
need to be muted (or dimmed) when other
signals are active, should be assigned as
program audio. Signals that neither have
Figure 13. Detail of front panel showing IFB
line inputs
Issue 1, October 1997 Model 770 User Guide
Page 32 Studio Technologies, Inc.
priority or are subservient to others should
be assigned as program.
Page 33

Model 770
All these wordy sentences are trying to
describe a simple procedure. Lets take
our first example, where an interrupt
signal is coming from a control room in
New York. In most cases this signal would
need to be routed to the Model 770s IFB
output; nothing should cause its level to
be muted or dimmed. If this is correct,
then this signal should be assigned as
interrupt. Assignment of another signal to
the interrupt bus, or activation of the frontpanel gooseneck microphone, will simply
cause these signals to be added
(summed) with the signal from New York.
The second example, audio from an off-air
receiver, is pretty straight forward; it
should be assigned as program. The third
example, the director cueing via a 2-way
radio, is simple too. It should be assigned
as an interrupt source.
Source Assignment Switches
Seven switches are provided to route the
source signals to the program and interrupt audio buses. The sources are: mixer
section main and AUX audio, four IFB line
inputs, and telephone interface. The
switches have three mechanical positions;
left, center, and right which are labeled
respectively PGM (for program), OFF, and
INT (for interrupt). In the off position signal
is not connected to either of the buses. In
the program position signal is connected
to the program bus. In the interrupt position signal is connected to interrupt audio
bus, as well as the interrupt signal detection circuit. There is absolutely no problem
assigning multiple sources to program or
interrupt.
Local IFB
The button labeled TALK TO IFB, located
on the lower-left-corner of the front panel,
is used to connect audio from the gooseneck microphone to the interrupt bus, and
on to the IFB output. This allows cue or
setup information to be sent to the talent,
or other users of the IFB output. The
interrupt LED will light whenever the button is pressed, and the program audio will
be muted or attenuated (dimmed). If the
interrupt function is already active, the
gooseneck microphone audio will be
added (summed) with the other interrupt
signal. To prevent acoustic feedback,
pressing the talk to IFB button also causes
the IFB monitor output and the monitor
sections monitor output to mute.
Interrupt LED
The yellow LED, labeled INTERRUPT, is
lit any time program audio is being interrupted. There are two way an interrupt can
take place: by the presence of signal on
the interrupt bus, or by pressing the local
talk-to-IFB button.
Level Meter
A 5-segment LED level meter displays
the level of the composite (program and
interrupt) IFB signal. The three green
LEDs are lit with signals in the normal
operating range. The yellow LED lights
with a signal slightly higher than normal.
The red LED lights when signal levels are
in the headroom area. The ballistics of
the meter are a cross between that of a
VU and a peak (PPM) meter. (We affectionately refer to it as a PU meter!)
The Model 770s monitor section allows
the selection of IFB as its source. With
this selection the mechanical VU meter will
also display the IFB signal. With normal
IFB audio signal levels the mechanical VU
meter may seem to display a few dB lower
than that displayed on the IFB sections
Model 770 User Guide Issue 1, October 1997
Studio Technologies, Inc. Page 33
Page 34

Model 770
Figure 14. Detail of front panel showing IFB
master section
LED meter. This is because the mechanical meter is slower in responding to
signal peaks. With a more constant signal,
such as a tone, the meters will display
essentially identical levels.
IFB Master Level Controls
Two controls are used to set the master
levels of the IFB audio buses. The inner
knob controls the level of the program
audio bus; the outer controls the interrupt
audio bus. In most cases simply setting
the controls to the unity gain position, as
marked on the front panel, will provide the
best performance. During actual operation
there is absolutely no problem adjusting
the controls to give the desired program-
to-interrupt level balance, along with
keeping the LED meter lighting in the
normal range; the green LEDs lighting
regularly, with an occasional lighting of
the yellow LED.
Telephone Interface
Three status LEDs, three switches, and
one trim potentiometer are associated with
the telephone interface. The yellow LED,
labeled STANDARD AUDIO, is lit whenever
the interface is set for the standard audio
mode. This occurs when the second pair
(pins 2 and 5) of the telco interfaces
modular jack are shorted (connected
together). The red LED, labeled RING,
lights whenever a high-voltage ringing
signal is detected on the input to the telco
interface. The green LED, labeled OFF-
HOOK, lights whenever DC loop current
is flowing through the interface. If the
interface is set for the standard audio
mode and DC current is detected, the off-
hook LED will light in a flashing on-and-off
cadence. This is to indicate an abnormal
condition, one that requires the mode of
the interface to be changed to the tele-
phone line mode.
The interface control switch, active in the
telephone line mode, allows the interface
to be manually answered or hung up.
Momentarily pressing the switch to the
position labeled ANSWER places the
interface in the off-hook state, and causes
a one-second acknowledgment tone to
be sent out the interface. If DC current
is detected, the interface will stay in the
off-hook state and the off-hook LED will
light. If loop current is not detected, the
Issue 1, October 1997 Model 770 User Guide
Page 34 Studio Technologies, Inc.
Page 35

Model 770
interface will return to its on-hook state
after a few seconds. Momentarily pressing
the switch to the position labeled HANG
UP disconnects the interface from the
telephone line. Note that in the standard
audio mode this switch is not active because the standard audio mode places
the interface permanently in what is effectively the off-hook condition.
A second switch controls the audio routing
through the interface. In the switchs
center position, labeled SEND, the send
audio source (selected using the DIP
switches on the back panel) is sent out
the interface. The send level has been
internally set to give the highest signal
level possible, without overloading connected equipment. In the switchs left
position, labeled PGM, audio received by
the interface is connected to the program
audio bus. In the switchs right position,
labeled INT, audio received by the interface is connected to the interrupt audio
bus. A receive level trim potentiometer is
provide, allowing the receive audio level
to be adjusted over a ±8dB range. A quiet
signal can be boosted, or a hot signal
can be attenuated.
Auto Answer Function
When the mode of the telco interface is
set for telephone line, and auto answer
has not been disabled, the interface will
answer a call after the detection of two
ringing voltage cycles. Waiting for two
complete ring cycles was specifically
selected so that a calling party will have a
chance to hear audible call progress tones
provide by their communications provider.
The telco interfaces circuitry is capable of
answering in a fraction of a ring cycle, but
this can be confusing to callers, especially
IFB Monitor Output
A separate monitor output is provided by
the IFB section, independent of the monitor sections monitor output. This allows
the IFB signal to be monitored at, essentially, all times, minimizing the chance of
important cues being missed. Only when
the gooseneck microphone is active will
the IFB monitor output be muted to prevent acoustic feedback. To use the IFB
monitor output is simple, just set the rotary
level control to the give the desired output
level.
Model 770 User Guide Issue 1, October 1997
Studio Technologies, Inc. Page 35
Figure 15. Detail of front panel showing telco
interface
Page 36

Model 770
ones who are located internationally,
where call setup time can vary greatly.
Upon answer a one second acknowledgment tone is sent out the interface. This is
to assist the caller in knowing that the
connection has been made.
Talk To Telco Function
The button labeled TALK TO TELCO is
used to connect audio from the gooseneck microphone to the telco interface.
This allows a cue or setup information to
be sent to the connected device. If the
telephone interface is set to the telephone
line mode, only when the interface is in the
off-hook state will the talk to telco function
be available. When the telephone interface
is set to the standard audio mode the talk
to telco function is always available. Activating the talk to telco function temporarily
disables the receiving or sending of audio
through the telco interface. Pressing the
talk to telco button also causes the IFB
monitor output and the monitor sections
monitor output to mute.
Monitor Section
Figure 16. Detail of front panel showing
monitor section
allow one or more of the audio sources to
be selected for monitoring. A review of the
sources may prove helpful:
Main This button selects the mixer
sections main audio bus as the monitor
source.
AUX This button selects the mixer
sections AUX audio bus as the monitor
source.
The monitor section assists the operator
in obtaining the best performance from
IFB This button selects IFB audio as the
monitor source.
the Model 770. It controls the signal that
is presented to the VU meter, monitor
output, and headphone output. Acting
as a trusty assistant, the monitor section
allows visual and aural monitoring of a
EXT 1 This button selects external
monitor input 1 as the monitor source.
EXT 2 This button selects external
monitor input 2 as the monitor source.
variety of signals, without affecting the
main, AUX, and IFB audio buses. Understanding and becoming comfortable with
using the monitor section is crucial to
obtaining optimal Model 770 performance.
The monitor source push-button switches
were chosen to allow more than one
source to be selected at a time. The ability
to simultaneously depress and lock mul-
tiple buttons is not a glitch, but is a
Source Selection Buttons
The core of the monitor section are five
monitor source buttons. These buttons
feature which can prove useful in some
specialized situations. An example is
where a mix-minus cue signal from a
remotely located facility is being returned
Issue 1, October 1997 Model 770 User Guide
Page 36 Studio Technologies, Inc.
Page 37

Model 770
to the Model 770 by means of external
monitor input 1. By selecting both EXT 1
and main, a composite signal is created
for monitoring.
Metering
A VU-type meter is provided for visual level
monitoring. The meter provides the operator with an excellent sense of the average
signal level. Its source is the monitors
section selected audio source.
Monitor Output
The monitor section provides a monitor output, along with an associated level control.
The source for the monitor output is the
selected monitor source. The monitor
output is line-level and is designed to be
connected to an audio power amplifier and
associated loudspeaker. Alternatively, it
can be connected to an amplified speaker
that contains an internal power amplifier.
The monitor output is muted whenever the
functions talk to telco, talk to IFB, or talk to
main and AUX are active. The mute function
limits the amount of sound that gets into the
gooseneck microphone, helping cue intelligibility and preventing acoustic feedback.
Headphone Output
A separate stereo headphone output is
provided, along with an associated level
control. The phones output is designed
to work well with virtually any of the contemporary medium- and high-impedance
headphones. Sony headphones were
used during the design of the Model 770;
their high sensitivity made them go way
loud! While a bit bright in the high-end
for our taste, their comfort and fine design
make them a good choice for use with the
Model 770.
Warning: Protect your ears! The
Model 770 is capable of driving headphones to extremely high sound pressure levels. Hearing experts advise
against continuous extended play,
especially at high levels. Polka music
has been found to be especially dangerous, so please be careful.
Practical Operating Tips
Now that weve reviewed all the sections
that comprise the Model 770, its time
to actually use the unit. In the following
paragraphs some suggestions about how
to best use the Model 770 are provided.
Setting the Mixer Sections Bus
Operating Levels
The mixer sections main and AUX master
level controls allow the overall gain structure of the audio mixing buses to be set.
Correctly setting these controls ensures
that maximum audio quality will be
achieved. In most cases simply setting the
controls to the unity gain position is appropriate; the unity gain position is clearly
marked on the front panel. If you are a
fanatic for accuracy, you may want set the
level controls precisely using the following procedure:
1. Set the 1kHz to main and AUX button
to the on (in) position. This will cause
a precision-level 1kHz tone to be
connected to the main and AUX buses.
2. Select main as the monitor source.
3. Adjust the main master level control so
that the meter displays 0 VU. The main
bus is now set for unity gain.
4. Select AUX as the monitor source.
Model 770 User Guide Issue 1, October 1997
Studio Technologies, Inc. Page 37
Page 38

Model 770
5. Adjust the AUX master level control so
that the meter displays 0 VU. The AUX
bus is now set for unity gain.
6. The procedure has now been completed. Return the 1kHz to main and
AUX button to the off (out) position.
Signal Present/Peak LEDs
Bi-color status LEDs are provided on the
mixer sections mic/line input sections.
Under normal operating conditions the
LEDs should light only with the color
green. Signal peaks may cause an occasional red flash, but sustained lighting of
the peak indicator means that audio performance is being compromised. Adjust
the level controls so that you arent in the
red except on rare occasions.
Limiter/Compressor
While the Model 770 was designed to
provide lots of signal headroom, most
applications, especially broadcast, wont
benefit from it. In fact, wide dynamic
range, in many cases, will simply tax the
transmission chain and lead to signal
degradation. Our feeling is that leaving the
limiter/compressor in the on state is your
best bet. If you cant think of a good reason why extended dynamic range on the
mixer sections main audio bus is desired,
leave the limiter/compressor active!
Dont misunderstand our position: Extended dynamic range is great for music
recordings. We love listening to terrific
classical, jazz, and, when available, pop
recordings. But for most applications
served by the Model 770 dynamic range
is not really a factor.
Talent Amplifiers
Both the Model 32 and Model 33 Talent
Amplifiers utilize a ¼-inch 2-conductor
phone jack for their audio output. On the
Model 32, either IFB audio or the channel
2 audio source, if configured, can be
selected as the audio source. On the
Model 33, either or both audio signals
can be selected. The level control(s)
should be adjusted for the desired level.
Note that even when the level control(s)
are set to the fully counterclockwise position, the audio output will not be fully off.
This ensures that personnel will never
(hopefully!) miss an important cue because a level control was accidentally
turned off.
Technical Notes
¼-Inch Plugs and EIA RS-453
An incompatibility problem lurks between
some ¼-inch 2-conductor and 3-conductor phone plugs and the jacks found on
professional audio equipment. While all
the plugs seem to look the same, some
do not comply with the industry standard,
called EIA RS-453. This standard defines
the physical dimensions, including the
shape of the plugs tip. It seems that some
plug manufacturers dont bother to make
the tip comply with the standard.
Why is this relevant to you? Because the
phone jacks used on the Model 770 do
comply with the standard, and they expect
to be mated with plugs that do, too.
Should a connection seem flaky, sound
noisy, or make intermittent contact, the
most likely problem is a nonstandard
phone plug. Replace the plug if this is
the case.
You should find that all plugs from
Switchcraft or Neutrik will work correctly,
specifically Switchcraft No. 297 or Neutrik
NP3C. In our experience, headphones are
Issue 1, October 1997 Model 770 User Guide
Page 38 Studio Technologies, Inc.
Page 39

Model 770
the most likely place to find nonstandard
plugswe even found them on some
world-class headphones that we use in
our lab!
Definition of Level
Studio Technologies has opted to use the
dBu designation as it seems to be quite
rational. Using dBm was fine when all
audio outputs were terminated with 600
ohm loads. In this way it was easy to say
that 0dB was 1 milliwatt dissipated in the
known load (i.e., 0dBm across 600 ohms
will measure 0.775V). Today, an output is
rarely terminated with 600 ohms; generally
10k ohms or higher. The dBu designation
is better because it refers to dB referenced
to 0.775V, with load impedance not a
factor. This takes into account the contemporary audio scene where most equipment has a low output source impedance,
and a high input impedance.
Faux VU Meter
In the spirit of George Washington (and to
make our mothers proud of us) we have
to tell the truth and admit that while the
meter selected for the Model 770 is of very
good quality, it doesnt meet the specifications of a true VU meter. So why was a
less-than-perfect meter selected for the
Model 770? The answer is easy and not
surprisingbucks! While the Model 770s
existing meter is already quite expensive,
being built in England by a top-notch
meter manufacturer, the cost for a true
VU meter is about five times as much!
The technical difference between the
meter used on the Model 770 and a true
VU meter lies in the ballistic characteristics, i.e. how the pointer accelerates and
decelerates in response to audio signals.
The Model 770s meter pointer moves very
close to, but not exactly, in the manner
required to be perfect.
For the Model 770 operator, the selected
meter provides a completely acceptable
indication of level. But as a technically
oriented company, we wanted to come
clean about our actions. Too bad so
many other audio companies dont tell you
that their VU meters are fakesmany
dont even come close to meeting the
specs!
VU Meter Calibration
From the factory the VU meters are calibrated so that a +4dBu signal level, as
measured on main output 1, results in a
reading of 0 VU on the meter. However,
it may be observed that the meter may no
longer be precisely calibrated when the
monitor source button is set to something
other than main. A difference of up to
0.5dB from the calibrated value could be
expected. This is due to tolerance variations in the components of the monitor
circuitry. In reality, only when steady tones
are present on the monitor sources will
this variation become apparent. During
actual operation its unlikely to become
a factor.
Model 32 and 33 Output Level
By design, the output level on the Model
32 and Model 33 Talent Amplifiers cannot
be set to fully off. While the output level
can be substantially attenuated, it never
can be set for full attenuation. This was
to ensure that talent personnel could never
accidentally be fully isolated from their
program or IFB source. There may be
special cases where full attenuation is
desired. This might be especially true with
the Model 33 Talent Amplifier, where a mix
of the two IFB channels can be achieved.
Model 770 User Guide Issue 1, October 1997
Studio Technologies, Inc. Page 39
Page 40

Model 770
Referring to the Model 32 or Model 33
schematic diagram, observe the 200 ohm
resistor that is connected between circuit
common and the counterclockwise connection of each potentiometer. This resistor prevents full attenuation. By replacing
this 200 ohm resistor with a 0 ohm
resistor or jumper strap, full attenuation
can be achieved.
Issue 1, October 1997 Model 770 User Guide
Page 40 Studio Technologies, Inc.
Page 41

Model 770
Specifications
General
Connectors:
Mic/Line: 3-pin XLR-type, female (pin 2 high)
Outputs Main 4, AUX 2, IFB Line, and IFB
Talent Amplifier: 3-pin XLR-type, male (pin 2
high for main 4, AUX 2, and IFB line)
All Other Audio: ¼-inch 3-conductor phone jacks
Telco Interface: 6-position modular jack
(RJ11-type)
AC Mains: 3-blade IEC-type
AC Mains Requirement:
100, 120, or 220/240V, ±10%, factory configured;
50/60Hz; 40 watts maximum
Mains Fusing: 1
Type: 5x20mm, fast acting
Rating: 0.4A for 100 or 120V mains, 0.2A for 220/
240V mains
Dimensions (Overall):
19.00 inches wide (48.3cm)
3.49 inches high (8.9cm)
9.50 inches deep (21.4cm)
Mounting:
2 standard rack spaces
Weight:
13.5.0 pounds (6.1kg)
Mixer Section
General Audio Parameters:
Frequency Response: 20Hz-20kHz, ±0.2dB,
mic in/main out 1
Distortion (THD+N): 0.04%, measured at 1kHz,
+4dBu input to mic in/main out 1
S/N Ratio: 85dB, referenced to +4dBu to mic in/
main out 1
Level Range:
Mic: 70 to 10dBu; Line: 30 to +30dBu
Range specified to give +4dBu output level,
master level controls set to unity gain position
Low-Cut Filter: 3dB at 85Hz, 18dB/octave slope
Status LED: bi-color, signal present/peak
Stereo Line Inputs: 2
Type: electronically balanced, direct-coupled,
compatible with balanced or unbalanced signals
Impedance: 24k ohms
Common Mode Rejection Ratio: 80dB @ 60Hz,
70dB @ 40kHz, typical
Nominal Level: +4dBu (8 to +10dBu
acceptable)
Main Audio Bus Limiter/Compressor:
Type: single-knee, VCA-controlled
Slope: 5:1, nominal
Threshold: +10dBu, nominal (6dB above
nominal output level)
Attack Time: 2mSec, nominal
Release Time: 100mSec, nominal
Status LED: limiter/compressor active
Outputs Main 1, 2, 3, AUX 1:
Type: electronically balanced, capacitor-coupled,
intended to drive balanced or unbalanced loads
of 600 ohms or greater
Source Impedance: 50 ohms, nominal
Nominal Level: +4dBu
Maximum Level: +27dBu into 10k ohms,
+26dBu into 600 ohms
Main Output 4, AUX Output 2:
Type: balanced, transformer-coupled, intended to
drive balanced or unbalanced loads of 2k ohms
or greater
Source Impedance: 170 ohms, nominal
Nominal Level: +4dBu
Maximum Level: +21dBu into 10k ohms
Mic/Line Inputs: 3
Type: balanced, transformer-coupled
Impedance: mic 1.6k ohms, line 15k ohms
Common Mode Rejection Ratio: 62dB @ 60Hz
(typical)
Model 770 User Guide Issue 1, October 1997
Studio Technologies, Inc. Page 41
Page 42

Model 770
IFB Section
General Audio Parameters:
Audio Switching and Muting: clickless using
special ramping analog switches
Frequency Response: 20Hz-20kHz, ±0.5dB,
IFB line in/IFB line out
Distortion (THD+N): 0.04%, measured at 1kHz,
+4dBu input to IFB line in/IFB line out
S/N Ratio: 71dB, referenced to +4dBu to IFB line
in/IFB line out
Interrupt Audio Limiter/Compressor: studio
quality, dual slope
Gooseneck Microphone Limiter/Compressor:
studio quality, dual slope
Line Inputs: 4
Type: electronically balanced, direct-coupled,
compatible with balanced or unbalanced signals
Impedance: 24k ohms
Common Mode Rejection Ratio: 80dB @ 60Hz,
70dB @ 40kHz, typical
Nominal Level: +4dBu, adjustable over ±8dB
Voice Operated (VOX) Interrupt Function:
Detection Bandpass: 400 to 1400Hz, nominal
Detect Time: less than 1mSec
Detect Level: 18dB below nominal
IFB Line Output:
Type: balanced, transformer-coupled, intended
to drive balanced or unbalanced loads of 2k
ohms or greater
Source Impedance: 170 ohms, nominal
Nominal Level: +4dBu
Maximum Level: +21dBu into 10k ohms
IFB Intercom Link Out: allows direct connection
to RTS/Telex intercom buses
Output Type: current source
Output Impedance: 10k ohms, nominal
Output Level: 18dBu when connected to 200
ohm load
Talent Amplifier Output:
Application: provides power and audio signals
for up to four Model 32 or Model 33 Talent Amplifiers. The output connector (3-pin XLR-type, male)
has common on pin 1, +22Vdc modulated with
IFB audio (10dBu nominal) on pin 2, and selectable audio source (10dBu nominal) on pin 3.
Telco Interface:
Application: selectable for compatibility with
telephone line (wet) or standard audio (dry)
signals
Impedance: 600 ohms
Receive Audio Level: 15dBu, nominal, adjust-
able over ±8dB range
Send Audio Level: 6dBu, nominal
Telephone Line:
Compatibility: 2-wire, loop start, 10mA loop
current minimum
Ring Detection: 40-150Vrms, 18-68Hz, ringer
equivalence 1.0B
Auto Answer: after detection of two complete
ring cycles (can be disabled)
Disconnect: manual using front-panel switch;
automatic after detection of break in loop current
Overcurrent Protect: solid-state, automatic reset
IFB Monitor Output:
Type: electronically balanced, capacitor-coupled,
intended to drive balanced or unbalanced loads
of 600 ohms or greater
Source Impedance: 50 ohms, nominal
Nominal Level: 4dBu, with monitor level control
@ 100%
Maximum Level: +19dBu into 10k ohms,
+18dBu into 600 ohms
Monitor Section
External Monitor Inputs: 2, monaural
Type: electronically balanced, direct-coupled,
compatible with balanced or unbalanced signals
Impedance: 24k ohms
Common Mode Rejection Ratio: 80dB @ 60Hz,
70dB @ 40kHz, typical
Nominal Level: +4dBu
Issue 1, October 1997 Model 770 User Guide
Page 42 Studio Technologies, Inc.
Page 43

Model 770
Monitor Output:
Type: electronically balanced, capacitor-coupled,
intended to drive balanced or unbalanced loads
of 600 ohms or greater
Source Impedance: 50 ohms, nominal
Nominal Level: 2dBu, with monitor level control
@ 100%
Maximum Level: +21dBu into 10k ohms,
+20dBu into 600 ohms
Headphone Output:
Compatibility: intended for connection to head-
phones with impedance of 100 ohms or greater
Maximum Voltage: 8Vpp, 100 ohm load
1kHz Tone Output:
Type: electronically balanced, capacitor-coupled,
intended to drive balanced or unbalanced loads
of 600 ohms or greater
Source Impedance: 100 ohms, nominal
Wave Form: sine
Output Level: +4dBu, nominal, adjustable over
1/+3dB
Metering:
Type: analog, VU scale
Calibration: 0 VU = +4dBu, adjustable ±3dB
Illumination: 7 LEDs
Polarity: Input-to-output polarity maintained with
the exception of monitor output, IFB monitor
output, and IFB intercom link output
Specifications subject to change without notice.
Model 770 User Guide Issue 1, October 1997
Studio Technologies, Inc. Page 43
Page 44

Model 770
This page intentionally left blank.
Issue 1, October 1997 Model 770 User Guide
Page 44 Studio Technologies, Inc.
Page 45

Page 46

Page 47

Page 48

Page 49

Page 50

Page 51

Page 52

Page 53

 Loading...