

Page 1

Model 60 Central Controller and
Model 61 Control Console
User Guide
Issue 2, March 1998
This User Guide is applicable for serial numbers:
Model 60 00200 to 00300
Model 61 00151 and later
© 1998 by Studio Technologies, Inc., all rights reserved
5520 West Touhy Avenue
Skokie, Illinois 60077 U.S.A.
Telephone (847) 676-9177
Fax (847) 982-0747
www.studio-tech.com
50076-398, Issue 2
Page 2

Tab le of Contents
Foreword..................................................................... 5
Introduction ................................................................. 7
What This User Guide Covers ................................ 7
System Overview .................................................... 7
System Features ..................................................... 7
Installation................................................................... 10
Configuration............................................................... 15
Operation .................................................................... 15
Troubleshooting .......................................................... 18
Technical Notes .......................................................... 18
Specifications .............................................................. 21
Block Diagrams
Model 60 Central Controller
Model 61 Control Console
Model 60/61 User Guide Issue 2, March 1998
Studio Technologies, Inc. Page 3
Page 3

Foreword
I am pleased to present the StudioComm series of products. As both president and owner
of Studio Technologies, I take a very personal approach when designing products. Getting
older has increased my appreciation of the more subtle things in life—be they a part of
nature or the nuances contained in a well-designed piece of electronic equipment. Do the
technical and operational aspects of a product work together to “feel” right? A Studio Technologies’ design is ready to go only when I am completely satisfied. My entire focus for the
StudioComm series was to make a system that you’d really enjoy using, and one that
would perform reliably for years. I hope you share my enthusiasm.
Many fine people worked toward making the StudioComm “happen.” Mitch Budniak (ace
consulting engineer) designed many of the circuits. Jim Cunningham contributed to the
analog design. Carrie Loving provided engineering support. Al Lux designed the printed
circuit boards. Fred Roeck performed the mechanical design. Joe Urbanczyk coordinated
the safety testing and agency approvals.
Many thanks to Bob Tjarks, professional audio sales manager at Gand Music & Sound,
Northfield, Illinois. Bob brought to my attention the need for a product to serve digital audio
workstations. His product idea evolved into the StudioComm series. Additional thanks to
Timothy Powell of Metro Mobile Recording, Glenview, Illinois, who provided his excellent
ears when issues of sonic quality arose. His extensive field and studio experience was
extremely helpful in keeping me on the audio “straight and narrow.”
Studio Technologies is receptive to your comments and questions. Please contact me via
phone (847) 676-9177, fax at (847) 982-0747, or the Internet at www.studio-tech.com—I’d
like to hear from you.
Sincerely,
Gordon K. Kapes
President
Model 60/61 User Guide Issue 2, March 1998
Studio Technologies, Inc. Page 5
Page 4

Introduction
The Model 60 Central Controller, along
with the companion Model 61 Control
Console, are members of the StudioComm
family of products. The Models 60 and 61
are specifically designed to work in conjunction with digital audio workstations to
provide routing, monitoring, and communications functions. Features include insert
switching, control room monitoring, dub
(copy) output, and an integrated headphone cue system. Several of the functions can be configured, allowing the
performance to be tailored to a specific
installation.
What This User Guide Covers
This User Guide is designed to assist you
when installing and using the Model 60
Central Controller and the Model 61 Control Console. A limited amount of troubleshooting information is also provided.
Should you require detailed technical
information please refer to the Service
Guide covering the Models 60 and 61. The
Service Guide contains detailed service
information, including schematic diagrams.
The Service Guide is not shipped with
each StudioComm system, but is available
from the factory upon request. It is free of
charge to purchasers of StudioComm
equipment. Give us a call or send a fax or
E-mail if you need this highly exciting
document!
System Overview
The StudioComm system is designed to
provide control over monitor and dub
sources, implements a passive insert
switching system, and includes a headphone cue system that allows communica-
tions from the control room to the talent. A
complete StudioComm system consists of
a rack-mounted controller and a desktop
control console.
The Model 60 Central Controller and the
Model 61 Control Console work together
to provide a simple, convenient operator
interface, extensive features, and excellent
sonic performance. The units interconnect
using a standard 5-pin MIDI-style cable.
Switches and controls on the Model 60’s
front panel allow access to many operating
parameters, including activating insert
devices, selecting control room and dub
input sources, and setting headphone cue
system level. The Model 61 Control Console places the most important controls at
the operator’s finger tips. These include
the control room level potentiometer and
monaural button, as well as the cue microphone and enable button.
System Features
Insert Switcher
The insert switcher section allows an
unbalanced stereo audio signal to be
routed to up to three processing devices.
This feature is specifically provided to
allow an analog output signal from an
audio workstation to be processed by
equalizers, compressors, or other analog
devices, then be returned to the workstation’s analog input. Three switches on
the Model 60’s front panel are used to
select which one (or more) of the three
devices are active in the insert audio
chain.
Alternately, the insert switcher can be
wired so as to create a four input/one
output stereo input source switcher. This
can be used for routing analog sources
to a work station’s analog input.
Model 60/61 User Guide Issue 2, March 1998
Studio Technologies, Inc. Page 7
Page 5
Stereo Line Inputs
The Model 60 contains four stereo linelevel inputs which are compatible with both
balanced and unbalanced signals. Each
input is independently configurable for a
nominal input level of –10dBV or +4dBu.
Analog audio outputs from digital audio
workstations, DAT recorders, video editing
equipment, CD players, cassette decks,
or virtually any analog source can be
connected.
Control Room Output
A stereo line-level output is provided for
connection to a power amplifier associated
with control room monitor loudspeakers.
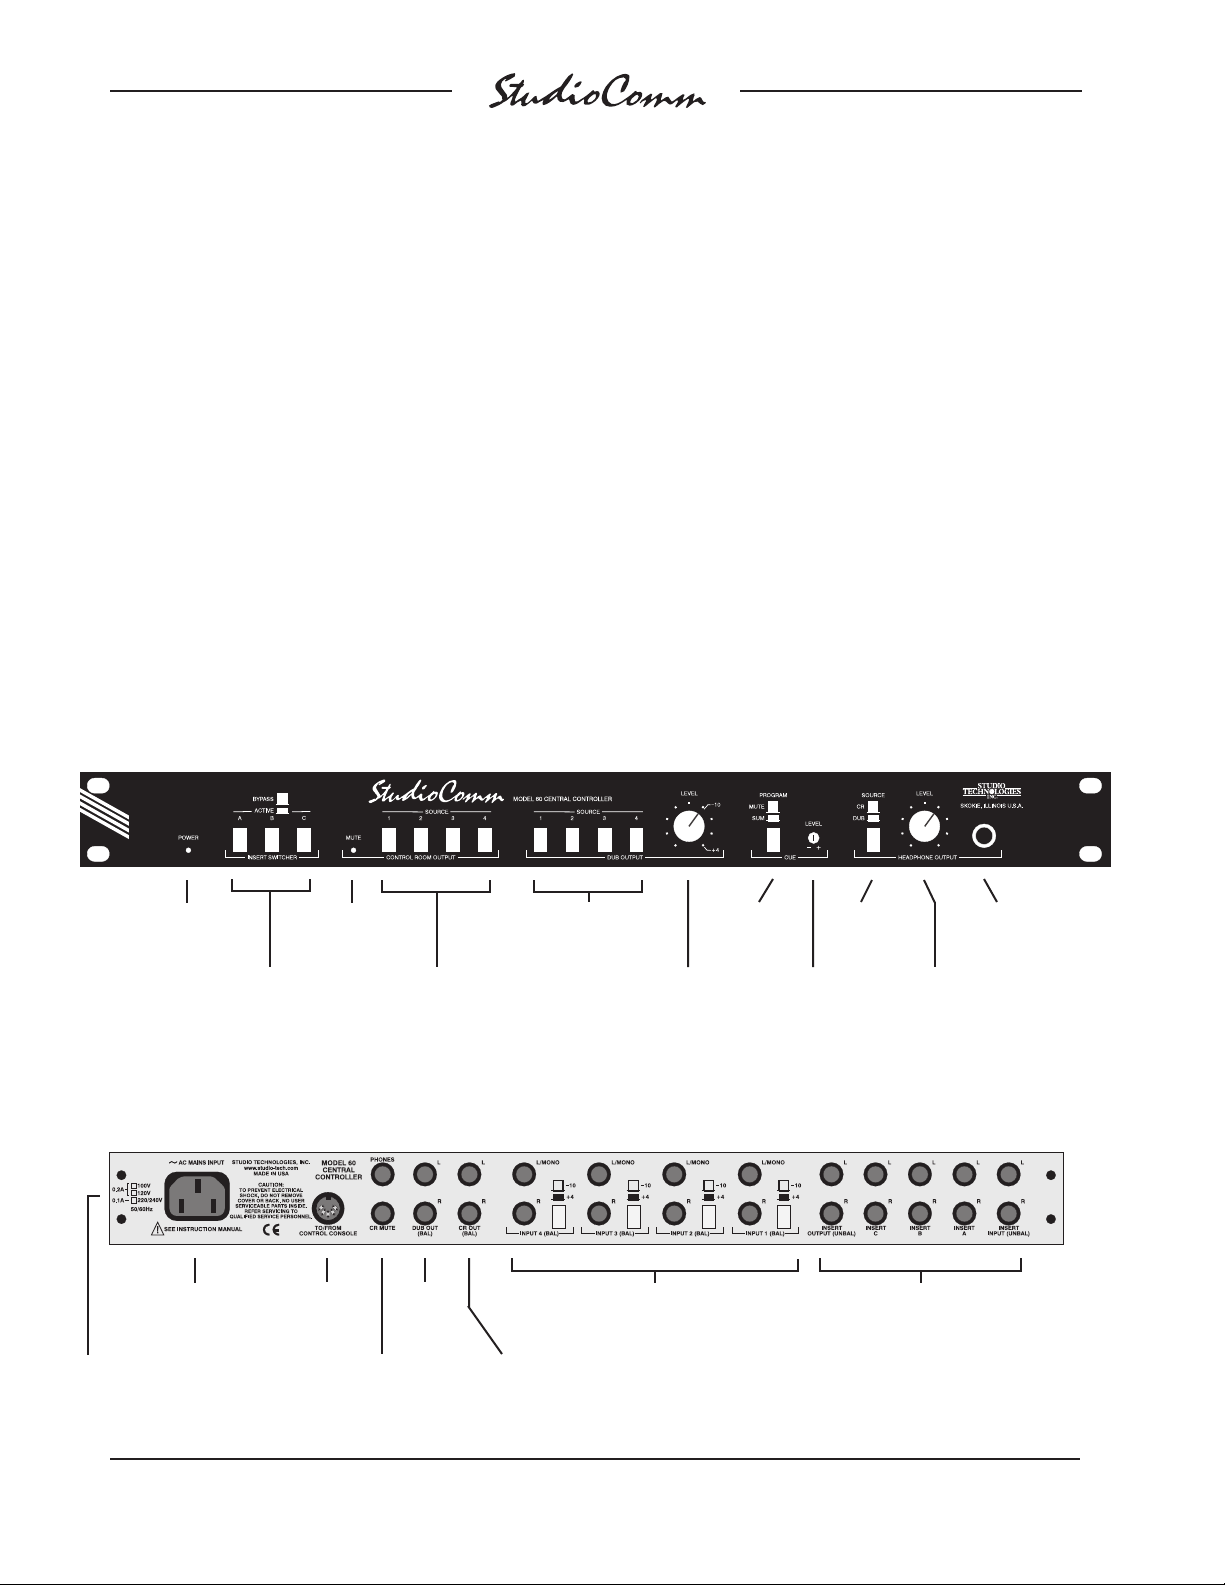
Model 60 Front Panel
Switches on the Model 60’s front panel
allow selection of one or more of the four
input signals as the control room source.
A smooth-feeling rotary control on the
Model 61 Control Console allows the
control room level to be adjusted. As a
production or mixing aid, the Model 61
contains a button that activates the control
room monaural (L+R) function.
For broadcast or other special application,
an external switch or contact closure can
be connected to the Model 60, allowing
the control room output to be fully muted
as required. An LED indicator on the
Model 60’s front panel lights whenever
mute is active. A power up/power fail
Power
present LED
Insert switcher
bypass/active
Control room
mute LED
Control room
source switches
switches
Dub source
switches
Cue program
Dub output
level control
switch
Headphone
source switch
Cue level
control
Headphone
output level
control
Model 60 Back Panel
AC mains
connection
Mains voltage
configuration chart
Issue 2, March 1998 Model 60/61 User Guide
Page 8 Studio Technologies, Inc.
To/from
Model 61
Control Console
Headphone
output; control
room mute input
Dub
output
Control
room output
Stereo line-level
inputs
Insert switcher input,
output, and insert device
connections
Headphone
output jack
Page 6
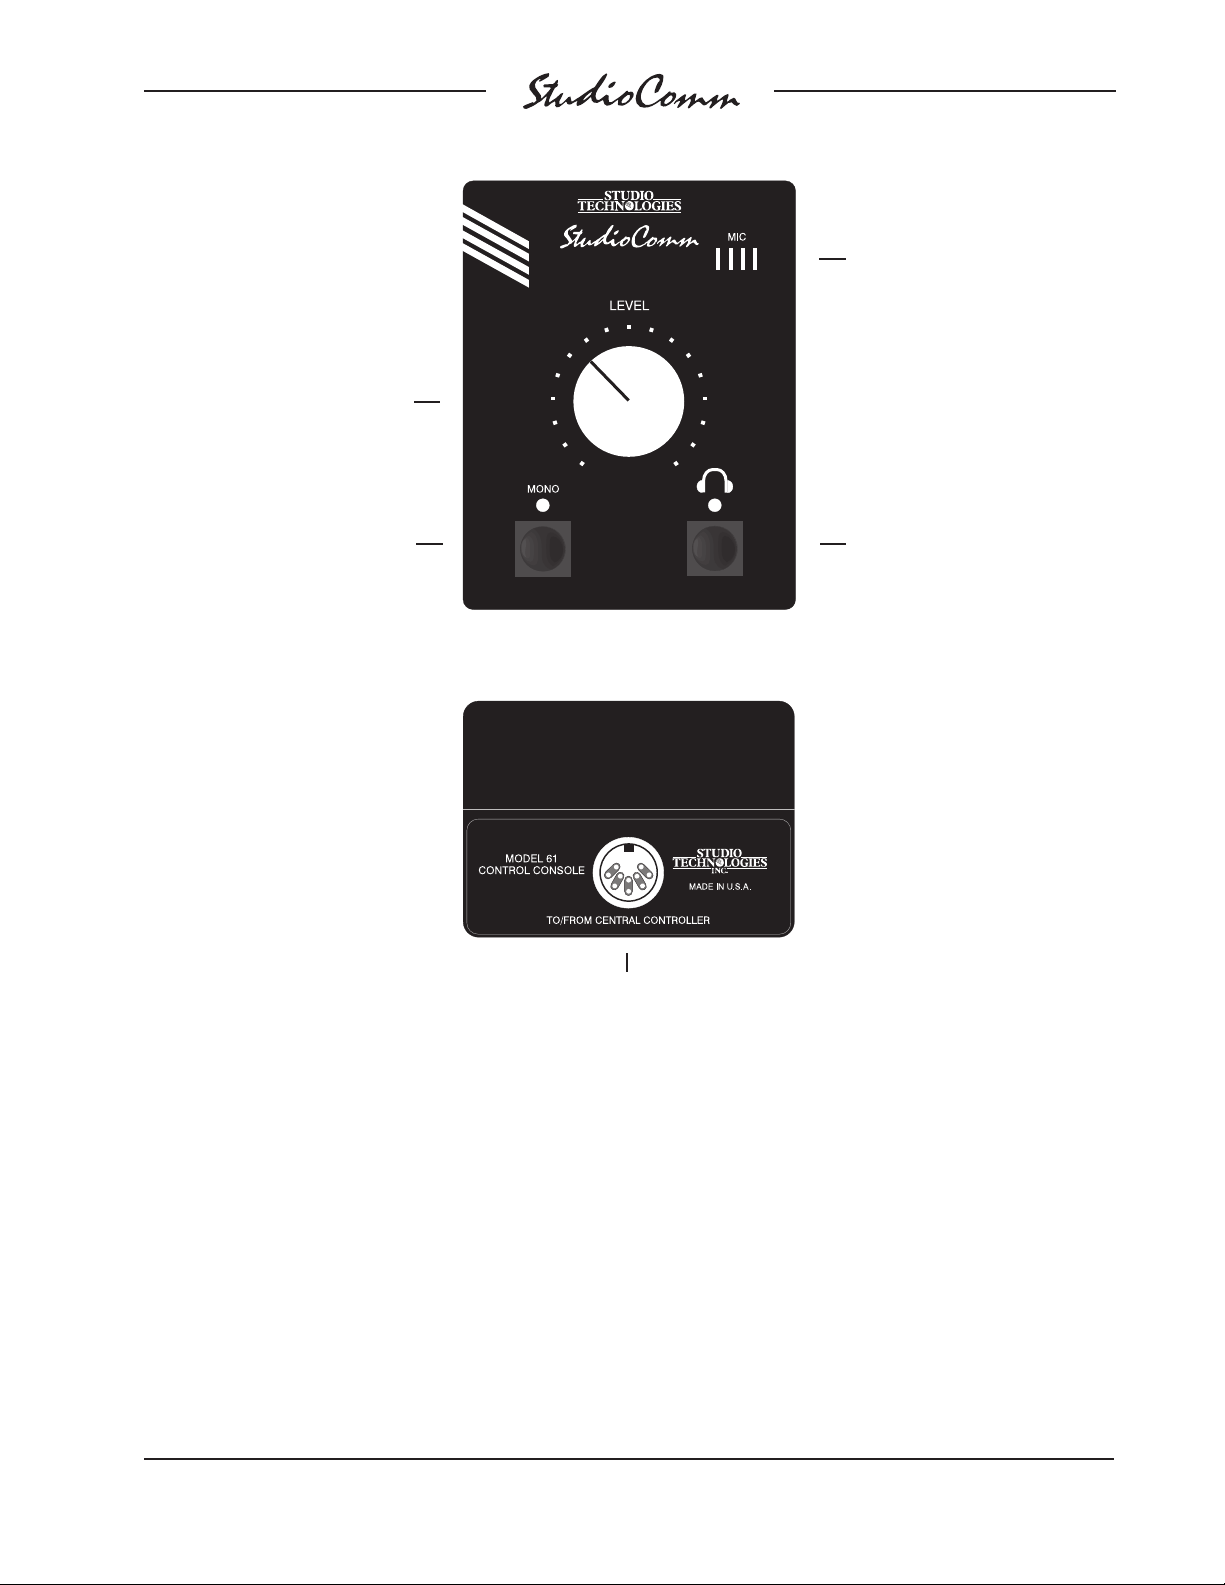
Model 61 Front Panel
Control room level
Cue microphone
Mono
Model 61 Back Panel
Cue (talk to phones)
To/from Model 60
Central Controller
detection function is associated with the
mute circuit. This limits the chance of
transients being present in the control
room output, protecting the control room
power amplifier and associated loud
speakers.
general-purpose output, useful in many
applications. Switches on the front panel
of the Model 60 Central Controller allow
selection of one or more of the input signals as the dub source(s). For flexibility, a
rotary control allows the nominal output
level to be adjusted. Turned fully clockwise
Dub Output
A stereo line-level output is provided for
dub (copy) use. It can also serve as a
Model 60/61 User Guide Issue 2, March 1998
Studio Technologies, Inc. Page 9
the output is set for +4dBu, with a calibration mark also shown for a nominal
–10dBV output.
Page 7

Headphone Monitoring
The Model 60 contains a stereo headphone output section that is capable of
driving one or two pairs of high-impedance
headphones. With acoustically efficient
headphones, such as those from Sony,
you can easily reach sonic nirvana! On
the Model 60’s front panel is a headphone output level control and a source
selection switch. The switch allows either
the source(s) selected for the control room
or the source(s) selected for the dub
output to be sent to the headphones.
For flexibility, headphone output jacks are
provided on both the front and back panels, with separate output circuits driving
each jack.
Cue (Talk to Phones)
The Model 61 Control Console contains
an internal microphone and enable button
that is used to send voices “cues” to the
talent by means of the headphone outputs.
To improve voice clarity and prevent
acoustic feedback the control room output
level automatically attenuates (dims) upon
activation of the cue microphone. A control
on the Model 60’s front panel allows adjustment of the voice level. Also on the
Model 60’s front panel is a switch that
selects whether the voice cue will replace
(interrupt) or add (sum) with the normal
headphone program source.
will be connected to the Model 60. AC
mains power will be connected to the
Model 60.
System Components
The StudioComm shipping carton contains
a Model 60 Central Controller, Model 61
Control Console, 5-conductor MIDI-style
cable, User Guide, and warranty card.
Units destined for North America are
shipped with an AC mains cord. Your
dealer or distributor will provide an AC
mains cord for non-North American
destinations.
Mounting the Model 60
The Model 60 requires one space in a
standard 19-inch (48.3cm) equipment
rack. Select a location near where the
Model 61 Control Console will be located.
A 10-foot (3.1m) cable is provided to
connect the Model 60 to the Model 61.
You can supply a longer cable, however
50 feet (15.4m) is the recommended
maximum length. It is desirable to locate
the Model 60 to allow easy access to both
the front and the back panels. The back
panel contains most of the input and
output connectors, while the front panel
contains many switches, controls, and
indicator lights. In addition, the front panel
also contains one of the headphone output
connector. The Model 60 is secured to the
equipment rack using two mounting
screws per side.
Installation
In this section you will be installing the
Model 60 Central Controller in an equipment rack. Input and output connections
will be made using the Model 60’s multitude of jacks. A location will be selected
for the Model 61 Control Console, and it
Issue 2, March 1998 Model 60/61 User Guide
Page 10 Studio Technologies, Inc.
Audio Inputs and Outputs
The Model 60’s line-level audio input and
output connections are made using ¼-inch
phone jacks. Don’t be concerned about
your audio quality, the jacks we use are
manufactured by Neutrik and feature goldplated contacts.
Page 8

Caution: For reliable audio interconnection, the plugs you use must comply with
industry standard RS-453. Switchcraft No.
297, Neutrik NP3C, or equivalent will work
correctly.
Insert Switcher
Of all the functions on the Model 60, the
insert switcher may be the most confusing
to understand and connect to—even us
here at the factory sometimes have trouble
explaining it to people! However, it is really
quite simple and, once you’ve connected it
into your system, we think you’ll find it a
very useful, timesaving feature.
The insert switcher is really just a set of
¼-inch jacks on the Model 60’s back panel
and three push-button switches on the
front panel. The insert switcher is entirely
passive; the audio signals don’t go through
any electronic circuitry.
The insert switcher’s design premise was
that it would be very useful for signals that
reside within a digital audio workstation to
be easily “processed” by one or more of an
engineer’s favorite analog devices. In most
situations only a small number of devices
are used frequently, such as a reverberation unit, tube-type equalizer, and dynamic
range processor. The insert switcher
eliminates the need to “patch” devices into
the audio chain.
Using the switcher is easy: with the workstation interface (mouse, keyboard, or
control surface), route the signal to be
processed to and from the insert switcher.
Then use the switches on the Model 60’s
front panel to select which of the three
devices is active in the audio “chain.”
Installation is quite simple:
• connect an analog stereo line-level
output signal from the workstation to
the insert switcher main input
• connect the insert switcher’s main
output to an analog input on the
workstation
• connect up to three analog processing
or effects devices to the insert
connections
The following paragraphs cover an installation in detail.
The source audio signal connects to the
insert switcher input via two ¼-inch jacks.
One jack serves the left channel, the other
the right. Using phone plugs connect tip to
audio high (+ or hot) and sleeve to shield.
If the signal source is balanced it needs
to be wired in accordance with the
manufacturer’s recommended method
for unbalanced operation. In most cases
the source of the audio signal will be an
analog output from a workstation or
digital-to-analog converter associated
with a workstation.
Two ¼-inch jacks allow access to the
insert switcher output. Using phone plugs
connect tip to audio high (+ or hot) and
sleeve to shield. It is expected that the
output signal will be connected to an
analog input on a workstation or analogto-digital converter associated with a
workstation.
There are three sets of ¼-inch jacks that
are used to connect to the insert devices.
The sets are labeled Insert A, Insert B,
and Insert C. Each set contains two jacks,
one for left and one for right. Like many
recording and sound reinforcement consoles, each jack provides both a send (an
Model 60/61 User Guide Issue 2, March 1998
Studio Technologies, Inc. Page 11
Page 9

output) and a return (an input); tip is send,
ring is return, and sleeve is shield. So for
each stereo device you’ll need two insert
cables, each having both a send and a
return plug.
While you can certainly prepare your own
“Y-cables,” it is far easier to use pre-made
insert cables. Your dealer or distributor
can assist you in getting the exact cables
you need. Studio Technologies has all its
production test cables custom made by
RAPCO International, Inc. (Jackson,
Missouri 63755, U.S.A., (800) 467-2726)
with great results. They follow our excruciatingly detailed specifications without a
complaint!
Insert Switcher Insert Connections
sources or having to buy a separate audio
routing switcher. Our final decision was
easy once we realized that by including an
insert switcher the features of a 4 input/1
output stereo source switcher would also
be provided! Follow the next paragraph if
you want to implement a source switcher
instead of an insert switcher.
Insert Switcher Insert Connections
when used as Audio Input
Ring: Input ( + )
Tip: No
Connection
Sleeve: Shield
(Switchcraft No. 297, Neutrik NP3C or equivalent)
Ring: Return (Input)
Tip: Send
(Output)
Sleeve: Shield
(Switchcraft No. 297, Neutrik NP3C or equivalent)
Using the Insert Switcher as an Input
Source Switcher
Frankly, when we were designing the
Model 60 the decision to include an insert
switcher versus including an input source
switcher was difficult. While an insert
switcher had a lot of merit, it would also be
useful to include a feature that would allow
analog sources such as CD players,
cassette decks, or microphone preamplifiers to be easily selected as an analog
input to a workstation. This would save
time by eliminating the need to patch
The first audio source should be connected to the insert input jacks. Using
¼-inch plugs, connect tip to audio high (+
or hot) and sleeve to shield. Sources 2, 3
and 4 will be connected to the three insert
jacks (labeled A, B, and C) by means of a
non-standard wiring scheme. Using ¼-inch
plugs, connect ring to audio high (+ or hot)
and sleeve to shield; don’t connect anything to the tip lead. To be even more
clear: you must use a 3-conductor plug
and leave the tip floating (isolated)—be
warned! The insert output jacks serve as
the output of the source switcher. Using
¼-inch plugs, connect tip as audio high
(+ or hot) and sleeve as shield.
Stereo Line Inputs
The Model 60 provides four stereo linelevel inputs. Each input is electronically
balanced and can be individually configured for compatibility with +4dBu or
Issue 2, March 1998 Model 60/61 User Guide
Page 12 Studio Technologies, Inc.
Page 10

Balanced Line Input Connection
Ring: Input ( – )
to the left input, simply insert an unterminated plug into the associated right input.
This will break the “normal” connection
that links the left and right input circuits.
Tip: Input ( + )
Sleeve: Shield
(Switchcraft No. 297, Neutrik NP3C or equivalent)
Unbalanced Line Input Connection
Tip: Input ( + )
Sleeve: Shield
(Switchcraft No. 280, Neutrik NP2C or equivalent)
–10dBV signal levels. Switches on the
Model 60’s back panel allow the input
sensitivity to be changed at any time.
Prepare the mating connectors (plugs) so
that tip is signal high (+ or hot), ring is low
(– or cold), and sleeve is shield. With an
unbalanced source connect the tip to high
(+ or hot), and both the ring and sleeve to
shield. If connecting to an unbalanced
source in this manner results in hum or
noise, connect tip to high (+ or hot) and
ring to shield; leave the sleeve
unterminated.
As an installation aid, a connection made
only to an input’s L/Mono jack routes the
signal to both the left and right input circuitry. This allows a monaural signal to be
utilized in a 2-channel mono format. If you
wish to have a mono input connected only
Control Room Output
The Model 60 contains a stereo line-level
output for connection to an audio power
amplifier. This audio amplifier serves a
pair of loudspeakers that are located in the
control room. (Of course the control room
output can be connected to loudspeakers
that contain integral power amplifiers, such
as the products from Genelec.) The output
is electronically balanced and capable of
driving loads of 600 ohms or greater. In
most situations the best performance will
be obtained if the audio amplifier’s input
sensitivity is set to near maximum. Refer
to the Technical Notes section for details
on setting amplifier sensitivity.
Prepare the mating connectors (plugs) so
that tip is signal high (+ or hot), ring is low
(– or cold), and sleeve is shield. To connect to an unbalanced load connect the tip
to high (+ or hot), and both the ring and
sleeve to shield.
Control Room Mute
In special applications, specifically on-air
broadcast, it may be desirable to allow
the control room output to be manually or
automatically muted. This can serve two
purposes: eliminating the need to remember to “turn down” the level control on the
Model 61 Control Console, and providing
a full mute of the control room output
signal. The Model 61’s rotary control
gives a 70dB attenuation range, perfect
for normal operation but not the full mute
that may be required when a “live” microphone is located adjacent to the control
room speakers.
Model 60/61 User Guide Issue 2, March 1998
Studio Technologies, Inc. Page 13
Page 11

Control Room Mute Connection
Tip: Mute ( + )
(Short to sleeve
to enable mute)
Sleeve: Shield
(Switchcraft No. 280, Neutrik NP2C or equivalent)
Access to the control room mute function
is via a ¼-inch jack located on the Model
60’s back panel. Mute is enabled whenever the tip lead is shorted (connected) to
the sleeve lead. Using a ¼-inch phone
plug, connect a normally open contact to
the tip and sleeve. The contact must be
capable of handling a current of 7 milliamperes at 15 volts DC.
Dub Output
The Model 60 contains a stereo line-level
output which is intended for connection to
a variety of analog audio devices. The dub
output is electronically balanced and is
capable of driving loads of 600 ohm or
greater. With the input impedance of most
audio devices being 10k ohms or greater,
the dub output can easily drive 10 or more
devices simultaneously.
Prepare the mating connectors (plugs) so
that tip is signal high (+ or hot), ring is low
(– or cold), and sleeve is shield. To connect to an unbalanced load connect the tip
to high (+ or hot), and both the ring and
sleeve to shield.
Headphone Output
The Model 60 contains headphone output
jacks on both the front and back panels.
For flexibility separate amplifier circuits
support each jack; connecting to the front
panel jack doesn’t affect the jack on the
back and vice-versa. The simplest way of
using the headphone output is simply to
plug a pair of headphones into the front
panel jack. In other applications it may be
convenient to wire connector panels located in a control room, studio, or voiceover booth to the back-panel headphone
output.
Using a ¼-inch phone plug, the headphone output should be wired with tip as
left channel, ring as right channel, and
sleeve as output common/shield.
The sonic quality of the headphone outputs are such that they are suitable for use
as additional unbalanced line-level outputs. If it is anticipated that the installation
may benefit from this ability it may be
helpful if the back-panel headphone output
is wired into jacks on a patch bay. In this
way this headphone output can be rapidly
connected to other pieces of equipment.
Connecting the Model 60 to the
Model 61
A standard 5-conductor MIDI-style cable
is used to connect the Model 60 to the
Model 61; a cable is included with each
system. Just connect the cable between
the female 5-pin DIN-type connectors on
the back panels of both the Model 60 and
61, and viola, you’re done.
Note: If you require a longer cable, be
certain to buy a MIDI-type cable that has
all 5 pins wired. If they aren’t all connected, the Model 61 will not operate. For
best performance, the cable that connects
the Model 60 with the Model 61 should be
limited to 50 feet (15.4m).
Issue 2, March 1998 Model 60/61 User Guide
Page 14 Studio Technologies, Inc.
Page 12

AC Mains Power
The Model 60 is internally configured to
operate from either 100, 120, or 220/240V,
50/60Hz. In most cases, units shipped to
North America are factory selected for
120V operation. Units bound for Japan are
selected for 100V, while our friends “down
under” and in Europe receive units set for
220/240V. Before connecting the Model 60
to mains power, check that it is configured
to match the local mains voltage. Look on
the back panel, adjacent to the power
entry connector, for the configured
voltage(s). Note than an incorrect configuration could seriously damage the unit.
Should it be necessary to change the
unit’s operating voltage it must be performed only at the factory or by an authorized service technician.
Configuration
Once the Model 60 and Model 61 have
been installed, the only configuration issue
you need to address is input sensitivity.
Input Sensitivity
Input sensitivity configuration switches are
associated with each of the four stereo
line-level inputs. For correct Model 60
operation the switches, located on the
back panel directly adjacent to the input
jacks, must be correctly set. For an input
signal with a nominal operating level of
–10dBV set to switch to the out position,
for a +4dBu input signal set the switch to
the in position.
The Model 60 uses an IEC standard
connector to mate with the AC mains cord.
The wire colors in the AC mains cord
should conform to the internationally
recognized CEE color code and must
be wired accordingly:
Connection Wire Color
Neutral (N) Light Blue
Line (L) Brown
Protective Earth (E) Green/Yellow
Safety Warning: The Model 60 does
not contain an AC mains disconnect
switch. As such the mains cord plug
serves as the disconnection device.
Safety consideration requires that the
plug and associated outlet be easily
accessible to allow rapid disconnection of mains power should it prove
necessary.
Operation
Now that you’ve installed and configured
the system, you’re ready to go. You should
find operation very easy.
Status LEDs
There are two LEDs on the Model 60
Central Controller’s front panel. The power
LED is lit whenever AC mains power is
applied to the unit. The control room mute
LED is lit whenever the mute function is
active. For normal control room speaker
operation the mute LED must not be lit.
There are two LEDs on the Model 61
Control Console. One indicates the status
of the control room mono function, the
other the status of the cue (talk to headphones) function.
Insert Switcher
As soon as mains power is applied, the
Model 60’s power present LED will light.
Model 60/61 User Guide Issue 2, March 1998
Studio Technologies, Inc. Page 15
On the Model 60’s front panel are three
push-button switches associated with
Page 13

the insert switcher. Correct operation of
the switches depends on how the insert
switcher section is wired into your specific
audio system. There are two ways
the insert switcher may have been configured: as an insert switcher or as an input
source switcher. When configured as an
insert switcher a signal is sent from, and
returned to, an audio workstation. The
three switches are used to select which
of the insert devices are active in the audio
“chain.” An insert switch set to its active
position routes signal to the insert device
and connects the device’s output into the
signal path. A switch set to its bypass
position will still route audio to the insert
device, but does not connect to the
device’s output. If all three switches are
in the bypass position then the unmodified
input signal is routed directly back to the
workstation.
When configured as an input source
switcher, operation of the three pushbuttons is quite easy but with a little “twist”
that must be remembered: only one of the
switches can be set to the active position
at a time. When all three switches are in
their bypass position, input 1, connected
to the insert switcher’s main audio input,
is routed to the output. To select input 2
place switch A to the active position;
ensure that switches B and C remain in
bypass. Follow the same rules to select
inputs 3 and 4. Should you make a mistake and have more than one switch in the
active mode at the same time, the “last”
switch will take priority. As an example:
if you have switches A and C in the active
position, input 4 (handled by switch C) will
be selected as the input source.
Control Room Monitoring
Using the four push-button switches
located on the Model 60’s front panel,
one or more of the input sources can be
selected for monitoring. The switches are
such that you can simultaneously depress
and “lock-in” two, three, or all four. Some
practice may be required to get the “feel”
of selecting multiple inputs. Circuitry in the
Model 60 electrically sums (adds) the
sources you select.
The control room output level is set using
the rotary control (“pot”) on the Model 61
Control Console. When the pot is fully
counterclockwise the output is attenuated
by approximately 70dB, not a full mute.
Whenever the cue (talk to phones) function is active the control room output level
attenuates (dims) by approximately 18dB.
This can prevent acoustic feedback and
allows voice signals to be clearly heard.
The Model 61 Control Console contains a
push-button switch to activate the monaural function. The switch is electrically set
for latching operation; press once to active
mono, press again to go back to stereo.
An LED, located directly above the mono
switch, displays mono status. The mono
function sums (adds) the left and right
source(s), drops the level 3dB, and sends
the resulting signal to both the left and
right control room outputs.
The Model 60 Central Controller allows
the connection of a switch or relay contact
to enable a control room output mute
function. Whenever mute is active the
control room output is effectively disabled,
and the mute status LED, located on the
Model 60’s front panel, lights. Note that
when mute is active the control room level
pot on the Model 61 is disabled.
Issue 2, March 1998 Model 60/61 User Guide
Page 16 Studio Technologies, Inc.
Page 14

Dub Output
Four push-button switches, located on the
Model 60’s front panel, are used to select
one or more of the input sources to be
routed to the dub output. Circuitry in the
Model 60 electrically sums (adds) the
sources you select.
A rotary level control (“pot”) on the Model
60’s front panel is used to set the dub
nominal output level. This allows the dub
output level to be quickly set to match
the input sensitivity of the connected
equipment. In the fully clockwise position
the circuitry is unity gain. In the fully counterclockwise position the dub output is fully
attenuated, allowing the pot to be used as
an output “fader” for special applications.
Markings on the Model 60’s front panel
identify where the rotary control should be
set for nominal output levels of +4dBu and
–10dBV.
Headphone Output
Warning: Protect your ears! The head-
phone output is capable of driving
headphones to extremely high sound
pressure levels. Hearing experts (along
with common sense and your mother)
advise against continuous extended
play, especially at high levels.
A rotary level control on the Model 60’s
front panel is used to set the headphone
output level. The “pot” sets the output level
for the both headphone output jacks, front
and back.
A push-button switch, located adjacent
to the headphone level control, is used
to select the headphone source. When
the switch is set to the CR (control room)
position the audio source(s) selected for
control room monitoring are also sent to
the headphones. The control room output
level pot, mono button, and output mute
function do not effect the headphone output. When the headphone source switch is
set to the dub position the audio source(s)
selected for dub are also sent to the headphones. The dub output level control does
not effect the headphone output.
Cue (Talk to Phones)
The cue function allows voice cues from
the control room to be sent to the headphone output. Using cue is quite simple;
press the push-button switch on the Model
61 Control Console and start talking!
Above the cue switch is a status LED and
a graphic outline of a pair of headphones.
The cue switch is set for momentary
operation so you’ll need to press and hold
the switch while you are talking to the
headphone user.
A rotary level control (“trim pot”) on the
Model 60’s front panel is used to set the
voice cue level relative to the normal audio
level. Set the trim pot so as to give a
comfortable level to the headphone user.
Adjacent to the trim pot is a push-button
switch that sets the cue operating mode.
With the switch set to the interrupt position
the normal audio signal going to the headphones is muted (interrupted) whenever
cue is active. When the switch is set to the
sum position the voice audio is summed
(added or mixed) with the normal audio. In
an on-air setting or an application such as
foley, you’d want to use the sum position.
In this way voice cues won’t inhibit the
talent’s ability to hear themselves or other
important program material. The interrupt
mode is useful when you are not recording
or broadcasting in a “real-time” setting and
“loud” program material makes a voice
cue hard to hear.
Model 60/61 User Guide Issue 2, March 1998
Studio Technologies, Inc. Page 17
Page 15

T roubleshooting
Technical Notes
Intermittent Audio Connections
Should you experience audio connections
that seem to be “flaky” or intermittent
carefully check the ¼-inch plugs that are
used to interface the installation with the
Model 60. The ¼-inch phone jacks used
on the StudioComm products are of very
high quality, conforming to the industry
standard EIA RS-453. Some ¼-inch plugs
do not meet this standard, specifically
in the shape of the tip conductor. In rare
cases you may have to replace plugs
on interconnecting cables or headphones
to remedy an interconnection problem.
Switchcraft No. 280 (2-conductor)/No. 297
(3-conductor) or Neutrik NP2C (2-conductor)/NP3C (3-conductor) phone plugs will
function correctly.
Clicks in the Audio
As covered in the Configuration section of
this guide, the four stereo line inputs can
be configured for +4dBu or –10dBV operation. Setting an input for –10dBV, while
connecting an audio source with a +4dBu
nominal level can lead to distortion (“clipping”) of the signal. In this fault condition
the user might hear a harsh “clicking”
sound in the audio, especially when peak
levels occur in the program material. To
remedy this problem simply use the appropriate switch on the Model 60’s back panel
to configure the input for +4dBu operation.
The distortion will go away and the gain
structure of the StudioComm system will
be correctly established.
Definition of Level—dBu and dBV
Whenever possible, Studio Technologies
has opted to use the dBu designation as
it seems to be quite rational. Using dBm
was fine when all audio line outputs were
terminated with 600 ohm loads. In this way
it was easy to say that 0dBm is 1 milliwatt
dissipated in the known load (i.e., 0dBm
across 600 ohms will measure 0.775V).
In contemporary situations an output is
rarely terminated with 600 ohms; generally
10k ohms or higher. The dBu designation
is better because it refers to dB referenced
to 0.775V, with no reference to load impedance. This takes into account today’s
audio scene where signals have
a low source impedance, and a high input
impedance. The dBu designation is becoming the standard for the professional
audio industry.
The Model 60 Central Controller is designed to interface with audio signals that
have nominal signal levels of +4dBu or
–10dBV. You might wonder why dBV
came into the picture. Most people don’t
realize that equipment that utilizes “–10”
levels usually mean –10dBV, which is
substantially different from –10dBu
(–10dBV = –7.78dBu). The dBV designation is simply a different way of measuring
signal level and is often used when dealing
with portable or consumer audio equipment. The dBV designation refers to dB
referenced to 1.0V, rather than dBu which
refers to 0.775V.
“Hot” Disconnection of the Model 61
Control Console
Should you need to relocate the Model
61 while your StudioComm system is
Issue 2, March 1998 Model 60/61 User Guide
Page 18 Studio Technologies, Inc.
Page 16

operating, there is no reason why you
can’t disconnect the 5-conductor cable,
move the unit, and then connect it again.
No clicks, pops, or other noises will occur
when the Model 61 is disconnected and
then again connected.
Cue (Talk to Phones) Noise
reduce the input sensitivity of the power
amplifier so you can operate at the
2-o’clock position. Most power amplifiers
have controls on their inputs to allow easy
adjustment of their input sensitivity.
Slating Issues/Cue Audio to Dub
Output
During field trials of the Model 60 and 61
one item came up for discussion: “thumps”
in the cue function. A brief discussion may
be useful. The Model 60 and Model 61’s
electronics that support the cue function is
quite quiet, not adding appreciable “clicks,
pops, or thumps.” However, mechanical
noise being picked up by the Model 61’s
microphone can be an issue.
If the cue button is pushed using a relatively light “touch” no objectionable noise
will be generated; pressing the button with
“gusto” will cause mechanical noise to be
transferred into the microphone. While the
Model 61’s microphone is of good quality,
shock mounting it was not possible using
a cost-effective method. The fact that the
Model 61 is physically small and the button is relatively close to the microphone
adds to the difficulty. (Note that most all
recording consoles, both small and large,
share this condition.) So in conclusion, use
a light touch on the button and everyone
should stay reasonably happy!
Power Amplifier Input Sensitivity
Optimum StudioComm performance is
obtained when the input sensitivity of the
control room power amplifier is adjusted to
match the Model 60’s control room output
level. With normal, but loud, listening
levels you should find the level potentiometers on the Model 61 to be set to about
2 o’clock. If you find that you don’t have
to turn up the Model 61’s control that high,
From the factory, voice cues are sent only
to the headphone output. It was anticipated that this would be the most common
use, specifically allowing personnel in the
control room to talk to talent in a studio
or voice-over booth. In some cases it may
be desirable to have a “slate” function—
sending a voice cue to an audio workstation or other recording medium. There is
a means of achieving this by modifying the
Model 60 to route the cue audio to the dub
output. From the factory this is not implemented, but is as simple as having a
qualified technician install two resistors
into the Model 60’s printed circuit board.
After the modification, whenever the cue
button is pressed on the Model 61 Control
Console the voice audio will go out both
the headphone and dub output. The limitation here is that you have to be careful of
what is being routed through the dub
output when you are voice cueing to the
headphones, and vice versa; a voice cue
to the phones is a voice cue to the dub!
For details on implementing this modification you’ll need a copy of the Model 60
schematic diagrams, available by contacting the factory.
Modifying the Back-Panel Headphone
Output
Each headphone output, front panel and
back panel, is driven by an independent
output circuit. From the factory the same
audio signal connects to each output
Model 60/61 User Guide Issue 2, March 1998
Studio Technologies, Inc. Page 19
Page 17

circuit, but provisions have been made to
allow the audio source for the back-panel
headphone output circuit to be changed.
The revised output will give flexibility for
those rare applications that seem to so
often arise! Once modified, the back-panel
headphone output will act more like that of
a line-level output. The alternate choices
are pre-level-control headphone audio or
cue audio. The pre-level- control audio
signal is the same source as the standard
headphone audio signal, but is not effected by the front-panel level control. This
implementation would be useful where an
audio facility has an existing headphone
amplifier system with level controls. The
other choice of having cue audio would
prove useful for specialized talkback or
cueing applications, such as remote ISDN
configurations. In this configuration, only
when the cue button on the Model 61 is
active will Model 61 microphone audio be
present on the back-panel headphone
output. When the cue button is not
pressed, no audio will be present on the
back-panel headphone output jack.
For details on implementing these alternate routing scheme you’ll need a copy of
the Model 60 schematic diagrams, available by contacting the factory.
Model 61 Momentary/Latching Button
Operation
qualified technician can remove a strap to
make the mono function be momentary
and/or add a strap to make the cue function latching. For details on implementing
these changes refer to the Service Guide,
available from the factory.
Control Room Mono Function
Many arguments where had while designing the control room monaural function.
Was the function supposed to be a true
mono function, sending the sum of left
and right to a separate mono control room
output? Was mono to be the sum of left
and right sent to both left and right channels? What about level build up with phase
coherent signals that are in both the left
and right channels? After much head
scratching it was realized that the mono
function that most people are accustomed
to is really a means of observing the
character of a stereo mix, and not a “true”
mono function. To observe the stereo
image of a mix you need to sum the left
and right signals, drop the level of the sum
by 3dB, and send the result out the left
and right outputs. This is what virtually all
recording consoles implement, and is what
the Model 60 does, too! We understand
that specialized applications such as
mastering and film mixing may require a
more exotic mono function. Sorry, our
hardware simply can’t support it!
From the factory the Model 61 is set to
have the mono function change state
(latch) each time the button is pressed.
The cue button is set for push to activate
(momentary) operation. In most cases
these operating modes will be appropriate.
However, if you don’t agree with our
choices don’t despair. In the Model 61’s
circuitry both functions can support
momentary and latching operation. A
Issue 2, March 1998 Model 60/61 User Guide
Page 20 Studio Technologies, Inc.
Page 18

Specifications
Model 60 Central Controller
Mounting:
One space in a standard 19-inch (48.3cm) rack
AC Mains Requirement:
100, 120, or 220/240V, ±10%, factory configured,
50/60Hz, 100-120V 0.2A maximum, 220/240V
0.1A maximum
Connectors:
Audio and Control: ¼-inch, 3-conductor phone
jacks
AC Mains: standard 3-blade plug, meets IEC 320
specifications
Fusing:
Qty: 1
Type: 5 x 20mm time lag (Littelfuse 218-series or
equivalent)
Rating: 0.200A for 100 and 120V mains power,
0.100A for 220/240V mains power
Insert Switcher:
Applications: allows routing of three unbalanced
stereo analog audio signals into audio path
Switching: passive (no electronics in signal path)
Nominal Operating Level: not specified
Audio Inputs:
Qty: 4, stereo (separate left and right input
connectors)
Type: electronically balanced, direct coupled,
compatible with balanced or unbalanced signals
Impedance: 24k ohms
Nominal Input Level: –10dBv or +4dBu, each
input individually configurable
Common Mode Rejection: 100dB @ DC and
60Hz, 70dB @ 20kHz, 62dB @ 40kHz (typical)
Control Room Output:
Qty: 1, stereo (separate left and right output
connectors)
Type: electronically balanced, intended to
drive loads of 600 ohms or greater, balanced
or unbalanced
Output Level (input source at nominal level):
–68dBu at 0% rotation (fully counterclockwise),
–50dBu at 25% rotation, –32dBu at 50% rotation,
–14dBu at 75% rotation, +4dBu at 100% rotation
(fully clockwise)
Maximum Output Level: +27dBu into 10k ohms,
+26dBu into 600 ohms
Frequency Response: 10Hz-40kHz +0/–0.5dB
Distortion (THD+N): 0.02% (measured at 1kHz)
S/N Ratio: 87dB (20Hz-20kHz ref. +4dBu output)
Mono: (L+R) –3dB to both left and right outputs
Mute: output level drops to 90dBu upon applica-
tion of contact closure. Contact closure must be
capable of handling 7mA at 15 volts DC.
Dim: output level drops 18dB when cue (talk to
phones) active
Dub Output:
Qty: 1, stereo (separate left and right output
connectors)
Type: electronically balanced, intended to drive
balanced or unbalanced loads of 600 ohms or
greater
Nominal Output Level: +4dBu, adjustable
+0/–∞dB
Maximum Output Level: +27dBu into 10k ohms,
+26dBu into 600 ohms
Frequency Response: 10Hz-40kHz +0/–0.25dB
Distortion (THD+N): 0.005% (measured at 1kHz)
S/N Ratio: 90dB (20Hz-20kHz ref. +4dBu)
Headphone Output:
Qty: 2, each jack (front and back) has separate
output circuit
Compatibility: each output intended for connec-
tion to headphones with impedance of 100 ohms
or greater
Maximum Voltage: 8Vpp, 100 ohm load
LED Indicators:
Qty: 2, power present and control room mute
Dimensions (Overall):
19.00 inches wide (48.3cm)
1.72 inches high (4.4cm)
6.65 inches deep (16.9cm)
(1 standard rack space)
Model 60/61 User Guide Issue 2, March 1998
Studio Technologies, Inc. Page 21
Page 19

Weight:
6.5 pounds (3.0kg)
Model 61 Control Console
Mounting:
Desktop
Power Requirements:
Provided by Model 60 Central Controller
Interconnection:
5-conductor MIDI-style cable, 10-foot (3.1m) cable
supplied, maximum length 50 feet (15.3m)
Internal Microphone:
Type: electret condenser
Frequency Response: 3dB roll off at 200Hz
LED Indicators:
Qty: 2, mono active and cue (talk to phones)
active
Dimensions (Overall):
3.2 inches wide (8.1cm)
2.2 inches high (5.6cm)
4.1 inches deep (10.4cm)
Weight:
0.8 pounds (0.4kg)
Specifications and information contained in this
User Guide subject to change without notice.
Issue 2, March 1998 Model 60/61 User Guide
Page 22 Studio Technologies, Inc.
Page 20

Page 21

Page 22

 Loading...