

Page 1
SRT5430
User Manual
Page 2

Table of contents
IMPORTANT SAFETY INSTRUCTIONS .................................................................................................2
1 INTRODUCTION .............................................................................................................................1
2 MAIN FUNCTIONS AND FEATURES .............................................................................................1
3 THE REMOTE CONTROL...............................................................................................................2
4 FRONT AND REAR PANEL ............................................................................................................4
4.1 REAR PANEL............................................................................................................................. 4
4.2 FRONT PANEL .......................................................................................................................... 4
5 INSTALLATION ...............................................................................................................................5
5.1 CONNECTING THE RECEIVER ......................................................................................................... 5
5.2 INSTALLATION GUIDE .................................................................................................................... 6
6 MENU ..............................................................................................................................................6
MAIN MENU........................................................................................................................................ 6
7.1 INFO. KEY ................................................................................................................................... 10
7.2 LANG KEY................................................................................................................................... 10
7.3 SUB KEY ...................................................................................................................................... 11
7.4 PREV/NEXT KEY & F.R./F.F. KEY............................................................................................... 11
7.5 ZOOM......................................................................................................................................... 11
7.7 EPG............................................................................................................................................ 12
7.8 TV CHANNEL AND RADIO CHANNEL LIST ........................................................................................ 12
7.9 FAVOURITE CHANNEL ................................................................................................................... 12
7.10 DVR FUNCTION ......................................................................................................................... 13
1) INSTANT RECORDING ................................................................................................................ 13
2) ELECTRONIC PROGRAM GUIDE TIMER RECORDING .................................................................... 14
3) TIMESHIFT............................................................................................................................ 15
4) PLAYBACK OF A RECORDED PROGRAM....................................................................................... 16
5) MULTIMEDIA PLAYER ................................................................................................................ 16
6) FORMAT PORTABLE HARD DISK.................................................................................................. 16
8. TROUBLESHOOTING ..............................................................................................................................17
9. SPECIFICATIONS..............................................................................................................................18
1
Page 3
To reduce the risk of fire and electric shock, do not expose this unit to rain or moisture.
Please carefully read these precautions and instructions before operating this unit. Keep the manual
for future reference.
Power Cord Protection
To avoid any malfunctions of the unit and to protect against electric shock, fire or personal injury,
please observe the following:
Hold the plug firmly when connecting or disconnecting the AC power cord.
Keep the AC power cord away from heating appliances.
Never put any heavy object on the AC power cord.
Do not attempt to repair or reconstruct the AC power cord in any way.
Never make or change connections with the power switched on.
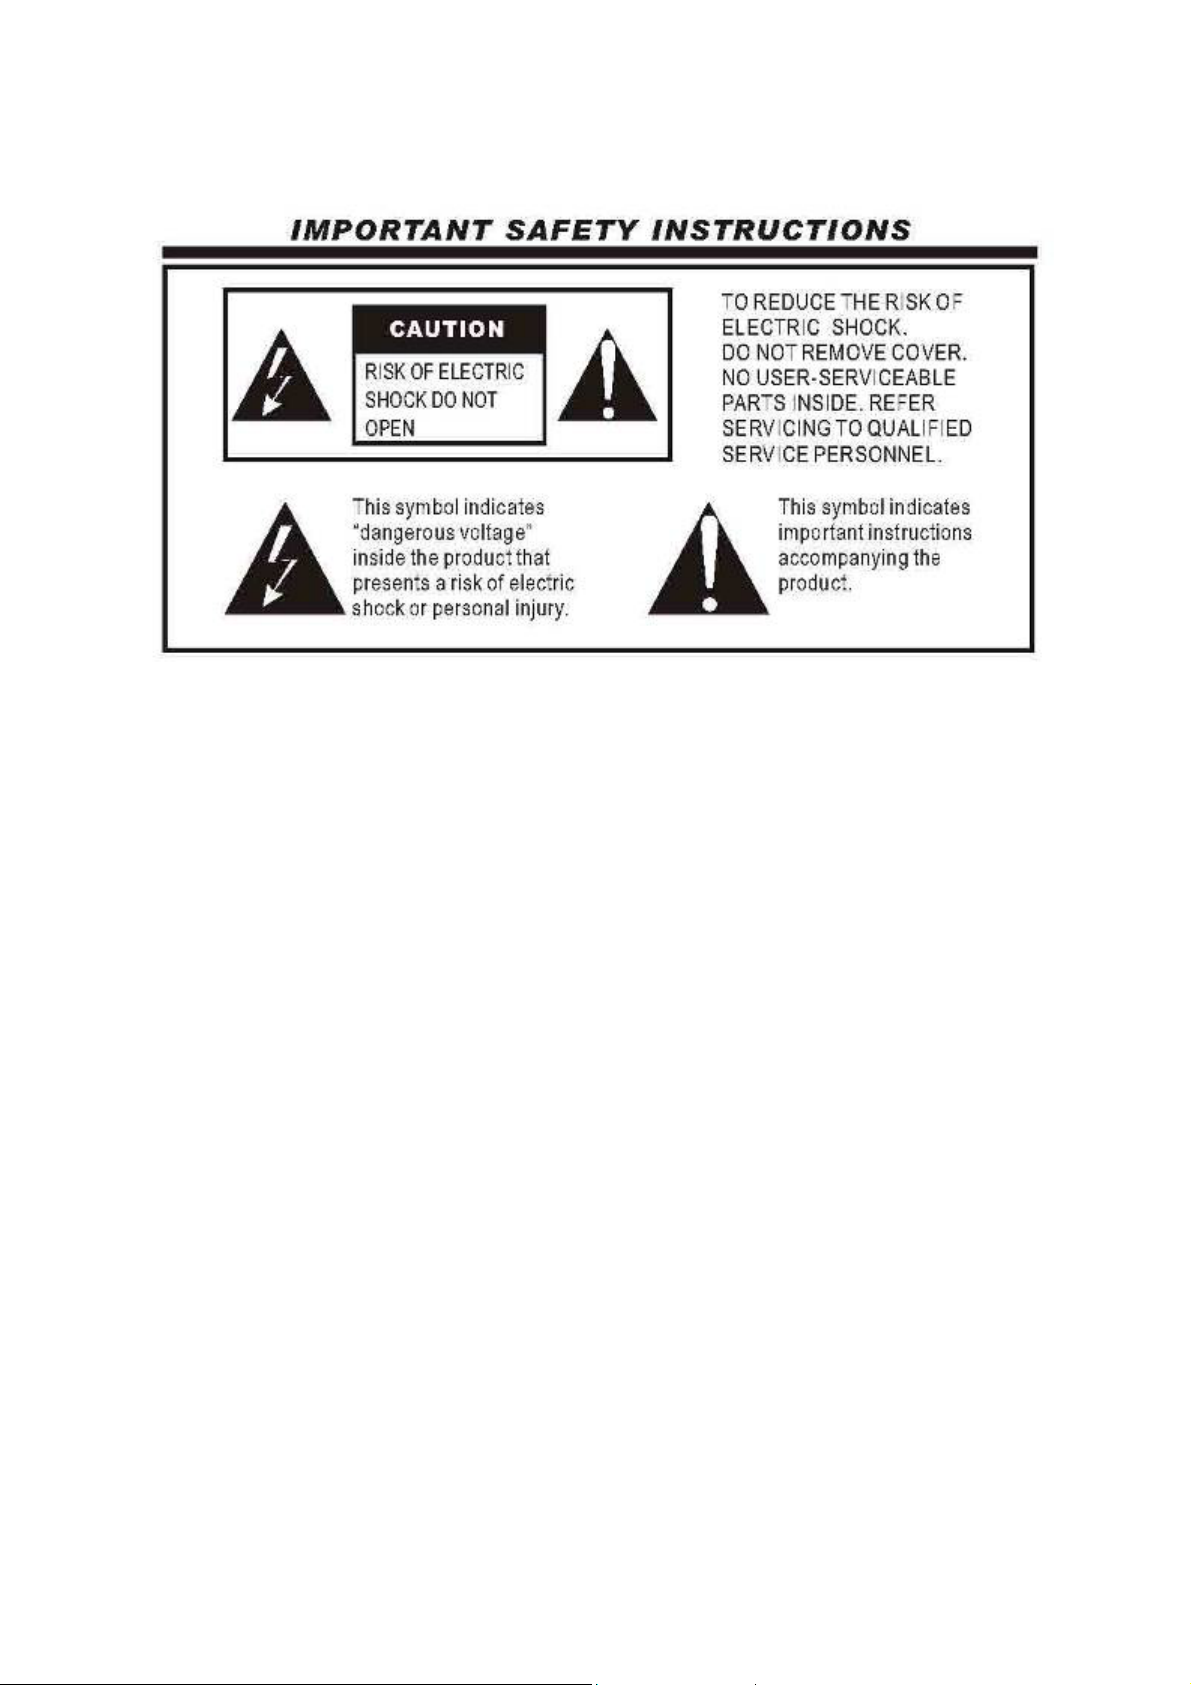
IMPORTANT SAFETY INSTRUCTIONS
- The ventilation should not be impeded by covering the ventilation openings with items, such as
newspapers, table-cloths, curtains, etc.;
- No naked flame sources, such as lit candles, should be placed on the apparatus;
- Attention should be drawn to the environment aspects of battery disposal. Don’t throw used
batteries in the rubbish. Please contact your retailer in order to protect the environment.
- Don’t use the apparatus in tropical climates;
- The apparatus shall not be exposed to dripping or splashing and that no objects filled with liquids,
such as vases, shall be placed on the apparatus.
- Where the mains plug is used as the disconnect device, the disconnect device shall remain readily
operable. The main plug shall remain readily operable.
- Keep minimum distances (5 cm) around the receiver for sufficient ventilation. (Minimum distance
around the apparatus for sufficient ventilation.)
- If the electric cable is damaged, it must be replaced by the manufacturer, or by a qualified person,
in order to avoid a danger.
2
Page 4

1 INTRODUCTION
This user manual is intended to guide you through the operation for the SRT 5430 DVB-T FTA High
Definition Digital Terrestrial Receiver.
A password will be required when modifying advanced options in the Menu. The default
password is “000000”.
2 MAIN FUNCTIONS AND FEATURES
This product is a high performance HDTV Terrestrial receiver. It fully complies with DVB-T FTA
receiver requirement specifications. It provides users with all
being broadcast in Standard Definition and High Definition.
1. Fully compatible with DVB-T FTA digital standard
2. Fully compatible with MPEG-4 H.264/AVC High Definition Digital TV
3. Fully compatible with MPEG-2 High Definition and Standard Definition Output
4. Fully compatible with MPEG-1 Layer I & II,
5. VHF & UHF Input and LOOP OUT
6. Multi-bilingual OSD language , audio language and subtitle language supported
7. 400 Channel capacity
8. On Screen Electronic Program Guide (EPG)
9. Supports Picture in Graphics(PIG)
10. Supports Auto search and Manual search
11. Parental control for channels
12. Plug and Play installation with an easy to use Menu System
13. Supports 576i, 576P, 720P, 1080i Video Resolution。
14. Supports 4:3 and 16:9 Aspect Ratio
15. Various channel editing function(Favorites, Move, Lock, Delete)
16. Supports HDMI High Definition Multimedia Interface(HDMI 1.2
17. Software upgrade via USB2.0 port compatible
18. USB 2.0 port compatible DVR and Media Player
19.
Record digital television FTA program to a USB Flash Drive or an external USB portable hard
disk and playback via USB2.0 compatible.
digital terrestrial TV and radio signals
)
1
Page 5
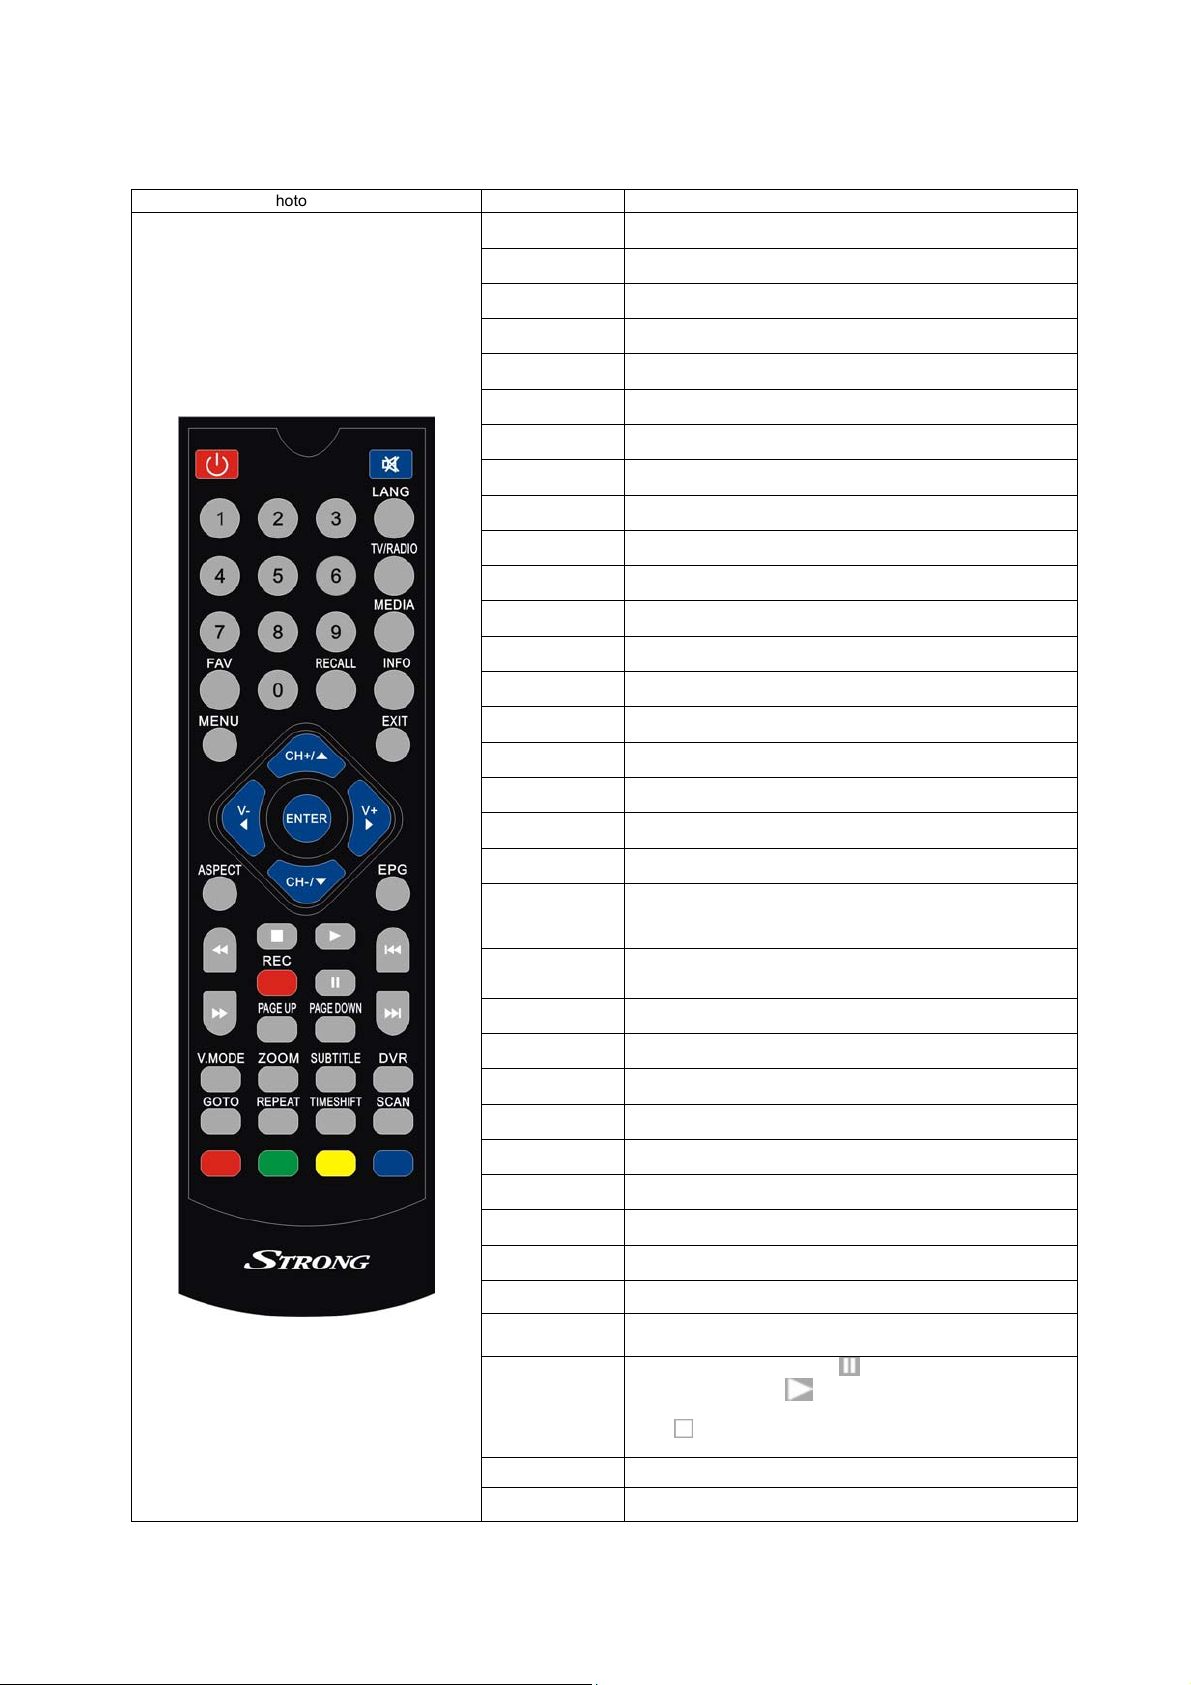
3 THE REMOTE CONTROL
Photograph Key Function
MUTE
Disable Audio output
POWER
0…..9
MEDIA
GOTO
V.MODE
RECALL
TV/RADIO
VOL+/VOL-
CH+/CH-
RED
GREEN
YELLOW
BLUE
MENU
EXIT
INFO.
Power on/off the STB
0-9 numeric buttons, for input of numbers or for selecting a TV
channel
Enter the multimedia menu.
GOTO select the track/time for multimedia playing
Change the video resolution output
Recall last channel while watching digital TV or listening to radio.
Press TV/Radio key to switch between TV program and Radio
program.
Increase or decrease the audio output volume
Select next/previous channel
Function key in menus.
Function key in menus.
Function key in menus.
Function key in menus.
Display menu, press again to exit current menu
Back to previous menu without saving
Press INFO. Key to display the information banner while watching
program.
EPG Press EPG key to display 7 days EPG information.
UP/DOWN
LEFT/RIGHT
OK
PREV/NEXT
FAV
REC
STOP
PLAY/PAUSE
DVR
F.R./F.F
SUBTITLE
LANG
Page UP/
Page Down
TIMESHIFT
ZOOM
SCAN
Move selection up/down within menus and lists
While watching a channel, the LEFT/RIGHT buttons increases or
decreases the audio output volume. Within a menu, press the LEFT
button to return to previous menu and the RIGHT button to enter a
sub-menu.
Call up a program list for the current channel while watching digital
TV or listening to the radio. In a menu, this button serves to confirm a
selection.
Page up/down in lists, and Previous/Next track
Display favorites channel
Press REC key to record the current program while watching TV
program
Press STOP key to stop recording program or stop a program during
playback
Play or pause the program during playback
Go to the Recorded File List
Press these keys to fast forward or rewind during playback
Switch between different subtitles.
Press LANG key to set the audio track and audio mode.
Turn to previous/next page of all TV list
Into the TIMESHIFT state, press key to enter the TIMESHIFT
suspended state; Press
state;
Press
button to exit the TIMESHIFT state; press info to see
detailed information;[BG1]
Zoom in or zoom out the picture.
Auto scan of TV and radio channels.
button to enter TIMESHIFT playback
2
Page 6

Battery Installation
Insert the batteries while observing the correct (+) and (-) polarities as illustrated below:
About the batteries
If the remote control unit fails to work even when it is operated near the receiver, please replace
the batteries.
Use size UM-4 (AAA) batteries.
Notes:
Do not use rechargeable (Ni-Cd) batteries.
Do not attempt to recharge, short circuit, disassemble or throw the batteries into the fire.
Do not drop, step on or cause any impact to the remote control unit. This may damage it,
resulting in malfunction.
Do not mix old and new batteries.
If the remote control unit is not going to be used for a long time, remove the batteries.
Caution
Keep batteries out of children’s reach. If batteries are swallowed, contact a physician immediately.
3
Page 7
A
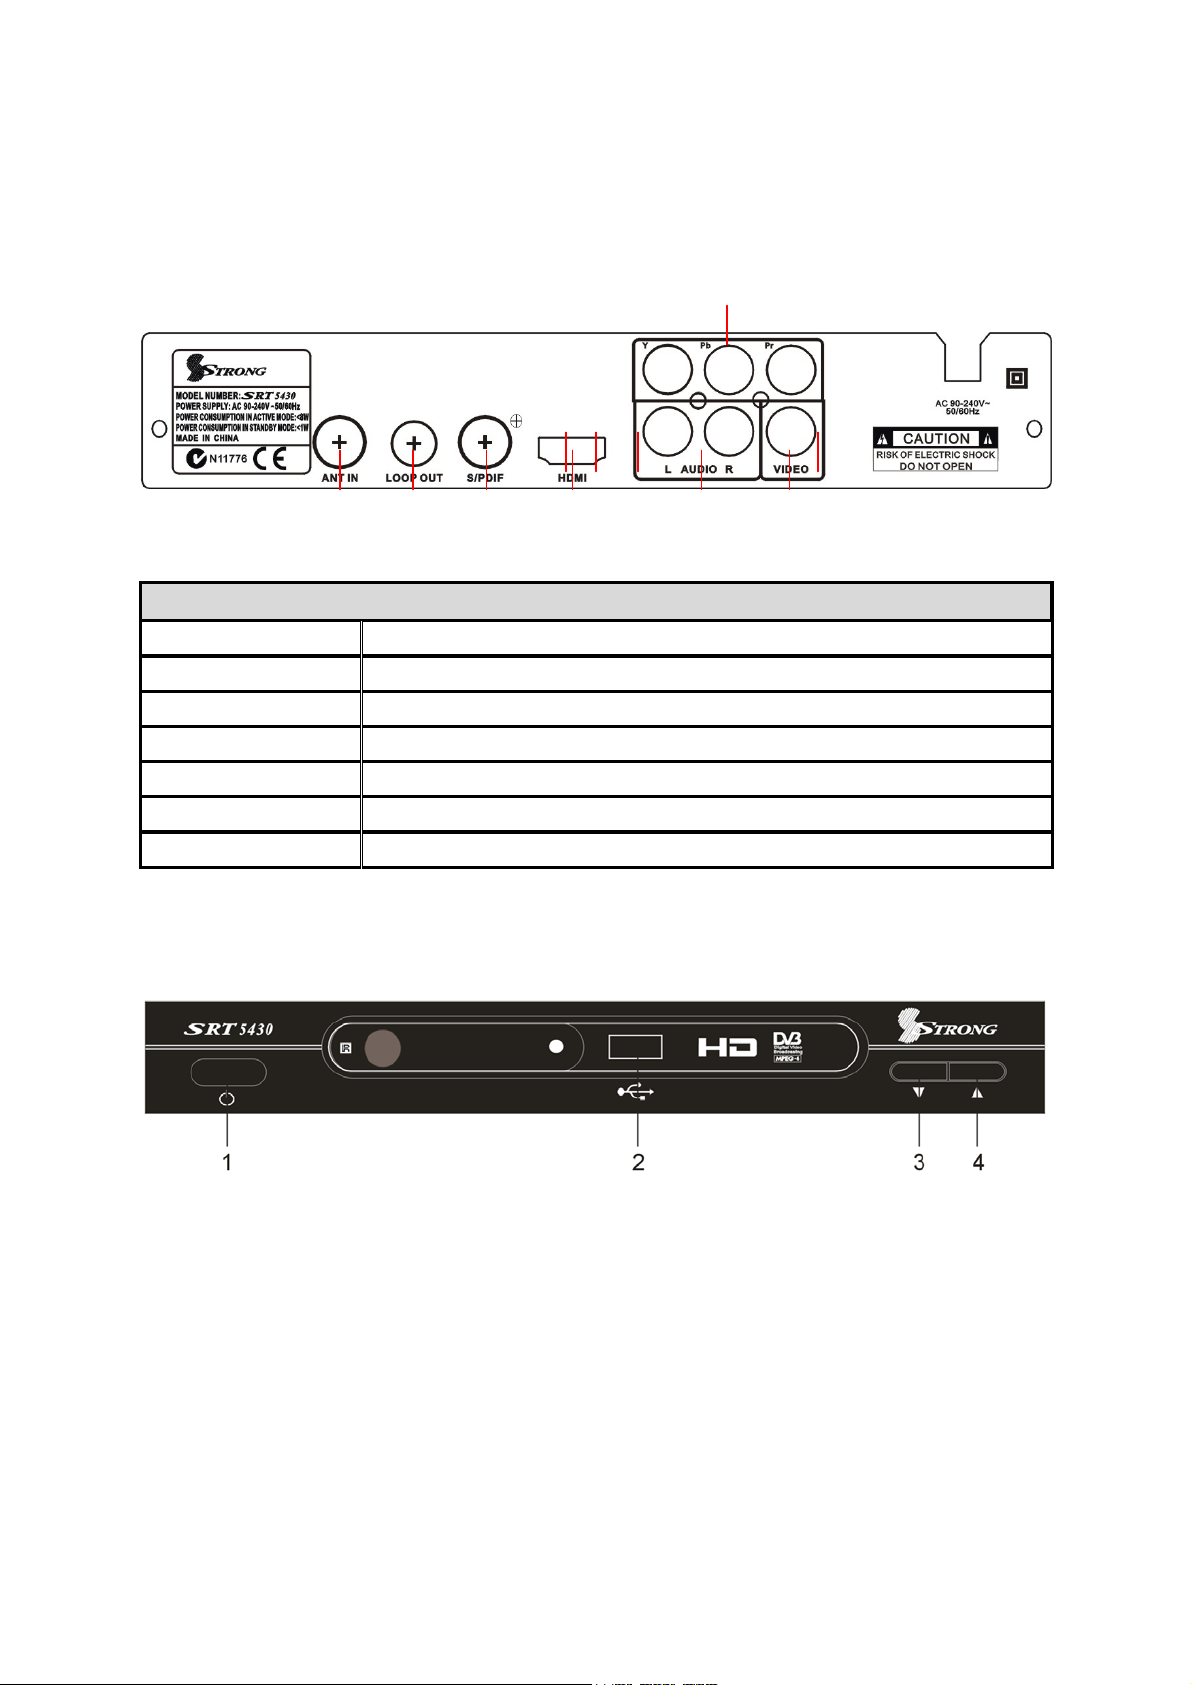
4 FRONT AND REAR PANEL
4.1 REAR PANEL
YPBPR
ANT IN
LOOP
OUT
S/PDIF
HDMI
udio L/R
VIDEO
Rear Panel
ANT IN Digital Terrestrial TV Broadcast signal input
Loop OUT Loop Out of antenna signal
S/PDIF Digital audio output
HDMI Digital HDTV video output with HDCP. HDMI version 1.2
YPbPr High Definition Component video output
Audio L/R Analog Audio output
VIDEO Composite Video output
4.2 FRONT PANEL
1.POWER
2.USB
3.CH-
4.CH+
4
Page 8

5 INSTALLATION
5.1 CONNECTING THE RECEIVER
Before you connect your STB to your TV please ensure that it is placed on a flat and stable surface.
Now that your STB is in position connect it to your TV and any other peripheral devices. Please refer
to the below diagram and your TVs user manual for cable installation instructions.
Connect your STB to power, power on your TV and the STB before continuing to the initial set up
guide.
5
Page 9
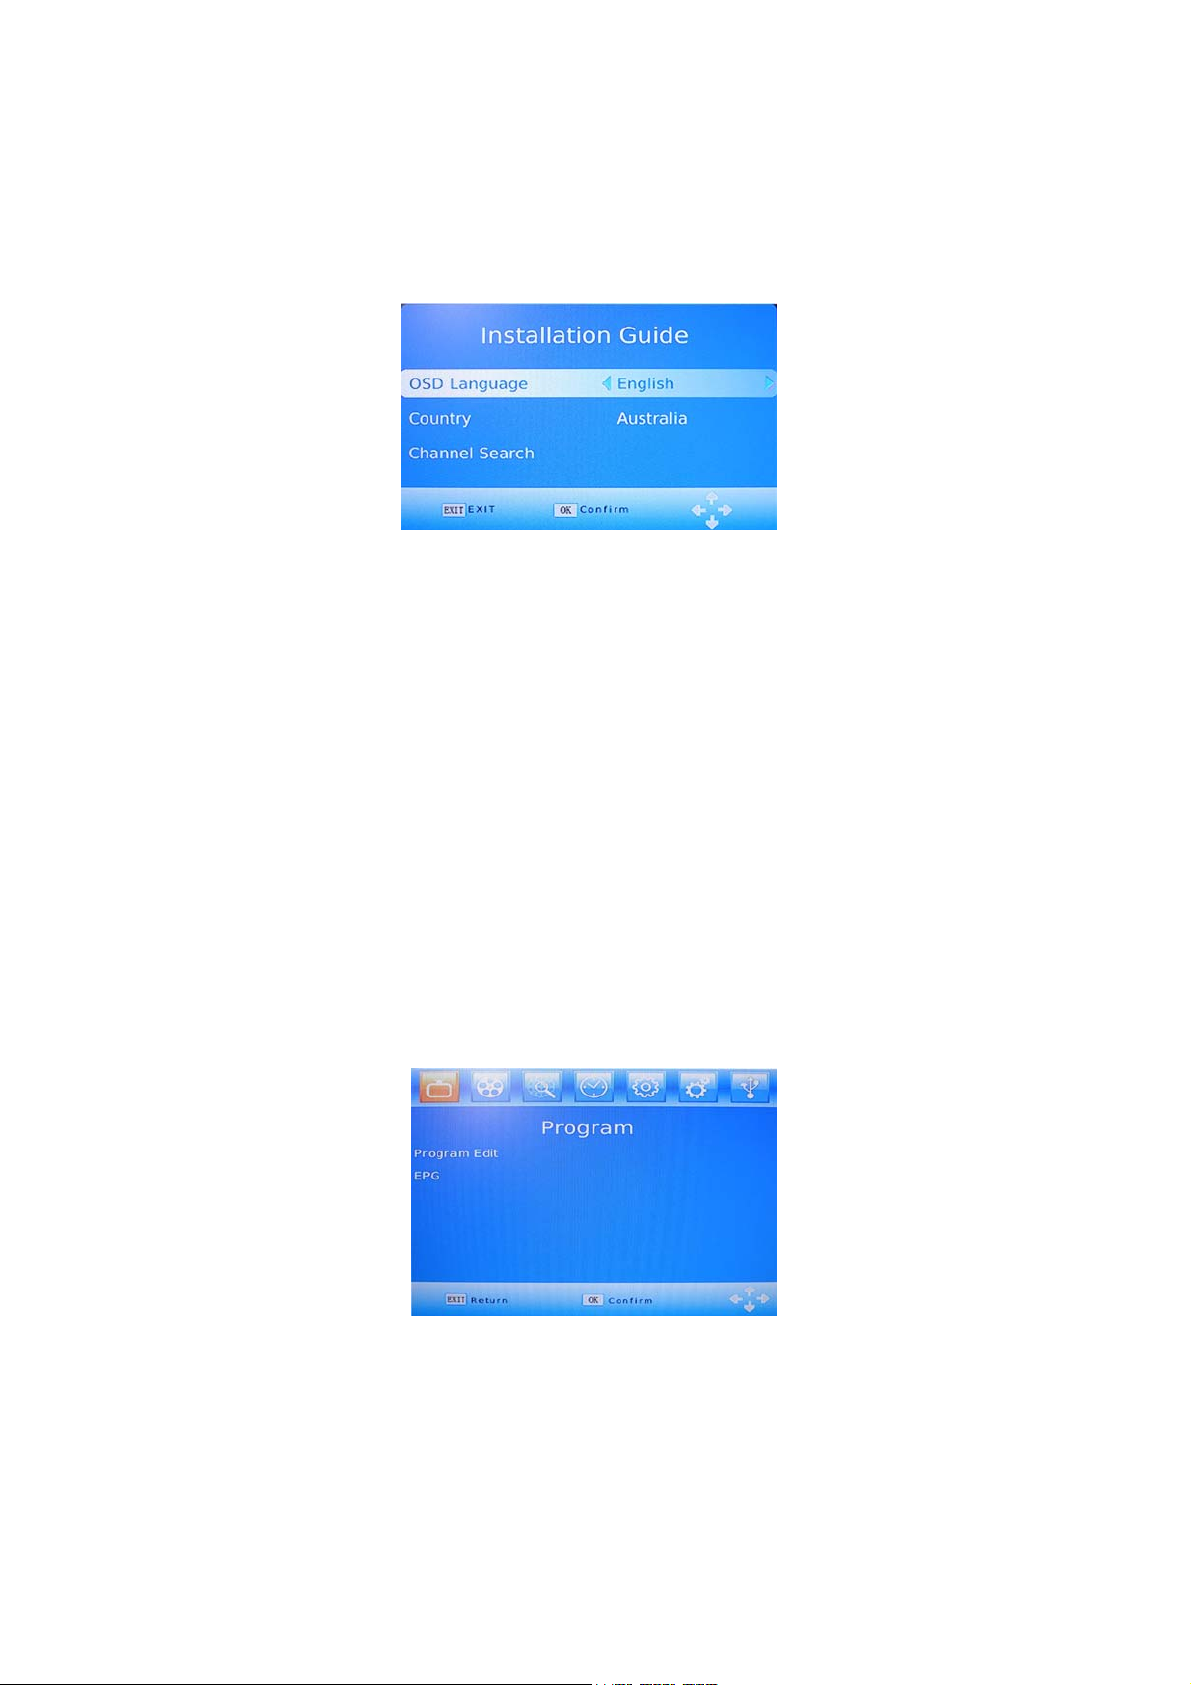
5.2 INSTALLATION GUIDE
If you are using the unit for the first time or have restored the unit to Factory Default, the installation
Guide Menu will appear on your TV screen. Follow the help information that at the bottom of the
window to select preference menu language and suitable country (Region) and start channel search.
(1) [OSD Language] Press RIGHT/LEFT key to select a language.
(2) [Country] Press RIGHT/LEFT key to select your country of residence.
(3) [Channel Search] Press RIGHT or OK key to begin Automatic channel search.
If no channel is found during the channel searching process, please check your antenna connections
and antenna are in working order. After the scanning process is completed the receiver will
automatically save the scanned channels and display the first channel in the list.
While you are using the unit, if you wish to perform an AUTO search, simply press the SCAN key
on the remote control. Or you can access the CHANNEL SEARCH menu to do the AUTO/MANUAL
channel search. Press MENU key on the remote and select [Channel Search] using RIGHT/LEFT
keys.
This Menu provides options to adjust the Search Channel settings. Press UP/DOWN to select an
option and press RIGHT/LEFT to adjust the settings. Press EXIT to exit the Menu.
6 MENU
MAIN MENU
Most functions are available in main menu. Follow the operation help information on the
bottom of the menu to modify the preference options.
modifying advanced options in the Menu. The default password is “000000”.
A password will be required when
Press the MENU key on the remote control; you can access the Main MENU. There are 7
items for set up. Use the LEFT and RIGHT keys to navigate through the menu. Select
the desired option and press the OK key or the RIGHT key to adjust the settings. Press
the EXIT key to exit the main menu.
6
Page 10

a. Program Settings:
You can edit the programs, check the TV Program Guide, sort the channels, and set
the LCN here.
1) To edit your program preferences (to lock, skip, favourite, move or delete a
program), you need to enter a password. Enter the default password “000000”. The
master unlock password is “888888”.
2) The EPG is an on-screen TV guide that shows scheduled programs seven days in
advance for every tuned channel. Press the EPG key on the Remote Control to
access the Electronic Program Guide.
3) Sort
NOTE: It is important to deactivate the LCN function while sorting out the position of
the channels. The “Sort” function allows you to sort the channels by different
methods:
By LCN: This will sort the channels by ascending order.
By Service name: This will sort the channels in alphabetical order.
By Service ID: This will sort the channels by Service ID.
By ONID: This will sort the channels according to the ONID.
b. Picture Settings:
The Picture option allows you to set the different functions such as:
Aspect ratio
The aspect ratio of the video can be 4:3 (also know as Anamorphic Image) or 16:9 (also know as
widescreen TV). Normally the aspect ratio of standard definition video should be 4:3 and the high
definition video should be 16:9. In order to get excellent quality on the TV set, press the MENU key to
enter the menu, and choose the aspect ratio setup menu to set a suitable aspect ratio. The screenshot
of the aspect ratio window is illustrated below.
Here is a description of how the aspect ratio conversion modes are chosen for the received stream
and the user’s television set aspect ratios.
16:9 Stream on a 16:9 TV 4:3 Stream on a 4:3 TV
Whatever the mode Whatever the mode
4:3 Stream on a 16:9 TV 16:9 Stream on a 4:3 TV
Letter-box Letter-box
Pan and scan Pan and scan
Full Screen
Full Screen
Not display area of the stream
Display black bars
7
Page 11

Resolution:
You can choose different resolution according to your TV: 576i, 576p, 720p, 1080i.
TV format: PAL/NTSC.
c. Channel Search settings:
(a) Auto Search: This option will automatically search for TV and Radio channels and save them
once the scanning is complete. All previously saved channels and settings will be deleted.
(b) Manual Search: This option allows you to scan for new channels without deleting previously
saved channels and settings.
(1) Select “Manual Search” and press the “OK” or “Right” key. The Manual Channel search
screen will appear.
(2) Press the “Right” or “Left” keys to select the channel frequency.
(3) Press the “OK” key to start scanning for new channels.
(4) If a new channel is found, it will be saved and stored along with the rest of the channels. If no
channels are found, the unit will automatically exit after finishing the scanning process.
d. Time settings:
It allows you to set:
Time Offset: Select auto or manual for GMT offset adjustments.
Country Region: Select the Country Region when [Time Offset] is set to AUTO.
Time Zone: Select the Time Zone offset when [Time Offset] is set to MANUAL.
Power Down (Sleep): Select the desired time for the Auto-shut off function (from 1
hour to 12 hours or set it to Off).
e. Option:
The menu contains the following options:
OSD Language: Change the ON Screen Display language.
Subtitle language: Select the subtitle language.
Audio language: If the program has multi-languages. Set your preference here.
f. System settings:
The menu contains the following options:
a) Parental Guidance:
The options for setting up the age reference starts from 4
years to 18 years. To access this function you will require to input a code. The
default password is “000000”. This function can also be deactivated simply by
setting it to OFF.
b) Set Password:
c) Restore Factory Default:
It allows you to modify the default password, which is “000000”.
It allows you to restore the unit to its default factory
settings. You will be asked to enter your password “000000”. Press “OK” key
once done.
Note:
d) Information:
This function will delete all your saved channels and your personal settings.
You can check the software version of your unit.
g. USB Settings:
The USB menu has 5 options:
(1) MULTIMEDIA:
While in TV Mode, press the “MEDIA” button to access to the Multimedia menu. The menu
contains 4 different icons: Music, Photo, Movie, and DVR.
Music Playing: Select “MUSIC” icon, move the cursor to enter the path of the desired audio file.
Press the OK button to play the selected audio file.
Photo Viewing: Choose PHOTO icon, and enter the path of the desired photo files. Press OK
button to view the desired photo files.
Movie Playing: Choose MOVIE icon, and move the cursor to choose the path of the desired
video files. Press the OK button to play the desired video files.
8
Page 12

DVR Playing: Select DVR icon. Select the recorded file you want to play, press OK to begin
playback. Press the RECALL key to move up to the next Folder. Press the RED key to switch
between Preview and Full screen modes. Use the YELLOW key to delete the file you don’t
want. Press the GREEN key to rename the recorded file if desired.
(2) Photo configure: You can adjust the slide time, slide mode and aspect ratio here.
(3) Movie configure: You can set the Aspect Ratio, Subtitle Specific, Subtitle background and
Subtitle Font-colour here.
(4) DVR configure: Record Device, here you can view information of your connected USB storage
device which includes Format Type, Total and Free space available on drive. You can choose
the option FORMAT to format your USB compatible device in Fat 32 of NTFS formats.
(5) The USB port is also used to perform a software Update:
(a) COPY THE SOFTWARE UPDATE FILE FROM YOUR PC TO A USB FLASH DRIVE
Please visit the STRONG website www.strong.com.au
or contact our customer service
department on 1800 820 030 to obtain the latest software for updating your receiver.
1. To upgrade your unit via USB, plug the USB compatible drive to the PC and
backup the entire data of the USB drive. Right click the USB drive and select
Format item. Format the USB drive as FAT32 file system.
NOTE: To perform a software upgrade of the Receiver, please ensure the USB Flash Drive or
Portable hard disk is in FAT32 file system format. The USB port for software updates is
not compatible with USB Flash drives or Portable Hard Disk Drives in NTFS, FAT16 or
U3 PRO File System formats.
2. Copy the update file named “SRT5430.AP” to the root of the USB drive. Then
remove the USB drive from the PC.
(b) UPDATE THE RECEIVER VIA THE USB PORT
1. Plug the USB drive with the update file to the USB port of the receiver.
2. Press the Menu button and then press “66666” to begin the upgrade process. When the upgrade
progress has reached 100% and the update has finished, remove the USB flash drive and power
off and power on the receiver again.
3. To ensure the software upgrade has taken effect, please set the receiver to the factory default
settings via the main menu once the receiver has rebooted.
NOTE: Please do not remove the USB drive from the receiver or power off the receiver during
the upgrade process. This may damage the receiver.
9
Page 13

7. Daily use
7.1 INFO. KEY
Press “INFO” key to display the Information banner while viewing TV programs.
Information banner:
7.2 LANG KEY
Some programs may have multilingual audio language and this audio broadcast may be on a different
audio mode such as Stereo, Left or Right. All the available audio languages will be displayed on the
audio track window when you press the LANG key. The screenshot illustrates this below. If there is no
audio output after you have selected the audio language, it indicates that there is no audio on the
current audio mode, so you have to select the previous audio mode.
10
Page 14

7.3 SUB KEY
Certain programs have multilingual subtitle information. All available subtitle languages will be
displayed in the subtitle information window when you press the SUBTITLE key. The screenshot
illustrates this below. Follow the help information in the subtitle window to select preferred subtitle.
7.4 PREV/NEXT KEY & F.R./F.F. KEY
The PREV/NEXT key and F.R./F.F. key can be used during playback of multimedia programs from
your external USB device. Press the PREV/NEXT key to go to the previous/next program and
F.R./F.F. key to fast forward or rewind during playback.
7.5 ZOOM
The Zoom key allows you to zoom in on pictures and video being viewed or played back.
Once you have zoomed in you can use the arrow keys to move the frame to four directions.
11
Page 15

7.7 EPG
Press EPG key to display the on screen electronic program guide.
This displays a 7 Day Electronic Program Guide for all programs being broadcast from all
broadcasters.
7.8 TV CHANNEL AND RADIO CHANNEL LIST
Press OK key to display all TV channels or all Radio channels. Follow the help information
at the bottom of the window to select preferred channel.
7.9 FAVOURITE CHANNEL
Setting up Favourite TV or Radio Channels:
You can add preferred channels to a favourite’s channel list. Press the Menu key to
access the Program Edit Menu. The Favourite channel option allows you to classify the
channels by different genre: Movies/News/Sports/Music. Press the “FAV” or “OK” key to
confirm your selection. A heart shaped symbol will appear next to that channel which
confirms your selection.
12
Page 16

Disable Favourite TV or Radio Channel:
Press the Menu key to access the Program Edit Menu. The list of the favourite channels
will be displayed. Highlight the desired channel to be disabled. Press “FAV” button, select
the “Disable” option and press the “FAV” or OK” key to cancel. Press the “Exit” key to
exit the menu.
View Favourite Channel:
While in normal viewing mode, press the “FAV” key to access to your favourite channel
menu. Press the LEFT or RIGHT keys on your remote to access to the classified SubMenu (Movies/News/Sports/Music). Press the UP or DOWN keys to browse through your
favourite channels. Press the “OK” key to select your favourite channel.
Delete a TV or RADIO Program:
Press the Menu key to access the Program Edit Menu. Select the program you wish to
delete and press the “BLUE” key on your remote. A warning message will appear on
your TV screen. Press the “OK” key to confirm the deletion of the channel. Repeat the
above procedure to delete further channels.
Skip TV or RADIO Channel:
Press the Menu key to access the Program Edit Menu. Select the channel you would like
to “Skip” and press the “GREEN” key on your remote. A skip symbol will appear. Now
the channel is marked as a SKIP. To save your settings and exit the menu, press the
“Exit” key.
Move a TV or RADIO Program:
Press the Menu key to access the Program Edit Menu. Select the desired channel you
wish to move and press the “RED” key on your remote. A “MOVE” symbol will appear on
your TV screen. Press the UP or DOWN keys to move the channel to the desired position.
Press the “OK” key to confirm your selection. Repeat the above process to move further
channels.
WARNING:
To use the DVR Function, Instant recording function, TV program guide timer
recording function, TIMESHIFT function, Playback recorded program function
and Multimedia player function it is necessary to connect an external device
such as a USB flash drive or an external hard disk drive to the USB port.
The maximum capacity of HDD supported by the STB is up to a size of 500GB. It
supports FAT32 and NTFS file formats.
7.10 DVR FUNCTION
The DVR function of your receiver allows you to record and playback your favourite programs.
Instant recordings, TV program Guide recordings and timer recordings are all available.
NOTE: To use the DVR function and TIMESHIFT function, make sure you have a USB Hard Disk
Drive or a USB Flash Drive connected to the USB port of the receiver. Please note that due to buffer
speed requirements some USB Flash Drives may not be compatible for use with the Timeshift function.
1) Instant recording
Press the REC. key to start instant recording of the TV program currently being viewed, the recording
symbol would be displayed in the top left of the screen. Press the INFO. key to view information of the
instant recording. Press the STOP key to stop the instant recording.
13
Page 17

2) Electronic Program Guide Timer recording
MENU =>PROGRAM => EPG=>Program Guide => Planning =>Schedule =>Event Add
=>Timer Recording.
You will never miss any of your favourite programs again with the Electronic Program Guide
recording feature.
While in TV mode, press the “EPG” key to access the on screen Electronic Program Guide, select the
channel and program you wish to record. Press the “OK” key to select the desired program to be
recorded. A Schedule Event window will appear. Select and set the correct parameters to schedule
the recording. Set the Mode option to “Record”. This program will be automatically recorded at the
scheduled time.
You can edit the set timer recording in the Schedule Event Menu by editing the channel number,
name, date, start time, and end time. Select the option of Once, Daily, Weekly or Monthly recording
as desired.
Once the recording schedule setup has been set, you can at any time edit the schedule
recording by pressing the “GREEN” key or delete the scheduled recording by pressing the “BLUE” key
on your remote.
After having finished the Schedule Recording setup, press the “EXIT” key to save and exit.
14
Page 18

3) TIMESHIFT
The TIMESHIFT function allows you to pause the TV program being viewed. Once paused the tv
program is being stored on your connected USB Hard Drive or Flash Drive.
When watching a program, press the “TIMESHIFT” key on the remote control to activate the
function. You can now use the F.R. (Rewind function) to go back to the point you began the
TIMESHIFT function or F.F. (Fast Forward) to catch up to live viewing. If you wish to stop the
TIMESHIFT function, press the “STOP” key.
A dialogue box will be displayed on screen asking you to confirm. Press “OK” to stop the TIMESHIFT
and save the recorded section to your USB HDD, or Flash Drive. You can view this section later by
pressing the FILE LIST key. If you select EXIT the receiver will continue to TIMESHIFT the program.
If you press the “INFO” key, you can access the TIMESHIFT information screen.
WARNING:
For the compatibility of HDD and USB devices with TIMESHIFT and DVR function, please refer to the
table below:
USB device
3.5inch HDD
2.5inch HDD
1.8inch HDD
Please make sure that you are NOT using an USB device or a 1.8inch HD for TIMESHIFT function.
TIMESHIFT PVR RECORD FORMAT
doesn’t work Works Fat32
Works Works NTFS
Works Works NTFS / FAT 32
doesn’t work Works NTFS / FAT 32
15
Page 19

4) Playback of a recorded program
Press the FILELIST key to display the recorded programs on your USB device. Follow the help
information at the bottom of the screen to preview, playback, edit or delete the recorded programs.
5) Multimedia player
A Multimedia player feature has also been integrated into the SRT 5430. Press the MEDIA key to
display the multimedia player window. You can now select to view Photos, play MP3 music files and
view Movie files via the multimedia player. Known supported files are outlined below.
NTFS, FAT32 and FAT16 file systems are supported.
Player Supported file
Photo JPEG, BMP, PNG
Music *.wma, *.mp3, *.aac
Movie
*.avi, *.mpg, *.dat, *.vob, *.mkv, *.mjpeg
6) Format portable hard disk
A Format hard disk function has also been provided. Formatting a hard disk will permanently delete all
the data on the hard disk. It is strongly recommended to backup all the data before formatting your
hard disk drive.
16
Page 20

8. TROUBLESHOOTING
The below table is a list of common problems that may occur with your receiver. If you are unable
to find a solution for the problem you are having please contact the STRONG Technical Help Line
on 1800 820 030 or emailing tech@strong.com.au
Fault Possible Cause Solution
Power on, but nothing
displayed on screen
TV picture drops out
and the unit displays
“No signal”
Receiving digital TV
but missing some
channels
Remote is not working Batteries are flat or there is interference Try replacing the batteries in
Unit not turned on at mains switch Ensure power plug is
Antenna is not properly connected or you
are in a bad reception area
Antenna is not properly connected or you
are in a bad reception area
plugged into wall socket and
switch is on.
Talk to your local TV antenna
technician about reception
problems in your area and
whether a new antenna
would benefit you
Talk to your local TV antenna
technician about reception
problems in your area and
whether a new antenna
would benefit you
the remote and ensure that
there is no direct sunlight on
the remote or unit
17
Page 21

9. SPECIFICATIONS
Tuner
Input Connector IEC 16902. Female
Input Frequency Range VHF & UHF
Num of RF Inputs 1
Input impedance 75 ohm
RF output Connector (bypass)IEC 169-2 Male
Loop through 474-858
Demodulation
Standard ETSI EN300 744
Guard interval Modes 1/32,1/16,1/8 Active Symbol duration
FEC Modes Rate 1/2,2/3,3/4,5/6,7/8
Carriers/Constellation All modes supported including non hierarchical
Demodulation COFDM(QPSK/QAM16/QAM64) 2K and 8K
Channel bandwidth 7 MHz wide channel 21-69PLL
Video Decoder
Standard ISO/IEC 13818-2 and ISO/IEC 14496-10
Transport stream ISO/IEC 13818-1
Video decoding MPEG-2 SD/HD (MP@ML
DivX 4.X ~ 5.X
JPEG,BMP,PNG, Motion JPEG
AVI, VOB, MOV, MKV
Aspect ratio 4:3, 16:9
Audio Decoder
Standard ISO/IEC13818-3 TR1011154
Audio decoding MPEG-1 and MPEG-2 Layer I & II, Dolby Digital Audio, WMA and HE-AAC Digital
Audio
Dolby Digital (AC-3) Stereo down-mixing to analog and digital audio outputs (including HDMI).
For digital outputs, L-PCM stereo encoding is provided
Sample rate 32 kHz, 22.1 kHz, 44.1KHz,48 kHz
Subtitles
Subtitle DVB Subtitle
Accessories
Remote control unit IR (36kHz) RC3 / other on request (38kHz)NEC
Batteries 2 x AA R6 type
User Manual 1 pcs
Power
AC input range AC 90V ~ 240V 50/60Hz
Power consumption < 8W
Standby consumption < 1W
Unit dimension 220X142X40mm
Weight 0.65 kgs
MHz
and MP@HL), MPEG-4 H.264/AVC SD/HD
18
Page 22

STRONG Australia PTY LTD.
60 WEDGEWOOD ROAD, HALLAM, VICTORIA 3803
PH: +61 3 8795 7990 FAX: +61 3 8795 7991
TECHNICAL SUPPORT: 1800 820 030
STRONG & CO. (FAR EAST), LTD.
P.O. BOX 85, YOKOHAMA, KANAGAWA-KEN
JAPAN 231-91 FAX: +81 45 651 1842
www.strong.com.au
tech@strong.com.au
©Strong Technologies Pty Ltd., 2011
19
 Loading...