

Stoelting SCBA118-37 Installation Manual

513855
SCBA-SCBF
Owner’s Manual
SCBA & SCBF
ENGLISH
1 SAFETY PRECAUTIONS
1 Before connecting the dispenser to the power source,
check that the voltage shown on the rating plate matches your
electricity supply. Connect the dispenser to a single-phase
supply through a grounded outlet as required by current
regulations.
2 Do not use extension cables to connect the dispenser.
3 To avoid any risks, if the power cable is damaged, it must
be replaced by the manufacturer, by an authorized technician
or by a similarly qualified person.
4 The dispenser is not suitable for outdoor use.
5 The dispenser must be installed in the upright position.
2 TECHNICAL CHARACTERISTICS
SCBA128-37
SCBA118-37
Transparent removable bowls
Capacity of each bowl, approx. gal
Dimensions:
width in
depth in
height in
Net weight, approx. lb
Gross weight, approx. lb
Hermetic compressor
Air-cooled condenser
Overload protector
Noise level less than 70 dB (A)
1 2 3 1
1.5 1.5 1.5 2.5
7.8 15.623.67.8
18.918.918.918.9
24 24 24 27.9
55 90 125 55
25 44 60 27
SCBA168-37
SCBF118-37
2 3
2.5 2.5
15.6 23.6
18.9 18.9
27.9 27.9
99 134
48 64
SCBF128-37
SCBF168-37
6 Before cleaning, always disconnect the dispenser by
removing the plug from the outlet.
7 Always disconnect the dispenser before removing any of
the panels for cleaning or maintenance work.
8 Do not use a water jet to clean the dispenser.
9 This dispenser must not be operated by children.
10 Do not let children play with the dispenser.
11 This dispenser must not be used by persons unless they
have been trained regarding the safe use of the dispenser and
understand the risks involved.
12 Only persons who know and have practical experience of
the dispenser are permitted access to the inner components of
the dispenser, especially when dealing with issues regarding
safety and hygiene.
IMPORTANT
Electrical characteristics: read the data on the plate of
each individual dispenser. This is located at the bottom
of the front panel, behind the drip tray on the right. The
serial numbers of the devices (preceded by the symbol #)
are shown on the frame below. Always refer to the data
shown on the plate.
We reserve the right to amend this manual without notice.
3 INTRODUCTION
Read this instruction booklet carefully in order to familiarize
yourself with all aspects of the dispenser.
Like all mechanical products, this machine requires cleaning
and maintenance. Good operation can also be affected by any
errors made by the operator during disassembly and cleaning.
For this reason, in the case of daily operations such as disassembly, cleaning, sanitizing and reassembly, it is important that
the person using the dispenser is aware of the procedures and
can perform them without making errors.
The warranty for the SCBA and SCBF machines is as follows:
Five years on compressor; Three years on electrical board; Two
years on non-wear parts; One year labor
.
13 For the dispenser to operate correctly, ambient temperature
must be between +41° and +89°F.
14 Use the dispenser to cool the indicated liquids only.
15 Do not introduce dangerous or toxic liquids to the
dispenser.
Every machine includes White Glove
Service. One call does it all – customer
service, technical service, parts or
warranty information, installation,
startup, sales, on-site service dispatch
and much more. Available 24 hours a
day, seven days a week year-round.
Contact White Glove Service at 800319-9549
2
4 UNPACK THE MACHINE
1 Remove the dispenser from the packaging, which you
should keep in case it is needed in the future.
2 Check that the dispenser has not been damaged during
transport. If it has, make a report to the carrier immediately.
NOTICE: Do not lay the machine on its side or back.
NOTICE: Do not lift the machine by the tank, auger, or
handles. Only lift by grasping the bottom of the machine.
NOTICE: The machine must sit in the upright position for 24
hours before turning it on. This will allow the oil in the
compressor to settle into place following shipping.
3 Position the dispenser on a bench capable of supporting the
weight, even at full load.
4 Allow a minimum clearance of at least 6” all around the
dispenser so as not to impede the flow of cooling air.
5 Check the stability of the device, adjusting the height of the
legs if necessary. If the dispenser is provided with taller legs
(approximately 4”), these must replace the original ones.
ATTENTION
Make sure the device is properly grounded, otherwise
you may cause electric shocks to persons or damage to
the dispenser.
6 The dispenser does not leave the factory washed and
sanitized. Before use, it must be disassembled, washed and
sanitized, following the instructions in Chapter 7.4 CLEANING.
lemon juice, orange juice or coffee), dissolve 3.5 - 7 ounces of
sugar in each quart of product.
5 If using freeze-dried bases to be diluted with milk or water,
prepare the product in a separate bowl and only pour it into the
machine bowls after making sure that it is homogeneous and
that the powder is well dissolved.
MIX & RECIPE GUIDELINES
NOTICE: Amount of Sugar - The sugar level of the mix or
recipe must be between 10-17%. Mixes with sugar levels
outside of this range will not freeze properly. Less than
10%, the machine may over-freeze the mix.Greater than
17%, the machine will have difficulty freezing the mix.
NOTICE: Custom Recipes When using a custom recipe
instead of a commercial mix, Stoelting strongly recommends using a refractometer to measure the sugar content.
NOTICE: Using Alcohol - Alcohol is an anti-freeze.
Replace NO more than ¼ of the water required in the recipe with alcohol.
IMPORTANT
Use the dispenser with food products only.
6 The dispenser must operate without interruption: the
cooling system for each bowl automatically stops when the
product is ready to be dispensed, maintaining the set density.
The augers continue to operate.
IMPORTANT
Place the device in such a way that the power cable is
easily accessible.
7 If required by local regulations, it is possible to have the
dispenser permanently connected to electrical power supply,
ref. National Electrical Code (NEC) and NFPA 70. If this is the
case, remove the terminal block and, if necessary, enlarge the
hole on the sheet base, to allow the conduit entry.
5 TO OPERATE SAFELY
1 Do not operate the dispenser without reading this
operator’s manual.
2 Do not operate the dispenser unless it is properly
grounded.
3 Do not operate the dispenser unless all panels are secured
with screws.
4 Do not put objects or fingers in panel louvers or spigot
outlet.
5 Do not remove bowls, augers, or panels for cleaning or
routine maintenance unless the dispenser is disconnected from
its power source.
6 The cover must remain closed at all times.
6 OPERATING PROCEDURES
To remove the top cover from the bowl, press the lock button
and slide the cover towards the front of the bowl. If there is a
safety lock for the cover, turn the key in an counterclockwise to
unlock (see figure 2).
1 Wash and sanitize the dispenser before using it, following
the instructions in Chapter 7.3 WASHING.
2 Fill the bowl with the desired product. The maximum liquid
mix is as follows: SCBA machines 1.5 gallons, and SCBF
machines 2.5 gallons.
3 If using liquid or powder bases, specially prepared for
granita, follow the manufacturer's instructions carefully.
4 If using natural products to prepare granita (for example
6. 1 DESCRIPTION OF CONTROLS
The dispenser is equipped with a main switch together with a
touchpad and a screen for each bowl. These devices allow setting the dispenser operation mode. The following modes are
available:
STANDBY: the dispenser is filled and it is ready to start.
GRANITA MAKING: the dispenser makes granitas according to
the product in the bowl.
PRODUCT PRESERVATION: the dispenser keeps the liquid
product at a suitable temperature for its preservation. This mode
can be selected during the night, since it allows maintaining the
product quality while reducing energy consumption.
WASHING: only the mixers work, the cooling system is stopped.
This mode can be selected during the dispenser washing.
MAIN SWITCH
The main switch is located under the dispenser, on the left side.
It has the following functions:
Position 0 : the dispenser is off.
Position I : the dispenser can work but it is in Standby
mode. Only pilot light (A) is on.
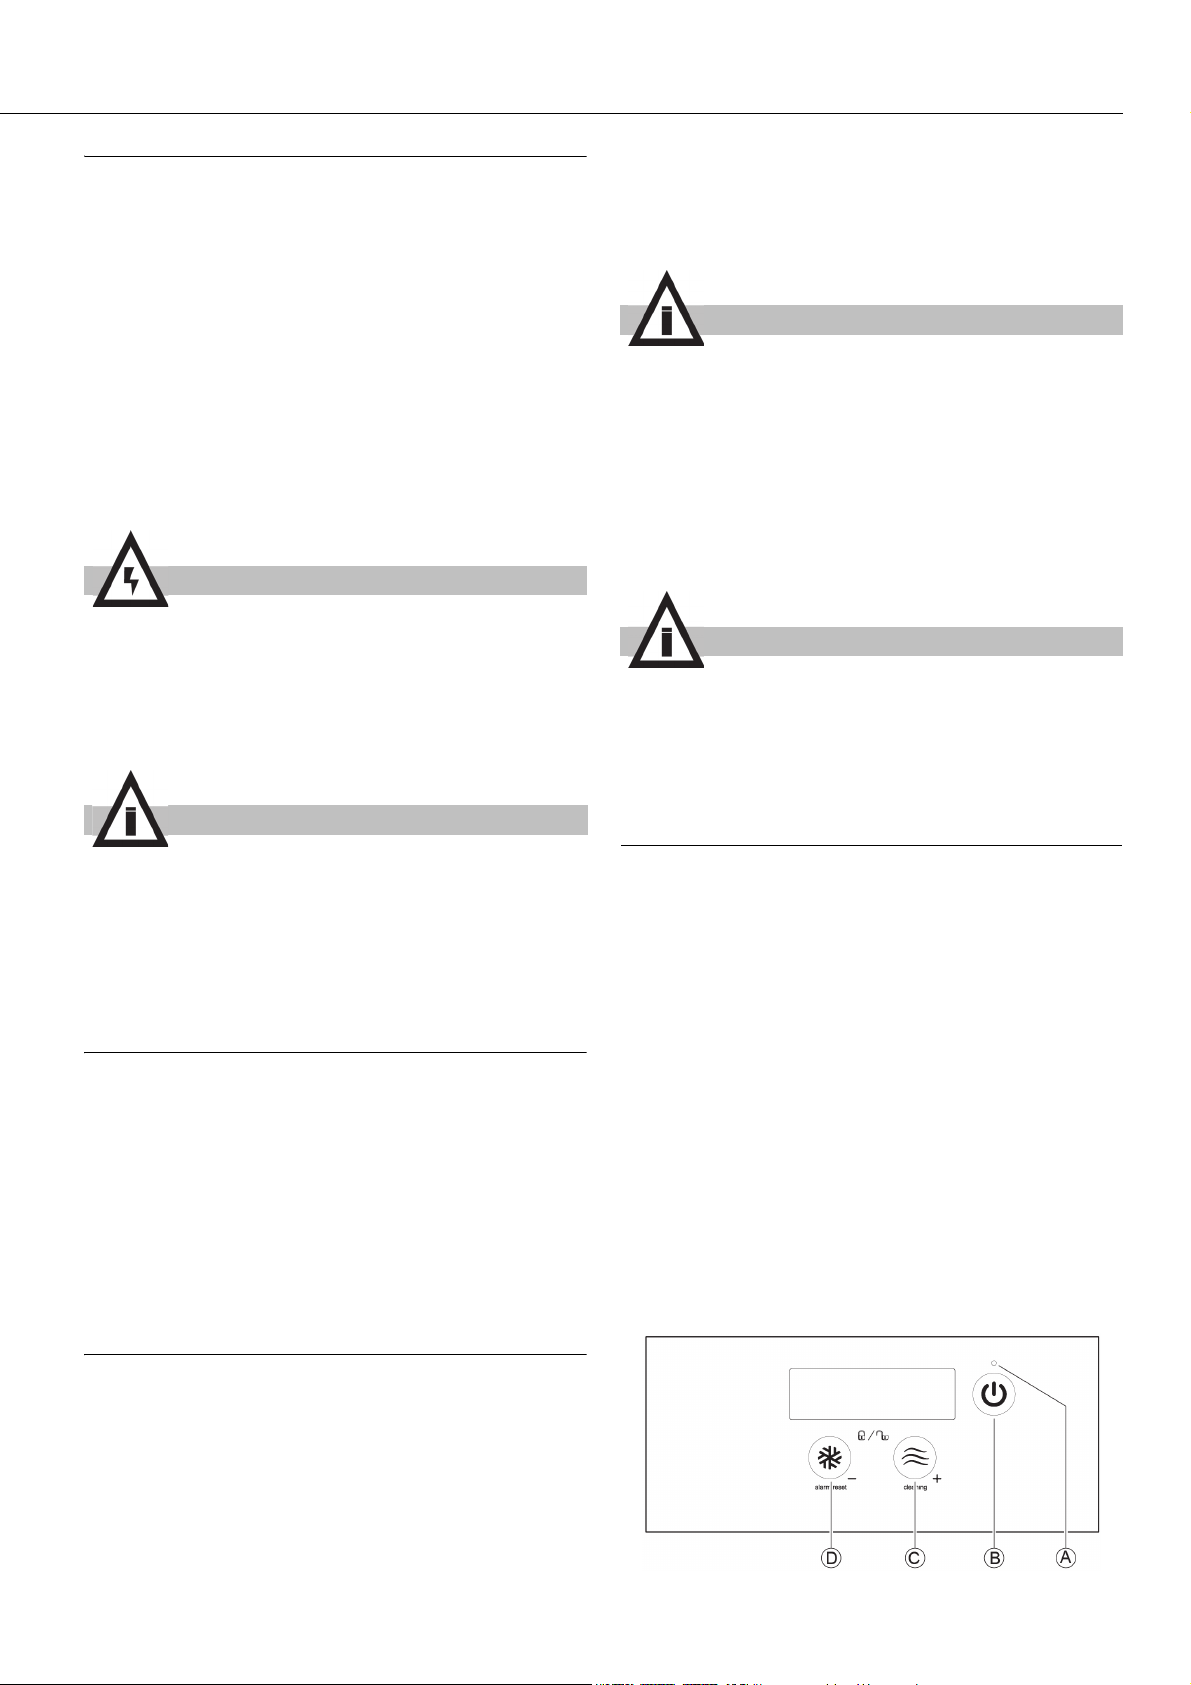
CONTROL KEYBOARD
figure 1
3
SCBA & SCBF
ENGLISH
The keys have the following functions:
Pilot light A On the right bowl: if it is on, it indicates that
the machine is in Standby mode; if it is off, it
indicates that the machine is working; if it
flashes, it indicates that the right bowl only is
off.
On the left bowl: if it is off, it indicates that
the bowl is working; if it flashes it indicates
that the bowl is off.
Standby
key (B)
Product
Preservation
Key (C)
Granita
Making key (D)
The display shows the following icons:
On the right bowl: if it is pressed for two seconds, it allows turning on and off the whole
machine; if it is pressed quickly while the
machine is working, it allows turning on and
off a single bowl (on machines with multiple
bowls only).
If it is pressed twice quickly: it allows turning
on and off the cover lights.
On the left bowl: if it is pressed quickly while
the machine is working, it allows turning on
and off a single bowl.
If it is pressed quickly, it allows increasing
density. If it is pressed one second while the
machine is running in the Granita making
mode, it allows switching to the Product
Preservation mode. If it is pressed one second while the machine is running in the
Product Preservation mode, it allows switching to the Washing mode.
If it is pressed quickly, it allows decreasing
density. If it is pressed one second while the
machine is running in the Product Preservation mode, it allows switching to the Granita
Making mode.
If it is pressed one second while the machine
is running in the Granita Making mode, it
allows resetting possible alarms.
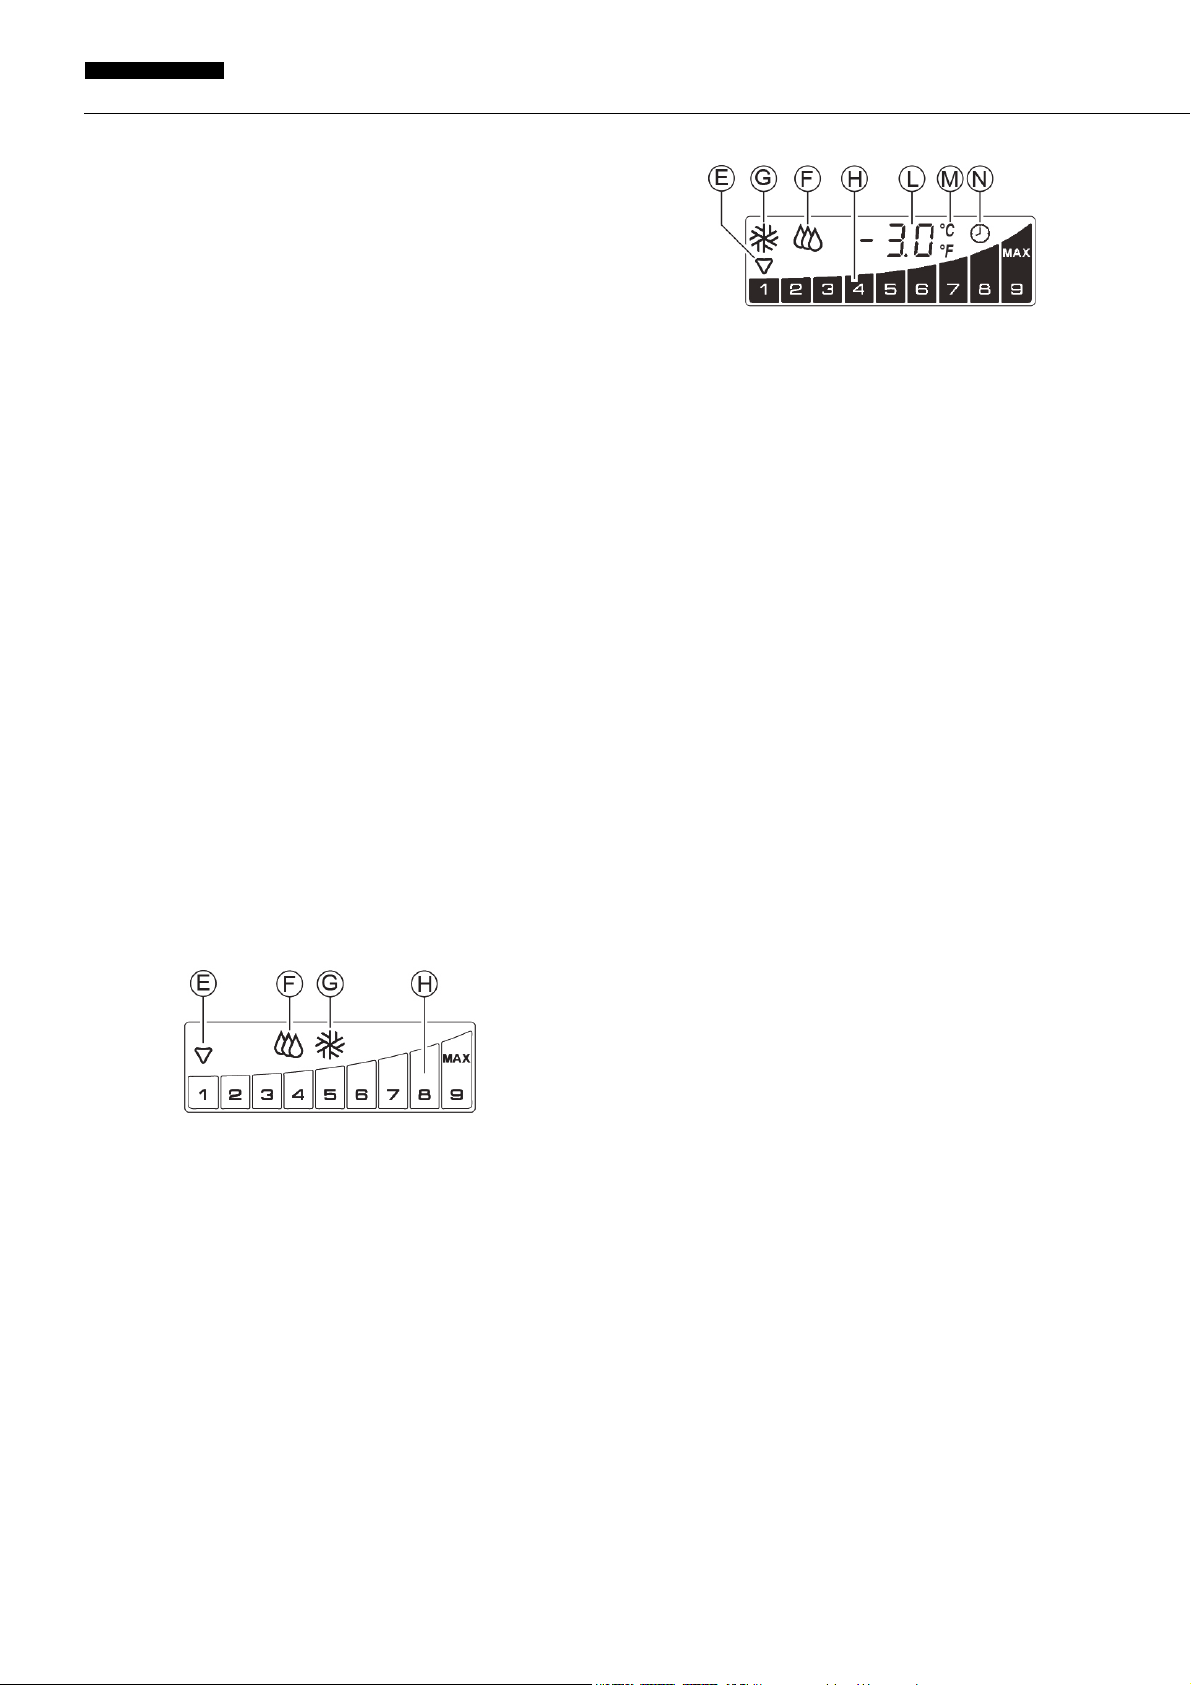
The smart display (optional) shows the following icons, too:
Compressor icon
(E)
Product Preservation Icon (F)
Granita making
Icon (G)
Density bar (H) It shows the set density value and the
Current time (L) Displays the current time and/or product
°C/°F scale icon
(M)
Timer icon (N) when this symbol is lit, the timer is operat-
TIMER
DAY/NIGHT TIMER
This control board has a clock module which is used to automatically switch from day mode to night mode and vice versa at
preset times.
NOTE: On machines with multiple bowls, the timer is only present on the right control and its settings apply to all bowls.
When the machine is in Standby, the current time is displayed
with two flashing points separating the second and third digit to
indicate the seconds.
The current time and the mode switching times can only be set
when the machine is in Standby mode using the following keys:
Setting of current time and temperature scale (°C / °F)Key B +
Key C
Setting of mode switching time intervalsKey B + Key D
Timer ON/OFF Key D pressed for 5 seconds
It shows the condition of the cooling solenoid valve.
Icon off: solenoid valve closed
Icon flashing: delay timer on
Icon on: solenoid valve open
If it is on, it shows that the machine is in
the Product Preservation mode.
If it is on, it shows that the machine is in
the Granita Making mode.
alarms.
temperature.
temperature scale set (°C or °F).
ing.
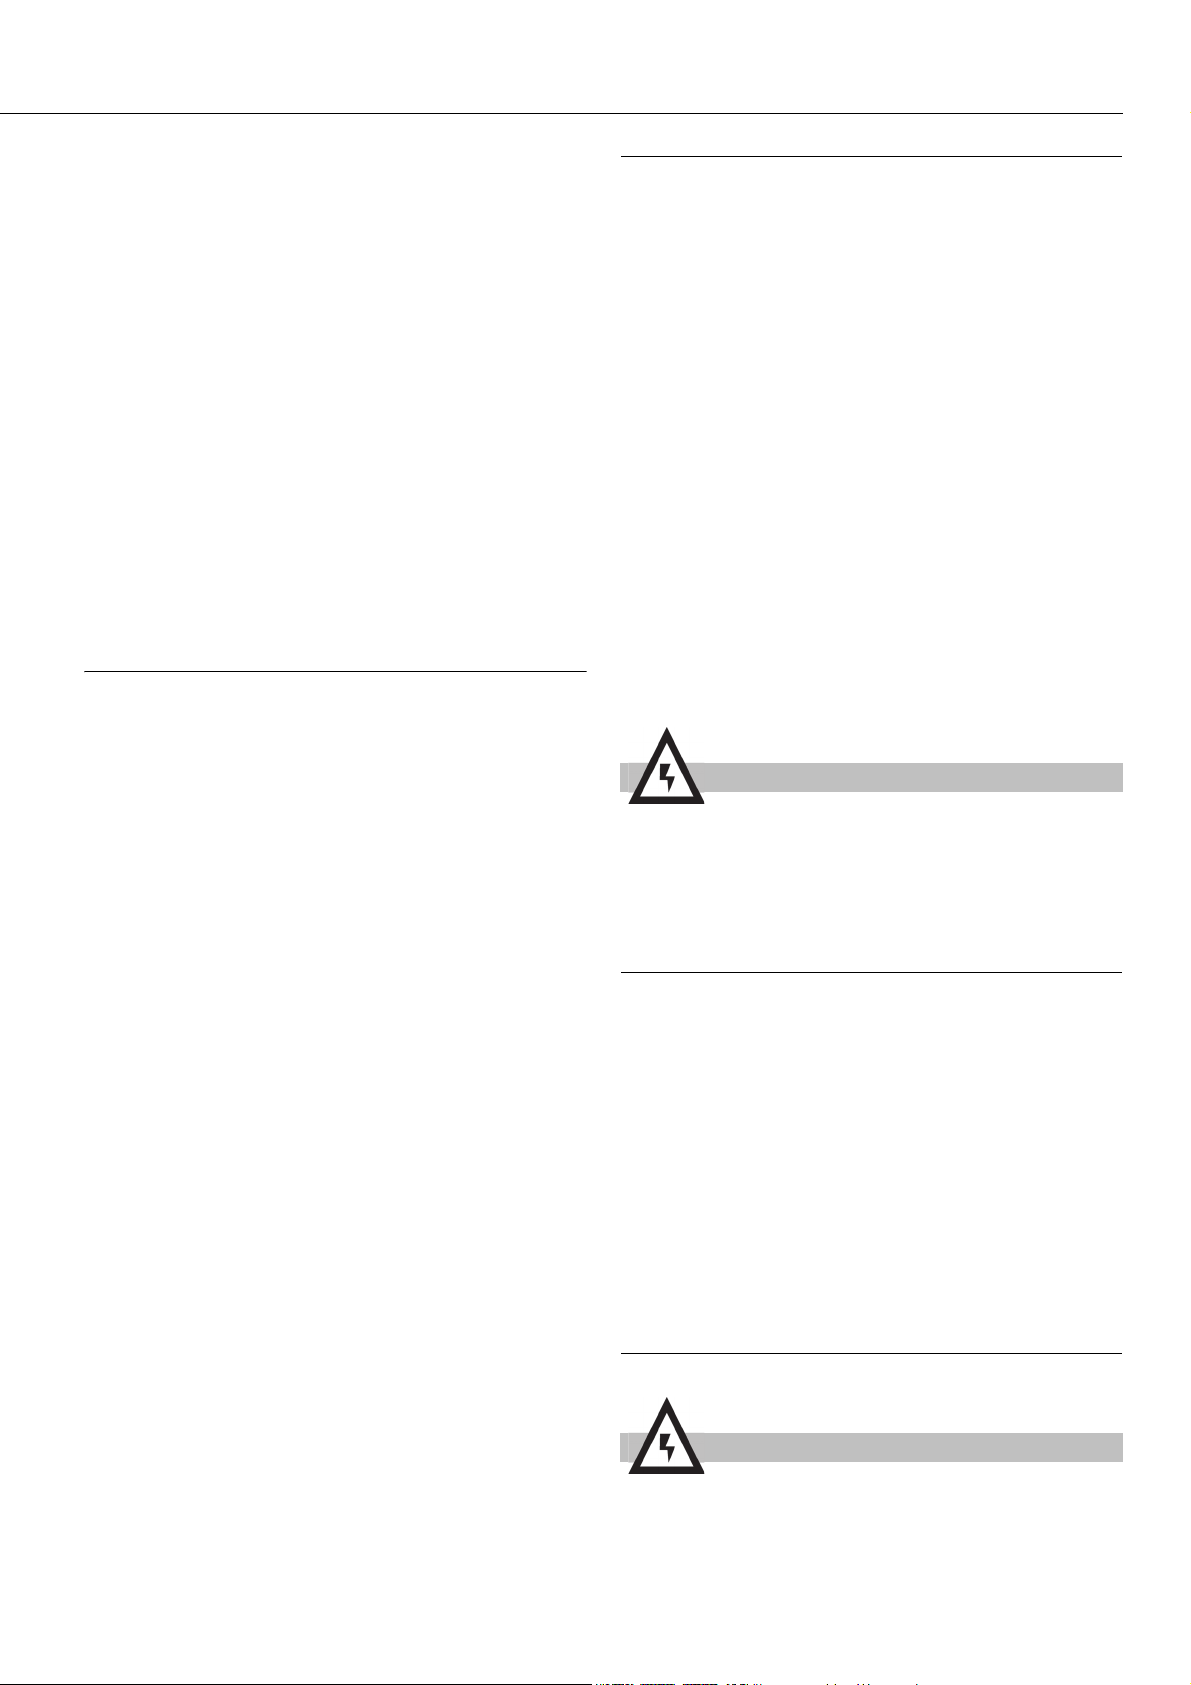
Compressor icon
(E)
Product Preservation Icon (F)
Granita making
Icon (G)
Density bar (H) It shows the set density value and the
HOW TO START THE DISPENSER
Turn the main power switch to position I. Pilot light (A) hopper
be on showing that the dispenser is ready to work.
Keep button (B) pressed until the dispenser starts.
Select the operation mode and the desired product density by
means of keys (C) or (D).
It shows the condition of the cooling solenoid valve.
Icon off: solenoid valve closed
Icon flashing: delay timer on
Icon on: solenoid valve open
If it is on, it shows that the machine is in
the Product Preservation mode.
If it is on, it shows that the machine is in
the Granita Making mode.
alarms.
SETTING OF CURRENT TIME
Press keys B and C simultaneously to enter the current time
setting mode. Press keys C and D to make the individual settings and press key B to conform and move on to the next
selection. The following must be set in this order:
1 The number 24 or 12 are displayed and the second two
digits flash.
2 Setting of current time. The first two digits flash as well as
the third or fourth digit if the 12 hr mode is selected.
3 Setting of minutes. hopperThe second two digits flash.
SETTING OF MODE SWITCHING TIME INTERVALS
Press keys B and C simultaneously to enter the switching time
interval setting mode. The setting always starts from 00:00 and
the first time with the day mode, indicated by a lit G icon. Press
keys C and D to increase or decrease the time shown on the
display by intervals of 15 minutes and press key B to modify the
operating mode from day to night and vice versa. To adjust the
intervals, you must select whether the machine should be in
night or day mode at 00:00 by pressing key B and then press
key C until you reach the time you want to change mode. Now
press key B to switch mode and the icon comes on to indicate
that the mode has changed. Scroll backwards and forwards
using keys C and D to check the switching time intervals. You
can set mode switching for every 15 minutes. When you reach
23:45 press key C again to quit the switching time interval set-
4
ting.
If the 12 hr mode has been selected, A or P is indicated on the
third or fourth figure (denoting AM or PM).
TIMER ON/OFF
If you press key D for 5 seconds when the machine is in
Standby mode, the day/night timer is activated. The icon N indicates the state of the timer. The default value the first time the
machine is switched on is timer OFF.
NOTE: The keypad lock also has affects the Standby mode
and therefore the possibility of adjusting the clock.
TEMPORARY SUSPENSION OF TIMER
When the timer is activated and the machine is operating in Day
Mode, the timer can be temporarily suspended so that the operating mode can be manually adjusted. To do this, hold down the
night key for two seconds, when the timer icon flashes you can
select the Night Mode or Cleaning on any bowl. Press the day
key again to reactivate the timer.
6. 2 ADDITIONAL FUNCTIONS
6. 3 OPERATION HELPFUL HINTS
1 The time required to make servable product varies
depending on several factors such as the ambient temperature,
the initial temperature of the product, its sugar content (degrees
Brix) and fat content and the density adjustment.
2 Filling the bowls with product that is already pre-cooled
further increases the efficiency of the dispenser.
3 To further reduce recovery time, refill the bowls when the
level of product is below the halfway point of the evaporator.
4 To store the product correctly, the dispenser must also
operate at night, at least in the PRODUCT STORAGE position.
5 Night operation in the PRODUCT STORAGE position also
eliminates the possible formation of ice (due to condensation of
atmospheric moisture) on the outside of the bowls.
6 Never turn off the dispenser when there is product in the
bowls. If not cooled, the product may deteriorate. Furthermore,
unless it is mixed, it may stick together and form blocks of ice. If
the mixer is restarted in these conditions (without waiting for the
ice to melt), the dispenser may be damaged.
7 All dispensers of this kind emit heat. If, however, this
emission seems excessive, check that no source of heat is
located near the dispenser itself and, in particular, near the
louvered panels. Also make sure that the airflow is not impeded
by the proximity of walls, boxes or similar. Leave at least 6” free
space around the dispenser. Finally, check that the filter
located behind the rear panel is clean.
LIGHT SWITCHING ON/OFF
By pressing key standby (B) twice quickly, lights can be turned
on and off. When the machine is in the Granita Making mode,
lights are always on; when the machine is in the Product Preservation mode, lights are always off.
DENSITY ADJUSTMENT
When the machine is working in the Granita Making mode, it is
possible to adjust product density by pressing keys C or D briefly.
The factory set value is 8, which is recommended to make granitas.
WASHING MODE
When the dispenser is in the Product Preservation mode, by
pressing key C for two seconds, the Washing mode is enabled.
In such a case, the auger turns but cooling is disabled.
Use this mode during the machine washing and sterilization to
prevent the cleaning solution from cooling.
By pressing any key, the dispenser exits from the Washing
mode and returns to the Product Preservation mode.
ALARM DISPLAY
If a fault occurs during the dispenser operation, an alarm message is displayed. One of the elements on the density bar hopper flash showing the corresponding alarm number. To find a
detailed alarm list, please refer to the Service Manual.
COMPRESSOR CONDITION
The compressor condition is shown above the first density bar
of the right bowl:
- Off: compressor off
- Flashing: start delay timer on
- On: compressor on
TOUCHPAD LOCK
It is possible to lock the touchpad to prevent access to the dispenser controls by keeping keys C and D pressed together for
two seconds.
By pressing keys C and D at the same time again, the touchpad
is unlocked.
ATTENTION
The access to the service area is restricted to persons
having safety/hygiene knowledge and practical experience on the dispenser.
8 The product is for use with confectionery drinks only.
6. 4 CLEANING
1 Cleaning and washing are essential to guarantee the
perfect preservation of the taste of the product and the
maximum efficiency of your dispenser. The procedures
described below should be considered general in nature and
may vary due to local health regulations.
2 Before disassembly for washing, the dispenser must be
emptied. Proceed as follows:
- use the touchpad to select the CLEANING operating mode
- if necessary, wait until the product becomes liquid
- remove the flow restrictor from the bowl (see figure 8)
- place a bucket under each spigot and empty the bowls
- fill the bowls with water and allow the dispenser to operate
in CLEANING mode for a few minutes. Then empty the bowls.
- hold down key A to switch off the dispenser
- turn the main power switch OFF
6. 4. 1 DISASSEMBLY
ATTENTION
Before disassembling any component, always disconnect the dispenser from the power source.
1 To remove the cover of the bowl, press the lock button and
slide the lid towards the front of the bowl.
If there is a safety lock for the lid, turn the key counterclockwise
5

SCBA & SCBF
ENGLISH
to unlock (see figure 2).
and then remove the bowl (see figure 4).
figure 2
2 To remove the bowl, push the lever upwards (see figure 3)
figure 3
figure 4
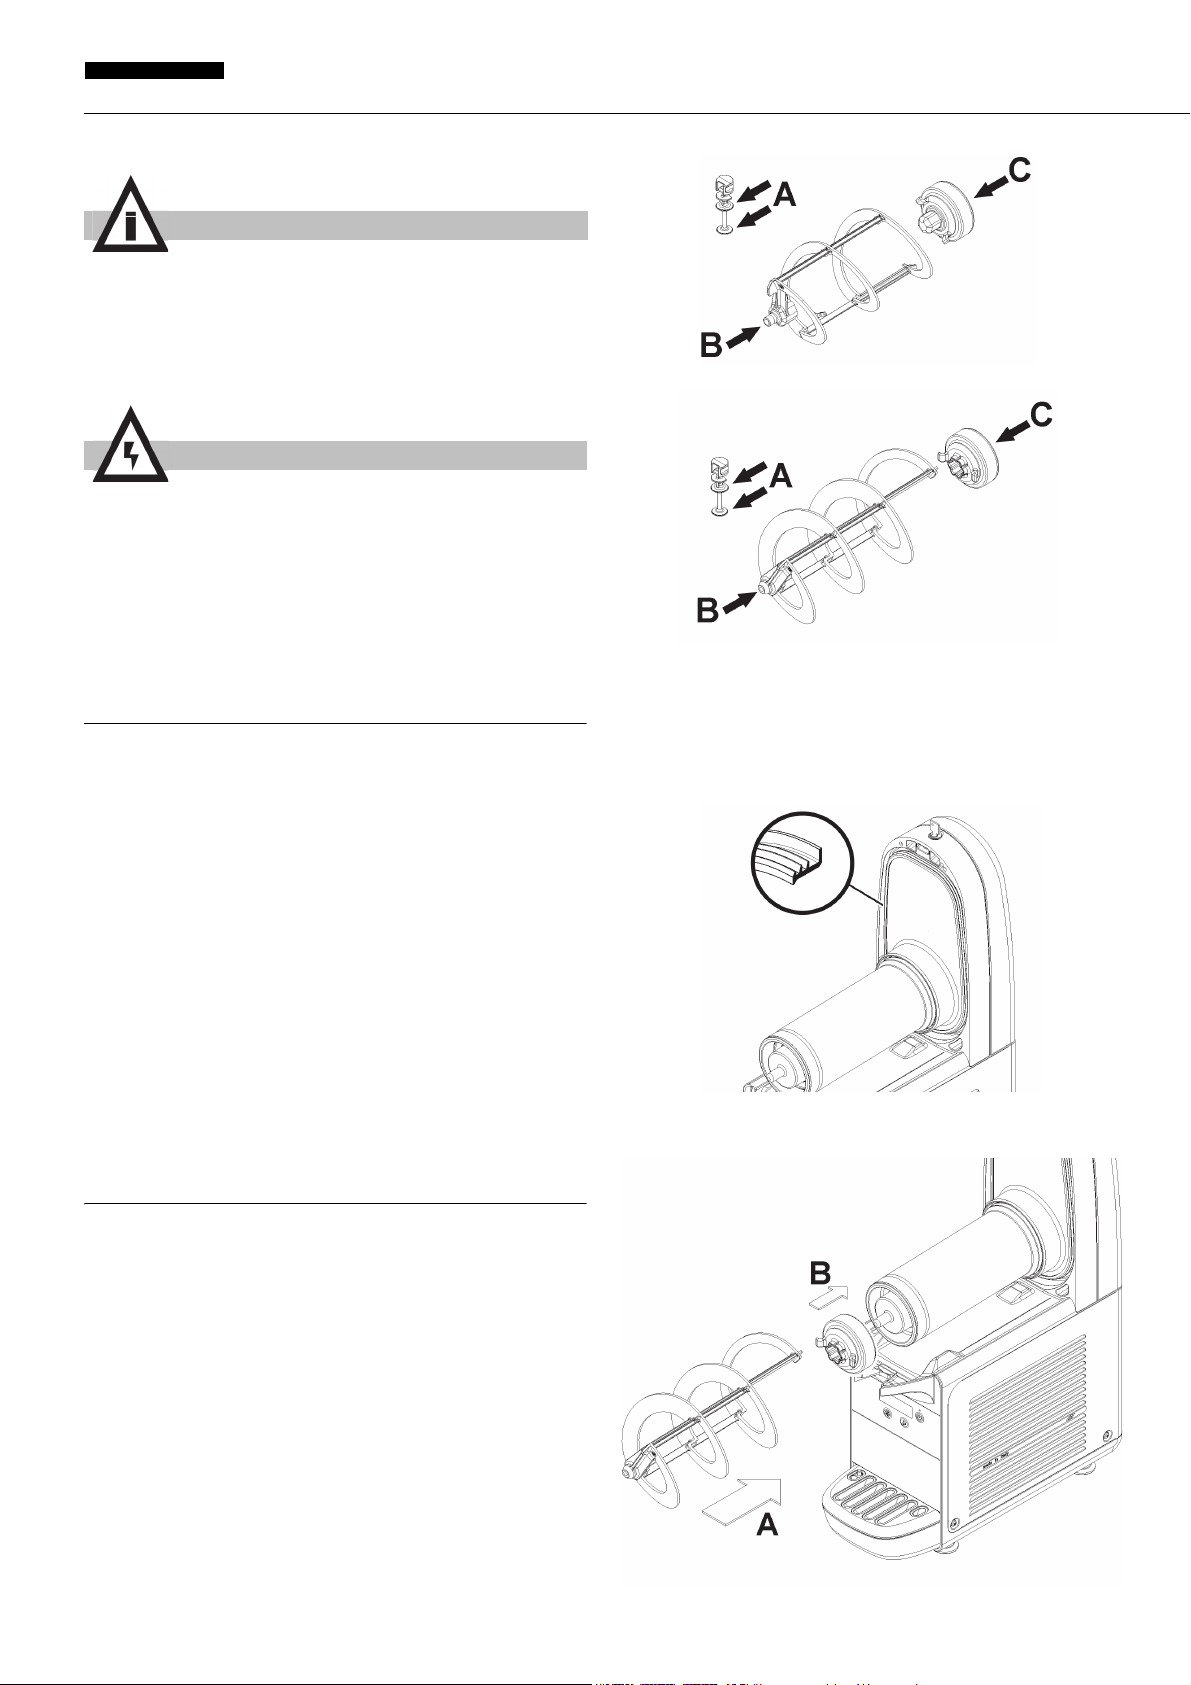
3 Remove the auger by sliding it out of the evaporator
6

cylinder. Then remove the hexagonal joint (see figure 5).
figure 5
4 Remove the gasket from its housing (see figure 6).
figure 7).
figure 7
6 Remove the drip tray and empty it.
7 Remove the flow restrictor from the bowl (see figure 8).
figure 6
5 Disassemble the spigot by following the order given (see
figure 8
6. 4. 2 CLEANING
IMPORTANT
Do not wash any part of the machine in a dishwasher.
ATTENTION
Before any cleaning operation, always disconnect the
dispenser from the power source.
1 Pour about one gallon of 90-110 °F water and mild
detergent into a bucket, following the manufacturer’s
instructions. A solution that is too strong can, in fact, damage
the parts to be washed, while a solution that is too diluted may
7
SCBA & SCBF
ENGLISH
not clean enough. Do not use abrasive detergents.
IMPORTANT
In order to prevent damage to the dispenser, use only
detergents that are compatible with the plastic parts.
2 Use a suitable brush and wash all the parts in contact with
the beverage thoroughly with the detergent solution.
ATTENTION
While washing the dispenser, do not use excessive
amounts of water around the electrical components. This
could cause electric shocks or damage to the dispenser.
3 Wash the evaporator cylinders using a soft brush.
4 Rinse all parts washed using tap water.
6. 4. 3 SANITIZING
Sanitizing must be done immediately before starting up the dispenser. Do not allow the dispenser to remain idle for a long time
after sanitation.
lubricant.
figure 9
figure 10
3 Reassemble the spigot on the bowl in reverse order
compared to that shown in figure 9.
4 Replace the bowl gasket.
NOTE: the rim with the greater diameter must be rested on the
rear wall (see figure 11).
1 Before starting the procedures described below, wash your
hands with antibacterial soap.
2 Prepare 2 gallons of Stera-Sheen sanitizing solution
according to the manufacturer's instructions.
3 Immerse all parts to be sanitized in the solution for the time
indicated by the product manufacturer.
4 Allow the sanitized parts to air dry on a clean surface.
5 Dry the external parts of the dispenser without using
abrasive cloths.
6. 4. 4 ASSEMBLY
NOTE: Total Blend sanitary lubricant, or equivalent must be
used when lubrication of parts is specified. Total Blend can
be used to lubricate parts and also as a spline lubricant. Do
not use more than one packet of Total Blend per freezing
cylinder.
NOTE: The United States Department of Agriculture and the
Food and Drug Administration require that lubricants used
on food processing equipment be certified for this use. Use
lubricants only in accordance with the manufacturer’s
instructions.
figure 11
5 Reassemble the hexagonal joint and then the auger (see
figure 12).
1 Slide the drip tray into place.
2 Lubricate the spigot piston, the hexagonal joint, and the
auger at the points indicated in figure 9 (SCBA) or figure 10
(SCBF), using only Total Blend or other food grade sanitary
figure 12
8
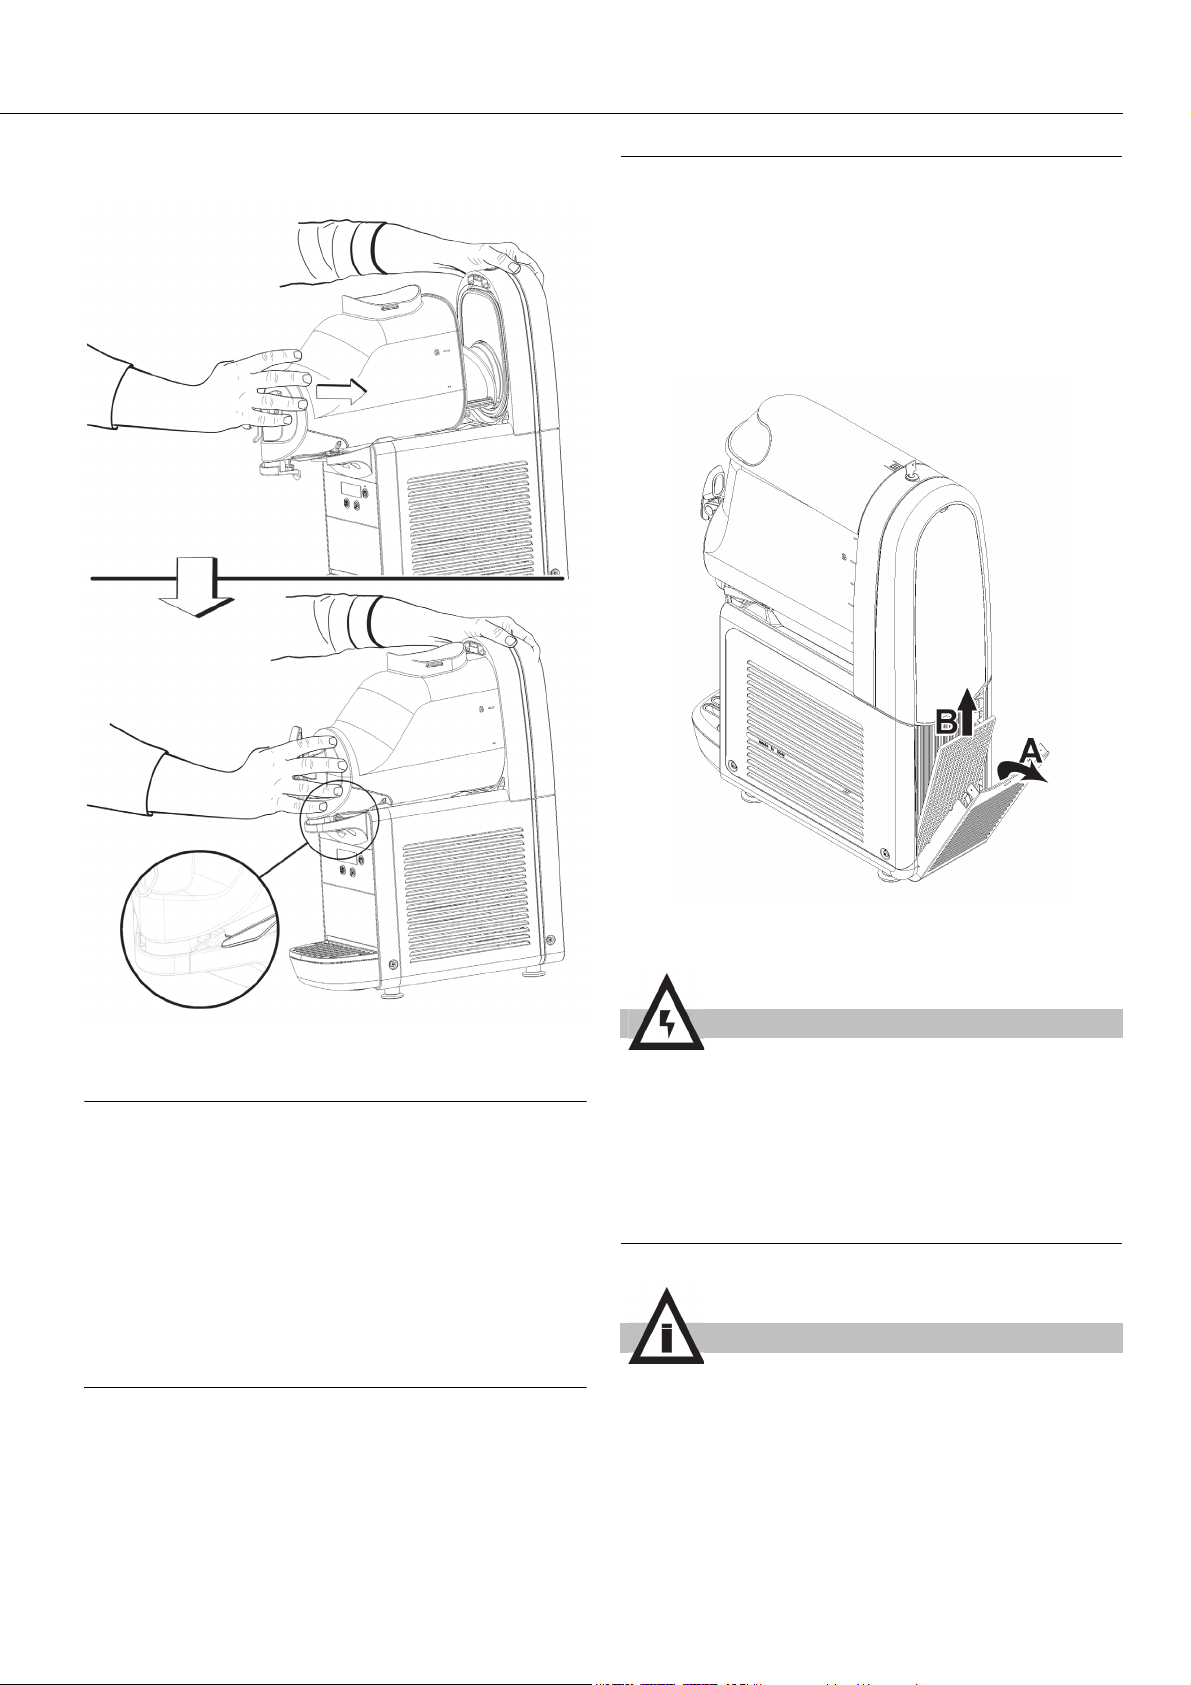
6 Replace the bowl by pushing it towards the back wall,
making sure it fits properly onto the gasket. The locking lever
will be lowered until it rests on the drip tray surface (see figure
13).
7 ROUTINE MAINTENANCE
1 Every day: inspect the dispenser and check for leaks of
product from the gaskets. If you notice leaks, first make sure
that the components of the dispenser are properly installed,
then check that the gaskets do not require lubrication and
finally that they are not worn or damaged. If they are, replace
them with original spare parts from the manufacturer.
2 Every month: remove the dust from the condenser filter at
the back of the machine (see figure 14).
figure 13
6. 5 IN-PLACE SANITIZATION
1 Prepare 2 gallons of Stera-Sheen sanitizing solution
according to the manufacturer's instructions.
2 Pour the solution into the bowls.
3 Using a suitable brush, wipe the solution onto all parts
above the level of the solution and on the underside of the
cover.
4 Install the cover and operate the dispenser in order to allow
the solution to be stirred for about 2 minutes. Drain the
sanitizing solution from the bowls through the spigots and then
dispose of it.
5 Remove the flow restrictor from the bowl (see figure 8).
6. 6 FREEZE DOWN & OPERATION
1 Place a container under the spigot and rinse the bowl with
mix to flush out any remaining sanitizing solution.
2 Fill the bowls with chilled mix.
3 Turn on the main power.
4 Press the power/standby button then press and hold the
freeze button for 1 second to start freezing product.
5 Once freezing, the snowflake icon displays on the screen
and the density bars are displayed.
6 Momentarily press the freeze or clean button to increase or
decrease density.
figure 14
ATTENTION
Beware of the condenser fins as they are sharp.
3 In case of strange noise or failure, disconnect the dispenser
from the power source and call for service.
7. 1 MAINTENANCE (TO BE CARRIED OUT BY
QUALIFIED SERVICE PERSONNEL ONLY)
IMPORTANT
In order to prevent damage to the dispenser, the plastic
parts must only be lubricated with Total Blend or with
another food grade sanitary lubricant compatible with
plastic parts.
Annually: Remove all the panels and clean the inside of the dis-
penser including the base and the inside of the panels.
Never remove the anti-condensation material wrapped around
the evaporator outlet tube (the copper tube located to the right
of the geared motor). If said material is missing or lost, replace
with original spare parts from the manufacturer.
9

SCBA & SCBF
ESPAÑOL
8 INSTRUCCIONES DE SEGURIDAD
ELÉCTRICA
1 Antes de conectar la alimentación eléctrica del distribuidor,
verifique que la tensión de red sea la correcta, indicada en la
placa. Conecte el distribuidor a una red monofásica, utilizando
un enchufe con toma de tierra, en cumplimiento de las normas
vigentes. Si la desconexión del aparato de la red eléctrica se
realiza mediante un interruptor unipolar, este debe garantizar
una distancia de apertura de los contactos que permita la
desconexión completa, en las condiciones previstas para la
categoría de sobretensión III.
2 No utilice alargaderas para conectar el aparato a la
alimentación eléctrica.
3 En caso de deterioro del cable de alimentación, este debe
ser sustituido por el fabricante, por el servicio de asistencia
técnica o por una persona con cualificación similar, para
prevenir cualquier riesgo.
4 El aparato no es apto para ser utilizado ambientes
exteriores.
5 El aparato se debe instalar en posición vertical.
6 Antes de cualquier operación de limpieza, desconecte
siempre la alimentación eléctrica del distribuidor, extrayendo la
clavija de la toma.
7 No quite los paneles para realizar operaciones de limpieza
o mantenimiento, hasta verificar que el distribuidor está
desconectado de la alimentación eléctrica.
8 No utilice chorros de agua para la limpieza.
10 CARACTERISTICAS TECNICAS
SCBF118-37
SCBA128-37
SCBA118-37
Contenedores transparentes
desmontables
Capacidad de cada contenedor,
aproximada
Dimensiones:
ancho cm 20 40 60 20 40 60
largo cm 50 50 50 50 50 50
alto cm 62 62 62 70 70 70
Peso neto, aproximado kg 23 41 57 25 45 61
Peso bruto, aproximado kg 25 44 60 27 48 64
Motocompresor hermético
Condensador a ventilación forzada
Guardamotor
Nivel de ruido inferior a 70dB (A)
n 1 2 3 1 2 3
l 6 6 6 10 10 10
SCBA168-37
SCBF128-37
IMPORTANTE
Características eléctricas: leer los datos que aparecen
en la placa de cada distribuidor que se encuentra situada
en la parte inferior del panel frontal, detrás del cajón
recogedor de gotas de la derecha. Los números de serie
de los aparatos (precedidos del símbolo #) aparecen
debajo el bastidor. Los datos que aparecen en la placa
de características son los que se tienen que tomar siempre como punto de referencia.
Queda reservado el derecho de modificación del presente
manual sin aviso previo.
SCBF168-37
9 Este aparato no puede ser utilizado por niños.
10 Evite que los niños jueguen con el aparato.
11 Este aparato no puede ser utilizado por personas con
capacidades físicas, sensoriales o mentales reducidas, o sin
experiencia y conocimientos, a menos que hayan recibido
asistencia y capacitación para el uso seguro del aparato y
comprendan los peligros que este implica.
12 El acceso al interior del distribuidor está reservado a
personas con conocimiento y experiencia con el aparato,
especialmente si se trata de operaciones relacionadas con la
seguridad y la higiene.
9 INSTRUCCIONES DE SEGURIDAD
HIGIÉNICA
1 Este aparato está destinado al uso doméstico o similar.
2 Para su correcto funcionamiento, la temperatura ambiente
debe estar comprendida entre +5 y +32 °C.
3 Utilice el aparato exclusivamente para enfriar los líquidos
indicados.
4 No introduzca sustancias o líquidos peligrosos o tóxicos en
el aparato.
11 INTRODUCCION
Es necesario leer atentamente este manual de instrucciones
con el objetivo de conocer todas las características del
distribuidor.
Como todos los productos mecánicos, también este distribuidor
necesita limpieza y cuidados. Su buen funcionamiento se
podría ver comprometido, además, por eventuales errores
efectuados por el operador durante las fases de desmontaje y
limpieza. Esta es la razón por la que es importante que el
usuario del distribuidor conozca, sin posibilidad de cometer
errores, los procedimientos de desmontaje, lavado,
desinfección y reensamblado, puesto que se trata de
operaciones diarias.
12 INSTALACIÓN
1 Extraer el distribuidor del embalaje que se aconseja
conservar para futuras necesidades.
IMPORTANTE
Durante las operaciones de transporte o elevación, no se
puede sujetar nunca el distribuidor por los recipientes
transparentes o los cilindros evaporadores. El fabricante
no responde de los desperfectos provocados por este
tipo de maniobras erróneas.
2 Controlar si el distribuidor ha sufrido desperfectos durante
10
 Loading...