

Stoelting CC303W Installation Manual

Model CC303W
OPERATING MANUAL
Manual No. 513621 Rev. 5


SAFETY
SAFETY WARNING:
Do Not attempt to assemble or take apart any parts of the machine
without making sure the refrigeration and beater switches are in the
“OFF” position and the keys are removed. Serious bodily injury may
result.
IMPORTANT:
In order to eliminate the custard machine as a source of bacterial
contamination, it is extremely important that the following
instructions be followed exactly each time the machine is
disassembled for cleaning as part of nightly shutdown procedures.
Ross’s makes no warranties expressed or implied as to the
introduction of bacteria or other pathogens into the custard mix run
through the machine. It is beyond the scope of this manual to address
proper mix handling procedures.
WARNING:
Never use HOT
WARNING:
Refrigeration must be OFF
hopper.
water anywhere inside the machine.
when the water is present in the barrel or
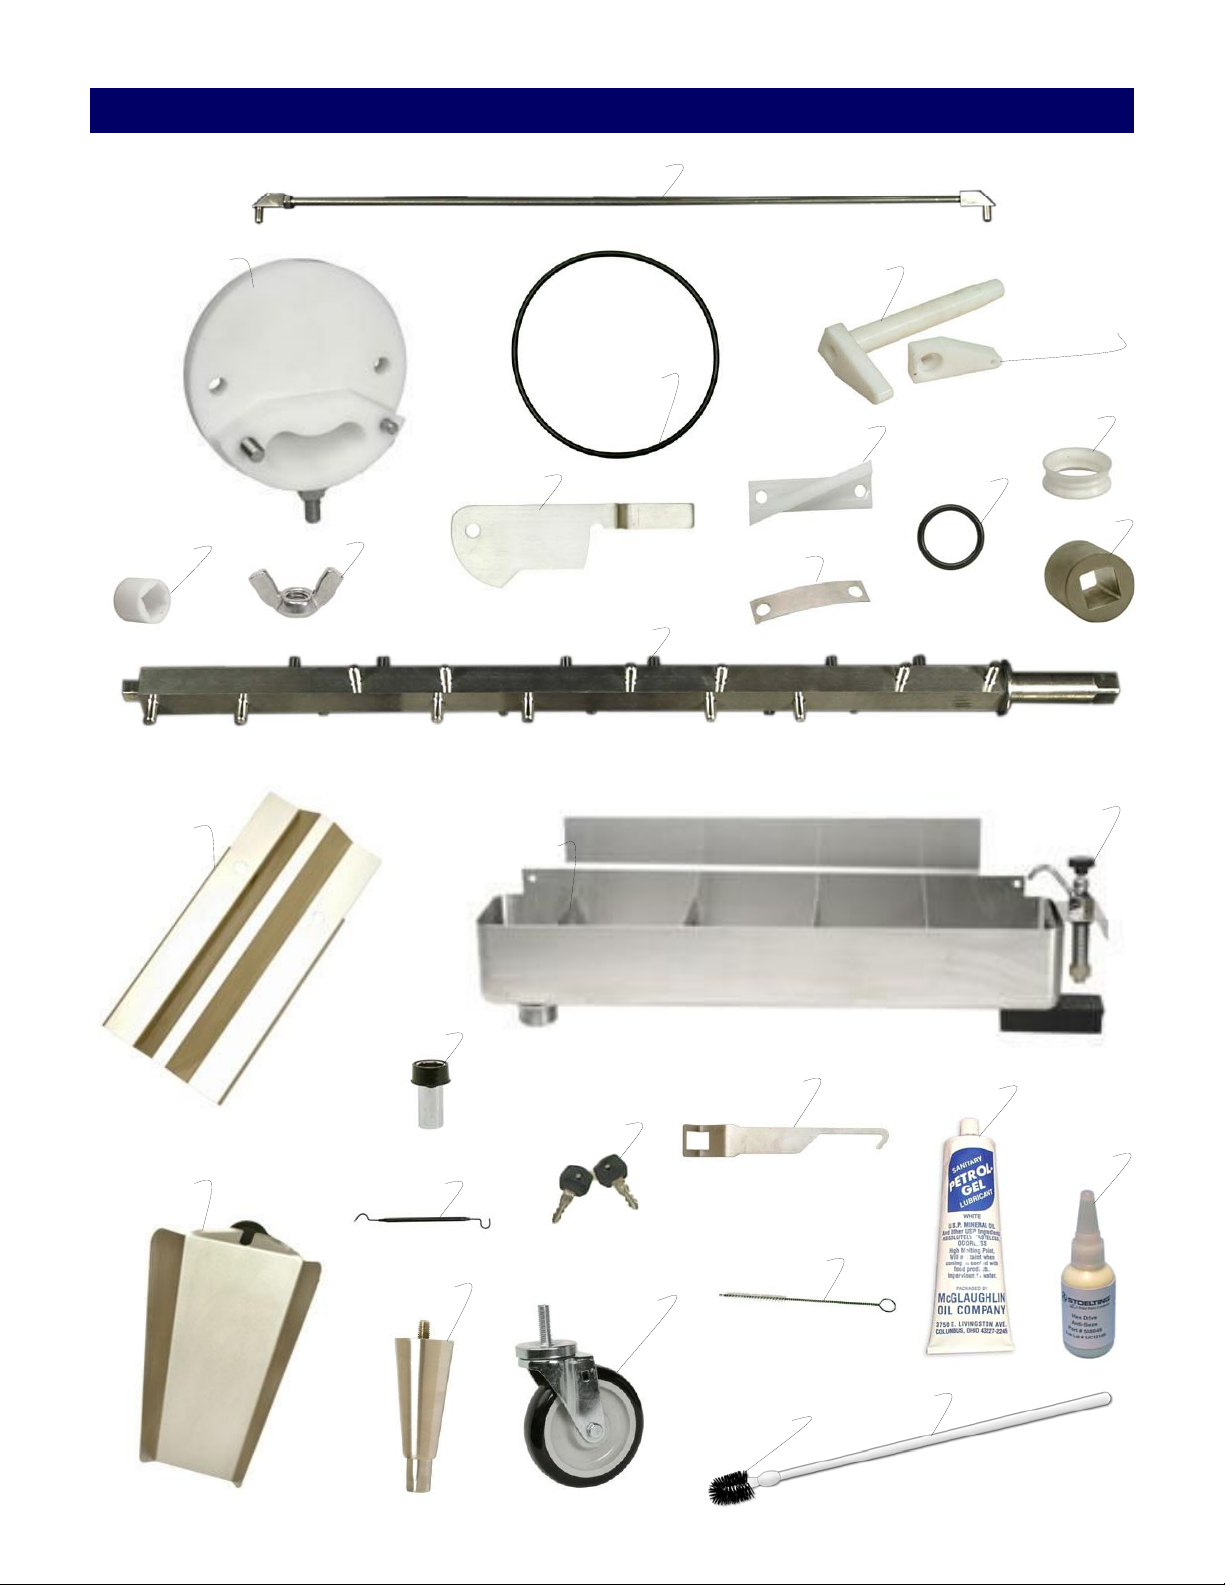
Parts
2183942
C-2000-52-SV
C-2000-40
C-4000-14
NT-0010
C-2000-56
C-4000-15
625140
674187
C-9000-58
C-2000-51
C-2000-50
C-2000-81
SL-0010
RG-0020
2187605
360004-SV
C-4000-20
C-4000-19
OF-0020-SV
C74
C-2000-61
219102-SV
CA-0010
CA-0020
C-2000-57
BR-0020
BR-0030
508135
508048
BR-0035

Parts (continued)
Standard Parts Included per Freezer
Part Description Quantity
B R-0020 B rush - Tubi ng (1 /2") 1
BR-00 3 0 B rush - Head (Barrel) 1
BR-0035 Brush - Handle (B a rr e l) 1
C74 O-Ring Pick 1
C -2000-57 Wrench - Beater Shaft 1
C-2000-61 Leg 2
C-4000-14 Guard Splash 1
C-4000-15 Divider 4
C-4000-19 Slide - Long (Chute) 1
CA-0010 Caster - Locking 2
CA-0020 Caster 2
OF-0020-SV Overflow 1
360004-SV Faucet Assembly - Trough 1
508048 Lubricant - Spline (2 oz Squeeze Tube) 1
508135 Petrol G el - 4 oz Tube 1
Standard Parts Included per Freezing Cylinder
Part Description Quantity
BS-0020 Bushing - Shaft Support 1
C-2000-40 Bushing - Auger Shaft 1
C-2000-50 Spring 12
C-2000-51 Blade 12
C-20 0 0 - 5 2 -SV Plate - Front w/Stainl ess Steel Insert 1
C-2000-56 Gate - Front 1
C-2000-81 Rod - Flow Control 1
C-4000-20 Slide - Short (Chute) 1
C-9000-58 Flow Control Valve Assembly (Hopper) 1
C -9000-66- SV Lid Assem bly - Plastic (I ncludes H andl e) 1
NT-0010 Wing Nut - Stainless Steel 4
R G- 002 0 O -Ri ng - R e a r Support Bushing 1
SL-0010 S eal - Beater S haf t 1
625140 O-Ring - Front Plate 1
674187 Shaft - Beater 1
719102-KY Keys (#719102 Keyed Switch) 1
2183942 Flow Control Rod Assembly 1
2187109 Cover - Hopper (Stainless Steel) 1
2187605 Coupling - 1" Square (Stainless) 1
Extra Parts Included per Freezer
Part Description Quantity
C-2000-40 Bushing - Auger Shaft C-2000-50 Spring C-2000-51 Blade SL-0010 Seal - Beater Shaft 625140 O-Ring - Front Plate -
Assembly/Sanitizing
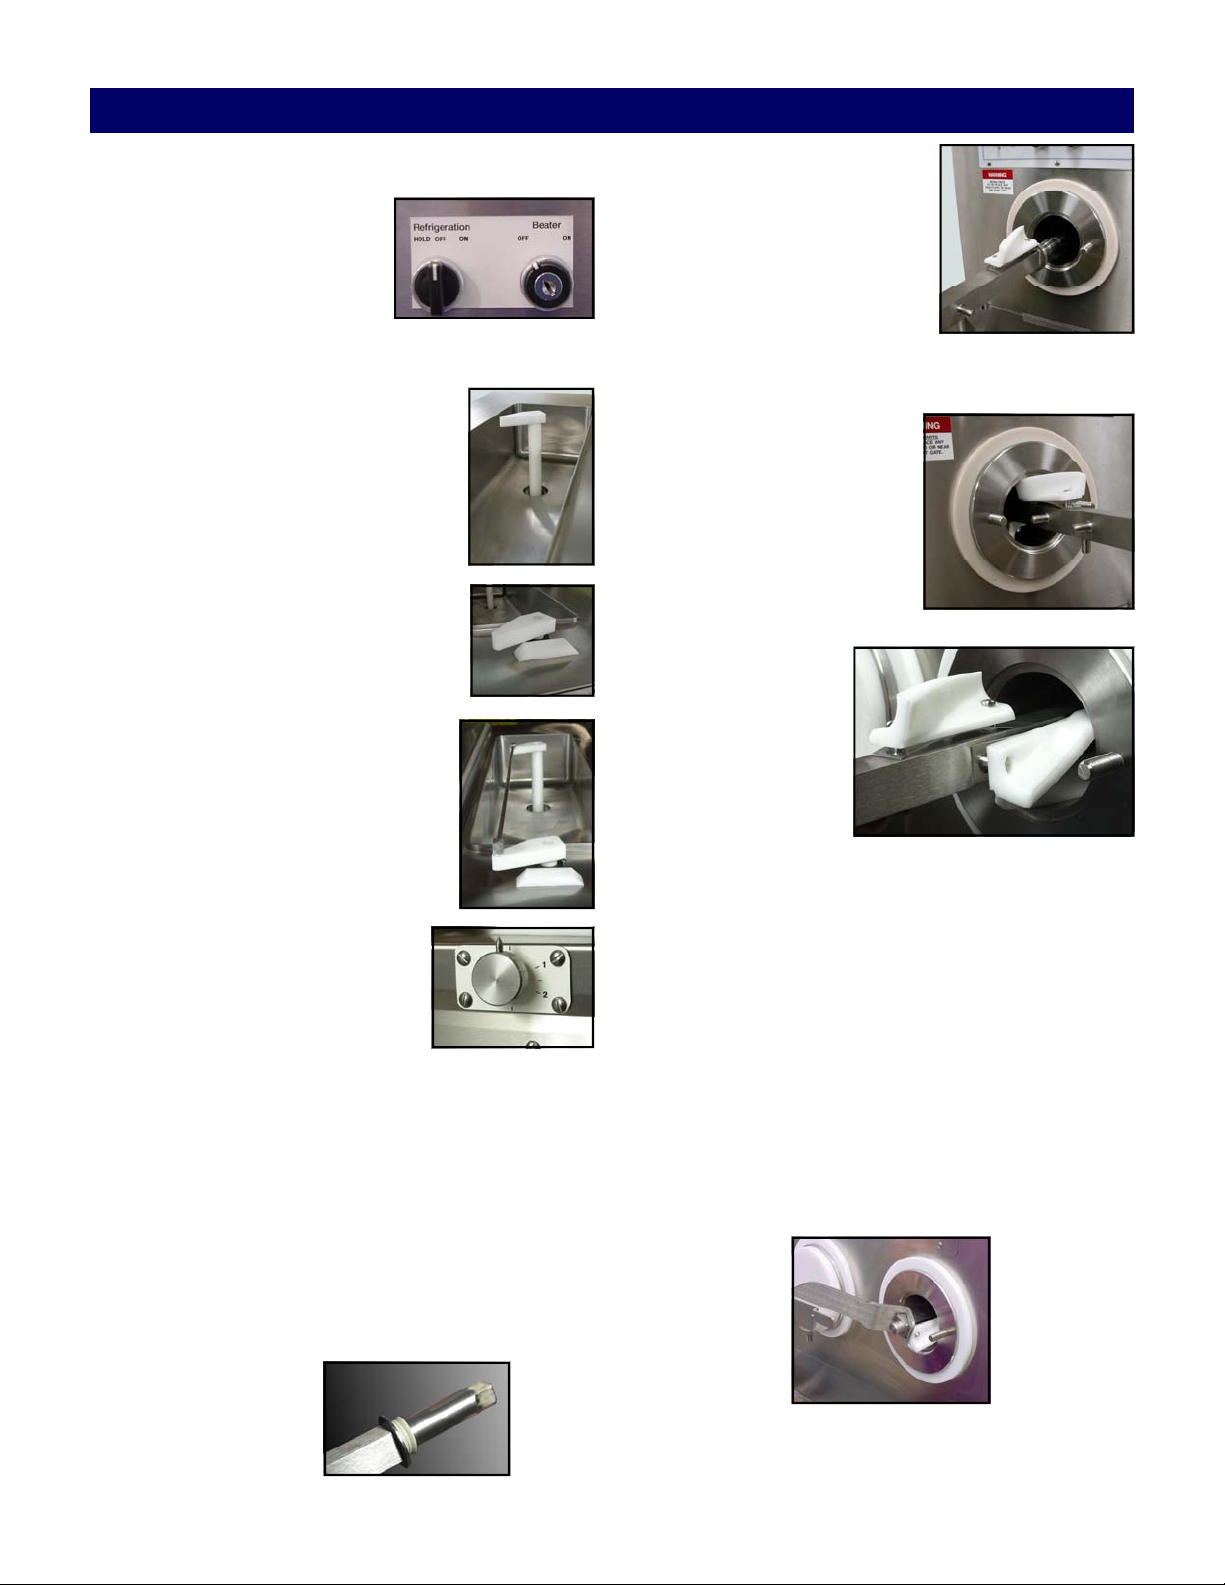
A. Initial Start
1. Make sure the refrigeration
and beater switches on the
front of the machine are
turned “OFF” and the beater
key is removed.
IMPORTANT: Wash hands and, if required, wear
disposable gloves to assemble and sanitize the machine.
B. Flow Control Valve Assem-
bly and Insertion
1. Place the white plastic flow valve in
the hopper pan drain hole. Tapered
portion of the tube to be inserted in
the drain tube hole.
2. Place the flow valve arm on the
square flow valve drive which is located at the front of the hopper pan.
3. Place one end of the flow control
rod in the small hole located on the
flow valve and place the other end
of the rod in the small hole on the
flow valve arm.
4. To adjust the flow control, turn
the flow control knob clockwise
to increase the flow and turn
counter clockwise to decrease
the flow.
C. Beater Shaft and Blade Assembly
IMPORTANT: Make sure to assemble the same
parts into the same barrel.
2. Starting on the end of the
beater shaft with the square
tip, place a metal spring
(arched upward) over the two
pins closest to the end. Place
a blade on top of the spring.
3. With the spring and blade in
place, slide the beater shaft into the barrel several
inches with the blade facing down.
4. Put a spring and blade on
the next set of pins. Push
the beater shaft further into
the barrel just far enough to
hold the blade in place on
the shaft. As you push, turn
the beater shaft so the next
set of pins is facing up.
You will have to
squeeze the blade
and spring against
the beater shaft in
order to push the
shaft into the barrel.
5. Continue adding
springs and blades to the beater shaft until all 12
blades are installed. It may get more difficult to
push the beater shaft into the barrel as you add
springs and blades.
6. Using the beater shaft wrench, push and turn the
beater shaft until it engages the drive coupling in
the back of the machine. When the beater shaft engages, it will move approximately one inch further
into the barrel. It will not be able to move back any
further. At this point, the entire shaft assembly will
be inside the barrel.
1. Coat the rear gasket with a small amount of Petrol
Gel. Place the rear gasket on the beater shaft. The
gasket should be placed over the hex cut end and
pushed over the round portion of the shaft until it
bumps against the square of the shaft. Put a small
amount of Hex Drive Anti Seize on the hex end of
the beater shaft.
7. Install the large o-ring on the front plate .
Page 3
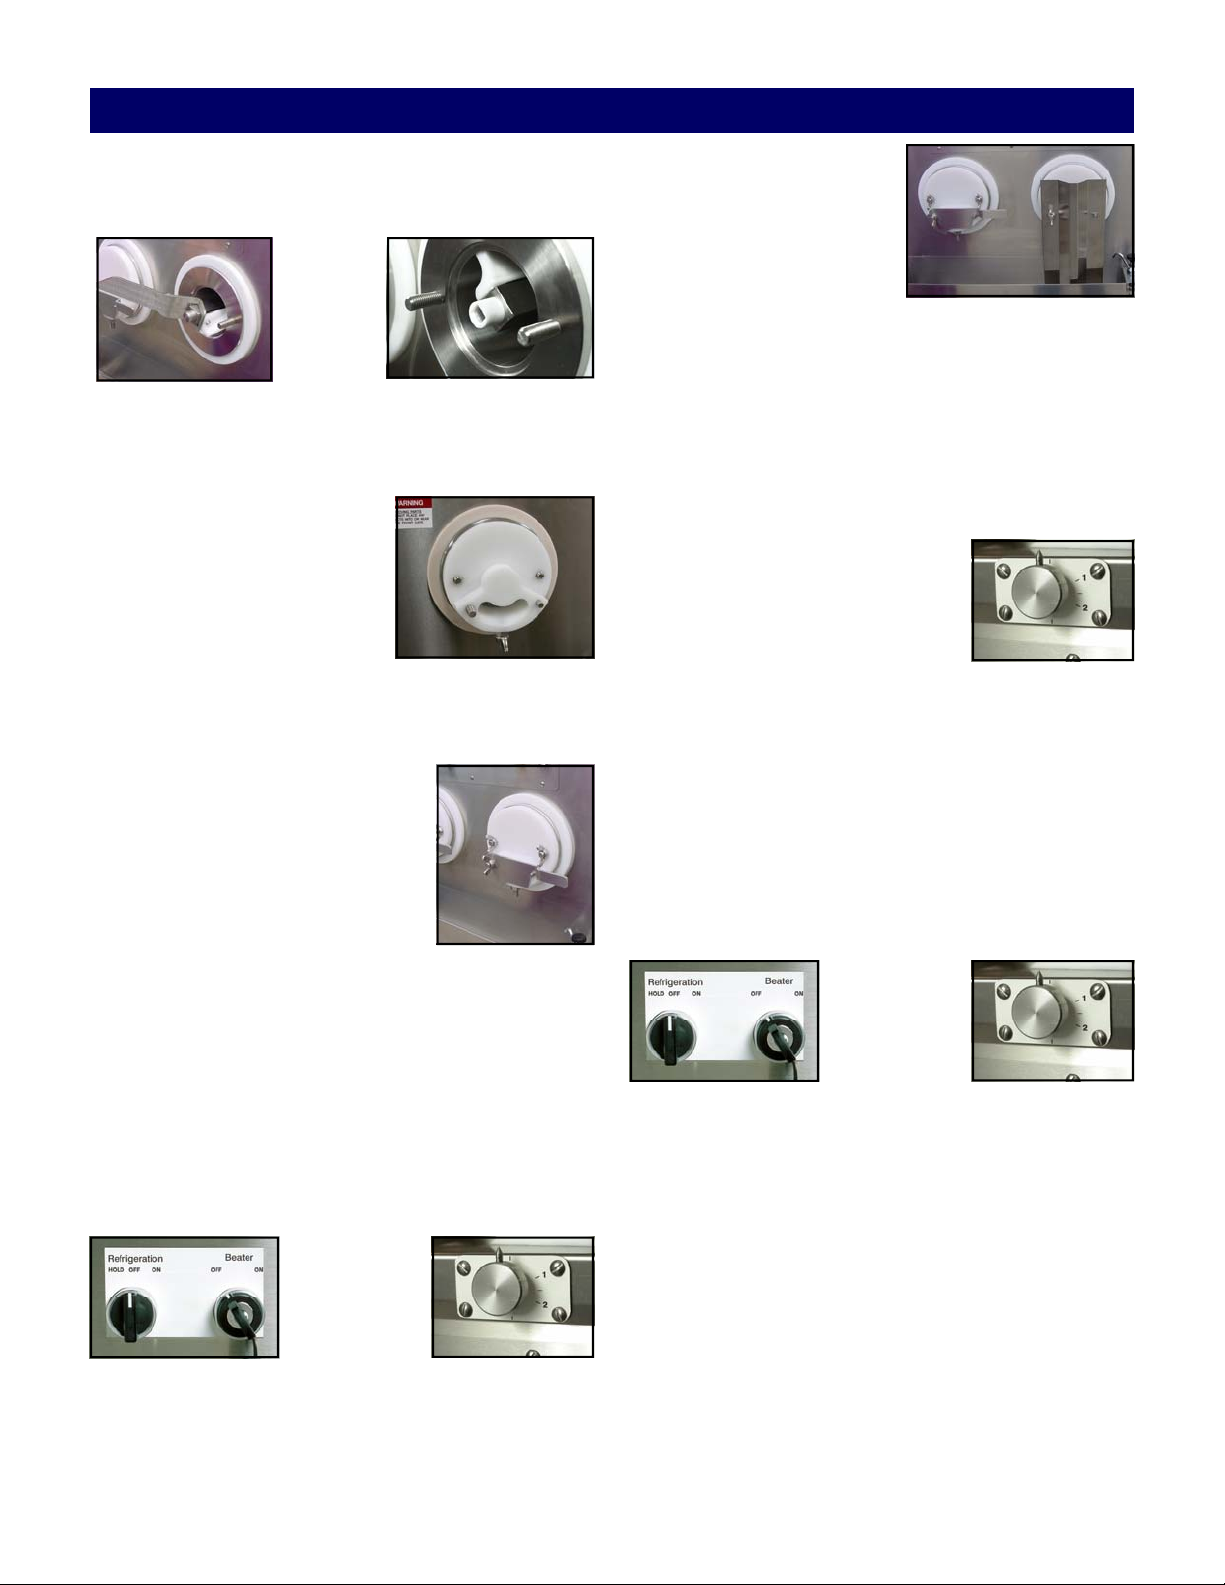
Assembly/Sanitizing
8. Put a small amount of Petrol Gel on the inside and
outside of the front bushing and install the bushing
onto the end of the beater shaft.
9. Slide the front plate over the threaded studs on the
front of the barrel with the front plate’s hole in the
bottom position. The rear of the front plate should
be tight against the front of
the barrel. If not, the beater
shaft was not installed correctly. If the front plate is
tight against the barrel, use
two wing nuts to secure It in
place. Tighten the wing nuts
securely.
10. Slide the front gate over the threaded stud so the
gate handle rests on the gate peg. If the front gate is
installed properly, it will cover
the custard outlet completely.
Secure the front gate and safety
guard with a wing nut on the
threaded stud.
11. Repeat the assembly instructions
on the remaining barrel(s).
3. Pour one to two gallons
(four to eight liters) of
approved sanitizer into
the hopper pan. The solution should be cold. Do
not exceed 100° Fahrenheit (38° Celsius).
4. Wash the sides of the hopper pan and the inside of
the hopper pan cover with a clean towel saturated
with the sanitized solution.
5. Turn the flow knob to position number “2” to allow
sanitizer to lubricate the barrel. After one or two
seconds, turn the beater switch on.
6. The sanitizer will flush through
the barrel, against the splashguard and into the dipping well.
(Note: Follow the manufacturer’s sanitizing instructions for
proper surface contact and time requirement.)
7. After all of the sanitizer has run through the barrel,
turn “OFF” the beater switch and turn the flow control to the off position. Remove the splashguard
and replace with the front gate. Close the front
gate.
8. Repeat the process on the remaining barrel(s). The
machine is now ready to operate.
D. Sanitizing
1. Put the beater key into the beater switch. Before
sanitizing, make sure the refrigeration switch on
the front of the machine is turned “OFF”; the front
control knob is to be in the “OFF” position.
2. Remove the front gate and replace with splashguard. Secure with wing nut. The splashguard directs the water into the dipping trough.
Page 4
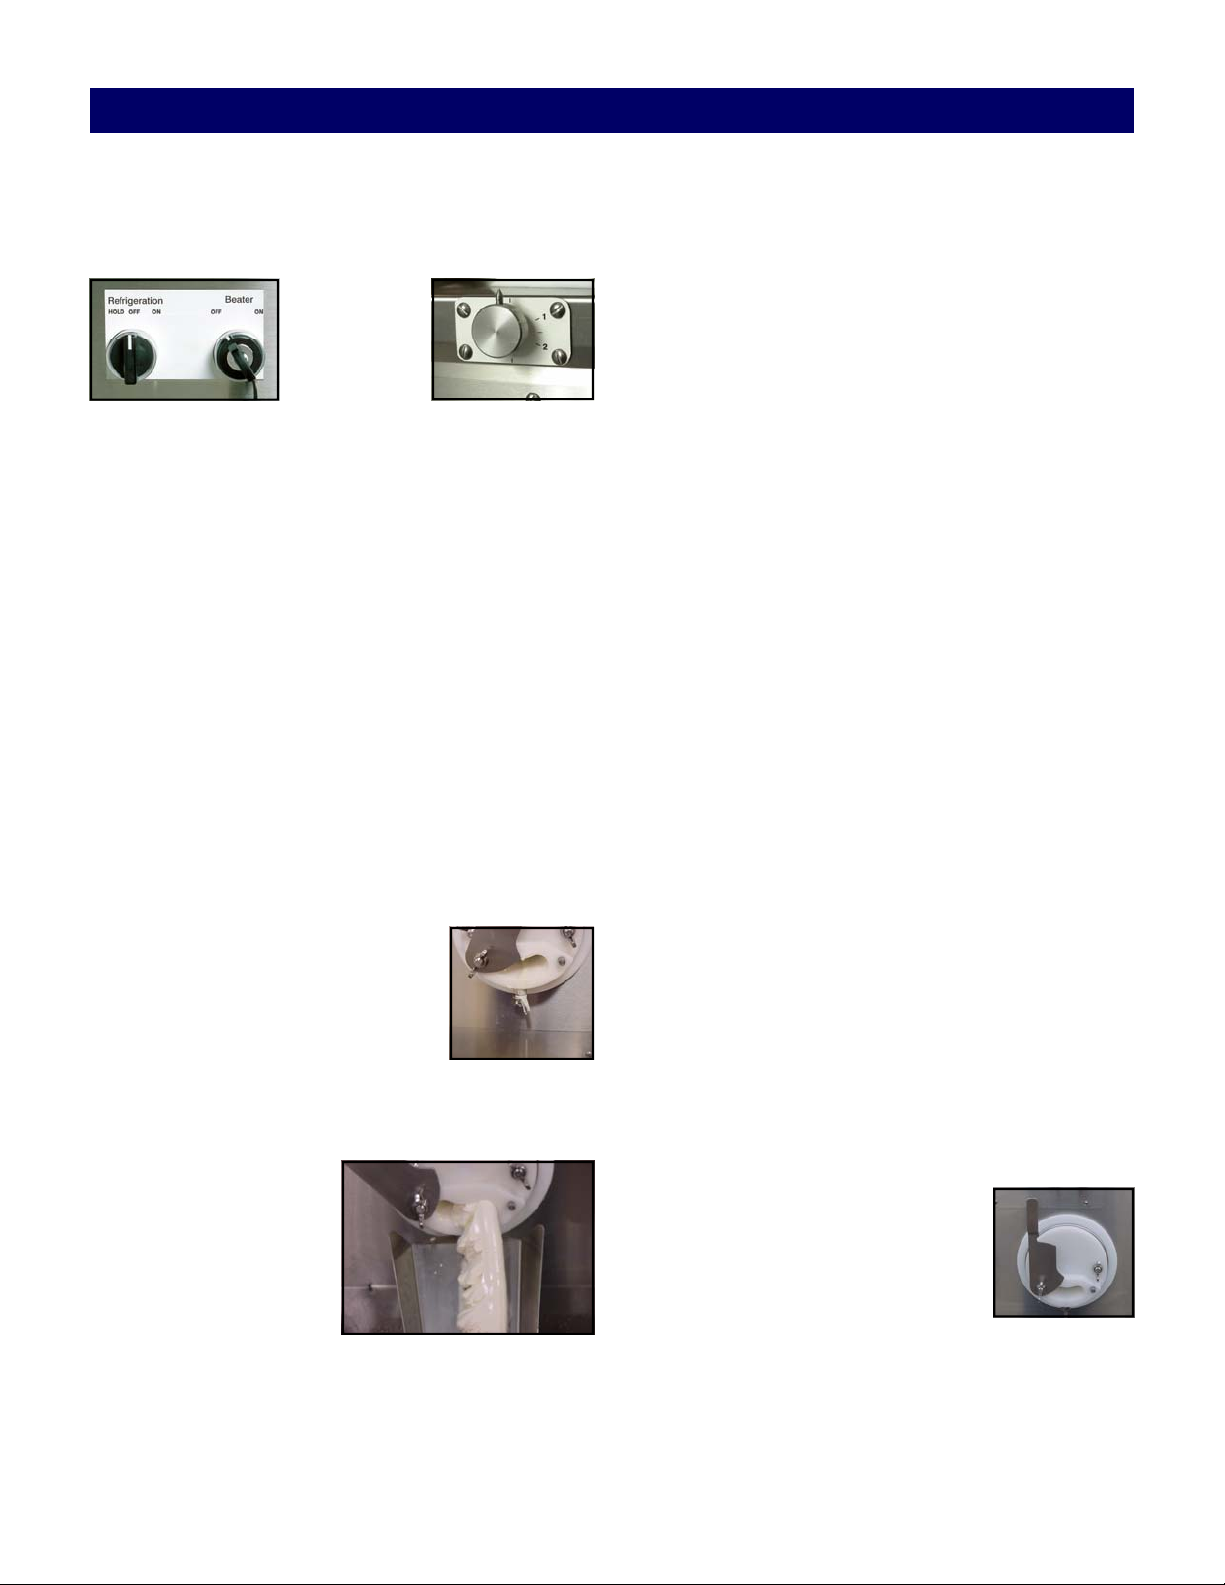
Machine Operation
A. System Startup
1. Verify that the flow control knob, the refrigeration,
and beater switches are in the “OFF” positions.
2. Turn on the Hopper Refrigeration.
3. Pour mix into the hopper pan. (Note: If using rerun
mix, use at least 50% fresh mix to 50% rerun mix.)
4. Turn the beater switch “ON”.
5. Turn the flow control knob to the number “1 1/2”
for approximately 3 seconds. Turn the knob back to
the “OFF” position. This allows custard to mix to
flush the sanitizer from the barrel to avoid instant
freezing of the sanitizer in the barrel.
Note: If a “growling” noise comes from the machine
during this procedure, it may be an indication that
there is not enough mix entering the barrel. Increase the flow slightly by adjusting the flow control
knob on the front of the machine. Keep in mind that
there are several minutes lag time between the increased mix flow and the elimination of any
“growling” noises.
11. Continue to run the mix into the bucket until it
reaches the desired quantity.
B. Hold Cycle During Operation
1. Adjust the flow control knob to the “OFF” position.
Wait approximately 1 minute.
2. Turn the refrigeration switch to the “Hold”.
3. When the frozen custard stops flowing, turn the
beater switch to the “OFF” position and REMOVE
KEY. Note: This should take approximately 2 minutes.
6. Place the custard slide on the threaded stud beneath
the front plate and secure firmly with a wing nut.
Aim the custard slide into a dipping cabinet or
other suitable container for dipping.
7. Open the front gate.
8. Within several seconds, a few
ounces of liquid mix and sanitizer
will flow out of the custard outlet
and into the dipping well. Discard
this mix.
9. Turn the refrigeration switch on and wait approximately 2 minutes for a chatter noise.
10. Set the flow control
know to “1/2-1” position until frozen custard is seen at the custard outlet. Increase
the mix by turning the
flow control knob to
gain the desired custard texture.
4. Clean out excess frozen custard from the custard
outlet on the front plate to prevent dripping.
5. Replace key.
6. Close the front gate.
7. Remove custard slide.
C. Resuming Production During Operation
1. Turn the beater switch “ON”.
2. Turn the refrigeration switch “ON”.
3. Wait for a chatter noise, approximately 1 minute.
Turn the flow control knob to the number “1-1 1/2”
position.
4. Open the front gate completely.
5. When the custard appears, adjust
the flow control knob to gain the
desired custard texture.
6. Continue to run the mix into the dipping cabinet
until you have the amount that you need.
Page 5

Machine Operation
D. Preparing for Shutdown (hopper empty)
Removal of Remaining Custard in the Barrel when no
mix is in the Hopper
1. Turn refrigeration switch to “Off”
2. Let machine rest for approx. 20 minutes. This allows the barrel enough time to warm before removing remaining custard.
3. Turn the beater switch is “ON”.
4. Run remaining custard through the barrel.
5. Turn the beater switch to “OFF” position.
6. Close the front gate and remove the custard slide.
E. Preparing for Shutdown (mix in hopper)
Removal of Remaining Custard in the Barrel when mix
is still in the Hopper
1. Turn “OFF” the refrigeration switch.
2. Let machine rest for approx. 20 minutes. This allows the barrel enough time to warm before draining the remaining mix from the hopper.
3. Take a sanitized bucket and place it at the opening
of the front plate.
4. Turn the flow control to “4”. This allows the mix to
drain into the barrel and then to your sanitized
bucket.
IMPORTANT: In order to eliminate the custard
machine as a source of bacterial contamination, it is
extremely important that the following instructions
be followed exactly each time the machine is disassembled for cleaning as part of nightly shutdown
procedures. Ross’s makes no warranties expressed
or implied as to the introduction of bacteria or other
pathogens into the custard mix run through the machine. It is beyond the scope of this manual to address proper mix handling procedures.
Page 6
Cleaning and Disassembly
A. Cleaning
1. Remove the front gate and install the splashguard.
2. Make a cleaning solution of 1½ to 2 gallons (4-8
liters) of cold water and the correct amount of
cleaning solution. Do not exceed 100 degrees Fahrenheit (38 degrees Celsius).
3. Pour the cleaning solution into the hopper pan.
Wash down the sides and bottom of the hopper pan
to dilute remaining mix.
4. Turn the flow control valve to the number “2” position to allow sanitizer into the barrel.
5. Turn the beater switch to “ON” and run the cleaning solution through the barrel.
Make sure the refrigeration switch is in the “OFF”
position.
6. Repeat the procedure until all mix residue is gone
and the hopper pan is clean.
3. Lay the washed parts out on a sanitized counter for
air drying. With the beater shaft wrench, pull the
beater shaft partially out of the barrel by grabbing
behind the first blade. Continue to pull the beater
shaft forward and remove each blade and spring
and place in a container for cleaning.
CAUTION: Be careful not to scratch the inside of
the barrel with the beater shaft.
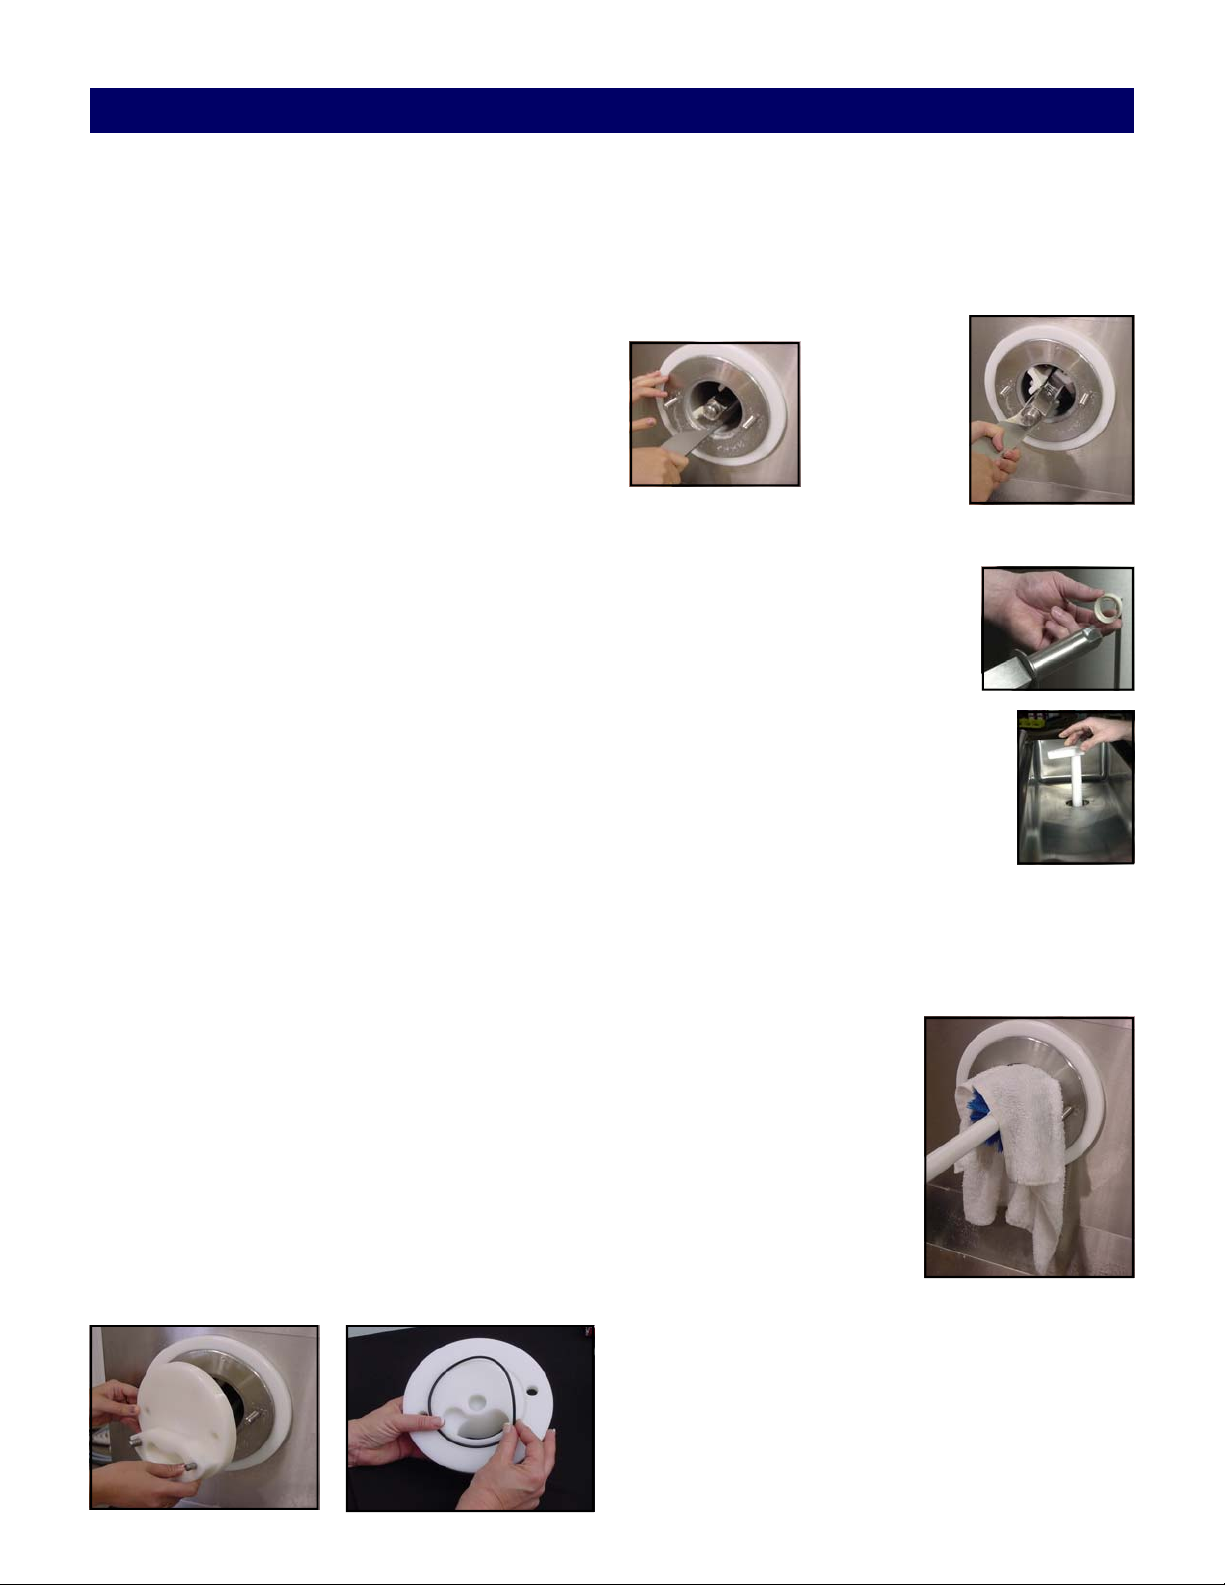
4. Remove the Rear Gasket and
wipe the lubricant off the hex end
of the beater with a clean towel.
5. Remove the flow control rod and
the flow control valve assembly.
7. Turn the beater switch to the “OFF” position and
remove the key.
8. Properly dispose of the cleaning solution.
SAFETY WARNING: Do not attempt to remove the
front plate, or beater shaft without first removing
the key from the beater switch. Serious bodily injury may result.
B. Disassembly
IMPORTANT: Make sure to keep the parts for
each individual barrel separated. The parts need to
be installed into the same barrel every time the machine is disassembled.
1. Remove key
2. Remove the front gate and front plate for washing.
Remove the o-ring from the front plate. Remove
front bushing from beater shaft.
6. Take all parts to the cleaning area for
washing. Add sufficient hot water and
cleaning solution to cover all of the
parts. Let soak for five minutes. Make
sure mix is removed from all small, hard to clean
areas of the parts, including o-ring grooves.
7. While the parts are soaking, use a cleaning solution
and barrel brush to clean inside barrel.
8. Wrap a clean towel soaked
with cleaning solution
around a barrel brush and
run the brush and towel
through the barrel until it is
clean.
Page 7
Cleaning and Disassembly
9. Make sure to clean
the drip pan that is
located at the rear of
the machine in the
access panel. Clean
out any custard in
the pan.
10. Clean the front mounting plates with a towel.
11. Clean the sheet metal on the entire machine. Use
stainless cleaner and polish on the sheet metal to
maintain the machine’s appearance. Do not use
stainless cleaner on areas where mix or frozen custard is used.
12. Return to the sink and wash each part. Place in a
rinse tank and then a sanitizing tank with a proper
dilution of an approved sanitizer.
IMPORTANT: Failure to follow these cleaning
procedures exactly, each and every night, may
result in eventual bacterial contamination of the
frozen custard product and health and legal
problems for the purchaser of this equipment
and the restaurant patrons
NEVER USE
HOT WATER ANYWHERE
INSIDE THE MACHINE!
502 Highway 67
Kiel, WI 53042
Phone: 800-558-5807
Fax: 920-894-7029
www.frozencustard.com
www.stoelting.com
Page 8

 Loading...