

Page 1

513856
C111
Owner’s Manual
Page 2

C111
ENGLISH
C111-37
1 SAFETY PRECAUTIONS
1 Before connecting the machine to the power source, check
that the voltage shown on the rating plate matches your
electricity supply. Connect the machine to a single-phase
supply through a grounded outlet as required by current
regulations.
2 Do not use extension cables to connect the machine.
3 To avoid any risks, if the power cable is damaged, it must
be replaced by the manufacturer, by an authorized technician
or by a similarly qualified person.
4 The machine is not suitable for outdoor use.
5 The machine must be installed in the upright position.
6 Before cleaning, always disconnect the machine by
removing the plug from the outlet.
7 Always disconnect the machine before removing any of the
panels for cleaning or maintenance work.
8 This machine must not be used by persons unless they
have been trained regarding the safe use of the machine and
understand the risks involved.
9 Only persons who know and have practical experience of
the machine are permitted access to the inner components of
the machine, especially when dealing with issues regarding
safety and hygiene.
10 This machine is intended exclusively for domestic and
similar use.
11 For the machine to operate correctly, ambient temperature
must be between +41° and +89°F.
12 Use the machine to cool the indicated liquids only.
13 Do not introduce dangerous or toxic liquids to the machine.
2 TECHNICAL CHARACTERISTICS
Hopper capacity, approx gal 1
Freezing Cylinder capacity,
approx
Dimensions:
width in 10.2
depth in 22.4
height in 28.7
Net weight, approx. lbs 106
Gross weight, approx. lbs 121
Hermetic compressor
Air-cooled condenser
Overload protector
Noise level less than 70 dB (A)
gal 0.5
IMPORTANT
Electrical characteristics: read the data on the data plate
of the machine; this data plate is located in the lower part
of the front panel, behind the drip tray. The serial numbers of the machine (preceded by the symbol #) is indicated on the frame, at the rear of the machine, behind the
condenser cover panel. Always refer to the data shown
on the plate.
The manufacturer reserves the right to amend this manual without notice.
3 INTRODUCTION
Read this instruction booklet carefully in order to familiarize
yourself with all aspects of the machine.
As with all mechanical products, this machine also requires
cleaning and care. In addition, its correct operation may be compromised by possible errors made by the operator during the
disassembly and cleaning operations. For this reason, it is important that the disassembly, cleaning, sanitizing and reassembly procedures - being everyday tasks - are familiar, without any
room for error on the part of the machine user.
The warranty for the C111 is as follows: Five years on major
components including: freezing cylinder, hopper, compressor
and, drive motor; One year on non-wear parts and labor
.
Every machine includes White Glove
Service. One call does it all – customer
service, technical service, parts or
warranty information, installation,
startup, sales, on-site service dispatch
and much more. Available 24 hours a
day, seven days a week year-round.
Contact White Glove Service at 800319-9549
2
Page 3

4 UNPACK THE MACHINE
1 Take the machine out of its packaging, which we
recommend you keep for future requirements.
2 Make sure that the machine has not been damaged during
transportation. If this is the case, immediately make a claim
with your carrier.
NOTICE: Do not lay the machine on its side or back.
6 OPERATING PROCEDURES
IMPORTANT
Before use, clean and sanitize the machine according to
the instructions provided in 6. 4 CLEANING.
NOTICE: Do not lift the machine by the tank, auger, or
handles. Only lift by grasping the bottom of the machine.
NOTICE: The machine must sit in the upright position for 24
hours before turning it on. This will allow the oil in the
compressor to settle into place following shipping.
3 Place the machine onto a counter designed to withstand its
weight, including when full.
4 Leave a clearance of at least 6” around the whole machine
to avoid obstructing the cooling air flow.
5 Check the stability of the device, adjusting the height of the
legs if necessary. If the dispenser is provided with taller legs
(approximately 4”), these must replace the original ones.
ATTENTION
Make sure the machine is properly grounded, otherwise
you may cause electric shocks to persons or damage to
the machine.
6 The machine does not leave the factory washed and
sanitized. Before use, it must be disassembled, washed and
sanitized, following the instructions in 6. 4 CLEANING.
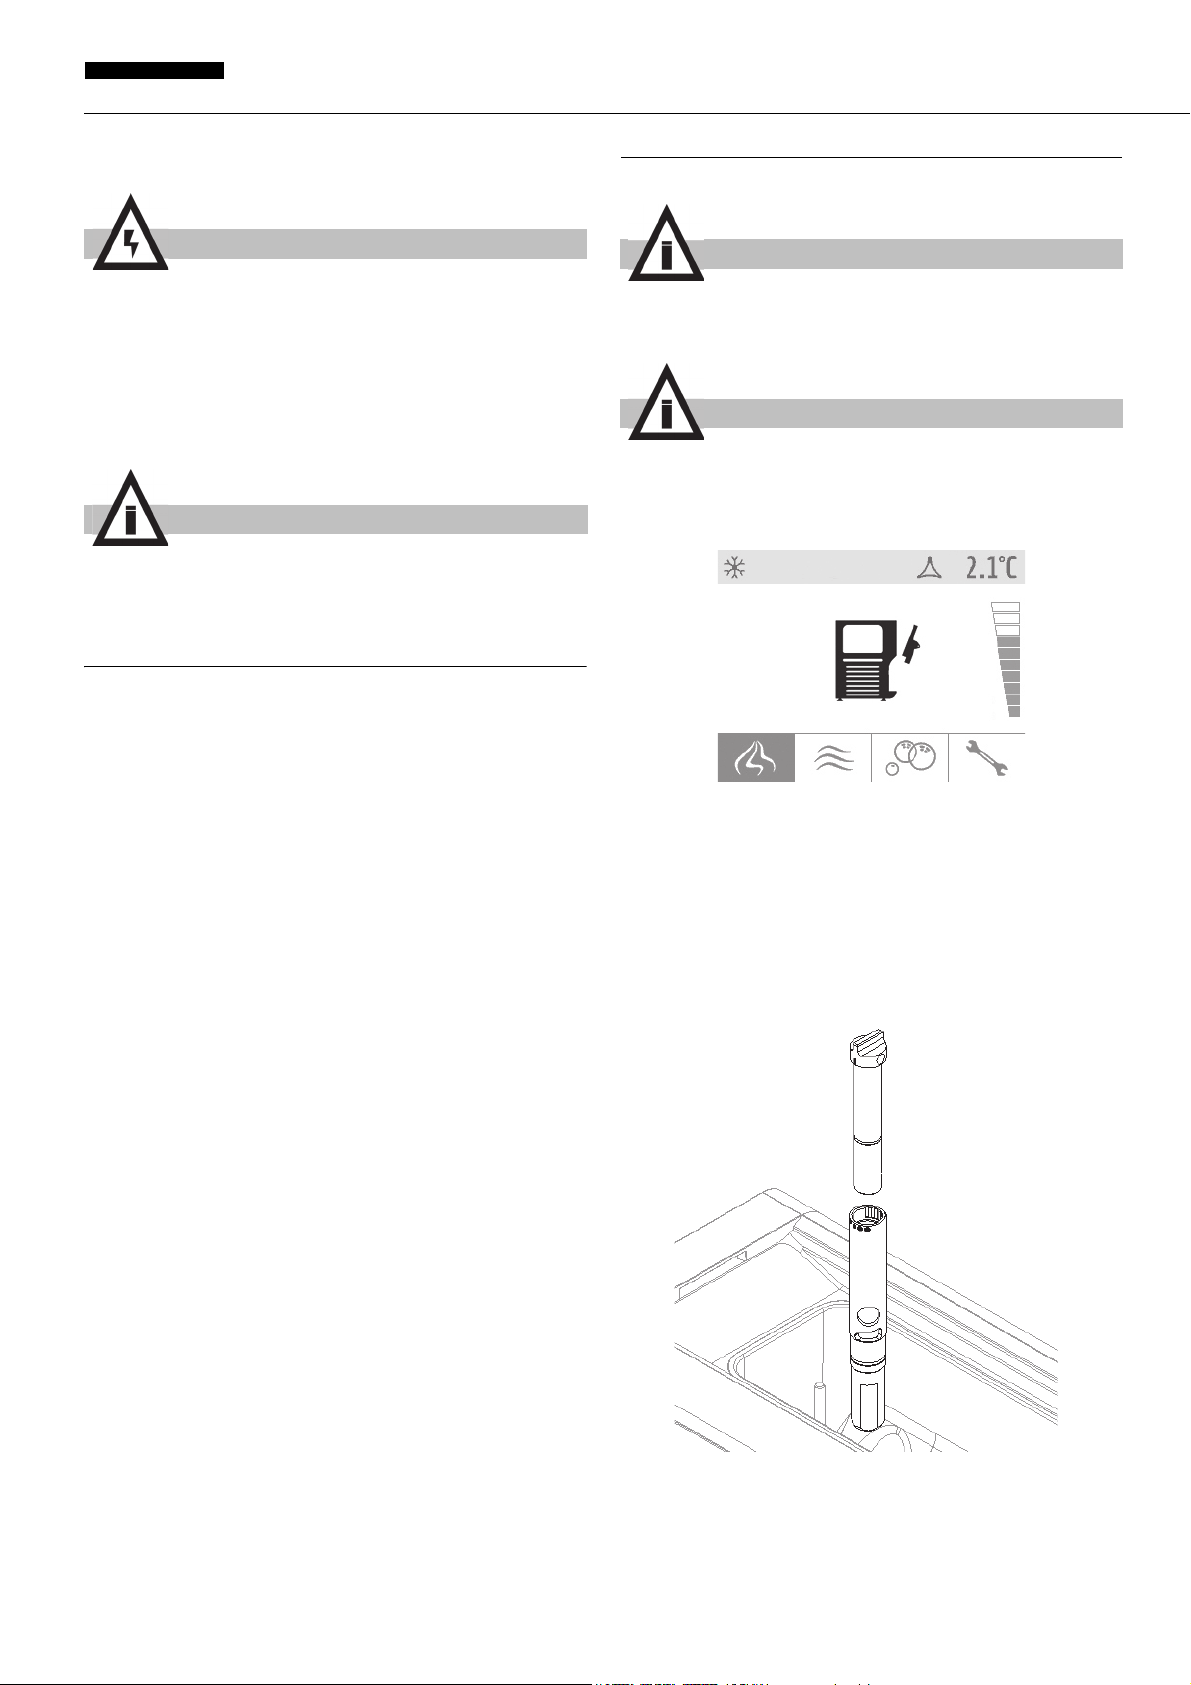
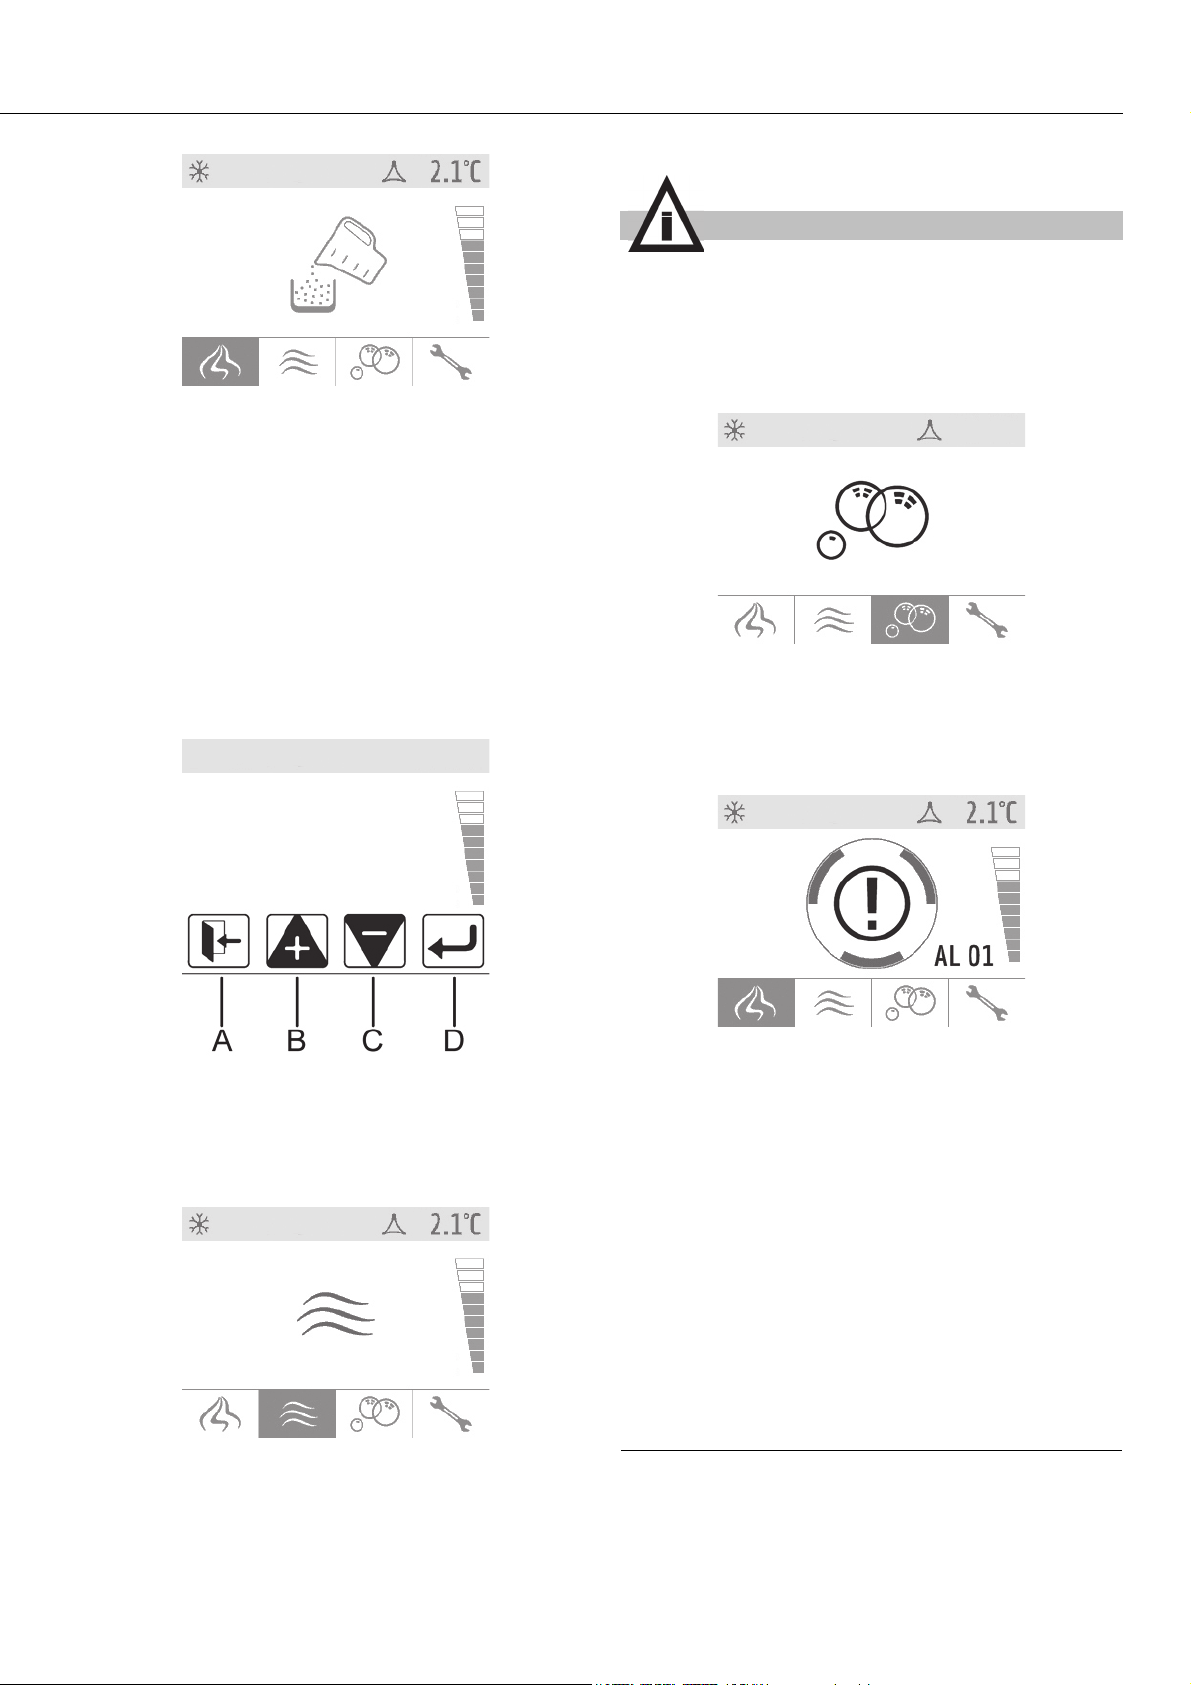
IMPORTANT
If the spigot assembly has not been installed, the
machine cannot operate and the display shows the
spigot assembly open icon (see figure 1).
figure 1
This machine is equipped with a hopper designed to keep the
mix refrigerated and a freezing cylinder for the production of the
soft serve.
Every time soft serve is dispensed, the same quantity of soft
serve mix feeds into the freezing cylinder from the hopper.
In order to obtain softer and lighter soft Serve, make sure that
the carburetor is installed correctly. (see figure 2)
IMPORTANT
Position the machine in such a way that the power supply cable is easily accessible.
5 TO OPERATE SAFELY
1 Do not use the machine before reading this instruction
manual first.
2 Do not use the machine unless it is properly grounded.
3 Do not operate the machine if the panels are not in place
and secured with screws.
4 Do not insert your fingers in panel louvers or spigot outlet.
5 Do not remove parts or panels for cleaning or maintenance
without first making sure the machine is disconnected from the
electricity supply.
6 The cover must remain closed at all times.
figure 2
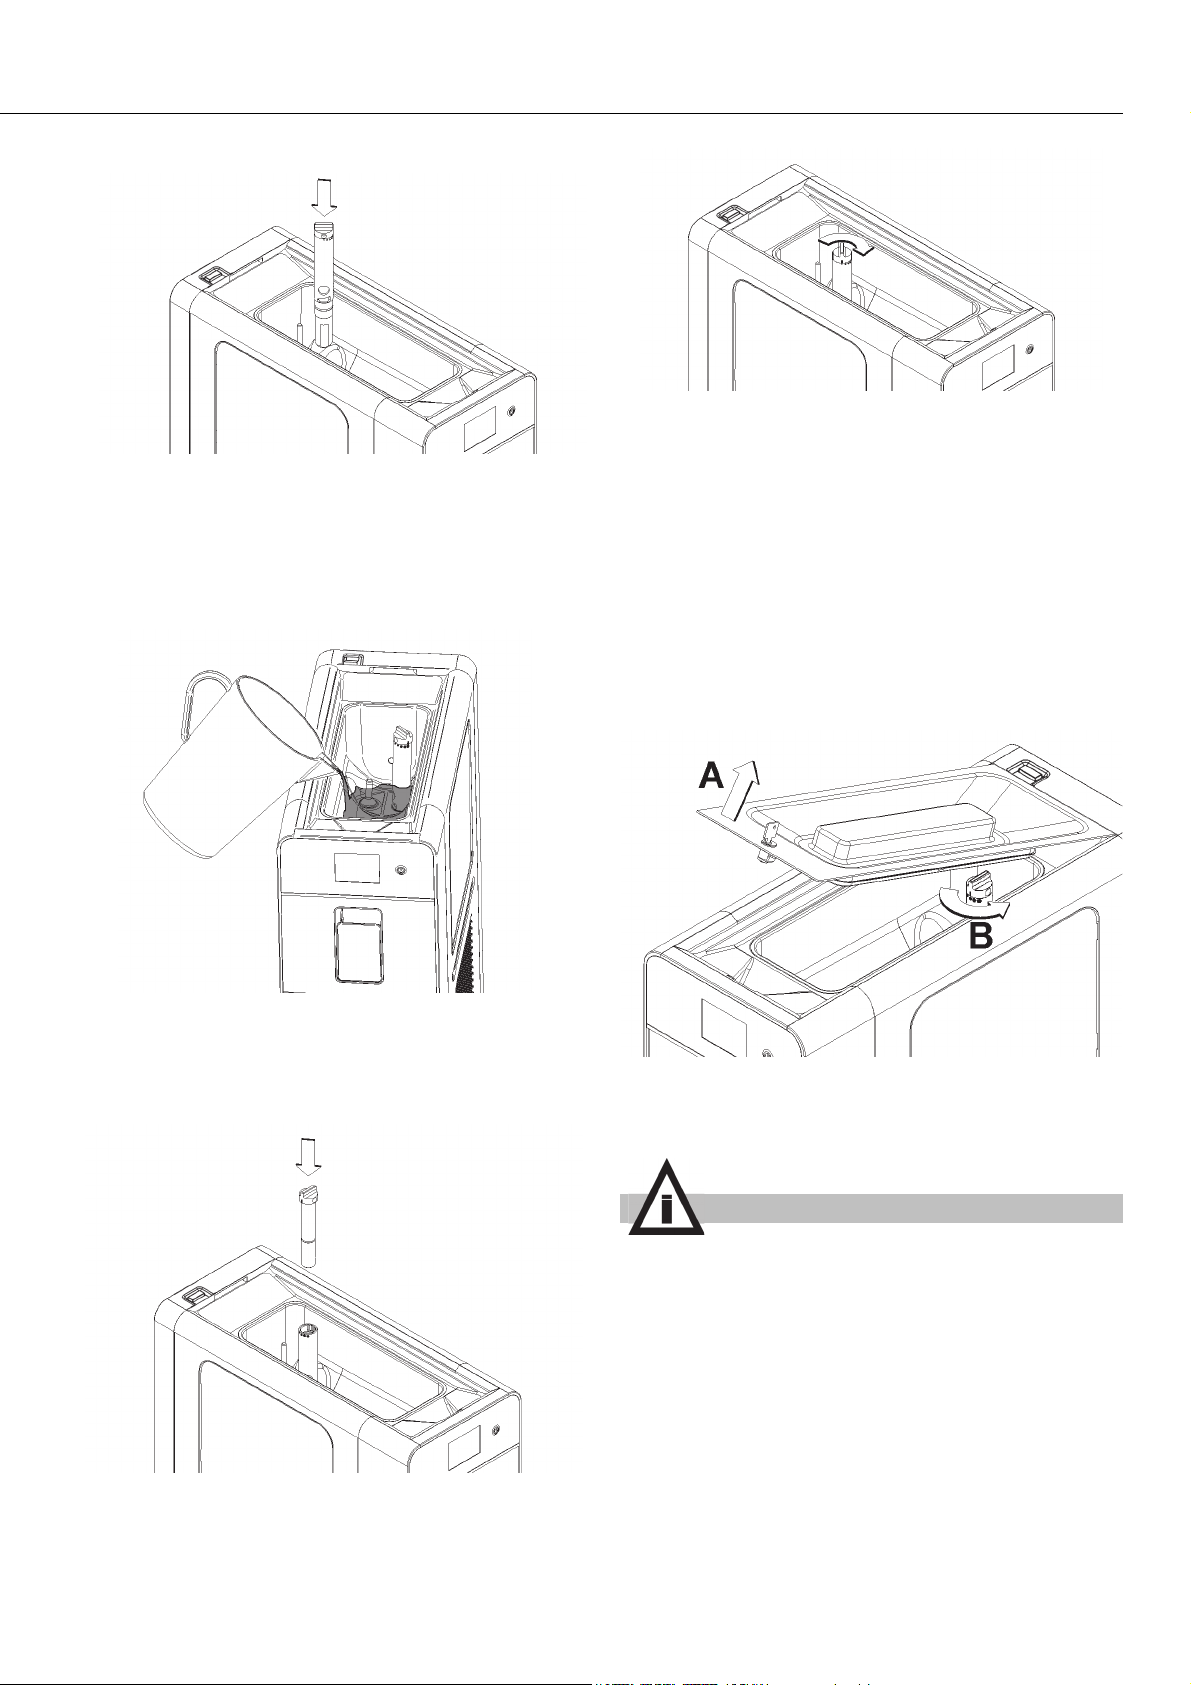
For best results, the following steps must be performed in the order specified:
1 Insert the lower part of the carburetor into the mix inlet tube
3
Page 4

C111
ENGLISH
in the hopper, making sure it is fully seated. (see figure 3)
figure 3
2 Pour mix into the hopper and wait for the freezing cylinder
to fill. The cylinder is filled when no more air bubbles exit the
holes in the carburetor. (see figure 4)
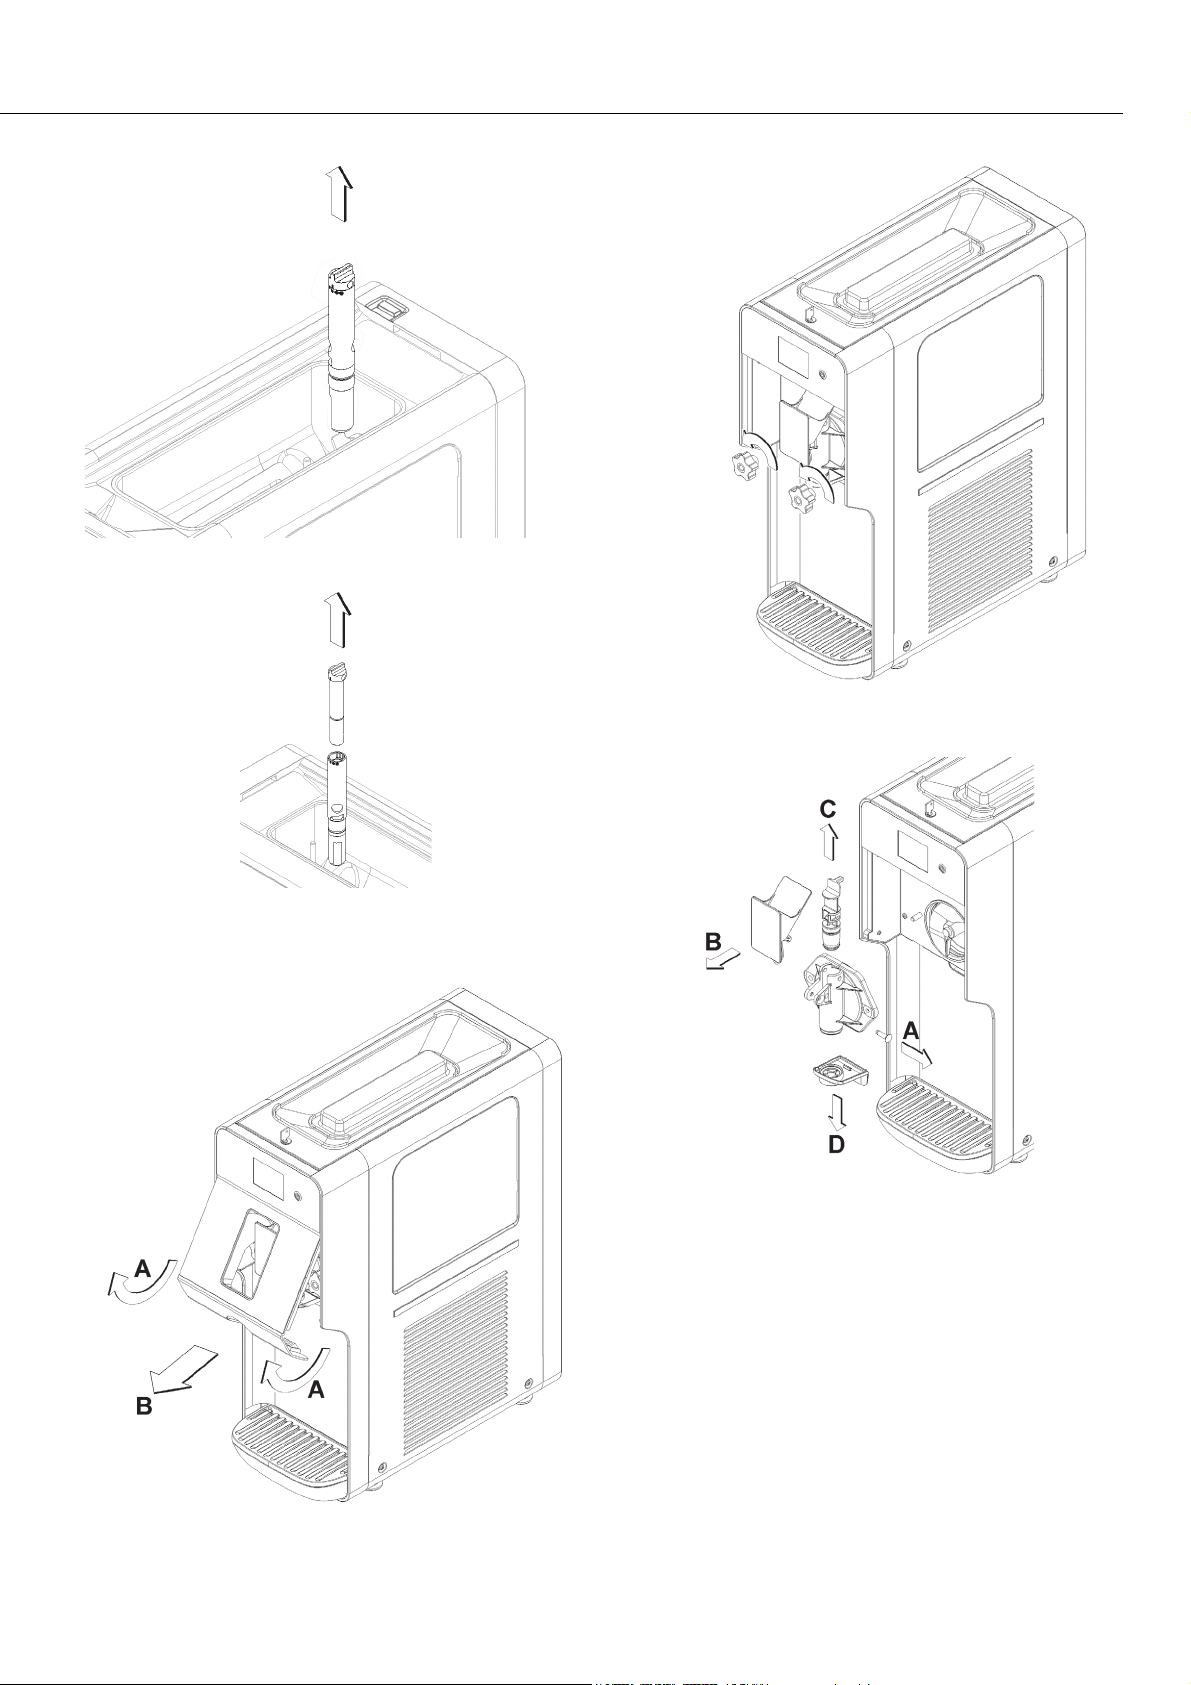
6 When the product is ready, remove the hopper cover and
turn the upper part of the carburetor counterclockwise to allow
the mix to enter the freezing cylinder.(see figure 7)
The quantity of air in the soft serve can be adjusted, keeping in
mind that, starting from the closing position:
complete rotation
counterclockwise
minimum rotation counterclockwise
: fully open, lower quantity of air
in the soft serve (low overrun)
: only open slightly, greater quan-
tity of air in the soft serve (high
overrun)
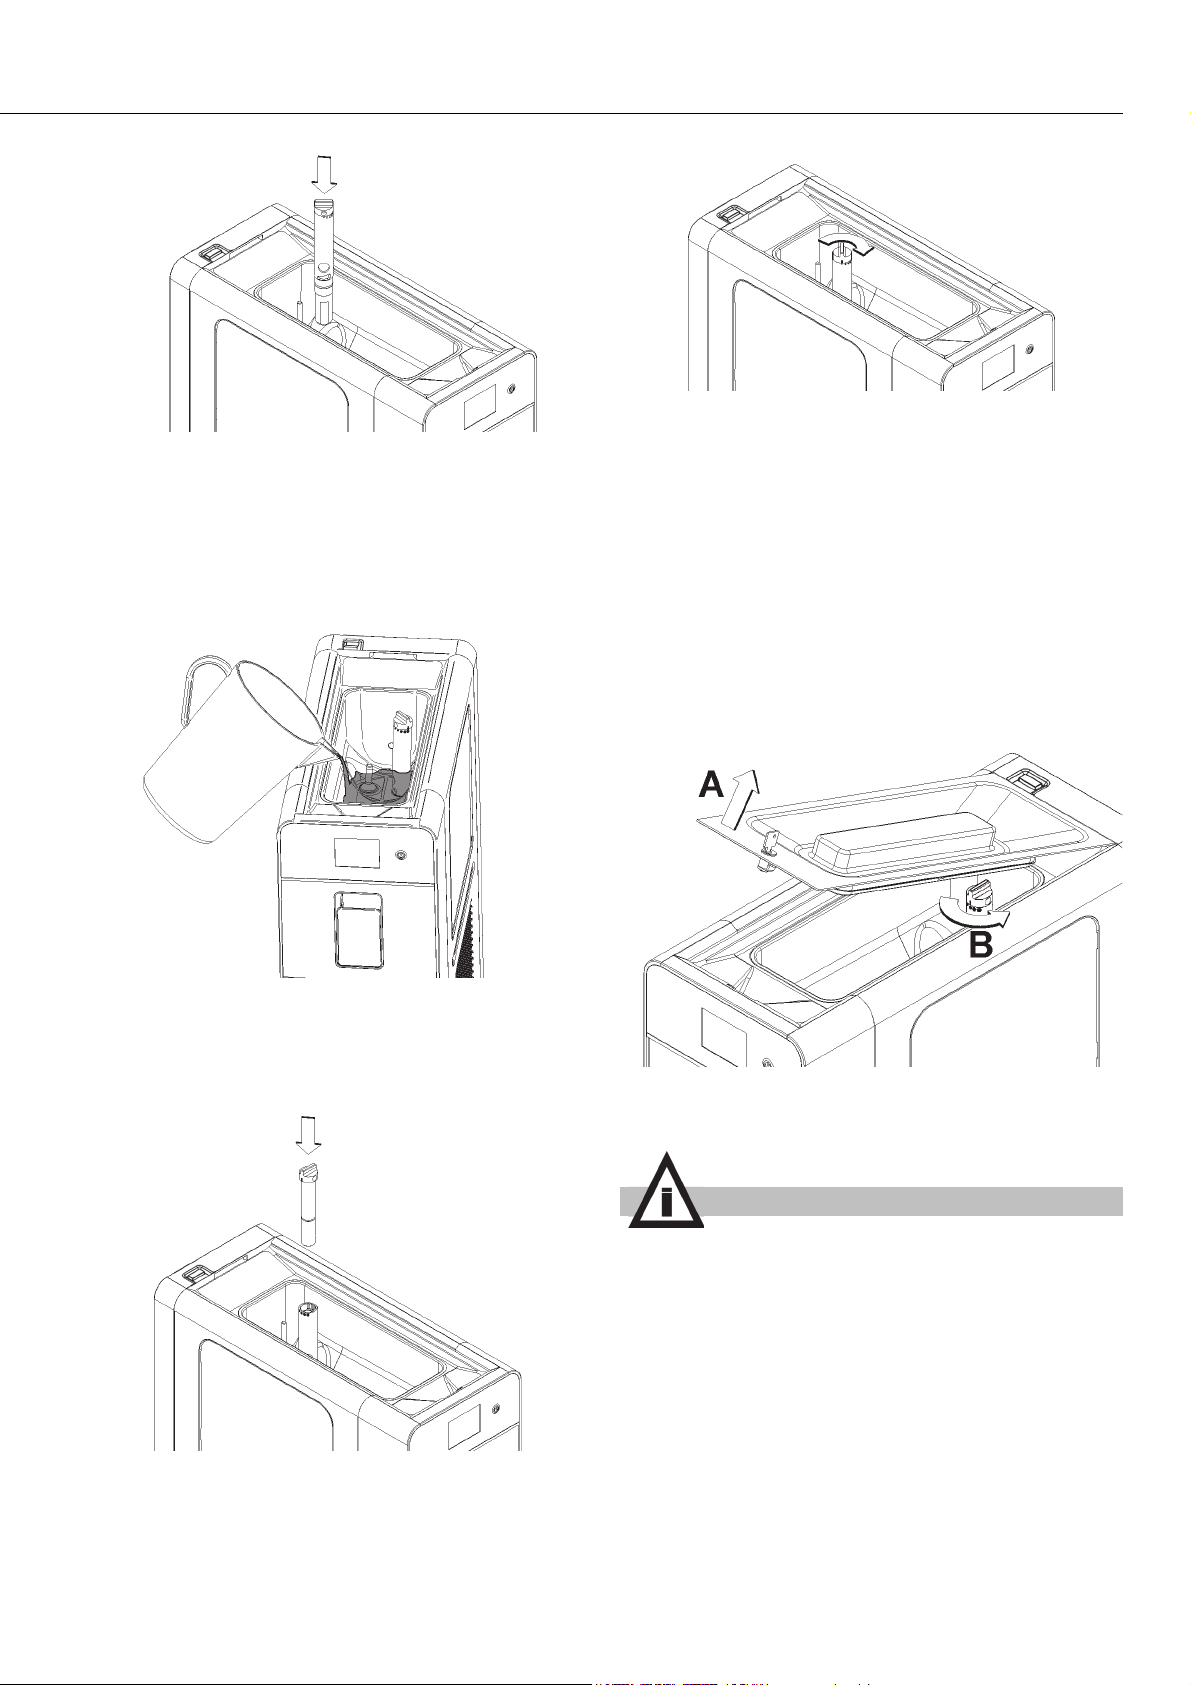
figure 4
3 Insert the upper part of the carburetor into the lower one.
(see figure 5)
figure 5
4 Turn the carburetor fully clockwise to stop the mix entering
the cylinder. (see figure 6)
figure 7
7 After making adjustments, install the hopper cover.
IMPORTANT
Use the machine with foodstuff only. Not intended for
household use.
8 Dispense the soft serve using the spigot handle.
9 If the carburetor adjustments do not make the desired
consistency, the mix can be modified as follows:
Soft serve too soft : increase the amount of liquid (water or
milk) from 5 % to 10 % of the total volume.
Soft serve too hard : decrease the amount of liquid (water or
milk) from 5 % to 10 % of the total volume.
10 The machine must operate continuously: the cooling
system stops automatically when the product is ready to be
dispensed. The auger speed decreases and only increases
when dispensing. The cooling system and auger operate at
default time intervals in order to restore the proper consistency
to the product.
6. 1 DESCRIPTION OF CONTROLS
The machine has a main power switch, an on/off button and a
touch display. The following operating modes are available:
5 Install the hopper cover, turn the main power switch on, and
start preparing soft serve. (See 6. 1 DESCRIPTION OF
CONTROLS)
figure 6
SOFT SERVE PRODUCTION: in this operating mode, the machine prepares soft serve.
NIGHT MODE: in this operating mode, the machine keeps the
liquid mix at a suitable temperature to preserve it. This function
is useful at night to keep the quality of the mix intact and limit
electricity consumption.
WASHING: in this operating mode, cooling is disabled. This
function is used during washing and sanitizing to prevent the
solution used from being cooled and freezing.
4
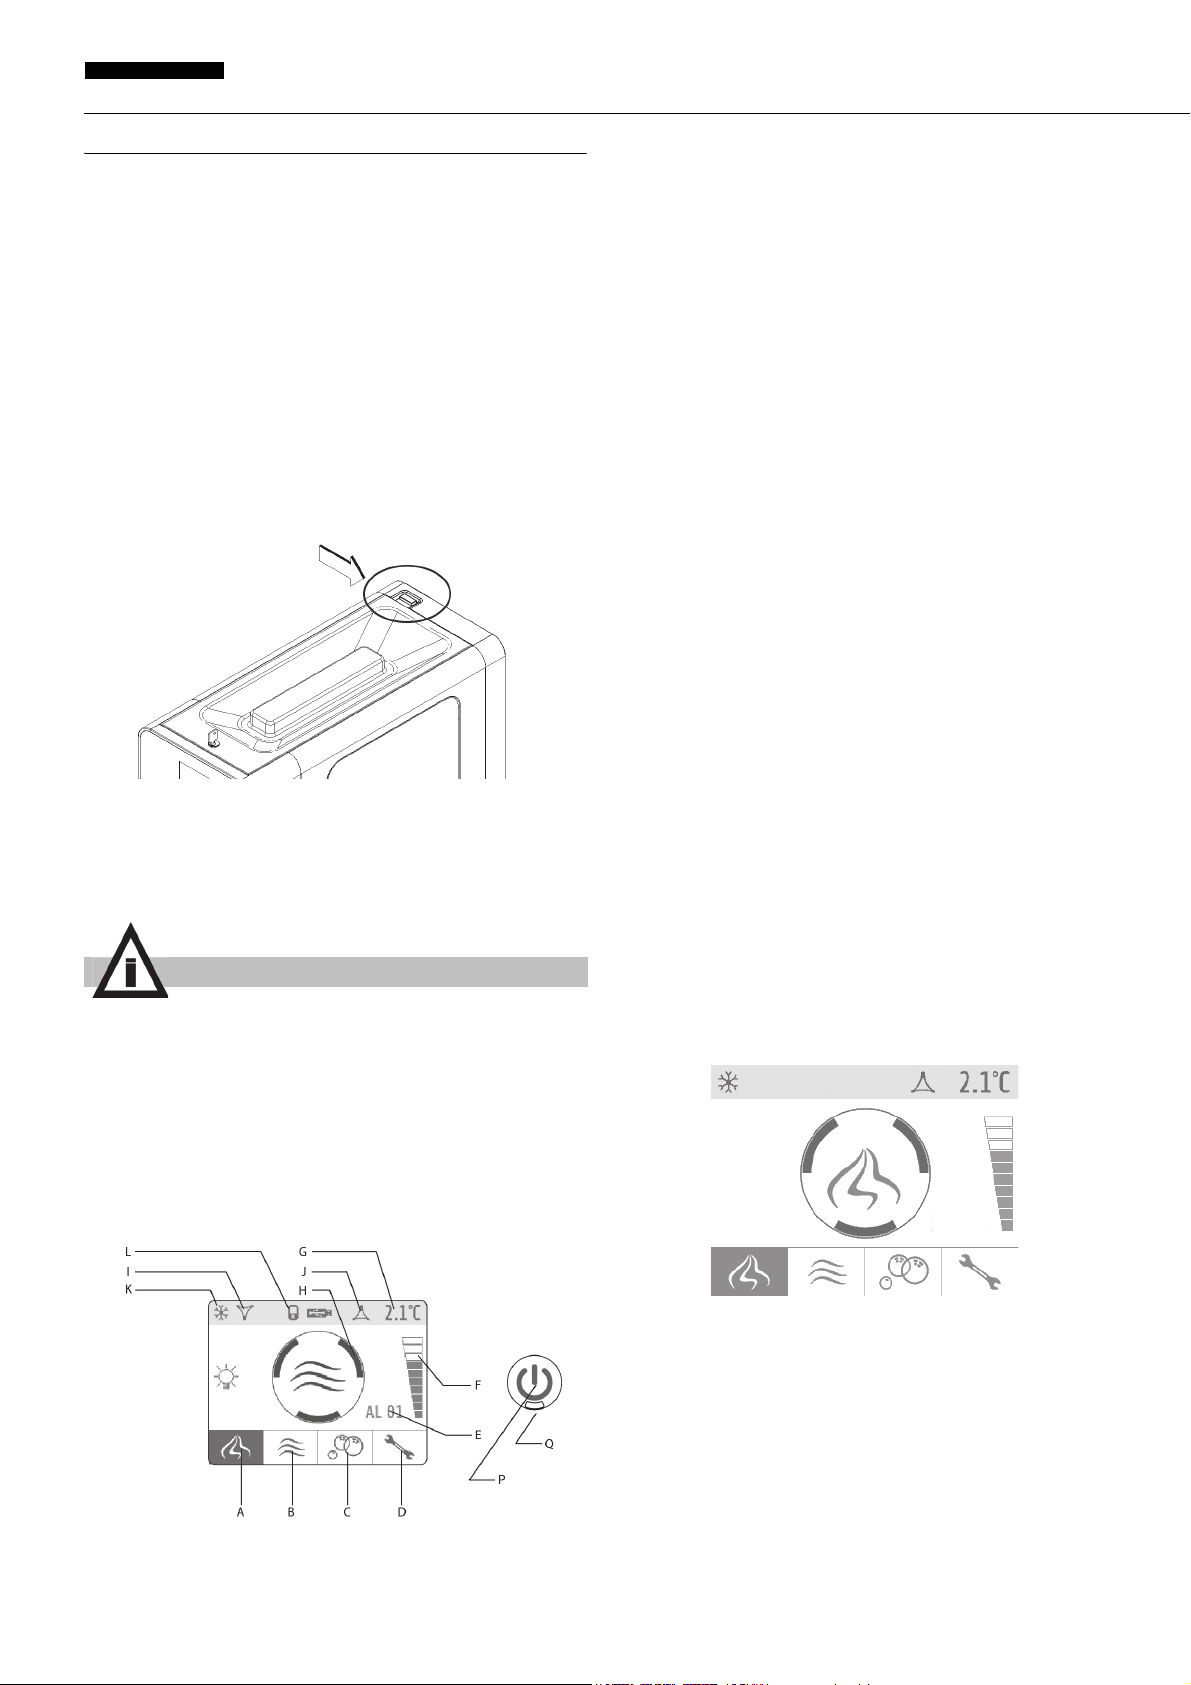
Page 5

MAIN SWITCH
The main power switch is located on the top of the machine at
the back.
H Status icon. Indicates the machine status (soft serve, night
mode, washing, alarm) and the soft serve preparation status when the soft serve mode is enabled:
red icon: soft serve not ready
yellow icon: soft serve almost ready
green icon: soft serve ready
I Hopper cooling icon. Indicates that the hopper cooling is in
operation.
J Freezing cylinder cooling icon. Indicates that the freezing
cylinder cooling is in operation.
K Compressor icon. Indicates the compressor is in opera-
tion.
L Display shut-down icon. Indicates that the touch display
has shut down and no controls can be accessed.
Its function is as follows:
Position 0 : machine is off
Position I : machine enabled for operation but in Standby
mode. Only indicator light Q is on.
IMPORTANT
If you turn the machine off and back on at the main power
switch, it will restart in the same operating mode it was in
when it was switched off.
ON/OFF BUTTON
The ON/OFF button P is located to the right of the touch display.
If indicator light Q comes on, the machine is switched on and in
standby mode, ready for operation. Hold down the ON/OFF button for one second to turn the machine on and off.
TOUCH DISPLAY
FOR MACHINE OPERATION
Turn the main power switch to position I. Red indicator light Q
comes on.
Hold down button P until the machine starts up again.
Select the desired function using icons A, B, c or D.
SOFT SERVE MODE
In this operating mode, the machine produces soft serve and the
mix in the hopper is kept at a suitable temperature to preserve
it. The soft serve preparation status is indicated on the display
by the central icon and by the color of the arrows.(see figure 9)
figure 9
When the soft serve is ready, the auger slows down, the cooling
system stops and the machine switches to serve mode. At default intervals (factory set to every 10 minutes), the auger increases speed and the cooling system runs to restore the proper
soft serve consistency.
When the spigot is opened, the auger speed increases and the
cooling system runs.
In order to produce soft serve, the hopper must contain a suitable quantity of mix. If the mix level gets low, the central icon displays low product.(see figure 10)
figure 8
The following icons appear on the display:
A SOFT serve PRODUCTION icon; when pressed, the
SOFT serve function is enabled.
B NIGHT MODE icon; when pressed, the NIGHT MODE
function is enabled
C WASHING icon; when pressed, the WASHING function is
enabled.
D PARAMETERS icon; when pressed, adjustments can be
made to the operating PARAMETERS.
E Alarm code. Indicates an alarm and displays the relevant
code.
F Consistency bar. Indicates the set consistency level.
G Mix temperature. Indicates the mix temperature in the hop-
per.
figure 10
Consistency adjustment
The consistency of the soft serve can be adjusted on a scale of
1 to 10. To adjust, touch the graduated bar on the right-hand
side of the touch display. The following controls are available:
A Exit icon: Exits without making any changes.
B Decrease icon: Decreases the consistency value.
C Increase icon: Increases the consistency value.
D Confirm icon: Confirms the value set.
5
Page 6

C111
ENGLISH
(see figure 11)
figure 11
NIGHT MODE
In this operating mode, the mix in both the hopper and in the
freezing cylinder is kept at a food safe temperature (factory set
to 36°F) to preserve it. The display indicates the night mode
icon. (see figure 12)
play. Press this icon to show the explanatory text relating to the
alarm. (see figure 14)
figure 14
MAINTENANCE ALARM (AL14)
After every 1500 hours of operation it is necessary to replace the
auger seal. After replacing the seal, the AL14 alarm must be reset.
To reset the alarm 14 is necessary:
- press parameters icon
- type user password (0000)
- press on hourglass icon
- press RESET button
- type user password (0000)
- press exit button
figure 12
When the mix has reached the set temperature, the auger slows
down, the cooling system stops, and the machine switches to
standby mode. At default intervals (factory set to every 10 minutes), the auger increases speed and the cooling system starts
to retain the proper temperature.
IMPORTANT
The product temperature during night mode is factory set
to 36°F.
WASHING MODE
In this operating mode, the cooling system does not operate and
the auger turns at a speed suitable for washing the machine.
The display indicates the Washing icon. (see figure 13)
figure 13
ALARMS
The machine is fitted with a self-diagnosis system. In the event
of a breakdown, the user is notified by the alarm icon on the dis-
6. 2 OPERATION HELPFUL HINTS
The machine parameters are factory set to guarantee optimum
operation. To prevent any risks of malfunctioning, the parameters must only be changed by the manufacturer, technical support, or other similarly qualified persons.
6. 3 SUGGESTIONS
1 All machines of this kind emit heat. Should the heat
generated be excessive, make sure that no heat sources are
located near the machine and, specifically, near the louvered
panels. Also make sure the air flow is not obstructed by the
walls, boxes or other items. Leave a clearance of at least 6” all
around the machine. Also make sure the filter situated behind
the rear panel is clean.
2 This machine is only intended for use with confectionery
products.
6. 4 CLEANING
1 Cleaning and washing the machine are vital to guarantee
perfect preservation of product flavor and maximum efficiency
of your machine. The procedures described below must be
considered of a general nature and may vary due to local
health and safety regulations.
2 Before disassembling for washing, the machine must be
emptied. Proceed as follows:
1 on the keypad, select the WASHING operating mode
2 if necessary, wait for the mix to liquify
3 place a bucket under the spigot and empty all the contents
of the hopper and freezing cylinder
4 remove the hopper cover.
If the cover is fitted with a safety lock, turn the key counterclockwise. (see figure 15)
6
Page 7

5 fill the hopper with water and allow the machine to operate
in WASHING mode for a few minutes. Then empty the wa-
ter out of the machine.
6 press and hold the ON/OFF button to turn off the machine
7 turn off the main power switch
6. 4. 1 DISASSEMBLY
ATTENTION
Before disassembling any component, always unplug
the machine from the main power source.
part and disassemble it. (see figure 18) and (see figure 19).
1 Remove the hopper cover. (see figure 16)
If the cover is fitted with a safety lock, turn the key
counterclockwise. (see figure 15)
figure 15
figure 18
figure 19
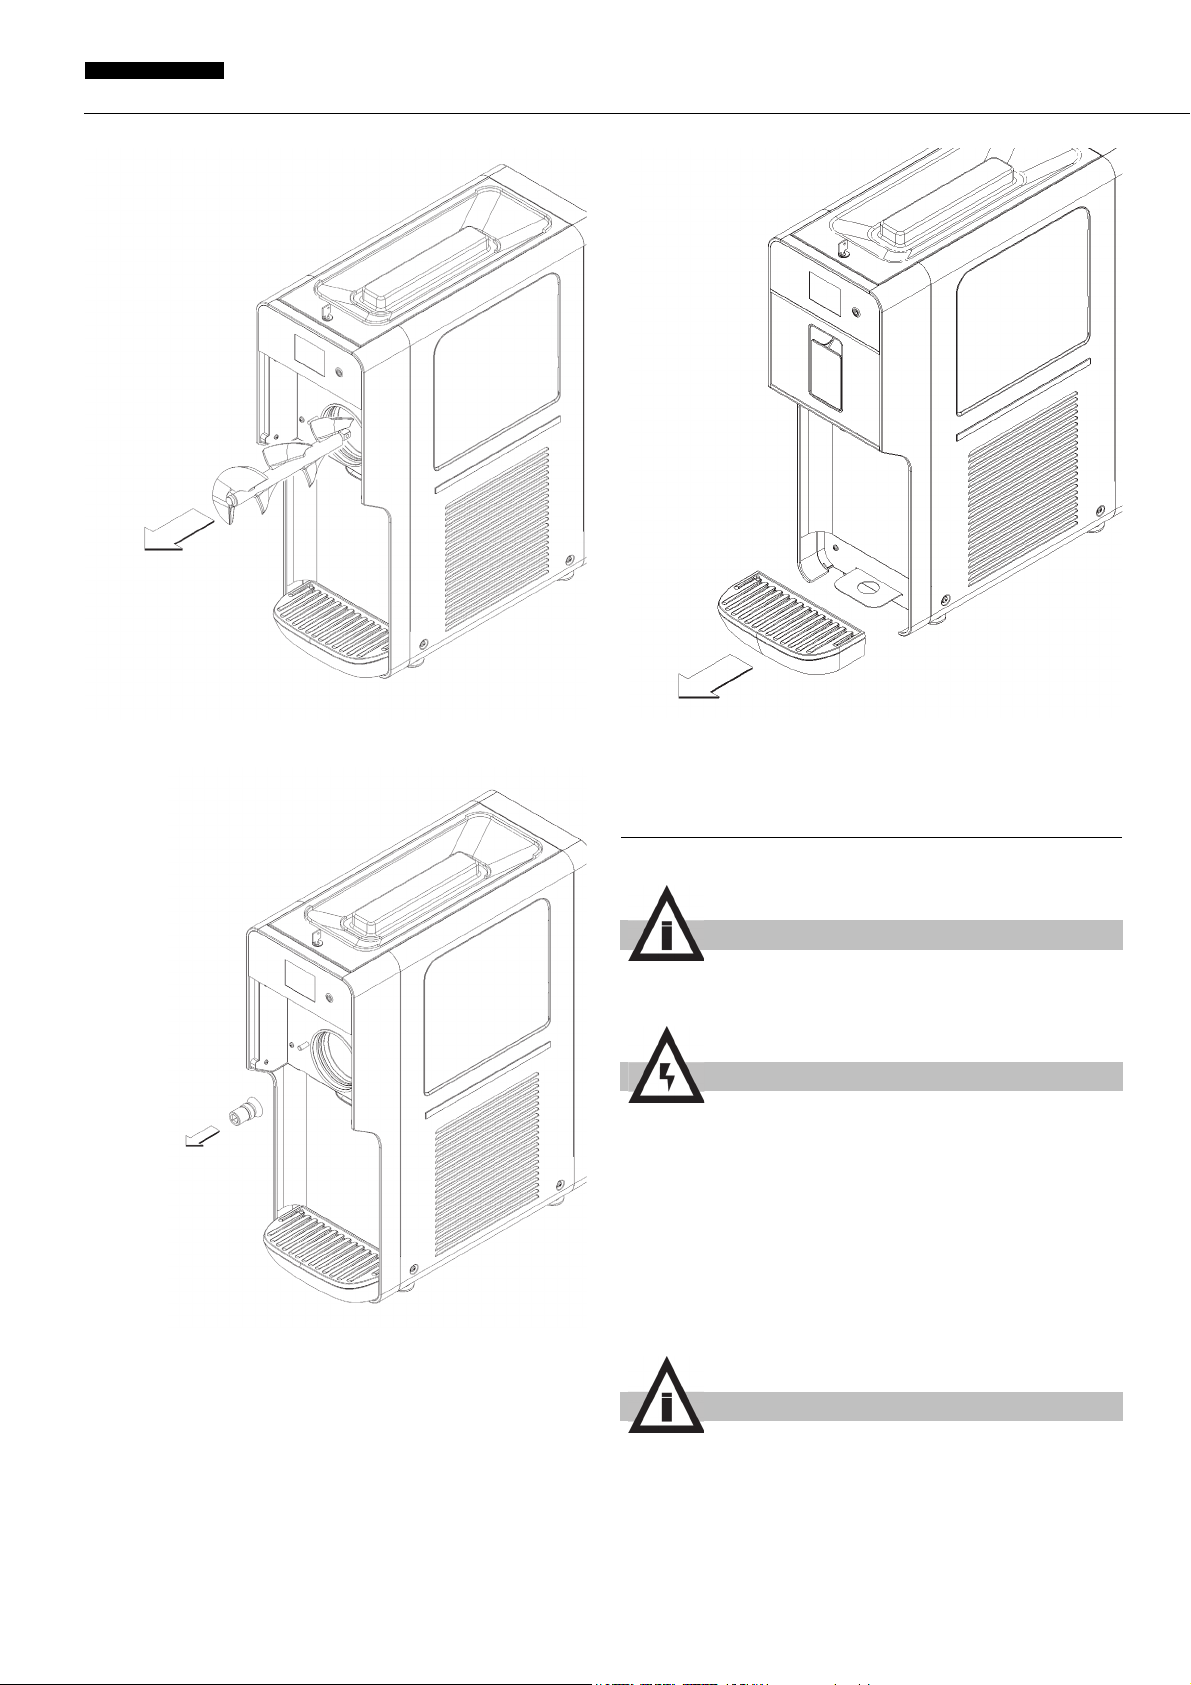
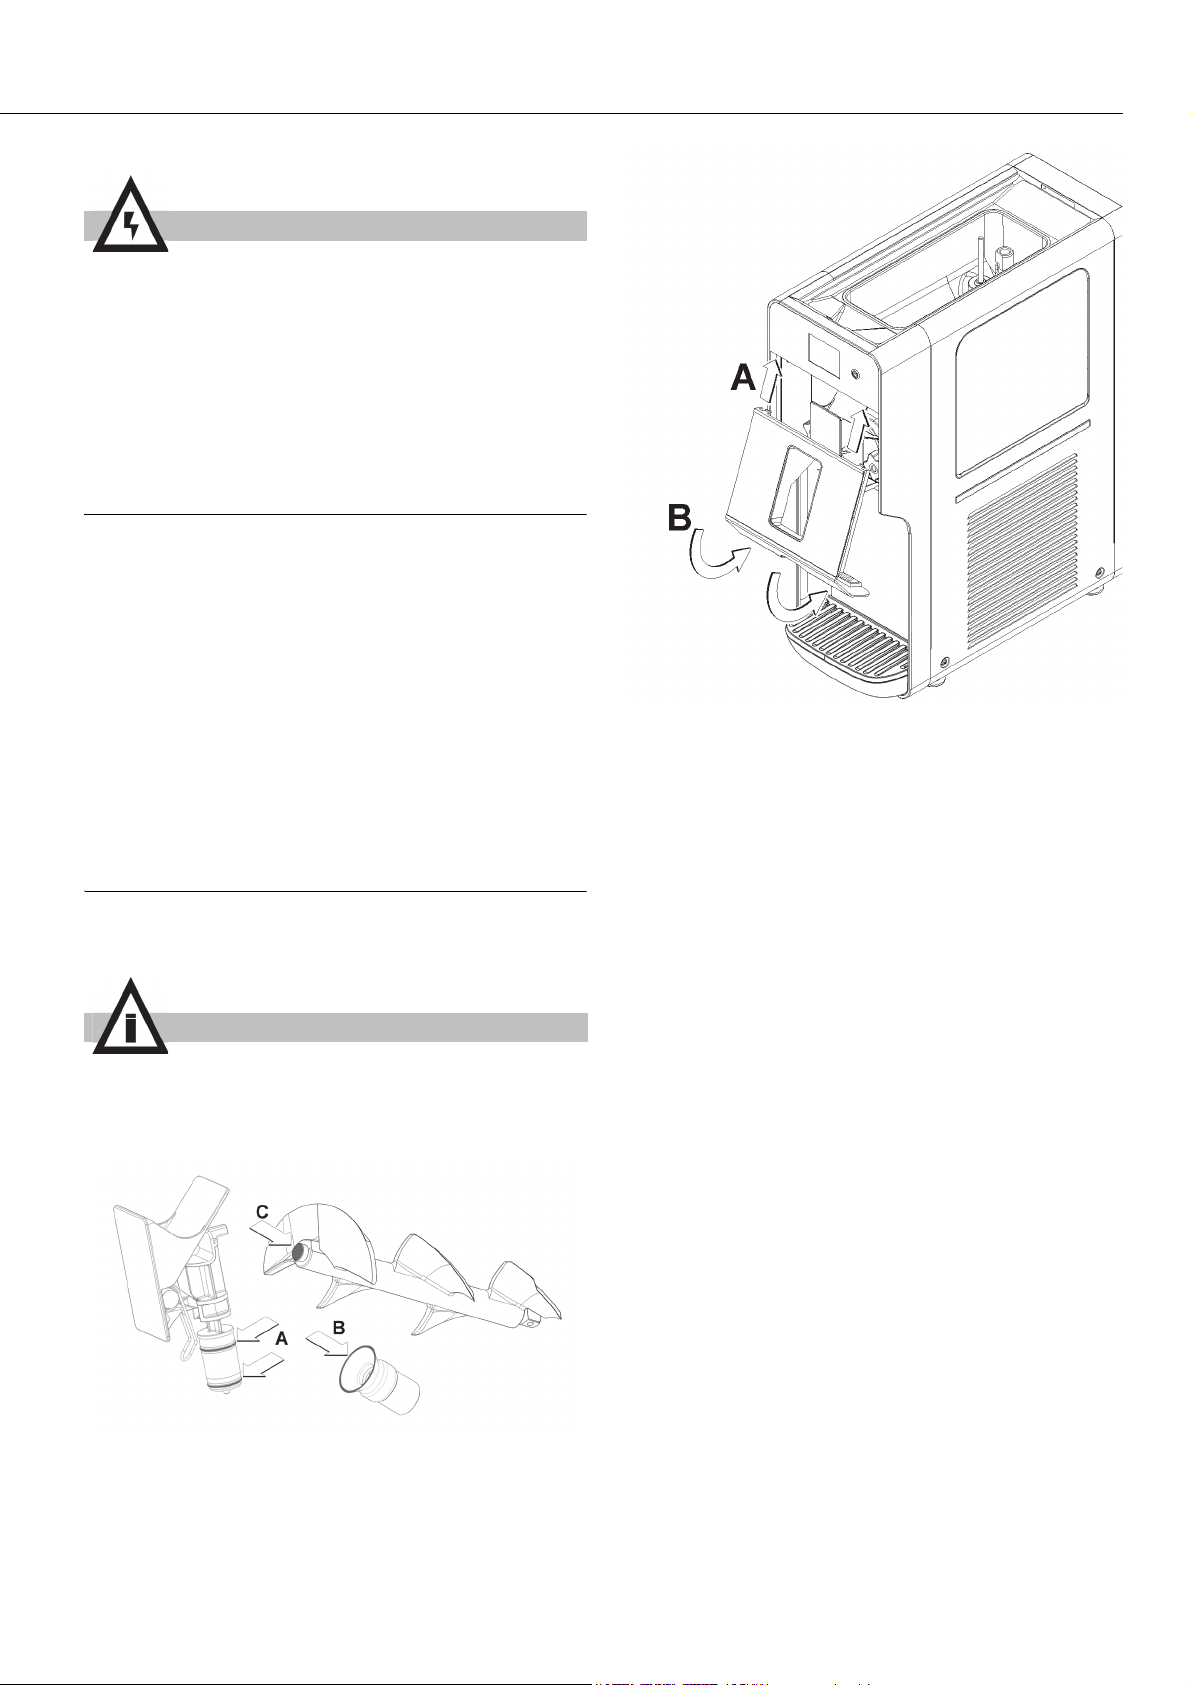
4 Remove the front panel. (see figure 20)
figure 16
2 If present, remove the auger in the hopper. (see figure 17)
figure 17
3 Remove the carburetor, both the upper part that the lower
figure 20
5 Unscrew both knobs from the spigot assembly. (see figure
7
Page 8

C111
ENGLISH
21)
figure 21
6 Remove the spigot assembly and disassemble it, following
the sequence specified. (see figure 22)
9 Remove the drip tray. (see figure 25)
figure 25
6. 4. 2 WASHING
IMPORTANT
If the power supply cable is damaged, it must be replaced
by the manufacturer or an authorized service provider to
avoid all risk.
figure 22
7 Remove the auger. (see figure 23)
figure 23
8 Remove the auger coupling and seal. (see figure 24)
ATTENTION
Before any cleaning operation, always disconnect the
dispenser from the power source.
1 Fill a bucket with approximately one gallon of 90-110 °F
water) and 1 oz of mild detergent (Stera-Sheen green label),
following the manufacturer’s instructions. A solution that is too
concentrated may damage the parts to be washed, whereas
one that is too diluted may not clean properly. Do not use any
abrasive detergents.
IMPORTANT
In order to avoid damaging the machine, only use detergents that are compatible with plastic components.
2 In order to avoid damaging the machine, only use
detergents that are compatible with plastic components.
ATTENTION
When cleaning the machine, do not use excessive
amounts of water around the electrical components. This
could cause electric shocks or damage to the machine.
figure 24
3 Wash the freezing cylinder, the hopper, and the mix inlet
tube using the brush supplied with the unit.
4 Rinse all washed parts under running water.
6. 4. 3 SANITIZING
Sanitizing must be done immediately before starting up the
dispenser. Do not allow the dispenser to remain idle for a long
time after sanitation.
8
Page 9

1 Before starting the procedures described below, wash your
hands with antibacterial soap.
2 Prepare 2 gallons of Stera-Sheen sanitizing solution
according to the manufacturer's instructions.
3 Immerse all parts to be sanitized in the solution for the time
indicated by the product manufacturer.
4 Allow the sanitized parts to air dry on a clean surface.
5 Dry the external parts of the dispenser without using
abrasive cloths.
6. 4. 4 ASSEMBLY
5 Reassemble the front panel. (see figure 26)
NOTE: Total Blend sanitary lubricant, or equivalent must be
used when lubrication of parts is specified. Total Blend can
be used to lubricate parts and also as a spline lubricant. Do
not use more than one packet of Total Blend per freezing
cylinder.
NOTE: The United States Department of Agriculture and the
Food and Drug Administration require that lubricants used
on food processing equipment be certified for this use. Use
lubricants only in accordance with the manufacturer’s
instructions.
1 Install the drip tray.
IMPORTANT
Lubricate the spigot piston, the auger seal and the front
of the auger in the points indicated in figure using only
Total Blend or other food grade sanitary lubricant.
2 Install the auger coupling onto the auger and insert it into
the freezing cylinder. Rotate the auger so that the coupling
engages the drive shaft.
3 Assemble the spigot assembly by first inserting the spigot
piston into the front door. Then install the handle onto the door
and secure it with the pin. Refer to Figure 20.
4 Place the front door assembly onto the studs and secure
with the knobs, tightening them carefully.
figure 26
6 Assemble the hopper auger taking care to insert the ends in
the grooves in the hopper.(see figure 27)
figure 27
6. 4. 5 IN-PLACE SANITIZATION
The sanitizing of the assembled machine prior to operation
should be performed in addition to the sanitizing of the disassembled machine described herein above, and never instead of
it.
1 Prepare 2 gallons of sanitizing solution according to the
manufacturer's instructions (Stera-Sheen green label).
2 Pour the solution into the hopper.
3 Using a suitable brush, wipe the solution onto all the parts
above the level of the solution including the underside of the
hopper cover.
4 Install the cover and operate the machine for approximately
5 minutes.
5 Drain the sanitizing solution from the bowls through the
spigots and then dispose of it.
6 Place a container under the spigot and rinse the machine
with mix to flush out any remaining sanitizing solution.
7 MAINTENANCE
1 Every day: check the machine and make sure there are no
leaks from the spigot assembly seal. If you notice a leak, first
check that the components have been assembled correctly,
then make sure the seal is not worn or damaged, in which case
replace it with an original spare part from the manufacturer.
9
Page 10

C111
ENGLISH
(see figure 28)
figure 28
2 Every week: make sure the auger seal is not worn or
damaged. If it is, replace with an original spare part from the
manufacturer. (see figure 29)
figure 29
3 Every week: check for auger seal leaks by examining the
drain tray (see figure 30). In case of a leak, make sure the
auger seal is properly installed and not worn or damaged. If it
is, replace with an original spare part from the manufacturer
(see figure 29).
31)
figure 31
ATTENTION
Be careful with the condenser fins as they are sharp.
5 In case of strange noise or failure, disconnect the machine
from the power source and call for service.
figure 30
4 Every Month: eliminate any dust that has built up on the
condenser filter situated at the back of the machine. (see figure
10
Page 11

11
Page 12

C111
ENGLISH
12
Page 13

1 INSTRUCCIONES DE SEGURIDAD
ELÉCTRICA
3 CARACTERISTICAS TECNICAS
1 Antes de conectar la alimentación eléctrica del distribuidor,
verifique que la tensión de red sea la correcta, indicada en la
placa. Conecte el distribuidor a una red monofásica, utilizando
un enchufe con toma de tierra, en cumplimiento de las normas
vigentes. Si la desconexión del aparato de la red eléctrica se
realiza mediante un interruptor unipolar, este debe garantizar
una distancia de apertura de los contactos que permita la
desconexión completa, en las condiciones previstas para la
categoría de sobretensión III.
2 No utilice alargaderas para conectar el aparato a la
alimentación eléctrica.
3 En caso de deterioro del cable de alimentación, este debe
ser sustituido por el fabricante, por el servicio de asistencia
técnica o por una persona con cualificación similar, para
prevenir cualquier riesgo.
4 El aparato no es apto para ser utilizado ambientes
exteriores.
5 El aparato se debe instalar en posición vertical.
6 Antes de cualquier operación de limpieza, desconecte
siempre la alimentación eléctrica del distribuidor, extrayendo la
clavija de la toma.
7 No quite los paneles para realizar operaciones de limpieza
o mantenimiento, hasta verificar que el distribuidor está
desconectado de la alimentación eléctrica.
C111-37
Capacidad aproximada del contenedor l 4
Capacidad aproximada del evaporador l 2
Dimensiones:
ancho cm 26
largo cm 57
alto cm 72
Peso neto, aproximado kg 50
Peso bruto, aproximado kg 55
Motocompresor hermético
Condensador a ventilación forzada
Guardamotor
Nivel de ruido inferior a 70dB (A)
IMPORTANTE
Características eléctricas: lea los datos presentes en la
placa de cada distribuidor, situada en la parte inferior del
panel frontal, detrás del cajón colector de gotas. Los
números de serie de los aparatos (precedidos por el
símbolo #) están indicados en el bastidor, en la parte
posterior del aparato, detrás del panel de cobertura del
condensador. Los datos de referencia de la máquina son
los indicados en la placa.
8 No utilice chorros de agua para la limpieza.
9 Este aparato no puede ser utilizado por niños.
10 Evite que los niños jueguen con el aparato.
11 Este aparato no puede ser utilizado por personas con
capacidades físicas, sensoriales o mentales reducidas, o sin
experiencia y conocimientos, a menos que hayan recibido
asistencia y capacitación para el uso seguro del aparato y
comprendan los peligros que este implica.
12 El acceso al interior del distribuidor está reservado a
personas con conocimiento y experiencia con el aparato,
especialmente si se trata de operaciones relacionadas con la
seguridad y la higiene.
2 INSTRUCCIONES DE SEGURIDAD
HIGIÉNICA
1 Este aparato está destinado al uso doméstico o similar.
2 Para su correcto funcionamiento, la temperatura ambiente
debe estar comprendida entre +5 y +32 °C.
3 Utilice el aparato exclusivamente para enfriar los líquidos
indicados.
4 No introduzca sustancias o líquidos peligrosos o tóxicos en
el aparato.
El fabricante se reserva el derecho a modificar el presente
manual sin preaviso.
4 INTRODUCCION
Lea atentamente este manual de instrucciones para conocer
todas las características del distribuidor.
Como todos los productos mecánicos, también este distribuidor
requiere limpieza y cuidado. Además, su correcto
funcionamiento puede verse afectado por eventuales errores
cometidos por el operador durante las fases de desmontaje y
limpieza. Por este motivo, es importante que los procedimientos
de desmontaje, lavado, esterilización y montaje, que son
operaciones diarias, sean conocidos por quienes utilizan el
distribuidor, sin posibilidad de error.
5 INSTALACIÓN
1 Extraiga el distribuidor de su embalaje (que se recomienda
conservar para su eventual uso en el futuro).
2 Verifique que el distribuidor no haya sufrido daños durante
el transporte. Si así fuera, realice inmediatamente la
reclamación correspondiente al transportista.
3 Apoye el distribuidor sobre una superficie capaz de
soportar su peso, incluso con carga completa.
4 Deje un espacio libre de al menos 15 cm alrededor del
distribuidor, para no obstaculizar el flujo de aire de
enfriamiento.
5 Verifique la estabilidad del aparato, regulando —si es
necesario— la altura de los pies. Si el suministro incluye una
serie de pies altos (aproximadamente 100 mm), es necesario
13
Page 14

C111
ESPAÑOL
utilizarlos para sustituir los pies originales.
ATTENCION
Verifique que el aparato esté correctamente conectado a
tierra; en caso contrario, se podrían producir descargas
eléctricas a las personas o daños en el distribuidor.
6 El distribuidor no sale lavado y esterilizado de la fábrica.
Por este motivo, antes del uso, debe ser desarmado, lavado y
esterilizado, siguiendo las indicaciones contenidas en las
presentes instrucciones (capítulo 7.4 LIMPIEZA).
IMPORTANTE
Coloque el aparato de tal forma que la clavija del cable
de alimentación sea fácilmente accesible.
6 PARA UN FUNCIONAMIENTO SEGURO Y
CORRECTO
1 No use el distribuidor hasta haber leído el presente manual
de instrucciones.
2 No use el distribuidor si no está correctamente conectadoSi
el grupo grifo no está instalado, el aparato no puede funcionar
y en la pantalla se visualiza el ícono que representa el grupo
grifo abierto (véase la figura 1).a tierra.
3 No ponga en funcionamiento el distribuidor si los paneles
no están en su sitio y bloqueados con tornillos.
4 No introduzca los dedos u objetos en las ranuras de los
paneles ni en la abertura del grifo.
5 No quite partes o paneles para realizar operaciones de
limpieza o mantenimiento, hasta verificar que el distribuidor
está desconectado de la alimentación eléctrica.
6 La tapa debe permanecer siempre cerrada.
7 INSTRUCCIONES DE USO
IMPORTANTE
Antes del uso, lave y esterilice el distribuidor, siguiendo
las indicaciones contenidas en las presentes instrucciones (capítulo 7.4.2 LAVADO).
IMPORTANTE
Si el grupo grifo no está instalado, el aparato no puede
funcionar y en la pantalla se visualiza el ícono que representa el grupo grifo abierto (ver figura 1).
figura 1
Este aparato está dotado de una cuba superior, destinada a
mantener refrigerado el producto base para la producción de
helado, y un cilindro inferior para la producción de helado
propiamente dicha.
Cada vez que se distribuye una porción de helado, la misma
cantidad de preparado pasa por gravedad de la cuba superior
al cilindro inferior.
Para obtener un helado más suave y ligero, es necesario que,
junto con el producto base, también entre una cierta cantidad de
aire en el cilindro. A tal fin, la máquina está dotada de un tubo
de mezcla separado en dos partes. (ver figura 2)
figura 2
Para obtener los mejores resultados, es necesario realizar las
siguientes operaciones, en el orden indicado:
1 Introduzca la parte inferior del tubo de mezcla en el orificio
de conexión entre la cuba y el cilindro, orientándolo de tal
14
Page 15
forma que entre completamente en su alojamiento. (ver figura
3)
figura 3
2 Vierta el preparado en la cuba superior y espere hasta que
se llene el cilindro. Esta situación se verifica cuando ya no
salen burbujas por los orificios presentes en el tubo de mezcla.
(ver figura 4)
cilindro. (ver figura 6)
figura 6
5 Cierre la tapa superior, encienda la máquina y comience la
producción de helado (véase 7.1 DESCRIPCIÓN DE LOS
MANDOS).
6 Cuando el helado está listo, abra la tapa y gire la parte
superior del tubo de mezcla en sentido levógiro para permitir la
entrada del preparado en el cilindro inferior.
Es posible regular la cantidad de aire presente en el helado,
teniendo en cuenta que, à partir de la position de fermeture:
Rotación completa en
sentido levógiro
Rotación completa en
sentido levógiro
: máxima apertura, menor canti-
dad de aire en el helado.
: mínima apertura, mayor canti-
dad de aire en el helado.
figura 4
3 Introduzca la parte superior del tubo de mezcla dentro de la
parte inferior. (ver figura 5)
figura 5
4 Gire completamente la parte superior del tubo de mezcla en
sentido dextrógiro para cerrar la entrada del preparado al
figura 7
7 Cierre nuevamente la tapa superior.
IMPORTANTE
Utilice el distribuidor solamente con productos alimentarios.
8 La entrega de palanca de acción helado.
9 En el caso en el que el ajuste de la densidad disponible no
es suficiente para lograr el resultado deseado, la mezcla puede
ser corregida como sigue:
Helado demasiado suave: aumentar la dosis de líquido, agua o
leche, a un valor entre 5 y 10% del volumen total.
Helado demasiado compacto: disminuir la dosis de líquido,
agua o leche, a un valor entre 5 y 10% del volumen total.
10 El distribuidor debe funcionar en forma continua: el sistema
de enfriamiento se detiene automáticamente cuando el
producto está listo para su distribución. El dispositivo de
mezcla disminuye su velocidad y la aumenta solo en el
momento de la distribución. A intervalos preestablecidos, el
sistema de enfriamiento se reactiva y el dispositivo de mezcla
aumenta su velocidad para restablecer la correcta densidad del
producto.
15
Page 16

C111
ESPAÑOL
7. 1 DESCRIPCIÓN DE LOS MANDOS
El distribuidor está dotado de un interruptor general, un botón
de encendido y una pantalla táctil. Están disponibles los
siguientes modos de funcionamiento:
PRODUCCIÓN DE HELADO. En este modo de
funcionamiento, el distribuidor produce helado.
CONSERVACIÓN. En este modo de funcionamiento, el
distribuidor mantiene el preparado líquido a una temperatura
idónea para su conservación. Esta función es útil durante las
horas nocturnas, para mantener inalterada la calidad del
preparado y reducir el consumo de energía eléctrica.
LAVADO. En este modo de funcionamiento, el enfriamiento no
está habilitado. Esta función es útil durante el lavado y la
esterilización de la máquina, para evitar que la solución utilizada
se enfríe y se congele.
INTERRUPTOR GENERAL
El interruptor general esta posicionado en la parte de arriba del
distribuidor, en el lado posterior.
Su función es la siguiente:
Posición 0 : máxima apertura, menor cantidad de aire en el
helado.
Posición I : mínima apertura, mayor cantidad de aire en el
helado.
En la pantalla están presentes los siguientes íconos:
A Ícono PRODUCCIÓN HELADO: su presión activa la fun-
ción HELADO.
B Ícono CONSERVACIÓN: su presión activa la función
CONSERVACIÓN.
C Ícono LAVADO: su presión activa la función LAVADO.
D Ícono PARÁMETROS: su presión permite regular los
PARÁMETROS de funcionamiento.
E Código de alarma: indica la presencia de una alarma y el
código correspondiente.
F Barra de densidad: indica el nivel de densidad regulada.
G Temperatura del preparado: indica la temperatura del pro-
ducto base contenido en la cuba superior.
H Ícono ESTADO: indica el estado en que se encuentra el
distribuidor (helado, conservación, lavado o alarma) y,
cuando está activado el modo HELADO, el estado de pro-
ducción del helado.
Ícono rojo: helado no listo.
Ícono amarillo: helado casi listo.
Ícono verde: helado listo.
I Ícono ENFRIAMIENTO CUBA SUPERIOR: indica que el
enfriamiento de la cuba superior está en funcionamiento.
J Ícono ENFRIAMIENTO CILINDRO INFERIOR: indica que
el enfriamiento del cilindro inferior está en funcionamiento.
K Icono COMPRESOR: indica el funcionamiento del com-
presor de refrigeración.
L Icono COMPRESOR: indica el funcionamiento del com-
presor de refrigeración.
PARA UTILIZAR EL DISTRIBUIDOR
Ponga el interruptor general en posición I. Se enciende el piloto
rojo Q.
Mantenga pulsado el botón P hasta que se encienda el
distribuidor.
Seleccione la función deseada con los íconos A, B, C o D.
IMPORTANTE
Apagando y reencendiendo el distribuidor con el interruptor general, el aparato se reenciende en el mismo
modo de funcionamiento en el que se encontraba al ser
apagado.
BOTÓN DE ENCENDIDO
El botón de encendido P está situado a la derecha de la pantalla
táctil. El encendido del piloto Q indica que el distribuidor está
encendido y se encuentra en modo stand-by, listo para el
funcionamiento. Manteniendo pulsado el botón P durante un
segundo, es posible encender y apagar el distribuidor.
PANTALLA TÁCTIL
figura 8
MODO HELADO
En este modo de funcionamiento, la máquina produce helado y
el preparado en la cuba superior se mantiene a una temperatura
idónea para su conservación. El estado de producción de
helado es indicado en la pantalla por el ícono central y por el
color de las flechas. (ver figura 9)
figura 9
Cuando el helado está listo, el sistema de mezcla decelera, el
sistema de enfriamiento se apaga y el aparato se pone en fase
de espera de distribución. A intervalos preestablecidos (por
defecto, 10 minutos), el sistema de mezcla acelera y el sistema
de refrigeración se enciende para restablecer la correcta
densidad del helado.
Cuando se abre el grifo de distribución, el sistema de mezcla
acelera y el sistema de refrigeración se enciende.
Para producir helado, es necesario que en la cuba superior
haya una adecuada cantidad de preparado. En caso contrario,
el sistema de enfriamiento no se enciende y en la pantalla se
16
Page 17

visualiza el ícono de falta de producto.
figura 10
Regulación de la densidad
Es posible regular la densidad del helado en una escala de 1 a
10. Para realizar esta regulación, es necesario tocar la barra
graduada situada en el lado derecho de la pantalla y acceder al
modo DENSIDAD. Están disponibles los siguientes mandos:
A Ícono SALIDA: para salir del modo de funcionamiento sin
realizar modificaciones.
B Ícono DISMINUCIÓN: para reducir el valor regulado.
C Ícono AUMENTO: para aumentar el valor regulado.
D Ícono CONFIRMACIÓN: para confirmar el valor regulado.
(ver figura 11)
restablecer la temperatura correcta.
IMPORTANTE
La temperatura de conservación del producto está regulada de fábrica a 2 °C.
MODO LAVADO
En este modo de funcionamiento, el sistema de enfriamiento no
funciona y el sistema de mezcla gira a una velocidad idónea
para el lavado de la máquina. En la pantalla se visualiza el ícono
LAVADO. (ver figura 13)
figura 13
ALARMAS
La máquina está dotada de un sistema de autodiagnóstico. Si
se verifica una disfunción, esta es indicada por la visualización
en la pantalla del ícono de alarma. Pulsando este último, es
posible visualizar el texto explicativo correspondiente a la
alarma en curso. (ver figura 14)
figura 11
MODO CONSERVACIÓN
En este modo de funcionamiento, el preparado —tanto en la
cuba superior como en el cilindro inferior— se mantiene a una
temperatura idónea para su conservación. En la pantalla se
visualiza el ícono CONSERVACIÓN. (ver figura 12)
figura 12
Una vez que el preparado alcanza la temperatura regulada, el
sistema de mezcla decelera, el sistema de enfriamiento se
apaga y el aparato se pone en fase de espera. A intervalos
preestablecidos (por defecto, 10 minutos), el sistema de mezcla
acelera y el sistema de refrigeración se enciende para
figura 14
ALARMA DE MANTENIMIENTO (AL 14)
Cada 1500 horas de funcionamiento es necesario reemplazar el
sello colocado en el terminal de limpiaparabrisas. Se lleva a
cabo dicha sustitución es necesario proceder a la AL14 de alarma de reinicio.
Para restablecer la alarma 14 es necesario:
- icono de parámetros de la prensa
- tipo de contraseña de usuario (0000)
- pulse sobre el icono de reloj de arena
- pulse el botón RESET
- tipo de contraseña de usuario (0000)
- botón de salida de prensa
7. 2 PARÁMETROS DE FUNCIONAMIENTO
Los parámetros del aparato son preestablecidos en la fábrica
para garantizar un correcto funcionamiento. Para evitar
17
Page 18

C111
ESPAÑOL
disfunciones, su modificación solo puede ser realizada por el
fabricante, por su servicio de asistencia técnica o por personas
con cualificación similar.
7. 3 SUGERENCIAS
1 Todos los distribuidores de este tipo liberan calor. Sin
embargo, si la emisión de calor parece excesiva, verifique que
no haya ninguna fuente de calor cerca del distribuidor y, en
particular, cerca de las rejillas. Verifique también que el flujo de
aire no sea obstaculizado por la cercanía de paredes, cajas,
etc. Deje al menos 15 cm de espacio libre alrededor del
distribuidor. Por último, verifique que el filtro situado debajo del
panel posterior esté limpio.
2 Este aparato está diseñado para funcionar exclusivamente
con alimentos dulces.
ATTENCION
El uso del aparato está reservado a personas con seguridad, higiene, conocimiento y práctica suficientes para el
uso correcto del aparato.
7. 4 LIMPIEZA
15)
figura 15
figura 16
1 El lavado y la limpieza son esenciales para garantizar la
perfecta conservación del sabor del producto y la máxima
eficiencia del distribuidor. Los procedimientos descritos a
continuación se deben considerar de carácter general y
pueden variar en función de la reglamentación sanitaria
vigente.
2 Antes de desmontarlo para su lavado, es necesario vaciar
completamente el distribuidor. Proceda en la forma siguiente:
1 Utilizando el teclado, seleccione el modo de funcionamien-
to LAVADO.
2 Si es necesario, espere hasta que el producto se vuelva
líquido.
3 Coloque un recipiente debajo del grifo y vacíe todo el con-
tenido de la cuba superior y del cilindro.
4 Quite la tapa.
Si la tapa tiene cerradura, gire la llave en sentido levógiro.
(ver figura 15)
5 Llene la cuba superior con agua y deje funcionar el distri-
buidor en modo LAVADO durante algunos minutos. A con-
tinuación, vacíe completamente el distribuidor.
6 Llene la cuba superior con agua y deje funcionar el distri-
buidor en modo LAVADO durante algunos minutos. A con-
tinuación, vacíe completamente el distribuidor.
7 Accione el interruptor general.
7. 4. 1 DESMONTAJE
2 Si está presente, retire el mezclador cuenca alta. (ver figura
17)
figura 17
3 Retire el tubo de mezcla, tanto en la parte superior que en
la parte inferior.
4 Quite el tube de mezcla y desmontalo (ver figura 18) y (ver
Antes de proceder al desmontaje de cualquier componente, desconecte siempre la alimentación eléctrica del
aparato, extrayendo la clavija de la toma.
1 Quite la tapa superior. (ver figura 16) Si la tapa tiene
cerradura, gire la llave en sentido levógiro y quítela. (ver figura
ATTENCION
18
Page 19

figura 19).
figura 21)
figura 21
7 Desmonte el grupo grifo siguiendo la secuencia indicada.
(ver figura 22)
figura 18
figura 19
5 Quite el panel frontal. (ver figura 20)
figura 20
6 Desenrosque ambos pomos de fijación del grupo grifo. (ver
figura 22
8 Quite el raspador. (ver figura 23)
figura 23
19
Page 20

C111
ESPAÑOL
9 Quite la junta. (ver figura 24)
figura 24
10 Extraiga el cajón colector de gotas de su alojamiento. (ver
figura 25)
7. 4. 2 LAVADO
IMPORTANTE
No lave ningún componente de la máquina en el lavavajillas.
ATTENCION
Antes de cualquier operación de limpieza, desconecte
siempre la alimentación eléctrica del distribuidor,
extrayendo la clavija de la toma o apagando el interruptor exterior de pared.
1 Prepare en una cubeta aproximadamente cuatro litros de
agua caliente (45-60 °C) y 15 gr (1 oz) de detergente
específico, proveedores (stera sheen green label); una
solución demasiado concentrada puede dañar los
componentes a lavar, mientras que una solución demasiado
diluida puede no ser suficiente para garantizar una limpieza
adecuada. No use detergentes abrasivos.
IMPORTANTE
figura 25
La temperatura de conservación del producto está regulada de fábrica a 2 °C.
2 Use un cepillo adecuado y lave cuidadosamente con
solución detergente todas las partes en contacto con el
producto.
ATTENCION
Durante el lavado del distribuidor, no use una excesiva
cantidad de agua cerca de los componentes eléctricos;
en caso contrario, se podrían producir descargas
eléctricas a las personas o daños en el distribuidor.
3 Lave el cilindro evaporador, la cuba superior y el orificio
usando el cepillo en dotacion.
4 Enjuague todas las partes lavadas con agua corriente.
7. 4. 3 ESTERILIZACIÓN DEL DISTRIBUIDOR
DESARMADO
La esterilización se debe realizar inmediatamente antes de
poner el distribuidor en funcionamiento; evite que este
permanezca inactivo durante mucho tiempo después de la
esterilización.
1 Antes de comenzar los procedimientos que se describen a
continuación, lávese las manos con jabón antibacteriano.
2 Prepare en una cubeta aproximadamente ocho litros de
agua caliente (45-60 °C) y 30 gr (2 ozs) de solución
proveedores (stera sheen green label).
3 Sumerja en la solución todas las partes a esterilizar durante
el tiempo indicado por el fabricante del producto o, por lo
meno, por 5 minutos.
4 Deje secar las partes esterilizadas al aire, sobre una
superficie limpia.
5 Seque las partes externas del distribuidor sin usar paños
abrasivos.
20
Page 21

7. 4. 4 MONTAJE
1 Coloque el cajón colector de gotas en su alojamiento.
IMPORTANTE
Lubrique el pistón del grifo, el enganche del raspador y
la parte delantera del raspador en los puntos indicados
en la figura, utilizando exclusivamente la grasa suministrada con la máquina u otra grasa para uso alimentario.
extremos en las ranuras en la cuenca alta.(ver figura 27)
figura 27
7. 4. 5 ESTERILIZACIÓN DEL DISTRIBUIDOR
ARMADO
2 Vuelva a colocar la junta y el raspador siguiendo la
secuencia inversa a la de desmontaje.
3 Coloque el grupo grifo siguiendo la secuencia inversa con
respecto a la ilustrada en la figura 19, e introdúzcalo en su
alojamiento.
4 Enrosque ambos pomos, apretándolos con cuidado.
5 Coloque el panel frontal. (ver figura 26)
figura 26
6 Montar el mezclador juntos teniendo cuidado de insertar los
La esterilización del aparato armado, antes de su puesta en
funcionamiento, se debe realizar además de la
esterilización del aparato desarmado descrita en el punto
anterior, y no como alternativa a la misma.
1 Prepare en una cubeta aproximadamente cuatro litros de
de agua y 15 gr (1 oz) de solución proveedores (stera sheen
green label).
2 Vierta la solución en el recipiente.
3 Usando un cepillo adecuado, frote la solución sobre todas
las partes por encima del nivel de la solución.
4 Coloque la tapa y haga funcionar el distribuidor para agitar
la solución durante aproximadamente 5 minutos.
5 Extraiga la solución esterilizante a través del grifo y
elimínela.
6 Enjuague con agua corriente para eliminar todos los
residuos de solución esterilizante del fondo de los recipientes.
7 No realice otras operaciones de enjuague.
8 MANTENIMIENTO
1 Una vez por día: controle el distribuidor y verifique que no
haya pérdidas de producto a través de la junta del grupo grifo.
Si se detectan pérdidas, verifique en primer lugar que los
componentes estén colocados correctamente; a continuación,
verifique que la junta no sea defectuosa y no esté desgastada;
de ser así, sustitúyala con un repuesto original del fabricante.
(ver figura 28)
figura 28
2 Una vez por semana: verifique que la junta del raspador
no esté desgastada. de ser así, sustitúyala con un repuesto
21
Page 22

C111
ESPAÑOL
original del fabricante. (ver figura 29)
figura 29
3 Una vez por semana: verifique la presencia de eventuales
pérdidas, extrayendo la bandeja (ver figura 30). Si hay verifique
que la junta del raspador no esté desgastada. de ser así,
sustitúyala con un repuesto original del fabricante (ver figura
29).
se encienda improvisamente.
7 Después de cualquier operación de reparación, vuelva a
colocar todos los componentes (tapas, tornillos, etc.) en su
posición original.
figura 30
4 Una vez por mes: elimine el polvo acumulado en el filtro
del condensador, situado en la parte posterior de la máquina.
(ver figura 31)
figura 31
ATTENCION
Preste atención a las aletas del condensador, ya que son
cortantes.
5 En caso de ruido anómalo, desconecte la máquina y
contacte con el servicio de asistencia.
6 En caso de avería, desconecte la máquina para evitar que
22
Page 23

1 CONSIGNE DE SÉCURITÉ EN MATIÈRE
C111-37
ÉLECTRIQUE
1 Avant d'effectuer le branchement électrique du distributeur,
vérifier que la tension secteur est bien celle qui figure sur la
plaquette signalétique. Brancher le distributeur sur un réseau
monophasé en utilisant une prise munie d'un système de mise
à la terre conforme aux prescriptions des normes en vigueur.
En cas de déconnexion de l'appareil du réseau électrique par le
biais d'un interrupteur unipolaire, cet interrupteur doit garantir
une distance d'ouverture des contacts permettant la
déconnexion totale dans les conditions de la catégorie de
surtension III.
2 Ne pas utiliser de rallonges pour effectuer le branchement
électrique de l'appareil.
3 Si le câble d'alimentation est endommagé, il doit être
remplacé par le fabricant ou son service technique d'assistance
ou, quoi qu'il en soit, par une personne en possession de
compétences similaires, et ce, afin d'écarter tout risque.
4 L'appareil n'est pas conçu pour être utilisé à l'extérieur.
5 L'appareil doit être installé en position verticale.
6 Avant une quelconque intervention d'entretien, débrancher
systématiquement le distributeur en enlevant la fiche de la
prise.
7 Ne pas démonter les panneaux lors des opérations de
nettoyage ou d'entretien avant de s'être assuré que le
distributeur est bien débranché.
8 Ne pas utiliser de jet d'eau pour effectuer le nettoyage.
3 CARACTERISTIQUES TECHNIQUES
Capacité du bac, environ l 4
Capacité de l’évaporateur, environ l 2
Dimensions:
largeur cm 26
profondeur cm 57
hauteur cm 72
Poids net, environ kg 50
Poids brut, environ kg 55
Motocompresseur hermétique
Condenseur à ventilation mécanique
Protège-moteur
Niveau de bruit inférieur à 70 dB (A)
IMPORTANT
Caractéristiques électriques : lire les données figurant
sur la plaquette signalétique de chaque distributeur
située dans la partie inférieure du panneau de façade,
derrière le plateau récolte-gouttes. Les numéros de série
des appareils (précédés du symbole #) sont gravés sur le
châssis, à l’arrière de l’appareil, derrière le panneau de
protection du condensateur. Les données figurant sur la
plaquette signalétique sont les seules auxquelles il faut
toujours se référer.
9 Cet appareil ne peut pas être utilisé par des enfants.
10 Éviter que des enfants jouent avec l'appareil.
11 Cet appareil ne peut pas être utilisé par des personnes dont
les capacités physiques, sensorielles ou mentales sont
réduites ou qui ne disposent pas de l'expérience et des
connaissances suffisantes, sauf si celles-ci ont reçu
l'assistance nécessaire et suivi une formation pour utiliser
l'appareil en toute sécurité et qu'elles comprennent les dangers
inhérents à son emploi.
12 L'accès à la partie interne du distributeur est limité aux
personnes qui disposent des connaissances et de l'expérience
pratique nécessaires de l'appareil, notamment en matière de
sécurité et d'hygiène.
2 CONSIGNE DE SÉCURITÉ EN MATIÈRE
D'HYGIÈNE
1 Cet appareil est destiné à être utilisé dans le cadre
d'applications domestiques ou similaires.
2 Pour garantir son bon fonctionnement, la température
ambiante doit être comprise entre +5 et +32 °C.
3 Utiliser l'appareil exclusivement pour refroidir les liquides
indiqués.
4 Ne pas introduire de substances ni de liquides dangereux
ou toxiques à l'intérieur de l'appareil.
Le fabricant se réserve le droit de modifier ce manuel sans
préavis.
4 INTRODUCTION
Il convient de lire attentivement ce livret d’instructions afin de
bien maîtriser toutes les caractéristiques du produit.
Comme tous les produits mécaniques, ce distributeur nécessite
lui aussi un nettoyage et un entretien. En outre, son bon
fonctionnement peut être compromis par d'éventuelles erreurs
commises par l'opérateur durant les opérations de démontage
et de nettoyage. C'est la raison pour laquelle il est important que
les procédures de démontage, lavage, désinfection et
remontage, qui sont des opérations quotidiennes, soient
parfaitement assimilées, sans possibilité d’erreurs, par
l'utilisateur du distributeur.
5 INSTALLATION
1 Extraire le distributeur de l’emballage qu’il est conseillé de
conserver pour toute nécessité future.
2 Vérifier que le distributeur n'a pas subi de dégâts durant le
transport. Si tel est le cas, faire immédiatement une
réclamation auprès du transporteur.
3 Poser le distributeur sur un support en mesure de soutenir
son poids, même entièrement chargé.
4 Prévoir un espace de 15 cm au moins tout autour du
distributeur pour ne pas obstruer le flux d’air de
refroidissement.
5 Vérifier la stabilité de l’appareil en réglant, le cas échéant,
la hauteur des pieds. Si le distributeur est livré avec un jeu de
23
Page 24
C111
FRANCAIS
pieds en hauteur (100 mm environ), celui-ci devra alors
remplacer le jeu d’origine.
ATTENTION
Veiller à ce que l’appareil soit correctement mis à la
terre; dans le cas contraire, il se peut que les personnes
subissent des chocs électriques ou que le distributeur
soit endommagé.
6 Le distributeur n’a été ni lavé, ni désinfecté en usine. Avant
toute utilisation, il convient donc de le démonter, de le laver et
de le désinfecter en suivant les indications décrites au chapitre
7.4 NETTOYAGE de ce livret.
IMPORTANT
Placer l’appareil de manière à ce que la prise du câble
d'alimentation soit aisément accessible.
6 POUR GARANTIR LE BON
FONCTIONNEMENT EN TOUTE SECURITE
1 Ne pas utiliser le distributeur avant d’avoir lu ce livret
d’instructions.
2 Ne pas utiliser le distributeur s’il n'a pas été correctement
mis à la terre.
3 Ne pas mettre le distributeur en marche tant que les
panneaux ne sont pas en place et assujettis par des vis.
4 Ne pas introduire les doigts ou des objets dans les fentes
des panneaux ni dans l'ouverture du robinet.
5 Ne pas enlever les composants ni les panneaux lors des
opérations de nettoyage ou d'entretien avant de s’être assuré
que le distributeur est bien débranché.
6 Le couvercle doit toujours rester fermé.
7 MODE D’EMPLOI
IMPORTANT
Avant toute utilisation, laver et désinfecter le distributeur
en suivant les indications décrites au chapitre 7.4.2
LAVAGE de ce livret.
IMPORTANT
Si le groupe du robinet n’a pas été installé, l’appareil ne
peut pas fonctionner et l’icône représentant le groupe du
robinet ouvert s’affiche sur l’écran.(voir )
figure 1
Cet appareil est équipé d’un bac supérieur destiné à maintenir
la réfrigération de la base de préparation de glace et d’un
cylindre inférieur qui permet de produire la glace.
Chaque fois qu’une portion de glace est distribuée, une quantité
égale de préparation passe par gravité du bac supérieur dans le
cylindre inférieur.
Pour obtenir une glace plus aérée et légère, il faut faire en sorte
qu’une certaine quantité d’air entre dans le cylindre en même
temps que la base. C’est la raison pour laquelle l’appareil est
équipé d’un tube de mélange spécial constitué de deux parties.
(voir figure 2)
figure 2
Afin d’obtenir les meilleurs résultats, il faut exécuter les
opérations suivantes dans l’ordre indiqué :
1 insérer la partie inférieure du tube de mélange dans le trou
de raccordement spécial situé entre le bac et le cylindre en
veillant à l’orienter de manière à l’introduire entièrement dans
24
Page 25
son siège. (voir figure 3)
figure 3
2 Verser la préparation dans le bac supérieur et attendre que
le cylindre se remplisse. Le remplissage est terminé lorsqu’il
n’y a plus de bulles d’air qui s’échappent par les trous pratiqués
sur le tube de mélange. (voir figure 4)
dans le cylindre. (voir figure 6)
figure 6
5 Fermer le couvercle supérieur, mettre la machine en
marche et activer la préparation de la glace. (Voir 7.1
DESCRIPTION DES COMMANDES)
6 Quand la glace est prête, ouvrir le couvercle et tourner la
partie supérieure du tube de mélange dans le sens anti-horaire
pour que la préparation puisse entrer dans le cylindre inférieur.
(voir figure 7) :
Il est possible de régler la quantité d’air présente dans la glace
d’après les informations suivantes, à partir de la position de
fermeture :
rotation complète dans
le sens anti-horaire
rotation minimale dans le
sens anti-horaire
: ouverture maximale, faible
quantité d’air dans la glace
: ouverture maximale, faible
quantité d’air dans la glace
figure 4
3 Insérer la partie supérieure du tube de mélange à l’intérieur
de la partie inférieure. (voir figure 5)
figure 5
4 Tourner la partie supérieure du tube de mélange à fond
dans le sens horaire pour fermer l’entrée de la préparation
figure 7
7 Refermer le couvercle supérieur.
IMPORTANT
Utiliser le distributeur uniquement avec des produits alimentaires.
8 Débiter la glace en utilisant le lévier du robinet.
9 Au cas où la portée de régulation de la densité ne soit pas
suffisante pour obtenir le résultat désiré, le mélange peut etre
modifié comme suit:
Glace trop souple : augmenter la quantité de liquide, eau ou
lait, d’une valeur entre 5% et 10% du volume total.
Glace trop compacte : réduire la quantité de liquid, eau ou lait,
d’une valeur entre 5% et 10% du volume totale.
10 Le distributeur doit fonctionner sans interruption : Le
système de refroidissement s’arrête automatiquement quand le
produit est prêt à être distribué. La vitesse du dispositif de
mélange diminue et n’augmente qu’au moment de la
distribution. À des intervalles de temps préréglés, le système
de refroidissement se réenclenche et la vitesse du dispositif de
mélange augmente pour rétablir la densité correcte du produit.
25
Page 26
C111
FRANCAIS
7. 1 DESCRIPTION DES COMMANDES
Le distributeur est équipé d’un interrupteur général, d’une
touche de mise en marche et d’un écran tactile. Les modes de
fonctionnement suivants sont disponibles :
PRODUCTION DE GLACE : dans ce mode, le distributeur
prépare la glace.
CONSERVATION : dans ce mode, le distributeur maintient la
préparation liquide à une température adaptée à sa
conservation. Cette fonction est utile durant les heures
nocturnes afin de maintenir la qualité de la préparation inaltérée
et de réduire la consommation d’énergie électrique.
LAVAGE : Dans ce mode, le refroidissement n’est pas habilité.
Cette fonction est utile durant le lavage et la désinfection de la
machine afin d’éviter que la solution utilisée ne refroidisse et
gèle.
INTERRUPTEUR GÉNÉRAL
L'interrupteur general est positionné au dessus du distributeur,
dans la partie postérieure.
Sa fonction est la suivante :
Position 0 : le distributeur est éteint.
Position I : le distributeur est habilité à fonctionner, mais
il est en mode Veille. Seul le voyant Q est allumé.
IMPORTANT
Lorsque l’utilisateur éteint puis rallume le distributeur à
partir de l’interrupteur général, celui-ci se remet en marche dans le même mode de fonctionnement que celui
dans lequel il se trouvait au moment où il a été éteint.
Les icônes suivantes s’affichent sur l’écran :
A Icône PRODUCTION GLACE : permet d’activer la fonc-
tion GLACE si elle est enfoncée.
B Icône CONSERVATION : permet de passer à la fonction
CONSERVATION si elle est enfoncée.
C Icône LAVAGE : permet de passer à la fonction LAVAGE
si elle est enfoncée.
D Icône PARAMÈTRES : permet de régler les PARA-
MÈTRES de fonctionnement si elle est enfoncée.
E Code d’alarme. Indique la présence d’une alarme et le
code correspondant.
F Barre de densité. Indique le niveau de densité paramétré.
G Température de la préparation. Indique la température de
la base contenue dans le bac supérieur.
H
Icône d’état. Indique l’état dans lequel se trouve le
distributeur (glace, conservation, lavage, alarme) et,
lorsque le mode Glace est activé, l’état de préparation de
la glace :
icône de couleur rouge : la glace n’est pas prête
icône de couleur jaune : la glace est presque prête
icône de couleur verte : la glace est prête
I Icône de refroidissement du bac supérieur. Indique que le
refroidissement du bac supérieur est en marche.
J Icône de refroidissement du cylindre inférieur. Indique que
le refroidissement du cylindre inférieur est en marche.
K Icône du compresseur. Indique le fonctionnement du com-
presseur du réfrigérateur.
L Icône du compresseur. Indique le fonctionnement du com-
presseur du réfrigérateur.
POUR LE FONCTIONNEMENT DU DISTRIBUTEUR
Amener l’interrupteur général en position I. Le voyant rouge Q
est allumé.
Maintenir la touche P enfoncée jusqu’à ce que le distributeur se
mette en route.
Sélectionner à l’aide des icônes A, B, c ou D la fonction désirée.
MODE GLACE
Dans ce mode, la machine produit de la glace et la préparation
dans le bac supérieur est maintenue à sa température de
conservation idéale. L’état de préparation de la glace est
indiqué sur l’afficheur par l’icône centrale et par la couleur de la
flèche. (voir figure 9)
TOUCHE DE MISE EN MARCHE
La touche de mise en marche P est située à droite de l’écran
tactile. L’allumage du témoin Q indique que le distributeur est
allumé et qu’il est en veille, prêt à fonctionner. Il suffit de
maintenir la touche P enfoncée pendant une seconde pour
allumer et éteindre le distributeur.
ÉCRAN TACTILE
figure 8
figure 9
Quand la glace est prête, le système de mélange ralentit, le
système de refroidissement s’arrête et l’appareil se met en
phase d’attente de distribution. À des intervalles préréglés
(réglage d’usine : 10 minutes), la vitesse du système de
mélange augmente et le système de réfrigérateur se déclenche
pour rétablir la densité correcte de la glace.
Lorsque l’utilisateur ouvre le robinet de mélange, la vitesse du
système de mélange augmente et le système de réfrigérateur
se déclenche.
Pour qu’il soit possible de produire de la glace, il faut qu’il y ait
une quantité de préparation appropriée dans le bac supérieur.
Dans le cas contraire, le système de refroidissement ne se
déclenche pas et l’icône d’absence de produit s’affiche sur
26
Page 27
l’écran. (voir figure 10)
figure 10
Réglage de la densité
Il est possible de régler la densité de la glace sur une échelle de
1 à 10. Pour faire ce réglage, il faut effleurer la barre graduée
placée du côté droit de l’écran et entrer en mode Densité. Les
commandes suivantes sont disponibles :
A Icône de sortie : permet de quitter le mode sans apporter
de modifications.
B Icône de diminution : permet de diminuer la valeur réglée.
C Icône d’augmentation : permet d’augmenter la valeur ré-
glée.
D Icône de confirmation : permet de confirmer la valeur ré-
glée.
(voir figure 11)
déclenche pour rétablir la température correcte.
IMPORTANT
La température de conservation du produit est réglée en
usine sur 2 °C.
MODE LAVAGE
Dans ce mode, le système de refroidissement n’est pas en
marche et le système de mélange tourne à une vitesse
appropriée au lavage de la machine. L’icône de lavage s’affiche
sur l’écran. (voir figure 13)
figure 13
ALARMES
La machine est équipée d’un système de diagnostic
automatique. En cas de dysfonctionnement, la défaillance est
indiquée par l’affichage de l’icône d’alarme sur l’écran. Il suffit
d’appuyer sur celle-ci pour afficher le texte explicatif de l’alarme
en cours. (voir figure 14)
figure 11
MODE CONSERVATION
Dans ce mode, la préparation dans le bac supérieur et dans le
cylindre inférieur est maintenue à sa température de
conservation idéale. L’icône de conservation s’affiche sur
l’écran. (voir figure 12)
figure 12
Quand la préparation a atteint la température préréglée, le
système de mélange ralentit, le système de refroidissement
s’arrête et l’appareil se met en phase d’attente. À des intervalles
préréglés (réglage d’usine : 10 minutes), la vitesse du système
de mélange augmente et le système de réfrigérateur se
figure 14
ENTRETIEN ALARM (AL 14)
Toutes les 1500 heures de fonctionnement est nécessaire de
remplacer le joint d'étanchéité placé dans le terminal d'essuieglace. Réaliser un tel remplacement est nécessaire de procéder
à l'AL14 d'alarme de réinitialisation.
Pour réinitialiser l'alarme 14 est nécessaire:
- paramètres de presse icon
- type mot de passe utilisateur (0000)
- appuyez sur l'icône de sablier
- appuyez sur le bouton RESET
- type mot de passe utilisateur (0000)
- appuyez sur le bouton de sortie
7. 2 PARAMÈTRES DE FONCTIONNEMENT
Les paramètres de l’appareil sont préréglés en usine pour
garantir son fonctionnement optimal. Leur modification ne peut
être effectuée que par le fabricant, son service d’assistance ou,
dans tous les cas, par des personnes qui disposent d’une
qualification similaire pour éviter tout risque de
27
Page 28

C111
FRANCAIS
dysfonctionnement.
7. 3 SUGGESTIONS
1 Tous les distributeurs de cette catégorie doivent dégager
de la chaleur. Si toutefois la chaleur produite semble
excessive, contrôler l’absence de sources de chaleur à
proximité du distributeur, notamment au voisinage des
panneaux munis de grilles. S'assurer par ailleurs que le flux
d'air n’est pas obstrué par la présence de cloisons, de boîtes
ou autres aux alentours du distributeur. Prévoir un espace de
15 cm au moins autour du distributeur. Pour finir, vérifier que le
filtre situé en dessous du panneau arrière n'est pas encrassé.
2 Cet appareil est destiné à être utilisé exclusivement avec
des confiseries alimentaires.
ATTENTION
L'utilisation de l’appareil est limitée aux personnes qui
connaissent les consignes de sécurité/hygiène et savent
l’utiliser correctement.
7. 4 NETTOYAGE
1 Le nettoyage et le lavage du produit sont fondamentaux
pour garantir la parfaite conservation du produit et de son goût
ainsi que le rendement élevé du distributeur. Les procédures
décrites ci-après présentent un caractère général et sont
susceptibles de varier en fonction des règlements sanitaires en
vigueur.
2 Le produit doit être vidé avant de démonter le distributeur
pour le laver. Procéder comme suit :
1 sélectionner sur le clavier le mode de fonctionnement LA-
VAGE.
2 le cas échéant, attendre que le produit devienne liquide.
3 placer un récipient sous le robinet et vider l’ensemble du
contenu du bac supérieur et du cylindre.
4 enlever le couvercle.
Si le couvercle est équipé d’une serrure de sûreté pour sa
fermeture, tourner la clé dans le sens anti-horaire. (voir fi-
gure 15)
5 remplir le bac supérieur d’eau et laisser le distributeur mar-
cher en mode LAVAGE pendant quelques minutes. Vider
ensuite l’ensemble du distributeur.
6 remplir le bac supérieur d’eau et laisser le distributeur mar-
cher en mode LAVAGE pendant quelques minutes. Vider
ensuite l’ensemble du distributeur.
7 éteindre l’interrupteur général.
(voir figure 15)
figure 15
figure 16
2 Se il est présent, retirez le mélangeur de bassin supérieur.
(voir figure 17)
figure 17
3 Retirez le tube de mélange, à la fois la partie supérieure
que la partie inférieure.
4 Enlever le tube de mélange et le démonter (voir figure 18)
7. 4. 1 DÉMONTAGE
Avant de procéder au démontage des composants, couper systématiquement le courant qui alimente l’appareil
en débranchant la fiche de la prise.
1 Enlever le couvercle supérieur. (voir figure 16)
Si le couvercle est équipé d’une serrure de sûreté pour sa
fermeture, tourner la clé dans le sens anti-horaire et l’enlever.
ATTENTION
28
Page 29
et (voir figure 19).
robinet. (voir figure 21)
figure 18
figure 21
7 Enlever le groupe du robinet et le démonter en respectant
la séquence indiquée. (voir figure 22)
figure 19
5 Enlever le panneau de façade. (voir figure 20)
figure 22
figure 20
6 Dévisser les deux poignées de fixation du groupe du
29
Page 30
C111
FRANCAIS
8 Enlever le racleur. (voir figure 23)
figure 25)
figure 23
9 Enlever le joint avec sa garniture. (voir figure 24)
figure 24
10 Enlever le plateau récolte-gouttes de son logement. (voir
figure 25
7. 4. 2 LAVAGE
IMPORTANT
Ne pas laver les composants de la machine dans le lavevaisselle.
ATTENTION
Avant toute intervention de nettoyage, débrancher
systématiquement le distributeur en enlevant la fiche de
la prise ou en éteignant l'interrupteur mural extérieur.
1 Préparer environ quatre litres d'eau chaude (45-60 °C) et
15 gr (1 oz) de détergent spécifique équipé (stera sheen green
label); une solution trop concentrée peut en effet occasionner
des dommages aux pièces à laver, alors qu'une solution trop
diluée peut ne pas nettoyer suffisamment. Ne pas utiliser de
détergents abrasifs.
IMPORTANT
Afin de prévenir toute détérioration du distributeur, utiliser uniquement des détergents compatibles avec les
pièces en plastique.
2 Utiliser une brosse adaptée et laver soigneusement avec la
solution détergente toutes les pièces en contact avec la
30
Page 31
boisson.
ATTENTION
Pendant le lavage du distributeur, ne pas utiliser de trop
grandes quantités d’eau à proximité des composants
électriques ; dans le cas contraire, des chocs électriques
peuvent se produire ou le distributeur peut être endommagé.
3 Laver le cylindre d’évaporation, le bac supérieur et le trou
de connection à l’aide de la brosse en dotation.
4 Rincer toutes les pièces lavées à l'eau du robinet.
7. 4. 3 DÉSINFECTION DU DISTRIBUTEUR
DÉMONTÉ
La désinfection doit être effectuée tout de suite avant de
mettre le distributeur en marche ; éviter qu’il ne reste trop
longtemps inactif après la désinfection.
1 Avant de commencer les procédures décrites ci-après, se
laver les mains avec un savon antibactérien.
2 Verser environ huit litres d'eau chaude (45-60 °C) et 30 gr
(2 ozs) de désinfectant équipé (stera sheen green label);
3 Faire tremper toutes les pièces à désinfecter dans la
solution pendant la durée indiquée par le fabricant du produit
ou pour 5 minutes au moins.
4 Poser les pièces désinfectées sur une surface propre et
laisser sécher à l'air.
5 Sécher les parties extérieures du distributeur sans utiliser
de chiffons abrasifs.
5 Remonter le panneau de façade. (voir figure 26)
figure 26
6 Monter le mélangeur ensemble prenant soin d'insérer les
extrémités dans les rainures dans le bassin supérieur.(voir
7. 4. 4 REMONTAGE
1 Introduire le plateau récolte-gouttes dans son logement.
IMPORTANT
Lubrifier le piston du robinet, le raccord du racleur et la
partie avant du racleur aux points indiqués dans la
figure. Utiliser uniquement la graisse fournie avec la
machine ou une autre graisse prévue pour un usage alimentaire.
2 Remonter le joint et le racleur en suivant la séquence
inverse au démontage.
3 Remonter le groupe du robinet en suivant la séquence
inverse à celle illustrée sur la Figure 19 et le remettre dans son
siège.
4 Revisser les deux poignées en les resserrant
précautionneusement.
31
Page 32

C111
FRANCAIS
figure 27)
d'origine fournie par le fabricant. (voir figure 28)
figure 28
2 Toutes les semaines : vérifier l'usure de la garniture du
joint du racleur. Si elle est usée, la remplacer par une pièce de
rechange d’origine du fabricant. (voir figure 29)
figure 27
7. 4. 5 DÉSINFECTION DU DISTRIBUTEUR
DÉMONTÉ
La désinfection de l’appareil monté, avant sa mise en
service, doit être effectuée en plus de la désinfection de
l'appareil démonté décrite au point précédent, et jamais à la
place de celle-ci.
1 Verser environ quatre litres d'eau et 15 gr (1 oz)
désinfectant équipé (stera sheen green label);
2 Verser la solution dans le bac.
3 À l’aide d’une brosse appropriée, étaler la solution sur
toutes les pièces au-dessus du niveau de la solution.
4 Monter le couvercle et mettre le distributeur en marche de
façon à agiter la solution pendant 5 minutes environ.
5 Vider la solution désinfectante du bac en ouvrant le robinet
et l’éliminer.
6 Rincer à l’eau fraîche de façon à éliminer d'éventuels
résidus de solution désinfectante qui auraient pu se déposer
sur le fond des bacs.
7 Ne pas rincer ultérieurement.
figure 29
3 Toutes les semaines : vérifier la présence de fuites
éventuelles en enlevant le bac spécial (voir figure 30). Dans le
cas vérifier Il est correctement installé et l'usure du joint du
racleur. Si il est usé, le remplacer par une pièce de rechange
d’origine du fabricant. (voir figure 29)
8 ENTRETIEN
1 Tous les jours : inspecter le distributeur et s'assurer que
les garnitures du groupe du robinet ne fuient pas et ne laissent
pas le produit s'échapper. En présence de fuites, commencer
par vérifier que les composants sont correctement montés, puis
s'assurer que la garniture n’est ni défectueuse, ni usée ; dans
le cas contraire, la remplacer par une pièce de rechange
figure 30
4 Tous les mois : ôter la poussière qui s’est accumulée sur
le filtre du condensateur situé à l’arrière de la machine.(voir
32
Page 33

figure 31)
figure 31
ATTENTION
Prendre garde au tranchant des ailettes du condensateur.
5 En cas de bruit anormal, débrancher la machine et
contacter le service d’assistance.
6 En cas de panne, débrancher la machine étant donné
qu’elle risque de redémarrer à l’improviste.
7 Après toute intervention de réparation, remettre chaque
composant, comme les vis et les couvercles, dans sa position
d’origine.
33
Page 34

DOMESTIC WARRANTY
y
play
(5)
p
(Including Mexico)
1. Scope:
Stoelting, A Vollrath Company (“Stoelting”) warrants to the first user (the “Buyer”) that the Stoelting-branded freezer
equipment (the “Equipment”) will be free from defects in materials and workmanship under normal use and proper
maintenance for the period listed below in the Warranty Period section. All warra nty periods begin on the date of original
install or one (1) year from the shipping date, whichever occurs first. This warranty is subject to all conditions,
exceptions, and limitations contained herein.
2. Disclaimer of Other Warranties:
THIS WARRANTY IS EXCLUSIVE; AND STOELTING HEREBY DISCLAIMS ANY IMPLIED WARRANTY
OF MERCHANTABILITY OR FITNESS FOR PARTICULAR PURPOSE.
3. Remedies:
Stoelting’s sole obligations, and Buyer’s sole remedies, for any breach of this warranty shall be, at Stoelting’s option,
one of the following: repair or replacement of the affected component at Stoelting’s plant in Kiel, Wisconsin, or refund
of the purchase price of the affected Equipment. Stoelting, through an Authorized Stoelting Provider, will
deinstall/reinstall the affected component from/into the equipment (“Labor”) for the period listed below in the Warranty
Period section. These obligations/remedies are subject to the conditions that Buyer (a) signs and returns to Stoelting,
upon installation, the Start-Up and Training Checklist for the affected equipment, (b) gives Stoelting prompt written
notice of any claimed breach of warranty within the applicable warranty period, and (c) delivers the affected equipment
to Stoelting or its designated service location, in its original packaging/crating, also within that period. Buyer shall bear
the cost and risk of shipping to and from Stoelting’s plant or designated service location.
4. Warranty Period:
Equipment
Soft Serve & Shake Five (5) Years Twelve (12) Months
Frozen Uncarbonated
Beverage
Custard & Batch Two (2) Years Twelve (12) Months
Dipping Cabinets &
Cabinets
Dis
Frozen Beverage /
Granita Dispenser
AutoVend
Crème Whippers Two (2) Years Twelve (12) Months
All equipment
Part
Freezing Cylinders
Hoppers
Compressors
Drive Motors
Speed Reducers
Augers
Evaporator
Compressors
Drive Motors
Speed Reducers
Freezing Cylinders
Hoppers
Compressors
Drive Motors
Speed Reducers
Beaters
Auger Shafts
All components Twelve (12) Months Twelve (12) Months
Compressors
Electronic Board
All other components
All components
Compressors
Motors
Condensers
All other components
ecified above
not s
Part Warrant
Five (5) Years Twelve (12) Months
Five
Three (3) Years
Two (2) Years
Twelve (12) Months Twelve (12) Months
Twelve (12) Months Twelve (12) Months
Period Labor Warranty Period
Years
Twelve (12) Months
Page 1 of 2 SFWARR-013 Revision 08
Page 35

DOMESTIC WARRANTY
(Including Mexico)
5. Conditions:
a) If the date of the original installation cannot be verified, these warranty periods begin one (1) year from the shipping
date. It is the responsibility of the seller to disclose this information to the customer at the time of sale.
b) Stoelting shall not be responsible to provide any remedy under this warranty with respect to any component that
fails by reason of negligence, abnormal use, misuse or abuse, faulty repair made by others, use with parts or
equipment not manufactured or supplied by Stoelting, any modification or alteration of any parts or equipment, or
damage in transit.
c) This warranty is valid only if the Equipment is installed and serviced by an Authorized Stoelting Provider and only if
new, genuine Stoelting parts are used.
d) The Equipment installation location must have suitable conditions as explained in the Stoelting operators manual,
specification sheet, and/or technical manual including but not limited to, ambient temperature, water supply
parameters, and space requirements.
e) The Authorized Stoelting Provider must return defective parts, at Stoelting’s discretion, for credit.
f) Any refrigerant other than that specified on the Equipment model identification nameplate voids this warranty.
6. Exceptions:
This warranty does NOT cover any of the following
a) Costs associated with installation labor, disposal of equipment being replaced, and shipping costs of replacement
parts or Equipment.
b) Cleaning, maintenance or lubrication of the Equipment as outlined in the Stoelting operators manual.
c) This warranty does not extend to parts, sometimes called “wear parts”, which are generally expected to deteriorate
and to require replacement as equipment is used, including but limited to o-rings, auger flights, auger seals, auger
support bushings, and drive belts. All such parts are sold AS IS.
d) External components including but not limited to hoses, piping, or electrical equipment.
e) Labor charges due to return trips or waiting if the Authorized Stoelting Provider is prevented from promptly starting
service work upon arrival. This exception includes labor charges incurred for limited access facilities including, but
not limited to, government and military buildings, and airports.
f) Failure, damage, or repairs due to faulty installation, misapplication, abuse, lack of service, or improper service,
unauthorized alteration, improper operation as indicated in the Stoelting operators manual, including but not limited
to failure to properly assemble and/or clean, improper tool usage, or use of unapproved lubrication, or cleaning and
sanitizing supplies.
g) Any costs associated with electricity, including utility increases, from any reason whatsoever.
h) Damage resulting from the use of refrigerant other than that specified on the Equipment model identification
nameplate.
i) The use of this equipment as a rental asset negates all warranties associated with the equipment.
j) Any special, indirect or consequential property or commercial damage of any nature whatsoever, if the jurisdiction
allows this exclusion.
7. Limitations:
THE REMEDIES SET FORTH IN THIS WARRANTY SHALL BE THE SOLE LIABILITY STOELTING AND
THE EXCLUSIVE REMEDY OF BUYER WITH RESPECT TO EQUIPMENT SUPPLIED BY STOELTING;
AND IN NO EVENT SHALL STOELTING BE LIABLE FOR ANY INCIDENTAL OR CONSEQUENTIAL
DAMAGES, INCLUDING AS EXAMPLES BUT NOT INTENDED TO BE LIMITED TO DOWNTIME,
OVERHEAD, MATERIALS, PERFORMANCE PENALTIES, LOST SALES, LOST PROFITS, PRODUCT
LOSS, OR PROPERTY DAMAGES, WHETHER FOR BREACH OF WARRANTY OR OTHER
CONTRACT BREACH, NEGLIGENCE OR OTHER TORT, OR ON ANY STRICT LIA BILIT Y THEORY.
Page 2 of 2 SFWARR-013 Revision 08
Page 36

 Loading...