

Page 1
{
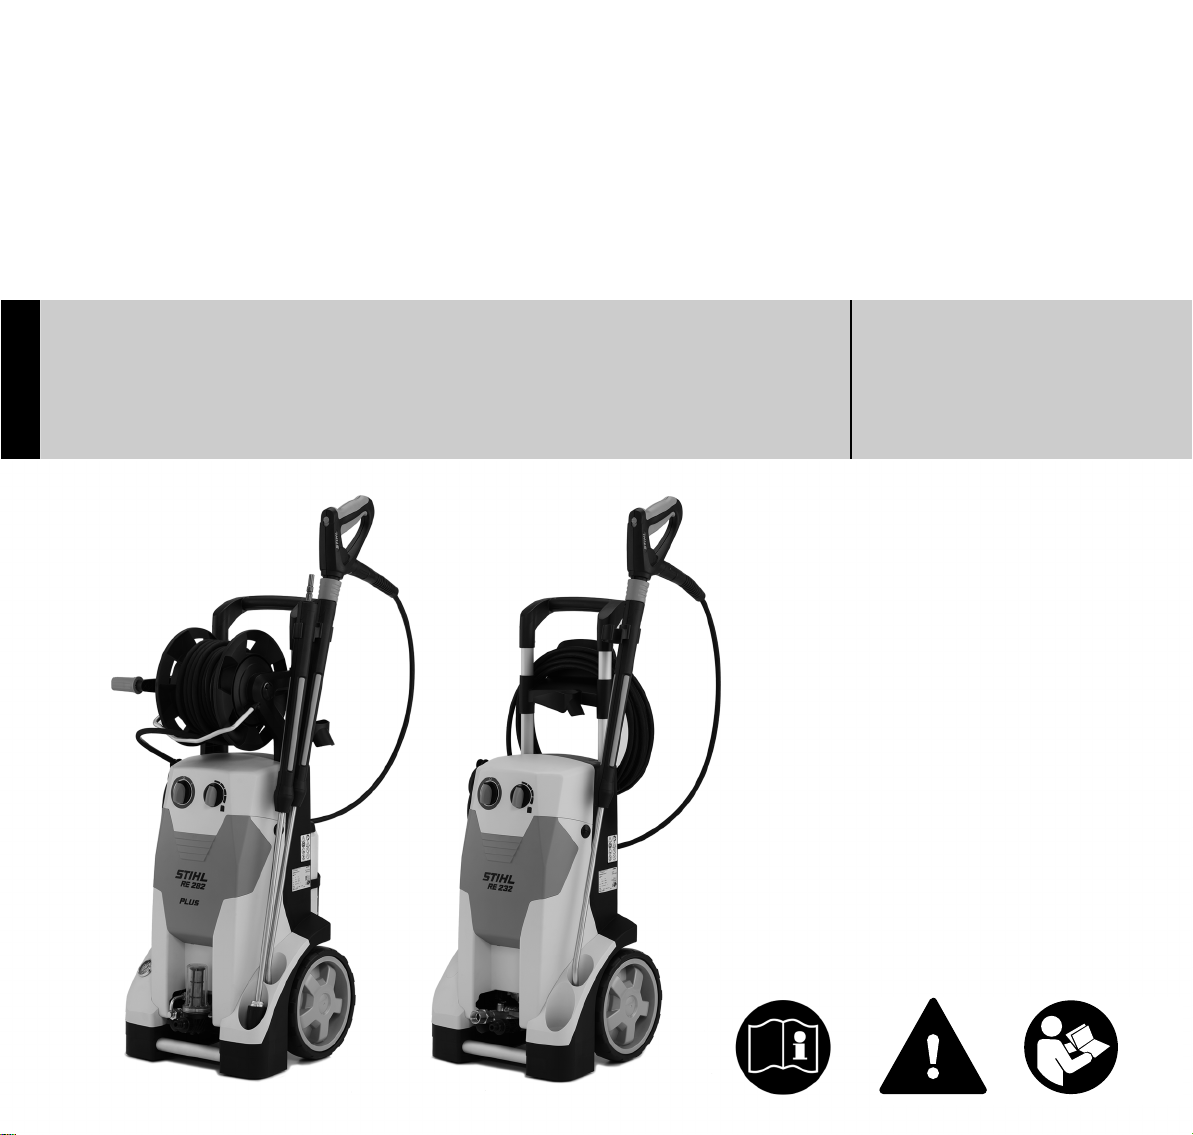
STIHL RE 232, 272 PLUS,
282 PLUS
Gebrauchsanleitung
Instruction Manual
Notice d’emploi
Manual de instrucciones
Istruzioni d’uso
Instruções de serviço
Handleiding
οδηγίες χρήσης
Page 2

D Gebrauchsanleitung
1 - 35
G Instruction Manual
36 - 68
F Notice d’emploi
69 - 105
E Manual de instrucciones
106 - 141
I Istruzioni d’uso
142 - 175
P Instruções de serviço
176 - 210
n Handleiding
211 - 245
g οδηγίες χρήσης
246 - 282
Page 3
Inhaltsverzeichnis
deutsch
Zu dieser Gebrauchsanleitung 2
Sicherheitshinweise und
Arbeitstechnik 2
Gerät komplettieren 10
Gerät transportieren 11
Strahlrohr anbauen, abbauen 11
Hochdruckschlauch anbauen,
abbauen 12
Wasserversorgung herstellen 13
Original GebrauchsanleitungGedruckt auf chlorfrei gebleichtem Papier.
Drucklose Wasserversorgung
herstellen 13
Gerät elektrisch anschließen 14
Gerät einschalten 15
Arbeiten 16
Reinigungsmittel beimischen 17
Arbeitshinweise 19
Gerät ausschalten 19
Nach der Arbeit 20
Gerät aufbewahren 21
Wartungs- und Pflegehinweise 22
Wartung 23
Ölstand prüfen 24
Druckfarben enthalten pflanzliche Öle, Papier ist recycelbar.
Inbetriebnahme nach langer
Lagerung 24
Verschleiß minimieren und
Schäden vermeiden 25
Wichtige Bauteile 26
Technische Daten 30
Betriebsstörungen beheben 32
Reparaturhinweise 34
Entsorgung 34
EG-Konformitätserklärung 34
Anschriften 35
Verehrte Kundin, lieber Kunde,
vielen Dank, dass Sie sich für ein
Qualitätserzeugnis der Firma STIHL
entschieden haben.
Dieses Produkt wurde mit modernen
Fertigungsverfahren und
umfangreichen
Qualitätssicherungsmaßnahmen
hergestellt. Wir sind bemüht alles zu tun,
damit Sie mit diesem Gerät zufrieden
sind und problemlos damit arbeiten
können.
Wenn Sie Fragen zu Ihrem Gerät
haben, wenden Sie sich bitte an Ihren
Händler oder direkt an unsere
Vertriebsgesellschaft.
Ihr
Dr. Nikolas Stihl
{
© ANDREAS STIHL AG & Co. KG, 2016
0458-652-9021-A. VA2.G16.
0000007104_002_D
RE 232, RE 272 PLUS, RE 282 PLUS
Diese Gebrauchsanleitung ist urheberrechtlich geschützt. Alle Rechte bleiben vorbehalten, besonders das Recht der Verviel
fältigung, Übersetzung und der Verarbeitung mit elektronischen Systemen.
-
1
Page 4
deutsch
Zu dieser
Gebrauchsanleitung
Bildsymbole
Sämtliche Bildsymbole, die auf dem
Gerät angebracht sind, sind in dieser
Gebrauchsanleitung erklärt.
Kennzeichnung von Textabschnitten
WARNUNG
Warnung vor Unfall- und
Verletzungsgefahr für Personen sowie
vor schwerwiegenden Sachschäden.
HINWEIS
Warnung vor Beschädigung des
Gerätes oder einzelner Bauteile.
Technische Weiterentwicklung
STIHL arbeitet ständig an der
Weiterentwicklung sämtlicher
Maschinen und Geräte; Änderungen
des Lieferumfanges in Form, Technik
und Ausstattung müssen wir uns
deshalb vorbehalten.
Aus Angaben und Abbildungen dieser
Gebrauchsanleitung können deshalb
keine Ansprüche abgeleitet werden.
Sicherheitshinweise und
Arbeitstechnik
Besondere Sicher
heitsmaßnahmen
sind beim Arbeiten
mit diesem Gerät
nötig, weil mit elek
trischem Strom
gearbeitet wird.
Die gesamte
Gebrauchsanlei
tung vor der ersten
Inbetriebnahme
aufmerksam lesen
und für späteren
Gebrauch sicher
aufbewahren.
Nichtbeachten der
Gebrauchsanlei
tung kann
lebensgefährlich
sein.
WARNUNG
– Kinder oder Jugendliche
-
dürfen nicht mit dem Gerät
arbeiten. Kinder
beaufsichtigen, um
sicherzustellen, dass sie
-
nicht mit dem Gerät
spielen.
– Gerät nur an Personen
weitergeben oder
-
ausleihen, die mit diesem
Modell und seiner
Handhabung vertraut sind
– stets die
Gebrauchsanleitung
mitgeben.
– Gerät nicht verwenden,
wenn Personen ohne
-
Schutzkleidung auf der
Arbeitsfläche sind.
– Vor allen Arbeiten am
Gerät, z. B. Reinigung,
Wartung, Austausch von
Teilen – Netzstecker
ziehen!
– Während der Arbeit mit
einem Hochdruckreiniger
können sich Aerosole
bilden. Das Einatmen von
Aerosolen kann
gesundheitsgefährdend
sein. Um die notwendigen
Maßnahmen zum Schutz
2
RE 232, RE 272 PLUS, RE 282 PLUS
Page 5

deutsch
gegen wasserhaltige
Aerosole festzulegen,
muss vor der Arbeit eine
Risikobeurteilung in
Abhängigkeit von der zu
reinigenden Oberfläche
und deren Umfeld
durchgeführt werden.
Atemschutzmasken der
Klasse FFP2 oder höher
sind zum Schutz gegen
wasserhaltige Aerosole
geeignet.
Länderbezogene
Sicherheitsvorschriften, z. B.
von Berufsgenossenschaften,
Sozialkassen, Behörden für
Arbeitsschutz und andere
beachten.
Wird das Gerät nicht benutzt,
ist es so abzustellen, dass
niemand gefährdet wird.
Gerät vor unbefugtem Zugriff
sichern, Netzstecker ziehen.
Das Gerät darf nur von
Personen benutzt werden, die
in dessen Benutzung und
Handhabung unterwiesen
sind, oder den Nachweis
erbringen, dass sie das Gerät
sicher bedienen können.
Das Gerät kann von Personen
mit eingeschränkten
physischen, sensorischen
oder geistigen Fähigkeiten
oder mangelnder Erfahrung
und Wissen benutzt werden,
sofern sie beaufsichtigt und
für den sicheren Umgang mit
dem Gerät eingewiesen
wurden um die damit
verbundenen Gefahren zu
verstehen.
Der Benutzer ist
verantwortlich für Unfälle oder
Gefahren, die gegenüber
anderen Personen oder deren
Eigentum auftreten.
Wer zum ersten Mal mit dem
Gerät arbeitet: Vom Verkäufer
oder von einem anderen
Fachkundigen erklären
lassen, wie man damit sicher
umgeht.
In einigen Ländern kann der
Betrieb Schall emittierender
Geräte durch kommunale
Bestimmungen eingeschränkt
sein. Länderbezogene
Vorschriften beachten.
Vor jedem Arbeitsbeginn
Gerät auf vorschriftsmäßigen
Zustand prüfen. Besonders
auf Anschlussleitung,
Netzstecker,
Hochdruckschlauch,
Spritzeinrichtung und
Sicherheitseinrichtungen
achten.
Niemals mit beschädigtem
Hochdruckschlauch arbeiten
– sofort austauschen.
Gerät nur dann in Betrieb
nehmen, wenn alle Bauteile
unbeschädigt sind.
Der Hochdruckschlauch darf
nicht überfahren, gezogen,
geknickt oder verdreht
werden.
Hochdruckschlauch oder
Anschlussleitung nicht zum
Ziehen oder Transportieren
des Gerätes verwenden.
Der Hochdruckschlauch muss
für den zulässigen
Betriebsüberdruck des
Gerätes zugelassen sein.
Der zulässige
Betriebsüberdruck, die
höchstzulässige Temperatur
und das Herstelldatum sind
auf der Ummantelung des
Hochdruckschlauches
aufgedruckt. Auf den
Armaturen sind zulässiger
Druck und Herstelldatum
angegeben.
RE 232, RE 272 PLUS, RE 282 PLUS
3
Page 6
deutsch
Zubehör und Ersatzteile
WARNUNG
– Hochdruckschläuche,
Armaturen und
Kupplungen sind wichtig
für die Gerätesicherheit.
Nur Hochdruckschläuche,
Armaturen, Kupplungen
und anderes Zubehör
anbauen, das von STIHL
für dieses Gerät
zugelassen ist, oder
technisch gleichartige
Teile. Bei Fragen dazu an
einen Fachhändler
wenden. Nur hochwertiges
Zubehör verwenden.
Ansonsten kann die
Gefahr von Unfällen oder
Schäden am Gerät
bestehen.
– STIHL empfiehlt STIHL
Original Teile und Zubehör
zu verwenden. Diese sind
in ihren Eigenschaften
optimal auf das Produkt
und die Anforderungen
des Benutzers
abgestimmt.
Keine Änderungen am Gerät
vornehmen – die Sicherheit
kann dadurch gefährdet
werden. Für Personen- und
Sachschäden, die bei der
Verwendung nicht
zugelassener Anbaugeräte
auftreten, schließt STIHL jede
Haftung aus.
Körperliche Eignung
Wer mit dem Gerät arbeitet,
muss ausgeruht, gesund und
in guter Verfassung sein. Wer
sich aus gesundheitlichen
Gründen nicht anstrengen
darf, sollte seinen Arzt fragen,
ob die Arbeit mit diesem Gerät
möglich ist.
Nach der Einnahme von
Alkohol, Medikamenten, die
das Reaktionsvermögen
beeinträchtigen oder Drogen
darf nicht mit dem Gerät
gearbeitet werden.
Einsatzbereiche
Der Hochdruckeiniger ist
geeignet zum Reinigen von
Flächen, Fahrzeugen,
Maschinen, Behältern,
Fassaden, Stallungen und
zum staub- und funkenfreien
Entrosten.
Der Einsatz des Geräts für
andere Zwecke ist nicht
zulässig und kann zu Unfällen
oder Schäden am Gerät
führen.
Gerät nicht bei Temperaturen
um oder unter 0 °C (32 °F)
betreiben.
Bekleidung und Ausrüstung
Schuhe mit griffiger Sohle
tragen.
WARNUNG
Um die Gefahr von
Augenverletzun
-
gen zu reduzieren
enganliegende
Schutzbrille nach
Norm EN 166 tra
-
gen. Auf richtigen
Sitz der Schutz
-
brille achten.
Schutzkleidung tragen. STIHL
empfiehlt die Verwendung
eines Arbeitsanzuges, um das
Risiko einer Verletzung bei
unbeabsichtigter Berührung
mit dem Hochdruckstrahl zu
vermindern.
4
RE 232, RE 272 PLUS, RE 282 PLUS
Page 7
deutsch
Transport
Beim Transport in und auf
Fahrzeugen:
– Hochdruckreiniger nach
den länderabhängig
geltenden Vorschriften
gegen Umkippen und
Beschädigung sichern
– Reinigungsmittelbehälter
entleeren und gegen
Umkippen sichern
Wenn Gerät und Zubehör bei
Temperaturen um oder unter
0 °C (32 °F) transportiert
werden, empfehlen wir die
Benutzung von
Frostschutzmittel – siehe
"Gerät aufbewahren".
Reinigungsmittel
WARNUNG
– Das Gerät wurde so
entwickelt, dass die vom
Hersteller angebotenen
oder empfohlenen
Reinigungsmittel
verwendet werden
können.
– Nur Reinigungsmittel
verwenden, die für die
Anwendung mit
Hochdruckreinigern
zugelassen sind. Die
Verwendung ungeeigneter
Reinigungsmittel oder
Chemikalien können zu
Gesundheitsgefährdung,
zur Beschädigung der
Maschine und des zu
reinigenden Objektes
führen. Bei Fragen dazu
an einen Fachhändler
wenden.
– Reinigungsmittel immer in
der vorgeschriebenen
Dosierung verwenden –
entsprechende
Anwendungshinweise des
Reinigungsmittels
beachten.
– Reinigungsmittel können
gesundheitsgefährdende
(giftige, ätzende,
reizende), brennbare,
leicht entzündliche Stoffe
enthalten.
Reinigungsmittel bei
Kontakt mit den Augen
oder der Haut sofort
gründlich mit reichlich
sauberem Wasser
ausspülen. Bei
Verschlucken sofort einen
Arzt konsultieren.
Sicherheitsdatenblätter
des Herstellers beachten!
Vor dem Arbeiten
Hochdruckreiniger
nicht direkt an das
Trinkwassernetz
anschließen.
RE 232, RE 272 PLUS, RE 282 PLUS
5
Page 8

deutsch
Hochdruckreiniger nur in
Verbindung mit einem
Rückflussverhinderer an das
Trinkwassernetz anschließen
– siehe "Sonderzubehör"
WARNUNG
– Wenn Trinkwasser den
Rückflussverhinderer
durchflossen hat, wird es
nicht mehr als Trinkwasser
betrachtet
Gerät nicht mit
verschmutztem Wasser
betreiben.
Bei Gefahr des Auftretens von
verschmutztem Wasser (z. B.
Fließsand) muss ein
entsprechender Wasserfilter
verwendet werden.
Hochdruckeiniger prüfen
WARNUNG
– Der Hochdruckreiniger
darf nur in
betriebssicherem und
unbeschädigtem Zustand
betrieben werden –
Unfallgefahr!
– Geräteschalter muss sich
leicht auf 0 betätigen
lassen
– Geräteschalter muss sich
in Stellung 0 befinden
– Gerät nicht mit
beschädigtem
Hochdruckschlauch,
Spritzeinrichtung und
Sicherheitseinrichtungen
betreiben
– Hochdruckschlauch und
Spritzeinrichtung in
einwandfreiem Zustand
(sauber, leichtgängig),
korrekte Montage
– zur sicheren Führung
müssen die Handgriffe
sauber und trocken sowie
frei von Öl und Schmutz
sein
– Ölstand kontrollieren
– keine Änderung an den
Bedienungs- und
Sicherheitseinrichtungen
vornehmen
– Gerät rutsch- und
kippsicher aufstellen.
Gerät nur auf einem
standfesten und ebenen
Untergrund betreiben
Elektrischer Anschluss
WARNUNG
Stromschlaggefahr
vermindern:
– Spannung und Frequenz
des Gerätes (siehe
Typenschild) müssen mit
Spannung und Frequenz
des Netzes
übereinstimmen
– Anschlussleitung,
Netzstecker und
Verlängerungsleitung auf
Beschädigungen prüfen.
Gerät nicht mit
beschädigter
Anschlussleitung,
Verlängerungsleitung oder
mit beschädigtem
Netzstecker betreiben
– elektrischer Anschluss nur
an einer vorschriftsmäßig
installierten Steckdose
– Isolierung von Anschluss-
und Verlängerungsleitung,
Stecker und Kupplung in
einwandfreiem Zustand
– Netzstecker, Anschluss-
und Verlängerungsleitung,
sowie elektrische
Steckverbindungen
niemals mit nassen
Händen anfassen
6
RE 232, RE 272 PLUS, RE 282 PLUS
Page 9
deutsch
WARNUNG
Anschluss- und
Verlängerungsleitung
sachgemäß verlegen:
– Mindestquerschnitte der
einzelnen Leitungen
beachten – siehe "Gerät
elektrisch anschließen"
– Anschlussleitung so
verlegen und
kennzeichnen, dass sie
nicht beschädigt und
niemand gefährdet werden
kann – Stolpergefahr!
– Die Verwendung
ungeeigneter
Verlängerungsleitungen
kann gefährlich sein. Nur
Verlängerungsleitungen
verwenden, die für den
Außeneinsatz zugelassen
und entsprechend
gekennzeichnet sind,
sowie einen
ausreichenden
Leitungsquerschnitt haben
– Stecker und Kupplung der
Verlängerungsleitung
müssen wasserdicht sein
und dürfen nicht im
Wasser liegen
– Es wird empfohlen, die
Steckverbindung z. B.
durch Verwendung einer
Kabeltrommel mindestens
60 mm über dem Boden zu
halten
– nicht an Kanten, spitzen
oder scharfen
Gegenständen scheuern
lassen
– nicht durch Türritzen oder
Fensterspalten quetschen
– bei verschlungenen
Leitungen – Netzstecker
ziehen und Kabel
entwirren
– Kabeltrommeln immer
ganz abwickeln, um
Brandgefahr durch
Überhitzung zu vermeiden
Während der Arbeit
WARNUNG
– Keine
lösungsmittelhaltigen
Flüssigkeiten oder
unverdünnte Säuren sowie
Lösungsmittel
(z. B. Benzin, Heizöl,
Farbverdünner oder
Aceton) ansaugen. Diese
Stoffe beschädigen die am
Gerät verwendeten
Materialien. Der
Sprühnebel ist
hochentzündlich, explosiv
und giftig.
Bei Beschädigung
der Netzan
-
schlussleitung
sofort den Netzste
cker ziehen –
Lebensgefahr
durch
Stromschlag!
Gerät selbst und
andere Elektroge
-
räte niemals mit
dem Hoch
-
druckstrahl oder
dem Wasser
-
schlauch
abspritzen –
Kurzschlussge
-
fahr!
Elektrische Anla
-
gen, Anschlüsse
und stromfüh
-
rende Leitungen
nicht mit dem
Hochdruckstrahl
oder dem Wasser
schlauch
abspritzen –
Kurzschlussge
-
fahr!
-
-
RE 232, RE 272 PLUS, RE 282 PLUS
7
Page 10

deutsch
Die Bedienungs
-
person darf den
Flüssigkeitsstrahl
weder auf sich
selbst noch auf
andere Personen
richten, auch nicht
um Kleidung oder
Schuhe zu reinigen
–
Verletzungsgefahr!
Immer für festen und sicheren
Stand sorgen.
Gerät nur stehend betreiben.
Vorsicht bei Glätte, Nässe,
Schnee, Eis, an Abhängen
oder auf unebenem Gelände –
Rutschgefahr!
Hochdruckreiniger vom
Reinigungsobjekt möglichst
weit entfernt abstellen.
Gerät nicht abdecken, auf
ausreichende Motorbelüftung
achten.
Hochdruckstrahl nicht auf
Tiere richten.
Hochdruckstrahl nicht auf
uneinsehbare Stellen richten.
Kinder, Tiere und Zuschauer
fernhalten.
Beim Reinigen dürfen keine
gefährlichen Stoffe (z. B.
Asbest, Öl) von dem zu
reinigenden Objekt in die
Umwelt gelangen. Unbedingt
einschlägige
Umweltrichtlinien beachten!
Keine Oberflächen aus
Asbestzement mit dem
Hochdruckstrahl bearbeiten.
Außer dem Schmutz könnten
gefährliche, lungengängige
Asbestfasern gelöst werden.
Gefahr besteht besonders
nach der Trocknung der
bearbeiteten Oberfläche.
Empfindliche Teile aus
Gummi, Stoff o. ä. nicht mit
einem Rundstrahl, z. B. mit
der Rotordüse reinigen. Beim
Reinigen auf genügend
Abstand zwischen
Hochdruckdüse und
Oberfläche achten, um eine
Beschädigung der zu
reinigenden Oberfläche zu
vermeiden.
Der Hebel der Spritzpistole
muss leichtgängig sein, und
sich von selbst in die
Ausgangsstellung bewegen,
nachdem er losgelassen
wurde.
Spritzeinrichtung mit beiden
Händen festhalten, um
Rückstoßkraft und bei
Spritzeinrichtungen mit
abgewinkeltem Strahlrohr
zusätzlich entstehendes
Drehmoment sicher
aufnehmen zu können.
Hochdruckschlauch nicht
knicken und keine Schlingen
bilden.
Anschlussleitung und
Hochdruckschlauch nicht
durch Überfahren,
Quetschen, Zerren usw.
beschädigen, vor Hitze und Öl
schützen.
Anschlussleitung nicht mit
dem Hochdruckstrahl
berühren.
Falls das Gerät nicht
bestimmungsgemäßer
Beanspruchung (z. B.
Gewalteinwirkung durch
Schlag oder Sturz) ausgesetzt
wurde, unbedingt vor
weiterem Betrieb auf
betriebssicheren Zustand
prüfen – siehe auch "Vor dem
Arbeiten". Auch die
Funktionstüchtigkeit der
Sicherheitseinrichtungen
prüfen. Nichtbetriebssicheres
8
RE 232, RE 272 PLUS, RE 282 PLUS
Page 11

deutsch
Gerät auf keinen Fall weiter
benutzen. Im Zweifelsfall
Fachhändler aufsuchen.
Vor dem Verlassen des
Gerätes: Gerät ausschalten –
Netzstecker ziehen.
Sicherheitseinrichtung
Unzulässig hoher Druck wird
beim Ansprechen der
Sicherheitseinrichtung über
ein Überströmventil in die
Saugseite der
Hochdruckpumpe
zurückgeleitet. Die
Sicherheitseinrichtung ist
werksseitig eingestellt und
darf nicht verstellt werden.
Nach der Arbeit
Gerät vor dem
Verlassen
ausschalten!
– Netzstecker aus der
Steckdose ziehen
– Wasserzulaufschlauch
zwischen Gerät und
Wasserversorgung
trennen
Netzstecker nicht durch
Ziehen an der
Anschlussleitung aus der
Steckdose ziehen, am
Netzstecker anfassen.
Wartung und Reparaturen
WARNUNG
Vor allen Arbeiten
am Gerät: Netzste
cker aus der
Steckdose ziehen.
– Nur hochwertige
Ersatzteile verwenden.
Ansonsten kann die
Gefahr von Unfällen oder
Schäden am Gerät
bestehen. Bei Fragen dazu
an einen Fachhändler
wenden.
– Arbeiten am Gerät (z. B.
das Ersetzen einer
beschädigten
Anschlussleitung) dürfen
nur von autorisierten
Fachhändlern oder
qualifizierten ElektroFachkräften ausgeführt
werden, um Gefährdungen
zu vermeiden.
Kunststoffteile mit einem Tuch
reinigen. Scharfe
Reinigungsmittel können den
Kunststoff beschädigen.
Kühlluftschlitze im
Motorgehäuse bei Bedarf
reinigen.
Gerät regelmäßig warten. Nur
Wartungsarbeiten und
Reparaturen ausführen, die in
der Gebrauchsanleitung
-
beschrieben sind. Alle
anderen Arbeiten von einem
Fachhändler ausführen
lassen.
STIHL empfiehlt STIHL
Original Ersatzteile zu
verwenden. Diese sind in
ihren Eigenschaften optimal
auf das Gerät und die
Anforderungen des Benutzers
abgestimmt.
STIHL empfiehlt
Wartungsarbeiten und
Reparaturen nur beim STIHL
Fachhändler durchführen zu
lassen. STIHL Fachhändlern
werden regelmäßig
Schulungen angeboten und
technische Informationen zur
Verfügung gestellt.
RE 232, RE 272 PLUS, RE 282 PLUS
9
Page 12
deutsch
2
1
6158BA001 KN
1
2
6158BA003 KN
1
2
6158BA004 KN
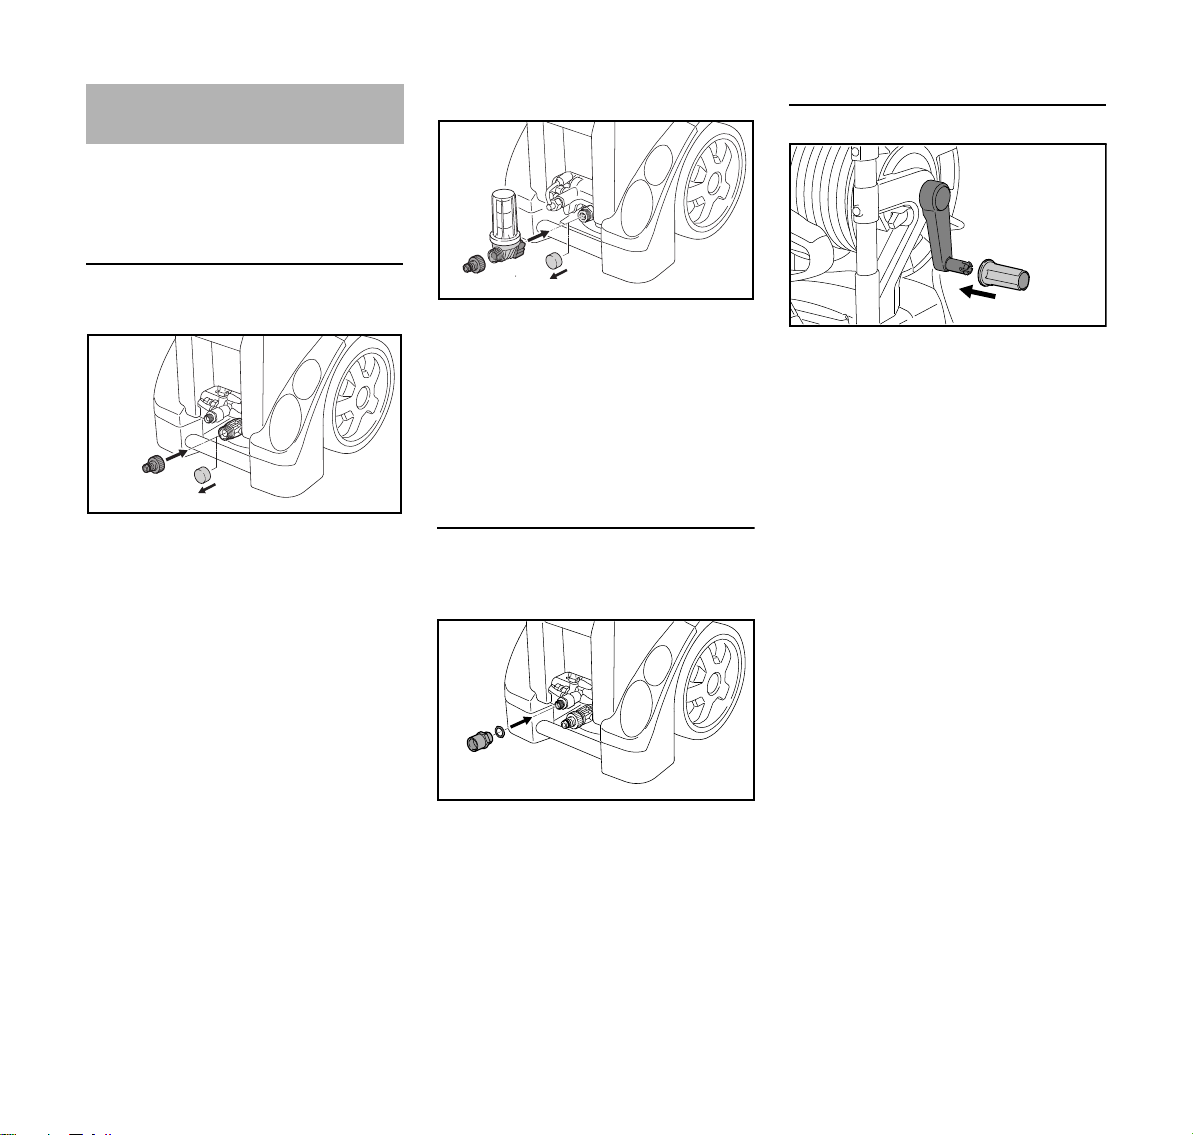
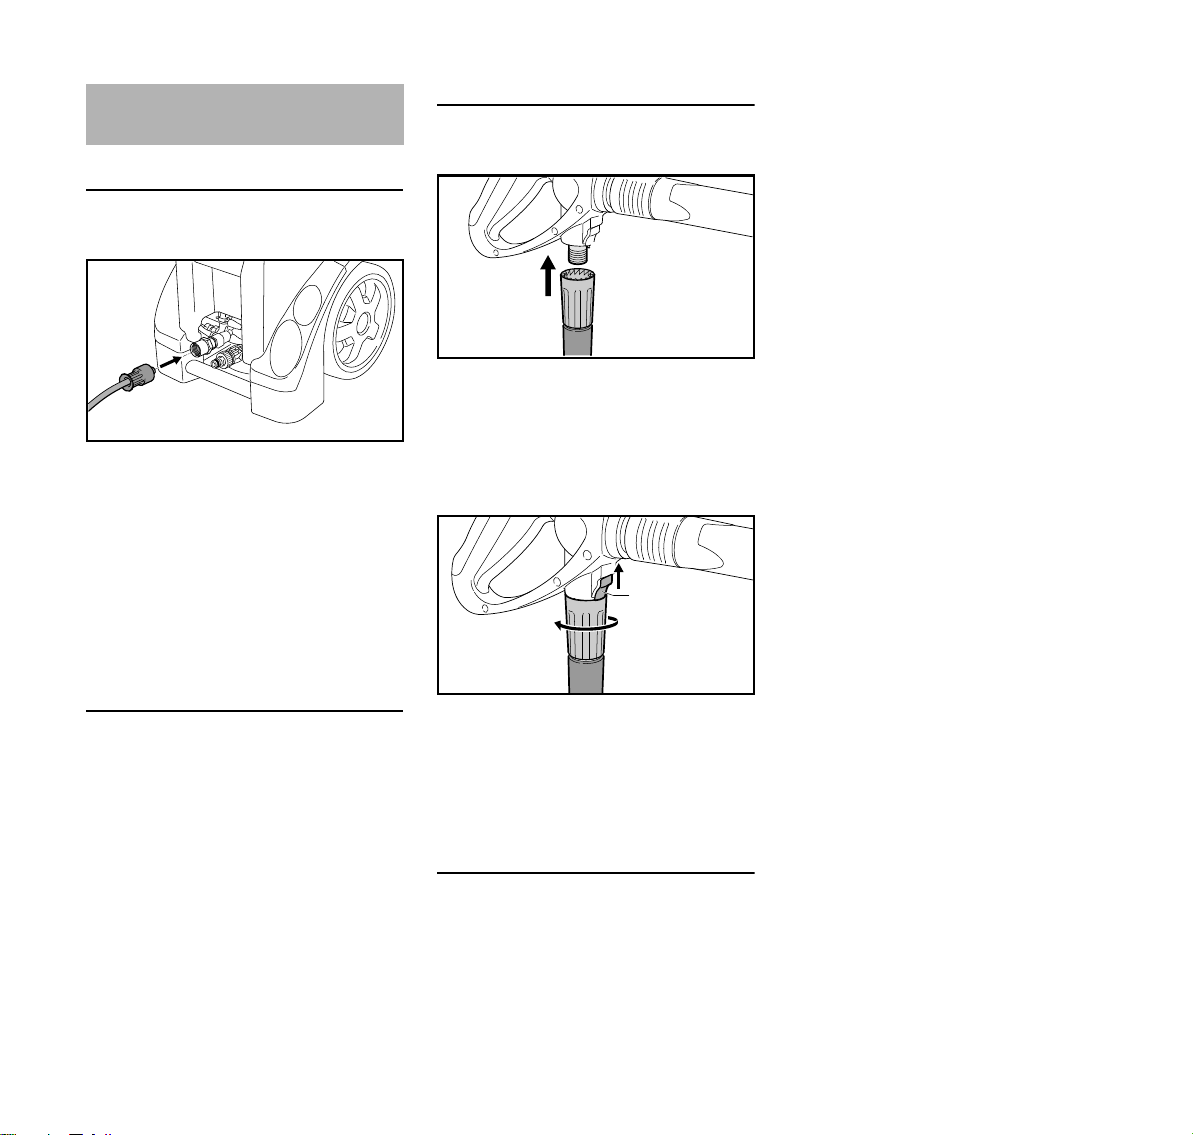
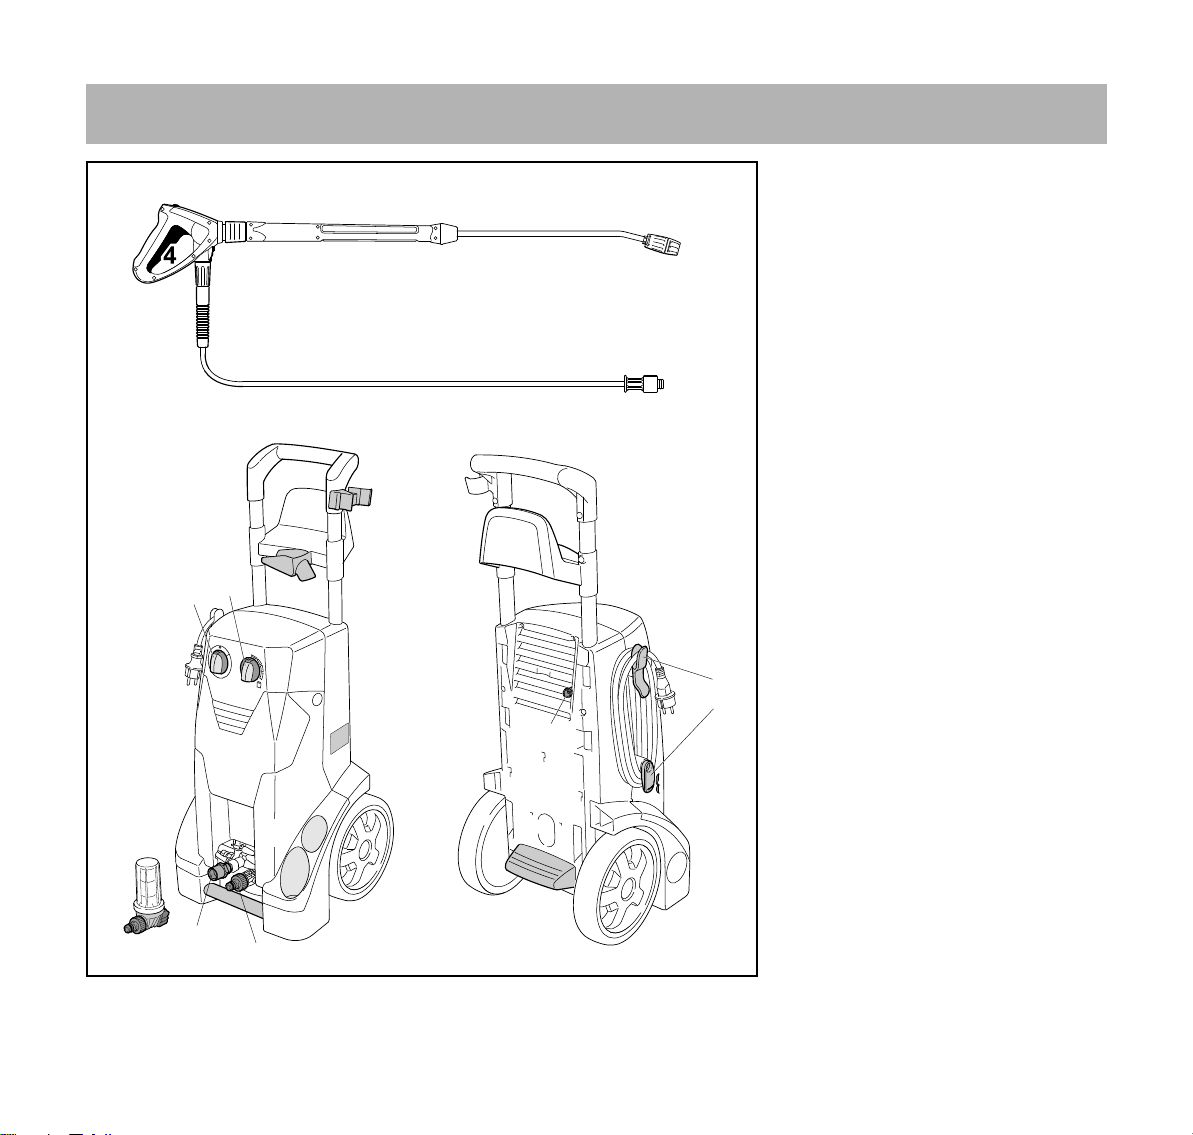
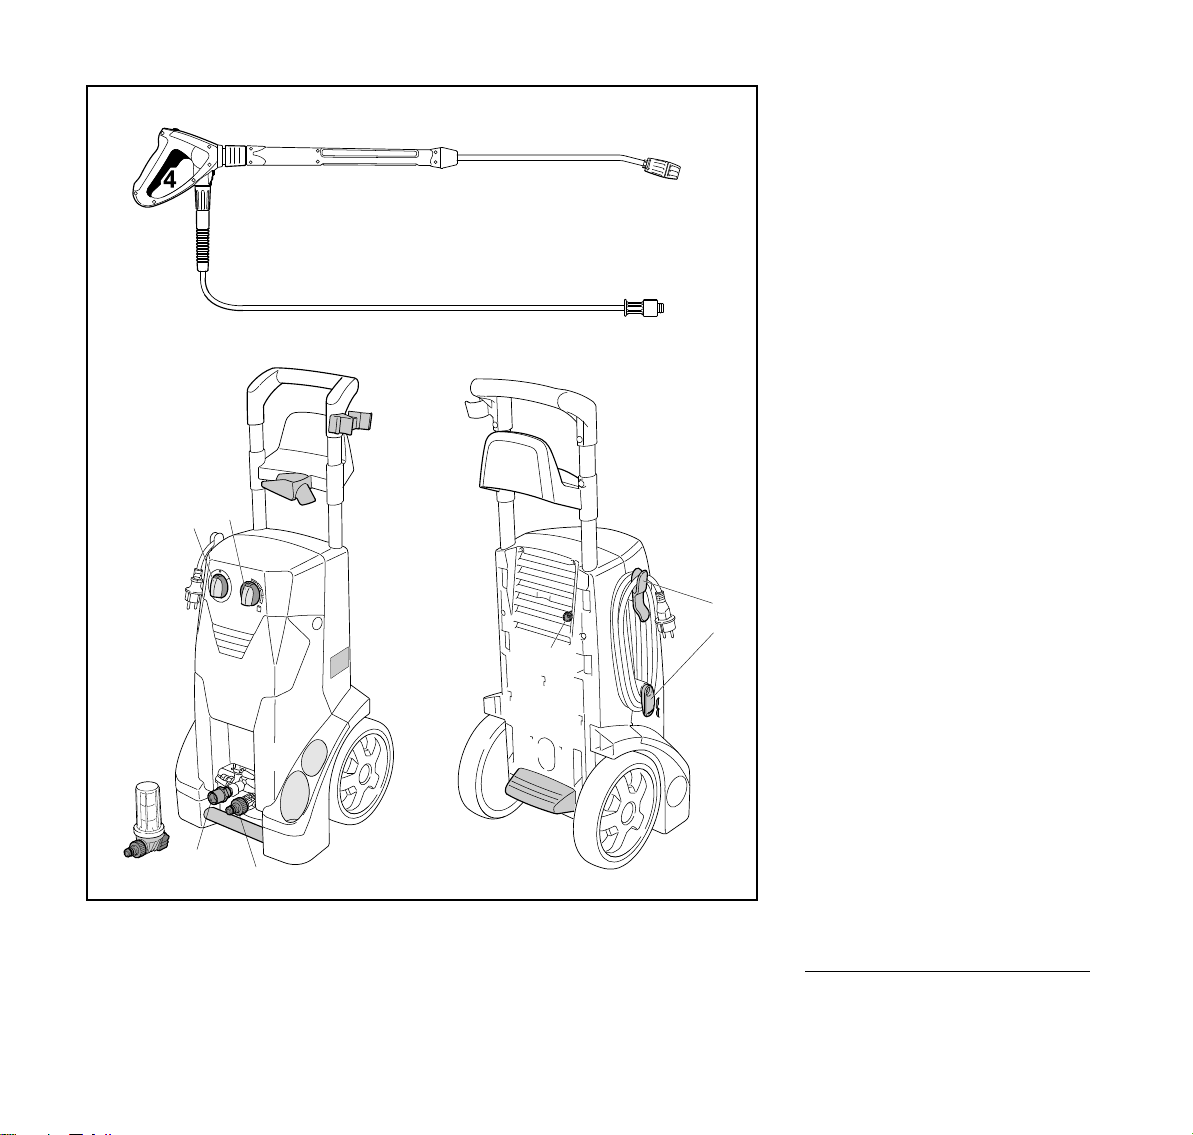
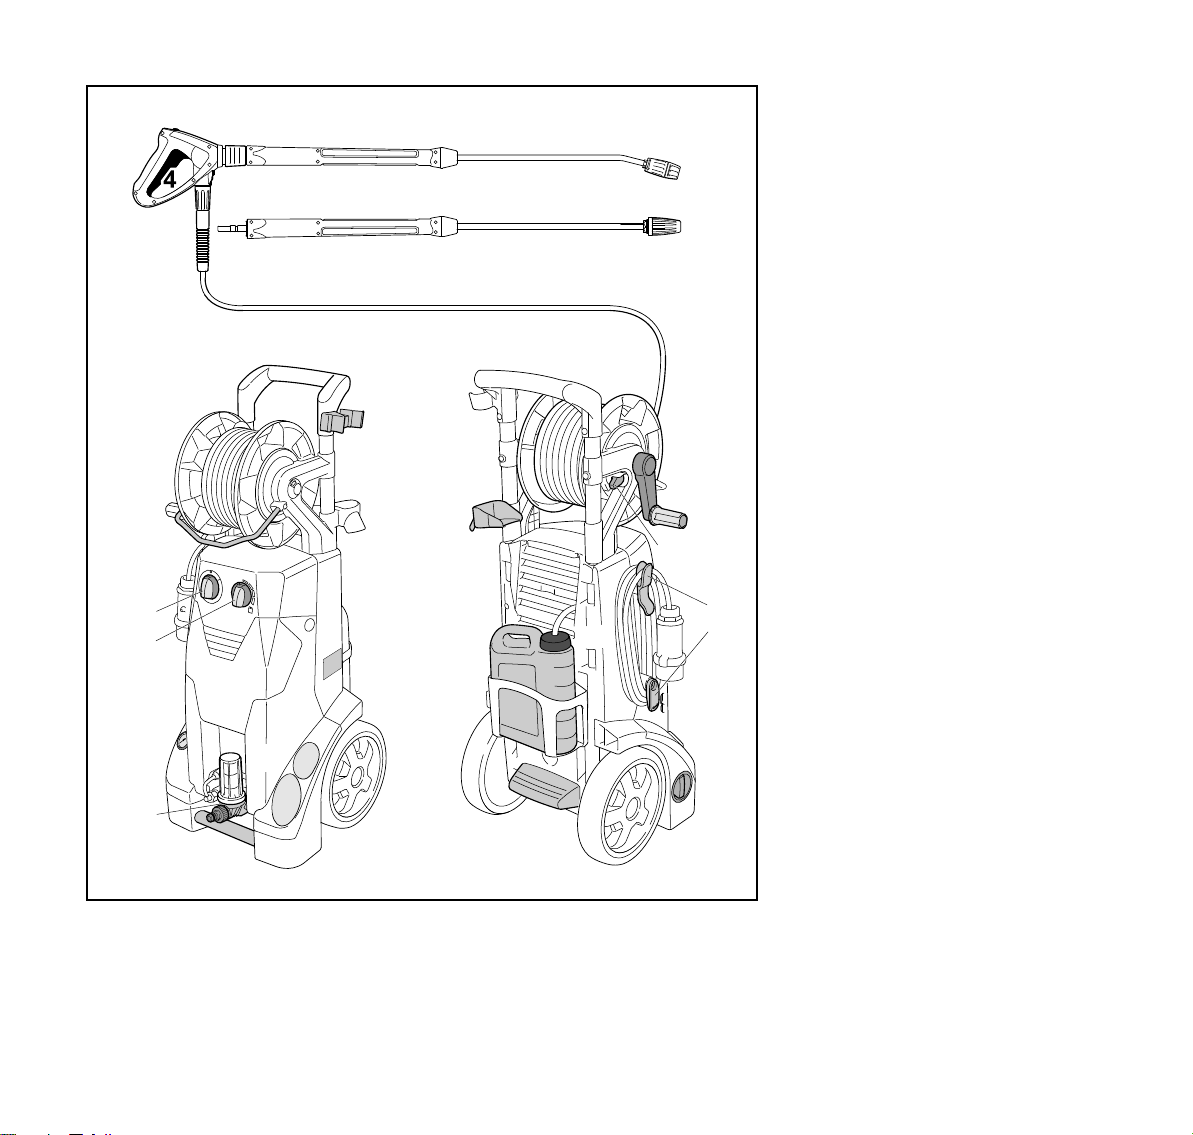
Gerät komplettieren
Vor der ersten Inbetriebnahme müssen
bei den Geräten verschiedene
Zubehörteile montiert werden.
Schlauchanschluss am Wasserzulauf
ohne Wasserfilter
N Schutzkappe (1) vom
Anschlussstutzen abziehen
Darauf achten, dass das
Wasserzulaufsieb im Anschlussstutzen
vorhanden ist.
N Schlauchanschluss (2) aufdrehen
und von Hand festziehen
mit Wasserfilter
3
N Schutzkappe (1) vom Wasserzulauf
abziehen
N Überwurfmutter des
Wasserfilters (2) ansetzen,
aufdrehen und von Hand festziehen
N Schlauchanschluss (3) aufdrehen
und von Hand festziehen
Geräte ohne Schlauchtrommel
Anschlussstutzen am
Hochdruckanschluss
1
2
Geräte mit Schlauchtrommel
6158BA002 KN
N Drehgriff (1) auf die Kurbel (2) der
Schlauchtrommel schieben und
einrasten
N Dichtring (1) auf den
Hochdruckanschluss schieben
N Anschlussstück (2) aufdrehen und
festziehen
10
RE 232, RE 272 PLUS, RE 282 PLUS
Page 13
deutsch
6158BA008 KN
647BA021 KN
1
2
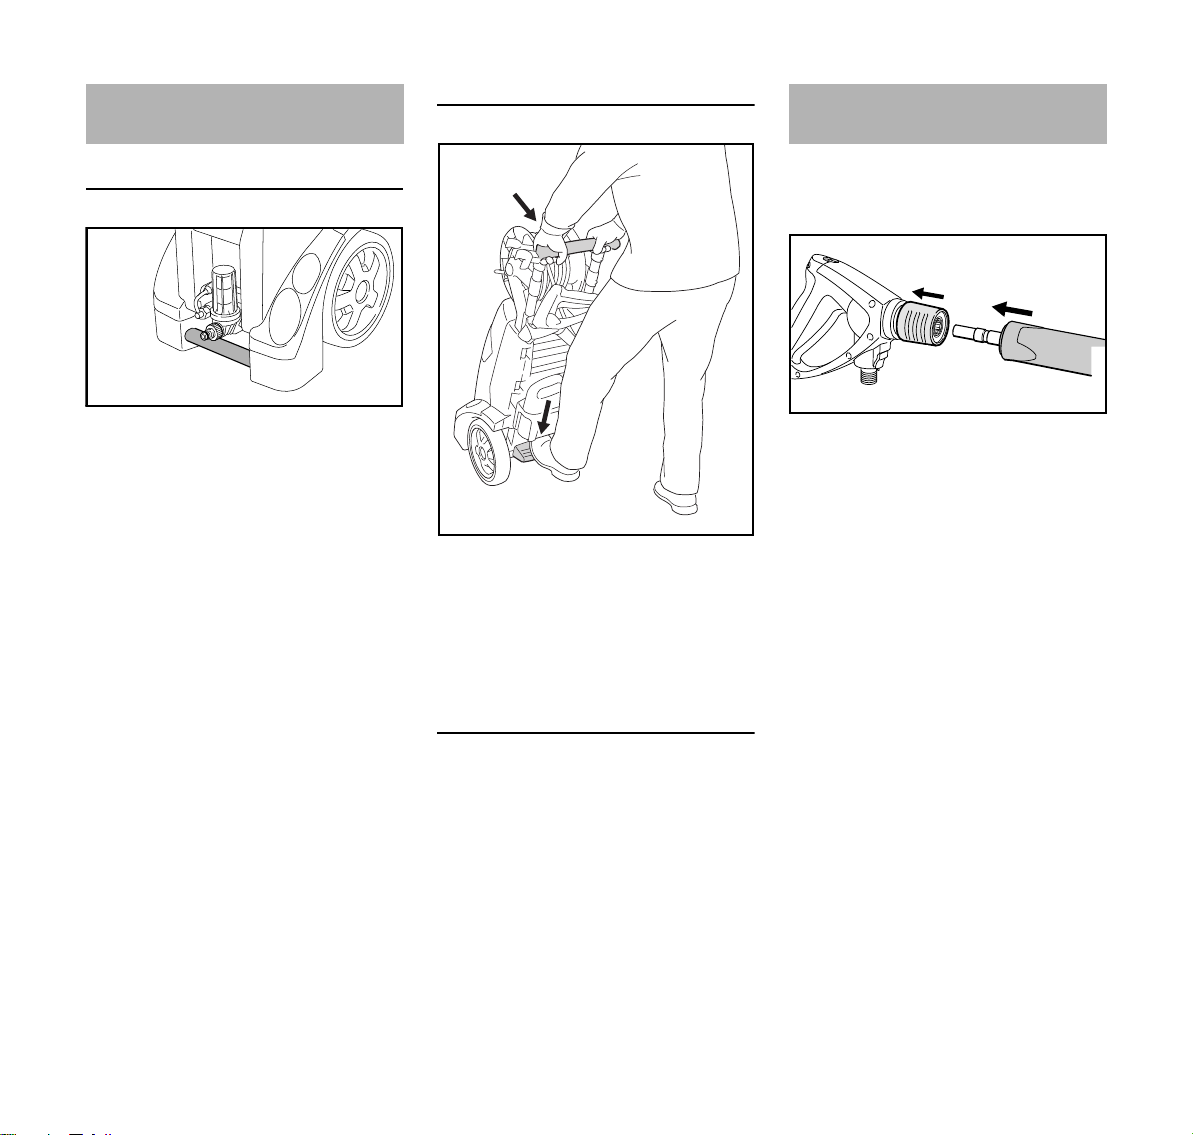
Gerät transportieren
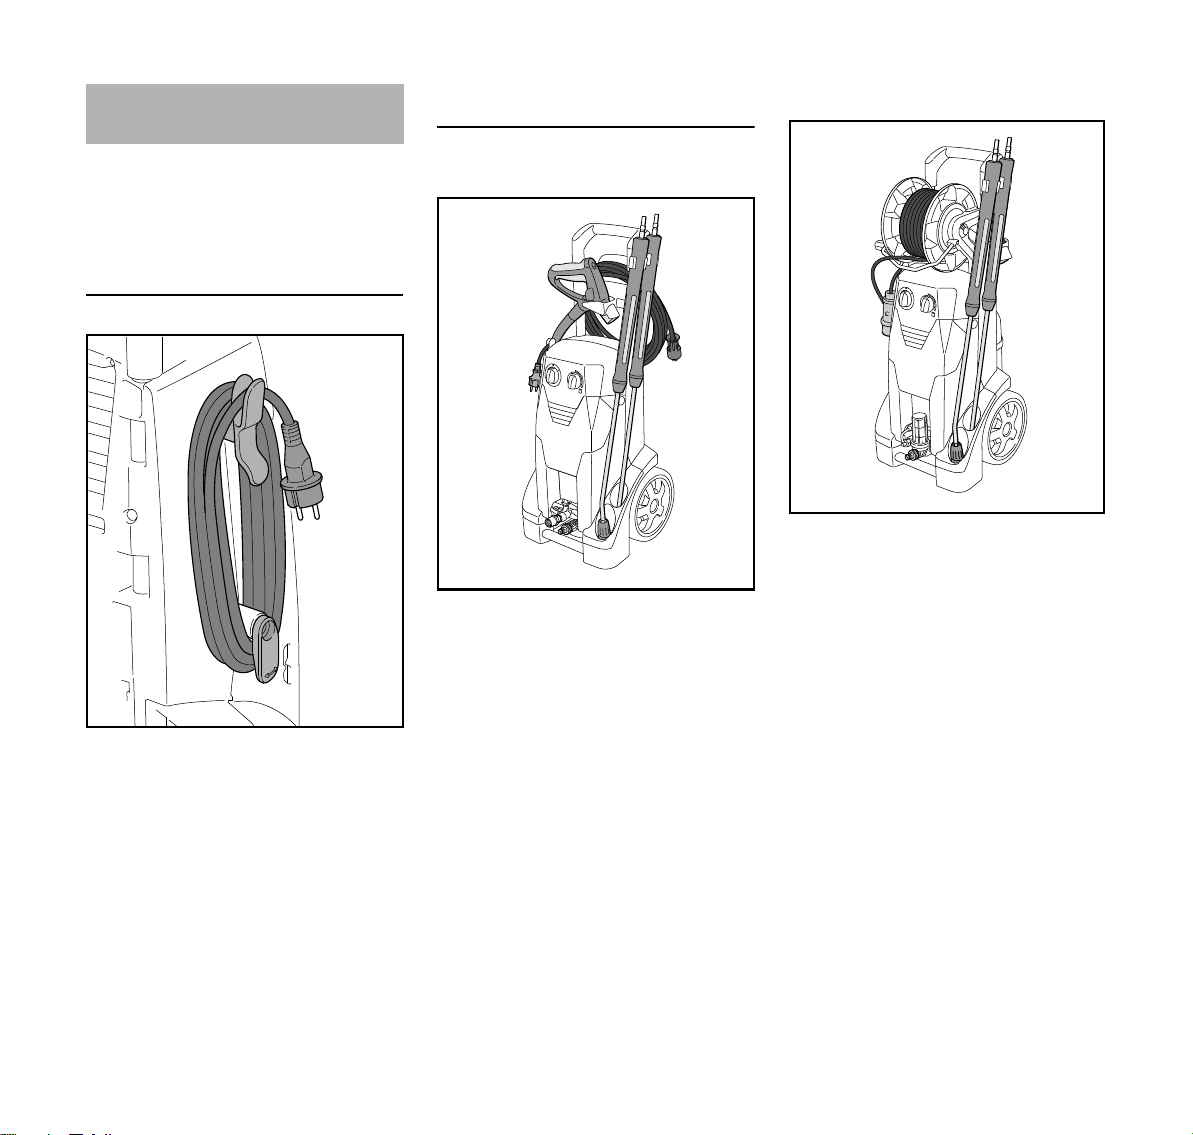
Transportgriff
Mit Hilfe des Transportgriffs kann das
Gerät getragen werden.
Gerät schieben
1
2
N Gerät am Schubbügel (1) mit
beiden Händen festhalten
N Gerät mit dem Fuß an der
Trittleiste (2) gegenhalten,
Schubbügel (1) herunterdrücken
und Gerät ausbalancieren
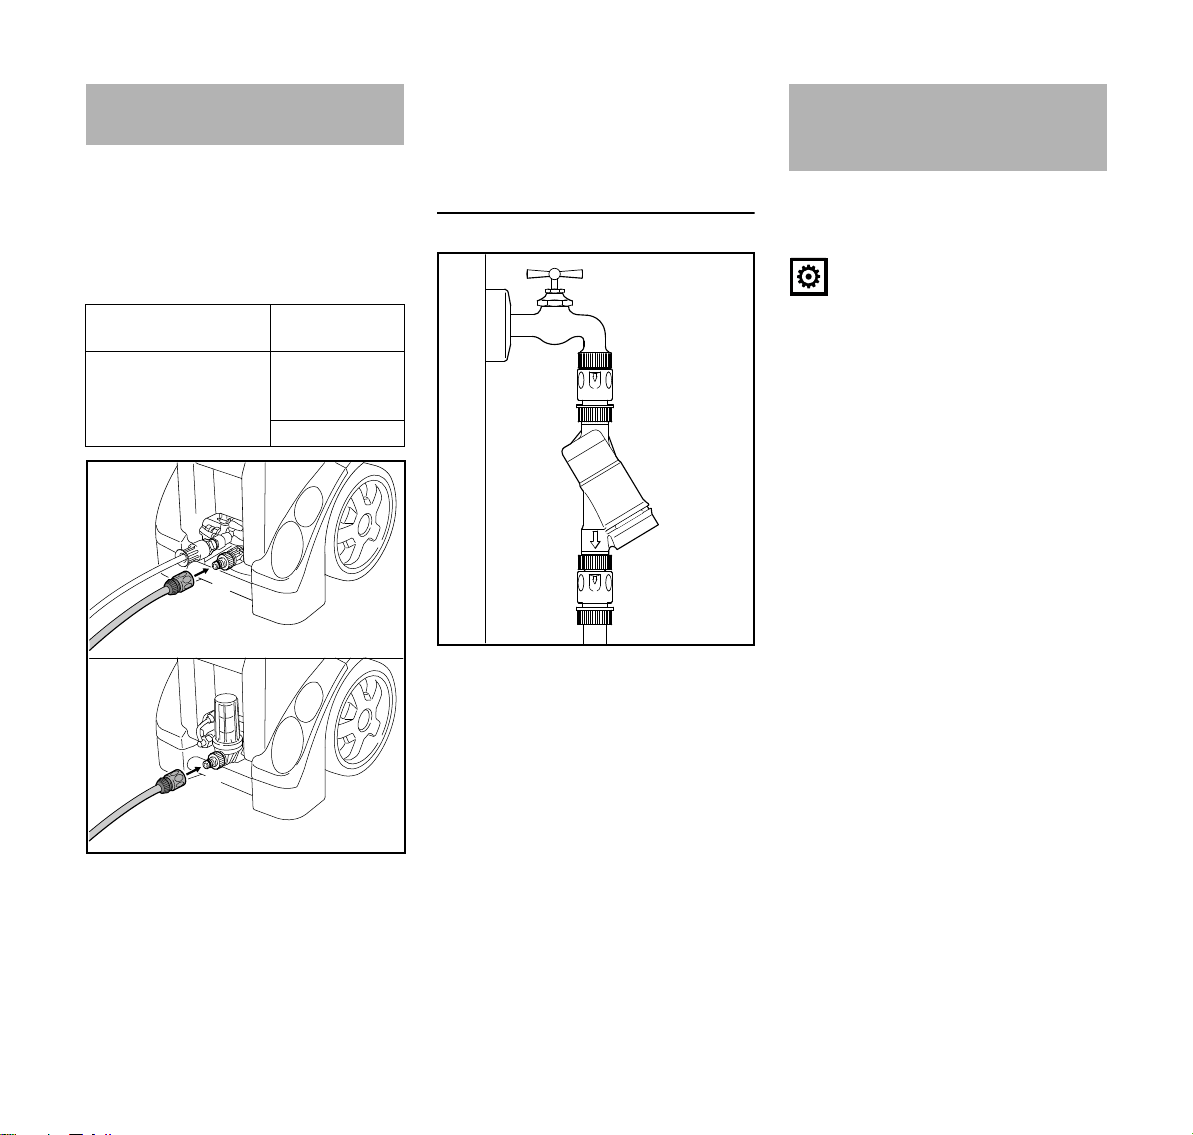
Strahlrohr anbauen, abbauen
N Schutzkappe vom Strahlrohr
abziehen und für spätere
Verwendung aufbewahren
N Kupplung (1) nach hinten ziehen
und halten
N Strahlrohr (2) in die Aufnahme der
6158BA009 KN
Spritzpistole schieben, bzw. zum
Abbau aus der Spritzpistole
herausziehen
N Kupplung (1) loslassen
RE 232, RE 272 PLUS, RE 282 PLUS
RE 272 PLUS, RE 282 PLUS
Bei liegendem Tranport der Geräte
sicherstellen, dass kein
Reinigungsmittel auslaufen kann.
N Reinigungsmittelbehälter
abnehmen – siehe
"Reinigungsmittelbehälter abbauen,
anbauen"
11
Page 14
deutsch
2
1
6158BA005 KN
1
2
3
647BA022 KN
647BA023 KN
3
4
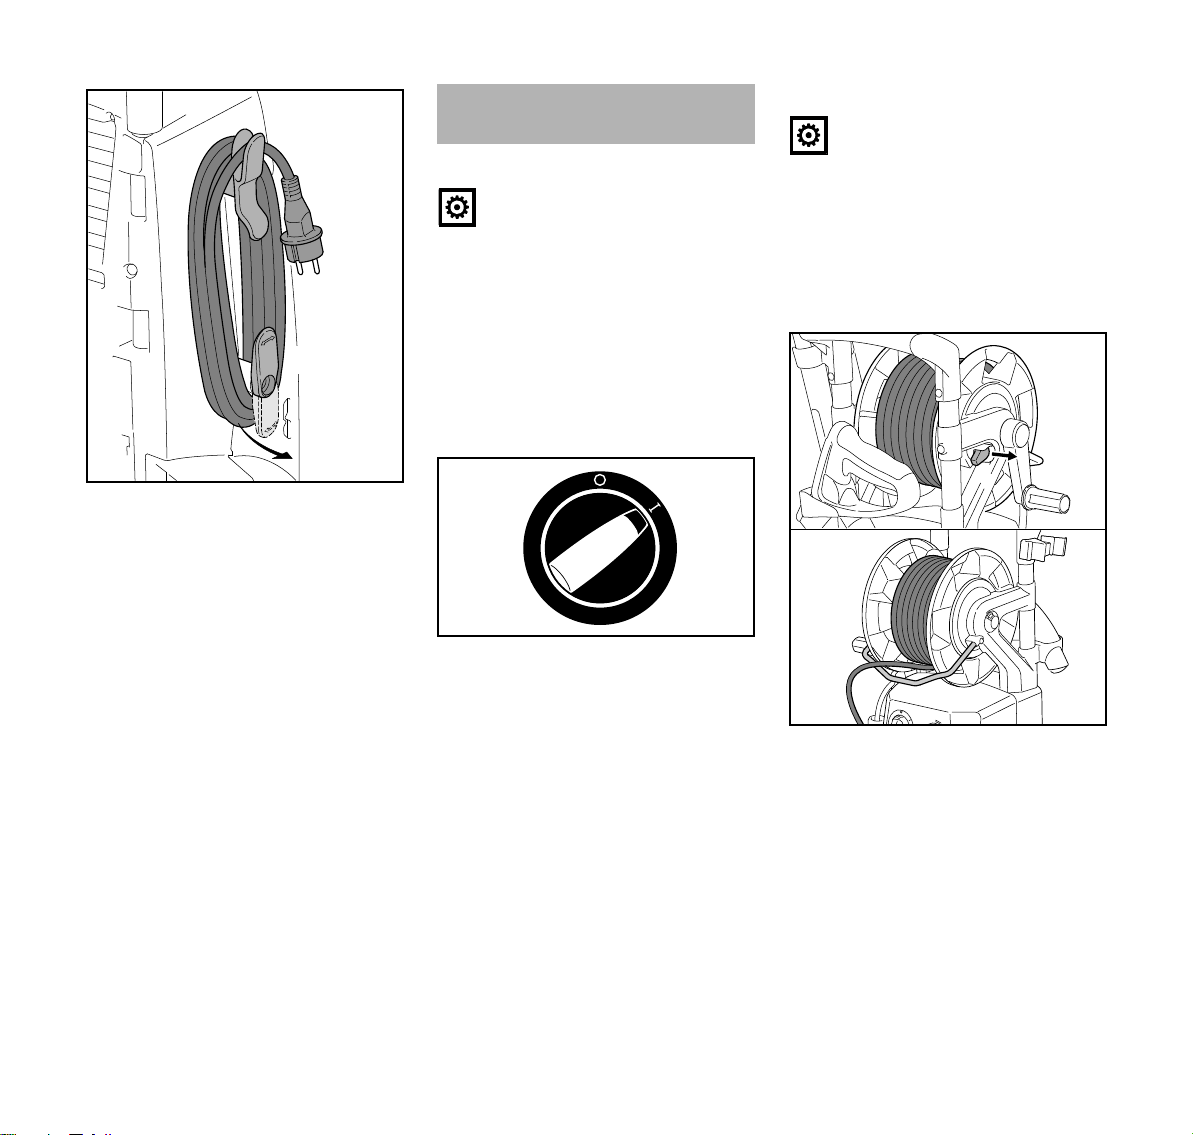
Hochdruckschlauch
anbauen, abbauen
Gerät ohne Schlauchtrommel
Hochdruckschlauch anbauen
N Hochdruckschlauch auf den
Anschlussstutzen (1) schieben
N Überwurfmutter (2) ansetzen,
aufdrehen und von Hand festziehen
Hochdruckschlauch abbauen
N Überwurfmutter (2) herunterdrehen
N Hochdruckschlauch vom
Anschlussstutzen (1) ziehen
Hochdruckschlauch an der Spritzpistole
anbauen
N Hochdruckschlauch (1) auf den
Anschlussstutzen (2) schieben
N Überwurfmutter (3) ansetzen,
aufdrehen und von Hand festziehen
abbauen
N Hochdruckschlauchverlängerung
zwischen Hochdruckschlauch und
Spritzpistole anschließen
Gerät mit Schlauchtrommel
Der Hochdruckschlauch ist bereits
angeschlossen.
12
N Schieber (4) in Pfeilrichtung
drücken und halten
N Überwurfmutter (3) lösen und in
Pfeilrichtung vom Anschlussstutzen
herunterdrehen
Hochdruckschlauchverlängerung
Grundsätzlich immer nur eine
Hochdruckschlauchverlängerung
(Sonderzubehör) verwenden.
RE 232, RE 272 PLUS, RE 282 PLUS
Page 15
deutsch
2
1
2
RE 232
6158BA006 KN
RE 282
1
RE 272
003BA003 KN
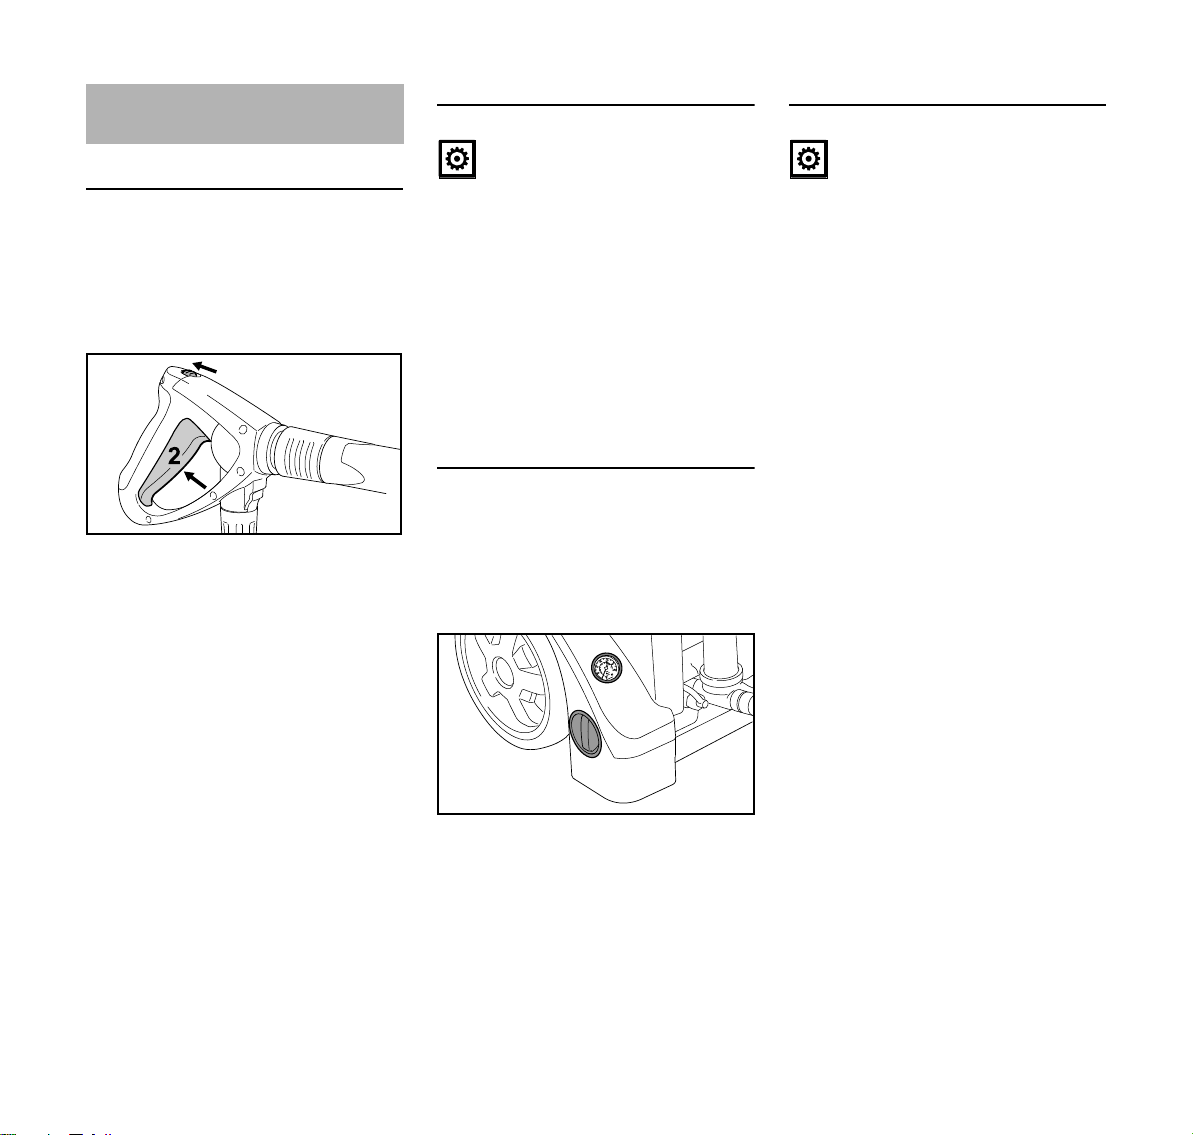
Wasserversorgung
herstellen
N Wasserschlauch anschließen
Wasserschlauch vor Anschluss an das
Gerät kurz mit Wasser spülen, damit
Sand und andere Schmutzteilchen nicht
in das Gerät gelangen können und der
Wasserschlauch entlüftet wird.
Durchmesser
Wasserschlauch: 3/4"
Länge
Wasserschlauch:
N Kupplung (1) auf den
Schlauchanschluss (2) schieben
N Wasserhahn öffnen
Zum Entlüften des Systems:
min. 10 m (um
Druckimpulse
abzufangen)
max. 25 m
N Spritzpistole (ohne montiertem
Strahlrohr) so lange betätigen, bis
ein gleichmäßiger Wasserstrahl
austritt
Anschluss an das Trinkwassernetz
Beim Anschluss an das
Trinkwassernetz muss zwischen
Wasserhahn und Schlauch ein
Rückflussverhinderer installiert sein. Die
Bauart des Rückflussverhinderers muss
die länderabhängig geltenden
Vorschriften erfüllen.
Wenn Trinkwasser den
Rückflussverhinderer durchflossen hat,
wird es nicht mehr als Trinkwasser
betrachtet.
Die Regelungen des örtlichen
Wasserversorgungsunternehmens zur
Verhinderung des Rückfließens von
Wasser aus dem Hochdruckreiniger in
das Trinkwassernetz sind zu beachten.
Drucklose
Wasserversorgung
herstellen
Der Hochdruckreiniger kann im
Saugbetrieb nur mit dem Saugset
(Sonderzubehör) betrieben werden.
HINWEIS
Die Verwendung eines Wasserfilters
wird grundsätzlich empfohlen.
N Gerät an Druckwasserversorgung
anschließen und gemäß der
vorliegenden Gebrauchsanleitung
kurzfristig in Betrieb nehmen
N Gerät ausschalten
N Spritzeinrichtung vom
Hochdruckschlauch abbauen
N Schlauchanschluss vom
Wasseranschluss abdrehen
N Saugset mit dem mitgelieferten
Anschlussstück am
Wasseranschluss anschließen
Unbedingt das im Saugset mitgelieferte
Anschlussstück verwenden. Die mit
dem Hochdruckreiniger serienmäßig
mitgelieferten Schlauchanschlüsse sind
im Saugbetrieb nicht dicht und daher für
das Ansaugen von Wasser nicht
geeignet.
N Saugschlauch mit Wasser füllen
und Saugglocke des
Saugschlauches in Wasserbehälter
tauchen – kein verschmutztes
Wasser verwenden
N Hochdruckschlauch mit der Hand
nach unten halten
N Gerät einschalten
RE 232, RE 272 PLUS, RE 282 PLUS
13
Page 16

deutsch
N warten, bis ein gleichmäßiger Strahl
am Hochdruckschlauch austritt
N Gerät ausschalten
N Spritzeinrichtung anschließen
N Gerät mit geöffneter Spritzpistole
einschalten
N Spritzpistole mehrfach kurzzeitig
betätigen, um Gerät möglichst
schnell zu entlüften
Gerät elektrisch anschließen
Spannung und Frequenz des Gerätes
(siehe Typenschild) muss mit Spannung
und Frequenz des Netzanschlusses
übereinstimmen.
Die Mindestabsicherung des
Netzanschlusses muss entsprechend
der Vorgabe in den Technischen Daten
ausgeführt sein – siehe "Technische
Daten".
Das Gerät muss an die
Spannungsversorgung über einen
Fehlerstromschutzschalter
angeschlossen werden, der die
Stromzufuhr unterbricht, wenn der
Differenzstrom zur Erde 30 mA für
30 ms überschreitet.
Der Netzanschluss muss IEC 60364-1
sowie den länderbezogenen
Vorschriften entsprechen.
Beim Einschalten des Gerätes können
auftretende Spannungsschwankungen
bei ungünstigen Netzverhältnissen
(hohe Netzimpedanz) andere
angeschlossene Verbraucher
beeinträchtigen. Bei Netzimpedanzen
kleiner als 0,15 Ω sind keine Störungen
zu erwarten.
Die Verlängerungsleitung muss
abhängig von Netzspannung und
Leitungslänge den aufgeführten
Mindestquerschnitt haben.
230 V / 1~:
230 V / 3~:
bis 20 m 2,5 mm
20 m bis 50 m 4 mm
2
2
230 V – 240 V / 1~:
bis 20 m 2,5 mm
20 m bis 50 m 4 mm
2
2
200 V / 3~:
bis 10 m 3,5 mm
10 m bis 30 m 5,5 mm
2
2
Anschluss an die Netzsteckdose
Vor Anschluss an die
Spannungsversorgung prüfen, ob das
Gerät ausgeschaltet ist – siehe "Gerät
ausschalten"
14
Leitungslänge Mindestquerschnitt
400 V / 3~:
400 V – 415 V / 3~:
bis 20 m 1,5 mm
20 m bis 50 m 2,5 mm
2
2
RE 232, RE 272 PLUS, RE 282 PLUS
Page 17
deutsch
1
6158BA007 KN
2
1607BA011 KN
1
6158BA020 KN
N Netzstecker aus dem oberen
Halter (1) nehmen
N unteren Halter (2) nach oben
schwenken und Anschlussleitung
abnehmen
N Netzstecker des Gerätes oder
Netzstecker der
Verlängerungsleitung in
vorschriftsmäßig installierte
Steckdose stecken
Gerät einschalten
N Wasserhahn öffnen
HINWEIS
Gerät nur bei angeschlossenem
Wasserzulaufschlauch und geöffnetem
Wasserhahn einschalten. Sonst
entsteht Wassermangel, der zu
Beschädigungen des Gerätes führen
kann.
N Hochdruckschlauch und
Anschlussleitung vollständig
ausrollen
N Geräteschalter auf Stellung I
drehen – Gerät ist nun im StandbyBetrieb
N Spritzpistole auf den zu reinigenden
Gegenstand richten – nie auf
Personen!
Beim Einschalten des Gerätes können
auftretende Spannungsschwankungen
bei ungünstigen Netzverhältnissen
(hohe Netzimpedanz) andere
angeschlossene Verbraucher
beeinträchtigen.
Bei Netzimpedanzen kleiner als
0,15 Ohm sind keine Störungen zu
erwarten.
Gerät mit Schlauchtrommel
HINWEIS
Hochdruckschlauch immer vollständig
von der Schlauchtrommel abwickeln.
Durch den hohen Wasserdruck dehnt
sich der Hochdruckschlauch aus. Dies
kann die Schlauchtrommel oder den
Hochdruckschlauch selbst
beschädigen.
N Schlauchtrommelsperre (1)
herausziehen
N Hochdruckschlauch vollständig
abwickeln
RE 232, RE 272 PLUS, RE 282 PLUS
15
Page 18
deutsch
1
647BA024 KN
1
2
6158BA010 KN
Arbeiten
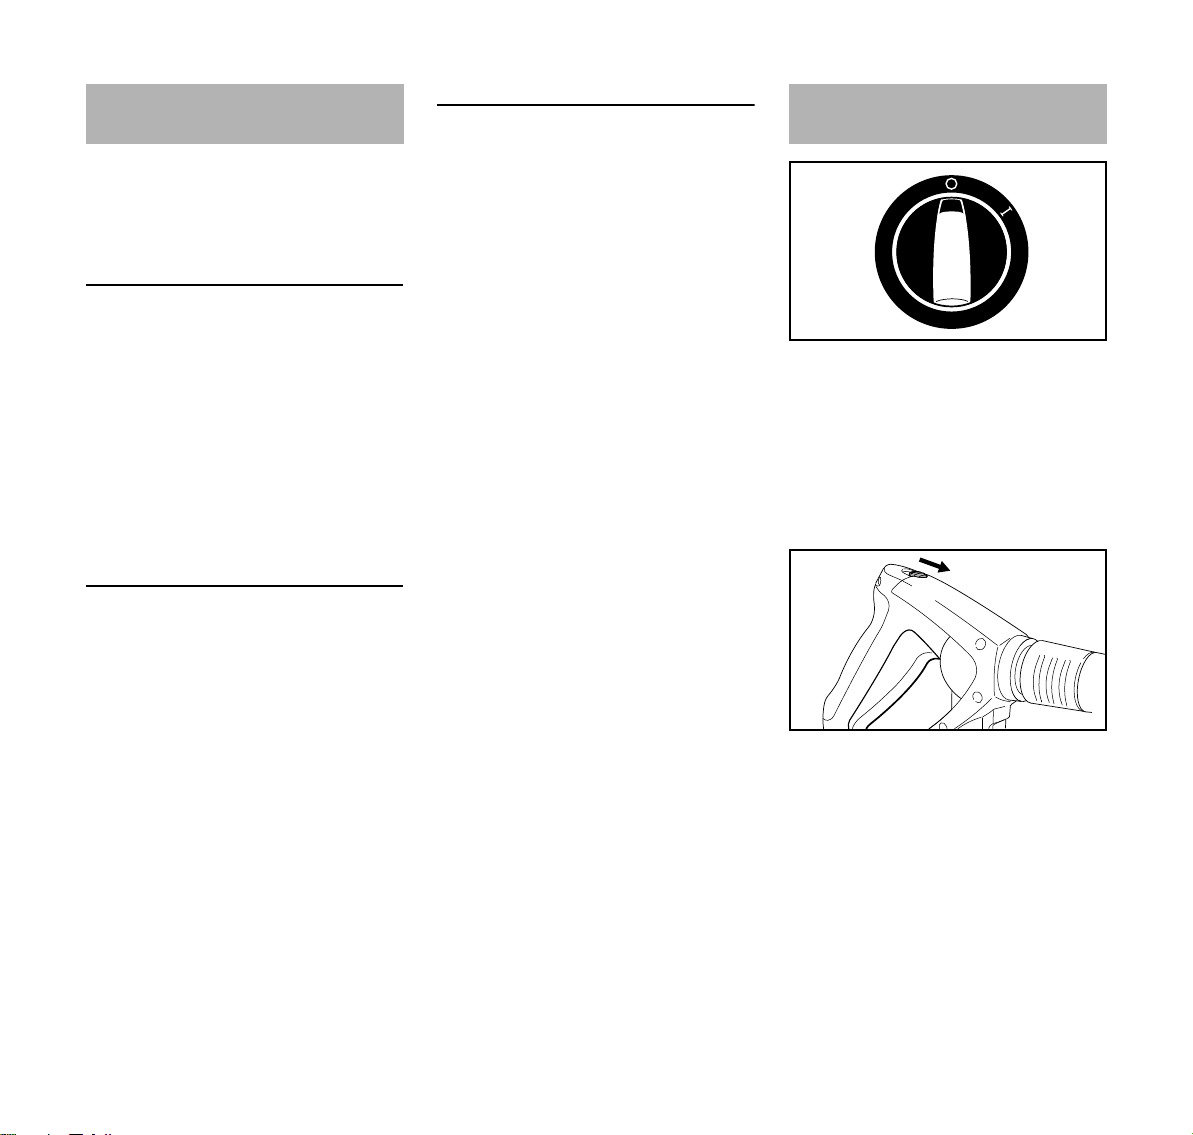
Spritzpistole betätigen
N Spritzpistole auf den zu reinigenden
Gegenstand richten – nie auf
Personen!
N Rotordüse, wenn verwendet, beim
Starten nach unten halten
N Sicherungshebel (1) in Pfeilrichtung
schieben – der Hebel (2) wird
entriegelt
N Hebel (2) durchdrücken
Der Motor schaltet automatisch ein und
wird beim Loslassen des Hebels (1)
wieder ausgeschaltet. Das Gerät ist
dann im Standby-Betrieb.
Standby-Betrieb
HINWEIS
Das Gerät maximal 5 min im StandbyBetrieb betreiben.
Gerät am Geräteschalter ausschalten –
siehe "Gerät ausschalten",
– bei Arbeitsunterbrechungen länger
als 5 min,
– bei Arbeitspausen,
– wenn das Gerät unbeaufsichtigt
zurück gelassen wird.
Druck-/Mengenregulierung am Gerät
Nur RE 272 PLUS, RE 282 PLUS
An der Hochdruckpumpe können
Arbeitsdruck und Wassermenge für
längerfristige Anpassungen an die
Reinigungsaufgabe eingestellt werden.
Hochdruckschlauch
HINWEIS
Hochdruckschlauch nicht knicken und
keine Schlingen bilden.
Auf den Hochdruckschlauch keine
schweren Gegenstände stellen, und
nicht mit Fahrzeugen darüber fahren.
16
N Drehgriff (1) zum Einstellen von
Arbeitsdruck und Wassermenge
drehen
Das Manometer (2) zeigt den Druck in
der Hochdruckpumpe an.
RE 232, RE 272 PLUS, RE 282 PLUS
Page 19
deutsch
6158BA028 KN
6158BA013 KN
6158BA017 KN
6158BA014 KN
6158BA015 KN
6158BA016 KN
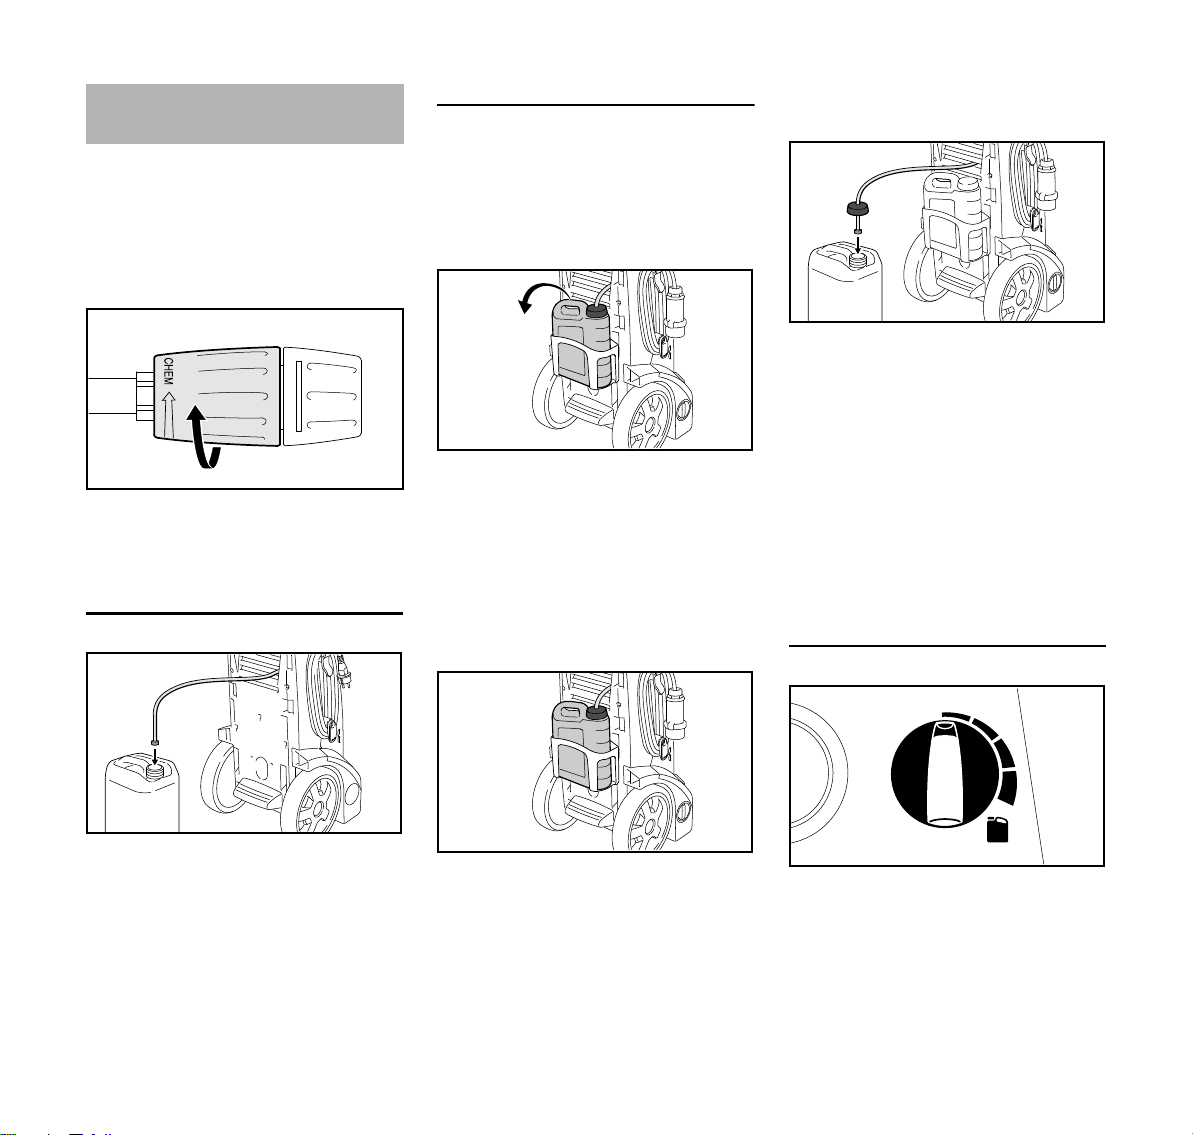
Reinigungsmittel beimischen
Bei angebauten
Hochdruckschlauchverlängerungen ist
keine Ansaugung von Reinigungsmitteln
möglich.
Reinigungsmittel kann nur im
Niederdruckbetrieb angesaugt werden.
N Stellhülse der Düse auf Anschlag in
Richtung "CHEM" drehen =
Niederdruckbetrieb
RE 232
RE 272 PLUS, RE 282 PLUS
Reinigungsmittelbehälter abbauen,
anbauen
Der Reinigungsmittelbehälter kann zum
Befüllen, Entleeren und Reinigen vom
Gerät abgenommen werden.
N Deckel mit Ansaugschlauch von der
Einfüllöffnung des
Reinigungsmittelbehälters
abdrehen
N Reinigungsmittelbehälter aus der
Halterung ziehen
Reinigungsmittel aus
Reinigungsmittelbehälter saugen
Reinigungsmittel aus separatem
Behälter saugen
N Deckel mit Ansaugschlauch von der
Einfüllöffnung des
Reinigungsmittelbehälters
abdrehen
N Deckel mit Ansaugschlauch auf
separaten Behälter schrauben
Der Deckel hat ein Standardgewinde
und passt auf die gängigen separaten
Behälter.
N Ansaugschlauch soweit wie möglich
in den separaten Behälter schieben
Alle Ausführungen
N Ansaugschlauch soweit wie möglich
in den separaten Behälter schieben
RE 232, RE 272 PLUS, RE 282 PLUS
N Reinigungsmittel in der
vorgeschriebenen Verdünnung in
den Reinigungsmittelbehälter
einfüllen
N Ansaugschlauch soweit wie möglich
in den Behälter schieben
N Menge des beizumischenden
Reinigungsmittels mit dem
Dosiergriff einstellen
Dosiergriff nach links: 0 % (min)
Dosiergriff nach rechts: 5 % (max)
17
Page 20

deutsch
N Reinigungsmittel von unten nach
oben auftragen
Reinigungsmittel dürfen nicht auf dem
zu reinigenden Gegenstand antrocknen
Wenn kein weiteres Reinigungsmittel
mehr zugemischt werden soll:
N Dosiergriff auf 0 % (min) stellen
N Hochdruckreiniger bei geöffneter
Spritzpistole kurze Zeit weiterlaufen
lassen, bis kein Reinigungsmittel
mehr aus der Düse austritt
Nach der Arbeit
N Reinigungsmittelbehälter entleeren
und mit klarem Wasser ausspülen
N Ansaugschlauch in klares Wasser
tauchen
N Spritzpistole betätigen und Reste
des Reinigungsmittels ausspülen
Reinigungsmittelkonzentration exakt
berechnen, einstellen
Bei einigen Reinigungsmitteln muss die
Konzentration sehr exakt eingestellt
werden. In diesem Fall
Wasserdurchsatz und Verbrauch an
Reinigungsmittel messen.
N Dosiergriff für Reinigungsmittel auf
"0 % (min)" stellen
N Spritzpistole in geeigneten, leeren
Auffangbehälter (> 20 l) halten und
exakt 1 Minute betätigen
N Wassermenge "Q" im Behälter
messen
N 2 Liter Reinigungsmittel in der
vorgeschriebenen Verdünnung in
ein geeignetes Gefäß (mit Skala
von 0,1 l) einfüllen – STIHL
empfiehlt STIHL Reinigungsmittel
zu verwenden
N Ansaugschlauch in Gefäß halten
N Dosiergriff für Reinigungsmittel
entsprechend der gewünschten
Konzentration einstellen: 0 % (min)
bis 5 % (max)
N Spritzpistole in geeigneten, leeren
Auffangbehälter (> 20 l) halten und
exakt 1 Minute betätigen
N Verbrauch an Reinigungsmittel
"QR" an der Skala ablesen
Berechnung der tatsächlichen
Reinigungsmittel-Konzentration:
QR
x V = Konzentration
Q
– QR = Menge des verbrauchten
Reinigungsmittels (in l/min)
– Q = Wassermenge ohne
Reinigungsmittel (in l/min)
– V = Vorverdünnung des
Reinigungsmittels (in %)
Weicht die tatsächliche Konzentration
von der gewünschten ab, Dosiergriff
entsprechend nachstellen, ggf.
Messung wiederholen.
Vorverdünnung des Reinigungsmittels
in % berechnen
Ist die Vorverdünnung nicht als %-Wert
angegeben, kann sie mit folgender
Tabelle ermittelt werden:
Verhältnis-Wert
1:1 = 50 %
1:2 = 33,3 %
1:3 = 25 %
1:5 = 16,6 %
1:10 = 9 %
Beispiel:
Berechnung Verhältnis-Wert 1:2
– A = 1
– B = 2
A
(A + B)
(1 + 2)
x 100 = Wert in %
1
x 100 = 33,3 %
18
RE 232, RE 272 PLUS, RE 282 PLUS
Page 21
deutsch
1607BA018 KN
1
647BA029 KN
Arbeitshinweise Gerät ausschalten
Stark verschmutzte Oberflächen
Stark verschmutzte Oberflächen vor
Nachfolgende Informationen und
Anwendungsbeispiele erleichtern die
Arbeit und tragen zu einem optimalen
Reinigungsergebnis bei.
dem Reinigen mit Wasser einweichen.
Reinigungsmittel:
Mit Hilfe von Reinigungsmitteln kann die
Reinigungswirkung verstärkt werden.
Arbeitsdruck und Wasserdurchsatz
Durch entsprechende Einwirkzeit
(abhängig vom verwendeten
Hoher Druck löst den Schmutz besser.
Je höher der Wasserdurchsatz, desto
besser wird der gelöste Schmutz
abtransportiert.
Empfindliche Teile und Oberflächen
(z. B. Autolack, Gummi) mit niedrigem
Druck oder größerem Abstand reinigen
um Beschädigungen zu vermeiden. Für
die Fahrzeugreinigung ist ein Druck von
100 bar ausreichend.
Düsen
Reinigungsmittel) erhöht sich die
Reinigungsleistung.
Reinigungsmittel nicht antrocknen
lassen.
Reinigungsmittel immer in der
vorgeschriebenen Dosierung
verwenden und entsprechende
Anwendungshinweise des
Reinigungsmittels beachten.
Mechanische Reinigung:
Durch den zusätzlichen Einsatz von
z. B. Rotordüse oder Waschbürste
N Geräteschalter auf Stellung 0
drehen
N Wasserhahn schließen
N Spritzpistole betätigen, bis das
Wasser nur noch aus der Düse
tropft (Gerät ist jetzt drucklos)
N Hebel loslassen
lassen sich stark haftende
Flachstrahldüse
Schmutzschichten besser lösen.
Universell einsetzbar – zur Reinigung
von Teilen und (sensiblen) Oberflächen.
Anwendungsgebiete:
– Reinigung von Fahrzeugen und
Maschinen
– Boden- und Flächenreinigung
– Dach- und Fassadenreinigung
N Sicherungshebel (1) in Pfeilrichtung
schieben – die Spritzpistole wird
verriegelt, unbeabsichtigtes
Einschalten wird so verhindert
Rotordüse
Zum Entfernen hartnäckiger
Verschmutzungen auf
widerstandfähigen Oberflächen.
RE 232, RE 272 PLUS, RE 282 PLUS
19
Page 22
deutsch
1
2
6158BA018 KN
6158BA019 KN
6158BA021 KN
Nach der Arbeit
N Netzstecker aus der Steckdose
ziehen
N Schlauch vom Wasserhahn und
vom Gerät entfernen
Anschlussleitung
Hochdruckschlauch aufwickeln und
Spritzeinrichtung aufbewahren
RE 232
N Pistole und Strahlrohr in die Halter
einsetzen
N Hochdruckschlauch aufwickeln und
in den Halter einhängen
RE 272 PLUS, RE 282 PLUS
N Pistole und Strahlrohr in die Halter
einsetzen
N Hochdruckschlauch aufwickeln
N unteren Halter (1) nach unten
schwenken
N Anschlussleitung aufwickeln und
zur Befestigung am Halter (2)
einhängen
20
RE 232, RE 272 PLUS, RE 282 PLUS
Page 23

Gerät aufbewahren
Gerät in einem trockenen, frostsicheren
Raum aufbewahren.
Ist Frostsicherheit nicht gewährleistet
Frostschutzmittel auf Glykolbasis – wie
bei Kraftfahrzeugen – in die Pumpe
einsaugen:
N Wasserzulaufschlauch in Behälter
mit Frostschutzmittel tauchen
N Spritzpistole ohne Strahlrohr in den
gleichen Behälter tauchen
N Gerät mit geöffneter Spritzpistole
einschalten
N Spritzpistole so lange betätigen, bis
ein gleichmäßiger Strahl austritt
N Restfrostschutzmittel in einem
geschlossenen Behälter
aufbewahren
deutsch
RE 232, RE 272 PLUS, RE 282 PLUS
21
Page 24
deutsch
Wartungs- und Pflegehinweise
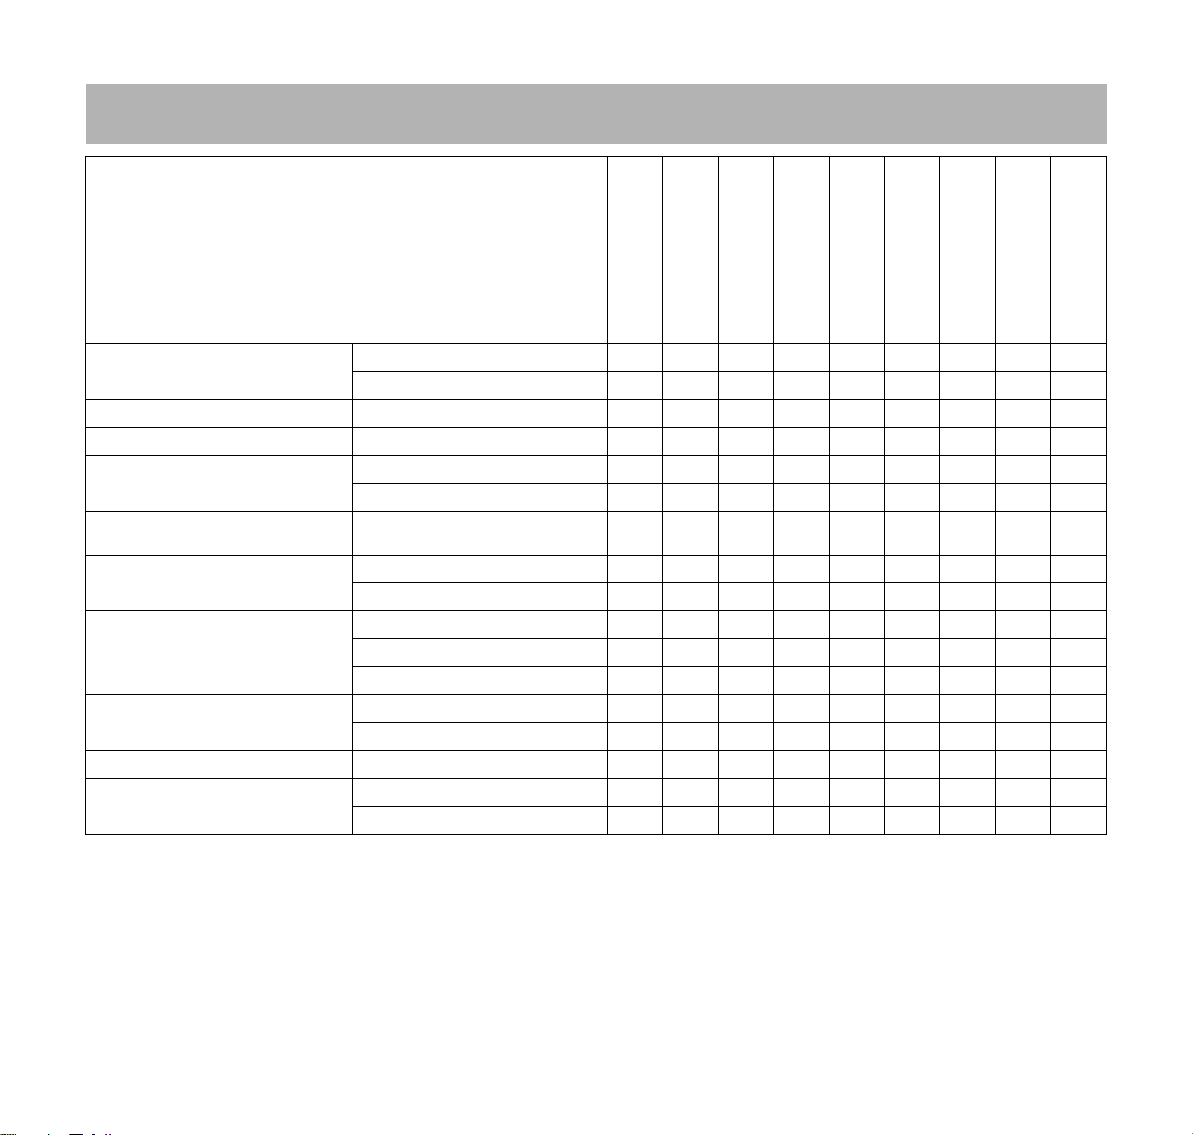
Die Angaben beziehen sich auf normale Einsatzbedingungen. Bei längeren tägli
chen Arbeitszeiten die angegebenen Intervalle entsprechend verkürzen. Bei nur
gelegentlichem Einsatz können die Intervalle entsprechend verlängert werden.
Komplette Maschine
Ölstand der Hochdruckpumpe prüfen X
Öl der Hochdruckpumpe wechseln durch Fachhändler
Anschlüsse am Hochdruckschlauch
Kupplungsstecker vom Strahlrohr und
Kupplungsmuffe der Spritzpistole
Wasserzulaufsieb
Hochdruckeingang
Wasserfilter
Hochdruckdüse
Belüftungsöffnungen reinigen X
Stützfüße
1)
STIHL empfiehlt den STIHL Fachhändler
2)
einmalig nach den ersten 50 Betriebsstunden
3)
je nach Ausstattung
3)
im
3)
Sichtprüfung (Zustand, Dichtheit) X
reinigen XX
reinigen XX
fetten X
reinigen XX
reinigen XX
ersetzen X
Sichtprüfung (Verschmutzung) X
reinigen X
ersetzen X
reinigen X
ersetzen X
prüfen X
ersetzen X
-
vor Arbeitsbeginn
nach Arbeitsende bzw.
täglich
wöchentlich
monatlich
RE 232 alle
200 Betriebsstunden
RE 272, 282 alle
300 Betriebsstunden
bei Störung
bei Beschädigung
1)
2)
X
2)
X
bei Bedarf
22
RE 232, RE 272 PLUS, RE 282 PLUS
Page 25
deutsch
647BA031 KN
6158BA026 KN
1
2
3
4
6158BA027 KN
Wartung
Vor Pflege oder Reinigung des Gerätes
immer den Netzstecker ziehen.
Um einen problemlosen Betrieb
sicherzustellen, empfehlen wir die
folgenden Arbeiten bei jeder Benutzung
des Gerätes durchzuführen:
N Wasserschlauch,
Hochdruckschlauch, Strahlrohr und
Zubehör vor Montage mit Wasser
durchspülen
N Kupplungsstecker vom Strahlrohr
und Kupplungsmuffe der
Spritzpistole von Sand und Staub
befreien
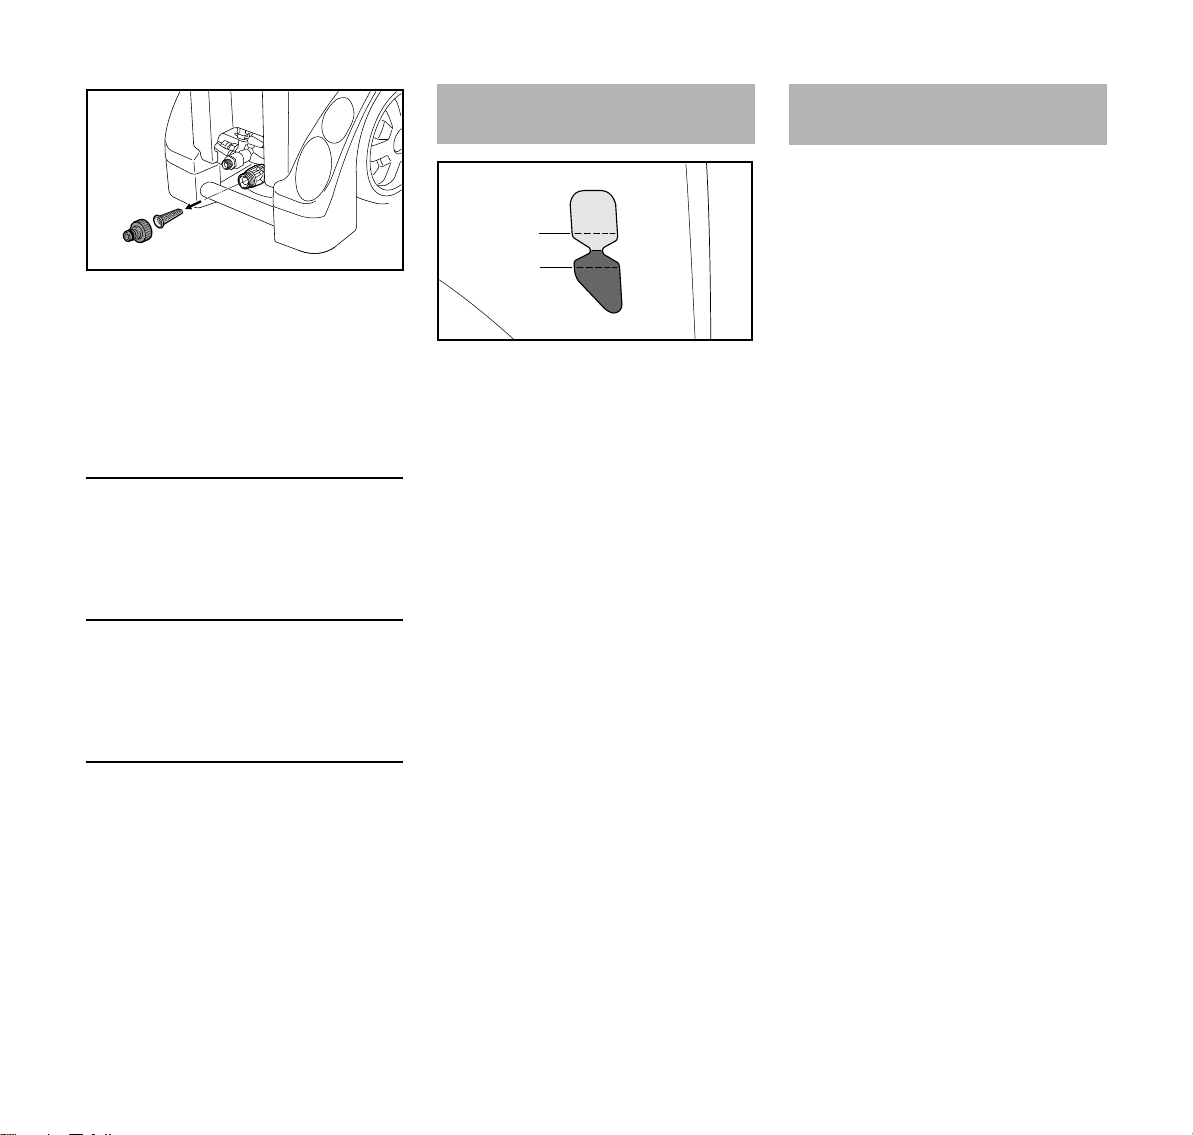
Hochdruckdüse reinigen
Eine verstopfte Düse hat einen zu hohen
Pumpendruck zur Folge, weshalb eine
Reinigung sofort erforderlich ist.
HINWEIS
Düse nur reinigen, wenn das Strahlrohr
abgebaut ist
N Strahlrohr von der Düsenseite mit
Wasser durchspülen
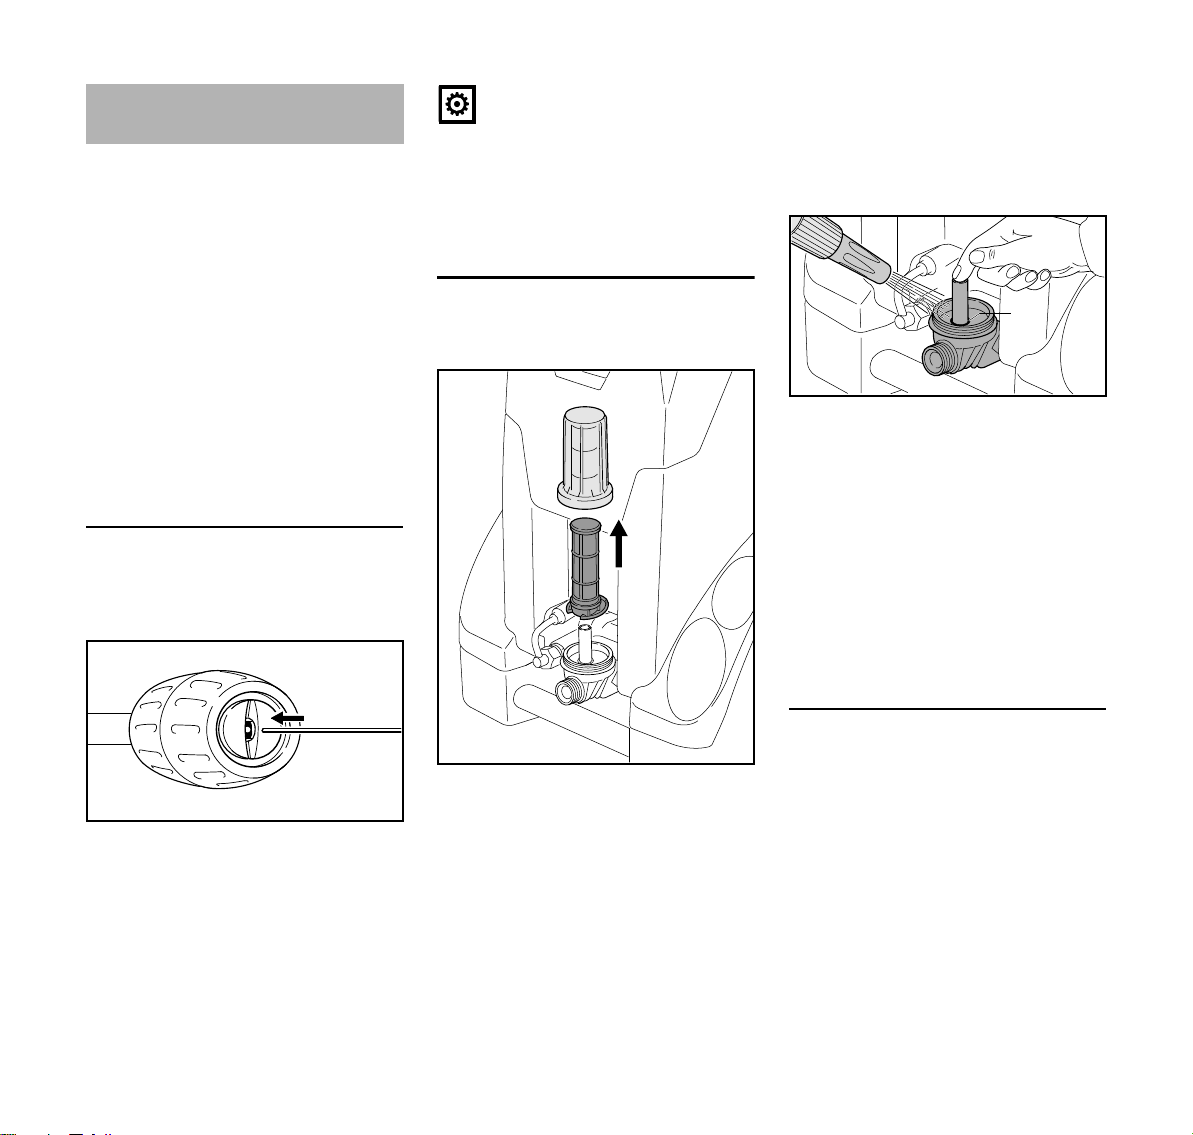
Wasserfilter reinigen
Wasserfilter bei Verschmutzung
reinigen.
N Filtereinsatz (2) mit klarem Wasser
von innen nach außen gründlich
ausspülen
N Filtereinsatz prüfen – einen
beschädigten Filtereinsatz ersetzen
N Austrittsöffnung (3) mit Finger
verschließen
N Filtergehäuse mit klarem Wasser
gründlich abspülen
N Runddichtring (4) im Filtergehäuse
und Runddichtring im Deckel mit
einem lebensmittelechten
Schmierfett fetten
N Filtereinsatz aufsetzen
N Deckel aufdrehen und festziehen
N Gerät ausschalten
N Spritzpistole betätigen, bis Wasser
nur noch aus dem Spritzkopf tropft –
das Gerät ist jetzt drucklos
N Strahlrohr abbauen
N Düse mit geeigneter Nadel reinigen
RE 232, RE 272 PLUS, RE 282 PLUS
N Deckel (1) abdrehen
N Filtereinsatz (2) nach oben
abnehmen
N Deckel (1) mit klarem Wasser
gründlich ausspülen
Wasserzulaufsieb reinigen
Wenn kein Wasserfilter angebaut ist,
Wasserzulaufsieb je nach Bedarf einmal
wöchentlich oder öfter reinigen.
23
Page 26
deutsch
1
6158BA022 KN
2
6158BA023 KN
max.
min.
N Schlauchanschluss (1) lösen
N Sieb (2) vorsichtig mit einer Zange
lösen und abspülen
N vor dem Einsetzen sicherstellen,
dass das Sieb intakt ist – ein
beschädigtes Sieb ersetzen
Belüftungsöffnungen reinigen
Das Gerät sauber halten, damit die
Kühlluft an den Öffnungen des Gerätes
frei ein- und austreten kann.
Anschlüsse fetten
Die Anschlüsse am Hochdruckschlauch
bei Bedarf mit einem lebensmittelechten
Schmierfett fetten.
Ölstand prüfen
Wöchentlich, sowie nach dem Transport
den Ölstand prüfen.
N Gerät auf einen ebenen,
waagrechten Untergrund stellen
N prüfen, ob der Ölstand zwischen
den Markierungen "min" und "max"
steht – ist dies nicht der Fall:
Fachhändler aufsuchen. STIHL
empfiehlt den STIHL Fachhändler
Inbetriebnahme nach langer
Lagerung
Durch lange Lagerzeiten können sich
mineralische Rückstände des Wassers
in der Pumpe ablagern. Dadurch läuft
der Motor schwer oder gar nicht an.
N Gerät an die Wasserleitung
anschließen und mit
Leitungswasser gründlich
durchspülen, Netzstecker dabei
nicht einstecken
N Netzstecker in Steckdose stecken
N Gerät mit geöffneter Spritzpistole
einschalten
Stützfüße prüfen
Um sicheren Stand des Gerätes zu
gewährleisten, die beiden vorderen
Stützfüße bei Beschädigung oder
Verschleiß ersetzen.
24
RE 232, RE 272 PLUS, RE 282 PLUS
Page 27

deutsch
Verschleiß minimieren und
Schäden vermeiden
Einhalten der Vorgaben dieser
Gebrauchsanleitung vermeidet
übermäßigen Verschleiß und Schäden
am Gerät.
Benutzung, Wartung und Lagerung des
Gerätes müssen so sorgfältig erfolgen,
wie in dieser Gebrauchsanleitung
beschrieben.
Alle Schäden, die durch Nichtbeachten
der Sicherheits-, Bedienungs- und
Wartungshinweise verursacht werden,
hat der Benutzer selbst zu verantworten.
Dies gilt insbesondere für:
– nicht von STIHL freigegebene
Änderungen am Produkt
– die Verwendung von Zubehören,
die nicht für das Gerät zulässig,
geeignet oder qualitativ
minderwertig sind
– nicht bestimmungsgemäße
Verwendung des Gerätes
– Einsatz des Gerätes bei Sport- oder
Wettbewerbs-Veranstaltungen
– Folgeschäden infolge der
Weiterbenutzung des Gerätes mit
defekten Bauteilen
– Frostschäden
– Schäden durch falsche
Spannungsversorgung
– Schäden durch schlechte
Wasserversorgung (z. B.
Querschnitt des Zulaufschlauches
zu klein)
Wartungsarbeiten
Alle im Kapitel "Wartungs- und
Pflegehinweise" aufgeführten Arbeiten
müssen regelmäßig durchgeführt
werden. Soweit diese Wartungsarbeiten
nicht vom Benutzer selbst ausgeführt
werden können, ist damit ein
Fachhändler zu beauftragen.
STIHL empfiehlt Wartungsarbeiten und
Reparaturen nur beim STIHL
Fachhändler durchführen zu lassen.
STIHL Fachhändlern werden
regelmäßig Schulungen angeboten und
technische Informationen zur Verfügung
gestellt.
Werden diese Arbeiten versäumt oder
unsachgemäß ausgeführt, können
Schäden entstehen, die der Benutzer
selbst zu verantworten hat. Dazu zählen
unter anderem:
– Schäden an Gerätekomponenten
infolge nicht rechtzeitig oder
unzureichend durchgeführter
Wartung
– Korrosions- und andere
Folgeschäden infolge
unsachgemäßer Lagerung
– Schäden am Gerät infolge
Verwendung von qualitativ
minderwertigen Ersatzteilen
Verschleißteile
Manche Teile des Hochdruckreinigers
unterliegen auch bei
bestimmungsgemäßem Gebrauch
einem normalen Verschleiß und müssen
je nach Art und Dauer der Nutzung
rechtzeitig ersetzt werden. Dazu
gehören u. a.:
– Hochdruckdüsen
– Hochdruckschläuche
RE 232, RE 272 PLUS, RE 282 PLUS
25
Page 28
deutsch
24
18
12
6158BA024 KN
2
8
5
6
1
3
7
9
10
11
14
13
17
16
21
22
20
23
19
15
#
Wichtige Bauteile
RE 232
1 Spritzpistole
2 Kupplung für Strahlrohr
3 Sicherungshebel
4 Hebel
5 Verriegelung
Hochdruckschlauchanschluss
6 Überwurfmutter
Hochdruckschlauch
7 Düse
8 Stellhülse für
Reinigungsmittelansaugung
9 Hochdruckschlauch
10 Schubbügel
11 Halter für Strahlrohr
12 Halter für Spritzpistole
13 Dosiergriff für Reinigungsmittel
14 Geräteschalter
15 Aufnahme für Strahlrohr
# Typenschild
26
RE 232, RE 272 PLUS, RE 282 PLUS
Page 29
deutsch
24
18
12
6158BA024 KN
2
8
5
6
1
3
7
9
10
11
14
13
17
16
21
22
20
23
19
15
#
RE 232
16 Schlauchanschluss Wasserzulauf
17 Anschlussstutzen für
Hochdruckschlauch
18 Transportgriff
19 Wasserfilter
20 Halter für Hochdruckschlauch
21 Ansaugschlauch für
Reinigungsmittel
22 Halter für Anschlussleitung
23 Ölstandanzeige
24 Trittleiste
# Typenschild
1)
RE 232, RE 272 PLUS, RE 282 PLUS
1)
je nach Ausstattung
27
Page 30
21
23
22
26
29
19
16
11
13
18
6158BA025 KN
2
8
5
6
1
3
7
10
9
12
20
14
15
25
24
27
28
#
17
deutsch
RE 272 PLUS, RE 282 PLUS
1 Spritzpistole
2 Kupplung für Strahlrohr
3 Sicherungshebel
4 Hebel
5 Verriegelung
Hochdruckschlauchanschluss
6 Überwurfmutter
Hochdruckschlauch
7 Düse
8 Stellhülse für
Reinigungsmittelansaugung
9 Rotordüse
10 Hochdruckschlauch
11 Schubbügel
12 Halter für Strahlrohr
13 Führungsbügel
14 Geräteschalter
15 Dosiergriff für Reinigungsmittel
16 Manometer
# Typenschild
28
RE 232, RE 272 PLUS, RE 282 PLUS
Page 31

deutsch
21
23
22
26
29
19
16
11
13
18
6158BA025 KN
2
8
5
6
1
3
7
10
9
12
20
14
15
25
24
27
28
#
17
RE 272 PLUS, RE 282 PLUS
17 Aufnahme für Strahlrohr
18 Wasserzulauf mit Wasserfilter und
Schlauchanschluss
19 Transportgriff
20 Halter für Spritzpistole
21 Schlauchtrommel
22 Kurbel der Schlauchtrommel
23 Schlauchtrommelsperre
24 Halter für Anschlussleitung
25 Ölstandanzeige
26 Drehgriff Druck- /
Mengenregulierung
27 Deckel für Reinigungsmittelbehälter
28 Reinigungsmittelbehälter
29 Trittleiste
# Typenschild
RE 232, RE 272 PLUS, RE 282 PLUS
29
Page 32

deutsch
Technische Daten
RE 232 RE 232
1)
RE 232 RE 272 PLUS RE 282 PLUS
Netzanschlussdaten: 230 V / 1~ / 50 Hz 230 V / 1~ / 50 Hz 220 V / 1~ / 60 Hz 230 V / 1~ / 50 Hz 400 V / 3~ / 50 Hz
Leistung: 3,3 kW 3 kW 3,1 kW 3 kW 3,5 kW
Absicherung (Charakteris
-
tik "C" oder "K"): 16 A 13 A 15 A 16 A 10 A
Schutzklasse:IIIII
Schutzart: IPX5 IPX5 IPX5 IPX5 IPX5
Arbeitsdruck: 14,5 MPa
(145 bar)
12,5 MPa
(125 bar)
13,5 MPa
(135 bar) 15 MPa (150 bar) 16 MPa (160 bar)
Max. zulässiger Druck: 20 MPa (200 bar) 18 MPa (180 bar) 20 MPa (200 bar) 20 MPa (200 bar) 20 MPa (200 bar)
Max. Wasserzulaufdruck: 1 MPa (10 bar) 1 MPa (10 bar) 1 MPa (10 bar) 1 MPa (10 bar) 1 MPa (10 bar)
Max. Wasserdurchsatz: 660 l/h 660 l/h 610 l/h 620 l/h 760 l/h
Wasserdurchsatz nach
EN 60335-2-79: 590 l/h 590 l/h 560 l/h 560 l/h 700 l/h
Max. Saughöhe: 1 m 1 m 1 m 1 m 1 m
Max. Wasserzulauftempe
ratur im
Druckwasserbetrieb:
Max. Wasserzulauftempe
-
60 °C (> 40 °C
max. 1h)
-
60 °C (> 40 °C
max. 1h)
60 °C (> 40 °C
max. 1h)
60 °C (> 40 °C
max. 1h)
60 °C (> 40 °C
max. 1h)
ratur im Saugbetrieb: 40 °C 40 °C 40 °C 40 °C 40 °C
Max. Rückstoßkraft: 24,6 N
2)
24,1 N
2)
21 N 2) / 22,3 N 3)22,7 N 2) / 24,2 N 3)29,6 N 2) / 31,5 N
3)
Länge ca.: 392 mm 392 mm 392 mm 392 mm 392 mm
Breite ca.: 390 mm 390 mm 390 mm 390 mm 390 mm
Höhe ca.: 1164 mm 1164 mm 1164 mm 1164 mm 1164 mm
Gewicht (mit Spritzeinrich
-
tung und
Hochdruckschlauch): ca. 36 kg ca. 36 kg ca. 37 kg ca. 42 kg ca. 42 kg
Länge Hochdruckschlauch
(Stahlgewebe) : 10 m, DN 06 10 m, DN 06 10 m, DN 06 15 m, DN 06 15 m, DN 06
1)
Großbritannien
2)
Flachstrahldüse
3)
Rotordüse
30
RE 232, RE 272 PLUS, RE 282 PLUS
Page 33

Schall- und Vibrationswerte
RE 232 RE 272 PLUS RE 282 PLUS
Schalldruckpegel L
nach
p
75,7 dB(A) 72,4 dB(A) 73,4 dB(A)
ISO 3744 (1 m Abstand)
Schallleistungspegel L
nach
w
89,9 dB(A) 86,6 dB(A) 87,6 dB(A)
ISO 3744
Vibrationswert ahv am Griff
< 2,5 m/s
nach ISO 5349
Für den Schalldruckpegel und den
Schallleistungspegel beträgt der
K-Faktor nach RL 2006/42/EG =
1,5 dB(A); für den Vibrationswert beträgt
der K-Faktor nach RL 2006/42/EG =
2
2,0 m/s
.
REACH
REACH bezeichnet eine EG
Verordnung zur Registrierung,
Bewertung und Zulassung von
Chemikalien.
Informationen zur Erfüllung der REACH
Verordnung (EG) Nr. 1907/2006 siehe
www.stihl.com/reach
deutsch
2
< 2,5 m/s
2
< 2,5 m/s
2
RE 232, RE 272 PLUS, RE 282 PLUS
31
Page 34

deutsch
Betriebsstörungen beheben
Vor Arbeiten an der Maschine Netzstecker ziehen, Wasserhahn schließen und Spritzpistole so lange betätigen, bis der Druck
abgebaut ist.
Störung Ursache Abhilfe
Motor läuft beim Einschalten nicht an
(brummt beim Einschalten)
Motor schaltet laufend aus und ein Hochdruckpumpe oder Spritzeinrichtung
Motor bleibt stehen Gerät schaltet wegen Überhitzung des Motors abÜbereinstimmung von Versorgungs- und
Schlechte, unklare, unsaubere
Strahlform
Druckschwankungen bzw. Druckabfall Wassermangel Wasserhahn ganz öffnen
Netzspannung ist zu niedrig bzw. nicht in
Ordnung
Kabelverlängerung mit falschem Querschnitt Verlängerung mit ausreichendem Quer
Kabelverlängerung zu lang Gerät ohne, oder mit kürzerer Kabelver
Netzsicherung ist abgeschaltet Gerät ausschalten, Spritzpistole betätigen
Spritzpistole nicht betätigt Spritzpistole beim Einschalten betätigen
undicht
Düse verschmutzt Düse reinigen, siehe "Wartung"
Hochdruckdüse im Spritzkopf verschmutzt Hochdruckdüse reinigen, siehe "Wartung"
Wasserzulaufsieb im Pumpeneingang
verstopft
Wasserfilter am Pumpeneingang verschmutzt Wasserfilter reinigen, siehe "Wartung"
Hochdruckpumpe undicht, Ventile defekt Gerät vom Fachhändler 1) instandsetzen
Düse verstopft Düse reinigen
Elektrischen Anschluss überprüfen
Stecker, Kabel und Schalter überprüfen
schnitt verwenden, siehe "Gerät elektrisch
anschließen"
längerung anschließen
bis Wasser nur noch aus Spritzkopf tropft,
Sicherungshebel einlegen, Netzsicherung
einschalten
1)
Gerät vom Fachhändler
lassen
Gerätespannung prüfen, den Motor min
destens 5 Minuten abkühlen lassen
zulässige Saughöhe einhalten (nur bei
Saugbetrieb)
Wasserzulaufsieb reinigen, siehe
"Wartung"
lassen
instandsetzen
-
-
-
32
RE 232, RE 272 PLUS, RE 282 PLUS
Page 35

deutsch
Vor Arbeiten an der Maschine Netzstecker ziehen, Wasserhahn schließen und Spritzpistole so lange betätigen, bis der Druck
abgebaut ist.
Störung Ursache Abhilfe
Reinigungsmittel bleiben aus Reinigungsmittelbehälter leer Reinigungsmittelbehälter füllen
Reinigungsmittelansaugung verstopft Verstopfung beseitigen
1)
Injektor verschlissen Gerät vom Fachhändler
instandsetzen
lassen
1)
STIHL empfiehlt den STIHL Fachhändler
RE 232, RE 272 PLUS, RE 282 PLUS
33
Page 36

deutsch
Reparaturhinweise Entsorgung
Benutzer dieses Gerätes dürfen nur
Wartungs- und Pflegearbeiten
durchführen, die in dieser
Gebrauchsanleitung beschrieben sind.
Weitergehende Reparaturen dürfen nur
Fachhändler ausführen.
STIHL empfiehlt Wartungsarbeiten und
Reparaturen nur beim STIHL
Fachhändler durchführen zu lassen.
STIHL Fachhändlern werden
regelmäßig Schulungen angeboten und
technische Informationen zur Verfügung
gestellt.
Bei Reparaturen nur Ersatzteile
einbauen, die von STIHL für dieses
Gerät zugelassen sind oder technisch
gleichartige Teile. Nur hochwertige
Ersatzteile verwenden. Ansonsten kann
die Gefahr von Unfällen oder Schäden
am Gerät bestehen.
STIHL empfiehlt STIHL OriginalErsatzteile zu verwenden.
STIHL Original-Ersatzteile erkennt man
an der STIHL Ersatzteilnummer, am
Schriftzug { und
gegebenenfalls am STIHL
Ersatzteilkennzeichen K (auf kleinen
Teilen kann das Zeichen auch allein
stehen).
Informationen zur Entsorgung sind bei
einem STIHL Fachhändler erhältlich.
N Hochdruckreiniger, Zubehör und
Verpackung vorschriftsmäßig und
umweltfreundlich entsorgen.
Hochdruckreiniger, Zube
hör und Verpackung
einer umweltfreundlichen
Wiederverwertung
zuführen.
Hochdruckreiniger, Zube
hör und Verpackung nicht
mit dem Hausmüll
entsorgen.
EG-Konformitätserklärung
-
ANDREAS STIHL AG & Co. KG
Badstr. 115
D-71336 Waiblingen
Deutschland
bestätigt, dass
-
Bauart: Hochdruckreini
ger
Fabrikmarke: STIHL
Typ: RE 232
Serienidentifizierung: 4788
Typ: RE 272 PLUS
Serienidentifizierung 4788
Typ: RE 282 PLUS
Serienidentifizierung 4788
den einschlägigen Bestimmungen der
Richtlinien 2011/65/EU, 2006/42/EG,
2004/108/EG (bis 19.04.2016),
2014/30/EU (ab 20.04.2016) und
2000/14/EG entspricht und in
Übereinstimmung mit den jeweils zum
Produktionsdatum gültigen Versionen
der folgenden Normen entwickelt und
gefertigt worden ist:
EN ISO 12100-1, EN ISO 12100-2,
EN 55014-1, EN 55014-2, EN 60335-1,
EN 60335-2-79, EN 61000-3-2,
EN 61000-3-11, EN 50581
Zur Ermittlung des gemessenen und des
garantierten Schallleistungspegels
wurde nach Richtlinie 2000/14/EG,
Anhang V verfahren.
-
34
RE 232, RE 272 PLUS, RE 282 PLUS
Page 37

deutsch
Gemessener Schallleistungspegel
RE 232 89,9 dB(A)
RE 272 PLUS 86,6 dB(A)
RE 282 PLUS 87,6 dB(A)
Garantierter Schallleistungspegel
RE 232 91 dB(A)
RE 272 PLUS 89 dB(A)
RE 282 PLUS 90 dB(A)
Aufbewahrung der Technischen
Unterlagen:
ANDREAS STIHL AG & Co. KG
Produktzulassung
Das Baujahr des Gerätes ist auf dem
CE-Schild des Gerätes angegeben.
Waiblingen, 11.03.2016
ANDREAS STIHL AG & Co. KG
i. V.
Thomas Elsner
Leiter Produktmanagement und
Services
Anschriften
STIHL Hauptverwaltung
ANDREAS STIHL AG & Co. KG
Postfach 1771
71307 Waiblingen
STIHL Vertriebsgesellschaften
DEUTSCHLAND
STIHL Vertriebszentrale AG & Co. KG
Robert-Bosch-Straße 13
64807 Dieburg
Telefon: +49 6071 3055358
ÖSTERREICH
STIHL Ges.m.b.H.
Fachmarktstraße 7
2334 Vösendorf
Telefon: +43 1 86596370
SCHWEIZ
STIHL Vertriebs AG
Isenrietstraße 4
8617 Mönchaltorf
Telefon: +41 44 9493030
TSCHECHISCHE REPUBLIK
Andreas STIHL, spol. s r.o.
Chrlická 753
664 42 Modřice
STIHL Importeure
BOSNIEN-HERZEGOWINA
UNIKOMERC d. o. o.
Bišće polje bb
88000 Mostar
Telefon: +387 36 352560
Fax: +38736350536
KROATIEN
UNIKOMERC - UVOZ d.o.o.
Sjedište:
Amruševa 10, 10000 Zagreb
Prodaja:
Ulica Kneza Ljudevita Posavskog 56,
10410 Velika Gorica
Telefon: +385 1 6370010
Fax: +385 1 6221569
TÜRKEI
SADAL TARIM MAKİNALARI DIŞ
TİCARET A.Ş.
Alsancak Sokak, No:10 I-6 Özel Parsel
34956 Tuzla, İstanbul
Telefon: +90 216 394 00 40
Fax: +90 216 394 00 44
RE 232, RE 272 PLUS, RE 282 PLUS
35
Page 38

Contents
English
Guide to Using this Manual 37
Safety Precautions and Working
Techniques 37
Assembling the Unit 44
Transporting the Unit 45
Fitting, removing spray lance 46
Fitting, removing high-pressure
hose 46
Connecting the water supply 47
Connecting to a pressureless water
supply 47
Connecting to Power Supply 48
Switching On 49
Working 49
Adding detergent 50
Tips for operation 52
Switching Off 53
After Finishing Work 53
Storing the Machine 54
Maintenance and Care 55
Maintenance 56
Checking the oil level 57
First use after long periods of
storage 57
Minimize Wear and Avoid Damage 58
Main Parts 59
Specifications 63
Troubleshooting 65
Maintenance and Repairs 67
Disposal 67
EC Declaration of Conformity 67
Dear Customer,
Thank you for choosing a quality
engineered STIHL product.
It has been built using modern
production techniques and
comprehensive quality assurance.
Every effort has been made to ensure
your satisfaction and troublefree use of
the product.
Please contact your dealer or our sales
company if you have any queries
concerning this product.
Your
Dr. Nikolas Stihl
0000007186_002_GB
Original Instruction Manual Printed on chlorine-free paper
Printing inks contain vegetable oils, paper can be recycled.
© ANDREAS STIHL AG & Co. KG, 2016
0458-652-9021-A. VA2.G16.
{
36
This instruction manual is protected by copyright. All rights reserved, especially the rights to reproduce, translate and process
with electronic systems.
RE 232, RE 272 PLUS, RE 282 PLUS
Page 39

English
Guide to Using this Manual Safety Precautions and
Working Techniques
Pictograms
Special safety pre
cautions must be
All the pictograms attached to the
machine are shown and explained in this
manual.
observed when
using this machine
because it uses
electrical power.
Symbols in text
It is important you
read and under
WARNING
Warning where there is a risk of an
accident or personal injury or serious
damage to property.
stand the
Instruction Manual
before first use and
keep the manual in
a safe place for
NOTICE
Caution where there is a risk of
damaging the machine or its individual
components.
Engineering improvements
STIHL's philosophy is to continually
improve all of its products. For this
reason we may modify the design,
engineering and appearance of our
products periodically.
Therefore, some changes, modifications
and improvements may not be covered
in this manual.
future reference.
Non-observance of
the Instruction
Manual may result
in serious or even
fatal injury.
WARNING
– Children or youngsters
-
should never be allowed to
use the machine.
Supervise children to
ensure that they do not
play with the machine.
– The machine should only
be provided or loaned to
-
people familiar with this
model and its operation.
The instruction manual
should always be handed
over with the machine.
– Do not use the machine if
anyone not wearing
protective clothing is in the
working area.
– Before starting any work
on the machine, e. g.,
cleaning, servicing,
replacement of parts –
unplug the power plug!
– Aerosols may form when
using a high-pressure
cleaner. Inhaling aerosols
can be harmful to health.
To determine the
measures necessary for
protection against
aqueous aerosols, before
starting work a risk
assessment should be
RE 232, RE 272 PLUS, RE 282 PLUS
37
Page 40

English
carried out according to
the surface to be cleaned
and the surrounding area.
Respiratory masks of class
FFP2 or higher offer
protection against
aqueous aerosols.
Comply with national safety
regulations issued, e.g. by
employers' liability insurance
associations, social security
institutions, occupational
safety and health authorities
or other organizations.
When the machine is not in
use, shut it off so that it does
not endanger others. Ensure
that the machine cannot be
used without authorization;
unplug the power plug.
The machine may only be
used by persons who have
been duly trained to use and
handle it or who can
demonstrate that they can
operate the machine safely.
The machine can be used by
persons with limited physical,
sensory or mental capacity or
with little experience and
know-how as long as they are
supervised and have been
instructed on how to handle
the machine safely and
understand the associated
risks.
The user is responsible for
avoiding injury to third parties
or damage to their property.
If you have not used this
machine model before: Have
your STIHL dealer or another
expert show you how to use it
safely.
In some countries, operation
of machines that emit noise
may be restricted by municipal
regulations. Observe national
regulations.
Always check that the
machine is in good working
order before starting work.
Pay particular attention to the
connecting cord, power plug,
high-pressure hose, spray
attachment and safety
mechanisms.
Never operate the machine
with a defective high-pressure
hose – ensure that it is
replaced immediately.
The machine may only be
used when all parts are in
perfect working order.
The high-pressure hose must
not be driven over, pulled,
buckled or twisted.
Do not use the high-pressure
hose or connecting cord to
pull or transport the machine.
The high-pressure hose must
be approved for the
permissible excess pressure
of the machine.
The permissible excess
pressure, the maximum
permitted temperature and
the date of manufacture are
stated on the cladding of the
high-pressure hose. The
permissible pressure and date
of manufacture are specified
on the fittings.
Accessories and Spare Parts
WARNING
– High-pressure hoses,
fittings and couplings are
important for machine
safety. Only high-pressure
hoses, fittings, couplings
and other accessories
which have been approved
by STIHL for this machine
or technically equivalent
parts may be mounted on
the machine. If you have
38
RE 232, RE 272 PLUS, RE 282 PLUS
Page 41

English
any questions in this
respect, consult a
servicing dealer. Use only
high-quality accessories.
Otherwise, there may be a
risk of accidents or
damage to the unit.
– STIHL recommends the
use of genuine STIHL
parts and accessories.
These have been
optimized for the product
and the user's
requirements.
Do not modify the machine –
otherwise the safety may be
endangered. STIHL excludes
all liability for personal injury
and damage to property
caused while using
unauthorized attachments.
Physical suitability
The machine may only be
operated by people who are
rested, in good physical
condition and mental health. If
you have any condition that
might be aggravated by
strenuous work, check with
your doctor before operating
this machine.
Anyone who has consumed
alcohol, medicines affecting
their ability to react or drugs
must not operate the machine.
Areas of application
The high-pressure cleaner
can be used to clean surfaces,
motor vehicles, machines,
tanks, facades or stables and
to remove rust without dust or
sparks.
Other uses are not permitted
and may lead to accidents or
damage to the machine.
Do not operate the machine at
temperatures near or below
0°C (32°F).
Clothing and equipment
Wear shoes with non-slip
soles.
WARNING
To reduce the risk
of eye injuries,
wear tight-fitting
safety goggles
conforming to
standard EN 166.
Make sure that the
safety goggles fit
correctly.
Wear protective clothing.
STIHL recommends that a
boiler suit be worn in order to
reduce the risk of injury due to
accidental exposure to the
high-pressure jet.
Transport
When transporting in and on
vehicles:
– Secure the high-pressure
cleaner in accordance with
the regulations applicable
in the country of use to
prevent toppling over and
damage
– Drain the detergent tank
and secure it to prevent
toppling over
RE 232, RE 272 PLUS, RE 282 PLUS
39
Page 42
English
Antifreeze is recommended if
the machine and accessories
are to be transported at
temperatures near or below
0 °C (32 °F) - see “Storage”.
Detergents
WARNING
– The machine was
designed for use with the
detergents offered or
recommended by the
manufacturer.
– Use only detergents that
are approved for use with
high-pressure cleaners.
Use of unsuitable
detergents can cause
damage to health, as well
as to the machine and the
object to be cleaned. If you
have any questions in this
respect, consult a
servicing dealer.
– Always use detergent in
the specified dosage –
follow the corresponding
instructions for use of the
detergent.
– Chemical detergents may
contain physiologically
harmful (toxic, caustic,
irritant), flammable or
explosive substances. In
the event of skin or eye
contact with detergent,
flush the affected body
parts with plenty of clean
water immediately. If
detergent is swallowed,
seek medical attention
immediately. Note the
manufacturer's safety data
sheets!
Before starting work
Do not connect the
high-pressure
cleaner directly to
the drinking water
main.
WARNING
– If drinking water has
passed through the back
flow preventer, it can no
longer be regarded as
drinking water.
Do not use the machine with
dirty water.
If there is a risk that dirty water
will occur (e. g., flowing sand),
an appropriate water filter
must be used.
Inspect the high-pressure
cleaner
WARNING
– The high-pressure cleaner
should only be used if it is
in full working order and
undamaged – risk of
accident!
– It must be possible to
move the switch to the 0
position easily
– The switch must be in the 0
position
40
Only connect the highpressure cleaner to the
drinking water main in
conjunction with a back flow
preventer – see "Special
accessories".
– Do not use the machine
with a damaged highpressure hose, spray
attachment and safety
devices
RE 232, RE 272 PLUS, RE 282 PLUS
Page 43

English
High-pressure hose and
–
spray attachment in good
condition (clean, moving
easily) and correctly
assembled
– For good control of the
machine, the handles
should be clean and dry
with no oil or dirt on them
– Check oil level
– Never attempt to modify
the controls or safety
devices in any way
– Set up the machine so that
it cannot slip or tip over.
Only operate the machine
on a stable and level
ground
Electrical connection
WARNING
Minimize the risk of electrical
shock:
– Voltage and frequency of
the machine (see rating
plate) must match the
voltage and frequency of
the mains supply
– Examine the connecting
cord, power plug and
extension cord for
damage. Do not use the
machine with a damaged
connecting cord, extension
cord or damaged power
plug
– Only connect the machine
to a correctly installed
power socket
– The insulation on the
connecting cord and any
extension cord, the plug
and the coupling must be
fully intact
– Never touch the power
plug, connecting cord and
extension cord, and
electrical plug connections
with wet hands
WARNING
Route the connecting cord
and extension cord properly:
– Observe the minimum
cross-section of the
individual cords – see
"Connecting the machine
to the power supply"
– Route and mark the power
cord so that it cannot
become damaged and no
one is endangered – risk of
stumbling!
– Use of unsuitable
extension cords can be
dangerous. Use only
extension cords that are
approved for outdoor use
and are correspondingly
marked and have a
sufficient cross-section
– The connector and
coupling of the extension
cord must be waterproof
and must not lie in water
– It is advisable to keep the
plug connection at least
60 mm above the
ground/floor, e. g. by using
a cable reel
– Don't let the cord rub
against edges or pointed
or sharp objects
RE 232, RE 272 PLUS, RE 282 PLUS
41
Page 44

English
Don't squeeze the cord
–
under doors or windows
– If cords become snarled –
unplug the power plug and
unsnarl the cord
– Always unroll the power
cord from the cable reel
completely, to avoid risk of
fire due to overheating.
During operation
WARNING
– Never draw in fluids
containing solvents or
undiluted acids and
solvents (e. g., gasoline,
heating oil, paint thinner or
acetone). These
substances damage the
materials used in the
machine. The spray is
highly combustible,
explosive and poisonous.
The plug must be
disconnected
immediately if the
cord is damaged –
danger of
electrocution!
Never direct the
high-pressure jet
or water hose
against the
machine itself or
against other elec
trical appliances
and equipment –
danger of shortcircuiting!
Never direct the
high-pressure jet
or water hose
against electrical
equipment, con
nections and
power cords – dan
ger of shortcircuiting!
Never direct the
high-pressure jet
against yourself or
other people, not
even to clean
clothing or shoes –
risk of injury!
Ensure you always have a
firm and safe footing.
The machine may only be
operated in an upright
position.
Beware of slipping on ice,
water, snow or uneven
ground!
Keep the high-pressure
cleaner as far away as
-
possible from the object being
cleaned.
Do not cover the machine.
Ensure adequate motor
ventilation.
Do not direct the highpressure jet toward animals.
Do not direct the high-
-
pressure jet onto places you
cannot see.
-
Keep children, animals and
bystanders at a safe distance.
Hazardous substances (e. g.
asbestos or oil) must not be
allowed to escape into the
environment unchecked when
working with the machine. The
applicable environmental
regulations must be observed
without fail.
Surfaces of asbestos cement
must never be cleaned with a
high-pressure jet. Hazardous,
breathable asbestos fibers
may be released in addition to
the dirt. The danger is
greatest when the washed
surface has dried.
42
RE 232, RE 272 PLUS, RE 282 PLUS
Page 45

English
Delicate parts made of rubber,
fabric or similar materials
must not be cleaned with a
pencil jet, e. g. from the rotary
nozzle. Maintain a sufficient
distance between the highpressure hose and the surface
when cleaning to avoid any
damage to the surface being
cleaned.
The trigger on the spray gun
must move easily and
automatically return to its
starting position when
released.
Hold the spray attachment
firmly with both hands in order
safely to withstand the
kickback force and additional
torque produced when using
spray attachments with an
angled spray lance.
Do not buckle or loop the highpressure hose.
Ensure that the connecting
cord and the high-pressure
hose are not damaged by
being driven over, squashed
or pulled; protect them against
heat and oil.
Do not touch the connecting
cord with the high-pressure
jet.
If the machine is subjected to
a strain for which it was not
designed (e. g., heavy impact
or a fall), always check that it
is in good condition before
continuing work - refer also to
the chapter "Before starting
work". Also make certain that
the safety mechanisms are
working properly. Never
continue using a machine that
is not in perfect working order.
In case of doubt, have the unit
checked by your servicing
dealer.
Before leaving the machine
unattended: Switch off the
machine – unplug the power
plug.
Safety equipment
When the safety equipment is
activated, excessive pressure
is returned to the intake side
of the pump via a safety valve.
This safety feature has been
set by the manufacturer and
must not be adjusted.
After finishing work
Switch off the
machine before
leaving it!
– Unplug the power plug
from the socket
– Disconnect water intake
hose between machine
and water supply
Never unplug the power plug
by pulling on the connecting
cord: always grip the plug
itself.
Maintenance and repairs
WARNING
Before starting any
work on the
machine: Always
disconnect the
machine from the
mains power
supply.
– Use only high-quality
spare parts. Otherwise,
there may be a risk of
accidents and damage to
the unit. If you have any
questions in this respect,
consult a servicing dealer.
– To avoid risks, work on the
machine (e. g. replacing a
damaged power cord) may
only be carried out by
authorized dealers or
qualified electricians.
RE 232, RE 272 PLUS, RE 282 PLUS
43
Page 46

English
2
1
6158BA001 KN
1
2
6158BA003 KN
Clean plastic parts with a
cloth. Harsh detergents can
damage the plastic.
Clean ventilation slots in
motor housing as needed.
The machine must be
serviced regularly. Do not
attempt any maintenance or
repair work not described in
the Instruction Manual. All
other work should be carried
out by a servicing dealer.
STIHL recommends the use
of genuine STIHL spare parts.
Such parts have been
optimized for the machine and
the user's requirements.
STIHL recommends that
maintenance and repair work
be carried out only by
authorized STIHL dealers.
STIHL dealers receive regular
training and are supplied with
technical information.
Assembling the Unit
Various accessory parts must be
mounted on the machines before
starting for the first time.
Hose connection at the water intake
without water filter
N Remove protective cap (1) from the
connector
Ensure that the water intake strainer is
present in the connector.
N Attach the hose connector (2) and
tighten it by hand
with water filter
3
N Remove protective cap (1) from the
water inlet
N Fit and attach the union nut of the
water filter (2) and tighten it by hand
N Attach the hose connector (3) and
tighten it by hand
Machines without hose reel
Connector on high-pressure connection
1
2
6158BA002 KN
N Push seal (1) unto the high-
pressure hose
N Screw on and tighten the
connecting element (2)
44
RE 232, RE 272 PLUS, RE 282 PLUS
Page 47

English
1
2
6158BA004 KN
6158BA008 KN
Machines with hose reel
N Push the knob (1) unto the crank (2)
of the hose reel until it engages
Transporting the Unit
Carrying handle
The machine can be carried using the
transport handle.
Pushing the machine
1
2
6158BA009 KN
N Hold the machine firmly with both
hands on the pushbar (1)
N Steady the machine with your foot
on the kick plate (2), press
pushbar (1) downward and balance
the machine
RE 232, RE 272 PLUS, RE 282 PLUS
RE 272 PLUS, RE 282 PLUS
When transporting laying down, ensure
that the detergent does not leak.
N Removing detergent tank – see
"Fitting, removing detergent tank"
45
Page 48

English
647BA021 KN
1
2
2
1
6158BA005 KN
1
2
3
647BA022 KN
647BA023 KN
3
4
Fitting, removing spray lance
N Remove protective cap from the
spray lance and save for later use
N Pull back and hold the coupling (1)
N Push the spray lance (2) into the
mount on the spray gun, or pull it out
to remove the spray gun,
respectively
N Release the coupling (1)
Fitting, removing highpressure hose
Machine without hose reel
Connecting the high-pressure hose
N Push high-pressure hose onto the
connector (1)
N Fit and attach the union nut (2) and
tighten it by hand
Disconnecting the high-pressure hose
N Unscrew the union nut (2)
N Pull high-pressure hose off of
connector (1)
High-pressure hose and spray gun
Fitting
N Push the high-pressure hose (1)
onto the connector (2)
N Fit and attach the union nut (3) and
tighten it by hand
Removing
Machine with hose reel
N Push the coupling (4) in the
The high-pressure hose is already
connected.
46
direction of the arrow and hold it
N Loosen the union nut (3) and
unscrew it from the connector in the
direction of the arrow
High-pressure hose extension
Always use only one high-pressure hose
extension (special accessory).
N Connect the high-pressure hose
extension between the highpressure hose and spray gun.
RE 232, RE 272 PLUS, RE 282 PLUS
Page 49

English
2
1
2
RE 232
6158BA006 KN
RE 282
1
RE 272
003BA003 KN
Connecting the water supply
N Connecting the water hose
Briefly rinse out the water hose before
connecting it to the machine to prevent
sand and other particles from entering
the machine and to purge the air from
the water hose.
Diameter of water
hose: 3/4"
Length of water hose: min. 10 m (to
absorb pres
sure surges)
max. 25 m
N Push the coupling (1) on to the hose
connector (2)
N Turn on water supply
To vent the system:
-
N Actuate the spray gun (without
spray lance mounted) until a
uniform water jet emerges
Connection to the drinking water main
When hooking up to the drinking water
main, a backflow preventer must be
installed between the water tap and the
hose. The design of the backflow
preventer must comply with the
applicable country-specific regulations.
If drinking water has passed through the
backflow preventer, it can no longer be
regarded as drinking water.
Follow the rules laid down by the local
water supply company to prevent water
flowing back from the high-pressure
cleaner into the drinking water main.
Connecting to a pressureless
water supply
The high-pressure cleaner can only be
used in suction operation with the
suction set (special accessory).
NOTICE
As a rule, it is advisable to use a water
filter.
N Connect the machine to the
pressurized water supply and start it
up briefly in accordance with the
Instruction Manual
N Switch off the machine
N Disconnect the spray attachment
from the high-pressure hose
N Unscrew the hose connector from
the water connection
N Connect the suction set to the water
connection with the included
connector
Always use the connector included in
the suction set. The hose connectors
included as standard with the highpressure cleaner are not leakproof in
suction operation and thus are not
suitable for drawing in water.
N Fill the suction hose with water and
immerse the suction cup of the
suction hose in the water tank – do
not use dirty water
N Hold down the high-pressure hose
by hand
N Switching on the machine
N Wait until a steady jet exits the high-
pressure hose
RE 232, RE 272 PLUS, RE 282 PLUS
47
Page 50

English
1
6158BA007 KN
2
N Switch off the machine
N Connect spray attachment
N Switch on the machine with the
spray gun open
N Actuate the spray gun several times
briefly in order to bleed the air out of
the machine as quickly as possible
Connecting to Power Supply
The voltage and frequency of the
machine (see rating plate) must match
the voltage and frequency of the power
connection.
The minimum fuse protection of the
power connection must comply with the
specifications – see "Specifications".
The machine must be connected to the
power supply via an earth-leakage
circuit breaker to disconnect the power
supply if the differential current to earth
exceeds 30 mA for 30 ms.
The power connection must correspond
to IEC 60364-1 and relevant national
regulations.
When the machine is switched on,
voltage fluctuations that occur under
unfavorable mains conditions (high
power line impedance) may negatively
affect other connected electrical
appliances. Trouble is not anticipated at
power line impedances less than
0.15 Ω.
The extension cord must have the
following minimum cross-section
depending on the mains voltage and
cord length.
Cord length Minimum cross-
section
400 V / 3~:
400 V – 415 V / 3~:
up to 20 m 1.5 mm
20 m to 50 m 2.5 mm
230 V / 1~:
230 V / 3~:
up to 20 m 2.5 mm
2
2
2
20 m to 50 m 4 mm
2
230 V – 240 V / 1~:
up to 20 m 2.5 mm
20 m to 50 m 4 mm
2
2
200 V / 3~:
up to 10 m 3.5 mm
10 m to 30 m 5.5 mm
2
2
Connection to the power supply socket
Before connection to the power supply,
check that the machine is switched off –
see "Switching off the machine"
N Remove the power plug from the
upper holder (1)
N Swivel the lower holder (2) upward
and remove the power cord
N Plug the power cord or extension
cord into a properly installed outlet
48
RE 232, RE 272 PLUS, RE 282 PLUS
Page 51

English
1607BA011 KN
1
6158BA020 KN
1
647BA024 KN
Switching On
N Turn on water supply
NOTICE
The machine may only be switched on
when the water intake hose is connected
and the water supply has been turned
on. Otherwise the machine may be
damaged due to lack of water.
N Completely unroll the high-pressure
hose
N Turn the master switch to I – now
the machine is in standby mode
N Point the spray gun at the object to
be cleaned – never at persons!
When the machine is switched on,
voltage fluctuations that occur under
unfavorable mains conditions (high
power line impedance) may negatively
affect other connected electrical
appliances.
Trouble is not anticipated at power line
impedances less than 0.15 ohms.
Machine with hose reel
NOTICE
Always completely unroll the highpressure hose from the hose reel. The
high water pressure causes the highpressure hose to expand. This can also
damage the hose reel or high-pressure
hose.
N Pull out hose reel stop (1)
N Completely unroll the high-pressure
hose
Working
Actuate the spray gun
N Point the spray gun at the object to
be cleaned – never at persons!
N Point the rotary nozzle downwards
when starting (if fitted)
N Press the safety latch (1) in the
direction of the arrow – the lever (2)
is unlatched
N Squeeze the lever (2)
The engine starts automatically and
stops again as soon as the lever (1) is
released. The machine is then in
standby mode.
RE 232, RE 272 PLUS, RE 282 PLUS
49
Page 52

English
1
2
6158BA010 KN
6158BA028 KN
6158BA013 KN
Standby mode
NOTICE
The machine must not be operated in
standby mode for more than 5 minutes.
Switch off the machine at the master
switch – see "Switching off the
machine",
– if work is interrupted for more than
5min,
– during breaks,
– if the machine is left unattended.
Pressure/quantity control on the
machine
Only RE 272 PLUS, RE 282 PLUS
Working pressure and water flow rate
can be set on the high-pressure pump
for long-term adjustment in line with the
cleaning job concerned.
High-pressure hose
NOTICE
Do not buckle or loop the high-pressure
hose.
Do not place any heavy objects on the
high-pressure hose, and do not drive
any vehicles over it.
Adding detergent
Detergent cannot be used when a highpressure hose extension is installed.
Detergent can only be drawn into the
machine in low-pressure operation.
N Turn the nozzle sleeve as far as it
will go towards "CHEM" = lowpressure operation
RE 232
N Turn the knob (1) to set the working
pressure and water flow rate
The pressure in the high-pressure pump
is indicated by a pressure gauge (2).
50
N Push the intake hose as far as
possible into the separate container
RE 272 PLUS, RE 282 PLUS
Fitting, removing detergent tank
The detergent tank can be removed
from the machine for filling, emptying
and cleaning.
RE 232, RE 272 PLUS, RE 282 PLUS
Page 53

English
6158BA017 KN
6158BA014 KN
6158BA015 KN
6158BA016 KN
N Unscrew the cap with intake hose
from the detergent container
N Pull the detergent tank out of the
holder
Drawing detergent from the detergent
tank
N Fill detergent tank with detergent
diluted as specified
N Push the intake hose as far as
possible into the container
Using detergent from a separate
container
N Unscrew the cap with intake hose
from the detergent container
opening
N Screw the cap with intake hose onto
separate container
The cap has a standard thread and fits
all standard separate containers.
N Push the intake hose as far as
possible into the separate container
All versions
N Use the detergent metering knob to
adjust the amount of detergent to be
added
Detergent metering knob
to the left: 0 % (min)
Detergent metering knob
to the right: 5 % (max)
N When applying detergent, start at
the bottom and work upwards
Detergent must not be allowed to dry on
the object to be cleaned
If detergent is no longer to be added:
N Set the detergent metering knob to
0 % (min)
N Let the high-pressure cleaner
continue to run with the spray gun
open until no more detergent comes
out of the nozzle
After finishing work
N Drain the detergent container and
flush it out with clean water
N Immerse the intake hose in clean
water
N Operate the spray gun and flush out
the residual detergent
Precisely calculating/setting the
detergent concentration
For a few detergents, the concentration
must be very precisely set. In this case,
measure the water flow and detergent
consumption.
N Set the detergent metering knob to
"0 % (min)"
N Hold the spray gun in a suitable
empty receptacle (> 20 l) and
actuate for exactly 1 minute
N Measure the quantity of water "Q" in
the container
RE 232, RE 272 PLUS, RE 282 PLUS
51
Page 54

English
N Fill 2 liters of detergent diluted as
directed into a suitable container
(with a scale of 0.1 l) – STIHL
recommends the use of genuine
STIHL detergents
N Hold the intake hose in the
container
N Set the detergent metering knob to
the desired concentration: 0 %
(min) to 5 % (max)
N Hold the spray gun in a suitable
empty receptacle (> 20 l) and
actuate for exactly 1 minute
N Read the detergent consumption
"QR" on the scale
Calculating the actual detergent
concentration:
QR
x V = concentration
Q
– QR = amount of detergent
consumed (in l/min)
– Q = Water without detergent
(in l/min)
– V = Predilution of detergent (in %)
If the actual concentration deviates from
the desired concentration, reset knob
and repeat measurement if necessary.
Calculating the predilution of the
detergent in %
If the predilution is not indicated as a
percentage, it can be calculated using
the following table:
Ratio
1:1 = 50 %
1:2 = 33.3 %
1:3 = 25 %
1:5 = 16.6 %
1:10 = 9 %
Example:
Calculation ratio of 1:2
– A = 1
– B = 2
A
(A + B)
(1 + 2)
x 100 = value in %
1
x 100 = 33.3 %
Tips for operation
The following information and examples
of application make work easier and
contribute to achieving an optimum
cleaning result.
Operating pressure and water
throughput
High pressure dissolves dirt better. The
higher the water throughput, the easier it
is to remove the dirt that has been
loosened.
Clean delicate parts and surfaces (e. g.
car paint, rubber) by applying low
pressure or at a greater distance to
avoid damage. 100 bar pressure is
sufficient for cleaning vehicles.
Nozzles
Fan-jet nozzle
All-purpose – to clean parts and
(sensitive) surfaces.
Applications:
– Cleaning vehicles and machines
– Cleaning floors and surfaces
– Cleaning roofs and facades
Rotary nozzle
To remove stubborn dirt on hard-
wearing surfaces.
Extremely dirty surfaces
Soak extremely dirty surfaces with water
before cleaning them.
52
RE 232, RE 272 PLUS, RE 282 PLUS
Page 55

English
1607BA018 KN
1
647BA029 KN
1
2
6158BA018 KN
Detergents:
The cleaning effect can be improved by
using detergents. The corresponding
exposure time (dependent on the
detergent used) increases the cleaning
performance.
Do not allow the detergent to dry.
Always use detergent in the specified
dosage and follow the corresponding
instructions for use of the detergent.
Mechanical cleaning:
The additional use of e. g. rotary nozzles
or washing brushes helps to remove
highly adhesive layers of dirt.
Switching Off
N Turn the master switch to 0
N Turn off water supply
N Actuate the spray gun until water
only drips from the spray head (the
machine is now depressurized)
N Release trigger
After Finishing Work
N Unplug the power plug from the
socket
N Disconnect hose from the water
supply and from the machine
Connecting cord
RE 232, RE 272 PLUS, RE 282 PLUS
N Press the safety latch (1) in the
direction of the arrow – the spray
gun is locked to prevent inadvertent
operation
N Swivel lower holder (1) downward
N Roll up the connecting cord and
hook onto the holder (2)
53
Page 56

English
6158BA019 KN
6158BA021 KN
Rolling up the high-pressure hose and
storing the spray attachment
RE 232
N Insert gun and spray lance into the
holders
N Roll up high-pressure hose and
hook onto the holder
RE 272 PLUS, RE 282 PLUS
N Insert gun and spray lance into the
holders
N Roll up high-pressure hose
Storing the Machine
Store the machine in a dry room where it
is protected from frost.
If protection from frost cannot be
guaranteed, draw glycol-based
antifreeze – like that used in motor
vehicles – into the pump:
N Insert water intake hose in container
with antifreeze
N Insert spray gun without spray lance
in the same container
N Switch on the machine with the
spray gun open
N Actuate the spray gun until a
uniform jet emerges
N Keep leftover antifreeze in a sealed
container
54
RE 232, RE 272 PLUS, RE 282 PLUS
Page 57

Maintenance and Care
English
The following maintenance intervals apply in normal operating conditions. The spec
ified intervals must be shortened accordingly for longer daily working hours. If the
machine is only used occasionally, the intervals can be extended accordingly.
Complete machine
Oil level of the high-pressure pump Check X
Oil of the high-pressure pump Have it changed by a servicing dealer
Connectors on high-pressure hose
Plug-type coupling of the spray lance and
the coupling sleeve of the spray gun
Water intake screen
sure inlet
Water filter
High pressure nozzle
Ventilation openings Clean X
Machine supports
1
STIHL recommends STIHL servicing dealers
2
Once after the first 50 hours of operation
3
According to equipment version
3)
in the high-pres
3)
Visual inspection (condition, leaks) X
Clean XX
Clean XX
grease X
Clean XX
Clean XX
-
Replace X
Visual inspection (Dirt) X
Clean X
Replace X
Clean X
Replace X
Check X
Replace X
-
Before starting work
At the end of work and/or
daily
Weekly
Monthly
RE 232 every 200 operating
hours
RE 272, 282 every 300 oper-ating hours
1)
2
X
X
If faulty
If damaged
2
As required
RE 232, RE 272 PLUS, RE 282 PLUS
55
Page 58

English
647BA031 KN
6158BA026 KN
1
2
3
4
6158BA027 KN
1
6158BA022 KN
2
Maintenance
Always unplug the power cord before
servicing or cleaning the machine.
In order to ensure trouble free operation,
we recommend carrying out the
following steps whenever the machine is
used:
N Rinse the water hose, high-
pressure hose, spray lance and
accessories with water before fitting
them
N Remove all sand and dust from the
plug-type coupling of the spray
lance and the coupling sleeve of the
spray gun
Cleaning the high-pressure nozzle
Since the pump pressure increases if
the nozzle is clogged, it must be cleaned
immediately.
NOTICE
Always remove the spray lance before
cleaning the nozzle
N Rinse spray lance with water from
the nozzle end
Cleaning the water filter
Clean the water filter when dirty.
N Cover outlet opening (3) with finger
N Rinse filter housing thoroughly with
clear water.
N Lubricate the O-ring (4) in the filter
housing and the O-ring in the lid with
multipurpose grease
N Fit filter insert
N Screw on and tighten lid
Cleaning the water intake screen
If the unit does not have a water filter,
clean the water intake screen once a
week or more often as necessary.
N Switch off the machine
N Actuate the spray gun until water
merely drips from the spray head –
the machine is now depressurized
N Remove spray lance
N Clean nozzle with a suitable needle
56
N Unscrew lid (1)
N Lift the filter insert (2) up and off
N Thoroughly rinse the lid (1) with
clear water
N Thoroughly rinse the filter insert
from the inside to the outside with
clear water
N Check filter insert – exchange if
filter insert is damaged
N Disconnect hose connector (1).
N Carefully release the strainer (2)
with pliers and rinse it.
N Before refitting the strainer, ensure
that it is undamaged and replace if
necessary
RE 232, RE 272 PLUS, RE 282 PLUS
Page 59
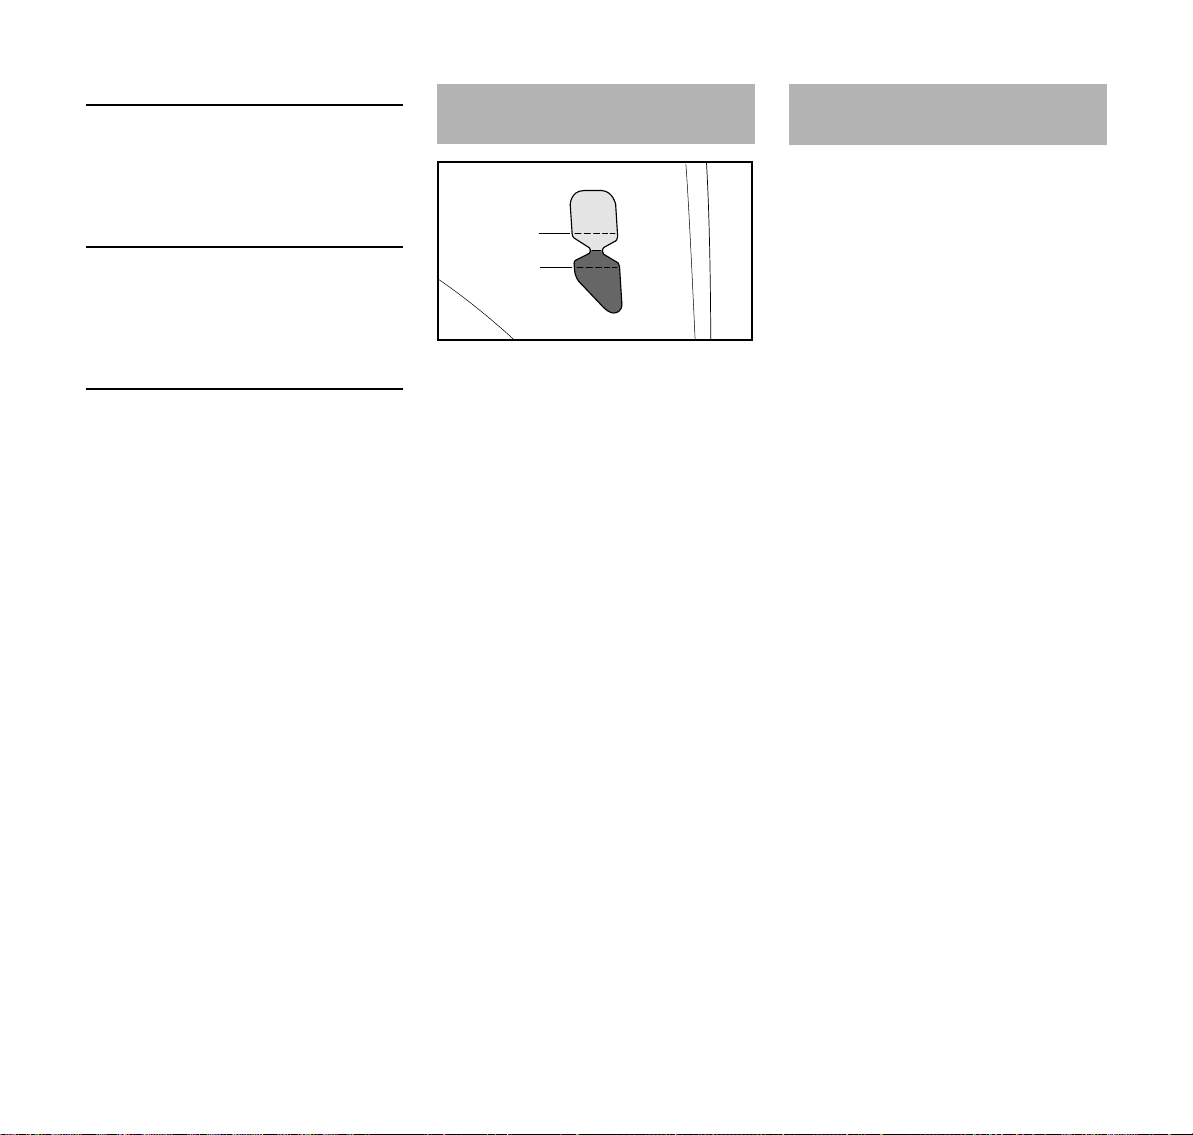
English
6158BA023 KN
max.
min.
Cleaning the ventilation openings
The machine must be kept clean so that
cooling air can flow freely through the
openings in the machine.
Lubricating the connections
Lubricate the connections on the highpressure hose with multipurpose grease
as necessary.
Checking the machine supports
The two front machine supports must be
replaced if damaged or worn, to ensure
the stability of the machine.
Checking the oil level
Check oil level weekly and after
transport.
N Place the machine on a flat
horizontal surface
N Check that the oil level is between
the “min” and “max” marks. If it is
not, contact your servicing dealer.
STIHL recommends STIHL
servicing dealers
First use after long periods of
storage
During long periods of storage, mineral
residue from the water may be
deposited in the pump. This may cause
the motor to start with difficulty or not at
all.
N Connect the machine to the water
supply and flush thoroughly with tap
water, leave the power cord
unplugged while doing so
N Plug the power plug into the wall
socket
N Switch on the machine with the
spray gun open
RE 232, RE 272 PLUS, RE 282 PLUS
57
Page 60

English
Minimize Wear and Avoid
Damage
Compliance with the specifications of
this owner's manual will avoid excessive
wear and damage to the machine.
The machine must be used, maintained
and stored as carefully as described in
this owner's manual.
The user is responsible for all damage
caused by failure to comply with the
safety, operating and maintenance
instructions. This applies in particular
for:
– Product modifications not
authorized by STIHL
– Use of accessories that are not
approved for the machine,
unsuitable or of inferior quality
– Use of the machine in a manner not
in keeping with the intended use
– Use of the machine in sporting
events or competitions
– Consequential damages due to
continued use of a machine with
defective components
– Damage due to freezing
– Damage due to improper power
supply voltage
– Damage due to poor water supply
(e.g., cross-section of the intake
hose too small)
Maintenance work
not carry out these maintenance tasks
him- or herself, they should be
delegated to a dealer.
STIHL recommends that maintenance
and repair work be carried out only by
authorized STIHL dealers. STIHL
dealers receive regular training and are
supplied with technical information.
If these tasks are not performed or are
performed improperly, this may result in
damage for which the user is
responsible. Among other things, this
includes:
– Damage to machine components
due to delayed or insufficient
performance of maintenance
– Corrosion damage and other
consequential damages due to
improper storage
– Damage to the machine as a result
of using replacement parts of
inferior quality
Wear parts
Some parts of the machine are subject
to normal wear and tear even when the
machine is used in conformity with its
intended use. These parts must be
replaced in due time, depending on the
nature and duration of use. These
include, among others:
– High-pressure nozzles
– High-pressure hoses
All of the tasks listed under
"Maintenance and Repairs" must be
carried out periodically. If the user does
58
RE 232, RE 272 PLUS, RE 282 PLUS
Page 61

Main Parts
24
18
12
6158BA024 KN
2
8
5
6
1
3
7
9
10
11
14
13
17
16
21
22
20
23
19
15
#
English
RE 232
1 Spray gun
2 Coupling for spray lance
3 Safety catch
4 Lever
5 Safety latch for high-pressure hose
6 Union nut for high-pressure hose
7 Nozzle
8 Nozzle sleeve for detergent intake
9 High-pressure hose
10 Pushbar
11 Spray lance holder
12 Spray gun holder
13 Detergent metering knob
14 Machine switch
15 Bracket for spray lance
# Model plate
RE 232, RE 272 PLUS, RE 282 PLUS
59
Page 62

24
18
12
6158BA024 KN
2
8
5
6
1
3
7
9
10
11
14
13
17
16
21
22
20
23
19
15
#
English
RE 232
16 Hose connection water intake
17 High-pressure hose connector
18 Carrying handle
19 Water filter
20 Holder for high-pressure hose
21 Suction hose for detergent
22 Power cord holder
23 Oil level display
24 Kick plate
# Model plate
1)
60
1)
According to version
RE 232, RE 272 PLUS, RE 282 PLUS
Page 63

English
21
23
22
26
29
19
16
11
13
18
6158BA025 KN
2
8
5
6
1
3
7
10
9
12
20
14
15
25
24
27
28
#
17
RE 272 PLUS, RE 282 PLUS
1 Spray gun
2 Coupling for spray lance
3 Safety catch
4 Lever
5 Safety latch for high-pressure hose
6 Union nut for high-pressure hose
7 Nozzle
8 Nozzle sleeve for detergent intake
9 Rotary nozzle
10 High-pressure hose
11 Pushbar
12 Spray lance holder
13 Guide clip
14 Machine switch
15 Detergent metering knob
16 Pressure gauge
# Model plate
RE 232, RE 272 PLUS, RE 282 PLUS
61
Page 64

21
23
22
26
29
19
16
11
13
18
6158BA025 KN
2
8
5
6
1
3
7
10
9
12
20
14
15
25
24
27
28
#
17
English
RE 272 PLUS, RE 282 PLUS
17 Bracket for spray lance
18 Water intake with water filter and
hose connector
19 Carrying handle
20 Spray gun holder
21 Hose reel
22 Crank handle for hose reel
23 Hose reel stop
24 Power cord holder
25 Oil level display
26 Pressure/quantity control knob
27 Cap for detergent tank
28 Detergent tank
29 Kick plate
# Model plate
62
RE 232, RE 272 PLUS, RE 282 PLUS
Page 65

Specifications
English
RE 232 RE 232
1
RE 232 RE 272 PLUS: RE 282 PLUS:
Power supply: 230 V / 1~ / 50 Hz 230 V / 1~ / 50 Hz 220 V / 1~ / 60 Hz 230 V / 1~ / 50 Hz 400V/3~/50Hz
Power output: 3.3 kW 3 kW 3.1 kW 3 kW 3.5 kW
Fuse (characteristic "C" or
"K"): 16A 13A 15A 16A 10A
Protection class:IIIII
Type of protection: IP X5 IP X5 IP X5 IP X5 IP X5
Working pressure: 14.5 MPa
(145 bar)
12.5 MPa
(125 bar)
13.5 MPa
(135 bar) 15 MPa (150 bar) 16 MPa (160 bar)
Max. permissible pressure: 20 MPa (200 bar) 18 MPa (180 bar) 20 MPa (200 bar) 20 MPa (200 bar) 20 MPa (200 bar)
Max. water feed pressure: 1 MPa (10 bar) 1 MPa (10 bar) 1 MPa (10 bar) 1 MPa (10 bar) 1 MPa (10 bar)
Max. water throughput: 660 l/h 660 l/h 610 l/h 620 l/h 760 l/h
Water throughput as per
EN 60335-2-79: 590 l/h 590 l/h 560 l/h 560 l/h 700 l/h
Max. suction lift: 1m 1m 1m 1m 1m
Max. water feed tempera
ture in the pressurized
water supply:
Max. water feed tempera
-
60 °C (> 40 °C
max. 1h)
-
60 °C (> 40 °C
max. 1h)
60 °C (> 40 °C
max. 1h)
60 °C (> 40 °C
max. 1h)
60 °C (> 40 °C
max. 1h)
ture in suction operation: 40 °C 40 °C 40 °C 40 °C 40 °C
Max. kickback force: 24.6 N
2)
24.1 N
2)
21 N 2) / 22.3 N 3)22.7 N 2) / 24.2 N 3)29.6 N 2) / 31.5 N
3)
Length approx.: 392 mm 392 mm 392 mm 392 mm 392 mm
Width approx.: 390 mm 390 mm 390 mm 390 mm 390 mm
Height approx.: 1164 mm 1164 mm 1164 mm 1164 mm 1164 mm
Weight (with spray attach
-
ment and high-pressure
hose): approx. 36 kg approx. 36 kg approx. 37 kg approx. 42 kg approx. 42 kg
Length of high-pressure
hose (steel braided): 10 m, DN 06 10 m, DN 06 10 m, DN 06 15 m, DN 06 15 m, DN06
1
Great Britain
2
Fan-jet nozzle
3
Rotary nozzle
RE 232, RE 272 PLUS, RE 282 PLUS
63
Page 66

English
Sound and vibration levels
RE 232 RE 272 PLUS: RE 282 PLUS:
Sound pressure level L
p
to
75.7 dB(A) 72.4 dB(A) 73.4 dB(A)
ISO 3744 (at a distance of 1 m)
Sound power level L
to
w
89.9 dB(A) 86.6 dB(A) 87.6 dB(A)
ISO 3744
Vibration level ahv at the handle
<2.5m/s
according to ISO 5349
For the sound pressure level and the
sound power level, the K-factor in
accordance with Directive 2006/42/EC =
1.5 dB(A); for the vibration level, the
K-factor in accordance with
Directive 2006/42/EC = 2.0 m/s
2
.
REACH
REACH is an EC regulation and stands
for the Registration, Evaluation,
Authorisation and Restriction of
Chemical substances.
For information on compliance with the
REACH regulation (EC) No. 1907/2006
see www.stihl.com/reach.
2
<2.5m/s
2
<2.5m/s
2
64
RE 232, RE 272 PLUS, RE 282 PLUS
Page 67

English
Troubleshooting
Before working on the machine, unplug the power cord, turn off the water supply and actuate the spray gun until the pressure has
been relieved.
Fault Cause Remedy
Motor does not run when switched on
(hums when switched on)
Motor constantly switches on and off High-pressure pump or spray attachment is
Engine stops Machine switches off because the motor is
Weak, ragged, unclean jet Nozzle fouled Clean nozzle, see "Maintenance"
Pressure fluctuates or drops Shortage of water Open water tap completely
Mains voltage is too low or improper Check electrical connection
Check plug, cable and switch
Extension cord with wrong cross-section Use an extension cord with a sufficient
cross-section, see "Connecting the
machine to the power supply"
Extension cord is too long Connect the machine without an exten
-
sion cord or with a shorter one
Mains circuit-breaker has been tripped Switch off the machine, actuate the spray
gun until water only drips out of the head,
engage the safety catch, reset the mains
circuit-breaker
Spray gun not actuated Actuate spray gun when switching on the
machine
Have the machine checked by a servicing
leaky
dealer
1)
Check whether the supply voltage and
overheating
machine voltage match; let the motor cool
down for at least 5 minutes
Comply with permissible suction lift (suc
tion mode only)
High-pressure nozzle in spray head is dirty Clean high-pressure nozzle; see
"Maintenance"
Water intake strainer in pump inflow clogged Clean water intake strainer; see
"Maintenance"
Water filter at pump intake is dirty Clean water filter; see "Maintenance"
High-pressure pump is leaky, valves are
defective
Have the machine checked by a servicing
1)
dealer
Nozzle clogged Cleaning the nozzle
-
RE 232, RE 272 PLUS, RE 282 PLUS
65
Page 68

English
Before working on the machine, unplug the power cord, turn off the water supply and actuate the spray gun until the pressure has
been relieved.
Fault Cause Remedy
No supply of detergents Detergent tank empty Fill detergent tank
Detergent intake is clogged Eliminate clog
1
STIHL recommends STIHL servicing dealers
Injector worn Have the machine checked by a servicing
dealer
1)
66
RE 232, RE 272 PLUS, RE 282 PLUS
Page 69

English
Maintenance and Repairs Disposal
Users of this machine may only carry out
the maintenance and service work
described in this user manual. All other
repairs must be carried out by a
servicing dealer.
STIHL recommends that you have
servicing and repair work carried out
exclusively by an authorized STIHL
servicing dealer. STIHL dealers are
regularly given the opportunity to attend
training courses and are supplied with
the necessary technical information.
When repairing the machine, only use
replacement parts which have been
approved by STIHL for this power tool or
are technically identical. Only use highquality replacement parts in order to
avoid the risk of accidents and damage
to the machine.
STIHL recommends the use of original
STIHL replacement parts.
Original STIHL parts can be identified by
the STIHL part number, the {
logo and the STIHL parts symbol K
(the symbol may appear alone on small
parts).
Information concerning disposal is
available from a STIHL servicing dealer.
N High-pressure cleaner, accessories
and packaging must be disposed of
in accordance with the regulations
and in an environmentally beneficial
manner.
High-pressure cleaner,
accessories and packag
ing must be collected and
recycled in an environ
mentally beneficial
manner.
Do not dispose of highpressure cleaner, acces
sories and packaging as
household waste.
-
EC Declaration of Conformity
ANDREAS STIHL AG & Co. KG
-
Badstr. 115
D-71336 Waiblingen
Germany
hereby confirms that
Model: High-pressure
-
Make: STIHL
Type: RE 232
Serial identification
number: 4788
Type: RE 272 PLUS
Serial identification
number 4788
Type: RE 282 PLUS
Serial identification
number 4788
conforms to the applicable provisions of
Directives 2011/65/EU, 2006/42/EC,
2004/108/EC (until 19.04.2016),
2014/30/EU (from 20.04.2016) and
2000/14/EC and has been developed
and built in compliance with the versions
of the following standards valid at the
production date:
EN ISO 12100-1, EN ISO 12100-2,
EN 55014-1, EN 55014-2, EN 60335-1,
EN 60335-2-79, EN 61000-3-2,
EN 61000-3-11, EN 50581
The measured and guaranteed
equivalent sound power level has been
determined in accordance with Directive
2000/14/EC, Annex V.
cleaner
RE 232, RE 272 PLUS, RE 282 PLUS
67
Page 70

English
Measured sound power level
RE 232 89.9 dB(A)
RE 272 PLUS 86.6 dB(A)
RE 282 PLUS 87.6 dB(A)
Guaranteed sound power level
RE 232 91 dB(A)
RE 272 PLUS 89 dB(A)
RE 282 PLUS 90 dB(A)
The technical documentation has been
retained by:
ANDREAS STIHL AG & Co. KG
Produktzulassung
The year of construction of the machine
is shown on the CE plate on the
machine.
Waiblingen, 11 March 2016
ANDREAS STIHL AG & Co. KG
pp
Thomas Elsner
Head of Product Management and
Services
68
RE 232, RE 272 PLUS, RE 282 PLUS
Page 71

Table des matières
français
Indications concernant la présente
Notice d'emploi 70
Prescriptions de sécurité et
techniques de travail 70
Assemblage 79
Transport de l'appareil 80
Démontage, montage de la lance 80
Montage, démontage du flexible
haute pression 81
Notice d'emploi d'origineImprimé sur papier blanchi sans chlore
Établissement de l'alimentation en
eau 82
Établissement d'une alimentation
en eau hors pression 82
Branchement électrique 83
Mise en marche 84
Utilisation 85
Apport de détergent 86
Instructions à suivre pour le travail 88
Arrêt 88
Après le travail 89
Rangement 90
Instructions pour la maintenance et
l'entretien 91
L'encre d'imprimerie contient des huiles végétales, le papier
est recyclable.
Maintenance 92
Contrôle du niveau d'huile 93
Mise en service après un arrêt
prolongé 94
Conseils à suivre pour réduire
l'usure et éviter les avaries 94
Principales pièces 96
Caractéristiques techniques 100
Dépannage 102
Instructions pour les réparations 104
Mise au rebut 104
Déclaration de conformité CE 104
Chère cliente, cher client,
nous vous félicitons d'avoir choisi un
produit de qualité de la société STIHL.
Ce produit a été fabriqué avec les
procédés les plus modernes et les
méthodes de surveillance de qualité les
plus avancées. Nous mettons tout en
œuvre pour que cette machine vous
assure les meilleurs services, de telle
sorte que vous puissiez en être
parfaitement satisfait.
Pour toute question concernant cette
machine, veuillez vous adresser à votre
revendeur ou directement à
l'importateur de votre pays.
Dr. Nikolas Stihl
{
© ANDREAS STIHL AG & Co. KG, 2016
0458-652-9021-A. VA2.G16.
0000007186_002_F
RE 232, RE 272 PLUS, RE 282 PLUS
La présente Notice d'emploi est protégée par des droits d'auteur. Tous droits réservés, en particulier tout droit de copie, de tra
duction et de traitement avec des systèmes électroniques quelconques.
69
-
Page 72

français
Indications concernant la
présente Notice d'emploi
Pictogrammes
Tous les pictogrammes appliqués sur le
dispositif sont expliqués dans la
présente Notice d'emploi.
Repérage des différents types de textes
AVERTISSEMENT
Avertissement contre un risque
d'accident et de blessure ainsi que de
graves dégâts matériels.
AVIS
Avertissement contre un risque de
détérioration du dispositif ou de certains
composants.
Développement technique
La philosophie de STIHL consiste à
poursuivre le développement continu de
toutes ses machines et de tous ses
dispositifs ; c'est pourquoi nous devons
nous réserver tout droit de modification
de nos produits, en ce qui concerne la
forme, la technique et les équipements.
On ne pourra donc en aucun cas se
prévaloir des indications et illustrations
de la présente Notice d'emploi à l'appui
de revendications quelconques.
Prescriptions de sécurité et
techniques de travail
En travaillant avec
cet appareil, il faut
respecter des
prescriptions de
sécurité particu
-
lières, parce qu'il
fonctionne à
l'électricité.
Avant la première
mise en service,
lire attentivement
et intégralement la
présente Notice
d'emploi. La
conserver précieu
sement pour
pouvoir la relire
lors d'une utilisa
-
tion ultérieure. Un
utilisateur qui ne
respecte pas les
instructions de la
Notice d'emploi
risque de causer
un accident grave,
voire mortel.
AVERTISSEMENT
– Les enfants et les jeunes
encore mineurs ne sont
pas autorisés à travailler
avec cet appareil. Veiller à
ce que des enfants ne
jouent pas avec cet
appareil.
– Ne confier l'appareil qu'à
des personnes
familiarisées avec ce
modèle et sa manipulation
– toujours y joindre la
Notice d'emploi.
– Ne pas utiliser l'appareil
lorsque des personnes
-
sans vêtements de
sécurité se trouvent sur
l'aire de travail.
– Avant toute intervention
sur cet appareil, par ex.
nettoyage, opération de
maintenance,
remplacement de pièces –
retirer la fiche de la prise
de courant !
– Au cours du travail avec un
nettoyeur haute pression,
des aérosols peuvent se
former. L'inhalation
d'aérosols peut être
nocive. Pour déterminer
les mesures à prendre
70
RE 232, RE 272 PLUS, RE 282 PLUS
Page 73

français
pour se protéger contre les
aérosols aqueux, avant
d'entreprendre le travail, il
faut procéder à une
évaluation des risques en
fonction de la surface à
nettoyer et de son
environnement. Des
masques respiratoires de
la classe FFP2 ou d'une
classe supérieure
conviennent pour la
protection contre les
aérosols aqueux.
Respecter les prescriptions
de sécurité nationales
spécifiques publiées par ex.
par les caisses
professionnelles
d'assurances mutuelles,
caisses de sécurité sociale,
services pour la protection du
travail et autres organismes
compétents.
Lorsque l'appareil n'est pas
utilisé, il faut le ranger en
veillant à ce qu'il ne présente
aucun risque pour d'autres
personnes. Assurer l'appareil
de telle sorte qu'il ne puisse
pas être utilisé sans
autorisation. Retirer la fiche
de la prise de courant.
L'appareil ne doit être utilisé
que par des personnes qui ont
reçu les instructions
nécessaires pour son
utilisation et sa manipulation
ou peuvent fournir la preuve
qu'elles sont capables de
manier cet appareil en toute
sécurité.
L'appareil peut être utilisé par
des personnes qui ne
disposent pas de toute leur
intégrité physique, sensorielle
ou mentale, ou manquent de
connaissances et
d'expérience, à condition
qu'elles travaillent sous la
surveillance d'une personne
responsable et aient reçu les
instructions nécessaires pour
savoir utiliser l'appareil en
toute sécurité et comprendre
les risques liés à son
utilisation.
L'utilisateur est responsable
des blessures qui pourraient
être infligées à d'autres
personnes, de même que des
dégâts matériels causés.
Avant de travailler pour la
première fois avec cet
appareil : demandez au
vendeur ou à une autre
personne compétente de
vous montrer comment
l'utiliser en toute sécurité.
Dans certains pays,
l'utilisation de machines
bruyantes peut être soumise à
des réglementations locales
qui précisent les créneaux
horaires à respecter.
Respecter les prescriptions
nationales spécifiques.
Avant de commencer le
travail, vérifier chaque fois
l'appareil pour s'assurer qu'il
se trouve en bon état de
fonctionnement. Faire tout
particulièrement attention au
cordon d'alimentation
électrique, à la fiche de
branchement sur le secteur,
au flexible haute pression, au
dispositif de projection et aux
dispositifs de sécurité.
Ne jamais travailler avec un
flexible haute pression
endommagé – le remplacer
immédiatement.
Il est interdit d'utiliser
l'appareil si ses composants
ne sont pas tous dans un état
impeccable.
Il ne faut pas rouler sur le
flexible haute pression, ni
l'étirer, le plier ou le vriller.
RE 232, RE 272 PLUS, RE 282 PLUS
71
Page 74

français
Ne pas utiliser le flexible haute
pression ou le cordon
d'alimentation électrique pour
tirer ou transporter l'appareil.
Le flexible haute pression doit
être homologué pour la
pression de service maximale
admissible de l'appareil.
La pression de service
maximale admissible, la
température maximale
admissible et la date de
fabrication sont indiquées sur
l'enrobage du flexible haute
pression. La pression
admissible et la date de
fabrication sont indiquées sur
les éléments de
raccordement.
Accessoires et pièces de
rechange
AVERTISSEMENT
– Les flexibles haute
pression, les raccords
rapides et les accessoires
de tuyauterie jouent un
rôle important pour la
sécurité de l'appareil.
Monter exclusivement des
flexibles haute pression,
raccords rapides et
accessoires de tuyauterie,
ou autres, autorisés par
STIHL pour cet appareil ou
des pièces similaires du
point de vue technique.
Pour toute question à ce
sujet, s'adresser à un
revendeur spécialisé.
Utiliser exclusivement des
accessoires de haute
qualité. En ne respectant
pas ces prescriptions, on
risquerait de causer un
accident ou
d'endommager l'appareil.
– STIHL recommande
d'utiliser des pièces et
accessoires d'origine
STIHL. Leurs
caractéristiques sont
optimisées tout
spécialement pour ce
produit, et pour satisfaire
aux exigences de
l'utilisateur.
N'apporter aucune
modification à cet appareil –
cela risquerait d'en
compromettre la sécurité.
STIHL décline toute
responsabilité pour des
blessures ou des dégâts
matériels occasionnés en cas
d'utilisation d'équipements
rapportés non autorisés.
Aptitudes personnelles
L'utilisateur de l'appareil doit
être reposé, en bonne santé
et en bonne condition
physique. Une personne à
laquelle il est interdit
d'effectuer des travaux
fatigants – pour des questions
de santé – devrait consulter
son médecin et lui demander
si elle peut travailler avec cet
appareil.
Il est interdit de travailler avec
cet appareil après avoir
consommé de l'alcool ou de la
drogue ou bien après avoir
pris des médicaments qui
risquent de limiter la capacité
de réaction.
Domaines d'utilisation
Le nettoyeur haute pression
convient pour le nettoyage de
surfaces, véhicules
automobiles, machines,
cuves, conteneurs, façades,
locaux d'une exploitation
agricole de même que pour le
décapage d'objets rouillés,
sans dégagement de
poussière ni d'étincelles.
72
RE 232, RE 272 PLUS, RE 282 PLUS
Page 75

français
L'utilisation de cet appareil
pour d'autres travaux est
interdite et risquerait de
provoquer des accidents ou
d'endommager l'appareil.
Ne pas utiliser l'appareil à des
températures égales ou
inférieures à 0 °C (32 °F).
Vêtements et équipement
Porter des chaussures à
semelle crantée
antidérapante.
AVERTISSEMENT
Étant donné le
risque de blessure
des yeux, il faut
impérativement
porter des lunettes
de protection cou
-
vrant étroitement
les yeux, confor
-
mément à la
norme EN 166.
Veiller à ce que les
lunettes soient par
faitement ajustées.
risque de blessure en cas de
contact accidentel avec le jet
haute pression.
Transport
Pour le transport dans ou sur
un véhicule :
– Assurer le nettoyeur haute
pression, conformément
aux prescriptions
nationales spécifiques,
afin qu'il ne risque pas de
se renverser et d'être
endommagé.
– Vider le réservoir à
détergent et l'assurer afin
qu'il ne risque pas de se
renverser.
Si l'appareil et ses
accessoires doivent être
transportés à des
températures inférieures à
0 °C (32 °F), il est
recommandé d'employer de
l'antigel – voir « Rangement ».
-
Détergents
AVERTISSEMENT
– L'appareil a été mis au
point de telle sorte que l'on
puisse employer tous les
détergents proposés ou
recommandés par le
fabricant.
– N'utiliser que des
détergents autorisés pour
l'emploi avec des
nettoyeurs haute pression.
L'utilisation de détergents
ou autres produits
chimiques qui ne
conviennent pas peut
présenter des risques pour
la santé ou endommager
l'appareil ou l'objet à
nettoyer. Pour toute
question à ce sujet,
s'adresser à un revendeur
spécialisé.
Porter des vêtements de
protection. STIHL
recommande de porter une
salopette pour réduire le
RE 232, RE 272 PLUS, RE 282 PLUS
73
Page 76

français
À l'utilisation de
–
détergents, toujours
respecter le dosage
prescrit – suivre le mode
d'emploi du détergent
respectif.
– Les détergents peuvent
renfermer des substances
nocives (toxiques,
caustiques, irritantes),
combustibles ou aisément
inflammables. En cas de
contact d'un détergent
avec les yeux ou la peau,
rincer immédiatement les
parties touchées avec de
l'eau pure en abondance.
En cas d'ingestion,
consulter immédiatement
un médecin. Consulter à
ce sujet les fiches de
données de sécurité du
fabricant !
Avant le travail
Ne pas brancher le
nettoyeur haute
pression directe
-
ment sur le réseau
de distribution
d'eau potable.
Il n'est permis de brancher le
nettoyeur haute pression
directement sur le réseau de
distribution d'eau potable que
si l'on utilise un clapet de nonretour – voir « Accessoires
spéciaux ».
AVERTISSEMENT
– Une fois que l'eau potable
a traversé le clapet de nonretour, elle n'est plus
considérée comme de
l'eau potable.
Ne pas faire fonctionner
l'appareil avec de l'eau sale.
Si l'eau employée risque de
contenir des impuretés (par
ex. du sable) il faut utiliser un
filtre à eau adéquat.
Contrôle du nettoyeur haute
pression
AVERTISSEMENT
– Il est interdit d'utiliser le
nettoyeur haute pression
s'il présente un
endommagement
quelconque ou s'il ne se
trouve pas en parfait état
de fonctionnement – risque
d'accident !
– L'interrupteur de l'appareil
doit pouvoir être facilement
amené dans la position 0.
– L'interrupteur de l'appareil
doit se trouver en
position 0.
– Il est interdit d'utiliser
l'appareil si le flexible
haute pression, le
dispositif de projection ou
un dispositif de sécurité est
endommagé.
– Le flexible haute pression
et le dispositif de projection
doivent être montés
correctement et se trouver
dans un état impeccable
(propreté, fonctionnement
facile).
– Les poignées doivent être
propres et sèches, sans
huile ni autres salissures,
pour que l'on puisse les
manier en toute sécurité.
– Contrôler le niveau d'huile.
– N'apporter aucune
modification aux dispositifs
de commande et de
sécurité.
– Placer l'appareil de telle
sorte qu'il ne risque pas de
glisser, ni de basculer.
Utiliser l'appareil
seulement sur une aire
plane et stable.
74
RE 232, RE 272 PLUS, RE 282 PLUS
Page 77

français
Branchement électrique
AVERTISSEMENT
Pour réduire le risque de choc
électrique :
– La tension et la fréquence
de l'appareil (voir plaque
signalétique) doivent
correspondre à la tension
et à la fréquence du
secteur.
– Contrôler si le cordon
d'alimentation électrique,
la fiche de branchement
sur le secteur et la rallonge
ne sont pas endommagés.
Il est interdit d'utiliser
l'appareil si le cordon
d'alimentation électrique,
la rallonge ou la fiche de
branchement sur la prise
du secteur est
endommagé.
– Brancher l'appareil
seulement sur une prise de
courant installée
conformément aux
prescriptions.
– Veiller à ce que l'isolement
du cordon d'alimentation
électrique et de la rallonge,
la fiche et la prise soient
dans un état impeccable.
– Ne jamais saisir la fiche, le
cordon d'alimentation
électrique ou la rallonge, ni
les connecteurs, avec les
mains mouillées.
AVERTISSEMENT
Poser correctement le cordon
d'alimentation électrique et la
rallonge :
– Veiller à ce que les
différents câbles aient les
sections minimales
requises – voir
« Branchement
électrique ».
– Poser le cordon
d'alimentation électrique et
le signaliser de telle sorte
qu'il ne risque pas d'être
endommagé et ne
présente pas de risque
pour d'autres personnes –
veiller à ce que personne
ne risque de trébucher !
– L'utilisation de rallonges
qui ne conviennent pas
peut être dangereuse.
Pour l'utilisation en plein
air, prendre exclusivement
des rallonges
homologuées pour une
telle utilisation, portant les
codes et symboles
pertinents, et composées
de fils de section
suffisante.
– Les fiches et prises des
rallonges doivent être
étanches et elles ne
doivent en aucun cas se
trouver dans l'eau.
– Il est recommandé de
maintenir la connexion au
moins à 60 mm du sol, en
utilisant par ex. un
enrouleur de câble.
– Veiller à ce que les câbles
ne frottent pas sur des
arêtes vives ou des objets
pointus ou acérés.
– Ne pas les pincer dans une
porte ou une fenêtre
entrouverte.
RE 232, RE 272 PLUS, RE 282 PLUS
75
Page 78

français
Si les câbles sont
–
emmêlés – débrancher la
fiche de la prise de courant
et démêler les câbles.
– Toujours débobiner
complètement le câble de
l'enrouleur, pour éviter une
surchauffe et un risque
d'incendie.
Au cours du travail
AVERTISSEMENT
– Ne pas aspirer des liquides
contenant des solvants, ni
des acides non dilués ou
des solvants (par ex. de
l'essence, du fioul, du
diluant pour peinture ou de
l'acétone). Ces produits
endommageraient les
matières des pièces de
l'appareil. De plus, le
brouillard du produit
pulvérisé serait
extrêmement inflammable,
explosif et toxique.
En cas d'endom
-
magement du
cordon d'alimenta
tion électrique,
retirer immédiate
-
ment la fiche de la
prise de courant –
danger de mort par
électrocution !
Ne jamais net
-
toyer l'appareil luimême ou d'autres
appareils élec
-
triques avec le jet
haute pression ou
le tuyau d'eau –
risque de courtcircuit !
Ne jamais net
-
toyer des
installations élec
-
triques, des
raccords élec
-
triques ou des
câbles sous ten
-
sion avec le jet
haute pression ou
le tuyau d'eau –
risque de courtcircuit !
L'utilisateur ne doit
jamais diriger le jet
-
de liquide vers lui,
ni vers d'autres
personnes, pas
même pour net
toyer des
vêtements ou des
chaussures –
risque de
blessure !
Toujours se tenir dans une
position stable et sûre.
À l'utilisation, l'appareil doit
toujours être bien d'aplomb
(debout).
Faire particulièrement
attention sur un sol glissant,
mouillé, couvert de neige ou
de verglas – de même qu'en
travaillant à flanc de coteau ou
sur un terrain inégal – risque
de dérapage !
Placer le nettoyeur haute
pression le plus loin possible
de l'objet à nettoyer.
Ne pas recouvrir l'appareil.
Veiller à ce qu'une bonne
ventilation du moteur soit
toujours assurée.
-
76
Ne pas diriger le jet haute
pression vers des animaux.
RE 232, RE 272 PLUS, RE 282 PLUS
Page 79

français
Ne pas diriger le jet haute
pression vers des endroits où
l'on manque de visibilité.
Veiller à ce que des
spectateurs éventuels, en
particulier des enfants, ou des
animaux restent à une
distance suffisante.
Au cours du nettoyage,
aucune substance
dangereuse (par ex. amiante,
huile) détachée de l'objet à
nettoyer ne doit parvenir dans
l'environnement. Respecter
impérativement les
prescriptions pertinentes pour
la protection de
l'environnement.
Ne pas nettoyer avec le jet
haute pression la surface
d'éléments en fibrociment.
Outre les saletés, on pourrait
détacher des fibres d'amiante
dangereuses risquant de
pénétrer dans les poumons.
C'est après le séchage des
surfaces ainsi nettoyées que
l'on encourt les plus grands
risques.
Ne pas nettoyer des surfaces
délicates en caoutchouc, tissu
ou autres matières analogues
avec un jet tourbillonnaire, par
ex. avec la turbo-buse. Au
nettoyage, garder une
distance suffisante entre la
buse haute pression et la
surface à nettoyer, afin
d'éviter d'endommager la
surface à nettoyer.
La gâchette du pistolet de la
lance doit fonctionner
facilement et revenir d'ellemême dans sa position de
départ dès qu'on la relâche.
Tenir le dispositif de projection
à deux mains pour pouvoir
aisément absorber la force de
recul et, si l'on travaille avec
une lance recourbée, le
couple de rotation produit à
l'actionnement de la gâchette
du pistolet.
Ne pas plier le flexible haute
pression. Veiller à ce qu'il ne
forme pas de boucles.
Ne pas endommager le
cordon d'alimentation
électrique et le flexible haute
pression en roulant dessus,
en l'écrasant, en l'étirant etc.
Le tenir à l'écart de la chaleur
et de l'huile.
Ne pas toucher le cordon
d'alimentation électrique avec
le jet haute pression.
Si l'appareil a été soumis à
des sollicitations sortant du
cadre de l'utilisation normale
(par ex. s'il a été soumis à des
efforts violents, en cas de
choc ou de chute), avant de le
remettre en marche, il faut
impérativement s'assurer qu'il
se trouve en parfait état de
fonctionnement – voir
également « Avant le
travail ». Contrôler aussi la
fiabilité des dispositifs de
sécurité. Il ne faut en aucun
cas continuer d'utiliser
l'appareil s'il ne se trouve pas
dans l'état impeccable requis
pour garantir son
fonctionnement en toute
sécurité. En cas de doute,
consulter le revendeur
spécialisé.
Avant de quitter l'appareil :
l'arrêter – retirer la fiche de la
prise de courant.
Dispositif de sécurité
Si la pression atteint une
valeur inadmissible, le
dispositif de sécurité intervient
et, via un clapet de décharge,
la pression est renvoyée vers
le côté aspiration de la pompe
haute pression. Le dispositif
RE 232, RE 272 PLUS, RE 282 PLUS
77
Page 80

français
de sécurité est réglé départ
usine et il est interdit de
modifier son réglage.
Après le travail
Arrêter l'appa
-
reil avant de le
quitter !
– Débrancher la fiche de la
prise de courant.
– Débrancher le tuyau
flexible d'amenée d'eau
posé entre le réseau de
distribution d'eau et
l'appareil.
Pour sortir la fiche de la prise
de courant, ne pas tirer sur le
cordon d'alimentation
électrique, mais toujours
saisir la fiche.
Maintenance et réparations
AVERTISSEMENT
Avant toute inter
-
vention sur
l'appareil : retirer la
fiche de la prise de
courant !
– Utiliser exclusivement des
pièces de rechange de
haute qualité. En ne
respectant pas ces
prescriptions, on risquerait
de causer un accident ou
d'endommager l'appareil.
Pour toute question à ce
sujet, s'adresser à un
revendeur spécialisé.
– Pour éviter les risques
d'accident, toutes les
interventions nécessaires
sur l'appareil (par ex. le
remplacement d'un cordon
d'alimentation électrique
endommagé) doivent être
effectuées exclusivement
par des revendeurs
spécialisés et agréés ou
par des électriciens
professionnels.
Nettoyer les pièces en matière
synthétique avec un chiffon.
Des détergents agressifs
risqueraient d'endommager
les pièces en matière
synthétique.
Nettoyer si nécessaire les
ouïes d'admission d'air de
refroidissement du carter du
moteur.
L'appareil doit faire l'objet
d'une maintenance régulière.
Effectuer exclusivement les
opérations de maintenance et
les réparations décrites dans
la Notice d'emploi. Faire
exécuter toutes les autres
opérations par un revendeur
spécialisé.
STIHL recommande d'utiliser
des pièces de rechange
d'origine STIHL. Leurs
caractéristiques sont
optimisées tout spécialement
pour cet appareil, et pour
répondre aux exigences de
l'utilisateur.
STIHL recommande de faire
effectuer les opérations de
maintenance et les
réparations exclusivement
chez le revendeur spécialisé
STIHL. Les revendeurs
spécialisés STIHL participent
régulièrement à des stages de
perfectionnement et ont à leur
disposition les informations
techniques requises.
78
RE 232, RE 272 PLUS, RE 282 PLUS
Page 81

français
1
2
6158BA003 KN
1
2
6158BA004 KN
Assemblage
Avant la première mise en service, il faut
monter différents accessoires sur les
appareils.
Raccord de tuyau flexible sur prise
d'arrivée d'eau
sans filtre à eau
2
1
N Enlever le capuchon (1) du
raccord ;
S'assurer que le tamis d'entrée d'eau est
bien mis dans le raccord.
N visser le raccord (2) et le serrer à la
main.
avec filtre à eau
3
N Enlever le capuchon (1) de la prise
d'eau de l'appareil ;
N engager l'écrou de raccord du filtre
à eau (2), le visser et le serrer à la
main ;
N visser le raccord (3) et le serrer à la
main.
Appareils sans enrouleur de flexible
6158BA001 KN
Raccord sur la prise haute pression
1
2
Appareils avec enrouleur de flexible
6158BA002 KN
N Glisser la poignée tournante (1) sur
la manivelle (2) de l'enrouleur et la
faire encliqueter.
N Glisser la bague d'étanchéité (1) sur
la prise haute pression ;
N visser et serrer le raccord (2).
RE 232, RE 272 PLUS, RE 282 PLUS
79
Page 82

français
6158BA008 KN
647BA021 KN
1
2
Transport de l'appareil
Poignée de transport
La poignée de transport permet de
porter l'appareil.
Déplacement de l'appareil en poussant
1
2
N Tenir fermement le guidon (1) de
l'appareil à deux mains ;
N retenir l'appareil en appliquant le
pied contre le cale-pied (2), pousser
le guidon (1) vers le bas et amener
l'appareil dans une position
d'équilibre.
Démontage, montage de la
lance
N Conserver précieusement le
capuchon de protection de la lance
pour pouvoir le réutiliser plus tard ;
N tirer la douille du raccord rapide (1)
en arrière et la retenir ;
N pousser la lance (2) dans la prise du
6158BA009 KN
pistolet ou bien, pour la démonter,
l'extraire de la prise du pistolet ;
N relâcher la douille du raccord
rapide (1).
80
RE 272 PLUS, RE 282 PLUS
Avant de transporter l'appareil en
position couchée, s'assurer que du
détergent ne risque pas de s'écouler.
N Enlever le réservoir à détergent –
voir « Démontage, montage du
réservoir à détergent ».
RE 232, RE 272 PLUS, RE 282 PLUS
Page 83

français
2
1
6158BA005 KN
1
2
3
647BA022 KN
647BA023 KN
3
4
Montage, démontage du
flexible haute pression
Appareil sans enrouleur de flexible
Montage du flexible haute pression
N Glisser le flexible haute pression sur
le raccord (1) ;
N engager l'écrou de raccord (2), le
visser et le serrer à la main.
Démontage du flexible haute pression
N Dévisser l'écrou de raccord (2) ;
N débrancher le flexible haute
pression du raccord (1).
Flexible haute pression sur le pistolet
Montage
N Glisser le flexible haute pression (1)
sur le raccord (2) ;
N engager l'écrou de raccord (3), le
visser et le serrer à la main.
Démontage
N Brancher la rallonge de flexible
haute pression entre le flexible
haute pression et le pistolet.
Appareil avec enrouleur de flexible
Le flexible haute pression est déjà
branché.
RE 232, RE 272 PLUS, RE 282 PLUS
N Pousser le coulisseau (4) dans le
sens de la flèche et le retenir ;
N desserrer l'écrou de raccord (3) et le
dévisser du raccord en tournant
dans le sens de la flèche.
Rallonge de flexible haute pression
Par principe, il ne faut utiliser qu'une
seule rallonge de flexible haute pression
(accessoire optionnel).
81
Page 84

français
2
1
2
RE 232
6158BA006 KN
RE 282
1
RE 272
003BA003 KN
Établissement de
l'alimentation en eau
N Brancher le tuyau d'eau.
Avant de raccorder le tuyau d'eau à
l'appareil, le rincer brièvement avec de
l'eau pour chasser l'air du tuyau et pour
éviter que, le cas échéant, du sable ou
d'autres impuretés pénètrent dans
l'appareil.
Diamètre du tuyau
d'eau : 3/4"
Longueur du tuyau
d'eau :
min. 10 m (pour
absorber les
impulsions de
pression)
max. 25 m
N Glisser le raccord rapide (1) sur la
prise pour flexible (2).
N Ouvrir le robinet d'eau.
Pour purger le système :
N Actionner le pistolet (sans avoir
monté la lance) jusqu'à ce qu'un jet
d'eau régulier sorte.
Raccordement au réseau d'eau potable
Pour le raccordement au réseau d'eau
potable, il faut intercaler un clapet de
non-retour entre le robinet d'eau et le
flexible. Le type du clapet de non-retour
doit satisfaire aux prescriptions
nationales spécifiques.
Une fois que l'eau potable a traversé le
clapet de non-retour, elle n'est plus
considérée comme de l'eau potable.
Il faut respecter la réglementation des
services locaux de distribution d'eau, en
ce qui concerne l'obligation d'empêcher
que de l'eau en provenance du
nettoyeur haute pression risque de
remonter dans le réseau d'eau potable.
Établissement d'une
alimentation en eau hors
pression
Le nettoyeur haute pression ne peut être
utilisé en mode de fonctionnement avec
aspiration d'eau qu'avec le kit
d'aspiration (accessoire optionnel).
AVIS
Il est expressément recommandé
d'utiliser un filtre à eau.
N Brancher l'appareil sur
l'alimentation en eau sous pression
et le mettre en service pendant
quelques instant comme indiqué
dans la présente Notice d'emploi ;
N arrêter l'appareil ;
N démonter le dispositif de projection
du flexible haute pression ;
N dévisser le raccord pour flexible de
la prise d'eau ;
N brancher le kit d'aspiration sur la
prise d'eau, avec le raccord joint au
kit d'aspiration ;
Utiliser impérativement le raccord joint à
la livraison du kit d'aspiration. Les
raccords pour tuyau flexible livrés, de
série, avec le nettoyeur haute pression
ne sont pas étanches en mode
aspiration et ils ne conviennent donc pas
pour l'aspiration d'eau.
N remplir le tuyau flexible d'aspiration
avec de l'eau et plonger la crépine
aspirante du tuyau flexible
d'aspiration dans un réservoir d'eau
– ne pas employer de l'eau sale ;
82
RE 232, RE 272 PLUS, RE 282 PLUS
Page 85

français
N tenir à la main le flexible haute
pression dirigé vers le bas ;
N mettre l'appareil en marche ;
N attendre que le flexible haute
pression donne un jet d'eau
régulier ;
N arrêter l'appareil ;
N brancher le dispositif de projection ;
N mettre l'appareil en marche avec le
pistolet ouvert ;
N actionner plusieurs fois brièvement
le pistolet po ur que l'ai r qui se trouv e
encore dans l'appareil soit purgé le
plus rapidement possible.
Branchement électrique
La tension et la fréquence de l’appareil
(voir la plaque signalétique) doivent
coïncider avec la tension et la fréquence
du réseau électrique.
La protection du branchement au
réseau doit être exécutée
conformément aux indications dans les
caractéristiques techniques – voir
« Caractéristiques techniques ».
L’appareil doit être branché au réseau
d’alimentation électrique par le biais
d’un disjoncteur différentiel à courant de
fuite qui coupe l’alimentation lorsque le
courant différentiel dépasse 30 mA
pendant 30 ms.
Le branchement secteur doit être réalisé
conformément à la norme CEI 60364-1
et à la réglementation nationale.
Lors de la mise sous tension de
l’appareil, si les conditions du réseau
sont défavorables (impédance élevée),
d’autres charges raccordées peuvent
être affectées par les fluctuations de
tension qui se produisent. Aucune
perturbation n’est à attendre en
présence d’impédances de réseau
inférieures à 0,15 Ω.
La rallonge doit avoir la section minimale
indiquée en fonction de la tension du
réseau et de la longueur de câble.
230 V / 3~ :
jusqu'à 20 m 2,5 mm
20m à50m 4mm
2
2
230 V – 240 V / 1~ :
jusqu'à 20 m 2,5 mm
20m à50m 4mm
2
2
200 V / 3~ :
jusqu'à 10 m 3,5 mm
10 m à 30 m 5,5 mm
2
2
Branchement sur la prise de courant du
secteur
Avant le branchement sur la prise
d'alimentation électrique, s'assurer que
l'interrupteur de l'appareil ne se trouve
pas en position de marche – voir
« Arrêt ».
RE 232, RE 272 PLUS, RE 282 PLUS
Longueur du câble Section minimale
400 V / 3~ :
400 V – 415 V / 3~ :
jusqu'à 20 m 1,5 mm
20 m à 50 m 2,5 mm
2
2
230 V / 1~ :
83
Page 86

français
1
6158BA007 KN
2
1607BA011 KN
1
6158BA020 KN
N Retirer la fiche du cordon
d'alimentation électrique du support
supérieur (1) ;
N faire pivoter le support inférieur (2)
vers le haut et enlever le cordon
d'alimentation électrique ;
N introduire la fiche du cordon
d'alimentation électrique de
l'appareil ou la fiche de la rallonge
dans une prise de courant installée
conformément à la réglementation.
Mise en marche
N Ouvrir le robinet d'eau ;
AVIS
Ne mettre l'appareil en marche que si le
tuyau d'eau est branché et que le robinet
est ouvert. Sinon, par suite du manque
d'eau, l'appareil risquerait d'être
endommagé.
N dérouler complètement le flexible
haute pression et le cordon
d'alimentation électrique ;
N tourner l'interrupteur de l'appareil en
position I – l'appareil est alors en
mode de repos ;
N diriger le pistolet vers l'objet à
nettoyer – jamais vers des
personnes !
À la mise en circuit de l'appareil, des
oscillations de la tension pouvant se
produire en cas de conditions
défavorables du réseau (forte
impédance du secteur) risquent de
perturber d'autres consommateurs
branchés.
Si l'impédance du secteur est inférieure
à 0,15 ohm, aucune perturbation n'est à
craindre.
Appareil avec enrouleur de flexible
AVIS
Toujours dérouler complètement le
flexible du tambour de l'enrouleur. Sous
la haute pression de l'eau, le flexible
haute pression se dilate. Cela risque
d'endommager l'enrouleur de flexible ou
le flexible haute pression lui-même.
N Sortir le verrou de l'enrouleur (1) ;
N dérouler complètement le flexible
haute pression.
84
RE 232, RE 272 PLUS, RE 282 PLUS
Page 87

français
1
647BA024 KN
1
2
6158BA010 KN
Utilisation
Actionnement du pistolet
N Diriger le pistolet vers l'objet à
nettoyer – jamais vers des
personnes !
N si une turbo-buse est montée, au
démarrage, il faut l'orienter vers le
bas ;
N pousser le bouton de sécurité (1)
dans le sens de la flèche – la
gâchette (2) du pistolet est
déverrouillée ;
N enfoncer la gâchette du pistolet (2)
à fond ;
Le moteur se met en marche
automatiquement et il s'arrête lorsqu'on
relâche la gâchette (1) du pistolet.
L'appareil se trouve alors en mode de
repos.
Mode de repos
AVIS
L'appareil peut être utilisé en mode de
repos au maximum pendant 5 min.
Couper le contact de l'appareil à l'aide
de l'interrupteur – voir « Arrêt »,
– pour des arrêts de travail de plus de
5min,
– pour les pauses de travail,
– avant de laisser l'appareil sans
surveillance.
Régulation de pression/débit sur
l'appareil
Seulement RE 272 PLUS,
RE 282 PLUS
Sur la pompe haute pression, on peut
procéder à des réglages pour adapter, à
long terme, la pression de service et le
débit en fonction de la tâche de
nettoyage prévue.
Flexible haute pression
AVIS
Ne pas plier le flexible haute pression.
Veiller à ce qu'il ne forme pas de
boucles.
Ne pas poser des objets lourds sur le
flexible haute pression et ne pas rouler
dessus avec des véhicules.
RE 232, RE 272 PLUS, RE 282 PLUS
N Tourner le bouton de réglage (1)
pour régler la pression de service et
le débit.
Le manomètre (2) indique la pression
régnant dans la pompe haute pression.
85
Page 88

français
6158BA028 KN
6158BA013 KN
6158BA017 KN
6158BA014 KN
6158BA015 KN
6158BA016 KN
Apport de détergent
Si une rallonge de flexible haute
pression est montée, l'aspiration de
détergent est impossible.
L'aspiration de détergent n'est possible
qu'en mode basse pression.
N Tourner la douille de réglage de la
buse à fond en direction de
« CHEM » = mode basse pression.
RE 232
RE 272 PLUS, RE 282 PLUS
Démontage, montage du réservoir à
détergent
Il est possible de démonter le réservoir à
détergent de l'appareil pour le remplir, le
vider et le nettoyer.
N Dévisser le bouchon muni du tuyau
d'aspiration de l'ouverture de
remplissage du réservoir à
détergent.
N Extraire le réservoir à détergent de
son support.
Aspiration de détergent à partir du
réservoir à détergent
Aspiration de détergent à partir d'un
bidon séparé
N Dévisser le bouchon muni du tuyau
d'aspiration de l'ouverture de
remplissage du réservoir à
détergent.
N Visser le couvercle muni du tuyau
d'aspiration sur le bidon de
détergent séparé.
Le bouchon est muni d'un filetage
standard qui se visse sur les bidons de
détergent courants.
N Pousser le tuyau d'aspiration dans
le bidon séparé, le plus
profondément possible.
Toutes les versions
N Pousser le tuyau d'aspiration dans
le bidon séparé, le plus
profondément possible.
86
N Verser du détergent dans le
réservoir à détergent, en respectant
le taux de dilution prescrit.
N Pousser le tuyau d'aspiration dans
le réservoir à détergent, le plus
profondément possible.
N Régler la quantité de détergent à
mélanger à l'eau à l'aide du bouton
de dosage.
RE 232, RE 272 PLUS, RE 282 PLUS
Page 89

français
Bouton de dosage vers la
gauche : 0 % (min.)
Bouton de dosage vers la
droite : 5 % (max.)
N Appliquer le détergent de bas en
haut.
Il ne faut jamais laisser les détergents
sécher sur les objets à nettoyer.
Si l'on veut couper l'apport de
détergent :
N Tourner le bouton de dosage en
position 0 % (min.).
N Laisser le nettoyeur haute pression
fonctionner encore quelques
instants avec le pistolet ouvert,
jusqu'à ce que la buse ne débite
plus de détergent.
Après le travail
N Vider le réservoir à détergent et le
rincer à l'eau pure.
N Plonger le tuyau d'aspiration dans
de l'eau pure.
N Actionner le pistolet et rincer les
restes de détergent.
Calcul et réglage exacts de la
concentration de détergent
À l'utilisation de certains détergents, il
faut impérativement régler la
concentration avec une très grande
précision. Dans ce cas, il faut mesurer le
débit d'eau et la consommation de
détergent.
N Placer le bouton de dosage de
détergent sur la position « 0 %
(min.) ».
N Maintenir le pistolet dans un
récipient vide approprié (> 20 l) et
l'actionner pendant exactement
1 minute.
N Mesurer la quantité « Q » recueillie
dans le récipient.
N Verser 2 litres de détergent, avec le
rapport de dilution prescrit, dans un
récipient approprié (avec
graduations de 0,1 l) – STIHL
recommande d'utiliser du détergent
STIHL.
N Tenir le tuyau d'aspiration dans le
récipient.
N Régler le bouton de dosage de
détergent selon la concentration
souhaitée : de 0 % (min.) à 5 %
(max.).
N Maintenir le pistolet dans un
récipient vide approprié (> 20 l) et
l'actionner pendant exactement
1 minute.
N Mesurer la consommation de
détergent « QR » sur la graduation.
Calcul de la concentration de détergent
réelle :
QR
x V = concentration
Q
– QR = quantité de détergent
consommée (en l/min)
– Q = débit d'eau sans détergent
(en l/min)
– V = dilution préalable du détergent
(en %)
Si la concentration réelle diffère de la
concentration souhaitée, corriger la
position du bouton de dosage et, le cas
échéant, répéter la mesure.
Calcul de la dilution préalable du
détergent en %
Si la dilution préalable n'est pas
indiquée en pourcentage, il est possible
de la calculer à l'aide du tableau
suivant :
Rapport
1:1 = 50 %
1:2 = 33,3 %
1:3 = 25 %
1:5 = 16,6 %
1:10 = 9 %
Exemple :
Calcul du rapport 1:2
– A = 1
– B = 2
A
(A + B)
(1 + 2)
x 100 = valeur en %
1
x 100 = 33,3 %
RE 232, RE 272 PLUS, RE 282 PLUS
87
Page 90

français
1607BA018 KN
1
647BA029 KN
Instructions à suivre pour le
travail
Les informations et exemples
d’utilisation ci-après facilitent le travail et
contribuent à un nettoyage au résultat
optimal.
Pression de service et débit d’eau
Une pression élevée détache plus
facilement les salissures. Plus le débit
d’eau est élevé, meilleure est
l’évacuation des salissures enlevées.
Nettoyer les pièces et les surfaces
sensibles (par exemple peinture
automobile, caoutchouc) avec une
basse pression ou à une distance
accrue par rapport à l’objet afin d’éviter
les dommages. Une pression de 100 bar
est suffisante pour le nettoyage d’un
véhicule.
Buses
Buse à jet plat
Utilisation universelle – pour le
nettoyage des pièces et des surfaces
(sensibles).
Domaines d’application :
– Nettoyage des véhicules et des
machines
– Nettoyage des sols et des surfaces
– Nettoyage des toits et façades
Turbobuse
Pour l’élimination de salissures
particulièrement tenaces sur des
surfaces résistantes.
Surfaces fortement encrassées
Mouiller les surfaces fortement
encrassées avec de l’eau avant le
nettoyage.
Détergents :
Les nettoyants peuvent amplifier l’effet
nettoyant. La puissance nettoyant peut
être accrue en laissant agir pendant une
durée appropriée (celle-ci dépend du
détergent utilisé).
Ne pas laisser sécher le détergent.
Il faut toujours utiliser le détergent avec
le dosage préconisé et observer les
consignes d’utilisation correspondantes
du détergent.
Nettoyage mécanique :
Les couches de salissures qui adhèrent
fortement peuvent être éliminées plus
facilement en utilisant en plus la
turbobuse ou la turbo-brosse.
Arrêt
N Tourner l'interrupteur de l'appareil
dans la position 0 ;
N fermer le robinet d'eau ;
N actionner la gâchette du pistolet
jusqu'à ce que l'eau ne ressorte plus
de la buse que goutte à goutte
(l'appareil est alors dépressurisé) ;
N relâcher la gâchette du pistolet ;
N pousser le bouton de sécurité (1)
dans le sens de la flèche – le pistolet
est verrouillé, ce qui écarte le risque
d'une mise en marche accidentelle.
88
RE 232, RE 272 PLUS, RE 282 PLUS
Page 91

français
1
2
6158BA018 KN
6158BA019 KN
6158BA021 KN
Après le travail
N Débrancher la fiche de la prise de
courant ;
N débrancher le tuyau d'amenée
d'eau du robinet d'eau et de
l'appareil.
Cordon d'alimentation électrique
Enroulement du flexible haute pression
et rangement du dispositif de projection
RE 232
N Mettre le pistolet et la lance dans les
supports ;
N enrouler le flexible haute pression et
l'accrocher dans les supports.
RE 272 PLUS, RE 282 PLUS
N Mettre le pistolet et la lance dans les
supports ;
N enrouler le flexible haute pression.
N Faire basculer le support (1) vers le
bas ;
N enrouler le cordon d'alimentation
électrique et l'accrocher au
support (2).
RE 232, RE 272 PLUS, RE 282 PLUS
89
Page 92

français
Rangement
Conserver l'appareil en un endroit sec et
à l’abri du gel.
Si la situation hors gel n'est pas
garantie, aspirer dans la pompe un
produit antigel à base de glycol tel que
celui qui est utilisé sur les véhicules
automobiles :
N Immerger le tuyau d'aspiration
d'eau dans le récipient contenant le
produit antigel.
N Immerger le pistolet pulvérisateur
sans lance dans le même récipient.
N Allumer l'appareil en tenant le
pistolet pulvérisateur ouvert.
N Actionner le pistolet pulvérisateur
jusqu'à ce qu'un jet régulier en
sorte.
N Conserver le reste de produit
antigel dans un récipient fermé.
90
RE 232, RE 272 PLUS, RE 282 PLUS
Page 93

Instructions pour la maintenance et l'entretien
français
Les indications ci-après sont valables pour des conditions d'utilisation normales.
Pour des journées de travail plus longues, il faut réduire, en conséquence, les inter
valles indiqués. En cas d'utilisation seulement occasionnelle, il est possible de
prolonger les intervalles en conséquence.
Machine complète
Niveau d'huile de la pompe haute pression Contrôle X
Huile de la pompe haute pression Vidange par le revendeur spécialisé
Raccords du flexible haute pression
Embout de raccord de la lance et man
chon de raccord du pistolet
Tamis d'entrée d'eau
haute pression
Filtre à eau
Buse haute pression
Orifices de ventilation Nettoyage X
Pieds d'appui
1)
STIHL recommande de s'adresser au revendeur spécialisé STIHL
2)
Une seule fois, au bout des 50 premières heures de fonctionnement
3)
Suivant l'équipement
3)
da ns l a pr ise d'e au
3)
Contrôle visuel (état, étanchéité) X
Nettoyage XX
Nettoyage XX
Graissage X
-
Nettoyage XX
Nettoyage XX
Remplacement X
Contrôle visuel (encrassement) X
Nettoyage X
Remplacement X
Nettoyage X
Remplacement X
Contrôle X
Remplacement X
-
avant de commencer le
travail
après le travail ou une fois
par jour
une fois par semaine
une fois par mois
RE 232, toutes les
200 heures de
fonctionnement
RE 272, 282 toutes les
300 heures de
fonctionnement
en cas de panne
en cas de détérioration
1)
2)
X
2)
X
au besoin
RE 232, RE 272 PLUS, RE 282 PLUS
91
Page 94

français
647BA031 KN
6158BA026 KN
1
2
Maintenance
Il faut toujours retirer la fiche de la prise
de courant avant d'entreprendre toute
opération d'entretien ou de réparation
de l'appareil.
Pour garantir un fonctionnement
impeccable, il est recommandé
d'effectuer les opérations suivantes à
chaque utilisation de l'appareil :
N avant le montage, rincer le flexible
d'amenée d'eau, le flexible haute
pression, la lance et les accessoires
avec de l'eau ;
N nettoyer le raccord rapide de la
lance et le manchon de
raccordement du pistolet pour
éliminer, le cas échéant, le sable et
la poussière.
Nettoyage de la buse haute pression
Si la buse est obstruée, la pression de la
pompe s'élève trop fortement et c'est
pourquoi un nettoyage immédiat est
nécessaire.
N Arrêter l'appareil ;
N actionner la gâchette du pistolet
jusqu'à ce que l'eau ne ressorte plus
de la buse que goutte à goutte –
l'appareil est alors dépressurisé ;
N démonter la lance ;
N nettoyer la buse avec une aiguille
appropriée ;
AVIS
Ne nettoyer la buse que lorsque la lance
est démontée.
N rincer la lance avec de l'eau, depuis
le côté de la buse.
Nettoyage du filtre à eau
Lorsque le filtre à eau est encrassé, il
faut le nettoyer.
N Dévisser le couvercle (1) ;
N enlever l'élément filtrant (2) vers le
haut ;
N rincer soigneusement le
couvercle (1) à l'eau claire ;
N rincer soigneusement l'élément
filtrant (2) à l'eau claire, de l'intérieur
vers l'extérieur ;
N contrôler l'élément filtrant – un
élément filtrant endommagé doit
être remplacé ;
92
RE 232, RE 272 PLUS, RE 282 PLUS
Page 95

français
3
4
6158BA027 KN
1
6158BA022 KN
2
6158BA023 KN
max.
min.
Contrôle du niveau d'huile
N obturer l'orifice de sortie (3) avec le
bout du doigt ;
N rincer soigneusement le boîtier du
filtre à l'eau claire ;
N lubrifier le joint torique (4) du boîtier
du filtre et le joint torique du
couvercle avec de la graisse pour
matériaux en contact avec des
produits alimentaires ;
N monter l'élément filtrant ;
N visser et serrer le couvercle.
Nettoyage du tamis d'arrivée d'eau
Si un filtre à eau n'est pas monté,
nettoyer le tamis d'arrivée d'eau une fois
par semaine ou plus souvent, selon
besoin.
N Dévisser le raccord pour
flexible (1) ;
N dégager le tamis (2) en agissant
prudemment avec une pince et le
rincer ;
N avant de remonter le tamis,
s'assurer qu'il est intact – un tamis
endommagé doit être remplacé.
Nettoyage des orifices de ventilation
Veiller à ce que l'appareil soit toujours
propre, pour que l'air de refroidissement
puisse entrer et sortir librement par ses
orifices de ventilation.
Graissage des raccords
Graisser les raccords du flexible haute
pression selon besoin, avec de la
graisse pour matériaux en contact avec
des produits alimentaires.
Contrôle des pieds d'appui
Contrôler le niveau d'huile une fois par
semaine, ainsi qu'après chaque
transport.
N Placer l'appareil sur une surface
plane et horizontale ;
N contrôler si le niveau d'huile se situe
entre les marques « min » et
« max » – si cela n'est pas le cas :
consulter le revendeur spécialisé.
STIHL recommande de s'adresser
au revendeur spécialisé STIHL.
RE 232, RE 272 PLUS, RE 282 PLUS
Pour garantir la stabilité de l'appareil,
remplacer les deux pieds d'appui avant
s'ils sont endommagés ou usés.
93
Page 96

français
Mise en service après un
arrêt prolongé
Les résidus minéraux présents dans
l'eau peuvent se déposer dans la pompe
lors de périodes de stockage
prolongées. Le moteur démarre alors
difficilement ou pas du tout.
N Raccorder l'appareil à la conduite
d'eau et le rincer soigneusement à
l'eau courante. Ne pas brancher la
fiche secteur pendant cette
opération.
N Insérer la fiche secteur dans la
prise.
N Allumer l'appareil en tenant le
pistolet pulvérisateur ouvert.
Conseils à suivre pour
réduire l'usure et éviter les
avaries
L'observation des indications du présent
mode d'emploi permet d'éviter une
usure excessive et des dommages à
l'appareil.
L'utilisation, l'entretien et le stockage de
l'appareil doivent se dérouler
conformément à leur description dans le
présent mode d'emploi.
L'utilisateur est seul responsable des
dommages qui résultent du non-respect
des consignes de sécurité, d'utilisation
et d'entretien. Cela s'applique
notamment aux situations suivantes :
– modifications au produit non
validées par STIHL
– utilisation d'accessoires non
autorisés pour l'appareil,
inappropriés ou de mauvaise
qualité
– utilisation non conforme de
l'appareil
– utilisation de l'appareil lors de
manifestations sportives ou de
compétitions
– dommages résultant de la poursuite
de l'utilisation de l'appareil avec des
composants défectueux
– dommages résultant du gel
– dommages résultant d'une tension
d'alimentation électrique incorrecte
– dommages résultant d'une
alimentation en eau incorrecte (par
exemple section du tuyau d'arrivée
trop faible)
Travaux de maintenance
Tous les travaux mentionnés dans le
chapitre « Instructions de maintenance
et d'entretien » doivent être effectués
régulièrement. Si ces travaux de
maintenance ne peuvent pas être
réalisés par l'utilisateur lui-même, il faut
alors faire appel à un distributeur.
STIHL recommande de faire effectuer
les opérations de maintenance et les
réparations exclusivement chez un
distributeur agréé STIHL. Les
distributeurs agréés STIHL participent
régulièrement à des stages de
perfectionnement et ont à leur
disposition les informations techniques
requises.
Si ces travaux sont négligés ou
exécutés de manière non conforme, il
peut se produire des dommages sont
seul l'utilisateur sera responsable. En
font notamment partie :
– Des dommages aux composants de
l'appareil résultant d'un entretien
non effectué en temps voulu ou
insuffisant
– De la corrosion ou d'autres
dommages conséquents résultant
d'un stockage inapproprié
– Des dommages à l'appareil
résultant de l'utilisation de pièces de
rechange de mauvaise qualité
94
RE 232, RE 272 PLUS, RE 282 PLUS
Page 97

Pièces d'usure
Même lorsqu'on utilise le nettoyeur
haute pression pour les travaux prévus
dans sa conception, certaines pièces
subissent une usure normale et elles
doivent être remplacées en temps voulu,
en fonction du genre d'utilisation et de la
durée de fonctionnement. Il s'agit, entre
autres, des pièces suivantes :
– Buses haute pression
– Tuyaux flexibles haute pression
français
RE 232, RE 272 PLUS, RE 282 PLUS
95
Page 98

français
24
18
12
6158BA024 KN
2
8
5
6
1
3
7
9
10
11
14
13
17
16
21
22
20
23
19
15
#
Principales pièces
RE 232
1 Pistolet
2 Raccord de lance
3 Bouton de sécurité
4 Gâchette
5 Verrouillage du raccord de flexible
haute pression
6 Écrou-chapeau de flexible haute
pression
7 Buse
8 Douille de réglage d'aspiration de
détergent
9 Flexible haute pression
10 Guidon
11 Support pour lance
12 Support pour pistolet
13 Bouton de dosage de détergent
14 Interrupteur de l'appareil
15 Support pour lance
# Plaque signalétique
96
RE 232, RE 272 PLUS, RE 282 PLUS
Page 99

français
24
18
12
6158BA024 KN
2
8
5
6
1
3
7
9
10
11
14
13
17
16
21
22
20
23
19
15
#
RE 232
16 Raccord de tuyau flexible sur prise
d'arrivée d'eau
17 Raccord de flexible haute pression
18 Poignée de transport
19 Filtre à eau
20 Support de flexible haute pression
21 Flexible d'aspiration pour réservoir
de détergent
22 Support de cordon d'alimentation
électrique
23 Jauge d'huile
24 Cale-pied
# Plaque signalétique
1)
RE 232, RE 272 PLUS, RE 282 PLUS
1)
Suivant l'équipement
97
Page 100

21
23
22
26
29
19
16
11
13
18
6158BA025 KN
2
8
5
6
1
3
7
10
9
12
20
14
15
25
24
27
28
#
17
français
RE 272 PLUS, RE 282 PLUS
1 Pistolet
2 Raccord de lance
3 Bouton de sécurité
4 Gâchette
5 Verrouillage du raccord de flexible
haute pression
6 Écrou-chapeau de flexible haute
pression
7 Buse
8 Douille de réglage d'aspiration de
détergent
9 Turbo-buse
10 Flexible haute pression
11 Guidon
12 Support pour lance
13 Étrier de guidage
14 Interrupteur de l'appareil
15 Bouton de dosage de détergent
16 Manomètre
# Plaque signalétique
98
RE 232, RE 272 PLUS, RE 282 PLUS
 Loading...