

Page 1

ATTENTION: INSTALLING THE CONTROLLER WITH THE
!
DEFAULT SETTINGS IS NOT RECOMMENDED. IN
ORDER TO PREVENT OVERHEATING OF THE SYSTEM
HEAT EXCHANGER FLUID OR DOMESTIC HOT WATER
THE SETTINGS “OCC” AND “OSTC” SHOULD BE SET
TO “ON” AND THE SETTING “EM” SHOULD BE RAISED
TO 290 °F.
OPERATION AND INSTALLATION
SOLAR CONTROLLER
» SOM 6 PLUS
Page 2
Contents
General .............................................................................2
Overview ...........................................................................3
1. Installation ..................................................................4
1.1 Mounting ..................................................................... 4
1.2 Electrical connection ....................................................4
1.3 Data communication/ Bus ............................................5
1.4 Terminal allocation ......................................................6
2. Operation and function ................................................8
2.1 Push buttons ................................................................ 8
2.2 System monitoring display ........................................... 8
General
Safety advice:
Please read the following information carefully before
installing and operating the controller. In this way damage
to the solar system caused by wrong installation will be
avoided. Please make sure that the mounting is adapted to
the characteristics of the building, that the local regulations
are respected and is conform with the technical rules.
Please pay attention to the following safety advice in order to
avoid danger and damage to people and property.
Subject to technical change. Errors excepted.
2.3 Flashing codes ............................................................. 9
3. Commissioning........................................................... 10
4. Channel overview ......................................................11
4.1 Display channels ........................................................ 11
4.2 Adjustment channels .................................................. 13
5. Troubleshooting ......................................................... 20
5.1 Various ...................................................................... 21
Instructions:
Attention should be paid to
• Valid national and local standards and regulations
• Respective valid standards and directives
Equipment to be installed and used in accordance with the
rules of the National Electrical Code (NEC) or with Canadian
Electrical Code (CEC), Part I.
These instructions are exclusively addressed to authorized
skilled personnel.
• Only qualified electricians should carry out installation
and maintenance work.
• Initial installation should be carried out by qualified personnel
Description of symbols
WARNING! Warnings are indicated with a warning
triangle!
Î They contain information on how to
avoid the danger described.
Signal words describe the danger that may occur, when it is
not avoided.
Warning means that injury, possibly life-threatening injury,
can occur.
Attention means that damage to the appliance can occur.
Note
Notes are indicated with an i nformat ion
symbol.
Î Arrows indicate instruction steps that should be carried
out.
2
Information about the product
Proper usage
The solar controller is designed for use in solar thermal
and heating systems in compliance with the technical data
specified in these instructions.
Improper use excludes all liability claims.
Note
Strong electromagnetic fields can impair the
function of the controller.
Î Make sure the controller as well as the system
are not exposed to strong electromagnetic
fields.
Page 3

0.4" / 11 mm
0.5" / 13 mm
Overview
• System-monitoring-display
• Up to 4 Pt1000 temperature sensors
• Semiconductor relay for pump speed control
• Energy metering
®
• VBus
• Function control
• Control of the system by ServiceCenter
software possible
• User-friendly operation
• Housing with outstanding design
• Extra-low power consumption
Included with the SOM 6 plus:
1 × SOM 6 plus
1 × accessory bag
1 × spare fuse T4A
2 × screws and wall plugs
4 × strain relief and screws
1 × manual
Additionally enclosed in the full kit:
1 × sensor FKP6
2 × sensor FRP6
Technical data
Housing: plastic, PC-ABS and PMMA
Protection type: IP 20 / EN 60529
Ambient temp.:
32 ... 104 °F
[0 ... 40 °C]
Size:
6.8" × 4.3" × 1.9"
172 × 110 × 47 mm
Mounting: wall mounting, mounting into
patch-panels is possible
Display: System screen for system
visua lization, 16-segment display,
7-segment display, 8 symbols for system
status and operating control lamp
2.6"
66 mm
1.1"
28 mm
6.8"
172 mm
4.3"
110 mm
Operation: by 3 push buttons at the front
of the housing
Functions: Differential temperature
controller with optional add-on system
functions. Func ti on con trol, operating
hours counter for solar pump, pump
speed control, drainback option and
energy metering.
Inputs:
for 4 Pt1000 temperature sensors
Output: 1 semiconductor relay
Bus: VBus
®
Power supply: 100 ... 240 V~
6.1"
155 mm
1.9" / 47 mm
Standby power consumption:
< 1 W
Switching capacities:
R1: 1 (1) A 100 ... 240 V~
(semiconductor relay)
3
Page 4
1. Installation
104 mm
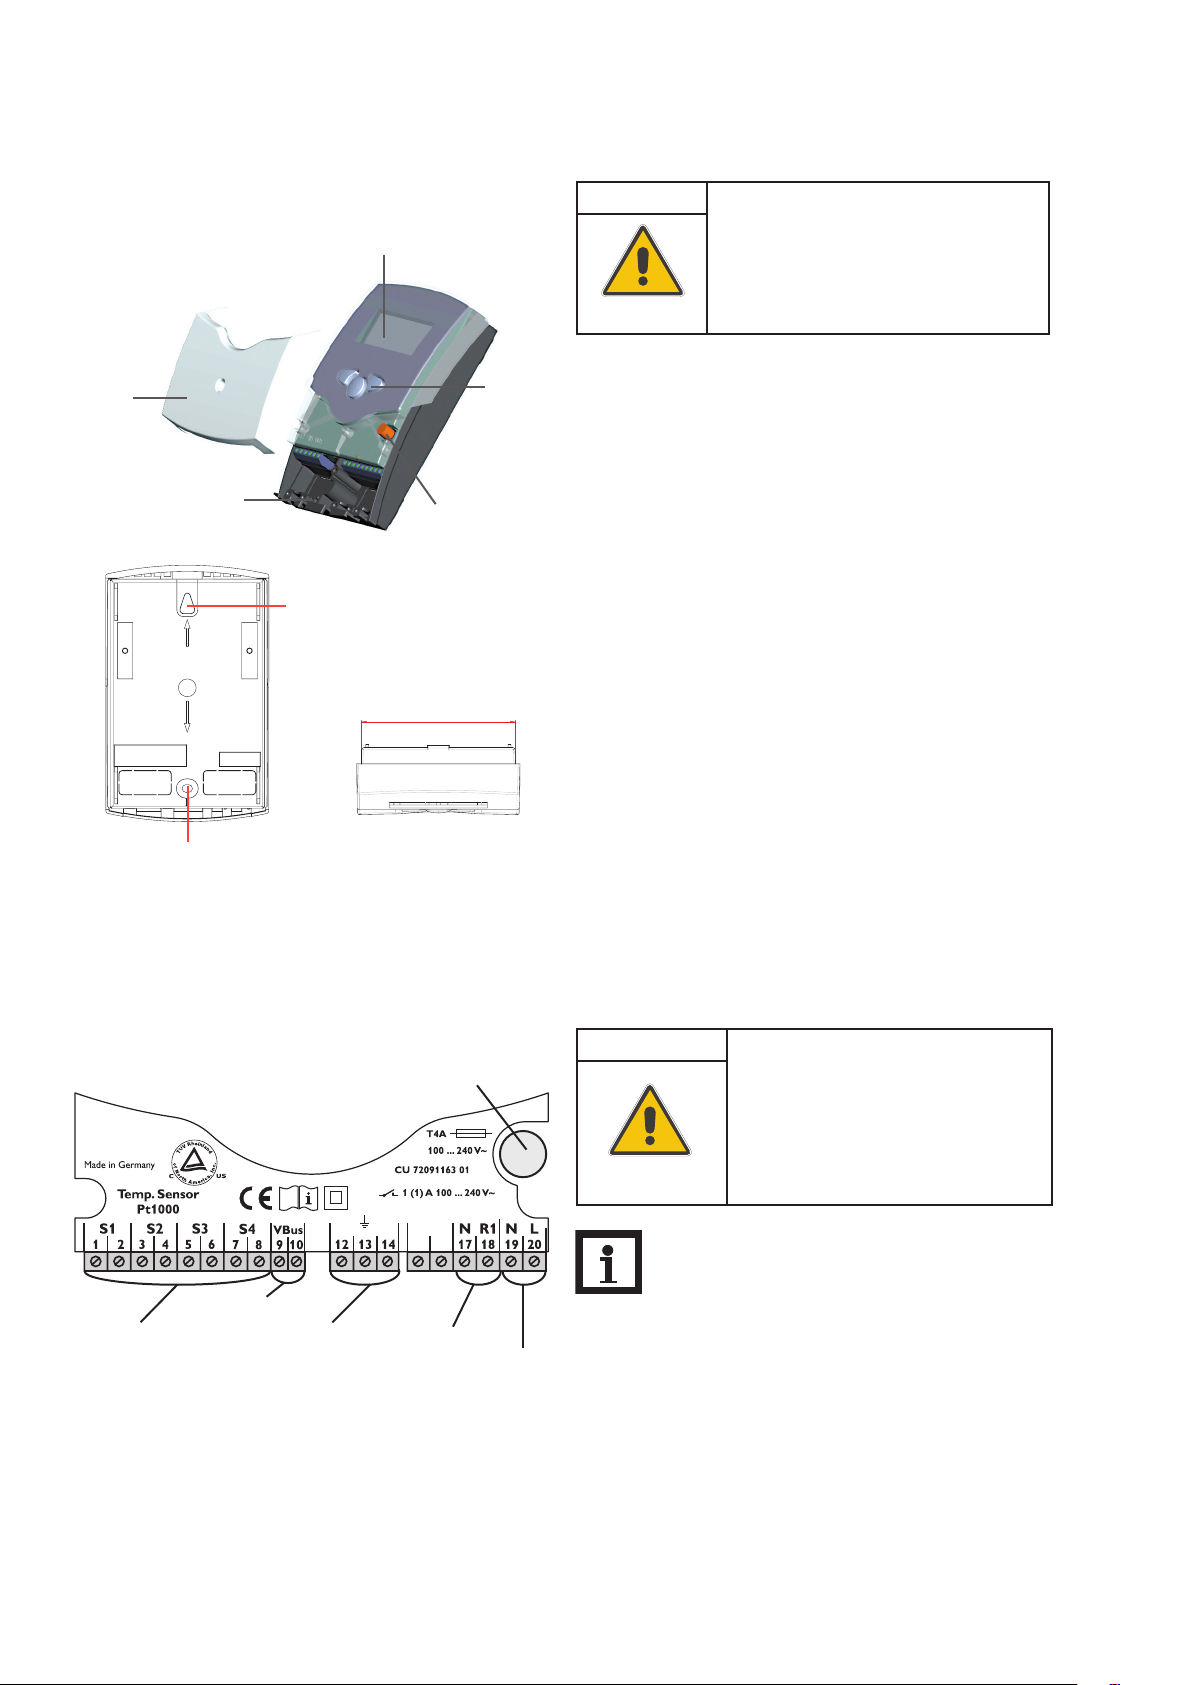
1.1 Mounting
display
WARNING! Electric shock!
Opening the housing will expose live
parts!
Î Switch off power supply and disconnect
the device from power supply before
opening the housing!
cover
cable conduits with strain
relief
5.1“
130 mm
lower fastening
upper fastening
fuse 4A
4.1“
push button
The unit must only be installed
• in a dry interior location
• in a non-hazardous location
• away from electromagnetic fields
The controller must additionally be supplied from a doublepole switch with contact gap of at least 0.12" [3 mm].
Route sensor cables and power supply cables separately.
Î Unscrew the cross-head screw from the cover and remove
it along with the cover from the housing
Î Mark the upper fastening point on the wall and drill
Î Fasten the enclosed wall plug and screw leaving the head
protruding
Î Hang the housing from the upper fastening point and
mark the lower fastening point through the hole in the
terminal box (centers 5.1" [130 mm])
Î Drill and insert the lower wall plug
Î Fasten the housing to the wall with lower fastening screw
and tighten
Î Complete wiring connections in accordance with terminal
allocations, see chap. 1.2 “Electrical connection”
Î Place the cover back onto the housing
Î Fasten the cover by means of the cross-head screw
1.2 Electrical connection
VBus
ground terminal
ATTENTION! ESD damage!
fuse
Electrosta tic discharge can lead to
damage to electronic components!
Î Take care to discharge properly
before touching the inside of the
device. To do so, touch a grounded
surface such as a radiator or tap!
Note:
The minimum pump speed must be set to 100% when
®
load terminalssensor terminal
power supply terminals
Connecting the device to the power supply must always be
the last step of the installation!
auxiliary relays or valves are connected.
The power supply to the controller must be carried out via
an external power switch (last step!). The supply voltage
must be 100 ... 240 V~ (50 ... 60 Hz). Flexible cables must be
attached to the housing with the enclosed strain relief and
the corresponding screws.
4
Page 5
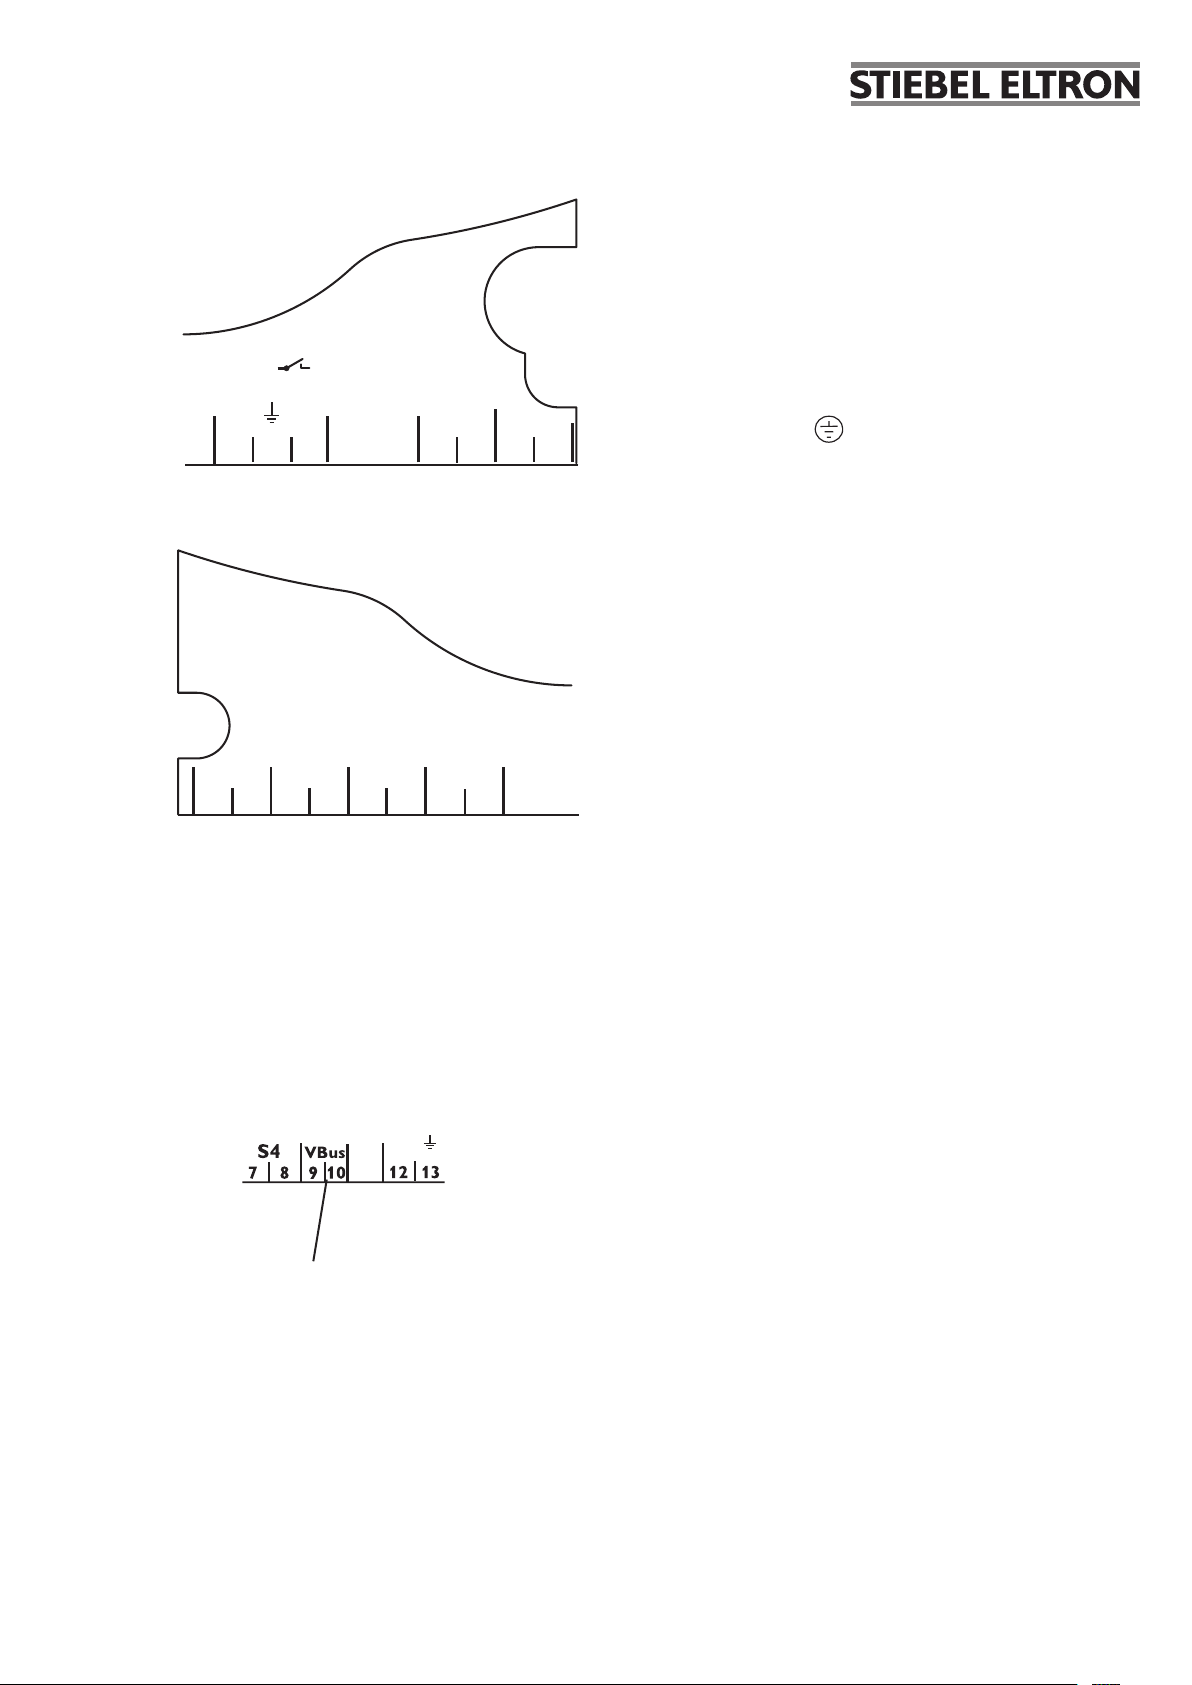
The controller is equipped with a semiconductor relay, to
which a load such as a pump, a valve etc. can be connected:
• Relay 1
18 = conductor R1
17 = neutral conductor N
13 = ground conductor
R1
1 (1) A (100 ... 240) V~
Grounding and load terminals
Temp. Sensor
Pt1000
S1 S2 S3
1 2
3 4 5 6
Sensor terminals S1 ... S4
S4
7 8
The power supply is to be carried out at the terminals:
19 = neutral conductor N
20 = conductor L
LNR1N
20191817141312
12 = ground terminal
The temperature sensors (S1 up to S4) are to be connected
to the following terminals with either polarity:
1 / 2 = Sensor 1 (e.g. Sensor collector)
3 / 4 = Sensor 2 (e.g. Sensor tank)
5 / 6 = Sensor 3 (e.g. Sensor tank top)
7 / 8 = Sensor 4 (e.g. Sensor return)
All Pt1000 temperature sensors are equipped with a platinum
measuring element in their tip. The electrical resistance of the
measuring element changes in relation to the temperature
(see table in chap. 5).
The difference between FKP and FRP type sensors only lies in
the cable insulation material. The insulation material of FKP
type sensor cables resists a higher temperature, so that FKP
type sensors should be used as collector sensors. FRP type
sensors are best used as reference sensors in tanks or pipes.
1.3 Data communication/ Bus
®
VBus
connection terminals
The controller is equipped with a VBus® for data transfer with
and energy supply to external modules. The connection is
carried out at the terminals marked “VBus” (either polarity).
One or more VBus® modules can be connected via this data
bus.
By means of a DL2 datalogger or an interface adapter, the
controller can be connected to a PC or a computer network.
5
Page 6
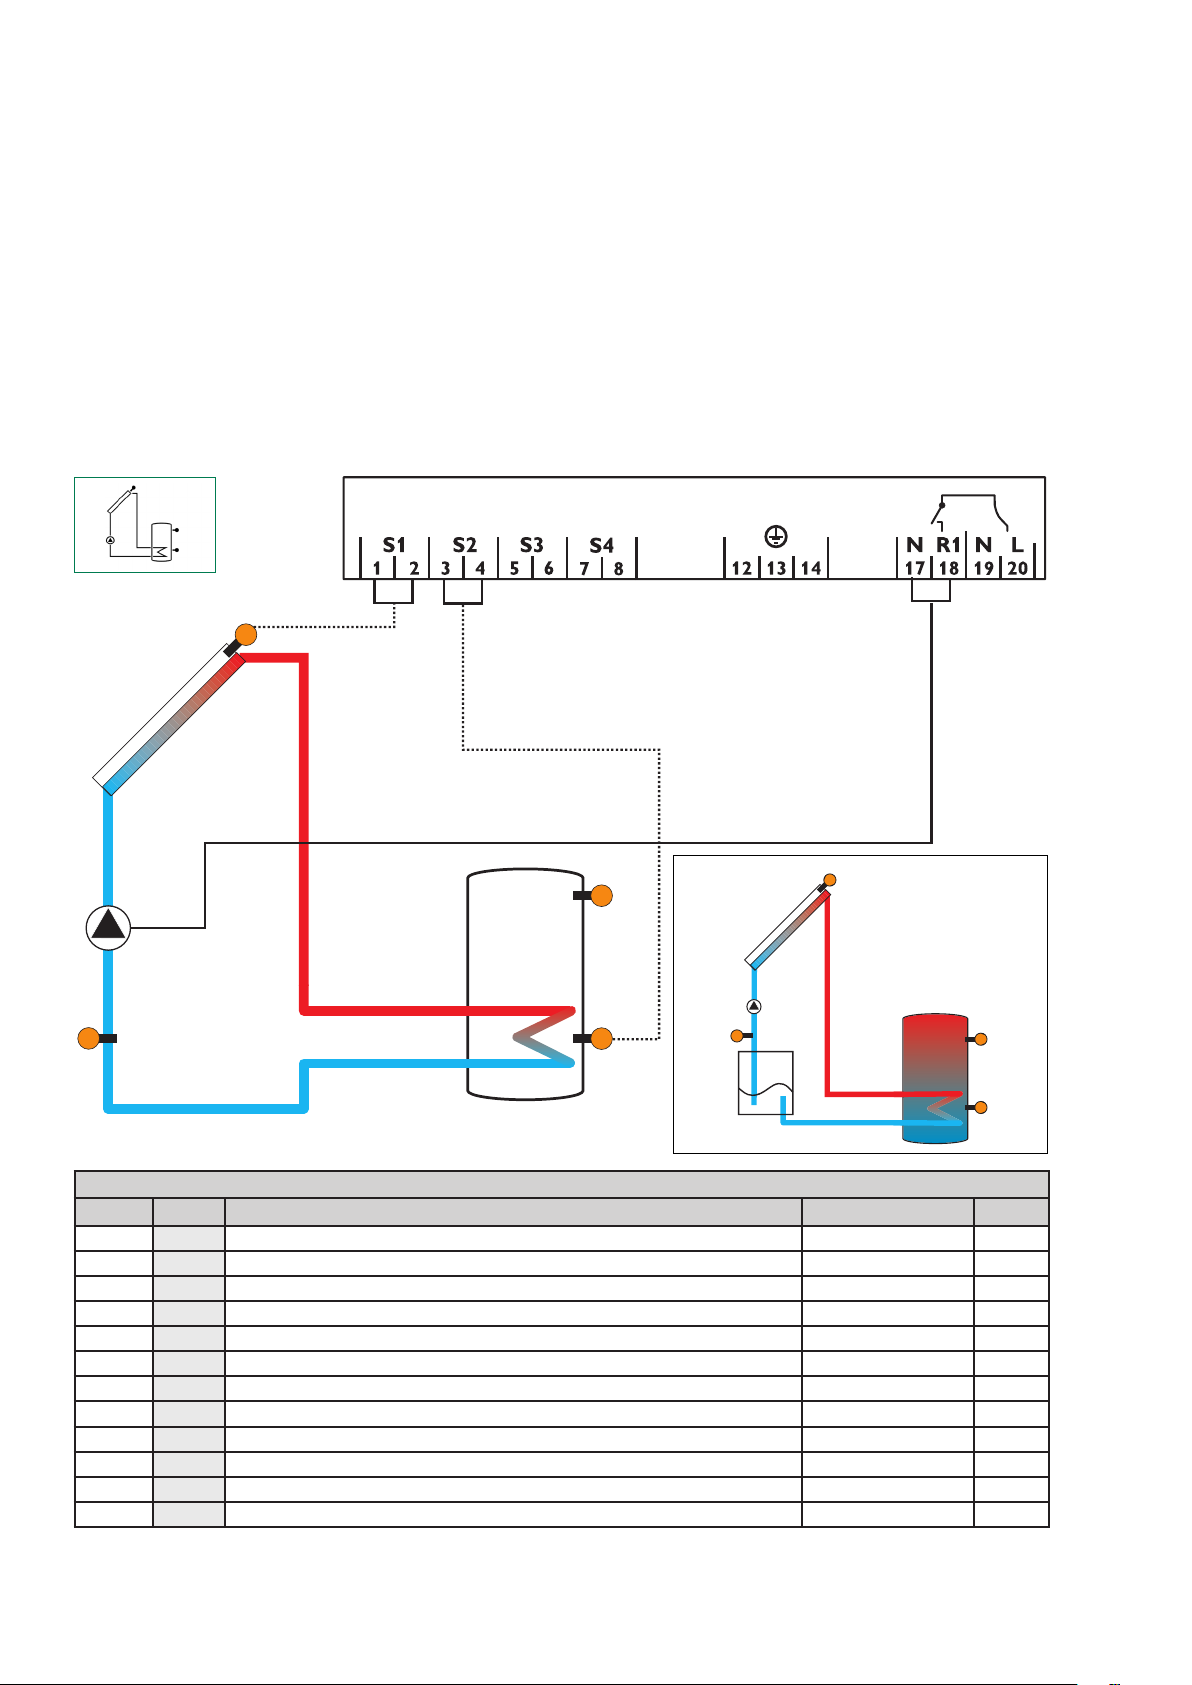
1.4 Terminal allocation
The controller calculates the temperature difference between
collector sensor S1 and tank sensor S2. If the difference is
larger than or identical to the adjusted switch - on temperature
difference (DT O), the solar pump will be operated by R1,
and the tank will be loaded until the switch-off temperature
difference (DT F) or the maximum tank temperature (S MX)
is reached.
S1
Sensors S3 and S4 ca n opt i o n a l l y be connected for
measurement purposes.
If energy metering (OHQM) is activated, sensor S4 has to be
connected as return sensor.
R1
S4 / TR
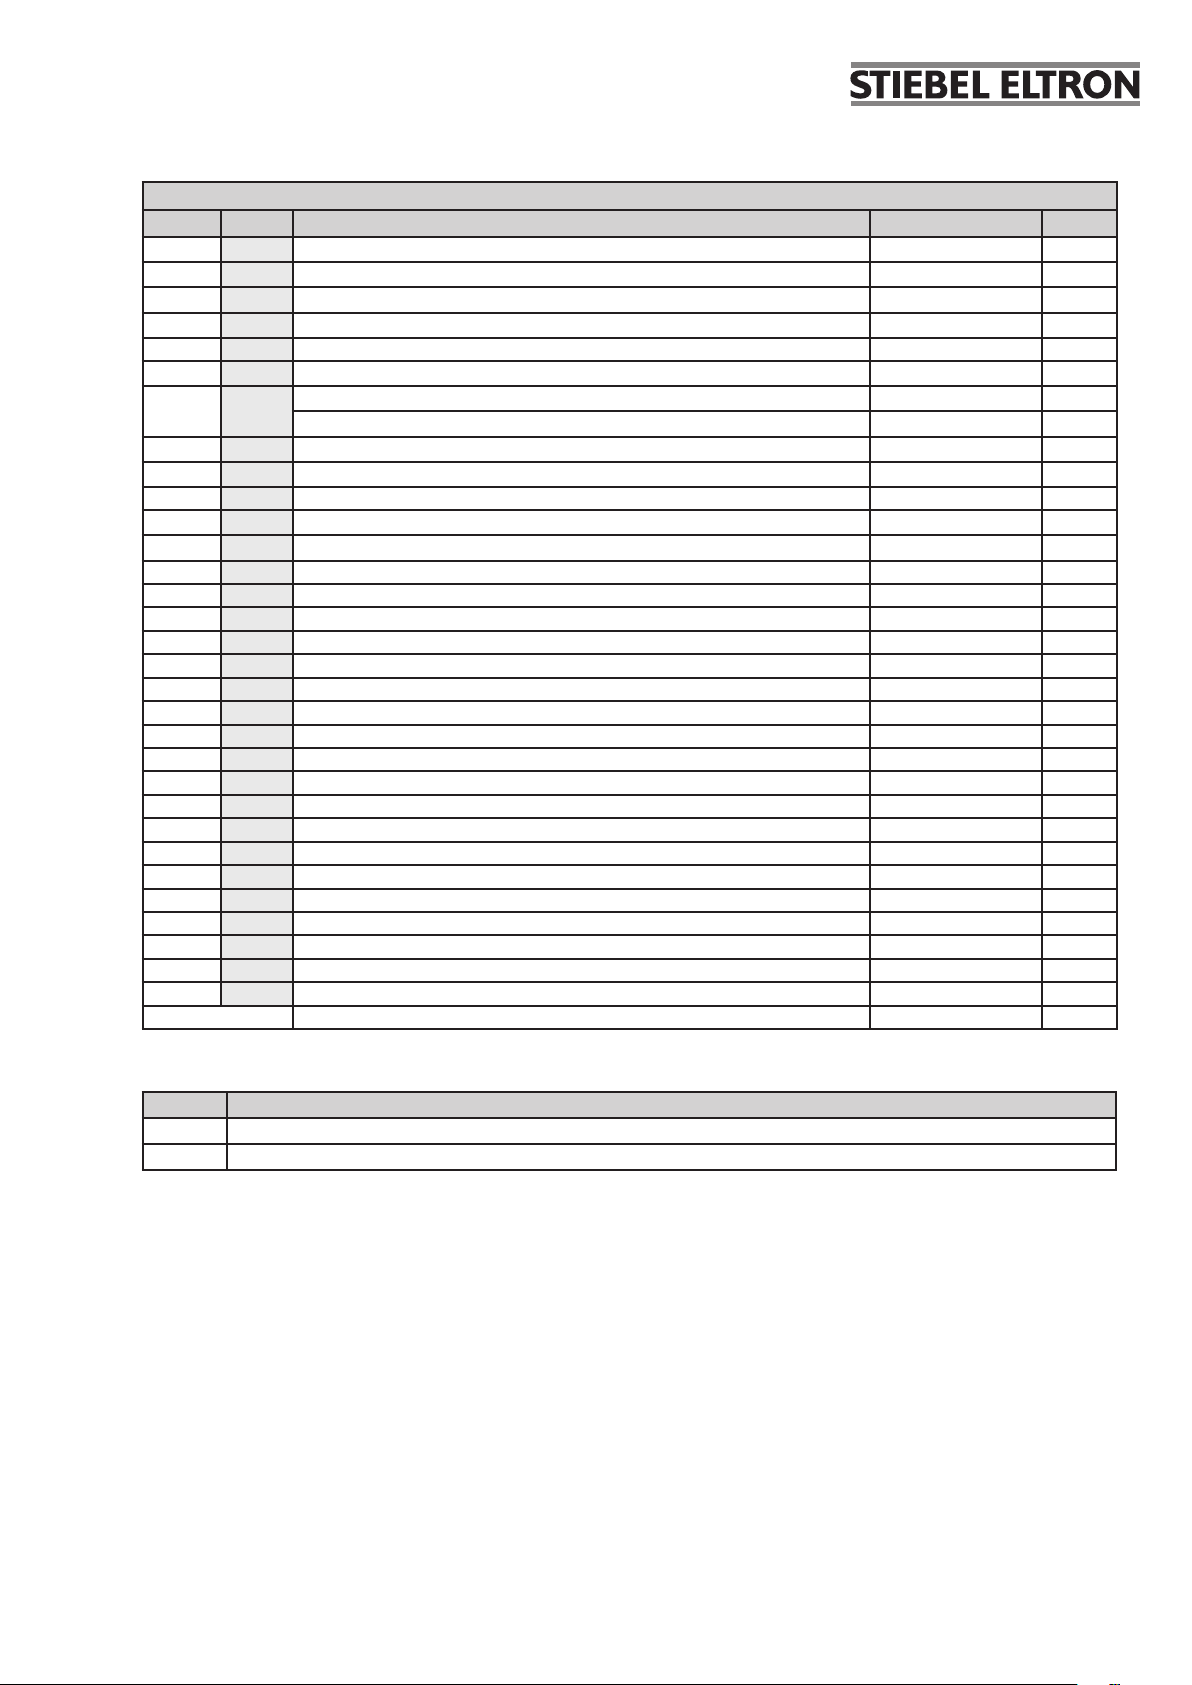
Display Channels
Channel Description Terminal Page
INIT
FLL
STAB
COL x Temperature collector S1 12
TST x Temperature tank S2 12
S3 x Temperature sensor 3 S3 12
S4 x Temperature sensor 4 S4 12
TR x* Temperature return sensor S4 12
n % x Pump speed R1 R1 13
hP x Operating hours R1 R1 13
kWh x* Heat quantity kWh - 13
MWh x* Heat quantity MWh - 13
x*
ODB initialization active - 12
x*
ODB filling time active - 12
x*
ODB stabilization in progress - 12
S3
R1
S4/TR
S2
S1
Drainback system layout
exemplary
S3
S2
6
Page 7
Adjustment Channels
Channel Description Factory setting Page
DT O x Switch-on temperature difference 12.0 °Ra [6.0 K] 14
DT F x Switch-off temperature difference 8.0 °Ra [4.0 K] 14
DT S x Nominal temperature difference 20.0 °Ra [10.0 K] 14
RIS x Rise control 4 °Ra [2 K] 14
nMN x Minimum pump speed 30 % 14
S MX x Maximum tank temperature 140 °F [60 °C] 15
EM x
OCC x Option collector cooling
CMX x* Maximum collector temperature
Emergency temperature collector 270 °F [130 °C] 15
Emergency temperature collector if ODB is activated: 200 °F [95 °C] 15
OFF 16
230 °F [110 °C] 16
OSYC x Option system cooling OFF 16
DTCO x* Cooling switch-on temperature difference
DTCF x* Cooling switch-off temperature difference
40.0 °Ra [20.0 K]
30.0 °Ra [15.0 K]
16
16
OSTC x Option tank cooling OFF 17
OHOL x* Option holiday cooling OFF 17
THOL x* Holiday cooling temperature 110 °F [40 °C] 17
OCN x Option minimum limitation OFF 17
CMN x* Minimum collector temperature 50 °F [10 °C] 17
OCF x Option antifreeze OFF 17
CFR x* Antifreeze temperature 40.0 °F [4.0 °C] 17
OHQM x Option energy metering OFF 18
FMAX x* Maximum flow 6.0 l 18
MEDT x* Antifreeze type 1 18
MED% x* Antifreeze concentration (only if MEDT = propylene or ethylene) 45 % 18
ODB x Drainback option OFF 19
tDTO x* ODB switch-on condition - time period 60 s 19
tFLL x* ODB filling time 5.0 min 19
tSTB x* ODB stabilization time 2.0 min 19
MAN x Manual operation R1 Auto 20
LANG x Language En 20
UNIT x Temperature unit °C 20
RESE x Reset - back to factory defaults 20
W0020100 Version number
Legend:
Symbol Specification
x Channel is available
x* Channel is available if the corresponding option is activated.
7
Page 8
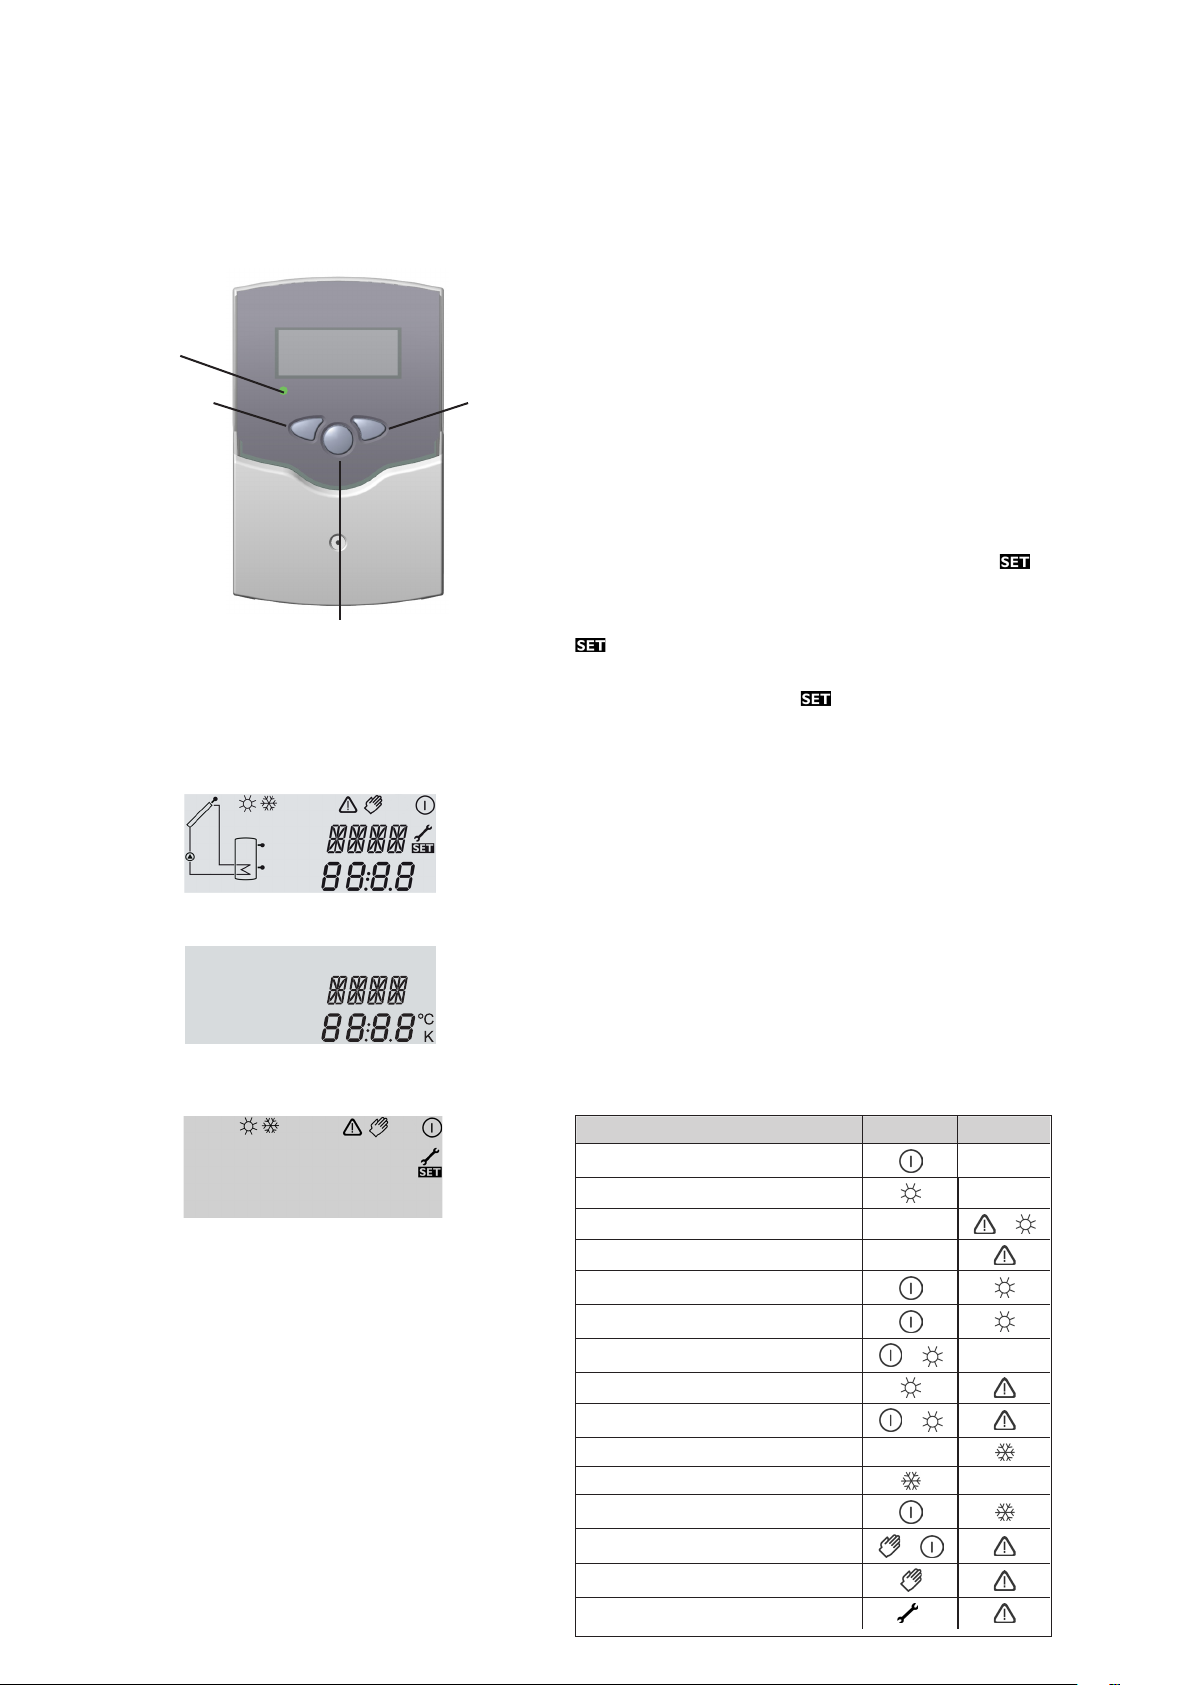
2. Operation and function
2.1 Push buttons
operating control lamp
backward
2
3
(selection / adjustment mode)
2.2 System monitoring display
SET
The controller is operated via three push buttons below the
display.
Button 1 is used for scrolling forward through the indication
menu or to increase the adjustment values. Button 2 is used for
scrolling backward and reducing values. Button 3 is used for
selecting channels and confirming adjustments.
During normal operation, only the display channels are
shown.
forward
1
Î Scroll through the display channels by pressing buttons
1 and 2
Accessing the adjustment channels:
Î Scroll down in the display menu and press button 1 for
approx. 2 seconds after you have reached the last display
item.
When an adjustment value is shown on the display,
is
indicated to the right of the channel name.
Î Press button 3 in order to access the adjustment mode
starts flashing.
Î Adjust the value using buttons 1 and 2
Î Briefly press button 3,
permanently appears,the
adjusted value will be saved.
The system monitoring display consists of three blocks: channel
display, tool bar and system screen.
The channel display consists of 2 lines. The upper line is an alpha-
system monitoring display
numeric 16-segment display (text display) for displaying channel
names and menu items. In the lower 7-segment display, the
channel values and the adjustment parameters are displayed.
Temperatures are either indicated in °F or °C, whereas
temperature differences are indicated in K or °Ra respectively.
channel display
The additional symbols of the tool bar indicate the current
system status.
Status standard flashing
relay 1 active
maximum tank temperature exceeded
tool bar
8
tank emergency shutdown active
collector emergency shutdown active
collector cooling active
system cooling active
tank cooling active
holiday cooling function activated
holiday cooling function active
collector minimum limitation active
antifreeze function activated
antifreeze function active
manual operation relay 1 ON
manual operation relay 1 OFF
sensor defective
+
+
+
+
Page 9

System screen
The system screen shows the solar system. It consists of several
system component symbols, which are – depending on the
current status of the system – either flashing or permanently
shown.
system screen
collector
pump
collector
sensor
tank heat exchanger
Collector
with collector sensor
tank
tank sensor
at the top
tank sensor at the bottom
Temperature sensor
2.3 Flashing codes
System screen flashing codes
LED flashing codes
Tank
with heat exchanger
Pump
• Pump is flashing when the relay is active
• Sensor symbols are flashing if the corresponding sensor
display channel is selected.
• Sensors are flashing quickly in the case of a sensor fault.
green: everything OK
red/green flashing initialization phase
manual operation
red flashing: sensor fault
(sensor symbol is flashing quickly)
9
Page 10

3. Commissioning
2
3
1
(SET)
The three push buttons of the BS/2 controller
Î Establish the power supply
During a short initialization phase, the operating control lamp
flashes red and green.
When the controller is commissioned for the first time or after
a reset, it will run a commissioning menu. The commissioning
menu leads the user through the most important adjustment
channels needed for operating the system.
Operating the commissioning menu:
Î Enter the channel by pressing button 3
The
The
The commissioning menu consists of the following 4 channels:
symbol flashes.
Î Adjust the value by pressing buttons 1 and 2
Î Save the adjustment by pressing button 3 again
symbol stops flashing.
Î Press button 1 or 2 to switch to the next or previous channel
LANG:
Language selection
Selection: dE, En
Factory setting: En
UNIT:
Temperature unit selection
Selection: °F, °C
Factory setting: °C
S MX:
Maximum tank temp.
Adjustment range:
40 ... 200°F [4 ... 95 °C]
in steps of 2 °Ra [1 K]
Factory setting:140°F [60 °C]
1. Language
Î Adjust the desired menu language in this channel
• dE : German
• En : English
2. Unit
Î Adjust the unit in which temperatures and temperature
differences shall be displayed
3. Maximum tank temperature
Î Adjust the desired maximum tank temperature
Note:
The controller is also equipped with a nonadjustable emergency shutdown function, which
will shut the system down if the tank reaches
200°F [95 °C].
nMN:
Pump speed control
Adjustment range: 30 ... 100
in steps of 5 %
Factory setting: 30
10
4. Minimum pump speed
Î Adjust a minimum speed for the pump
Note:
If a load which is not speed-controlled is used, the
value must be set to 100%.
Page 11

Confirmation enquiry
4. Channel overview
4.1 Display channels
Indication of drainback time periods
Completing the commissioning menu
After the last channel of the commissioning menu has been
adjusted and confirmed, the controller asks for confirmation
of the adjustments.
Î To confirm the adjustments made in the commissioning
menu, press button 3
Now the controller is ready for operation with typical settings
to suit the selected system layout.
The set tings made in the commissioning menu can be
changed later on in the corresponding adjustment channels.
Additional functions and options can of course be individually
adjusted as well (see chap. 4.2).
Note:
The displayed values and adjustment channels
depend on which options and functions have been
selected. Only values and adjustment channels
available for the individual settings selected will
appear in the menu.
Initialization
INIT:
ODB initialization active
Filling time
FLL:
ODB filling time active
Stabilization
STAB:
Stabilization
Indication of collector temperature
COL:
Collector temperature
Display range: -40 ... +500 °F
[-40 ... +260 °C]
Indication of tank temperatures
TST:
Tank temperatures
Display range: -40 ... +500 °F
[-40 ... +260 °C]
Indicates the time adjusted in tDTO, running backwards.
Indicates the time adjusted in tFLL, running backwards.
Indicates the time adjusted in tSTB, running backwards.
Indicates the current collector temperature.
Indicates the current tank temperature.
11
Page 12

Indication of sensors 3 and 4
S3, S4:
Sensor temperatures
Display range: -40 ... +500 °F
[-40 ... +260 °C]
Indicates the current temperature of the corresponding additional sensor (without control function).
• S3 : temperature sensor 3
• S4 : temperature sensor 4
Note:
S3 and S4 will only be indicated if the temperature
sensors are connected.
Indication of return temperature
TR:
Return tempe rature
Display range: -40 ... +500 °F
[-40 ... +260 °C]
Indication of current pump speed
n %:
Current pump speed
Display range: 30 ... 100 %
kWh/MWh: Heat quantity in
kWh / MWh
Display channel
If energy metering is active, the temperature at sensor4 is
indicated as TR.
Indicates the current pump speed of the solar pump.
Indicates the energy gained in heat quantity – only available
if energy metering (OHQM) is activated.
The flow rate as well as the reference sensors S1 (flow) and
S4 (return) are used for calculating the heat quantity supplied.
It is shown in kWh in the channel kWh and in MWh in the
channel MWh. The overall heat quantity results from the sum
of both values.
The accumulated heat quantity can be set back to 0. As soon
as one of the display channels of the heat quantity is selected,
the symbol is permanently shown on the display.
Î Press button 3 for about 2seconds in order to access the
RESET mode of the counter.
The display symbol will flash and the heat quantity value
will be set to 0.
Î In order to finish this process, press button 3 to confirm.
In order to interrupt the RESET-process, do not press a button
for about five seconds. The display returns to the display mode.
Operating hours counter
h P:
Operating hours counter
Display channel
12
The operating hours counter accumulates the solar operating
hours of the relay (h P). Full hours are displayed.
The accumulated operating hours can be set back to 0. As
soon as one operating hours channel is selected, the symbol
is displayed.
Î In order to access the RESET-mode of the counter, press
button 3 for approx. 2 seconds.
The display symbol will flash and the operating hours
will be set to 0.
Î Confirm the reset with button 3 in order to finish the reset.
In order to interrupt the RESET-process, do not press a button
for about five seconds. The display returns to the display mode.
Page 13

4.2 Adjustment channels
∆T-regulation
DT O:
Switch-on temperature diff.
Adjustment range: 2.0 ... 40.0°Ra
[1.0 ... 20.0 K]
in steps of 1 °Ra [0.5 K]
Factory setting: 12.0°Ra
[6.0 K]
DT F:
Switch-off temperature diff.
Adjustment range: 1.0 ... 39.0°Ra
[0.5 ... 19.5 K]
in steps of 1 °Ra [0.5 K]
Factory setting: 8.0°Ra
[4.0 K]
Pump speed control
DT S:
Nominal temperature difference
Adjustment range: 3.0 ... 60.0 °Ra
[1.5 ... 30.0 K]
in steps of 1 °Ra [0.5 K]
Factory setting: 20.0 °Ra
[10.0 K]
RIS:
Rise
Adjustment range:
2 ... 40 °Ra [1 ... 20 K]
in steps of 2 °Ra [1 K]
Factory setting: 4 °Ra [2 K]
Minimum pump speed
nMN:
Pump speed control
Adjustment range: 30 ... 100
in steps of 5 %
Factory setting: 30
The controller works as a standard differential controller. If the
switch-on difference is reached, the pump is activated. When
the temperature difference falls below the adjusted switch-off
temperature difference, the relay switches off.
Note:
The switch-on temperature difference must be
at least 1 °Ra [0.5 K] higher than the switch-off
tempe rature difference.
Note:
When the drainback option ODB is activated, the
temperature differences DTO, DTF and DTS are
set to a fixed adjustment:
DTO = 20 °Ra [10 K]
DTF = 8 °Ra [4 K]
DTS = 30 °Ra [15 K]
Previous adjustments made in these channels will be
overridden and may have to be entered again if ODB
is deactivated later on.
Note:
For pump speed control, the operation mode of
relay 1 must be set to Auto (adjustment channel
MAN)
When the switch-on temperature difference is reached, the
pump is activated at full speed for 10 seconds. Then, the
speed is reduced to the minimum pump speed value (factory
setting = 30%).
If the temperature difference reaches the adjusted nominal
temperature difference, the pump speed increases by one step
(10%). If the difference increases by the adjustable rise value, the
pump speed increases by 10% respectively until the maximum
pump speed of 100% is reached. The response of the controller
can be adapted via the parameter “Rise”.
Note:
The nominal temperature difference must be
at least 1 °Ra [0.5 K] higher than the switch-on
tempe rature difference.
A relative minimum pump speed can be allocated to the
output R1 via the adjustment channel nMN.
Note:
When a load which is not speed-controlled is used,
the value must be set to 100% in order to deactivate
pump speed control.
13
Page 14

Maximum tank temperature
S MX:
Maximum tank temp.
Adjustment range:
40 ... 200°F [4 ... 95 °C]
in steps of 2 °Ra [1 K]
Factory setting:140°F [60 °C]
Once the adjusted maximum temperature is exceeded,
the solar pump is switched off and further loading of the
tank is prevented to reduce scald risk or system damage. A
fixed hysteresis of 4 °Ra [2 K] is set for the maximum tank
temperature.
When the temperature at sensor 2 exceeds the adjusted
maximum tank temperature, the
display.
Note:
If the collector cooling or the system cooling
function is activated, the adjusted tank temperature
may be overridden. In order to prevent system
damage, the controller is also equipped with a
non-adjustable emergency shutdown if the tank
reaches 200°F [95 °C].
symbol is shown on the
Collector temperature limitation
Emergency shutdown of the collector
EM:
Collector temperature limitation
Adjustment range:
170 ... 390°F
[80 ... 200 °C]
in steps of 2 °Ra [1 K]
Factory setting:
270°F [130 °C]
If the adjusted collector emergency shutdown temperature EM
is exceeded, the controller switches off the solar pump (R1)
in order to protect the system against overheating (collector
emergency shutdown). A hysteresis of 20°Ra [10K] is set for
the collector temperature limitation. While the collector is in
emergency shutdown,
Note:
If the drainba ck op t i on ODB is ac t ivated ,
the adj ustment ran ge of EM is changed to
170...250°F [80...120°C]. The factory setting
in that case is 200°F [95°C].
WARNING! Danger of injury and system damage
(flashing) is shown on the display.
through pressure surges!
If water is used as a heat transfe r
medium in a pressure-less system, the
water will start boiling at 212 °F [100
°C].
Î If a pressure-less drainback system
is used with water as a heat transfer
medium, do not adjust the collector
temperature limitation EM to more
than 200 °F [95 °C]!
14
Page 15

Cooling functions
Below, the three cooling functions – collector cooling, system
cooling and tank cooling – are described in detail. The
following note is valid for all three cooling functions:
Note:
The cooling functions will not become active as long
as solar loading is possible.
Collector cooling function
OCC:
Option collector cooling
Adjustment range: OFF / ON
Factory setting: OFF
CMX:
Maximum collector temp.
Adjustment range:
150 ... 320°F
[70 ... 160 °C]
in steps of 1 °Ra [1 K]
Factory setting:
230°F [110 °C]
System cooling function
OSYC:
Option system cooling
Adjustment range: OFF / ON
Factory setting: OFF
DTCO:
Switch-on temperature diff.
Adjustment range:
2.0 ... 60.0 °Ra
[1.0 ... 30.0 K]
in steps of 1 °Ra [0.5 K]
Factory setting:
40.0°Ra [20.0 K]
DTCF:
Switch-off temperature diff.
Adjustment range:
1.0 ... 59.0 °Ra
[0.5 ... 29.5 K]
in steps of 1 °Ra [0.5 K]
Factory setting:
30.0 °Ra [15.0 K]
When the collector cooling function is activated, the controller
aims to keep the collector at an operational temperature.
When the adjusted maximum tank temperature is reached,
solar loading stops. If the collector temperature increases to
the adjusted maximum collector temperature, the solar pump
is activated until the collector temperature falls at least 10°Ra
[5K] below the maximum collector temperature. The tank
temperature may increase (subordinate active maximum tank
temperature), but only up to 200°F [95°C] (emergency shutdown
of the tank).
If the collector cooling function is active,
and (flashing)
is shown on the display.
Note:
This function will only be available if the system
cooling function (OSYC) is deactivated.
When the system cooling function is activated, the controller
aims to keep the solar system operational for a longer time.
The function overrides the maximum tank temperature to
provide thermal relief of the collector field and the heat
transfer fluid on hot days.
If the tank temperature is higher than the maximum tank
temperature S MX and the switch-on temperature difference
DTCO is reached, the solar system remains activated. Solar
loading is continued until either the tank temperature
reaches 200°F [95°C] (emergency shutdown of the tank), the
temperature difference falls below the adjusted value DTCF or
the collector emergency shutdown temperature EM is reached.
If the system cooling function is active,
and (flashing) is
shown on the display.
Note:
This function will only be available if the collector
cooling function (OCC) is deactivated.
15
Page 16

Tank cooling function
OSTC:
Tank cooling option
Adjustment range: OFF / ON
Factory setting: OFF
OHOL:
Holiday cooling option
Adjustment range: OFF / ON
Factory setting: OFF
THOL:
Holiday cooling temperature
Adjustment range:
70 ... 175 °F
[20 ... 80 °C]
in steps of 1 °Ra [1 K]
Factory setting:
110 °F [40 °C]
When the tank cooling function is activated, the controller aims
to cool down the tank during the night in order to prepare it for
solar loading on the following day.
If the adjusted maximum tank temperature S MX is exceeded
and the collector temperature falls below the tank temperature,
the system will be reactivated in order to cool down the tank.
Cooling will continue until the tank temperature has fallen
below the adjusted maximum tank temperature S MX again. A
fixed hysteresis of 4°Ra [2K] is set for this function.
Reference threshold temperature differences for the tank
cooling function are DT O and DT F.
If no DHW consumption is expected for a longer period of
time, the additional holiday cooling option OHOL can be
activated in order to extend the tank cooling function. The
adjustable temperature THOL then replaces the maximum
tank temperature S MX as a switch-off temperature for the
tank cooling function.
When the holiday cooling function is activated
, and
(flashing) are shown on the display.
While the holiday cooling function is active, , and
(flashing) are shown on the display.
Collector minimum limitation option
OCN:
Collector minimum limitation
Adjustment range: OFF / ON
Factory setting: OFF
CMN:
Collector minimum temp.
Adjustment range:
50 ... 190°F
[10 ... 90 °C]
in steps of 1 °Ra [0.5 K]
Factory setting:
50°F [10 °C]
Antifreeze option
OCF:
Antifreeze function
Adjustment range: OFF / ON
Factory setting: OFF
CFR:
Antifreeze temperature
Adjustment range:
-40.0 ... +50.0°F
[-40.0 ... +10.0 °C]
in steps of 1 °Ra [0.5 K]
Factory setting:
40.0°F [4.0 °C]
If the collector minimum limitation option is activated, the
pump (R1) is only switched on if the adjustable collector
minimum temperature is exceeded. The minimum temperature
prevents the pump from being switched on too often at low
collector temperatures. A fixed hysteresis of 10°Ra [5°K] is
set for this function
If the collector minimum limitation is active,
(flashing) is
shown on the display.
Note:
If OSTC or OCF is active, the collector minimum
function will be overridden. In that case, the
collector temperature may fall below CMN.
The antifreeze function activates the loading circuit between
the collector and the tank when the temperature falls below
the adjusted antifreeze temperature. This will protect the fluid
against freezing or coagulating. If the adjusted antifreeze
temperature is exceeded by 2 °Ra [1 K], the loading circuit
will be deactivated.
When the antifreeze function is activated,
is shown on the
display. If the antifreeze function is active, and (flashing)
are shown on the display.
Note:
Since this function uses the limited heat quantity
of the tank, the antifreeze function should be used
in regions with few days of temperatures around
the freezing point.
The antifreeze function will be suppressed if the
tank temperature falls below 40 °F [5 °C] in order
to protect the tank from frost damage.
16
Page 17

Energy metering
OHQM: Energy metering
Adjustment range: OFF / ON
Factory setting: OFF
FMAX: Flow rate in l/min
Adjustment range: 0.5 ... 100.0
in steps of 0.5
Factory setting: 6.0
If OHQM is activated, the heat quantity gained can be
calculated and displayed. Energy metering is possible if a
flowmeter is used. To enable energy metering, proceed as
follows:
Î Read the flow rate (l/min) from the flowmeter at maximum
pump speed and adjust it in the FMAX channel
Î Adjust the heat transfer fluid and the concentration of the
antifreeze in the channels MEDT and MED%.
MEDT: Heat transfer fluid
Adjustment range: 0 ... 3
Factory setting: 1
MED%: Antifreeze ratio
in Vol-% (MED% is hidden
when MEDT 0 or 3 is used.)
Adjustment range: 20 ... 70
in steps of 1%
Factory setting: 45
Heat transfer fluid:
0 : Water
1 : Propylene glycol
2 : Ethylene glycol
®
3 : Tyfocor
H-30 L/LS
17
Page 18

Drainback option
Note:
A drainback system layout requires additional
components such as a holding tank. The drainback
option should only be activated if all components
required are properly installed.
ODB:
Drainback option
Adjustment range: OFF / ON
Factory setting: OFF
Note:
When the drainback option ODB is activated, the
cooling functions OCC, OSYC and OSTC as well as
the antifreeze function OCF are not available.
If OCC, OSYC, OSTC or OCF have already been
activated before, they will be deactivated again
as soon as ODB is activated. They will remain
deactivated, even if ODB is deactivated later on.
Time period - switch-on conditions
tDTO:
Time period -
switch-on conditions
Adjustment range: 1 ... 100 s
in steps of 1 s
Factory setting: 60 s
A drainback system permits the heat transfer fluid to drain
back into the holding tank when solar energy is not collected.
The drainback option will initiate the filling of the system
when solar loading begins.
If the drainback option ODB is activated, the pump will
operate at 100 % speed for the adjusted filling time tFLL in
order to fill the system with fluid from the holding tank. After
tFLL, pump speed will go down to the adjusted minimum
pump speed nMn. The switch-off conditions will then be
ignored for the stabilization time tSTB in order to avoid the
system from shutting down prematurely.
If the function is activated, the menu items described in the
following (tDTO, tFLL and tSTB) have to be adjusted:
Note:
When the drainback option ODB is activated, the
temperature differences DTO, DTF and DTS are set
to a fixed adjustment. Additionally, the adjustment
range and the factory setting of the collector
emergency shutdown temperature EM changes
(see the corresponding channel descriptions for
further information).
Previous adjustments made in these channels will
be overridden and have to be entered again if ODB
is deactivated later on.
The parameter tDTO is used for adjusting the time period
du ring wh ich th e switch-on condition DT O must be
permanentely fulfilled.
Filling time
tFLL:
Filling time
Adjustment range:
1.0 ... 30.0 min
in steps of 0.5 min
Factory setting: 5.0 min
Stabilization
tSTB:
Stabilization
Adjustment range:
1.0 ... 15.0 min
in steps of 0.5 min
Factory setting: 2.0 min
18
The filling time can be adjusted using the parameter tFLL.
During this period, the pump runs at 100% speed.
The parameter tSTB is used for adjusting the time period
during which the switch-off condition DT F will be ignored
after the filling time has ended.
Page 19

Operating mode
MAN:
Operating mode Adjustment
range: OFF, Auto, ON
Factory setting: Auto
For control and service work, the operating mode of the
controller can be manually adjusted. For this purpose, select
the adjustment value MAN in which the following adjustments
can be made:
Operating mode
OFF : relay off
Auto : relay in automatic operation
ON : relay on
(flashing) +
(flashing) + +
Note:
Always adjust the operating mode back to “Auto”
when the control and service work is completed.
Normal operation is not possible in manual mode.
Language
LANG:
Language selection
Selection: dE, En
Factory setting: En
Unit
UNIT:
Temperature unit selection
Selection: °F, °C
Factory setting: °C
Reset
RESE
Reset function
The menu language can be adjusted in this channel.
• dE : German
• En : English
In this adjustment channel, the display unit for temperatures
and temperature differences can be chosen. The unit can be
switched between °C/K and °F/°Ra during operation.
Temperatures and temperature differences in °F and °Ra are
displayed without units. If the indication is set to °C, the units
are displayed with the values.
By using the reset function, all adjustments will be set back
to the factory settings.
Î To initiate a reset, press button 3
Any previous adjustments will be lost. Therefore, initiating
the reset function is always followed by a security enquiry.
Only confirm the security enquiry if you are sure that you wish
to reset all adjustments to the factory settings!
Security enquiry:
Î To confirm the security enquiry, press button 3
Note:
Whenever a reset has been completed, the controller
runs the commissioning menu again (see chap.3).
19
Page 20

5. Troubleshooting
VBus® terminals
ground
terminals
fuse
In the case of an error, a message is shown on the display of
the controller:
Warning symbols
Operating control lamp
load terminalssensor terminals
power supply
terminals
Operating control lamp flashes red. On the display the
symbols and appear.
Sensor defect. An error code instead of
a temperature is displayed in the sensor
display channel.
- 88.8888.8
Cable broken.
Check cable.
Short circuit. Check
cable.
Disconnected Pt1000 temperature sensors
can be checked with an ohmmeter. In the
following table, the resistance values with
the corresponding temperatures are shown.
°C °F Ω °C °F Ω
-10 14 961 55 131 1213
-5 23 980 60 140 1232
0 32 1000 65 149 1252
5 41 1019 70 158 1271
10 50 1039 75 167 1290
15 59 1058 80 176 1309
20 68 1078 85 185 1328
25 77 1097 90 194 1347
30 86 1117 95 203 1366
35 95 1136 100 212 1385
40 104 1155 105 221 1404
45 113 1175 110 230 1423
50 122 1194 115 239 1442
Resistance values of the Pt1000-sensors
Operating control lamp off.
Check the power supply. Is it disconnected?
no
The fuse of the controller
could be blown. It can be
Check the supply line and
reconnect it.
replace d after th e front
cover has been removed
(spare fuse is enclosed in
the accessory bag).
yes
20
Page 21

5.1 Various
Pump is overheated, but no heat transfer from the collector
to the tank, flow and return have the same temperature;
perhaps also air / gas bubbles in the lines.
Air in the system?
Air in the system; in crease
the system pressure to at
no yes
least static primary pressure plus 7. 25 psi (0.5 bar);
if necessary continue to
increase pressure; switch
the pump off and on for a
Is the collector circuit
short time.
blocked at the dirt trap?
yes
Clean the dirt trap
Pump starts up very late
Pump starts for a short moment, switches off, switches on
again, etc.
Temperature difference at
the controller too small?
Change ∆Ton and ∆Toff
no yes
correspondingly. Problem
solved?
no
yes
Wrong position of collector
sensors?
no
yes
Mount the collector sensor
o.k.
at solar flow ( w a rmest
co lle c tor outp u t); use
Plausibility control of
the option tube collector
s e ns o r w e l l o f t h e
respective collector.
special function
The temperature difference between tank and collector
increases enormously during operation; the collector circuit
cannot dissipate the heat.
Switch-on temperature
difference Ton to large?
no yes
Non-ideal position of the
collector sensor (e.g. flatscrew
sensor instead of sensor in
sensor wells)?
yes
Change ∆Ton and ∆ Toff
correspondingly.
Ac ti vate tube co ll e c to r
function if necessary.
o.k.
Collector circuit pump
defective?
no yes
Heat exchanger calcified?
no
yes
Heat exchanger blocked?
yesno
Heat exchanger too small?
yes
Check / replace it
Decalcify it
Clean it
Replace with correctly
sized one.
21
Page 22

Tanks cool down at night
a b
Collector circuit pump
runs during the night?
no yes
Collector temperature is at
night higher than the outdoor temperature
no yes
Sufficient tank insulation?
yes no
Insulation close enough to
the tank?
yes no
Are the tank connections
insulated?
yes no
Warm water outflow
upwards?
no yes
Check controller:
Manual operation active?
Tube collector function
active? Tank cooling or
antifreeze function active?
Check the check valve in
the flow and the return
pipe with regard to the
functional efficiency.
Increase insulation.
Re p lace ins u la t ion or
increase it.
Insulate the connections.
Change connection and
let the water flow horizo n t al l y or th r o ug h a
siphon (downwards); less
tank losses now ?
no yes
Control the non-return
va lv e i n wa rm wa t e r
circulation - o.k.
yes no
The thermosiphoning in
Further pumps which are
connected to the solar tank
must also be checked.
Clean or replace it
the circulation line is too
strong; insert a stronger
valve in the non-return
valve or an electrical 2-port
valve behind the circulation
pump; the 2-port valve is
open when the pump is
activated, otherwise it is
closed; connect pump and
2-por t valve electrically
in parallel; activate the
circulation again
The solar circuit pump does not work, although the collector
is considerably warmer than the tank.
Is the control lamp (LED)
illuminated?
There is no current; check
fuses / replace them and
check power supply.
yes no
Does the pump start up in
manual operation?
no
yes
The adjusted temperature
difference for starting the
pump is to high; choose a
value which makes more
sense.
Is the pump current
enabled by the controller?
Does the warm water
circulation run for a very
long time?
no yes
Ci rc u lat i on pum p an d
blocking valve should be
switched off for one night;
less tank losses?
yes no
a
22
o.k.
Use the circulation pump
with timer and switch-off
thermostat (energy efficient
circulation).
Check whether the pumps
of the ba cku p he a ti ng
circuit run at night; check
whether the non-return
valve is defective; problem
solved ?
no
b
yes
o.k.
no
yes
Are the controller fuses
o.k. ?
no yes
Replace fuses.
Is the pump stuck?
yes
Tu r n th e p u m p s ha f t
using a screwdriver; now
passable?
no
Pump is defective - replace
it
Co nt r ol l e r m i g h t b e
defective - replace it or
contact the distributor.
Page 23

Warranty
Make any warranty claim in the country where you purchased
the appliance. In such cases, please contact our representation
or the importer.
Our warranty applies only if:
— These installation instructions have been observed
— Exclusively accessories designated for this appliance have been
used
— All required steps up to and including commissioning have be
carried out by a qualied contractor
— Maintenance as specied has been carried out
— Exclusively our spare parts have been used for repairs
Environment and recycling
Please help us protect the environment. Dispose of the appliance
and its packaging in accordance with national regulations.
23
Page 24

Deutschland
STIEBEL ELTRON GmbH & Co. KG
Dr.-Stiebel-Straße | D-37603 Holzminden
Tel. 0 55 31 702 0 | Fax 0 55 31 702 480
Email info@stiebel-eltron.de
www.stiebel-eltron.de
Verkauf Tel. 0180 3 700705 | Fax 0180 3 702015 | info-center@stiebel-eltron.de
Kundendienst Tel. 0180 3 702020 | Fax 0180 3 702025 | kundendienst@stiebel-eltron.de
Ersatzteilverkauf Tel. 0180 3 702030 | Fax 0180 3 702035 | ersatzteile@stiebel-eltron.de
Vertriebszentren Tel. 0180 3 702010 | Fax 0180 3 702004
STIEBEL ELTRON Inc.
17 West Street | West Hateld MA 01088
Tel. 4 13-247-3380 | Fax 413-247-3369
Email info@stiebel-eltron-usa.com
www.stiebel-eltron-usa.com
Austria
STIEBEL ELTRON Ges.m.b.H.
Eferdinger Str. 73 | A-4600 Wels
Tel. 07242-47367-0 | Fax 07242-47367-42
Email info@stiebel-eltron.at
www.stiebel-eltron.at
Belgium
STIEBEL ELTRON Sprl/ Pvba
P/A Avenue du Port 104, 5 Etage
B-1000 Bruxelles
Tel. 02-4232222 | Fax 02-4232212
Email info@stiebel-eltron.be
www.stiebel-eltron.be
CCzech Republik
STIEBEL ELTRON spol. s r.o.
K Hájům 946 | CZ-15500 Praha 5-Stodůlky
Tel. 2-51116111 | Fax 2-35512122
Email info@stiebel-eltron.cz
www.stiebel-eltron.cz
Denmark
PETTINAROLI A/S
Madal Allé 21 | DK-5500 Middelfart
Tel. 63 41 66 66 | Fax 63 41 66 60
Email info@pettinaroli.dk
www.pettinaroli.dk
France
STIEBEL ELTRON S.A.S.
7-9, rue des Selliers
B.P. 85107 | F-57073 Metz-Cédex 3
Tel. 03 87 74 38 88 | Fax 03 87 74 68 26
Email info@stiebel-eltron.fr
www.stiebel-eltron.fr
Finland
Insinööritoimisto Olli Andersson Oy
Keskuskatu 8 | FI-04600 Mäntsälä
Tel. 020 720 9988 | Fax 020 720 9989
Email info@stiebel-eltron.
www.stiebel-eltron.
Great Britain
Stiebel Eltron UK Ltd.
Unit 12 Stadium Court
Stadium Road
Bromborough
Wirral CH62 3QP
Email: info@stiebel-eltron.co.uk
www.stiebel-eltron.co.uk
Hungary
STIEBEL ELTRON Kft.
Pacsirtamezo´´ u. 41 | H-1036 Budapest
Tel. 01250-6055 | Fax 01368-8097
Email info@stiebel-eltron.hu
www.stiebel-eltron.hu
Japan
Nihon Stiebel Co. Ltd.
Ebara building 3F | 2-9-3 Hamamatsu-cho
Minato-ku | Tokyo 105-0013
Tel. 3 34364662 | Fax 3 34594365
fujiki@nihonstiebel.co.jp
Netherlands
STIEBEL ELTRON Nederland B.V.
Daviottenweg 36 | Postbus 2020
NL-5202 CA‘s-Hertogenbosch
Tel. 073-623 0000 | Fax 073-623 1141
Email stiebel@stiebel-eltron.nl
www.stiebel-eltron.nl
Poland
STIEBEL ELTRON sp.z. o.o
ul. Instalatorów 9 | PL-02-237 Warszawa
Tel. 022-846 48 20 | Fax 022-8 46 67 03
Email stiebel@stiebel-eltron.com.pl
www.stiebel-eltron.com.pl
Russia
STIEBEL ELTRON RUSSIA
Urzhumskaya street, 4. | 129343 Moscow
Tel. (495) 775 3889 | Fax (495) 775-3887
Email info@stiebel-eltron.ru
www.stiebel-eltron.ru
Switzerland
STIEBEL ELTRON AG
Netzibodenstr. 23 c | CH-4133 Pratteln
Tel. 061-816 93 33 | Fax 061-8 16 93 44
Email info@stiebel-eltron.ch
www.stiebel-eltron.ch
Thailand
STIEBEL ELTRON Asia Ltd.
469 Moo 2, Tambol Klong-Jik
Ampur Bangpa-In | Ayutthaya 13160
Tel. 035-22 00 88 | Fax 035-22 11 88
Email stiebel@loxinfo.co.th
www.stiebeleltronasia.com
United States of America
STIEBEL ELTRON Inc.
17 West Street | West Hateld MA 01088
Tel. 4 13-247-3380 | Fax 413-247-3369
Email info@stiebel-eltron-usa.com
www.stiebel-eltron-usa.com
Irrtum und technische Änderungen vorbehalten | Subject to errors and technical changes! | Sous réserve d‘erreurs et de modifications
techniques! · Onder voorbehoud van vergissingen en technische wijzigingen! | Salvo error o modificación técnica! | Rätt till misstag och
4<AMHCMN=jbehig>
tekniska ändringar förbehålls! | Excepto erro ou alteração técnica | Zastrzeżone zmiany techniczne i ewentualne błędy | Omyly a technické
změny jsou vyhrazeny! | A muszaki változtatások és tévedések jogát fenntartjuk! |
не исключается. Stand 06/09
ВозмоҖность неточностейи технических изменений
A 291478-35631-8540
 Loading...