

STIEBEL ELTRON Simple X Operation And Installation Instructions Manual
I
Installation
and
operation
instructions
_.1
Troubleshooting
Elimination offaults by the
qualified
installer
SimpleX
Instantaneous
water heater
(pressure
type)
Operation
and installation
instructions
ii:r::r*it:l:r,iti:i'.r:i::ii:r::l:::il::;:ri!.;linli:i:;rl,l
..i**$i!l$iilli*aiiiiii:x:s
qgsq@
Guarantee
For Guarantees
please
referto the
respedive terms and conditions
of supplyforyour counrry.
/AThe
installation,eledrical(onnedion
and
first operation of thit
-appliance
should be @rried our
bythe
qualifled
installei
The
company
does not accept
liabilityfor failure ofany
goods
supplied which have nor
been installed and operated in
accordan.e
wirh the manufacturer'5
instruction.
Envlronment and recydlng
Please help us to
protect
the environment by disposing ofthe
packagjng
in
accordancewith
national regulations
for waste
processing.
Cause
------__-.l
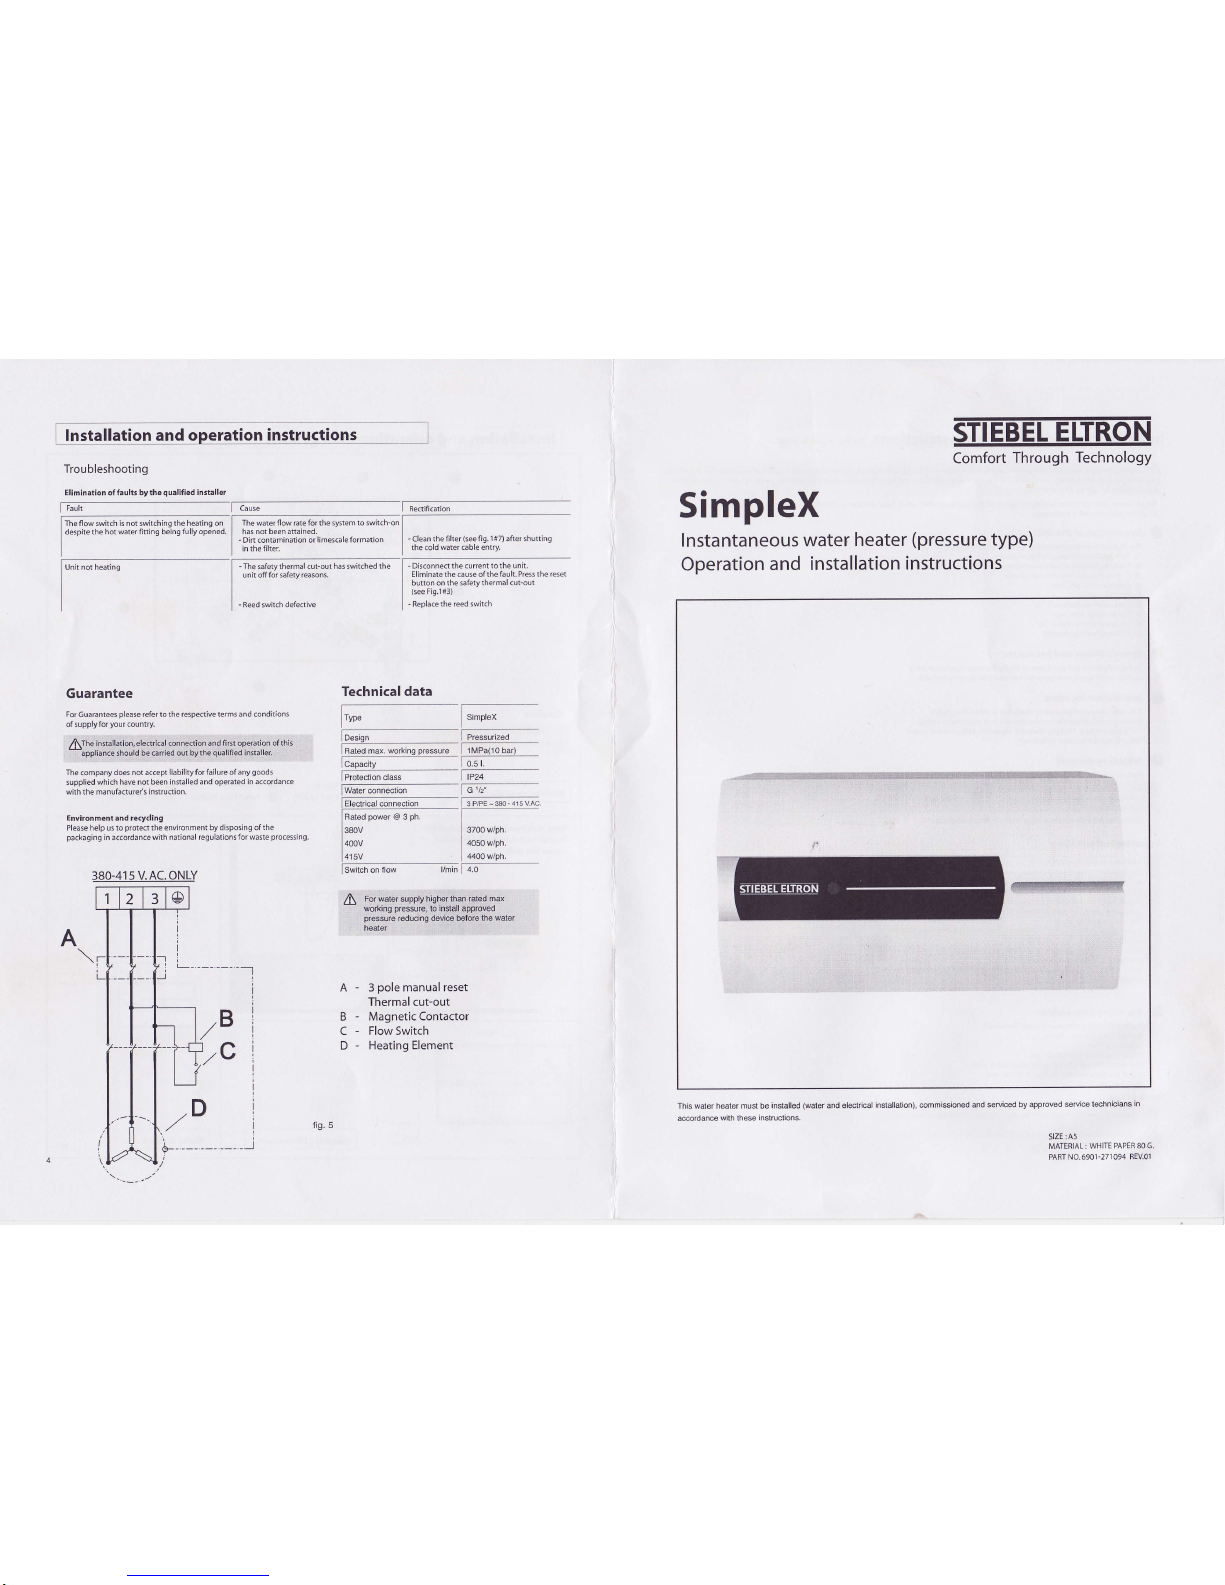
/B
',aC
3
pole
manual
reset
Thermal
cut-out
Magnetic
Contactor
Flow Switch
Heating Element
The
waterflow rateforthe
system to switch-on
has
not been aftained.
Din contamination or
limescale formation
in the filre[
lSwitch
on
flow
I Redifi.arion
-
Clean
the filter
(see
69.1
r7)
after shutting
th€ cold
water.able entry.
-
Dis(onnec the current
to the unat.
Eliminate rhe caure oflhe
fault. Press the reset
buton on
the safetythermal cut-out
(see
Fig.l#3)
-
Replace the reed
switch
Technical data
ltrp"
Simplex
tD""i*, F"""**d
Rated ma.
working
pressure
I
l MPa(10
!qr)
G;p*,y
to.s L
tF.i""r'."
"l*
ltPu
fw"tt*d.r
fcvl
^"t*
2[
For water supply higher tha rated
max
working
pressure,
to
inslall
approved
pressure
reducjng device betot€
the watel
heater
A
R-
c-
D.
D
This water heater must be
installed
(water
and electrical
installation),
commissioned
and serviced
by approved service
technicians
in
a@ordance
with
these
inslructaons.
SIZE:A5
MATERIAL
: WHITE
PAPER 80 6.
PART NO.6901-27r 094
REVol
Fault
Theflow switch is notswitching
the
heating on
despit€
the hot water fiting being
fully opened
-The
safetythermal
cut-out has switched
the
unit offfor safety
reasons.
380V
400v
380-41s V. AC. ONLY
1
2
3
rb
I
-L
\
I
I
nrlqllation
a nd operation
i n
gtru
ction s ror
the
quariried
irrlaller
A
Th€lnstatlatlon,eledrlcalGonnectlonandflrstoperatlonofthlsapplian(cshouldbe(airledoutbyaquallfledlnsblteith€lnstallatlon
rhall(omplywlthAS3500,4.l
orAS/NZS35OO.4.2andanyotherreldantAustrallanstandardsandlnduttrycoderrelevanttoappllcatlon
{e{|,
AS35OO.5 for
dom.ttl( lnttallatlon}
The
company does not
accept liability for failure of
any
goods
supplied
which have
not
been installed
and
operated
in accordance
which themanufacurer's
instruction.
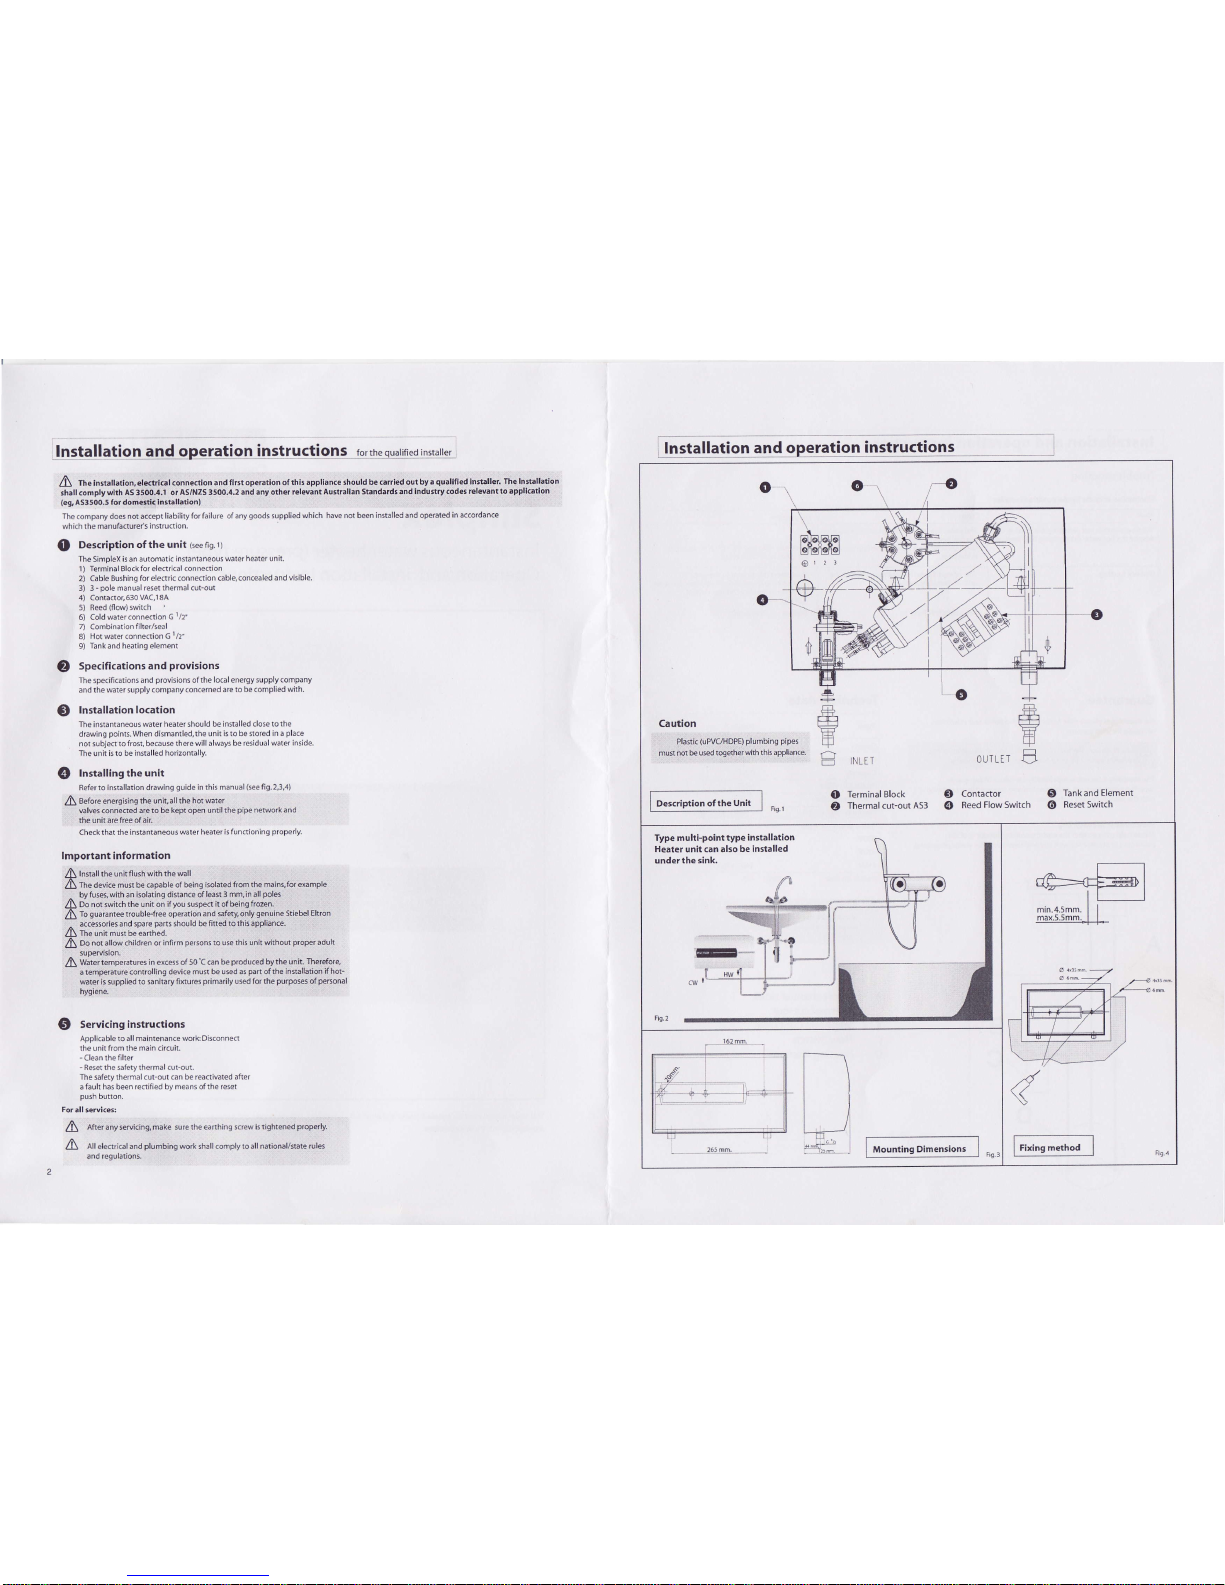
Q
Description of
the unit
Geefis.1)
The
Simplex
is an automatic instantaneous
water heater unit.
1) Terminal Blockfor
electrical connection
2) Cable Bushing
for electrlc connedion
cable, concealed
and visible.
3) 3-
pole
manual resetthennalcut-out
4) Contactor,630VAc,l8A
5) Reed
(flow)switch
6) cold
warer connection
G
r/2"
7)
Combination
fi lter/seal
8)
HotwaterconnedionG
l/2"
9)
Tankand
hearingelement
@
Specifications
and
provisions
The
speciflcations
and
provision5
ofrhe
local
energysupply
company
and the water supply
company concerned
arc to be complied with.
@
lnstallationlocation
The
instantaneous
watet
heater should
be installed closetothe
drawing
points.When
dismantled,the
unit is to be stored
in a
place
not subject to
frost, because there will always
be residual water inside.
The
unit
is to be installed horizontally.
@
Installing the
unit
Referto
installation drawlng
guide
in
this manual
(seefig.2,3,4)
2[
Beforeenergisingthe
un]!all the
hotMter
valves connected
areto be kept open
until thepipe neMork and
the unk arefree ofai[
Checkthat the instantaneous
water heater
is functioning
properly.
lmportant information
/\
Install
the unirflush
withthe wall
2l\
The
device mur
be capable
of
being isolated ftom
the mains,for example
by
fuses,with an isolating dislance ofleas
3 mm,in all
poles
1S
Do
not
switch
the unir on lfyou suspec
it ofbeing
frozen.
I
To
guaranteetrorblefree
operation
and safettonly
genuine
stiebel
Eltron
-
accessories and spare
pans
should be fined to this
appliance.
fA
The
unft
must beearthed.
lA
Do not altow children or
infirm
persons
to use this
unit wirhom
properadult
suoeryision.
2[
Vy'aterremperatures
in exc6s ofso'c can
be
produced
by the unit.
Therefore,
atemperature(ontrolling
device
must be u5ed a5
pan
ofthe
installation ifhot-
water ls supplied
to sanitary finures
primarily
used for the
purposes
ofpeBonal
hygiene.
@
Servicinginstructions
Aoolicable ro all maintenan(e workDisconnec
the unit from the
main
cifcuit.
-
Clean lhefilter
-
Reset the safety thermal cuFout.
The
safety
thermal cut-out .an be reacti€ted after
a fault has
been redified by means ofthe reset
push
button.
Foi
all serul<eJ:
/\
After any servicing, make sufe the
earthing screw is tightened
properly.
A
All elecrical and
plumbing
work shall <omplyto all national/ste
rules
and regulation5.
lnstaffation
and operation
instructions
-
:
o
Caution
Pla5tic
{uPVCAIDPE)
plumbing
plpes
must not
b€ used togetherwlth
this appliance,
T :]
l\LL
-
0uTLEr
{f
Description ofthe
Unit
O
TerminalBlock
O
Contactor
Q
TankandElement
A
Thermalcut-outAS3
O
ReedFlowswitch
@
Resetswitch
Typ€ multFpolnt type
installatlon
Heater unit can also
be installed
under
the slnk.
"e
(
162
mm.
l--
Mounting
Dimensions
265 mm.
 Loading...