

Page 1

master stroke
msk 3000
MANUALE D’USO
msk 3000
L R L R
INPUTS
BYPASS
HIGH PASSHIGH PASS
LOW PASSLOW PASS
max
min
LEVELS
max
min
LEVEL
BOOST
+12
0
dB
FREQ
120
40
Hz
AQXM2 MODULES
HI PASS Q-FILTER
X-OVER
FILTER OFF
MODE
LOWPASS
HIGHPASS
LOHI
BANDPASS
L
MONOMONO
SPEAKERSSUPPLY
R
ON
master stroke
Page 2

DESCRIZIONE GENERALE
STADIO PREAMPLIFICATORE
Doppio connettore d'ingresso dorato (ingresso e by-pass) con protezione
dei jack. Circuitazione GR.I.P.S. contro disturbi di qualsiasi genere.
Preamplificatore ad altissime prestazioni a circuiti integrati (OPA2134,
NE5532) con bassissimo rumore. Condensatori di disaccoppiamento non
polarizzati del tipo CERAFINE (espressamente studiati per uso audio).
Componentistica passiva di precisione (resistenze 1% a film metallico,
condensatori in poliestere al 5%). Filtro X-Over configurabile in Passa Alto,
Passa Basso, Passa Banda e Gamma Intera, con pendenza di 12 dB/oct. 55
Frequenze selezionabili tra 22Hz e 8500Hz mediante due moduli AQXM2
(Toll.1%). Risposta dei filtri di tipo Butterworth (Q=0.707) e Tchebitchef
(Q=1) selezionabile. Booster Paragrafico variabile tra 40Hz e 120Hz
(linearmente regolabile da 0 a +12db). Controlli completamente accessibili
dalla parte superiore.
STADIO AMPLIFICATORE
Circuitazione completamente simmetrica dall'ingresso all'uscita con stadio
d'ingresso a FET (2SK389, 2SJ109 Toshiba) a bassissimo rumore. Tutti i
circuiti audio sono in configurazione Cascode alimentati con generatori di
corrente costante. Alimentazione stabilizzata dei circuiti atti
all'elaborazione del segnale audio. Circuitazione driver completamente
schermata per l'immunità ai disturbi e diafonia. Controllo automatico della
corrente di riposo per gli stadi finali tramite circuitazione intelligente che
analizza e scorpora la corrente di polarizzazione degli stadi finali da quella
che scorre sull'altoparlante. Stadio finale composto da N°28 transistori
Toshiba (2SA1962, 2SC5242) da 130Watt, 15Ampere, 30MHz ; N°4
transistori Sanyo (2SA1011, 2SC2344) da 100MHz; N°4 transistori Hitachi
(2SB649, 2SD669)da 140MHz.
STADIO ALIMENTATORE
Frequenza di clock 80KHz Stabilizzato PWM (da 11V)con "recupero
d'energia induttiva". A due livelli di tensione con doppio alimentatore
separato (uno per il ramo positivo e l'altro per il negativo) per ottimizzare i
rendimenti a tutte le potenze d'uscita.
Utilizzo di 2 trasformatori toroidali e 2 induttori di generose dimensioni per
abbondanti riserve d'energia. 12 MOSFET di commutazione da 80Ampere,
0.0085Ohm per un totale di 960Ampere ed una resistenza complessiva di
0.00071Ohm. Serie di condensatori di livellamento per un totale di ben
28640uF. Circuito di commutazione dei livelli d'alimentazione a MOSFET.
Barre di rinforzo in rame dorate, connettori di potenza ricavati da blocchi
pieni d'ottone e circuito stampato dorato con rame da 120um per
bassissime perdite di potenza sui percorsi ad alta corrente.
Dissipatore ad elevata efficienza dotato di tunnel per la ventilazione forzata
attuata da 6 ventole da 40mm di diametro a controllo termo-caricoproporzionale (la velocità di rotazione dipende dalla temperatura del
dissipatore e dal modulo del carico applicato all'amplificatore)
35°C
. Protezioni contro: corto circuito ai morsetti d'uscita, corrente
a partire da
continua sugli altoparlanti, elevata temperatura del dissipatore, transitori
d'accensione.
pag. 2
VARIE
L’amplificatore e corredato di:
1 manuale d’uso
1 foglio di garanzia
1 scatola espositore
1 condensatore (AudioLink HC1500)
2 staffe di fissaggio per HC1500
1 portafusibile (AudioLink PRF300)
2 fusibili da 150 A
4 piedini di fissaggio scorrevoli
4 viti di fissaggio
Page 3

tecnologie esclusive
GR.I.P.S. - GRound Improved Path System - (Stadio
Preamplificatore)
Agli albori del CAR HI-FI il problema principale da risolvere nelle
elettroniche fu quello di eliminare i disturbi elettrici ed elettromagnetici
prodotti dalle vetture. Per evitare di creare anelli di massa nelle connessioni
tra autoradio ed elettroniche di potenza, si adottarono diversi sistemi tra cui
quello di separare la massa degli amplificatori da quella di batteria della
vettura. Questo sistema si rivelò particolarmente efficace ed affidabile, tanto
e vero che la maggior parte dei costruttori di HI-FI Car lo utilizza nelle sue
realizzazioni odierne. Ciò nonostante, con l'avvento delle iniezioni
elettroniche ed altro, questo sistema molto spesso si rivela insufficiente in
quanto attenua maggiormente i disturbi di tipo elettrico (alternatore)
mentre è meno influente su quelli di tipo elettromagnetico (scariche
candele). Noi della Steg siamo andati oltre progettando un sistema che
combatte le due tipologie di disturbo, alternativo alle linee bilanciate come
efficacia, con in più il vantaggio di non degradare la qualità del suono e
mantenere la compatibilità con le connessioni standard esistenti (jack). La
circuitazione GR.I.P.S. infatti isola ciascuna massa di ingresso dalle altre,
scongiurando il pericolo di anelli anche in realizzazioni multiamplificate,
amplificatori multicanale (le più soggette a questo rischio) o là dove non sia
stata posta particolare attenzione nel cablaggio dell'impianto.
P.R.H.E.S.S. - Primary Regulated High Efficiency Supply System -
(Stadio Alimentatore)
Questa circuitazione rivoluziona il mondo dei convertitori DC-DC in auto.
Si tratta infatti di un circuito survoltore stabilizzato in PWM (in cui la
tensione di uscita non dipende da quella di ingresso) che a differenza dei
convertitori stabilizzati standard, mantiene rendimenti estremamente
elevati (paragonabili a quelli di convertitori non stabilizzati). Il tutto si
traduce in un notevole risparmio di energia ed una completa insensibilità
della potenza erogata dall'amplificatore alle fluttuazioni della tensione di
batteria. I rendimenti quindi subiscono una notevole impennata rispetto alla
media.
*
*A.T.R.I. è un servizio di assistenza
rapida interna offerta dall’Azienda
costruttrice G.T. Trading, ai possessori di
questo apparecchio.
pag. 3
Page 4

Caratteristiche msk 3000
Potenza 4 Ω Stereo
Potenza 2 Ω Stereo
Potenza 4 Ω Mono
Potenza 2 Ω Mono
Rendimento globale
Rendimento globale
Risp. in Frequenza
Distorsione
Distors. di Intermod.
alimentazione +12 tipo crossover
accensione remota +12 selezione “q” filtro
alimentazione gnd frequenza equalizzazione
uscita altoparlante destro - spie di stato funzionamento
uscita altoparlante destro + guadagno equalizzatore
uscita altoparlante sinistro - sensibilita’ canale destro
uscita altoparlante sinistro + sensibilita’ canale sinistro
Segnale-rumore min. sens.
Fattore smorzamento
Sensibilità ingresso
Impedenza ingresso
Range di Alimentazione
Assorb. massima potenza
Assorb. massima potenza
Assorb. minimo
Frequenze di taglio HP/LP/BP
Separazione tra i canali
Intervento “Boost”
Fusibile
Dimensioni
Peso
Gli amplificatori MASTER STROKE hanno alimentazione interna stabilizzata. - Le
caratteristiche tecniche sono ottenute (e non variano) con tensione di
alimentazione compresa fra 10,5 e 14,4 V. - Gli amplificatori sono costruiti e
dimensionati per fornire una potenza superiore a quella dichiarata. Le potenze
dichiarate sono comunque le minime garantite e sempre riscontrabili sull’
amplificatore, indipendentemente dalle tolleranze della componentistica usata per
la costruzione
La G.T .T rading si riserva il diritto di apportare modifiche tecniche ed estetiche senza
pag. 4
preavviso alcuno.
Page 5

RMS @ 11V - 14,4 V
RMS @ 11V - 14,4 V
RMS @ 11V - 14,4 V
RMS @ 11V - 14,4 V
max pow. 4 Ω - 11V
max pow. 2 Ω - 11V
Hz -3 dB
stereo 4 Ω max pow. 1kHz
4 Ω max pow. DIM 100
dB (“A” weight)
4 Ω - 1kHz
Volt RMS
Kohm
V. Batt
stereo 4 Ω - A
stereo 2 Ω - A
A
Hz (12 dB oct,)
dB
Hz / dB
A
mm.
Kg.
400 W x 2
800 W x 2
1.600 W x 1
3.000 W x 1
>58%
>50%
10÷80.000
<0,02%
<0,02 %
>97 (>100)
> 200
0,5 ÷ 5
>11
10,5 ÷ 16
108
220
3
22÷8.500
70
40÷120 / 0÷ +12
150 (outside)
620 x 60 x 255
9.500
ingresso segnale sinistro
ingresso segnale destro
uscita segnale sinistro
uscita segnale destro
sede modulo hp
sede modulo lp
pag. 5
Page 6

ONON
ONON
SAFESAFE
SAFESAFE
1 Posizione dell’amplificatore.
Non posizionare l’amplificatore sotto
moquette o in vani con superfici a
contatto del dissipatore che non
permetterebbero un adeguato scambio
master stroke
master stroke
msk 3000
msk 3000
1a1a
di calore.
Sono importanti anche il verso di
installazione e gli eventuali oggetti vicini
all’amplificatore stesso, il sistema di
raffreddamento forzato (6 ventole da
40mm termo-carico controllate) crea un
flusso d’aria come indicato nella (fig. a), è
quindi fondamentale non ostruire gli
ingressi e le uscite del suddetto circuito di
raffreddamento, la forma
dell’amplificatore è appositamente
studiata per collocazioni come quelle
indicate nelle (fig. b,c,) che garantiscono
1b
la migliore dissipazione di calore. La
posizione indicata dalla (fig. d) è
assolutamente da evitare poichè non
msk 3000
SAFESAFE
1c
ONON
master stroke
permette un regolare funzionamento
dello stesso. Gli amplificatori steg sono
comunque protetti contro i surriscaldamenti e quando le protezioni entrano in
funzione (85°C) l’amplificatore smette di
funzionare per riprendere appena la
temperatura del dissipatore scende di
qualche grado sotto la soglia di protezione.
1D2a
2 Fissaggio dell’amplificatore.
Per prevenire danni alle persone,
all’amplificatore o alla vettura fissate
bene l’amplificatore, in un punto sicuro.
Gli amplificatori master stroke si
avvalgono di un sistema di fissaggio
semplice ed efficace (fig. a). I quattro
piedini forniti a corredo vanno inseriti
lungo la scanalatura del dissipatore e
possono essere posizionati in un punto
qualsiasi della lunghezza dello stesso (fig.
b) così da permettere il fissaggio anche su
superfici che non consentono quattro fori
a distanza regolare. Stabilite le posizioni
dei piedini basta bloccarli avvitando le viti
autofilettanti fornite a corredo.
2b
3a
pag. 6
SAFE SAFE SAFE
ON ON ON
1 2 3
STATUSSTAT U SSTATUS
3 Stato dell’amplificatore (STATUS).
ONON
SAFESAFE
Sul pannello superiore dell’ amplificatore si trovano i due LED di verifica dello
stato “STATUS” di funzionamento (fig. a).
1 VERDE: In funzione.
2 VERDE+ROSSO: Stato di muting
per protezione termica o cortocircuito
sulla linea altoparlanti.
3 ROSSO: Malfunzionamento
dell’amplificatore che smette di
funzionare per prevenire danni agli altri
componenti dell’impianto collegati
all’uscita. Se l’amplificatore rimane in
questo stato consigliamo di rivolgersi al
rivenditore steg.
Page 7
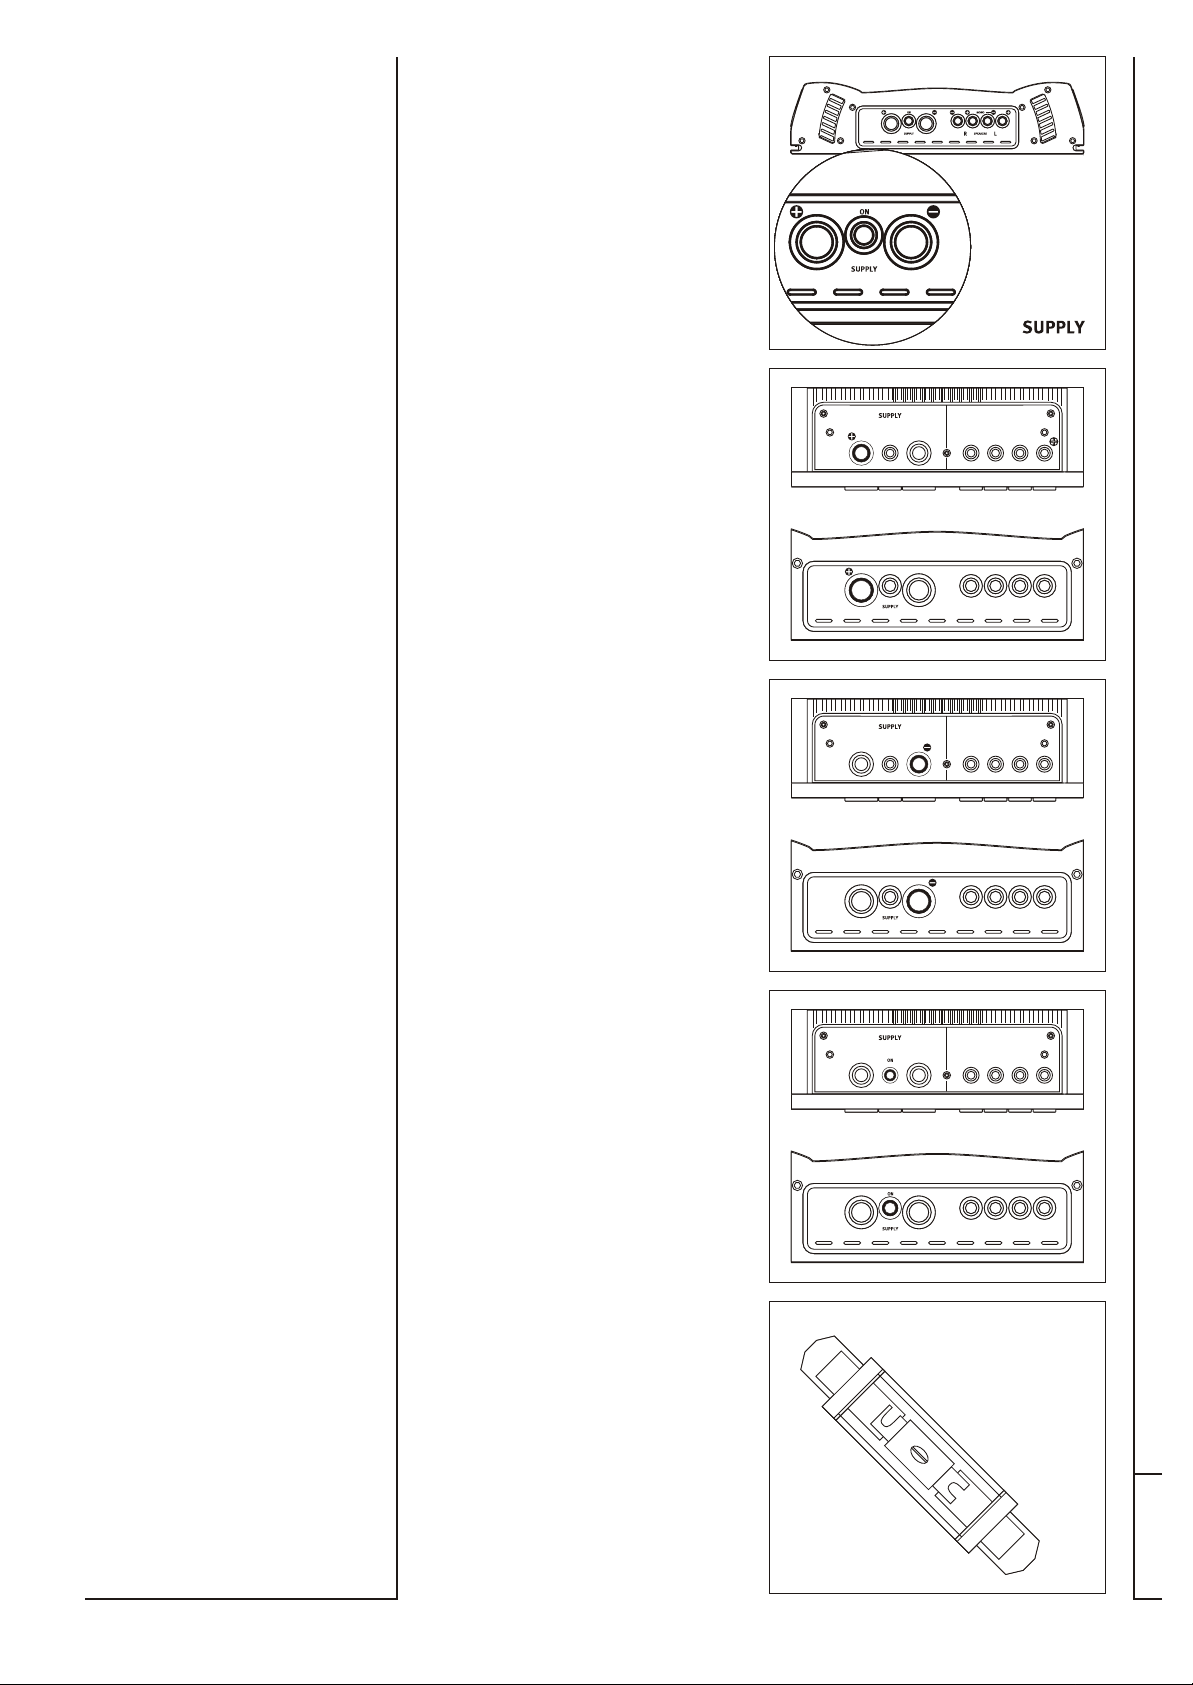
4 Alimentazioni (SUPPLY).
Intervenire sempre con i terminali di
alimentazione della batteria scollegati.
Stabilita la posizione definitiva
dell’amplificatore tagliate le lunghezze
dei cavi in eccesso e inseriteli
nell’apposita morsettiera SUPPLY (fig. a).
(fig. b) Positivo (SUPPLY “+”).
Il cavo di alimentazione utilizzato deve
essere di adeguata sezione.
E’ importante sapere che maggiore è la
sezione del cavo utilizzato, migliori sono
le prestazioni dell’amplificatore. Per
effettuare il passaggio del cavo di
alimentazione consigliamo di evitare
curve troppo accentuate, attorcigliamenti
e passaggi all’interno di lamiere taglienti
senza l’uso di appositi gommini.
Installare un fusibile il più possibile
vicino alla batteria per proteggere la
linea di alimentazione. Il valore del
fusibile deve essere superiore alla somma
dei fusibili richiesti dalle altre elettroniche
collegate alla linea di alimentazione.
(fig. c) Negativo (SUPPLY “-”).
Il cavo di massa deve essere di sezione
uguale o superiore a quella di alimentazione. La lunghezza deve essere il
minimo indispensabile per raggiungere
un punto metallico della scocca della
vettura. Sverniciare e pulire bene il punto
in cui il cavo, opportunamente terminato
con un capocorda ad occhiello, deve
essere collegato. Serrare bene il terminale
con una vite di buone dimensioni
ricordando di inserire una rondella
antisvitamento per essere sicuri che non si
allenti nel tempo. Se per collegare il
capocorda ad occhiello si deve effettuare
un foro, ispezionare prima le parti
adiacenti per non recare danni ad organi
importanti dell’auto.
ATTENZIONE ! Un contatto di massa di
qualità scadente si traduce in una
diminuzione della potenza e in un
peggioramento della qualità e del rumore
di tutto l’impianto
(fig. d) Accensione(SUPPLY “ON”).
Collegare un cavo della sezione di circa
1mmalla sorgente dotata di commutatore di accensione (uscita dedicata o uscita
per antenna elettrica).
Per il tragitto del cavo dalla sorgente
all’amplificatore usare le stesse precauzioni del cavo di alimentazione.
4a
VISTA SUPERIORE
4b
VISTA FRONTALE
VISTA SUPERIORE
4c
VISTA FRONTALE
VISTA SUPERIORE
4D
VISTA FRONTALE
(fig. e) Fusibile esterno.
In caso di bruciatura il fusibile deve essere
sostituito con uno di pari valore. Il
corretto valore del fusibile di ogni
modello master stroke è indicato
nelle caratteristiche tecniche di questo
manuale.
4E
pag. 7
Page 8

5a5b5c3a
VISTA SUPERIORE
5 Collegamento Altoparlanti
(SPEAKERS).
Il cavo di potenza utilizzato deve essere di
buona sezione. Maggiore sarà la sezione,
migliore sarà il trasferimento della
potenza agli altoparlanti. Per effettuare il
passaggio del cavo di potenza consigliamo di evitare curve troppo accentuate,
attorcigliamenti e passaggi all’interno di
lamiere taglienti senza l’uso di appositi
gommini.
VISTA FRONTALE VISTA FRONTALE LATO SEGNALE
VISTA SUPERIORE
VISTA FRONTALE
VISTA SUPERIORE
VISTA FRONTALE LATO SEGNALE
(fig. a) Stereo.
La configurazione Stereo può essere
adottata per pilotare sistemi con
impedenza di 2, 4 Ohm o superiore.
(fig. b) Mono.
Per il funzionamento in mono
dell’amplificatore è necessario unire gli
ingressi di segnale RCA con un adattatore
ad “Y”.
In configurazione mono l’impedenza
consigliata del sistema di altoparlanti
collegato è di 4 Ohm o superiore.
(fig. c) Mono + Stereo.
Questa è la configurazione che permette
di usare le uscite stereo per i diffusori
dedicati alla riproduzione delle frequenze medioalte e l’uscita mono per un
subwoofer che completa e ottimizza la
resa in gamma bassa.
Quando si adotta questo tipo di configurazione l’impedenza dei diffusori non
deve mai scendere al di sotto dei 4 Ohm.
Sullo schema si indica con “L” delle
bobine e con “C” dei condensatori
bipolarizzati necessari alla realizzazione
dei crossover passivi da utilizzare nella
configurazione Mono+Stereo. Se si
utilizzano altoparlanti con impedenza di
8 ohm il valore delle bobine raddoppia e
quello dei condensatori dimezza.
ATTENZIONE: utilizzare componenti
passivi con valore di “potenza dissipabile” adeguato.
pag. 8
VISTA FRONTALE
VISTA FRONTALE LATO SEGNALE
C
C
L
Page 9

6 Segnale (INPUT),(BYPASS).
Il cavo di segnale utilizzato deve essere
schermato per evitare l’inserimento di
disturbi dovuti ai campi magnetici
presenti nell’auto (centraline, ecc.). Per
effettuare il passaggio del cavo di segnale
consigliamo di evitare curve troppo
accentuate, attorcigliamenti e passaggi
all’interno di lamiere taglienti senza l’uso
di appositi gommini. E’ importante che
lungo il tragitto il cavo di segnale non
affianchi mai quello di alimentazione.
(fig. a) INPUT. Collegare il cavo di
segnale proveniente dalla sorgente,
terminato con connettori RCA, alle prese
dorate per l’ingresso (INPUT “L”e“R”).
VISTA SUPERIORE
VISTA SUPERIORE
VISTA FRONTALE
VISTA FRONTALE
6a 6b 7a 7b
(fig. B) BYPASS. Collegare il cavo di
segnale, terminato con i connettori RCA
alle prese dorate per l’uscita (BYPASS
“L”e“R”), da utilizzare come pilota di
altre eventuali elettroniche..
7 Sensibilità / Equalizzazione.
(fig. a) Sul pannello superiore regolare la
sensibilità dell’ amplificatore utilizzando
un giravite a lama piatta. Portare sulla
posizione “min” (3,5 Volt) i comandi
della sensibilità ruotandoli in senso
antiorario. Accendere la sorgente e
posizionare il volume a due terzi della
scala prevista dal costruttore. Ruotare i
comandi della sensibilità
dell’amplificatore in senso orario verso la
posizione “max” (0,15 Volt) fino ai primi
cenni di distorsione, questa operazione è
valida per entrambi i canali “L” e “R”.
(fig. b) Regolazione BOOST.
Sul pannello superiore sono presenti i
potenziometri di regolazione dell’
efficace equalizzatore parametrico, il
primo (Freq), (fig. c ),permette di
A
scegliere la frequenza di intervento (40120 Hz), il secondo (Level), (fig.c ),
B
regola il livello di incremento
dell’equalizzazione in dB (0-12), vedi
(fig. c). Questa regolazione permette di
ottimizzare la risposta della gamma bassa.
VISTA SUPERIORE
VISTA FRONTALE
VISTA SUPERIORE
VISTA FRONTALE
7c
+18
+12
+6
+0
d
-4
B
-8
r
-12
-16
-20
-24
-28
10 200k20 50
A
B
B
100
200 500 1k 2k 5k 10k 20k 50k
Hz
VISTA SUPERIORE
A
VISTA FRONTALE
pag. 9
Page 10

8 Crossover Elettronico.
Gli amplificatori master stroke
hanno internamente un crossover
elettronico multimodale, le cui frequenze
di intervento sono stabilite dai moduli
aqxm2 inseriti nelle fessure (HIGH
PASS e LOW PASS), posizionate in una
vaschetta sul lato ingresso
dell’amplificatore (fig. a).La pendenza
8a10a
dei tagli corrisponde a 12 dB/OCT. Per
attivare il crossover agire sul comando
(XOVER) e spostarlo sulla posizione
preferita: quando il comando è in
aqxm2 MODULES
posizione (FILTER OFF) (fig. b), la banda
passante dell’uscita è a gamma intera.
Questo dispositivo permette di
aqxm2 MODULES
ottimizzare la resa dell’amplificatore se
dedicato alla riproduzione di una
specifica sezione della gamma audio, per
esempio nel caso si voglia limitare lo stress
meccanico dei woofer, si può utilizzare il
filtro in modo passa-alto (HIGH PASS)
(fig.e) come filtro subsonico
selezionando una frequenza di taglio
molto bassa (es. 22 Hz). Tutte le
frequenze inferiori al valore selezionato
vengono filtrate e il sistema d’altoparlanti
applicato inizia a riprodurre dalla
frequenza impostata. Al contrario se il
filtro sarà settato in modo passa-basso
(LOWPASS) (fig. c) , tutte le frequenze
8B
8C
8D 8E
superiori al valore selezionato vengono
filtrate e il sistema d’altoparlanti applicato
inizia a riprodurre dalla frequenza
impostata. I due tipi di filtro possono
essere usati contemporaneamente
posizionando il selettore sulla posizione
passa-banda (BANDPASS) (fig. f)
limitando la riproduzione della gamma
d’uscita al range di frequenze comprese
tra i due punti di taglio.
Se il filtro passa alto o passa basso sono
attivati senza inserire il modulo AQXM2
la frequenza di taglio sarà di 22Hz.
pag. 10
9A
RUNNING WITH
AQXM2
MODULES
22 senza modulo,25,30,33,35,38,40,45,
50,55,60,65,70,75,80,85,90,95,100,
110,120,130,150,180,200,250,300,350,
400,450,500,600,700,800,900,1000,
1100,1200,1300,1400,1500,1800,2000,
2500,3000,3500,4000,4500,5000,
5500,6000,6500,7000,7500,8000,8500.
- Hz -
9B
9 “Q“ del filtro
Il “Q” del filtro permette di enfatizzare la
curva della risposta sonora nel punto
della frequenza di taglio del crossover
quando si utilizza in modo
(HIGH PASS) (fig. 8e)
.
passa-alto
I valori impostabili con il comando sono
due: 0,5 (fig. 9a) e 1
(LOW) (HIGH)
(fig. 9b).
10 Modulo AQXM2.
Le frequenze di taglio del crossover
elettronico sono selezionabili con la
massima precisione attraverso
l’inserimento del modulo AQXM2
opzionale (fig. 10a) disponibile presso i
rivenditori STEG nei valori elencati.
Page 11

Total Harmonic Distorsion
con alimentazione da 10,5 a 14,4 Volt,su
carico di 4 ohm, distorsione armonica in
funzione della potenza:
0,021% @ 465Watt
5
2
1
0.5
0.2
0.1
0.05
%
0.02
0.01
0.005
0.002
0.0006
1 6002 5 10 20 50 100 200
W
Frequency Responce
con alimentazione da 10,5 a 14,4 Volt,su
carico di 4 ohm, risposta in frequenza ad
1 Watt di potenza
Intermodulation distortion
con alimentazione da 10,5 a 14,4 Volt,su
carico di 4 ohm, distorsione di
intermodulazione in funzione della
potenza
%
+5
+4
+3
+2
+1
d
+0
B
r
-1
-2
-3
-4
-5
10 200k20 50 100 200 500 1k 2k 5k 10k 20k 50k 100k
Hz
5
2
1
0.5
0.2
0.1
0.05
0.02
0.01
0.005
0.002
0.0006
1 7002 5 10 20 50 100 200 500
W
Fast Fourier Transformer
con alimentazione da 10,5 a 14,4 Volt,su
carico di 4 ohm, alla potenza nominale di
400 Watt
Le eccezionali caratteristiche costruttive e
l’assenza di compromessi nella
realizzazione di questo amplificatore,
sono scelte ulteriormente confermate dai
grafici di misura, realizzati nei nostri
laboratori con apparecchiature AudioPrecision SistemOne.
+0
-20
-40
d
-60
B
r
-80
-100
-120
2k 20k4k 6k 8k 10k 12k 14k 16k 18k
GR.I.P.S.
P.R.H.E.S.S.
mproved
I
ound
GR
ath System
P
rimary Regulated
P
High Efficiency
System
upply
S
Hz
Le misure sono state rilevate su un campione di produzione e sono soggette
a piccole variazioni dovute dalle, seppure minime, tolleranze dei
componenti utilizzati all’interno dell’apparecchio. La G.T. T rading si riserva
il diritto di apportare modifiche al fine di migliorare ulteriormente il
prodotto.
pag. 11
Page 12

Page 13

master stroke
msk 3000
USERS MANUAL
Page 14

GENERAL DESCRIPTION
PRE-AMPLIFIER STAGE
Dual gilt input connector (input and by-pass) with jack protection.
GR.I.P.S. circuitry against interference of any kind. Very high performance
pre-amplifier with integrated circuits (OPA2134, NE5532) and very low
noise. Non-polarised CERAFINE decoupling capacitors (specifically
designed for audio applications).
Precision passive components (metal film resistances 1%, polyester
capacitors 5%). Configurable X-Over filter with High Pass, Low Pass, Band
Pass and Full Range, with 12 dB/oct gradient. 55 frequencies selectable
between 22Hz and 8500Hz using two AQXM2 modules (Tolerance 1%).
Butterworth (Q=0,707) and Tchebitchef (Q=1) filter response (selectable).
Para-graphic Booster variable between 40Hz and 120Hz (linear adjustment
between 0 and +12db). Controls are completely accessible from the upper
part.
AMPLIFIER STAGE
Completely symmetrical circuitry from input to output with a very low noise
FET input stage (2SK389, 2SJ109 T oshiba). All audio circuits are in Cascode
configuration powered by constant current generators. Stabilised power
supply of circuits used to process the audio signal. Fully-screened driver
circuits providing complete protection against interference and diaphony
(cross-talk). Automatic control of rest current for the end stages through
intelligent circuits which analyse and break down the polarisation current of
the end stages themselves from those flowing through the speakers. End
stage comprising N°28 T oshiba transistors (2SA1962, 2SC5242) at 130 Watt,
15Amperes, 30MHz; N°4 Sanyo transistors (2SA1011, 2SC2344) at
100MHz; N°4 Hitachi transistors (2SB649, 2SD669) at 140MHz.
FEEDER STAGE
Clock frequency 80KHz Stabilised PWM (11V) with "recovery of inductive
energy". There are two levels of voltage with dual separate feeders (one for
the positive branch and the other for the negative) to optimise yield at all
output powers.
Use of 2 thoroidal transformers and 2 oversized inductors to ensure
excellent power reserves. 12 switching MOSFET at 80 Amperes,
0,0085Ohm for a total of 960 Amperes and overall resistance of 0,00071
Ohm. Set of levelling capacitors for a total as high as 28640 uF. MOSFET
power supply Level switching circuit. Reinforcement bars in gilt copper,
power connectors machined from solid bars of brass and gilt printed circuit
with 120 um copper for very low power losses over high current routes.
VARIOUS
Highly efficient heat sink fitted with a force-feed ventilation tunnel
equipped with 6 x 40 mm diameter fans under proportional thermo-load
control (the rotation speed depends on the temperature of the heat sink and
the load module fitted to the amplifier) beginning at 35°C. Protection
against: short circuit of output terminals, continuous current on the
loudspeakers, high heat sink temperature, start-up transistors.
pag. 14
The amplifier is supplied by:
1 user’s manual
1 warranty card
1 show box
1 capacitor (AudioLink HC1500)
2 mount brackets for HC1500
1 fuse holder (AudioLink PRF300)
2 fuse 150 A
4 slide fixing feets
4 fixing screws
Page 15

esclusive tecnology
GR.I.P.S. - GRound Improved Path System -
(Preamplifier)
At the dawn of the CAR HI-FI, the main electronics problem that needed to
be solved was to eliminate the electrical and electromagnetic disturbances
produced by vehicles. To prevent creating ground loops in the connections
between car radio and power electronics, different systems were adopted
among which separation of the amplifier ground from the car-battery
ground. This system proved to be particularly efficient and reliable, so
much so that it is even today used by the majority of car hi-fi manufacturers.
Nevertheless, with the coming of electronic injection and other, this system
has often proved insufficient, since it largely attenuates electrical-type
disturbances (alternator) while having less effect on electromagnetic-type
disturbances (spark plug discharge). We at Steg have gone beyond this by
designing a system which fights the two types of disturbance, an alternative
to balanced lines but equally effective, with the added advantage of not
degrading the sound quality and maintaining compatibility with the existing
standard connections (jacks). The GR.I.P.S. circuitry, in fact, isolates each
input ground from the others, averting the risk of loops also in multiamplified constructions and multi-channel amplifiers (mostly subject to this
risk), or where the system has not been wired with particular care.
P.R.H.E.S.S. - Primary Regulated High Efficiency Supply System -
(Power supply)
This circuitry revolutionizes the world of DC-DC converters in motor
vehicles. It is, in fact, a PWM-stabilized voltage-booster circuit (where the
output voltage does not depend on the input voltage) which, differing from
the standard stabilized converters, maintains extremely high efficiency
(comparable to that of non-stabilized converters). Altogether this translates
into considerable energy saving and complete insensitivity of the amplifier
power output to battery voltage oscillations. The result is a considerable
boost in efficiency compared to the average.
*
*A.T.R.I. is a fast service assistance
offered by the factory G.T . Trading, to this
pruduct customers.
pag. 15
Page 16

characteristics msk 3000
Stereo 4 Ω power
Stereo 2 Ω power
Mono 4 Ω power
Mono 2 Ω power
Overall efficiency
Overall efficiency
Frequency response
Distortion
Intermodulation distortion
supply +12 crossover type
remote control +12 crossover“q” select
supply gnd equalization frequency
out speakers rigth - status light indicators
out speakers rigth + equalization gain
out speakers left - right channel sensitivity
out speakers left + left channel sensitivity
Linear noise-signal
Damping factor
Input sensitivity
Input impedance
Supply range
Max. power absorption
Max. power absorption
Min. power absorption
Cut frequency HP/LP/BP
Channel separation
“Boost” operation
Fuse
Dimensions
Weight
MASTER STROKE amplifiers have a stabilized internal power supply. The
technical characteristics are obtained (and do not alter) with a power supply voltage
of between 10,5 and 14.4V. The amplifiers are built and dimensioned to supply
power exceeding the declared rating. The value is indicated as "typical power". The
power declared is in any case the minimum guaranteed and always verifiable on the
amplifier, independent of the tolerances of the components used in its construction.
G.T. TRADING reserves the right to make any technical and aesthetic
pag. 16
modifications to the product without prior notice.
Page 17

RMS @ 11V - 14V
RMS @ 11V - 14V
RMS @ 11V - 14V
RMS @ 11V - 14V
max pow. 4 Ω - 11V
max pow. 2 Ω - 11V
Hz -3 dB
stereo 4 Ω max pow. 1kHz
4 Ω max pow. DIM 100
dB (“A” weight)
4 Ω - 1kHz
Volt RMS
Kohm
V. Batt
stereo 4 Ω - A
stereo 2 Ω - A
A
Hz (12 dB oct,)
dB
Hz / dB
A
mm.
Kg.
400 W x 2
800 W x 2
1.600 W x 1
3.000 W x 1
>58%
>50%
10÷80.000
<0,02%
<0,02 %
>97 (>100)
> 200
0,5 ÷ 5
>11
10,5 ÷ 16
108
220
3
22÷8.500
70
40÷120 / 0÷ +12
150 (outside)
620 x 60 x 255
9.500
left signal input
rigth signal input
left signal output
rigth signal output
hp module slot
lp module slot
pag. 17
Page 18

ONON
ONON
SAFESAFE
SAFESAFE
1 Amplifier positioning.
Do not place the amplifier under
moquettes or in spaces with surfaces in
contact with the heat-sink, since this
would prevent adequate heat exchange.
master stroke
master stroke
msk 3000
msk 3000
1a1a
Also the direction of installation of the
amplifier is important like nearly object,
the forced cooling system (6 x 40mm
fans controlled by temperature and load)
create a air flux like showed in (fig. a), it’s
very important to leave free the input and
the output of that cooling circuitry, its
shape is specially designed for positioning
as shown in the (fig. b,c,) which
guarantees the best heat dissipation. The
(fig. d) position is absolutely to be
avoided, since it does not allow regular
functioning of the amplifier. STEG
1b
amplifiers are, however, protected
against overheating; when the
protections are activated (85°C), the
msk 3000
SAFESAFE
1c
ONON
master stroke
amplifier stops working and starts again
only after the temperature of the heatsink goes down to a few degrees below
the protection threshold.
2 Fixing the amplifier.
To prevent damage to persons, the
amplifier or the vehicle, firmly fix the
1D2a
amplifier in a safe place. The
stroke
amplifiers can be fitted in a
simple and efficient way . The four
master
(fig. a)
feet provided are inserted along the heatsink groove and can be positioned at any
point along its length , and can thus
(fig.b)
also be fitted onto surfaces where four
evenly-spaced holes cannot be made.
Once the foot positions have been
established, lock them by screwing down
the self-tapping screws provided.
3 Amplifier state (STATUS).
On the front panel of the amplifier are
two LEDs which indicate the amplifier
operating state
1
GREEN: on.
2
GREEN+RED: Muting state for
ONON
2b
SAFESAFE
thermal cut-out or short-circuit on the
speaker line.
3
RED: Malfunctioning of the
(fig. a).
amplifier which stops working to
prevent damage to the other system
components connected to the output.
Should the amplifier remain in this state,
it is advisable to contact a STEG
SAFE SAFE SAFE
dealer.
3a
pag. 18
ON ON ON
1 2 3
STATUSSTAT U SSTATUS
Page 19

Feeders
4 (SUPPLY).
Always operate with the battery feeder
terminals disconnected. Once the final
position of the amplifier has been
established, cut off the excess cables and
insert them in the special terminal board
SUPPLY (
fig. a).
(fig. b) Positive (SUPPLY “+”).
The power cable used must have an
I
adequate cross-section.
N.B. The greater the cross-section of the
cable, the higher the amplifier
performance. When running the power
cable it is recommended to avoid too
sharp curves, twists and passage through
sharp metal without the use of special
rubber pieces. Install a fuse as close as
possible to the battery to protect the
feeder. The fuse value must be greater
than the sum of the fuses required by the
other electronic parts connected to the
feeder.
Negative
(fig. c) (SUPPLY “-”).
The ground cable must have a crosssection equal to or greater than the
power cable. The length must be the
minimum indispensable to reach a
metallic point on the vehicle body.
Remove the paint and thoroughly clean
the point at which the cable,
appropriately terminated with an eyelet
terminal, is to be connected. Tighten the
terminal well with a good-sized screw,
remembering to insert a washer to
prevent that the screw loosens with time.
If a hole needs to be made to connect the
eyelet terminal, first examine the
adjacent parts to prevent causing
damage to important parts of the
vehicle.
WARNING ! A poor-quality ground
contact means a drop in power and
worsening of the quality and noise of the
whole system.
4a
TOP VIEW
4b
FRONT VIEW
TOP VIEW
4c
FRONT VIEW
TOP VIEW
Switching on
(fig. d) (SUPPLY “ON”) .
Connect a cable of about 1mm crosssection to the source equipped with
ignition switch (dedicated output or
output for electric antenna). For the cable
passage from the source to the amplifier
use the same precautions as for the power
cable.
(fig. e) Exteral f
use (FUSE).
In case the fuse is blown, it must be
replaced with one of the same value. The
correct value of each
master stroke
model fuse is indicated in the technical
characteristics in this manual.
4D
FRONT VIEW
4E
pag. 19
Page 20

TOP VIEW
Speaker connection
5 (SPEAKERS).
The power cable used must have a good
cross-section. The greater the crosssection, the better the power transfer to
the speakers will be. When running the
power cable it is recommended to avoid
5a5b5c3a
too sharp curves, twists and passage
through sharp metal without the use of
special rubber pieces.
(fig. a) Stereo.
The stereo configuration can be adapted
FRONT VIEW
SIGNAL SIDE FRONT VIEW
to drive systems with an impedance of 2
or 4 Ohm or higher.
(fig. b) Mono.
For mono operation of the amplifier, the
RCA signal inputs must be joined with a
"Y" connector adapter. In the mono
configuration, the connected speaker
system impedance must be 4 Ohm or
TOP VIEW
higher.
(fig. c) Mono + Stereo.
This configuration allows using the stereo
outputs for the speakers dedicated to
medium-high frequency reproduction,
and the mono output for a subwoofer
which completes and optimizes the lowrange yield.
When adopting this type of configuration,
the speaker impedance must never fall
below 4 Ohm. The diagram indicates the
FRONT VIEW
SIGNAL SIDE FRONT VIEW
coil values with "L" and the bipolarized
capacitor values with "C", required to
make the passive crossovers to use in the
Mono+Stereo configuration. When
using speakers with an 8-Ohm
impedance, the coil value doubles and
the capacitor value halves.
WARNING: must use appropriate power
value of passive components.
pag. 20
TOP VIEW
FRONT VIEW
SIGNAL SIDE FRONT VIEW
C
C
L
Page 21

6 Segnale (INPUT),(BYPASS).
The signal cable used must be screened to
prevent disturbances due to magnetic
fields present in the vehicle (control units,
etc.). When running the signal cable it is
recommended to avoid too sharp curves,
twists and passage through sharp metal
without the use of special rubber pieces.
It is important that the signal cable never
runs alongside the power cable.
TOP VIEW
6a 6b 7a 7b
(fig. a) INPUT. Connec
t the signal cable
terminated with RCA connectors to the
gold-plated jacks for the input (INPUT "L"
and "R").
(fig. B) BYPASS. Connect the signal cable
terminated with RCA connectors to the
gold-plated jacks for the output (BYPASS
INPUT "L" and "R"). T o use for drive other
eventually amplifiers
7 Sensitiviy / Equalizzation.
(fig. a) In the fron panel adjust the
amplifier sensitivity using a flat-point
screw driver. Set the sensitivity control to
the minimum position “min” (3,5 Volt) by
turning anticlockwise. Switch on the
source and position the volume at twothirds of the given scale. Turn the
amplifier sensitivity control clockwise
towards the maximum position “max”
(0,15 Volt) until the first signs of distortion,
repeat the same operation for both two
channel “L” e “R”.
(fig. b) BOOST Adjustment.
The upper panel has adjustment
potentiometers of the highly effective
parametrical equaliser; the first (Freq),
(Fig. c ),allows selection of action
A
frequency (40-120 Hz), the second
(Level), (Fig. c ), sets the equaliser
B
increase level dB (0-12), see (fig. c). This
adjustment makes it possible to optimise
the low range response.
FRONT VIEW
TOP VIEW
FRONT VIEW
TOP VIEW
7c
+18
+12
+6
+0
d
-4
B
-8
r
-12
-16
-20
-24
-28
10 200k20 50
A
B
B
100
200 500 1k 2k 5k 10k 20k 50k
Hz
FRONT VIEW
TOP VIEW
pag. 21
A
FRONT VIEW
Page 22

8 Electronic Crossover .
The master stroke amplifiers have
an internal electronic crossover, the
frequency cuts will be set by aqxm2
modules, inserting in the slots (HIGH
PASS e LOW PASS), located on the inout
side of the amplifier (fig. a). The cut-off
slope of the internal crossover is 12
dB/OCT.
8a10a
T o activate the electronic crossover act on
the (XOVER) switch and set it to the
preferred position: in (FILTER OFF) (fig.
b) position the pass band for the outlet is
aqxm2 MODULES
in full range. This device makes it possible
to optimise the yield of the amplifier if
dedicated to reproduction of a specific
aqxm2 MODULES
section of the audio range; for example if
it is required to limit the mechanical stress
of the woofers, the filter can be used in
high-pass mode (HIGH PASS) (fig.e) s a
subsonic filter by selecting a very low cutout frequency (e.g. 22 Hz). All
frequencies below the selected value are
filtered and the loudspeaker system fitted
begins to reproduce the set frequency.
On the contrary, if the filter is set in lowpass mode (LOWPASS) (fig. c) , all
frequencies higher than the selected
value are filtered and the loudspeaker
system installed will begin to reproduce
the set frequency. The two types of filter
8B
8C
8D 8E
can be used simultaneously by
positioning the switch to the band-pass
position (BANDPASS) (fig. f) and limiting
the reproduction of the outlet range to
the range of frequencies included
between the two cut-out points.
If the high-pass filter is activated without
inserting the AQXM2 module in its
housing, in this case a subsonic filter is
obtained with cut-off at 22Hz.
9A
RUNNING WITH
AQXM2
MODULES
22without module,25,30,33,35,38,40,45,
50,55,60,65,70,75,80,85,90,95,100,
110,120,130,150,180,200,250,300,350,
400,450,500,600,700,800,900,1000,
1100,1200,1300,1400,1500,1800,2000,
2500,3000,3500,4000,4500,5000,
5500,6000,6500,7000,7500,8000,8500.
- Hz -
9B
9 Filter "Q"
The filter "Q" allows emphasizing the
sound response curve at the crossover
cut-off frequency point, when used in
(HIGH PASS) configuration (fig. 8e) .
The setting value can be two: 0,5 (LOW)
(fig. 9a) e 1 (HIGH) (fig. 9b).
10 AQXM2 Module.
The cut-off frequencies of the electronic
crossover are selectable with maximum
precision through insertion of the
optional AQXM2 module (fig. 10a)
available at STEG dealers in the values
indicated.
pag. 22
Page 23

Total Harmonic Distorsion
with 10,5 to 14,4 Volt power supply, @ 4
ohm load, harmonic distortion by power:
0,021% @ 465Watt
5
2
1
0.5
0.2
0.1
0.05
%
0.02
0.01
0.005
0.002
0.0006
1 6002 5 10 20 50 100 200
W
Frequency Responce
with 10,5 to 14,4 Volt power supply, @ 4
ohm load, frequency response at 1Watt
Intermodulation distortion
with 10,5 to 14,4 Volt power supply, @ 4
ohm load, intermodulation distortion by
power
%
+5
+4
+3
+2
+1
d
+0
B
r
-1
-2
-3
-4
-5
10 200k20 50 100 200 500 1k 2k 5k 10k 20k 50k 100k
Hz
5
2
1
0.5
0.2
0.1
0.05
0.02
0.01
0.005
0.002
0.0006
1 7002 5 10 20 50 100 200 500
W
Fast Fourier Transformer
with 10,5 to 14,4 Volt power supply, @ 4
ohm load, at 400 Watt nominal power
The exceptional constructive
characteristics and the “No compromise”
realization of this amplifier, are choices
confirmed by this measurement
diagrams realized in our laboratories by
Audio-Precision SistemOne equipments.
+0
-20
-40
d
-60
B
r
-80
-100
-120
2k 20k4k 6k 8k 10k 12k 14k 16k 18k
GR.I.P .S.
P .R.H.E.S.S.
mproved
I
ound
GR
ath System
P
rimary Regulated
P
High Efficiency
System
upply
S
Hz
The measuraments was taken on a production sample and can be a little
variable by the smallest tollerance of the used components. The G.T . T rading
reserves the right to make any technical and aesthetic modifications to the
product without advisement.
pag. 23
Page 24

G.T. TRADING s.r.l. - Loc. Ghilardino - Zona Artigianale, 61034 Fossombrone (PS) ITALY
Tel (++39) 0721.728727 R.A. - Fax (++39) 0721.749175
url: www.steg.it - Email: steg@steg.it
 Loading...