

ARCTIS PRO
WIRELESS
PRODUCT INFORMATION GUIDE

CONTENTS
WELCOME TO
Welcome 2
SteelSeries Engine 3
Product overview 5 – 8
Power On/Off 9
Bluetooth 10
Setup PS4 Pro/Original 11 – 12
Setup PS4 Slim 13 – 16
Setup PC/Mac 17 – 18
Ski Goggle Headband 19
Battery 20
Speakerplate 21
Transmitter Operation 22
Translations
Español 23
简体中文 27
繁體中文 30
日本語 33
한국어 38
Deutsch 43
Русский 48
Français 53
Italiano 58
Português 62
Regulatory 68
ARCTIS PRO WIRELESS
History showed us that gaming headsets rarely looked good and sounded
worse, so we made Arctis and put all other headsets on notice. Next, the
audiophiles said that a gaming headset could never stand up to dedicated
headphones, so we made Arctis Pro and changed the game.
Like you, we are esports pros, pubstars, 5am raiders, 1hp heroes, streamers
and dreamers. Your Arctis Pro was forged out of our belief that gaming isn’t
your way to escape reality, it’s your path to rewrite it.
2
find help at support.steelseries.com
STEELSERIES ENGINE
Download SteelSeries Engine to control the
Wireless Transmitter
with Engine Apps
the OLED screen).
from PC, and to integrate
(like displaying Discord info on
steelseries.com/engine
SOFTWARE REQUIREMENTS
Platforms
Windows 7 +
Mac OS X 10.8 +
120 MB of free hard drive space for installation
*
DTS Headphone:X 7.1 Surround available on
Windows only. Software installation required.
3 4
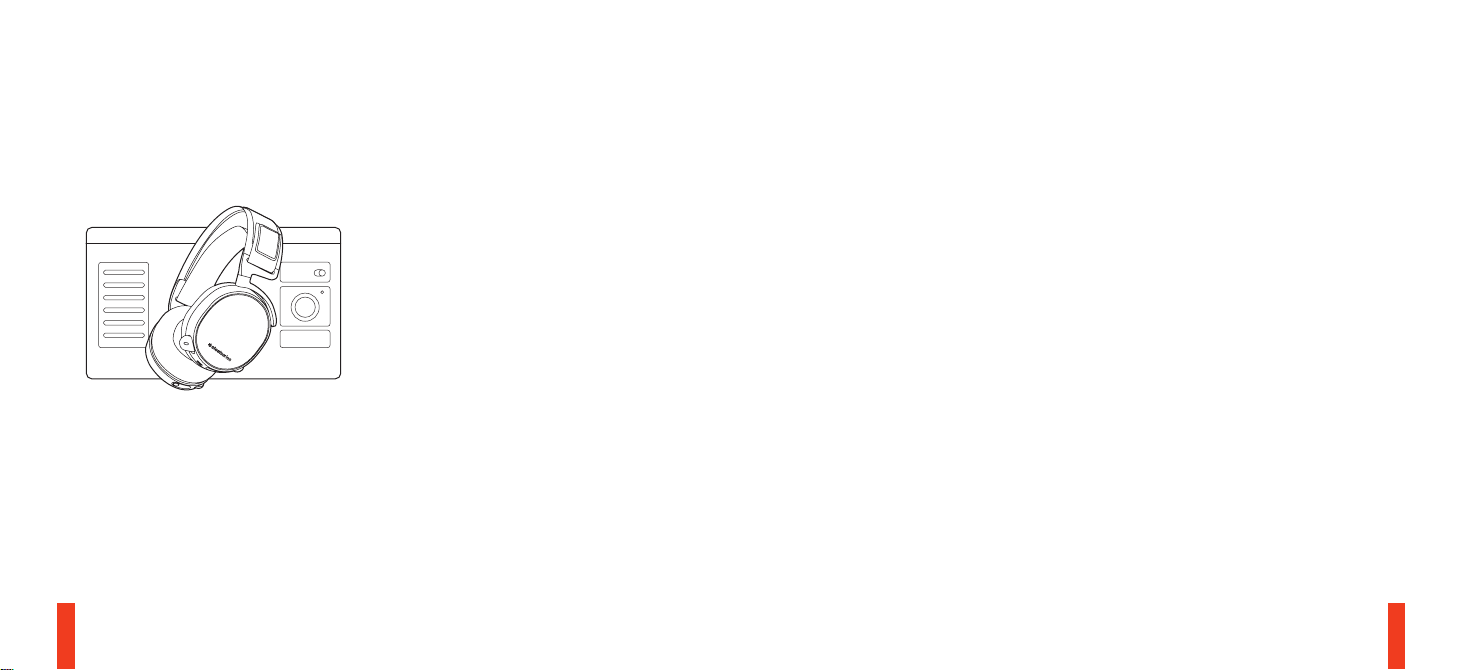
PACKAGE CONTENTS
Headset
Wireless Transmitter
Additional Battery
USB Audio Cable
Optical Audio Cable
Power Cable
Mobile Audio Cable
Mobile Charging Cable
SYSTEM REQUIREMENTS //
COMPATIBILITY
PC
PS4 (Pro / Original / Slim)
STEELSERIES ENGINE
SOFTWARE REQUIREMENTS
Platforms
Windows 7 +
Mac OS X 10.8 +
120 MB of free hard drive space for installation
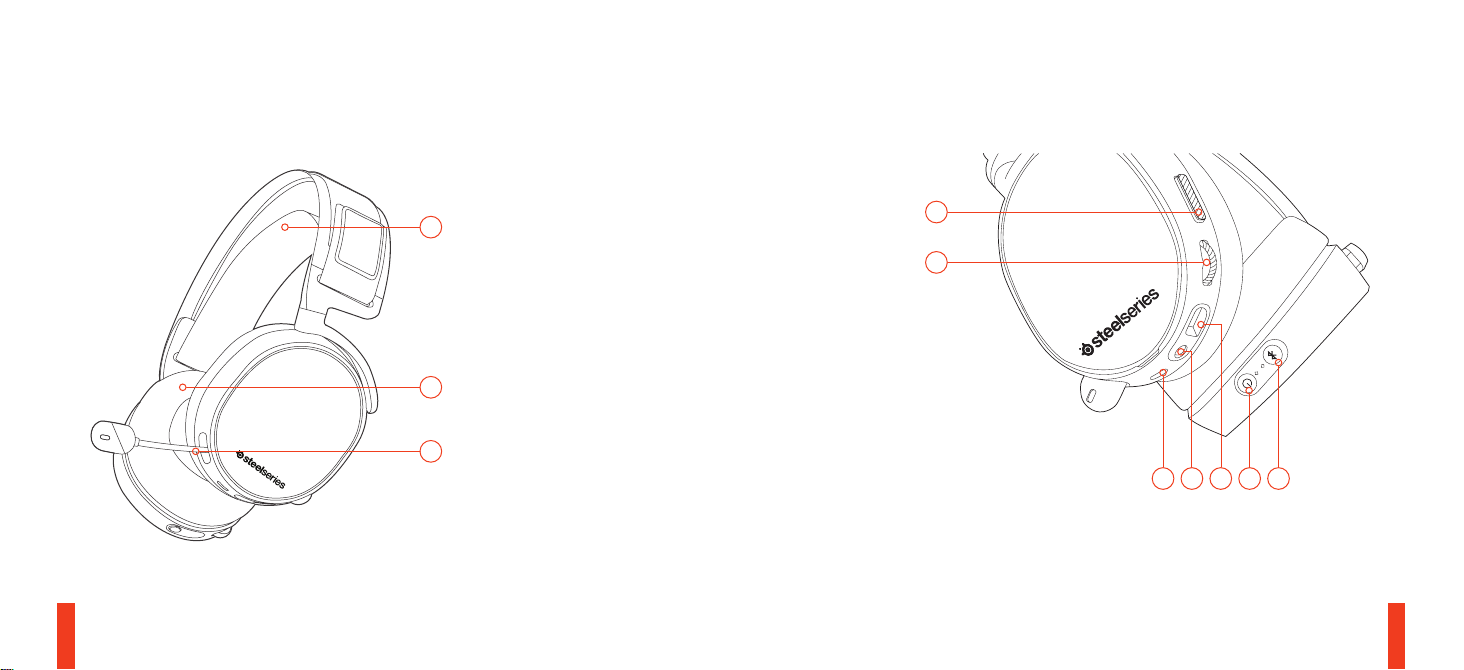
PRODUCT OVERVIEW
*
Find accessories and replacement parts at steelseries.com/gaming-accessories
01
01 Ski goggle headband
Airweave ear cushions
02
ClearCast microphone
03
02
03
5 6
*
*
04 Microphone mute button
05 Control Wheel
06 Micro-USB jack (for charging and firmware
updates)
07 Headphone share jack
08 Mobile audio cable jack
09 Power button
10 Bluetooth button
04
05
0806 09 1007
*
Find accessories and replacement parts at steelseries.com/gaming-accessories
16
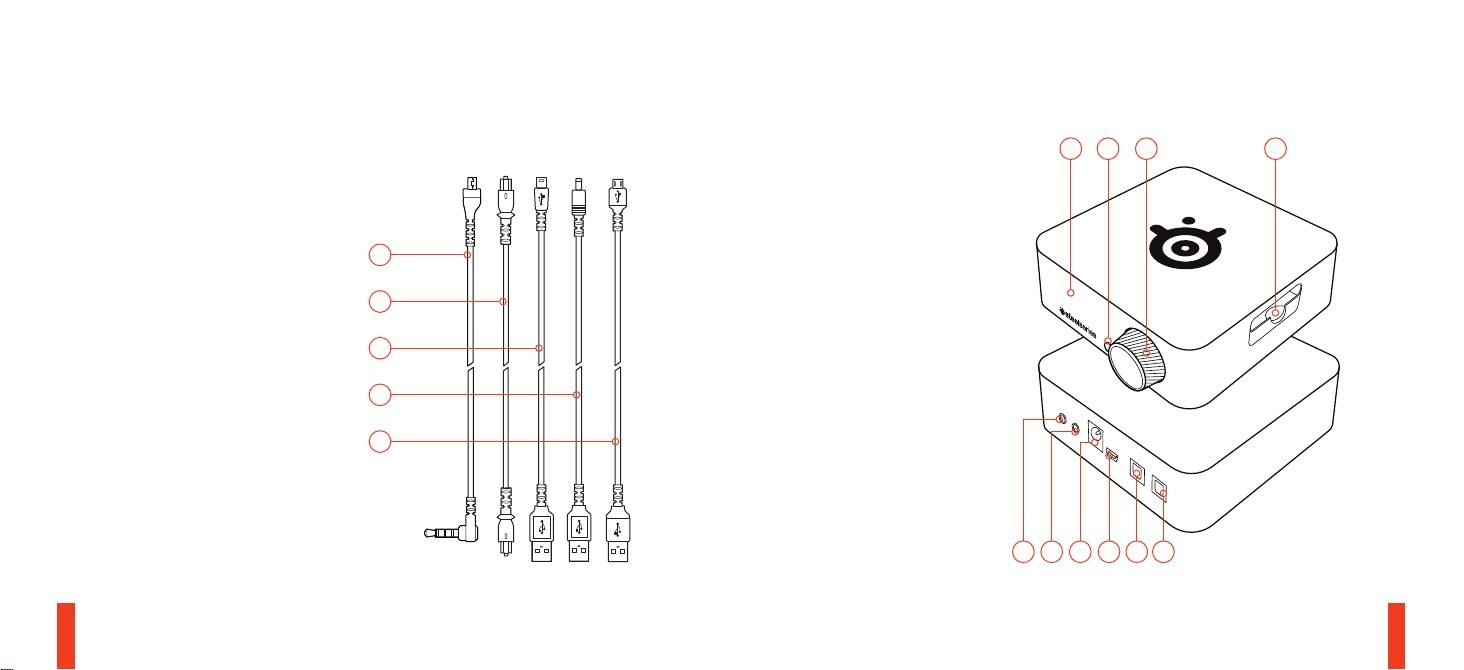
11
Mobile charging cable
12 Power Cable
13 USB Audio Cable
14 Optical Audio Cable
15 Mobile audio cable
OLED screen
16
17 Secondary button
18 Control knob
15
*
14
13
19 Battery charging slot
20 Line In jack
21 Line Out jack
22 DC jack
17 18 19
23 Mini USB jack
12
11
24 Optical in
25 Optical out
Optional
LINE
IN
LINE
OUT
DC
USB
OPTICAL
IN
OPTICAL
OUT
20 21 22 2423 25
7 8

POWER ON/OFF BLUETOOTHfind help at support.steelseries.com
POWER ON
Power the headset on or off press and hold the
power button
09
for 2 seconds.
PAIRING
The headset is already paired to the transmitter
when it arrives. In the event you need to re-pair,
go into the pairing menu and follow the
on-screen instructions
Option > System > Pairing
09
9 10
POWER ON
To turn Bluetooth off, press and hold the
Bluetooth button
10
PAIRING
With Bluetooth off, press and hold Bluetooth
10
button
for 6 seconds.
CONTROL
ANSWER/END VOICE CALL
· press the Bluetooth button
single
10
PLAY/PAUSE MUSIC
· press the Bluetooth button
single
SKIP TRACK
double
· · press Bluetooth button
10
10
10
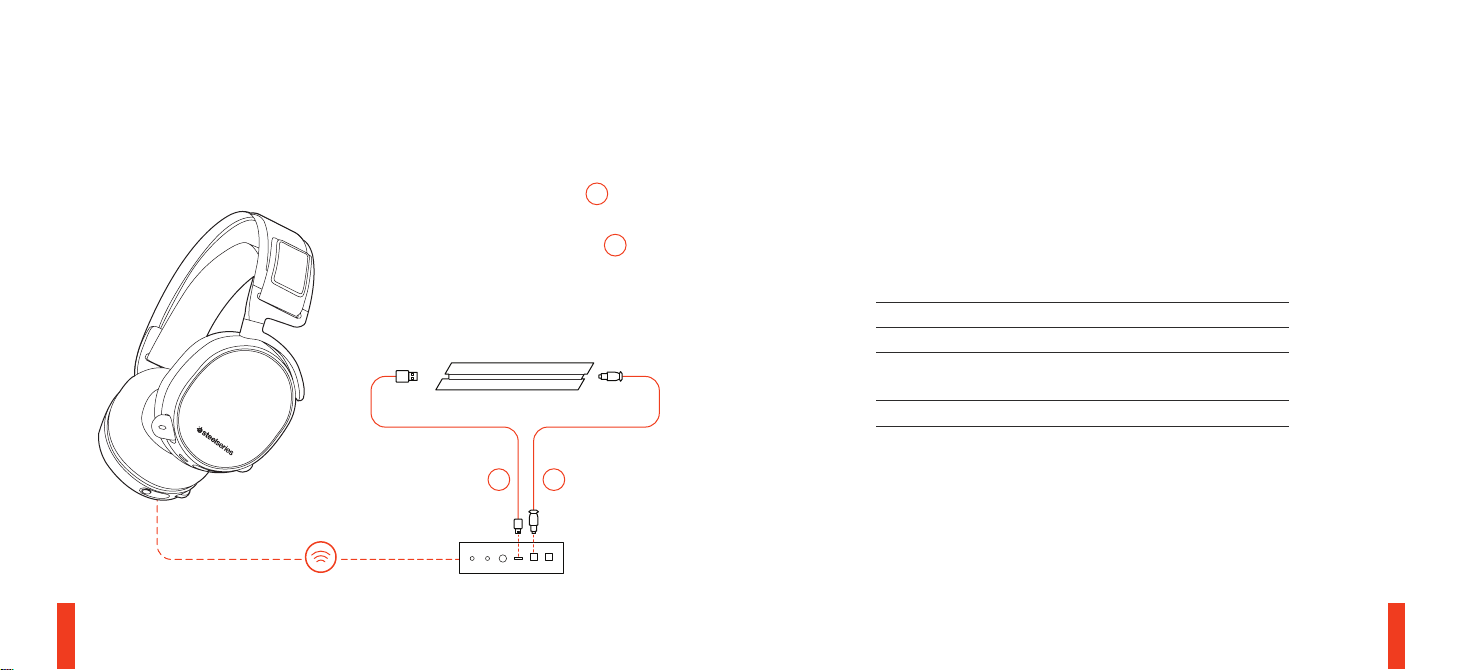
SETUP PS4 PRO AND ORIGINAL
HARDWARE INSTALLATION
01 Connect the USB audio cable
Wireless Transmitter to the front of the PS4
02 Connect the Optical Audio Cable
the Wireless Transmitter to the back of the
PS4
2.4 GHZ
11 12
13
from the
14
from
1413
WIRELESS TRANSMITTER SETTINGS
Main Menu > Source > PS4
PS4 AUDIO SETTINGS
PS4 SETTING > SOUND AND SCREEN > AUDIO OUTPUT SETTING
Primary Output Port Digital Out (Optical)
Audio Format (Priority) Bitstream (Dolby)
DEVICES
> AUDIO DEVICES
Output to Headphones Chat Audio
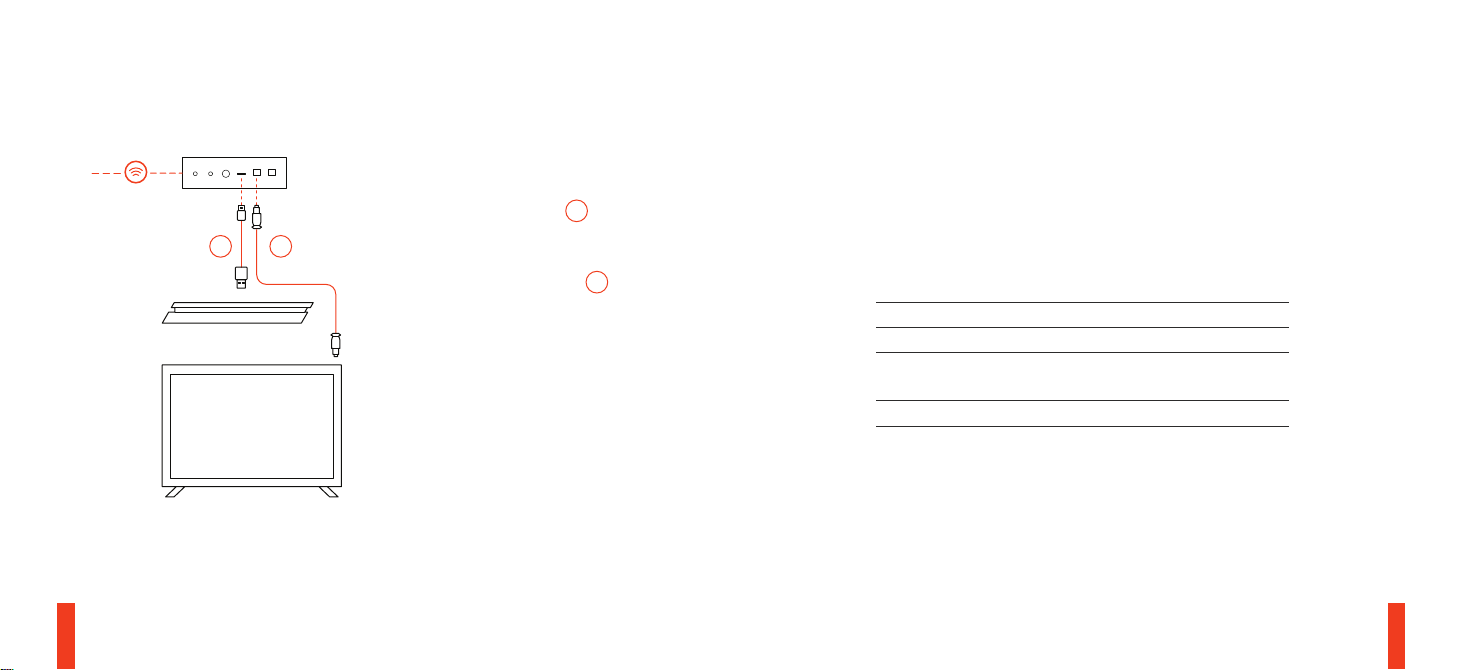
SETUP PS4 SLIM WITH OPTICAL AUDIO
HARDWARE INSTALLATION
WIRELESS TRANSMITTER SETTINGS
01 Connect the optical cable
1413
13 14
Wireless Transmitter to the optical output
of your TV or HDMI adapter
02 Connect the USB audio cable
the Wireless Transmitter to the USB port
on the front of the PS4
* The PS4 Slim does not have an optical
output. For full functionality you will need
to connect the Wireless Transmitter to the
optical output of a TV or an HDMI adapter.
If no optical is available proceed to the
next page.
14
from the
13
from
Main Menu > Source > PS4
PS4 AUDIO SETTINGS
PS4 SETTING > SOUND AND SCREEN > AUDIO OUTPUT SETTING
Primary Output Port Digital Out (Optical)
Audio Format (Priority) Bitstream (Dolby)
DEVICES
> AUDIO DEVICES
Output to Headphones Chat Audio
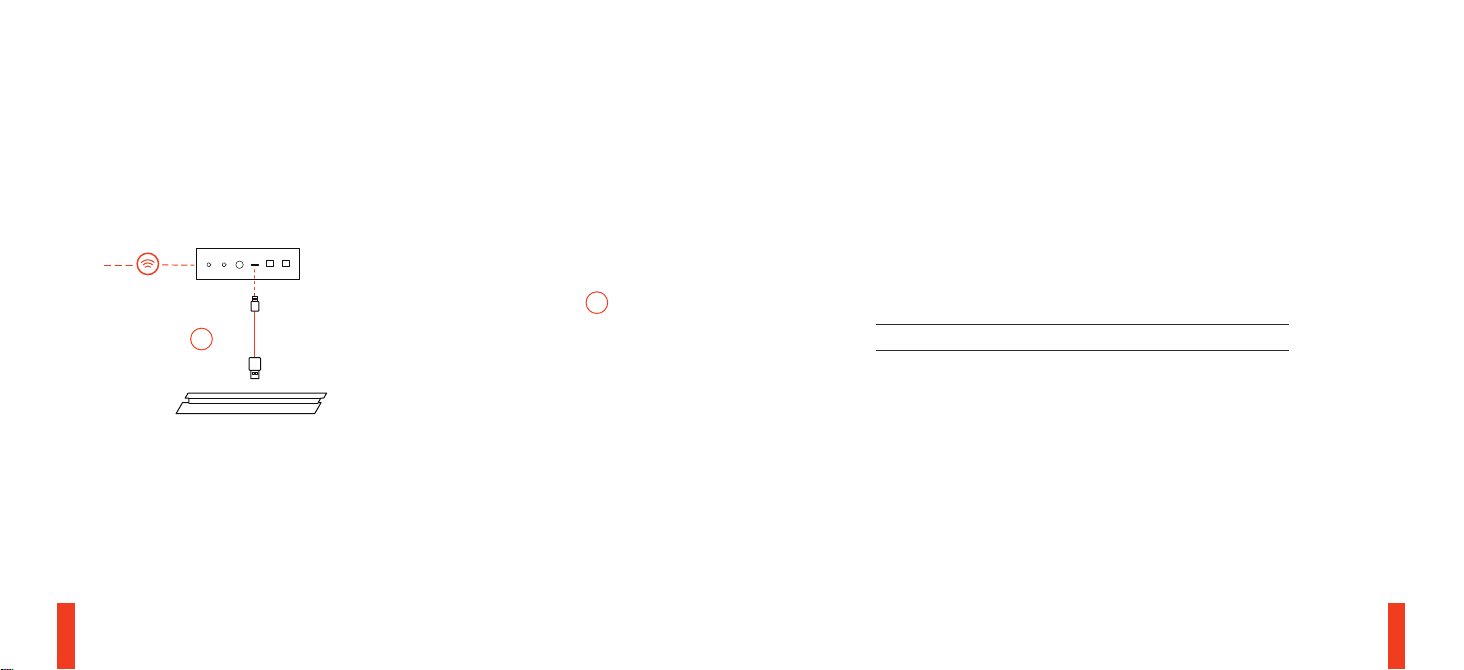
SETUP PS4 SLIM WITHOUT OPTICAL AUDIO
WIRELESS TRANSMITTER SETTINGS
Main Menu > Source > PS4
HARDWARE INSTALLATION
PS4 AUDIO SETTINGS
01 Connect the USB audio cable
13
15 16
Wireless Transmitter to the USB port on the
front of the PS4
* Without optical audio, surround sound and
ChatMix features will be unavailable.
13
from the
DEVICES > AUDIO DEVICES
Output to Headphones All Audio
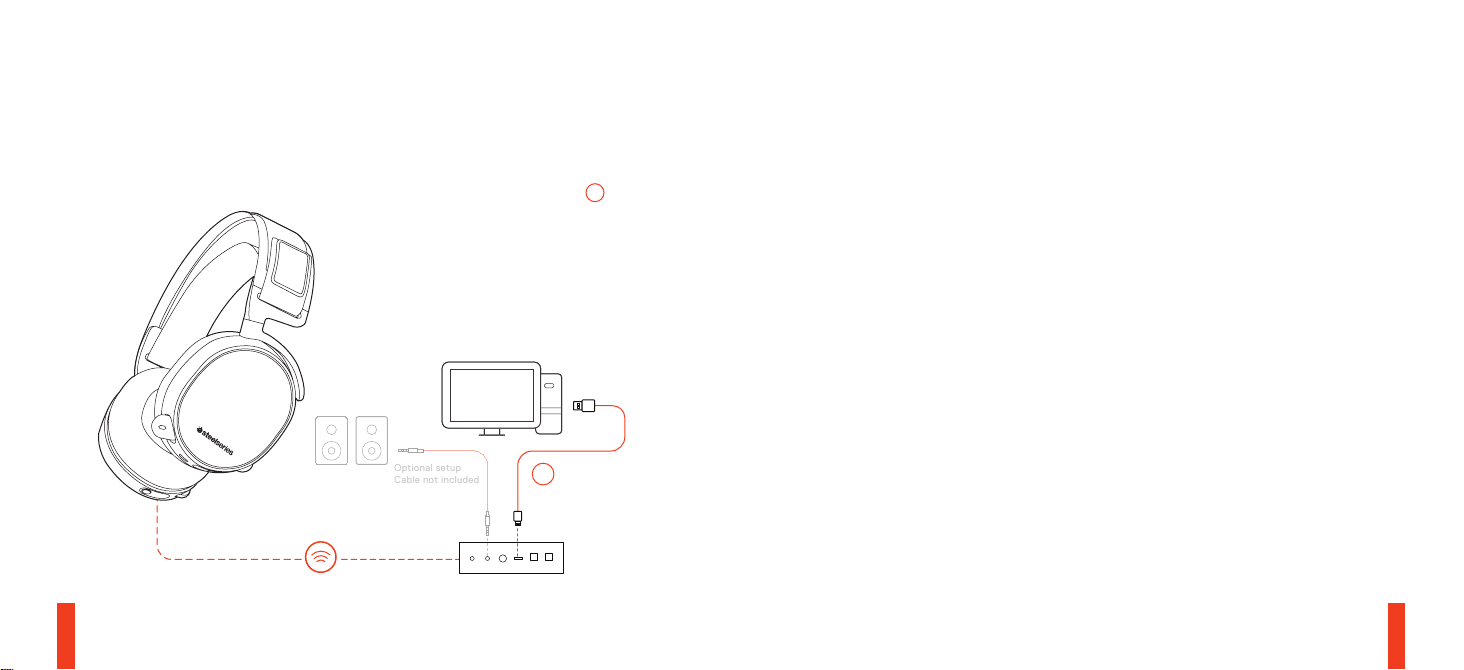
SETUP PC/MAC find help at support.steelseries.com
Optional setup
Cable not included
HARDWARE INSTALLATION
01
Connect the USB audio cable
Wireless Transmitter to the PC
02 (optional) Connect a 3.5mm cable from the
Wireless Transmitter’s Line Out jack to a
pair of speakers for automatic switching
when headset power is toggled
2.4 GHZ
17 18
13
from the
13
SETTINGS
Main Menu > Source > PC
WINDOWS SOUND SETTINGS
01 Under “Playback” highlight Arctis Pro
Game Audio and select “Set Default”
02 Select Arctis Pro Chat Audio and select
“Set Default Communications Device”
03 Under “Recording” highlight Arctis Pro
Chat Audio and select “Set Default”
MAC SOUND SETTINGS
01 Go to System Preferences > Sound
02 Under ‘Output’ select Arctis Pro
Game Audio
03 Under ‘Input’ select Arctis Pro Microphone
04 In your VoIP (chat) application select
Arctis Pro Chat Audio as the default audio
device
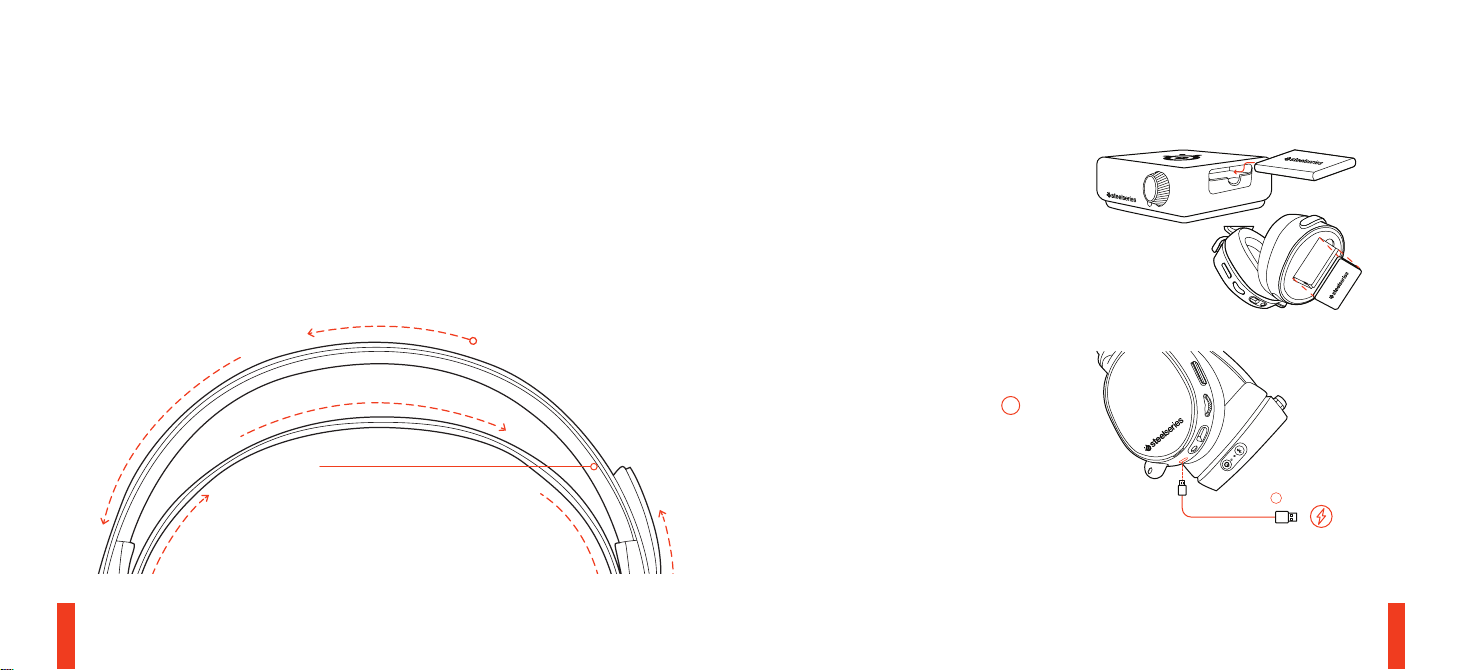
SKI GOGGLE HEADBAND accessory headbands available at steelseries.com
BATTERY find help at support.steelseries.com
BATTERY SWAPPING
To charge additional battery, place the battery
inside the charging slot on the transmitter
Install
Direction of headband
installation
MOBILE CHARGING
To charge headset while using or on the go,
connect the Mobile Charging Cable
the micro-USB port on the headset to any USB
power source
Velcro
Tighten or loosen the Velcro straps
on the sides of the headband to
achieve the desired fit
19 20
11
from
11
SPEAKER PLATE accessories available at steelseries.com
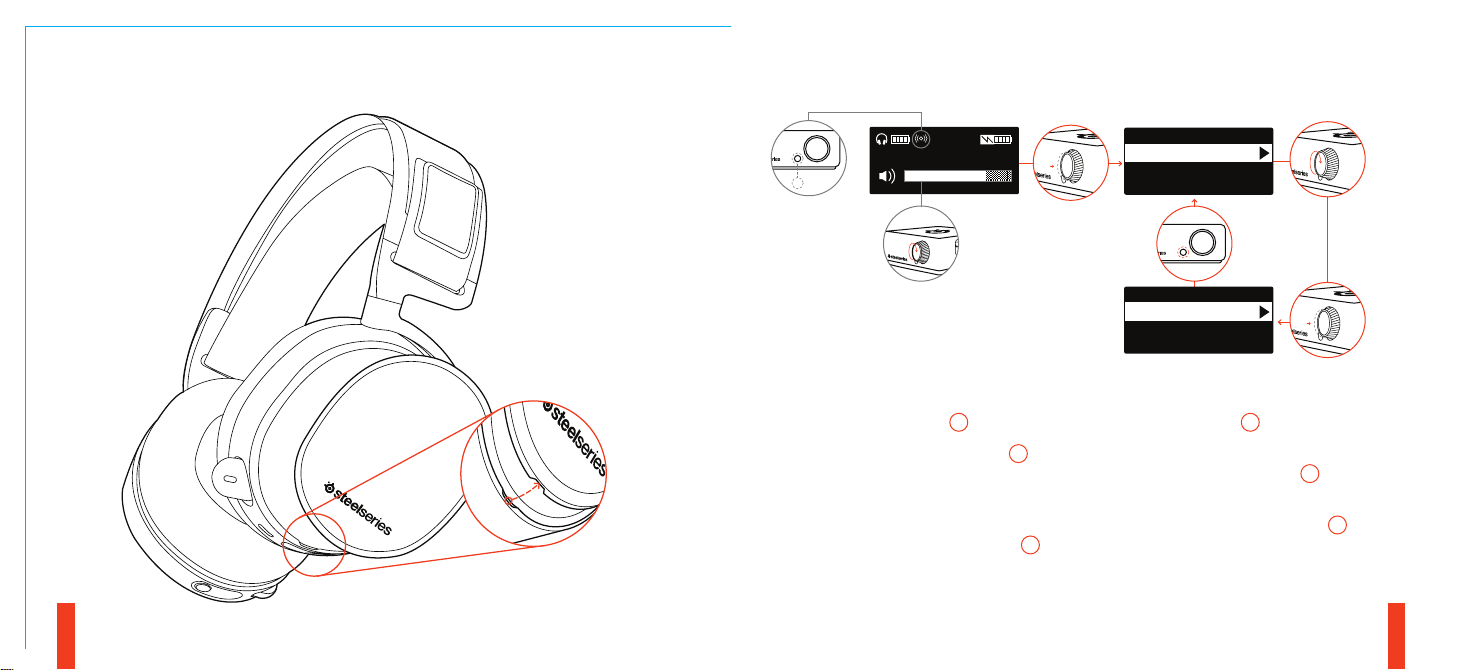
TRANSIMITTER OPERATION
7.1
PC
3s
MAIN MENU
AUDIO
SOURCE
AUDIO
CHATMIX
EQUALIZER
HOME SCREEN
• Rotate the control knob
• Press and release the control knob
enter the menu
(to adjust EQ, set ChatMix, and customize
settings)
• Press and hold the secondary button
toggle surround
21 22
18
to adjust volume
18
to
17
MAIN MENU
• Rotate the control knob
the menu
• Press and release the control knob
select menu items
• Press and release the secondary button
to
go back one step
18
to scroll through
18
to
17
to

ESPAÑOL
STEELSERIES ENGINE
Descarga SteelSeries Engine para controlar el
transmisor inalámbrico de la PC y para integrar con
Engine Apps (como mostrar información Discord en
la pantalla OLED). steelseries.com/engine
Requisitos del software SteelSeries Engine
Plataformas:
Windows 7 – Windows 10
Mac OS X 10.8 – 10.11
120 MB de espacio libre en el disco duro para la
instalación
*
SteelSeries 7.1 Surround disponible solo en Windows
solicite ayuda en
Contenido del paquete
Auriculares
Transmisor inalámbrico
Batería adicional
Cable de audio USB
Cable de audio óptico
Cable de alimentación
23 24
support.steelseries.com
Cable de audio portátil
Cable de carga portátil
Requisitos del sistema // Compatibilidad
PC
PS4 ( Pro / Slim / Original )
DESCRIPCIÓN GENERAL DEL PRODUCTO
01 Vincha de gafas de ski *
02 Almohadillas AirWeave *
03 Micrófono ClearCast
04 Botón para silenciar micrófono
05 Rueda de control
06 Conector micro-USB (para cargar y para
actualizaciones de rmware)
07 Conector para compartir auriculares
08 Conector de cable principal
09 Botón de encendido
10 Botón de Bluetooth
11 Cable de carga portátil
12 Cable de alimentación
13 Cable de audio USB
14 Cable de audio óptico
15 Cable de audio portátil
16 Pantalla OLED
17 Botón secundario
18 Rueda de control
19 Ranura de carga de batería
20 Conector de entrada
21 Conector de salida
22 Conector de CC
23 Conector mini USB
24 Entrada óptica
25 Salida óptica
*
Encuentre accesorios y repuestos en
steelseries.com
ENCENDIDO
Para encender los auriculares, presiona y mantén
presionado el botón de encendido 08 durante 2
segundos.
EMPAREJAMIENTO
Opción > Sistema > Emparejamiento
Los auriculares ya están emparejados con el
transmisor de fábrica. Si necesitas volver a emparejar,
dirígete al menú de emparejamiento y sigue las
instrucciones en pantalla.Bluetooth
BLUETOOTH
Encendido
Cuando los auriculares están encendidos, presiona
y suelta el botón de Bluetooth. Para apagar el
Bluetooth, presiona y mantén presionado el botón
de Bluetooth.
Emparejamiento
Con el Bluetooth apagado, presiona y mantén
presionado el botón de Bluetooth durante 6
segundos.
Control
Responder/finalizar llamada de voz
· una vez el botón de Bluetooth
presiona
Reproducir/pausar música
presiona · una vez el botón de Bluetooth

Saltar canción
presiona
· · dos veces el botón de Bluetooth
CONFIGURACIÓN DE PS4 PRO Y ORIGINAL
Instalación de hardware
01 Conecta el cable de audio USB del transmisor
inalámbrico a la parte frontal de la PS4
02 Conecta el cable de audio óptico del transmisor
inalámbrico a la parte trasera de la PS4
CONFIGURACIÓN DEL TRANSMISOR
INALÁMBRICO
Menú principal > Origen > PS4
CONFIGURACIÓN DE AUDIO DE PS4
Configuración de ps4 > Sonido y pantalla >
Configuración de salida de audio
Puerto de salida principal > Salida digital (óptica)
Formato de audio (prioridad) > Flujo de bits (Dolby)
Dispositivos > Dispositivos de audio
Salida a auriculares > Audio de chat
25 26
CONFIGURACIÓN DE PS4 SLIM
(con audio óptico)
Nota: la PS4 Slim no tiene salida óptica. Para obtener
una funcionalidad completa, deberás conectar
GameDAC a la salida óptica del TV o un adaptador
HDMI. Si no está disponible, continúa en la página
siguiente.
01 Conecta el cable óptico del Transmisor
inalámbrico a la salida óptica de tu TV o adaptador
HDMI
02 Conecta el cable de audio USB del Transmisor
inalámbrico al puerto USB en la parte frontal de la
PS4
CONFIGURACIÓN DE AUDIO DE PS4
Configuración de ps4 > Sonido y pantalla >
Configuración de salida de audio
Puerto de salida principal > Salida digital (óptica)
Formato de audio (prioridad) > Flujo de bits (Dolby)
Dispositivos > Dispositivos de audio
Salida a auriculares > Audio de chat
CONFIGURACIÓN DE PS4 SLIM
(sin audio óptico)
Nota: sin el audio óptico, las características de sonido
envolvente y ChatMix no estarán disponibles.
01 Conecta el cable de audio USB del Transmisor al
puerto USB en la parte frontal de la PS4
Configuraciones de audio PS4
Dispositivos > Dispositivos de audio > Salida a
auriculares > Todo el audio
PC EINRICHTEN
01 Verbinden Sie das USB-Audiokabel vom
WirelessTransmitter aus mit dem PC
02 (optional) Verbinden Sie ein 3,5-mm-Kabel von
der Line-Out-Buchse des WirelessTransmitters
aus mit einem Lautsprecherpaar für
automatischen Wechsel, wenn das Headset
ausgeschaltet wird
Einstellungen WirelessTransmitter
Hauptmenü > Quelle > PC WINDOWS-
TONEINSTELLUNGEN
01 Markieren Sie unter „Wiedergabegeräte“ Arctis Pro
Game Audio und wählen Sie „Als Standardgerät
auswählen“
02 Wählen Sie Arctis Pro Chat Audio und
anschließend „Als Standardkommunikationsgerät
festlegen“
03 Markieren Sie unter „Aufnahmegeräte“ Arctis Pro
Chat Audio und wählen Sie „Als Standardgerät
auswählen“
MAC-TONEINSTELLUNGEN
01 Gehen Sie zu Systemeinstellungen > Ton
02 Wählen Sie unter „Ausgabe“ Arctis Pro
Game Audio
03 Wählen Sie unter „Eingang“ Arctis Pro
Microphone
04 Wählen Sie in Ihrer VoIP (Chat)-Anwendung Arctis
Pro Chat Audio als Standardaudiogerät
CINTA PARA EL CABELLO CON
GAFAS DE ESQUÍ
Velcro
Apriete o aoje las tiras de velcro de los laterales de la
cinta para lograr el ajuste deseado
Cintas para cabello complementarias disponibles en
steelseries.com

简体中文
STEELSERIES ENGINE
下载SteelSeries Engine来从PC控制无线发射器,并
集成于Engine应用中(如在OLED上显示Discord信
息。steelseries.com/engine
SteelSeries Engine 系統需求
適用平台:
Windows 7 – Windows 10
Mac OS X 10.8 – 10.11
安装需要120 MB磁盘空间
*
SteelSeries 7.1 Surround仅在Windows上可用
请在
support.steelseries.com上寻求帮助
系統需求 // 相容性
PC
PS4 (Pro / Slim / Original)
产品概述
01 滑雪镜头带*
02 AirWeave耳垫*
03 ClearCast麦克风
27 28
04 麦克风静音按钮
05 控制轮
06 Micro-USB插孔(用于充电和軟件更新)
07 耳机共享插孔
08 主线缆插孔
09 电源按钮
10 蓝牙按钮
11 耳机充电线
12 电源线
13 USB音频线
14 光纤音频线
15 手机音频线
16 OLED屏
17 菜单按钮
18 控制轮
19 电池充电槽
20 Line In插孔
21 Line Out插孔
22 电源插孔
23 Mini USB插孔
24 光纤输入插孔
25 光纤输出插孔
开机
要关闭耳机电源,请按住电源按钮08 2秒钟。
配对
选项 > 系统 > 配对
到货时,耳机已与发射器配对。如果您需要
重新配对,请进入配对菜单并按照屏幕上的
说明进行操作。
蓝牙
开机
耳机打开后,按下并释放蓝牙按钮。要关闭蓝牙,
请按住蓝牙按钮。
配对
关闭蓝牙后,按住蓝牙按钮6秒钟。
控制
接听/结束语音呼叫
· 按蓝牙按钮
单击
播放/暂停音乐
单击
· 按蓝牙按钮
跳过音轨
双击
· · 按蓝牙按钮
设置PS4 PRO 及原版PS4
硬件安装
01 将无线发射器的USB音频线连接到PS4的前面
02 将无线发射器的光纤音频线连接到PS4的背面
无线发射器设置
主菜单 > 来源 > PS4
PS4音频设置
PS4设置>声音和画面>音频输出设置
主输出端口 > 数字输出(光纤)
音频格式(优先)> 杜比数码(Dolby)

设备 > 音频设备
输出至耳机 > 聊天音频
PS4 Slim设置 带光纤音频
注意:PS4 Slim没有光纤输出。要获得完整功能,
您需要将GameDAC连接到电视或HDMI适配器的光
纤输出。如无光纤可用,请到下一页。
01 将无线发射器的光缆连接到电视或HDMI适配器
的光纤输出
02 使用USB音频线连接无线发射器到PS4前面的
USB端口
PS4 Slim设置 无光纤音频
注意: 无光纤音频,环绕声和ChatMix
功能将不可用。
01 将无线发射器的USB音频线连接到PS4
前面的USB端口
PS4音频设置:
设备 > 音频设备 > 输出到耳机 > 所有音频
29 30
设置PC
将无线发射器的USB音频线连接到PC
(可选)使用3.5mm线缆连接无线发身器的Line
Out插孔到一对扬声器,切换耳机电源时,音频
自动切换到扬声器
无线发射器设置
主菜单 > 来源 > PC
WINDOWS声音设置
01 在“回放”下选中Arctis Pro Game Audio, 并选
择“设为默认”
02 选中Arctis Pro Game Audio,并选择“设为默认
通信设备”
03 在“录音”下,选中Arctis Pro Chat Audio,并选
择“设为默认”
MAC声音设置
01 转到系统偏好设置>声音
01 在“输出”下选中Arctis Pro Game Audio
01 在“输出”下选中Arctis Pro Microphone
04 在您的VoIP(聊天)应用中选择Arctis Pro Chat
Audio作为默认音频设备
滑雪镜头带
尼龙搭扣
拉紧或放松頭带兩侧的尼龙搭扣,
以获得理想的松紧度
頭帶附件可在
电池
电池切换
要为附加电池充电,请将电池放在发射器的充
电槽内
steelseries.com購買
繁體中文
STEELSERIES ENGINE
下載SteelSeries Engine讓您在PC上控制無線發送
器,並集成於Engine應用中(如在OLED上顯示
Discord信息。
steelseries.com/engine
移动充电
在使用或随身携带时对耳机充电,使用移动充电线
连接耳机上的micro-USB端口到任何USB电源
无线发射机
主屏幕
旋转控制旋钮调节音量
按下并释放控制旋钮进入菜单(调整EQ,设置
ChatMix和自定义设置)
按住辅助按钮切换环绕声
菜单
旋转控制旋钮滚动菜单
按下并释放控制旋钮选择菜单项
按下并释放辅助按钮返回上一步
SteelSeries Engine 軟體需求
適用平台:
Windows 7 – Windows 10
Mac OS X 10.8 – 10.11
安裝需要120 MB 的硬碟空間

*
SteelSeries 7.1聲道環繞音效僅能於Windows
平台使用
您可在
support.steelseries.com獲得更多協助
內容物
頭戴式耳機
無線發送器
附加电池
USB音源線
光纖音源線
電源線
手機音源線
耳機充電線
產品資訊指南
系統需求 // 相容性
PC
PS4 (Pro / Slim / Original)
產品概覽
01 滑雪鏡頭帶*
02 AirWeave耳罩*
03 ClearCast麥克風
04 麥克風静音按鈕
05 音量控制旋鈕
06 Micro-USB槽(用於充電和軟體更新)
07 耳機共享插槽
08 主線插槽
09 電源按鈕
10 藍芽按鈕
11 耳機充電線
12 電源線
13 USB音源線
14 光纖音源線
15 手機音源線
16 OLED螢幕
17 選單按鈕
18 控制旋鈕
19 電池充電槽
20 Line in插槽
21 Line out插槽
22 電源插槽
23 Mini USB插槽
24 光纖輸入插槽
25 光纖輸出插槽
開機
08
要關閉耳機電源,請按住電源按鈕
2秒鐘。
配對
選項 > 系統 > 配對
到貨時,耳機已與發射器配對好。如果您需要
重新配對,請進入配對選單並按照螢幕上的
說明進行操作。
藍芽
開機
耳機打開後,按下並放開藍芽按鈕。
關閉藍牙,請按住藍芽按鈕。
配對
關閉藍芽後,按住藍芽按鈕6秒鐘。
控制
接聽/結束語音通話
· 藍芽按鈕
單按
播放/暫停音樂
· 藍芽按鈕
單按
跳下一首
雙按
· · 藍芽按鈕
設置PS4 PRO 及原版PS4
硬體安裝
01 將無線發送器的USB音源線連接到PS4的前方
02 將無線發送器的光纖音源線連接到PS4的後方
無線發送器設置
主選單 > 來源 > PS4
PS4音源設置
PS4設置 > 音效和畫面 > 音源輸出設置
主輸出端口 > 數字輸出(光纖)
音源格式(優先)> 杜比數位音頻 (Dolby)
設備>音源設備
輸出至耳機 > 聊天語音
31 32

PS4 Slim設置 帶光纖音源
注意:PS4 Slim没有光纖輸出。要使用完整功能,
您需要將無線發送器連接到電視或HDMI轉接器的
光纖輸出。如無光纖可用,請看無光纖音源設置。
01 將無線發射器的光纜連接到電視或HDMI轉接器
的光纖輸出
02 使用USB音源線連接無線發送器到PS4前面的
USB插槽
PS4 Slim設置 無光纖音源
注意: 無光纖音源,環繞音效和ChatMix
功能將不可用。
01. 將無線發送器的USB音源線連接到PS4
前面的USB插槽
PS4音頻設置:
設備 > 音源設備 > 輸出到耳機 > 所有音源
設置PC
將無線發送器的USB音源線連接到PC
(可選)使用3.5mm線連接無線發送器的Line Out
插槽到音響,切換耳機電源時,音源將自動切換
到音響
無線發送器設置
主選單 > 來源 > PC
雪鏡頭帶
魔鬼氈
請將頭帶兩邊魔鬼氈的鬆緊度調整至適合
您的鬆緊度。
其他款式頭帶可於
steelseries.com 購買
日本語
STEELSERIES ENGINE
SteelSeries Engine をダウンロードすると、PCから
ワイヤレス トランスミッターを制御できます。ま
33 34
た、Engine アプリとの統合(OLED 画面に Discord
情報を表示するなど)も可能になります。詳しく
は steelseries.com/engine をご覧ください。
パッケージの内容
ヘッドセット
ワイヤレス トランスミッター
追加バッテリー
USBオーディオケーブル
光学式オーディオケーブル
電源ケーブル
モバイル オーディオケーブル
モバイル充電ケーブル
製品情報ガイド
システム要件 // 互換性
PC
PS4 ( Pro / Slim / Original )
SteelSeries Engine ソフトウェア要件
プラットフォーム:
Windows 7 – Windows 10
Mac OS X 10.8 – 10.11
インストールに120 MBの空き容量が必要
*
SteelSeries 7.1 Surround は Windows でのみご利
用いただけます
ご不明な点は
ご覧ください
製品概要
01 スキーゴーグル ヘッドバンド *
02 AirWeave イヤークッション *
03 ClearCast マイク
04 マイク消音ボタン
05 コントロールホイール
06 Micro USB ジャック(充電およびファームウェ
07 ヘッドフォン共有ジャック
08 メインケーブルジャック
09 電源ボタン
10 Bluetooth ボタン
11 モバイル充電ケーブル
12 電源ケーブル
13 USBオーディオケーブル
14 光学式オーディオケーブル
15 モバイル オーディオケーブル*
16 OLED 画面
support.steelseries.com のヘルプを
ア アップデート用)

17 セカンダリボタン
18 コントロールホイール
19 バッテリー充電スロット
20 Line In ジャック
21 Line Out ジャック
22 DCジャック
23 Mini USBジャック
24 Optical In
25 Optical Out
*
steelseries.com でアクセサリおよび交換用の部
品をお求めいただけます
電源オン
ヘッドセットの電源を切るには、電源ボタン 08
を2秒間長押しします。
ペアリング
オプション > システム > ペアリング
ヘッドセットは出荷時の状態ですでにトランスミ
ッターとペアリングされています。再度ペアリン
グを行う必要があるときは、ペアリング メニュー
に進んで画面の指示に従ってください。
35 36
BLUETOOTH
電源オン
ヘッドセットの電源がオンになっている状態で
Bluetooth ボタンを押して離します。Bluetooth
をオフにするには、Bluetooth ボタンを長押し
します。
ペアリング
Bluetooth をオフにした状態で、Bluetooth ボタン
を6秒間長押しします。
コントロール
音声コールに出る / 終了する
Bluetooth ボタンを1度だけ押す
音楽を再生する / 停止する
Bluetooth ボタンを1度だけ押す
トラックをスキップする
Bluetooth ボタンを2度続けて押す
PS4 PROと通常版PS4の設定
ハードウェアの取り付け
01 ワイヤレス トランスミッターのUSBオーディ
オケーブルをPS4の前面に接続します
02 ワイヤレス トランスミッターの光学式オーデ
ィオケーブルをPS4の背面に接続します
ワイヤレス トランスミッターの設定
メインメニュー > ソース(Source) > PS4
PS4オーディオ設定
PS4 設定 > サウンドとスクリーン > 音声出力設定
主に使用する出力端子 > デジタル出力(光)
音声フォーマット(優先) > ビットストリーム
(Dolby)
周辺機器 > オーディオ機器
ヘッドホンへの出力 > チャット音声
PS4 SLIM の設定 光オーディオあり
注: PS4 Slim には光出力端子がありません。完全
な機能をお楽しみいただくには、GameDAC をご
利用のテレビの光出力端子か HDMI アダプタに接
続していただく必要があります。光オーディオ
をご利用いただけない場合は、次のページをご
覧ください。
01. ワイヤレス トランスミッターの光学式ケーブ
ルを、ご利用のテレビの光出力端子または
HDMI アダプタに接続します
02 ワイヤレス トランスミッターのUSBオーデオ
ケーブルを、PS4の前面にあるUSBポートに挿
します
ワイヤレス トランスミッターの設定
メインメニュー > ソース(Source) > PS4
PS4オーディオ設定
PS4 設定 > サウンドとスクリーン > 音声出力設定
主に使用する出力端子 > デジタル出力(光)
音声フォーマット(優先) > ビットストリーム
(Dolby)
周辺機器 > オーディオ機器
ヘッドホンへの出力 > チャット音声
PS4 SLIM の設定 光オーディオなし
注: 光オーディオがない場合、サラウンドサウン
ドと ChatMix の機能はご利用いただけません。
01 ワイヤレス トランスミッターのUSBオーディ
オケーブルを、PS4の前面のUSBポートに挿し
ます
PS4 オーディオ設定
周辺機器 > オーディオ機器 >

ヘッドホンへの出力 > すべての音声
PCの設定
ワイヤレス トランスミッターのUSBオーディオケ
ーブルをPCに接続します
(任意)ワイヤレス トランスミッターの Line Out
ジャックの3.5mmケーブルをスピーカーに接続し
ます。こうすると、ヘッドセットの電源をオフに
したときに自動で切り替わるようになります。
ワイヤレス トランスミッターの設定
メインメニュー > ソース > PC
WINDOWS の音声設定
01 「再生」で Arctis Pro Game Audio をハイライ
トし、「デフォルトに設定」を選択します
02 Arctis Pro Chat Audio を選択し、「デフォルト
の通信機器」を選択します
03 「録音」で Arctis Pro Chat Audio をハイライ
トし、「デフォルトに設定」を選択します
MAC の音声設定
01 [システム環境設定] > [サウンド] と進みます
02 [出力] タブで Arctis Pro Game Audio を選択し
ます
37 38
03 [入力] タブで Arctis Pro Microphone を選択し
ます
04 ご利用の VoIP(チャット)アプリケーション
で、Arctis Pro Chat Audio をデフォルトのオー
ディオ機器として選択します。
スキーゴーグル ヘッドバンド
面ファスナー
ヘッドバンド両側のストラップの面ファスナーを
調整し、きつすぎず緩すぎない、丁度いい装着感
になるようにしてください。
インストール
ヘッドバンドの取り付け方法の説明です
アクセサリヘッドバンドをお求めの場合は
steelseries.com をご覧ください
バッテリー
バッテリーの交換
追加バッテリーを充電するには、トランスミッタ
ーの充電スロットにバッテリーを入れます
モバイル充電
ヘッドセットの使用中、または外出先で充電する
には、ヘッドセットの Micro-USB ポートのモバイ
ル充電ケーブルをUSB電源に接続します
ワイヤレス トランスミッター
ホーム画面
コントロールノブを回すと音量を調節できます
コントロールノブを押して離すとメニューに入
ります(EQの調整、ChatMix の設定、設定のカ
スタマイズ)
한국어
STEELSERIES ENGINE
SteelSeries Engine을 다운로드하여 PC에서
무선 송신기를 제어하고 (Discord 정보를 OLED
화면에 표시하는 등) Engine 앱과 연동하세요.
steelseries.com/engine
SteelSeries Engine 소프트웨어 필요 사용
플랫폼:
Windows 7 – Windows 10
Mac OS X 10.8 – 10.11
설치를 위해 120MB의 하드 드라이브 공간 필요
副ボタンを長押しするとサラウンドを切り替
えます
メニュー
コントロールノブを回すとメニューをスクロー
ルします
コントロールノブを押して離すとメニューの項目
を選択します
副ボタンを長押しすると1つ前のステップに戻
ります
*
SteelSeries 7.1 Surround는 Windows만 지원
고객 지원은
필요 시스템 사양 // 호환 시스템
PC
PS4 ( Pro / Slim / Original )
패키지 구성
헤드셋
무선 송신기
추가 배터리
support.steelseries.com을 방문하세요

USB 오디오 케이블
광 오디오 케이블
전원 케이블
모바일 오디오 케이블
모바일 충전 케이블제품 정보 가이드
제품 개요
01 스키 고글 헤드밴드 *
02 AirWeave 이어 쿠션 *
03 ClearCast 마이크
04 마이크 음소거 버튼
05 제어 휠
06 마이크 음소거 버튼
07 헤드폰 공유 잭
08 메인 케이블 잭
09 전원 버튼
10 Bluetooth 버튼
11 모바일 충전 케이블
12 전원 케이블
13 USB 오디오 케이블
14 광 오디오 케이블
15 모바일 오디오 케이블 *
39 40
16 OLED 화면
17 보조 버튼
18 제어 휠
19 배터리 충전 슬롯
20 Line In 잭
21 Line Out 잭
22 DC 잭
23 Mini USB 잭
24 광 입력
25 광 출력
*
보조장치와 교체용 부품은 steelseries.com에서
구할 수 있습니다
전원
헤드셋의 전원을 끄려면 전원 버튼 08을 2초 동안
길게 누르십시오.
페어링
옵션 > 시스템 > 페어링
헤드셋은 출고 시 이미 송신기와 페어링되어
있습니다. 다시 페어링해야 하는 경우, 페어링 메뉴에
들어가 화면상의 지시에 따르십시오.
BLUETOOTH
전원
헤드셋이 켜져 있는 상태에서 BLUETOOTH 버튼을
눌렀다가 손을 떼십시오. BLUETOOTH를 끄려면
BLUETOOTH 버튼을 길게 누르십시오.
페어링
BLUETOOTH가 꺼진 상태에서 BLUETOOTH 버튼을
6초 동안 길게 누르십시오.
제어
음성 통화 받기/끊기
BLUETOOTH 버튼을 짧게 한 번
음악 재생/일시정지
BLUETOOTH 버튼을 짧게 한 번 · 누르십시오
트랙 건너뛰기
BLUETOOTH 버튼을 짧게 두 번
PS4 PRO 구성 및 오리지널 하드웨어 설치
01 USB 오디오 케이블을 사용해 무선 송신기를 PS4
· 누르십시오
· · 누르십시오
전면에 연결합니다
02 광 오디오 케이블을 사용해 무선 송신기를 PS4
후면에 연결합니다
무선 송신기 설정
메인 메뉴 > 소스 > PS4
PS4 오디오 설정
PS4 설정 > 사운드 및 화면 > 오디오 출력 설정
기본 출력 단자 > 디지털 아웃(광)
오디오 포맷(우선) > 비트스트림(Dolby)
주변기기 > 오디오 기기
헤드셋으로 출력 > 채팅 오디오
PS4 Slim 구성 광 오디오 사용
참고: PS4 Slim에는 광 출력 단자가 없습니다. 모든
기능을 제대로 활용하려면 GameDAC을 TV의
광 출력 단자나 HDMI 어댑터에 연결해야 합니다.
광 출력 단자를 사용할 수 없다면 다음 페이지로
넘어가십시오.

01 광 케이블을 사용해 무선 송신기를 TV의 광
출력단자나 HDMI 어댑터에 연결하십시오
02 USB 오디오 케이블을 사용해 무선 송신기를 PS4
전면의 USB 포트에 연결하십시오
무선 송신기 설정
메인 메뉴 > 소스 > PS4
PS4 오디오 설정
PS4 설정 > 사운드 및 화면 > 오디오 출력 설정
기본 출력 단자 > 디지털 아웃(광)
오디오 포맷(우선) > 비트스트림(Dolby)
주변기기 > 오디오 기기
헤드셋으로 출력 > 채팅 오디오
PS4 Slim 구성 광 오디오 미사용
참고: 광 오디오가 없으면 서라운드 사운드와
ChatMix 기능을 사용할 수 없습니다.
01. USB 오디오 케이블을 사용해 무선 송신기를 PS4
전면의 USB 포트에 연결하십시오
PS4 오디오 설정
주변기기 > 오디오 기기 > 헤드폰에 출력
41 42
> 모든 오디오
PC 구성
USB 오디오 케이블을 사용해 무선 송신기를 PC에
연결하십시오
(선택) 3.5mm 케이블로 무선 송신기의 Line Out
잭을 스피커에 연결하면 헤드셋 전원을 켜고 끌 때
자동으로 전환됩니다
무선 송신기 설정
메인 메뉴 > 소스 > PC
WINDOWS 사운드 설정
01 “재생”에서 Arctis Pro Game Audio를 선택하고
“기본값으로 설정”을 선택하십시오
02 Arctis Pro Chat Audio를 선택하고 “기본 통신
장치로 설정”을 선택하십시오
03 “녹음/녹화” 에서 Arctis Pro Chat Audio를
선택한 후 “기본값으로 설정”을 선택하십시오
MAC 사운드 설정
01 시스템 환경설정 > 사운드로 가십시오
02 ‘출력’에서 Arctis Pro Game Audio를
선택하십시오
03 ‘입력’에서 Arctis Pro Microphone을
선택하십시오
04 VoIP(채팅) 응용 프로그램에서 Arctis Pro Chat
Audio를 기본 오디오 장치로 선택하십시오
스키 고글 헤드밴드
벨크로
헤드셋 측면의 벨크로 띠의 부착을 조절하여 적절히
착용
보조 헤드밴드는
있습니다
배터리
배터리 교체
추가 배터리를 충전하려면 송신기의 충전 슬롯에
배터리를 넣으십시오
steelseries.com 에서 구하실 수
모바일 충전
사용 중 또는 이동 중에 헤드셋을 충전하려면, 모바일
충전 케이블을 사용해 헤드셋의 Micro-USB 포트를
아무 USB 전원에나 연결하십시오
무선 송신기
홈 화면
제어 다이얼을 돌려 음량을 조절하십시오
(EQ 조절, ChatMix 설정, 또는 기타 사용자 지정
설정을 위해) 메뉴에 들어가려면 제어 다이얼을
눌렀다 손을 떼십시오
서라운드를 켜고 끄려면 보조 버튼을 길게
누르십시오
메뉴
제어 다이얼을 돌려 메뉴를 스크롤할 수 있습니다
메뉴 항목을 선택하려면 제어 다이얼을 눌렀다
떼십시오
한 단계 뒤로 가려면 보조 버튼을 눌렀다 떼십시오

05 Steuerrad
06 Micro-USB-Anschluss
DEUTSCH
STEELSERIES ENGINE
Laden Sie die SteelSeries Engine herunter, um den
WirelessTransmitter über Ihren PC zu steuern und
Engine Apps (wie die Anzeige von Discord-Infos auf
dem OLED-Bildschirm) zu integrieren.
com/engine
Softwareanforderungen für die SteelSeries
Engine
Plattformen:
Windows 7 – Windows 10
Mac OS X 10.8 – 10.11
120 MB freier Speicherplatz für die Installation
*
SteelSeries 7.1 Surround ist nur für Windows
erhältlich
support.steelseries.com
Hilfe unter
Paketinhalt
Headset
Wireless Transmitter
43 44
steelseries.
Zusätzlicher Akku
USB-Audiokabel
Optisches Audiokabel
Stromkabel
Mobiles Audiokabel
Mobiles Ladekabel
Produktinformationen
Systemanforderungen // Kompatibilität
PC
PS4 ( Pro / Slim / Original )
PRODUKTÜBERSICHT
01 Skibrillen-Stirnband *
02 AirWeave-Ohrpolster *
03 ClearCast-Mikrofon
04 Hauptkabelbuchse
(zum Laden oder für Firmware-Updates)
07 Headset-Hilfsbuchse
08 Hauptkabelbuchse
09 POWER-Taste
10 Bluetooth-Taste
11 Mobiles Ladekabel
12 Stromkabel
13 USB-Audiokabel
14 Optical Audio Cable
15 Mobiles Audiokabel *
16 OLED-Bildschirm
17 Sekundäre Taste
18 Steuerrad
19 Akku-Ladebuchse
20 Line-In-Buchse
21 Line-Out-Buchse
22 Strombuchse
23 Mini-USB-Anschluss
24 Optical-In
25 Optical-Out
*
Accessoires und Ersatzteile ndest du unter
steelseries.com
EINSCHALTEN
Um das Headset einzuschalten, halten Sie die
POWER-Taste (08) zwei Sekunden lang gedrückt.
KOPPLUNG
Option > System > Kopplung
Das Headset ist bereits von Werk aus mit dem
Transmitter gekoppelt. Sollte eine erneute Kopplung
notwendig sein, wechseln Sie in das Kopplungsmenü
und befolgen Sie die Bildschirmanweisungen.
BLUETOOTH
Einschalten
Wenn das Headset eingeschaltet ist, drücken und
lassen Sie die Bluetooth-Taste los. Um Bluetooth zu
deaktivieren, drücken und halten Sie die BluetoothTaste gedrückt.
Kopplung

Wenn Bluetooth deaktiviert ist, drücken und halten
Sie die Bluetooth-Taste sechs Sekunden lang
gedrückt.
STEUERUNG
SPRACHANRUF ANNEHMEN/BEENDEN
Einzeln
· Drücken Sie die Bluetooth-Taste
MUSIK-WIEDERGABE/PAUSE
Einzeln
· Drücken Sie die Bluetooth-Taste
TITEL ÜBERSPRINGEN
· · Drücken Sie die Bluetooth-Taste
Doppelt
EINRICHTUNG PS4 PRO UND PS4
Hardware-Installation
01 Schließe das USB-Audiokabel an den kabellosen
Transmitter und die Vorderseite der PS4 an
02 Schließe das optische Audiokabel an den
kabellosen Transmitter und die Rückseite
der PS4 an
KABELLOSER TRANSMITTER
45 46
EINSTELLUNGEN
Hauptmenü > Quelle > PS4
PS4 AUDIOEINSTELLUNGEN
Ps4 Einstellung > Sound Und Bildschirm >
Audioausgabe-Einstellungen
Primärer Ausgabeport > Digital Out (Optical)
Audioformat (Priorität) > Bitstream (Dolby)
Geräte > Audiogeräte
Ausgabe über Kopfhörer > Chat-Audio
SETUP FÜR PS4SLIM mit optischem Audio
Hinweis: Die PS4Slim verfügt nicht über einen
optischen Ausgang. Für eine vollständige
Funktionalität müssen Sie das GameDAC mit dem
optischen Ausgang eines TV-Geräts oder eines
HDMI-Adapters verbinden. Wenn kein optischer
Ausgang verfügbar ist, fahren Sie bitte mit der
nächsten Seite fort.
01 Verbinden Sie das optische Kabel vom
WirelessTransmitter aus mit dem optischen
Ausgang Ihres TV-Geräts oder HDMI-Adapters
02 Verbinden Sie das USB-Audiokabel vom
WirelessTransmitter aus mit dem USB-Anschluss
an der Vorderseite der PS4
KABELLOSER TRANSMITTER
EINSTELLUNGEN
Hauptmenü > Quelle > PS4
PS4 AUDIOEINSTELLUNGEN
Ps4 Einstellung > Sound Und Bildschirm >
Audioausgabe-Einstellungen
Primärer Ausgabeport > Digital Out (Optical)
Audioformat (Priorität) > Bitstream (Dolby)
Geräte > Audiogeräte
Ausgabe über Kopfhörer > Chat-Audio
SETUP FÜR PS4SLIM ohne optischem Audio
Hinweis: Ohne optischem Audio sind die SurroundSound- und ChatMix-Funktionen nicht verfügbar.
01. Verbinden Sie das USB-Audiokabel vom
WirelessTransmitter aus mit dem USB-Port
an der Vorderseite der PS4
PS4- AUDIOEINSTELLUNGEN
Geräte > Audiogeräte > Kopfhörer-Ausgabe
> Alle Audio
PC EINRICHTEN
Verbinden Sie das USB-Audiokabel vom
WirelessTransmitter aus mit dem PC
(optional) Verbinden Sie ein 3,5-mm-Kabel von der
Line-Out-Buchse des WirelessTransmitters aus mit
einem Lautsprecherpaar für automatischen Wechsel,
wenn das Headset ausgeschaltet wird
Einstellungen WirelessTransmitter
Hauptmenü > Quelle > PC
WINDOWS-TONEINSTELLUNGEN
01 Markieren Sie unter „Wiedergabegeräte“ Arctis
Pro Game Audio und wählen Sie „Als
Standardgerät auswählen“
02 Wählen Sie Arctis Pro Chat Audio und
anschließend „Als Standardkommunikationsgerät
festlegen“

03 Markieren Sie unter „Aufnahmegeräte“ Arctis Pro
Chat Audio und wählen Sie „Als Standardgerät
auswählen
MAC-TONEINSTELLUNGEN
01 Gehen Sie zu Systemeinstellungen > Ton
02 Wählen Sie unter „Ausgabe“ Arctis Pro
Game Audio
03 Wählen Sie unter „Eingang“ Arctis Pro
Microphone
04 Wählen Sie in Ihrer VoIP (Chat)-Anwendung Arctis
Pro Chat Audio als Standardaudiogerät”
SKIBRILLEN-KOPFBÜGEL
Klettverschluss
Ziehe die Klettbänder an den Seiten des Kopfbügels
fest oder lockere sie, um eine optimale Passform zu
erreichen.
Zusatzklettbänder erhältlich unter
AKKU
AKKUWECHSEL
47 48
steelseries.com
Um einen weiteren Akku zu laden, setzen Sie den
Akku in die Ladebuchse auf dem Transmitter
MOBILES AUFLADEN
Um das Headset während der Nutzung oder
unterwegs zu laden, verbinden Sie das mobile
Ladekabel vom Micro-USB-Anschluss am Headset
aus mit einer beliebigen USB-Stromquelle
WIRELESSTRANSMITTER
Startbildschirm
Drehen Sie den Steuerknopf, um die Lautstärke
einzustellen
Drücken und lassen Sie den Steuerknopf los, um in
das Menü zu wechseln (um EQ einzustellen, ChatMix
einzurichten und Einstellungen vorzunehmen)
Drücken und halten Sie die Sekundärtaste gedrückt,
um den SurroundSound auszuschalten
Menü
Drehen Sie den Steuerknopf, um durch das Menü
zu scrollen
Drücken und lassen Sie den Steuerknopf los, um
Menü-Elemente auszuwählen
Drücken und lassen Sie die Sekundärtaste los, um
einen Schritt zurückzugehen
РУССКИЙ
STEELSERIES ENGINE
Загрузите SteelSeries Engine для управления
беспроводным передатчиком с компьютера
и интеграции с приложениями Engine
(например, для отображения информации
Discord на светодиодном экране).
com/engine
Системные требования ПО SteelSeries
Engine
Платформы:
Windows 7 – Windows 10
Mac OS X 10.8 – 10.11
120 МБ свободного места на жёстком диске
для установки
*
Функция SteelSeries 7.1 Surround работает
только на ОС Windows
За помощью обращайтесь по адресу support.
steelseries.com
Содержимое упаковки
Наушники
Беспроводной передатчик
steelseries.
Дополнительный аккумулятор
Звуковой USB-кабель
Оптический аудиокабель
Шнур питания
Портативный аудиокабель
Портативный зарядный кабель
Руководство по эксплуатации
Системные требования // Совместимость
ПК
PS4 ( Pro / Slim / Original )
ОБ ИЗДЕЛИИ
01 Лыжное оголовье *
02 Амбушюры AirWeave *
03 Микрофон ClearCast
04 Кнопка отключения микрофона
05 Колесико управления
06 Разъем микро-USB (для зарядки и
обновления прошивки)

07 Разветвитель для наушников
08 Разъем для основного кабеля
09 Кнопка питания
10 Кнопка Bluetooth
11 Портативный зарядный кабель
12 Шнур питания
13 Звуковой USB-кабель
14 Оптический аудиокабель
15 Портативный аудиокабель
16 Светодиодный экран
17 Вторинна кнопка
18 Колесико управления
19 Гнездо для зарядки аккумулятора
20 Разъем линейного входа
21 Разъем линейного выхода
22 Разъем для подключения внешнего
источника постоянного тока
23 Разъем мини-USB
24 Оптический вход
25 Оптический выход
*
Аксессуары и запчасти можно купить на сайте
steelseries.com
49 50
ВКЛЮЧЕНИЕ
Чтобы выключить наушники, нажмите и
удерживайте кнопку питания 08 в течение 2
секунд.
СОЕДИНЕНИЕ
Настройка > Система > Соединение
Наушники уже соединены с передатчиком в
заводской комплектации. Если необходимо
снова соединить их, войдите в меню
«Соединение» и следуйте указаниям на экране.
BLUETOOTH
Включение
При включенных наушниках нажмите и
отпустите кнопку Bluetooth. Чтобы отключить
bluetooth, нажмите и удерживайте кнопку
Bluetooth.
Соединение
При выключенном bluetooth нажмите и
удерживайте кнопку Bluetooth в течение 6
секунд.
УПРАВЛЕНИЕ
ОТВЕТ/ЗАВЕРШЕНИЕ ГОЛОСОВОЙ СВЯЗИ
Один раз
· нажмите кнопку Bluetooth
ПРОИГРЫВАНИЕ/ПАУЗА
Один раз
· нажмите кнопку Bluetooth
ПРОПУСТИТЬ ТРЕК
· · нажмите кнопку Bluetooth
Два раза
УСТАНОВКА PS4 PRO И ОРИГИНАЛЬНОГО
ОБОРУДОВАНИЯ
01 Подключите звуковой USB-кабель от
беспроводного передатчика к порту на
передней панели PS4
02 Подключите оптический кабель от
беспроводного передатчика к порту в
задней панели PS4
НАСТРОЙКИ БЕСПРОВОДНОГО
ПЕРЕДАТЧИКА
Главное меню > Источник > PS4
НАСТРОЙКИ ЗВУКА PS4
Настройки Ps4 > Звук И Экран >
Параметры Звукового Выхода
Порт основного выхода > Цифровой выход
(оптический)
Аудиоформат (приоритет) > Битовый поток
(Dolby)
Устройства > Звуковые устройства
Выход к наушникам > Звук чата
УСТАНОВКА НА PS4 SLIM
с оптическим аудиокабелем
Внимание: система PS4 Slim не оснащена
оптическим выходом. Для доступа к полному
функционалу необходимо подключить
GameDAC к оптическому выходу телевизора
или HDMI-адаптера. Если оптический кабель
отсутствует, перейдите к следующей странице.
01 Подключите оптический кабель от
беспроводного передатчика к оптическому
выходу телевизора или HDMI-адаптера
02 Подключите звуковой USB-кабель от
беспроводного передатчика к USB-порту на
передней панели PS4

Audio и выберите «Использовать по
НАСТРОЙКИ БЕСПРОВОДНОГО
ПЕРЕДАТЧИКА
Главное меню > Источник > PS4
НАСТРОЙКИ ЗВУКА PS4
Настройки Ps4 > Звук И Экран >
Параметры Звукового Выхода
Порт основного выхода > Цифровой выход
(оптический)
Аудиоформат (приоритет) > Битовый поток
(Dolby)
Устройства > Звуковые устройства
Выход к наушникам > Звук чата
УСТАНОВКА НА PS4 SLIM
без оптического аудиокабеля
Внимание: без оптического аудиокабеля
функции «звук вокруг» и ChatMix недоступны.
01 Подключите звуковой USB-кабель от
беспроводного передатчика к USB-порту на
передней панели PS4
51 52
НАСТРОЙКИ ЗВУКА PS4
Устройства > Звуковые устройства > Выход к
наушникам > Все настройки звука
УСТАНОВКА НА КОМПЬЮТЕРЕ
Подключите звуковой USB-кабель от
беспроводного передатчика к компьютеру
(необязательно) Подключите 3,5мм
кабель от разъема линейного выхода
беспроводного передатчика к паре колонок
для автоматического переключения звука при
включении или выключении наушников
Параметры беспроводного передатчика
Главное меню > Источник > Компьютер
НАСТРОЙКА ЗВУКА ДЛЯ WINDOWS
01 В разделе «Воспроизведение» выделите
Arctis Pro Game Audio и выберите
«Использовать по умолчанию»
02 Выберите Arctis Pro Chat Audio, затем
«Использовать в качестве устройства связи
по умолчанию»
03 В разделе «Запись» выделите Arctis Pro Chat
умолчанию»
НАСТРОЙКА ЗВУКА ДЛЯ MAC
01 Откройте Установки системы > Звук
02 В разделе «Выход» выберите Arctis Pro Game
Audio
03 В разделе «Вход» выберите Arctis Pro
Microphone
04 В приложении VoIP (чат) выберите Arctis Pro
Chat Audio в качестве звукового устройства
по умолчанию”
ЛЫЖНОЕ ОГОЛОВЬЕ НАУШНИКОВ
Липучка
С помощью липучек по бокам можно изменить
размер оголовья
Дополнительные оголовья можно купить на
сайте
steelseries.com
АККУМУЛЯТОР
СМЕНА АККУМУЛЯТОРА
Для зарядки дополнительного аккумулятора
поместите его в зарядное гнездо передатчика
МОБИЛЬНАЯ ЗАРЯДКА
Чтобы зарядить наушники на ходу, подключите
портативный зарядный кабель от микро-USB
порта наушников к любому источнику питания с
USB-разъемом.
БЕСПРОВОДНОЙ ПЕРЕДАТЧИК
Главный экран
Поверните ручку управления для регулировки
звука
Нажмите и отпустите ручку управления, чтобы
войти в меню (для настройки эквалайзера
и персональных параметров, а также для
установки ChatMix)
Нажмите и удерживайте вторую кнопку, чтобы
включить или выключить «звук вокруг»
Меню
Поверните ручку управления для прокрутки
меню
Нажмите и отпустите ручку управления для
выбора пунктов меню
Нажмите и отпустите вторую кнопку для
возврата на шаг назад”

FRANÇAIS
STEELSERIES ENGINE
Téléchargez SteelSeries Engine pour contrôler
l’émetteur sans l du PC et pour l’intégrer aux
applications Engine (pour acher les infos Discord
sur l’écran OLED, par exemple).
engine
Configuration requise pour le
logiciel SteelSeries Engine
Plateformes:
Windows 7 – Windows 10
Mac OS X 10.8 – 10.11
120Mo d’espace libre sur le disque dur pour
l’installation
*
SteelSeries 7.1 Surround disponible uniquement pour
Windows
aide disponible à l’adresse
Contenu de l’emballage
Casque
Émetteur sans l
53 54
steelseries.com/
support.steelseries.com
Batterie supplémentaire
Câble audio USB
Câble audio optique
Câble d’alimentation
Câble audio mobile
Câble de chargement mobile
Guide d’informations produit
Configuration requise // Compatibilité
PC / Mac
PS4 ( Pro / Slim / Original )
VUE D’ENSEMBLE DU PRODUIT
01 Sangle de lunettes de ski*
02 Coussinets d’oreille AirWeave*
03 Microphone ClearCast
04 Bouton muet du microphone
05 Molette de contrôle
06 Prise micro-USB
(pour le chargement et les mises
à jour de micrologiciels)
07 Prise de partage du casque
08 Prise du câble principal
09 Bouton marche/arrêt
10 Bouton Bluetooth
11 Câble de chargement mobile
12 Câble d’alimentation
13 Câble audio USB
14 Câble audio optique
15 Câble audio mobile*
16 Écran OLED
17 Bouton secondaire
18 Molette de contrôle
19 Emplacement de chargement de batterie
20 Prise d’entrée
21 Prise de sortie
22 Prise DC
23 Prise mini-USB
24 Entrée optique
25 Sortie optique
* Accessoires et pièces de rechange disponibles à
steelseries.com
l’adresse
ALLUMAGE
Pour allumer ou éteindre le casque, maintenez le
bouton marche/arrêt 08 appuyé pendant 2 secondes.
APPAIRAGE
Option > Système > Appairage
Le casque est déjà appairé avec l’émetteur lorsque
vous le recevez. Si vous avez besoin de l’appairer à
nouveau, rendez-vous au menu appairage et suivez
les instructions à l’écran.
BLUETOOTH
Allumage
Lorsque le casque est allumé, appuyez sur le bouton
Bluetooth puis relâchez-le. Pour l’éteindre, maintenez
le bouton Bluetooth appuyé.
Appairage
Quand le Bluetooth est éteint, maintenez le bouton
Bluetooth appuyé pendant 6 secondes.

COMMANDES
RÉPONDRE/METTRE FIN À UN APPEL VOCAL
appuyer · une fois sur le bouton Bluetooth
LECTURE/MISE EN PAUSE DE LA MUSIQUE
appuyer · une fois sur le bouton Bluetooth
PASSER LE MORCEAU
appuyer · · deux fois sur le bouton Bluetooth
CONFIGURATION PS4 PRO ET ORIGINALE
Installation du matériel
01 Connectez le câble audio USB de l’émetteur sans
l à l’avant de la PS4
02 Connectez le câble audio optique de l’émetteur
sans l à l’arrière de la PS4
PARAMÈTRES ÉMETTEUR SANS FIL
Menu principal > Source > PS4
PARAMÈTRES AUDIO PS4
PARAMÈTRES PS4 > SON ET ÉCRAN >
PARAMÈTRES DE SORTIE AUDIO
55 56
Port de sortie principal > Sortie digitale (optique)
Format audio (Priorité) > Bitstream (Dolby)
Périphériques > Périphériques audio
Sortie vers le casque > Audio du Chat
CONFIGURATION PS4 SLIM avec audio optique
Remarque: La PS4 Slim n’est pas dotée de sortie
optique. Pour une fonctionnalité optimale, il vous
faudra relier le GameDAC à la sortie optique d’un
téléviseur ou d’un adaptateur HDMI. Si aucune sortie
optique n’est disponible, passez à la page suivante.
01 Reliez le câble optique de l’émetteur sans l à la
sortie optique de votre téléviseur ou adaptateur
HDMI
02 Reliez le câble audio USB de l’émetteur sans l au
port USB situé sur la face avant de la PS4
CONFIGURATION PS4 SLIM sans audio optique
Remarque: Sans audio optique, le son surround et les
fonctionnalités ChatMix ne seront pas disponibles.
1. Reliez le câble audio USB de l’émetteur sans l au
port USB situé sur la face avant de la PS4
PARAMÈTRES ÉMETTEUR SANS FIL
Menu principal > Source > PS4
PARAMÈTRES AUDIO PS4
Paramètres Ps4 > Son Et Écran > Paramètres
De Sortie Audio
Port de sortie principal > Sortie digitale (optique)
Format audio (Priorité) > Bitstream (Dolby)
Périphériques > Périphériques audio
Sortie vers le casque > Audio du Chat
PARAMÈTRES AUDIO PS4
Périphériques > Périphériques audio >
Sortie casque > Tout audio
CONFIGURATION PC
Reliez le câble audio USB de l’émetteur sans l au PC
(facultatif) Reliez un câble 3,5 mm de la prise de
sortie de l’émetteur sans l à une paire de hautparleurs pour basculement automatique lorsque
l’alimentation du casque est coupée
Paramètres émetteur sans fil
Menu principal > Source > PC
PARAMÈTRES SON WINDOWS
01 Sous «Lecture», sélectionnez Audio de jeu Arctis
Pro, puis sélectionnez «Dénir par défaut»
02 Sélectionnez Audio de chat Arctis Pro, puis
sélectionnez «Dénir le périphérique de
communication par défaut»
03 Sous «Enregistrement», sélectionnez Audio de
chat Arctis Pro, puis sélectionnez «Dénir par
défaut»
PARAMÈTRES SON MAC
01 Rendez-vous dans Préférences système > Son
02 Sous «Sortie», sélectionnez Audio de jeu
Arctis Pro
03 Sous «Entrée», sélectionnez Microphone
Arctis Pro
04 Dans votre application VoIP (chat), sélectionnez
Audio de chat Arctis Pro en tant que périphérique
audio par défaut”

SERRE-TÊTE DE MASQUE DE SKI
Velcro
Serrez ou desserrez les lanières en Velcro sur les
côtés du serre-tête pour un ajustement optimal
Installation
Sens de l’installation du serre-tête
Serre-tête accessoires disponibles à l’adresse
steelseries.com
BATTERIE
ÉCHANGE DE BATTERIES
Pour charger la batterie supplémentaire, placez-la
dans l’emplacement de chargement situé sur
l’émetteur
CHARGEMENT MOBILE
Pour charger le casque pendant que vous l’utilisez,
ou en vous déplaçant, reliez le câble de chargement
mobile du port micro-USB situé sur le casque à
n’importe quelle source d’alimentation USB”
57 58
Plaques pour haut-parleurs disponibles sur
steelseries.com
ÉMETTEUR SANS FIL
Écran d’accueil
Tournez le bouton de contrôle pour ajuster le volume
Appuyez sur le bouton de contrôle et relâchez-le
pour entrer dans le menu (pour ajuster l’égalisateur,
congurer ChatMix et personnaliser les paramètres)
Maintenez le bouton secondaire appuyé pour activer/
désactiver le son surround
Menu
Faites tourner le bouton de contrôle pour faire déler
le menu
Appuyez sur le bouton de contrôle et relâchez-le pour
sélectionner des articles du menu
Appuyez sur le bouton secondaire et relâchez-le pour
revenir en arrière”
ITALIANO
STEELSERIES ENGINE
Scarica SteelSeries Engine per controllare il
trasmettitore wireless dal PC e integrare con le app
Engine (come la visualizzazione delle informazioni di
Discord sullo schermo OLED).
Requisiti del software SteelSeries Engine
Piattaforme:
Windows 7 – Windows 10
Mac OS X 10.8 – 10.11
120 MB di spazio libero sul disco sso per
l’installazione
* SteelSeries 7.1 Surround disponibile solo su Windows
per ricevere assistenza, visita
Contenuto del pacchetto
Cue
Trasmettitore wireless
Batteria supplementare
Cavo audio USB
Cavo audio ottico
Cavo di alimentazione
steelseries.com/engine
support.steelseries.com
Cavo audio per dispositivi mobili
Cavo per ricarica mobile
Guida informazioni sul prodotto
Requisiti di sistema // Compatibilità
PC / Mac
PS4 ( Pro / Slim / Original )
PANORAMICA DEL PRODOTTO
01 Archetto stile occhiali da sci *
02 Cuscinetti AirWeave *
03 Microfono ClearCast
04 Pulsante per la disattivazione del microfono
05 Ruota di controllo
06 Jack micro USB (per caricamento e
aggiornamenti rmware)
07 Jack splitter per cue
08 Jack cavo principale
09 Pulsante di accensione
10 Pulsante Bluetooth
11 Cavo per ricarica mobile

12 Cavo di alimentazione
13 Cavo audio USB
14 Cavo audio ottico
15 Cavo audio per dispositivi mobili *
16 Schermo OLED
17 Pulsante secondario
18 Ruota di controllo
19 Vano caricabatteria
20 Jack line-in
21 Jack line-out
22 Jack DC
23 Jack mini USB
24 Ingresso ottico
25 Uscita ottica
* Puoi trovare accessori e parti di ricambio su
steelseries.com
ACCENSIONE
Per accendere le cue tieni premuto il pulsante di
accensione (08) per 2 secondi.
59 60
ASSOCIAZIONE
Opzioni > Sistema > Associazione
Le cue vengono fornite già associate al
trasmettitore. Nel caso in cui sia necessario eettuare
nuovamente l’associazione, recati nell’apposito menu
e attieniti alle istruzioni visualizzabili a schermo.
BLUETOOTH
Attivazione
A cue accese, premi e rilascia il pulsante Bluetooth.
Per disattivare il Bluetooth, tieni premuto l’apposito
pulsante.
Associazione
Con il Bluetooth disattivato, tieni premuto il pulsante
Bluetooth per 6 secondi.
CONTROLLA
RISPONDI A/TERMINA UNA CHIAMATA
VOCALE
premi · una volta il pulsante Bluetooth
RIPRODUCI/INTERROMPI LA MUSICA
premi · una volta il pulsante Bluetooth
SALTA BRANO
premi · · due volte il pulsante Bluetooth
IMPOSTAZIONI DEL SISTEMA PS4 PRO E
ORIGINALE
Installazione dell’hardware
01 Collega il cavo audio USB dal trasmettitore
wireless alla parte frontale del sistema PS4
02 Collega il cavo audio ottico dal trasmettitore
wireless alla parte retrostante del sistema PS4
IMPOSTAZIONI TRASMETTITORE WIRELESS
Menu principale > Sorgente > PS4
IMPOSTAZIONI AUDIO DEL SISTEMA PS4
Impostazioni Sistema Ps4 > Suoni E Schermo
> Impostazioni Uscita Audio
Porta di uscita primaria > Uscita digitale (ottica)
Formato audio (priorità) > Flusso di bit ad alta
velocità (Dolby)
Dispositivi > Dispositivi audio
Uscita in cua > Audio chat
IMPOSTAZIONI PS4 SLIM
con uscita audio ottica
Nota: Il sistema PS4 Slim non è provvisto di uscita
ottica. Per usufruire della piena funzionalità dovrai
collegare il GameDAC all’uscita ottica di una TV o
a un adattatore HDMI. In caso di assenza di uscita
ottica disponibile, prosegui alla pagina successiva.
01. Collega il cavo ottico dal trasmettitore wireless
all’uscita ottica della tua TV o all’adattatore HDMI
02. Collega il cavo audio USB dal trasmettitore
wireless alla porta USB frontale del sistema PS4
IMPOSTAZIONI TRASMETTITORE WIRELESS
Menu principale > Sorgente > PS4
IMPOSTAZIONI AUDIO DEL SISTEMA PS4
Impostazioni Sistema Ps4 > Suoni E Schermo
> Impostazioni Uscita Audio
Porta di uscita primaria > Uscita digitale (ottica)
Formato audio (priorità) > Flusso di bit ad alta
velocità (Dolby)
Dispositivi > Dispositivi audio
Uscita in cua > Audio chat

CONFIGURAZIONE PS4 SLIM
senza uscita audio ottica
Nota: senza l’uscita audio, l’audio surround e le
funzionalità ChatMix non sono disponibili.
01. Collega il cavo audio USB dal trasmettitore
Wireless alla porta USB posta sul davanti del
sistema PS4
IMPOSTAZIONI AUDIO SISTEMA PS4
Dispositivi > Dispositivi audio > Da uscita a cua >
Tutto l’audio
IMPOSTAZIONI PC
Collega il cavo audio USB dal trasmettitore
wireless al PC
(facoltativo) Collega un cavo da 3,5 mm dal jack lineout dal trasmettitore wireless a un paio di altoparlanti
per passare automaticamente l’audio dalle cue agli
altoparlanti previa attivazione delle une o degli altri
IMPOSTAZIONI TRASMETTITORE WIRELESS
Menu principale > Sorgente > PC
61 62
IMPOSTAZIONI AUDIO WINDOWS
01 In “Riproduzione” evidenzia Audio gioco Arctis Pro
e seleziona “Imposta predenito”
02 Seleziona Audio chat Arctis Pro e seleziona
“Imposta dispositivo di comunicazione predenito”
03 In “Registrazione” evidenzia Audio chat Arctis Pro
e seleziona “Imposta predenito”
IMPOSTAZIONI AUDIO MAC
01 Vai a Preferenza di sistema > Audio
02 In “”Uscita”” seleziona Audio gioco Arctis Pro
03 In “”Ingresso”” seleziona Microfono Arctis Pro
04 Nella tua applicazione VoIP (chat) seleziona Audio
chat Arctis Pro come periferica audio predenita
ARCHETTO STILE OCCHIALI DA SCI
Velcro
Stringi o allenta le cinghie di velcro sull’archetto per
ottenere la misura desiderata.
Montaggio
Direzione di montaggio dell’archetto
Accessori disponibili su
steelseries.com
BATTERIA
CAMBIO BATTERIA
Per caricare la batteria supplementare, inseriscila
nell’apposito vano caricabatteria del trasmettitore
RICARICA MOBILE
Per caricare le cue durante l’uso o in mobilità,
collega il cavo per la ricarica mobile dalla porta micro
USB delle cue a qualsiasi fonte di alimentazione
USB
TRASMETTITORE WIRELESS
Schermata iniziale
PORTUGUÊS
STEELSERIES ENGINE
Baixe o SteelSeries Engine para controlar o
transmissor sem o através do PC e integrá-lo com
apps do Engine (como exibir informações do Discord
na tela OLED). steelseries.com/engine
Requisitos do software SteelSeries Engine
Plataformas:
Windows 7 – Windows 10
Ruota la manopola di controllo per regolare il volume
Premi e rilascia la manopola di controllo per accedere
al menu (per regolare l’equalizzazione, congurare
ChatMix e personalizzare le impostazioni)
Tieni premuto il pulsante secondario per attivare/
disattivare il surround
Menu
Ruota la manopola di controllo per scorrere il menu
Premi e rilascia la manopola di controllo per
selezionare una voce del menu
Premi e rilascia il pulsante secondario per tornare
indietro
Mac OS X 10.8 – 10.11
120 MB de espaço livre no disco rígido para a
instalação
* SteelSeries 7.1 Surround disponível somente no
Windows
obtenha ajuda em
support.steelseries.com

Conteúdo da embalagem
Headset
Transmissor sem o
Bateria adicional
Cabo de áudio USB
Cabo de áudio ótico
Cabo de energia
Cabo de áudio móvel
Cabo de recarga móvel”
Guia de Informações do produto
Requisitos do sistema // Compatibilidade
PC / Mac
PS4 ( Pro / Slim / Original )
VISÃO GERAL DO PRODUTO
01 Faixa de óculos de esqui*
02 Almofadas de orelha AirWeave*
03 Microfone ClearCast
04 Botão de silenciar microfone
63 64
05 Roda de controle
06 Plugue Micro USB (para recarga e atualização de
rmware)
07 Plugue de compartilhar fone
08 Plugue do cabo principal
09 Botão de ligar
10 Botão de Bluetooth
11 Cabo de recarga móvel
12 Cabo de energia
13 Cabo de áudio USB
14 Cabo de áudio ótico
15 Cabo de áudio móvel*
16 Tela OLED
17 Botão secundário
18 Roda de controle
19 Espaço de carga da bateria
20 Plugue de entrada
21 Plugue de saída
22 Plugue do cabo de energia
23 Plugue Mini USB
24 Entrada ótica
25 Saída ótica
* Encontre acessórios e peças de reposição em
steelseries.com
LIGANDO
Para desligar o headset, aperte e segure o botão de
ligar 08 por 2 segundos.
Pareando
Opções > Sistema > Parear
O headset já vem pareado ao transmissor. Caso
precise parear novamente, entre no menu de
pareamento e siga as instruções na tela.”
BLUETOOTH
Ligando
Com o headset ligado, aperte e solte o botão do
Bluetooth. Para desligar o Bluetooth, aperte e segure
o botão do Bluetooth.
Pareando
Com o Bluetooth desligado, aperte e segure o botão
do Bluetooth por 6 segundos.”
CONTROLE
ATENDER/ENCERRAR CHAMADA DE VOZ
aperte uma vez
REPRODUZIR/PAUSAR MÚSICA
aperte uma vez
PULAR FAIXA
aperte duas vezes
CONFIGURAÇÃO PS4 PRO E ORIGINAL
Instalação de Hardware
01 Conecte o cabo de áudio USB do transmissor sem
o na frente do PS4
02 Conecte o cabo de áudio ótico do transmissor
sem frio na traseira do PS4
CONFIGURAÇÕES DO TRANSMISSOR
SEM FIO
Menu principal > Origem > PS4
CONFIGURAÇÕES DE ÁUDIO DO PS4
Configurações Do Ps4 > Som E Tela
> Configurações De Saída De Som
· o botão do Bluetooth
· o botão do Bluetooth
· · o botão do Bluetooth”

Porta de saída Principal > Saída Digital (Ótica)
Formato de Áudio (Prioridade) > Bitstream (Dolby)
Dispositivos > Dispositivos de Áudio
Saída de Fones > Áudio de Chat
CONFIGURAÇÃO DO PS4 SLIM
com áudio ótico
Aviso: O PS4 Slim não possui saída ótica. Para total
funcionalidade, você deverá conectar o GameDAC à
saída ótica de uma TV ou a um adaptador HDMI. Se
nenhuma saída ótica estiver disponível, prossiga para
a próxima página.
01. Conecte o cabo ótico do transmissor sem o à
saída ótica da sua TV ou a um adaptador HDMI
02. Conecte o cabo de áudio USB do transmissor
sem o à entrada USB na frente do PS4
CONFIGURAÇÃO DO PS4 SLIM
sem áudio ótico
Aviso: Sem áudio ótico, o som surround e o ChatMix
cam indisponíveis.
65 66
01. Conecte o cabo de áudio USB do transmissor
sem o à entrada USB na frente do PS4
CONFIGURAÇÕES DO TRANSMISSOR
SEM FIO
Menu principal > Origem > PS4
CONFIGURAÇÕES DE ÁUDIO DO PS4
Configurações Do Ps4 > Som E Tela
> Configurações De Saída De Som
Porta de saída Principal > Saída Digital (Ótica)
Formato de Áudio (Prioridade) > Bitstream (Dolby)
Dispositivos > Dispositivos de Áudio
Saída de Fones > Áudio de Chat
Configurações de áudio do PS4
Dispositivos > Dispositivos de áudio > Saída para
fones > Todos os áudios”
CONFIGURANDO NO PC
Conecte o cabo de áudio USB do transmissor sem
o ao PC
(opcional) Conecte um cabo de 3,5 mm do plugue
de saída do transmissor sem o a um par de altofalantes para troca automática quando o headset
for desligado
Configurações do transmissor sem fio
Menu principal > Entrada > PC
CONFIGURAÇÕES DE SOM DO WINDOWS
01 Em “”Reprodução””, selecione Áudio do jogo
Arctis Pro e selecione “”Denir padrão””
02 Selecione Áudio do chat Arctis Pro e selecione
“”Denir dispositivo de comunicação padrão””
03 Sob “”Gravação””, selecione Áudio do chat Arctis
Pro e selecione “”Denir padrão””
CONFIGURAÇÕES DE SOM NO MAC
01 Vá em Preferências do sistema > Som
02 Em “”Saída””, selecione Áudio do jogo Arctis Pro
03 Em “”Entrada””, selecione Microfone Arctis Pro
04 Em seu aplicativo de VoIP (chat), selecione
Áudio do chat Arctis Pro como dispositivo
de áudio padrão”
FAIXA DE ÓCULOS DE ESQUI
Velcro
Aperte ou solte as faixas de velcro nos lados da faixa
para chegar no ponto desejado
Faixas disponíveis em
BATERIA
TROCA DE BATERIA
Para carregar uma bateria adicional, coloque a bateria
dentro do espaço de carga no transmissor
CARREGAMENTO MÓVEL
Para carregar o headset enquanto usa ou onde
estiver, conecte o cabo de recarga móvel da entrada
micro USB do headset a qualquer fonte de energia
USB
Placas de alto-falante disponíveis em steelseries.com
TRANSMISSOR SEM FIO
Tela inicial
Gire o controle para ajustar o volume
Aperte e solte o controle para entrar no menu
(para ajustar EQ, denir ChatMix e personalizar
steelseries.com

congurações)
Aperte e segure o botão secundário para ligar o
surround
Menu
Gire o controle para navegar pelo menu
Aperte e solte o controle para selecionar
itens do menu
Aperte e solte o botão secundário para
voltar um passo
67
REGULATORY
Federal Communication Commission Interference Statement
This device complies with Part 15 of the FCC Rules. Operation is subject to the following two conditions: (1)
This device may not cause harmful interference, and (2) this device must accept any interference received,
including interference that may cause undesired operation.
This equipment has been tested and found to comply with the limits for a Class B digital device, pursuant to
Part 15 of the FCC Rules. These limits are designed to provide reasonable protection against harmful interference in a residential installation. This equipment generates, uses and can radiate radio frequency energy
and, if not installed and used in accordance with the instructions, may cause harmful interference to radio
communications. However, there is no guarantee that interference will not occur in a particular installation.
If this equipment does cause harmful interference to radio or television reception, which can be determined
by turning the equipment off and on, the user is encouraged to try to correct the interference by one of the
following measures:
- Reorient or relocate the receiving antenna.
- Increase the separation between the equipment and receiver.
- Connect the equipment into an outlet on a circuit different from that to which the receiver is connected.
- Consult the dealer or an experienced radio/TV technician for help.
FCC Caution: Any changes or modifications not expressly approved by the party responsible for compliance
could void the user’s authority to operate this equipment.
This transmitter must not be co-located or operating in conjunction with any other antenna or transmitter.
Operations in the 5GHz products are restricted to indoor usage only.
Radiation Exposure Statement:
This equipment complies with FCC radiation exposure limits set forth for an uncontrolled environment. This
equipment should be installed and operated with minimum distance 20cm between the radiator & your body.
Note: The country code selection is for non-US model only and is not available to all US model. Per FCC
regulation, all WiFi product marketed in US must fixed to US operation channels only.
Industry Canada Statement:
This device complies with RSS-210 of the Industry Canada Rules. Operation is subject to the following two
conditions: (1) This device may not cause harmful interference, and (2) this device must accept any interference received, including interference that may cause undesired operation.

Ce dispositif est conforme à la norme CNR-210 d’Industrie Canada applicable aux appareils radio exempts
de licence. Son fonctionnement est sujet aux deux conditions suivantes: (1) le dispositif ne doit pas produire
de brouillage préjudiciable, et (2) ce dispositif doit accepter tout brouillage reçu, y compris un brouillage
susceptible de provoquer un fonctionnement indésirable.
Radiation Exposure Statement:
This equipment complies with IC radiation exposure limits set forth for an uncontrolled environment. This
equipment should be installed and operated with minimum distance 20cm between the radiator & your body.
Déclaration d’exposition aux radiations:
Cet équipement est conforme aux limites d’exposition aux rayonnements IC établies pour un environnement
non contrôlé. Cet équipement doit être installé et utilisé avec un minimum de 20 cm de distance entre la
source de rayonnement et votre corps.
This Class B digital apparatus complies with Canadian ICES-003.
Cet appareil numérique de la classe B est conforme à la norme NMB-003 du Canada.
Europe – EU Declaration of Conformity
Hereby, SteelSeries ApS. declares that the equipment which is compliance with directive RoHS 2.0
(2015/863/EU), R.E.D (2014/53/EU), EMC Directive (2014/30/EU), and LVD (2014/35/EU) which are issued by
the Commission of the European Community.
The full text of the EU declaration of conformity is available at the following internet address: https://
steelseries.com/
SteelSeries ApS. hereby confirms, to date, based on the feedback from our suppliers indicates that our products shipping to the EU territory comply with REACH (Registration, Evaluation, Authorization, and Restriction
of Chemicals - (EC) 1907/2006) compliance program. We are fully committed to offering REACH compliance
on the products and posting accurate REACH compliance status for the all of products.
WEEE
This product must not be disposed of with your other household waste or treat them in compliance with the
local regulations or contact your local city office, your household waste disposal service or the shop where
you purchased the product.
Safety Guideline for Lithium Battery
Please keep follow all listed important warnings and cautions below while using this battery pack to avoid any
damage or hazard.
This product must not be disposed of with your other household waste or treat them in compliance with the
local regulations or contact your local city office, your household waste disposal service or the shop where
you purchased the product.
“CAUTION!” Risk of explosion if battery pack is not replace by same type as specified by the
manufacturer.
1. The battery polarity (+) and (-) shall not be connected and charged reversely. Risk of explosion if the
battery polarity (+) and (-) is reversed.
2. Please keep this battery pack away from fire and high heat sources due to explosion might happen. Do not
place your battery pack close to any heater or hot location.
3. This battery pack shall not be hit or impacted. This battery pack shall not be dealt with any sharp or keen
objects either.
4. This battery pack shall not be exposed to moisture, dripping or splashing.
5. If any electrolyte flow out of this battery pack when touch the user’s eyes and skin, please seek medical
advice immediately.
この装置は、情報処理装置等電波障害自主規制協議会(VCCI)の基準に基づくクラス B 情報技術装置です。
この装置、家庭環境で使用することを目的としていますが、この装置がラジオやテレビジョン受信機に近
接して使用されると、受信障害を引き起こすことがあります。取扱説明書に従って正しい取り扱いをして
ください。
この機器の使用周波数帯では、電子レンジ等の産業‧科学‧医療用機器のほか工場の製造ライン等で使用さ
れている移動体識別用の構内無線局(免許を要する無線局)及び特定小電力無線局(免許を要しない無線
局)並びにアマチュア無線局(免許を要する無線局)が運用されています。
1 この機器を使用する前に、近くで移動体識別用の構内無線局及び特定小電力無線局並びにアマチュア無線
局が運用されていないことを確認して下さい。
2 万一、この機器から移動体識別用の構内無線局に対して有害な電波干渉の事例が発生した場合には、速や
かに使用周波数を変更するか又は電波の発射を停止した上、下記連絡先にご連絡頂き、混信回避のための処
置等(例えば、パーティションの設置など)についてご相談して下さい。
3 その他、この機器から移動体識別用の特定小電力無線局あるいはアマチュア無線局に対して有害な電波干
渉の事例が発生した場合など何かお困りのことが起きたときは、次の連絡先へお問い合わせ下さい。
低功率電波輻射性電機管理辦法
第十二條 經型式認證合格之低功率射頻電機,非經許可,公司、商號或使用者均不得擅自變更頻率、加大功率
或變更原設計之特性及功能。
第十四條 低功率射頻電機之使用不得影響飛航安全及干擾合法通信;經發現有干擾現象時,應立即停用,並改
善至無干擾時方得繼續使用。
前項合法通信,指依電信法規定作業之無線電通信。

低功率射頻電機須忍受合法通信或工業、科學及醫療用電波輻射性電機設備之干擾。低功率射頻電機須忍受合
法通信或工業、科學及醫療用電波輻射性電機設備之干擾。
*報廢電池請按照廢棄物管理辦法回收處理
鋰電池安全使用指南
注意: 電池若未正確更換,可能會爆炸,請用原廠建議之同款的電池來更換。
電池不可當作一般的家庭廢棄物棄置,請依據當地法規使用公共回收系統退回、回收或處理電池。
1. 電池極性(+)和( - )不得相反連接,充電電池極性如果電池極性反轉,則有爆炸危險。
2. 請勿將此電池放在靠近火源或任何高溫的地方,否則可能會因高熱源而發生爆炸。
3. 電池組不得受撞擊,也不能用任何尖銳的物體去穿刺。
4. 該電池組無防水功能,不得暴露於潮濕場所避免受潮導致兩電池極性短路導致爆炸危險。
Custom Union Compliance.
(Russia / Belarus / Kazakhstan)
Direct Current
ACMA Compliance (Australia/ New-Zealand)
该电子电气产品含有某些有害物质,在环保使用期限内可以放心使用,超过环保使用期限之后则应该进入回收
循环系统。
《废弃电器电子产品回收处理管理条例》提示性说明
为了更好地关爱及保护地球,当用户不再需要此产品或产品寿命终止时,请遵守国家废弃电器电子产品回收处
理相关法律法规,将其交给当地具有国家认可的回收处理资质的厂商进行回收处理。
锂电池安全使用指南
注意: 电池若未正确更换,可能会爆炸,请用原厂建议之同款的电池来更换。
电池不可当作一般的家庭废弃物弃置,请依据当地法规使用公共回收系统退回、回收或处理电池。
1. 电池极性(+)和( - )不得相反连接,充电电池极性如果电池极性反转,则有爆炸危险。
2. 请勿将此电池放在靠近火源或任何高温的地方,否则可能会因高热源而发生爆炸。
3. 电池组不得受撞击,也不能用任何尖锐的物体去穿刺。
4. 该电池组无防水功能,不得暴露于潮湿场所避免受潮导致两电池极性短路导致爆炸危险。
根据中国大陆《电子电气产品有害物质限制使用标识要求》,以下部分列出了产品中可能包含的有害物质的名称
零部件名称
电路板组件
其他线材
(Pb)
铅
(Hg)
汞
和含量:
镉
(Cd)
有害物质
六价铬
(Cr(VI))
多溴联苯
(PBB)
多溴二苯醚
(PBDE)
*:电路板组件包括印刷电路板及其构成的零部件,如电阻、电容、集成电路、连接器等。
本表格依据SJ/T 11364的规定编制。
O:表示该有害物质在该部件所有均质材料中的含量均在 GB/T 26572规定的限量要求以下。
X:表示该有害物质至少在该部件的某一均质材料中的含量超出GB/T 26572规定的限量要求;
上表中打“X”的部件,应功能需要,部分有害物质含量超出GB/T 26572规定的限量要求,但是符合欧盟RoHS法规
要求(属于豁免部分)。

Regions Contact Information
亞洲
Asia
USA
Europe
More information and support from https://steelseries.com/
Product Name (產品名稱/产品名称):Headset (耳機/耳机)
Model No. (型號/型号): HS-00014
Rated (規格/规格): 5V , 500mA
Product Name (產品名稱/产品名称): Transceiver (收發器/收发器)
Model No. (型號/型号): HS-00014TX
Rated (規格/规格): 5V ,1000mA
Made in China 中國製造/中国制造
Accessories information (配件資訊/配件信息)
Product (產品/产品): Rechargeable Lithium-Ion Battery (二次式鋰電池组/可充式锂电池组)
Model No. (型號/型号): 160240
Rated (規格/规格): 3.7V
Capacity (電容量/电容量): 1000mAh
丹麥商賽睿有限公司台灣分公司
23511 新北市中和區建一路150
號16樓
SteelSeries ApS. Taiwan Branch
16F, No.150, Jian-Yi Rd., Chung Ho
Dist., New Taipei City Taiwan
656 W Randolph St, Suite 3E
Chicago, IL 60661, USA
Dirch Passers Allé 27, 5.Sal 2000
Frederiksberg, Denmark
+886 2 8226 3858
+886 2 8226 3858
+1 312 258 9467
+45 702 500 75

learn more at steelseries.com
 Loading...