

Stealth Cam FX SERIES Instruction Manual

INSTRUCTION MANUAL
FX SERIES
V
2

-'.&!!
2!
--"*.)&%+#%!#)%/--!
!"#$%&'($# )*$#+(",'-)#.&#/$.%0#').1.2$,#)"#.)'11#+")$%).415#6$#($-"77$%,#-*$-8.%0#"'(#
6$/&.)$# 3"(# %$6# +(",'-)# '+,4)$&9# :3# ;"'(# '%.)# .&# *4<.%0# )("'/1$5# +1$4&$# -*$-8# )*$#
6$/&.)$#)"#,$)$(7.%$#;"'#4($#'&.%0#)*$#14)$&)#3.(764($#"(#&"3)64($#<$(&."%9#
CUSTOMER-SERVICE-
CONTACT'&'HOURS!
%400!A:11B!7CCDEFGD76GH!
CALL'CENTER'HOURS!
*4?!N!A:=!O!7!+*!N!K!.*!P($%Q!
TECHNICAL-SUPPORT-
EMAIL:!=)$41)*-47>0&7"(09-"7!
.01231!20045!67!849:3!;4:!1<2=0!:13>4?31@!
STEALTH CAM
.@)@!I4J!KLKM7G!
R:2?S!.:2=:=1T!%U!CKHKLDGKH6!
"""#$%&'(%)*'+#*,+!
/0012341/546!
QS5

"""#$%&'(%)*'+#*,+! -'.&!!
/0012341/546!
7!
TABLE-OF-CONTENTS
6DK!
F!
C!
7!
7!
GDME!
ML!
M6!
MK!
MFDMC
!
M7!
(2<1:2!)V1:V=15!
W9=XY!$Z2:Z!R9=S1!
R1?1:20!"?;4:<2Z=4?!
(2<1:2!.:4[:2<<=?[!
W9=XY!$1Zs
(93Z4<!$1ZZ=?[3!
*1<4:\!(2:S!"?3Z2002Z=4?!
I2ZZ1:\!&1<4V20!]!"?3Z2002Z=4?!
^=15!2?S!_101Z=?[!F=013!
A:1`91?Z0\!+3Y1S!W913Z=4?3!
,=<=Z1S!a2::2?Z\!"?;4:<2Z=4?!

www.stealthcam.com! Page!!
877126918490!
4!
CAMERA'OVERVIEW'
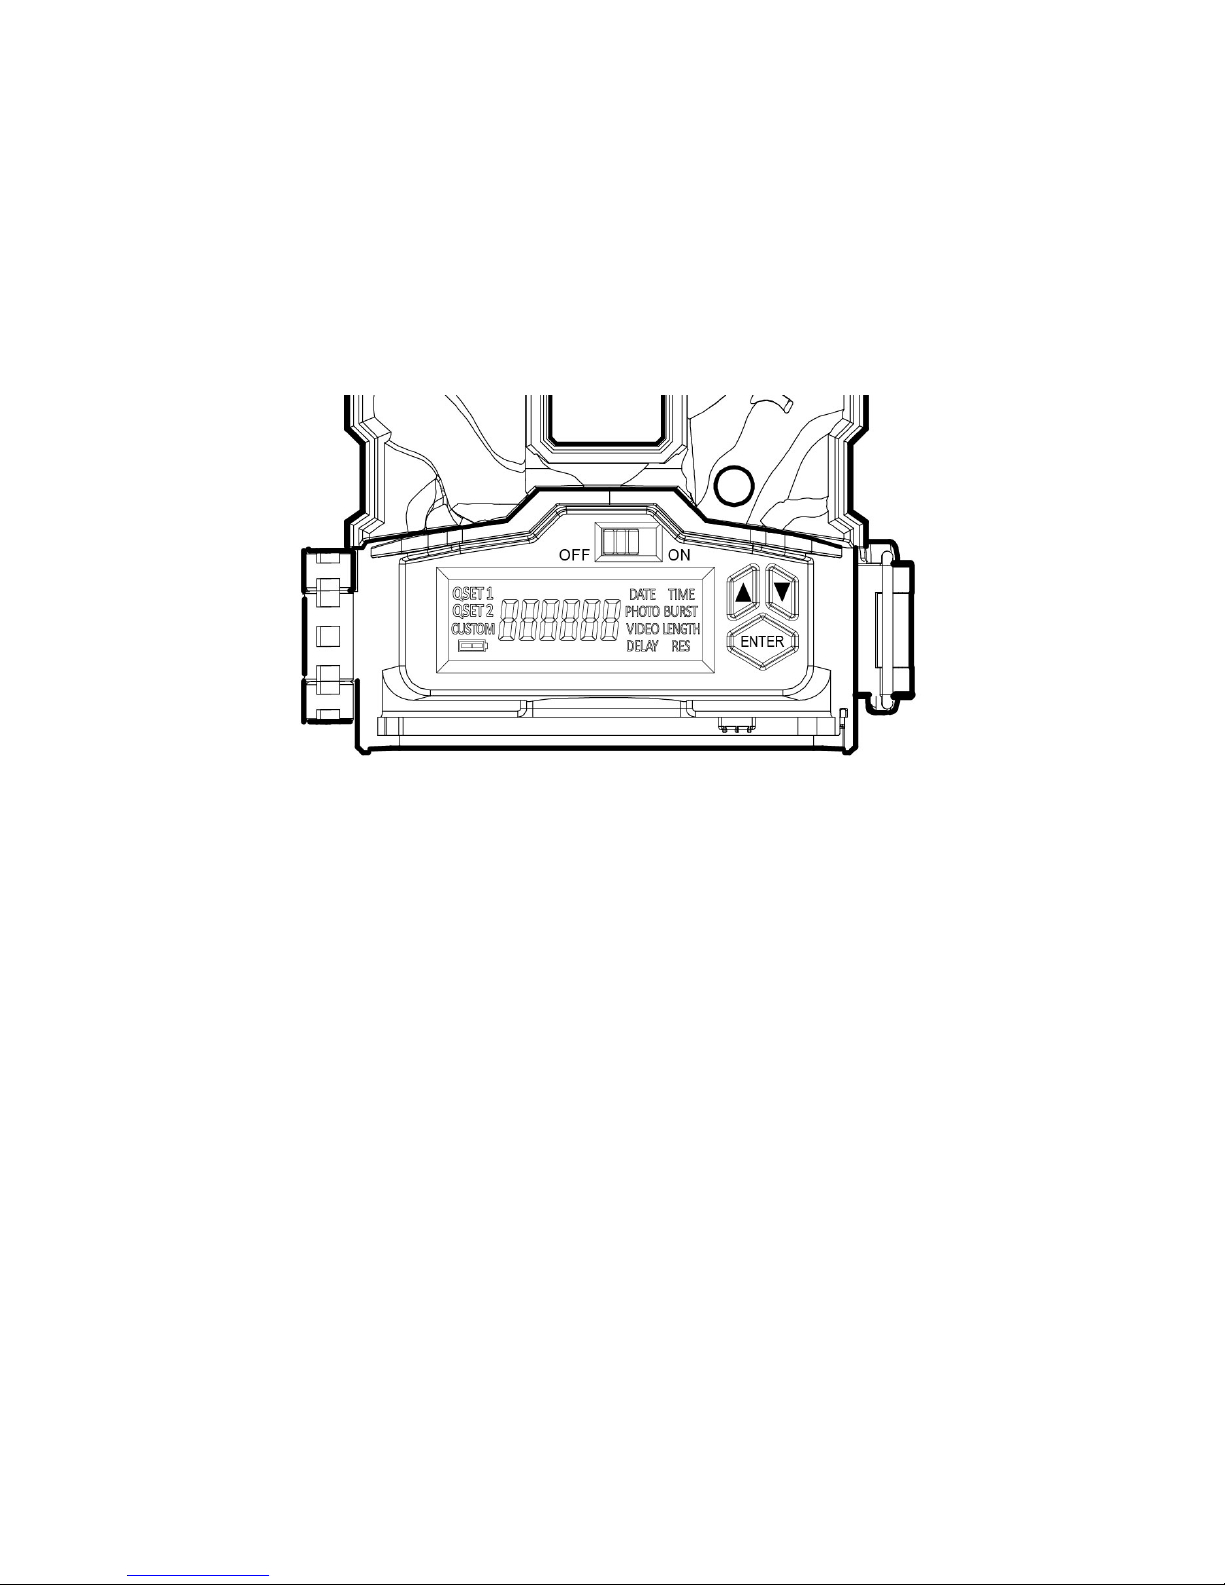
Controls
"""#$%&'(%)*'+#*,+! -'.&!!
/0012341/546!
8!
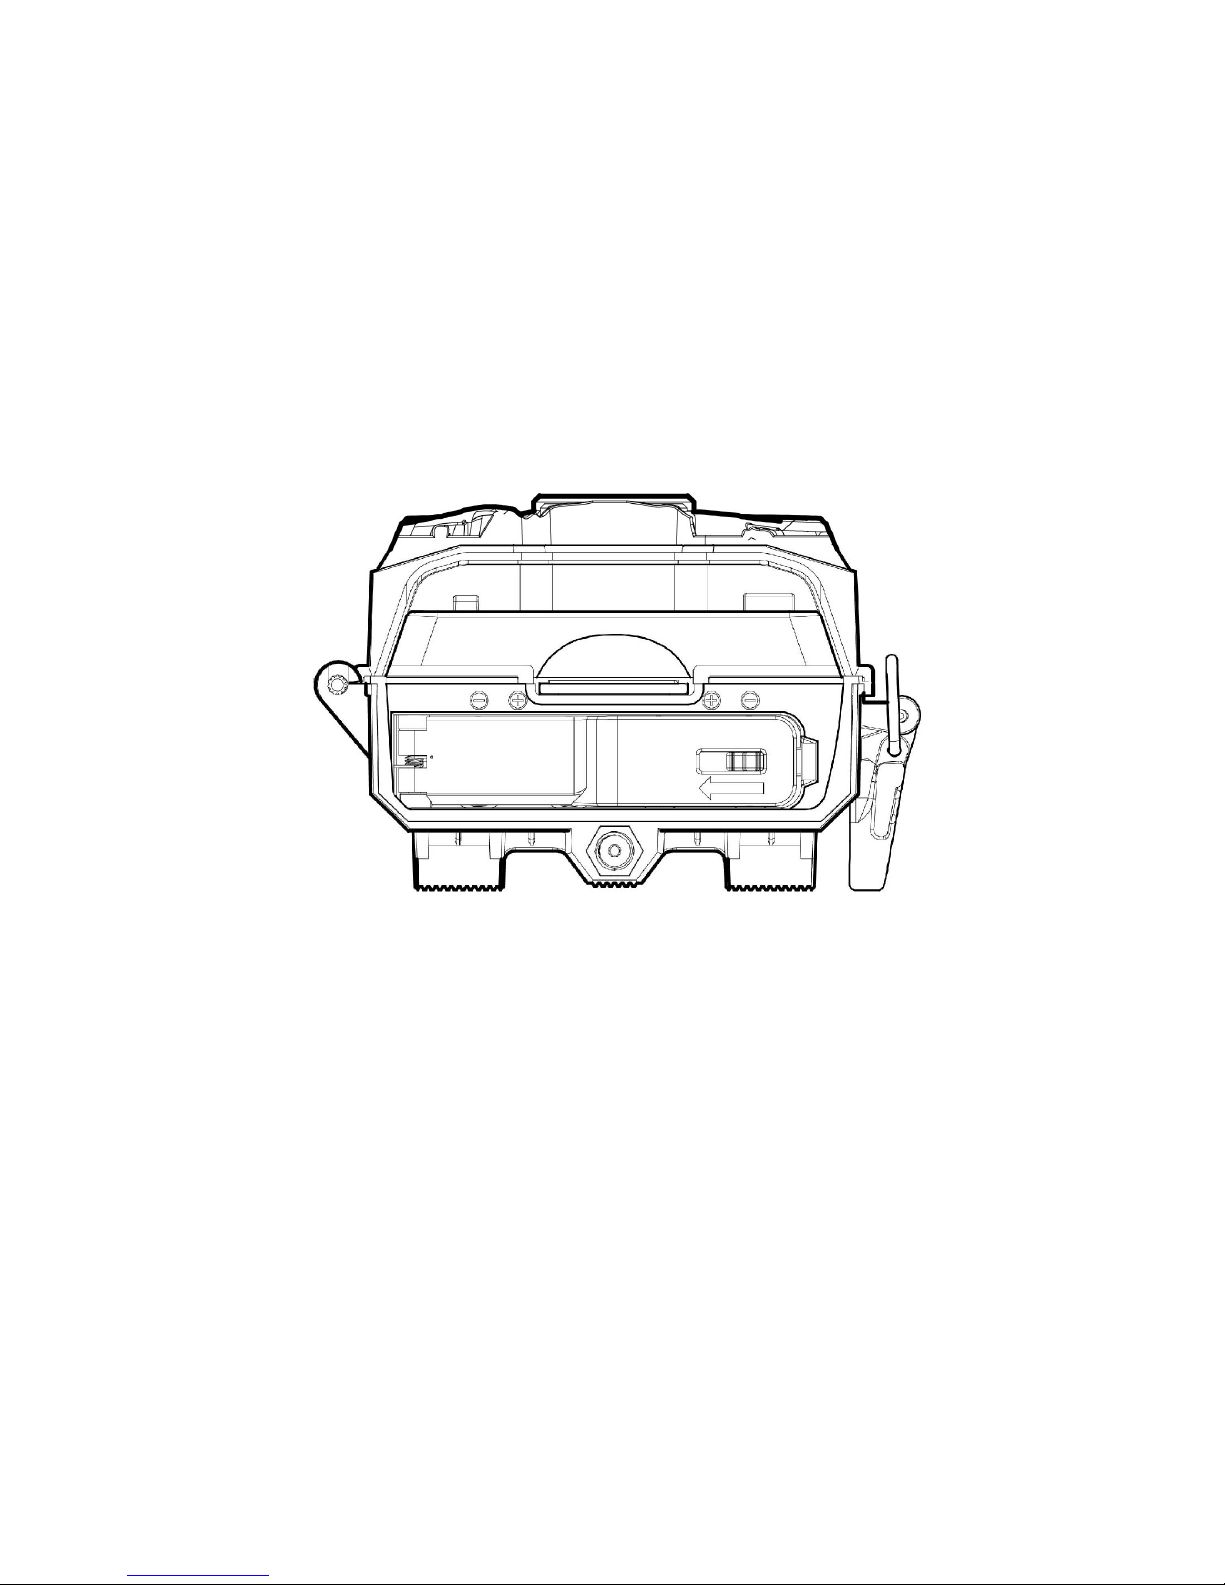
CAMERA'OVERVIEW'(CONT)'
SD and Battery Compartment'

"""#$%&'(%)*'+#*,+! -'.&!!
/0012341/546!
3!
QUICK'START'GUIDE'
Power'Options'
1. Insert!8!‘AA’!batteries!into!the!inside!battery!compartments.!
Memory'
Insert!a!clean!Class!10!SD!memory!card,!between!2GB!and!32GB!into!memory!card!slot.!!Memory!
card!must!be!inserted!in!the!correct!orientation!until!spring!lock!mechanism!engages.!
Mount'Camera'
Mount!the!camera!at!the!desired!location!using!the!strap!mount,!Python!Lock!cable,!Articulating!
Ball!Joint!Mount,!or!other!desired!mounting!mechanism.!!Position!the!camera!so!that!it!does!not!
face!East!or!West!directly!as!the!rising!and!setting!of!the!sun!can!cause!false!positive!triggers.!
Activation
ON – Slide the ON/OFF Switch to the ON Position (Right Position)
OFF – Slide the ON/OFF Switch to the OFF Position (Left Position)
Modes
Cycle between camera modes by pressing the UP/DOWN arrows. The current camera mode is
displayed on the left side of the LCD screen:!
_1;290Z!$1ZZ=?[3! _1Z2=03!4?!.2[1!
W$/%1!
MED!N!LH!$1X!%=<1!)9Z!N!1!"<2[1
7!
8!
VGA Video!N!30!$1X!%=<1!)9Z!N!10 Se
c Length!
9!
('$%)*!
User Defined!N MED –!K!$1X!%=<1!)9Z!N!M!"<2[1
!P_1;290ZQ!
W$/%2!

"""#$%&'(%)*'+#*,+! -'.&!!
/0012341/546!
0!
GENERAL'INFORMATION'
Storing(conditions'
Operating Environment: 14 to 104 deg F (-10 to 40 deg C). 20-85% relative
humidity,)non-condensing.
Special(care(instructions!!'
NOTE:&This&camera&is&a&precision&electronic&device.&Do¬&attempt&to&service&this%
camera%yourself,&as&opening&or&removing&covers&may&expose&you&to&dangerous*
voltage*points*or*other*risks.-
The$ camera$ is$ designed$ to$ be$ weather$ resistant.$ Never$ attempt$ to$ immerse$ the
unit%in%water%or%any%other%liquid.%This%will%damage%the%unit%and%void%the%warranty.
Do not mix old and new batteries.
Do not mix alkaline, standard, or rechargeable batteries.
Use a soft lens cloth for cleaning lens. Avoid touching lens with fingers.
Remove dirt or stains with a soft cloth dampened with water or neutral detergent.
Keep your camera in a dry and cool dust---free environment or container when it is
NOT used.
Remove batteries when camera is NOT in use for an extended period of time.
Avoid dropping your camera on to a hard surface.
Do not disassemble your camera.
Do not mix new and old batteries.
Do not access the camera’s internal components compartment for
unauthorized service, as this could cause serious damage to the unit and WILL
void the warranty.
"""#$%&'(%)*'+#*,+! -'.&!!
/0012341/546!
/!
CAMERA'PROGRAMMING'
%8=3! QS Series ;12Z9:13! 3! S=3Z=?XZ! <4S13! 4;! 4>1:2Z=4?B! QSET1 / QSET2' /'CUSTOM@! ! /2X8!
31ZZ=?[! =3! 2XZ=V2Z1S! by cycling the UP or DOWN buttons.
QSET1!–!This!is!the!1st Quick!Set!programming!mode.!!When!the!camera!is!changed!to!the!this!
mode,!the!display!screen!will!give!a!digital!read!out!of!the!following:!
1
st!
!!-''9'Photo Delay –'(Del
ay)!Counts!down!from!9sec!to!0sec'
2nd! - rdY'–'(Ready)!Camera!is!in!a!ready!and!active!state!
With!this!setting!the!camera!is!preprogrammed!to!take!photos!at!MED!resolution,!a!30!second!
timeout!delay!betwe
en!activations!and!takes!1!photo!every!trigger!activation.!
QSET2!–!This!is!the!2nd Quick!Set!programming!mode.!!When!the!camera!is!changed!to!the!
this!mode,!the!display!screen!will!give!a!digital!read!out!of!the!following:!
1
st!
!!-''9'Video Delay –'(Delay
)!Counts!down!from!9sec!to!0sec
2nd! - rdY'–'(Ready)!Camera!is!in!a!ready!and!active!state!
With!this!setting!the!camera!is!preprogrammed!to!take!a 10 second video,!a!30!second!
timeout!delay!between!activations.!

"""#$%&'(%)*'+#*,+! -'.&!!
/0012341/546!
4!
CAMERA'PROGRAMMING'–'CUSTOM'(CONT)'
CUSTOM!N!%8=3!=3!Z81!other!31ZZ=?[!2?S!=3!S1;=?1S!d\!Z81!f931:g@!!a81?!Z81!X2<1:2!=3!X82?[1S!Z4!
Z81!Z8=3!<4S1T!Z81!S=3>02\!3X:11?!5=00
"""#$%&'(%)*'+#*,+! -'.&!!!
/0012341/546!
96!
CAMERA'PROGRAMMING'–'CUSTOM'(CONT)'
DATE' –' (010118!default):! ! %8=3!31ZZ=?[!=3!931S!Z4
"""#$%&'(%)*'+#*,+! -'.&!!!
/0012341/546!
99!
CAMERA'PROGRAMMING'+'CUSTOM'(CONT)'
PHOTO BURST – (1 Photo default): This setting is used to determine the number of photos the
camera will take during its activation. This setting can be changed between 1 PHOTO up to 3
PHOTOS. With this option blinking, use the UP or DOWN arrow key to move between the value
range in increments of 1. Press the ENTER button to accept all your changes and to go back to main
options menu. This setting is only visible in PHOTO MODE.
VIDEO LENGTH – (15 S default): This setting is used to determine the length of time, in seconds, of
the video recording. This setting can be set to either 30 S / 15 S / 10 S / 5 S. With this option
blinking, use the UP or DOWN arrow key to make your selection. Press the ENTER button to accept
all your changes and to go back to main options menu. This setting is only visible in VIDEO MODE.
DELAY – (5 S default): This setting is used to determine the length of time that the camera will
wait before it reinitializes its PIR sensor for the next activation. With this option blinking, use of the
UP and DOWN arrows to choice how many seconds you want the delay to be set for – 120 S / 60 S /
30 S / 15 S / 10 S / 5 S. Once this setting is on the appropriate time, press the ENTER button to
accept all your changes and to go back to main options menu.
RESOLUTION'–'(MED'default):!%8=3!31ZZ=?[!=3!931S!Z4!S1Z1:<=?1!Z81!M1[2>=J10!:13409Z=4?!4;!12X8!
=<2[1!Z2Y1?!d\!Z81!X2<1:2@!!%8=3!=3!4?0\!;4:!.j)%)!<4S1@!a=Z8!Z8=3!4>Z=4?!d0=?Y=?[T!931!Z81!UP!4:!
DOWN!2::45!Y1\!Z4!<4V1!d1Z511?!Z81!resolutions@!%81!8=[81:!Z81! :13409Z=4?! 4;! 2?! =<2[1! Z81!
<4:1! 3>2X1! Z81! ;=01! 5=00! Z2Y1! 4?! Z81! $_! <1<4:\! X2:S@! .:133! Z81! ENTER!d9ZZ4?!Z4! 2XX1>Z!200!
\49:!X82?[13!2?S!Z4 Loading...