

Page 1

The Windows™ Color Presentation Printer
WinType 800C
Users Manual
80825100
Page 2

Bescheinigung des Importeurs
Hiermit wird bescheinigt, daß der
COMPUTER DRUCKER TM300
in Übereinstimmung mit den Bestimmungen der
VDE 0878 3/22.89, EN 55022: 1987, BMPT Vfg. 243/1991 und 46/1992
funk-entstört ist.
Dem Bundesamt für Zulassungen in der Telekommunikation wurde das Inverkehrbringen dieses Gerätes
angezeigt und die Berechtigung zur Überprüfung der Serie auf die Einhaltung der Bestimmungen eingeräumt.
Star Micronics Deutschland, GmbH
Westerbachstraße 59, D-60489
Frankfurt, Germany
The above statements apply only to printers marketed in Germany.
T rademark Acknowledgments
TrueType: Apple Computer, Inc.
Windows 3.1, MS-DOS: Microsoft Corporation
Notice
• All rights reserved. Reproduction of any part of this manual in any form whatsoever without STAR's
express permission is forbidden.
• The contents of this manual are subject to change without notice.
All efforts have been made to ensure the accuracy of the contents of this manual at the time of press.
However, should any errors be detected, STAR would greatly appreciate being informed of them.
• The above notwithstanding, STAR can assume no responsibility for any errors in this manual.
©Copyright 1994 Star Micronics Co., Ltd.
Federal Communications Commission Radio Frequency Interference Statement
This equipment has been tested and found to comply with the limits for a Class B digital device, pursuant to
Part 15 of FCC rules. These limits are designed to provide reasonable protection against harmful interference
in a residential installation. This equipment generates, uses and can radiate radio frequency energy and, if not
installed and used in accordance with the instructions, may cause harmful interference to radio communications. However, there is no guarantee that interference will not occur in a particular installation. If this equipment does cause harmful interference to radio or television reception, which can be determined by turning the
equipment off and on, the user is encouraged to try to correct the interference by one or more of the following
measures.
• Reorient or relocate the receiving antenna.
• Increase the separation between the equipment and receiver.
• Connect the equipment into an outlet on a circuit different from that to which the receiver is connected.
• Consult the dealer or an experienced radio/TV technician for help.
Note: The following cable must be used to comply with FCC Regulations as well as to avoid interference
to home equipment.
Interface cable: Twisted-pair shielded cable
Non-shielded A.C. Power Cord
Do not attempt to modify this equipment. If modified, your authority to operate this equipment might be
voided by the FCC.
The above statement applies only to printers marketed in the U.S.A.
Statement of The Canadian Department of Communications Radio InterferenceRegulations
This digital device does not exceed the Class B limits for radio noise emissions from digital apparatus set out
in the Radio Interference Regulations of the Canadian Department of Communications.
Le présent appareil numérique n'emen pas de bruits radioélectriques dépassant les limits applicable aux appareils
numériques de la classe B prescrites dan le Règlement sur le brouillage radioélectrique édicté par le minisère
des Communications du Canada.
The above statement applies only to printers marketed in Canada.
Page 3

i
Contents
Introduction iii
A word about the printer iii
System requirements iii
This users manual iii
How to use this manual iv
Features of the printer iv
Printer components v
Chapter 1 Setting up your printer 1
Unpacking and checking the package contents 1
Package contents 1
Genuine Star supplies 2
Placing the printer 3
Preparing to print 3
Loading coated paper 4
Installing the film roll 5
Connecting the power cord 8
Performing a test print 8
Connecting the printer to your computer 9
Chapter 2 Installing the printer driver and TrueType fonts 11
System requirements 11
Installing the printer driver and TrueType fonts 11
TrueType font samples 14
Chapter 3 Printing with WinType 800C 15
The control panel 15
The Paper lamp 15
The Film Roll lamp 15
The Ready lamp 15
The Ready button 15
Features of the printer 16
Recommended print media 16
Operating the printer 17
Turning ON the power to the printer 17
Turning OFF the power to the printer 17
Loading print media 17
The paper tray 17
Manual loading 19
Printable area 19
Page 4

ii
Getting ready to print 21
Printing 23
DIP switch settings 23
Changing halftones and image quality 24
Changing halftones 24
Changing gamma correction 25
Changing color balance 26
High speed printing 26
Print speed 28
Other buttons in the Options dialog box 29
Black Representation 29
Intensity 30
Photo 30
Text 30
Printing on Special A4 and Legal size media 31
Replacing the film roll 33
Changing the film roll setting 35
Printing with iron-on transfer 37
Steps for printing on the transfer sheets 37
Steps for transferring the image on the cloth 38
Steps for the finishing process 39
Chapter 4 Maintenance & troubleshooting 41
Maintaining your printer 41
Cleaning the outside of the printer 41
Cleaning the inside of the printer 41
Clearing paper jams 46
Transporting your printer 48
Troubleshooting 51
Other DIP switch settings 55
Pinout of interface connector 56
Chapter 5 Reference information 57
Specifications 57
Glossary 60
Index 64
Page 5

iii
Introduction
Thank you for purchasing the Star W inT ype 800C color pr esentation laser quality printer.
This Users Manual has been organized into five chapters, a glossary and an index to
help you learn the proper operation and care of your printer. The first three chapters
explain the basic car e and handling of this printer and the operation of the printer driver
softwar e. The remaining chapters ar e intended as a reference guide for tr oubleshooting
any printing problems you may encounter.
A word about the printer
The Star W inType 800C is a new type of color presentation laser quality printer that has
been developed specifically for users of Windows™ version 3.1. This printer comes
with the WinType software and it does not require special add-in cards or cartridges.
This printer will only print from W indows applications. It will not function in any DOS
application.
System requirements
To operate this printer you need an IBM compatible PC with at least a 386SX 16-MHz
CPU and at least 8 megabytes (MB) of PC memory (RAM). The PC must be running
DOS 3.3 or later and Windows 3.1 in Enhanced Mode. A Microsoft-compatible mouse
is highly recommended. You must also have a 3.5" floppy disk drive. A standard PC
parallel printer port is required to connect the printer using a standard high quality shielded
Centronics parallel cable.
This users manual
Chapter 1 Setting up your printer
This chapter explains the basic procedures for unpacking, placing and connecting your
printer.
Chapter 2 Installing the printer driver software and
TrueType fonts
This chapter details the procedures used to install the Star WinType 800C printer driver
software and TrueType fonts. You must install the printer driver software to be able to
print.
Chapter 3 Printing
This chapter explains how to operate your printer and the printer driver software.
Chapter 4 Maintenance & troubleshooting
This chapter explains the proper procedures for routine maintenance and care of your
printer and a quick reference to help you solve any problems which you may occur.
Page 6

iv
Chapter 5 Reference information
This chapter lists the printer's specifications.
Glossary
This provides you with the definitions of commonly used printer and computer words.
Index
This lists, in alphabetical order, topics which appear in this manual.
How to use this manual
Each chapter provides you with simple explanations of the printer's operation. We have
included illustrations of the printer and W indows screens wherever necessary and wherever space allowed. You should be able to operate this printer by carefully following
each of the steps provided.
Features of the printer
This printer is capable of laser quality color page printing on Letter , A4, Legal and Special A4 size coated, presentation quality smooth paper, OHP (overhead projection) film
and iron-on transfer sheets.
The main features of the printer include:
• Full color and monochrome laser quality printing
• Up to 2 pages per minute using monochrome film rolls and 1 page per minute using
4 color film rolls.
• Laser quality 300 dots per inch resolution
• Prints documents made using virtually any Windows 3.1 application software
• 35 Scalable TrueType fonts for Windows 3.1 applications
• Meets or exceeds all requirements of the Environmental Protection Agency's Ener gy
Star program
• Printouts require no drying time
• Printouts do not bleed, smear nor wrinkle
• Compact and stylish design
Page 7
v
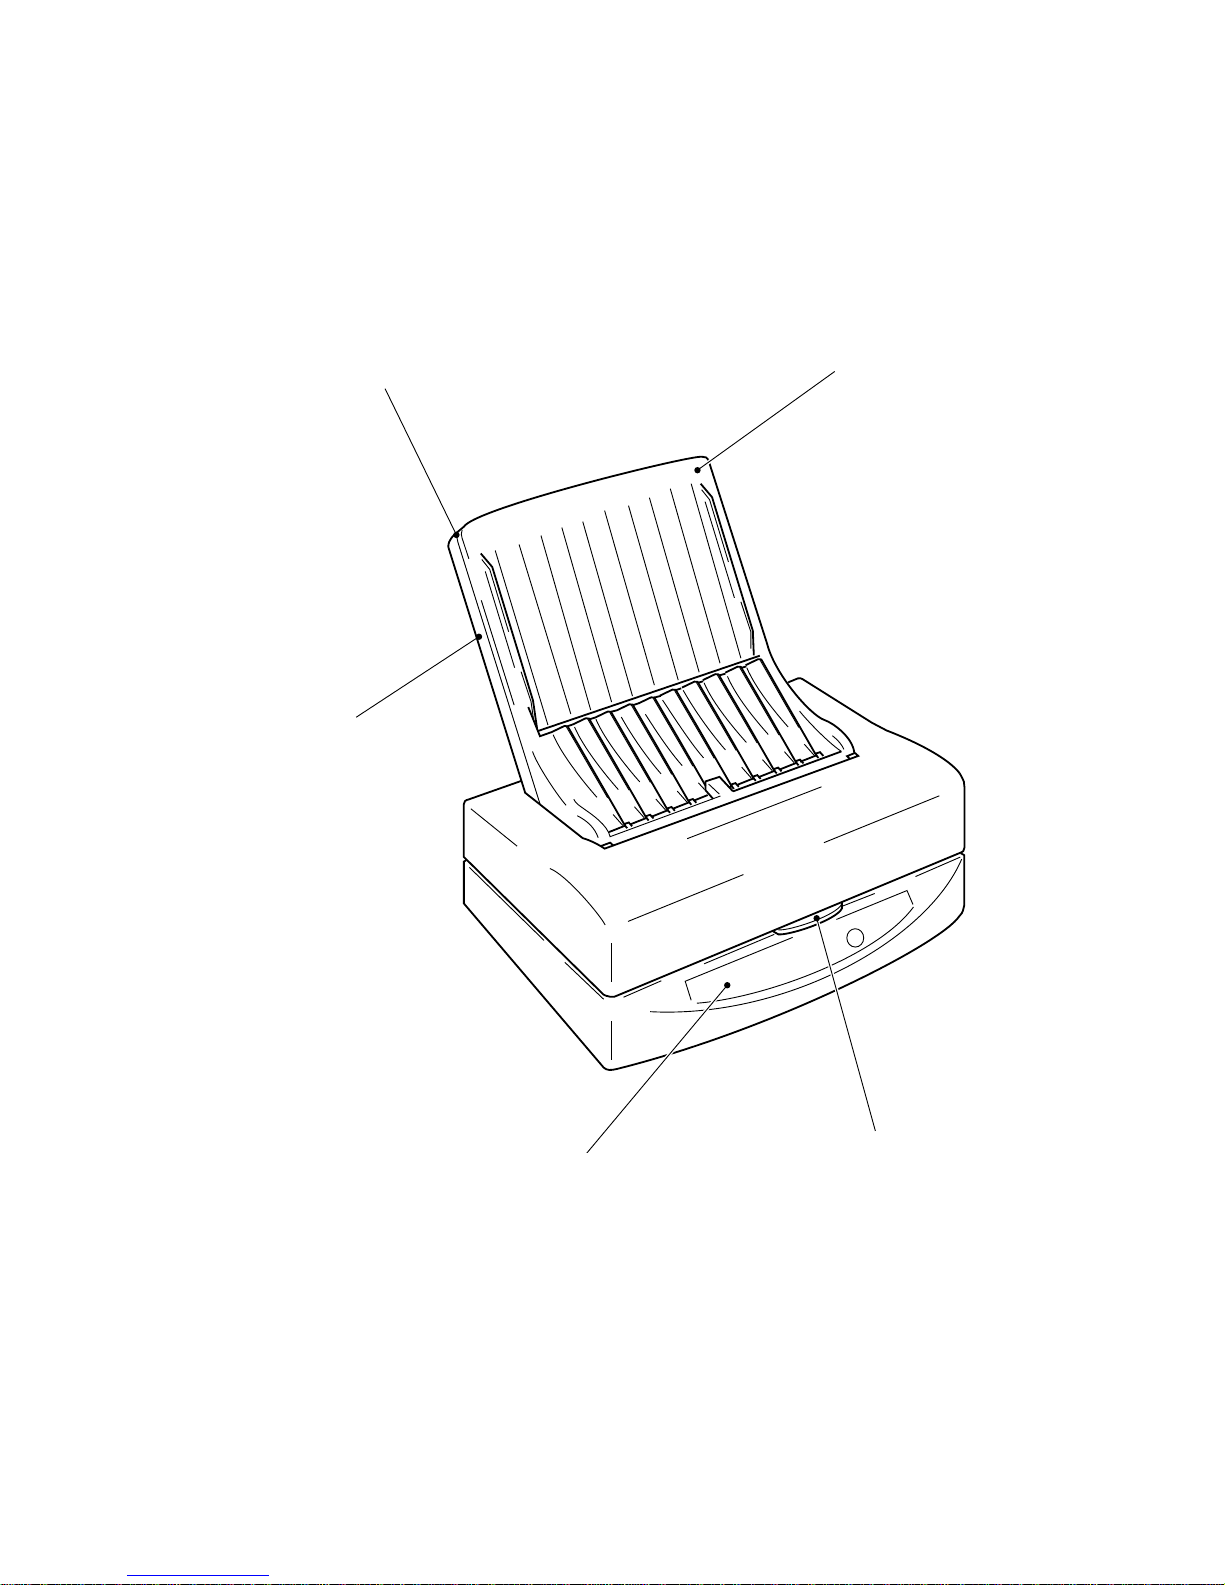
Printer components
Paper tray base
This holds your print media.
Top cover release
Press this to open the
printer's top cover.
Control panel
The control panel includes the Ready
button and the Ready, Paper and
Film Roll lamps.
Paper tray
The paper tray cover and the paper
tray base, when put together, are
called the paper tray.
Paper tray cover
This covers the paper tray.
Page 8

vi
Parallel interface connector
This connects the printer to the computer.
Power switch
AC cord socket
DIP switches
Top cover
Air vents
Top cover support
Thermal head
Bobbin sockets
These are used to mount the film
roll to the inside of the printer.
Platen roller
Page 9

vii
Federal Communications Commission Radio Frequency Interference Statement
This equipment has been tested and found to comply with the limits for a Class B digital device, pursuant to
Part 15 of FCC rules. These limits are designed to provide reasonable protection against harmful interference
in a residential installation. This equipment generates, uses and can radiate radio frequency energy and, if not
installed and used in accordance with the instructions, may cause harmful interference to radio communications. However, there is no guarantee that interference will not occur in a particular installation. If this equipment does cause harmful interference to radio or television reception, which can be determined by turning the
equipment off and on, the user is encouraged to try to correct the interference by one or more of the following
measures.
• Reorient or relocate the receiving antenna.
• Increase the separation between the equipment and receiver.
• Connect the equipment into an outlet on a circuit different from that to which the receiver is connected.
• Consult the dealer or an experienced radio/TV technician for help.
Note: The following cable must be used to comply with FCC Regulations as well as to avoid interference
to home equipment.
Interface cable: Twisted-pair shielded cable
Non-shielded A.C. Power Cord
Do not attempt to modify this equipment. If modified, your authority to operate this equipment might be
voided by the FCC.
The above statement applies only to printers marketed in the U.S.A.
Statement of The Canadian Department of Communications Radio Interference Regulations
This digital device does not exceed the Class B limits for radio noise emissions from digital apparatus set out
in the Radio Interference Regulations of the Canadian Department of Communications.
Le présent appareil numérique n'emen pas de bruits radioélectriques dépassant les limits applicable aux appareils numériques de la classe B prescrites dan le Règlement sur le brouillage radioélectrique édicté par le
minisère des Communications du Canada.
The above statement applies only to printers marketed in Canada.
Bescheinigung des Importeurs
Hiermit wird bescheinigt, daß der
COMPUTER DRUCKER TM300
in Übereinstimmung mit den Bestimmungen der
VDE0878 3/22. 89, EN 55022: 1987, BMPT Vfg. 243/1991 und 46/1992
funk-entstört ist.
Dem Bundesamt für Zulassungen in der Telekommunikation wurde das Inverkehrbringen dieses Gerätes
angezeigt und die Berechtigung zur Überprüfung der Serie auf die Einhaltung der Bestimmungen eingeräumt.
STAR MICRONICS DEUTSCHLAND GMBH
Westerbachstraße 59, W-6000
Frankfurt/Main 90, Germany
The above statement applies only to printers marketed in Germany.
T rademark Acknowledgments
TrueType: Apple Computer, Inc.
Windows 3.1, MS-DOS: Microsoft Corporation
Notice
• All rights reserved. Reproduction of any part of this manual in any form whatsoever without STAR's
express permission is forbidden.
• The contents of this manual are subject to change without notice.
All efforts have been made to ensure the accuracy of the contents of this manual at the time of press.
However, should any errors be detected, STAR would greatly appreciate being informed of them.
• The above notwithstanding, STAR can assume no responsibility for any errors in this manual.
©Copyright 1994 Star Micronics Co., Ltd.
Page 10
1
Chapter 1 Setting up your printer
Y our printer is a r eliable and quality precisioned instrument. However, it is every owner's
responsibility to make sur e that their equipment is pr operly placed and sensibly used. If
the following conditions are met, you can expect your printer to perform at its finest and
to last a long time.
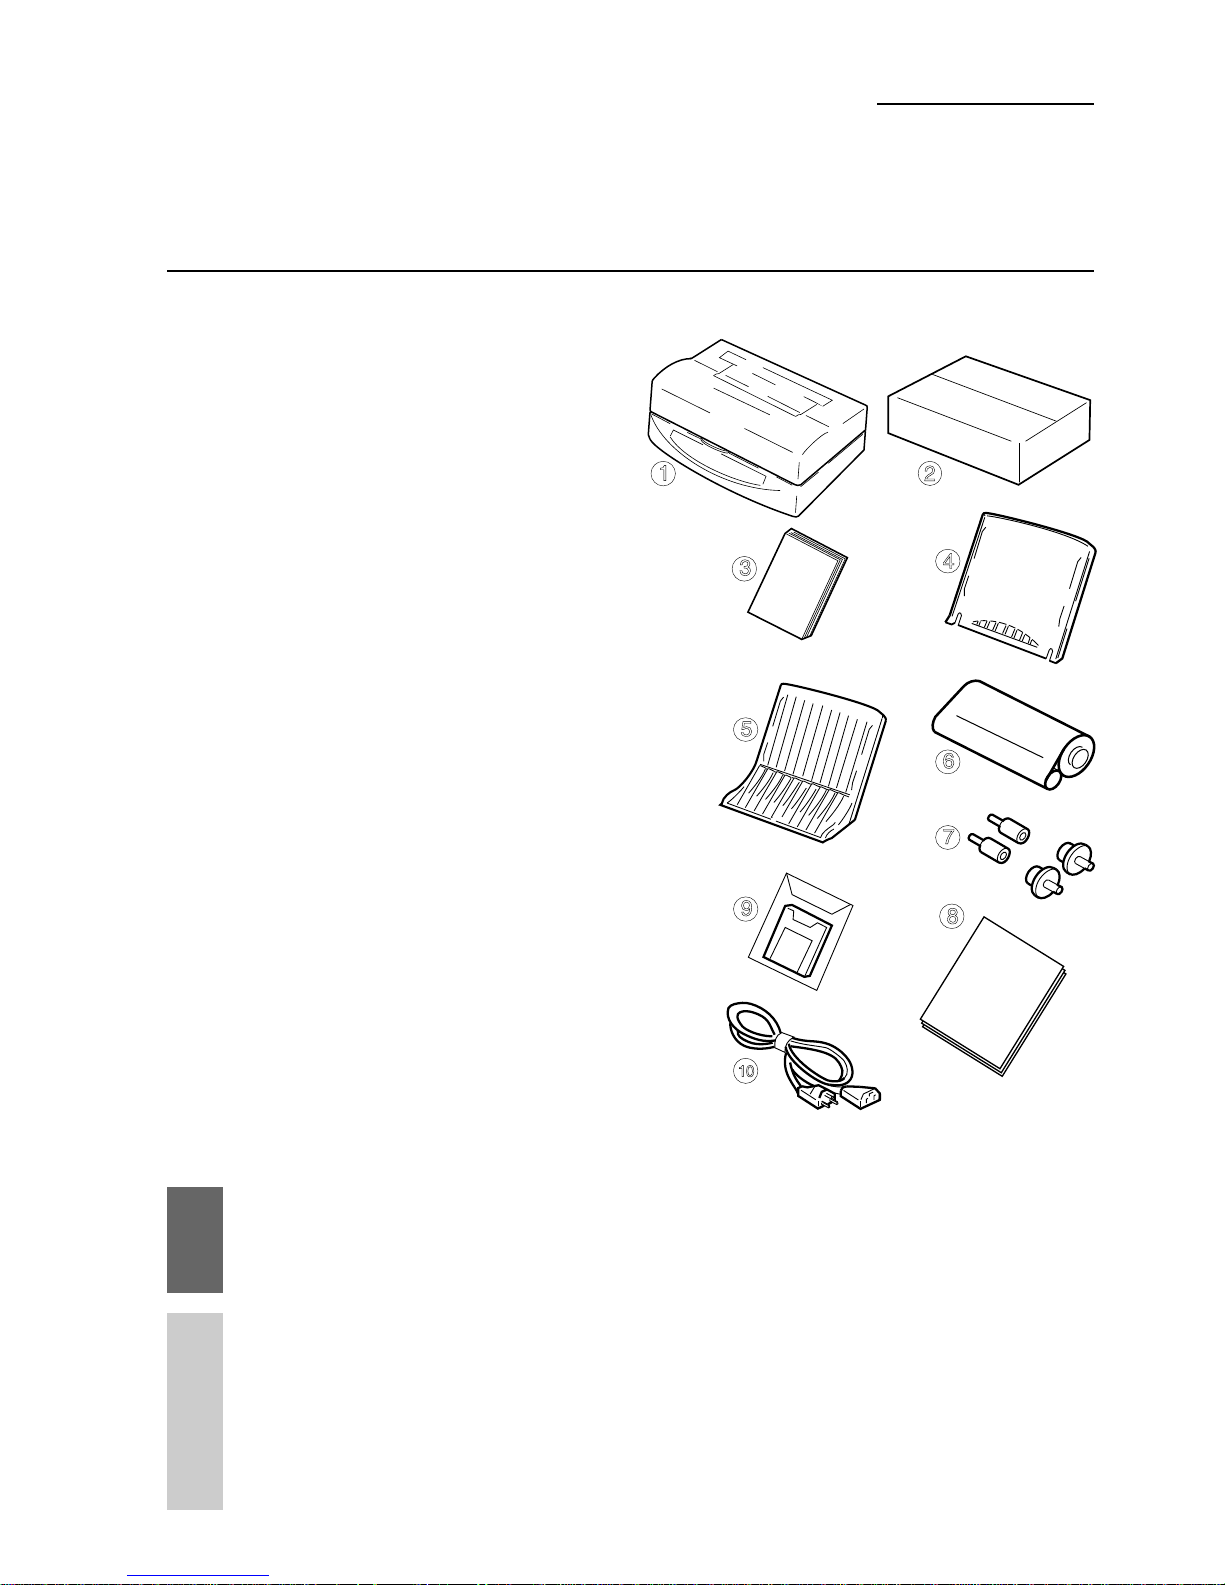
Unpacking and checking the package contents
When you open the box, you will find the
items in the list below included. While removing all of the packing materials, check
to make sure that each item below has been
included. There should be a total of ten
items. If you are missing any of them, contact your dealer immediately.
Package contents
1. WinType 800C color presentation printer
2. Accessories carton containing the
following items:
3. This Users Manual
4. Paper tray base
5. Paper tray cover
6. Starter 3-color film roll
7. Film roll bobbins
8. Starter paper (30 sheets)
9. Printer driver and font software (2 disks)
10. Power cable
We strongly recommend that you save the
sales receipt, boxes and packing materials
for this printer. They will protect the printer
should you ever need to transport it to a new
location or require service.
Caution: Always remove the film roll prior to transporting the printer. Failure to
do so may result in permanent damage to your printer and may void
your warranty. See page 48 for an explanation.
Note: The enclosed paper and 3 color film roll are samples supplied
to help you get started printing quickly. These are sample supplies
and have a limited yield of only 30 pages. You can purchase genuine
Star Supplies from your Authorized Star Dealer. Your WinType 800C
Windows Color Presentation Printer supports the genuine Star
Supplies listed on the next page.
1
2
3
4
5
6
9
7
8
10
Page 11

2
Genuine Star supplies
Description Model Number Yield Per Roll
3 color film roll (Letter/A4 size) TL1-11C3H 80 pages
3 color film roll (Legal/Special A4 size) TL1-14C3H 69 pages
4 color film roll (Letter/A4 size) TL1-11C4H 59 pages
4 color film roll (Legal/Special A4 size) TL1-14C4H 47 pages
Monochrome film roll TL1-CBH 200 pages
Note: All film rolls are sold with 2 rolls per package.
Description Model Number Size Sheets/Pack
Coated paper A-PWC Letter 100 sheets
A4-PWC A4 100 sheets
SA-PWC Legal 100 sheets
SA4-PWC Special A4 100 sheets
Presentation A-PW Letter 100 sheets
grade paper
A4-PW A4 100 sheets
SA-PW Legal 100 sheets
SA4-PW Special A4 100 sheets
OHP film A-TFC Letter 100 sheets
A4-TFC A4 100 sheets
SA-TFC Legal 100 sheets
SA4-TFC Special A4 OHP 100 sheets
Iron-on transfer T90IO-A4 A4 10 sheets
sheets
T90IO-LTR Letter 10 sheets
Page 12

3
Placing the printer
If you take good care of your printer , you can expect it to perform at its finest and to last
for a very long time. You can do that by first setting your printer in an area which meets
the following requirements.
• A firm, level surface which is free from vibration.
• An area free from excessive heat such as direct sunlight or heaters.
• A dust free environment.
• A steady power supply. Do not connect it to an outlet which uses the same circuit as
a refrigerator or an air conditioner.
• Use only the line voltage specified on the identification plate.
• The printer should be positioned relatively close to the computer. The maximum
recommended length of the parallel interface cable (not supplied) is 2 meters or 6
feet.
• The printer should be placed so that there is a minimum of 5 cm. (2 in.) clearance on the front, left and right sides to prevent blockage of its ventilation fan outlets
and at least 30 cm. on the back of the printer to allow opening of the printer's top
cover.
Preparing to print
After placing for your printer in a suitable area, you can begin preparing it to print. You
must carefully follow the Steps below to properly and safely load the print media and
install the film roll.
Note: The following Steps assume that you are using the starter film roll
and the starter paper. Coated paper is included for the American
market and presentation grade paper is included for other markets
See Chapter 3 for detailed explanations on printing with other print
media.
Page 13
4
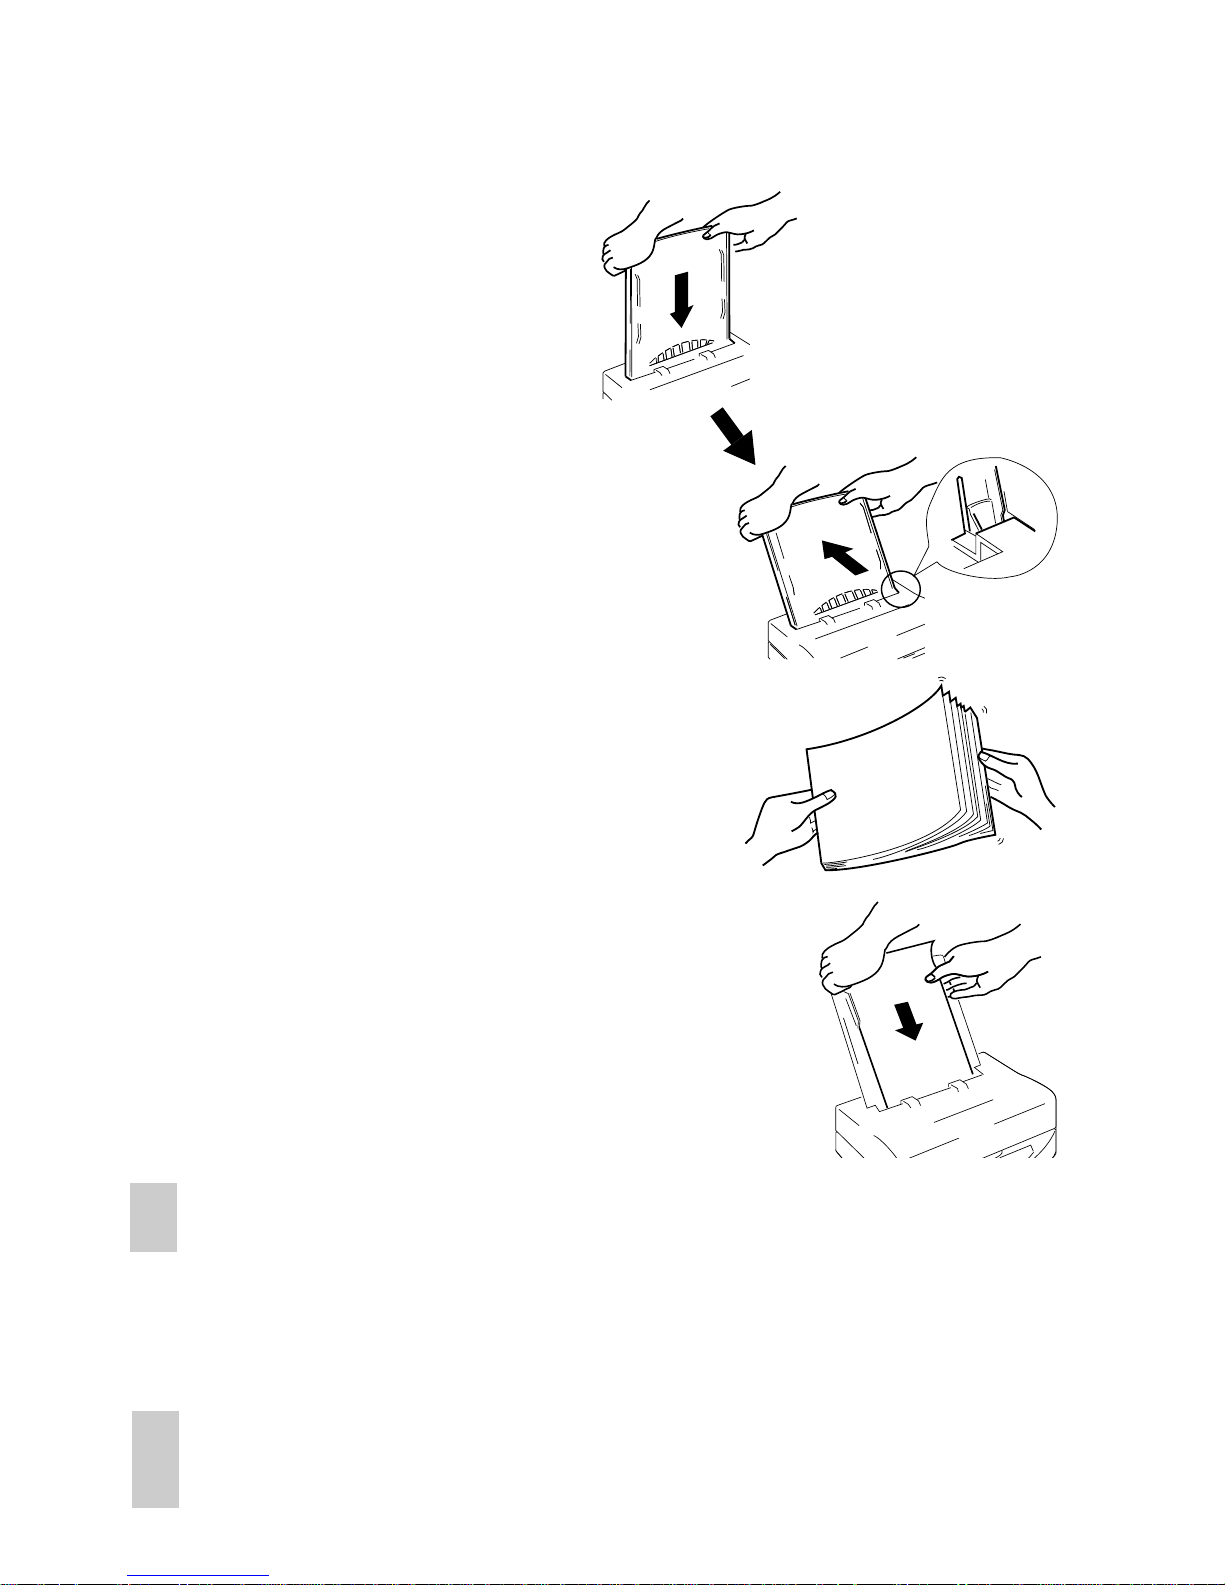
Loading paper
You must always follow the Steps below to load paper before installing the film roll.
Steps:
1. Insert the paper tray base into the
positioning holes at the back side
of the printer.
2. Fan the paper. This will prevent
paper jams from occurring.
3. Load one sheet of paper into the
paper tray base with the printing side
facing the paper tray base.
Note: Recommended coated paper will have the words "PRINT OPPOSITE
SIDE" printed in light blue letters on the back side.
4. After one sheet has been inserted all the
way into the printer, add the remainder
of the stack of paper.
Note: The paper tray can hold up to 50 sheets of coated/presentation grade
paper at one time. Be certain to insert the print media with the print
side facing down when inserting into the printer.
Page 14
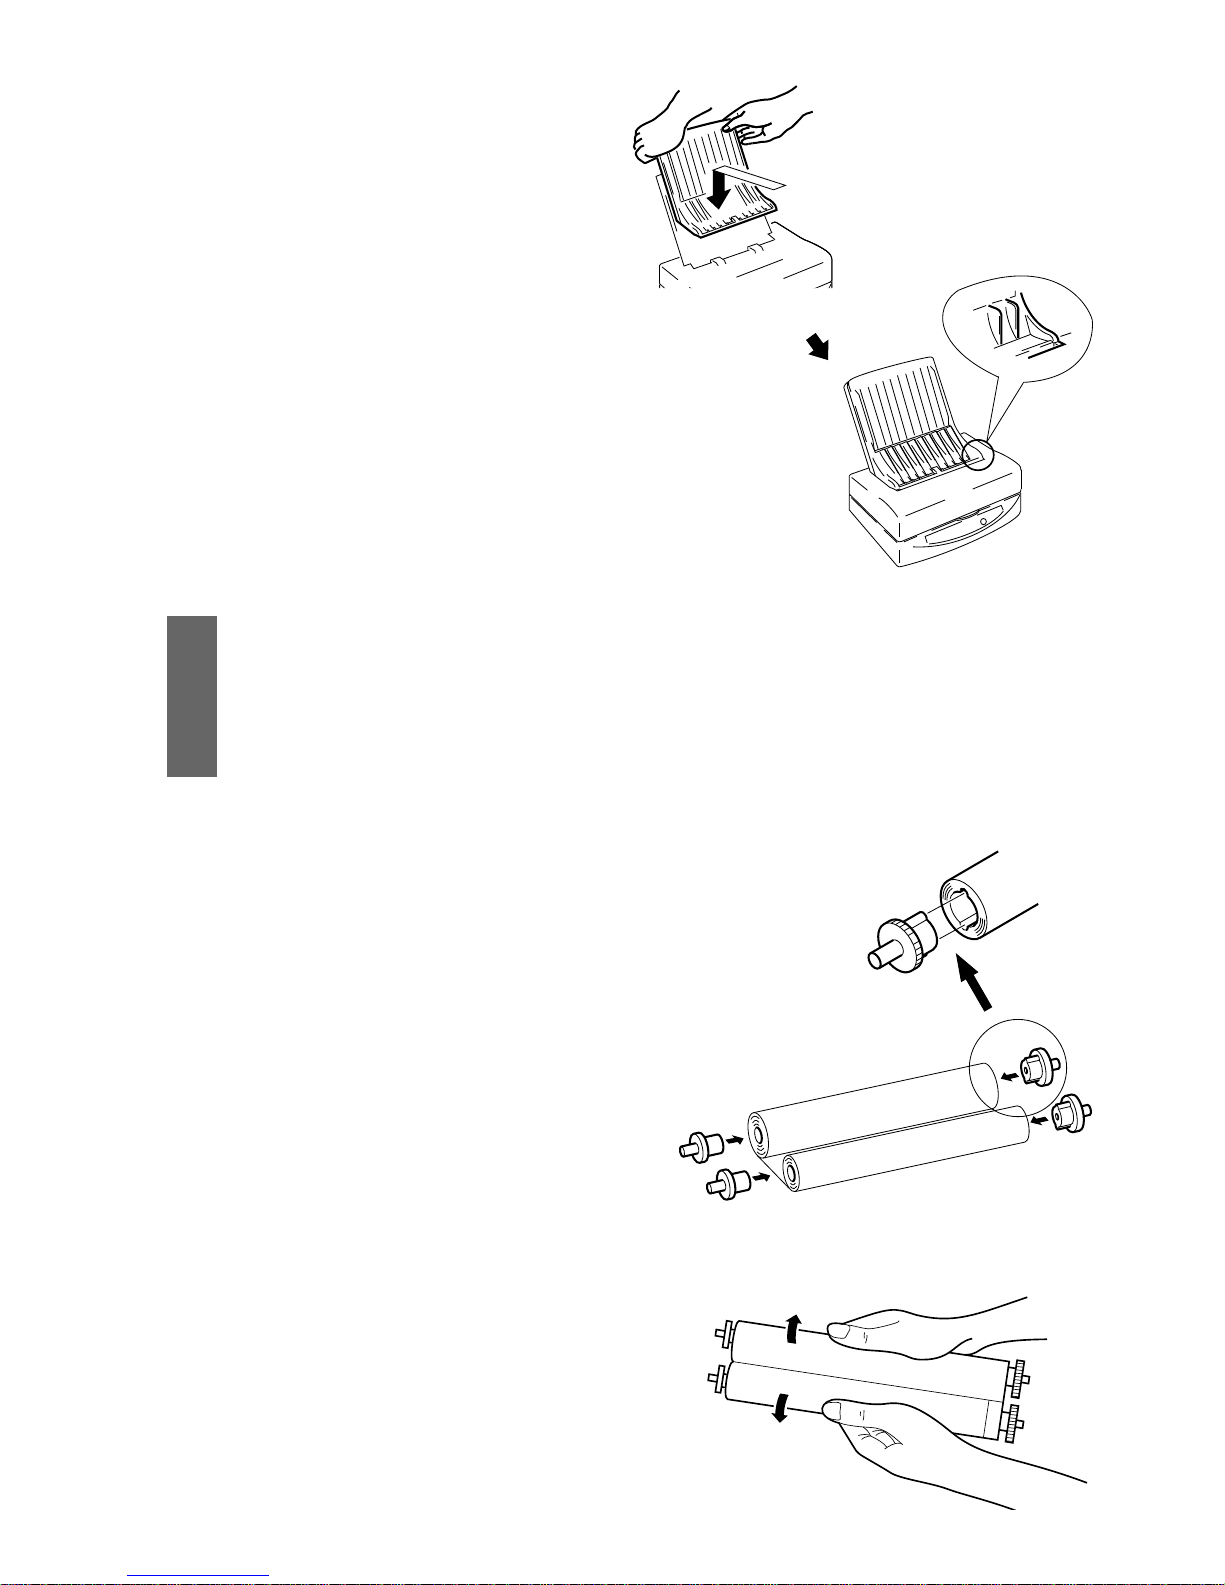
5
5. After inserting the paper,
place the paper tray cover on top
of the paper tray base in the direction
indicated by the arrows in the illustration at the right.
Installing the film roll
Caution: It is essential that you have paper in the paper tray, that the paper
tray cover and the top cover support are in place when you open the
top cover of the printer. Failing to do so will allow the top cover to
drop down when opened. This can cause unexpected and painful
injury.
Steps:
1. Insert the film roll bobbins into
holes on both sides of the rolls.
Be certain to insert the bobbins with
wedges into the holes that are shaped in
the same way. Those portions of the
bobbins are colored green.
2. Unwrap the film roll and
gently pull the two halves apart.
They are held together with a
light adhesive.
Align the bobbin
protrusions with the
grooves in the film roll.
This side has no
grooves for the bobbin.
Green
Green
Page 15
6
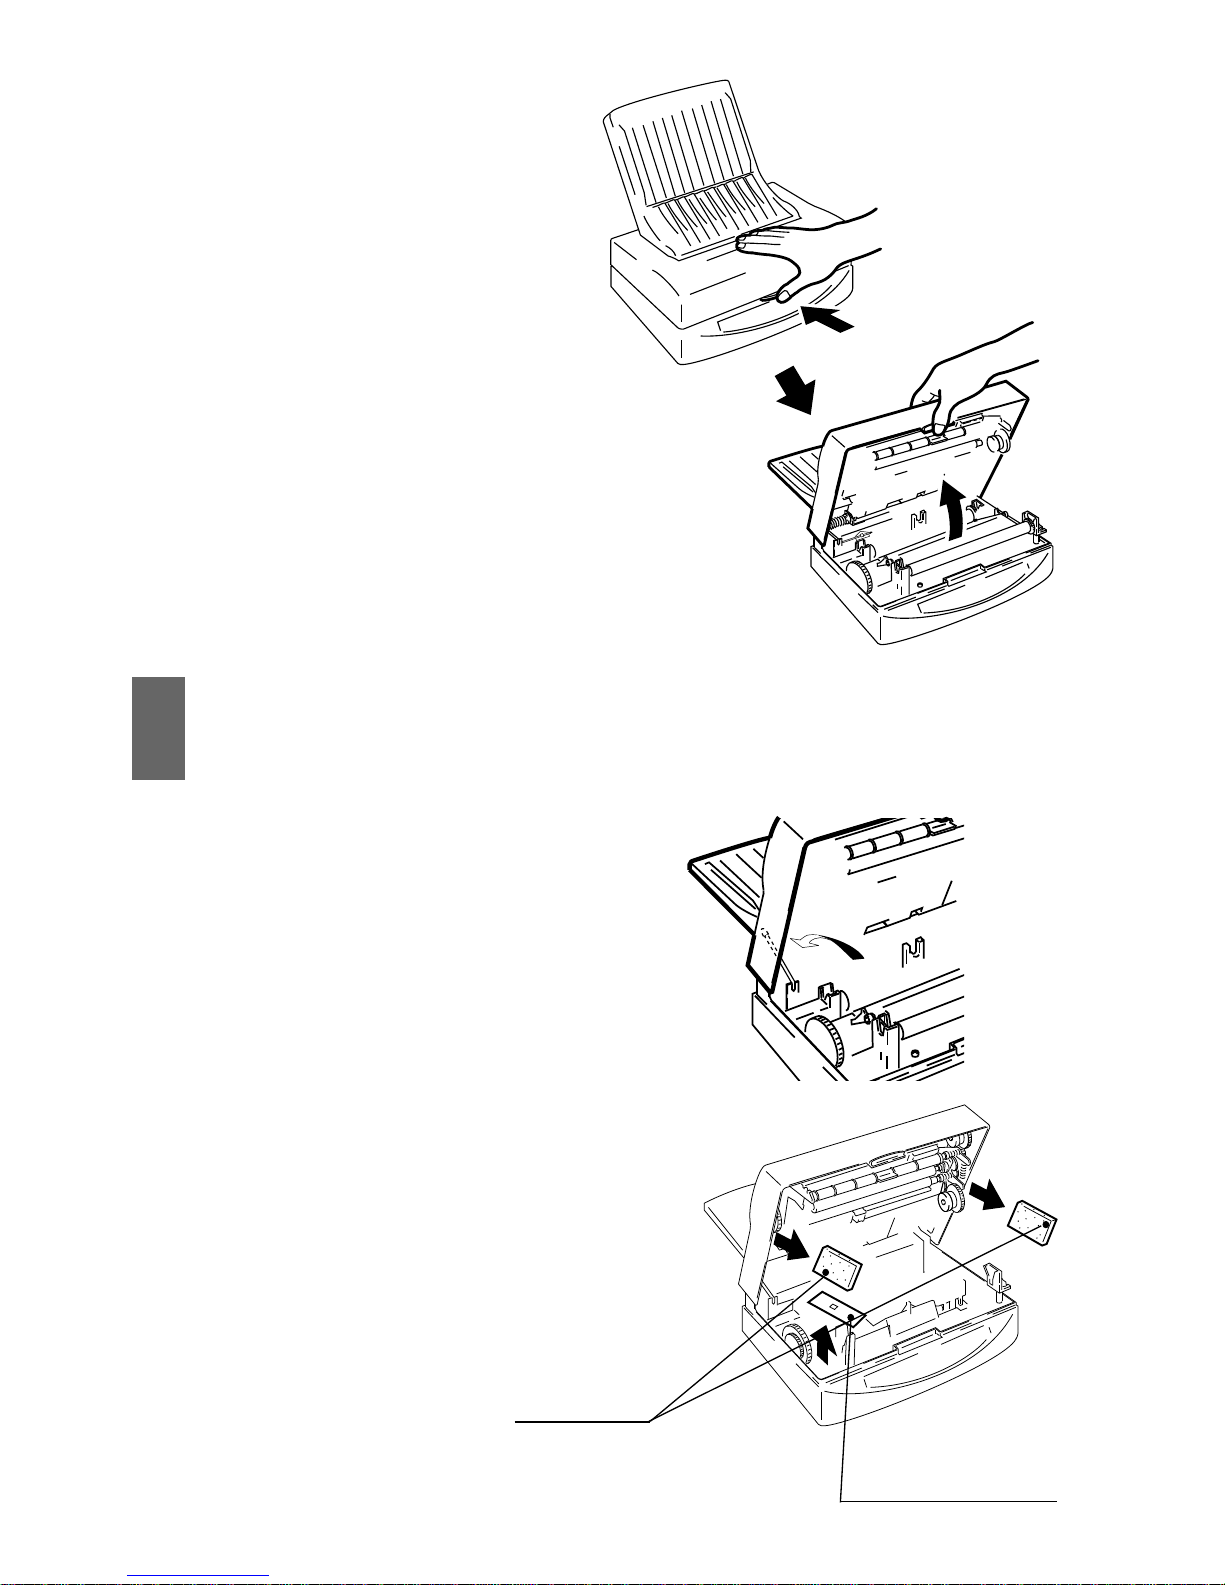
3. Press the cover release and open the
top cover.
Caution: Always leave the paper tray and top cover support in place when
opening the printer's top cover. Removing them while top cover is
open will cause it to fall shut while your hands are inside the machine.
4. Lift up the Top Cover Support
located on the left on the inside of
the printer and slip the end of the
support bar into the latch located on
the inside of the Top Cover. Gently
lower the Top Cover until it stops.
5. Remove the two protective transportation inserts and the socket protective
transportation sheet from inside
the printer.
Protective
transportation
inserts
Socket protective
transportation
sheet
Page 16
7
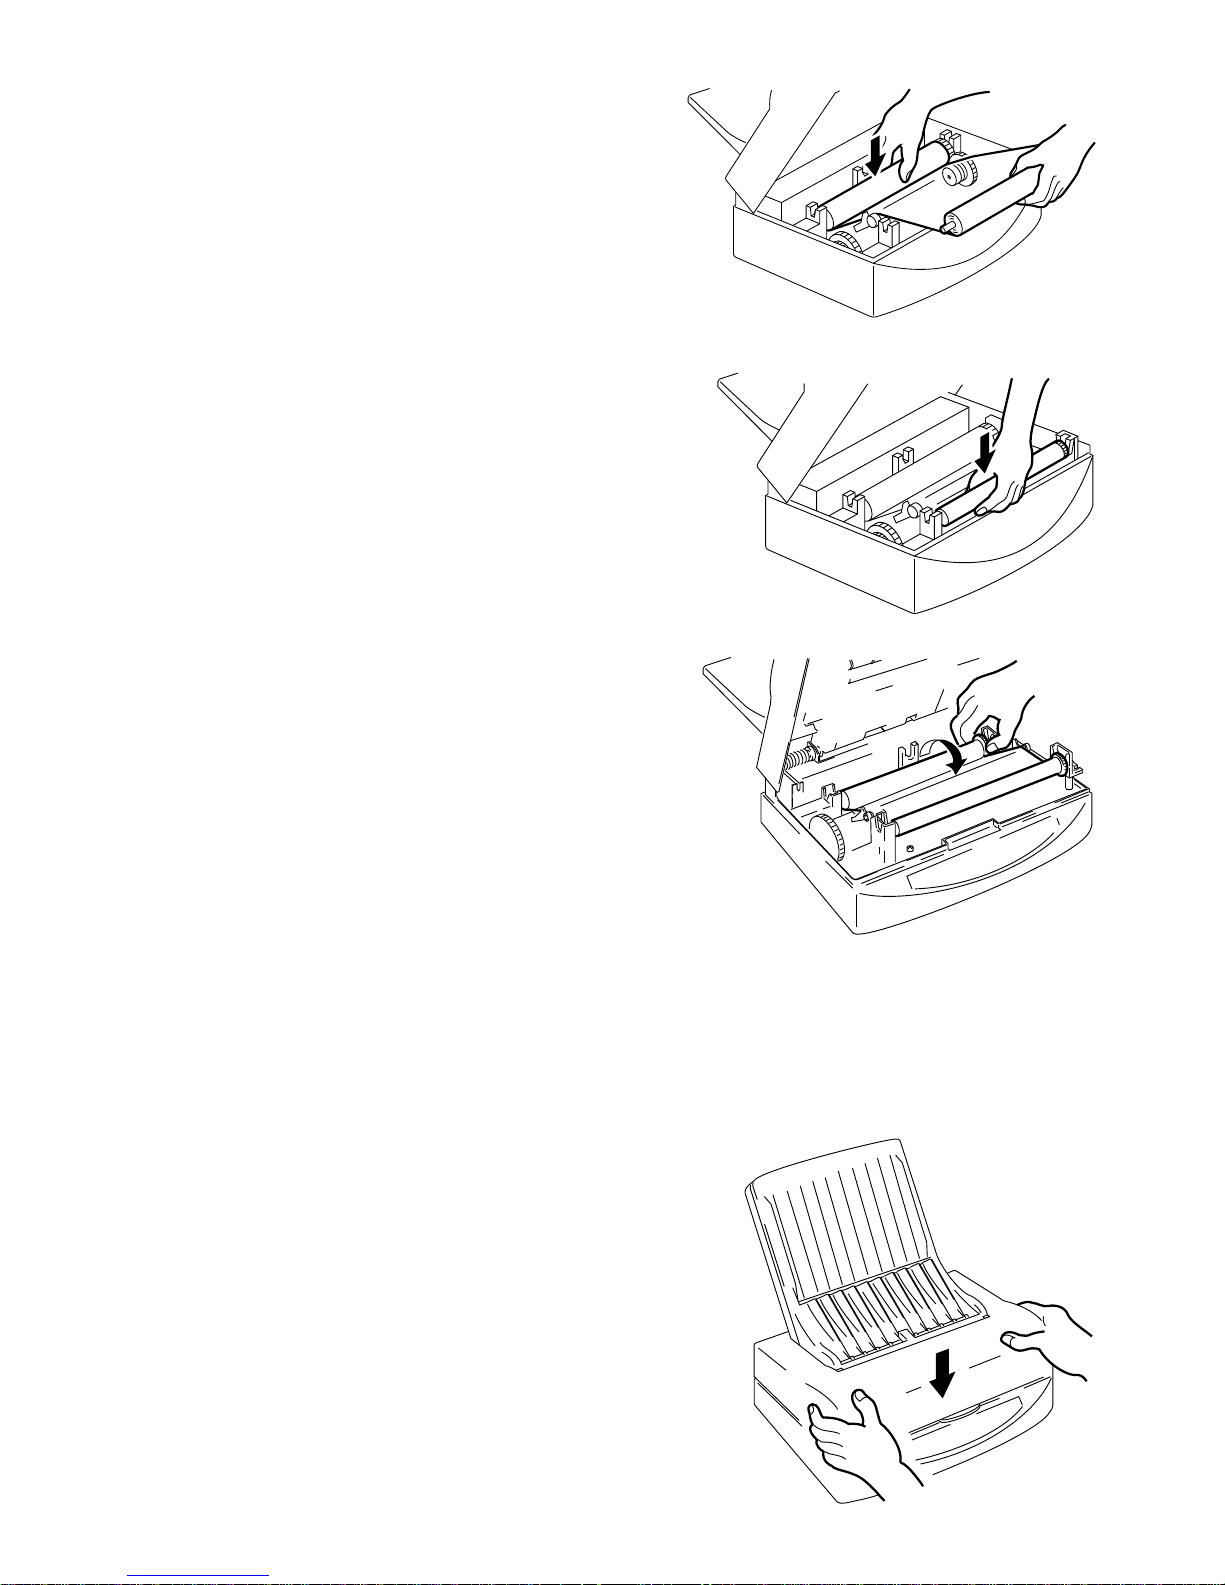
6. Place the larger half of the film roll into
the rear portion of the printer.
Fit the geared bobbin side into the slot
first. Then slip the other end into the
opposing slot. The smaller bobbin (on
the left side) should pop into place.
The bobbin and printer gears should
mesh.
Insert the take-up roll (smaller half) into
the slots in the front portion of the
machine by following the procedures
described above.
7. Gently rotate, toward the front of the
printer, the gear of the film roll to
take up any slack in the sheet.
8. Lay the Top Cover Support Bar down
to its original position while holding the
top cover with one hand.
9. Gently, but firmly , close the printer's top
cover by pushing down on it. When the
top cover properly closes, you will
hear the click of the latches.
Page 17
8
Connecting the power cord
Steps:
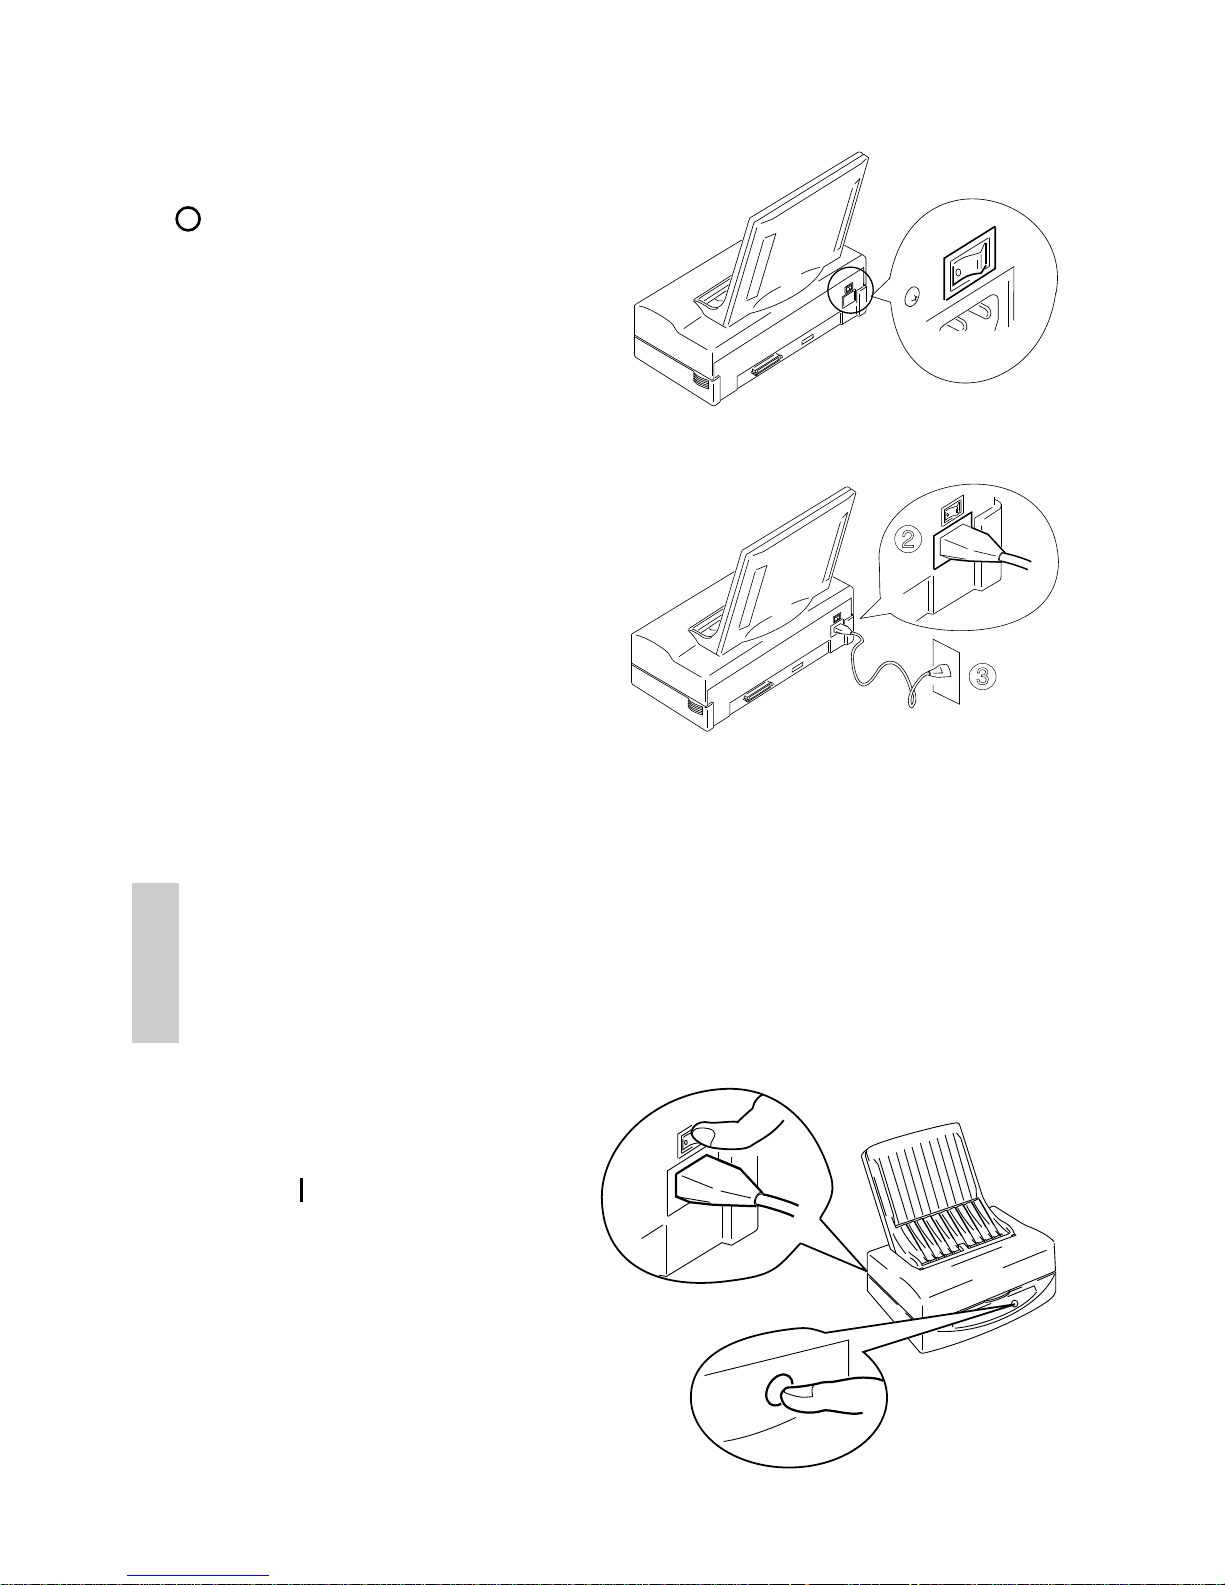
1. Make sure that the power switch, located
on the back of the printer, is in the OFF
[ ] position.
2. Securely plug the power cord into the
socket located at the rear of the printer.
3. Plug the other end of the power cord into
a grounded wall outlet.
Performing a test print
To make sure that you have correctly prepared your printer for printing, we suggest that
you perform a test print.
Note: If you are using the anything other than the included paper and film
roll, you must first change the dip switch settings. Refer to Chapter 4
Troubleshooting for details.
Note: You should use recommended paper for this test to get the best
results.
1. While pressing the Ready button on the
control panel, which is located on the
front of the printer , turn the power switch
to the ON [ ] position.
2. Release the Ready button when
printing starts. The test will print
one page of color patterns.
If the print is successful, you are ready
to connect the printer to your computer .
If there is any problem in printing, perform all of the Steps again.
2
3
Ready
Page 18
9
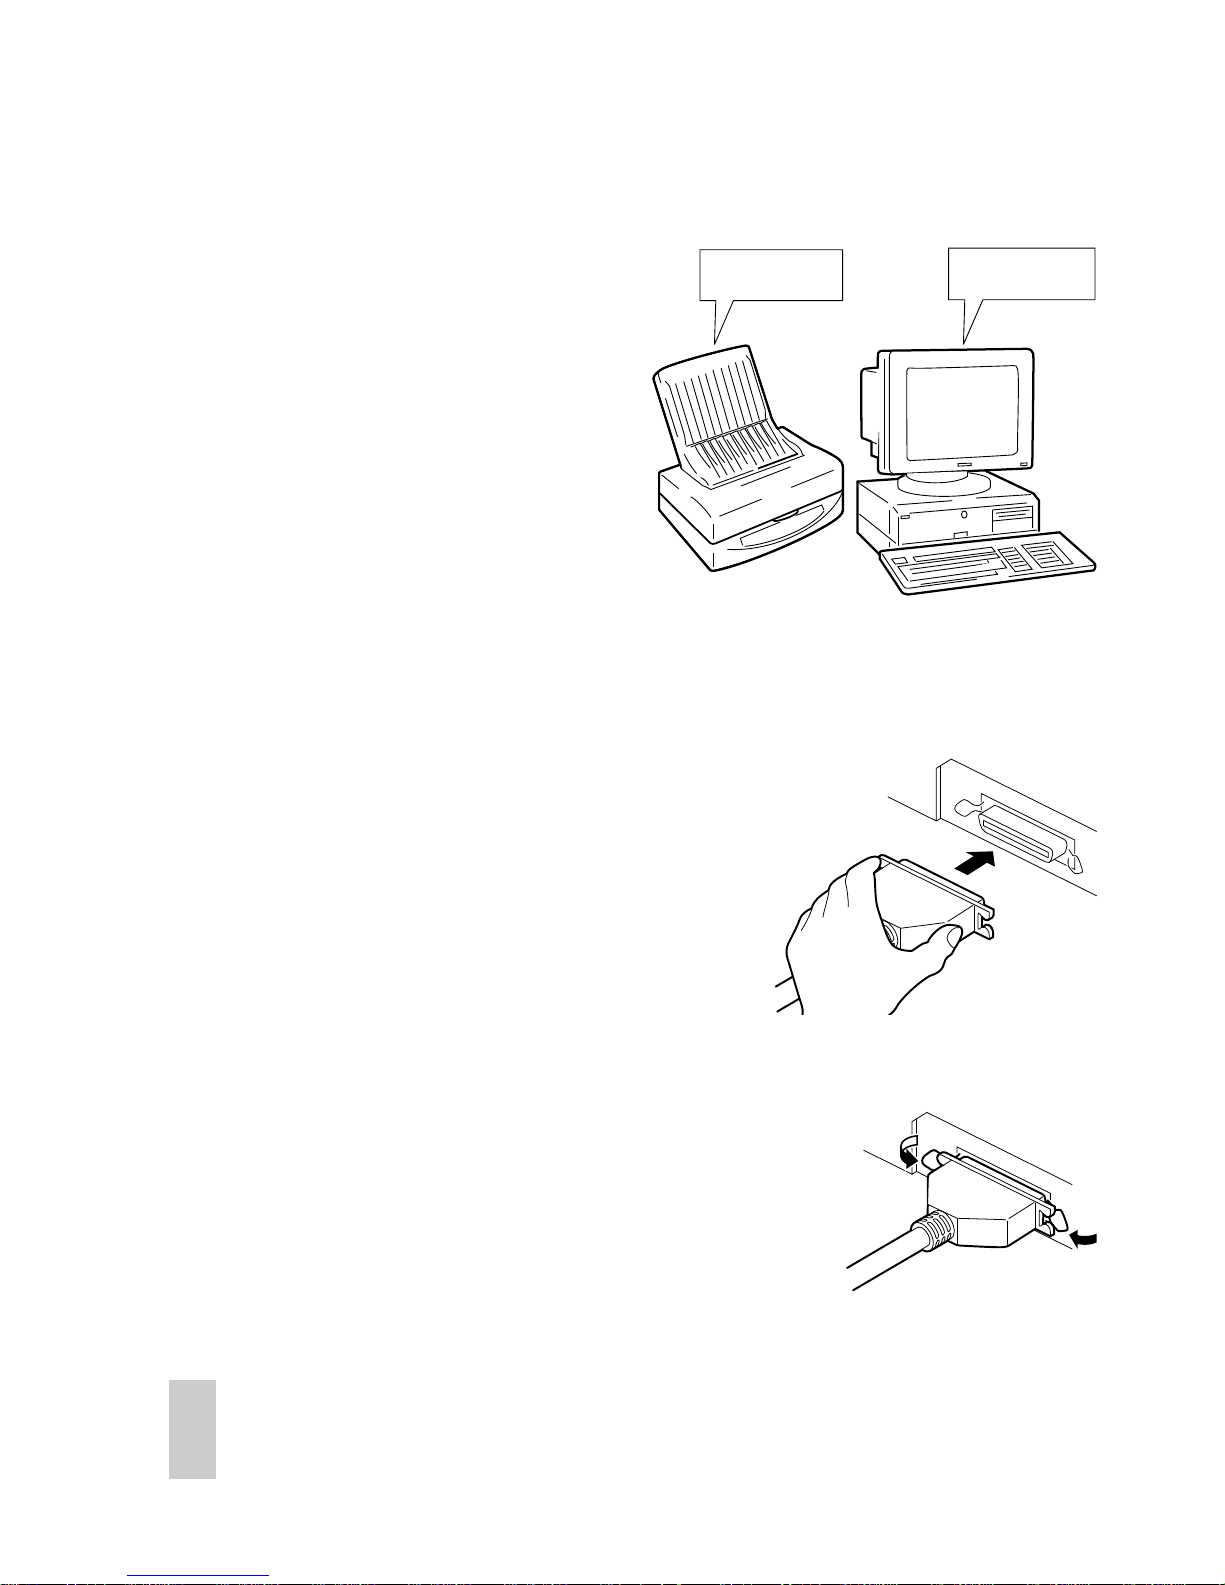
Connecting the printer to your computer
Follow these Steps to connect the printer to a computer with a high quality 36 pin
shielded Centronics parallel interface cable (not supplied).
Steps:
1. Make certain that both your printer and
your computer are turned OFF.
2. Plug one end of the parallel cable into
one of the interface ports on the computer.
3. Plug the other end of the interface cable
into the printer's interface port which is
located on the back of the printer.
4. Securely fit the prongs on either side of
the printer's port into the clips on both
sides of the printer cable.
Note: To ensure proper operation, you must use a high quality Centronics-
compatible shielded parallel interface cable. This cable should not be
longer than 2 meters or 6 feet.
Power OFF!
Power OFF!
Page 19

10
Page 20

11
Chapter 2 Installing the printer driver and
TrueType fonts
If you have prepared your printer, you can install the printer driver which accompanied
this printer on floppy disk number one. This printer comes with two floppy diskettes.
One disk contains the printer driver and the other contains the 35 scalable TrueType
fonts which are designed especially for Windows version 3.1 applications printing. To
operate the printer, you must follow these steps to install the printer driver software.
Before installing the printer driver, however, we suggest that you take a few moments to
check your system configuration to make sure that your computer is ready for the installation.
System requirements
To run this printer driver you need an IBM compatible PC with at least a 386SX 16-MHz
CPU and you must be running MS-DOS 3.3 or later and Windows 3.1 or later. The
WinType 800C will not work properly on 286 based PCs and other earlier systems.
This printer requires at least 8 megabytes (MB) of memory (RAM) and the system software requires at least 5 megabytes of disk space on your system's hard drive. An additional 1.85 megabytes is needed to install all of the 35 TrueType fonts.
A Microsoft-compatible mouse is also highly recommended. This manual assumes that
you are using a mouse. If you are not using a mouse, please refer to your Windows 3.1
Users Guide for information on using the keyboard in place of a mouse.
A standard PC parallel printer port is required to connect the printer using a high quality
Centronics compatible shielded printer cable.
Note: It is important that you use a properly manufactured cable. A poor
quality cable may affect the output of this printer.
Installing the printer driver and TrueType fonts
If at any time during installation of the printer driver you need help, press <F1> or
choose <Help> on the Setup screen.
Note: Remember that you need at least 5 megabytes of hard disk space to
install this printer driver and 1.85 megabytes of hard disk space to
install the 35 TrueType fonts.
Always make a backup copy of each disk in the software package
and store the original disks in a safe place. Use the backup copies to
install the software.
Steps:
1. Make sure your printer is connected to
a printer port and that it is turned ON.
Page 21
12
2. Insert disk #1 into the <A> drive.
(Use the <B> drive depending on your
computer.)
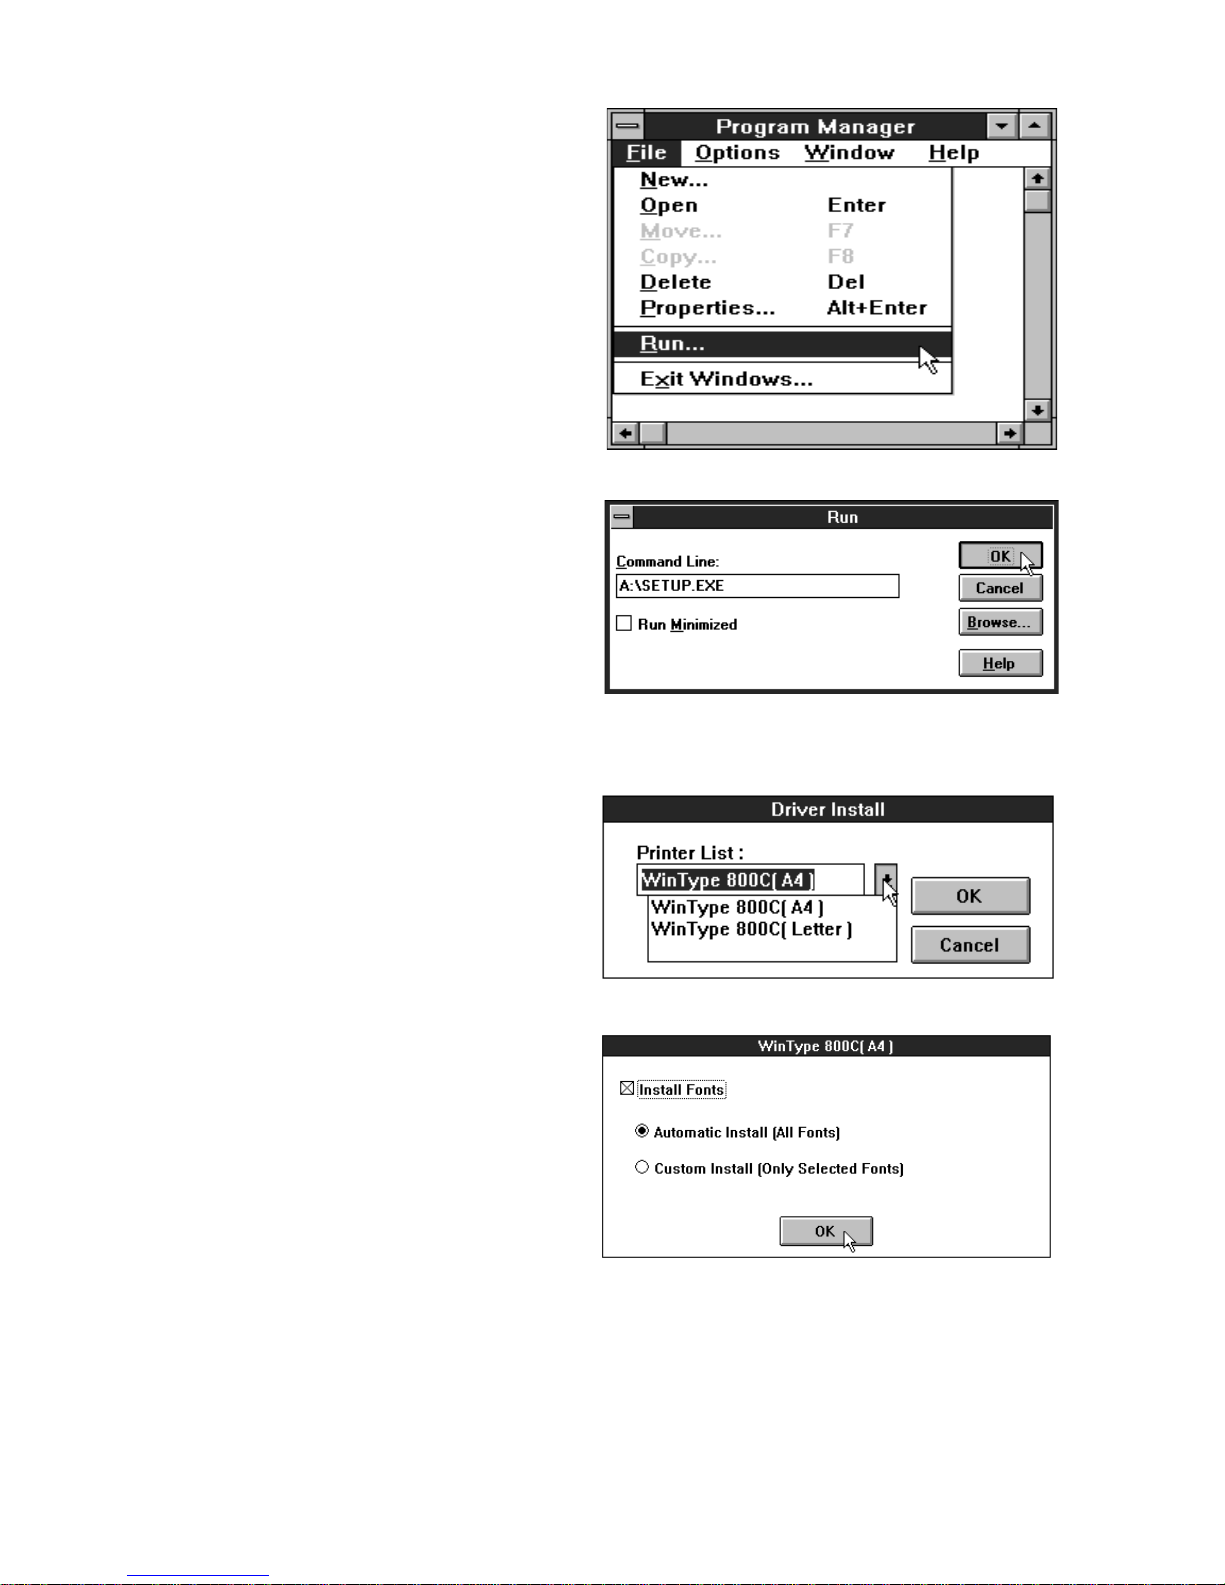
3. In the Windows Program Manager,
choose Run from the file menu.
4. In the Command Line box, type
"A:\setup" and press <Return>,
if A: is the letter of the drive containing
the software program. You can also select this by clicking on the Browse...
button and selecting the drive in which
the software program floppy is located.
Select setup.EXE and click OK.
5. You will see the ST AR WinT ype 800C
installer screen prompting you to select
the printer type. You can select either
WinT ype 800C (A4) or WinT ype 800C
(Letter). Select one and click on OK.
6. After selecting one and clicking OK,
the Install Fonts dialog box will appear.
You can install the 35 TrueT ype fonts at
this time by clicking on the Install Fonts
checkbox.
Y ou can select either Automatic Install,
which will automatically install all of
the fonts on floppy disk #2; or Custom
Install, which will install only the fonts
you select.
You can also decline from adding the
TrueType fonts at this time by simply
clicking OK without selecting Install
Fonts.
Page 22

13
Automatic Install
1. If you selected Automatic Install, (All
Fonts) at Step 6 on page 12, the install
program will prompt you to insert Floppy
disk #2, and will automatically proceed with
installing all 35 TrueType fonts before requesting
you to select a default printer.
2. When the TrueType fonts have been installed,
you will be prompted to select a default
printer. The install program will automatically
open up the Printer's dialog box in the Control
Panels.
3. Double-click on ST AR WinT ype 800C
on LPT1: if the printer port you are
using is LPT1. If your computer has
only 1 parallel port, LPT1 is the name
of the port.
4. Click Close to continue.
5. When the installation is done, you will
see a message telling you that the
installation of the printer driver was
completed successfully. Click on Re-
start to restart Windows or Quit.
Custom Install
1. If you selected Custom Install, the in-
stall program will prompt you to insert
Floppy disk #2 and will open up the
Fonts icon in the Control Panel.
2. Click on the <Add> button.
3. Select the appropriate drive (a:\ or b:\)
(Drives list box) for the fonts on disk
#2. The fonts will appear in the List
of Fonts box.
4. Select the fonts you want to add by
clicking on their names. To select all
of the fonts, click the Select All button.
Page 23

14
5. Click on OK. The Fonts dialog box will
appear. When installation is complete,
the fonts will appear in the Installed
Fonts list box.
6. After clicking Close, the printer driver
install program will prompt you to
select a default printer. You can then
proceed with Automatic Install Steps
3 – 5 described on the previous page.
Without Install Font
1. If you didn't select to install any fonts,
you will be prompted to select a default
printer. You can then proceed with
Automatic Install Steps 3 – 5
described on the previous page.
Note: To make the typefaces appear in your application, reselect your
printer in Printer Setup in the application File menu.
Note: You must restart Windows in order to begin using this printer for the
first time.
TrueType font samples
American text Broadway Brush 445
Caslon Openface Cloister Blk Commercial Script
Cooper Black Davida BD DomCasual
EngraversRoman Exotic350DMBd Freeform721 Blk
Freehand 521 HandelGothic Hobo
Humanist 521 XBd Impress Kaufmann
OCR-A Olddreadful No. 7 Onyx
Orbit Parisian Park A venue
Playbill PTBarnum Raleigh DMBd
Schadow BlkCn Seagull Hv Shotgun
Tango University Roman VAGRounded
Vineta Windsor
Page 24

15
Chapter 3 Printing with WinType 800C
The WinType 800C prints exceptionally vivid and glossy color presentation materials on
genuine Star supplies including our coated paper, presentation grade paper, overhead
projection (OHP) film and iron-on transfer sheets. The WinType 800C accepts media
from the paper tray or you can load media manually. This printer is also easy to use
because it works within the graphical interface of the Windows environment. In this
chapter, we'll explain the special features of this printer and how to control it to get the
best possible printing quality.
The control panel
The control panel on the front of the printer has three lamps and one button. The lamps
and button indicate the status of the printer when the power is turned ON.
The Paper lamp
This orange colored lamp is ordinarily not
lit. If an error is detected, such as "paper
out" or "paper jam," this lamp will flash and
the printer will enter the Not Ready mode.
The Not Ready mode is indicated by the
flashing, green Ready lamp.
The Film Roll lamp
This lamp is also colored orange and it too
is ordinarily not lit. If an error is detected,
such as "no film roll," or "wrong film roll"
this lamp will flash and the printer will enter the Not Ready mode which is also indicated by the flashing green Ready lamp.
The Ready lamp
This lamp is green and will light when you
turn on the printer's power. When it is lit,
the printer is in the Ready mode, which
means that it can receive and print data sent
from your computer. When an error is detected, the printer will automatically enter
the Not Ready mode. After you have
cleared the problem, press the round Ready
button. The Ready lamp will light and
printing can proceed.
The Ready button
Press this button to set the printer On or Off
line with the computer. When On line, or
the Ready mode, the printer can receive and
print data from the computer.
Paper
Film Roll
Ready
Paper
Film Roll
Ready
Paper
Film Roll
Ready
Paper
Film Roll
Ready
Page 25

16
Features of the printer
This printer includes the following capabilities.
• Printing from any Windows 3.1 application
• Full color and monochrome laser quality printing
• 300 dpi for high quality output
• 50 sheet paper tray or manual insertion
• Printing on coated paper presentation grade paper, overhead projection (OHP) film
and iron-transfer sheets
• Easy to use graphical interface for the Windows environment
• Small, compact size and stylish design
• 1 page per minute color printing speed
• 2 pages per minute monochrome printing speed
Recommended print media
This printer can print on media ranging from coated paper to presentation grade paper,
overhead projection (OHP) film and iron-on transfer sheets. The WinType 800C also
accepts media loaded from the paper tray or manually loaded media. The following list
describes media to use with this printer to maintain its exceptional color quality.
Media Type Dimensions Recommended Type
Coated paper Letter (8 1/2" x 11") A-PWC
(216mm x 279mm)
A4 (8.27" x 11.69") A4-PWC
(210mm x 297mm)
SA4 (8.27" x 14") SA4-PWC
(210 x 356 mm) Manual insertion only.
Legal (8 1/2" x 14") SA-PWC
(216mm x 356mm) Manual insertion only.
Presentation Letter (8 1/2" x 11") A-PW
grade paper (216mm x 279mm)
A4 (8.27" x 11.69") A4-PW
(210mm x 297mm)
SA4 (8.27" x 14") SA4-PW
(210 x 356 mm) Manual insertion only.
Legal (8 1/2" x 14") SA-PW
(216mm x 356mm) Manual insertion only.
Iron-on transfer A4 (8.27" x 11.69") T90IO-A4
sheets (210mm x 297mm) Manual insertion only
Letter (8 1/2" x 11") T90IO-LTR
(216mm x 280mm) Manual insertion only
OHP film Letter (8 1/2" x 11") A-TFC
(216mm x 279mm)
A4 (8.27" x 11.69") A4-TFC
(210mm x 297mm)
SA4 (8.27" x 14") SA4-TFC
(210 x 356 mm) Manual insertion only.
Legal (8 1/2" x 14") SA-TFC
(216mm x 356mm) Manual insertion only.
Page 26

17
Operating the printer
Turning ON the power to the printer
Flip the switch located above the power cord
on the back side of the printer in the direction of arrow in the illustration at the right.
The switch should be in the [ ] position.
Turning OFF the power to the printer
Flip the same switch on the back side of the
printer in the direction of arrow in the illustration at the right.
The switch should be in the [ ] position.
Caution: Never turn OFF the power when you are printing because this will
cause paper to jam inside of the machine.
See Chapter 4 Maintenance and troubleshooting for an explanation
on clearing paper jams.
Loading print media
You can load print media either via the paper tray or manually.
Caution: There are print media types which the paper tray cannot use.
They are: Iron-on transfer sheets (all sizes); Legal, Special A4 size
(all print media types). See Page 37 for details on printing on iron-on
transfer sheets.
The paper tray
The paper tray is for use with A4 and letter sized paper and OHP film only.
Steps:
1. Gently lift up the paper tray cover.
Page 27

18
2. Fan approximately 50 sheets of coated/
presentation grade paper . This will help
prevent paper jams from occurring.
Note: It is best to insert one sheet of media first and make sure that is all
the way into the printer before adding more media.
When printing with OHP film, insert one sheet of coated/presentation
grade paper at the bottom and place the OHP film on top of it.
3. Place the media into the paper tray with
the printing side facing the paper tray.
Note: The paper tray can hold up to 50 sheets of coated/presentation grade
paper at one time. Be certain to insert the print media with the print
side facing down when inserting into the printer.
Note: Recommended coated paper will have the words "PRINT OPPOSITE
SIDE" printed in light blue letters on the back side.
The side from where you can read the silver colored letters on the
Recommended OHP film is the print side.
4. Replace the paper tray cover.
Note: You can print on overhead projection (OHP) film in the same way as
described above. However, you must select "Film" in the printer
driver Media Type box. Read "Getting ready to print" on the next
few pages for an explanation on setting up the printer driver.
Page 28

19
Manual loading
This printer can also receive manually loaded print media. The steps required for manually loading media are outlined below.
Steps:
1. Remove any media that has finished
printing.
2. Load the media with the printing side
down into the opening in the paper tray
cover. Make sure that it is inserted completely into the printer feeder.
Caution: Do not manually load more than one sheet of media at a time. Wait
until the first sheet has been completely printed and removed before
loading more media.
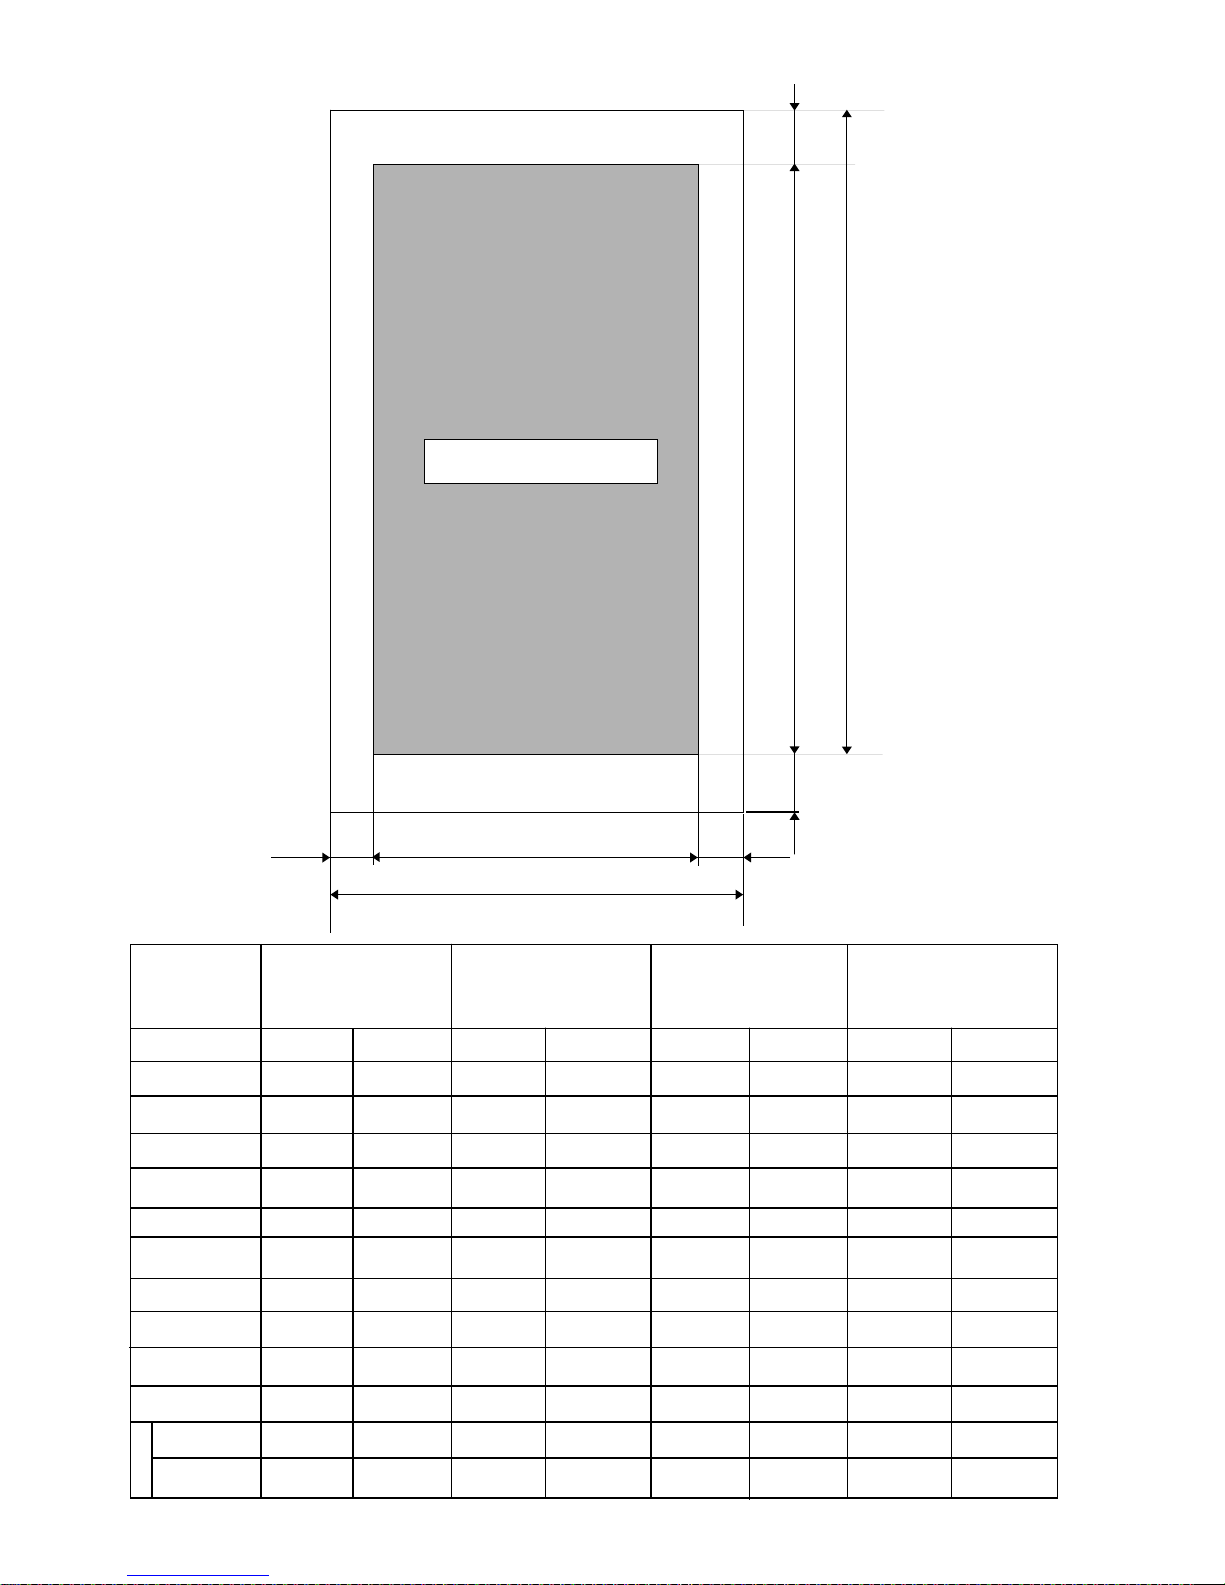
Printable area
Refer to the following information to determine the actual printable area for your print
media. An illustration of these dimensions is on the next page.
Page 29
20
B
D
A
CE
(G)
(H)
F
Printable Area
Letter Size A4 Size Legal Size Special A4 Size
(inches) (mm) (inches) (mm)
Color Mono Color Mono Color Mono Color Mono
A 8.5 8.5 210 210 8.5 8.5 210 210
B 11 11 297 297 14 14 355.6 355.6
C 8.1 8.1 200.5 200.5 8.1 8.1 200.5 200.5
(Dots) (2432) (2432) (2368) (2368) (2432) (2432) (2368) (2368)
D 9.5 10.1 258 273.6 12.5 13.1 316.6 332.1
(Lines) (2850) (3034) (3048) (3232) (3750) (3934) (3739) (3293)
E 0.2 0.2 4.75 4.75 0.2 0.2 4.75 4.75
F 0.55 0.55 14 14 0.55 0.55 14 14
(G) (0.2) (0.2) (4.75) (4.75) (0.2) (0.2) (4.75) (4.75)
(H) (0.95) (0.35) (25) (9.4) (0.95) (0.35) (25) (9.5)
A, B, C ±0.06 ±0.06 ±1 ±1 ±0.06 ±0.06 ±1 ±1
D, E, F ±0.12 ±0.12 ±3 ±3 ±0.14 ±0.14 ±3.6 ±3.6
Tolerance
Page 30

21
Getting ready to print
Before printing, there are a few things that you should do to setup the W inType 800C for
printing. You will need to select the WinType 800C printer driver and make selections
on media size, media type, orientation, etc. The Steps required for making these selections are outlined below.
Steps:
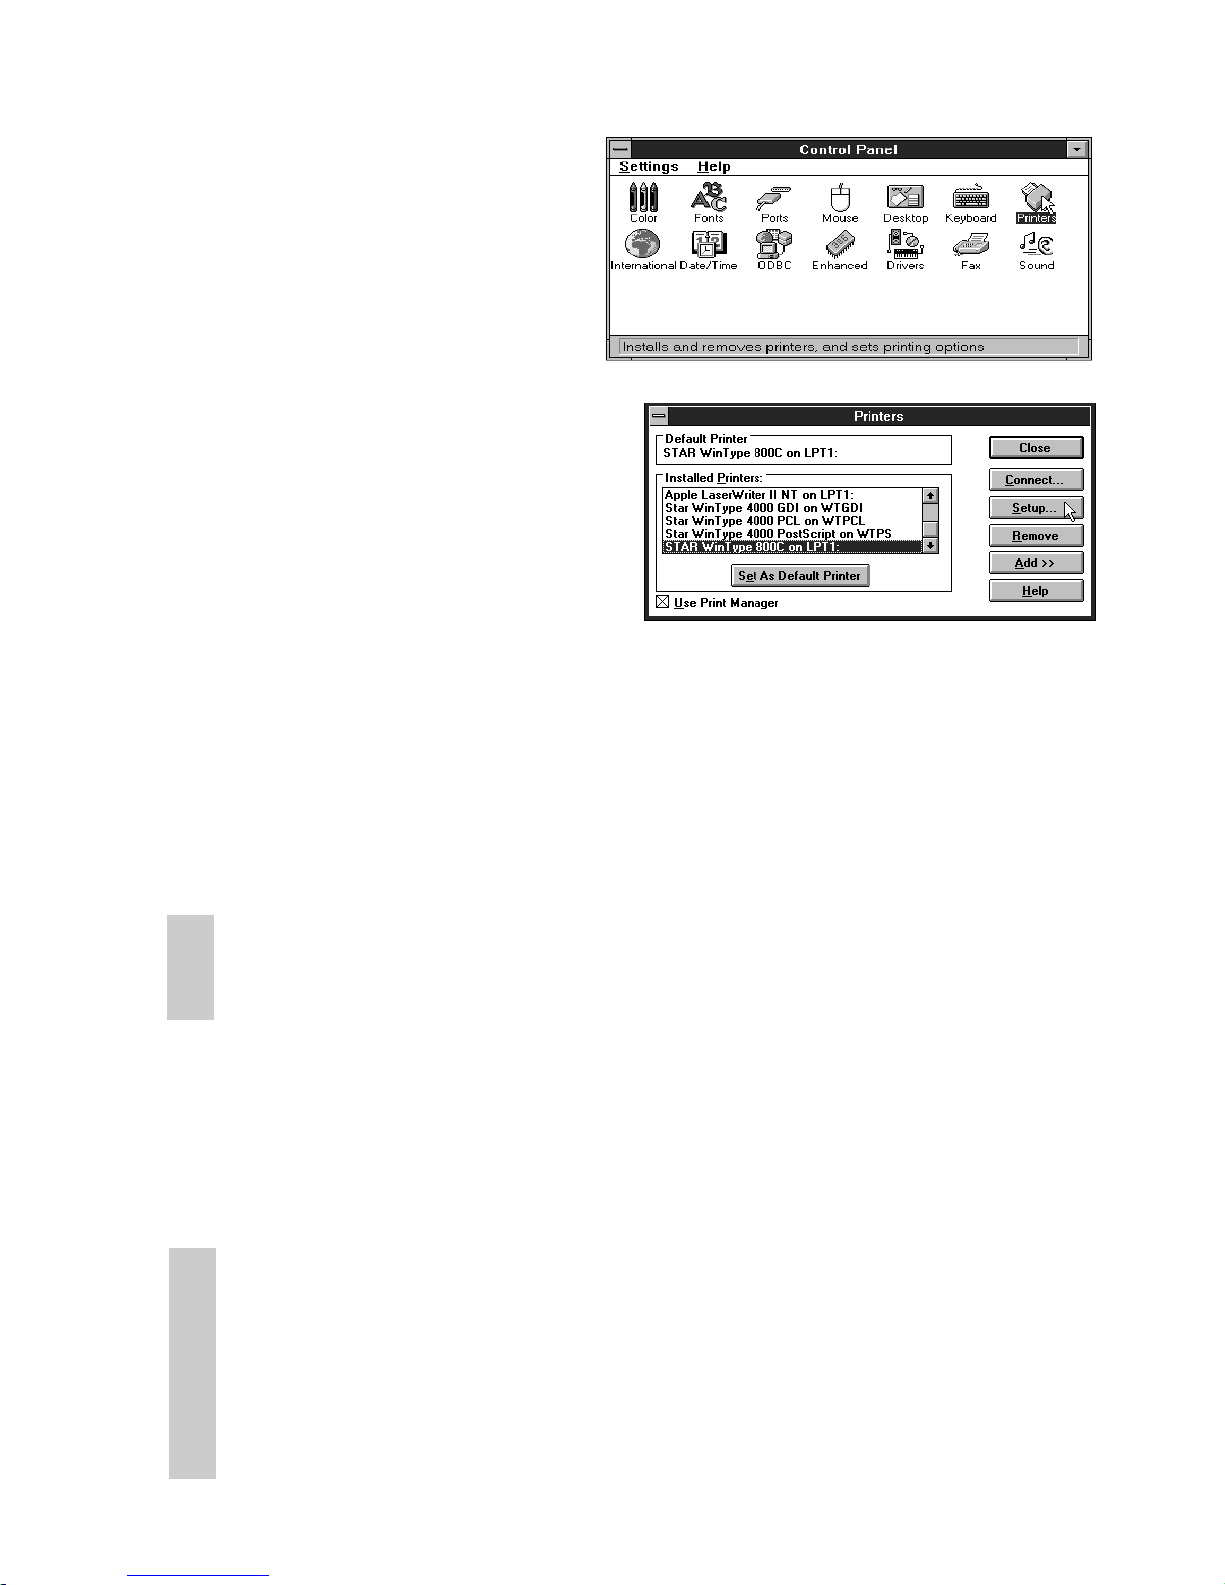
1. In the Program Manager, open the
Main group by double-click on its icon.
2. Double-click on the Control Panel icon
in the Main group.
3. Double-click on the Printers icon
in the Control Panel window.
4. Double-click on ST AR WinT ype 800C
on LPT1 in the Installed Printers window, if LPT1 is the port to which this
printer is connected. This will set it as
the default printer.
5. Click on the Setup button.
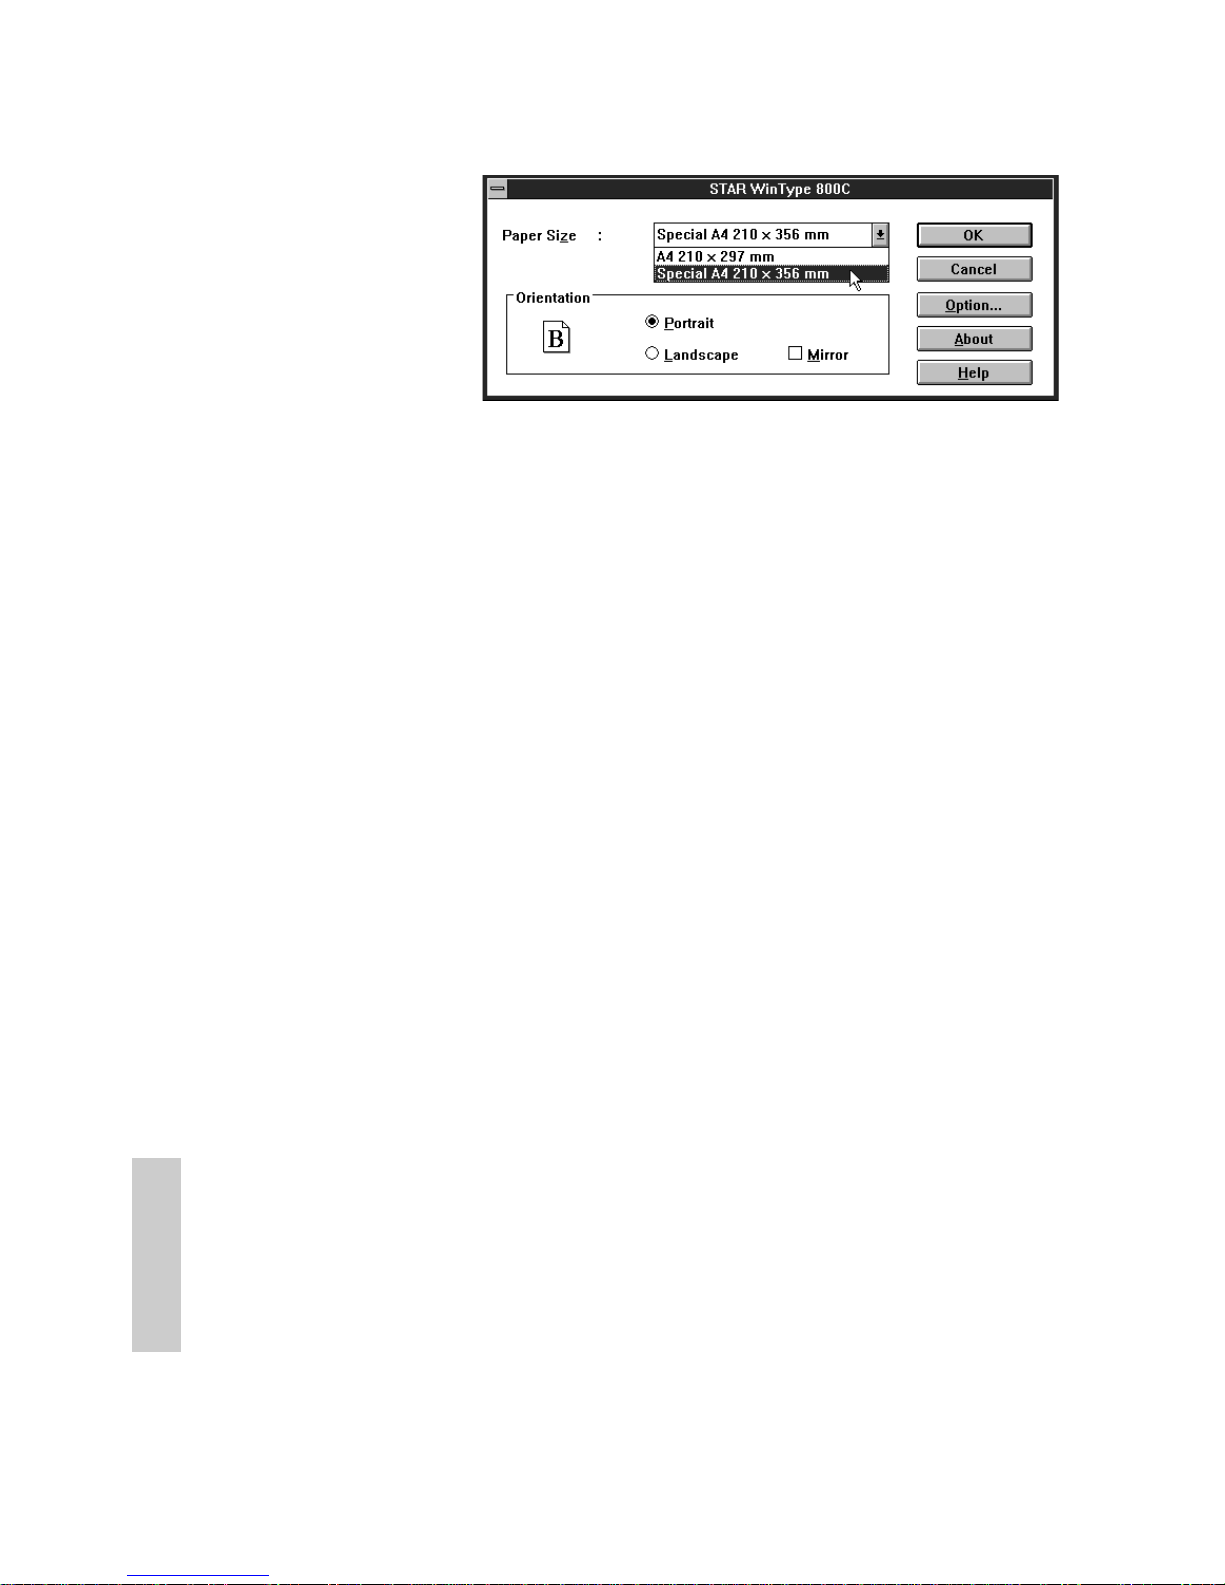
6. Select the size of the media you
will be using. If you selected
A4 type at step #5 on page 10,
you can select either A4 210 x 297
mm (8.27" x 11.69") or Special A4
210 x 356 mm (8.27" x 14")
If you selected Letter type at step #5
on page 10, you can select either Letter
210mm x 279mm (81/2" x 11") or
Legal 216mm x 356mm (81/2" x 14")
You can also use these to select size
corresponding to your overhead projection (OHP) film and iron-on transfer
sheets.
Page 31

22
7. Select either Portrait, Landscape or
Mirror printing.
If you select Portrait, your documents
will be printed vertically. If you select
Landscape, your documents will be
printed horizontally . Mirror is used to
reverse the image .
8. Click on the Options button.
This will call up the Options menu
where you can make further changes
there.
9. Select the media type you want to use
in the drop-down list box. Selections
include: Coated Paper, Plain Paper
and OHP Film. Default is Coated
Paper.
Note: Select Coated Paper when printing presentation grade paper. Select
OHP Film when printing iron-on transfer sheets.
Caution: You can use print media other than the recommended paper, such as
PPC paper or the equivalent. However, be aware that print quality
will greatly decrease with other print media. When using PPC paper
or the equivalent, select Plain Paper in the Media Type checkbox.
10.Select the type of film roll you have
installed on the printer, from the dropdown list box. Selections include:
3-Color for 3 color film rolls; 4-Color
for 4 color film rolls; Monochrome for
black film rolls.
11.Click on the OK button of the Options
dialog box.
12.Click on the OK button of the Setup
dialog box.
13.Click on the Close button in the
Printers dialog box to save your
changes and return to the Program Manager.
Note: The instructions above are for settings made from the Control Panel.
Depending on the application software you are using, similar settings
can be made from the "Print Setup" command in the File menu.
Page 32

23
Printing
When you select the Print command from the File menu of your W indows application,
printing will begin. Operation may vary somewhat, however, per software application
program.
If you have selected Fast Print to Port (see
"High speed printing" on page 26) in the
Options dialog box, a message like the one
at the right will be displayed. This will provide you with the status of the document
being currently printed.
DIP switch settings
This printer is equipped with DIP switches so that you can freely set the darkness or
lightness of the final print. The DIP switches are located on the back side of the printer
and can be changed using the tip of a ball point pen or other similar object. Altogether
there are 7 levels from which you can select.
T o change the darkness setting of your printer, you use DIP switches 7, 8 and 9. Use the
following illustration to make your selections.
Note: Printer driver settings have a higher priority than DIP switch settings.
DIP switch settings are primarily useful for test prints.
Caution: DIP switches other than the ones mentioned here should not be
touched.
Caution: Always turn OFF the power when making DIP switch setting changes.
Note: The default setting is 0 (all switches ON).
Print Intensity
0
1
0
1
0
1
0
1
0
1
0
1
0
1
+3
(Darkest)
+2
+1
0
(Standard)
-1
-2
-3
(Lightest)
(OFF)
(ON)
ON 1 2 3 4 5 7 96 8 10
Page 33

24
There are other selections in the Options dialog box that can enhance the performance
and color graphics quality of your printer. These selections - changing halftones, image
quality, gamma correction, color balance and high speed printing - are described in the
following sections.
Changing halftones and image quality
The Options dialog box, introduced earlier , contains three parameters for changing half-
tone and image quality. The following explains how to change them and what each
setting means.
Changing halftones
Steps:
1. Open the Main group by double click-
ing on its icon.
2. Double-click on the Control Panel icon
in the Main group.
3. Double-click on the Printers icon.
4. Click on STAR WinType 800C on
LPT1 in the Installed Printers list,
if LPT1 is the port to which this
printer is connected.
5. Click on the Setup button.
Page 34

25
6. Click on the Options button.
There is a box in the Options dialog box
titled "Halftone" which is where you
can select the halftone that meets your
needs. The following lists the meanings
of each type of halftone.
Spiral This gives a sharp image and is
best for computer graphics and
presentations. Because the "cells"
for the basic image are smaller, you
can print much finer images.
Mesh This also gives a sharp image and is
good for computer graphics and
presentations. Because the "cells"
for the basic image are large, color
discrepancies won't stand out.
Error This gives a softer image and
Diffusion is good for natural looking
images.
Changing gamma correction
Gamma correction, also part of the Options dialog box, is used for adjusting the brightness of tones. This printer driver includes R: (red), G: (green), and B: (blue) gamma
corrections. You can brighten or darken halftone colors using these settings. Refer to the
illustration below to set gamma correction.
Bright Max. 3.0
(set in increments of 0.4)
Standard 1.0 (Default setting)
(Set in decrements of 0.2)
Dark Min. 0.6
Note: If the gamma correction is set too high, gradations will decrease.
Page 35

26
Changing color balance
You can use the color balance scroll bars, also part of the Options dialog box, to change
the balance of the colors you are going to use. Again, this printer driver is equipped with
scroll bars for the three colors of red, green and blue. This is good for enhancing some of
the colors you want to use in your presentation documents. For example, if you move
the R: (red) scroll bar to the right, you can increase the reddishness of the overall image.
Use the following illustration to set the density you want.
Weak Standard Strong
(set in increments of 1)
Minimum –64 0 Maximum +64
Note: Gamma correction affects the 40% to 60% of the color selected.
Density adjusts the concentration of the entire body of color selected.
7. When you have finished making your
changes, click on the OK button of the
Options dialog box.
8. Click on the OK button of the Setup
dialog box.
9. Click on the Close button to save your
changes and return to the Program
Manager.
High speed printing
There are two parameters from which you can choose for printing speed. These parameters are under the Performance box in the Options dialog box. Follow the Steps
below to change printing speeds.
Steps:
1. Open the Main group by double clicking on its icon.
2. Double-click on the Control Panel icon
in the Main group.
Page 36
27
3. Double-click on the Printers icon.
4. Click on STAR WinType 800C on
LPT1 in the Installed Printers list,
if LPT1 is the port to which this
printer is connected.
5. Click on the Setup button.
6. Click on the Options button.
7. Click on Fast Print to Port.
Putting an X in the Fast Print to Port
box will cause your print job to be sent
directly to the printer without going
through Windows Print Manager. This
will increase printing speed.
Note: Fast Print to Port works only in 386 Enhanced mode of IBM PC/AT
compatible computers.
Note: If you are linked to a network or printing to a file, do not use Fast Print to
Port.
8. Click on Use Max. Memory.
Putting an X in the Use Max. Memory
box will increase printing speed by
increasing the memory (RAM) used to
process your print job.
Note: If your application is low on memory, do not use Use Max. Memory.
If there is not enough memory when this is checked, printing speed
will not increase.
Use Max. Memory memory size varies according to the conditions
under which it is being used. Please refer to the table on the next
page for memory sizes. If Use Max. Memory is not being used,
memory size is 1MB regardless of the conditions.
Page 37

28
Film Roll
Paper Size Monochrome 3-color 4-color
A4 or Letter 1MB 3MB 4MB
Special A4 or Legal 1.2MB 3.6MB 5MB
Print speed
Another way you can change the printing speed is by changing the settings in the Options menu.
Steps:
1. Open the Main group by double clicking on its icon.
2. Double-click on the Control Panel icon
in the Main group.
3. Double-click on the Printers icon.
4. Click on STAR WinType 800C on
LPT1 in the Installed Printers list,
if LPT1 is the port to which this
printer is connected.
5. Click on the Setup button.
Page 38

29
6. Click on the Options button.
The fourth item from the top in the
Options dialog box is Print Speed.
Here you can select between
Auto, Medium and Low speeds.
An explanation of each is below.
Auto: This is the default setting which
prints documents at the standard
speed of this printer.
Medium: This is slightly slower than Auto .
Low: This is the slowest speed
available. It is useful when printing graphics with patterns or high
intensity.
Other buttons in the Options dialog box
Black Representation
This function in the Options dialog box is
used to produce a sharper black print for
your document only when using 4 color film
rolls. If you select Y + M + C = Black your
printer will print each of the three colors
for your black text or graphics and will place
one layer of black ink on top to give you a
sharper, more solid black.
You can also select Black Only which will
cause the film roll to bypass the other three
colors and print only black where black is
required.
Page 39

30
Intensity
This will change the lightness and darkness
of the printed image.
Photo
When you click on the Photo button,
Gamma Correction will automatically
change to the values of R = 0.8, G = 1.0 and
B = 1.4 to give your photographs more true
color printing. Color Balance will be set to
R = 0, G = 5 and B = 0
If you click on this when using 4 color film
ribbons, Black Representation will be set
to Y+M+C+Black.
Text
When you click on the T ext button, Gamma
Correction will automatically be set to the
values of R = G = B = 1.0 and Color Balance will be set to R = G = B = 0.
If you click on this when using 4 color film
ribbons, Black Representation will be set
to Black Only.
Page 40

31
Printing on Special A4 and Legal size media
This printer can also print on special A4 size media (210 x 356mm/8.27 in. x 14 in.) and
Legal (8 1/2" x 14"). However, you must install the proper Special A4/Legal size film
roll and setup the new paper size through the Printers Setup dialog box in Windows.
Steps:
1. Open the Main group by double click-
ing on its icon.
2. Double-click on the Control Panel icon
in the Main group.
3. Double-click on the Printers
icon.
4. Click on STAR WinType 800C on
LPT1 in the Installed Printers list,
if LPT1 is the port to which this
printer is connected.
5. Click on the Setup button.
Page 41
32
6. Click on the Drop-down list
box to reveal media sizes.
7. Click on Legal 8.5 x 14 in.
When using Letter type, A4
will become Special A4.
8. Click on the OK button.
9. Click on the Close button to save your
settings and return to the Program
Manager.
10.You must manually feed Legal print
media for printing. This is because
the paper tray does not automatically
feed SA4 media.
Note: You must install the proper TL-1-14C3H (3 color), TL-1-14C4H (4
color) film roll to be able to print. Failing to do so will result in a
printing error. See "Installing the film roll" on page 5 for details on
installation.
Note: See "Manual loading" on page 19 for details on manually feeding
print media.
Page 42

33
Replacing the film roll
You must replace the film roll whenever you change from color to monochrome printing
(or the reverse) or whenever the film roll is used up. Follow the Steps below to replace
the film roll.
Steps:
1. Make sure that the power switch is in
the OFF position.
2. Open the top cover of the printer while
the paper tray is in place. Use the Top
Cover Support bar to prop up the Top
Cover.
Caution: Always use the Top Cover Support Bar to prop open the Top Cover.
Caution: Always leave the paper tray in place when opening the printer's top
cover. Removing it while the top cover is open will cause it to fall shut
while your hands are inside the machine.
Caution: Do not touch the sensor located at the front left side inside the printer
when the printer's power is ON. Touching the sensor will cause the
gears to automatically rotate.
Do not touch this sensor
Page 43

34
3. Remove the film roll.
First remove the take-up roll located in
the front of the printer.
Next, remove the film roll in the back
of the printer.
Caution: Be careful not to touch the thermal print head because it may be very hot.
4. Remove the film roll bobbins from the
roll you just removed.
Note: You can dispose of used film rolls as normal garbage. However, you
should remember that all printed data will remain in reverse image on
the film roll. Take special precaution if you have printed sensitive
information using the film roll.
5. Follow the instructions on pages 4 - 6
to install a new film roll.
Page 44

35
Changing the film roll setting
You must setup the printer driver in W indows when changing to a different type of film
roll. Follow the Steps below.
Steps:
1. Open the Main group by double click-
ing on its icon.
2. Double-click on the Control Panel icon
in the Main group.
3. Double-click on the Printers icon.
4. Click on STAR WinType 800C on
LPT1 in the Installed Printers list,
if LPT1 is the port to which this
printer is connected.
5. Click on the Setup button.
6. Click on the Options button.
Page 45

36
7. Click on the Film Roll Drop-down list
box and select the new type of film roll
you have just installed.
See page 2 of Chapter 1 "Setting up your
printer" for a list of genuine Star printer
supplies for a description of the types
of film rolls you can use with this printer .
8. When finished making your selection,
click on the OK button.
9. A message to confirm your changes will
appear. Click on OK.
10.Click on the OK button of the Setup
dialog box.
11.Click on the Close button to save your
changes and return to the Program
Manager.
Page 46

37
Printing with iron-on transfer
This printer can print not only on coated paper for laser quality color output, but it also
can output laser quality color images on iron-on transfer sheets. However, you should
observe the Steps below when printing on iron-on transfer sheets.
Note: Use only Genuine Star Iron-on Transfer Sheets for this application.
The iron-on transfer is a great way to create original designs for T-shirts or other cloth
items. When you are printing iron-on transfer sheets, always select OHP Film in the
Media T ype setting of the printer driver.
Steps for printing on the transfer sheets
1. Create an image with your software
program.
2. Place the finishing sheet, with its
silicon side facing upwards into the
paper tray base. The silicon side is the
side facing you when the cut corner is
in the upper right hand side.
Note: The finishing sheet is not for printing. It is used to prevent any
printing or feeding trouble with the iron-on transfer sheet.
3. After inserting the finishing sheet, place
the paper tray cover on top of the paper
tray base in the direction of the arrows
in the illustration at the right.
Page 47

38
4. Click on the Mirror checkbox
in the Printers Setup dialog
box. This will cause the
printer to print a mirror image
of your design.
5. Load the iron-on transfer sheet, with
the printing side down, into the opening
in the paper tray cover. Make sure that
it is inserted completely into the printer .
Caution: Do not manually load more than one sheet at a time. Wait until the
first sheet has been completely printed before loading more sheets.
6. Print your image on the transfer sheet.
Steps for transferring the image on the cloth
1. Cut out the image on the transfer sheet
leaving approximately 1/2" margin
around the image. Round off the
corners because this will reduce the
chance of the image peeling off.
2. Carefully position the transfer sheet on
the cloth with the image side down.
3. Uniformly iron the transfer sheet with
the iron set to 320°F (160°C).
4. Slowly remove the transfer sheet from
the cloth starting from a corner.
Note: Do not remove the transfer sheet until it has cooled to room
temperature.
Page 48

39
Steps for the finishing process
1. Place the finishing sheet over the image
on the cloth, with the cut out corner in
the top left. Make sure that the silicon
side is down. The finishing sheet should
completely cover the image.
2. Iron the finishing sheet at the same
setting used to iron the transfer sheet.
Note: Do not remove the finishing sheet until it has cooled to room
temperature.
3. Slowly remove the finishing sheet from
the cloth starting from a corner.
4. If the image seems like it will peel off
of the cloth, repeat the finishing process.
Page 49

40
Page 50

41
Chapter 4 Maintenance & troubleshooting
Your printer is a reliable, precisioned instrument. It was built with care and should, if
handled properly, perform at its finest and serve you well for a long time. However, like
any piece of equipment, there may be times when it may not perform as you had expected. In this chapter, we would like to provide you with simple guidelines on the proper
maintenance that will keep your printer in fine working condition and troubleshooting
techniques to help you should you ever experience problems.
Maintaining your printer
The best way to keep your printer in fine working condition is to keep it clean. The
following describes how to clean your printer.
Cleaning the outside of the printer
Steps:
1. Use a dry, soft cloth to gently wipe the
exterior of the printer.
If your printer is exceptionally dirty , you
may apply water or a neutral cleaner
to the cloth to wipe away the excess dirt.
Caution: Do not use thinners or organic solvents, such as Benzine, to clean
your printer.
Cleaning the inside of the printer
If you periodically clean the inside of your printer , it will continue to perform at its finest
for a long time. You should remember to clean the inside of the printer whenever any of
the following occur.
• Paper jams occur often
• Vertical lines occur in the printed image
• Colors are not stable
Water
Neutral
cleaner
Page 51

42
Ethanol
To clean the inside of the printer, you should prepare the following items.
• A soft cloth dampened with ethanol.
Caution: Gasoline, Benzine and thinners cause irreversible damage to plastic.
They should never be used to clean this printer.
Caution: Do not use sharp objects to clean the inside of the printer because
this could cause damage.
Steps:
1. Dampen a soft cloth with ethanol.
2. Make sure that the printer is not printing and turn off the power to the printer .
3. Remove the paper tray cover and the
paper tray.
4. Press the top cover release and open the
top cover while the paper tray is in place.
Use the Top Cover Support Bar to prop
up the top cover.
Caution: Always use the Top Cover Support Bar to prop open the Top Cover.
Removing it while the Top Cover is open will cause it to fall shut while
your hands are inside the machine.
Page 52

43
Caution: Because cleaning is done while the paper tray cover and paper tray
are removed from the printer, it may slam shut.
Always hold the top cover with one hand while cleaning to prevent
injury.
5. Remove the film rolls as described on
page 28.
6. Wipe the thermal head using the soft
cloth.
Caution: If you have used the printer recently, be especially careful because
the thermal head may still be hot.
7. Gently wipe the platen roller with the
soft cloth.
Page 53

44
8. Wipe the paper feeders with the soft
cloth.
9. Wipe the paper extract rollers with the
soft cloth.
10.While holding up the paper guide, wipe
the area of the paper pinch rollers you
can see with the soft cloth.
11.Rotate the gear, shown in the illustration, to expose the opposite side of the
pinch rollers.
Wipe the entire roller
while rotating the gear .
Wipe the entire roller
while rotating the gear .
Page 54

45
12.Wipe the pinch rollers in the back of the
inside of the printer.
13.Lay the Top Cover Support Bar down
to its original position while holding the
top cover with one hand and gently close
the top cover. You should hear a clicking sound as it closes tightly.
14.Place the paper tray and paper tray cover
back into their normal operating positions and turn ON the power to the
printer.
Caution: Do not print for 5 to 10 minutes (or until the alcohol has dried) after
cleaning the inside of the printer.
Make sure that the
Ready lamp is lit.
Page 55

46
Clearing paper jams
If you should experience a paper jam, Windows will display an error message and the
Paper lamp on the control panel will light. Observe the following steps should a paper
jam occur.
Steps:
1. Turn the printer's power OFF once and
then turn it ON again.
Note: Turning the printer's power OFF and ON again will initialize the printer
which makes removing the jammed paper easier.
2. Turn the power OFF again.
3. If your print media has jammed partway
through the feeder mechanism, remove
the paper tray cover and gently pull the
paper up through the entrance of the
feeder.
Proceed to Step 8 on page 48.
4. If your print media has jammed partway
through being ejected from the printer,
gently pull the media up through the paper eject. Proceed to Step 8 on page
48.
Page 56

47
5. If your print media becomes jammed
inside of the machine, press the cover
release and open the top cover while the
paper tray is in place. Use the T op Cover
Support Bar to prop up the Top Cover.
6. Y our print media will appear if you gen-
tly rotate the gear, as shown in the illustration at the right.
Note: Do not leave any paper scraps inside of the printer if your paper
should rip.
7. After removing the jammed paper, close
the top cover. You should hear a clicking sound as it closes tightly.
Page 57

48
8. Turn ON the power to the printer and
confirm that the Ready lamp is lit.
Transporting your printer
We suggest that you take the following precautions when transporting your printer to a
new location to prevent damage to it.
Steps:
1. Get the original carton box and protective items out and ready for packing the
printer .
2. Make sure that the printer is not printing and turn OFF the power.
3. Unplug the interface cable and the
power cord.
4. Press the cover release and open the top
cover and use the Top Cover Support
Bar to prop open the top cover.
Page 58

49
5. Remove the film roll as described on
page 33.
6. Replace the protective inserts as shown
in the illustration at the right.
7. Replace the protective sheet.
8. Lay the Top Cover Support Bar down
to its original position while holding the
top cover with one hand.
9. Close the cover completely while gen-
tly pressing the protective pieces toward
the inside of the printer.
This should
protrude
through the
sheet.
Page 59

50
9. Remove the paper tray cover and the
paper tray base.
10.Wrap the printer in its original protective sheet and place it in its original box.
Page 60
51
Troubleshooting
Your printer is a reliable, precisioned instrument and should not cause you any trouble if
it is used and treated sensibly. However, we are providing you with this troubleshooting
section to help you should you encounter any problems with your printer. Remember
that your printer is a highly sophisticated device and that this section is intended to be
only a brief guide. As with many other precisioned instruments, this printer contains
high voltage. We request that you perform only the operations which are explained here.
Warning: Any attempt to perform troubleshooting operations other than those
described here may result in electric shock, damage to the printer or
both.
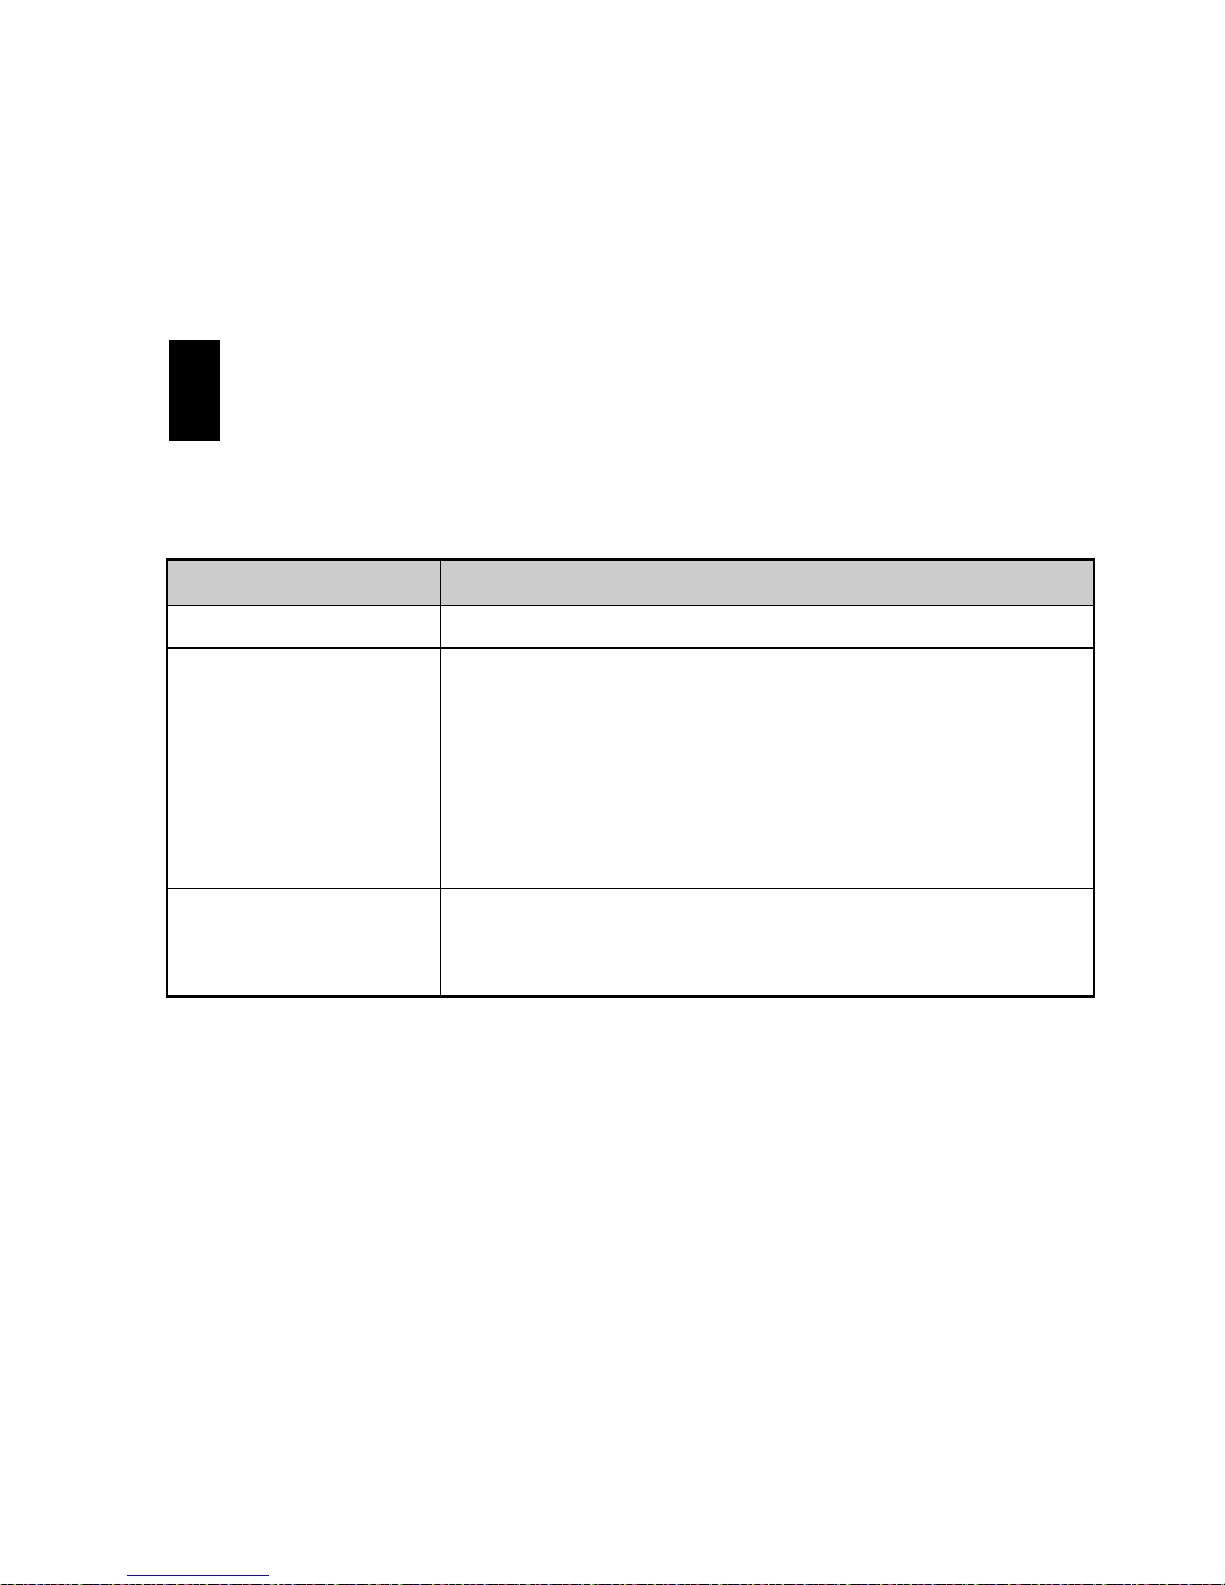
The following table is provided to give you an idea of where to find solutions to problems you may encounter.
Region of problem Description
Power supply Power is not being supplied to the printer. (Page 52)
Printing The printer doesn't print, or it stops printing. (Page 52)
The printed image has vertical lines. (Page 52)
The overall print is light. (Page 52)
The overall print is dark. (Page 53)
Patterns appear where print density is high. (Page 53)
Color variations are too large. (Page 53)
Only part of the image is printed. (Page 54)
Paper feeding Paper won't feed from the paper tray or manually. (Page 54)
Paper jams occur frequently. (Page 54)
Two sheets of paper are fed at the same time. (Page 54)
Page 61

52
Power supply
Power is not being supplied to the printer.
Check Possible remedy
Is the printer turned ON? Check to make sure that the power switch on the back
of the printer is in the ON [ ] position.
Is the AC adapter properly Turn the printer OFF. Make sure that the power cable
plugged into the printer and is securely connected and then turn the printer back
the electrical outlet? ON.
Is the voltage correct? Use only the AC adapter that came with this printer.
Printing
The printer doesn't print, or it stops printing.
Check Possible remedy
Is the interface cable Make sure that the interface cable is plugged securely.
connected securely?
Is the printer in the Ready Make sure that the Ready lamp is lit. If it is flashing,
mode? press it to enter the Ready mode.
Is paper jammed? Make sure that there is no paper or other media
jammed inside of the printer. See page 46 for an
explanation on clearing paper jams.
Is the software you are Check the installation settings in your software and reusing properly installed install it if necessary.
for your printer?
Is the proper media being Special A4 media must be either manually fed or
used? rework your data for A4 size.
The printed image has vertical lines.
Check Possible remedy
Is the thermal head dirty? Clean the inside of the printer. See page 41 for an
explanation of the proper way to clean the inside of
your printer.
The overall print is light.
Check Possible remedy
Is the media surface too Use only the recommended media with this printer.
rough? See Chapter 3 for an explanation of the proper media
to use.
Page 62

53
The overall print is light - continued.
Check Possible remedy
Are you using the correct Recommended coated paper will have the words
side? "PRINT OPPOSITE SIDE" printed in light blue
letters on the back side. The side from where you can
read the silver colored letters on the recommended
OHP film is the print side.
Is the media type set Check the media type settings in the Printers Setup
correctly? dialog box in Windows.
Is the print intensity set too Change the Printer Setup dialog box in Windows to a
low? higher setting. See Chapter 3 Changing intensity for
an explanation.
The overall print is dark.
Check Possible remedy
Is the media type set Check the media type settings in the Printers Setup
correctly? dialog box in Windows.
Is the print intensity set too Change the Printer Setup dialog box in Windows to a
high? higher setting. See Chapter 3 Changing intensity for
an explanation.
Patterns appear where print density is high.
Check Possible remedy
Is the print intensity set too Change the Printer Setup dialog box in Windows to a
low? higher setting. See Chapter 3 Changing intensity for
an explanation.
Is the print speed too high? Change the print speed.
See Chapter 3 Changing print speed for an
explanation.
Color variations are too large.
Check Possible remedy
Are the platen and pinch Clean the inside of the printer. See page 41 for an
rollers dirty? explanation of the proper way to clean the inside of
your printer.
Page 63

54
Only part of the image is printed.
Check Possible remedy
Is the proper media being Special A4 media must be either manually fed or
used? rework your data for A4 size.
Paper feeding
Paper won't feed from the paper tray or manually.
Check Possible remedy
Is paper feed roller dirty? Clean the inside of the printer. See page 41 for an
explanation of the proper way to clean the inside of your
printer .
Is the paper too thick or Use only the recommended paper types.
too thin?
Is the top cover completely Close it tightly if it is open.
closed?
Paper jams occur frequently.
Check Possible remedy
Are the platen and pinch Clean the inside of the printer. See page 41 for an
rollers dirty? explanation of the proper way to clean the inside of
your printer.
Is the paper too thick or Use only the recommended paper types.
too thin?
Is the top cover completely Close it tightly if it is open.
closed?
Is the film roll properly Properly select the film roll which is currently
selected? installed on the printer.
Are you using the wrong Check the media settings and the film roll settings.
size media? Using the wrong media or the wrong film will cause
errors to occur.
Two sheets of paper are fed at the same time.
Check Possible remedy
Is there static electricity Fan your media before loading it into the paper tray.
built up on the media? For iron-on transfer sheets, always place the finishing
sheet in the paper tray and manually feed one transfer
sheet at a time.
Page 64

55
Other DIP switch settings
This printer has 10 DIP switches located on the back, as mentioned earlier in this manual.
The following information is provided to help you should you ever need to adjust the
printer's performance in the future. We recommend that switches other than 7 through 9
for print intensity ordinarily be left alone.
Print Type Items that can be changed with the DIP switches
Normal printing
(Note 1)
• Overall print intensity (7 levels from +3 to —3)
(printing from Windows) • Sets slow speed mode
(Note 2)
Test print • Change of film rolls (5 types)
• Change of print media/size (3 types/2 types)
• Overall print intensity (7 levels from +3 to —3)
Note 1: Windows settings take priority over DIP switch settings.
Note 2: This sets Low print speed which is useful for areas with high intensity
or patterns.
Paper Types
Plain Paper
Coated Paper,
Presentation
grade paper
OHP Film,
Iron-on Transfer
Sheets
Film Roll Types
Paper Sizes Print Intensity
TL1-11C4H
4 Color, A4
TL1-14C4H
4 Color, A4/SA4
TL1-14C3H
4 Color, A4/SA4
TL1-CBH
Monochrome
A4/SA4
TL1-11C3H
3 Color, A4
A4
S4A
0
1
0
1
0
1
0
1
0
1
0
1
0
1
0
1
0
1
0
1
0
1
0
1
0
1
0
1
0
1
0
1
0
1
0
1
+3
(Darkest)
+2
+1
0
(Standard)
-1
-2
-3
(Lightest)
Do not change
this switch setting.
It should always
be set to the 1
(ON) position.
ON 1 2 3 4 5 7 96 8 10
0
1
Slow Speed
Mode
(Coated Paper)
Page 65

56
Pinout of interface connector
This printer uses a standard 8 bit parallel interface connector (Centronics interface). The
following information is the pin assignment of the interface connector.
Pin Signal Pin Signal
1 DATA STROBE 19 GND
2 DATA 1 20 GND
3 DATA 2 21 GND
4 DATA 3 22 GND
5 DATA 4 23 GND
6 DATA 5 24 GND
7 DATA 6 25 GND
8 DATA 7 26 GND
9 DATA 8 27 GND
10 ACKNLG 28 GND
11 BUSY 29 GND
12 EOP 30 GND
13 ON LINE 31 INPUT PRIME
14 GND 32 FAULT
15 33 GND
16 GND 34 EOI
17 CHASSIS GND 35
18 +5V (Max. 160mA) 36
118
19
36
Page 66

57
Chapter 5 Reference information
Specifications
Engine
Printing process Thermal wax transfer
Resolution 300 X 300 dpi
Printing speed
Letter size paper Monochrome 31 seconds/page
3 color (YMC) 64 seconds/page
4 color (YMCB) 80 seconds/page
A4 size paper Monochrome 32 seconds/page
3 color (YMC) 67 seconds/page
4 color (YMCB) 85 seconds/page
Legal size paper Monochrome 37 seconds/page
3 color (YMC) 87 seconds/page
4 color (YMCB) 107 seconds/page
Special A4 size paper Monochrome 37 seconds/page
3 color (YMC) 87 seconds/page
4 color (YMCB) 107 seconds/page
Paper feed
Speed Paper: 4, 6, 8 or 10 ms/line (depending on data
transfer speed)
OHP film: 6, 8 or 10 ms/line (depending on data transfer
speed)
Paper handling Paper tray Capacity: 50 sheets of coated/presenta-
tion grade paper
Paper stacker:10 sheets
Manual insertion:Available
Characters No resident font
Software fonts: 35 TrueType fonts (on floppy disk)
Page 67

58
TrueType fonts are supplied on disk for use with
Windows 3.1 applications.
Memory Standard RAM size is 512 KB.
Interface Centronics parallel
Power supply 120VAC, 220VAC, 230VAC, 240VAC, 50/60Hz
(varies according to the country of purchase)
Power consumption At standby: 17W
At printing: 120W
Dimensions 14.13" (W) x 10.08" (D) x 5.04" (H)
(359mm (W) x 256mm (D) x 128mm (H))
Weight 16.5 lbs. (7.5 kg.)
Reliability information
Printer life 25,000 pages or 5 years
Printer head life 5,000 pages (A4 size, 3 color, 20% duty)
Noise level ISO-7779
53.0 dB
Environment
Temperature Operating: +10° to +35°C (50° to 95°F)
Non-operating: -20° to +55°C (- 4° to 131°F)
Humidity Operating: 30 to 70% RH (no condensation)
Non-operating: 30 to 90% RH (no condensation)
Printer supply accessories
Film roll TL1-11C3H-30
Color type: 3 color (YMC) film roll
Size: Page length is less than 11" (Letter and A4)
Life: 30 pages per roll
Coated paper A-PWC-30 (for American market)
Size: Letter
Packaging: 30 sheets
Presentation grade A4-PW-30 (except for American market)
paper Size: A4
Packaging: 30 sheets
Page 68

59
Printer supply options
Film roll
TL1-11C3H Color type: 3 color (YMC) film roll
Size: Page length is less than 11" (Letter and A4)
Life: 80 pages per roll
TL1-14C3H Color type: 3 color (YMC) film roll
Size: Page length is less than 14" (Letter, A4, Legal, SA4)
Life: 69 pages per roll
TL1-11C4H Color type: 4 color (YMCB) film roll
Size: Page length is less than 1 1" (Letter and A4)
Life: 59 pages per roll
TL1-14C4H Color type: 4 color (YMCB) film roll
Size: Page length is less than 14" (Letter, A4, Legal, SA4)
Life: 47 pages per roll
TL1-CBH Color type: Monochrome film roll
Size: Page length is less than 14" (Letter, A4, Legal, SA4)
Life: 200 pages per roll (at Letter or A4)
Coated paper A-PWC A4-PWC
Size: Letter Size: A4
Packaging: 100 sheets Packaging: 100 sheets
SA-PWC SA4-PWC
Size: Legal Size: Special A4
Packaging: 100 sheets Packaging: 100 sheets
Presentation grade paper A-PW A4-PW
Size: Letter Size: A4
Packaging: 100 sheets Packaging: 100 sheets
SA-PW SA4-PW
Size: Legal Size: Special A4
Packaging: 100 sheets Packaging: 100 sheets
OHP film A-TFC A4-TFC
Size: Letter Size: A4
Packaging: 100 sheets Packaging: 100 sheets
SA-TFC SA4-TFC
Size: Legal Size: Special A4
Packaging: 100 sheets Packaging: 100 sheets
Iron-on transfer sheets T90IO-LTR T90IO-A4
Size: Letter Size: A4
Packaging: 100 sheets Packaging: 100 sheets
Page 69

60
Glossary
T o fur ther aid you in the understanding of the printer and computer peripherals, we have
created this glossary of terms. Some of the terms listed in this glossar y appear in this
User's Manual, while others are commonly used computer terminology.
A
Application
A program that you use to perform a specific
task on your computer . These include programs
for word-processing or graphics creation.
ATM fonts
An abbreviation for Adobe Type Manager.
This font system was developed by Adobe Sys-
tems.
Attribute
The characteristics of a font. It includes orientation, symbol set, spacing, pitch, point size,
style, stroke and typeface.
B
Backup
To make a copy of the original floppy diskette
or a file on the hard disk. Making a backup of
your disks or files ensures that you won't lose
data if the originals are lost or damaged.
Bit
Binary digit. This is the smallest unit of information that a computer can hold. The value of
a bit (which is either 1 or 0) represents a twoway choice (on or off, true or false, black or
white).
Bitmap
A set of bits that represent a graphic image.
Bitmapped character
A character in a font that's rendered as a bitmap
and drawn as a pixel pattern on the screen. See
also font and pixel.
Bitmapped font
A font in a single point size made up of bitmapped characters. Some fonts stored in the
computer system are bitmapped fonts.
Buffer
A "holding area" in the memory where information can be stored by one program or device
and then read by another. For example, some
printers have built-in memory to store text that
comes from the computer faster than it can
printed. This memory, which frees the computer
for other work while the printer is printing is
called a printer buffer.
Button
An image on your screen which resembles a
push-button. You can click to designate, confirm or cancel an action.
Byte
A series of 8 bits that represent one character.
C
Cancel button
A button that appears in most dialog boxes which
you can use to cancel any command or option
you may have chosen.
Central processing unit (CPU)
The brain of the computer. It is the microprocessor which performs the actual computations.
Centronics parallel port
A standard wiring configuration for parallel data
transmission. Centronics is often used as a synonym for the parallel standard developed by
Centronics Inc.
Character set
The complete set of characters available in a
font.
Checkbox
A small box associated with an option in a dialog box or window . You can click on the checkbox to turn the option on or off. An option is on
when there is an X in the checkbox.
Page 70

61
Click
To position the pointer arrow on an object on
your display and to press the left button of your
mouse.
Color balance
This function adjusts the overall balance of the
three colors of red, green and blue. This is good
for enhancing some of the colors you want to
use in your presentation documents.
Command
An instruction that causes the computer to perform some action.
Configuration
(1) Your computer set up. (2) Your hardware:
the computer, displays, keyboard and peripheral
devices.
CPI
An abbreviation for Characters Per Inch.
D
Data bits
The number of bits in a transmitted byte that
actually contains data.
Default
A preset value or setting on your computer
which you can change.
Dialog box
A box which contains a message or instructions
for you to follow or a box containing options
from which you can select.
Document
Whatever you created on your computer using
an application program.
Double-click
To position your pointer arrow on an object, such
as an icon, and to press the left mouse button
twice in quick succession without moving your
mouse.
Drag and drop
To position your pointer arrow on an object and
press and hold the left mouse button, moving
the mouse and releasing the button.
E
EEPROM
Electronically Erasable Programmable Read
Only Memory. It has an internal switch to permit the user to erase the contents and write new
contents into it by means of electrical signals.
Engine
This is the mechanical printer developer and
laser portion of the printer.
Emulation
One printer's imitation of the functions of another printer.
Error Diffusion
This is a type of dithering process which results
in a softer printed image. It is useful for printing photographic images.
Expansion RAM board
An available option that is easily attached to the
computer to increase memory.
F
Fast Print to Port
This function of the Options dialog box, will
send your print job directly to the LPT port without going through Windows' Print Manager.
File
A named, ordered collection of information
stored on your hard disk or floppy disk.
File menu
A menu that lists commands that affect your
documents. File menus typically contain commands such as Save, Print and Quit.
Film Roll
This is the thermal wax roll which contains ink
used in printing documents.
Floppy disk
A disk made of flexible plastic which stores information from your computer. Floppy disks
come in two types: 3.5" and 5.25."
Font
A set of letters, numbers or symbols of the same
typeface design.
Page 71

62
G
Gamma Correction
Gamma is used to adjust the mid-range color
density of your image.
H
Halftone
This setting in the Options dialog box allows
you to define how sharp you want the printed
image to appear . There are three types with this
printer driver: Spiral; Mesh; Error Diffusion.
Handshaking
In data communications, the automatic acknowledgment by the receiving device of information
that has been sent to it, either by signals and the
interface ("hard") or by software controls
("soft").
Hex dump
Conversion by the printer of ASCII symbols into
their hexadecimal (base 16) equivalent. This is
useful for programmers or other users who want
to troubleshoot the communications between the
computer and the printer.
I
Icon
A small pictorial representation of an item on
your computer's desktop in Windows.
Interface
A hardware plug that allows cable connections
of two devices. For example, a cable from a
computer parallel port to a printer's parallel port.
L
Landscape
Printing on paper across its wider dimensions,
such as a spreadsheet that is 1 1 inches wide and
8.5 inches high; landscape pictures are usually
wider than they are tall.
M
Megabyte
1024 kilobytes, or 1,048,576 bytes. Also represented as MB.
Memory
Part of the computer system that can store information and retrieve it later.
Menu
A list of items either in the group windows or in
your applications from which you can select.
These are selected by clicking on them with your
mouse button.
Mesh
This is a type of dithering method which is part
of the Halftone setting in the printer driver's
Options dialog box. The dithering cells are
larger than Spiral which makes misregistration
of color less noticable.
Mirror
This function, in the printer driver Setup dialog
box, will cause your image to be printed vertically reversed.
Mouse
A device that controls the pointer arrow on your
display in Windows.
Mouse button
The button on the top of the mouse which you
press to make selections or do some action on
your screen.
MS-DOS
Microsoft Disk Operating System.
P
Parallel
A communications interface that sends or receives 8 bits of information plus control signals
at a time.
Parity
A bit in a serial information that allows a computer and printer to automatically check for errors in transmission.
Point
This is the typical unit of measurement for height
of a font. One point equals 1/72nd inch.
Page 72

63
Portrait
Printing on paper across the narrower dimensions, such as a letter on paper which is 8.5
inches wide and 11 inches high; portrait pictures are usually taller than they are wide.
PostScript
PostScript is a printer page description language
developed by Adobe Systems to communicate
between software applications and printers, independent of the printer's resolution.
R
RAM
Random Access Memory. This is memory that
can be used to store information temporarily
such as text or printing configurations. RAMstored information is erased when the power is
turned off.
ROM
Read Only Memory . This is memory which can
be stored permanently whether the power to the
computer is on or off.
S
Scalable fonts
These are fonts created within the printer on a
character-by character basis ensuring high speed
and print quality. In virtually limitless sizes,
these fonts can be scaled from 3 points to 999.75
points in quarter-point increments.
Serial
A communications interface that sends or receives 1 bit of information at a time at a specified baud rate.
Spiral
This is a type of dithering method where the
dithering cells are somewhat smaller than Mesh.
It produces finer images for graphics and presentations.
System fonts
These are fonts that are installed and used by
Windows during a normal installation.
T
Title bar
The bar at the top of your window that shows
the name of the current window.
TrueType font
A type of scalable font supplied with the Star
WinType 800C printer and used in Windows to
create WYSIWYG (What You See Is What You
Get) output. This font system was developed
by Apple Computer.
U
Use Max. Memory
This is a setting in the Options dialog box for
sending data to the printer via Windows' Print
Manager.
V
Virtual memory
A method by which a computer substitutes hard
disk space for RAM.
W
Window
An area of your display which shows information on your desktop. You can create and view
documents through windows.
Windows
A graphical user interface software program
developed by Microsoft Corporation for use on
MS-DOS computers.
WYSIWYG
An abbreviation of What You See Is What You
Get.
Page 73

64
Control panel 15
D
Darkness 23
Description 51
Dimensions 58
DIP switch settings 23
Dispose of used film 34
E
Electric shock 51
Engine 57
Environment 58
Error Diffusion 25
F
Fast Print to Port 23
Features of the printer 16
Feed SA4 media 32
Feeder mechanism 46
Film 22
Film roll 28
Film roll bobbins 1, 5, 34
G
Gamma correction 25
Genuine Star supplies 2
Glossary 61
H
Halftone 25
High speed printing 26
High voltage 51
Index
Symbols
3-color 22, 28
386 Enhanced 27
4-color 22, 28
A
A4 28
Accessories carton 1
Auto 29
B
Backup copy 11
Benzine 41
Black Only 29
Black Representation 29
Brightness of tones 25
Browse... 12
C
Centronics parallel interface cable 9
Changing density 26
Changing gamma correction 25
Changing halftones 24
Changing halftones and image quality 24
Changing the film roll setting 35
Characters 57
Cleaning the inside of the printer 41
Cleaning the outside of the printer 41
Clearing paper jams 46
Coated paper 2, 22
Color balance 26
Connecting the power cord 8
Connecting the printer
to your computer 9
Page 74

65
I
Installing the film roll 5
Installing the printer driver 11
Installing the printer driver software 11
Intensity 30
Interface 58
Interface cable 9
interface connector 56
Interface port 9
Iron-on transfer sheets 2, 21, 37
J
Jammed inside of the machine 47
L
Landscape 22
Lightness 23
Loading print media 17
Low 29
LPT1 14
M
Main group 21
Maintaining your printer 41
Maintenance & troubleshooting 41
Manual loading 19
Media type 16, 22
Medium 29
Memory iii, 11, 58
Mesh 25
Monochrome 28
N
Not Ready mode 15
O
Operating the printer 17
Options button 22
Options menu 22
Organic solvents 41
Overhead projection (OHP) film 2, 21
P
Package contents 1
Paper extract rollers 44
Paper feed 57
Paper feeders 44
Paper feeding 51, 54
Paper jams 54
Paper lamp 15, 46
Paper pinch rollers 44
Paper tray 4, 17, 33
Paper tray base 1, 4
Paper tray cover 1
Parallel interface cable 3
Performance 26
Photo 30
Placing the printer 3
Plain paper 22
Portrait 22
Power cable 1
Power supply 51, 52, 58
Preparing to print 3
Presentation grade paper 2, 22
Print Monitor 27
Print speed 29, 28
Printable area 19
Printer driver 1, 11
Printers icon 21
Printing 23, 51, 52
Printing on special A4 size media 31
Page 75

66
Printing speed 57
Printing with iron-on transfer sheets 37
Printing with WinType 800C 15
Program Manager 12, 21
Protective pieces 6, 49
Protective sheet 49
R
RAM iii, 11
Ready button 15
Ready lamp 15
Ready mode 15
Recommended coated paper 4
Reference information 57
Region of problem 51
Reliability 58
Replacing the film roll 33
Run 12
S
Sensitive information 34
Sensor 33
Setting up your printer 1
Setup button 21
Silicon 37
Socket protective sheet 6
Software fonts 57
Special A4 28
Specifications 57
Spiral 25
Starter 3-color film roll 1
System requirements iv, 11
T
Take-up roll 7
Test print 8
Text 30
Thermal print head 34
Thinners 41
Top cover 7, 33
Top Cover Support Bar 33
Transporting your printer 48
Troubleshooting 51
TrueType font samples 14
TrueType fonts 11, 57
Turning OFF the power 17
Turning ON the power 17
Type of ink 22
U
Unpacking and checking
the package contents 1
Use Max. Memory 27
W
Weight 58
Windows 11
Page 76

67
Customer service information
In the event that you are experiencing some technical difficulty with your Star printer,
please refer to Chapter 7 Maintenance & troubleshooting. That chapter provides you
with easy methods to diagnose and resolve problems which you may encounter.
For further technical support, you should first contact your Authorized Star Dealer. If
you require additional support, Star Micronics offers a wide variety of technical support
services. Please use the phone numbers listed below based on the country which your
Star printer was purchased.
Star Micronics Technical Hotline:
North America: 1-908-572-3300 Australia: 61-2-748-4300
Hong Kong: 852-795-2335 New Zealand: 64-9-570-1470
Star Micronics FaxBack (Document Retrieval) System:
Requires access to a facsimile machine or board with receive capability
North America: 1-908-572-4004
Star Micronics Bulletin Board Service:
Requires a computer modem
North America: 1-908-572-5010
United Kingdom: 44-494-461395
France: 33-1-305807
Germany: 49-69-780929
Netherlands: 31-73-424485
Australia and New Zealand: 61-2-748-2960
Customer response
Star Micronics Co., Ltd., invites your suggestions and comments on your printer and this
Users Manual. Please address your correspondence to Attn: Product Manager
Worldwide Headquarters
536 Nanatsushinya
Shimizu, Shizuoka Japan 424
North and South America Markets
STAR MICRONICS AMERICA, INC.
70-D Ethel Road West
Piscataway, NJ 08854
Australian Market
STAR MICRONICS PTY. LTD.
Unit A/107-115 Asquith Street
Silverwater, NSW 2141, Australia
Asian Market
STAR MICRONICS ASIA LTD.
18/F Tower 2, Enterprise Square
9 Sheung Yuet Road, Kowloon Bay,
HONG KONG
U.K. Market
STAR MICRONICS UK., LTD.
Star House
Peregrine Business Park
Gomm Road, High Wycombe
Bucks. HP13 7DL, U.K.
New Zealand Market
STAR MICRONICS (N.Z.) LTD.
64 Lunn Ave, Mount Wellington
P.O. Box 6255 Wellesley St.
Auckland, New Zealand
European Market
STAR MICRONICS DEUTSCHLAND GMBH
Westerbachstraße 59
D-60489 Frankfurt, F.R. of Germany
 Loading...