

Page 1

THERMAL PRINTER
TSP200 SERIES
USERS MANUAL
GUIDE D’UTILISATION
BEDIENUNGSANLEITUNG
MANUALE DI ISTRUZIONI
Page 2

Federal Communications Commission
Radio Frequency Interference
Statement
This equipment has been tested and found to comply with the limits for a Class A digital
device, pursuant to Part 15 of the FCC Rules. These limits are designed to provide
reasonable protection against harmful interference when the equipment is operated in a
commercial environment. This equipment generates, uses and can radiate radio frequency
energy and, if not installed and used in accordance with the instruction manual, may cause
harmful interference to radio communications. Operation of this equipment in a residential
area is likely to cause harmful interference in which case the user will be required to correct
the interference at his own expense.
For compliance with the Federal Noise Interference Standard, this equipment requires a
shielded cable.
This statement will be applied only for the printers marketed in U.S.A.
Statement of
The Canadian Department of Communications
Radio Interference Regulations
This digital apparatus does not exceed the Class A limits for radio noise emissions from
digital apparatus set out in the Radio Interference Regulations of the Canadian Department
of Communications.
Le présent appareil numérique n’émet pas de bruits radioélectriques dépassant les limites
applicables aux appareils numériques de la classe A prescrites dans le Règlement sur le
brouillage radioélectrique édicté par le ministère des Communications du Canada.
The above statement applies only to printers marketed in Canada.
NOTICE
• All rights reserved. Reproduction of any part of this manual in any form whatsoever,
without STAR’s express permission is forbidden.
• The contents of this manual are subject to change without notice.
• All efforts have been made to ensure the accuracy of the contents of this manual at the
time of going to press. However, should any errors be detected, STAR would greatly
appreciate being informed of them.
• The above notwithstanding, STAR can assume no responsibility for any errors in this
manual.
©
Copyright 1996 Star Micronics Co., LTD.
Page 3

TABLE OF CONTENTS
1. SETTING THE PAPER ......................................................................1
1-1. Setting the Paper ..........................................................................1
1-2. Changing the Paper ......................................................................3
1-3. Paper Jams....................................................................................4
2. CONTROL PANEL ............................................................................5
2-1. Power ON.....................................................................................5
2-2. Errors............................................................................................6
3. CAUTIONS.........................................................................................7
3-1. Operating Cautions ......................................................................7
3-2. Safety Cautions ............................................................................7
4. COMMAND SUMMARY ..................................................................8
4-1. Star Mode.....................................................................................8
4-2. ESC/POS Mode*........................................................................12
APPENDIX .............................................................................................56
* ESC/POS is a trademark of Seiko Epson Corporation.
Page 4
– 1 –
ENGLISH
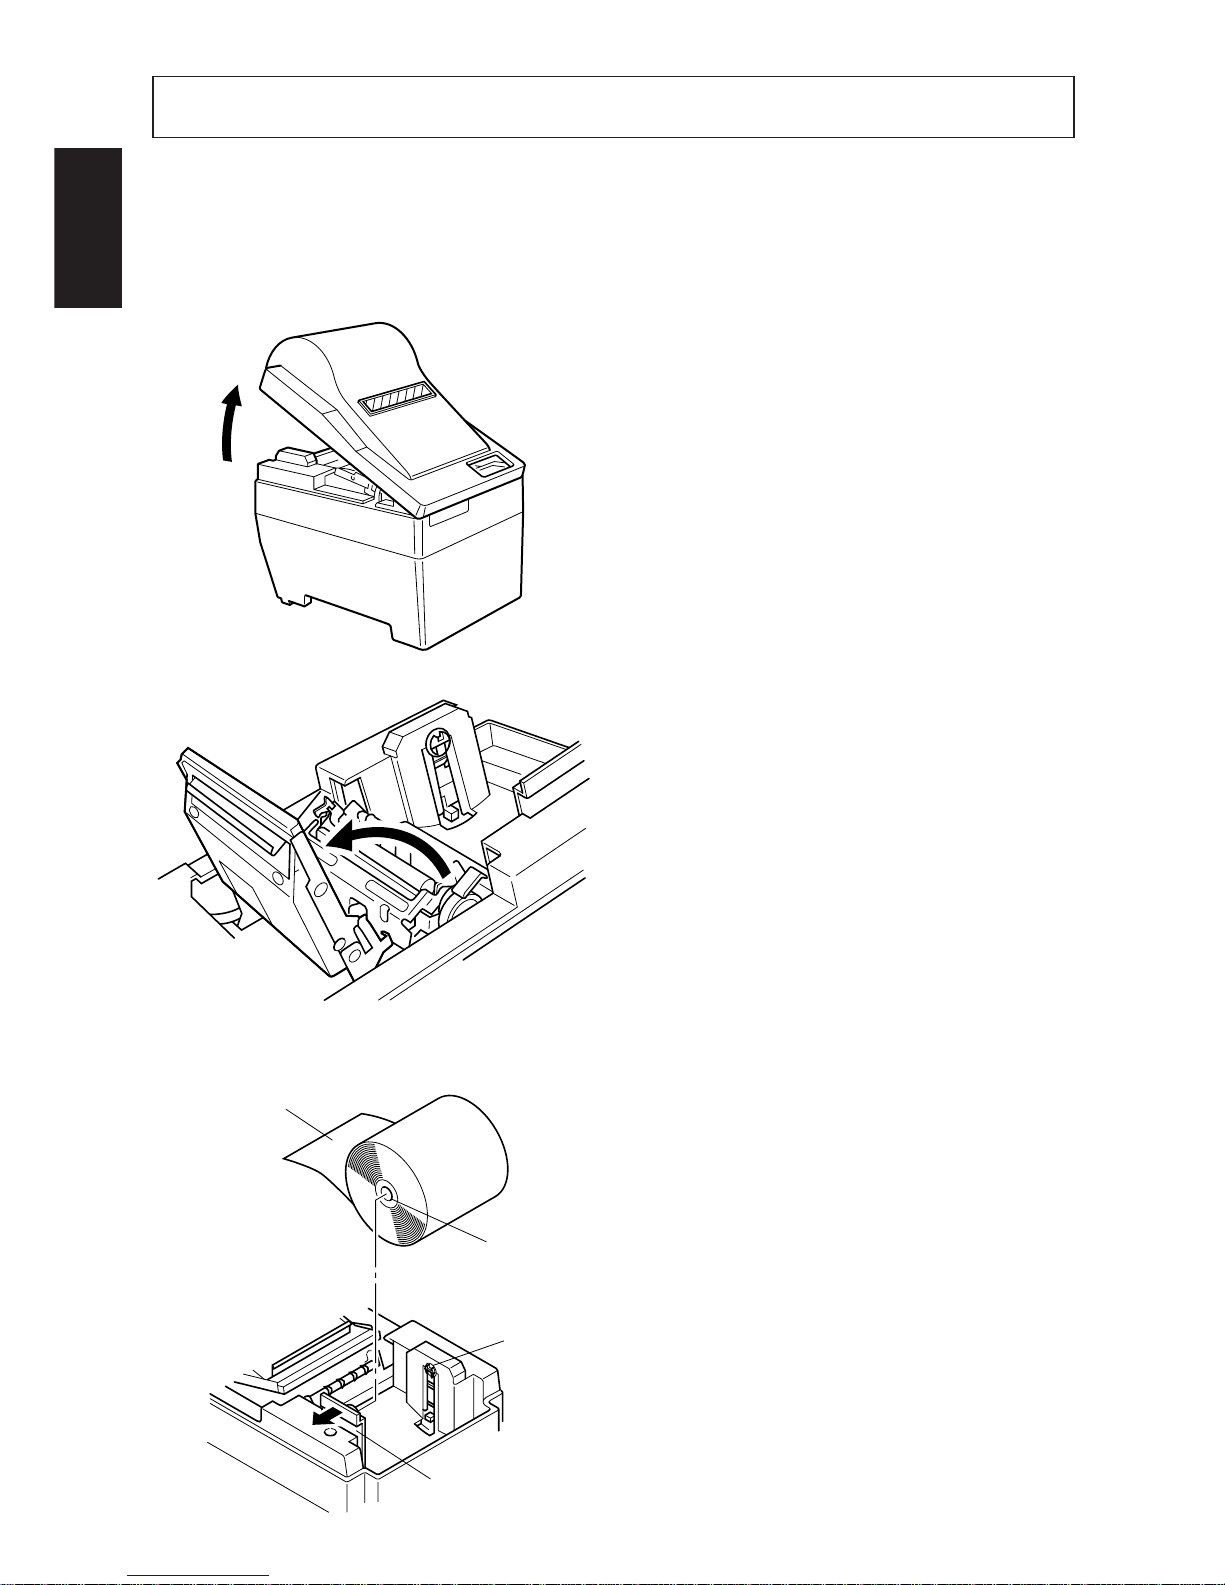
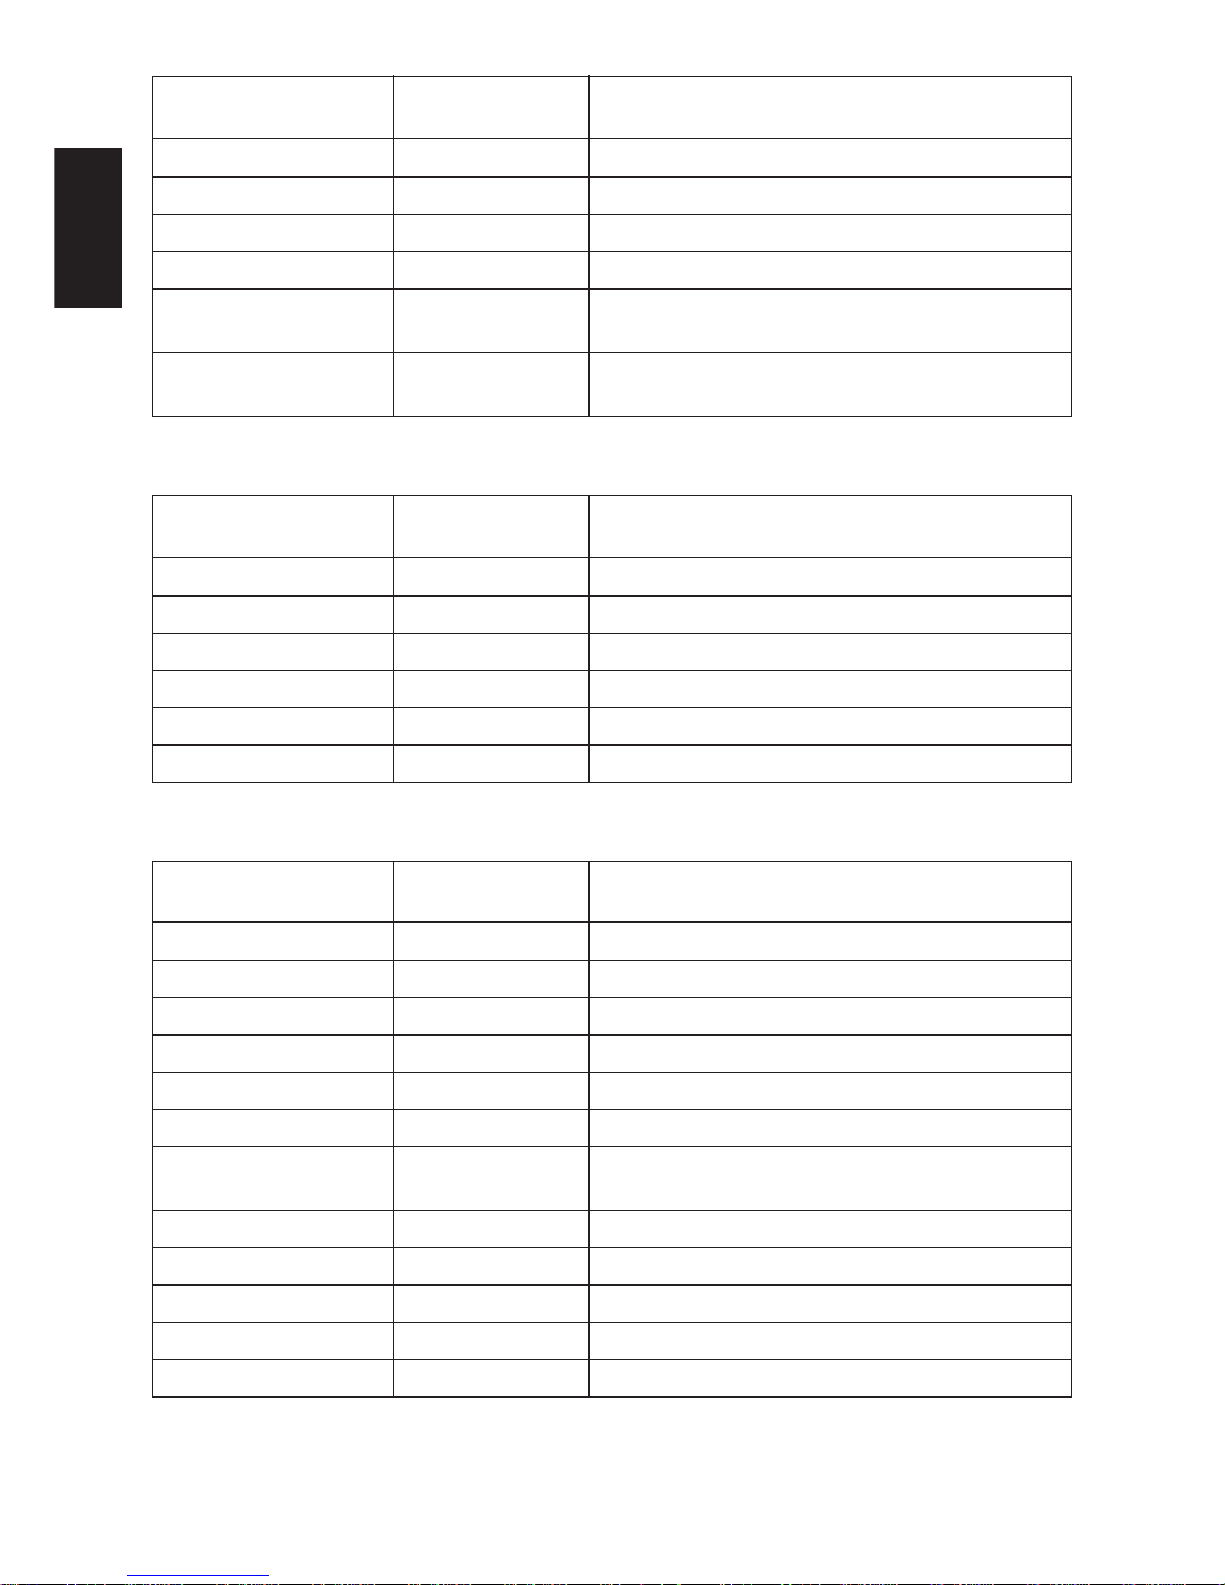
1 Open the cover.
2 If the unit has an auto-cutter unit,
move the unit in the direction of the
arrow until the lock engages. (This
step is unnecessary if there is no
auto-cutter unit.)
3 Widen the paper holder in the direc-
tion of the arrow and position the
paper in the manner shown in the
illustration. Make sure that the core
of the paper is firmly held by the
paper holder at this time.
1-1. Setting the Paper
Prepare a roll of paper. Make sure that the feeding edge of the paper is cut in a
straight right angle to the direction of feed.
Roll paper
Core
Axis
Paper roll holder
1. SETTING THE PAPER
Page 5
– 2 –
ENGLISH
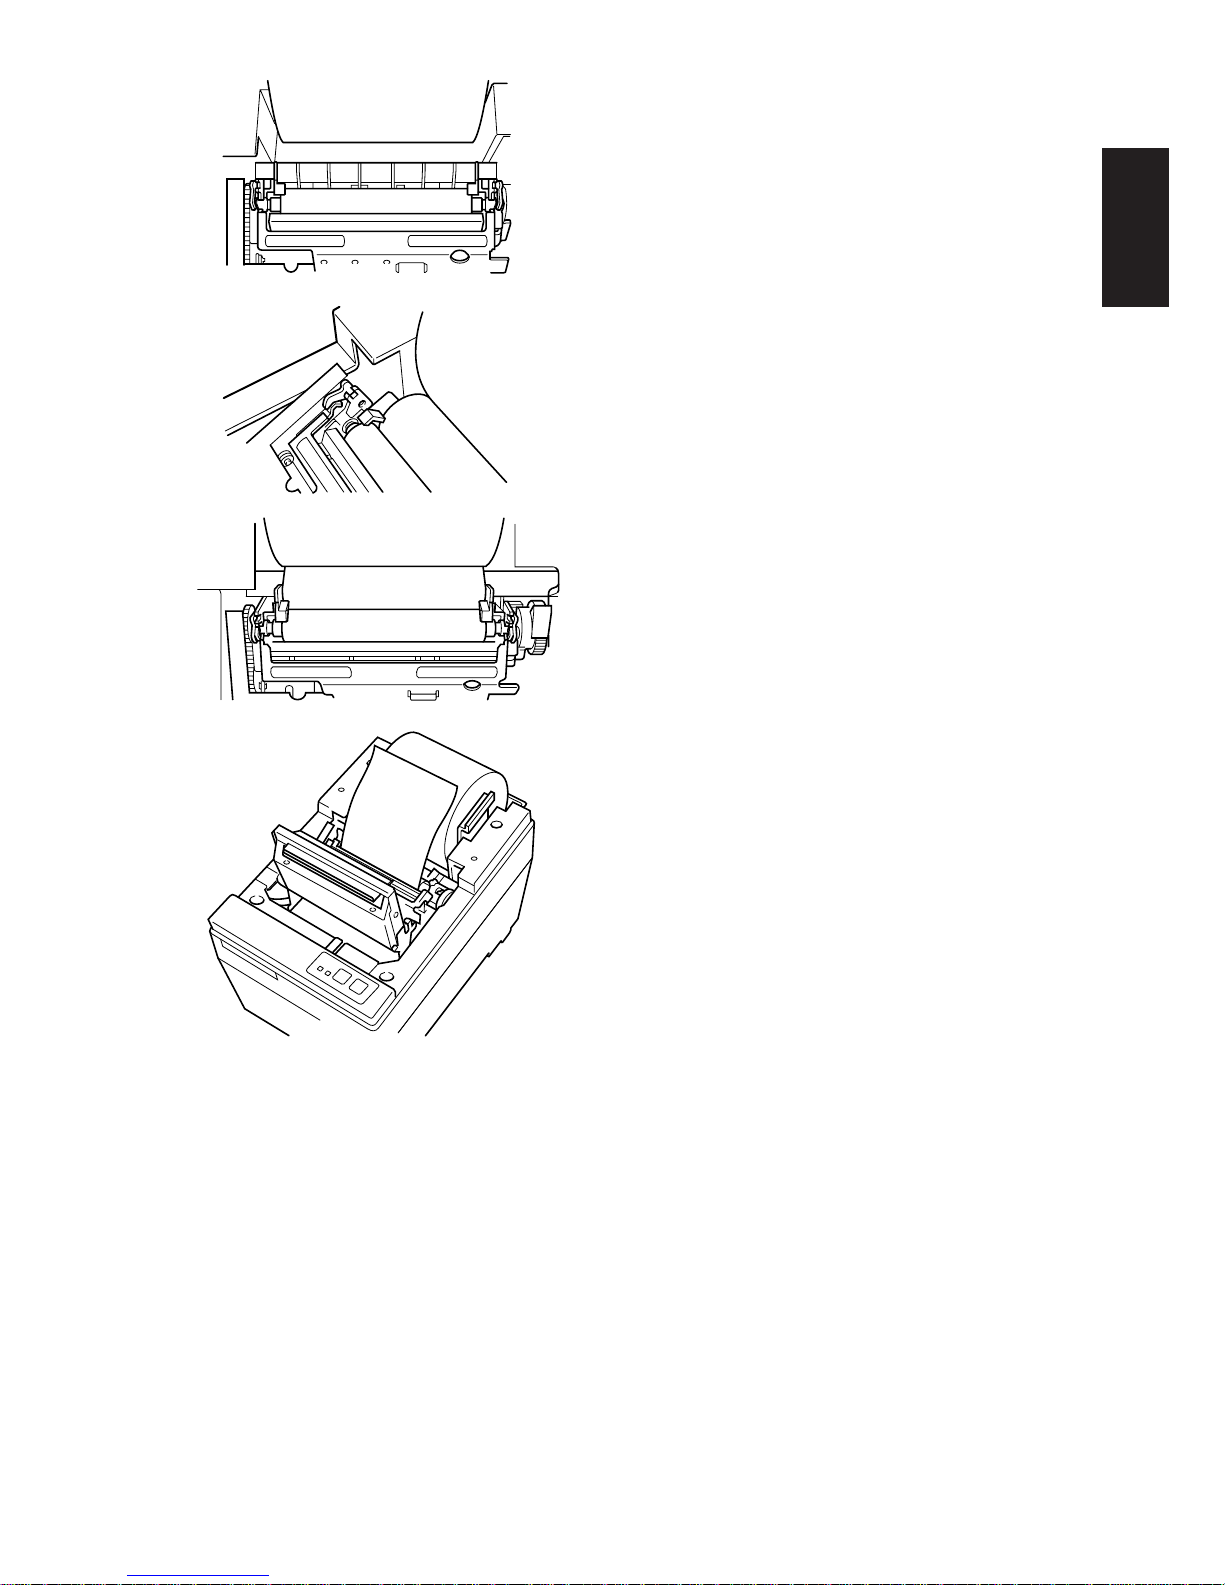
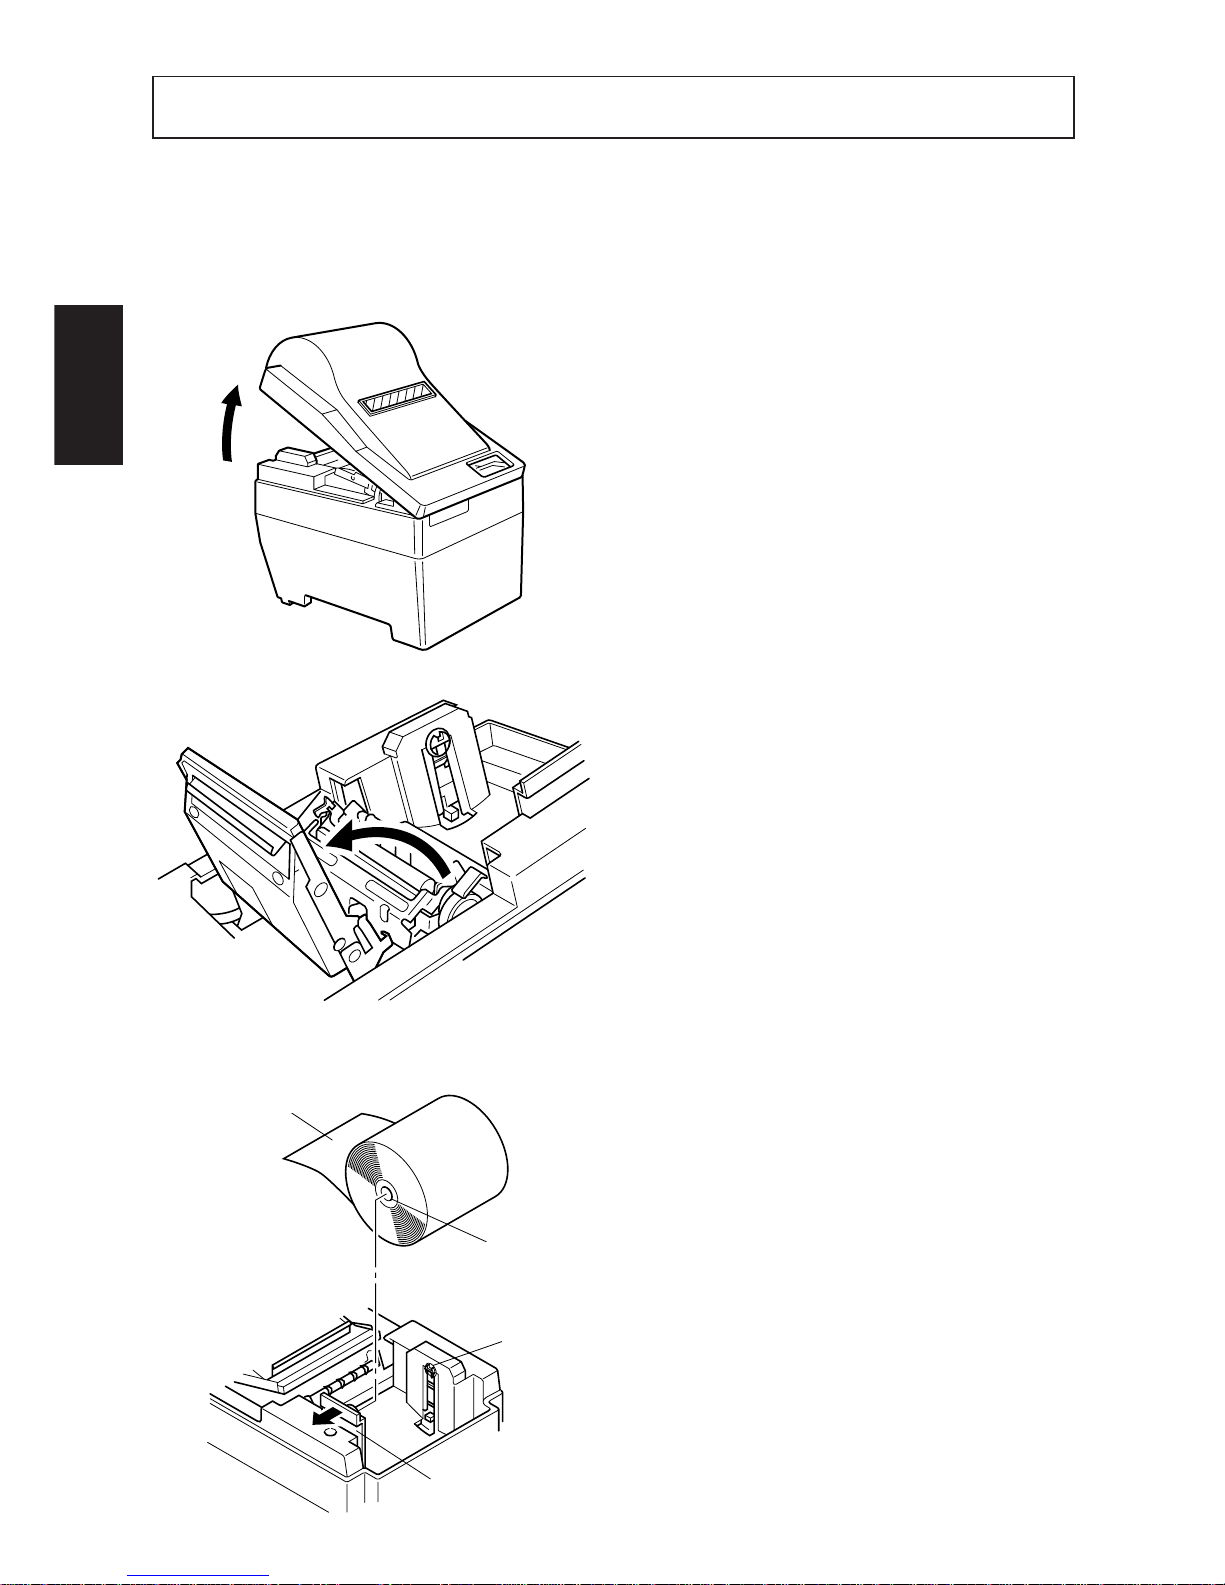
4 Auto Loading
Insert the edge of the paper into the
opening. The paper is properly inserted when paper extends from the
printer mechanism. Check that the
paper is protruding approximately
15 to 20 centimeters from printer
mechanism. If the paper extends
less than 15 centimeters, press the
feed key to feed more paper. Once
these steps have been taken, remove
any remaining slack in the paper.
If the paper has not been inserted
straight, it will jam. If this happens,
pull the head up lever towards you
and pull on the edge of the paper
until the paper is moving straight.
After confirming that 15 to 20
centimeters of paper is extending
from the printer, push the head up
lever back to the previous position.
Manual Loading
Pull the head up lever forward to
bring the print head into the up position. Insert the edge of the paper
into the opening and turn the green
knob located near the head up lever
until the edge of the paper protrudes
from the printer mechanism. Grab
the edge of the paper and pull the
paper until it is moving straight.
After confirming that 15 to 20
centimeters of paper is extending
from the printer, push the head up
lever back to the previous position.
Page 6
– 3 –
ENGLISH
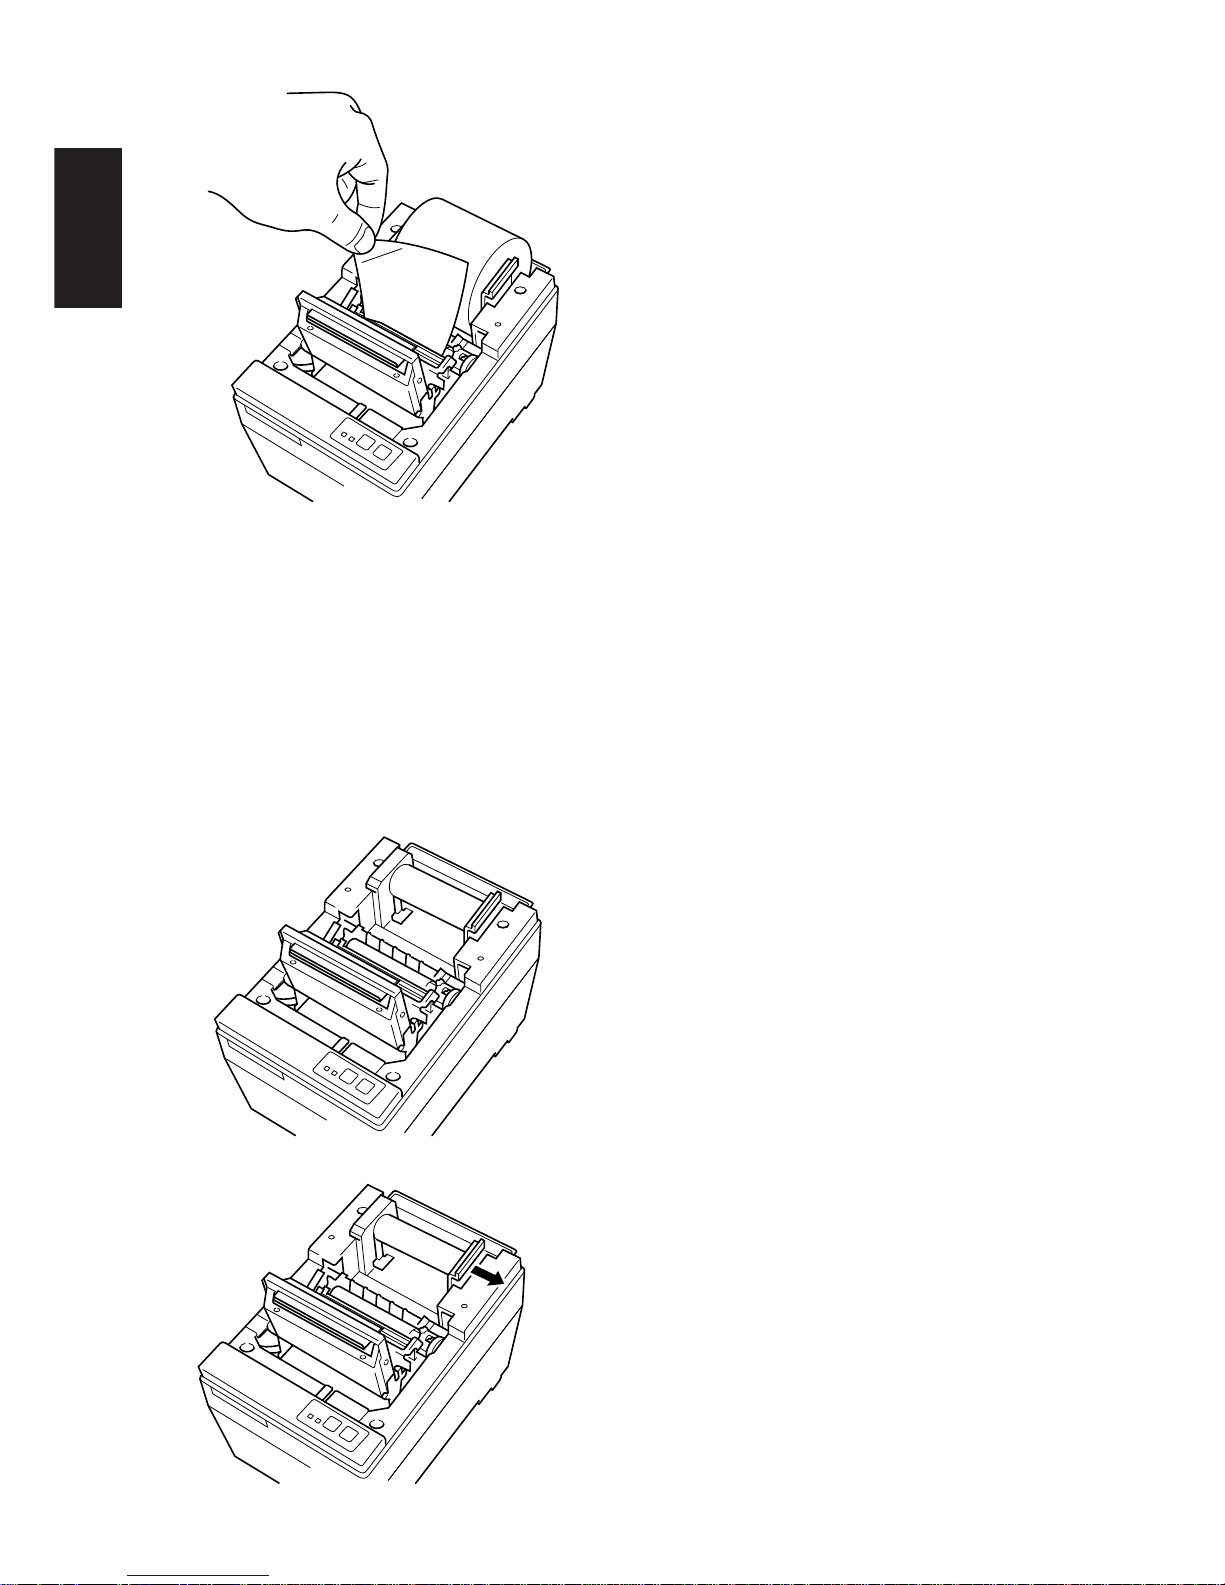
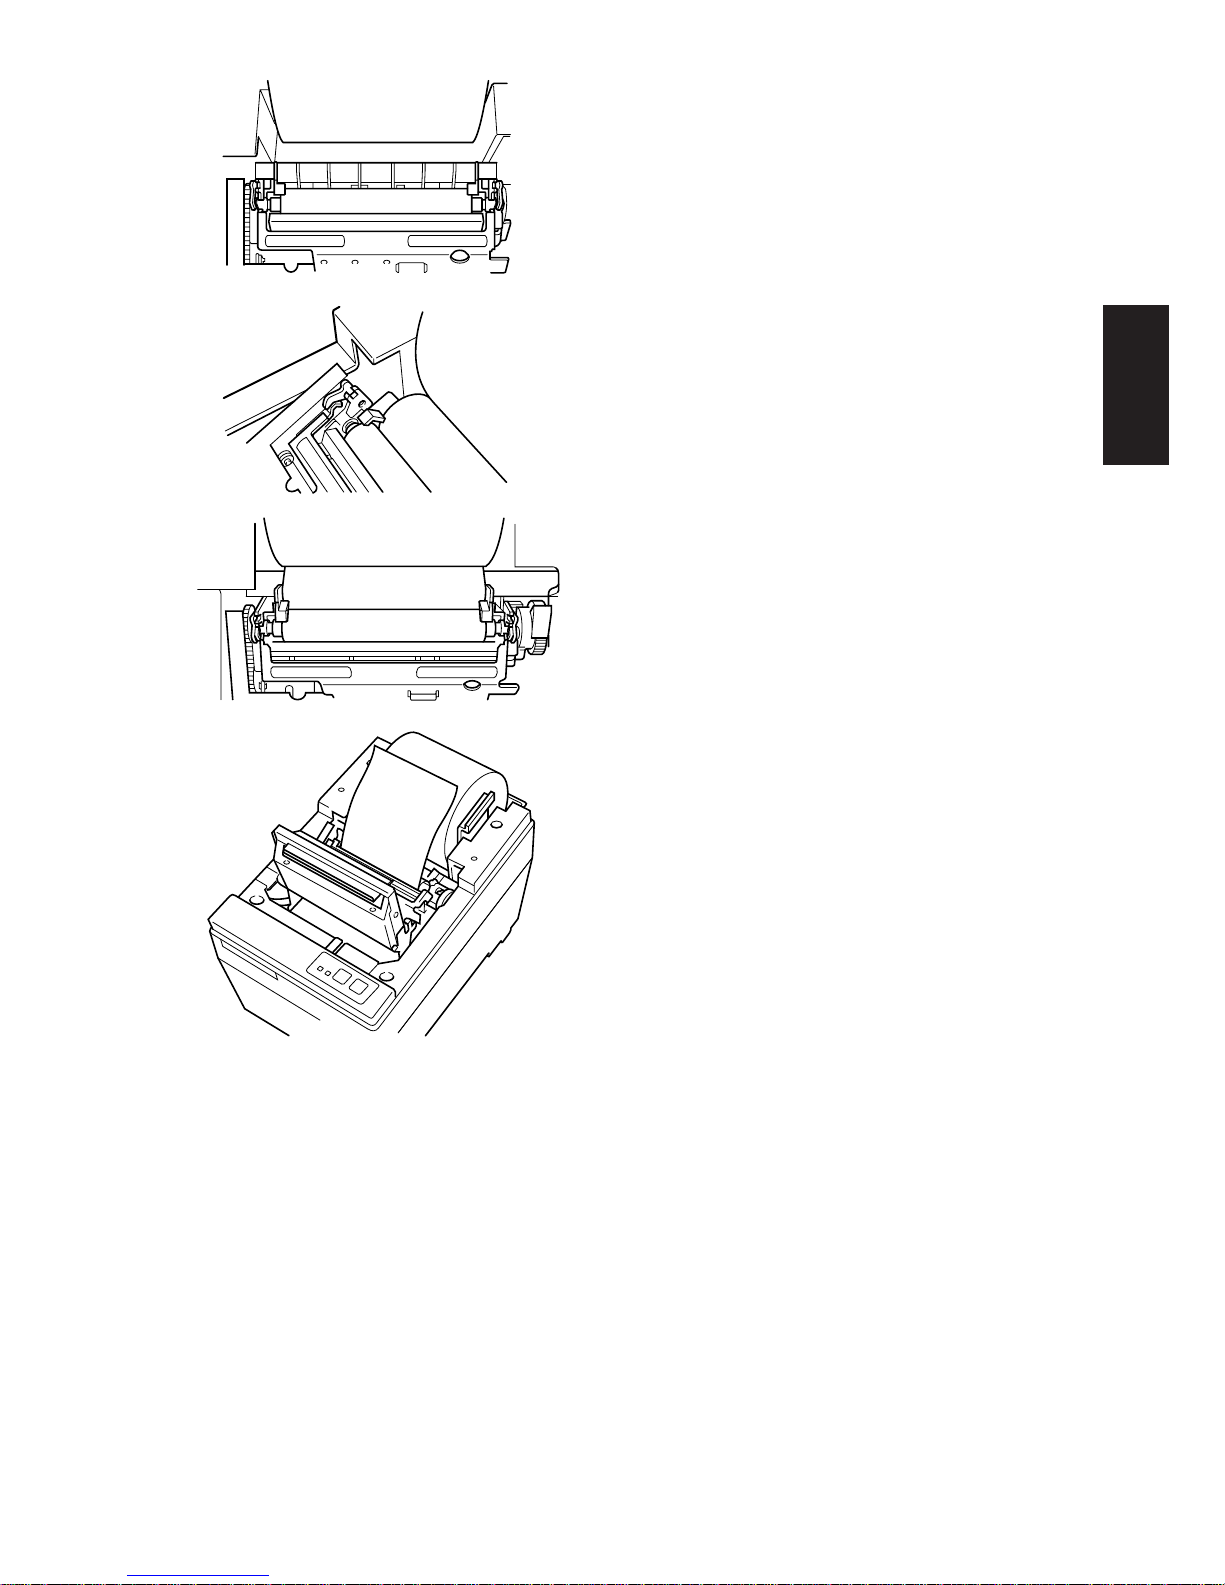
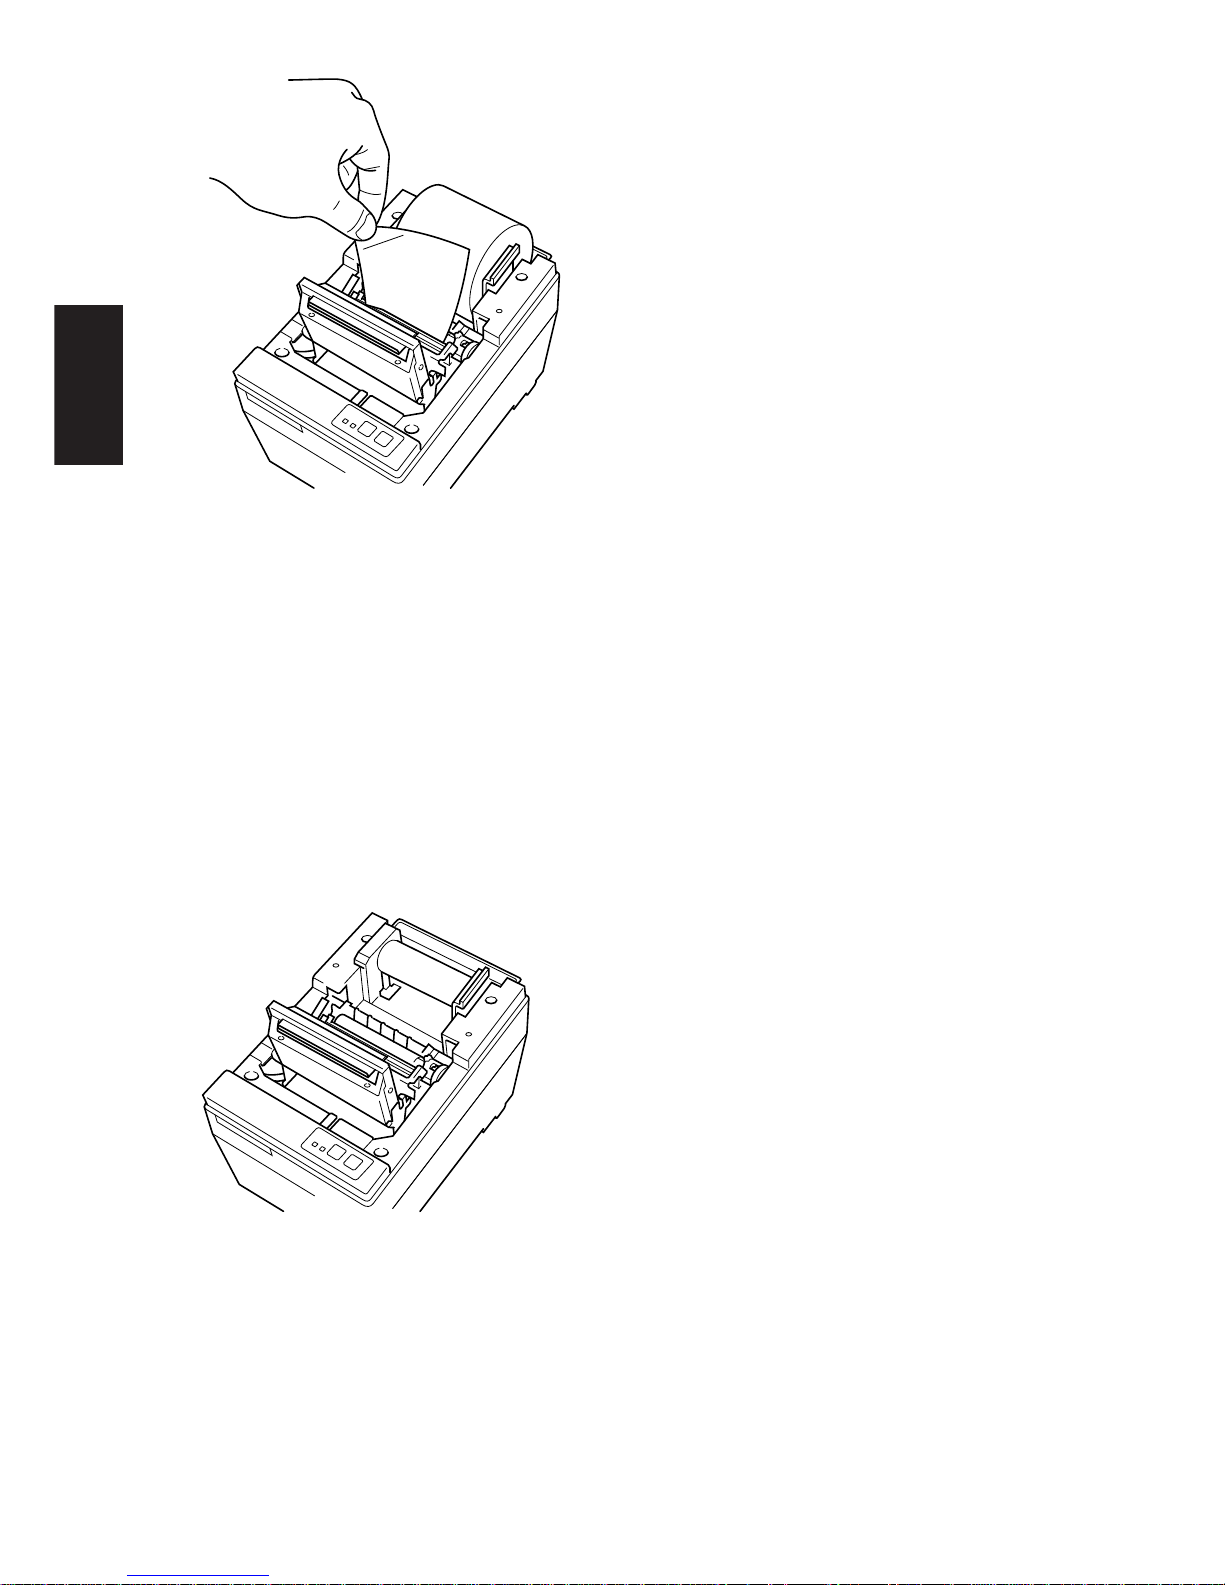
5 Hold the edge of the paper and press
it against the head and cut it. Be
careful not to cut your hands or
fingers on the edge of the autocutter unit.
6 Close the auto-cutter unit. (This step
is unnecessary if there is no autocutter unit.)
7 Close the cover and press the on-
line switch. The on-line lamp will
come on.
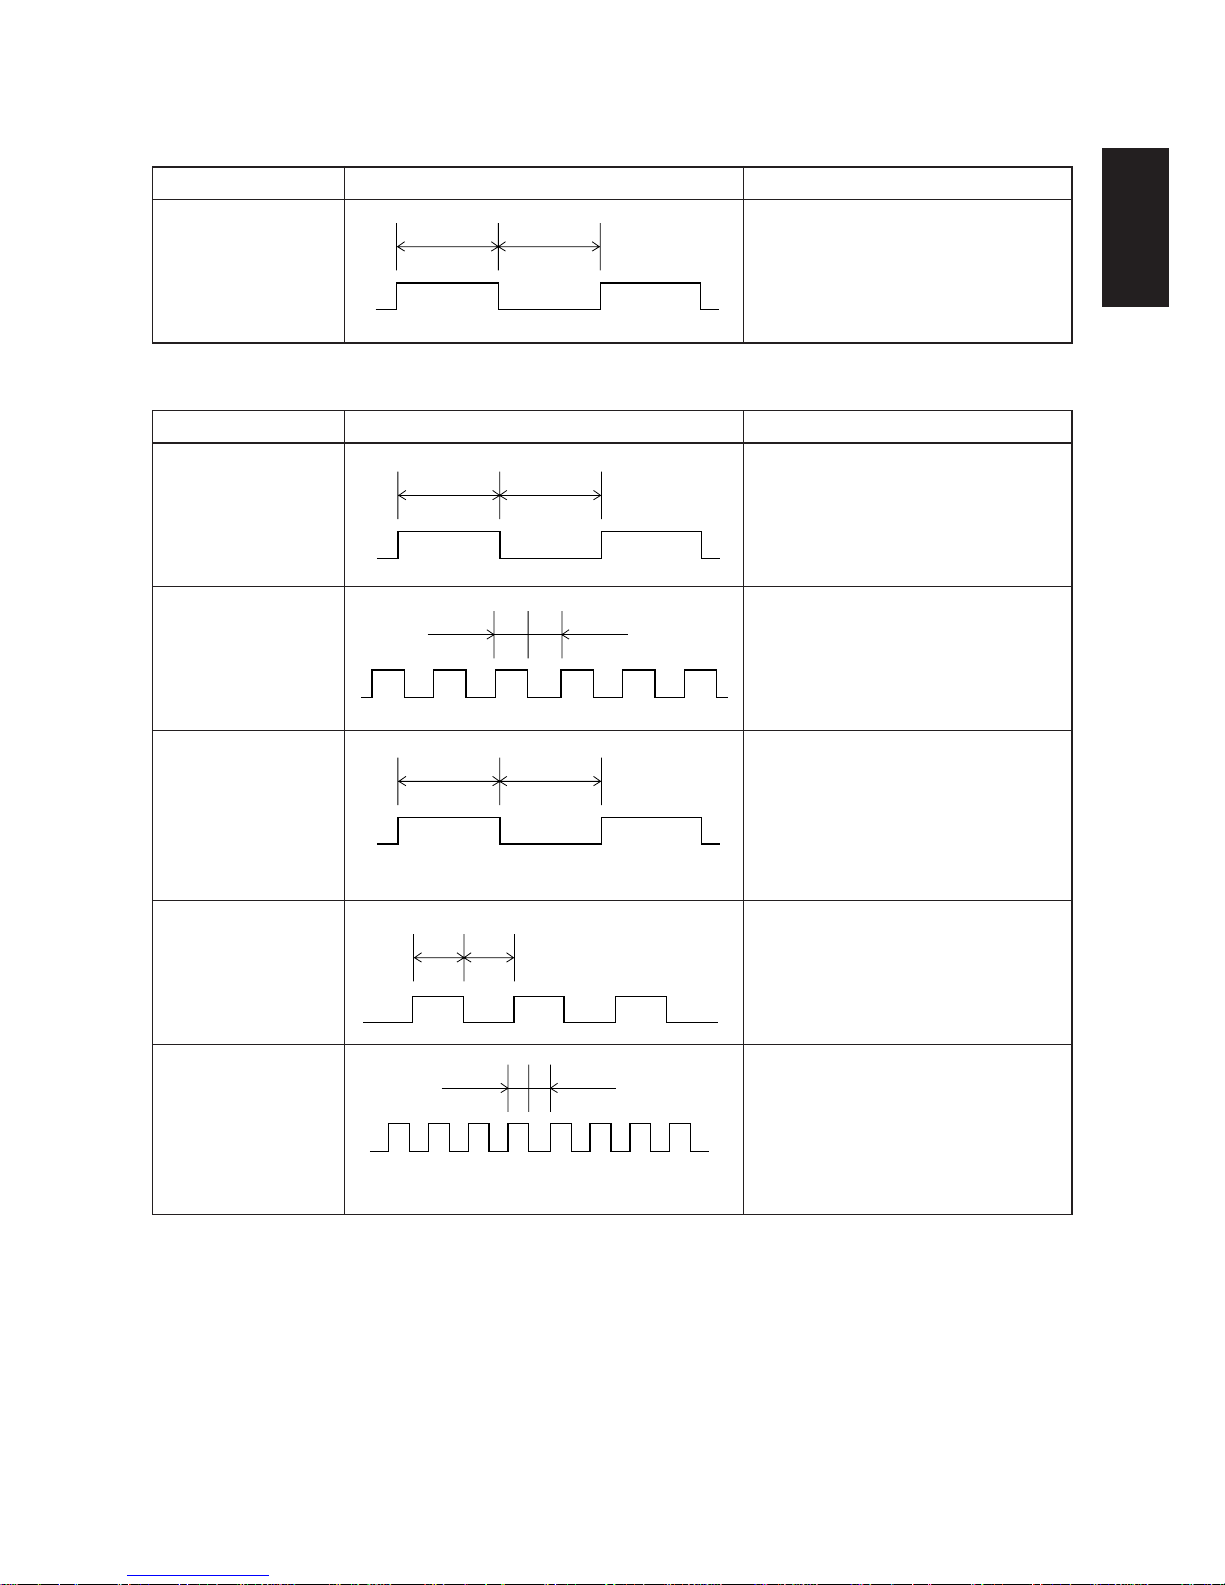
1 If the near-end sensor is operating
and there is still paper on the roll,
cut the paper just before the paper
opening and then press the (feed)
switch until the feed of paper stops.
2 Open the cover and pull the head up
lever forward so the print head is in
the up position and pull the paper
out.
3 Widen the paper holder in the direc-
tion of the arrow and remove paper
roll or the core.
4 Follow the procedure outlined in
“1-1 Setting the Paper” to replace
the paper roll.
1-2. Changing the Paper
Page 7

– 4 –
ENGLISH
1-3. Paper Jams
1 Turn the power off and open the cover.
2 If the unit has an auto-cutter unit, move the unit in the direction of the arrow
until the lock engages. (This step is unnecessary if there is no auto-cutter unit.)
3 Cut the roll of paper just before the paper opening and remove the paper.
4 Using the same procedure outlined for cleaning the head, push the head open
lever back to release the set cover system and to place the head in the open
position.
5 Remove the paper jam. If the jam cannot be removed, turn the feed knob and
remove the paper.
6 Once the paper jam has been removed, press the top of the set cover and engage
the head open lever.
Caution
If the paper jam is in the auto-cutter, insert a Phillips screwdriver into the right
side of the auto-cutter and use it to turn the internal gears to free the paper jam.
Page 8

– 5 –
ENGLISH
2-1. Power ON
Operating Panel
Paper - Yes
Paper - No
1 Power Lamp (Green LED)
2 On-Line Lamp (Green LED)
3 On-Line Switch
4 Feed Switch
When the power switch is turned on, the Power Lamp and On-Line Lamp will
come on. If there is no paper, the Power Lamp will flash at approximately one
second intervals.
ON LINE
POWER
FEED
ON LINE
POWER
FEED
12 3 4
2. CONTROL PANEL
Page 9
– 6 –
ENGLISH
2-2. Errors
1) Automatic Recovery (Power Lamp: Flashing; On-Line Lamp: On)
Error Description
Abnormal head
temperature
Power Lamp Flashing Pattern Recovery Conditions
Automatic recovery after head
temperature lowers.
2) Recoverable Errors (Power Lamp: Flashing; On-Line Lamp: Off)
Power Lamp Flashing Pattern Recovery Conditions
Insert paper and press on-line
switch. (Star)
Insert paper and close cover. (ESC/
POS)
Lower head and press on-line
switch. (Star)
Lower head and close cover. (ESC/
POS)
Press on-line switch and printing
will continue. Both lamps light
when printing and power lamp
flashes and on-line lamp lights
when on-line. (Star)
Same as “No paper”. (ESC/POS)
Close cover and press on-line
switch. (Star)
Close cover. (ESC/POS)
If the blade is at the home position,
press on-line switch to continue
printing. If the blade is not at the
home position, it is not a recoverable error. (Star)
Command (ESC/POS)
Approx. 1 Sec Approx. 1 Sec
Approx. 1 Sec Approx. 1 Sec
Approx. 250 msApprox. 250 ms
Approx. 2 Sec Approx. 2 Sec
Approx.
500 ms
Approx.
500 ms
Approx. 125 msApprox. 125 ms
Error Description
No paper
Head up
Paper near end of
roll
Cover is open
Error during paper
cutting
3) Fatal Error (Power Lamp: Flashing; On-Line Lamp: Flashing) the unit
will have to be repaired.
Page 10

– 7 –
ENGLISH
3-1. Operating Cautions
1 The service life of the thermal print head cannot be guaranteed if any paper
other than the recommended paper is used. There will be a noticeable decline
in the service life of the thermal element of the print head when the paper used
contains (Na+, K++, CI-).
2 Never print when there is water or any form of moisture, such as from
condensation, on the surface of the print head.
3-2. Safety Cautions
1 Never touch the thermal print head or motor during printing or immediately
after printing as these components are very hot.
2 Never touch any moving parts, such as gears or knobs, during printing.
3 Always use care near the edges of printer components, especially metal
components, as they may cause injury.
3. CAUTIONS
Page 11

– 8 –
ENGLISH
4-1. Star Mode
Commands to Select Characters
Control codes
Hexadecimal
Function
codes
<ESC> “R” n 1B 52 n Select international character set
<ESC> “/” “1” 1B 2F 31
Select slash zero
<ESC> “/” <1> 1B 2F 01
<ESC> “/” “0” 1B 2F 30
Select normal zero
<ESC> “/” <0> 1B 2F 00
<ESC> “b” n1 n2 n3 n4 1B 62 n1 n2 n3 n4 Select bar code printing
d1 ... <RS> d1 ... 1E
<ESC> “M” 1B 4D Select 12-dot pitch printing
<ESC> “p” 1B 70 Select 14-dot pitch printing
<ESC> “P” 1B 50 Select 15-dot pitch printing
<ESC> “:” 1B 3A Select 16-dot pitch printing
<ESC> <SP> n 1B 20 n Set character spacing
<SO> 0E Sets the printing magnified double in
character width.
<DC4> 14 Resets the printing magnified in
character width.
<ESC> “W” n 1B 57 n
Sets the magnification rate in character width.
<ESC> <SO> 1B 0E Sets the printing magnified double in
character height.
<ESC> <DC4> 1B 14 Resets the printing magnified in character
height.
<ESC> “h” n 1B 68 n
Sets the magnification rate in character height
.
<ESC> “i” n1 n2 1B 69 n1 n2 Sets the magnification rates in character
width and height.
<ESC> “–” “1” 1B 2D 31
Select underlining
<ESC> “–” <1> 1B 2D 01
<ESC>“–” “0” 1B 2D 30
Cancel underlining
<ESC> “–” <0> 1B 2D 00
<ESC> “_” “1” 1B 5F 31
Select overlining
<ESC> “_” <1> 1B 5F 01
<ESC> “_” “0” 1B 5F 30
Cancel overlining
<ESC> “_” <0> 1B 5F 00
4. COMMAND SUMMARY
Page 12
– 9 –
ENGLISH
Control codes
Hexadecimal
Function
codes
<ESC> “4” 1B 34 Select highlight printing
<ESC> “5” 1B 35 Cancel highlight printing
<SI> 0F Inverted printing
<DC2> 12 Cancel inverted printing
<ESC> “E” 1B 45
Select emphasized printing
<ESC> “G” 1B 47
<ESC> “F” 1B 46
Cancel emphasized printing
<ESC> “H” 1B 48
Commands to Set the Page Format
Control codes
Hexadecimal
Function
codes
<ESC> “C” n 1B 43 n Set page length in lines
<ESC> “C” <0> n 1B 43 00 n Set page length in inches
<ESC> “N” n 1B 4E n Set bottom margin
<ESC> “O” 1B 4F Cancel bottom margin
<ESC> “l” n 1B 6C n Set left margin
<ESC> “Q” n 1B 51 n Set right margin
Commands to Move the Print Position
Control codes
Hexadecimal
Function
codes
<LF> 0A Line feed
<CR> 0D Carriage Return
<ESC> “a” n 1B 61 n Feed paper n lines
<FF> 0C Form feed
<HT> 09 Horizontal tab
<VT> 0B Vertical tab
<ESC> “z” “1” 1B 7A 31
Set line spacing to 4 mm
<ESC> “z” <1> 1B 7A 01
<ESC> “0” 1B 30 Set line spacing to 3 mm
<ESC> “J” n 1B 4A n One time n/4 mm feed
<ESC> “j” n 1B 6A n One time n/4 mm backfeed
<ESC> “B” n1 n2 ... <0> 1B 42 n1 n2 ... 00 Set vertical tab stops
<ESC> “D” n1 n2 ... <0> 1B 44 n1 n2 ... 00 Set horizontal tab stops
Page 13

– 10 –
ENGLISH
Commands to Print Dot Graphics
Control codes
Hexadecimal
Function
codes
<ESC> “K” n <0> 1B 4B n 00 m1 m2 Print normal density graphics
m1 m2 ... ...
<ESC> “L” n1 n2 1B 4C n1 n2 m1 m2 Print high density graphics
m1 m2 ... ...
<ESC> “k” n <0> m1 ... 1B 6B n 00 m1 ... Print fine density graphics
Commands to Print Download Characters
Control codes
Hexadecimal
Function
codes
<ESC> “&” “1” “1” 1B 26 31 31 n
n m1 m2 ... m48 m1 m2 ... m48
Define download character
<ESC> “&” <1> <1> 1B 26 01 01
n m1 m2 ... m48 n m1 m2 ... m48
<ESC> “&” “1” “0” n 1B 26 31 30 n
Delete a download character
<ESC> “&” <1> <0> n 1B 26 01 00 n
<ESC> “%” “1” 1B 25 31
Enable download character set
<ESC> “%” <1> 1B 25 01
<ESC> “%” “0” 1B 25 30
Disable download character set
<ESC> “%” <0> 1B 25 00
Commands to Control Peripheral Devices
Control codes
Hexadecimal
Function
codes
<ESC> <BEL> n1 n2 1B 07 n1 n2 Define drive pulse width for peripheral
device #1
<BEL> 07 Control peripheral device #1
<FS> 1C Control peripheral device #1 immediately
<EM> 19 Control peripheral device #2 immediately
<SUB> 1A Control peripheral device #2 immediately
Commands to Control Auto Cutter
Control codes
Hexadecimal
Function
codes
<ESC> “d” “0” 1B 64 30
<ESC> “d” <0> 1B 64 00
Full-cut command to the auto cutter
<ESC> “d” “1” 1B 64 31
<ESC> “d” <1> 1B 64 01
Partial-cut command to the auto cutter
Page 14

– 11 –
ENGLISH
Other Commands
Control codes
Hexadecimal
Function
codes
<CAN> 18 Cancel last line & Initialize printer
<DC3> 13 Deselect printer
<DC1> 11 Set select mode
<RS> 1E Beep the buzzer
<ESC> “#N, n1 n2 n3 n4”
1B 23 N 2C n1 n2 n3 n4
Set memory switch
<LF> <NUL> 0A 00
<ESC> “@” 1B 40 Initialize printer
<ENQ> 05 Enquiry
<ESC> “?” <LF> <NUL> 1B 3F 0A 00 Reset printer hardware
Page 15

– 12 –
ENGLISH
4-2. ESC/POS Mode
Control Code Hexadecimal Code Function
HT 09 Horizontal tab
LF 0A Print line feed
FF 0C Page mode print and return
DLE EOT 10 04 Real time transmission of status
DLE ENQ 10 05 Real time request to printer
CAN 18 Cancel print data in page mode
ESC FF 1B FF Print page mode data
ESC SP 1B 20 Set right space amount of character
ESC ! 1B 21 Universal print mode designation
ESC # 1B 23 Set memory switch
ESC $ 1B 24 Designate absolute printing
ESC % 1B 25 Designate/cancel download character set
ESC & 1B 26 Define download characters
ESC
*
1B 2A Designate bit image mode
ESC - 1B 2D Designate/cancel underline
ESC 2 1B 32 Set 1/6 inch line feed amount
ESC 3 1B 33 Set line feed amount
ESC = 1B 3D Select peripheral equipment
ESC ? 1B 3F Delete download characters
ESC @ 1B 40 Initialize printer
ESC D 1B 44 Set horizontal tab position
ESC E 1B 45 Designate/cancel emphasized print
ESC G 1B 47 Designate/cancel double print
ESC J 1B 4A Print and paper feed
ESC L 1B 4C Select page mode
ESC R 1B 52 Select international characters
ESC S 1B 53 Select standard mode
ESC T 1B 54 Select character print direction in print mode
ESC V 1B 56 Designate/cancel 90° character rotation
ESC W 1B 57 Set print range in page mode
ESC \ 1B 5C Designate relative position
ESC a 1B 61 Align position
ESC c4 1B 63 34 Select no valid paper detector at print stop
ESC c5 1B 63 35 Enable/disable panel switch
ESC d 1B 64 Print and paper feed “n” lines
ESC i 1B 69 Partial cut (one section remaining)
ESC p 1B 70 Designate pulse generation
ESC t 1B 74 Select character code table
Page 16

– 13 –
ENGLISH
Control Code Hexadecimal Code Function
ESC u 1B 75 Transmission of peripheral equipment status
ESC v 1B 76 Transmission of paper detection status
ESC { 1B 7B Designate/cancel inverted printing
GS ! 1D 21 Designate character size
GS $ 1D 24 Designate absolute position of vertical direction of
characters in page mode
GS
*
1D 2A Define download bit image
GS / 1D 2F Print download bit image
GS : 1D 3A Start/finish macro definition
GS B 1D 42 Designate/cancel reverse printing
GS H 1D 48 Select print position of HRI characters
GS I 1D 49 Printer ID transmission
GS L 1D 4C Set left margin
GS P 1D 50 Set basic calculated pitch
GS V 1D 56 Paper cut
GS W 1D 57 Set print range
GS \ 1D 5C Designate the relative position of vertical characters when
printing in the page mode
GS ^ 1D 5E Execute macro
GS a 1D 61 Enable/disable automatic status transmission
GS f 1D 66 Select HRI character font
GS h 1D 68 Set bar code height
GS k 1D 6B Printing of bar code
GS r 1D 72 Transmission of status
GS w 1D 77 Set lateral size of bar code
Page 17

TABLE DES MATIÈRES
1. MISE EN PLACE DU PAPIER........................................................15
1-1. Mise en place du papier .............................................................15
1-2. Changement de rouleau de papier..............................................17
1-3. Bourrages de papier ...................................................................18
2. TABLEAU DE COMMANDE .........................................................19
2-1. Mise sous tension....................................................................... 19
2-2. Erreurs........................................................................................20
3. PRECAUTIONS ...............................................................................21
3-1. Précautions relatives à l’utilisation ............................................21
3-2. Précautions relatives à la sécurité ..............................................21
4. RESUME DES COMMANDES .......................................................22
4-1. Mode Star...................................................................................22
4-2. Mode ESC/POS*........................................................................26
APPENDICE ...........................................................................................56
L’appendice n’est pas traduit.
* ESC/POS est une marque de fabrique de Seiko Epson Corporation.
Page 18
– 15 –
FRANÇAIS
1 Ouvrir le capot.
2 Si l’imprimante dispose d’un méca-
nisme de découpe automatique, déplacer ce dernier dans la direction
indiquée par la flèche jusqu’à ce
que le verrouillage soit effectué.
(Ignorer cette étape si l’appareil ne
dispose pas de mécanisme de découpe automatique.)
3 Ecarter le support du rouleau de
papier dans la direction indiquée
par la flèche et installer le rouleau
de papier de la manière illustrée cicontre. S’assurer lors de cette étape
que le rouleau de papier est maintenu fermement en place par son
support.
1-1. Mise en place du papier
Préparer un rouleau de papier. S’assurer que le bord du papier est coupé à angle
droit par rapport à la direction d’avance du papier.
Roll paper
Core
Axis
Paper roll holder
Rouleau de
papier
Rouleau
Support du rouleau de papier
Axe
1. MISE EN PLACE DU PAPIER
Page 19
– 16 –
FRANÇAIS
4 Chargement automatique
Insérer le bord du papier dans
l’ouverture. S’assurer que le papier
est correctement inséré en vérifiant
s’il ressort du mécanisme d’impression. Le papier doit ressortir de 15 à
20 cm du mécanisme d’impression.
Si la portion de papier ressortant du
mécanisme d’impression est inférieure ou égale à 15 cm, appuyer sur
la touche d’avance FEED afin de
faire avancer le papier. Une fois ces
étapes effectuées, s’assurer qu’il n’y
a pas de mou dans le papier. Si le
papier n’est pas correctement inséré, cela provoquera un bourrage.
En cas de bourrage, tirer le levier
vert de la tête de l’imprimante vers
soi et tirer sur le bord du papier
jusqu’à ce qu’il avance de façon
correcte. Après s’être assuré que 15
à 20 cm de papier ressortent de
l’imprimante, pousser le levier vert
de la tête de l’imprimante jusqu’à sa
position originale.
Chargement manuel
Tirer le levier vert de la tête de
l’imprimante vers l’avant afin
d’amener la tête d’impression en
position supérieure. Insérer le bord
de la feuille de papier dans l’ouverture et tourner le bouton vert situé à
proximité du levier de la tête de
l’imprimante jusqu’à ce que le bord
du papier ressorte du mécanisme
d’impression. Saisir le bord du papier et tirer ce dernier jusqu’à ce
qu’il se déplace correctement. Après
s’être assuré que 15 à 20 cm de
papier ressortent de l’imprimante,
pousser le levier vert de la tête de
l’imprimante jusqu’à sa position
originale.
Page 20
– 17 –
FRANÇAIS
5 Tenir le bord du papier et appuyer
ce dernier contre la tête et effectuer
la découpe. Prudence! Veiller à ne
pas se couper les mains ou les doigts
sur le bord tranchant du mécanisme
de découpe automatique.
6 Refermer le mécanisme de découpe
automatique. (Ignorer cette étape si
l’appareil ne dispose pas de mécanisme de découpe automatique.)
7 Refermer le capot et appuyer sur le
commutateur ON LINE (en ligne).
Le témoin ON LINE s’allume alors.
1-2. Changement de rouleau de papier
1 Si le capteur de fin de rouleau fonc-
tionne lorsqu’il reste du papier sur
le rouleau, couper le papier juste
avant l’ouverture et appuyer ensuite sur la touche FEED jusqu’à ce
que l’avance du papier cesse.
2 Ouvrir le capot et tirer le levier vert
de la tête de l’imprimante vers
l’avant de sorte à ce que la tête
d’impression soit en position supérieure, et retirer le papier.
3 Ecarter le support du rouleau de
papier dans la direction indiquée
par la flèche et retirer le rouleau.
Page 21

– 18 –
FRANÇAIS
4 Pour remplacer le rouleau de pa-
pier, suivre les étapes de la section
“1-1. Mise en place du papier”.
1-3. Bourrages de papier
1 Mettre l’imprimante hors tension et ouvrir le capot.
2 Si l’imprimante dispose d’un mécanisme de découpe automatique, déplacer
ce dernier jusqu’à ce que le mécanisme soit verrouillé. (Ignorer cette étape si
l’appareil ne dispose pas de mécanisme de découpe automatique.)
3 Couper le rouleau de papier juste avant l’ouverture pour le papier et retirer ce
dernier.
4 En suivant les instructions données pour le nettoyage de la tête d’impression,
pousser les leviers d’ouverture de la tête de l’imprimante vers l’arrière afin de
libérer le système de verrouillage du cache et placer la tête en position ouverte.
5 Corriger le bourrage de papier. Si cela est impossible, tourner le bouton
d’avance et retirer le papier.
6 Une fois le bourrage de papier corrigé, appuyer sur le dessus du cache de sorte
à bloquer ce dernier via les leviers d’ouverture de la tête de l’imprimante.
Attention
Si le bourrage de papier se situe au niveau du mécanisme de découpe automatique, insérer un tournevis cruciforme dans le côté droit du mécanisme et faire
tourner les rouages internes à l’aide du tournevis afin d’éliminer le bourrage.
Page 22

– 19 –
FRANÇAIS
2-1. Mise sous tension
Tableau de commande
Papier chargé
Pas de papier chargé
1 Témoin d’alimentation POWER
(DEL verte)
2 Témoin ON LINE (en ligne) (DEL
verte)
3 Commutateur ON LINE (en ligne)
4 Touche d’avance FEED
Lorsque l’imprimante est mise sous tension, les témoins d’alimentation POWER
et ON LINE (en ligne) s’allument. Si l’imprimante ne contient pas de papier, le
témoin POWER clignote à intervalles d’environ une seconde.
ON LINE
POWER
FEED
ON LINE
POWER
FEED
12 3 4
2. TABLEAU DE COMMANDE
Page 23

– 20 –
FRANÇAIS
2-2. Erreurs
1) Erreurs à correction automatique (témoin POWER clignotant; témoin
ON LINE allumé)
Description de l’erreur
T° anormale de la
tête
Cycle de clignotement du témoin POWER Correction d’erreur
Correction automatique après
baisse de la t° de la tête.
2) Erreurs corrigibles (témoin POWER clignotant; témoin ON LINE éteint)
Cycle de clignotement du témoin POWER Correction d’erreur
Insérer le papier et appuyer sur le
commutateur ON-LINE. (Star)
Insérer le papier et refermer le
capot. (ESC/POS)
Abaisser la tête d’impression et
appuyer sur le commutateur ONLINE. (Star)
Abaisser la tête d’impression et
refermer le capot. (ESC/POS)
Appuyer sur le commutateur ONLINE et l’impression se poursuit.
Les deux témoins sont allumés
pendant l’impression ; le témoin
POWER clignote et le témoin ONLINE est allumé lorsque l’appareil
est en ligne. (Star)
Voir l’erreur “Pas de papier”.
(ESC/POS)
Refermer le capot et appuyer sur le
commutateur ON-LINE. (Star)
Refermer le capot. (ESC/POS)
Si la lame est à sa position
d’origine, appuyer sur commutateur
ON-LINE afin de poursuivre
l’impression. Si la lame n’est pas à
sa position d’origine, l’erreur n’est
pas réparable. (Star)
Commande (ESC/POS)
Description de l’erreur
Pas de papier
chargé
Tête en position
supérieure
Fin du rouleau de
papier proche
Le couvercle est
ouvert.
Erreur durant la
découpe du papier
Approx. 1 Sec Approx. 1 Sec
Approx. 1 Sec Approx. 1 Sec
Approx. 250 msApprox. 250 ms
Approx. 2 Sec Approx. 2 Sec
Approx. 125 msApprox. 125 ms
3) Erreur non-corrigible (témoin POWER clignotant; témoin ON LINE
clignotant), il convient de faire réparer l’imprimante.
Environ 1 sec.Environ 1 sec.
Environ 1 sec.
Environ 250 ms Environ 250 ms
Environ 1 sec.
Environ 2 sec. Environ 2 sec.
Environ 125 ms Environ 125 ms
Environ
500 ms
Environ
500 ms
Page 24

– 21 –
FRANÇAIS
3-1. Précautions relatives à l’utilisation
1 La durée de vie de la tête d’imprimante thermique ne peut être garantie si tout
autre papier que celui recommandé est employé. Si le papier utilisé contient
du Na+, K++, CI–, la durée de vie de l’élément thermique de la tête
d’impression sera considérablement réduite.
2 Ne jamais effectuer d’impression lorsque la surface de la tête d’impression est
couverte d’eau ou de toute forme d’humidité, telle que la condensation.
3-2. Précautions relatives à la sécurité
1 Ne jamais toucher la tête d’imprimante thermique ou le moteur durant
l’impression ou immédiatement après l’impression. En effet, ces éléments
sont alors extrêmement chauds.
2 Ne jamais toucher les éléments mobiles tels que les rouages ou les boutons
durant l’impression.
3 Les bords des éléments de l’imprimante, surtout ceux en métal, sont à manier
avec une prudence particulière. En effet, ceux-ci pourraient causer des
blessures.
3. PRECAUTIONS
Page 25

– 22 –
FRANÇAIS
4-1. Mode Star
Commandes de sélection de caractères
Code de contrôle
Codes
Fonction
hexadécimaux
<ESC> “R” n 1B 52 n Sélection du jeu de caractères internationaux
<ESC> “/” “1” 1B 2F 31
Sélection du zéro barré
<ESC> “/” <1> 1B 2F 01
<ESC> “/” “0” 1B 2F 30
Sélection du zéro normal
<ESC> “/” <0> 1B 2F 00
<ESC> “b” n1 n2 n3 n4 1B 62 n1 n2 n3 n4
Sélection d’impression de code à barres
d1 ... <RS> d1 ... 1E
<ESC> “M” 1B 4D Sélection d’impression de pas 12 points
<ESC> “p” 1B 70 Sélection d’impression de pas 14 points
<ESC> “P” 1B 50 Sélection d’impression de pas 15 points
<ESC> “:” 1B 3A Sélection d’impression de pas 16 points
<ESC> <SP> n 1B 20 n Réglage d’espacement de caractère
<SO> 0E Réglage d’impression d’agrandissement
double de largeur de caractère
<DC4> 14 Nouveau réglage d’impression d’agrandissement
de largeur de caractère
<ESC> “W” n 1B 57 n Réglage d’agrandissement de largeur de caractère
<ESC> <SO> 1B 0E Réglage d’impression d’agrandissement
double de hauteur de caractère
<ESC> <DC4> 1B 14 Nouveau réglage d’impression d’agrandissement
de hauteur de caractère
<ESC> “h” n 1B 68 n Réglage d’agrandissement de hauteur de caractère
<ESC> “i” n1 n2 1B 69 n1 n2 Réglage d’agrandissements de largeur et de
hauteur de caractère
<ESC> “–” “1” 1B 2D 31
Sélection de soulignement
<ESC> “–” <1> 1B 2D 01
<ESC>“–” “0” 1B 2D 30
Annulation de soulignement
<ESC> “–” <0> 1B 2D 00
<ESC> “_” “1” 1B 5F 31
Sélection de surlignement
<ESC> “_” <1> 1B 5F 01
<ESC> “_” “0” 1B 5F 30
Annulation de surlignement
<ESC> “_” <0> 1B 5F 00
4. RESUME DES COMMANDES
Page 26

– 23 –
FRANÇAIS
Code de contrôle
Codes
Fonction
hexadécimaux
<ESC> “4” 1B 34 Sélection d’impression surintensifiée
<ESC> “5” 1B 35 Annulation d’impression surintensifiée
<SI> 0F Impression inversée
<DC2> 12 Annulation d’impression inversée
<ESC> “E” 1B 45
Sélection d’impression mise en valeur
<ESC> “G” 1B 47
<ESC> “F” 1B 46
Annulation d’impression mise en valeur
<ESC> “H” 1B 48
Commandes de réglage du format de page
Code de contrôle
Codes
Fonction
hexadécimaux
<ESC> “C” n 1B 43 n Réglage de la longueur de page en lignes
<ESC> “C” <0> n 1B 43 00 n Réglage de la longueur de page en pouces
<ESC> “N” n 1B 4E n Réglage de la marge inférieure
<ESC> “O” 1B 4F Annulation de la marge inférieure
<ESC> “l” n 1B 6C n Réglage de la marche gauche
<ESC> “Q” n 1B 51 n Réglage de la marge droite
Commandes de déplacement de la position d’impression
Code de contrôle
Codes
Fonction
hexadécimaux
<LF> 0A Avance de ligne
<CR> 0D Retour de chariot
<ESC> “a” n 1B 61 n Avance de n lignes de papier
<FF> 0C Saut de page
<HT> 09 Tabulation horizontale
<VT> 0B Tabulation verticale
<ESC> “z” “1” 1B 7A 31
Réglage d’espacement de ligne à 4 mm
<ESC> “z” <1> 1B 7A 01
<ESC> “0” 1B 30 Réglage d’espacement de ligne à 3 mm
<ESC> “J” n 1B 4A n Avance de n/4 mm à la fois
<ESC> “j” n 1B 6A n Recul de n/4 mm à la fois
<ESC> “B” n1 n2 ... <0> 1B 42 n1 n2 ... 00 Réglage d’arrêts de tabulation verticale
<ESC> “D” n1 n2 ... <0> 1B 44 n1 n2 ... 00 Réglage d’arrêts de tabulation horizontale
Page 27

– 24 –
FRANÇAIS
Commandes d’impression de graphiques en points
Code de contrôle
Codes
Fonction
hexadécimaux
<ESC> “K” n <0> 1B 4B n 00 m1 m2
Impression de graphiques densité normale
m1 m2 ... ...
<ESC> “L” n1 n2 1B 4C n1 n2 m1 m2
Impression de graphiques haute densité
m1 m2 ... ...
<ESC> “k” n <0> m1 ... 1B 6B n 00 m1 ... Impression de graphiques densité fine
Commandes d’impression de caractères téléchargés
Code de contrôle
Codes
Fonction
hexadécimaux
<ESC> “&” “1” “1” 1B 26 31 31 n
n m1 m2 ... m48 m1 m2 ... m48
Définition de caractère téléchargé
<ESC> “&” <1> <1> 1B 26 01 01
n m1 m2 ... m48 n m1 m2 ... m48
<ESC> “&” “1” “0” n 1B 26 31 30 n
Suppression de caractère téléchargé
<ESC> “&” <1> <0> n 1B 26 01 00 n
<ESC> “%” “1” 1B 25 31
Validation d’un jeu de caractères téléchargés
<ESC> “%” <1> 1B 25 01
<ESC> “%” “0” 1B 25 30
Invalidation d’un jeu de caractères téléchargés
<ESC> “%” <0> 1B 25 00
Commandes de pilotage des périphériques
Code de contrôle
Codes
Fonction
hexadécimaux
<ESC> <BEL> n1 n2 1B 07 n1 n2 Définition de la largeur d’impulsion d’entraîne-
ment du périphérique #1
<BEL> 07 Pilotage du périphérique #1
<FS> 1C Pilotage immédiat du périphérique #1
<EM> 19 Pilotage immédiat du périphérique #2
<SUB> 1A Pilotage immédiat du périphérique #2
Commandes de pilotage du mécanisme automatique de découpe
Code de contrôle
Codes
Fonction
hexadécimaux
<ESC> “d” “0” 1B 64 30 Commande de découpe complète au mécanisme
<ESC> “d” <0> 1B 64 00 automatique
<ESC> “d” “1” 1B 64 31 Commande de découpe partielle au mécanisme
<ESC> “d” <1> 1B 64 01 automatique
Page 28

– 25 –
FRANÇAIS
Autres commandes
Code de contrôle
Codes
Fonction
hexadécimaux
<CAN> 18 Annulation de la dernière ligne et initialisation
de l’imprimante
<DC3> 13 Désélection de l’imprimante
<DC1> 11 Réglage du mode de sélection
<RS> 1E Retentissement de l’avertisseur
<ESC> “#N, n1 n2 n3 n4”
1B 23 N 2C n1 n2 n3 n4
Réglage du commutateur de mémorisation
<LF> <NUL> 0A 00
<ESC> “@” 1B 40 Initialisation de l’imprimante
<ENQ> 05 Interrogation
<ESC> “?” <LF> <NUL> 1B 3F 0A 00 Initialisation de l’imprimante
Page 29

– 26 –
FRANÇAIS
4-2. Mode ESC/POS
Code de
commande
Code hexadécimal Fonction
HT 09 Tabulation horizontale
LF 0A Avance de ligne
FF 0C Impression mode de page et retour
DLE EOT 10 04 Transmission d’état en temps réel
DLE ENQ 10 05 Demande à l’imprimante en temps réel
CAN 18 Annulation des données d’impression en mode de page
ESC FF 1B FF Impression des données en mode de page
ESC SP 1B 20 Réglage d’espacement des caractères
ESC ! 1B 21 Désignation du mode d’impression universel
ESC # 1B 23 Commutateur de réglage de la mémoire
ESC $ 1B 24 Désignation de l’impression absolue
ESC % 1B 25 Désignation/annulation du jeu de caractères téléchargés
ESC & 1B 26 Définition des caractères téléchargés
ESC
*
1B 2A Désignation du mode d’image de bit
ESC - 1B 2D Désignation/annulation du soulignement
ESC 2 1B 32 Réglage de l’avance de ligne de 1/6ème de pouce
ESC 3 1B 33 Réglage de l’avance de ligne
ESC = 1B 3D Sélection de l’équipement périphérique
ESC ? 1B 3F Effacement des caractères téléchargés
ESC @ 1B 40 Initialisation de l’imprimante
ESC D 1B 44 Réglage de la position de la tabulation horizontale
ESC E 1B 45 Désignation/annulation d’impression mise en valeur
ESC G 1B 47 Désignation/annulation d’impression double
ESC J 1B 4A Impression et avance de papier
ESC L 1B 4C Sélection du mode de page
ESC R 1B 52 Sélection des caractères internationaux
ESC S 1B 53 Sélection du mode standard
ESC T 1B 54 Sélection de la direction d’impression des caractères en
mode d’impression
ESC V 1B 56 Désignation/annulation de la rotation de 90° des caractères
ESC W 1B 57 Réglage de la plage d’impression en mode de page
ESC \ 1B 5C Désignation de la position relative
ESC a 1B 61 Alignement de la position
ESC c4 1B 63 34 Pas de sélection de papier valide à l’arrêt d’impression
ESC c5 1B 63 35 Activation/désactivation des commandes du panneau
ESC d 1B 64 Impression et alimentation du papier de “n” lignes
ESC i 1B 69 Découpe partielle (une partie reste attachée)
ESC p 1B 70 Désignation de la génération d’impulsions
ESC t 1B 74 Sélection du tableau des codes de caractères
Page 30

– 27 –
FRANÇAIS
Code de
commande
Code hexadécimal Fonction
ESC u 1B 75 Transmission de l’état de l’équipement périphérique
ESC v 1B 76 Transmission de l’état de détection du papier
ESC { 1B 7B Désignation/annulation de l’impression inversée
GS ! 1D 21 Désignation de la taille de caractères
GS $ 1D 24 Désignation de la position absolue de la direction verticale
des caractères en mode de page
GS
*
1D 2A Définition de l’image bit téléchargée
GS / 1D 2F Impression de l’image bit téléchargée
GS : 1D 3A Début/fin de la définition macro
GS B 1D 42 Désignation/annulation de l’impression à l’envers
GS H 1D 48 Sélection de la position d’impression des caractères HRI
GS I 1D 49 Transmission de l’identification de l’imprimante
GS L 1D 4C Réglage de la marge de gauche
GS P 1D 50 Réglage du pas calculé de base
GS V 1D 56 Coupure du papier
GS W 1D 57 Réglage de la plage d’impression
GS \ 1D 5C Désignation de la position relative des caractères verticaux
lors de l’impression en mode de page
GS ^ 1D 5E Exécution de macro
GS a 1D 61 Activation/désactivation de la transmission de l’état
automatique
GS f 1D 66 Sélection de fonte de caractères HRI
GS h 1D 68 Réglage de la hauteur de codes à barres
GS k 1D 6B Impression de codes à barres
GS r 1D 72 Transmission d’état
GS w 1D 77 Réglage de la taille latérale de codes à barres
Page 31

INHALTSVERZEICHNIS
1. PAPIER EINLEGEN ........................................................................29
1-1. Papier einlegen...........................................................................29
1-2. Papier wechseln..........................................................................31
1-3. Papierstau ...................................................................................32
2. BEDIENFELD ..................................................................................33
2-1. Einschalten .................................................................................33
2-2. Fehlermeldungen........................................................................34
3. BEHANDLUNG DES DRUCKERS ................................................35
3-1. Vorsichtsmaßregeln zum Betrieb...............................................35
3-2. Sicherheitsregeln........................................................................35
4. ZUSAMMENFASSUNG DER BEFEHLE ......................................36
4-1. Star-Betriebsart ..........................................................................36
4-2. ESC/POS Betrieb* ..................................................................... 40
ANHANG................................................................................................56
Der Anhand dieser Bedienungsanleitung ist nur in englischer Sprache.
* ESC/POS ist ein Warenzeichen der Seiko Epson Corporation.
Page 32

– 29 –
DEUTSCH
1 Druckerabdeckung öffnen.
2 Wenn das Gerät eine Abschneider
hat, diesen in Pfeilrichtung bewegen, bis die Sperre einrastet. (Dieser
Schritt ist nicht erforderlich, wenn
kein Abschneider vorhanden ist.)
3 Den Papierrollenhalter in Pfeil-
richtung drücken und das Papier
einlegen, wie in der Abbildung gezeigt. Sicherstellen, daß der Kern
des Papiers jetzt vom
Papierrollenhalter fest gehalten
wird.
1-1. Papier einlegen
Eine Papierrolle vorbereiten. Sicherstellen, daß die Einzugkante des Papier in
geradem Winkel zur Einzugrichtung abgeschnitten ist.
Roll paper
Core
Axis
Paper roll holder
Papierrollenhalter
Papierrolle
Achse
Kern
1. PAPIER EINLEGEN
Page 33

– 30 –
DEUTSCH
4 Automatisches Einlegen
Die Kante des Papiers in die Papierschlitz einführen. Der Drucker erkennt automatisch das Papier und
schiebt es 15 - 20 cm vor. Wenn es
weniger als 15 cm herausragt, die
Vorschubtaste drücken, um es weiter zu bewegen. Danach sicherstellen, daß das Papier straffgezogen
ist.
Ist das Papier nicht gerade
eingezogent, staut es. Wenn das passiert, den Papier-Freigabehebel nach
vorne ziehen, und das Papier herausziehen, bis es sich gerade bewegt. Nachdem sichergestellt ist,
daß das Papier um 15 bis 20 cm aus
dem Drucker herausragt, den Papier-Freigabehebel in die Ausgangsstellung zurückstellen.
Manuelles Einlegen
Den Papier-Freigabehebel nach vorne ziehen, um den Druckkopf abzuheben. Die Papierkante in den
Papierschlitz einführen und das grüne Zahnrad in der Nähe des PapierFreigabehebels drehen, bis die
Papierkante aus dem Druckermechanismus herausragt. Die
Papierkante greifen und das Papier
ziehen, bis es gerade herauskommt.
Nachdem sichergestellt ist, daß das
Papier um 15 bis 20 cm aus dem
Drucker herausragt, den Papier-Freigabehebel in die Ausgangsstellung
zurückstellen.
Page 34

– 31 –
DEUTSCH
5 Überschüssiges Papier an der
Metallkante des Druckkopfes abreißen.
6 Den Abschneider schließen. (Die-
ser Schritt ist nicht erforderlich,
wenn kein Abschneider vorhanden
ist.)
7 Die Druckerabdeckung schließen,
und die On Line-Taste drücken. Die
On Line-LED leuchtet auf.
1 Wenn der Papiervorrat-Sensor an-
spricht und noch Papier auf der Rolle
vorhanden ist, das Papier kurz vor
der Papieröffnung abschneiden und
dann die Feed-Taste drücken, bis
der Papiervorschub stoppt.
2 Die Druckerabdeckung öffnen, und
den Papier-Freigabehebel nach vorne ziehen, so daß der Druckkopf
abgehoben ist, und das Papier herausziehen.
3 Den Papierrollenhalter in Pfeil-
richtung drücken und die Papierrolle bzw. den Kern entfernen.
4 Die Schritte wie unter “1-1 Papier
einlegen” ausführen, um die Papierrolle auszutauschen.
1-2. Papier wechseln
Page 35

– 32 –
DEUTSCH
1-3. Papierstau
1 Das Gerät ausschalten, und die Druckerabdeckung öffnen.
2 Wenn das Gerät einen Abschneider hat, diesen nach vorne ziehen, bis die
Sperre einrastet. (Dieser Schritt ist nicht erforderlich, wenn kein Abschneider
vorhanden ist.)
3 Die Papierrolle kurz vor der Papierschlitz abschneiden, und das Papier
entnehmen.
4 Die Kopföffnungshebel zurückdrücken, um das Abdecksystem freizugeben,
und den Kopf in Offen-Stellung stellen.
5 Den Papierstau beheben. Wenn der Papierstau nicht behoben werden kann,
den Vorschubknopf drehen, und das Papier entfernen.
6 Wenn der Papierstau behoben ist, das Abdecksystem oben andrücken, und die
Kopföffnungshebel einrasten lassen.
Achtung
Wenn sich der Papierstau in der automatischen Abschneideinheit befindet,
einen Kreuzschlitz-Schraubenzieher in die rechten Seite der automatischen
Abschneideinheit einführen und drehen, so daß die internen Zahnräder gedreht
werden und den Papierstau beseitigen.
Page 36

– 33 –
DEUTSCH
2-1. Einschalten
Bedienfeld
Papier - Ja
Papier - Nein
1 Betriebs-LED (grüne LED)
2 On Line-LED (grüne LED)
3 On Line-Taste
4 FEED-Taste
Wenn der Netzschalter eingeschaltet wird, leuchten die Betriebs-LED und die On
Line-LED. Wenn kein Papier vorhanden ist, blinkt die Betriebs-LED in Intervallen von etwa einer Sekunde.
ON LINE
POWER
FEED
ON LINE
POWER
FEED
12 3 4
2. BEDIENFELD
Page 37

– 34 –
DEUTSCH
2-2. Fehlermeldungen
1) Automatische Fehlerbehebung (Betriebs-LED: Blinkt; On Line-LED:
Ein)
Fehlerbeschreibung
Anormale
Kopftemperatur
Blinkmuster der Betriebs-LED Behebungszustand
Automatische Behebung nach
Sinken der Kopftemperatur.
2) Behebbare Fehler (Betriebs-LED: Blinkt; On Line-LED: Aus)
Blinkmuster der Betriebs-LED Behebungszustand
Papier einlegen und On Line-Taste
drücken. (Star)
Papier einlegen und Abdeckung
schließen. (ESC/POS)
Druckkopf absenken und On LineTaste drücken. (Star)
Druckkopf absenken und Abdeckung schließen. (ESC/POS)
On Line-Taste drücken, um den
Druck fortzusetzen.
Beim Druck leuchten beide
Anzeigen. Im On Line-Betrieb
blinkt die Betriebs-LED und die On
Line-LED leuchtet. (Star)
Siehe “Kein Papier-Fehler”. (ESC/
POS)
Abdeckung schließen und On LineTaste drücken. (Star)
Abdeckung schließen. (ESC/POS)
Ist das Messer in seiner Grundeinstellung, On Line-Taste drücken,
um den Druck fortzusetzen. Ist das
Messer nicht in seiner Grundstellung, ist der Fehler nicht
behebbar. (Star)
Befehl (ESC/POS)
Fehlerbeschreibung
Kein Papier
Kopf angehoben
Ende der Papierrolle fast erreicht
Druckerabdeckung
geöffnet
Fehler beim
Papierschneiden
Approx. 1 Sec Approx. 1 Sec
Approx. 1 Sec Approx. 1 Sec
3) Fataler Fehler (Betriebs-LED: Blinkt; On Line-LED: Blinkt)
Ca. 1 s Ca. 1 s
Ca. 1 s
Ca. 1 s
Approx. 250 msApprox. 250 ms
Ca. 250 ms Ca. 250 ms
Approx. 2 Sec Approx. 2 Sec
Ca. 2 s
Ca. 2 s
Approx. 125 msApprox. 125 ms
Ca.
500 ms
Ca.
500 ms
Ca. 125 ms Ca. 125 ms
Page 38

– 35 –
DEUTSCH
3-1. Vorsichtsmaßregeln zum Betrieb
1 Die Lebensdauer des Thermo-Druckkopfs kann nicht garantiert werden,
wenn anderes als das empfohlene Papier verwendet wird. Besonders wenn das
verwendete Papier (Na+, K++, Cl-) enthält, tritt eine merkbare Verkürzung
der Lebensdauer ein.
2 Niemals drucken, wenn Wasser oder Feuchtigkeit, wie etwa Kondensation,
auf der Oberfläche des Druckkopfes vorhanden ist.
3-2. Sicherheitsregeln
1 Niemals den Thermo-Druckkopf oder -Motor beim Drucken oder gleich nach
dem Drucken berühren, da sich diese Bauteile stark erhitzen.
2 Niemals bewegliche Teile, wie Zahnräder, beim Druckvorgang berühren.
3 Immer in der Nähe von Metallkanten vorsichtig sein, da leicht Verletzungen
verursacht werden können.
3. BEHANDLUNG DES DRUCKERS
Page 39

– 36 –
DEUTSCH
4-1. Star-Betriebsart
Befehle zum Ändern der Zeichendarstellung
Steuerbefehle
Hexadezimal-
Funktion
Codes
<ESC> “R” n 1B 52 n Internationalen Zeichensatz einstellen
<ESC> “/” “1” 1B 2F 31
Null mit Schrägstrich wählen
<ESC> “/” <1> 1B 2F 01
<ESC> “/” “0” 1B 2F 30
Normale Null wählen
<ESC> “/” <0> 1B 2F 00
<ESC> “b” n1 n2 n3 n4 1B 62 n1 n2 n3 n4
Barcode-Druck aktivieren
d1 ... <RS> d1 ... 1E
<ESC> “M” 1B 4D Drucken mit 12-Punkt-Größe
<ESC> “p” 1B 70 Drucken mit 14-Punkt-Größe
<ESC> “P” 1B 50 Drucken mit 15-Punkt-Größe
<ESC> “:” 1B 3A Drucken mit 16-Punkt-Größe
<ESC> <SP> n 1B 20 n Zeichenabstand einstellen
<SO> 0E Druck mit doppelter Zeichenbreite
<DC4> 14 Rückstellen der Zeichenbreite
<ESC> “W” n 1B 57 n Zeichenbreite definieren
<ESC> <SO> 1B 0E Druck mit doppelter Zeichenhöhe
<ESC> <DC4> 1B 14 Rückstellen der Zeichenhöhe
<ESC> “h” n 1B 68 n Zeichenhöhe definieren
<ESC> “i” n1 n2 1B 69 n1 n2 Zeichenbreite und -höhe definieren
<ESC> “–” “1” 1B 2D 31
Unterstreichen aktivieren
<ESC> “–” <1> 1B 2D 01
<ESC>“–” “0” 1B 2D 30
Unterstreichen deaktivieren
<ESC> “–” <0> 1B 2D 00
<ESC> “_” “1” 1B 5F 31
Überstreichen aktivieren
<ESC> “_” <1> 1B 5F 01
<ESC> “_” “0” 1B 5F 30
Überstreichen deaktivieren
<ESC> “_” <0> 1B 5F 00
<ESC> “4” 1B 34 Hervorgehobenen Druck aktivieren
<ESC> “5” 1B 35 Hervorgehobenen Druck deaktivieren
<SI> 0F Inversdruck aktivieren
<DC2> 12 Inversdruck deaktivieren
4. ZUSAMMENFASSUNG DER BEFEHLE
Page 40

– 37 –
DEUTSCH
Steuerbefehle
Hexadezimal-
Funktion
Codes
<ESC> “E” 1B 45
Fettdruck aktivieren
<ESC> “G” 1B 47
<ESC> “F” 1B 46
Fettdruck deaktivieren
<ESC> “H” 1B 48
Befehle zum Festlegen der Seitengröße
Steuerbefehle
Hexadezimal-
Funktion
Codes
<ESC> “C” n 1B 43 n Seitenlänge in Zeilen definieren
<ESC> “C” <0> n 1B 43 00 n Seitenlänge in Zoll definieren
<ESC> “N” n 1B 4E n Unteren Rand definieren
<ESC> “O” 1B 4F Unteren Rand löschen
<ESC> “l” n 1B 6C n Linken Rand definieren
<ESC> “Q” n 1B 51 n Rechten Rand definieren
Befehle zum Ändern der Druckposition
Steuerbefehle
Hexadezimal-
Funktion
Codes
<LF> 0A Zeilenvorschub
<CR> 0D Wagenrücklauf
<ESC> “a” n 1B 61 n Papier um n Zeilen vorschieben
<FF> 0C Seitenvorschub
<HT> 09 Horizontaler Tabulator
<VT> 0B Vertikaler Tabulator
<ESC> “z” “1” 1B 7A 31
Zeilenvorschub auf 4 mm setzen
<ESC> “z” <1> 1B 7A 01
<ESC> “0” 1B 30 Zeilenvorschub auf 3 mm setzen
<ESC> “J” n 1B 4A n Einmaliger Vorschub um n/4 mm
<ESC> “j” n 1B 6A n Einmaliger Rückschritt um n/4 mm
<ESC> “B” n1 n2 ... <0> 1B 42 n1 n2 ... 00 Vertikale Tabulatoren definieren
<ESC> “D” n1 n2 ... <0> 1B 44 n1 n2 ... 00 Horizontale Tabulatoren definieren
Page 41

– 38 –
DEUTSCH
Befehle zum Druck von Rastergrafiken
Steuerbefehle
Hexadezimal-
Funktion
Codes
<ESC> “K” n <0> 1B 4B n 00 m1 m2
Grafikdruck in normaler Auflösung
m1 m2 ... ...
<ESC> “L” n1 n2 1B 4C n1 n2 m1 m2
Grafikdruck in hoher Auflösung
m1 m2 ... ...
<ESC> “k” n <0> m1 ... 1B 6B n 00 m1 ... Grafikdruck in maximaler Auflösung
Befehle zum Druck von Download-Zeichen
Steuerbefehle
Hexadezimal-
Funktion
Codes
<ESC> “&” “1” “1” 1B 26 31 31 n
n m1 m2 ... m48 m1 m2 ... m48
Download-Zeichen definieren
<ESC> “&” <1> <1> 1B 26 01 01
n m1 m2 ... m48 n m1 m2 ... m48
<ESC> “&” “1” “0” n 1B 26 31 30 n
Download-Zeichen löschen
<ESC> “&” <1> <0> n 1B 26 01 00 n
<ESC> “%” “1” 1B 25 31
Download-Zeichensatz selektieren
<ESC> “%” <1> 1B 25 01
<ESC> “%” “0” 1B 25 30
Download-Zeichensatz deselektieren
<ESC> “%” <0> 1B 25 00
Befehle zum Steuern von Peripheriegeräten
Steuerbefehle
Hexadezimal-
Funktion
Codes
<ESC> <BEL> n1 n2 1B 07 n1 n2 Treiberimpuls für Peripheriegerät Nr. 1 definieren
<BEL> 07 Peripheriegerät Nr. 1 steuern
<FS> 1C Peripheriegerät Nr. 1 ohne Verzögerung steuern
<EM> 19 Peripheriegerät Nr. 2 ohne Verzögerung steuern
<SUB> 1A Peripheriegerät Nr. 2 ohne Verzögerung steuern
Befehle zum Steuern des automatischen Abschneiders
Steuerbefehle
Hexadezimal-
Funktion
Codes
<ESC> “d” “0” 1B 64 30 Befehl an den automatischen Abschneider zum
<ESC> “d” <0> 1B 64 00 vollen Schnitt
<ESC> “d” “1” 1B 64 31 Befehl an den automatischen Abschneider zum
<ESC> “d” <1> 1B 64 01 teilweisen Schnitt
Page 42

– 39 –
DEUTSCH
Weitere Befehle
Steuerbefehle
Hexadezimal-
Funktion
Codes
<CAN> 18 Letzte Zeile löschen und Drucker initialisieren
<DC3> 13 Drucker deaktivieren
<DC1> 11 Aktivierungsmodus definieren
<RS> 1E Signalton aktivieren
<ESC> “#N, n1 n2 n3 n4”
1B 23 N 2C n1 n2 n3 n4
Stellung der Memory-Switches festlegen
<LF> <NUL> 0A 00
<ESC> “@” 1B 40 Drucker initialisieren
<ENQ> 05 Anfrage
<ESC> “?” <LF> <NUL> 1B 3F 0A 00 Druckerhardware zurücksetzen
Page 43

– 40 –
DEUTSCH
4-2. ESC/POS Betrieb
Steuerbefehle Hexadezimal-Codes Funktion
HT 09 Horizontaler Tabulator
LF 0A Zeilenvorschub drucken
FF 0C Seiten-Modus drucken und zurückschalten
DLE EOT 10 04 Echtzeitübertragung des Status
DLE ENQ 10 05 Echtzeitanforderung an Drucker
CAN 18 Druckdaten im Seiten-Modus löschen
ESC FF 1B FF Druckdaten im Seiten-Modus drucken
ESC SP 1B 20 Zeichenabstand einstellen
ESC ! 1B 21 Universal-Druckmodus bestimmen
ESC # 1B 23 Stellung der Memory-Switches festlegen
ESC $ 1B 24 Absolute Positionierung
ESC % 1B 25 Download-Zeichensatz EIN / AUS
ESC & 1B 26 Download-Zeichensatz bestimmen
ESC
*
1B 2A Bitmap-Grafik bestimmen
ESC - 1B 2D Unterstreichen EIN / AUS
ESC 2 1B 32 1/6 Zoll Zeilenvorschub einstellen
ESC 3 1B 33 Zeilenvorschub einstellen
ESC = 1B 3D Peripheriegeräte wählen
ESC ? 1B 3F Download-Zeichen löschen
ESC @ 1B 40 Drucker initialisieren
ESC D 1B 44 Horizontale Tabulatorposition setzen
ESC E 1B 45 Fettdruck EIN / AUS
ESC G 1B 47 Schattendruck EIN / AUS
ESC J 1B 4A Druck und Papiereinzug
ESC L 1B 4C Seiten-Modus wählen
ESC R 1B 52 Internationalen Zeichensatz wählen
ESC S 1B 53 Standard-Modus wählen
ESC T 1B 54 Druckrichtung im Druck-Modus wählen
ESC V 1B 56 90° Zeichendrehung EIN / AUS
ESC W 1B 57 Druckbereich im Seiten-Modus einstellen
ESC \ 1B 5C Relative Positionierung
ESC a 1B 61 Position ausrichten
ESC c4 1B 63 34 Keinen gültigen Papier-Detektor bei Druckstop wählen
ESC c5 1B 63 35 Tasten des Bedienfeldes EIN / AUS
ESC d 1B 64 Druck und Papiervorschub “n” Zeilen
ESC i 1B 69 Teilweise Abschneiden (ein Sektion verbleibend)
ESC p 1B 70 Impulserzeugung bestimmen
ESC t 1B 74 Zeichentabelle wählen
Page 44

– 41 –
DEUTSCH
Steuerbefehle Hexadezimal-Codes Funktion
ESC u 1B 75 Übertragung des Status von Peripheriegeräten
ESC v 1B 76 Übertragung des Papiererkennungs-Status
ESC { 1B 7B Invertierter Druck EIN / AUS
GS ! 1D 21 Zeichengröße bestimmen
GS $ 1D 24 Absolute Position der vertikalen Druckrichtung der
Zeichen im Seiten-Modus bestimmen
GS
*
1D 2A Download Bitmap-Grafik bestimmen
GS / 1D 2F Download Bitmap-Grafik drucken
GS : 1D 3A Makrodefinition starten / beenden
GS B 1D 42 Reversdruck EIN / AUS
GS H 1D 48 Druckposition der HRI-Zeichen wählen
GS I 1D 49 Drucker ID übertragen
GS L 1D 4C Linken Rand setzen
GS P 1D 50 Grundlegenden Berechnungsabstand einstellen
GS V 1D 56 Papier abschneiden
GS W 1D 57 Druckbereich einstellen
GS \ 1D 5C Relative Position der vertikalen Druckrichtung der
Zeichen im Seiten-Modus bestimmen
GS ^ 1D 5E Makro ausführen
GS a 1D 61 Automatische Statusübertragung EIN / AUS
GS f 1D 66 HRI-Zeichensatz wählen
GS h 1D 68 Barcode-Höhe einstellen
GS k 1D 6B Barcode drucken
GS r 1D 72 Status übertragen
GS w 1D 77 Laterale Größe des Barcodes einstellen
Page 45

INDICE
1. CARICAMENTO DELLA CARTA .................................................43
1-1. Caricamento della carta..............................................................43
1-2. Sostituzione della carta ..............................................................45
1-3. Inceppamento della carta ...........................................................46
2. PANNELLO DI CONTROLLO .......................................................47
2-1. Accensione .................................................................................47
2-2. Errori ..........................................................................................48
3. PRECAUZIONI ................................................................................49
3-1. Precauzioni d’uso.......................................................................49
3-2. Precauzioni di sicurezza.............................................................49
4. ELENCO DEI COMANDI ...............................................................50
4-1. Modo Star................................................................................... 50
4-2. Modo ESC/POS* ....................................................................... 54
APPENDICE ........................................................................................... 56
L’Appendice appare solo nella sezione in inglese di questo manuale.
* ESC/POS è un marchio registrato di Seiko Epson Corporation.
Page 46

– 43 –
ITALIANO
1 Aprire il coperchio.
2 Se nella stampante è installata la
taglierina automatica, spostare la
taglierina nella direzione indicata
dalla freccia fino al suo arresto (questa operazione non è necessaria se la
taglierina automatica non è presente).
3 Spingere il supporto del rotolo di
carta nella direzione indicata dalla
freccia e posizionare la carta nel
modo illustrato nella figura. Accertarsi che la bobina del rotolo di carta
sia bloccata saldamente dal supporto del rotolo di carta.
1-1. Caricamento della carta
Preparare un rotolo di carta. Accertarsi che il bordo d’entrata della carta sia
tagliato perpendicolarmente rispetto alla direzione di avanzamento.
Roll paper
Core
Axis
Paper roll holder
Rotolo di carta
Bobina
Asse
Supporto del rotolo di carta
1. CARICAMENTO DELLA CARTA
Page 47

– 44 –
ITALIANO
4 Caricamento automatico
Inserire il bordo della carta nella
fessura. La carta è inserita correttamente quando fuoriesce dal meccanismo della stampante. Verificare
che la carta sporga per circa 15-20
centimetri dal meccanismo della
stampante. Se la carta sporge per
meno di 15 centimetri, premere il
tasto Feed per far avanzare più carta. Dopo aver eseguito queste operazioni, tirare la carta allentata.
Se la carta non è stata inserita diritta,
si incepperà. In questo caso, tirare la
leva alza-testina verso se stessi e
tirare il bordo della carta finché questa non si muove in modo rettilineo.
Dopo essersi accertati che dalla
stampante sporgano 15-20 centimetri di carta, riportare la leva alzatestina nella posizione precedente.
Caricamento manuale
Tirare in avanti la leva alza-testina
per portare la testina di stampa in
posizione alzata. Inserire il bordo
della carta nella fessura e ruotare la
manopola verde situata vicino alla
leva alza-testina finché il bordo della carta non sporge dal meccanismo
della stampante. Afferrare il bordo
della carta e tirarlo finché la carta
non si muove in modo rettilineo.
Dopo essersi accertati che dalla
stampante sporgano 15-20 centimetri di carta, riportare la leva alzatestina nella posizione precedente.
Page 48

– 45 –
ITALIANO
5 Prendere il lembo della carta, pre-
merlo contro la testina e tagliarlo.
Fare attenzione a non ferirsi le mani
o le dita sul bordo della taglierina
automatica.
6 Chiudere la taglierina automatica
(questa operazione non è necessaria
se la taglierina automatica non è
presente).
7 Chiudere il coperchio e premere il
tasto On-Line. La spia On-Line si
accenderà.
1 Se il sensore di rilevamento fine
carta è abilitato e vi è ancora carta
sul rotolo, tagliarla immediatamente prima dell’uscita dalla fessura
della carta e quindi tenere premuto
il tasto Feed finché l’avanzamento
della carta non si arresta.
2 Aprire il coperchio e tirare in avanti
la leva alza-testina in modo che la
testina di stampa sia in posizione
alzata ed estrarre la carta.
3 Spingere il supporto del rotolo di
carta nella direzione indicata dalla
freccia e rimuovere il rotolo di carta
o la bobina.
4 Seguire il procedimento descritto
nella sezione “1-1. Caricamento
della carta” per sostituire il rotolo di
carta.
1-2. Sostituzione della carta
Page 49

– 46 –
ITALIANO
1-3. Inceppamento della carta
1 Spegnere la stampante ed aprire il coperchio.
2 Se nella stampante è installata la taglierina automatica, spostare la taglierina
nella direzione indicata dalla freccia fino al suo arresto (questa operazione non
è necessaria se la taglierina automatica non è presente).
3 Tagliarla il rotolo di carta immediatamente prima dell’uscita dalla fessura
della carta e rimuovere la carta.
4 Servendosi dello stesso procedimento descritto per la pulizia della testina,
spingere la leva di apertura della testina indietro per rilasciare il coperchio del
meccanismo e portare la testina in posizione aperta.
5 Eliminare l’inceppamento. Se non si riesce a farlo, ruotare la manopola di
avanzamento e rimuovere la carta.
6 Dopo aver eliminato l’inceppamento, premere il coperchio del meccanismo
ed innestare la leva di apertura della testina.
Attenzione
Se l’inceppamento si è verificato nell’area della taglierina automatica, inserire
un cacciavite a croce nel fianco destro della taglierina automatica e ruotare gli
ingranaggi interni per liberare la carta inceppata.
Page 50

– 47 –
ITALIANO
2-1. Accensione
Pannello comandi
Carta caricata
Carta non caricata
1 Spia Power (LED verde)
2 Spia On-Line (LED verde)
3 Tasto On-Line
4 Tasto Feed
Quando si accende l’interruttore di alimentazione, le spie Power e On-Line si
illuminano. Se non vi è carta, la spia Power lampeggerà ad intervalli di circa un
secondo.
ON LINE
POWER
FEED
ON LINE
POWER
FEED
12 3 4
2. PANNELLO DI CONTROLLO
Page 51

– 48 –
ITALIANO
Approx. 1 Sec Approx. 1 Sec
2-2. Errori
1) Ripristino automatico (spia Power: lampeggiante; spia On-Line:
accesa)
Descrizione
dell’errore
Temperatura della
testina troppo
elevata
3) Errore irreversibile (spia Power: lampeggiante; spia On-Line:
lampeggiante) l’unità dovrà essere riparata.
2) Errori risolvibili (spia Power: lampeggiante; spia On-Line: spenta)
Ripristino automatico
all’abbassamento della temperatura
della testina.
Approx. 1 Sec Approx. 1 Sec
Approx. 250 msApprox. 250 ms
Approx. 2 Sec Approx. 2 Sec
Approx. 125 msApprox. 125 ms
Frequenza di lampeggiamento spia Power
Circa 250 ms Circa 250 ms
Circa 125 ms Circa 125 ms
Circa 1 sec. Circa 1 sec.
Circa 2 sec. Circa 2 sec.
Circa
500 ms
Circa
500 ms
Circa 1 sec.
Circa 1 sec.
Frequenza di lampeggiamento spia Power Condizioni di ripristino
Condizioni di ripristino
Inserire la carta e premere il tasto
On-Line. (Star)
Inserire la carta e chiudere il
coperchio. (ESC/POS)
Abbassare la testina e premere il
tasto On-Line. (Star)
Abbassare la testina e chiudere il
coperchio. (ESC/POS)
Premere il tasto On-Line per far
proseguire la stampa. Durante la
stampa entrambe le spie si
accendono, mentre nel modo online
la spia Power lampeggia e la spia
On-Line si accende. (Star)
Come per “Fine carta”. (ESC/POS)
Chiudere il coperchio e premere il
tasto On-Line. (Star)
Chiudere il coperchio. (ESC/POS)
Se la lama è nella posizione di
partenza, premere il tasto On-Line
per far proseguire la stampa. Se la
lama non è nella posizione di
partenza, questo errore non è
risolvibile. (Star)
Comando. (ESC/POS)
Descrizione
dell’errore
La carta è
terminata
La testina è
sollevata
La carta è quasi
alla fine del rotolo
Il coperchio è
aperto
Si è verificato un
errore durante il
taglio della carta
Page 52

– 49 –
ITALIANO
3-1. Precauzioni d’uso
1 La durata prevista della testina di stampa termica non può essere garantita se
si utilizza carta diversa da quella raccomandata. Se il tipo di carta utilizzato
contiene (Na+, K++, Cl-), si avrà una sensibile diminuzione della durata
dell’elemento termico della testina di stampa.
2 Non utilizzare la stampante se sulla superficie della testina di stampa si è
depositata dell’acqua o si è formata dell’umidità, ad esempio della condensa.
3-2. Precauzioni di sicurezza
1 Non toccare mai la testina di stampa termica o il motore durante la stampa o
immediatamente dopo la stampa, in quanto questi componenti scottano.
2 Non toccare mai alcuna parte in movimento della stampante, come ingranaggi
o manopole, durante la stampa.
3 Prestare sempre attenzione quando si opera in prossimità dei bordi dei
componenti della stampante, in particolare dei componenti metallici, per
evitare di ferirsi.
3. PRECAUZIONI
Page 53

– 50 –
ITALIANO
4-1. Modo Star
Comandi di selezione caratteri
Codici di controllo Codici esadecimali Funzione
<ESC> “R” n 1B 52 n Seleziona un set di caratteri internazionali
<ESC> “/” “1” 1B 2F 31
Seleziona lo zero barrato
<ESC> “/” <1> 1B 2F 01
<ESC> “/” “0” 1B 2F 30
Seleziona lo zero normale
<ESC> “/” <0> 1B 2F 00
<ESC> “b” n1 n2 n3 n4 1B 62 n1 n2 n3 n4
Seleziona la stampa dei codici a barre
d1 ... <RS> d1 ... 1E
<ESC> “M” 1B 4D Seleziona la stampa corpo 12 punti
<ESC> “p” 1B 70 Seleziona la stampa corpo 14 punti
<ESC> “P” 1B 50 Seleziona la stampa corpo 15 punti
<ESC> “:” 1B 3A Seleziona la stampa corpo 16 punti
<ESC> <SP> n 1B 20 n Imposta la spaziatura tra i caratteri
<SO> 0E Imposta la stampa a doppia larghezza.
<DC4> 14 Annulla la stampa a larghezza ingrandita.
<ESC> “W” n 1B 57 n Imposta il fattore d’ingrandimento per la larghezza
del carattere.
<ESC> <SO> 1B 0E Imposta la stampa a doppia altezza.
<ESC> <DC4> 1B 14 Annulla la stampa ad altezza ingrandita.
<ESC> “h” n 1B 68 n Imposta il fattore d’ingrandimento per l’altezza del
carattere.
<ESC> “i” n1 n2 1B 69 n1 n2 Imposta i fattori d’ingrandimento per la larghezza e
l’altezza del carattere.
<ESC> “–” “1” 1B 2D 31
Seleziona lo stile sottolineato
<ESC> “–” <1> 1B 2D 01
<ESC>“–” “0” 1B 2D 30
Annulla lo stile sottolineato
<ESC> “–” <0> 1B 2D 00
<ESC> “_” “1” 1B 5F 31
Seleziona lo stile barrato
<ESC> “_” <1> 1B 5F 01
<ESC> “_” “0” 1B 5F 30
Annulla lo stile barrato
<ESC> “_” <0> 1B 5F 00
<ESC> “4” 1B 34 Seleziona la stampa evidenziata
<ESC> “5” 1B 35 Annulla la stampa evidenziata
<SI> 0F Seleziona la stampa rovesciata
4. ELENCO DEI COMANDI
Page 54

– 51 –
ITALIANO
Codici di controllo Codici esadecimali Funzione
<DC2> 12 Annulla la stampa rovesciata
<ESC> “E” 1B 45
Seleziona la stampa enfatizzata
<ESC> “G” 1B 47
<ESC> “F” 1B 46
Annulla la stampa enfatizzata
<ESC> “H” 1B 48
Comandi di impostazione del formato pagina
Codici di controllo Codici esadecimali Funzione
<ESC> “C” n 1B 43 n Imposta la lunghezza pagina in righe
<ESC> “C” <0> n 1B 43 00 n Imposta la lunghezza pagina in pollici
<ESC> “N” n 1B 4E n Imposta il margine inferiore
<ESC> “O” 1B 4F Annulla il margine inferiore
<ESC> “l” n 1B 6C n Imposta il margine sinistro
<ESC> “Q” n 1B 51 n Imposta il margine destro
Comandi di spostamento della posizione di stampa
Codici di controllo Codici esadecimali Funzione
<LF> 0A Avanzamento riga
<CR> 0D Ritorno carrello
<ESC> “a” n 1B 61 n Avanzamento carta di n righe
<FF> 0C Avanzamento pagina
<HT> 09 Tabulazione orizzontale
<VT> 0B Tabulazione verticale
<ESC> “z” “1” 1B 7A 31
Imposta l’interlinea a 4 mm
<ESC> “z” <1> 1B 7A 01
<ESC> “0” 1B 30 Imposta l’interlinea a 3 mm
<ESC> “J” n 1B 4A n Singolo spostamento in avanti di n/4 mm
<ESC> “j” n 1B 6A n Singolo spostamento indietro di n/4 mm
<ESC> “B” n1 n2 ... <0> 1B 42 n1 n2 ... 00 Imposta tabulazioni verticali
<ESC> “D” n1 n2 ... <0> 1B 44 n1 n2 ... 00 Imposta tabulazioni orizzontali
Page 55

– 52 –
ITALIANO
Comandi di stampa di grafica a matrice di punti
Codici di controllo Codici esadecimali Funzione
<ESC> “K” n <0> 1B 4B n 00 m1 m2
Stampa la grafica a densità normale
m1 m2 ... ...
<ESC> “L” n1 n2 1B 4C n1 n2 m1 m2
Stampa la grafica ad alta densità
m1 m2 ... ...
<ESC> “k” n <0> m1 ... 1B 6B n 00 m1 ... Stampa la grafica a densità fine
Comandi di stampa dei caratteri trasferibili
Codici di controllo Codici esadecimali Funzione
<ESC> “&” “1” “1” 1B 26 31 31 n
n m1 m2 ... m48 m1 m2 ... m48
Definisce i caratteri trasferibili
<ESC> “&” <1> <1> 1B 26 01 01
n m1 m2 ... m48 n m1 m2 ... m48
<ESC> “&” “1” “0” n 1B 26 31 30 n
Cancella un carattere trasferibile
<ESC> “&” <1> <0> n 1B 26 01 00 n
<ESC> “%” “1” 1B 25 31
Abilita un set di caratteri trasferibili
<ESC> “%” <1> 1B 25 01
<ESC> “%” “0” 1B 25 30
Disabilita un set di caratteri trasferibili
<ESC> “%” <0> 1B 25 00
Comandi di controllo di unità periferiche
Codici di controllo Codici esadecimali Funzione
<ESC> <BEL> n1 n2 1B 07 n1 n2 Definisce l’ampiezza del segnale di attivazione del-
l’unità periferica #1
<BEL> 07 Invia un segnale all’unità periferica #1
<FS> 1C Invia subito un segnale all’unità periferica #1
<EM> 19 Invia subito un segnale all’unità periferica #2
<SUB> 1A Invia subito un segnale all’unità periferica #2
Comandi di controllo della taglierina automatica
Codici di controllo Codici esadecimali Funzione
<ESC> “d” “0” 1B 64 30 Invia alla taglierina automatica un comando di taglio
<ESC> “d” <0> 1B 64 00 completo
<ESC> “d” “1” 1B 64 31 Invia alla taglierina automatica un comando di taglio
<ESC> “d” <1> 1B 64 01 parziale
Page 56

– 53 –
ITALIANO
Altri comandi
Codici di controllo Codici esadecimali Funzione
<CAN> 18 Annulla l’ultima riga e inizializza la stampante
<DC3> 13 Deseleziona la stampante
<DC1> 11 Imposta la modalità di selezione
<RS> 1E Fa emettere un segnale acustico al cicalino
<ESC> “#N, n1 n2 n3 n4”
1B 23 N 2C n1 n2 n3 n4
Imposta l’interruttore di memoria
<LF> <NUL> 0A 00
<ESC> “@” 1B 40 Inizializza la stampante
<ENQ> 05 Interrogazione stampante
<ESC> “?” <LF> <NUL> 1B 3F 0A 00 Reset hardware stampante
Page 57

– 54 –
ITALIANO
4-2. Modo ESC/POS
Codice di controllo
Codice esadecimale Funzione
HT 09 Tabulazione orizzontale
LF 0A Avanzamento riga
FF 0C Stampa in modo pagina e ritorno
DLE EOT 10 04 Trasmissione in tempo reale dello stato
DLE ENQ 10 05 Interrogazione in tempo reale della stampante
CAN 18 Cancella i dati di stampa in modo pagina
ESC FF 1B FF Stampa i dati in modo pagina
ESC SP 1B 20 Imposta il numero di spazi alla destra del carattere
ESC ! 1B 21 Imposta il modo di stampa universale
ESC # 1B 23 Imposta l’interruttore di memoria
ESC $ 1B 24 Imposta la posizione di stampa assoluta
ESC % 1B 25 Imposta/annulla il set di caratteri trasferibili
ESC & 1B 26 Definisce i caratteri trasferibili
ESC
*
1B 2A Seleziona il modo grafico bitmap
ESC - 1B 2D Attiva/disattiva la sottolineatura
ESC 2 1B 32 Imposta l’interlinea a 1/6 di pollice
ESC 3 1B 33 Imposta il valore dell’interlinea
ESC = 1B 3D Seleziona l’unità periferica
ESC ? 1B 3F Cancella i caratteri trasferibili
ESC @ 1B 40 Inizializza la stampante
ESC D 1B 44 Imposta la posizione di tabulazione orizzontale
ESC E 1B 45 Attiva/disattiva la stampa enfatizzata
ESC G 1B 47 Attiva/disattiva la stampa in grassetto
ESC J 1B 4A Stampa e avanzamento carta
ESC L 1B 4C Seleziona il modo pagina
ESC R 1B 52 Seleziona i caratteri internazionali
ESC S 1B 53 Seleziona il modo standard
ESC T 1B 54 Seleziona la direzione di stampa del carattere nel modo di
stampa
ESC V 1B 56 Attiva/disattiva la rotazione di 90° del carattere
ESC W 1B 57 Definisce l’area di stampa nel modo pagina
ESC \ 1B 5C Imposta la posizione di stampa relativa
ESC a 1B 61 Allinea la posizione di stampa
ESC c4 1B 63 34 Attiva il rilevatore di carta non valida all’arresto della stampa
ESC c5 1B 63 35 Abilita/disabilita i tasti sul pannello di controllo
ESC d 1B 64 Stampa e avanzamento carta di “n” righe
ESC i 1B 69 Taglio parziale (una parte della carta non viene tagliata)
ESC p 1B 70 Definisce la generazione dell’impulso
ESC t 1B 74 Seleziona la tabella dei codici carattere
Page 58

– 55 –
ITALIANO
Codice di controllo
Codice esadecimale Funzione
ESC u 1B 75 Stato della trasmissione dell’unità periferica
ESC v 1B 76 Stato della trasmissione del rilevatore carta
ESC { 1B 7B Attiva/disattiva la stampa rovesciata
GS ! 1D 21 Imposta la dimensione del carattere
GS $ 1D 24 Imposta la posizione di stampa assoluta dei caratteri in
direzione verticale in modo pagina
GS
*
1D 2A Definisce la grafica bitmap trasferibile
GS / 1D 2F Stampa la grafica bitmap trasferibile
GS : 1D 3A Inizia/termina la definizione della macro
GS B 1D 42 Attiva/disattiva la stampa all’indietro
GS H 1D 48 Seleziona la posizione di stampa dei caratteri HRI
GS I 1D 49 Trasmissione dell’ID della stampante
GS L 1D 4C Imposta il margine sinistro
GS P 1D 50 Imposta il passo di stampa di base calcolato
GS V 1D 56 Taglio carta
GS W 1D 57 Definisce l’area di stampa
GS \ 1D 5C Imposta la posizione di stampa relativa dei caratteri in
direzione verticale in modo pagina
GS ^ 1D 5E Esegue la macro
GS a 1D 61 Abilita/disabilita la trasmissione automatica dello stato
GS f 1D 66 Seleziona il font di caratteri HRI
GS h 1D 68 Imposta l’altezza del codice a barre
GS k 1D 6B Stampa dei codici a barre
GS r 1D 72 Trasmissione dello stato
GS w 1D 77 Imposta l’ampiezza del codice a barre
Page 59

– 56 –
APPENDIX
General Specifications
Printing system .........................Line thermal dot-matrix
Resolution................................. 8 dots/mm (horiz.) x 8 dots/mm (vert.)
Printable width..........................72mm
Printing speeds..........................50mm/sec (max.)
Printable characters ..................ANK, International
Bar codes .................................. JAN, EAN, UPC, Code 39, ITF, Code 128,
Code 93, NW-7
Character matrix .......................12 × 24 dots
Interfaces ..................................RS-232C, Parallel
Dimensions ............................... TSP212: 158(W) × 234(D) × 193(H) mm
TSP242: 158(W) × 234(D) × 193(H) mm
Weight ......................................TSP212: 2.8kg
TSP242: 3.0kg
Power ........................................(50/60Hz) AC120V, AC230V
Power consumption ..................Max. 43 W Avg. 19W (During continuous print-
ing of ASCII characters)
Operating environment............. +5˚C ~ +40˚C
25% ~ 85% RH
Storage environment................. –20˚C ~ +60˚C
10% ~ 90% RH
APPENDIX
Page 60

– 57 –
APPENDIX
Automatic paper cutter
Life ....................................... 300, 000 cuts
Min. cut length ..................... 25.4mm (1 inch)
Memory Switch
Each memory switch is a 16-bit word stored in EEPROM.
The printer is shipped with the factory setting which is made in accordance with
its product type.
For the detailed functions and the settings of the Memory switches, please refer
to “Programmer’s Manual”.
The factory settings are shown in the table below.
Memory switch TSP212 TSP242
#0 0000 0000
#1 0000 0000
#2 0000 0100
#3 0000 0000
#4 0000 0000
(TSP212) (TSP242)
234mm
158mm
193mm
234mm
158mm
193mm
Page 61

– 58 –
APPENDIX
0
0
Paper Specifications
Recommended paper-roll types:
NIPPON PAPER INDUSTRIES TF50KS-E2C
Many paper types are available. Please use paper that meets the following criteria.
1. Paper type General high-sensitivity thermal paper
2. Paper width 76
-1
mm
3. Paper thickness General thermal paper: 67µm
4. Paper rolls Internal diameter: ø12 mm
Outer diameter: ø85
-2 mm
The shiny side of the paper is facing outward.
Never use any tape or adhesives on the core of
the paper.
5. Print area
±1
2mm 72mm
Printable width
76mm
Page 62

– 59 –
APPENDIX
Cleaning
(1)Head and Platen Cleaning
The head and platen should be cleaned periodically to ensure full printing
performance. Cleaning using the following procedure is recommended every ten
ø85 mm roles of paper.
1 Turn the power switch off.
2 Open the cover.
3 If the unit has an auto-cutter unit,
move the unit in the direction of the
arrow until the lock engages. (This
step is unnecessary if there is no
auto-cutter unit.)
4 Push the two head open levers for
the printer mechanism to the rear to
release the set cover lock. Leave the
head up lever towards the rear at this
time.
Page 63

– 60 –
APPENDIX
5 Open the front of the set cover to
expose the printing surface of the
head.
6 Use a cotton swab or a soft cloth
dipped in alcohol (ethyl or isopropyl
alcohol) to clean the thermal element of the print head.
7 Clean the surface platen by holding
a soft, dry cloth in place and turning
the paper feed knob.
8 Once the cleaning has been com-
pleted, confirm that the head up
lever is to the rear and press the top
of the set cover so that the head open
lever and set cover engage.
Cautions
* Never use sharp tools or abrasive materials, such as a knife or sandpaper, to
clean the thermal element of the print head. Serious damage will result.
* Always wait until the alcohol has completely dried before printing.
* Always wait until the thermal element of the print head has cooled before
cleaning.
(2)Other Cleaning
It is also recommended that any dust or other particles be removed during
cleaning. They can attach to the paper and cause poor printing.
Page 64

MEMO
P 1996.10
P 1996.12
Page 65

Page 66

Printed in Japan, 80870036
ELECTRONIC PRODUCTS DIVISION
STAR MICRONICS CO., LTD.
536 Nanatsushinnya, Shimizu, Shizuoka, 424 Japan
Tel: 0543-47-0112, Fax: 0543-48-5271
OVERSEAS SUBSIDIARY COMPANIES
STAR MICRONICS AMERICA, INC.
70-D Ethel Road West, Piscataway, NJ 08854 U.S.A
Tel: 908-572-9512, Fax: 908-572-5095
STAR MICRONICS DEUTSCHLAND GMBH
Westerbachstraße 59, D-60489 Frankfurt, Germany
Tel: 069-789990, Fax: 069-781006
STAR MICRONICS U.K. LTD.
Star House, Peregrine Business Park, Gomm Road,
High Wycombe, Bucks, HP13 7DL, U.K.
Tel: 01494-471111, Fax: 01494-473333
 Loading...