

Star Manufacturing SPDE1HP, SPDE1ARB-120V Parts List
HEATED
PERISTALTIC DISPENSER
MODEL
SPDE1ARB, SPDE2ARB
SPDE1HP
Installation and
Operation
Instructions
2M-Z7537 Rev. G 2/16/07
SPDE2ARB
1

SAFETY SYMBOL
Using any part other than genuine Star factory supplied parts relieves the
manufacturer of all liability.
Star reserves the right to change specifi cations and product design without
notice. Such revisions do not entitle the buyer to corresponding changes,
improvements, additions or replacements for previously purchased
equipment.
Due to periodic changes in designs, methods, procedures, policies and
regulations, the specifi cations contained in this sheet are subject to change
without notice. While Star Manufacturing exercises good faith efforts to provide
information that is accurate, we are not responsible for errors or omissions
in information provided or conclusions reached as a result of using the
specifi cations. By using the information provided, the user assumes all risks in
connection with such use.
These symbols are intended to alert the user to the presence of
important operating and maintenance instructions in the manual
accompanying the appliance.
RETAIN THIS MANUAL FOR FUTURE REFERENCE
NOTICE
MAINTENANCE AND REPAIRS
Contact your local authorized service agent for service or required maintenance. Please record the model
number, serial number, voltage and purchase date in the area below and have it ready when you call to
ensure faster service.
Model No.
Serial No.
Voltage
Purchase Date
Authorized Service Agent
Reference the listing provided with the unit
or
for an updated listing go to:
Website: www.star-mfg.com
E-mail Service@star-mfg.com
Telephone: (800) 807-9054 Local (314) 781-2777
The Star Service Help Desk
Business 8:00 am to 4:30 p.m. Central Standard Time
Hours:
Telephone: (800) 807-9054 Local (314) 781-2777
Fax: (800) 396-2677 Local (314) 781-2714
E-mail Parts@star-mfg.com
Service@star-mfg.com
Warranty@star-mfg.com
Website: www.star-mfg.com
Mailing Address: Star Manufacturing International Inc.
10 Sunnen Drive
St. Louis, MO 63143
U.S.A
2
2

SPECIFICATIONS
SPDE1ARB-120V
Capacity: One 160 ounce pouch
Electrical: 120V, 60 hertz, single phase, 820 Watts, 7 amps
Cord: 6 ft. length
Plug: 120V - NEMA 5-15P
Dimensions: 9-7/16" W x 19-9/16" D x 30-5/16" H (23.97 W x 49.69 D x 77.0 H cm)
Net Weight: 42 lbs. (19.1 kg)
SPDE1ARB-230V
Capacity: One 160 ounce pouch
Electrical: 230V, 60 hertz, single phase, 820 Watts, 3.5 amps
Cord: 8 ft. length
Plug: 250V 10 amp NEMA-CEE7-7 Euro
Dimensions: 9-7/16" W x 19-9/16" D x 30-5/16" H (23.97 W x 49.69 D x 77.0 H cm)
Net Weight: 42 lbs. (19.1 kg)
SPDE1HP
Capacity: One 160 ounce pouch
Electrical: 120V, 60 hertz, single phase, 820 Watts, 7 amps
Cord: 6 ft. length
Plug: 120V - NEMA 5-15P
Dimensions: 9-7/16" W x 19-9/16" D x 27-5/16" H (23.97 W x 49.69 D x 69.4 H cm)
Net Weight: 42 lbs. (19.1 kg)0V
SPDE2ARB-120V
Capacity: Two 128 ounce pouches
Electrical: 120V, 60 hertz, single phase, 1000 Watts, 8.5 amps
Cord: 6 ft. length
Plug: 120V - NEMA 5-15P
Dimensions: 10 29/32" W x 21 15/32" D x 32 1/4" H (27.8 W x 54.5 D x 81.9 H cm)
Net Weight: 60 lbs. (27.2 kg)
3
CAUTION
This equipment is designed and sold for commercial use only by personnel trained and experienced
in its operation and is not sold for consumer use in and around the home nor for use directly by
the general public in food service locations.
Before using your new equipment, read and understand all the instructions & labels associated with
the unit prior to putting it into operation. Make sure all people associated with its use understand
the units operation & safety before they use the unit.
All shipping containers should be checked for freight damage both visible and concealed. This
unit has been tested and carefully packaged to insure delivery of your unit in perfect condition.
If equipment is received in damaged condition, either apparent or concealed, a claim must be
made with the delivering carrier.
Concealed damage or loss - if damage or loss is not apparent until after equipment is unpacked, a
request for inspection of concealed damage must be made with carrier within 15 days. Be certain
to retain all contents plus external and internal packaging materials for inspection. The carrier will
make an inspection and will supply necessary claim forms.
GENERAL INSTALLATION DATA
This peristaltic dispenser is equipped for the voltage and wattage indicated on the nameplate
mounted on the back of the unit and is designed for use on alternating current (AC) only.
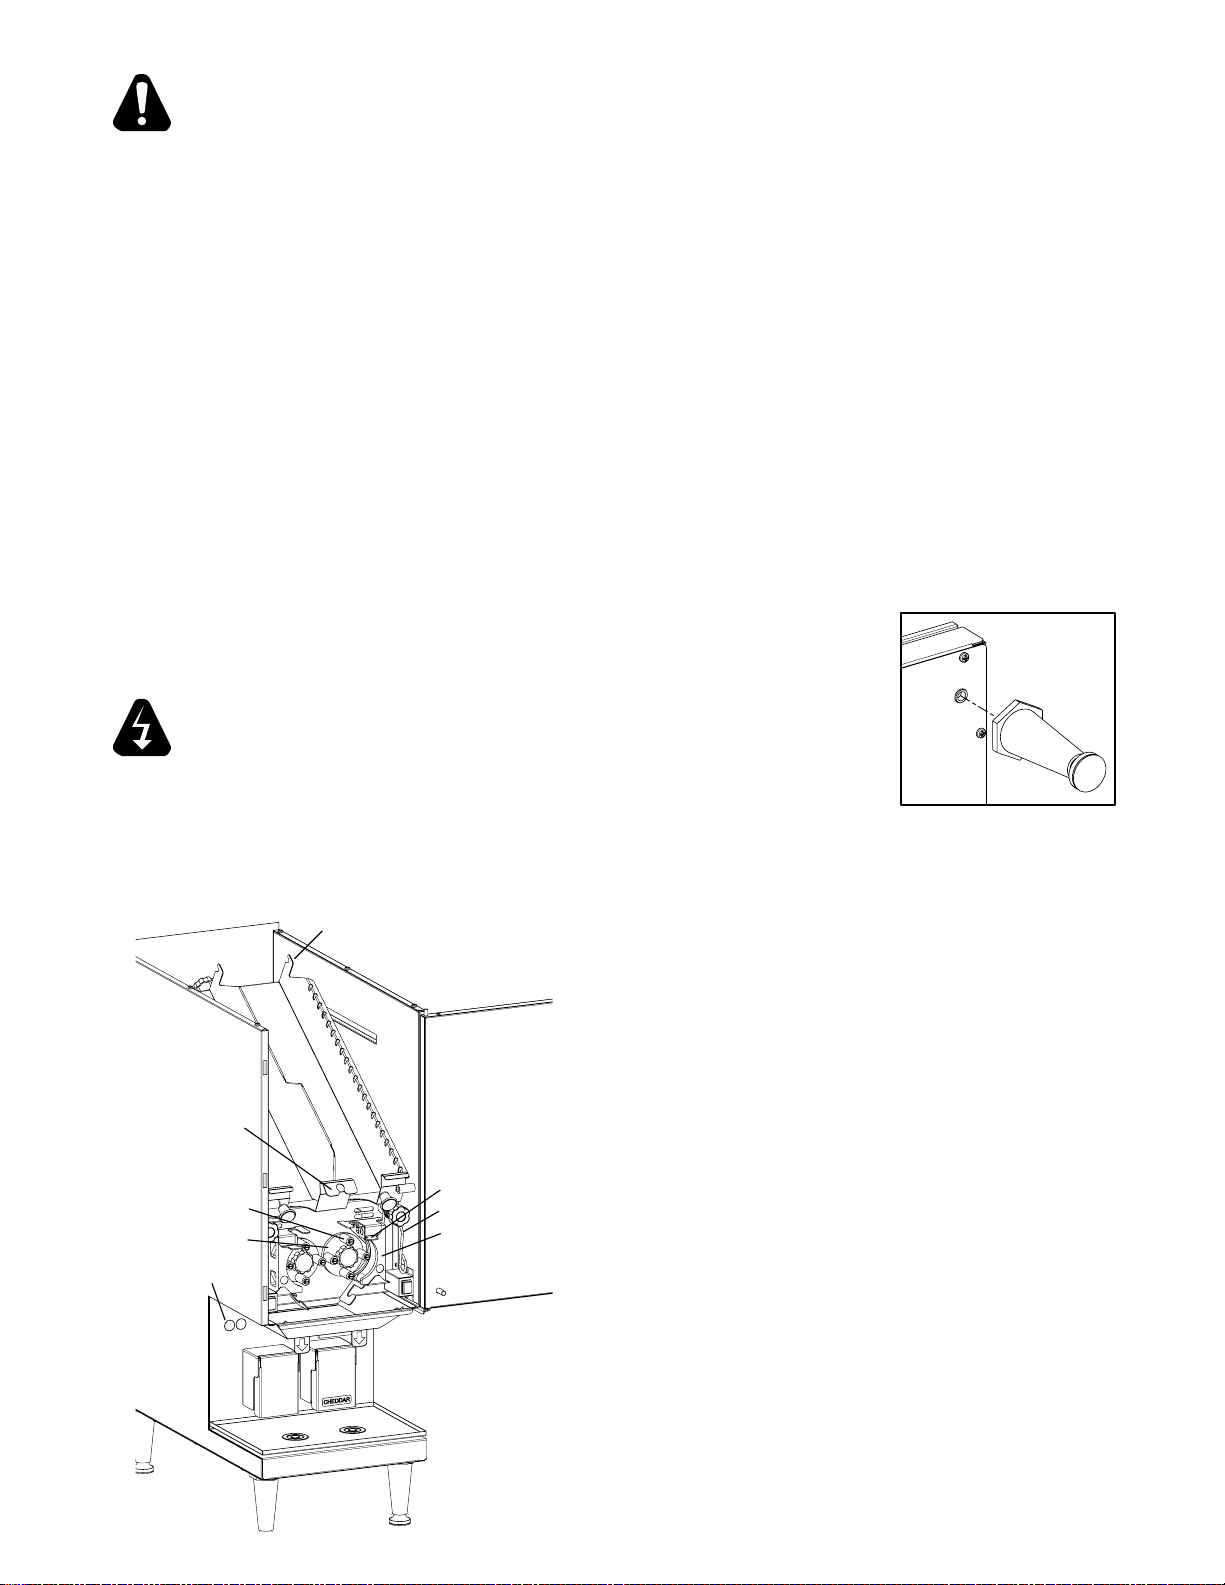
NOTE: The peristaltic dispenser should not be installed without
the legs provided with the machine. The legs screw into the nuts
on the bottom of the dispenser.
WARNING
DO NOT CONNECT TO DIRECT CURRENT (DC).
GENERAL OPERATING INSTRUCTIONS
The SPDE1 heated dispenser is designed to be used with a 9” x 18”
(22.8 x 45.7cm) poly bag with a 1 inch (2.5cm) outlet fi tment. The peristaltic dispenser is
designed to be used with 1/4 inch ID (.6cm) to 1/2 inch id. (1.3cm) tubing with 1/16 inch (.16cm)
wall thickness. SPDE2 slightly smaller.
Loading Product:
1. Turn the dispenser OFF.
2. Unhook the tension spring from the catch.
3. Slide the pump block away from the pump head.
4. The product should be preheated according to the
manufacturer's instructions and should be a minimum
of 140°F (60°C) before dispensing.
5. Insert the new bag into the tray making sure the fi tment
rests on the block track and route the tube around the
rollers.
SPDE2ARB models have a Tube Changing Bracket,
when loading only one bag, clip the tube of the second
bag in the bracket, to prevent product from leaking.
(NOTE: Make sure tube is not twisted.)
6. Hook the top of the bag on the bag hooks, some
models.
7. Place the end of the tube in the slot of the bottom
bracket.
8. Slide the pump block toward the pump head.
9. Hook the tension spring onto the catch.
10. Route the tube through the hole in the tube cover leaving
1/2" of the tube below the cover.
1 1. Dispense a small amount of product to insure the tube
is seated correctly and the product is fl owing.
4
Tube Changing
Bracket
(SPDE2ARB only)
Rollers
Pump
Head
Portion Controls
Bag Hook (some models)
Catch
Tension Spring
Pump Block
IL1234
IL1235

PORTION CONTROL
This dispenser is supplied with a portion control timer. This portion control is based on a time
setting. Variations in product temperature and consistency will affect the dispensed amount.
To insure a consistent portion, use product that is at the correct temperature (145°F to 160°).
SPDE2 models have a Portion Control Label showing approximate settings for portion size
in oz, see Fig 1. The units are pre-set at the factory for 0.75oz, this is a general guideline, and
following procedures still need to be followed to complete calibration.
To set portion:
1. Load preheated product bag into dispenser.
2. Dispense product until there is a steady fl ow.
3. Dispense the product into a clean container and
measure the product to verify the dispensed
amount.
4. Using a small screwdriver, remove the round plug
covering the adjustment knob located on the front
of the unit below the tube cover.
5. Turn the control dial clockwise for more product
and counterclockwise for less product.
6. Repeat steps 3 and 5 until the desired amount
is reached.
Figure 1, Portion Control Label,
SPDE2 models only.
IL1268
OPERATION NOTES
The product should be preheated according to the manufacturer's instructions.
The product should be a minimum of 140°F before dispensing.
The digital temperature readout displays the cabinet air temperature and will fl uctuate during
normal operation. The product temperature should be close to the temperature set point, but
the actual product temperature should be checked periodically to ensure proper operation.
The dispenser will not function correctly if the product is not at the correct temperature.
CHECKING PRODUCT TEMPERATURE
The dispenser should be plugged in and turned on with product in the dispenser for a least 5
hours.
1. Dispense at least 3 inches of product into an insulated cup.
2. Without hesitation, insert the thermometer to the bottom of the cup and stir the product
gently with the stem of the thermometer.
3. Position the tip of the thermometer in the center of the product mass.
4. The temperature should read between 140°F and 160°F.
The dispenser is designed to operate 24 hours a day. Once the product is placed in the
dispenser it should not be removed until the bag is empty or the holding period of the product
has expired.
NOTE: To increase the evacuation,
open the dispenser and pull the
product toward the outlet 3 or 4 times
during operation, see Fig 2.
IL1269
Figure 2, Pull product down once or
twice during operation.
5
 Loading...