

Star Manufacturing 404F Installation Manual

®
®
®
®
®
DEEP FAT
FRYER
MODEL
404F
615FF
630FF
Installation and
Operation
Instructions
2M-Z15997 Rev. A 10/01/2015
615FF
630FF

SAFETY SYMBOL
Using any part other than genuine Star factory supplied parts relieves the
manufacturer of all liability.
Star reserves the right to change specications and product design without
notice. Such revisions do not entitle the buyer to corresponding changes,
improvements, additions or replacements for previously purchased
equipment.
Due to periodic changes in designs, methods, procedures, policies and
regulations, the specications contained in this sheet are subject to change
without notice. While Star International Holdings Inc., Company exercises
good faith efforts to provide information that is accurate, we are not
responsible for errors or omissions in information provided or conclusions
reached as a result of using the specications. By using the information
provided, the user assumes all risks in connection with such use.
These symbols are intended to alert the user to the presence of
important operating and maintenance instructions in the manual
accompanying the appliance.
RETAIN THIS MANUAL FOR FUTURE REFERENCE
NOTICE
MAINTENANCE AND REPAIRS
Contact your local authorized service agent for service or required maintenance.
Please record the model number, serial number, voltage and purchase date in the area below and have it
ready when you call to ensure a faster service.
Authorized Service Agent Listing
Model No.
Serial No.
Voltage
Purchase Date
Reference the listing provided with the unit
or
for an updated listing go to:
Website: www.star-mfg.com
E-mail customerservice@star-mfg.com
Service Help Desk
Business 8:00 am to 4:30 p.m. Central Standard Time
Hours:
Telephone: (314) 678-6303
Fax: (314) 781-2714
E-mail customerservice@star-mfg.com
Website: www.star-mfg.com
Mailing Address: Star International Holdings Inc., Company
10 Sunnen Drive
St. Louis, MO 63143
U.S.A
2M-Z15997: Star-Max Gas Deep Fat Fryer
2

CAUTION
Specications
Model BTU
404F 24,000
615FF 30,000 64 lbs 75 lbs
630FF 70,000 1/2” (2cm) 110 lbs 118 lbs 24”
N.P.T. Gas
Connection
3/8” (1cm)
Weight Dimensions
Installed Shipped Width Depth Height
64 lbs 73 lbs
12”
24” 25 5/8”
25 1/8” 23 3/8”
GENERAL INSTALLATION DATA
PLACE THE LAMINATED WARNING SIGN SUPPLIED WITH THE FRYER IN AN
AREA VISIBLE TO THE FRYER OPERATOR.
This equipment is designed and sold for commercial use only by personnel trained and experienced
in its operation and is not sold for consumer use in and around the home nor for use directly by the
general public in food service locations.
Before using your new equipment, read and understand all the instructions & labels associated with
the unit prior to putting it into operation. Make sure all people associated with its use understand the
units operation & safety before they use the unit.
All shipping containers should be checked for freight damage both visible and concealed. This
unit has been tested and carefully packaged to insure delivery of your unit in perfect condition. If
equipment is received in damaged condition, either apparent or concealed, a claim must be made
with the delivering carrier.
Concealed damage or loss - if damage or loss is not apparent until after equipment is unpacked, a
request for inspection of concealed damage must be made with carrier within 15 days. Be certain to
retain all contents plus external and internal packaging materials for inspection. The carrier will make
an inspection and will supply necessary claim forms.
The installation of the Appliance should conform to the NATIONAL FUEL GAS CODE
"ANSI Z223.1 - LATEST EDITION" AND ALL LOCAL GAS COMPANY RULES AND
REGULATIONS.
IN CANADA INSTALLATION SHALL BE IN ACCORDANCE WITH THE CURRENT CAN/
CGA-B149.1 NATURAL GAS INSTALLATION CODE OR CAN/CGA-B149.2 PROPANE
INSTALLATION CODE AND LOCAL CODES WHERE APPLICABLE.
WARNING: Improper installation, adjustment, alteration, service or maintenance can
cause property damage, injury or death. Read the installation, operating and maintenance
instructions thoroughly before installing or servicing the equipment.
This appliance and control valve must be disconnected from the gas supply piping system during any
pressure testing of that system at test pressures in excess of 1/2 PSIG (1.034 ATM). This appliance
must be isolated from the gas supply piping system by closing its individual manual shutoff valve
during any pressure testing of the gas supply piping system at test pressures equal to or less than
1/2 PSIG (1.034 ATM). For your protection, we recommend a qualied installing agency install this
appliance. They should be familiar with gas installations and your local gas requirements. In any
case, your gas company should be called to approve the nal installation. In addition, there should be
posted, in a prominent location, detailed instructions to be followed in the event the operator smells
gas. Obtain the instructions from the local gas supplier.
2M-Z15997: Star-Max Gas Deep Fat Fryer
FRYER SHOULD BE RESTRAINED TO PREVENT TIPPING WHEN INSTALLED
TO AVOID SPLASHING OF HOT LIQUID. USE ADEQUATE TIES WHEN
CAUTION
INSTALLING THE FRYER.
CAUTION
INAPPROPRIATE USE DUE TO A LACK OF COMMON SENSE MAY RESULT IN
PRODUCT DAMAGE OR PERSONAL INJURY.
3

FOR YOUR SAFETY
DO NOT STORE OR USE GASOLINE OR OTHER FLAMMABLE VAPORS AND
LIQUIDS IN THE VICINITY OF THIS OR ANY OTHER APPLIANCE. KEEP THE
APPLIANCE AREA CLEAR AND FREE FROM COMBUSTIBLES.
AIR SUPPLY
Provisions for adequate air supply must be provided.
AIR INTAKES IN BOTTOM
Make certain that the air intake opening in the bottom of the appliance is not obstructed.
It is essential for proper combustion and operation of the appliance.
CAUTION
CAUTION
DO NOT USE SPACE UNDER FRYER FOR STORAGE
LEVELING UNIT
Level unit by adjusting the (4) feet.
DO NOT INSTALL WITHOUT FEET PROVIDED.
CLEARANCE
Clearances from combustible and non-combustible material must be a minimum of 48" from the
top of the appliance and 6" from the sides and back. Adequate clearance should also be provided
for proper operation and servicing.
EXHAUST CANOPY
It is essential that facilities be provided over the fryer to carry off fumes and gases.
This unit is not to be connected to a ue or stack for exhaust purposes.
GAS PIPING
Gas piping shall be new, clean and of such size and so installed as to provide a supply of gas
sufcient to meet the full gas input of the appliance. If the appliance is to be connected to existing
piping, it shall be checked to determine if it has adequate capacity. Joint compound (pipe dope)
shall be used sparingly and only on the male threads of the pipe joints. Such compounds shall be
resistant to the action of L.P. gases.
WARNING: Any loose dirt or metal particles which are allowed to enter the
gas lines on the appliance will damage the automatic valve and affect its
operation. When installing this appliance, all pipe and ttings must be free
from all internal loose dirt. Do not remove the seal until actual connection
is made to the gas supply line.
CONNECTING GAS SUPPLY LINE
The gas inlet on this appliance is sealed at the factory to prevent entry of dirt. Do not remove
this seal until actual connection is made to the gas supply line. Each unit is supplied with a
gas pressure regulator adjusted for use with the gas specied on the nameplate. To connect
gas supply, attach pipe nipple provided with unit. For pressure requirements and adjustment of
regulator, see GAS PRESSURE REGULATOR.
MANUAL SHUT OFF VALVE
A manual shut off valve should be installed upstream from the union and within six feet of the
appliance.
CHECKING FOR GAS LEAKS
Soap and water solution or other material acceptable for the purpose of locating gas leaks shall
be used. MATCHES, CANDLES, FLAME OR OTHER SOURCES OF IGNITION SHALL NOT BE
USED FOR THIS PURPOSE.
4
2M-Z15997: Star-Max Gas Deep Fat Fryer
GAS PRESSURE REGULATOR
IL2268
The regulator is factory set as specied on the rating plate. If it should be necessary to check the
manifold pressure, remove the 1/8" pipe plug from the top part of the burner manifold and attach a
pressure gauge. To adjust gas pressure, unscrew cap from pressure regulator on control valve and turn
screw to the right to increase and left to decrease the gas pressure to its proper setting. Replace cap.
Manifold Pressure should be no more than 10" water column for LP gas or 3 1/2" for natural gas.
LIGHTING INSTRUCTIONS
1. Wait 5 minutes before relighting pilot.
2. Open front door.
3. Turn thermostat to "OFF" position.
4. Turn valve knob to "PILOT." Push knob in completely. Light pilot through opening on front of unit.
Hold button in for sixty seconds or until pilot remains lit.
5. Check if drain valve is in closed position.
6. Add liquid fat as required.
7. Turn valve knob to "ON." Set thermostat to desired temperature.
8. To turn all gas off to valve control and to pilot, turn valve knob to "OFF" position
(complete shutdown).
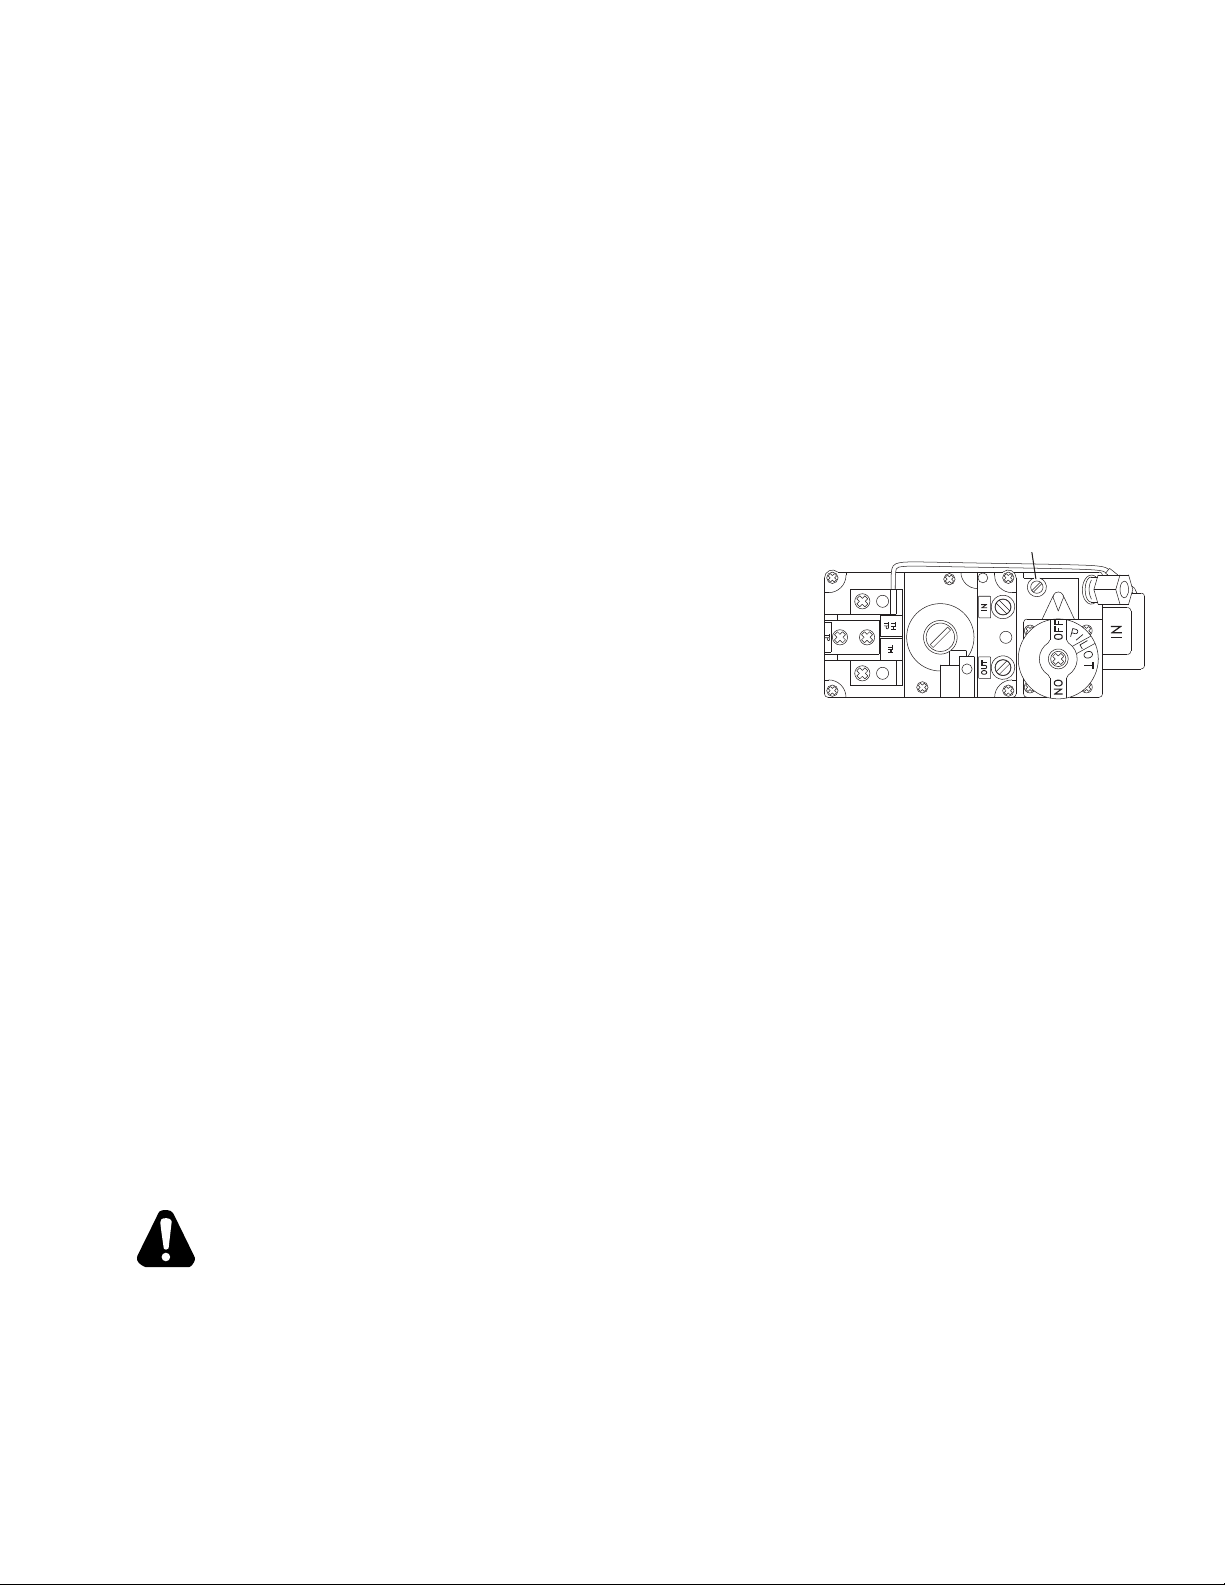
TO ADJUST PILOT
1. Open the front door panel.
2. Turn the adjustment screw to the right or left to decrease or
increase pilot ame. (Flame must surround thermocouple
tips by approximately 1/2" (1.2cm).)
Adjust Pilot
THERMOSTAT RECALIBRATION
1. To determine whether or not the thermostat should
be recalibrated, use an accurate thermometer located
approximately in the center of the kettle with the bulb 1" (2.4cm) below the top of the fat.
2. Set thermostat to 350°F (177° C) and check the thermometer reading when burner ame goes
off. Temperature should be approximately 5°F (3°C) less than the thermostat dial setting.
3. If not:
a. Without disturbing thermostat, pull knob forward and remove from shaft.
b. Turn screw in center of shaft clockwise to decrease temperature or counterclockwise
to increase temperature. NOTE: 1/4 turn of this screw will result in a change of
approximately 30°F (17°C).
c. Replace knob.
4. Repeat steps 1, 2 and 3 until correct.
HIGH LIMIT THERMOSTAT
These units are equipped with a manual reset high temperature limit type thermostat. This thermostat
will shut off the electric current to the magnetic gas valve, which shuts off the gas if the fat temperature
reaches 450°F (232°C). The fryer will not operate until the red reset button is pushed in.
Should the high temperature limit thermostat operate, the temperature regulating thermostat should be
checked for malfunctions. The high limit thermostat is located inside the fryer to your right and can be
reached when the door is open.
DO NOT REMOVE FEET!
2M-Z15997: Star-Max Gas Deep Fat Fryer
CAUTION
DO NOT HEAT AN EMPTY KETTLE.
HOT FAT IS POTENTIALLY DANGEROUS. DO NOT COME IN DIRECT CONTACT
WITH HOT FAT.
5

OPERATING INSTRUCTIONS
1. CLEAN KETTLE thoroughly before using. Remove baskets and crumb tray. Clean protective
oil from interior of kettle with warm water & mild detergent. Drain through valve in bottom and
rinse thoroughly with clear water and dry completely before lling with oil.
2. DRAIN VALVE - Make certain it is closed before adding fat.
3. ADD FAT -
Model 615FD/630FD - A fat level line on the rear of the kettle will guide you in determining the
minimum fat level (12" fryers have a 15 lb. (6.8kg) fat capacity, 24" fryers have a 30 lb. (13.6kg)
fat capacity). If solid fat is used, pack the solid fat carefully to the sides and bottom of the kettle
before turning the temperature control knob to the "ON" position.
Model 404D - Keep level of fat 2" (5cm) above tubes. Kettle holds approximately 18 lbs. (8.2kg)
of fat. If solid fat is used, melt the solid fat before lling the fryer. Never attempt to use solid
shortening to ll kettle.
A higher fat level can be used when frying bulky foods, such as chicken or sh cakes. The level
should be chosen carefully so that the foaming action does not spill out of the kettle.
4. Turn the valve knob to "ON" position.
5. TEMPERATURE CONTROL - The thermostat is a combination switch and heat control. The
"OFF" position will turn off the electric current which closes the gas valve. With the fat in the
kettle (Note: On models 615FD/630FD, solid fat must be carefully packed to the sides and
bottom of the kettle) turn the thermostat knob to 200° F (93°C).
6. CRUMB TRAY Model 615FD/630FD - Place the crumb tray in the kettle when the fat has melted.
BASKET RACK Model 404D - Place the rack before adding fat.
7. Turn the thermostat knob to the desired frying temperature. DO NOT FRY MORE FOOD PER
BATCH THAN YOU CAN FRY EFFICIENTLY - Too much food per batch causes excessive
temperature drop, wastes fat, and nothing is gained in capacity.
8. LOWERING BASKET - When the fat has reached the proper temperature, lower the basket
and food slowly into the fat. When moist food is lowered too quickly into hot fat, the fat will foam
and spatter excessively.
9. DRAIN - After the food has nished frying, raise the baskets and hang them on the handles of
the kettle. Allow excess fat to drain back into the kettle.
10. IDLING - During idle periods, lower the temperature setting of the thermostat to approximately
200° F (93°C). It is not necessary to maintain full cooking temperature during idle periods, for
the fat can be reheated quickly to the desired temperature. This procedure will result in longer
fat life and less gas consumption.
NOTE: See the Handy Frying Chart for recommended temperature and time required to properly
fry various foods as well as procedures and coating suggestions.
11. TO TURN THE FRYER OFF - Turn the thermostat dial knob counterclockwise to the "OFF"
position. The pilot will remain lit.
12. STRAINING FAT - Wait until fat is warm before straining fat. Slip lter bag over end of drain
valve nipple and tie in place with a bow knot so it will not slide off. Place a receptacle under bag
and slowly open drain valve. When the kettle is empty, use a small pot to pour hot oil vigorously
around sides, tubes and bottom of kettle to wash out crumbs, etc. Continue to pour until all
crumbs, etc. are washed into lter bag. Remove lter bag and wash for next use. Close drain
valve, and pour fat back into kettle.
13. TO DRAIN KETTLE - Turn thermostat dial to the "OFF" position. Remove baskets. Drain fat
from kettle only when fat is warm and liquid. A cold fryer heated up will not drain properly. Use
a stick, if necessary, to stir up cold fat in bottom of kettle. Remove crumb tray.
14. CLEANING THE EXTERIOR - The exterior surfaces can be kept clean and attractive by regularly
wiping with a clean soft cloth. Any discoloration can be removed with a non-abrasive cleaner.
15. REASSEMBLING - After the kettle has been cleaned and the fryer body wiped off, replace
crumb tray.
16. OVERNIGHT SHUTDOWN - Turn knob on combination control to the "PILOT" position. This will
maintain the safety pilot and also prevent any gas from reaching the main burner. To activate
unit, turn the combination control knob to the "ON" position.
17. COMPLETE SHUTDOWN - Turn valve knob to "OFF" position.
2M-Z15997: Star-Max Gas Deep Fat Fryer
6

CAUTION
CAUTION
OPERATING INSTRUCTIONS continued
DO NOT ATTEMPT TO FORCE THE RESET BUTTON OR KNOB ON THE VALVE
CONTROL UNDER ANY CIRCUMSTANCES.
GENERAL MAINTENANCE TIPS
1. DO NOT re empty kettle or with fat or oil beneath the minimum level indicator.
2. DO NOT fry foods in excess of 385°F (196°C).
3. DO NOT overll your fry kettle.
4. DO NOT allow burned crumbs to accumulate.
5. DO melt solid fat or shortening before lling fryer.
6. DO keep kettle lled to capacity at all time.
7. DO use correct fry fats and shortening, and follow temperature recommendations.
8. DO lter fat and clean fry kettle daily.
PROPER CLEANING OF KETTLE
DO NOT ALLOW WATER TO GET IN HOT FAT. IT CAN EXPLODE.
1. Drain fat from fryer while the fat is warm, not hot.
2. Rinse to remove all loose residue and crumbs.
3. Fill with water. Bring to a boil and add a fryer cleaner. Boiling time will depend on
condition of the fryer (30 minutes to 2 hours or until clean).
4. Turn heat off, drain and rinse with water until clean.
5. Use a vinegar rinse (2 to 3 cups) to stir, drain and rinse thoroughly with clear water.
6. Wipe kettle with a soft cloth and allow to thoroughly dry.
7. Add fat. Melt solid fat or shortening before lling fryer. Never attempt to use solid
shortening to ll kettle. The shortening Must Be Liquid.
REPAIRS AND SERVICE
This appliance should only be repaired or serviced by the factory or factory authorized
personnel.
Moving this fryer with hot liquid is extremely hazardous and can cause serious
CAUTION
2M-Z15997: Star-Max Gas Deep Fat Fryer
burns. Before moving fryer, drain oil.
7

CAUTIONS FOR ALL DEEP FAT FRYERS
NEVER LEAVE AN OPERATING FRYER UNATTENDED
• Have your equipment checked regularly to
REMEMBER HOT OIL IS DANGEROUS –
RESPECT IT!
WARNING – INSTALLATION
• Locate your fryer in a protected place so
that it cannot be tipped over or knocked
off its support. A mechanical restraint
should be installed to prohibit the fryer
from tipping or moving. Consult your local
codes for allowable methods of restraint.
• Install an automatic re extinguisher over
the fryer and in the exhaust duct.
• Be sure your power supply is installed
properly and in accordance with the local
and national codes.
• Install a shut-off switch or gas valve close
to the fryer. It must turn off the fryer
immediately.
• Failure to add a mechanical restraint can
result in oil splashing out and contacting
the skin, leading to serious injury or death!
WARNING – HOT OIL
• Hot oil is dangerous – Severe burns can
result when hot oil contacts the skin.
• Hot oil is ammable – Keep open ames
away from hot oil and its vapors.
• If your fryer starts to smoke or boil
• Train all personnel to understand the
• Instruct your personnel on what to do if
• Inappropriate use due to a lack of
WARNING – MAINTENANCE
insure its safe and properly functioning.
abnormally, cut off the power supply
immediately and determine the reason for
the smoking or boiling before attempting
to use it again.
WARNING – TRAINING
hazards of hot oil. Instruct them on the
proper action to take if something does
not seem to be acting properly.
there is an oil re. Do not use water on
an oil re! Use only re extinguishers of
the approved type and never direct such
extinguishers so as to blow the oil out of
the oil container.
common sense may result in product
damage or personal injury.
• Never allow water or ice to get in hot oil.
IT CAN EXPLODE!
WARNING - ENVIRONMENT
• Keep your oors clean and free of grease
and all other substances so no one slips
accidentally and contacts the hot fryer.
• Keep areas and lters clean above your
fryers – Oil soiled lint or dust can ignite
easily and ames will spread rapidly.
2M-Z15997: Star-Max Gas Deep Fat Fryer
8
 Loading...