

Page 1
QuickTouch® II
Wireless Remote
(For EasyTouch®, IntelliTouch
and SunTouch® Control Systems)
®
Installation and User’s Guide
IMPORTANT SAFETY INSTRUCTIONS
READ AND FOLLOW ALL INSTRUCTIONS
SAVE THESE INSTRUCTIONS
QuickTouch® II Wireless Remote Installation and User’s Guide
Page 2

Technical Support
Phone: (800) 831-7133 - Fax: (800) 284-4151
visit www.pentairpool.com and www.staritepool.com
CONTENTS
IMPORTANT WARNING AND SAFETY INSTRUCTIONS ....................................... i
QuickTouch II Wireless Remote Overview ...............................................................
QuickTouch II Wireless Remote Buttons/LED .......................................................... 2
Setup QuickTouch II Wireless Remote Receive ...................................................... 3
Connecting the QuickTouch II Receiver to the Load Center .................................... 4
Wiring the QuickTouch II Receiver to SunTouch Power Center ............................... 6
QuickTouch II Wireless Remote Receiver Antenna Location .................................. 7
Mounting the QuickTouch II Receiver Module ......................................................... 8
Troubleshooting ..... .................................................................................................. 10
QuickTouch II Remote Battery Replacement ........................................................... 11
1
© 2011 Pentair Water Pool and Spa, Inc. All rights reserved.
1620 Hawkins Ave., Sanford, NC 27330 • (919) 566-8000
10951 West Los Angeles Ave., Moorpark, CA 93021 • (805) 553-5000
QuickTouch
and Spa® is a registered trademark of Pentair Water Pool and Spa, Inc. and/or its affiliated
companies in the United States and/or other countries. Unless noted, names and brands
of others that may be used in this document are not used to indicate an affiliation or
endorsement between the proprietors of these names and brands and Pentair Water Pool
and Spa, Inc. Those names and brands may be the trademarks or registered trademarks
of those parties or others.
P/N 521362 Rev A - 07/19/11
QuickTouch® II Wireless Remote Installation and User’s Guide
®
, IntelliTouch®, EasyTouch®, SunTouch®, Compool® and Pentair Water Pool
Page 3

IMPORTANT WARNING AND SAFETY INSTRUCTIONS
SERIOUS BODILY INJURY OR DEATH CAN RESULT IF THIS
PRODUCT IS NOT INSTALLED AND USED CORRECTLY.
INSTALLERS, POOL OPERATORS AND POOL OWNERS MUST
READ THESE WARNINGS AND ALL INSTRUCTIONS BEFORE
USING THE POOL AND/OR SPA LED LIGHT.
Most states and local codes regulate the construction, installation, and
operation of public pools and spas, and the construction of residential
pools and spas. It is important to comply with these codes, many of which directly
regulate the installation and use of this product. Consult your local building and health
codes for more information.
IMPORTANT NOTICE - Attention Installer: This Installation and User’s
Guide (“Guide”) contains important information about the installation,
operation and safe use of this underwater pool and spa light. This Guide
should be given to the owner and/or operator of this equipment.
Before installing this product, read and follow all warning notices
and instructions in this Guide. Failure to follow warnings and
instructions can result in severe injury, death, or property damage.
Call (800) 831-7133 for additional free copies of these instructions. Please refer to
www.pentairpool.com for more information related to this products.
Do not use this product to control an automatic pool cover.
Swimmers may become entrapped underneath the cover.
The QuickTouch® II four function wireless remote must be installed by a
qualified pool professional in accordance with the National Electrical
Code (NEC), NFPA 70 or the Canadian Electrical Code (CEC), CSA
C22.1. All applicable local installation codes and ordinances must
also be adhered to. Improper installation will create an electrical
hazard which could result in death or serious injury to pool users,
installers or others due to electrical shock, and may also cause
damage to property. Always disconnect the power to the pool light at
the circuit breaker before servicing the light. Failure to do so could
result in death or serious injury to serviceman, pool users or others
due to electrical shock.
i
Risk of Electrical Shock or Electrocution!
Always disconnect the AC power to the control system load
center and power center at the circuit breaker before installing or
servicing the QuickTouch II wireless remote. Failure to do so
could result in death or serious injury to serviceman, pool users
or others due to electrical shock.
QuickTouch® II Wireless Remote Installation and User’s Guide
Page 4
ii
IMPORTANT WARNING AND SAFETY INSTRUCTIONS
CAUTION: IMPORTANT BATTERY INFORMATION
• Dispose of used batteries according to the manufacturer’s instructions.
• There are two 3V lithium batteries (CR2032) in the QuickTouch® II
wireless remote, with normal use the remote should last for several
years. If the batteries need to be replaced, see page 13 for instructions.
FCC Regulatory Safety Notice -
This equipment has been tested and found to comply with the limits for a Class B
digital device, pursuant to Part 15 of the FCC Rules. These limits are designed to
provide reasonable protection against harmful interference in a residential
installation. This equipment generates, uses and can radiate radio frequency
energy and, if not installed and used in accordance with the instructions, may
cause harmful interference to radio communications. However,
there is no guarantee that interference will not occur in a particular installation. If
this equipment does cause harmful interference to radio or television reception,
which
can be determined by turning the equipment off and on, the user is encouraged to
try to correct the interference by one or more of the following measures:
• Reorient or relocate the receiving antenna.
• Increase the separation between the equipment and receiver.
• Connect the equipment into an outlet on a circuit different from that
to which the receiver is connected.
• Consult the dealer or an experienced radio/TV technician for help.
• Modifications not expressly approved by the party responsible for
FCC compliance could void the user’s authority to operate the
equipment.
RF Exposure Requirements: This Device must not be co-located or
operated in conjunction with any other antenna or transmitter.
IC Regulatory Notice
Operation is subject to the following two conditions: (1) this device may not
cause interference, and (2) this device must accept any interference, including
interference that may cause undesired operation of the device.
IMPORTANT - To avoid damage to the remote, never submerge in water. The
QuickTouch II wireless remote is water resistant only and can be exposed to temporary
splashing or wet hands. However, the remote is not intended to be submersed. Remove
unit immediately if it is dropped in water or exposed to rain. Store the unit indoors in a
dry environment. For more information see page 1.
QuickTouch® II Wireless Remote Installation and User’s Guide
Page 5

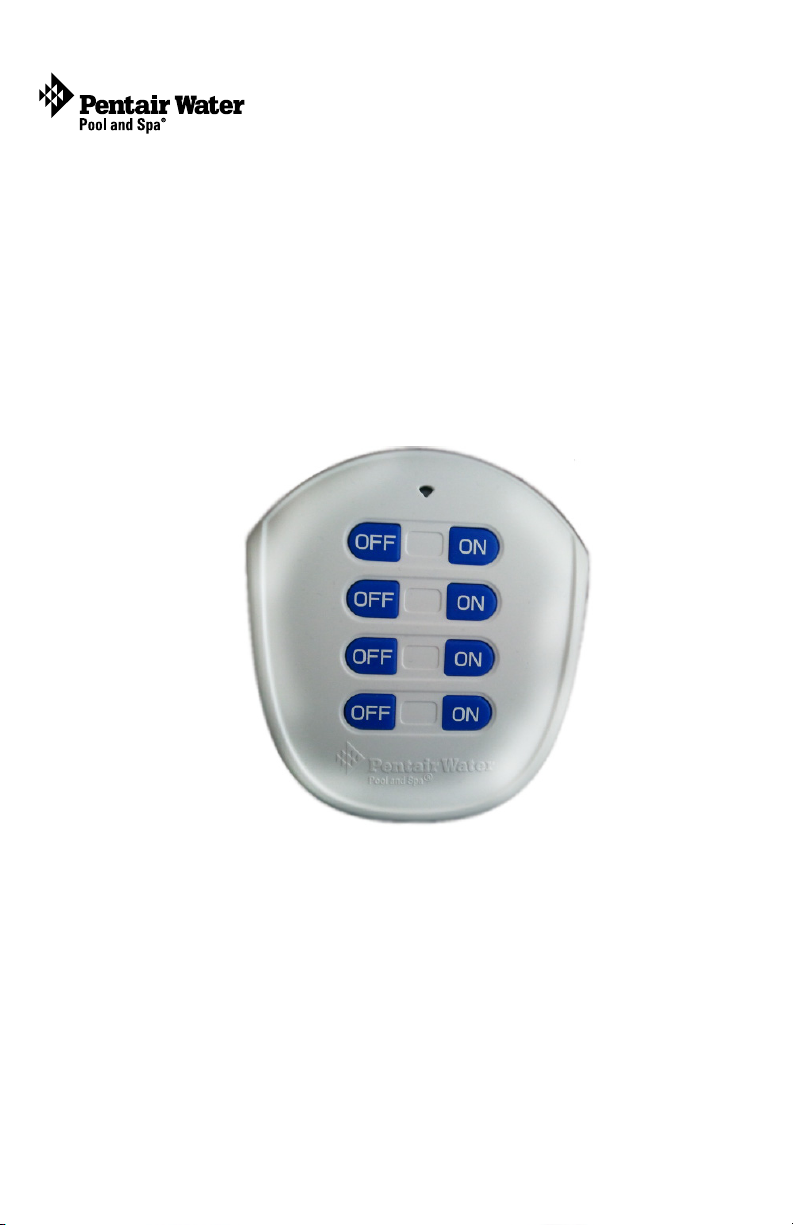
QuickTouch® II Wireless Remote Overview
The QuickTouch® II hand-held wireless remote can control up to four pool/spa circuits
functions such as lights, jet pump, air blower, waterfall, etc.
The QuickTouch II wireless remote is for use with EasyTouch®, IntelliTouch®,
SunTouch® and Compool® to EasyTouch Upgrade control systems. EasyTouch,
IntelliTouch and SunTouch control systems supports one QuickTouch II wireless
remote per system.
What to do if the remote is submerged in water: The QuickTouch II wireless remote
may be used with wet hands. The QuickTouch II wireless remote is water resistant only
and can be exposed to temporary splashing or wet hands. However, the remote is not
intended to be submersed. Remove remote immediately if it’s dropped in water or
exposed to rain. If accidental submersion occurs, remove the batteries from the remote.
Let the water drain out of the remote. Allow the batteries to dry completely.
Reassemble the unit when completely dry.
QuickTouch II Wireless Remote kit contents
• Four function wireless remote
• Label Set
• Receiver assembly - Includes circuit board, enclosure and 15 ft.
cable
• Plastic anchors (qty.4) for mounting Receiver to concrete or stucco
walls
• Mounting screws (qty. 4): Two screws for mounting the receiver and
two screws for the enclosure
• User’s and Installation Guide (this manual)
QuickTouch II Antenna Receiver Location
The QuickTouch II wireless remote has an operating range of up to 250 ft. (line-of-sight)
from the QuickTouch II antenna receiver, which is typically located near the load center.
The optimum wireless transmission range may be affected by physical obstructions,
(especially those containing metal), and geographical features.
1
Replacement Kit Part Numbers
• QuickTouch II remote replacement kit (P/N 521245)
• QuickTouch II receiver replacement kit (P/N 521246)
IMPORTANT!
The QuickTouch II hand-held remote may be used with wet hands, but should never
be submerged in water, as this could damage the unit. If accidental submerged in
water, dry the unit out by removing the battery cover and removing the battery. Position
the unit so that the water can drain out. Reassemble the unit when completely dry.
Related manuals - Download the following manuals:
IntelliTouch User’s Guide: http://www.pentairpool.com/pdfs/IntelliTouchUG.pdf
EasyTouch User’s Guide: http://www.pentairpool.com/pdfs/easytouch8and4UG.pdf
SunTouch User’s Guide: http://www.pentairpool.com/pdfs/suntouchUG.pdf
QuickTouch® II Wireless Remote Installation and User’s Guide
Page 6

2
QuickTouch II Wireless Remote Buttons/LED
The QuickTouch II wireless hand-held remote buttons can be setup to control up to
four circuit functions. To activate a circuit function, press and hold the circuit "ON"
button for at least a full second (LED indicator will flicker). To switch a circuit “OFF”,
press and hold the “OFF” button. Affix a circuit function label (provided) between each
button to identify the button function.
Transmitter remote factory preset button assignments
LED: Illuminates when the
remote is transmitting
signals
Spa button (#1)
Activates the spa circuit
Button (#2)
Auxiliary 1 circuit
Button (#3)
Auxiliary 2 circuit
Button (#4)
Auxiliary 3 circuit
Affix label between
OFF and ON switches
QuickTouch® II Wireless Remote Installation and User’s Guide
Page 7

Setup QuickTouch II Wireless Remote Receive
The following describes how to setup your QuickTouch II wireless remote to
communicate to the QuickTouch II receiver.
To setup the QuickTouch II remote to communicate with the wireless receiver:
1. Open receiver case.
2. Press the White Receiver button (shown below).
3. An LED on the QuickTouch II receiver will flash three (3) times (once the
Receiver button is pressed, you have 60 seconds to connect the QuickTouch
II remote to the receiver).
4. Hold down button four (4) and button eight (8) simultaneously.
5. The QuickTouch II remote can now communicate with the receiver. Check all
of the remote buttons to make sure they operate correctly.
Note: One receiver can communicate with up to eight QuickTouch II remotes.
3
Receiver button
Button #4 4
Receiver
8 Button #8
Transmitter Remote
QuickTouch® II Wireless Remote Installation and User’s Guide
Page 8

4
INTELLIBRITE 5g POOL LED LIGHT FIXTURE INSTALLATION
CONNECTING THE QUICKTOUCH II RECEIVER TO THE LOAD CENTER
(NEW POOL CONSTRUCTION)
All electrical installation, including electrical wiring methods and
materials used to complete the electrical installation of the
EasyTouch, IntelliTouch and SunTouch Pool/Spa control system MUST BE
PERFORMED BY A SERVICE PROFESSIONAL AND/OR UNDER DIRECT
SUPERVISION OF A QUALIFIED ELECTRICIAN in accordance with the National
Electrical Code or the Canadian Electric Code, as well as any local electrical codes in
effect at the time of installation. Refer to NEC 680-21 (b) or CEC 687-060, 062, and
066 for further details.
The QuickTouch II receiver is connected to the EasyTouch, IntelliTouch and SunTouch
system via a four-conductor communication cable. For receiver antenna location, see
page 13.
To connect the receiver cable to EasyTouch or IntelliTouch load center:
1.
2. Unlatch the load center front door spring latch, and open the front door.
3. Remove the two screws securing the high voltage cover-panel, and remove
it from the enclosure (illustration below shows cover-panel removed).
4. Loosen the two control panel access screws and fold down the outdoor
control panel.
Switch OFF the power to the load center at the main
circuit breaker before removing the High Voltage
Cover Panel. Failure to do so could result in personal
injury and/or death. Shorting wires may permanently
damage the device and load center. Close all panels
and load center front door when remote installation is
complete.
Retaining
screw
Retaining screws
(High voltage
cover-pane
shown removed)
Route receiver
cable up low
voltage raceway
to main circuit
board
QuickTouch® II Wireless Remote Installation and User’s Guide
Retaining screw
Control panel
(fold down to
access COM
port on circuit
board)
Grommet
Page 9

5. Insert the four conductor (22 AWG) cable into the plastic grommet on the
bottom of the enclosure and route the wire up through the low voltage
raceway to the main circuit board.
6. Strip back the conductors ¼-inch.
7. EasyTouch System: Insert the conductors into the COM PORT (J20) screw
terminals located on the top of the EasyTouch circuit board (see diagram
below). Secure the wires with the screws. For wiring details, refer to the pin
configuration shown below. Note: Multiple wires may be inserted into a single
screw terminal.
EasyTouch circuit board
EasyTouch Circuit Board
COM port
IntelliTouch System: Insert the wire into either of the COM PORTS (J7 and
J8) screw terminals located on the left side of the Personality board. Secure
the wires with the screws. For wiring details, refer to the pin configuration
shown below. Note: Multiple wires may be inserted into a single screw
terminal.
5
IntelliTouch Personality
board COM ports
(J7/J8)
BLK
GRN
YEL
RED
IntelliTouch Personality
Circuit Board
8. Close the control panel and secure it with the two access screws.
9. Install the high voltage panel cover and secure it with the two retaining
screws.
10. Close the load center front door and secure with the latch.
11. Switch power on to the load center.
QuickTouch® II Wireless Remote Installation and User’s Guide
Page 10

ONLY
SOLAR
CLNR
6
WIRING THE QUICKTOUCH II RECEIVER TO SUNTOUCH POWER CENTER
The QuickTouch II receiver is connected to the SunTouch system via an RS-485 four
conductor communication cable.
To connect the receiver cable to the SunTouch power center:
1.
2. Unlatch the front door of the SunTouch Power Center, and open the door.
3. Loosen the retaining screw on front panel. Open the hinged front panel to
access the electronics compartment.
4. Insert the four conductor (22 AWG) cable into the plastic grommet opening
located on the left side, and up through the low voltage raceway to the
SunTouch circuit board.
6. Strip back the conductors ¼-inch.
7. Insert the connector on the COM PORT (J11) screw terminal on the
motherboard. Secure the wires with the screws. Make sure to match the color
coding of the wires; Yellow = +DT, Green = -DT. Note: Multiple wires may be
inserted into a single screw terminal.
8. When the connection is completed, close the control panel and secure it with
the retaining screw.
9. Close the front door. Fasten the spring latch.
Switch OFF the power to the load center at the main
circuit breaker before removing the High Voltage
Cover Panel. Failure to do so could result in personal
injury and/or death. Shorting wires may permanently
damage the remote and load center. Close all panels
and load center front door when remote installation is
complete.
RED
J11
COM PORT
GAS
HEATER
RESET
BLK
VALVE ACTUATORS
SOLAR
ONLY
CLNR
VLV A
VLV B
VLV C
Connect to
receiver
QuickTouch® II Wireless Remote Installation and User’s Guide
INTAKE
RETURN
SOLAR
PUMP
AUX 1
AUX 2
AUX 3
Page 11

QuickTouch II Wireless Remote Receiver Antenna Location
The optimum wireless receive range for the QuickTouch II receiver may be affected by
physical obstructions, (especially those containing metal), weather conditions, and
geographical features. The QuickTouch II wireless remote has an operating range of up
to 250 ft. (line-of-sight) from the receiver. The receiver kit includes a 15 ft. connection
cable. If needed, using extra cable, the cable length can be lengthened to 300 ft. The
recommended locations for the receiver are shown below.
Note: Only one unique QuickTouch II wireless remote receiver can be
used per EasyTouch, IntelliTouch or SunTouch system.
Possible
receiver
antenna
location
7
Possible
receiver
antenna
location
Possible
receiver
antenna
location
QuickTouch® II Wireless Remote Installation and User’s Guide
Page 12

8
Mounting the QuickTouch II Receiver Module
The QuickTouch II wireless remote has an operating range of up to 250 ft.
(line-of-sight) from the receiver.
To install the receiver:
1. Choose an installation location for the receiver near the load center.
2. Remove the two lower retaining screws from the receiver and slide the
receiver case up to remove it from the back plate.
3. Remove the receiver circuit board from the back plate by carefully
lifting it up out of the back plate supports. Place the circuit board on a
clean dry surface away from direct sunlight.
4. Mount the receiver back plate (see page 9) onto a flat wooden surface,
such as a wooden fence, or post. While holding the back plate, install
two lower mounting screws through the back plate lower mounting
holes. Tighten the screws to secure the back plate in place. Install two
screws through the upper mounting holes.
5. Slide the receiver circuit board into the back plate into the board side
supports.
6. Route the receiver cable up through the bottom of the back plate (see
page 11) to the screw terminal connector.
7. Insert the four wires into the screw terminals of the receiver connector.
Using a small flat-blade screwdriver, secure the wires with the screws.
Make sure to match the color coding of the four wires (see page 12 for
wiring diagram).
8. Carefully slide the case over the receiver antenna and secure it to the
back plate with the two lower retaining screws.
QuickTouch® II Wireless Remote Installation and User’s Guide
Page 13

REPLACING THE INTELLIBRITE 5G POOL LED LIGHT FIXTURE
(AFTER ELECTRICAL REQUIREMENTS ARE MET)
Case
Antenna
1DNGKLB
2TD-NRG
9
Receiver circuit board
Upper mounting point
(screw)
Back plate
Left-side receiver circuit
board support
Lower mounting
point (screw)
Lower exit hole (left side)
3TD+LEY
4V51DER
Upper mounting point
(screw)
Lower mounting
point (screw)
Retaining screws
Receiver Module
QuickTouch® II Wireless Remote Installation and User’s Guide
Page 14

10
Troubleshooting
Symptom
POWER LED does not light.
RS 485 LED does not light when
Transmitter button(s) are pressed;
unit fails to operate.
Unit functions, but some circuits
do not work, or operate the
incorrect circuit.
Unit fails to operate, or fails to
dependably at range.
Possible Cause
Control Center does not have power.
Defective cable or connection to the
Control Center.
Defective Receiver board.
Defective cable or connection to
the Control Center.
Transmitter battery has failed.
Defective Transmitter or Receiver.
Defective Transmitter or Receiver.
Undue electrical noise.
Too many obstructions between the
Transmitter and Receiver.
Solution
Ensure power is being supplied and that
the Control Center operates correctly
without the Receiver installed.
Verify the function of the board using
known good cable set.
Contact Factory or Service center.
Verify the function of the board using
known good cable set.
Replace Transmitter batteries.
Contact Factory or Service center.
Contact Factory or Service center.
Relocate the Receiver away from
operating equipment such as blower
motors.
Relocate the Receiver to place that
provides fewer obstructions to the area
user commonly operates the
Transmitter.
Receiver unit is too near the ground.
Unit seems to turn ON or OFF circuits
without the user / Transmitter
Unit dependably turns equipment
ON, but once equipment is running it
equipment does not dependably
turn equipment OFF, or range is
greatly reduced when equipment is
running.
Unit operates, but has greatly reduced
range compared to prior function.
A home nearby is operating similar
wireless unit.
Undue electrical noise is being
produced by one or more pieces of
equipment such as blower motors
OR in close proximity to the Receiver.
Transmitter battery is failing.
QuickTouch® II Wireless Remote Installation and User’s Guide
Relocate the Receiver to maximize the
distance between the Receiver
antenna and the ground.
Repeat setup for the Transmitter and
Receiver. See page 3.
Relocate the Receiver away from
relocate the Receiver in a location that
provides fewer obstructions to the
area the user commonly operates
the Transmitter.
Replace transmitter batteries.
Page 15

QuickTouch II Remote Battery Replacement
The QuickTouch II wireless remote has two 3V lithium CR2032 batteries located on the
circuit board. With normal use the remote batteries should last for several years. In the
event the battery must be replaced, discard in accordance with local and/or state
ordinances.
To replace the two batteries:
1. Place the QuickTouch II remote face down on a flat clean surface. Remove the
screw securing the back cover.
2. Insert a small flat-blade screw driver into the notches located on the top of the
remote and gently pry the two halves apart. Separate the front and back cover.
3. Remove the screw securing the circuit board to the back cover.
4. Lift the circuit board out of the back cover.
5. The batteries are located on the back of the circuit board. To replace each
battery, grip the side of the battery and slide it out of it’s support. Note: Always
replace both batteries. Replace batteries with positive (+) face up.
6. Place the circuit board (buttons facing up) onto the plastic supports in the
back cover. Secure the circuit board in place with the retaining screw.
7. Place the back cover over the front cover and snap the two halves together.
Secure the covers with the retaining screw.
8. Check the battery replacement: Press each button and verify that the LED
blinks when each button is pressed.
11
Screw
Battery
(+3V face up)
Notches
(top of remote)
Screw
Circuit
board
supports
QuickTouch® II Wireless Remote Installation and User’s Guide
Page 16

*521362*
P/N 521362 Rev A
QuickTouch® II Wireless Remote Installation and User’s Guide
 Loading...