

STA-RITE PoolShark Vacuum Owner's Manual
PoolShark®Vacuum
O W N E R’ S M A N U A L
INSTALLATION, OPERATION & PARTS
Sta-Rite Pool/Spa Group
293 Wright Street, Delavan, WI 53115
International: 262-728-5551, FAX: 262-728-7550
www.starite.com
Union City, TN • Delavan, WI • Mississauga, ON • Murrieta, CA
© 2005 S788 (4/12/05)
2
PLEASE READ THE FOLLOWING
BEFORE INSTALLING YOUR NEW
AUTOMATIC POOL CLEANER!
About Safety:
This is the safety alert symbol. When you see this
symbol on your system or in this manual, look for one of
the following signal words and be alert to the potential for
personal injury.
warns about hazards that will cause death,
serious personal injury, or major property damage if
ignored.
warns about hazards that can cause death,
serious personal injury, or major property damage if
ignored.
warns about hazards that will or can cause
minor personal injury or property damage if ignored.
Carefully read and follow all safety instructions in this
manual and on equipment. Keep safety labels in good condition; replace if missing or damaged.
ABOUT YOUR POOL
AND FILTER SYSTEM:
Before installing your cleaner, review and understand all warnings and safety information on the inside
front cover of this manual.
Pre-installation check list
Before installing the cleaner in a vinyl liner pool:
Check liner closely for signs of deterioration or damage
from age, chemicals, pool wall damage, etc. If any damage
is found, have a qualified pool professional make all necessary repairs. Also, if there are stones, roots, etc., under
the liner, remove them before installing the cleaner.
Before installing the cleaner in a gunite pool or a pool
that is partially or completely tiled:
Repair loose tiles and tighten any loose light rings.
Before installing the cleaner, clean your filter system:
Make sure you have cleaned the filter, including backwashing, rinsing, and emptying all baskets. A clean system
is necessary for proper cleaner operation and coverage.
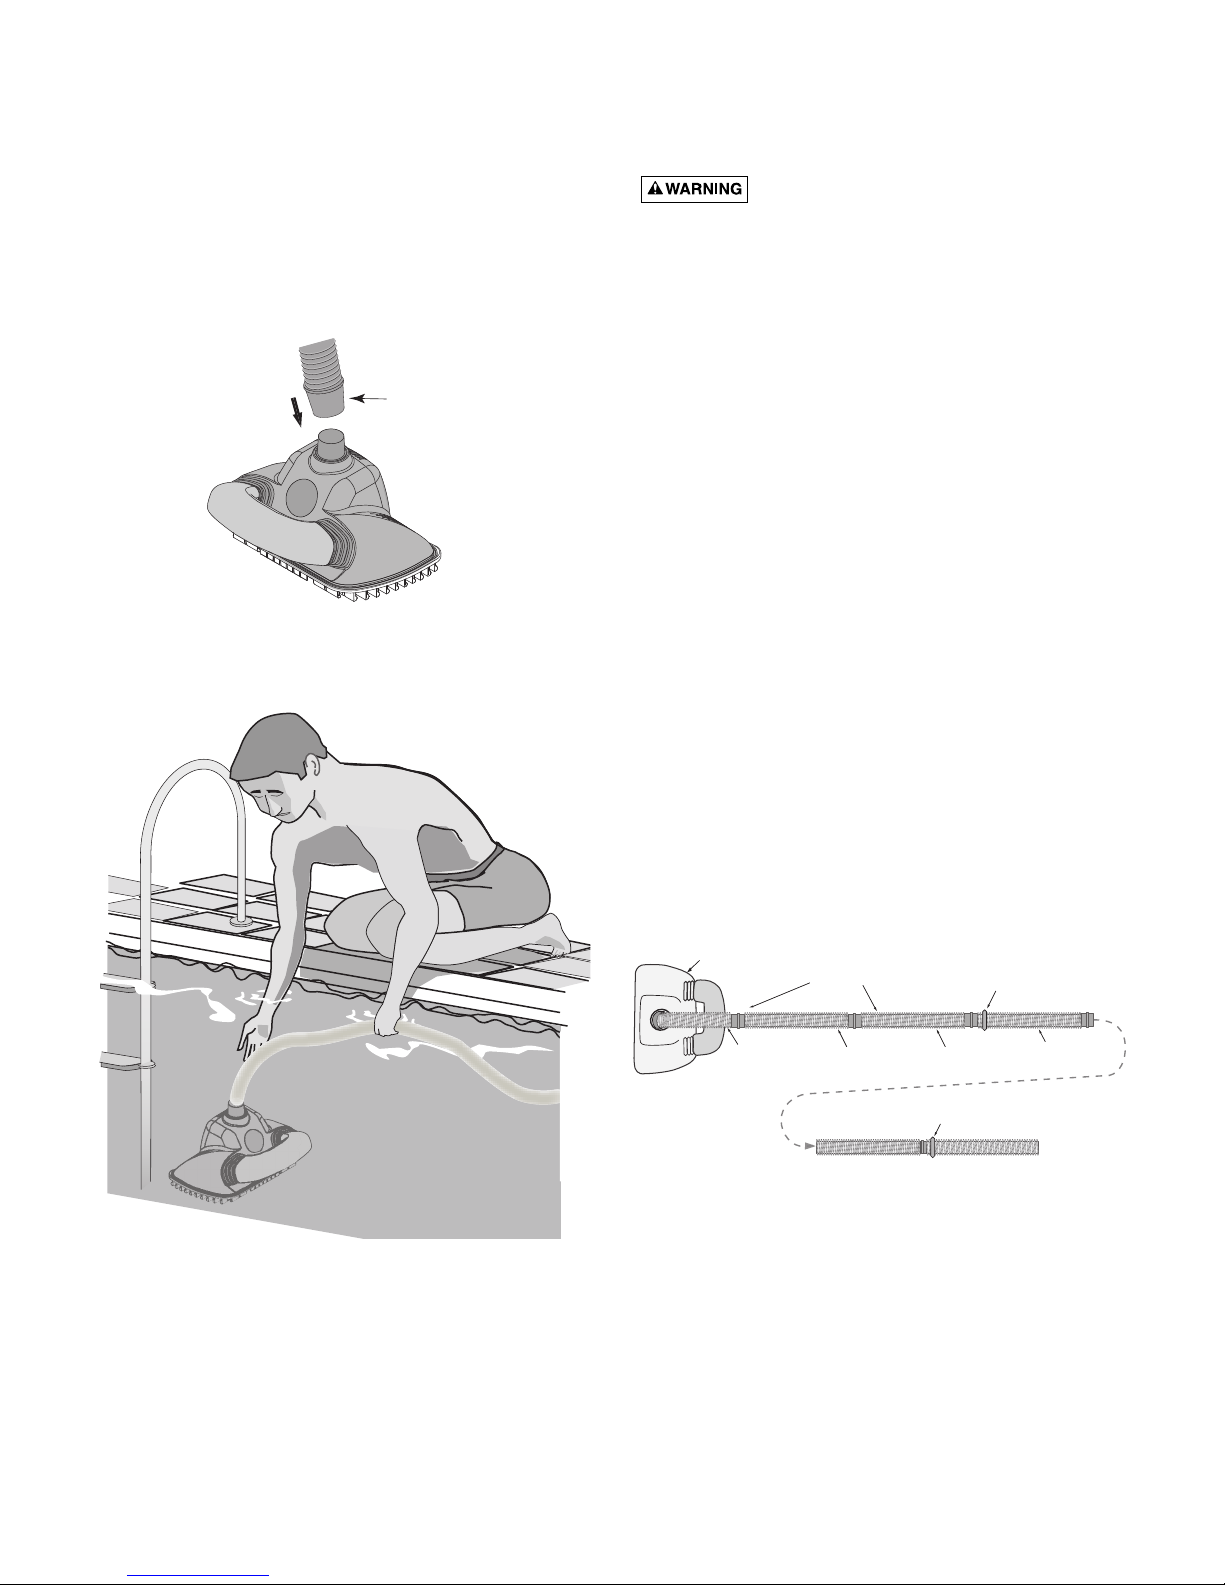
Before installing the cleaner, fill the hose with water:
Always make sure the cleaner head is submerged and the
hose is full of water before connecting the hose to the filtration system (whether through a skimmer or dedicated
wall fitting). Air in the system can damage the pump
through dry running and overheating.
Before installing the cleaner, understand cleaner
coverage:
The cleaner is designed to rid your pool of debris in approximately 4-6 hours. Less time could be needed, depending on the pool size.
The cleaner was not designed to automatically clean steps
or swimouts or to work under a solar cover. It was also not
designed to do initial cleanup for a new pool or when
opening your pool for the season.
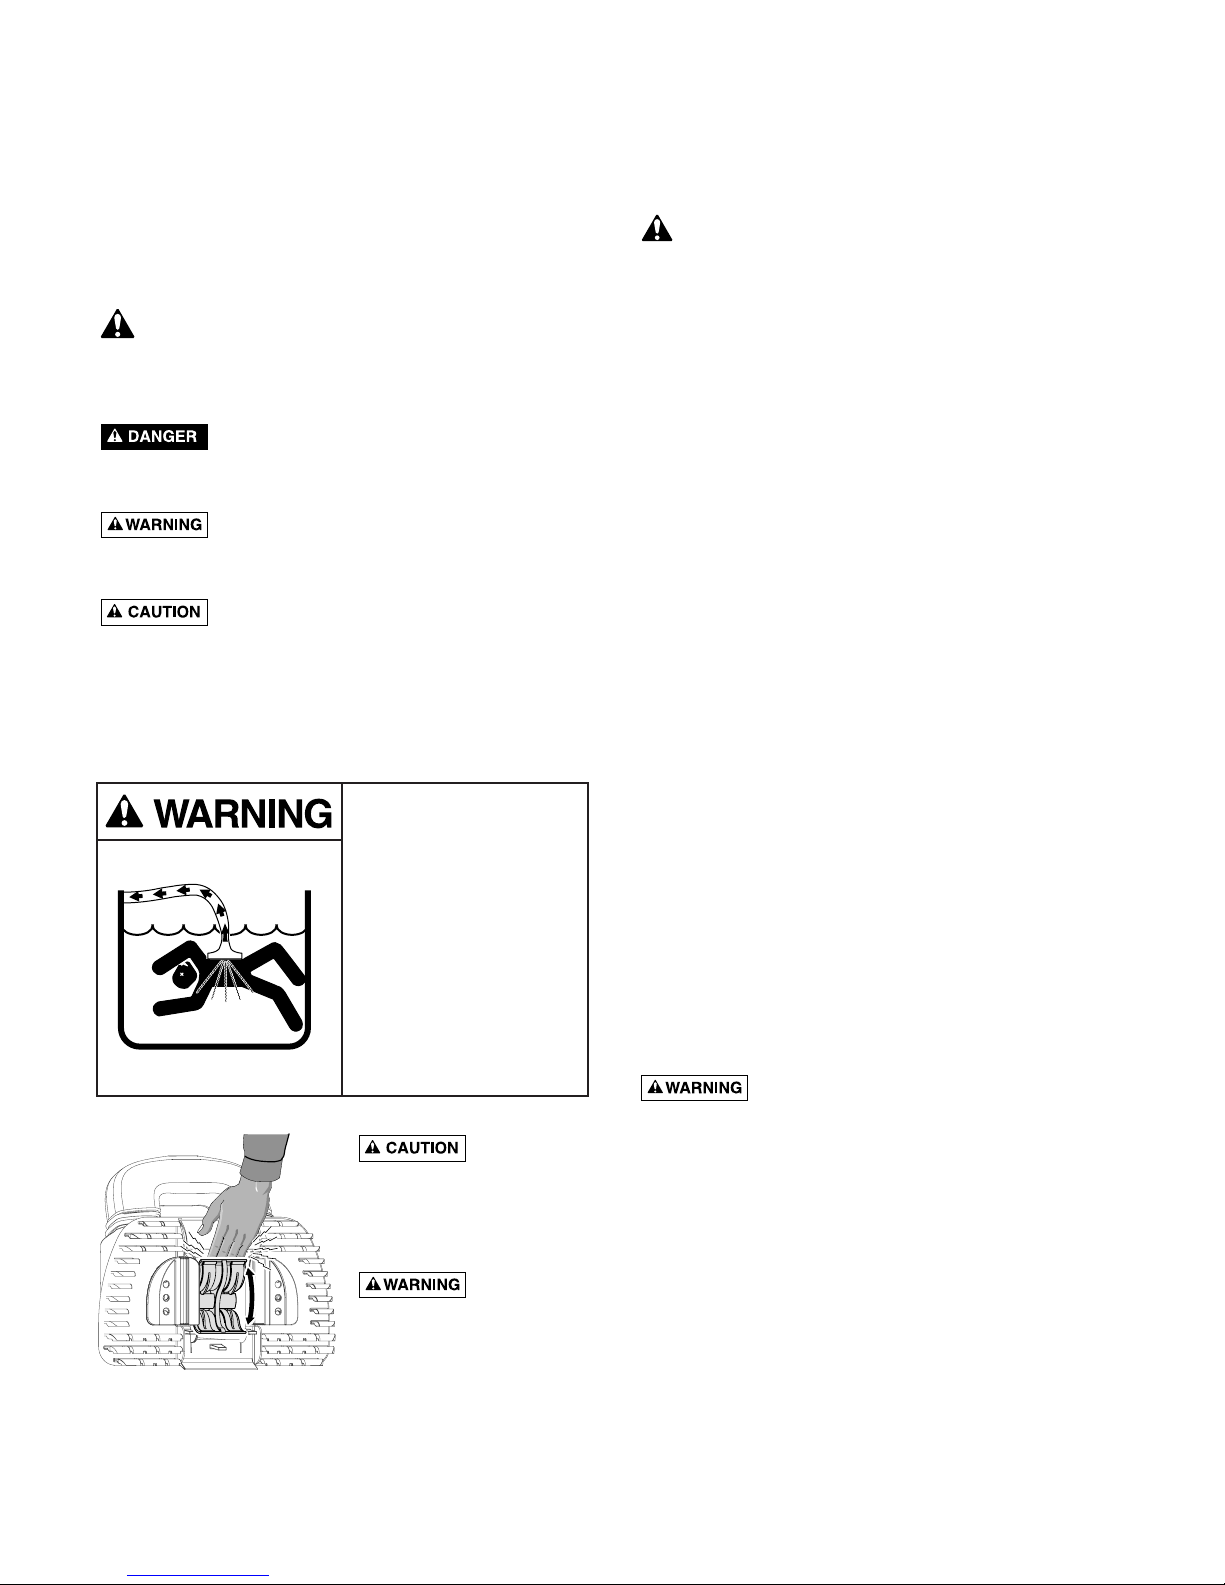
Suction entrapment, injury, and drowning
hazard. If your pool has a dedicated suction port (“vac
port”) for vacuuming or for an automatic pool cleaner, it
must be covered when not in use. A spring loaded safety
cover (a “vac port fitting”) is included with your cleaner.
Install it on the suction port to prevent entrapment and injury. If the cover provided does not fit, purchase one that
does from your local pool store and install it instead. The
cover should conform to IAPMO SPS4-99A.
Hazardous suction.
Can trap and tear
hair or body parts.
Can cause drowning.
Do not play with cleaner
or hose or apply to body.
Do not let children use or
play with pool cleaner.
Stop pump before
attempting to clean unit.
Do not allow swimmers in
pool while pool cleaner is
operating.
Oscillator
may injure hands or fingers. Stop pump before at-
tempting to clean out pool
cleaner head.
Hose can trip
or entangle swimmers.
Do not allow swimmers in
pool while pool cleaner is
operating.
3
CONTENTS:
Safety ..............................................................................2
Installation ...................................................................3-6
Maintenance ...................................................................6
About “Fine-tuning” Vacuum
Adjustments and Connections.........................................7
Disassembly.................................................................8-9
Repair Parts..............................................................10-11
Troubleshooting ............................................................12
Warranty.......................................................................13
INSTALLATION
Please use the convenient, water resistant,
“Installation
Instructions”
card.
Step 1: Install vacuum port door fitting
If there is no spring-loaded door on the vacuum port, install the included cover.
If you pool only has a skimmer, and no dedicated vacuum port, proceed to Step 2.
1. Screw the fitting into the port opening.
2. Orient the fitting so the arrow on the door points up.
3. Secure the cover by tightening the allen-screw below the
door.
Step 2: Straighten hose (Figure 2)
Remove and uncoil the hoses from the carton. Lay them
out in the sunlight, flat and straight.
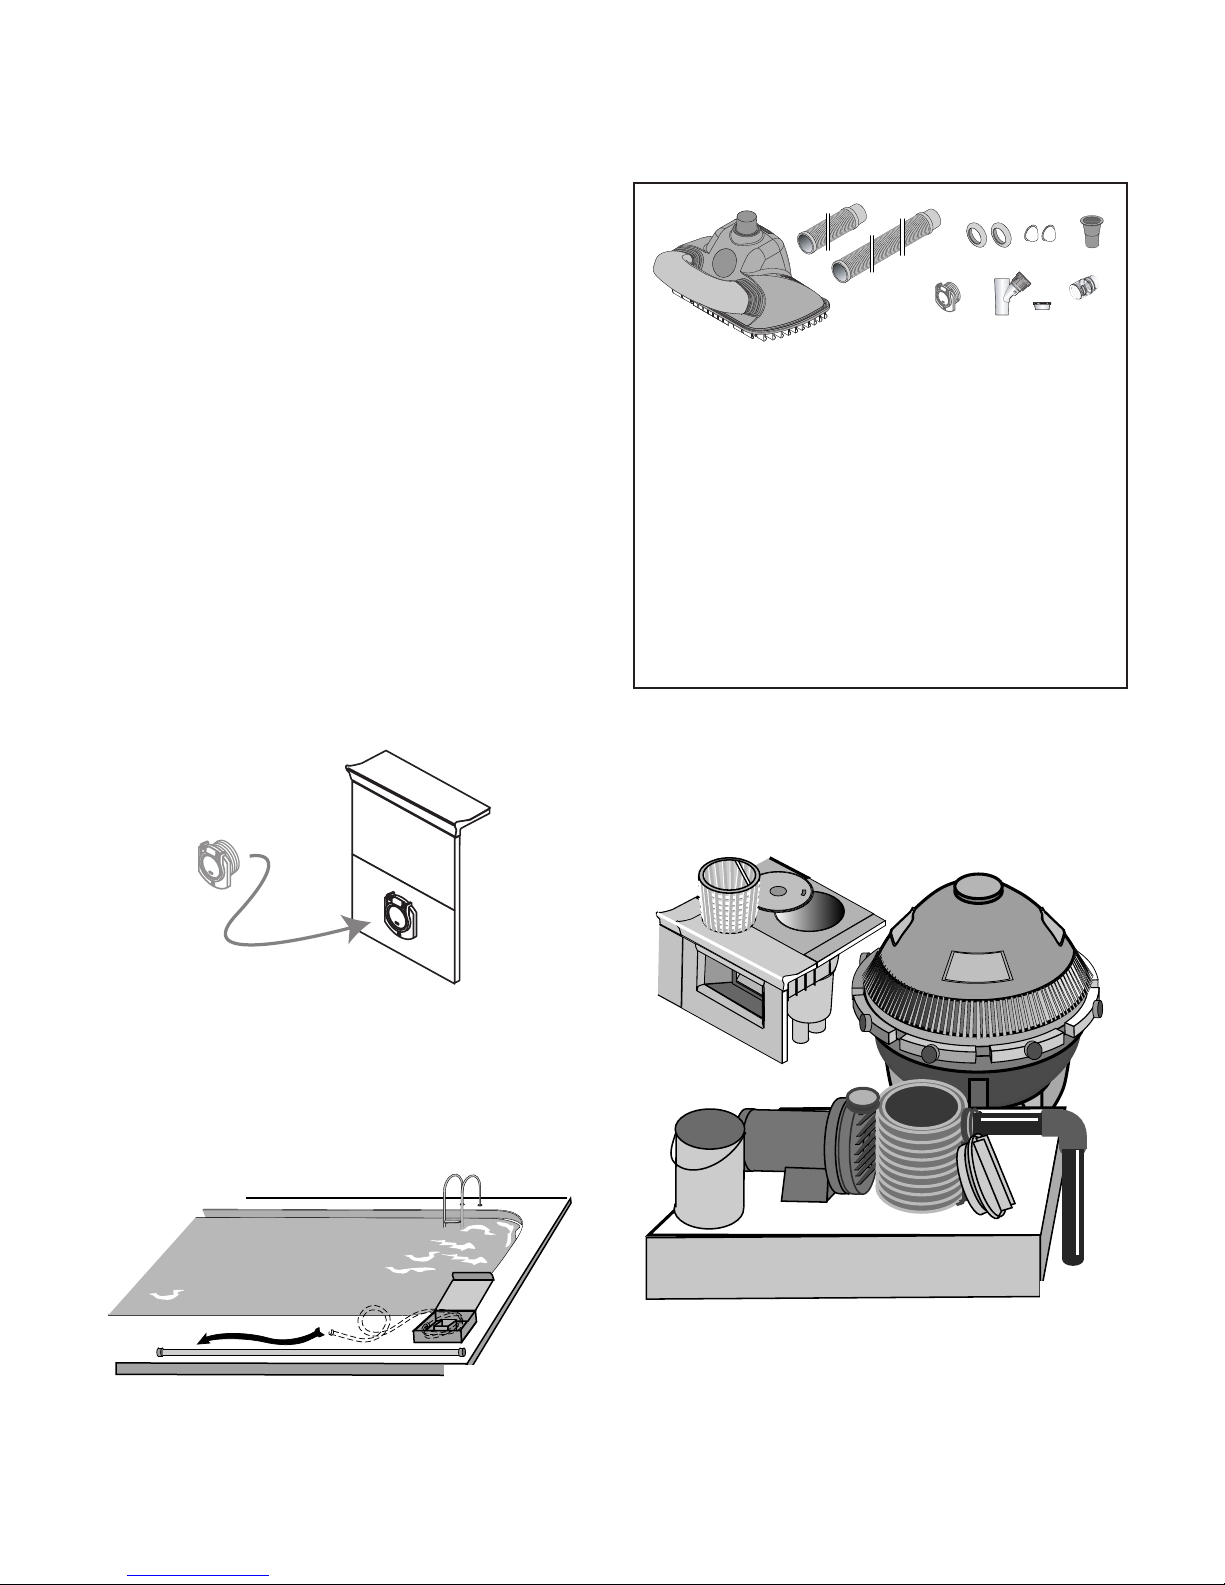
Step 3: Check parts (Figure 3)
Step 4: Clean filter system (Figure 4)
Backwash and clean filter; rinse; clean all baskets, etc.
Start pump.
3894
AB
C
D
EF
H
J
K
G
M
A
X
I
M
U
M
F
L
O
W
M
I
N
I
M
U
M
F
L
O
W
A. Pool Cleaner
B. Short Leader Hose (1 Length, 0.36 Meter)
C. Hose (10 Lengths, 1 Meter Each)
D. Hose Weights (2)
E. Eyeball diverters (2)
F. Reducer Cone
G. Vac Port Fitting
H. Regulator
J . Regulator Cap
K . Flow Gauge
• Short Extension Hose (not illustrated)
Figure 3
Figure 2
Figure 1
5
Figure 4
1880 079
1882 0795
4
Step 5: Adjust valves for vacuuming (Figure 5)
Decide on the vacuum connection you are going to use
(either a skimmer or a dedicated wall fitting) and adjust
the pump valves (if your system has valves) to direct all
vacuum there.
Close the main drain (also see “About Fine Tuning the
Vacuum”, Page 7).
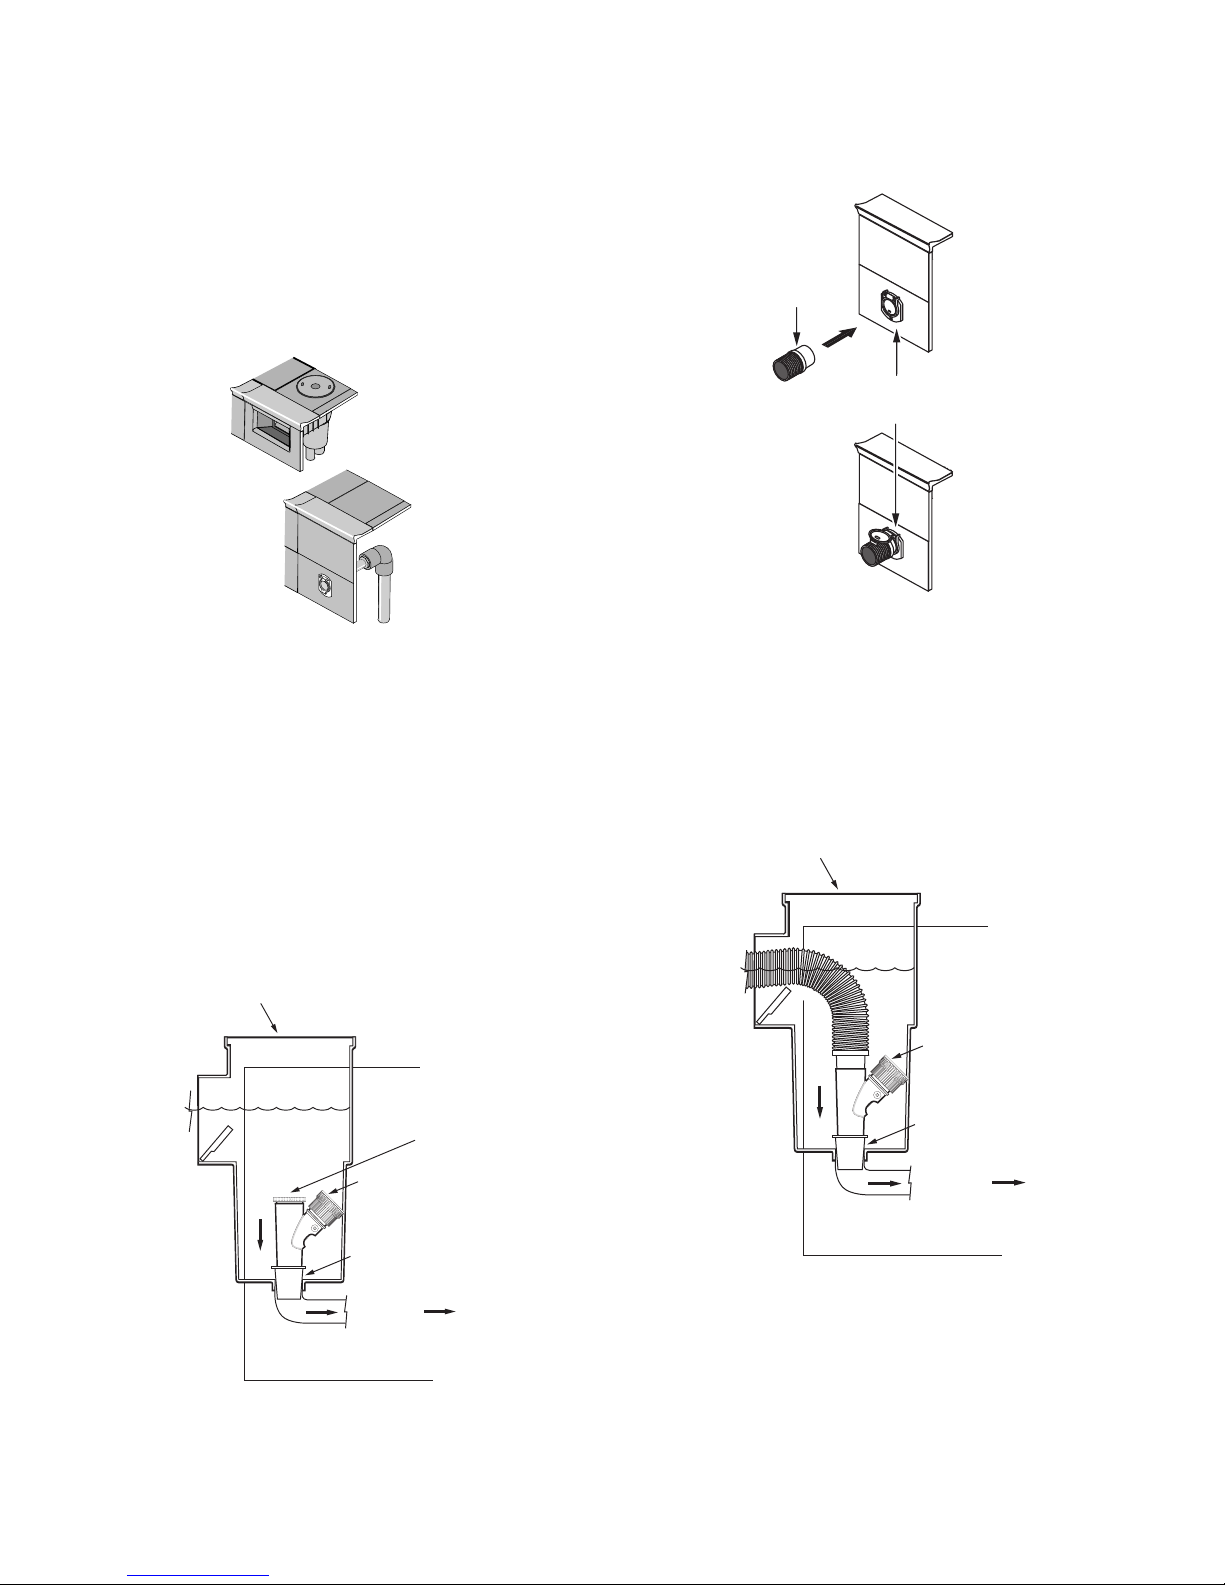
Step 6: Install Regulator in Pools with a Dedicated
Vacuum Port
The pool regulator adjusts the amount of vacuum in the
line for optimum cleaning.
If your pool has a dedicated wall fitting in addition to the
skimmer, follow the procedure below.
1. Turn off the pool pump.
2. Place the regulator in the skimmer as shown. The cap
must be placed in the top.
Use the adapter cone if needed.
3. Attach one length of hose to the vacuum port.
Step 7: Pools with only a Skimmer
1. Turn off the pool pump.
2. Place the regulator in the skimmer as shown. Do not
install the cap.
Use the adapter cone if needed.
3. Submerge one length of hose so it becomes filled
with water.
4. Insert the “male” end of the hose into the regulator.
Figure 5
Figure 7 - Vacuum Port Connection.
Figure 6 - Regulator in Skimmer.
Figure 8 - Regulator in Skimmer.
Skimmer
Vac
Port
Hose
End
Vac Port
Fitting
Skimmer
Cap
Regulator
Adapter Cone
To Pump
Skimmer
Regulator
Adapter Cone
To Pump
5
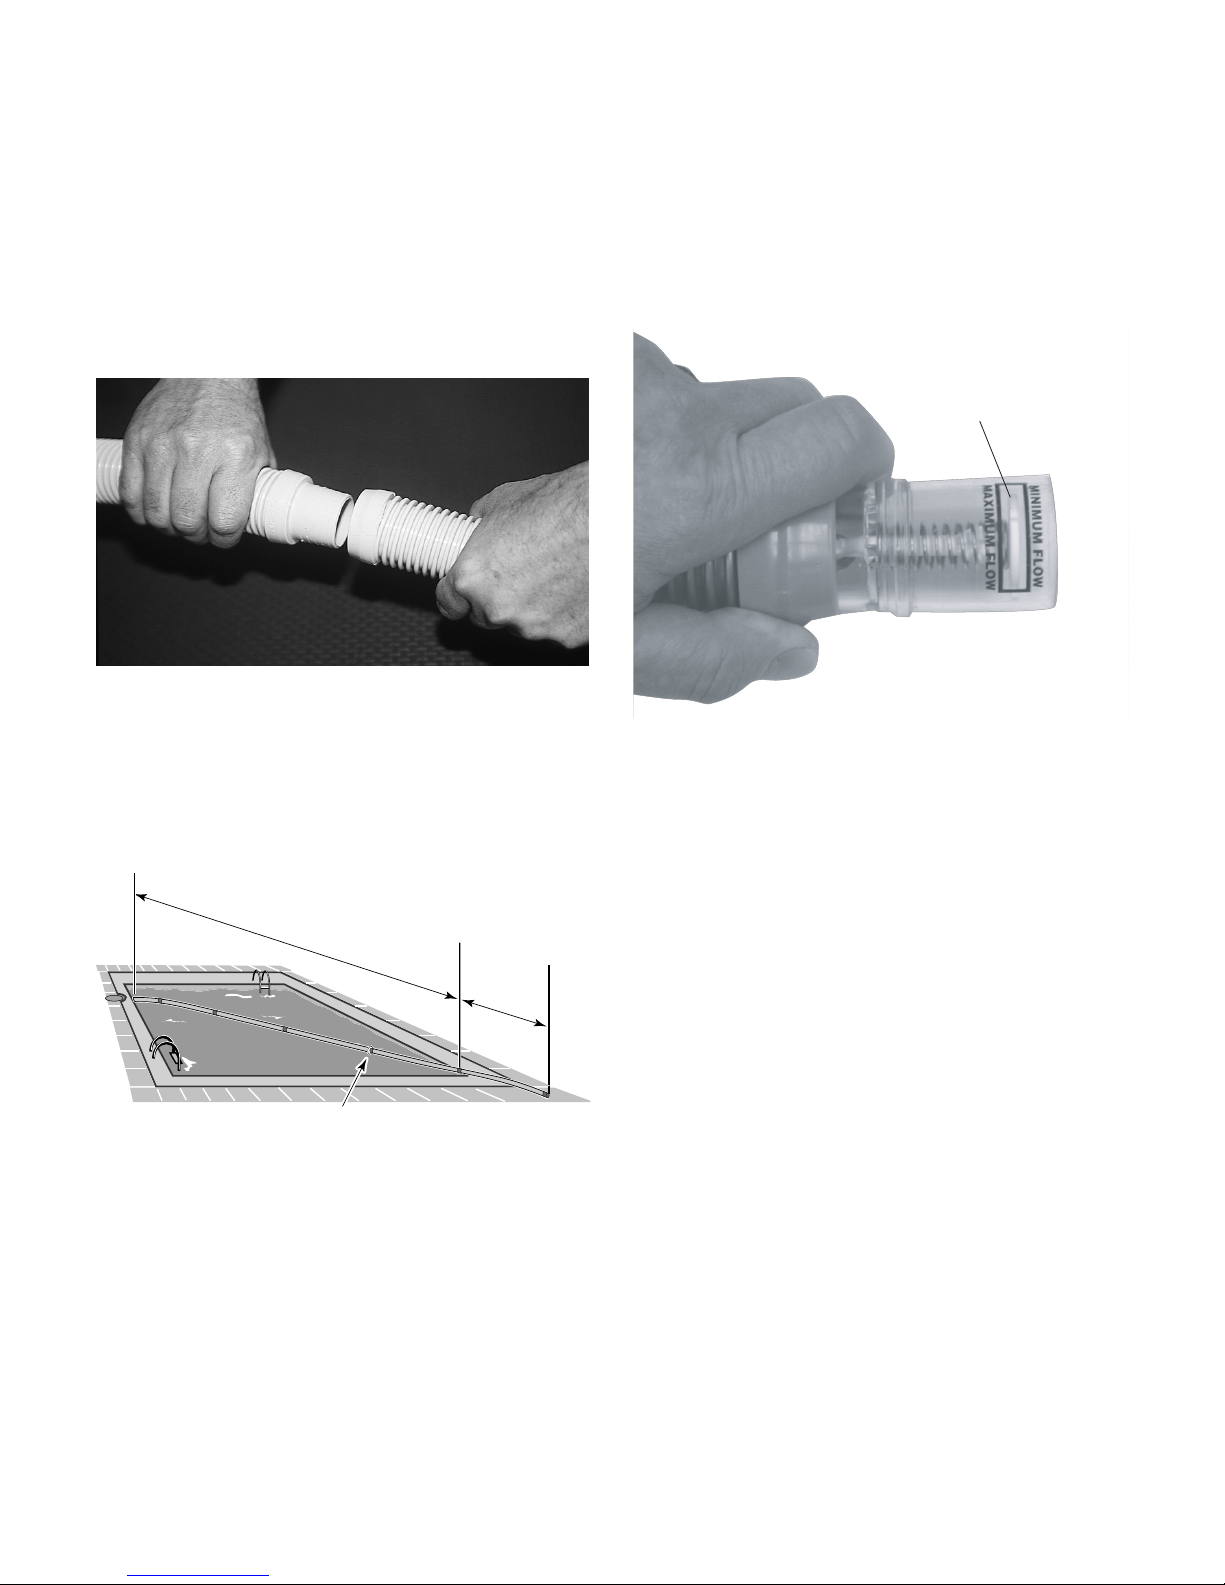
Step 8: Connect the hose sections (Figures 9 and 10).
For best results and to maintain proper operation, use only
original hoses, or direct replacements (See Repair Parts
page).
Join the hose sections one to another by fitting the male
end to the female end of the added section (see Figure 9).
Make sure the connections are snug. The number of
lengths that you will need depends on the size of your
pool.
The overall length of hose needed will be the distance
from:
(a) the point at which you will attach the hose to the suction connection, to (b) the furthest point in the pool from
(a), plus one hose length (Figure 10).
Submerge the hose so it fills with water and expels air from
the hose. Attach one ond of the hose to the vacuum source
as descrbed in Steps 2 and 3. Keep the other end of the
hose accessible.
Step 9: Adjust flow
1. Insert the flow gauge into the open end of the hose,
still underwater.
2. Start the pump.
3. Turn the adjustment knob on the flow regulator until
the indicator on the flow gauge is between the maximum and minimum flow (See Figure 11).
NOTE: If you have a very strong pump and the flow is
still too fast, slightly open the main drain.
4. Turn off the pump.
5. Remove the flow gauge and attache the hose to the
cleaner.
Figure 9
Figure 10
Figure 11 - Flow Indicated on Flow Gauge.
Disc Indicator
Hose must equal longest stretch — —
plus one length.
Add one hose weight to the third cuff from the PoolShark
®
6
Step 10: Connect Hose to Cleaner.
Connect the hose cuff of the 14" (0.36 m) hose to the
cleaner (correct end of hose is marked). Add other hose
sections as shown in Figure 10.
Fill the cleaner with water and let it sink to the bottom.
Verify hose connections as shown on the following page,
and that gate valves are fully open in the suction line.
MAINTENANCE
Hazardous suction. Suction through the
PoolShark can entrap bathers, causing severe injuries or
drowning. Do not operate the PoolShark cleaner while
people are using the swimming pool. Do not allow anyone
to play with the PoolShark or its hoses.
Your PoolShark can stay in the pool at all times except during chemical shock treatments. However, when people are
using the pool, disconnect the PoolShark and pull it to one
side of the pool.
The PoolShark requires almost no maintenance. Manually
open and close the regulator valve from time to time to
flush away accumulated dirt and debris and ensure smooth
operation. Also, from time to time, visually inspect the
PoolShark to be sure that:
• The oscillator moves freely and is not obstructed by
debris.
• The vacuum pad is not excessively worn. When the
traction pads on the bottom have worn down, it’s time
for replacement.
NOTICE: When storing the PoolShark, do not coil the
hose. Instead, lay it out straight and flat in an area protected from direct sunlight. Use only a genuine PoolShark
hose. The warranty is void if the cleaner is operated with
other than a genuine PoolShark hose.
Balancing the hose
It may or may not be necessary to add weight to your hose,
depending on your pool’s size, shape, and depth. Try the
cleaner first without any hose weights. If the hose is too
buoyant, add the weight as shown in Figure 14.
Figure 13
Figure 12
Figure 14
Hose Cuff
marked
"Connect
to Cleaner"
Pool Shark cleaner
Short leader Second hose
No weight on these
hose cuffs.
Section
Attach second hose weight 1” back from the
end of the fifth section for pools deeper than 6 feet.
Attach first hose weight
1" back from the end of
the third hose section
Third hose
Section
Fourth hose
Section
5049 0605
7
Pool pump suction is hazardous and can
cause entrapment with severe personal injury or
drowning. Use regulator (see instructions below) in pool
cleaner system at all times.
NOTICE: Each pool’s hydraulic system and vacuum
connections are different. Be sure you have installed the
regulator before you “fine-tune” the system. This not only
regulates vacuum, but also acts as a safety device.
About “Fine-Tuning” Vacuum
Adjustments and Connections
Suction entrapment, injury, and drowning hazard. If your
pool has a dedicated suction port (“vac port”) for vacuuming or for an automatic pool cleaner, it must be covered when not in use. Purchase a spring loaded safety
cover from your local pool store and install it on the suction port to prevent entrapment and injury.
For the “NOVICE POOL OWNER” where vacuuming is a
new experience, please read all of the following points, the
installation instructions, and the trouble shooting guide
carefully. Please note the following:
•“
Vacuum
” and “
suction
” are two words meaning the
same thing.
•“
Dedicated suction line
”, “
vac port
”, and “
vac fitting
”
are different terms for a hole in the side wall of pool;
this hole is connected to the pump suction and is dedicated to vacuuming.
• Some pools do not have a vac port. If your pool does
have one, please read the “
Suction Entrapment
” warn-
ing, above.
For the “SEASONED POOL OWNER”: The automatic pool
cleaner connection and vacuum adjustments can be similar to using your manual pool vacuum. Please read on.
Valves (pump, skimmer, and main drain) and
vacuum adjustments
You may need to spend some time adjusting the skimmer
and main drain valves in order to obtain the best vacuum
setting for good cleaner operation. Once you have found
the correct valve settings for best operation, we suggest
you mark the valves to ensure repeated success.
In-Line leaf canisters
If your pool is exposed to large quantities of leaves, we
suggest purchasing and installing an in-line leaf canister. A
leaf canister will provide more debris-loading capacity and
also provides a water by-pass when the canister is full. It is
very important that the pump not starve for water!
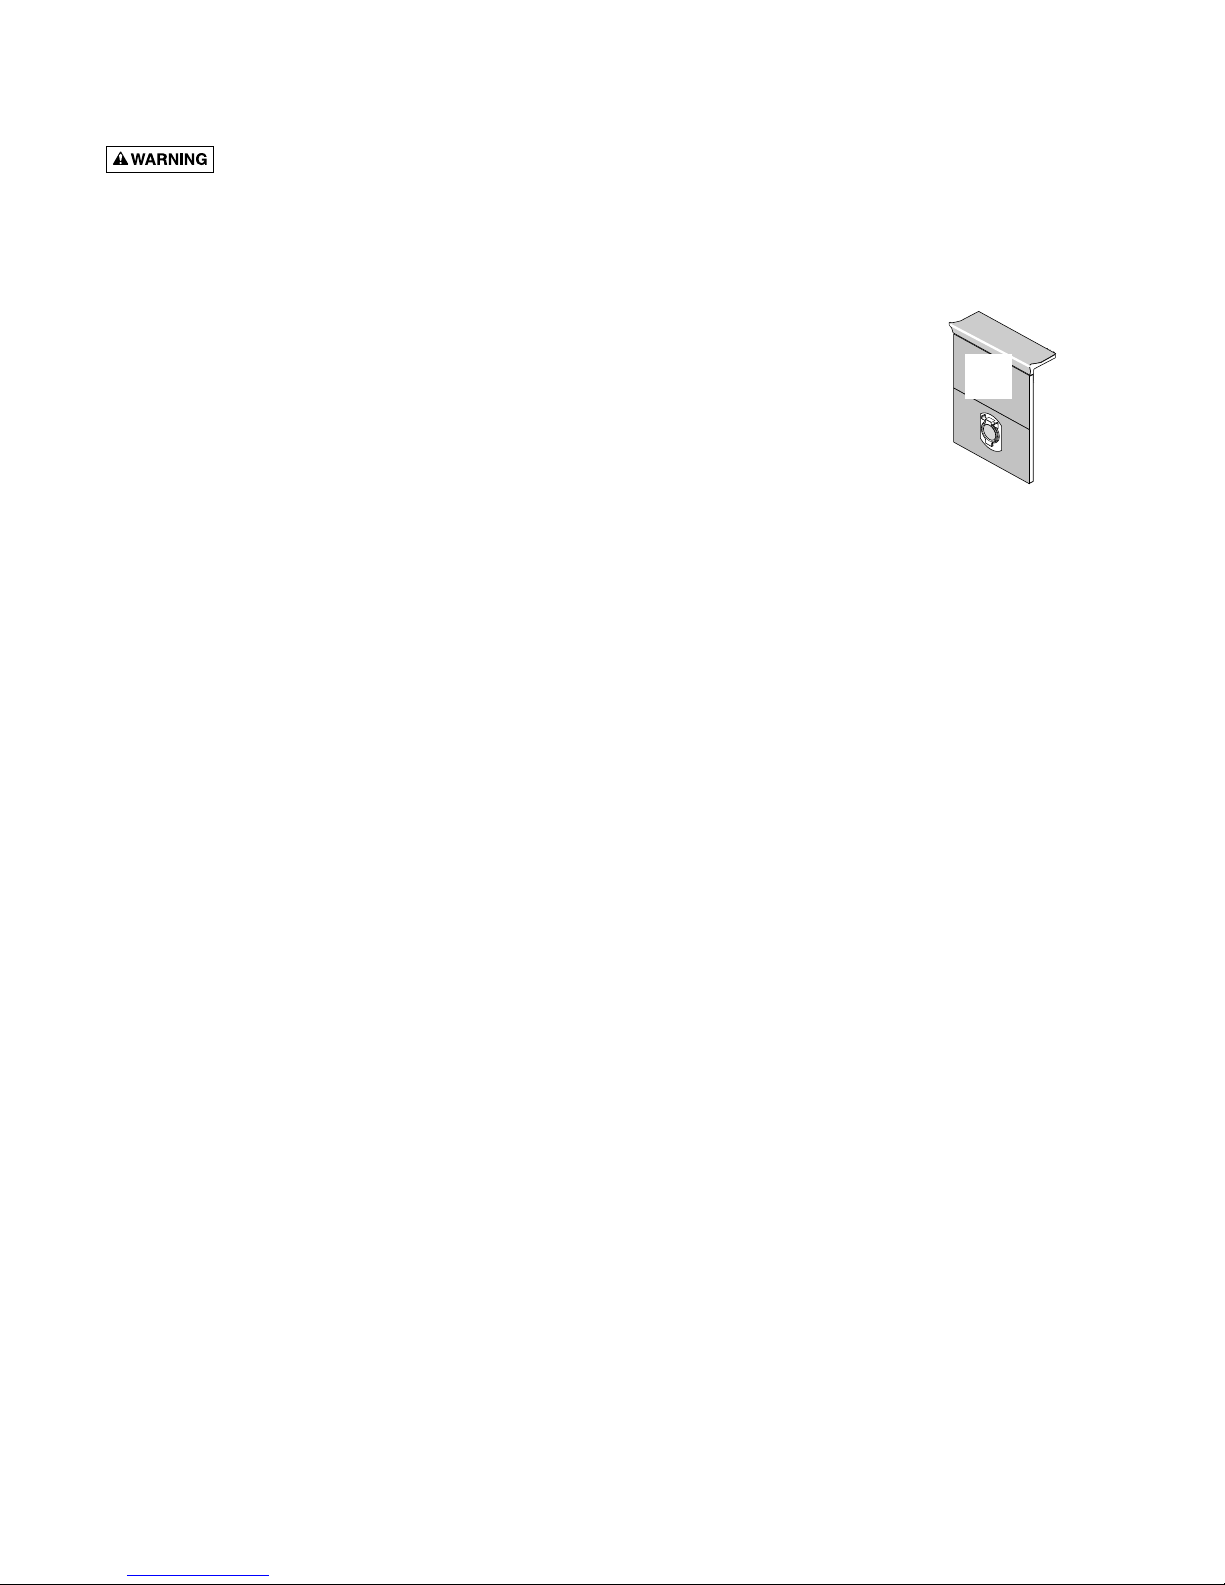
Dedicated suction
line/vac port/vac
fitting
Some pools have a dedicated wall fitting just for vacuuming. If the wall fitting
connection is used, you may
notice that the clear pump
lid shows signs of bubbles or
what appears to be the presence of air. To eliminate this, slightly open the main drain
valve to supplement the water intake. The cleaner may
slow down a bit when you change the suction.
Skimmer vac plates
Some pool owners connect the hose to a skimmer vac
plate, which allows the skimmer basket to remain in the
skimmer. If this method is used, empty the basket frequently. Also make sure that the vacuum regulator provided is completely submerged so that it will not suck air
and damage the pump.
Skimmer vac plate vacuum control adjusters
Some pool owners use one of a variety of manufacturer’s
skimmer vac plates. Some have a vacuum control adjuster,
and some do not. The adjuster could be a screw-type, a
spring loaded apparatus, or a dial design. For those vac
plates with adjusters, it is important to adjust them when
fine tuning the vacuum for the cleaner.
Figure 15: Typical Dedicated
Vacuum Port.
Vac
Port
8
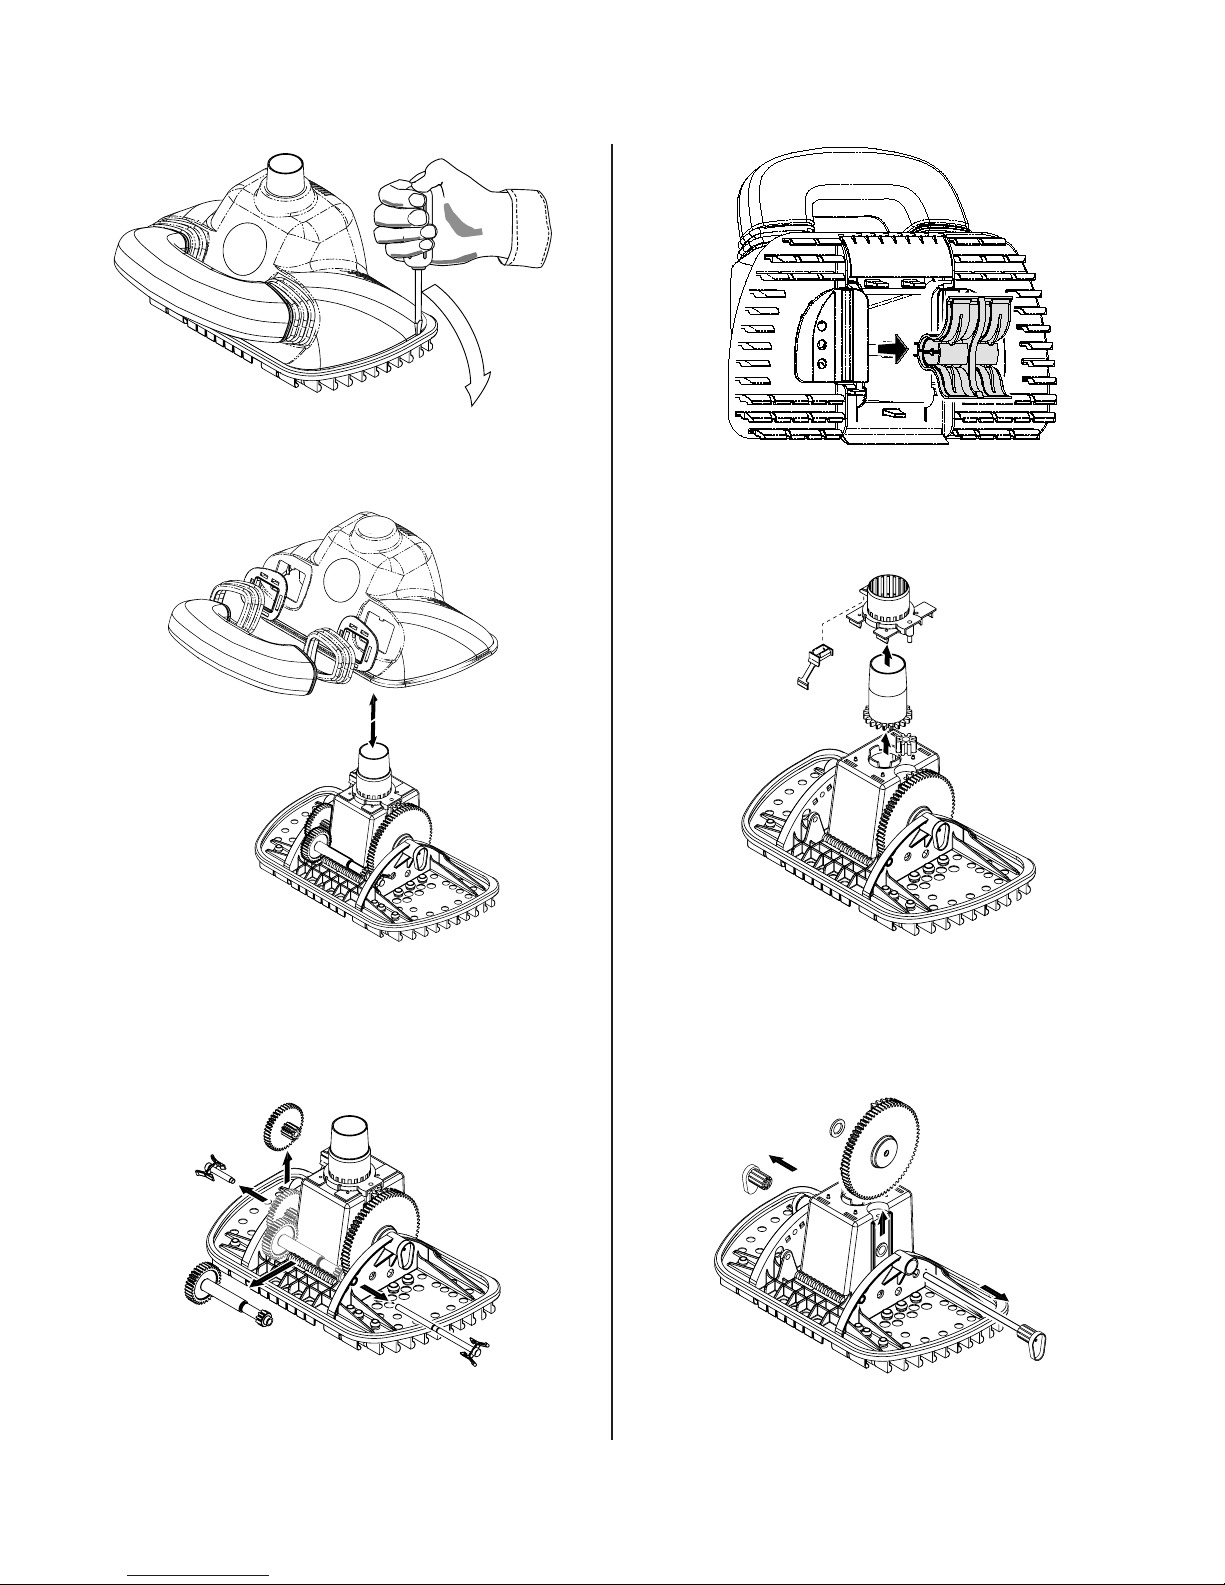
Step 1: With a screwdriver, carefully work the rubber vacuum pad down over the lip of the Outer Housing.
Step 2: Lift the Outer Housing straight up off of the chassis. Squeeze the tabs on the Bumper Clips (inside the
housing) to remove the Bumper. The Bumper, Bumper
Boots, and Bumper Clips pull apart.
Step 3: Squeeze and pull the Sprocket Clips to release the
Drive Shaft Assembly and Center Sprocket.
Step 5: Squeeze the latching tabs and pull up on the
Swivel Housing and Swivel. The assembly will come up,
releasing the Swivel Sprocket. Squeeze the latching tabs to
remove the Clutch Clip.
Step 6: Remove the Shaft Plug with the stainless steel shaft
and the Large Steering Drive Assembly.
Step 4: Pull the Oscillator Straight out from the bottom of
the Outer Housing. Be careful not to lose the Sliding Seals.
Disassembly
3900 0201
3901 0201
3904 0201

9
Step 7: Remove the Oscillator Sleeve, releasing the
Oscillator Sleeve Bushing and the Clutch assembly.
Reassembly: To reassemble the PoolShark, reverse the steps
above. NOTE: The notch on the center disk of the Large
Steering Drive Assembly must be down (as shown) for assembly.
Disassembly (continued)
3907 0201
3906 0201
10
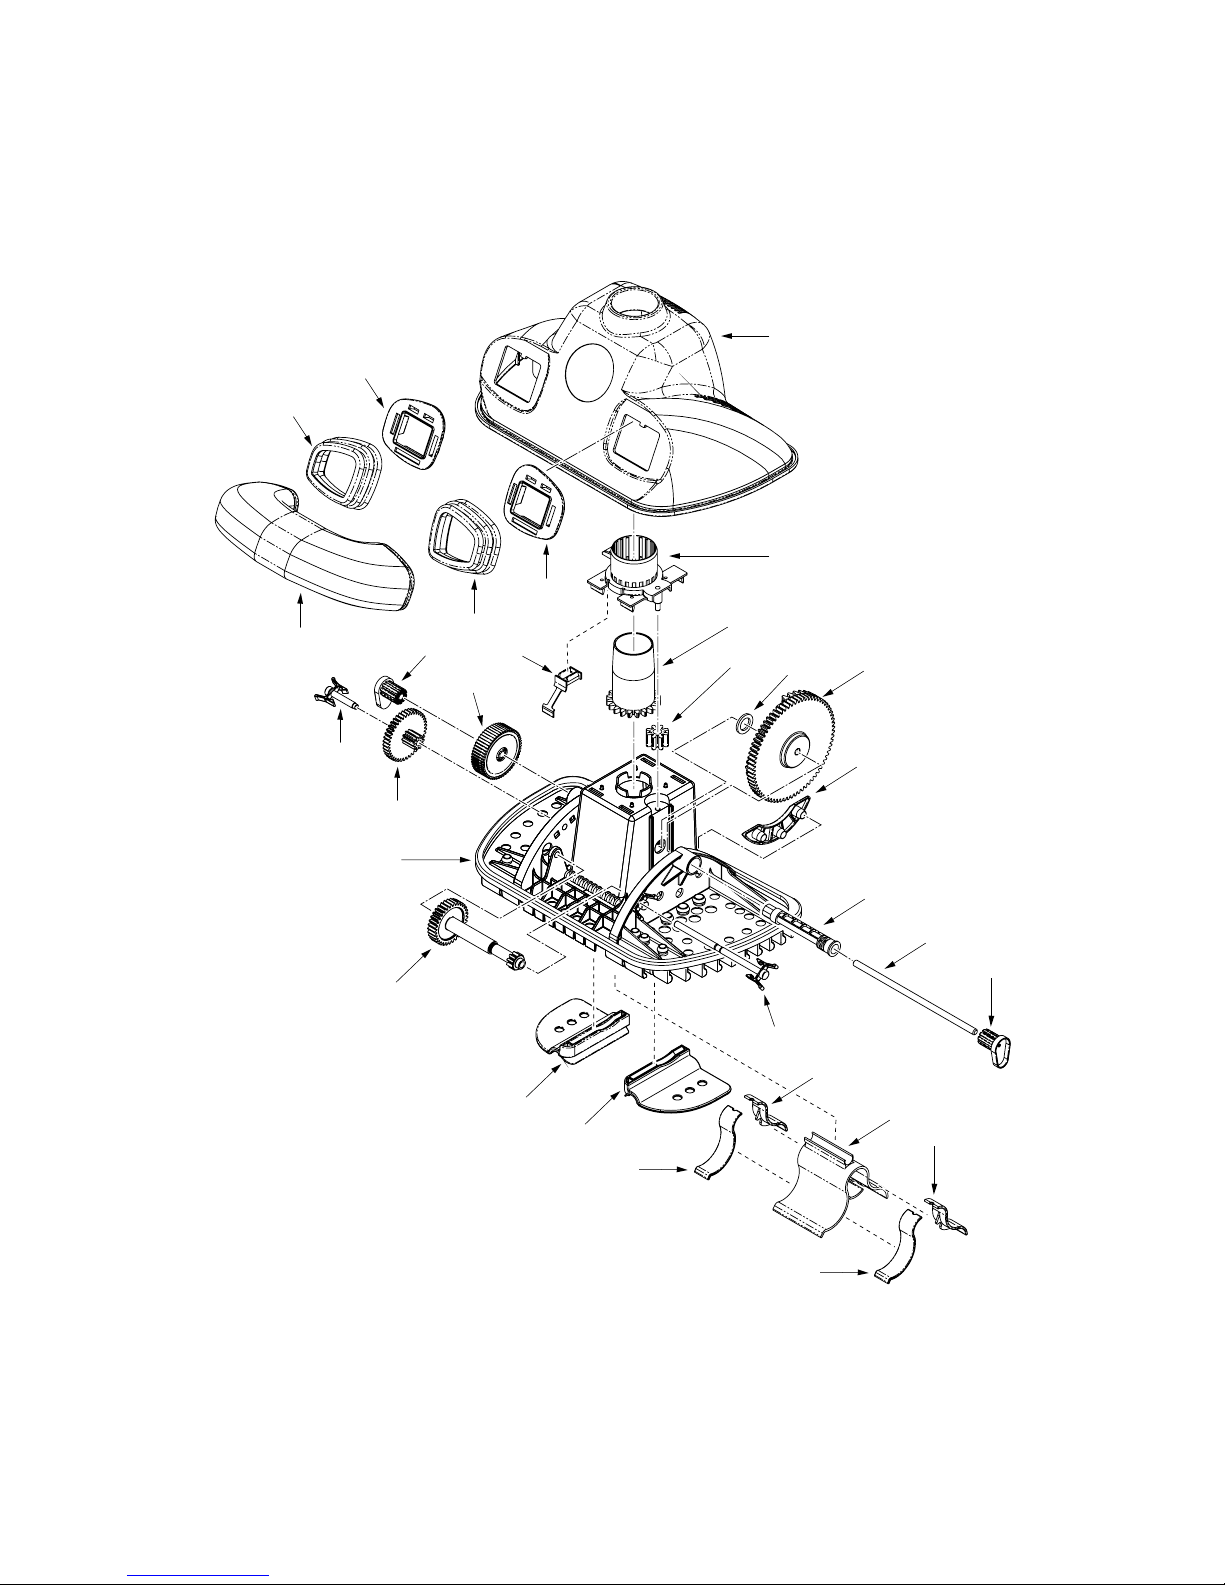
27
PoolShark Exploded View
26
28
24
25
10
23
21
1
2
3
4
5
6
20
18
17
19
16
15
7
8
9
10
11
12
13
12
14
14
3908 0201
11
Key Part Model Model
No. Description Qty. GW7500 GW7700
• Steering Kit (Incl. Key Nos. 2,3,4) 1 GW7505 GW7515
2 Swivel Housing 1
3 Swivel 1
4 Swivel Sprocket 1
23 Clutch Clip 1
• Clutch Kit (Incl. Key Nos. 5,8,21,23) GW7503 GW7503
5 Oscillator Sleeve Bushing 1
8 Oscillator Sleeve 1
21 Clutch Assembly 1
• Gear Kit (Incl. Key Nos. 6,10,11,17,19,20) GW7504 GW7504
6 Large Steering Drive Assembly 1
10 Shaft Plug 2
11 Long Sprocket Clip 1
17 Drive Shaft Assembly 1
19 Center Sprocket 1
20 Short Sprocket Clip 1
• Oscillator Kit (Incl. Key Nos. 12, 13,14) 1 GW7502 GW7502
12 Small Sliding Seal 2
13 Oscillator 1
14 Large Sliding Seal 2
• Seal Flap Kit (Incl. Key Nos. 15,16) 1 GW7506 GW7506
15 Right Seal Flap 1
16 Left Seal Flap 1
18 Chassis with Pad 1 41201-0242 41201-0242C
• Bumper Kit (Incl. Key Nos. 24,25, 26,27,28) 1 GW7501 GW7511
24 Right Bumper Clip 1
25 Right Bumper Boot 1
26 Bumper 1
27 Left Bumper Boot 1
28 Left Bumper Boot Clip 1
• Accessory Kit 1 77705-0400 77705-0400
Includes: Regulator 1
Regulator Cap 1
Hose Weight 2
Flow Gauge 1
Reducer Cone 1
Eyeball Diverter 2
Vac Port Fitting 1
• Short Leader Hose 1 GW9540 GW9540
• Suction Hose, 1 meter segement 10 41201-0252 41201-0252
Parts Not Available Separately:
1 Outer Housing 1
7 Support Brace 1
9 Stainless Steel Axle 1
PoolShark Repair Parts List
• Not Illustrated.
12
TROUBLESHOOTING
Common Causes of Cleaner Problems:
• Dirty filter Clean the filter
• Dirty basket in pump Clean the basket
hair and lint strainer
• Debris blocking the Remove the Debris
bottom of the PoolShark
• Leaks in the hose Remove the leaky section
• Debris in the regulator Clean the regulator valve
• Low vacuum through Close the main drain
the cleaner
PoolShark doesn’t move or pulsates slowly:
• Make sure that the main drain and all other suction
lines are closed except the suction line to which the
PoolShark is attached.
• Check for debris in the filter or the pump strainer
basket.
• Check for debris in the PoolShark’s oscillator. Debris
may prevent oscillator movement or restrict the flow
through the cleaner.
• Check the oscillator for: damage; lost seals (there
should be 4 seals): obstructed seals (seals should slide
freely on the oscillator).
• Be sure that the short, soft leader hose section is the
first section in the hose assembly (next to the cleaner).
To install the eyeball diverter:
The water flow from the return line can push the
PoolShark’s hose, causing the PoolShark to steer away
from the return line or to remain in one area of the
pool. To correct this, adjust your existing return line diverters or install the eyeball diverters supplied with the
PoolShark as follows:
A. Turn off the main circulation pump.
B. Unscrew the lock rings from the pool’s return line
fittings and remove the original eyeball diverters.
C. Replace them with the PoolShark’s eyeball diverters.
D. Replace the lock rings and tighten them. Be sure
that the openings of the eyeball diverters point
down or to the side (9:00 O’clock position), before
fully tightening the rings.
Usually, directing the return line water flow against
the side of the pool (as described above) works
best. However, you may want to try pointing the
flow downward or in different positions to see
which works best in the pool.
After installing the eyeball diverter, turn the circulation pump on. The PoolShark should begin moving
across the pool floor, vacuuming up the debris in its
path.
E. If the PoolShark’s eyeball diverters do not fit your
existing return line fittings, adjust your existing fittings as best you can as described above.
If the PoolShark tracks in a repetitive pattern:
• Check the pool return line water flow and redirect it as
necessary with a return line eyeball diverter (see “To install the eyeball diverter”, above).
• Check the PoolShark’s hose to be sure that it has not
become bent or kinked. Do not coil the hose, as it will
retain the coiled shape and reduce the cleaning coverage. To check the hose, lay each hose section flat on
the pool deck (or another flat surface) and look down
the length of the hose. It should be perfectly flat and
straight. Replace any sections which are bent or
kinked.
• Check the oscillator for: damage; lost seals (there
should be 4 seals): obstructed seals (seals should slide
freely on the oscillator).
• Be sure that the short, soft leader hose section is the
first section in the hose assembly (next to the cleaner).
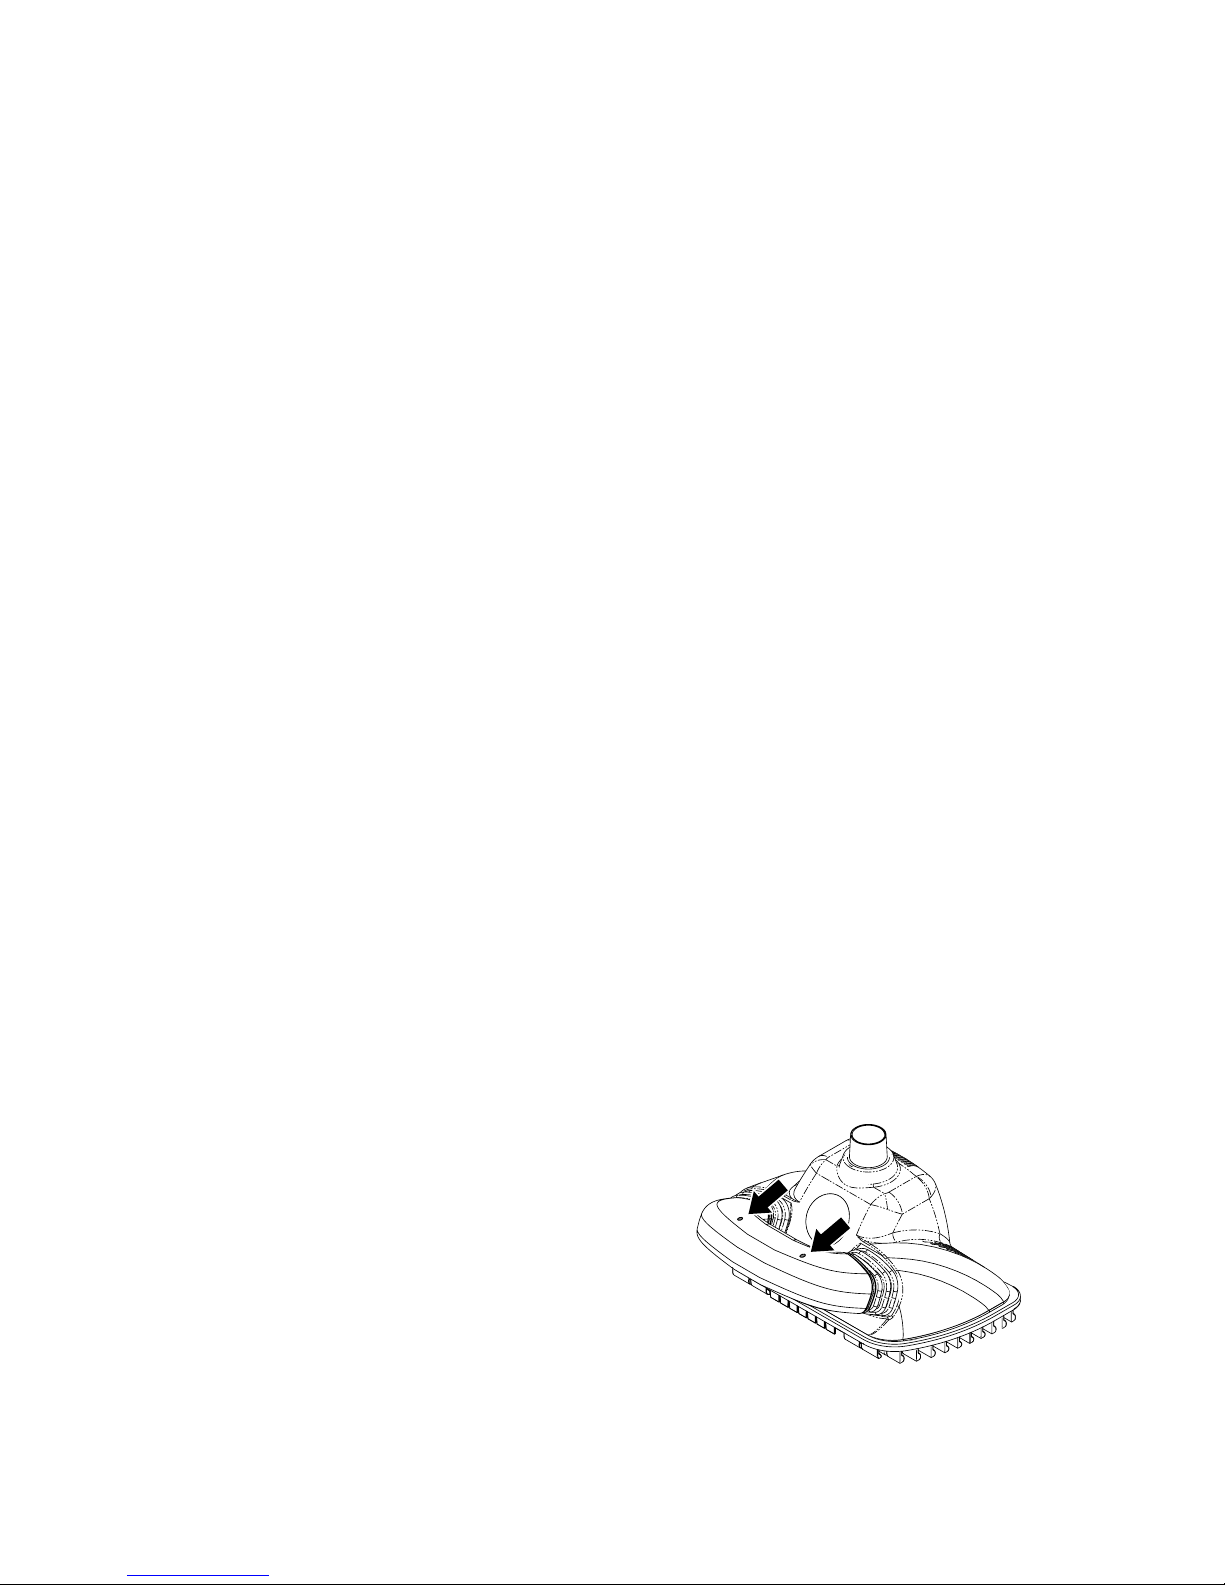
Square Bottom Pools Only:
If the transition radius between your pool’s floor and wall
is small and the PoolShark will not climb the pool walls,
then you have a square bottom pool. If so, remove the
cleaner from the pool and drill two holes in the indentations in the bumper (see Figure 14). This will provide an
outlet for air which would otherwise accumulate in the
hollow bumper. This air, from microscopic bubbles suspended in the pool water, is normally able to escape when
the PoolShark climbs the pool walls.
NOTICE: DO NOT drill the holes if your PoolShark CAN
climb the pool walls!
Figure 16: Drill Bumper if you have a square-bottom pool.
3899 0201
CREATE A RECORD OF YOUR WARRANTY AT STA-RITE:
• Complete a warranty registration at www.staritepool.com by clicking on “Register Products” and selecting Sta-Rite Pool
OR
• Complete bottom portion completely and mail within 10 days of installation to Sta-Rite, Attn.: Pool Warranty Dept., 293 Wright St., Delavan , WI 53115
Warranty Registration Card
Name
Address
City State Zip
Installation (or Purchase) Date
Product Purchased
Model Number
■■ New installation ■■ Replacement
Years pool has been in service ■■ less than 1 ■■ 1-3 ■■ 3-5 ■■ 5-10
This product was purchased from:
Company name
Address
City State Zip
STA-RITE LIMITED WARRANTY
For technical information about this product, contact the installer or call Sta-Rite at 262-728-9181.
Visit www.staritepool.com
• for more information about Sta-Rite products listed above
• to locate a Sta-Rite dealer near you
Product Specific Warranties (from date of installation)
Product Limited
Family Warranty Exceptions
Filters 1 Year System 3 Tank Bodies - 10 Yrs
Filter Valves 1 Year
Pumps 1 Year
Heaters 2 Years *Commercial Application - 1 Yr
Controls 1 Year
Above Ground Systems 1 Year
Lights and Niches 1 Year Lamps and Bulbs - 90 Days
White Goods 1 Year
Maintenance Equipment 90 Days
Drainer/Utility Pumps 90 Days
Replacement Parts 90 Days
Cleaners: Lil Shark 1 Year
Cleaners: Calypso 1 Year
Cleaners: Pool Shark 2 Years Footpad and Seal Flaps - 1 Yr
Cleaners: Great White 2 Years
* Commercial and multi-family application.
Retain this warranty certificate in a
safe and convenient location for your records.
Pumps, filters, skimmers, underwater lights (excluding bulbs), accessories and fittings manufactured by Sta-Rite are warranted to
be free of defects in material and/or workmanship for one (1) year
from the original date of installation.
The foregoing warranties relate to the original consumer purchaser
(“Purchaser”) only. Sta-Rite Industries shall have the option to repair or replace the defective product, at its sole discretion.
Purchasers must pay all labor and shipping charges necessary to
replace the product covered by this warranty. Requests for warranty service must be made through the installing dealer. This warranty shall not apply to any product that has been subject to
negligence, misapplication, improper installation or maintenance,
or other circumstances which are not in Sta-Rite’s direct control.
Failure to have product installed by a professional in compliance
with local codes will void any and all manufacturers warranty.
This warranty sets forth Sta-Rite’s obligation and Purchaser’s exclusive remedy for defective products.
STA-RITE SHALL NOT BE LIABLE FOR ANY CONSEQUENTIAL,
INCIDENTAL OR CONTINGENT DAMAGES WHATSOEVER.
THE FOREGOING WARRANTIES ARE EXCLUSIVE AND IN
LIEU OF ALL OTHER EXPRESS WARRANTIES. IMPLIED WARRANTIES, INCLUDING BUT NOT LIMITED TO THE IMPLIED
WARRANTIES OF MERCHANTABILITY AND FITNESS FOR A
PARTICULAR PURPOSE, SHALL NOT EXTEND BEYOND THE
DURATION OF THE APPLICABLE EXPRESS WARRANTIES
PROVIDED HEREIN.
Some states do not allow the exclusion or limitation of incidental or
consequential damages or limitations on how long an implied warranty lasts, so the above limitations or exclusion may not apply to
you. This warranty gives you specific legal rights and you may also
have other rights which vary from state to state.
Supersedes all previous publications.
S4877PS (Rev. 7/21/04)
 Loading...