

Page 1
16
*99460100*
1
AquaLumin® III - Nicheless Light
Installation Guide
IMPORTANT SAFETY INSTRUCTIONS
READ AND FOLLOW ALL INSTRUCTIONS
SAVE THESE INSTRUCTIONS
Section Contents
1. Installing a mounting bracket and light fixture during new vinyl pool construction...........3
2. Replacing light fixture in existing pools......................................................................7
3. Replacing a lamp only..............................................................................................10
Parts List / Replacement Part Kits........................................................................13-15
Minimum Qualifications
• Licensed or Certified Electrician
• Electrician or Qualified Pool Serviceman
• Qualified Pool Serviceman or Homeowner
IMPORTANT NOTICE
This AquaLumin III light will install only with the following AquaLumin III Mounting Brackets,
manufactured after JUNE 6, 1994:
AquaLumin III Vinyl Mounting Bracket Assembly 1" (P/N 78887800)
AquaLumin III Vinyl Mounting Bracket Assembly 3/4" (P/N 78887700)
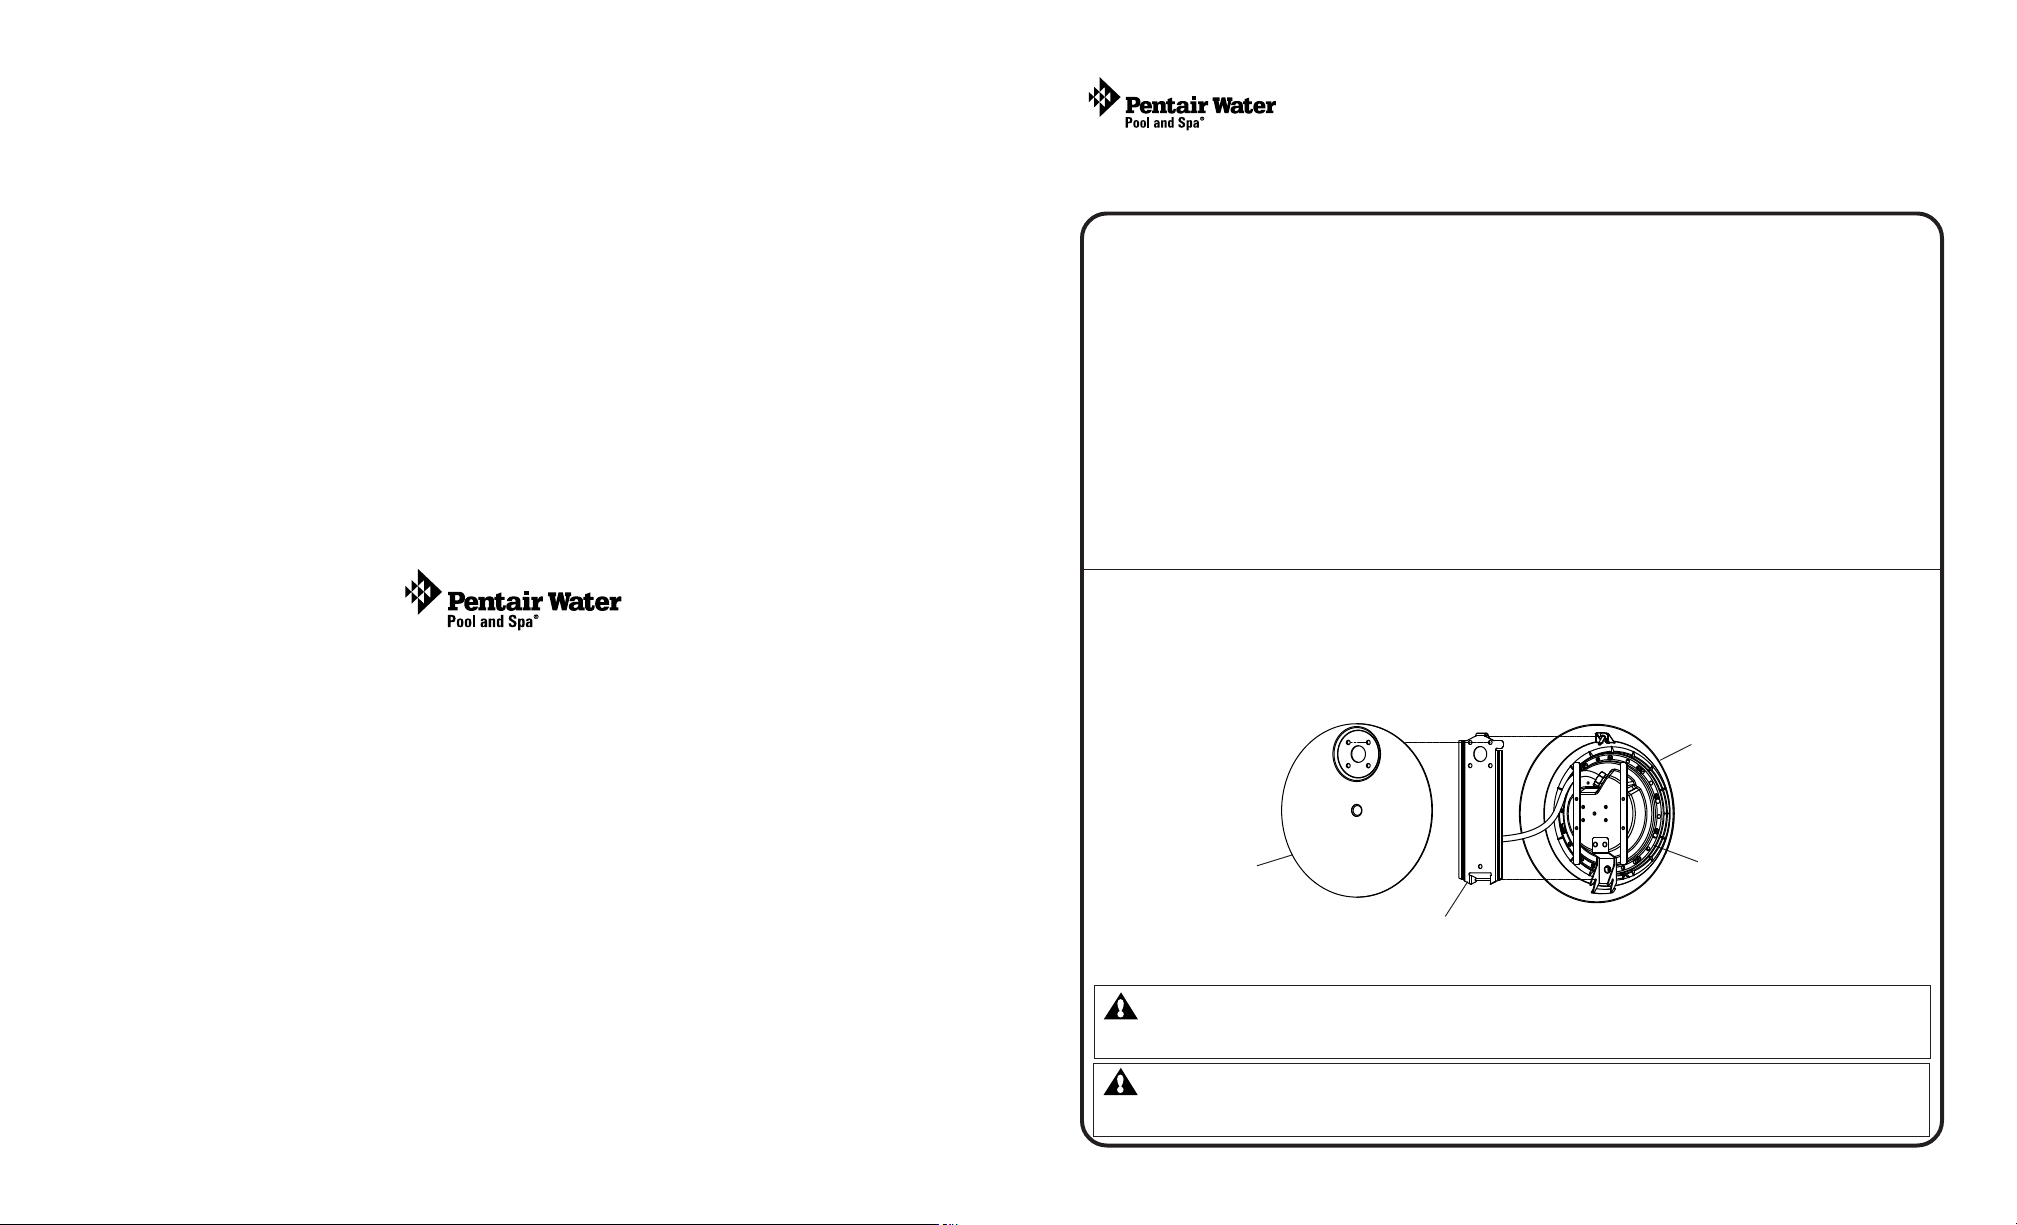
BACK VIEW
Housing
P/N 99460100 Rev J 09/08/11
AquaLumin
®
III - Nicheless Light Installation Guide
Mounting
AquaLumin III - Manufactured after June 6, 1994
WARNING! DO NOT install the AquaLumin® light in ocean salt water pools, spas and hot
tubs. The AquaLumin® light is designed for use in fresh water pools, spas and hot tubs
(including those using salt chlorine generators).
WARNING! THE LIGHT LENS MAY GET HOT WHEN IN USE. USERS SHOULD AVOID
CONTACT WITH THE LIGHT AS SERIOUS BURNS MAY RESULT FROM PROLONGED
CONTACT WITH THE LIGHT.
P/N 99460100 Rev J - 09/08/11
Housing
Mounting
AquaLumin® III - Nicheless Light Installation Guide
Page 2

2
15
Technical Support
Contact Technical Support at:
Sanford, North Carolina (8 A.M. to 5 P.M.)
Moorpark, California (8 A.M. to 5 P.M.)
Phone: (800) 831-7133
Fax: (800) 284-4151
Web sites: visit www.pentairpool.com and www.staritepool.com
Replacement Part Kits
AquaLumin III Replacement Part Kits
Part
Number Description
600138 Bulb replacement kit 120V / 250W
619484 - Bulb (120V/250W) Qty. 1
619599 - Lens gasket Qty. 1
619792 - Sealing screws Qty. 10
600139 Bulb replacement kit 12V / 100W
619584 - Bulb (12V/100W) Qty. 1
619599 - Lens gasket Qty. 1
619792 - Sealing screws Qty. 10
600141 Le ns replacement kit
619797 - Lens Qty. 1
619599 - Lens gasket Qty. 1
619792 - Sealing screws Qty. 10
© 2011 Pentair Water Pool and Spa, Inc. All rights reserved
This document is subject to change without notice
1620 Hawkins Ave., Sanford, NC 27330 • (919) 566-8000
10951 West Los Angeles Ave., Moorpark, CA 93021 • (805) 553-5000
AquaLumin® and Pentair Water Pool and Spa® is a trademark and/or a registered trademark of Pentair Water Pool
and Spa, Inc. and/or its affiliated companies in the United States and/or other countries. Unless noted, names and
brands of others that may be used in this document are not used to indicate an affiliation or endorsement between
the proprietors of these names and brands and Pentair Water Pool and Spa, Inc. Those names and brands may be
the trademarks or registered trademarks of those parties or others.
P/N 99460100 Rev J - 09/08/11
AquaLumin
®
III - Nicheless Light Installation Guide
AquaLumin® III - Nicheless Light Installation Guide
Page 3
OU
B
o
.
O
g
e
t
g
t
t
L
g
Y
g
o
g
r
o
14
1
2
3
5
6
4
3
Light Assembly Parts
Section 1: Installing a mounting bracket and light fixture during new vinyl
pool construction
WARNING !
DO NOT install the AquaLumin® light in ocean salt water pools, spas and hot tubs. The AquaLumin® light is
designed for use in fresh water pools, spas and hot tubs (including those using salt chlorine generators).
D A N G E R !
RISK OF ELECTRICAL SHOCK OR ELECTROCUTION
This Nicheless light fixture must be installed by a licensed or certified electrician or a
qualified pool serviceman in accordance with the National Electrical Code and all
applicable local codes and ordinances. Improper installation will create an electrical
hazard which could result in death or serious injury to pool users, installers or others due
to electrical shock and may also cause damage to property. Always disconnect power to
the pool light at the circuit breaker before servicing the light. Failure to do so could result
in death or serious injury to serviceman, pool users or others due to electrical shock.
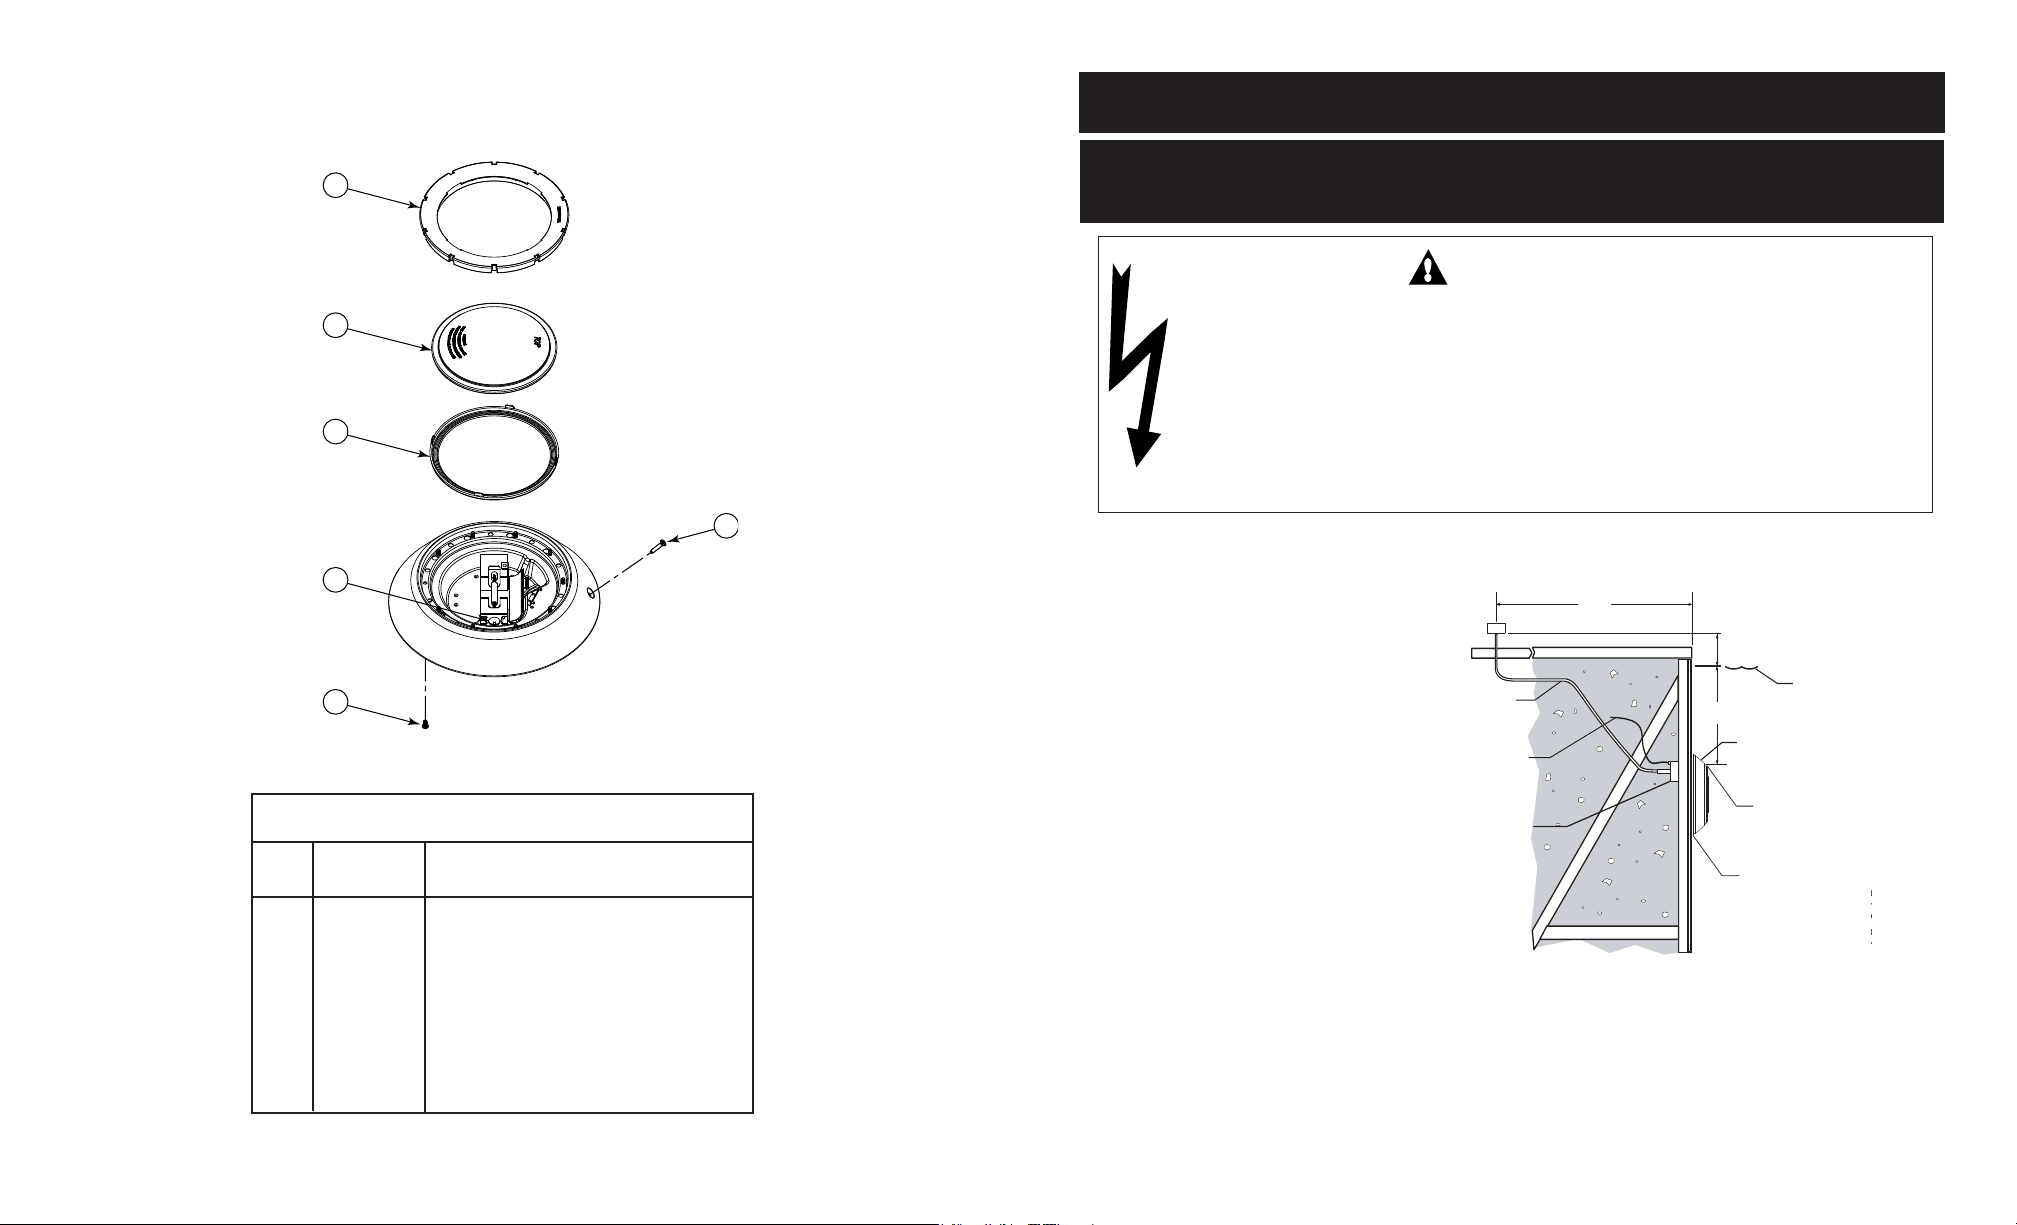
A. Preparatory steps which must be completed by the electrician before light is installed,
see Figure 1.
1. Be sure the electrical
system of the pool
TO GFCI, CIRCUIT
BREAKER AND
POWER SOURCE
conforms with the
requirements of the
current National
Electrical Code (NEC)
and all local codes and
ordinances. A licensed
RIGID CONDUIT
XISTING
TO E
BONDING
CONNECTOR
or certified electrician
AquaLumin III Replacement Parts
must install the
MOUNTING HUB
electrical system to
Part
Item Number Description
1 619601 Face ring (white)
619632 Face ring (black)
2 619797 Lens
3 619599 Lens gasket
4 78889900 Captive screw
5* 619584 Halogen lamp 12 volt /100 watt
6 619792 Sealing screws (10 req.)
619484 Halogen lamp 120 volt / 250 watt
meet or exceed those
Figure 1
requirements before
the Nicheless Light is
installed. Some of the
requirements of the
NEC are listed below.
a. The lighting circuit must have a Ground Fault Circuit Interrupter (GFCI), and have an
appropriately rated circuit breaker.
b. The junction box (or, for 12 volt models, the low voltage transformer) is located at least
12 inches above water level, and at least 48 inches from the edge of the pool, see
Figure 1.
Note: (*) Sold in Bulb Replacement Kits 600139
and 600138, Lens Replacement Kit 600141.
AquaLumin
®
III - Nicheless Light Installation Guide
c. The light fixture and all metal items within five (5) feet of the pool must be properly
electrically bonded.
48"
MIN.
AquaLumin® III - Nicheless Light Installation Guide
12" MIN. FROM BOTTOM
OF JUNCTION BOX
OR LOW VOLTAGE
TRANSFORMER TO WA
WATER
LEVEL
18" MIN. FROM WATER
TO TOP OF FACE RING
PILOT SCREW AT TOP
TOP OF FACE RING
SPONDS
CORRE
TO CENTER OF
NTING HU
M
RTANT:
IMP
DO NOT install the li
of the pool/spa surface, with
beam pointin
the li
with the li
upward. ONL
ht in the si
ht beam in the ho
TER LINE
ht in th
de of the po
bottom
ht
he li
INSTAL
,
/spa wall
l
izontal positi
n
Page 4

4
( & )
13
Section 1: Installing a mounting bracket and light fixture during new vinyl
pool construction (Continued)
d. The mounting bracket and mounting hub must be
properly installed so that the top edge of the face ring
of the Nicheless Light is at least 18 inches below the
surface of the water in the pool. The top of the face
ring will line up with the center of the Plastic Mounting
Hub, see Figure 1 on page 3.
e. The mounting bracket (not shown) and mounting hub
must be properly electrically bonded and grounded via
the No. 8 AWG ground connector located at the upper
left mounting bolt positioned, see Figure 2.
2. To be certain that the pool's electrical system meets all
applicable requirements, you should also consult the local
building department.
3. Use only Pentair Water Pool and Spa Nicheless Fixtures,
(Mounting Bracket Assembly), to ensure proper bonding
and grounding connections.
B. Perform the following steps after the electrical system requirements are met
(see Section 1A (page 3) for requirements)
Figure 2
Vinyl Liner Mounting Bracket Parts
Models 250 watt / 120 volt and
100 watt / 12 volt (transformer required)
1. Locate position on a vertical wall where light is to be installed. The top of the light face ring
must be 18 inches below normal water level as required by NEC Article 680.
2. Cut or punch a three (3) inch diameter hole through pool wall with center 18 inches below
normal water level for mounting hub and mounting bracket installation.
3. If using plastic conduit, install PVC conduit adapter (provided) before installing plastic
mounting hub. Use only recommended sealant for PVC/ABS threads. Position mounting hub
over hole with the word “TOP” at the top, and secure with mounting flange and two (2) hex
nuts and lock washers. Tighten hex nuts evenly with equal torque.
NOTE: Attach the stainless steel mounting bracket temporarily to ABS mounting hub.
Perfect top and bottom alignment of ABS hub will be easier.
CAUTION: Remove mounting bracket before liner is installed. Failure to
remove mounting bracket can damage the liner during installation.
AquaLumin
®
III - Nicheless Light Installation Guide
Vinyl Liner Replacement Parts
Part
Item Number Description
1 619547 Wall mounting bracket assembly
2 619548 Metal bracket cup assembly
3 619549 Mounting hub 3/4 in. assembly
4 619550 Mounting hub 1 in. assembly
5 78872600 Mounting spacer
6 619617 Housing spacer
7 86001800 Nipple, 1 in.
AquaLumin® III - Nicheless Light Installation Guide
Page 5

12
5
Section 3: Replacing a lamp only (Continued)
13. While holding the glass lens and plastic face ring, turn the light over and place it face down
on a flat soft clean surface. Be careful not to scratch the lens.
14. Insert one new sealing screw, provided with the Bulb Replacement Kit, through the circular
hole located at the TOP (12 o'clock) of the back of the housing and loosely tighten it into
the face ring. Insert the remaining new sealing screw through the circular hole located at
the BOTTOM (6 o'clock) of the back of the housing and loosely tighten it into the face ring.
The BOTTOM (6 o'clock) circular hole is accessible through a hole drilled in the center of
the hook mounting bracket.
15. Continue to tighten all the sealing screws into the face ring. It is recommended that
opposing sealing screws be tightened in order (12 o'clock and 6 o'clock; 3 o'clock and 9
o'clock, etc.) to the recommended torque of 10-15 in-lbs. This provides even pressure on
the lens and lens gasket and creates a seal between the environment and the inside of the
light fixture.
16. Wrap a length of the cord up to a maximum of eight (8) feet long on the back of the light
assembly. Wind a maximum of three (3) wraps of cord so that the last wrap stops at the
top of the light. This extra cord allows the light to be brought out of the pool for servicing.
NOTE: Leave 2" to 3" of slack cord at the top so that the light may be tipped back for
removal.
WARNING Always install a new lens gasket, part number 619599, whenever
reassembling the light. Failure to do so may permit water to leak into the assembly which
could cause; (a) an electrical hazard resulting in death or serious injury to pool users,
installer, or others due to electrical shock, or (b) breakage of the lamp or lens, which
likewise could result in serious injury to pool user, installers, or bystanders, or in damage
to property.
17. Feed the remaining cord through the conduit hole in the mounting hub. Place the hook
mounting bracket over the pin on the bottom of the mounting bracket. Press down
lightly to secure in place. Secure at the top of the light with the captive screw.
18. Before operating the light for more than 10 seconds, be sure the Nicheless Light is
completely submerged in water. To check for proper operation, switch on the main switch
or circuit breaker, as well as the switch which operates the Nicheless Light.
Section 1: Installing a mounting bracket and light fixture during new vinyl
pool construction (Continued)
4. Connect bonding wire from bonding grid to bonding lug on rear of the mounting hub
assembly.
5. Before installing liner, be sure
gasket is firmly attached to
mounting hub. After liner is
installed and properly stretched
into position, locate bolt holes in
hub and punch liner for four
bracket mounting bolts. Install
the mounting spacer against the
liner and hold in position with
mounting bracket. Secure with
four (4) bracket mounting bolts
and washers.
NOTE: If using PVC conduit, you
must attach grounding wire to
grounding lug on upper left
mounting bolt positioned, see
Figure 4, on page 6.
6. Wrap a length of the cord up to a maximum of eight (8) feet long on the back of the light
assembly. Wind a maximum of three (3) wraps of cord so the last wrap stops at the top of
the light. This extra cord allows you to bring the light out of the pool to install a new lamp
and for servicing.
NOTE: Leave 2" to 3" of slack cord at the top so that the light may be tipped back for
removal.
7. Feed the remaining cord through the conduit hole in the mounting hub. Place hook
mounting bracket over the pin on the bottom of the mounting bracket and press down
lightly to secure in place. Secure at the top of the light with the captive screw. When
installed properly, the housing spacer should fill any gap between the pool wall and the
light.
Figure 3.
AquaLumin
WARNING Use only the special stainless steel captive screw (see Light
Assembly Parts, item 4, on page 14) provided with this Nicheless Light. This screw
mounts and electrically grounds the housing securely to the Nicheless fixture. Failure to
use the screw provided could create an electrical hazard which could result in death or
serious injury to pool users, installers or others due to electrical shock.
®
III - Nicheless Light Installation Guide
NOTE: If PVC conduit is being used, a #8 ground wire for U.L. or a #6 ground wire for CSA,
must be pulled through the conduit along with the light cord and fastened at the junction
box and at the grounding lug located on the light wall Mounting Bracket (the Upper left
bracket mounting bolt).
AquaLumin® III - Nicheless Light Installation Guide
Page 6

6
11
Section 1: Installing a mounting bracket and light fixture during new vinyl
pool construction (Continued)
8. Cut the cord at the junction box, leaving at least six (6) inches of cord to make
connections.
9. Strip 6 inches of the outer cord jacket to expose the three insulated wires. Be careful not
to damage the insulation on the three inner wires.
10. Connect cord to electrical wires at Junction Box, be careful to not pull the three (3) in. of
slack cord at the light through the conduit when connecting the wires. All wiring should be
connected to a Class A Ground Fault Circuit Interrupter (GFCI), in accordance with
electrical codes, see Section 1.A.1.a on page 3.
11. Connect all three wires to the corresponding circuit wires in the junction box and secure
the junction box cover in place.
WARNING: Never operate this Nicheless Light for more than 10 seconds unless
it is totally submerged in water. Without total submersion, the light assembly will get
extremely hot, which may result in serious burns or in breakage of the lamp or lens.
This may result in serious injury to pool users, installer, or bystanders, or in damage
to property.
WARNING: Use only the special stainless steel captive screw (see Light
Assembly Parts, item 4, on page 14) provided with this Nicheless Light. This screw
mounts and electrically grounds the housing securely to the Nicheless fixture. Failure
to use the screw provided could create an electrical hazard which could result in death
or serious injury to pool users, installers or others due to electrical shock.
Section 3: Replacing a lamp only (Continued)
WARNING: Be sure power is OFF before installing or removing lamp. Allow lamp to cool
before relamping. This light fixture uses a Halogen Quartz lamp. Do Not touch lamp with bare
hands, this may severely reduce its life. Use the plastic furnished with the replacement lamp to
eliminate finger prints from getting on lamp.
8. To remove the lamp:
a. Place the light in front of you so that the captive screw hole is at the top, and the lamp
is in a horizontal position.
b. Grasp the lamp on the right side.
c. Push the lamp to the left, compressing the spring in the spring loaded lamp socket,
until the right side of the lamp comes free from the fixed socket end.
9. Install the new lamp by performing step 8, a through c, in reverse order. NOTE: Select
proper lamp for either 12 volt or 120 volt applications. Take care not to touch the halogen
bulb with bare hands.
WARNING Always install a new lens gasket, part number 619599, whenever
reassembling the light. Failure to do so may permit water to leak into the assembly which
could cause; (a) an electrical hazard resulting in death or serious injury to pool users,
installer, or others due to electrical shock, or (b) breakage of the lamp or lens, which
likewise could result in serious injury to pool user, installers, or bystanders, or in damage
to property.
10. Never reuse the old lens gasket when reassembling the light. Replace the old lens gasket
with a new genuine Pentair Water Pool and Spa AquaLumin III lens gasket (P/N 619599),
provided in the Bulb Replacement Kit. The orientation of the tabs on the lens gasket is not
important.
Figure 4.
12. Before operating the light for more than 10 seconds, fill pool until the Nicheless Light is
completely submerged in water. To check for proper operation, turn on main switch or
circuit breaker, as well as the switch which operates the Nicheless Light.
C. Winterizing: Light should be left in place for winterization.
AquaLumin
®
III - Nicheless Light Installation Guide
11. Replace the eight (8) sealing screws left in the face ring with eight (8) new sealing screws
provided in the Bulb Replacement Kit. NOTE: Install the new sealing screws in the same
location as those removed, leaving "TOP" (12 o'clock) and "BOTTOM" (6 o'clock) open.
12. Reinstall the lens gasket, lens and plastic face ring. While replacing the lens, be sure the
tabs around the perimeter of the lens gasket are not under the flange of the lens. Orientate
the lens so that the word "TOP" is aligned with the captive screw hole. When reinstalling
the plastic face ring, align the heads of the sealing screws with the large circular holes of
the keyway slots. Press down on the plastic face ring and rotate in the clockwise direction
until the sealing screws interfere with the housing (at the end of the slot). Orientate the
plastic face ring so that the words "MADE IN USA" are aligned with the captive screw hole
on the housing as well as the word "TOP" on the lens.
AquaLumin® III - Nicheless Light Installation Guide
Page 7

10
7
Section 3: Replacing a lamp only
The following steps may be performed by a qualified pool serviceman or a homeowner.
NOTE: Use ONLY the Pentair Water Pool and Spa Bulb Replacement Kit when relamping (P/N 600139 12V/100W or P/N 600138-120V/250W). See relamping installation instructions provided with the light.
WARNING Never operate this Nicheless Light for more than 10 seconds unless it is
totally submerged in water. Without total submersion, the light assembly will get extremely hot,
which may result in serious burns or in breakage of the lamp or lens. This may result in serious
injury to pool users, installer, or bystanders, or in damage to property.
WARNING Use only the special stainless steel pilot screw (see Light Assembly
Parts, item 4, on page 14) provided with this Nicheless Light. This screw mounts and electri-
cally grounds the housing securely to the Nicheless fixture. Failure to use the screw provided
could create an electrical hazard which could result in death or serious injury to pool users,
installers or others due to electrical shock.
D A N G E R !
RISK OF ELECTRICAL SHOCK OR ELECTROCUTION
Always disconnect power to the pool light at the circuit breaker before servicing the
light. Failure to do so could result in death or serious injury to installer, serviceman,
pool users, or others due to electrical shock.
1. Turn off main electrical switch or circuit breaker as well as the switch which operates the
Nicheless Light.
2. Unscrew the captive screw on the top of the light, then tilt the top of the light out from the
wall and lift the bottom of the light out of the bracket. Unwind the excess cable that is
stored in the back of the light.
3. Place the light face down on the deck on a flat soft clean surface. Take care not to scratch
the lens.
4. Using a Phillips head screwdriver, loosen (do not remove) all ten 10 screws on the back of
the light.
5. Using a Phillips head screwdriver, remove the two (2) screws located at the TOP
(12 o'clock) and BOTTOM (6 o'clock) on the back of the light.
6. While holding the glass lens and plastic face ring, turn the light over. Rotate the face ring
in a counter-clockwise direction such that the heads of the sealing screws align with the
large circular holes of the keyways slots. Lift the plastic face ring away from the housing to
remove the lens and lens gasket.
7. To remove the lens and lens gasket, gently pull on the tabs located around the perimeter of
the lens gasket. This will allow air to enter the housing and will assist with removal of the
lens.
AquaLumin
®
III - Nicheless Light Installation Guide
Section 2: Replacing light fixture in existing pools
WARNING: Use only the special stainless steel captive screw (see Light
Assembly Parts, item 4, on page 14) provided with this Nicheless Light. This screw
mounts and electrically grounds the housing securely to the Nicheless fixture. Failure to
use the screw provided could create an electrical hazard which could result in death or
serious injury to pool users, installers or others due to electrical shock.
IMPORTANT NOTICE
This AquaLumin III light will install only with the following AquaLumin III Mounting
Brackets, manufactured after JUNE 6, 1994.
D A N G E R !
RISK OF ELECTRICAL SHOCK OR ELECTROCUTION
This Nicheless light fixture must be installed by a licensed or certified electrician or
a qualified pool serviceman in accordance with the National Electrical Code and all
applicable local codes and ordinances. Improper installation will create an electrical
hazard which could result in death or serious injury to pool users, installers or
others due to electrical shock and may also cause damage to property. Always
disconnect power to the pool light at the circuit breaker before servicing the light.
Failure to do so could result in death or serious injury to serviceman, pool users or
others due to electrical shock.
Description Part Number
AquaLumin III Vinyl Mounting Bracket Assembly 1" 78887800
AquaLumin III Vinyl Mounting Bracket Assembly 3/4" 78887700
A. The following are preparatory steps which must be completed by the electrician or
qualified pool serviceman before replacing light fixture, see Figure 5 on page 8.
1. Verify the pool meets the requirements of the current National Electrical Code and all local
codes and ordinances. A licensed or certified electrician must install the electrical system to
meet or exceed those requirements before the Nicheless Light is installed. Some of the
requirements of the National Electrical Code which the pool's electrical system must meet are
as follows:
a. The lighting circuit must have a Ground Fault Circuit Interrupter (GFCI), and an
appropriately rated circuit breaker.
AquaLumin® III - Nicheless Light Installation Guide
Page 8

8
OU
B
.
O
g
e
t
g
t
t
L
g
Y
g
o
g
r
o
9
Section 2: Replacing light fixture in existing pools (Continued)
b. The junction box, or the low voltage transformer for 12 volt models, is located at least
12 inches above water level and at least 48 inches from the edge of the pool, see
Figure 5.
c. The light fixture and all metal items within five (5) feet of the pool must be properly
electrically bonded.
d. The mounting bracket must be properly installed so that the top edge of the face ring
of the Nicheless Light is at least 18 inches below the surface of the water in the pool,
see Figure 5.
e. The mounting bracket and mounting hub must be properly electrically bonded and
grounded via the No. 8 AWG ground connector located at the rear of the Nicheless
fixture, see Figure 5.
2. Consult the local building department to be certain that the pool's electrical system meets
all applicable requirements.
3. Install this light fixture only in a Pentair Water Pool and Spa mounting bracket. Mounting
brackets made by other manufacturers may not provide proper bonding and grounding
connections.
TO GFCI, CIRCUIT
BREAKER AND
POWER SOURCE
RIGID CONDUIT
Figure 5
XISTING
TO E
BONDING
CONNECTOR
MOUNTING HUB
48"
MIN.
12" MIN. FROM BOTTOM
OF JUNCTION BOX
OR LOW VOLTAGE
TRANSFORMER TO WA
WATER
LEVEL
18" MIN. FROM WATER
TO TOP OF FACE RING
PILOT SCREW AT TOP
TOP OF FACE RING
SPONDS
CORRE
TO CENTER OF
NTING HU
M
RTANT:
IMP
DO NOT install the li
of the pool/spa surface, with
beam pointin
the li
with the li
upwar
ht in the side of the po
ht beam in the ho
TER LINE
ht in th
d. ONL
bottom
he li
INSTAL
l/spa wall,
izontal positi
Section 2: Replacing light fixture in existing pools (Continued)
B. Replacing light fixture after electrical system requirements are met
1. Turn off main electrical switch or circuit breaker, as well as the switch which operates the
Nicheless Light.
WARNING: Failure to bring the pool's electrical system up to code requirements
before installing this Nicheless Light will create an electrical hazard which could result
in death or serious injury to pool users, installers, or others due to electrical shock, and
may also cause damage to property.
2. To remove light assembly, remove captive screw at top of housing, remove light assembly
from mounting bracket, and place assembly on deck. Take care not to scratch the lens.
3. Remove junction box cover, disconnect the light fixture wires, and pull the cord through the
conduit.
4. Feed the new light fixture cord through the conduit from the Nicheless Fixture to the
junction box.
NOTE: Depending on the length of the conduit, special tools may be required to pull the
cord through the conduit.
5. Wrap a length of the cord up to a maximum of eight (8) feet long on the back of the light
assembly. Wind a minimum of three (3) wraps of cord so that the last wrap stops at the top
of the light. This extra cord allows you to bring the light out of the pool for installation of a
new lamp and for servicing.
NOTE: Leave 2" to 3" of slack cord at the top so that the light may be tipped back for
removal.
6. Feed the remaining cord through the conduit hole in the mounting hub. Place hook
mounting bracket over pin on the bottom of the mounting bracket and press down lightly to
secure into place. Secure at top of the light with the captive screw.
7. Cut the cord at the junction box, leaving at least six (6) inches of cord to make
connections.
8. Strip six (6) inches of the outer cord jacket from the cord to expose the three insulated
wires. Be careful not to damage the insulation on the three inner wires.
9. Connect cord to electrical wires at Junction Box, be sure not to pull the three (3) inches of
slack cord at the back of the light through the conduit when connecting the wires. All wiring
ht
n
should be connected to a Class A GFCI in accordance with electrical codes, see Section
2.A.1.a on page 7.
10. Connect all three wires to the corresponding circuit wires in the junction box and secure the
junction box cover in place.
11. Before operating the light for more than 10 seconds, fill pool until the Nicheless Light is
completely submerged in water. To check for proper operation, turn on main switch or
circuit breaker, as well as the switch which operates the Nicheless Light.
AquaLumin
®
III - Nicheless Light Installation Guide
AquaLumin® III - Nicheless Light Installation Guide
 Loading...