

Page 1

THERMAL PRINTER
TSP400 SERIES
USERS MANUAL
GUIDE D’UTILISATION
BEDIENUNGSANLEITUNG
MANUALE DI ISTRUZIONI
Page 2

Federal Communications Commission
Radio Frequency Interference
Statement
This equipment has been tested and found to comply with the limits for a Class A digital
device, pursuant to Part 15 of the FCC Rules. These limits are designed to provide
reasonable protection against harmful interference when the equipment is operated in a
commercial environment. This equipment generates, uses and can radiate radio frequency
energy and, if not installed and used in accordance with the instruction manual, may cause
harmful interference to radio communications. Operation of this equipment in a residential
area is likely to cause harmful interference in which case the user will be required to correct
the interference at his own expense.
For compliance with the Federal Noise Interference Standard, this equipment requires a
shielded cable.
This statement will be applied only for the printers marketed in U.S.A.
Statement of
The Canadian Department of Communications
Radio Interference Regulations
This digital apparatus does not exceed the Class A limits for radio noise emissions from
digital apparatus set out in the Radio Interference Regulations of the Canadian Department
of Communications.
Le présent appareil numérique n’émet pas de bruits radioélectriques dépassant les limites
applicables aux appareils numériques de la classe A prescrites dans le Règlement sur le
brouillage radioélectrique édicté par le ministère des Communications du Canada.
The above statement applies only to printers marketed in Canada.
CE
Manufacturer’s Declaration of Conformity
(EC Council Directive 89/336/EEC of 3 May 1989)
This product has been designed and manufactured in accordance with the International
Standards EN50081-1/01.92 and EN50082-1/01.92 following the provisions of the
Electro Magnetic Compatibility Directive of the European Communities as of May 1989.
NOTICE
• All rights reserved. Reproduction of any part of this manual in any form whatsoever,
without STAR’s express permission is forbidden.
• The contents of this manual are subject to change without notice.
• All efforts have been made to ensure the accuracy of the contents of this manual at the
time of going to press. However, should any errors be detected, STAR would greatly
appreciate being informed of them.
• The above notwithstanding, STAR can assume no responsibility for any errors in this
manual.
©
Copyright 1995 Star Micronics Co., LTD.
Page 3

TABLE OF CONTENTS
1. SETTING UP ........................................................................................1
1-1. Loading the Paper Roll ................................................................1
1-2. Adjusting the Head Position ........................................................3
2. CONTROL PANEL ..............................................................................4
3. COMMAND SUMMARY ....................................................................5
3-1. Page Mode....................................................................................6
3-2. Line Mode ....................................................................................8
APPENDIX ............................................................................................. 48
Page 4

– 1 –
ENGLISH
1. SETTING UP
■ First, remove the blue semi-transparent tape from all parts.
1-1. Loading the Paper Roll
Your printer accepts thermal roll paper 60mm ~ 82mm wide.
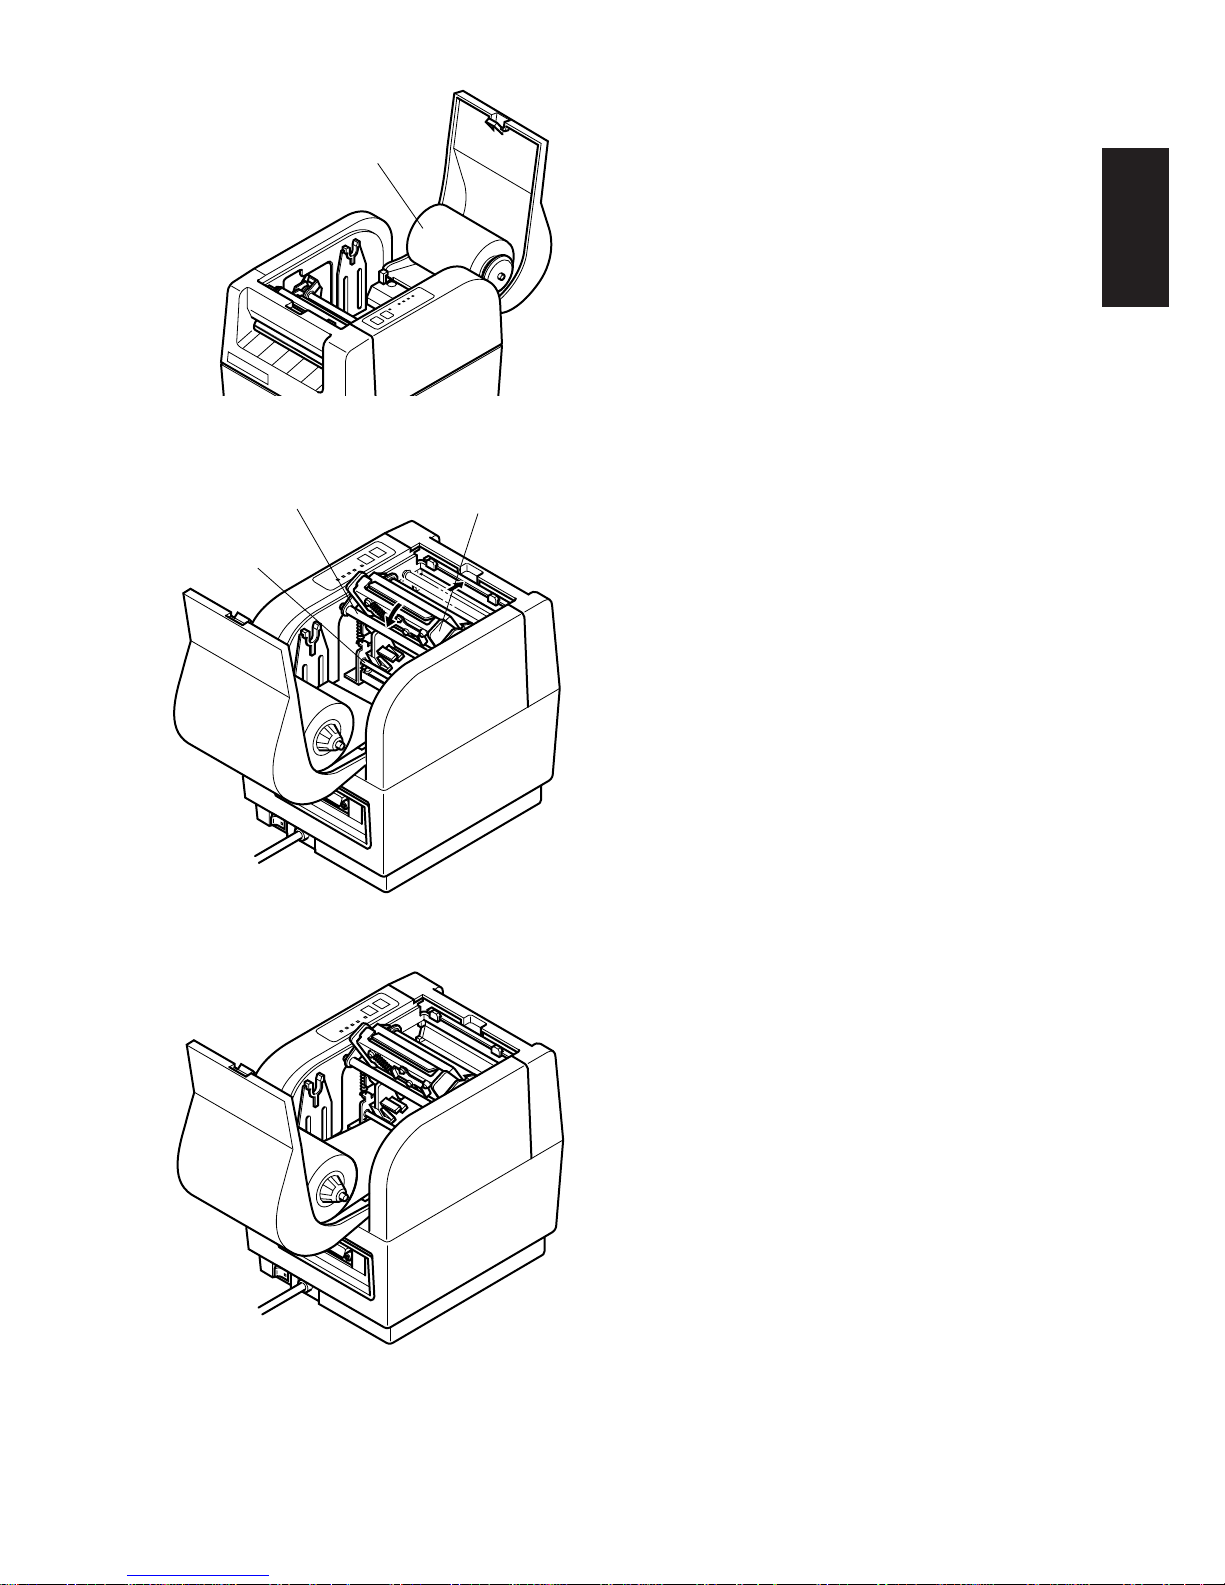
The procedure for loading a paper roll is as follows. The illustrations show the
TSP412 printer, however, the loading procedure for the TSP442 is the same.
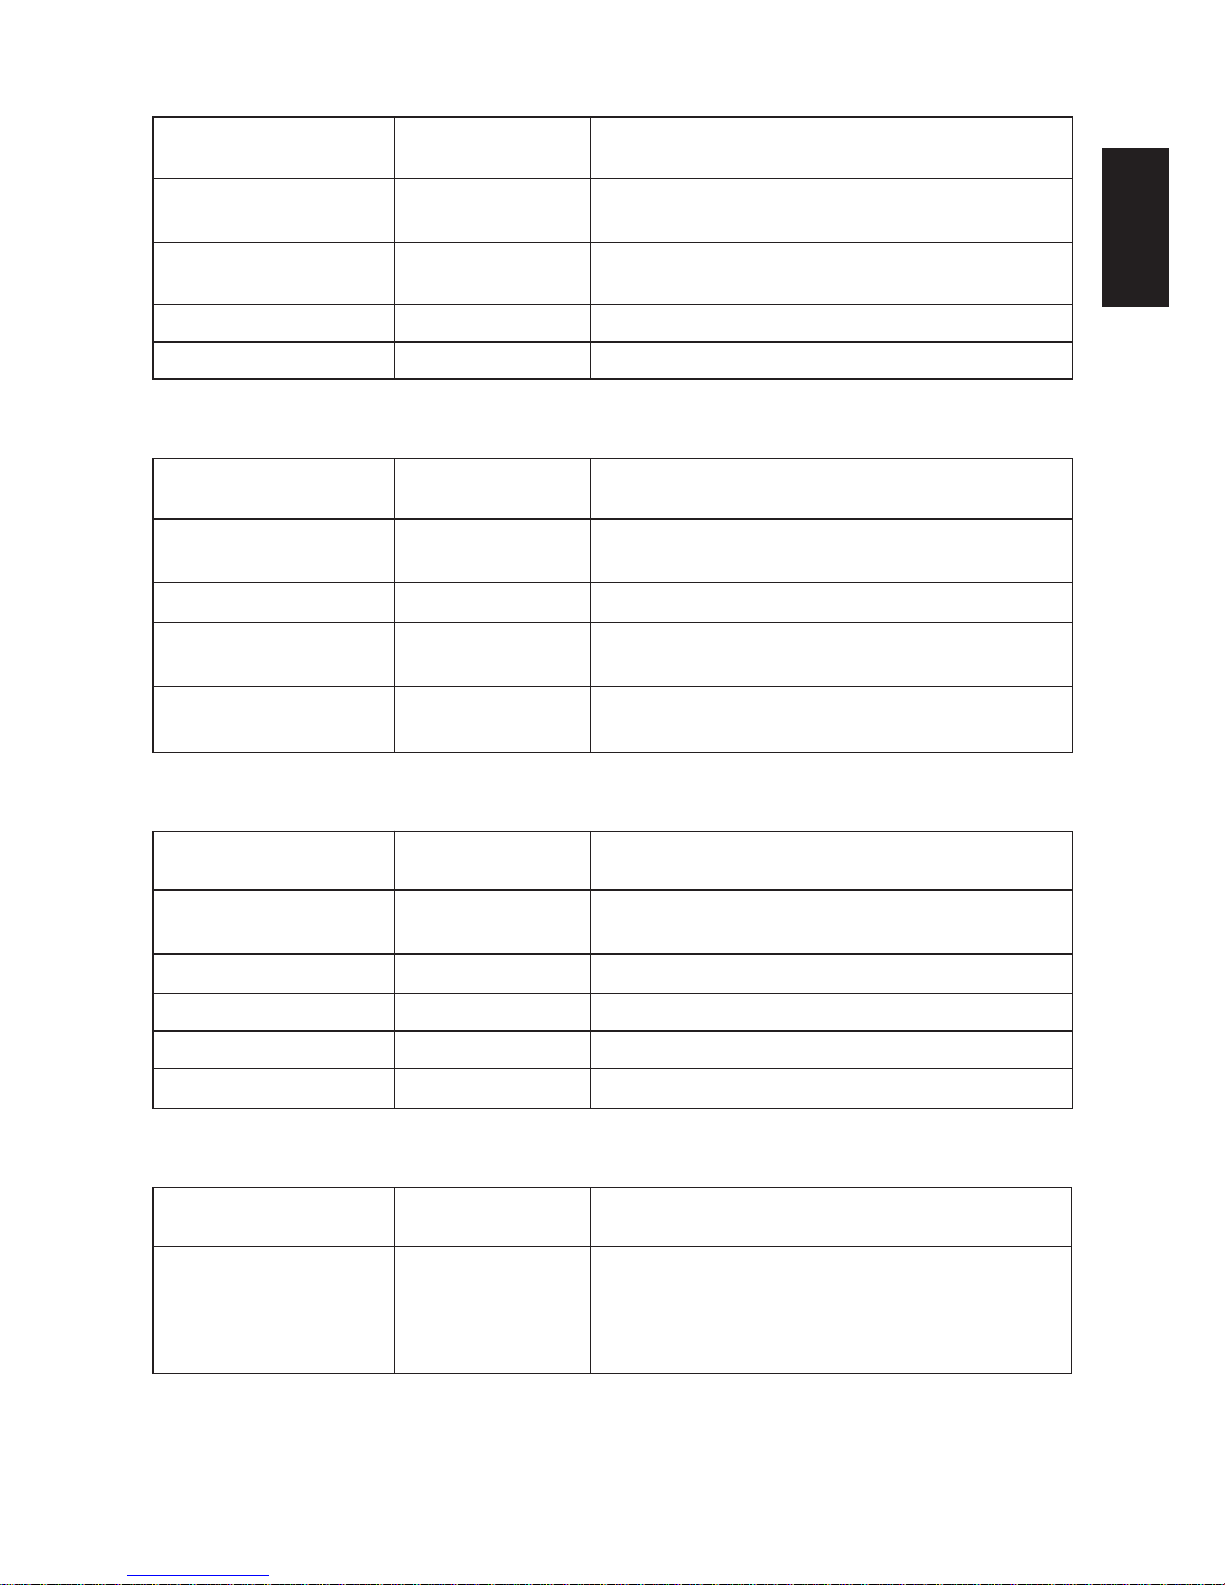
1 Switch off the printer’s power.
2 Open the printer cover.
3 Cut the top edge of the paper straight
across. If the paper end is secured to
the roll by a label or by tape, unroll
the paper one turn and cut away all
traces of adhesive. (Adhesive can
stick to the internal paper roller and
interfere with paper feeding.)
4 Insert the paper-roll shaft into the
paper roll.
Fig. 1-2
Fig. 1-3
Printer cover
Paper roll
Paper-roll shaft
Fig. 1-1
■ Before loading the first paper roll, be
sure to remove the cardboard and the
protective paper (under the tear bar)
that were inserted to protect the print
head during shipping.
Page 5
– 2 –
ENGLISH
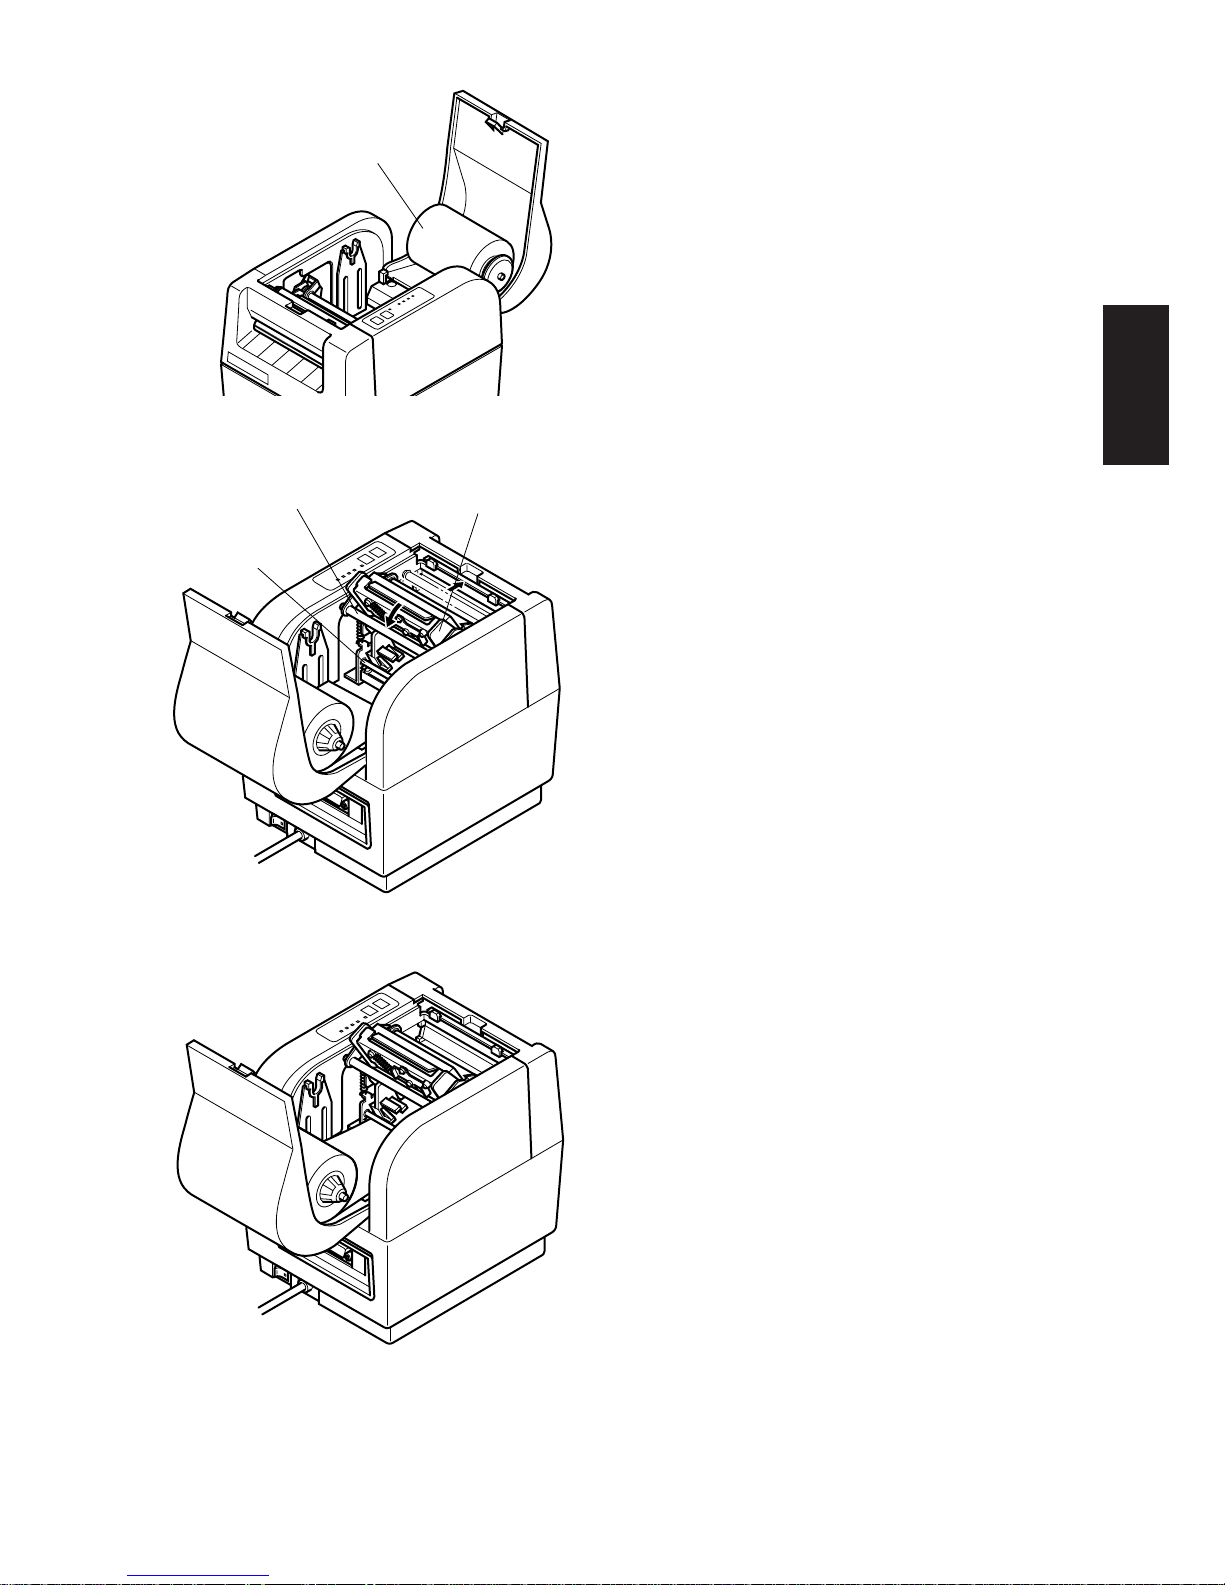
5 Temporarily place the paper roll on
the printer cover. Be sure that the
roll is correctly oriented for loading.
6 Pull on the green release bar so that
it unlocks, then tilt the print head
unit. Avoid touching the print head
with your fingers.
7 Insert the paper so that it passes
under the paper-guide roller shaft
and between the transmissive sensors.
8 Push the paper until the edge moves
all the way through to the tear bar.
Fig. 1-4
Fig. 1-5
Fig. 1-6
Paper roll
Release bar
Print head unit
Paper guide
roller shaft
Page 6
– 3 –
ENGLISH
Thick paper
Thin paper
0.6mm
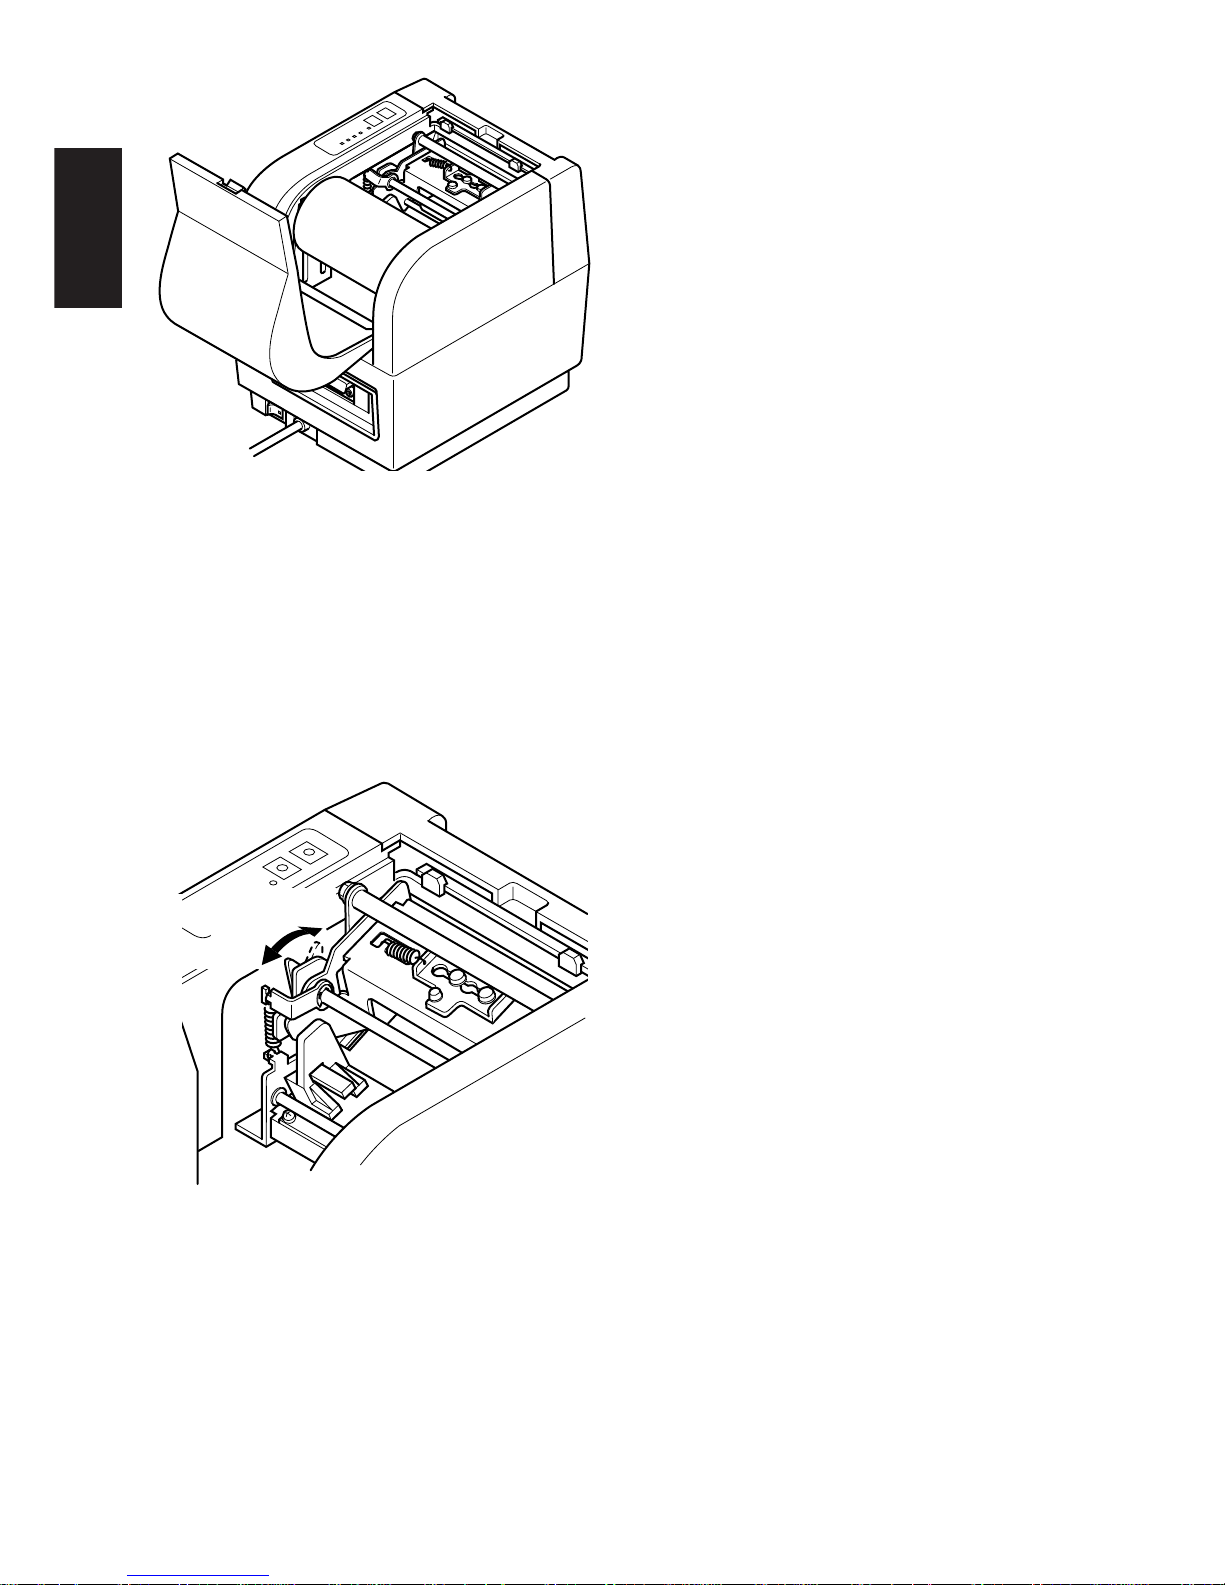
9 Return the print head unit to its
original position and be sure that it
locks into place. (The printer cover
will not close unless the print head
unit is locked.)
0 Move the paper roll onto the print-
er’s paper-roll holder.
A Hold the roll down and pull on the
leading edge of the paper to remove any slack.
B Close the printer cover.
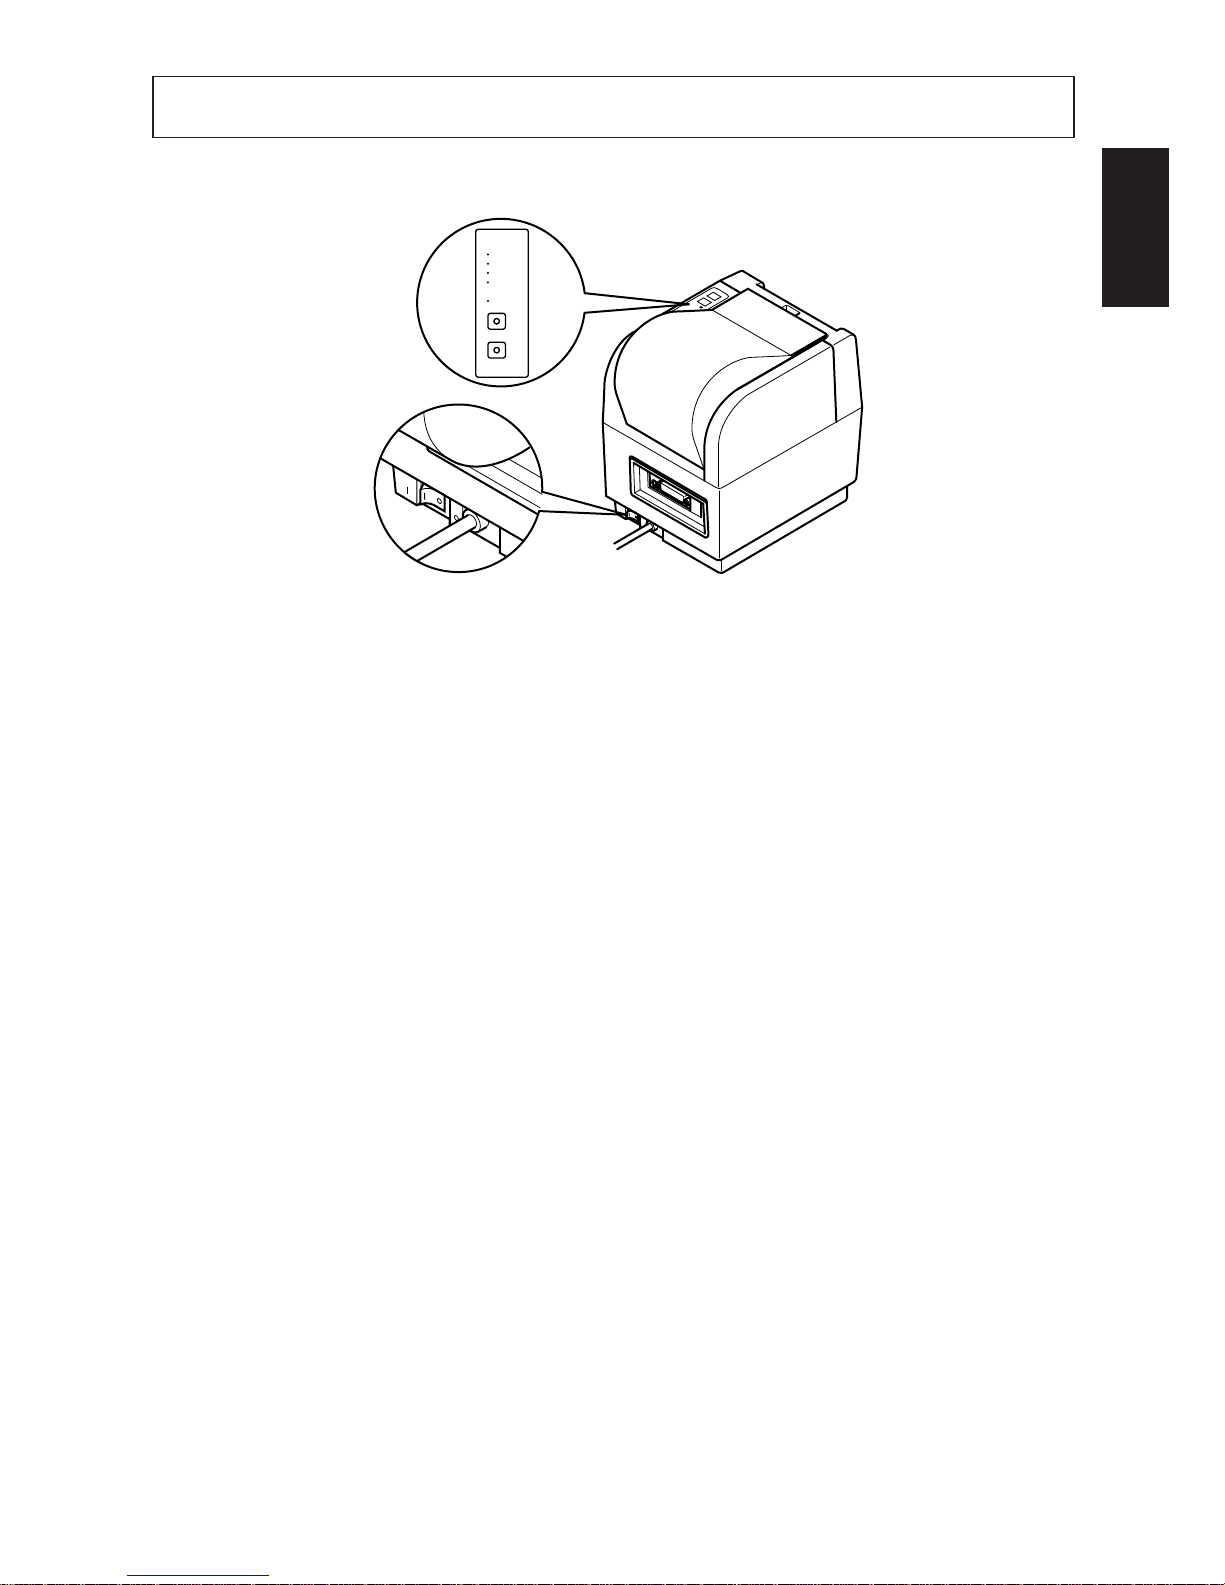
1-2. Adjusting the Head Position
Fig. 1-7
1 You can set the print head position
to accommodate thick or thin paper.
Change the position by moving the
left-side and right-side levers forward or back.
2 Be sure to unlock the print head
before moving the levers.
Fig. 1-8
Page 7
– 4 –
ENGLISH
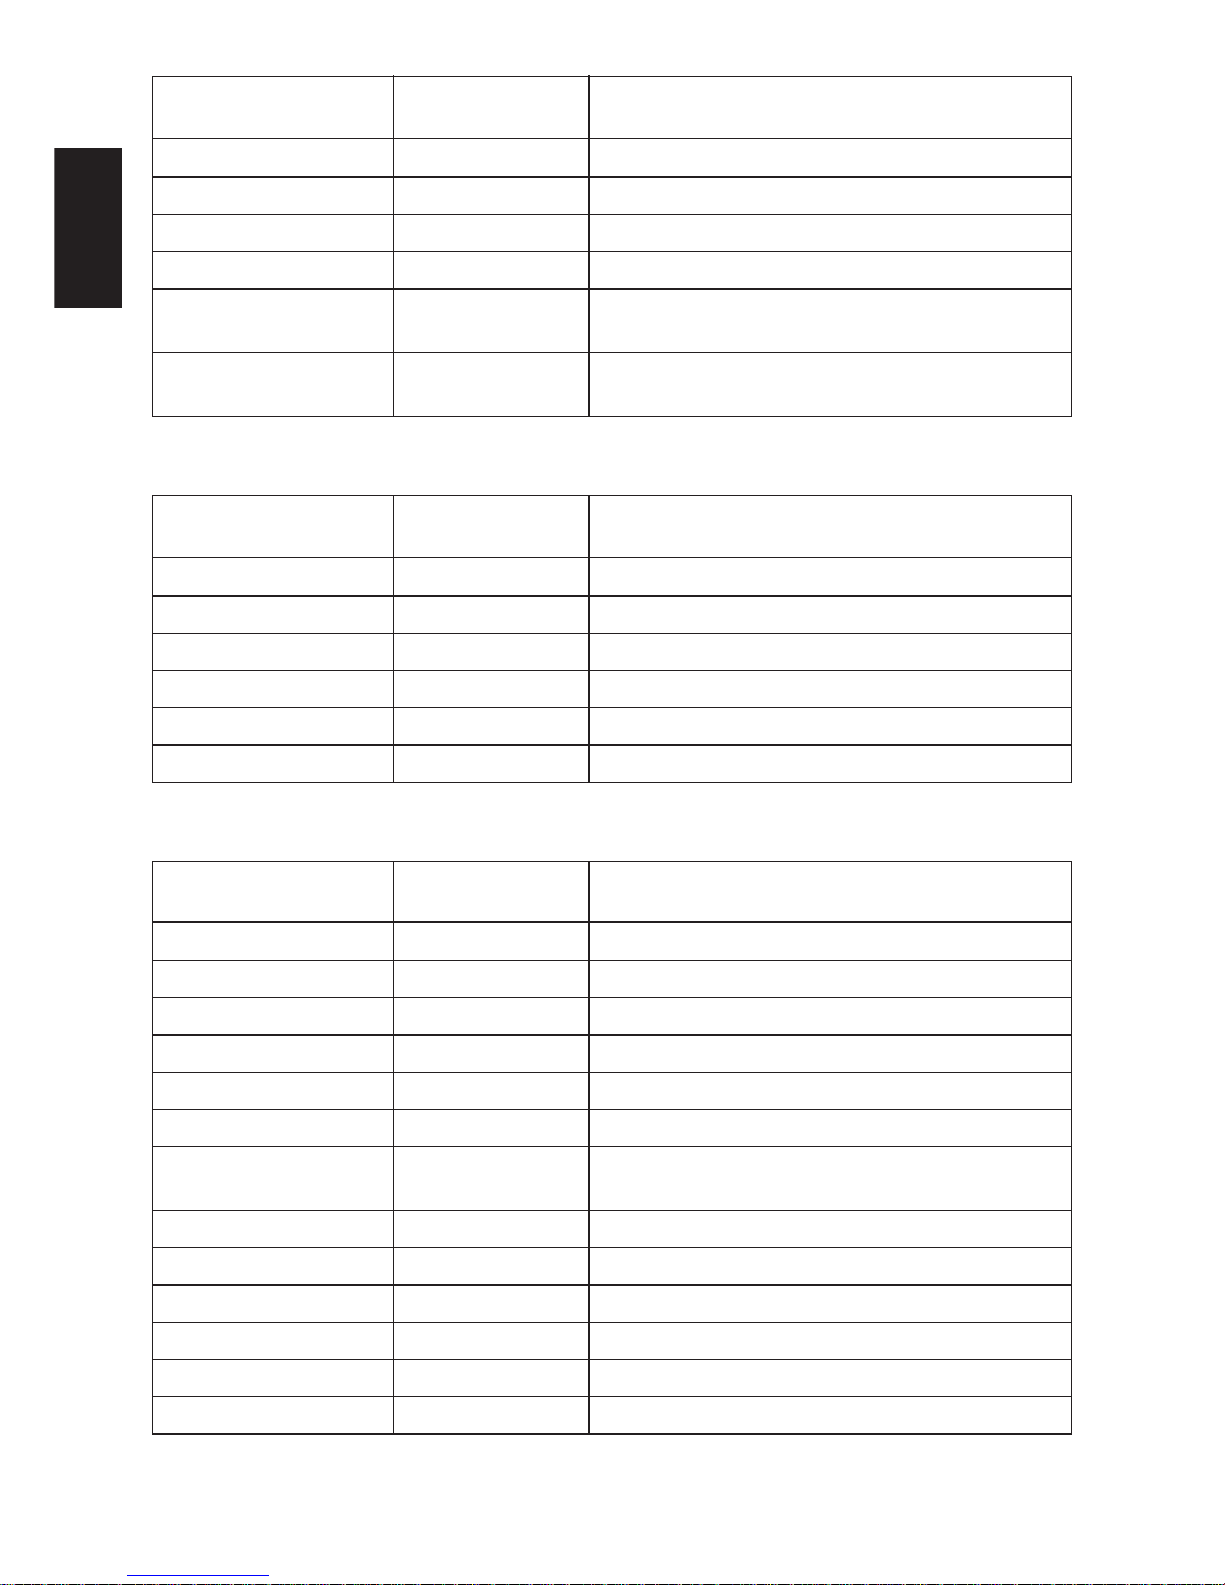
2. CONTROL PANEL
The buttons and indicators on the control panel operate as follows.
Fig. 2-1
ON LINE switch/indicator
Press the button to toggle the printer online or offline. The indicator lights up to
indicate that the printer is online. When the printer goes offline, it ceases printing
and becomes unable to receive data from the host.
NOTE: If the print head overheats during long continuous use, the printer
automatically stops printing and the ON LINE indicator begins to flash.
The printer will automatically resume printing when the print head cools
down.
FEED switch
This button generates continuous or full paper feed, depending on the setting of
Memory Switch. The FEED switch operates regardless of whether the printer is
online or offline. If Memory Switch is set to Start-position detect = OFF, hold the
FEED switch down to feed paper continuously. Paper feed stops when you release
the button. If Memory Switch is set to Start-position detect = ON, each press of
the FEED switch feeds the paper to the next top position.
POWER indicator
Lights up to indicate that the printer’s power is on.
HEAD UP indicator
Lights up to indicate that the print head unit is unlocked. Do not try printing while
this indicator is on. If this indicator comes on suddenly during printing, it is likely
that a paper jam has pushed the print head unit out of position.
ON
OFF
POWER
HEAD UP
NO PAPER
ERROR
ON LINE
FEED
Page 8

– 5 –
ENGLISH
The printer has two different software modes which can be selected using the
memory switch. In order to enable changed memory switch settings, turn the
printer OFF and ON again or send printer reset command (<ESC>“?”) to the
printer.
(Factory setting: Page Mode)
Page Mode:
Code <ESC> “#0,0000” <LF> <NUL>
Hex 1B 23 30 2C 30 30 30 30 0A 00
Ideal for bar code label, graphics and text data printing.
Can locate and rotate bar code and text. Accepts a non-compressed BMP file so
that the printer can import and print a BMP file which is scanned or edited in
Windows applications.
The printer has the following control commands. Each control code starts with
<ESC> code and ends with <LF> <NUL> codes, except for the Request status
command <ENQ> and the Call Download Character command <ESC> “G”.
Line Mode:
Code <ESC> “#0,0001” <LF> <NUL>
Hex 1B 23 30 2C 30 30 30 31 0A 00
This mode is compatible with Star Receipt printers, such as the SP300 and SP200
series.
For improvement purposes, the descriptions and specifications in this manual are
subject to change without notice.
3. COMMAND SUMMARY
Page 9

– 6 –
ENGLISH
3-1. Page Mode
Format Definition
Hexadecimal codes
1B 43 0A 00
1B 44 n1n2n3n4 0A
00
1B 4C n1n2 3B x1x2x3x4
2C y1y2y3y4 2C x5x6x7x8
2C y5y6y7y8 2C d 2C w 0A
00
1B 45 n1n2 0A 00
1B 50 43 n1n2 3B x1x2x3x4
2C y1y2y3y4 2C w 2C h 2C
c 2C r1r2 2C d1d2 0A 00
1B 50 42 n1n2 3B x1x2x3x4
2C y1y2y3y4 2C w 2C b 2C
m 2C h1h2h3h4 0A 00
1B 59 d1d2 0A 00
Control codes
<ESC> “C”<LF> <NUL>
<ESC> “D n1n2n3n4” <LF>
<NUL>
<ESC> “L n1n2 ; x1x2x3x4
, y1y2y3y4, x5x6x7x8
, y5y6y7y8, d, w” <LF>
<NUL>
<ESC> “E n1n2” <LF>: <NUL>
<ESC> “PC n1n2 ; x1x2x3x4
, y1y2y3y4, w, h,
c, r1r2, d1d2” <LF> <NUL>
<ESC> “PB n1n2 ; x1x2x3x4
, y1y2y3y4, w, b,
m, h1h2h3h4” <LF> <NUL>
<ESC> “Y d1d2” <LF> <NUL>
Function
Clear format
Define print area
Define ruled line format
Cancel ruled line format
Define character string format
Define bar code format
Define character pitch
Hexadecimal codes
1B 52 43 n1n2 3B a1a2.…an
0A 00
1B 52 42 n1n2 3B a1a2.…an
0A 00
1B 51 3B x1x2x3x4 2C
y1y2y3y4 2C|1|2|3|4 2C
w1w2w3 2C n11n12n13
n.…n1k <LF>.…nm1nm2
.…nmk” 0A 00
1B 48 m x1x2x3x4 2C
y1y2y3y4 2C (BMP file data)
2C 0A 00
1B 47 n1n2 2C n3n4 1B 30
1B 58 0A 00
Control codes
<ESC> “RC n1n2 ; a1.....an”
<LF> <NUL>
<ESC> “RB n1n2 ; a1.....an”
<LF> <NUL>
<ESC> “Q ; x1x2x3x4,
y1y2y3y4, |1|2|3|4,
w1w2w3, n11n12n13
n.…n1k <LF>.…nm1nm2
.…nmk” <LF> <NUL>
<ESC> “H m x1x2x3x4,
y1y2y3y4, (BMP file data)
,” <LF> <NUL>
<ESC> “G n1n2, n3n4” <ESC>
“0”
<ESC> “X” <LF> <NUL>
Function
Set character string data
Set bar code data
Store dot graphic data into image
memory
Copy BMP file to printer
Call download character
Clear image data
Print Data Settings
Page 10

– 7 –
ENGLISH
Other commands
Hexadecimal codes
1B 49 0A 00
1B 54 d n1n2 0A 00
1B 42 d n1n2 0A
00
1B 23 N 2C n1n2n3n4 0A
00
1B 3F 0A 00
05
1B 4E n1n2 0A 00
1B 46 n1n2 3B d1.…d48
0A 00
1B 5A n 0A 00
Function
Print Label
Set Feed Length after Printing
Enable cutter
Set Memory Switch
Reset printer
Request status
Select international character set
Register download character
Select “zero”style
Control codes
<ESC> “I” <LF> <NUL>
<ESC> “T d n1n2” <LF> <NUL>
<ESC> “B d n1n2” <LF>
<NUL>
<ESC> “# N, n1n2n3n4” <LF>
<NUL>
<ESC> “?” <LF> <NUL>
<ENQ>
<ESC> “N n1n2” <LF> <NUL>
<ESC> “F n1n2 ; d1.....d48”
<LF> <NUL>
<ESC> “Z n” <LF> <NUL>
Page 11

– 8 –
ENGLISH
3-2. Line Mode
Commands to Select Characters
Control codes
Hexadecimal
Function
codes
<ESC> “R” n 1B 52 n Select international character set
<ESC> “/” “1” 1B 2F 31
Select slash zero
<ESC> “/” <1> 1B 2F 01
<ESC> “/” “0” 1B 2F 30
Select normal zero
<ESC> “/” <0> 1B 2F 00
<ESC> “b” n1 n2 n3 n4 1B 62 n1 n2 n3 n4 Select bar code printing
d1 ... <RS> d1 ... 1E
<ESC> “M” 1B 4D Select 12-dot pitch printing
<ESC> “p” 1B 70 Select 14-dot pitch printing
<ESC> “P” 1B 50 Select 15-dot pitch printing
<ESC> “:” 1B 3A Select 16-dot pitch printing
<ESC> <SP> n 1B 20 n Set character spacing
<SO> 0E Sets the printing magnified double in
character width.
<DC4> 14 Resets the printing magnified in
character width.
<ESC> “W” n 1B 57 n
Sets the magnification rate in character width.
<ESC> <SO> 1B 0E Sets the printing magnified double in
character height.
<ESC> <DC4> 1B 14 Resets the printing magnified in character
height.
<ESC> “h” n 1B 68 n
Sets the magnification rate in character height
.
<ESC> “i” n1 n2 1B 69 n1 n2 Sets the magnification rates in character
width and height.
<ESC> “–” “1” 1B 2D 31
Select underlining
<ESC> “–” <1> 1B 2D 01
<ESC>“–” “0” 1B 2D 30
Cancel underlining
<ESC> “–” <0> 1B 2D 00
<ESC> “_” “1” 1B 5F 31
Select overlining
<ESC> “_” <1> 1B 5F 01
<ESC> “_” “0” 1B 5F 30
Cancel overlining
<ESC> “_” <0> 1B 5F 00
Page 12
– 9 –
ENGLISH
Control codes
Hexadecimal
Function
codes
<ESC> “4” 1B 34 Select highlight printing
<ESC> “5” 1B 35 Cancel highlight printing
<SI> 0F Inverted printing
<DC2> 12 Cancel inverted printing
<ESC> “E” 1B 45
Select emphasized printing
<ESC> “G” 1B 47
<ESC> “F” 1B 46
Cancel emphasized printing
<ESC> “H” 1B 48
Commands to Set the Page Format
Control codes
Hexadecimal
Function
codes
<ESC> “C” n 1B 43 n Set page length in lines
<ESC> “C” <0> n 1B 43 00 n Set page length in inches
<ESC> “N” n 1B 4E n Set bottom margin
<ESC> “O” 1B 4F Cancel bottom margin
<ESC> “l” n 1B 6C n Set left margin
<ESC> “Q” n 1B 51 n Set right margin
Commands to Move the Print Position
Control codes
Hexadecimal
Function
codes
<LF> 0A Line feed
<CR> 0D Carriage Return
<ESC> “a” n 1B 61 n Feed paper n lines
<FF> 0C Form feed
<HT> 09 Horizontal tab
<VT> 0B Vertical tab
<ESC> “z” “1” 1B 7A 31
Set line spacing to 4 mm
<ESC> “z” <1> 1B 7A 01
<ESC> “0” 1B 30 Set line spacing to 3 mm
<ESC> “J” n 1B 4A n One time n/4 mm feed
<ESC> “j” n 1B 6A n One time n/4 mm backfeed
<ESC> “I” n 1B 49 n One time n/8 mm feed
<ESC> “B” n1 n2 ... <0> 1B 42 n1 n2 ... 00 Set vertical tab stops
<ESC> “D” n1 n2 ... <0> 1B 44 n1 n2 ... 00 Set horizontal tab stops
Page 13
– 10 –
ENGLISH
Commands to Print Dot Graphics
Control codes
Hexadecimal
Function
codes
<ESC> “K” n <0> 1B 4B n 00 m1 m2 Print normal density graphics
m1 m2 ... ...
<ESC> “L” n1 n2 1B 4C n1 n2 m1 m2 Print high density graphics
m1 m2 ... ...
<ESC> “k” n <0> d1 ... 1B 6B n 00 d1 ... Print fine density graphics
<ESC> “X” n1 n2 m1 ... 1B 58 n1 n2 m1 ... Print fine density graphics
Commands to Print Download Characters
Control codes
Hexadecimal
Function
codes
<ESC> “&” <1> <1> 1B 26 01 01 n Define download character
n m1 m2 ... m48 m1 m2 ... m48
<ESC> “&” <1> <0> n 1B 26 01 00 n Delete a download character
<ESC> “%” “1” 1B 25 31
Enable download character set
<ESC> “%” <1> 1B 25 01
<ESC> “%” “0” 1B 25 30
Disable download character set
<ESC> “%” <0> 1B 25 00
Commands to Control Peripheral Devices
Control codes
Hexadecimal
Function
codes
<ESC> <BEL> n1 n2 1B 07 n1 n2 Define drive pulse width for peripheral
device #1
<BEL> 07 Control peripheral device #1
<FS> 1C Control peripheral device #1 immediately
<EM> 19 Control peripheral device #2 immediately
<SUB> 1A Control peripheral device #2 immediately
Commands to Control Auto Cutter
Control codes
Hexadecimal
Function
codes
<ESC> “d” “0” 1B 64 30
<ESC> “d” <0> 1B 64 00
Full-cut command to the auto cutter
<ESC> “d” “1” 1B 64 31
<ESC> “d” <1> 1B 64 01
Page 14

– 11 –
ENGLISH
Other Commands
Control codes
Hexadecimal
Function
codes
<CAN> 18 Cancel last line & Initialize printer
<DC3> 13 Deselect printer
<DC1> 11
Set select mode
<DC1> n 11 n
<RS> 1E Beep the buzzer
<ESC> “#N, n1 n2 n3 n4”
1B 23 N 2C n1 n2 n3 n4
Set memory switch
<LF> <NUL> 0A 00
<ESC> “@” 1B 40 Initialize printer
<ENQ> 05 Enquiry
<STX> 02 Enter STX-ETX mode
<ETX> 03 Terminate STX-ETX mode
<ESC> “?” <LF> <NUL> 1B 3F 0A 00 Reset printer hardware
Page 15

TABLE DES MATIERES
1. INSTALLATION ................................................................................13
1-1. Chargement du rouleau de papier ..............................................13
1-2. Réglage de la position de la tête.................................................15
2. TABLEAU DE COMMANDE ...........................................................16
3. RESUME DES COMMANDES .........................................................17
3-1. Mode Page..................................................................................18
3-2. Mode Ligne ................................................................................20
APPENDICE ...........................................................................................48
L’appendice n’est pas traduit.
Page 16

– 13 –
FRANÇAIS
1. INSTALLATION
■ Commencer par enlever la bande bleue semi-transparente de toutes les pièces.
■ Avant de charger le premier rouleau
de papier, veiller à enlever le carton
ainsi que le papier de protection (sous
la barre de découpe) qui ont été insérés en vue de protection de la tête
d’impression lors de l’expédition.
Fig. 1-1
Fig. 1-2
Printer cover
Paper roll
Paper-roll shaft
Fig. 1-3
1-1. Chargement du rouleau de papier
L’imprimante accepte un rouleau de papier thermosensible d’une largeur de
60 mm ~ 82 mm.
La procédure de chargement d’un rouleau de papier est décrite ci-dessous. Les
illustrations décrivent l’imprimante TSP412, mais il faut préciser que la procédure de chargement de l’imprimante TSP442 est identique.
1 Eteindre l’alimentation de l’impri-
mante
2 Ouvrir le couvercle de l’imprimante
3 Couper le bord supérieur du papier
d’un bout à l’autre. Si l’extrémité du
papier est immobilisée au rouleau
par une étiquette ou par une bande,
dérouler le papier d’un tour, puis le
couper pour enlever toute trace d’adhésif. (Il est possible que l’adhésif
colle au rouleau de papier interne et
donc qu’il entrave l’avance du papier).
4 Insérer l’arbre du rouleau de papier
dans le rouleau de papier.
Couvercle
d’imprimante
Rouleau de papier
Arbre de rouleau de papier
Page 17
– 14 –
FRANÇAIS
5 Mettre le rouleau de papier sur le
couvercle de l’imprimante à titre
temporaire. S’assurer que le rouleau est orienté correctement en vue
de chargement.
6 Tirer la barre de déclenchement verte
de manière qu’elle se débloque, puis
incliner la tête d’impression. Eviter
de toucher des doigts la tête d’impression.
7 Insérer le papier de manière qu’il
passe sous l’arbre du rouleau du
guide-papier et entre les détecteurs
de transmission.
8 Pousser le papier jusqu’à ce que le
bord parvienne entièrement à la barre
de découpe.
Fig. 1-4
Fig. 1-5
Fig. 1-6
Paper roll
Release bar
Print head unit
Paper guide
roller shaft
Rouleau de papier
Arbre de rouleau
de guide-papier
Tête d’impression
Barre de déclenchement
Page 18

– 15 –
FRANÇAIS
Papier mince
0.6mm
Papier épais,
9 Faire retourner la tête d’impression
en position d’origine et s’assurer
qu’elle se bloque en place. (Le couvercle d’imprimante ne fermera pas
tant que la tête d’impression n’est
pas bloquée).
0 Mettre le rouleau de papier sur le
porte-rouleau de papier de l’imprimante.
A Maintenir le rouleau abaissé et tirer
le bord d’avance du papier afin d’éliminer tout jeu éventuel.
B Fermer le couvercle de l’impri-
mante.
Fig. 1-7
1-2. Réglage de la position de la tête
1 Il est possible de régler la position
de la tête d’imprimante en vue d’acceptation de papier mince ou épais.
Changer la position en faisant avancer ou reculer les leviers droit et
gauche.
2 Veiller à débloquer la tête d’impres-
sion avant de déplacer les leviers.
Fig. 1-8
Page 19

– 16 –
FRANÇAIS
2. TABLEAU DE COMMANDE
Les touches et témoins du tableau de commande fonctionnent de la manière
suivante:
Fig. 2-1
Commutateur/Témoin ON LINE (EN LIGNE)
Appuyer sur la touche pour faire passer l’imprimante du mode en ligne au mode
hors ligne. Le témoin s’allume pour indiquer que l’imprimante est en ligne.
Lorsque l’imprimante passe en mode hors ligne, elle s’arrête d’imprimer et elle
ne peut plus recevoir de données de l’ordinateur.
REMARQUE:En cas d’échauffement de la tête d’impression lors d’une utilisa-
tion longue et continue, l’imprimante s’arrête d’imprimer automatiquement et le témoin ON LINE commence à clignoter.
L’imprimante commence à imprimer automatiquement dès que
la tête d’impression refroidit.
Commutateur FEED (AVANCE)
Cette touche fait avancer le papier en continu ou complètement, suivant le réglage
du commutateur de mémoire. Le commutateur FEED intervient que l’imprimante
soit en ligne ou hors ligne. Si le commutateur de mémoire est réglé en position
de démarrage Détection = DESACTIVEE, maintenir le commutateur FEED
enfoncé pour faire avancer le papier de manière continue. L’avance de papier
cesse dès qu’on relâche la touche. Si le commutateur de mémoire est réglé en
position de démarrage Détection = ACTIVEE, le papier avance à la position
supérieure suivante chaque fois qu’on appuie sur le commutateur FEED.
Témoin POWER (ALIMENTATION)
Il s’allume pour indiquer que l’alimentation est reliée à l’imprimante.
Témoin HEAD UP (TETE VERS LE HAUT)
Il s’allume pour indiquer que la tête d’impression est débloquée. Ne pas essayer
d’imprimer lorsque ce témoin est allumé. Si ce témoin s’allume tout d’un coup
pendant l’impression, il est probable que la tête d’impression n’est plus en
position correcte du fait qu’elle a été poussée par le papier coincé.
ON
OFF
POWER
HEAD UP
NO PAPER
ERROR
ON LINE
FEED
Page 20

– 17 –
FRANÇAIS
L’imprimante a deux modes de logiciel différents et il est possible de les
sélectionner en utilisant le commutateur de mémoire. Pour valider des changements du commutateur de mémoire, éteindre puis rallumer l’imprimante ou
transmettre une commande de réinitialisation (<ESC>”?”) à l’imprimante.
(Réglage en usine: Mode Page)
Mode Page:
Code <ESC> “#0,0000” <LF> <NUL>
Hex 1B 23 30 2C 30 30 30 30 0A 00
Idéal pour impression d’étiquette de code à barres, graphiques et données de
texte.
En mesure de repérer et d’orienter le code à barres et le texte. Accepte un fichier
BMP non comprimé, ce qui permet à l’imprimante d’importer et d’imprimer un
fichier BMP qui est balayé ou édité dans des applications Windows.
L’imprimante dispose des commandes de contrôle indiquées ci-dessous. Chaque
code de contrôle commence par le code <ESC> et se termine par les codes <LF>
<NUL>, à l’exception de la commande de Demande d’état <ENQ> et de la
commande d’appel de téléchargement de caractère <ESC> “G”.
Mode Ligne:
Code <ESC> “#0,0001” <LF> <NUL>
Hex 1B 23 30 2C 30 30 30 31 0A 00
Ce mode est compatible avec les imprimantes de réception Star, par exemple
imprimantes des séries SP300 et SP200.
Les descriptions et spécifications de ce manuel peuvent être modifiées sans
préavis en vue d’améliorations.
3. RESUME DES COMMANDES
Page 21

– 18 –
FRANÇAIS
Codes hexadécimaux
1B 43 0A 00
1B 44 n1n2n3n4 0A
00
1B 4C n1n2 3B x1x2x3x4
2C y1y2y3y4 2C x5x6x7x8
2C y5y6y7y8 2C d 2C w 0A
00
1B 45 n1n2 0A 00
1B 50 43 n1n2 3B x1x2x3x4
2C y1y2y3y4 2C w 2C h 2C
c 2C r1r2 2C d1d2 0A 00
1B 50 42 n1n2 3B x1x2x3x4
2C y1y2y3y4 2C w 2C b 2C
m 2C h1h2h3h4 0A 00
1B 59 d1d2 0A 00
Codes de contrôle
<ESC> “C”<LF> <NUL>
<ESC> “D n1n2n3n4” <LF>
<NUL>
<ESC> “L n1n2 ; x1x2x3x4
, y1y2y3y4, x5x6x7x8
, y5y6y7y8, d, w” <LF>
<NUL>
<ESC> “E n1n2” <LF>: <NUL>
<ESC> “PC n1n2 ; x1x2x3x4
, y1y2y3y4, w, h,
c, r1r2, d1d2” <LF> <NUL>
<ESC> “PB n1n2 ; x1x2x3x4
, y1y2y3y4, w, b,
m, h1h2h3h4” <LF> <NUL>
<ESC> “Y d1d2” <LF> <NUL>
Fonction
Elimination du format
Définition de la zone d’impression
Définition de format traçage de ligne
Annulation du format traçage de ligne
Définition du format chaîne de caractères
Définition du format code à barres
Définition du pas de caractère
Codes hexadécimaux
1B 52 43 n1n2 3B a1a2.…an
0A 00
1B 52 42 n1n2 3B a1a2.…an
0A 00
1B 51 3B x1x2x3x4 2C
y1y2y3y4 2C|1|2|3|4 2C
w1w2w3 2C n11n12n13
n.…n1k <LF>.…nm1nm2
.…nmk” 0A 00
1B 48 m x1x2x3x4 2C
y1y2y3y4 2C (BMP file data)
2C 0A 00
1B 47 n1n2 2C n3n4 1B 30
1B 58 0A 00
Codes de contrôle
<ESC> “RC n1n2 ; a1.....an”
<LF> <NUL>
<ESC> “RB n1n2 ; a1.....an”
<LF> <NUL>
<ESC> “Q ; x1x2x3x4,
y1y2y3y4, |1|2|3|4,
w1w2w3, n11n12n13
n.…n1k <LF>.…nm1nm2
.…nmk” <LF> <NUL>
<ESC> “H m x1x2x3x4,
y1y2y3y4, (BMP file data)
,” <LF> <NUL>
<ESC> “G n1n2, n3n4” <ESC>
“0”
<ESC> “X” <LF> <NUL>
Fonction
Réglage des données de chaîne de caractè-
res
Réglage des données de code à barres
Mise des données graphiques à points dans
la mémoire de l’image
Copie du fichier BMP dans l’imprimante
Appel de téléchargement de caractère
Elimination des données d’image
3-1. Mode Page
Définition du format
Réglage des données d’impression
Page 22

– 19 –
FRANÇAIS
Autres commandes
Codes hexadécimaux
1B 49 0A 00
1B 54 d n1n2 0A 00
1B 42 d n1n2 0A
00
1B 23 N 2C n1n2n3n4 0A
00
1B 3F 0A 00
05
1B 4E n1n2 0A 00
1B 46 n1n2 3B d1.…d48
0A 00
1B 5A n 0A 00
Fonction
Impression d’étiquette
Réglage de la longueur d’avance
après l’impression
Validation du couteau
Réglage du commutateur de mémoire
Réinitialisation de l’imprimante
Demande d’état
Sélection du jeu de caractères inter-
nationaux
Enregistrement de téléchargement
de caractère
Sélection du style de “zéro”
Codes de contrôle
<ESC> “I” <LF> <NUL>
<ESC> “T d n1n2” <LF> <NUL>
<ESC> “B d n1n2” <LF>
<NUL>
<ESC> “# N, n1n2n3n4” <LF>
<NUL>
<ESC> “?” <LF> <NUL>
<ENQ>
<ESC> “N n1n2” <LF> <NUL>
<ESC> “F n1n2 ; d1.....d48”
<LF> <NUL>
<ESC> “Z n” <LF> <NUL>
Page 23

– 20 –
FRANÇAIS
3-2. Mode Ligne
Commandes de sélection de caractères
Codes de contrôle
Codes
Fonction
hexadécimaux
<ESC> “R” n 1B 52 n Sélection du jeu de caractères internationaux
<ESC> “/” “1” 1B 2F 31
Sélection du zéro barré
<ESC> “/” <1> 1B 2F 01
<ESC> “/” “0” 1B 2F 30
Sélection du zéro normal
<ESC> “/” <0> 1B 2F 00
<ESC> “b” n1 n2 n3 n4 1B 62 n1 n2 n3 n4
Sélection d’impression de code à barres
d1 ... <RS> d1 ... 1E
<ESC> “M” 1B 4D Sélection d’impression de pas 12 points
<ESC> “p” 1B 70 Sélection d’impression de pas 14 points
<ESC> “P” 1B 50 Sélection d’impression de pas 15 points
<ESC> “:” 1B 3A Sélection d’impression de pas 16 points
<ESC> <SP> n 1B 20 n Réglage d’espacement de caractère
<SO> 0E Réglage d’impression d’agrandissement
double de largeur de caractère
<DC4> 14 Nouveau réglage d’impression d’agrandissement
de largeur de caractère
<ESC> “W” n 1B 57 n Réglage d’agrandissement de largeur de caractère
<ESC> <SO> 1B 0E Réglage d’impression d’agrandissement
double de hauteur de caractère
<ESC> <DC4> 1B 14 Nouveau réglage d’impression d’agrandissement
de hauteur de caractère
<ESC> “h” n 1B 68 n Réglage d’agrandissement de hauteur de caractère
<ESC> “i” n1 n2 1B 69 n1 n2 Réglage d’agrandissements de largeur et de
hauteur de caractère
<ESC> “–” “1” 1B 2D 31
Sélection de soulignement
<ESC> “–” <1> 1B 2D 01
<ESC>“–” “0” 1B 2D 30
Annulation de soulignement
<ESC> “–” <0> 1B 2D 00
<ESC> “_” “1” 1B 5F 31
Sélection de surlignement
<ESC> “_” <1> 1B 5F 01
<ESC> “_” “0” 1B 5F 30
Annulation de surlignement
<ESC> “_” <0> 1B 5F 00
Page 24

– 21 –
FRANÇAIS
Codes de contrôle
Codes
Fonction
hexadécimaux
<ESC> “4” 1B 34 Sélection d’impression surintensifiée
<ESC> “5” 1B 35 Annulation d’impression surintensifiée
<SI> 0F Impression inversée
<DC2> 12 Annulation d’impression inversée
<ESC> “E” 1B 45
Sélection d’impression mise en valeur
<ESC> “G” 1B 47
<ESC> “F” 1B 46
Annulation d’impression mise en valeur
<ESC> “H” 1B 48
Commandes de réglage du format de page
Codes de contrôle
Codes
Fonction
hexadécimaux
<ESC> “C” n 1B 43 n Réglage de la longueur de page en lignes
<ESC> “C” <0> n 1B 43 00 n Réglage de la longueur de page en pouces
<ESC> “N” n 1B 4E n Réglage de la marge inférieure
<ESC> “O” 1B 4F Annulation de la marge inférieure
<ESC> “l” n 1B 6C n Réglage de la marche gauche
<ESC> “Q” n 1B 51 n Réglage de la marge droite
Commandes de déplacement de la position d’impression
Codes de contrôle
Codes
Fonction
hexadécimaux
<LF> 0A Avance de ligne
<CR> 0D Retour de chariot
<ESC> “a” n 1B 61 n Avance de n lignes de papier
<FF> 0C Saut de page
<HT> 09 Tabulation horizontale
<VT> 0B Tabulation verticale
<ESC> “z” “1” 1B 7A 31
Réglage d’espacement de ligne à 4 mm
<ESC> “z” <1> 1B 7A 01
<ESC> “0” 1B 30 Réglage d’espacement de ligne à 3 mm
<ESC> “J” n 1B 4A n Avance de n/4 mm à la fois
<ESC> “j” n 1B 6A n Recul de n/4 mm à la fois
<ESC> “I” n 1B 49 n Avance de n/8 mm à la fois
<ESC> “B” n1 n2 ... <0> 1B 42 n1 n2 ... 00 Réglage d’arrêts de tabulation verticale
<ESC> “D” n1 n2 ... <0> 1B 44 n1 n2 ... 00 Réglage d’arrêts de tabulation horizontale
Page 25

– 22 –
FRANÇAIS
Commandes d’impression de graphiques en points
Codes de contrôle
Codes
Fonction
hexadécimaux
<ESC> “K” n <0> 1B 4B n 00 m1 m2 Impression de graphiques densité normale
m1 m2 ... ...
<ESC> “L” n1 n2 1B 4C n1 n2 m1 m2 Impression de graphiques haute densité
m1 m2 ... ...
<ESC> “k” n <0> d1 ... 1B 6B n 00 d1 ... Impression de graphiques densité fine
<ESC> “X” n1 n2 m1 ... 1B 58 n1 n2 m1 ... Impression de graphiques densité fine
Commandes d’impression de caractères téléchargés
Codes de contrôle
Codes
Fonction
hexadécimaux
<ESC> “&” <1> <1> 1B 26 01 01 n Définition de caractère téléchargé
n m1 m2 ... m48 m1 m2 ... m48
<ESC> “&” <1> <0> n 1B 26 01 00 n Suppression de caractère téléchargé
<ESC> “%” “1” 1B 25 31
Valider d’un jeu de caractères téléchargés
<ESC> “%” <1> 1B 25 01
<ESC> “%” “0” 1B 25 30
Invalider un jeu de caractères téléchargés
<ESC> “%” <0> 1B 25 00
Commandes de pilotage des périphériques
Codes de contrôle
Codes
Fonction
hexadécimaux
<ESC> <BEL> n1 n2 1B 07 n1 n2 Définition de la largeur d’impulsion d’entraînement
du périphérique #1
<BEL> 07 Pilotage du périphérique #1
<FS> 1C Pilotage immédiat du périphérique #1
<EM> 19 Pilotage immédiat du périphérique #2
<SUB> 1A Pilotage immédiat du périphérique #2
Commandes de pilotage du couteau automatique
Codes de contrôle
Codes
Fonction
hexadécimaux
<ESC> “d” “0” 1B 64 30
<ESC> “d” <0> 1B 64 00 Commande de coupe complète au couteau
<ESC> “d” “1” 1B 64 31 automatique
<ESC> “d” <1> 1B 64 01
Page 26

– 23 –
FRANÇAIS
Autres commandes
Codes de contrôle
Codes
Fonction
hexadécimaux
<CAN> 18 Annulation de la dernière ligne et initialisation de
l’imprimante
<DC3> 13 Désélection de l’imprimante
<DC1> 11
Réglage du mode de sélection
<DC1> n 11 n
<RS> 1E Retentissement de l’avertisseur
<ESC> “#N, n1 n2 n3 n4”
1B 23 N 2C n1 n2 n3 n4
Réglage du commutateur de mémoire
<LF> <NUL> 0A 00
<ESC> “@” 1B 40 Initialisation de l’imprimante
<ENQ> 05 Interrogation
<STX> 02 Entrée du mode STX-ETX
<ETX> 03 Fin du mode STX-ETX
<ESC> “?” <LF> <NUL> 1B 3F 0A 00 Réinitialisation de l’imprimante
Page 27

INHALTSVERZEICHNIS
1. INBETRIEBNAHME..........................................................................25
1-1. Einlegen der Papierrolle.............................................................25
1-2. Einstellung der Druckkopfposition ............................................27
2. BEDIENFELD ....................................................................................28
3. AUFSTELLUNG DER DRUCKERBEFEHLE..................................29
3-1. Seitenmodus ...............................................................................30
3-2. Zeilenmodus...............................................................................32
ANHANG................................................................................................48
Der Anhang erscheint nur im englischen Teil dieser Bedienungsanleitung
Page 28

– 25 –
DEUTSCH
1. INBETRIEBNAHME
■ Entfernen Sie zunächst das halbtransparente, blaue Klebeband von allen Teilen.
■ Stellen Sie vor dem ersten Einlegen
der Papierrolle sicher, daß das
Pappstück und das Papier (unter der
Abreißkante) entfernt worden ist.
Diese Teile dienen dem Schutz des
Druckkopfes beim Transport.
Abb. 1-1
1-1. Einlegen der Papierrolle
Ihr Drucker arbeitet mit einer 60mm ~ 82mm breiten Thermopapierrolle.
Gehen Sie bei dem Einlegen einer Papierrolle wie im folgenden beschrieben vor.
Die Abbildungen zeigen einen Drucker des Typs TSP412, das Einlegen der Rolle
ist aber beim TSP442 identisch.
Abb. 1-2
Printer cover
Paper roll
Paper-roll shaft
Abb. 1-3
1 Schalten Sie den Drucker aus.
2 Öffnen Sie die Druckerklappe
3 Schneiden Sie die obere Kante des
Papier gerade auf. Falls das Papierende mit einem Aufkleber oder einem Stück Klebeband gesichert ist,
rollen Sie eine Windung Papier ab,
und schneiden Sie Papier mit
Klebstoffresten vollständig ab. (Der
Klebstoff könnte an der
Papierförderrolle im Inneren des
Druckers haften bleiben und den
Papiertransport behindern.)
4 Stecken Sie die Achse in die Papier-
rolle.
Achse für die Papierrolle
Druckerklappe
Papierrolle
Page 29

– 26 –
DEUTSCH
5 Legen Sie die Papierrolle vorüber-
gehend in den Druckerdeckel. Achten Sie darauf, daß die Rolle zum
Einlegen bereits richtig herum liegt.
6 Ziehen Sie den grünen
Entriegelungshebel, so daß er löst;
kippen Sie dann die Druckkopfeinheit. Vermeiden Sie es, den
Druckkopf mit den Fingern zu berühren.
7 Führen Sie das Papier so ein, daß es
unter der Papierführungsrolle und
zwischen den Transportsensoren
hindurch läuft.
8 Ziehen Sie das Papier so weit durch
den Drucker, bis die Abreißkante
erreicht ist.
Abb. 1-4
Abb. 1-5
Abb. 1-6
Paper roll
Release bar
Print head unit
Paper guide
roller shaft
Papierrolle
Druckkopfeinheit
Papierführungs–
rollen
Entriegelungshebel
Page 30

– 27 –
DEUTSCH
Dünnes Papier
0.6mm
Dickes Papier,
9 Kippen Sie den Druckkopf zurück
in seine Ausgangsstellung. Vergewissern Sie sich, daß der Druckkopf
eingerastet ist. (Der Druckerdeckel
kann nicht geschlossen werden, solange der Druckkopf nicht eingerastet ist.)
0 Legen Sie die Papierrolle in den
Papierrollenhalter des Druckers.
A Halten Sie die Rolle fest, und ziehen
Sie am Papierende das Papier straff.
B Schließen Sie den Druckerdeckel.
Abb. 1-7
1-2. Einstellung der Druckkopfposition
1 Sie können für dickes und dünnes
Papier die Position des Druckkopfs
jeweils passend einstellen. Die Position wird verändert, indem Sie die
linken und rechten Hebel nach vorn
oder nach hinten bewegen.
2 Sie müssen vor dem Verstellen der
Hebel den Druckkopf entriegeln.
Abb. 1-8
Page 31

– 28 –
DEUTSCH
2. BEDIENFELD
Die Tasten und Anzeigen des Bedienfeldes arbeiten wie im folgenden beschrieben.
Abb. 2-1
Schalter/Anzeige ON LINE
Mit dieser Taste wird zwischen den Drucker-Modi “Online” und “Offline” hinund hergeschaltet. Die Anzeige leuchtet, wenn der Drucker online ist. Wenn der
Drucker offline geht, wird der Druck gestoppt, und der Drucker kann keine Daten
vom Computer empfangen.
HINWEIS: Wenn der Druckkopf während eines langandauernden, ununterbro-
chenen Gebrauchs überhitzt, stoppt der Drucker die Ausgabe automatisch, und die ON-LINE-Anzeige blinkt. Der Drucker setzt die
Ausgabe automatisch fort, sobald der Druckkopf abgekühlt ist.
Schalter FEED
Diese Taste löst je nach Stellung des Speicherschalters einen fortlaufenden
Papiervorschub oder einen kompletten Papiervorschub auf den nächsten Seitenbeginn aus. Der FEED-Schalter ist immer aktiv, unabhängig davon, ob der Drucker
online oder offline ist. Wenn der Speicherschalter auf der Position “Start-position
detect = OFF” (zu deutsch Erkennung der Startposition Aus) steht, wird das Papier
fortlaufend vorgeschoben, solange der FEED-Schalter gedrückt wird. Der
Papiervorschub wird sofort gestoppt, sobald Sie die Taste loslassen. Wenn der
Speicherschalter auf der Position “Start-position detect = ON” (zu deutsch Erkennung der Startposition An) steht, wird das Papier bei jedem Druck auf den FEEDSchalter auf den Beginn der nächsten Seite vorgeschoben.
Anzeige POWER
Sie leuchtet, wenn der Drucker angeschaltet ist.
Anzeige HEAD UP
Sie leuchtet, wenn der Druckkopf nicht verriegelt ist. Versuchen Sie nicht zu
drucken, wenn diese Anzeige leuchtet. Falls diese Anzeige plötzlich mitten im
Druckvorgang aufleuchtet, ist es sehr wahrscheinlich, daß ein Papierstau die
Druckkopfeinheit aus der korrekten Position gedrückt hat.
ON
OFF
POWER
HEAD UP
NO PAPER
ERROR
ON LINE
FEED
Page 32

– 29 –
DEUTSCH
Der Drucker verfügt über zwei Software-Modi, die über den Speicherschalter
angewählt werden können. Um geänderte Speicherschalter-Einstellungen wirksam werden zu lassen, muß der Drucker aus- und wieder angeschaltet werden,
oder an ihn muß der der Drucker-Reset-Befehl (<ESC>“?”) gesendet werden.
(Werksvoreinstellung: Seitenmodus)
Seitenmodus:
Code <ESC> “#0,0000” <LF> <NUL>
Hex 1B 23 30 2C 30 30 30 30 0A 00
Dieser Modus eignet sich zur Ausgabe von Barcode-Aufklebern, Graphiken und
Textdaten.
In diesem Modus können Text und Barcodes auf dem Papier positioniert und
gedreht werden. Der Drucker akzeptiert unkomprimierte BMP-Dateien, so daß
mit ihm BMP-Dateien empfangen und gedruckt werden können, die zuvor
eingescannt oder mit Windows-Programmen erstellt worden sind.
Der Drucker kennt die im folgenden aufgeführten Befehle. Jeder Befehlscode
beginnt mit dem Code <ESC> und endet mit den Code <LF><NUL>. Ausnahmen sind die Befehle “Request Status” <ENQ> und “Call Download Character”
<ESC> “G”.
Zeilenmodus:
Code <ESC> “#0,0001” <LF> <NUL>
Hex 1B 23 30 2C 30 30 30 31 0A 00
Dieser Modus ist kompatibel mit Star-Kassenbeleg-Druckern wie den Serien
SP300 und SP200.
Das Produkt wird ständig verbessert. Beschreibungen und technischen Daten in
dieser Bedienungsanleitung können sich daher ohne besondere Mitteilung ändern.
3. AUFSTELLUNG DER DRUCKERBEFEHLE
Page 33

– 30 –
DEUTSCH
Hexadezimal-Codes
1B 43 0A 00
1B 44 n1n2n3n4 0A
00
1B 4C n1n2 3B x1x2x3x4
2C y1y2y3y4 2C x5x6x7x8
2C y5y6y7y8 2C d 2C w 0A
00
1B 45 n1n2 0A 00
1B 50 43 n1n2 3B x1x2x3x4
2C y1y2y3y4 2C w 2C h 2C
c 2C r1r2 2C d1d2 0A 00
1B 50 42 n1n2 3B x1x2x3x4
2C y1y2y3y4 2C w 2C b 2C
m 2C h1h2h3h4 0A 00
1B 59 d1d2 0A 00
Steuerbefehle
<ESC> “C”<LF> <NUL>
<ESC> “D n1n2n3n4” <LF>
<NUL>
<ESC> “L n1n2 ; x1x2x3x4
, y1y2y3y4, x5x6x7x8
, y5y6y7y8, d, w” <LF>
<NUL>
<ESC> “E n1n2” <LF>: <NUL>
<ESC> “PC n1n2 ; x1x2x3x4
, y1y2y3y4, w, h,
c, r1r2, d1d2” <LF> <NUL>
<ESC> “PB n1n2 ; x1x2x3x4
, y1y2y3y4, w, b,
m, h1h2h3h4” <LF> <NUL>
<ESC> “Y d1d2” <LF> <NUL>
Funktion
Format löschen
Druckbereich definieren
Zeilenformat definieren
Zeilenformat löschen
Zeichenkettenformat definieren
Barcode-Format definieren
Zeichengröße definieren
Hexadezimal-Codes
1B 52 43 n1n2 3B a1a2.…an
0A 00
1B 52 42 n1n2 3B a1a2.…an
0A 00
1B 51 3B x1x2x3x4 2C
y1y2y3y4 2C|1|2|3|4 2C
w1w2w3 2C n11n12n13
n.…n1k <LF>.…nm1nm2
.…nmk” 0A 00
1B 48 m x1x2x3x4 2C
y1y2y3y4 2C (BMP file data)
2C 0A 00
1B 47 n1n2 2C n3n4 1B 30
1B 58 0A 00
Steuerbefehle
<ESC> “RC n1n2 ; a1.....an”
<LF> <NUL>
<ESC> “RB n1n2 ; a1.....an”
<LF> <NUL>
<ESC> “Q ; x1x2x3x4,
y1y2y3y4, |1|2|3|4,
w1w2w3, n11n12n13
n.…n1k <LF>.…nm1nm2
.…nmk” <LF> <NUL>
<ESC> “H m x1x2x3x4,
y1y2y3y4, (BMP file data)
,” <LF> <NUL>
<ESC> “G n1n2, n3n4” <ESC>
“0”
<ESC> “X” <LF> <NUL>
Funktion
Daten für eine Zeichenkette definieren
Daten für einen Barcode definieren
Graphikdaten in den Bildspeicher laden
BMP-Datei zum Drucker kopieren
Heruntergeladenes Zeichen aufrufen
Bilddaten löschen
3-1. Seitenmodus
Formatdefinitionen
Definition der Druckdaten
Page 34

– 31 –
DEUTSCH
Weitere Befehle
Hexadezimal-Codes
1B 49 0A 00
1B 54 d n1n2 0A 00
1B 42 d n1n2 0A
00
1B 23 N 2C n1n2n3n4 0A
00
1B 3F 0A 00
05
1B 4E n1n2 0A 00
1B 46 n1n2 3B d1.…d48
0A 00
1B 5A n 0A 00
Funktion
Aufkleber drucken
Nach dem Druck Vorschublänge
festlegen
Abschneider aktivieren
Stellung des Speicherschalters festlegen
Drucker zurücksetzen
Status abfragen
Internationalen Zeichensatz einstel-
len
Heruntergeladenes Zeichen spei-
chern
“Zero”-Stil wählen
Steuerbefehle
<ESC> “I” <LF> <NUL>
<ESC> “T d n1n2” <LF> <NUL>
<ESC> “B d n1n2” <LF>
<NUL>
<ESC> “# N, n1n2n3n4” <LF>
<NUL>
<ESC> “?” <LF> <NUL>
<ENQ>
<ESC> “N n1n2” <LF> <NUL>
<ESC> “F n1n2 ; d1.....d48”
<LF> <NUL>
<ESC> “Z n” <LF> <NUL>
Page 35

– 32 –
DEUTSCH
3-2. Zeilenmodus
Befehle zur Zeichenwahl
Steuerbefehle
Hexadezimal-
Funktion
Codes
<ESC> “R” n 1B 52 n Internationalen Zeichensatz einstellen
<ESC> “/” “1” 1B 2F 31
0 mit Querstrich wählen
<ESC> “/” <1> 1B 2F 01
<ESC> “/” “0” 1B 2F 30
Normale 0 wählen
<ESC> “/” <0> 1B 2F 00
<ESC> “b” n1 n2 n3 n4 1B 62 n1 n2 n3 n4
Barcode-Druck aktivieren
d1 ... <RS> d1 ... 1E
<ESC> “M” 1B 4D 12-Punkt-Druck definieren
<ESC> “p” 1B 70 14-Punkt-Druck definieren
<ESC> “P” 1B 50 15-Punkt-Druck definieren
<ESC> “:” 1B 3A 16-Punkt-Druck definieren
<ESC> <SP> n 1B 20 n Zeichenabstand definieren
<SO> 0E Druck mit doppelter Zeichenbreite aktivieren
<DC4> 14 Breitdruck deaktivieren
<ESC> “W” n 1B 57 n Verbreiterungsfaktor definieren
<ESC> <SO> 1B 0E Druck mit doppelter Zeichenhöhe aktivieren
<ESC> <DC4> 1B 14 Vergrößerung der Zeichenhöhe deaktivieren
<ESC> “h” n 1B 68 n Faktor für die Vergrößerung in der
Zeichenhöhe definieren
<ESC> “i” n1 n2 1B 69 n1 n2 Vergrößerungsfaktor für Breite und
Höhe definieren
<ESC> “–” “1” 1B 2D 31
Unterstreichen aktivieren
<ESC> “–” <1> 1B 2D 01
<ESC>“–” “0” 1B 2D 30
Unterstreichen deaktivieren
<ESC> “–” <0> 1B 2D 00
<ESC> “_” “1” 1B 5F 31
Überstreichen aktivieren
<ESC> “_” <1> 1B 5F 01
<ESC> “_” “0” 1B 5F 30
Überstreichen deaktivieren
<ESC> “_” <0> 1B 5F 00
Page 36

– 33 –
DEUTSCH
Steuerbefehle
Hexadezimal-
Funktion
Codes
<ESC> “4” 1B 34 Hervorgehobenen Druck aktivieren
<ESC> “5” 1B 35 Hervorgehobenen Druck deaktivieren
<SI> 0F Inversdruck aktivieren
<DC2> 12 Inversdruck deaktivieren
<ESC> “E” 1B 45
Fettdruck aktivieren
<ESC> “G” 1B 47
<ESC> “F” 1B 46
Fettdruck deaktivieren
<ESC> “H” 1B 48
Befehle zum Festlegen der Seitengröße
Steuerbefehle
Hexadezimal-
Funktion
Codes
<ESC> “C” n 1B 43 n Seitenlänge in Zeilen definieren
<ESC> “C” <0> n 1B 43 00 n Seitenlänge in Zoll definieren
<ESC> “N” n 1B 4E n Unteren Rand definieren
<ESC> “O” 1B 4F Unteren Rand löschen
<ESC> “l” n 1B 6C n Linken Rand definieren
<ESC> “Q” n 1B 51 n Rechten Rand definieren
Befehle zum Ändern der Druckposition
Steuerbefehle
Hexadezimal-
Funktion
Codes
<LF> 0A Line feed (Zeilenvorschub)
<CR> 0D Carriage return (Wagenrücklauf)
<ESC> “a” n 1B 61 n Papier um n Zeilen vorschieben
<FF> 0C Form feed (Seitenvorschub)
<HT> 09 Horizontaler Tabulator
<VT> 0B Vertikaler Tabulator
<ESC> “z” “1” 1B 7A 31
Zeilenvorschub auf 4 mm setzen
<ESC> “z” <1> 1B 7A 01
<ESC> “0” 1B 30 Zeilenvorschub auf 3 mm setzen
<ESC> “J” n 1B 4A n Einmaliger Vorschub um n/4 mm
<ESC> “j” n 1B 6A n Einmaliger Rückschub um n/4 mm
<ESC> “I” n 1B 49 n Einmaliger Vorschub um n/8 mm
<ESC> “B” n1 n2 ... <0> 1B 42 n1 n2 ... 00 Vertikale Tabulatoren definieren
<ESC> “D” n1 n2 ... <0> 1B 44 n1 n2 ... 00 Horizontale Tabulatoren definieren
Page 37

– 34 –
DEUTSCH
Befehle zum Druck von Rastergraphiken
Steuerbefehle
Hexadezimal-
Funktion
Codes
<ESC> “K” n <0> 1B 4B n 00 m1 m2 Graphikdruck in normaler Auflösung
m1 m2 ... ...
<ESC> “L” n1 n2 1B 4C n1 n2 m1 m2 Graphikdruck in hoher Auflösung
m1 m2 ... ...
<ESC> “k” n <0> d1 ... 1B 6B n 00 d1 ... Graphikdruck in maximaler Auflösung
<ESC> “X” n1 n2 m1 ... 1B 58 n1 n2 m1 ... Graphikdruck in maximaler Auflösung
Befehle zum Druck von heruntergeladenen Zeichen
Steuerbefehle
Hexadezimal-
Funktion
Codes
<ESC> “&” <1> <1> 1B 26 01 01 n Heruntergeladenes Zeichen definieren
n m1 m2 ... m48 m1 m2 ... m48
<ESC> “&” <1> <0> n 1B 26 01 00 n Heruntergeladenes Zeichen löschen
<ESC> “%” “1” 1B 25 31
Heruntergeladenen Zeichensatz freigeben
<ESC> “%” <1> 1B 25 01
<ESC> “%” “0” 1B 25 30
Heruntergeladenen Zeichensatz unwirksam machen
<ESC> “%” <0> 1B 25 00
Befehle zum Steuern von Peripheriegeräten
Steuerbefehle
Hexadezimal-
Funktion
Codes
<ESC> <BEL> n1 n2 1B 07 n1 n2 Treiberimpuls für Peripheriegerät Nr. 1 definieren
<BEL> 07 Peripheriegerät Nr. 1 steuern
<FS> 1C Peripheriegerät Nr. 1 ohne Verzögerung steuern
<EM> 19 Peripheriegerät Nr. 2 ohne Verzögerung steuern
<SUB> 1A Peripheriegerät Nr. 2 ohne Verzögerung steuern
Befehle zum Steuern des automatischen Abschneiders
Steuerbefehle
Hexadezimal-
Funktion
Codes
<ESC> “d” “0” 1B 64 30
<ESC> “d” <0> 1B 64 00 Befehl an den automatischen Abschneider
<ESC> “d” “1” 1B 64 31 zum Schnitt
<ESC> “d” <1> 1B 64 01
Page 38

– 35 –
DEUTSCH
Weitere Befehle
Steuerbefehle
Hexadezimal-
Funktion
Codes
<CAN> 18 Letzte Zeile löschen und Drucker inizialisieren
<DC3> 13 Drucker deaktivieren
<DC1> 11
Aktivierungsmodus definieren
<DC1> n 11 n
<RS> 1E Summer ertönen lassen
<ESC> “#N, n1 n2 n3 n4”
1B 23 N 2C n1 n2 n3 n4
Stellung des Speicherschalters festlegen
<LF> <NUL> 0A 00
<ESC> “@” 1B 40 Drucker zurücksetzen inizialisieren
<ENQ> 05 Anfrage
<STX> 02 STX-ETX-Modus aktivieren
<ETX> 03 STX-ETX-Modus beenden
<ESC> “?” <LF> <NUL> 1B 3F 0A 00 Druckerhardware zurücksetzen
Page 39

INDICE
1. INSTALLAZIONE..............................................................................37
1-1. Caricamento del rotolo di carta..................................................37
1-2. Regolazione della posizione della testina ..................................39
2. PANNELLO DI CONTROLLO..........................................................40
3. ELENCO DEI COMANDI..................................................................41
3-1. Modo Pagina ..............................................................................42
3-2. Modo Riga..................................................................................44
APPENDICE ...........................................................................................48
L’Appendice appare solo nella sezione in inglese di questo manuale.
Page 40

– 37 –
ITALIANO
1. INSTALLAZIONE
■ Per prima cosa, staccare il nastro adesivo semitrasparente blu da tutti i
componenti.
Fig. 1-1
■ Prima di caricare il primo rotolo di
carta, assicurarsi di rimuovere il cartone ed il foglio di protezione (da
sotto la barra di strappo) inseriti per
proteggere la testina di stampa durante il trasporto.
1-1. Caricamento del rotolo di carta
La stampante può accettare carta termica a rotoli da 60 mm ~ 82 mm di larghezza.
La procedura per il caricamento di un rotolo di carta è illustrata di seguito. La
stampante raffigurata è il modello TSP412; tuttavia, la procedura per il caricamento
relativa al modello TSP442 è identica.
Printer cover
Paper roll
Paper-roll shaft
Fig. 1-3
1 Spegnere la stampante.
2 Aprire il coperchio della stampante.
3 Rifilare il bordo superiore della car-
ta tagliandolo da parte a parte. Se il
bordo della carta è fissato al rotolo
con un’etichetta o con del nastro
adesivo, srotolare di un giro la carta
e tagliare tutta quella con tracce di
adesivo (l’adesivo può attaccarsi al
rullo interno ed ostacolare il
trascinamento della carta).
4 Inserire l’asta nel rotolo di carta.
Asta del rotolo di carta
Rotolo di carta
Fig. 1-2
Coperchio della
stampante
Page 41

– 38 –
ITALIANO
5 Collocare provvisoriamente il roto-
lo di carta sul coperchio della stampante. Assicurarsi che il rotolo sia
rivolto nel senso corretto per il
caricamento.
6 Tirare la barra di apertura verde in
modo da sbloccarla, quindi inclinare il gruppo testina di stampa. Evitare di toccare la testina di stampa con
le dita.
7 Inserire la carta in modo da farla
passare sotto l’asta del rullo guida
carta e in mezzo ai sensori trasmittenti.
8 Spingere la carta fino a quando il
bordo non si è spostato fino in fondo
oltre la barra di strappo.
Fig. 1-4
Fig. 1-5
Fig. 1-6
Paper roll
Release bar
Print head unit
Paper guide
roller shaft
Rotolo di carta
Asta del rullo
guida carta
Barra di apertura
Gruppo testina di
stampa
Page 42

– 39 –
ITALIANO
Carta sottile
0,6mm
Carta spessa,
9 Riportare il gruppo testina di stam-
pa nella sua posizione originale ed
assicurarsi che si blocchi in posizione (il coperchio della stampante non
si chiude fino a quando il gruppo
testina di stampa non è bloccato).
0 Spostare il rotolo di carta installan-
dolo sui supporti del rotolo della
stampante.
A Tenere fermo il rotolo e tirare il
bordo superiore della carta per mettere in tensione il rotolo.
B Chiudere il coperchio della stam-
pante.
1-2. Regolazione della posizione della testina
1 È possibile regolare la posizione
della testina di stampa per permettere l’inserimento di carta spessa o
sottile. Cambiare la posizione spostando in avanti o indietro le leve
poste sui lati destro e sinistro.
2 Assicurarsi di sbloccare la testina di
stampa prima di spostare le leve.
Fig. 1-8
Fig. 1-7
Page 43

– 40 –
ITALIANO
2. PANNELLO DI CONTROLLO
I pulsanti e le spie luminose del pannello di controllo funzionano come descritto
di seguito.
Fig. 2-1
Pulsante/spia ON LINE
Premere il pulsante per far passare la stampante dallo stato di online a quello di
offline e viceversa. La spia si illumina per indicare che la stampante è online.
Quando la stampante va in offline, interrompe la stampa e non può ricevere dati
dal computer.
NOTA: Se la testina di stampa si surriscalda durante un lungo uso continuo, la
stampante interrompe la stampa e la spia ON LINE inizia a lampeggiare.
La stampante riprende automaticamente a stampare quando la testina di
stampa si raffredda.
Pulsante FEED
Questo pulsante provoca l’avanzamento continuo o completo della carta, a
seconda dell’impostazione dell’interruttore di memoria. Il pulsante FEED agisce
indifferentemente sia che la stampante sia online che offline. Se l’interruttore di
memoria è impostato con l’opzione “Rileva posizione di inizio” = OFF, tenere
premuto il pulsante FEED per far avanzare ininterrottamente la carta. L’avanzamento della carta viene interrotto quando si rilascia il pulsante. Se l’interruttore
di memoria è impostato con l’opzione “Rileva posizione di inizio” = ON, ogni
volta che si preme il pulsante FEED si provoca l’avanzamento della carta fino alla
posizione di inizio successiva.
Spia POWER
Si illumina per indicare che la stampante è accesa.
Spia HEAD UP
Si illumina per indicare che il gruppo testina di stampa è sbloccato. Non tentare
di stampare mentre questa spia è accesa. Se la spia si accende improvvisamente
nel corso della stampa, è probabile che della carta inceppata abbia spinto il gruppo
testina di stampa fuori dal suo alloggiamento.
ON
OFF
POWER
HEAD UP
NO PAPER
ERROR
ON LINE
FEED
Page 44

– 41 –
ITALIANO
La stampante dispone di due diverse modalità software selezionabili tramite
interruttore di memoria. Per rendere attive le modifiche alle impostazioni
dell’interruttore di memoria, spegnere e riaccendere la stampante oppure inviare
alla stampante un comando di ripristino (<ESC>“?”).
(Impostazione di fabbrica: Modo Pagina)
Modo Pagina:
Code <ESC> “#0,0000” <LF> <NUL>
Hex 1B 23 30 2C 30 30 30 30 0A 00
È ideale per la stampa di etichette di codici a barre, grafica e testo.
È in grado di posizionare e ruotare i codici a barre ed il testo. Gestisce file BMP
non compressi consentendo così alla stampante di importare e stampare un file
BMP generato da scanner o modificato con applicazioni Windows.
La stampante dispone dei seguenti comandi di controllo. Ogni codice di controllo
inizia con il codice <ESC> e termina con i codici <LF> <NUL>, ad eccezione dei
comandi di richiesta stato <ENQ> e di richiamo carattere trasferibile <ESC> “G”.
Modo Riga:
Code <ESC> “#0,0001” <LF> <NUL>
Hex 1B 23 30 2C 30 30 30 31 0A 00
Questo modo è compatibile con le stampanti Receipt della Star, come la serie
SP300 e SP200.
A causa dei continui miglioramenti del prodotto, le descrizioni e le caratteristiche
contenute in questo manuale sono soggette a modifica senza preavviso.
3. ELENCO DEI COMANDI
Page 45

– 42 –
ITALIANO
Codici esadecimali
1B 43 0A 00
1B 44 n1n2n3n4 0A
00
1B 4C n1n2 3B x1x2x3x4
2C y1y2y3y4 2C x5x6x7x8
2C y5y6y7y8 2C d 2C w 0A
00
1B 45 n1n2 0A 00
1B 50 43 n1n2 3B x1x2x3x4
2C y1y2y3y4 2C w 2C h 2C
c 2C r1r2 2C d1d2 0A 00
1B 50 42 n1n2 3B x1x2x3x4
2C y1y2y3y4 2C w 2C b 2C
m 2C h1h2h3h4 0A 00
1B 59 d1d2 0A 00
Codici di controllo
<ESC> “C”<LF> <NUL>
<ESC> “D n1n2n3n4” <LF>
<NUL>
<ESC> “L n1n2 ; x1x2x3x4
, y1y2y3y4, x5x6x7x8
, y5y6y7y8, d, w” <LF>
<NUL>
<ESC> “E n1n2” <LF>: <NUL>
<ESC> “PC n1n2 ; x1x2x3x4
, y1y2y3y4, w, h,
c, r1r2, d1d2” <LF> <NUL>
<ESC> “PB n1n2 ; x1x2x3x4
, y1y2y3y4, w, b,
m, h1h2h3h4” <LF> <NUL>
<ESC> “Y d1d2” <LF> <NUL>
Funzione
Cancella il formato
Definisce l’area di stampa
Definisce il formato riga graduata
Annulla il formato riga graduata
Definisce il formato stringa di caratteri
Definisce il formato codice a barre
Definisce il passo del carattere
Hexadezimal-Codes
1B 52 43 n1n2 3B a1a2.…an
0A 00
1B 52 42 n1n2 3B a1a2.…an
0A 00
1B 51 3B x1x2x3x4 2C
y1y2y3y4 2C|1|2|3|4 2C
w1w2w3 2C n11n12n13
n.…n1k <LF>.…nm1nm2
.…nmk” 0A 00
1B 48 m x1x2x3x4 2C
y1y2y3y4 2C (BMP file data)
2C 0A 00
1B 47 n1n2 2C n3n4 1B 30
1B 58 0A 00
Steuerbefehle
<ESC> “RC n1n2 ; a1.....an”
<LF> <NUL>
<ESC> “RB n1n2 ; a1.....an”
<LF> <NUL>
<ESC> “Q ; x1x2x3x4,
y1y2y3y4, |1|2|3|4,
w1w2w3, n11n12n13
n.…n1k <LF>.…nm1nm2
.…nmk” <LF> <NUL>
<ESC> “H m x1x2x3x4,
y1y2y3y4, (BMP file data)
,” <LF> <NUL>
<ESC> “G n1n2, n3n4” <ESC>
“0”
<ESC> “X” <LF> <NUL>
Funktion
Imposta i dati di stringa di caratteri
Imposta i dati di codice a barre
Memorizza i dati dell’immagine a matrice
di punti nella memoria grafica
Copia un file BMP nella stampante
Richiama un carattere trasferibile
Cancella i dati dell’immagine
3-1. Modo Pagina
Definizione del formato
Impostazioni dei dati di stampa
Page 46

– 43 –
ITALIANO
Altri comandi
Codici esadecimali
1B 49 0A 00
1B 54 d n1n2 0A 00
1B 42 d n1n2 0A
00
1B 23 N 2C n1n2n3n4 0A
00
1B 3F 0A 00
05
1B 4E n1n2 0A 00
1B 46 n1n2 3B d1.…d48
0A 00
1B 5A n 0A 00
Funzione
Stampa l’etichetta
Imposta la lunghezza di alimentazione dopo
la stampa
Abilita la taglierina
Imposta l’interruttore di memoria
Ripristina la stampante
Richiesta stato
Seleziona un set di caratteri internazionali
Registra un carattere trasferibile
Seleziona lo stile dello zero
Codici di controllo
<ESC> “I” <LF> <NUL>
<ESC> “T d n1n2” <LF> <NUL>
<ESC> “B d n1n2” <LF>
<NUL>
<ESC> “# N, n1n2n3n4” <LF>
<NUL>
<ESC> “?” <LF> <NUL>
<ENQ>
<ESC> “N n1n2” <LF> <NUL>
<ESC> “F n1n2 ; d1.....d48”
<LF> <NUL>
<ESC> “Z n” <LF> <NUL>
Page 47

– 44 –
ITALIANO
3-2. Modo Riga
Comandi di selezione caratteri
Codici di controllo
Codici
Funzione
esadecimali
<ESC> “R” n 1B 52 n Seleziona un set di caratteri internazionali
<ESC> “/” “1” 1B 2F 31
Seleziona lo zero barrato
<ESC> “/” <1> 1B 2F 01
<ESC> “/” “0” 1B 2F 30
Seleziona lo zero normale
<ESC> “/” <0> 1B 2F 00
<ESC> “b” n1 n2 n3 n4 1B 62 n1 n2 n3 n4
Seleziona la stampa a codici a barre
d1 ... <RS> d1 ... 1E
<ESC> “M” 1B 4D Seleziona la stampa a passo 12 punti
<ESC> “p” 1B 70 Seleziona la stampa a passo 14 punti
<ESC> “P” 1B 50 Seleziona la stampa a passo 15 punti
<ESC> “:” 1B 3A Seleziona la stampa a passo 16 punti
<ESC> <SP> n 1B 20 n Imposta la spaziatura dei caratteri
<SO> 0E Imposta la stampa a doppia larghezza.
<DC4> 14 Termina la stampa a larghezza ingrandita.
<ESC> “W” n 1B 57 n Imposta il fattore d’ingrandimento per la larghezza
del carattere.
<ESC> <SO> 1B 0E Imposta la stampa a doppia altezza.
<ESC> <DC4> 1B 14 Termina la stampa ad altezza ingrandita.
<ESC> “h” n 1B 68 n Imposta il fattore d’ingrandimento per l’altezza del
carattere.
<ESC> “i” n1 n2 1B 69 n1 n2 Imposta i fattori d’ingrandimento per la larghezza e
l’altezza del carattere.
<ESC> “–” “1” 1B 2D 31
Seleziona la sottolineatura
<ESC> “–” <1> 1B 2D 01
<ESC>“–” “0” 1B 2D 30
Annulla la sottolineatura
<ESC> “–” <0> 1B 2D 00
<ESC> “_” “1” 1B 5F 31
Seleziona l’effetto barrato
<ESC> “_” <1> 1B 5F 01
<ESC> “_” “0” 1B 5F 30
Annulla l’effetto barrato
<ESC> “_” <0> 1B 5F 00
Page 48

– 45 –
ITALIANO
Codici di controllo
Codici
Funzione
esadecimali
<ESC> “4” 1B 34 Seleziona la stampa evidenziata
<ESC> “5” 1B 35 Annulla la stampa evidenziata
<SI> 0F Seleziona la stampa invertita
<DC2> 12 Annulla la stampa invertita
<ESC> “E” 1B 45
Seleziona la stampa enfatizzata
<ESC> “G” 1B 47
<ESC> “F” 1B 46
Annulla la stampa enfatizzata
<ESC> “H” 1B 48
Comandi di impostazione del formato pagina
Codici di controllo
Codici
Funzione
esadecimali
<ESC> “C” n 1B 43 n Imposta la lunghezza pagina in righe
<ESC> “C” <0> n 1B 43 00 n Imposta la lunghezza pagina in pollici
<ESC> “N” n 1B 4E n Imposta il margine inferiore
<ESC> “O” 1B 4F Annulla il margine inferiore
<ESC> “l” n 1B 6C n Imposta il margine sinistro
<ESC> “Q” n 1B 51 n Imposta il margine destro
Comandi di spostamento della posizione di stampa
Codici di controllo
Codici
Funzione
esadecimali
<LF> 0A Avanzamento riga
<CR> 0D Ritorno carrello
<ESC> “a” n 1B 61 n Avanzamento carta di n righe
<FF> 0C Avanzamento pagina
<HT> 09 Tabulazione orizzontale
<VT> 0B Tabulazione verticale
<ESC> “z” “1” 1B 7A 31
Imposta l’interlinea a 4 mm
<ESC> “z” <1> 1B 7A 01
<ESC> “0” 1B 30 Imposta l’interlinea a 3 mm
<ESC> “J” n 1B 4A n Singolo avanzamento di n/4 mm
<ESC> “j” n 1B 6A n Singolo arretramento di n/4 mm
<ESC> “I” n 1B 49 n Singolo avanzamento di n/8 mm
<ESC> “B” n1 n2 ... <0> 1B 42 n1 n2 ... 00 Imposta arresti di tabulazione verticali
<ESC> “D” n1 n2 ... <0> 1B 44 n1 n2 ... 00 Imposta arresti di tabulazione orizzontali
Page 49

– 46 –
ITALIANO
Comandi di stampa di grafica a matrice di punti
Codici di controllo
Codici
Funzione
esadecimali
<ESC> “K” n <0> 1B 4B n 00 m1 m2 Stampa di grafica a densità normale
m1 m2 ... ...
<ESC> “L” n1 n2 1B 4C n1 n2 m1 m2 Stampa di grafica ad alta densità
m1 m2 ... ...
<ESC> “k” n <0> d1 ... 1B 6B n 00 d1 ... Stampa di grafica a densità fine
<ESC> “X” n1 n2 m1 ... 1B 58 n1 n2 m1 ... Stampa di grafica a densità fine
Comandi di stampa di caratteri trasferibili
Codici di controllo
Codici
Funzione
esadecimali
<ESC> “&” <1> <1> 1B 26 01 01 n Definisce un carattere trasferibile
n m1 m2 ... m48 m1 m2 ... m48
<ESC> “&” <1> <0> n 1B 26 01 00 n Cancella un carattere trasferibile
<ESC> “%” “1” 1B 25 31
Abilita un set di caratteri trasferibili
<ESC> “%” <1> 1B 25 01
<ESC> “%” “0” 1B 25 30
Disabilita un set di caratteri trasferibili
<ESC> “%” <0> 1B 25 00
Comandi di controllo di unità periferiche
Codici di controllo
Codici
Funzione
esadecimali
<ESC> <BEL> n1 n2 1B 07 n1 n2 Definisce l’ampiezza dell’impulso di attivazione del-
l’unità periferica #1
<BEL> 07 Controlla l’unità periferica #1
<FS> 1C Controlla l’unità periferica #1 immediatamente
<EM> 19 Controlla l’unità periferica #2 immediatamente
<SUB> 1A Controlla l’unità periferica #2 immediatamente
Comandi di controllo della taglierina automatica
Codici di controllo
Codici
Funzione
esadecimali
<ESC> “d” “0” 1B 64 30
<ESC> “d” <0> 1B 64 00 Invia alla taglierina automatica un comando
<ESC> “d” “1” 1B 64 31 di taglio completo
<ESC> “d” <1> 1B 64 01
Page 50

– 47 –
ITALIANO
Altri comandi
Codici di controllo
Codici
Funzione
esadecimali
<CAN> 18 Annulla l’ultima riga e inizializza la stampante
<DC3> 13 Deseleziona la stampante
<DC1> 11
Imposta la modalità di selezione
<DC1> n 11 n
<RS> 1E Fa emettere un segnale acustico al cicalino
<ESC> “#N, n1 n2 n3 n4”
1B 23 N 2C n1 n2 n3 n4
Imposta l’interruttore di memoria
<LF> <NUL> 0A 00
<ESC> “@” 1B 40 Inizializza la stampante
<ENQ> 05 Interrogazione memoria
<STX> 02 Entra in modalità STX-ETX
<ETX> 03 Esce dalla modalità STX-ETX
<ESC> “?” <LF> <NUL> 1B 3F 0A 00 Ripristina l’hardware della stampante
Page 51

– 48 –
APPENDIX
APPENDIX
General Specifications
Printing system ......................... Line thermal dot-matrix
Resolution................................. 8 dots/mm (horiz.) x 8 dots/mm (vert.)
Printable width..........................Page Mode 80mm
Line Mode 75mm
Printing speeds..........................50mm/sec, 25mm/sec
Printable characters ..................ANK, International
Bar codes .................................. JAN, EAN, UPC, Code 39, ITF, Code 128,
Code 93, NW-7
Character matrix .......................Page Mode 8 × 16 dots (small)
16 × 24 dots (standard)
24 × 32 dots (large)
Line Mode 12 × 24 dots
Interfaces ..................................RS-232C, RS-422A, Parallel
Dimensions ...............................TSP412: 178(W) × 226(D) × 256(H) mm
TSP442: 178(W) × 244(D) × 256(H) mm
Weight ......................................TSP412: 3.4kg
TSP442: 3.7kg
Power ........................................(50/60Hz) AC120V, AC220V, AC240V
Power consumption .................. Max. 170 W Avg. 30W (During continuous
printing of ASCII characters)
Operating environment............. +5˚C ~ +40˚C
25% ~ 85% RH
Storage environment.................–20˚C ~ +60˚C
10% ~ 90% RH
Page 52

– 49 –
APPENDIX
Automatic paper cutter
Life ....................................... 300, 000 cuts (if paper debris is cleared)
Min. cut length .....................25.4mm (1 inch)
(TSP412)
178mm
226mm
256mm
(TSP442)
178mm
244mm
256mm
Page 53

– 50 –
APPENDIX
0
Paper Specifications
Recommended paper-roll types:
NIPPON PAPER INDUSTRIES TF50KS-E
TF62KS-E
NEW OJI PAPER Co.,Ltd. KF-730
Many paper types are available. Please use paper that meets the following
criteria.
1. Paper type General high-sensitivity thermal paper
General high-sensitivity label paper
• If you use medium or low sensitivity paper,
run a test print to check operation. If the
printer is unable to print at 50mm/sec, set the
print speed to 25mm/sec.
2. Paper width 60mm ~ 82
-1
mm
• When using narrow paper, be sure that the
paper is at least wide enough to keep the platen
and head from touching. Never use paper that
allows the head to touch the platen.
• If the paper width is 70mm or less, do not run
the platen in reverse.
3. Paper thickness General thermal paper: 60 ~ 150µm
Label paper: Max. 160µm
4. Paper rolls Internal diameter: 25.4mm (1 inch)
Outer diameter: 115mm
Rolls must have the thermal side facing inwards. Never use tape or other adhesive to
fasten the trailing end of the paper to the roller.
Page 54

– 51 –
APPENDIX
82mm
b
a
Printable width
26
Max. 36
Paper-feed
direction
lenhth of a Length of b
Line mode 3.5mm 75mm
Page mode 1mm 80mm
5. Print area
6. Black marking Print density: 1.2
Print position:
Marked side: Back (obverse of printable
side)
Mark dimensions: Width 10 ~ 20mm
(offset from center)
Length 3mm ~ 10mm
Positioning: Mark’s trailing end (rela-
tive to feed direction) identifies start position
Page 55

– 52 –
APPENDIX
7. Label-paper specifications Label pitch: a 10~300mm
Spacing between labels: b 3~10mm (5mm is
preferred.)
Backing paper: c Max. 5mm
a
b
c
Page 56

– 55 –
MEMO
P 1996.1
 Loading...