

Page 1
TC17A/TC21A
Domestic and Std. Export
ENGLISH/French/Spanish
Middleby Cooking Systems Group 1400 Toastmaster Drive Elgin, IL 60120 (847)741-3300 FAX (847)741-4406
Conveyor Toaster
Models TC17A, TC21A
P/N 45067
Rev. B V1 1/01
OWNER'S OPERATING AND
INSTALLATION MANUAL
© 2001 Toastmaster, A Middleby Company.
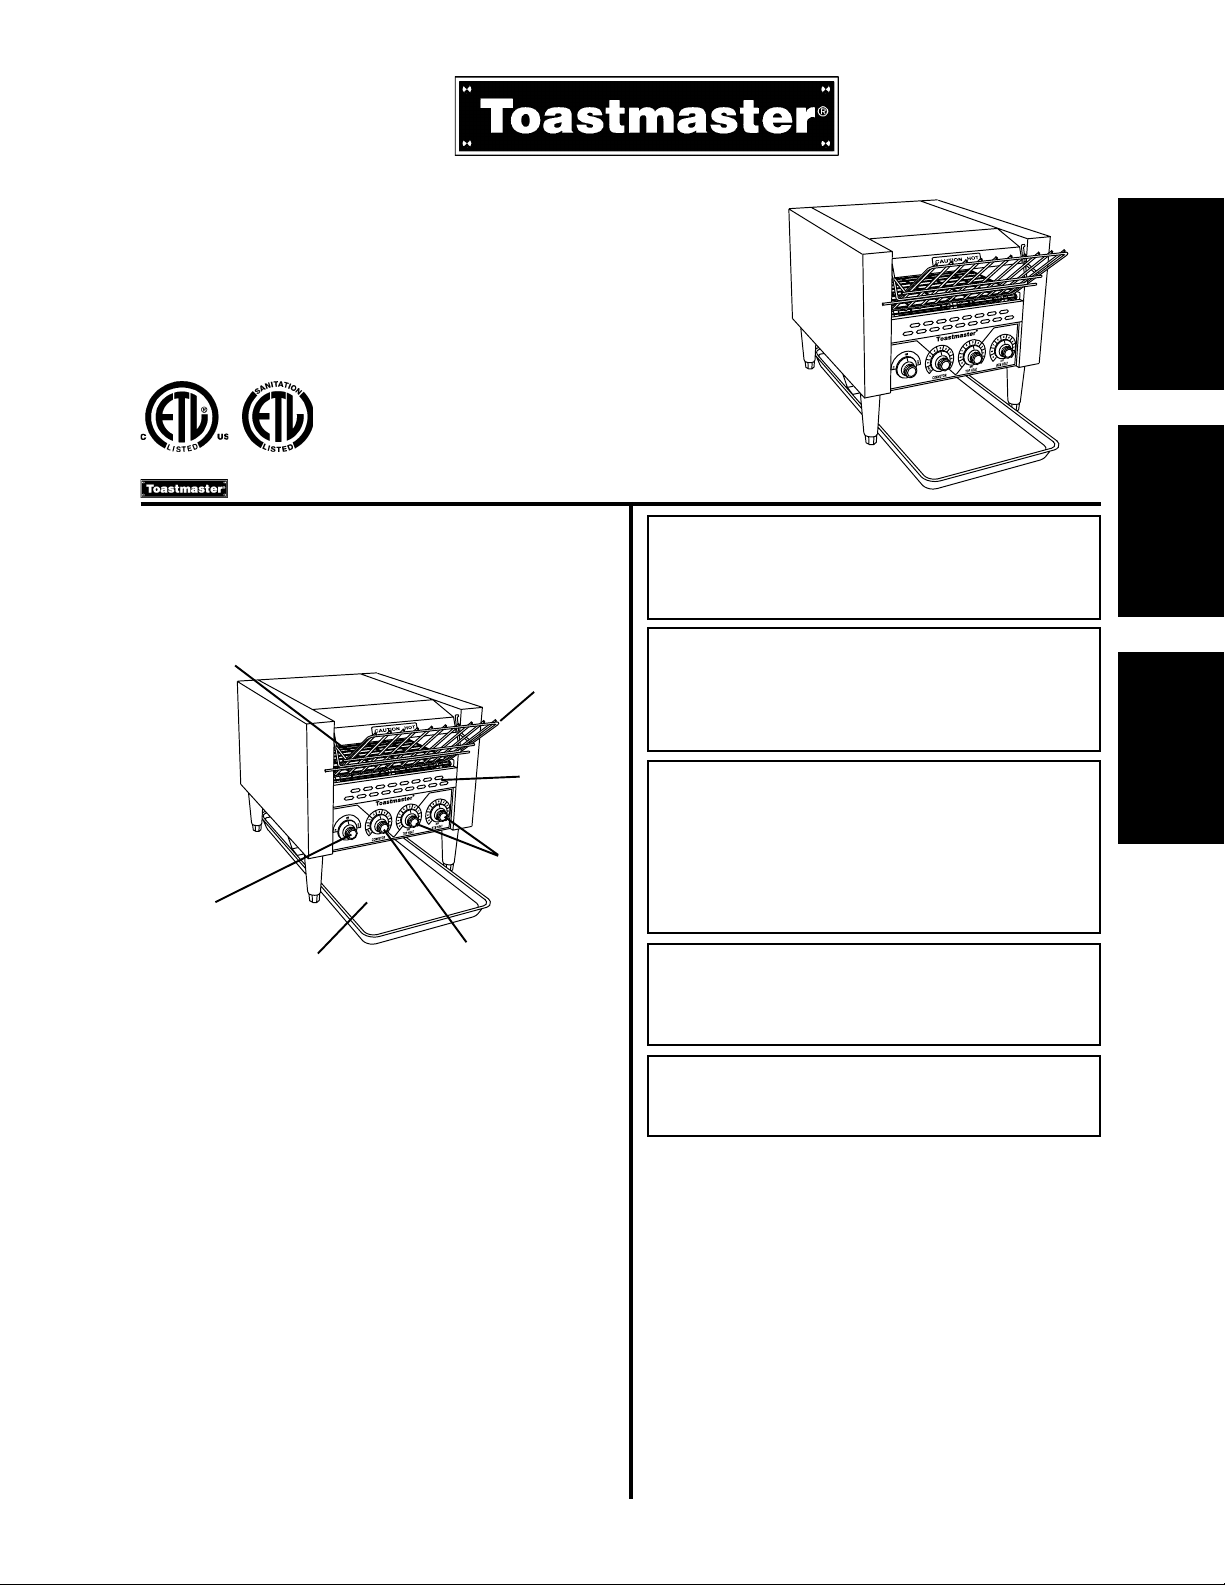
I. DESCRIPTION AND SPECIFICATIONS
A. Component Location
1. ON/OFF/STBY
B. Component Function (see Figure 1)
1-3. Toaster control knobs - see Section III, Operation.
4. Crumb tray - Collects crumbs from the toasted product. The
5. Entry rack - Loaded with the bakery product to be toasted. The
6. Conveyor - Transports the bakery product through the toaster,
7. Return tray - Collects the toasted product. The tray can be
C. Operating and Electrical Specifications
Pre-Heat Time: 15 minutes
Electrical Specifications/TC17 toaster models:
TC17A74: 120V, 50/60 Hz, 1 Ph, 1.97kW, 16.4A, NEMA 5-20P plug
TC17A63: 208V, 50/60 Hz, 1 Ph, 2.62kW, 12.6A, NEMA 6-15P plug
TC17A66: 240V, 50/60 Hz, 1 Ph, 2.62kW, 11.0A, NEMA 6-15P plug
Electrical Specifications/TC21 toaster models:
TC21A63: 208V, 50/60 Hz, 1 Ph, 2.90kW, 13.9A, NEMA 6-20P plug
TC21A66: 240V, 50/60 Hz, 1 Ph, 2.90kW, 12.1A, NEMA 6-20P plug
NOTE
Electrical wiring diagrams are provided at the back of this Manual.
is a registered trademark of Toastmaster, A Middleby Company. All rights reserved.
The major components of the toaster are shown in Figure 1
below.
6. Conveyor
knob
7. Return tray
tray can be removed for cleaning.
product then slides onto the conveyor. The entry rack can be
removed for cleaning.
between the top and bottom heating elements.
removed for cleaning.
Figure 1
5. Entry rack
4. Crumb tray
3. Top and Bottom
temperature
control knobs
2. Conveyor speed
control knob
WARNING: IN CASE OF FIRE
Disconnect the toaster from its power source IMMEDIATELY. This allows the unit to cool, making it
easier to put out the fire.
WARNING
FOR YOUR SAFETY DO NOT STORE OR USE
GASOLINE OR OTHER FLAMMABLE VAPORS
OR LIQUIDS IN THE VICINITY OF THIS OR ANY
OTHER APPLIANCE
WARNING
IMPROPER INSTALLATION, ADJUSTMENT, ALTERATION, SERVICE OR MAINTENANCE CAN
CAUSE PROPERTY DAMAGE, INJURY OR
DEATH. READ THE INSTALLATION AND OPERATING INSTRUCTIONS THOROUGHLY BEFORE
INSTALLING OR SERVICING THIS EQUIPMENT.
WARNING
Do not operate the conveyor toaster on either of its
sides, on its rear surface, or without legs. Premature failure of the heating elements will occur.
WARNING
Disconnect the toaster from its electrical power
supply before cleaning or servicing.
CAUTION
Using any parts other than genuine Toastmaster factory parts
relieves the manufacturer of all liability.
IMPORTANT
Contact your authorized service agent to perform maintenance
and repairs. A service agency directory is supplied with your
toaster.
IMPORTANT
Toastmaster (manufacturer) reserves the right to change specifications and product design without notice. Such revisions do
not entitle the buyer to corresponding changes, improvements,
additions or replacements for previously purchased equipment.
RETAIN THIS MANUAL FOR FUTURE REFERENCE
This manual provides detailed information for the installation
and operation of your toaster. It also contains information to
assist the operator in diagnosing problems in the event of a
malfunction. This manual is an important tool for the operator
and should be kept readily available.
1
page 1
ENGLISH
page 5
FRANÇAIS
página 9
ESPAÑOL
Page 2
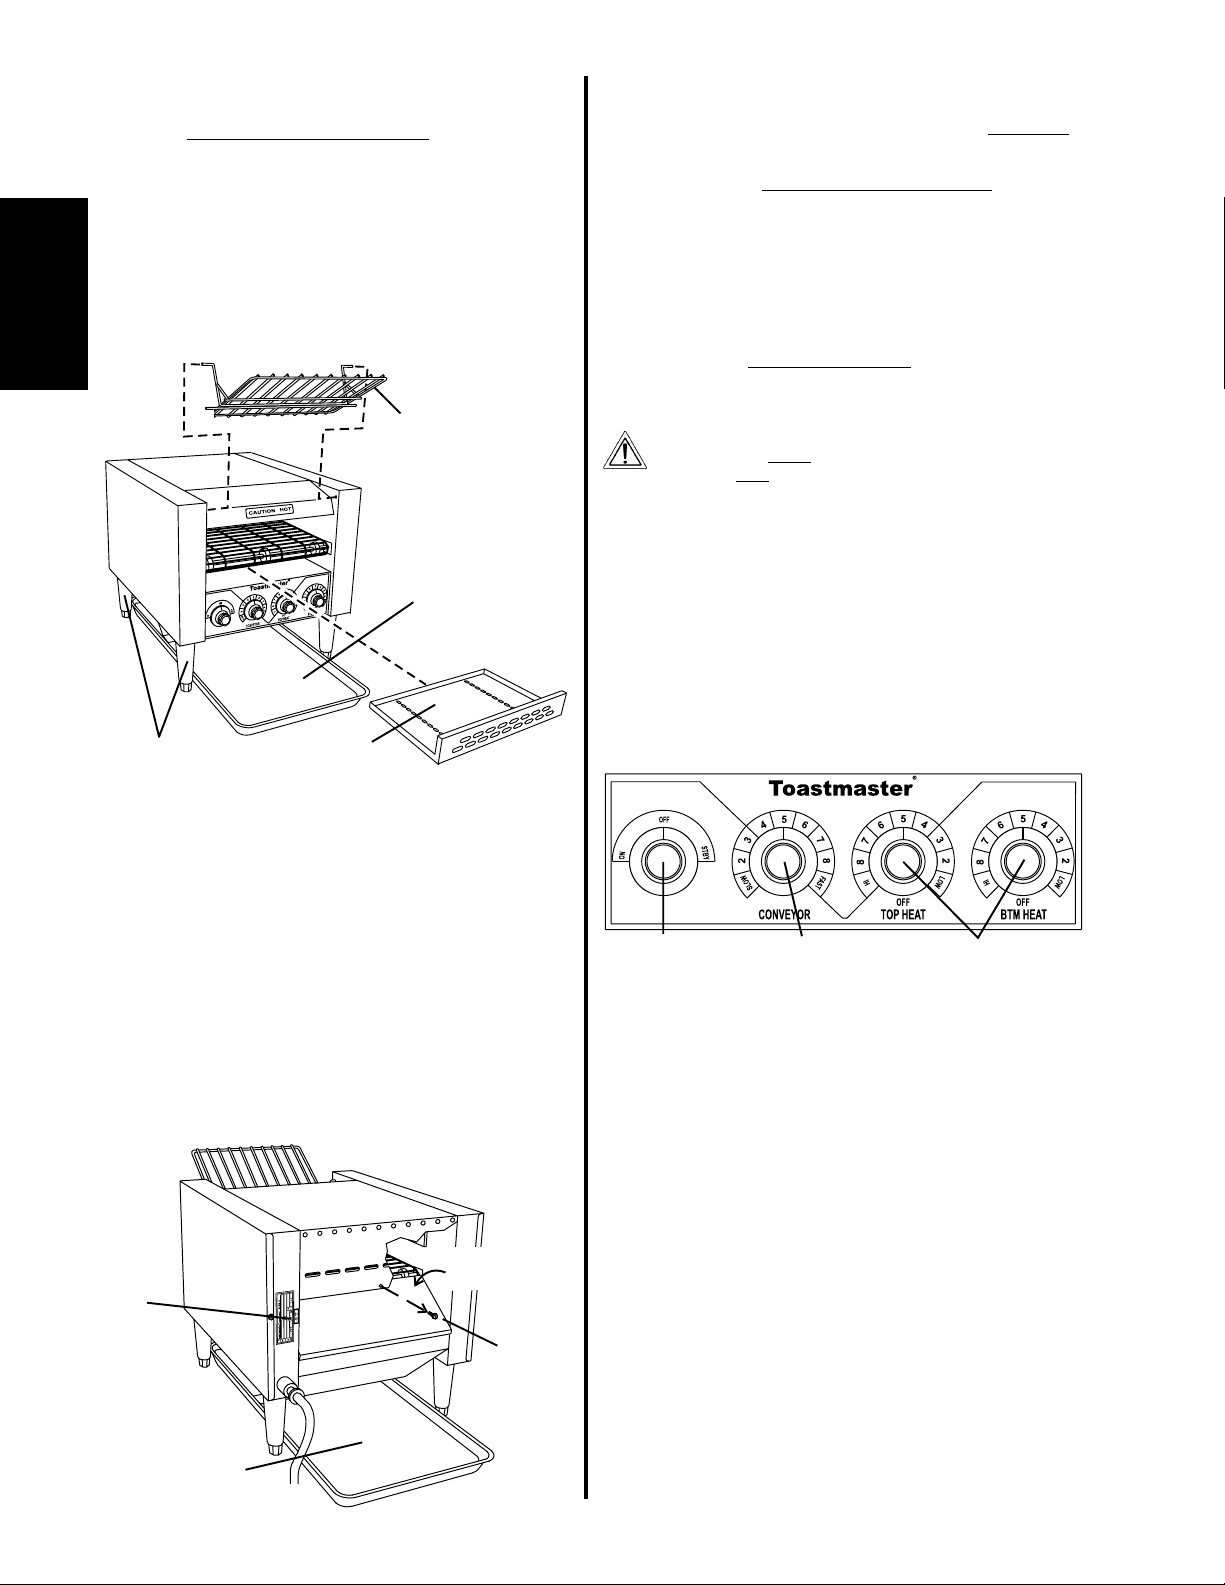
II. INSTALLATION
IMPORTANT
IT IS THE
CONCEALED OR NON-CONCEALED DAMAGE TO THE FREIGHT
COMPANY.
A. Assembly
ENGLISH
1. Thread the 4 (102mm) legs into the four holes on the bottom of
2. Install the entry rack and crumb tray into the front of the toaster,
thread into holes
in bottom of
CUSTOMERS RESPONSIBILITY TO REPORT ANY
the toaster. See Figure 2. Then, place the toaster in the desired
location.
as shown in Figure 2.
Figure 2 - Basic assembly and front-exit configuration
Entry rack
hanger rods fit
into holes on
toaster body
Return tray
slides underneath
toaster
Legs (4)
toaster
Crumb tray
slides into opening
in front of toaster
B. Electrical Utility Connection
IMPORTANT
THE ELECTRICAL CONNECTION TO THE TOASTER
REQUIRES A
CIRCUIT BREAKER/FUSED DISCONNECT. ELECTRICAL SPECIFICATIONS ARE LISTED ON THE SERIAL PLATE (SHOWN IN FIGURE 3), AND IN THE
ELECTRICAL SPECIFICATIONS ON PAGE 1
OF THIS MANUAL.
CONSULT ALL APPLICABLE NATIONAL AND LOCAL CODES FOR
FURTHER ELECTRICAL CONNECTION REQUIREMENTS.
1. Before proceeding with the electrical connection, check the
following:
a. Check that the electrical supply matches the toasters
requirements. Refer to the toasters serial plate (Figure 3)
and to the
Electrical Specifications on Page 1.
b. Check that the appropriate receptacle is available for the
power cord plug.
WARNING
ENSURE THAT
CONNECT
BOTH THE CIRCUIT BREAKER/FUSED DIS-
AND THE ON/OFF/STBY KNOB ARE IN THE OFF
POSITION BEFORE PROCEEDING. ENSURE THAT ANY
PACKING MATERIAL RESIDUE HAS BEEN REMOVED FROM
INSIDE THE TOASTING CHAMBER.
2. Insert the power cord plug into its receptacle.
III. OPERATION
A. Location and Function of Controls
This section provides a basic description of the toaster controls, their
location, and the functions they perform. The operator MUST be familiar
with the controls. Refer to Figure 4.
Figure 4
3. TOASTERS INTENDED FOR FRONT-EXIT OPERATION
ONLY:
Position the return tray underneath the toaster, as shown in
Figure 2. Note that the return tray extends past the FRONT of
the toaster in the front-exit configuration.
4. TOASTERS INTENDED FOR STRAIGHT-THROUGH, REAREXIT OPERATION ONLY:
Remove the CENTER screw from the rear panel of the
toaster, as shown in Figure 3.
Push the rear panel forward into the toaster.
Position the return tray underneath the toaster as shown
in Figure 3. Note that the return tray extends past the
REAR of the toaster in the rear-exit configuration.
Figure 3 - Electrical connection and rear-exit configuration
2. Adjust
panel
Serial
plate
1. Remove
screw
Return tray
slides underneath
toaster
1. ON/OFF/STBY
knob
2. Conveyor
speed control
knob
3. Top and Bottom
temperature
adjustment knobs
1. ON/OFF/STBY knob
When set to ON, turns on the conveyor and elements.
When set to OFF, turns off the conveyor and elements.
When set to STBY, places the toaster in a standby mode
by reducing the power to the heating elements. This saves
power during idle periods and extends the life of the toasters
components. Switching the knob back to the ON position
will return the toaster to operating temperature within 5
minutes.
2. Conveyor Speed control knob
Adjusts the speed of the conveyor belt.
SLOW is the minimum speed setting.
FAST is the maximum speed setting.
3. Top and Bottom temperature adjustment knobs
Adjusts the temperature of the heating elements. Two knobs are
provided so that the top and bottom heating element temperatures
can be adjusted independently. Turning one of the knobs to the
OFF position allows one-sided toasting (for bagels, etc.)
LOW is the lowest temperature setting, which produces a
lighter toasting of the bakery product on its top or bottom.
HIGH is the highest temperature setting, which produces a
2
darker toasting of the bakery product on its top or bottom.
Page 3
B. Operation Procedure
1. Restore electrical power to the toaster at the circuit breaker/fused
disconnect.
2. Switch the ON/OFF/STBY knob to the ON position.
3. Allow the toaster to pre-heat for at least 15 minutes.
4. Adjust the toasting time (if necessary) by turning the conveyor
speed control knob.
5. Adjust the heating element temperatures (if necessary) by turning
the Top and Bottom temperature adjustment knobs.
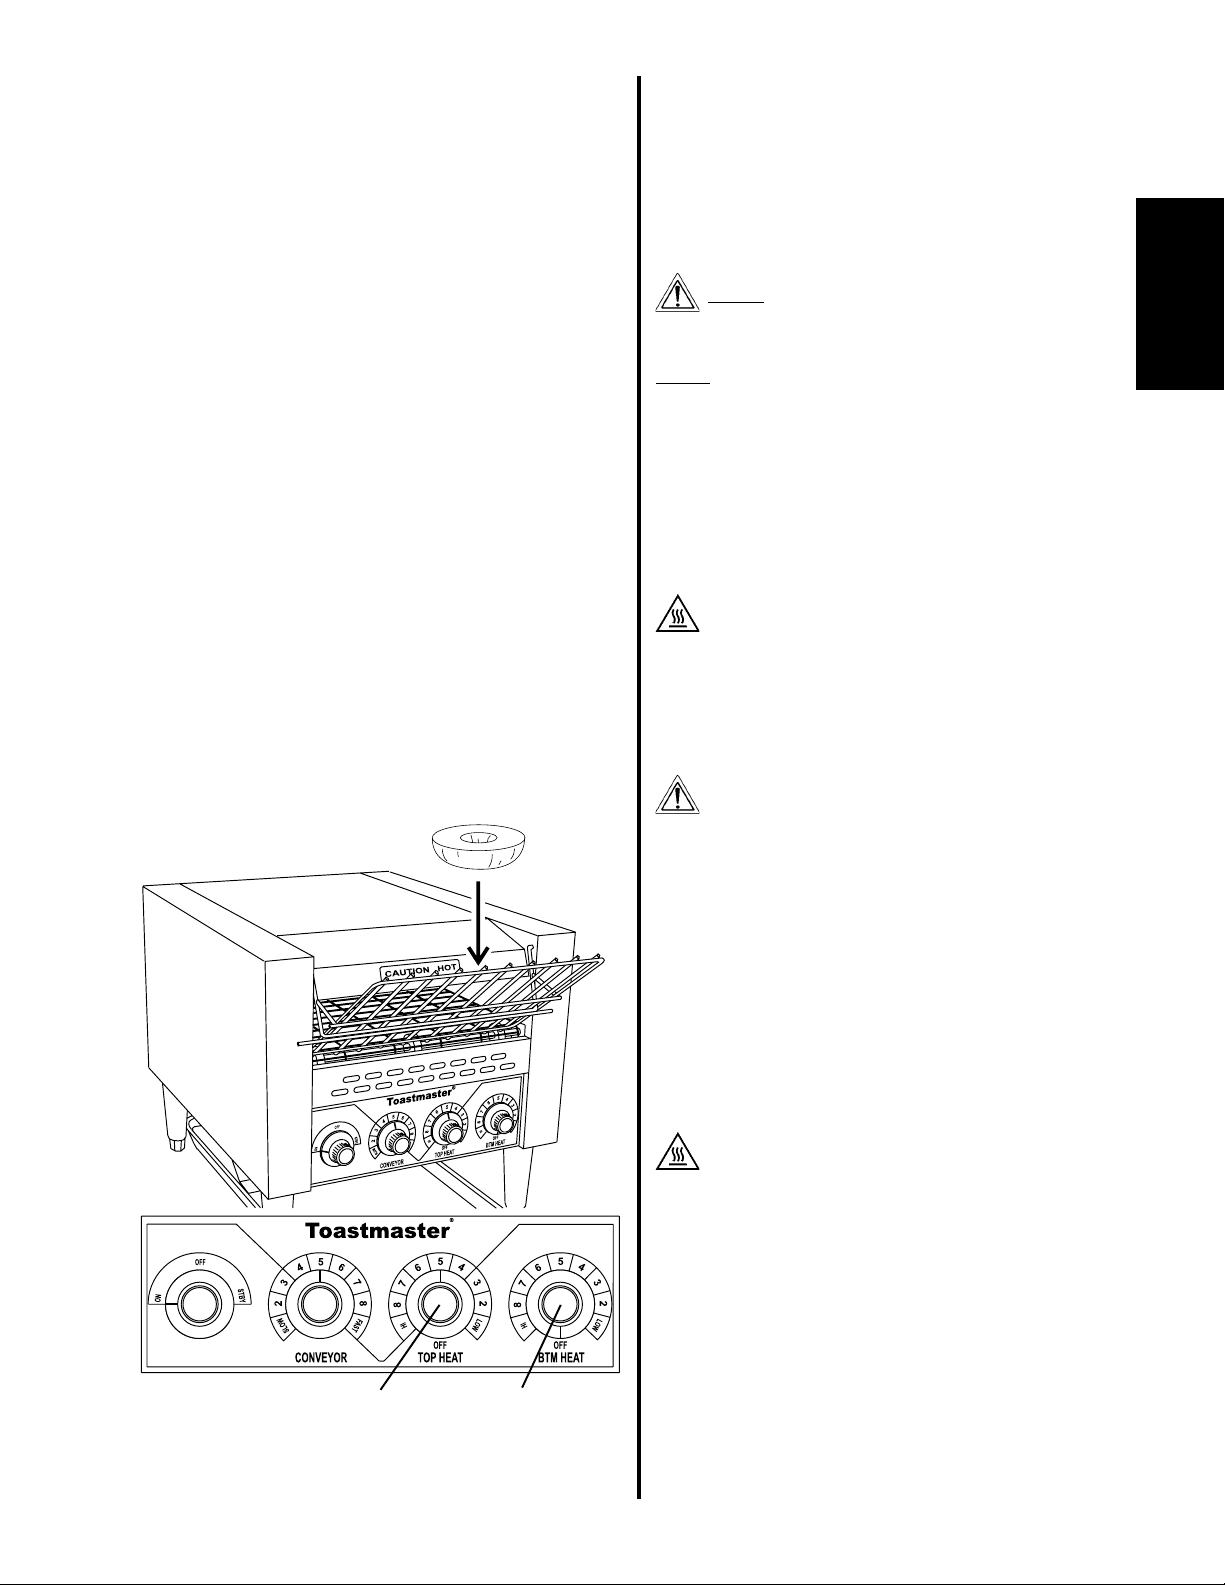
NOTE: For proper toasting of one-sided bakery products (bagels,
etc.), we recommend the following:
Turn the Top temperature adjustment knob to the desired
setting to toast the cut side of the product.
Turn the Bottom temperature adjustment knob to a lower
setting, or to the OFF position, as desired.
Load the product onto the entry rack with the cut side facing
UP, as shown in Figure 5.
If the product is loaded cut-side down, reverse the Top and Bottom
temperature knob settings provided above. Note that if the product
is loaded cut-side down, the heat of the conveyor belt may cause
a slight streaking effect on the cut side of the bakery product.
5. Load the entry rack with the bakery product to be toasted. The
product will slide off the entry rack and onto the conveyor.
6. After toasting, remove the product from the return tray.
7. During inactive periods, switch the Product Selection knob to the
STBY position. This reduces the power to the heating elements
to save power during idle periods and extends the life of the
toasters components. Switching the knob back to the ON position
will return the toaster to operating temperature within 5 minutes.
C. Shutdown Procedure
1. Switch the ON/OFF/STBY knob to the OFF (O) position.
2. Wait for the toaster to cool. Note that the cooling fan will remain
in operation to allow the toaster to cool faster.
3. AFTER the cooling fan stops, disconnect electrical power to
the toaster at the circuit breaker/fused disconnect.
D. Clearing Jams
WARNING
NEVER INSERT YOUR HANDS INTO THE TOASTING
CHAMBER TO CLEAR A JAM. SERIOUS INJURY MAY
RESULT.
CAUTION
NEVER use a plastic object to clear a jam. If the toaster is not
completely cool, damage to the toaster may result.
CAUTION
When clearing a jam, use care to avoid damaging the heating elements.
1. Switch the ON/OFF/STBY knob to the OFF (O) position.
2. Wait for the toaster to cool. Note that the cooling fan will remain
in operation to allow the toaster to cool faster.
3. AFTER the cooling fan stops, disconnect electrical power to
the toaster at the circuit breaker/fused disconnect.
CAUTION - HOT SURFACES
DO NOT ATTEMPT TO CLEAR THE JAM UNTIL THE
TOASTER HAS COOLED THOROUGHLY.
4. Carefully clear the jam using a long object as a probe. This
object should preferably be made of wood, which is less likely
to damage the heating elements.
ENGLISH
Figure 5
Load buns/bagels
CUT SIDE UP
for proper toasting
Top temperature
adjustment knob
set as desired
Bottom temperature
adjustment knob set to a
lower setting or to OFF
E. Daily Cleaning
WARNING
WHEN CLEANING THE TOASTER, NEVER APPLY
ENOUGH LIQUID TO STAND IN PLACE ON THE UNIT. DO
NOT SPRAY, RINSE, OR SUBMERGE THE TOASTER.
EXCESSIVE MOISTURE IN THE UNIT WILL CAUSE A SEVERE ELECTRICAL HAZARD AND MAY OTHERWISE
DAMAGE THE TOASTER.
CAUTION
DO NOT clean your toaster using abrasive cleaners or pads. Both
will scratch and dull the finish.
1. With the conveyor running, use a brush to clean any crumbs off
the conveyor into the crumb tray.
2. Switch the ON/OFF/STBY knob to the OFF (O) position.
3. Wait for the toaster to cool. Note that the cooling fan will remain
in operation to allow the toaster to cool faster.
4. AFTER the cooling fan stops, disconnect electrical power to
the toaster at the circuit breaker/fused disconnect.
CAUTION - HOT SURFACES
DO NOT TOUCH HOT SURFACES ON THE TOASTER, OR
REACH INTO THE TOASTING CHAMBER, UNTIL THE UNIT
HAS COOLED THOROUGHLY.
5. Wipe the exterior of the toaster with a damp sponge or cloth
soaked in hot or warm detergent water. Wipe with a clean,
damp cloth to remove the excess detergent, and then wipe again
to dry the toaster.
6. Remove the crumb tray and the return tray from the toaster,
and empty them. Wash the trays in warm detergent water, and
rinse them.
CAUTION
Never remove the crumb tray while the conveyor is moving.
7. Remove the entry rack from the toaster. Wash the rack in warm
detergent water, and rinse it.
8. Towel the trays and entry rack dry. Reassemble all parts onto
the toaster.
3
Page 4
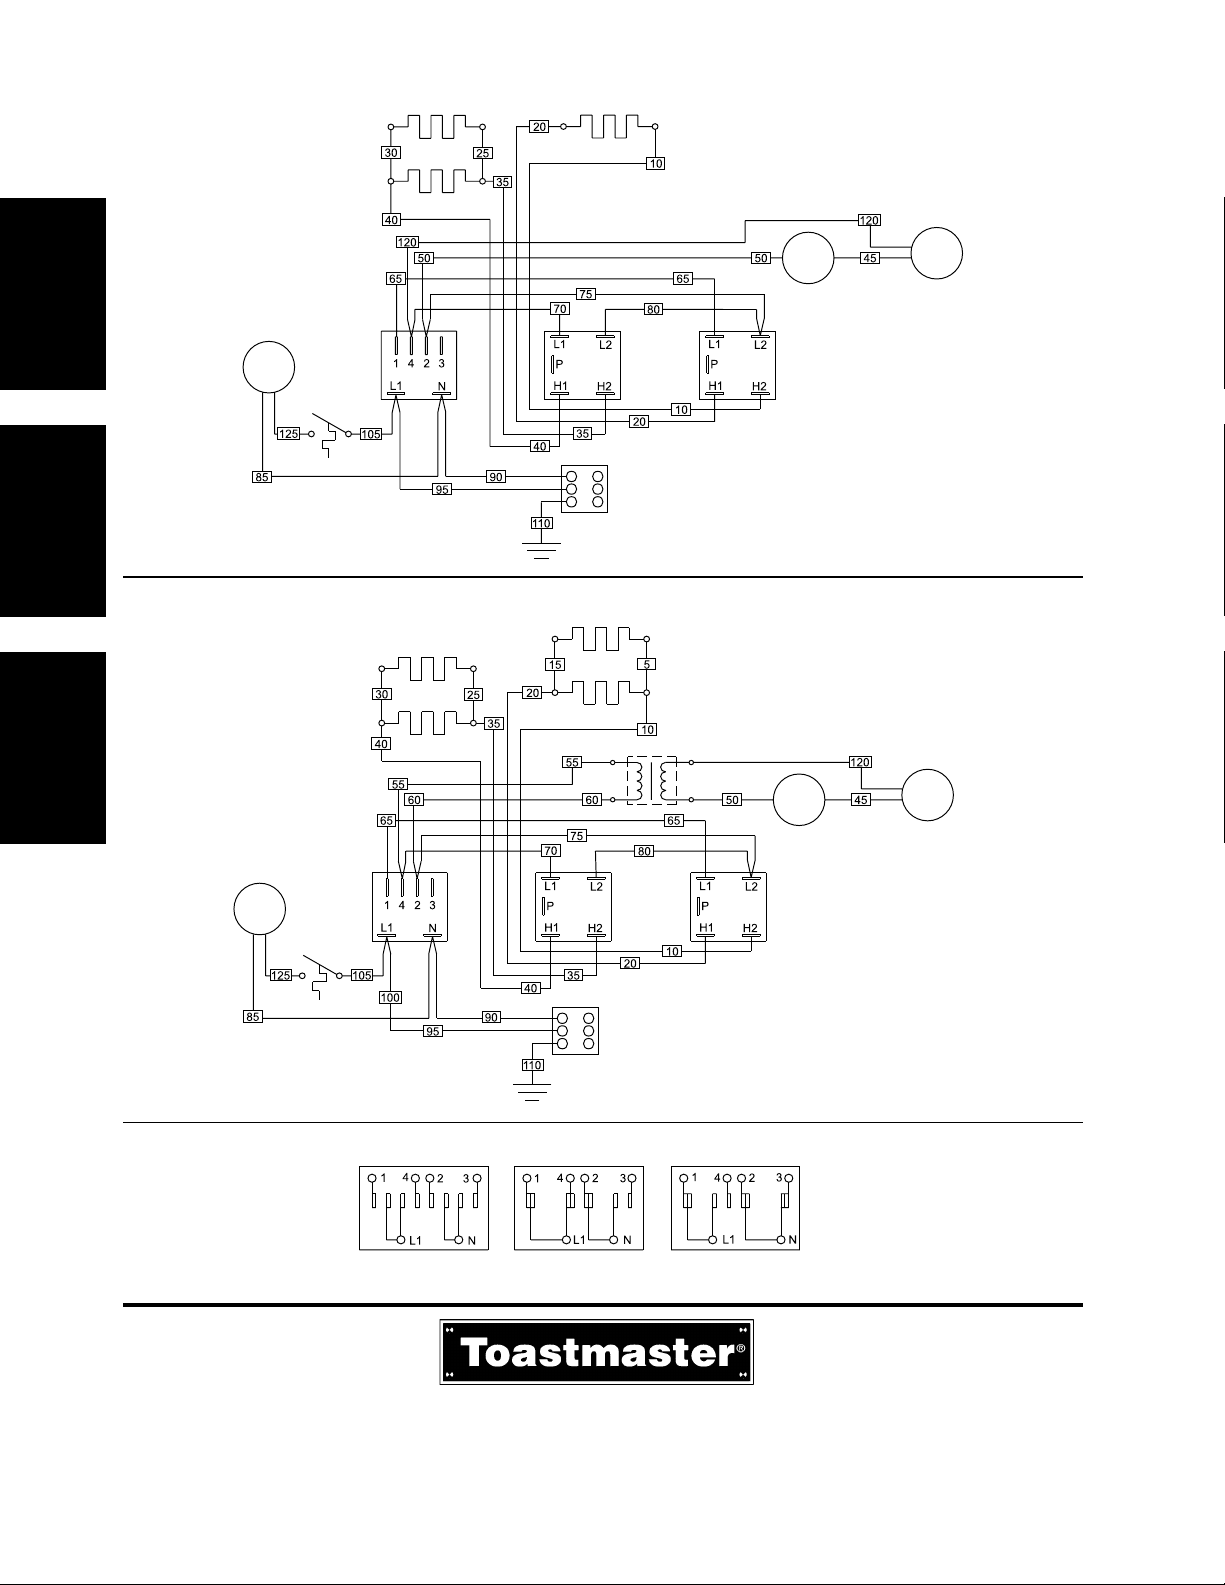
Wiring Diagram - Model TC17A74 120V Toasters
ENGLISH
page 1
FRANÇAIS
page 5
Wiring Diagram - Models TC17A/21A63 208V Toasters, Models TC17A/21A66 240V Toasters
ESPAÑOL
página 9
FAN
BTM ELEMENT 1
BTM ELEMENT 2
ON/OFF/STBY
SWITCH
COOL DOWN
SWITCH
BTM ELEMENT 1
BTM ELEMENT 2
GND
BOTTOM
TEMPERATURE
ADJUSTMENT
SWITCH
TERMINAL
BLOCK
TOP ELEMENT 1
TOP ELEMENT 2
TOP ELEMENT
CONVEYOR
SPEED CONTROL
TOP TEMPERATURE
ADJUSTMENT
SWITCH
MOTOR
TRANSFORMER
230V p : 115V s
CONVEYOR
SPEED CONTROL
TOP TEMPERATURE
ADJUSTMENT
SWITCH
FAN
ON/OFF/STBY
SWITCH
COOL DOWN
SWITCH
GND
BOTTOM
TEMPERATURE
ADJUSTMENT
SWITCH
TERMINAL
BLOCK
Switch Configuration - All Model TC17A and TC21A Toasters
OFF POSITION ON POSITION STBY POSITION
MOTOR
A Middleby Company
Toastmaster 1400 Toastmaster Drive Elgin, IL 60120 USA (847)741-3300 FAX (847)741-4406
Middleby Corp 24-Hour Service Hotline 1-800-238-8444
www.middleby.com
4
Page 5

Exportation intérieure et
standard
Anglais/FRANÇAIS/Espagnol
Middleby Cooking Systems Group 1400 Toastmaster Drive Elgin, IL 60120 (847)741-3300 Télécopieur (847)741-4406
Grille-pain à transporteur
Modèles TC17A et TC21A
N/P 45067
Rév. B V1 1/01
MANUEL DINSTALLATION ET DE
FONCTIONNEMENT
© 2001 Toastmaster, une société Middleby
I. DESCRIPTION ET SPÉCIFICATIONS
A. Emplacement des composants
B. Fonction des composants (voir Figure 1)
1-3. Bouton de commande du grille-pain voir Section III,
4. Plateau à miettes Collecte les miettes du produit grillé. Il peut
5. Grille dentrée les produits de boulangerie y sont chargés
6. Transporteur - Transporte le produit à travers le grille-pain,
7. Plateau de retour - Collecte le produit grillé. Il peut être retiré
C. Spécifications électriques et de fonctionnement
Préchauffage : 15 minutes
Spécifications électriques/modèles de grille-pain TC17 :
TC17A74 : 120 V, 50/60 Hz, 1 Ph, 1,97 kW, 16,4 A, fiche NEMA 5-20P
TC17A63 : 208 V, 50/60 Hz, 1 Ph, 2,62 kW, 12,6 A, fiche NEMA 6-15P
TC17A66 : 240 V, 50/60 Hz, 1 Ph, 2,62 kW, 11,0 A, fiche NEMA 6-15P
Spécifications électriques/modèles de grille-pain TC21 :
TC21A63 : 208 V, 50/60 Hz, 1 Ph, 2,90 kW, 13,9 fiche NEMA 6-20P
TC21A66 : 240 V, 50/60 Hz, 1 Ph, 2,90 kW, 12,1 A, fiche NEMA 6-20P
REMARQUE
Les schémas de câblage sont fournis à larrière de ce manuel.
est une marque déposée de Toastmaster, une société Middleby. Tous droits réservés.
Les composants principaux du grille-pain sont illustrés à la
Figure 1, ci-dessous.
Figure 1
6. Transporteur
5. Grille
dentrée
4. Plateau à
miettes
3. Boutons de
commande de la
température du
1. Bouton ON/
OFF/STBY
(marche/arrêt/
attente)
Fonctionnement.
être retiré afin de le nettoyer.
pour être grillés. Le produit glisse ensuite sur le transporteur.
La grille dentrée peut être retirée afin de la nettoyer.
entre les éléments chauffants du haut et du bas.
afin de le nettoyer.
7. Plateau de retour
bas et du haut
2. Bouton de
commande de
vitesse du
transporteur
AVERTISSEMENT : EN CAS DINCENDIE
Débranchez IMMÉDIATEMENT le grille-pain de sa
source électrique. Ceci permet un refroidissement de
lunité et par conséquent une maîtrise plus aisée du
feu.
AVERTISSEMENT
POUR VOTRE SÉCURITÉ, NE STOCKEZ PAS ET
NUTILISEZ PAS DESSENCE OU AUTRES
PRODUITS INFLAMMABLES À PROXIMITÉ DE CET
APPAREIL OU DE TOUT AUTRE ÉQUIPEMENT.
AVERTISSEMENT
UNE INSTALLATION, UN RÉGLAGE, UNE
MODIFICATION, UN ENTRETIEN OU UNE
MAINTENANCE INAPPROPRIÉS PEUVENT
ENTRAÎNER DES DÉGÂTS MATÉRIELS, DES
BLESSURES CORPORELLES GRAVES, VOIRE
MORTELLES. LISEZ ATTENTIVEMENT LES
INSTRUCTIONS DINSTALLATION ET DE
FONCTIONNEMENT AVANT DE METTRE EN
SERVICE OU DENTRETENIR CET ÉQUIPEMENT.
AVERTISSEMENT
Nutilisez pas le grille-pain à transporteur sur lun de
ses côtés, sur sa surface arrière, ou sans les pieds. Il
pourrait en résulter une défaillance prématurée des
éléments chauffants.
AVERTISSEMENT
Débranchez lalimentation en électricité du grille-pain
avant tout nettoyage ou entretien.
ATTENTION
Lutilisation de pièces autres que les pièces Toastmaster dorigine
décharge le fabricant de toute responsabilité.
IMPORTANT
Contactez votre réparateur agréé pour effectuer la maintenance
et les réparations. Un répertoire de centres de service est fourni
avec votre grille-pain.
IMPORTANT
Toastmaster (fabricant) se réserve le droit de modifier les
spécifications et la conception du produit sans préavis. Ces
révisions nimpliquent pas, pour lacheteur, lobtention de
modifications, améliorations, ajouts ou remplacements
correspondants en ce qui concerne léquipement acheté
préalablement.
CONSERVEZ CE MANUEL POUR LES RÉFÉRENCES ULTÉRIEURES
Ce manuel fournit des informations détaillées relatives à linstallation
et au fonctionnement de votre grille-pain. Il contient également des
informations permettant daider lopérateur à diagnostiquer les
problèmes en cas de défaut de fonctionnement. Ce manuel est
un outil important quil convient davoir sous la main.
page 1
ENGLISH
page 5
FRANÇAIS
página 9
ESPAÑOL
Page 6

II . INSTALLATION
IMPORTANT
IL EST DE LA
SOCIÉTÉ DE TRANSPORT TOUT DOMMAGE APPARENT OU
NON APPARENT.
A. Assemblage
1. Insérez les pieds de 4 po (102 mm) dans les quatre trous
situés sous le grille-pain. Voir Figure 2. Placez ensuite le grillepain à lemplacement désiré.
2. Installez la grille dentrée et le plateau à miettes à lavant du
four, comme le démontre la Figure 2.
Figure 2 Assemblage de base et configuration avec
FRANÇAIS
RESPONSABILITÉ DU CLIENT DE SIGNALER À LA
sortie avant
Les tiges de
suspension de la
grille dentrée
sadaptent dans les
trous du corps du
grille-pain
Le plateau de retour se
glisse en-dessous du
grille-pain
B. Raccordement électrique
IMPORTANT
LE RACCORDEMENT ÉLECTRIQUE AU GRILLE-PAIN
NÉCESSITE
UN DISJONCTEUR/SECTIONNEUR À FUSIBLES. LES
SPÉCIFICATIONS ÉLECTRIQUES SE TROUVENT SUR LA PLAQUE
DE SÉRIE (VOIR FIGURE 3) ET DANS LES
SPÉCIFICATIONS
ÉLECTRIQUES À LA PAGE 1 DE CE MANUEL.
CONSULTEZ TOUTES LES RÉGLEMENTATIONS NATIONALES ET
LOCALES APPLICABLES POUR LES EXIGENCES EN MATIÈRE DE
RACCORDEMENTS ÉLECTRIQUES SUPPLÉMENTAIRES.
1. Avant dentreprendre les connexions, vérifiez ce qui suit :
a. Vérifiez si lalimentation en électricité est adaptée au grille-
pain. Reportez-vous à la plaque de série du grille-pain (Figure
3) et aux
Spécifications électriques à la page 1.
b. Vérifiez si la prise de courant appropriée est disponible pour
le cordon dalimentation.
AVERTISSEMENT
ASSUREZ-VOUS QU
SECTIONNEUR À FUSIBLES
AUSSI BIEN LE DISJONCEUR/
QUE LE BOUTON ON/OFF/
STBY (MARCHE/ARRÊT/ATTENTE) SONT EN POSITION
OFF AVANT DE COMMENCER. VERIFIEZ QUIL NE RESTE
PLUS DEMBALLAGE A LINTERIEUR DE LA CHAMBRE DE
CUISSON.
2. Insérez le cordon dalimentation dans la prise.
III. FONCTIONNEMENT
A. Emplacement et fonction des commandes
Cette section offre un aperçu des commandes du grille-pain, de leur
emplacement et de leurs fonctions. Lopérateur DOIT se familiariser
avec les commandes. Reportez-vous à la Figure 4.
Les pieds (4)
sinsèrent dans
les trous situés
sous le grille-pain
Le plateau à miettes
se glisse dans
louverture à lavant
du grille-pain
3. APPAREILS NÉTANT CONÇUS QUE POUR UNE UTILISATION
AVEC SORTIE AVANT :
Positionnez le plateau de retour en-dessous du grille-pain,
comme le démontre la Figure 2. Notez que le plateau de retour
sétend au-delà de lAVANT du grille-pain dans le cas de la
configuration avec sortie avant.
4. APPAREILS NÉTANT CONÇUS QUE POUR UNE UTILISATION
À TRAVERS AVEC SORTIE ARRIÈRE :
Déposez la vis CENTRALE du panneau arrière du grille-
pain, comme le démontre la Figure 3.
Poussez le panneau arrière vers lavant, dans le grille-
pain.
Positionnez le plateau de retour en-dessous du grille-
pain, comme le démontre la Figure 3. Notez que le plateau
de retour sétend au-delà de lARRIÈRE du grille-pain
dans le cas de la configuration avec sortie arrière.
Figure 3 Raccordement électrique et configuration avec
sortie arrière
Plaque
de série
Le plateau de
retour se glisse
en-dessous du
grille-pain
2. Ajustez le
panneau
1. Enlevez
la vis
Figure 4
1. Bouton ON/
OFF/STBY
(marche/arrêt/
attente)
2. Bouton de
commande de
vitesse du
transporteur
3. Boutons de
commande de la
température du bas et
du haut
1. Bouton ON/OFF/STBY (marche/arrêt/attente)
Lorsquil est placé sur « ON », le transporteur et les éléments
se mettent en marche.
Lorsquil est placé sur « OFF », le transporteur et les éléments
se mettent à larrêt.
Lorsquil est placé sur « STBY », lalimentation aux éléments
chauffants est réduite et le grille-pain passe ainsi en mode
dattente. Ceci permet déconomiser lénergie pendant les
périodes de repos et daugmenter la durée de vie des
composants du grille-pain. Si vous replacez le bouton en
position « ON », le grille-pain repassera à la température de
fonctionnement endéans les 5 minutes.
2. Bouton de commande de vitesse du transporteur
Permet dajuster la vitesse de la bande transporteuse.
« SLOW » (lent) est le réglage de vitesse minimum.
« FAST » (rapide) est le réglage de vitesse maximum.
3. Boutons de commande de la température du bas et du haut
Permet de régler la température des éléments chauffants. Il existe
deux boutons de sorte que la température des éléments chauffants
du haut et du bas puisse être réglée indépendamment. Si vous
tournez lun des boutons en position « OFF », cela vous permet
de griller dun seul côté (pour les bagels, etc.)
La position « LOW » est le réglage de température le plus bas
permettant de légèrement griller les produits de boulangerie
au-dessus ou en-dessous.
La position « HIGH » est le réglage de température le plus élevé
permettant de griller, voire même rôtir, les produits de
boulangerie au-dessus ou en-dessous.
Page 7

B. Procédure dutilisation
1. Remettez le grille-pain sous tension au niveau du disjoncteur/
sectionneur à fusibles.
2. Placez le bouton ON/OFF/STBY (marche/arrêt/attente) en position « ON ».
3. Laisser préchauffer le grille-pain pendant au moins 15 minutes.
4. Ajustez le temps de cuisson (si nécessaire) en tournant le bouton de commande de vitesse du transporteur.
5. Ajustez la température des éléments chauffants (si nécessaire)
en tournant les boutons de réglage de la température du haut et
du bas.
REMARQUE : Pour griller des produits de boulangerie dun seul
côté (bagels, etc.), nous recommandons la procédure suivante :
Placez le bouton de réglage de la température du haut de
sorte que le côté coupé du produit puisse être grillé comme
désiré.
Placez le bouton de réglage de la température du bas sur la
position la plus faible ou sur « OFF », comme vous le désirez.
Chargez le produit sur la grille dentrée, côté coupé vers le
HAUT, comme le démontre la Figure 5.
Si le produit est chargé avec le côté coupé vers le bas, inversez
les réglages des boutons de la température du haut et du bas.
Veuillez noter que si le produit est chargé avec le côté coupé
vers le bas, la chaleur de la bande transporteuse pourrait causer
un léger effet de rayures sur la face coupée du produit.
5. Chargez les produits de boulangerie à griller sur la grille dentrée.
Le produit glissera de la grille dentrée sur le transporteur.
6. Après la cuisson, enlevez le produit du plateau de retour.
7. Pendant les périodes dinactivité, placez le bouton de sélection en
position « STBY ». Ceci permet de réduire lalimentation vers les
éléments chauffants afin déconomiser lénergie pendant les
périodes de repos et daugmenter la durée de vie des composants
du grille-pain. Si vous replacez le bouton en position « ON », le
grille-pain repassera à la température de fonctionnement endéans
les 5 minutes.
Figure 5
Chargez les petits
pains/bagels CÔTÉ
COUPÉ VERS LE
HAUT pour pouvoir les
griller correctement
Bouton
dajustement de la
température du
haut réglé comme
désiré
Bouton de réglage de la
température du bas placé
sur la position la plus faible
ou sur « OFF »
C. Procédure darrêt
1. Placez le bouton ON/OFF/STBY (marche/arrêt/attente) en
position « OFF » ( « O »).
2. Attendez que le grille-pain refroidisse. Notez que le ventilateur
continue à fonctionner afin de permettre au grille-pain de refroidir
plus rapidement.
3. APRÈS que le ventilateur se soit arrêté, débranchez
lalimentation en électricité du grille-pain au disjoncteur/
sectionneur à fusibles.
D. Dégagement dincidents
AVERTISSEMENT
NE JAMAIS INTRODUIRE LES MAINS DANS LA CHAMBRE
DE CUISSON POUR DÉGAGER UN PRODUIT. DES
BLESSURES GRAVES PEUVENT EN RÉSULTER.
MISE EN GARDE
NE JAMAIS utiliser dobjet en plastique pour dégager un produit.
Si le grille-pain nest pas complètement refroidi, cela pourrait
endommager le grille-pain.
MISE EN GARDE
Lorsque vous dégagez un produit, faites attention de ne pas
endommager les éléments chauffants.
1. Placez le bouton ON/OFF/STBY (marche/arrêt/attente) en
position « OFF » ( « O »).
2. Attendez que le grille-pain refroidisse. Notez que le ventilateur
continue à fonctionner afin de permettre au grille-pain de refroidir
plus rapidement.
3. APRÈS que le ventilateur sest arrêté, débranchez lalimentation
en électricité du grille-pain au disjoncteur/sectionneur à fusibles.
ATTENTION TEMPERATURE ÉLEVÉE
NESSAYEZ PAS DE DÉGAGER LE PRODUIT AVANT QUE LE
GRILLE-PAIN NE SOIT COMPLÈTEMENT REFROIDI.
4. Dégagez précautionneusement le produit à laide dun objet
assez long comme, par exemple, une sonde. Une sonde en
bois est préférable car elle risque moins dendommager les
résistances.
E. Nettoyage quotidien
AVERTISSEMENT
PENDANT LENTRETIEN DU GRILLE-PAIN, NE LAISSEZ
JAMAIS UNE TROP GRANDE QUANTITE DE PRODUIT
EN CONTACT AVEC LAPPAREIL. NASPERGEZ PAS, NE
RINCEZ PAS ET NIMMERGEZ PAS LE GRILLE-PAIN. UNE
HUMIDITÉ EXCESSIVE ENTRAINERAIT DIMPORTANTS
RISQUES DELECTROCUTION ET POURRAIT
EGALEMENT ENDOMMAGER LE GRILLE-PAIN.
MISE EN GARDE
NE PAS utiliser de substances ou de produits abrasifs pour
lentretien du grille-pain. Ceux-ci peuvent rayer et ternir la surface.
1. Mettez en marche le transporteur et évacuez les miettes sur le
plateau à miettes à laide dune brosse.
2. Placez le bouton ON/OFF/STBY (marche/arrêt/attente) en
position « OFF » ( « O »).
3. Attendez que le grille-pain refroidisse. Notez que le ventilateur
continue à fonctionner afin de permettre au grille-pain de refroidir
plus rapidement.
4. APRÈS que le ventilateur se soit arrêté, débranchez
lalimentation en électricité du grille-pain au disjoncteur/
sectionneur à fusibles.
ATTENTION TEMPERATURE ÉLEVÉE
NE TOUCHEZ PAS LES SURFACES CHAUDES DU GRILLEPAIN OU LA CHAMBRE DE CUISSON AVANT LE
REFROIDISSEMENT COMPLET DE LUNITÉ.
5. Essuyez lextérieur de lappareil à laide dune éponge humide
ou dun chiffon trempé dans de leau savonneuse chaude ou
bouillante. Essuyez avec un chiffon humide et propre afin
denlever tout excès de détergent et essuyez ensuite pour
sécher le grille-pain.
6. Enlevez le plateau à miettes et le plateau de retour du grille-pain
et videz-les. Lavez-les dans de leau savonneuse et chaude
et rincez-les ensuite.
MISE EN GARDE
Ne jamais enlever le plateau à miettes lorsque le transporteur
est en mouvement.
7. Enlevez la grille dentrée du grille-pain. Lavez-la dans de leau
savonneuse et chaude et rincez-la ensuite.
8. Essuyez les plateaux et la grille dentrée à laide dun essuie.
Remontez toutes les pièces dans le grille-pain.
FRANÇAIS
Page 8

Schéma de câblage Grille-pain de 120 V, modèle TC17A74
ENGLISH
page 1
FRANÇAIS
page 5
ESPAÑOL
página 9
VENTI-
LATEUR
ÉLÉMENT DU BAS 1
ÉLÉMENT DU BAS 2
BOUTON ON/OFF/
STBY (marche/
arrêt/attente)
INTERRUPTEUR DE
REFROIDISSEMENT
MASSE
BOUTON DE
RÉGLAGE DE LA
TEMPÉRATURE
DU BAS
BORNE
ÉLÉMENT DU HAUT
COMMANDE DE VITESSE
DU TRANSPORTEUR
BOUTON DE
RÉGLAGE DE LA
TEMPÉRATURE DU
HAUT
Schéma de câblage Grille-pain de 208 V, modèles TC17A/21A63
ÉLÉMENT DU HAUT 1
ÉLÉMENT DU BAS 1
ÉLÉMENT DU HAUT 2
ÉLÉMENT DU BAS 2
MOTEUR
TRANSFORMATEUR
VENTI-
LATEUR
INTERRUPTEUR DE
REFROIDISSEMENT
BOUTON ON/OFF/
STBY (marche/
arrêt/attente)
MASSE
BOUTON DE
RÉGLAGE DE LA
TEMPÉRATURE
DU BAS
BORNE
230V p : 115V s
COMMANDE DE VITESSE
DU TRANSPORTEUR
BOUTON DE
RÉGLAGE DE LA
TEMPÉRATURE DU
HAUT
MOTEUR
Configuration du commutateur Modèles TC17A et TC21A de grille-pain
POSITION « OFF »
(arrêt)
POSITION « ON »
(marche)
POSITION « STBY »
(attente)
Une société Middleby
Middleby Cooking Systems Group 1400 Toastmaster Drive Elgin, IL 60120 USA (847)741-3300 Télécopieur (847)741-4406
Middleby Corp Assistance téléphonique 24 heures sur 24 1-800-238-8444
www.middleby.com
Page 9

TC17A/TC21A
Doméstico y Exportación estándar
Inglés/Francés/ESPAÑOL
Middleby Cooking Systems Group 1400 Toastmaster Drive Elgin, IL 60120 EE.UU. (847)741-3300 FAX (847)741-4406
Tostadora con transportador
Modelos TC17A, TC21A
N/P 45067
Rev. B V1 1/01
MANUAL DE INSTALACIÓN Y
OPERACIÓN DEL PROPIETARIO
© 2001 Toastmaster, Una compañía Middleby.
I. DESCRIPCIÓN Y ESPECIFICACIONES
A. Localización de componentes
1. Perilla de ON/
OFF/STBY
(ENCENDIDO/
APAGADO/
ESPERA)
B. Función de los componentes (ver la Figura 1)
1-3. Perillas de control de la tostadora - ver la Sección III, Operación.
4. Bandeja colectora - Recibe los residuos de productos tostados.
5. Rejilla de entrada - Es donde se coloca el producto de panadería
6. Transportador - Transporta el producto de panadería a través
7. Bandeja de retorno - Recoge el producto tostado. La bandeja
C. Especificaciones de operación y eléctricas
Tiempo de precalentamiento: 15 minutos
Especificaciones eléctricas/ Modelos de tostadora TC17:
TC17A74: 120V, 50/60 Hz, 1 Ph, 1.97kW, 16.4A, Enchufe NEMA 5-20P
TC17A63: 208V, 50/60 Hz, 1 Ph, 2.62kW, 12.6A, Enchufe NEMA 6-15P
TC17A66: 240V, 50/60 Hz, 1 Ph, 2.62kW, 11.0A, Enchufe NEMA 6-15P
Especificaciones eléctricas/ Modelos de tostadora TC21:
TC21A63: 208V, 50/60 Hz, 1 Ph, 2.90kW, 13.9A, Enchufe NEMA 6-20P
TC21A66: 240V, 50/60 Hz, 1 Ph, 2.90kW, 12.1A, Enchufe NEMA 6-20P
NOTA
Al final de este manual se incluyen diagramas de cableado eléctrico.
es una marca registrada de Toastmaster, Una compañía Middleby. Reservados todos los derechos.
Los componentes principales de la tostadora se muestran a
continuación en la Figura 1.
6. Transportador
7. Bandeja de retorno
La bandeja se puede retirar para limpiarla.
que se va a tostar. El producto se desliza entonces sobre el
transportador. La rejilla de entrada se puede retirar para
limpiarla.
de la tostadora, entre los elementos térmicos superior e inferior.
se puede retirar para limpiarla.
Figura 1
5. Rejilla de
entrada
4. Bandeja
colectora
3. Perillas de
control de la
temperatura de la
parte superior e
inferior
2. Perilla de
control de la
velocidad del
transportador
9
AVISO: EN CASO DE INCENDIO
Desconecte INMEDIATAMENTE la tostadora del
suministro eléctrico. Esto permite que la unidad se
enfríe y facilita apagar el incendio.
AVISO
PARA SU SEGURIDAD, NO UTILICE NI ALMACENE
GASOLINA NI OTROS GASES O LÍQUIDOS
INFLAMABLES CERCA DE ÉSTE U OTROS
APARATOS ELÉCTRICOS
AVISO
UNA INSTALACIÓN, AJUSTE, ALTERACIÓN,
SERVICIO O MANTENIMIENTO INAPROPIADOS
PUEDEN CAUSAR DAÑOS MATERIALES,
LESIONES PERSONALES O LA MUERTE. LEA
ATENTAMENTE LAS INSTRUCCIONES DE
INSTALACIÓN Y OPERACIÓN ANTES DE INSTALAR
O PRESTAR SERVICIO A ESTE EQUIPO.
AVISO
No haga funcionar la tostadora con transportador
sobre ninguno de sus lados, sobre la pare posterior
o sin las patas. Si lo hiciera los elementos térmicos
fallarían prematuramente.
AVISO
Desconecte la tostadora del suministro eléctrico
antes de realizar tareas de limpieza o servicio.
PRECAUCIÓN
Si se utilizan piezas distintas de las originales suministradas en
fábrica por Toastmaster, el fabricante queda libre de toda
responsabilidad.
IMPORTANTE
Antes de realizar tareas de mantenimiento y reparación, póngase
en contacto con el técnico de servicio autorizado. Con el horno
se incluye una lista de establecimientos de servicio.
IMPORTANTE
Toastmaster (fabricante) se reserva el derecho de modificar las
especificaciones y diseño del producto sin previo aviso Estas
modificaciones no dan derecho al comprador a los cambios,
mejoras, adiciones o reemplazos por equipo comprado con
anterioridad.
CONSERVE ESTE MANUAL PARA USARLO COMO
REFERENCIA EN EL FUTURO
Este manual proporciona información detallada sobre la
instalación y operación de su tostadora. También contiene
información para ayudar al operador a solucionar problemas en
el caso de una avería. Este manual es una herramienta importante
para el operador y debe conservarse en un lugar de fácil
acceso.
page 1
ENGLISH
page 5
FRANÇAIS
página 9
ESPAÑOL
Page 10

II. INSTALACIÓN
IMPORTANTE
ES
RESPONSABILIDAD DEL CLIENTE INFORMAR A LA
EMPRESA DE TRANSPORTE SOBRE CUALQUIER DAÑO VISIBLE
U OCULTO.
A. Montaje
1. Inserte las patas de 4" (102 mm) en los cuatro orificios de la
parte inferior de la tostadora. Ver la Figura 2. Después coloque
la tostadora en el lugar deseado.
2. Instale la rejilla de entrada y la bandeja colectora dentro de la
parte delantera de la tostadora, tal como se muestra en la
Figura 2.
Figura 2 - Ensamblado básico y configuración con salida
por la parte delantera
Rejilla de entrada
Las varillas de
sujeción se insertan
en los orificios del
bastidor de la
tostadora
Bandeja de retorno
Se desliza debajo de
la tostadora
ESPAÑOL
Patas (4)
Se insertan dentro
de los orificios en la
parte inferior de la
tostadora
3. SÓLO TOSTADORAS DISEÑADAS CON SALIDA POR LA
PARTE DELANTERA:
Coloque la bandeja de retorno debajo de la tostadora, tal como
se muestra en la Figura 2. Observe que la bandeja de retorno
se extiende más allá de la PARTE DELANTERA de la tostadora
en la configuración con salida por la parte delantera.
4. SÓLO TOSTADORAS DISEÑADAS CON OPERACIÓN "DIRECTA"
CON SALIDA POR LA PARTE POSTERIOR:
Retire el tornillo CENTRAL del panel posterior de la
tostadora, tal como se muestra en la Figura 3.
Empuje el panel posterior hacia adelante dentro de la
tostadora.
Coloque la bandeja de retorno debajo de la tostadora, tal
como se muestra en la Figura 3. Observe que la bandeja
de retorno se extiende más allá de la PARTE POSTERIOR
de la tostadora en la configuración de salida por la parte
posterior.
Figura 3 - Conexión eléctrica y configuración con salida
Placa
informativa
Bandeja de
retorno
Se desliza debajo
de la tostadora
Bandeja colectora
Se desliza dentro de
la abertura en la
parte delantera de la
tostadora
por la parte posterior
2. Ajustar
panel
1. Retirar el
tornillo
B. Conexión de servicio eléctrico
IMPORTANTE
LA CONEXIÓN DEL SERVICIO ELÉCTRICO A LA TOSTADORA
REQUIERE UN DISYUNTOR/CONECTOR CON FUSIBLE. LAS
ESPECIFICACIONES ELÉCTRICAS SE INDICAN EN LA PLACA
INFORMATIVA (MOSTRADA EN LA FIGURA 3) Y EN LAS
ESPECIFICACIONES ELÉCTRICAS DE LA PÁGINA 1 DE ESTE
MANUAL.
CONSULTE TODOS LOS CÓDIGOS LOCALES Y NACIONALES
APLICABLES PARA OTROS REQUISITOS DE CONEXIONES
ELÉCTRICAS.
1. Antes de proceder con la conexión eléctrica, verifique lo siguiente:
a. Compruebe si el suministro eléctrico coincide con los
requisitos de la tostadora. Consulte la placa informativa de
la tostadora (Figura 3) y las
Especificaciones Eléctricas en
la página 1.
b. Compruebe que el enchufe del cable de potencia cuente
con el receptáculo apropiado.
AVI SO
ANTES DE PROSEGUIR, ASEGÚRESE DE QUE
DISYUNTOR/CONECTOR CON FUSIBLE
COMO LA PERILLA
TANTO EL
DE ON/OFF/STBY (ENCENDIDO/APAGADO/ESPERA) SE
ENCUENTREN EN LA POSICIÓN OFF. ASEGÚRESE DE
RETIRAR LOS RESIDUOS DEL MATERIAL DE EMBALAJE
DEL INTERIOR DE LA CÁMARA DE LA TOSTADORA.
2. Inserte el enchufe del cable de potencia en su receptáculo.
III. OPERACIÓN
A. Ubicación y función de los controles
Esta sección proporciona una descripción básica de los controles de
la tostadora, su ubicación y las funciones que realizan. El operador
DEBE estar familiarizado con los controles. Ver la Figura 4.
Figura 4
1. Perilla de ON/OFF/
STBY (ENCENDIDO/
APAGADO/ESPERA)
2. Perilla de control
de velocidad del
transportador
1. Perilla de ON/OFF/STBY (ENCENDIDO/APAGADO/ESPERA)
Cuando se ajusta a "ON" se activa el transportador y los
elementos.
Cuando se ajusta a "OFF" se desactiva el transportador y
los elementos.
Cuando se ajusta a "STBY", la tostadora entra al modo de
espera reduciendo el suministro de energía a los elementos
térmicos. Esto ahorra energía durante los períodos de
inactividad y extiende la vida útil de los componentes de la
tostadora. Si se ajusta la perilla a la posición "ON" la tostadora
volverá a la temperatura de operación en menos de 5 minutos.
2. Perilla de control de la velocidad del transportador
Ajusta la velocidad del transportador.
"SLOW" (LENTO) es el ajuste de velocidad mínima.
"FAST" (RÁPIDO) es el ajuste de velocidad máxima.
3. Perillas de ajuste de la temperatura de la parte superior e inferior
Ajusta la temperatura de los elementos térmicos. Se proporcionan
dos perillas para que se pueda ajustar independientemente la
temperatura del elemento térmico superior e inferior. Si se ajusta
una de las perillas a la posición "OFF" se podrá tostar una sola
cara (para panes ácimos (bagels), etc.)
"LOW" (BAJO)es el ajuste más bajo de temperatura,
resultando en un ligero tostado de la parte superior o inferior
del producto de panadería.
"HIGH" (ALTO) es el ajuste más alto de temperatura,
produciendo un tostado más oscuro de la parte superior o
10
inferior del producto de panadería.
3. Perillas de ajuste de
la temperatura de la
parte superior e
inferior
Page 11

B. Procedimiento de operación
1. Encienda la tostadora usando el disyuntor/conector con fusible.
2. Ajuste la perilla de ON/OFF/STBY (ENCENDIDO/APAGADO/
ESPERA) a la posición "ON".
3. Permita que la tostadora se caliente durante 15 minutos como
mínimo.
4. Ajuste el tiempo de tostado (si es necesario) girando la perilla de
control de la velocidad del transportador.
5. Ajuste las temperaturas de los elementos térmicos (si es
necesario) girando las perillas de ajuste de la temperatura de la
parte superior e inferior.
NOTA: Para tostar apropiadamente un solo lado de los productos
(panes ácimos (bagels), etc), recomendamos que haga lo siguien:
Gire la perilla de ajuste de la temperatura de la parte superior
al ajuste deseado para tostar el lado cortado del producto.
Gire la perilla de ajuste de la temperatura de la parte inferior
al ajuste más bajo, o a la posición "OFF", según lo deseado.
Coloque el producto en la rejilla de entrada con el lado cortado
hacia ARRIBA, tal como se muestra en la Figura 5.
Si el producto se coloca con el lado cortado hacia abajo, invierta
los ajustes de las perillas de la temperatura de la parte superior e
inferior indicados arriba. Observe que si el producto se coloca
con el lado cortado hacia abajo, el calor del transportador puede
hacer que aparezcan ligeras líneas en el lado cortado del producto.
5. Coloque el producto que va a tostar en la rejilla de entrada. El
producto se deslizará de la rejilla de entrada y caerá sobre el
transportador.
6. Después de tostarlo, retire el producto de la bandeja de retorno.
7. Durante períodos de inactividad, cambie la perilla de Selección de
Productos a la posición "STBY". Esto reduce el consumo de
energía de los elementos térmicos, ahorrando energía durante
períodos de inactividad, y alargando la vida útil de los componentes
de la tostadora. Si cambia la perilla a la posición "ON" la tostadora
volverá a la temperatura de operación en menos de 5 minutos.
Figura 5
Coloque los bollos/panes ácimos
(bagels) con el LADO CORTADO
HACIA ARRIBA para que se
tuesten apropiadamente
Perilla de ajuste de la
temperatura de la
parte superior
colocada en la
posición deseada
Perilla de ajuste de la
temperatura de la parte
inferior colocada a un
ajuste más bajo o a la
posición "OFF"
C. Procedimiento de desconexión
1. Cambie la perilla de ON/OFF/STBY (ENCENDIDO/APAGADO/
ESPERA) a la posición OFF ("O").
2. Permita que la tostadora se enfríe. Observe que el ventilador
de enfriamiento continuará funcionando para permitir que la
tostadora se enfríe más rápidamente.
3. DESPUÉS de que el ventilador de enfriamiento se detenga,
desconecte el suministro de energía eléctrica a la tostadora
usando el disyuntor/conector con fusible.
D. Cómo eliminar atascos
AVI SO
NUNCA INTRODUZCA LAS MANOS EN LA CÁMARA DE
TOSTAR PARA ELIMINAR UN ATASCO. PODRÍA SUFRIR
GRAVES LESIONES PERSONALES.
PRECAUCIÓN
NUNCA use un objeto de plástico para eliminar un atasco. Si la
tostadora no se ha enfriado completamente, podría dañarse.
PRECAUCIÓN
Cuando elimine un atasco, procure no dañar los elementos
térmicos.
1. Coloque la perilla de ON/OFF/STBY (ENCENDIDO/APAGADO/
ESPERA) a la posición OFF ("O").
2. Permita que la tostadora se enfríe. Observe que el ventilador
de enfriamiento continuará funcionando para permitir que la
tostadora se enfríe más rápidamente.
3. DESPUÉS de que el ventilador de enfriamiento se detenga,
desconecte el suministro de energía eléctrica a la tostadora
usando el disyuntor/conector con fusible.
PRECAUCIÓN - SUPERFICIES CALIENTES
NO INTENTE ELIMINAR EL ATASCO HASTA QUE LA
TOSTADORA SE HAYA ENFRIADO COMPLETAMENTE.
4. Elimine el atasco con cuidado usando un objeto largo para
explorar. Este objeto debe ser preferiblemente de madera
porque es menos probable que cause daños a los elementos
térmicos.
E. Limpieza diaria
AVI SO
CUANDO LIMPIE LA TOSTADORA, NO APLIQUE
DEMASIADO LÍQUIDO. NO ROCÍE, LAVE NI SUMERJA
LA TOSTADORA. LA HUMEDAD EXCESIVA EN LA UNIDAD
CREARÁ UN RIESGO DE DESCARGA ELÉCTRICA Y
COMO MENOS PUEDE DAÑAR LA TOSTADORA.
PRECAUCIÓN
NO limpie la tostadora usando limpiadores o esponjas abrasivas.
Se rayará el acabado y se perderá el brillo.
1. Con el transportador en movimiento, utilice un cepillo para limpiar
los residuos de alimentos de la cinta transportadora, dejando
que caigan en la bandeja colectora.
2. Coloque la perilla de ON/OFF/STBY (ENCENDIDO/APAGADO/
ESPERA) en la posición OFF ("O").
3. Permita que la tostadora se enfríe. Observe que el ventilador
de enfriamiento continuará funcionando para permitir que la
tostadora se enfríe más rápidamente.
4. DESPUÉS de que el ventilador de enfriamiento se detenga,
desconecte el suministro de energía eléctrica a la tostadora
usando el disyuntor/conector con fusible.
PRECAUCIÓN - SUPERFICIES CALIENTES
NO TOQUE LAS SUPERFICIES CALIENTES DE LA
TOSTADORA NI INTRODUZCA LAS MANOS EN LA
CÁMARA DE TOSTAR HASTA QUE LA UNIDAD SE HAYA
ENFRIADO COMPLETAMENTE.
5. Limpie el exterior de la tostadora con una esponja húmeda o un
paño empapado con agua caliente o templada y detergente.
Limpie con un paño limpio y húmedo para eliminar el exceso de
detergente y vuelva a limpiar para secar la tostadora.
6. Retire la bandeja colectora y la bandeja de retorno de la
tostadora y vacíelas. Lave las bandejas con agua templada y
detergente y enjuáguelas.
PRECAUCIÓN
No retire nunca la bandeja colectora cuando el transportador
se mueve.
7. Retire la rejilla de entrada de la tostadora. Lave la rejilla con
agua templada y detergente y enjuáguela.
8. Con una toalla seque las bandejas y la rejilla de entrada. Vuelva
a instalar todas las piezas en la tostadora.
11
ESPAÑOL
Page 12

Diagrama de cableado - Tostadoras modelo TC17A74 120V
ENGLISH
page 1
FRANÇAIS
page 5
Diagrama de cableado - Tostadoras modelos TC17A/21A63 208V, Tostadoras modelo TC17A/
ESPAÑOL
página 9
VENTI-
LADOR
INTERRUPTOR DE
ELEMENTO
INFERIOR 1
ELEMENTO
INFERIOR 2
INTERRUPTOR
"ON/OFF/STBY"
(ENCENDIDO/
APAGADO/
ESPERA)
ENFRIAMIENTO
ELEMENTO
INFERIOR 1
ELEMENTO
INFERIOR 2
INTERRUPTOR
DE AJUSTE DE
LA
TEMPERATURA
DE LA PARTE
INFERIOR
BLOQUE
TERMINAL
TIERRA
21A66 240V
ELEMENTO
SUPERIOR
ELEMENTO
SUPERIOR 1
ELEMENTO
SUPERIOR 2
CONTROL DE VELOCIDAD
DEL TRANSPORTADOR
INTERRUPTOR DE
AJUSTE DE LA
TEMPERATURA DE
LA PARTE SUPERIOR
MOTOR
TRANSFORMADOR
VENTI-
LADOR
INTERRUPTOR
"ON/OFF/STBY"
(ENCENDIDO/
APAGADO/
ESPERA)
INTERRUPTOR DE
ENFRIAMIENTO
TIERRA
INTERRUPTOR
DE AJUSTE DE
LA
TEMPERATURA
DE LA PARTE
INFERIOR
BLOQUE
TERMINAL
230V p : 115V s
CONTROL DE VELOCIDAD
DEL TRANSPORTADOR
INTERRUPTOR DE
AJUSTE DE LA
TEMPERATURA DE
LA PARTE SUPERIOR
MOTOR
Configuración de interruptores - Todas las tostadoras modelo TC17A y TC21A
POSICIÓN "OFF"
(APAGADO)
POSICIÓN "ON"
(ENCENDIDO)
POSICIÓN "STBY"
(ESPERA)
Una compañía Middleby
Toastmaster 1400 Toastmaster Drive Elgin, IL 60120 EE.UU. (847)741-3300 FAX (847)741-4406
Servicio de atención al cliente de Middleby Corp. (24 horas al día) 1-800-238-8444
www.middleby.com
12
 Loading...