

Page 1
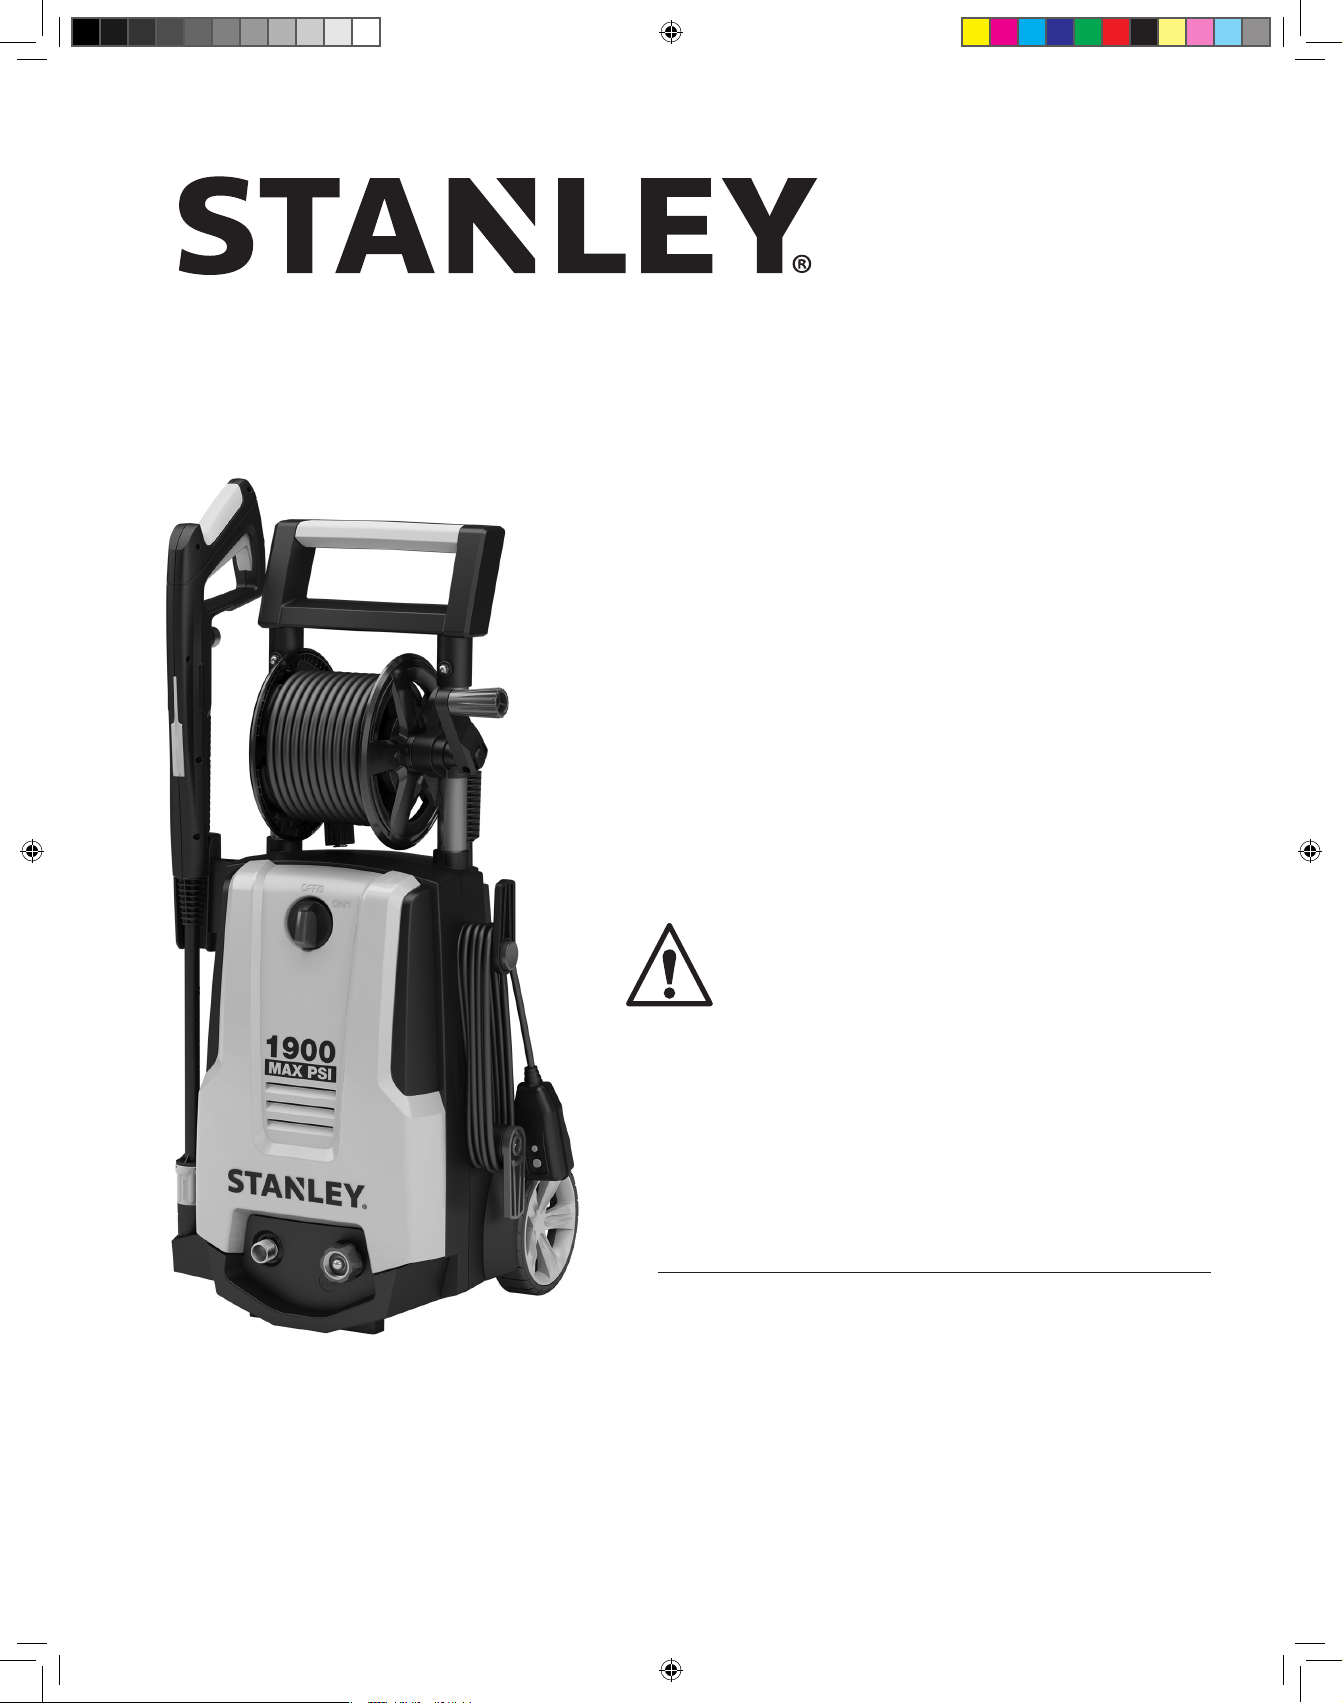
1900 PSI
ELECTRIC PRESSURE
WASHER
ASSEMBLY, CARE AND
USE INSTRUCTIONS
Model SHP 1900
IMPORTANT:
RETAIN THESE INSTRUCTIONS AND ATTACH
RECEIPT TO MANUAL FOR FUTURE REFERENCE.
READ CAREFULLY
ALWAYS WEAR EYE PROTECTION TO
PREVENT INJURY TO EYES WHEN
OPERATING THE POWER WASHER.
Questions, problems, missing parts?
Before returning to your retailer, call our
customer service department at 1-866-508-1330,
8 a.m. - 5:00 p.m., CST, Monday - Friday.
www.stanleypressurewashers.com
© 2016 Stanley Black & Decker, Inc.
STANLEY® and the STANLEY® logo are trademarks of Stanley Black & Decker, Inc.
93904-KP
93904_16ANR029_Stanley 1900PSI ENG-FR-SP.indd 1 16/12/23 下午1:02
or an affiliate thereof and are used under license.
Page 2

TABLE OF CONTENTS
PRODUCT SPECIFICATIONS
TABLE OF CONTENTS
Product Specifications ............................................................................................ 2
Package Contents .................................................................................................. 3
Hardware Contents ................................................................................................ 3
Safety Information ................................................................................................. 4
Assembly Instructions ............................................................................................. 6
Operating Instructions .............................................................................................9
Care and Maintenance ......................................................................................... 13
Troubleshooting ................................................................................................... 15
Limited Warranty ................................................................................................. 16
Replacement Parts List ......................................................................................... 17
PRODUCT SPECIFICATIONS
SPECIFICATIONS
Max PSI
Model
(lbs/sq. in.)
SHP 1900 1900 1.3
2
93904_16ANR029_Stanley 1900PSI ENG-FR-SP.indd 2 16/12/23 下午1:02
Max GPM
(Gal/per min) Cold Water Volts Amps Weight (lbs.)
✔
120 13 24.9
Page 3
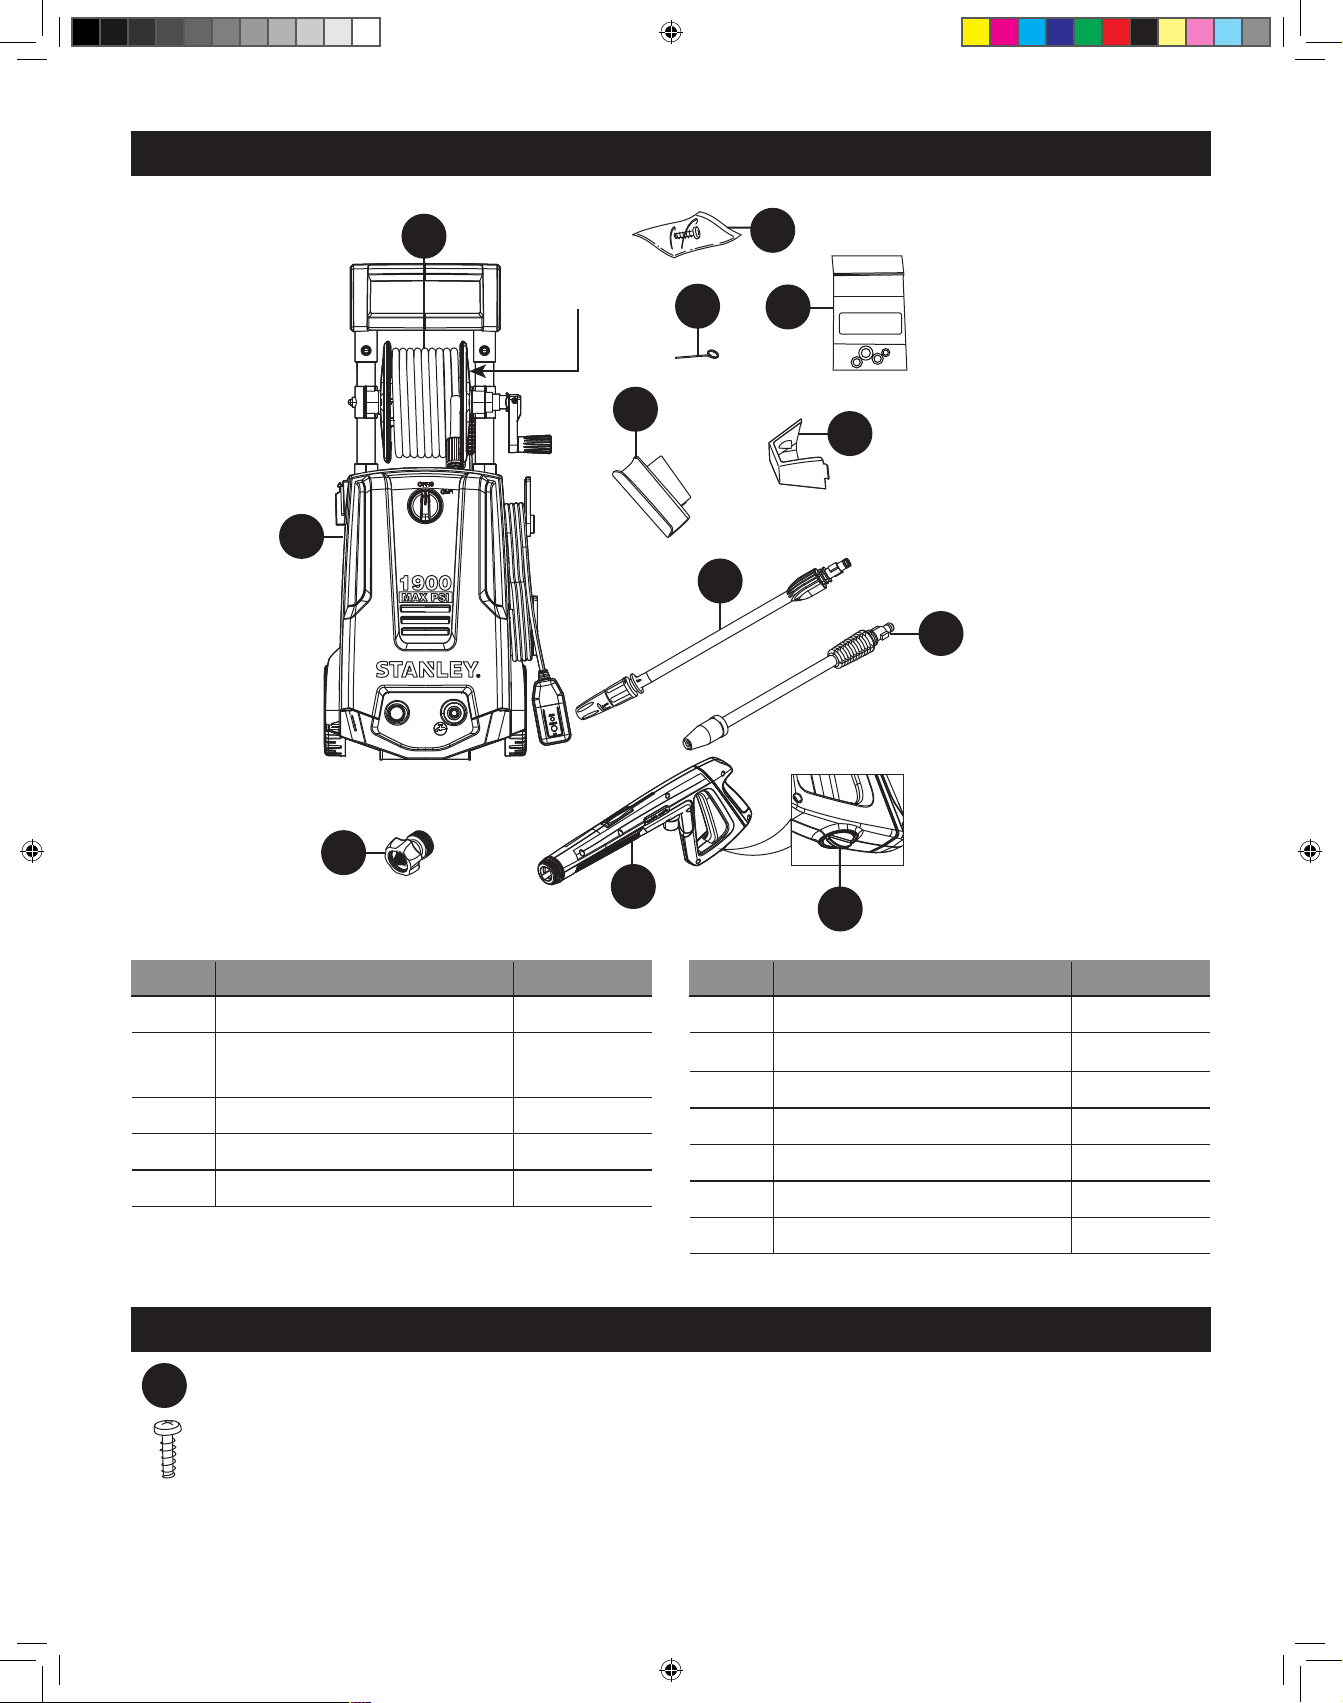
PACKAGE CONTENTS
PACKAGE CONTENTS
PACKAGE CONTENTS
A
B
(Hose reel for
storage only)
D
C
AA
J
PW909SHP1900
E
F
G
K
PART DESCRIPTION QUANTITY
A Power Washer Unit 1
B Soft PVC High Pressure
1
Hose
C Nozzle Cleaning Wire 1
D Spray Gun Holster 1
E Nozzle Tray 1
HARDWARE CONTENTS
AA
Note: Screw is located in
package with manual
I
H
PART DESCRIPTION QUANTITY
F High/Low Lance Nozzle 1
G Turbo Lance Nozzle 1
H Spray Gun Trigger Lock 1
I Spray Gun 1
J O-Ring Replacement Kit 1
K Garden Hose Adapter 1
AA Screw 1
Screw
Qty. 1
3
93904_16ANR029_Stanley 1900PSI ENG-FR-SP.indd 3 16/12/23 下午1:02
Page 4
SAFETY INFORMATION
SAFETY INFORMATION
SAFETY INFORMATION
Please read and understand this entire manual before
attempting to assemble, operate, or install the product.
This manual contains information that relates to
PROTECTING PERSONAL SAFETY and PREVENTING
EQUIPMENT PROBLEMS. It is very important to read this
manual carefully and understand it thoroughly before
using the product. The symbols listed below are used to
indicate this information.
DANGER
Potential hazard that will result in serious injury
or loss of life.
WARNING
Hazard that could result in serious injury or loss
of life.
CAUTION
Potential hazard that may result in moderate
injury or damage to equipment.
Note: The word “Note” is used to inform the reader of
something the operator needs to know about the tool.
WARNING
To reduce the risk of injury, the user must read
and understand the instructions before using
this product.
1. Warning – When using this product basic,
precautions should always be followed, including
the following
2. Read all the instructions before using the product
3. Know how to stop the product and bleed pressures
quickly. Be thoroughly familiar with the controls.
4. Keep operating area clear of persons
5. Do not overreach or stand on unstable support.
Keep good footing and balance at all times.
6. Follow the maintenance instructions as specified in
the manual
7. To avoid personal injury and/or damage to property
and to maximize your power washing experience,
carefully follow all of the safety tips, instructions,
warnings and safeguards and become familiar with
all of the controls.
8. This power washer conforms to CSA and other
safety and consumer standards. DO NOT modify or
rebuild any part of your power washer.
9. DO NOT use your power washer when you are
under the influence of alcohol or drugs. Use this
4
power tool carefully and only when you are alert.
10. Watch your balance and footing while using your
power washer. Surfaces become slippery when wet
and are extra slippery when using a detergent or
cleaner.
11. NEVER operate the power washer in bare feet,
sandals, or open-toed shoes.
12. When using the power washer near children, make
sure they are closely supervised by an adult to avoid
injury. NEVER let a child use the power washer.
13. Keep fingers, hands, feet and any part of your body
clear of the stream of high pressure water. The
powerful spray can cause blindness or blast holes in
the skin. It can break a window if you are too close
when you pull the trigger on the spray gun.
14. ALWAYS wear eye protection to prevent injury to
eyes when operating the power washer.
15. To avoid mishaps or injury, ALWAYS use the trigger
safety lock when not using the power washer even
if the spraying stops for a moment.
16. The power washer is equipped with a Ground Fault
Circuit Interrupter (GFCI) which greatly reduces the
chance of electric shock while the unit is in use. If
replacement of the plug or cord is needed, use only
identical replacement parts.
17. Point the spray gun in a safe direction when
beginning a power washing session.
18. NEVER spray directly at a person, animal, electrical
device or the unit itself.
19. When first using the spray gun, hold the spray
gun and lance with two hands when pulling the
trigger (one hand to pull the trigger and the other
to stabilize the gun assembly) until you get used to
the “kickback” from the spray gun.
20. When you press the power switch to turn off the
power washer, water pressure may remain in the
system. To discharge the pressure, point the spray
gun in a safe direction and pull the trigger.
21. NEVER spray flammable liquids.
22. NEVER use the power washer in areas that contain
combustible dust, liquids or vapors.
23. Avoid contact of the pressure hose with sharp
objects and examine the hose regularly. Replace
if damaged. Due to the high pressure involved, it
cannot be repaired if cut or damaged.
24. Only use detergent specifically formulated for
power washers and follow instructions on the
detergent’s label.
25. Protect eyes, lungs, and skin from exposure to
detergent. Dish or laundry soap is too thick and will
clog the nozzle of your detergent bottle.
93904_16ANR029_Stanley 1900PSI ENG-FR-SP.indd 4 16/12/23 下午1:02
Page 5
SAFETY INFORMATION
SAFETY INFORMATION
SAFETY INFORMATION
IMPORTANT: Store the power washer indoors to
prevent the water in the unit from expanding under
freezing conditions. When the water freezes and
expands, your power washer will be damaged and
become inoperable. Or, if storing outdoors, it is
recommended you use pump saver (not included) to
protect pumps.
26. NEVER use hot water with your power washer. It
will overheat and damage the high pressure pump.
27. NEVER leave the power washer unattended while
it is powered “ON”.
28. ALWAYS turn the water supply “ON ” before
turning the power washer power to “ON”.
Running the pump dry will cause damage to the
internal components.
29. NEVER use a water supply to your power washer
that exceeds 150 PSI maximum.
30. NEVER disconnect the high pressure hose from the
power washer while the system is pressurized.
31. NEVER permanently engage the trigger
mechanisms on the spray gun.
32. NEVER operate the power washer unless all
components are properly and securely connected.
33. NEVER allow the power washer pump to run for
more than one minute after you have turned off
the water supply. This can cause the motor and
pump to overheat and fail.
34. NEVER use lances or other parts that are not
compatible for this specific AR Blue Clean unit.
35. NEVER use an extension power cord since it
defeats the effectiveness of the GFCI and increases
the chance of electrocuting the operator.
36. NEVER spray any electrical outlet with your power
washer.
37. Inspect the power cord before using. DO NOT use
it if it is damaged.
KEEP THESE INSTRUCTIONS FOR FUTURE REFERENCE.
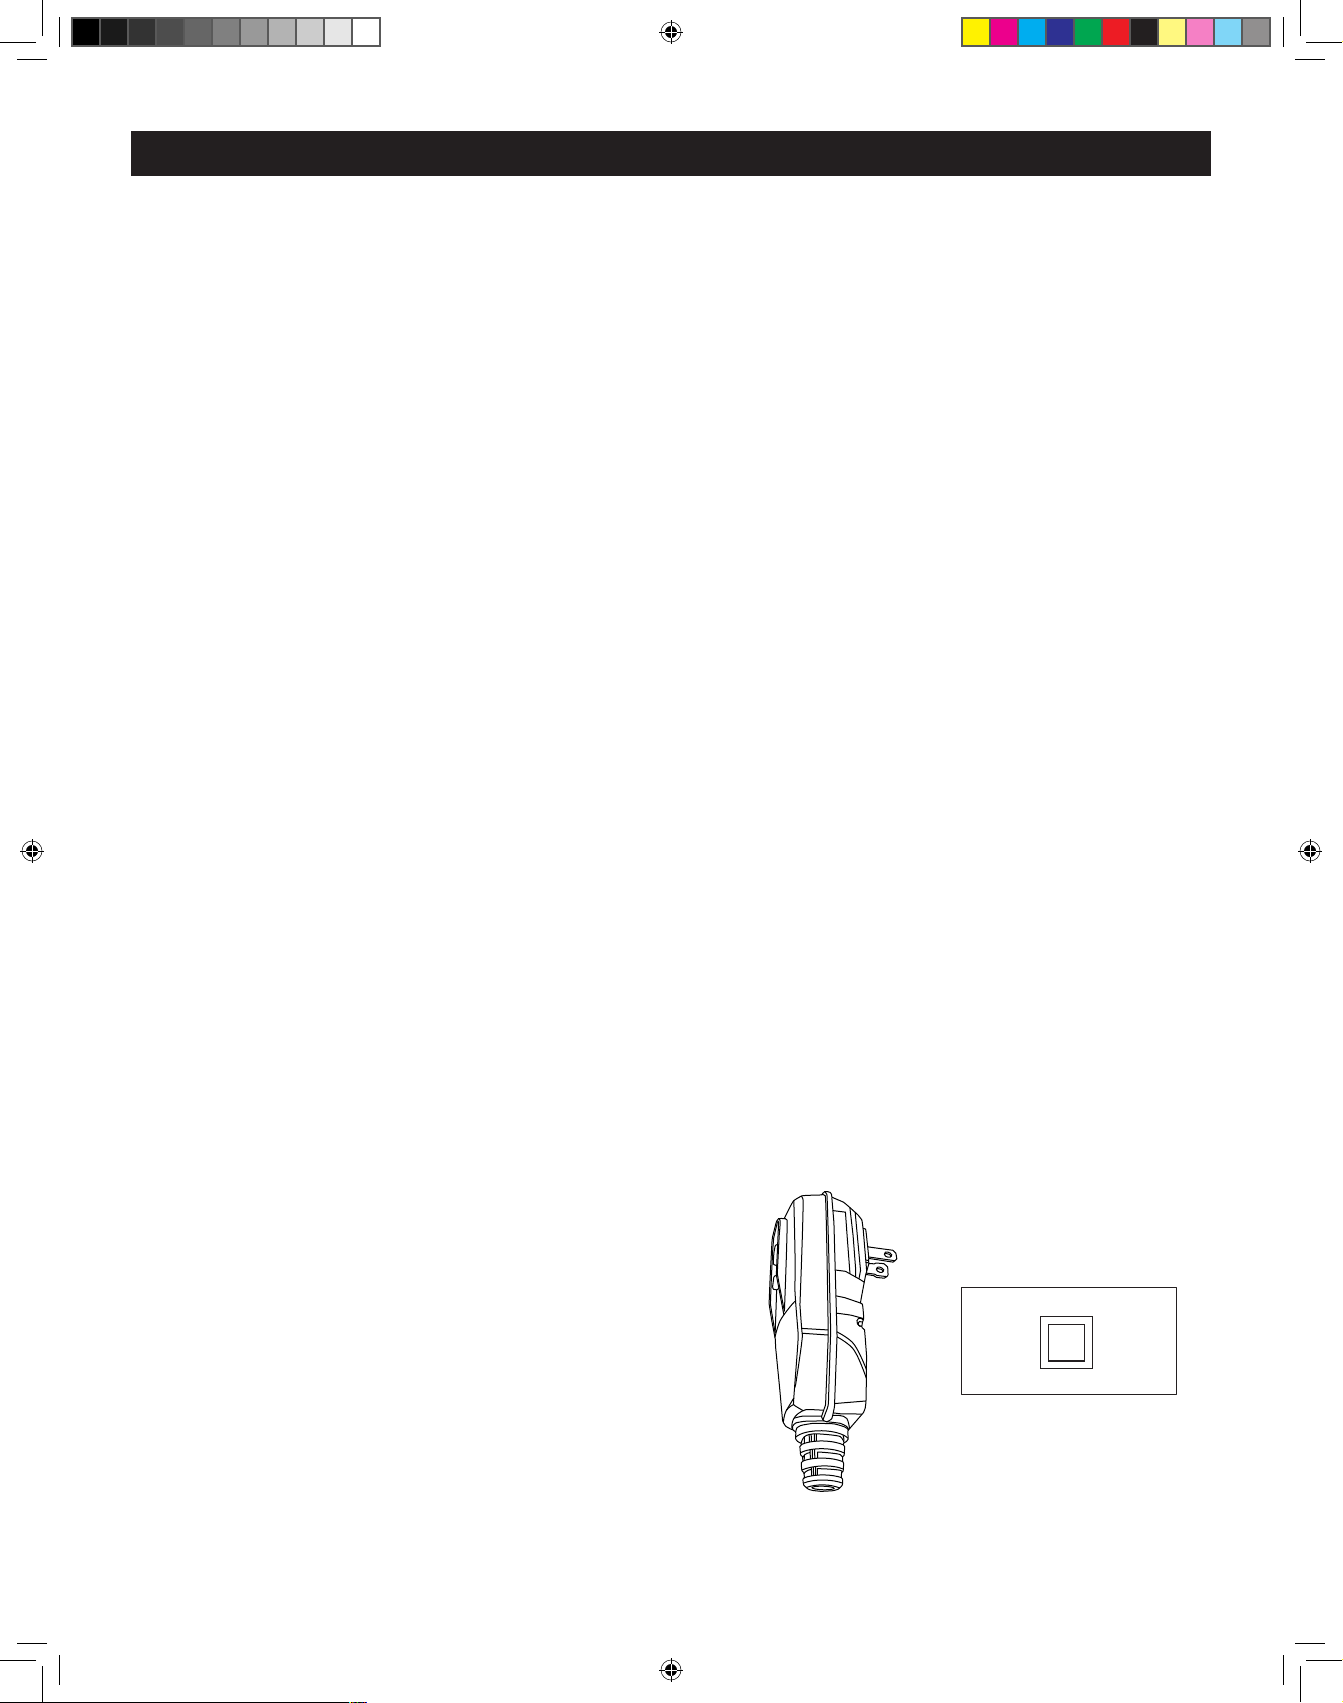
Servicing of a Double-Insulated Appliance
Ground Fault Circuit Interrupter Protection:
This pressure washer is provided with a ground-fault
circuit-interrupter (GFCI) built into the plugs of the
power-supply cord. This device provides additional
protection from the risk of electric shock. Should
replacement of the plug or cord become necessary,
use only identical replacement parts that include GFCI
protection.
In a double-insulated product, two systems of
insulation
are provided instead of grounding. Grounding means
are not provided for a double insulated product, nor
should grounding means be added to the product.
Servicing a double-insulated product requires extreme
care and knowledge of the system, and should only be
done by qualified service personnel.
Replacement parts for a double-insulated product must
be identical to the original parts.
A double-insulated product is marked with the words
“Double Insulation” or “Double Insulated”. Product
may also be marked with symbol shown here.
Double Insolated Product
5
93904_16ANR029_Stanley 1900PSI ENG-FR-SP.indd 5 16/12/23 下午1:02
Page 6
PREPARATION
PREPARATION
Screw
Qty. 1
PREPARATION
Before beginning assembly of product, make sure
all parts are present. Compare parts with package
contents list and hardware contents list. If any part is
missing or damaged, DO NOT attempt to assemble the
product.
Estimated Assembly Time: 5 minutes
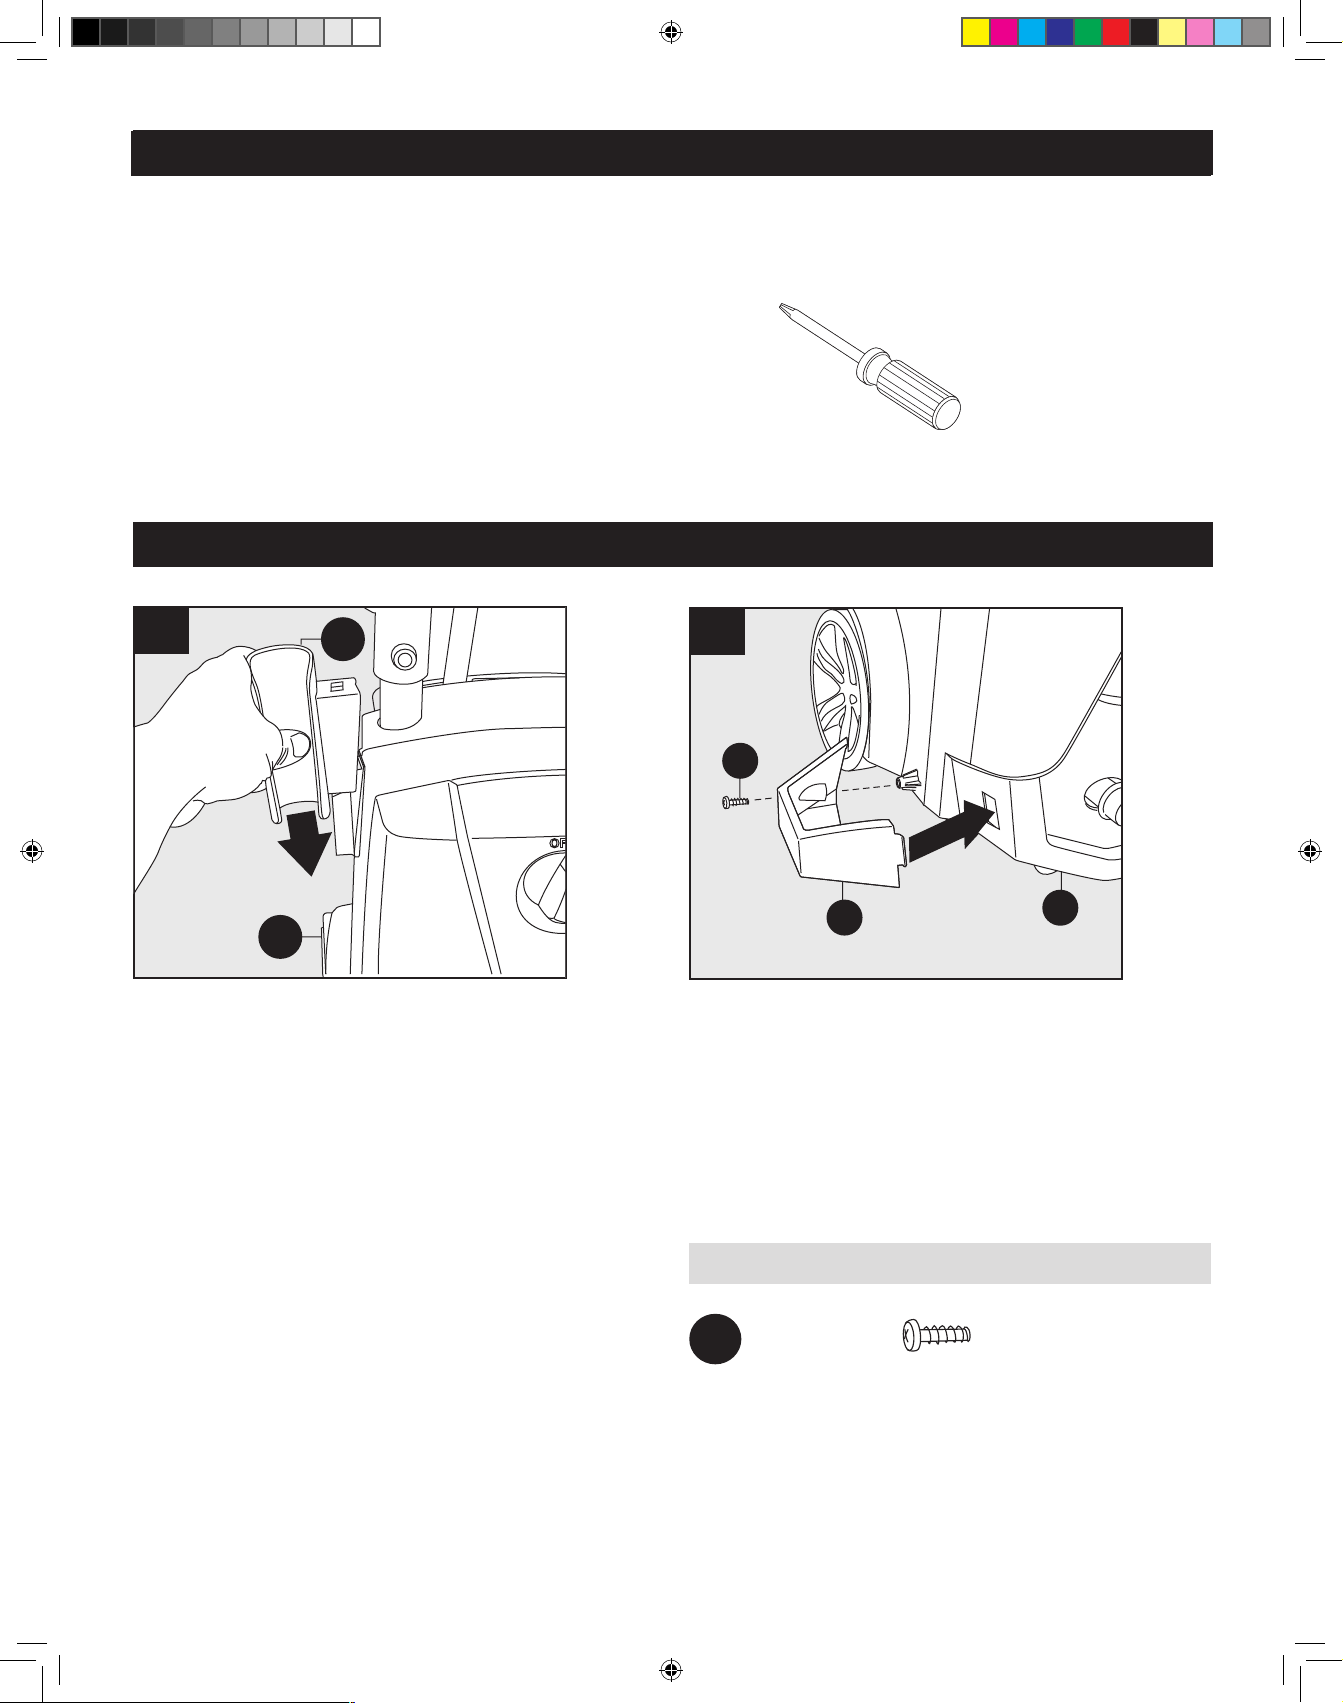
ASSEMBLY INSTRUCTIONS
Tools Required for Assembly (not included): Phillips
screwdriver
1
D
A
Power Unit Assembly
Slide the spray gun holster (D) onto left side, when
facing the unit, of power washer unit (A).
Note: When placing the gun with the lance at-
tached, the nozzle will rest in this tray.
2
AA
E
Slip tab into slot and screw the nozzle tray (E) on bottom left, when facing the unit, of power washer unit
(A).
Secure with screw (AA).
Note: DO NOT use a power screwdriver. When the
screw is completely tight, give a small final clockwise
twist of the screwdriver.
DO NOT overtighten.
A
Hardware Used:
AA
6
93904_16ANR029_Stanley 1900PSI ENG-FR-SP.indd 6 16/12/23 下午1:02
Screw x 1
Page 7
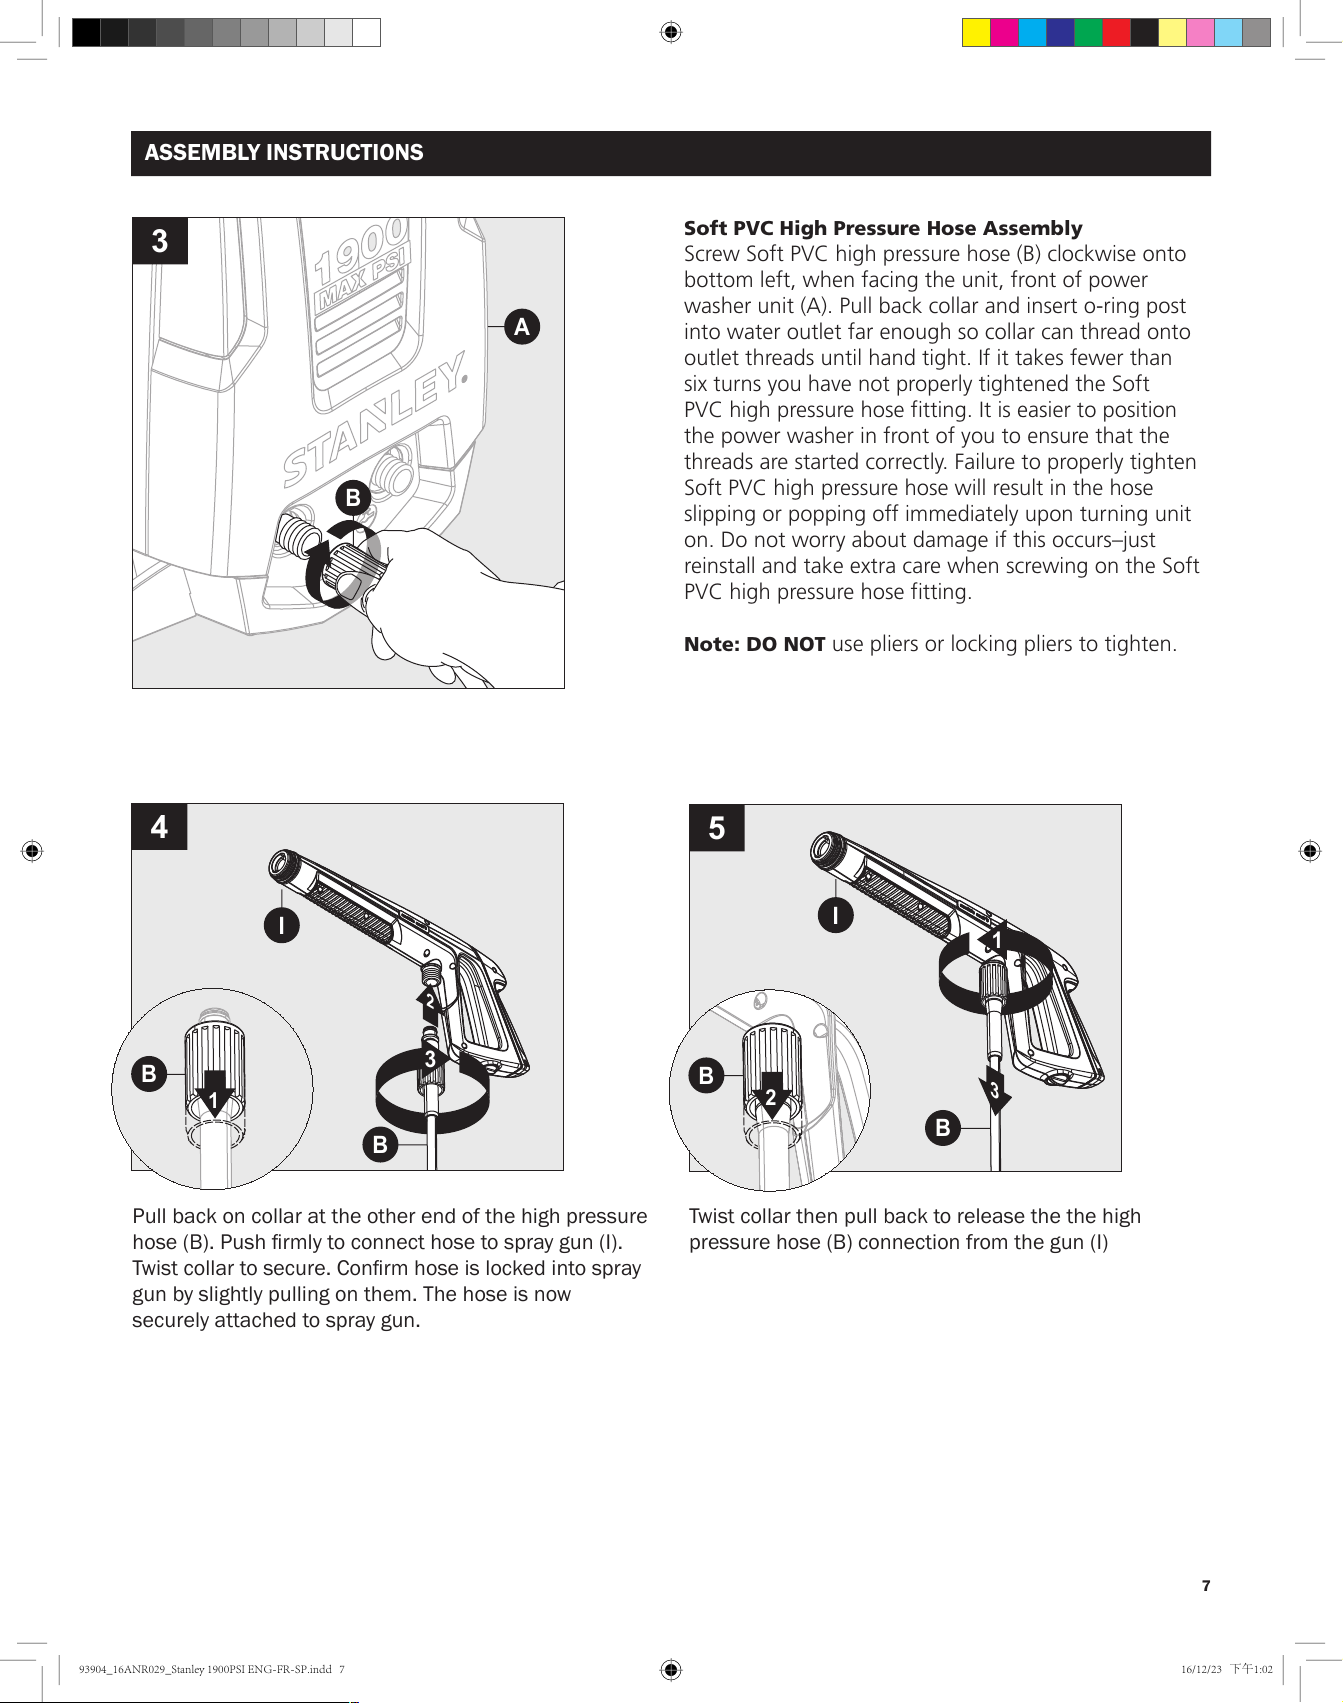
ASSEMBLY INSTRUCTIONS
3
2
3
B
A
Soft PVC High Pressure Hose Assembly
Screw Soft PVC high pressure hose (B) clockwise onto
bottom left, when facing the unit, front of power
washer unit (A). Pull back collar and insert o-ring post
into water outlet far enough so collar can thread onto
outlet threads until hand tight. If it takes fewer than
six turns you have not properly tightened the Soft
PVC high pressure hose fitting. It is easier to position
the power washer in front of you to ensure that the
threads are started correctly. Failure to properly tighten
Soft PVC high pressure hose will result in the hose
slipping or popping off immediately upon turning unit
on. Do not worry about damage if this occurs–just
reinstall and take extra care when screwing on the Soft
PVC high pressure hose fitting.
Note: DO NOT use pliers or locking pliers to tighten.
4
I
2
B
1
Pull back on collar at the other end of the high pressure
hose (B). Push rmly to connect hose to spray gun (I).
Twist collar to secure. Conrm hose is locked into spray
gun by slightly pulling on them. The hose is now
securely attached to spray gun.
3
B
5
I
1
B
Twist collar then pull back to release the the high
pressure hose (B) connection from the gun (I)
3
B
7
93904_16ANR029_Stanley 1900PSI ENG-FR-SP.indd 7 16/12/23 下午1:02
Page 8

ASSEMBLY INSTRUCTIONS
6
K
1
Unlocked Locked
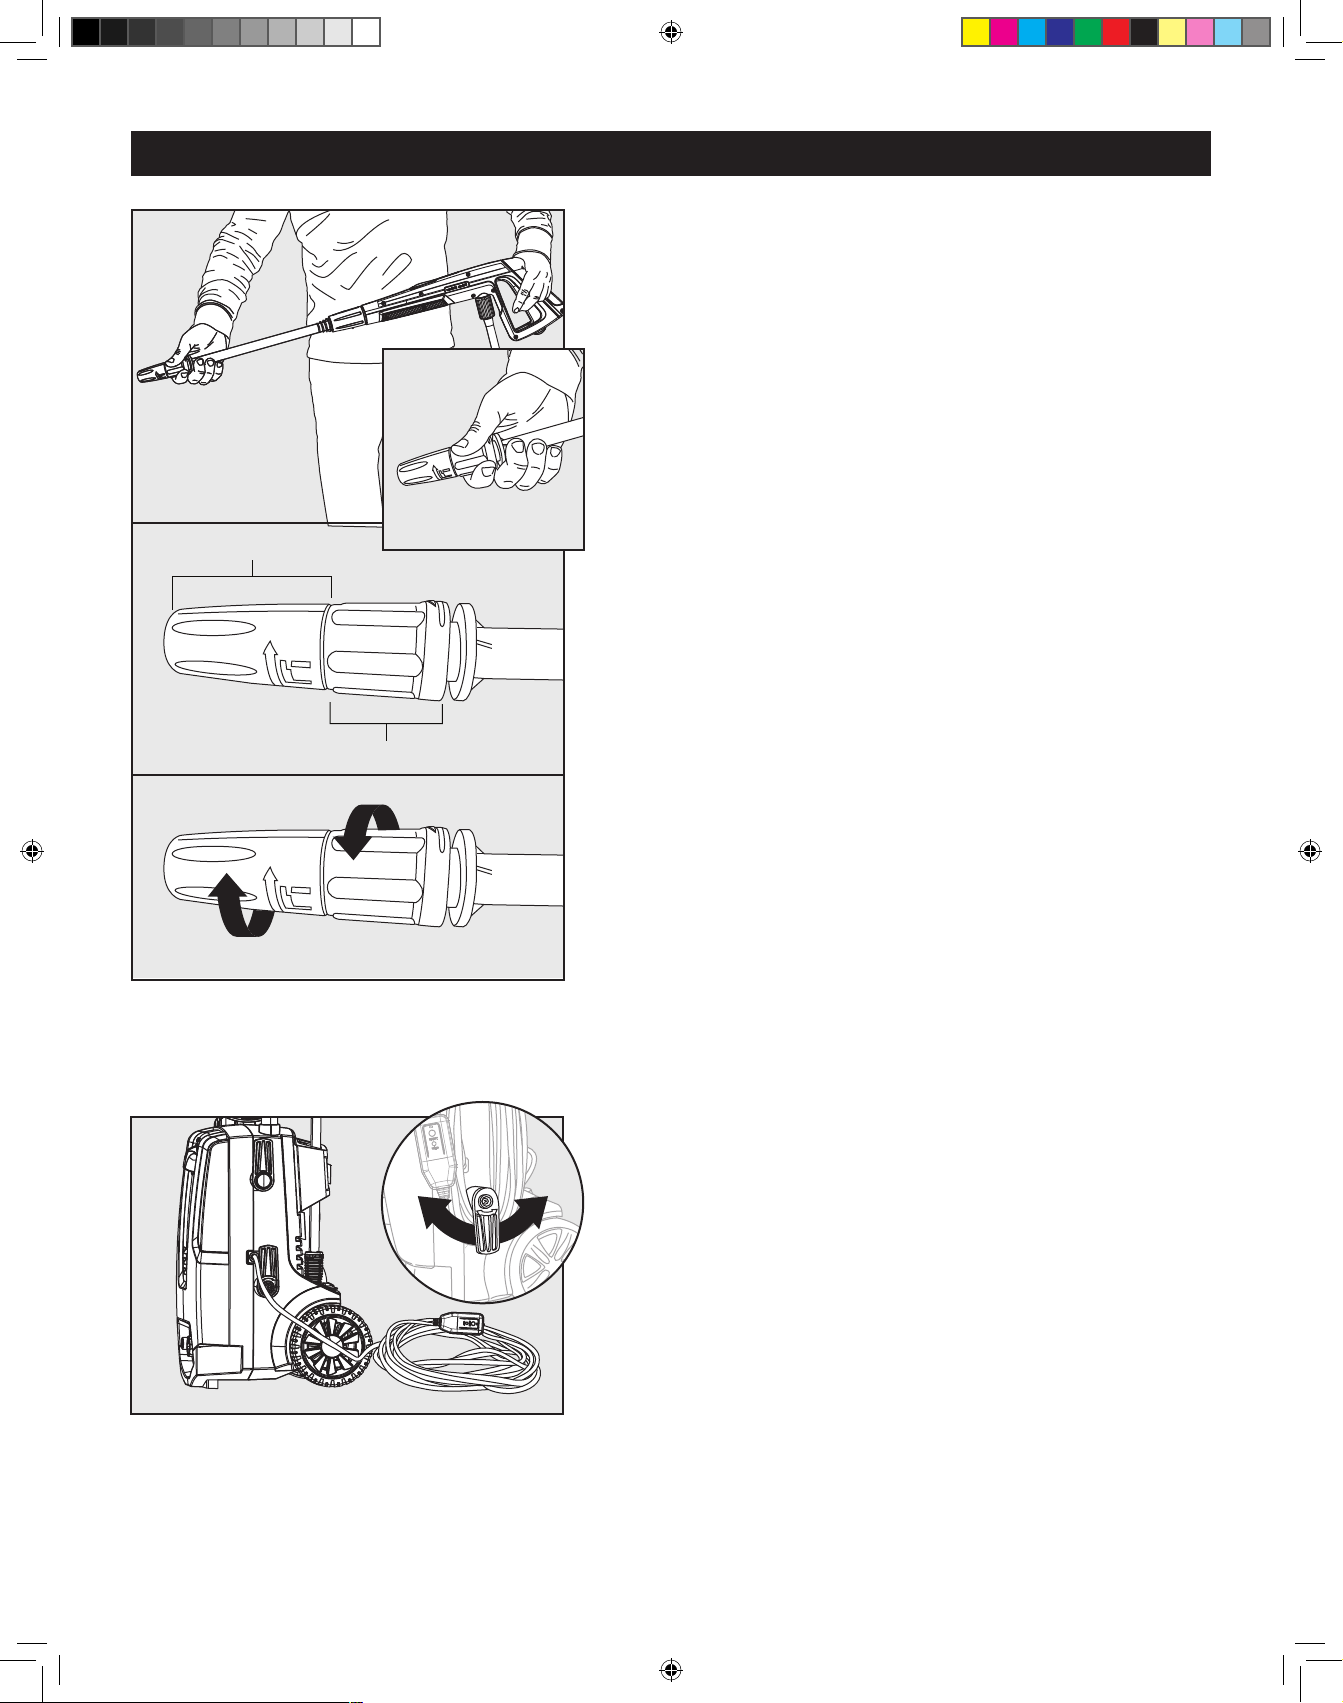
Locking Spray Gun (before Lance installation)
To lock trigger of spray gun (I), point gun away
from you and turn dial to lock (“3” and “9” position).
Squeeze or pull trigger to make sure it is locked.
ALWAYS leave in locked position when not in
use. This ensures the gun is in “safe” mode until it
is ready for use. Turn dial to unlock (“12” and “6”
position) to release spray gun trigger.
Note: The trigger lock prevents trigger from being
accidentally engaged.
7
GF
I
1
G
2
High/Low Nozzle Lance and Turbo Nozzle Lance
Installation
While the spray gun (I) is in the locked position, insert
the high/low nozzle lance (F) or turbo nozzle lance (G)
into the end of the spray gun, by inserting and pushing
together turning clockwise simultaneously. To remove,
push together and turn counterclockwise.
Note: Always push the safety lock button to lock the
trigger when changing lances to ensure that they do
not accidentally eject with force during removal.
Note: When using the turbo lance, make sure the
turbo nozzle is screwed on tight at the end of the lance
each time you use it.
Note: Turbo nozzle is not adjustable.
8
93904_16ANR029_Stanley 1900PSI ENG-FR-SP.indd 8 16/12/23 下午1:02
Page 9
ASSEMBLY INSTRUCTIONS
8
A
K
Garden Hose Adapter Installation
Attach collar of garden hose adapter (K) directly to
power washer water inlet (A). Hand tighten.
9
1
K
Attach garden hose to the garden hose adapter (K).
Note: Flush out garden hose before connecting
to garden hose adapter.
OPERATING INSTRUCTIONS
You have now completed assembly and are ready to
begin using your electric power washer. Read and
observe all safety instructions.
• Turn on water supply at the faucet to completely
open.
• Make sure the “ON/OFF” switch is in the “OFF”
position. The power switch has international
symbols for ‘on’ and ‘off’: On (|) Off (O).
• Unwind the power cord completely and plug the
GFCI into a grounded 120 volt outlet.
• Release safety push trigger lock up and back into
trigger. While pointing the spray gun in a safe
direction, squeeze the trigger on the spray gun until
there is a steady stream of water, letting the water
and air out of the hose. Push trigger lock back
down to lock back into place.
9
93904_16ANR029_Stanley 1900PSI ENG-FR-SP.indd 9 16/12/23 下午1:02
Page 10
OPERATING INSTRUCTIONS
OPERATING INSTRUCTIONS
OFF/0
ON/I
• Turn the power switch to the “ON” (|) position.
The unit will turn on for 1 - 2 seconds and shut
off. This is a normal function of the auto start
feature. Squeeze the spray gun trigger to begin
pressure washing.
• Begin power washing by squeezing the trigger on
the spray gun all the way into the handle.
• Release the spray gun trigger to stop the power
washer
• Allow the motor to come to a complete stop
before squeezing the trigger again.
• Squeezing rapidly will cause the auto start feature
to miss an on/off cycle that may prevent it from
turning on while squeezing trigger after rapid
squeezing. Use slow deliberate trigger pulls to
avoid such symptoms.
OFF/0
ON/I
• Always test a small area to avoid chance of
damaging the surface.
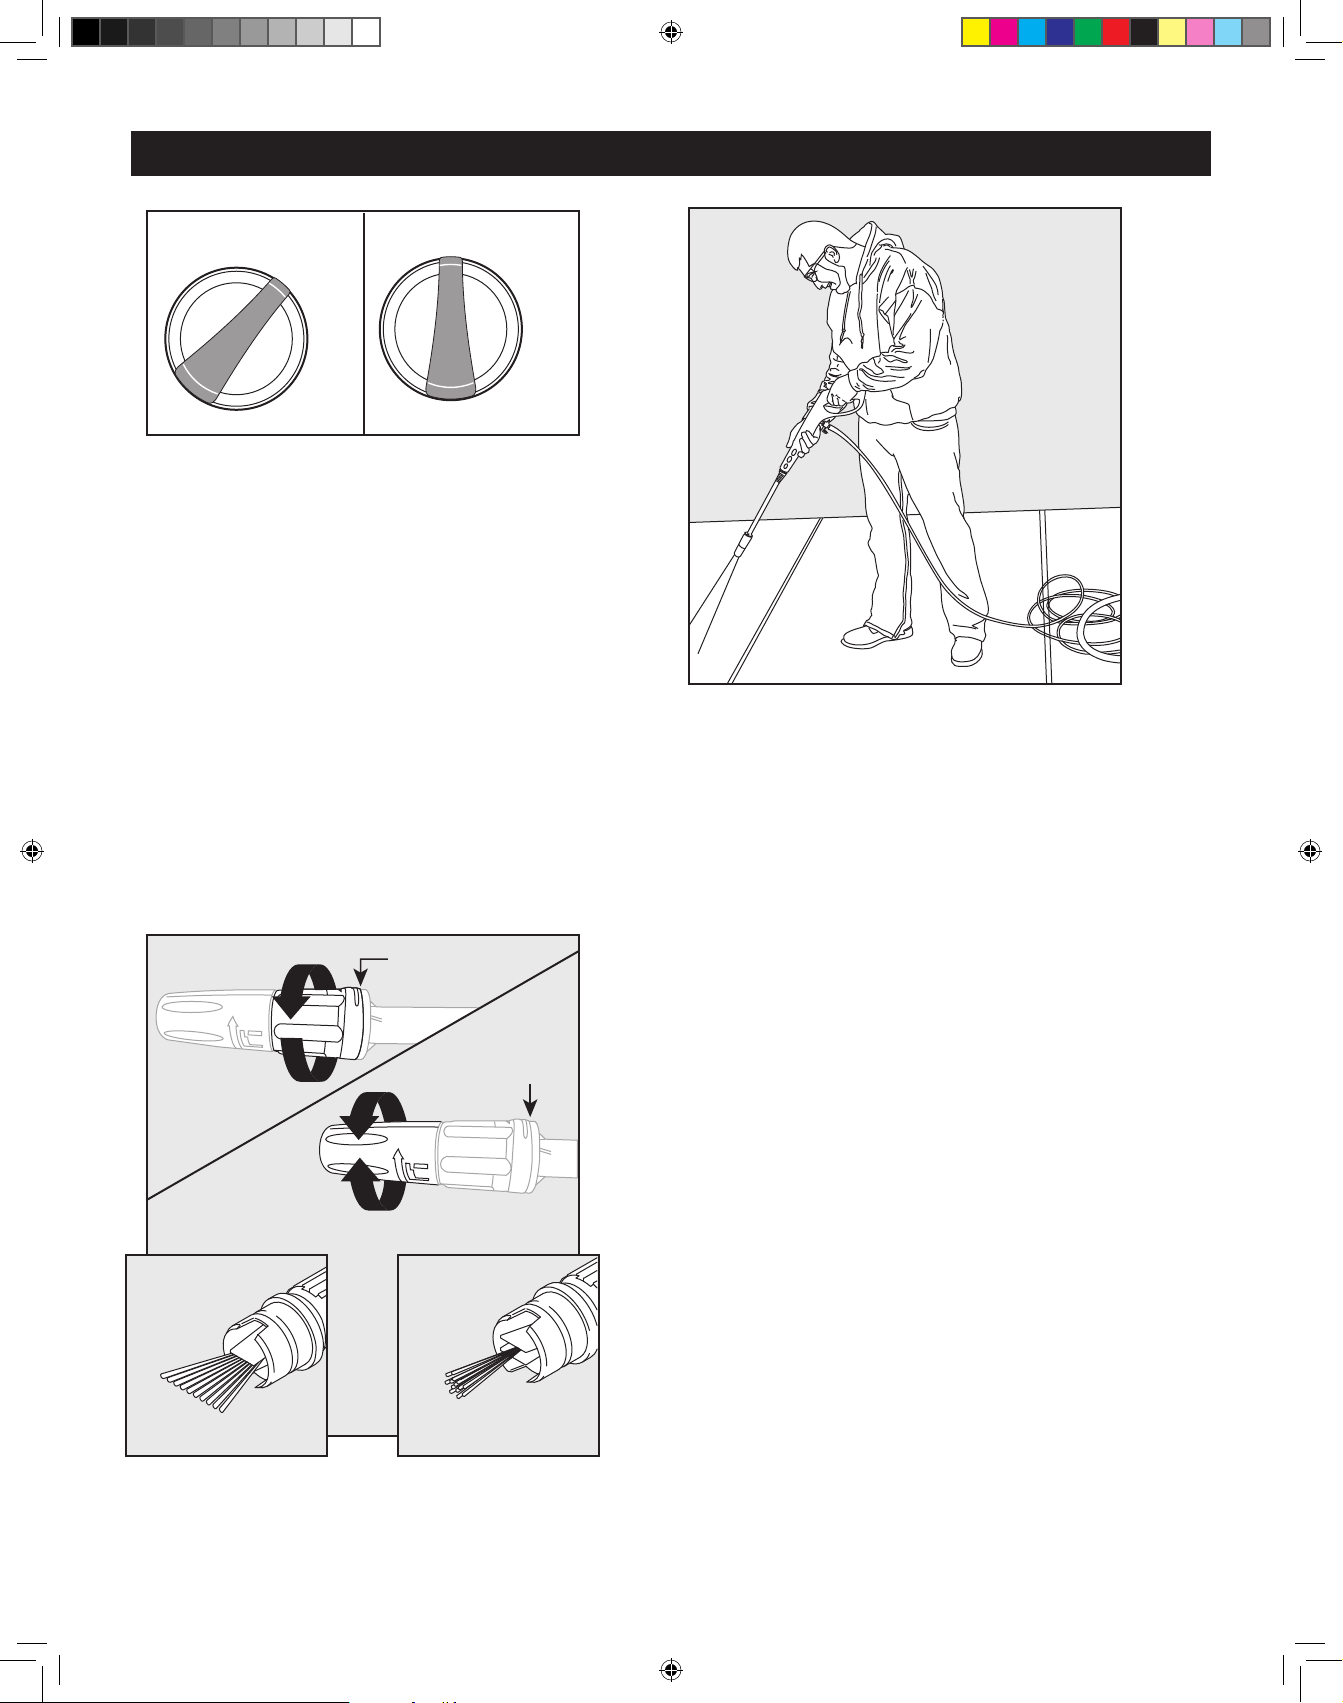
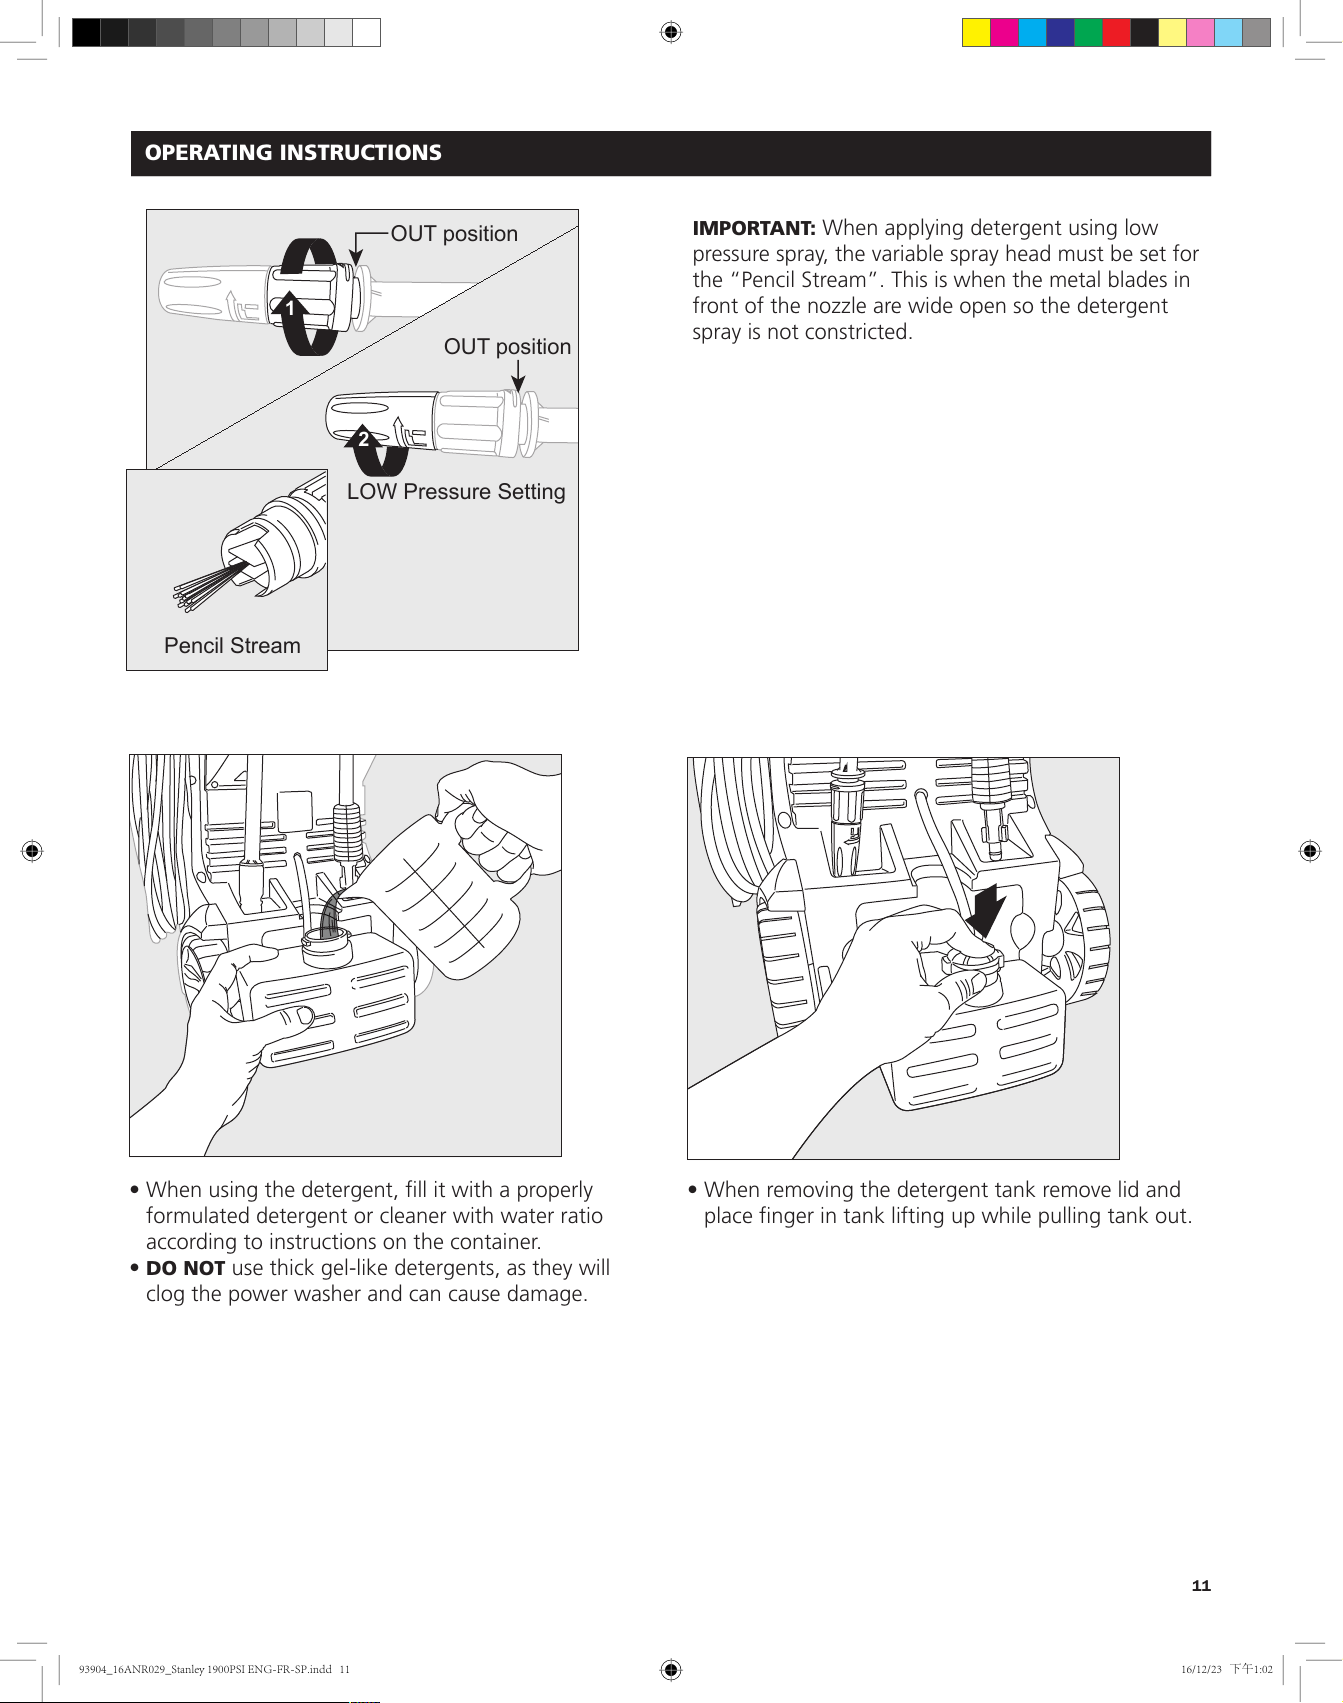
IN position
1
IN position
2
2
High Pressure Setting
Fan Spray Pencil Stream
Using High/Low Nozzle
• High pressure spray is used for cleaning and low
pressure spray activates the detergent function.
• The adjustable spray nozzle had has two (2)
positions:
– IN position for high pressure spray. Twist the
nozzle counterclockwise until it stops and gap is
closed.
– OUT position for low pressure spray for detergent
function. Twist the nozzle clockwise until it stops
and gap is open.
• When using the high pressure setting, twist the
nozzle head clockwise or counterclockwise to
achieve the stream desired.
• When using the low pressure setting twist the nozzle
head clockwise to open the fan blades
all the way.
10
93904_16ANR029_Stanley 1900PSI ENG-FR-SP.indd 10 16/12/23 下午1:02
Page 11
OPERATING INSTRUCTIONS
OPERATING INSTRUCTIONS
1
2
LOW Pressure Setting
Pencil Stream
OUT position
OUT position
IMPORTANT: When applying detergent using low
pressure spray, the variable spray head must be set for
the “Pencil Stream”. This is when the metal blades in
front of the nozzle are wide open so the detergent
spray is not constricted.
• When using the detergent, fill it with a properly
formulated detergent or cleaner with water ratio
• When removing the detergent tank remove lid and
place finger in tank lifting up while pulling tank out.
according to instructions on the container.
• DO NOT use thick gel-like detergents, as they will
clog the power washer and can cause damage.
11
93904_16ANR029_Stanley 1900PSI ENG-FR-SP.indd 11 16/12/23 下午1:02
Page 12
OPERATING INSTRUCTIONS
OPERATING INSTRUCTIONS
OPERATING INSTRUCTIONS
Spray
Pressure
Operation Tips
• If you hear the motor run intermittently when the
trigger is not being squeezed, that is normal.
The pump is priming itself so it is ready to operate
when the trigger is squeezed. Turn off the power
washer if not being used after five minutes.
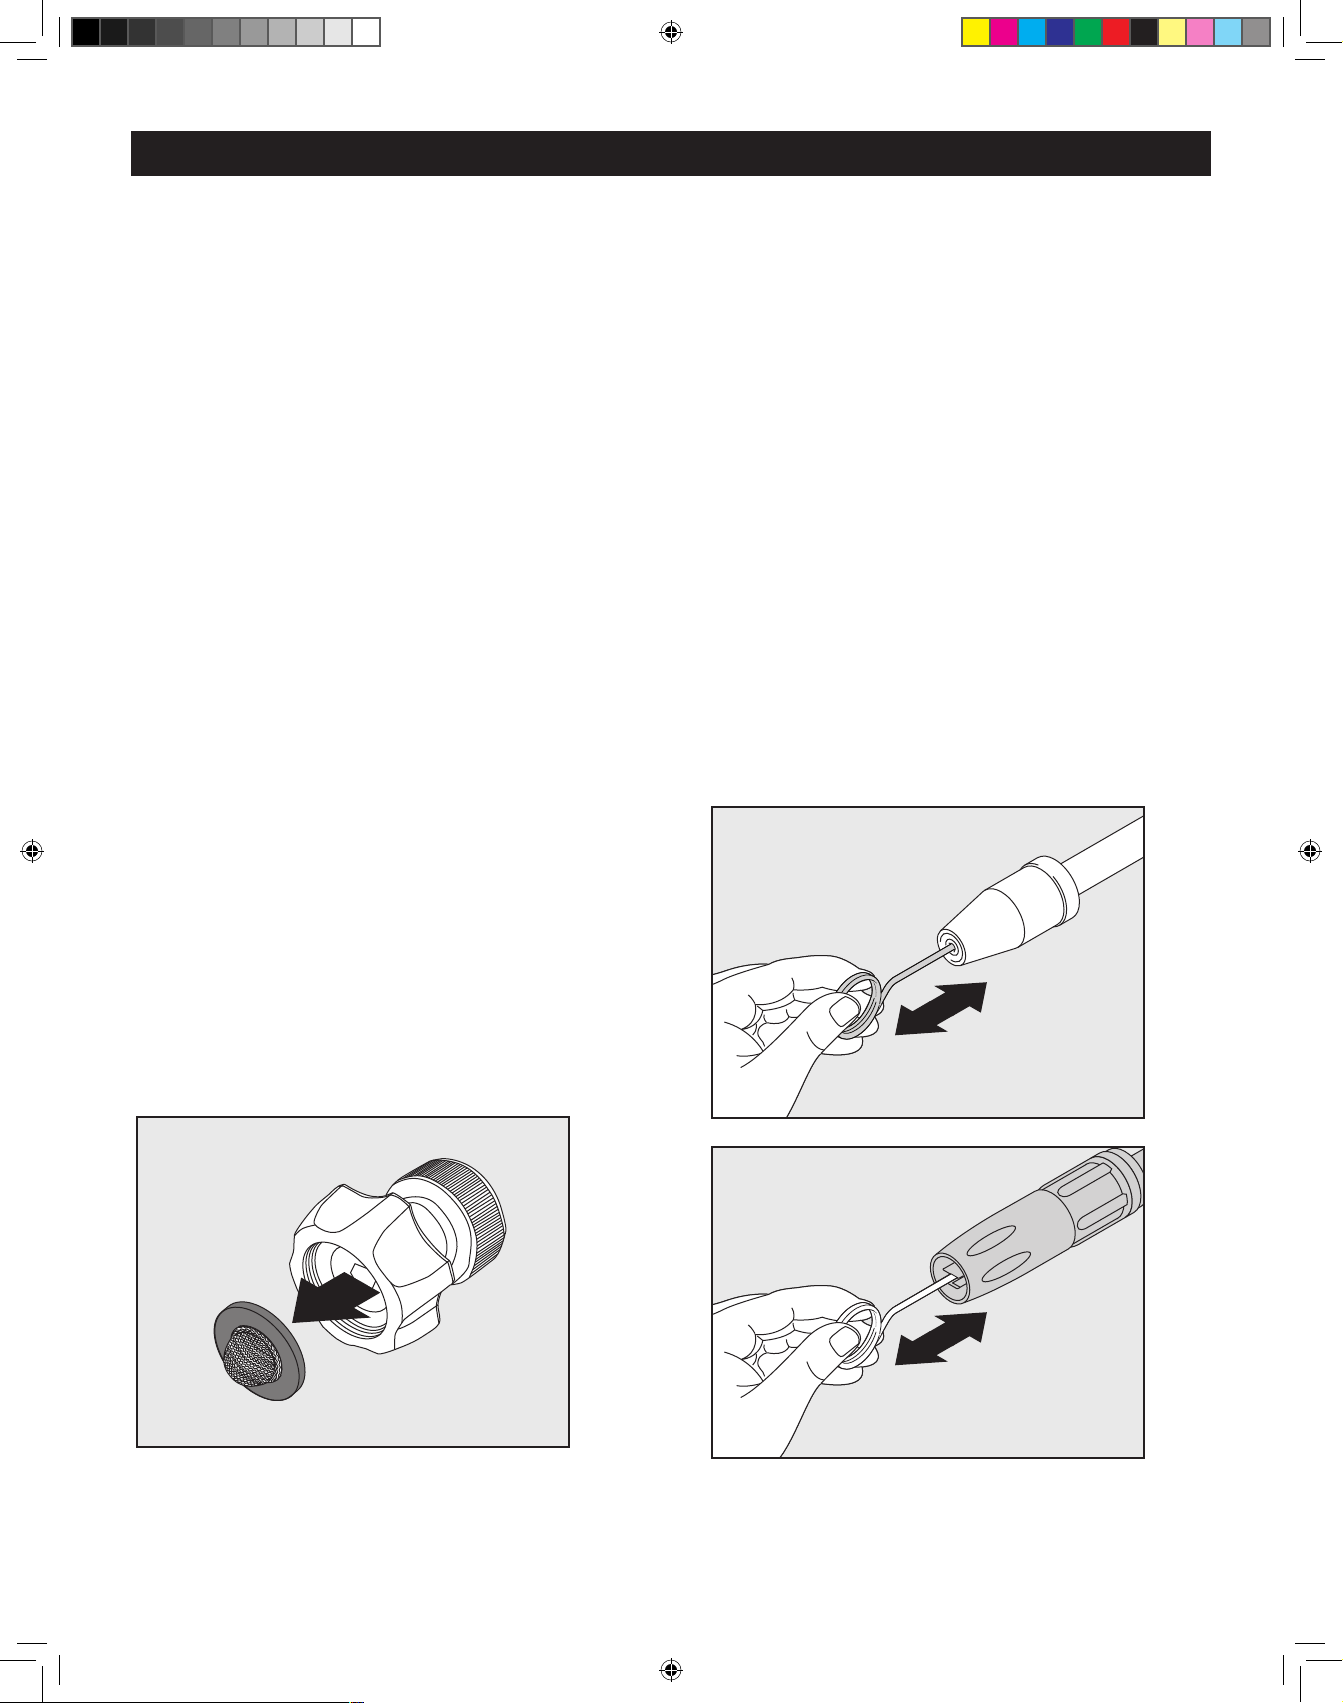
• The o-rings on the bayonet end of the nozzle lance
should be cleaned regularly and lubricated with nonwater soluble grease such as petroleum jelly.
• Keep the nozzle cleaning wire for use in unclogging
the nozzle. If you lose the cleaning wire, a straightened
paper clip also works.
How to Avoid Damaging Surfaces
• Damage to surfaces being cleaned occurs because
the impact force of the water pressure exceeds the
durability of the surface. Bare wood can be penetrated;
paint can be peeled off, etc. You can vary the force of
your power washer by controlling:
1. The angle of the surface being cleaned
2. The distance of the nozzle from the surface being
cleaned
2
1
• NEVER use a narrow high pressure stream of water on
soft surfaces susceptible to damage.
• Use the high/low nozzle lance when cleaning windows.
Be sure to adjust the nozzle to low spray and place
the nozzle approximately four to five feet away from
the window with the nozzle at forty five degree angle.
Squeeze the trigger and vary the spray pattern and
angle until optimum cleaning efficiency is achieved.
Using Power Cord
• Easily remove the power cord from side of unit by
swiveling the bottom blue cord hook to the right or
left until it faces up. The power cord then can be easily
slid off of the side of the power washer unit.
• Swivel blue, cord hook back down when ready to wrap
the cord back into place for storage.
12
93904_16ANR029_Stanley 1900PSI ENG-FR-SP.indd 12 16/12/23 下午1:02
Page 13
CARE AND MAINTENANCE
Detergents
• Use detergents designed for power washers. These
can be purchased online at our website www.
stanleyypressurewashers.com. Hardware stores or
home centers also have power washer detergents
for different cleaning projects. The cleaning solution
should be the consistency of water in order to
prevent clogging your detergent bottle and nozzle.
• This system applies detergent under low pressure.
The cleaning power of the detergents is enhanced
when applied with low pressure and enough
time is given to break down dirt and grime. The
combination of low pressure and chemical action is
very effective and can be better than scrubbing if
applied properly. ALWAYS spray detergent on a dry
surface. DO NOT pre-soak area. Wetting the surface
first dilutes
the detergent and reduces its cleaning ability. DO
NOT allow detergent to dry on surface. On vertical
surfaces being cleaned, apply detergent to lower
surfaces and work your way up to prevent detergent
from causing streaks in the dirt and grime. Rinse
detergent by pressure washing from bottom up for
same reason.
• If a stain is particularly tough, it may be necessary
to reapply the detergent and use a bristled brush to
scrub the stain. Subsequent power washing after
brushing should successfully complete your cleaning
job.
Cleaning Nozzles
• A clogged or partially clogged nozzle can cause
significant reduction of water pressure coming out
of the nozzle and/or cause the unit to pulsate while
spraying.
• Turn off the unit.
• Turn off the water supply to the unit.
• Relieve any pressure trapped in the hose by
squeezing the trigger 2-3 times, and then lock the
spray gun by pushing the lock button from left to
right.
• Remove the lance from the spray gun
• Using the nozzle tip cleaner provided (or an
unfolded paper clip), insert the wire into the
nozzle hole and move back and forth until debris is
dislodged.
• Tap quick connect end of lance on hard surface
several times
• Back flush water through the nozzles using garden
hose and highest pressure available (either standard
water nozzle or use your thumb over the nozzle to
create water pressure for back flush).
Cleaning Garden Hose Adapter
• The screens inside the clear garden hose adapter
should be cleaned periodically. Rinse it with clean
water, and then place it back in the adapter.
13
93904_16ANR029_Stanley 1900PSI ENG-FR-SP.indd 13 16/12/23 下午1:02
Page 14

OPERATING INSTRUCTIONS
CARE AND MAINTENANCE
OPERATING INSTRUCTIONS
Storage
• When your pressure washing session has been
completed, turn off the power switch located on
the front of the power washer. Unplug the power
cord from the outlet. Turn off the water supply. Pull
the trigger on the spray gun 2-3 times to drain out
the excess water and to release any remaining water
pressure. Disconnect the garden hose adapter from
the water inlet. DO NOT allow the power washer to
run with no water flowing through it.
• Remove detergent bottle and clean completely.
Residual chemical will stick to the container and can
cause the detergent injector to clog and not function
properly.
• Remove high pressure hose from spray gun.
• Remove lance from the gun. Place the gun in the
holder on the side. Lances are placed into any of the
slots in the back of the unit. Make sure to discard any
remaining detergent from the bottle. Flush the bottle
and nozzle head with fresh water to prevent clogging.
• Hook the power cord around the L-shaped tabs on the
right side of the machine when facing it.
14
93904_16ANR029_Stanley 1900PSI ENG-FR-SP.indd 14 16/12/23 下午1:02
Page 15

TROUBLESHOOTING
TROUBLESHOOTING
If you have any questions regarding the product, please call customer service at 1-866-508-1330.
PROBLEM CORRECTIVE ACTION
Unit will not turn on. 1. The GFCI module on the end of the power cord must be plugged directly into an
outlet.
2. Do not use an extension cord.
3. With the GFCI Connected make sure the power switch is turned on.
Note: When power switch is turned on, the power washer will turn on by itself for 1-2
seconds and shut off. This is normal.
The high pressure
(HP) hose will
not connect/stay
connected to the
spray gun. Is this a
spray gun problem?
The unit is running
but there is no water
flow.
Why is water leaking
where the high
pressure hose connects
to the spray gun?
I can’t remove the
lance from the spray
gun. What should I
do?
1. In most cases, the spray gun is not the problem. The problem is the rubber sleeve
covering the fitting at the end of the high pressure hose. It has likely slipped up
toward the metal tip. To fix: wiggle, twist and/or pull the rubber sleeve down until the
entire tip is visible plus an 1/8 in. of the metal fitting below the tip. Now try to insert
the hose tip into the spray gun. It should “click” into place and will not come out until
the hose is released by pushing in the lever on the underside of the gun. You may cut
away the end of the sleeve with a sharp knife if unable to move the sleeve down. Be
careful not to cut or puncture the hose.
2. Do not push in the release button when connecting the high pressure hose.
1. Check the water source. Unclog the nozzle on the lance. (See nozzle cleaning
instructions under “Cleaning nozzles”.) Or take off the lance and just spray out of the
spray gun. This will indicate if the problem is with the lance.
1. Make sure there is an o-ring at the end of the metal tip of the high pressure hose.
If no o-ring is present, the connection between the hose and spray gun will leak.
O-Ring replacements are included in the package contents.
1. All lances and the detergent bottles are attached and removed from the extension
lance in the same manner. Insert the quick-release end of the lance/detergent bottle
into the extension lance. Press the extension lance and lance together (about a 1/8”)
and turn clockwise. The lance will lock in place. Remove the lance by reversing this
procedure. Press the extension lance and lance together and turn counter clockwise.
The lance will slide out.
2. Or, hold the extension lance and lance in an upright position with the nozzle end
on the floor. Push the whole assembly straight down to loosen the connection,
and then follow the removal process again. You may also spray soapy water or a
lubricant in the area where the lance connects to the extension lance.
The power washer
turns on for 2
seconds, shuts off,
and will not turn
back on. Do I have a
defective unit?
1. It sounds like your power washer is working just fine. When the water is connected,
the accessories are assembled properly, and the power switch is turned on, the power
washer may turn on for 1 - 2 seconds to prime the pump. It automatically shuts off
and waits for the spray gun trigger to be pressed. When the trigger is pressed, water
starts flowing through the pump. The water sensor in the pump “senses” the moving
water and automatically turns the power washer on.
2. Turn the power switch to off, hold in the trigger on the spray gun, so that you have a
steady stream of water. While you are holding the trigger open on the spray gun, at
the same time, turn the power switch on.
15
93904_16ANR029_Stanley 1900PSI ENG-FR-SP.indd 15 16/12/23 下午1:02
Page 16

CARE AND MAINTENANCE
LIMITED WARRANTY
The Warranty of this product is coverd by A.R.North America.
This product has a 2 (two) year warranty. Please read the following carefully to understand what each warranty
entails:
This product is under warranty to the original retail consumer against defects in material and workmanship for a
period 1(one) year and is a complete “bumper to bumper” warranty including the spray gun,the high pressure
hose and all accessories from the date of purchase. The warranty is not transferable or assignable.This warranty
covers replacement parts. This limited one year warranty applies only to products used in consumer applications
and is void in rental or any commercial application. Reasonable care must be used in conformity with operation
and maintenance instructions in the owner’s manual and quick start guide. Failure to follow these instructions will
void this warranty. This warranty gives you special legal rights and you may also have other rights which vary from
state to state.
The second year of the warranty only covers manufacturer defects.
Warranty Process
Keep your original receipt of purchase in case of warranty claim.
If your power washer develops a problem, contact Customer Service:
• Call our toll-free number at 1-866-508-1330. Customer Service is available Monday - Friday 8:00 a.m. to 5:00
p.m. Central Standard Time (CST). The Customer Service person will work with you to fix the problem.
If the power washer needs to be returned for repair, shipping costs to the company must be paid by the
customer. A Return Merchandise Authorization (RMA) Number will be issued for the return. Upon receiving
the power washer, the company will repair or replace the unit. We will send unit back to customer at no charge.
Please note: Power washers sent to the company without an RMA Number will NOT be accepted and shipped
back at the expense of the sender.
Return address:
A.R. North America, Inc.
140 81st Avenue North East
Fridley, MN 55432
Manufactured by:
A.R. North America, Inc.
140 81st Avenue North East Fridley, MN 55432
16
93904_16ANR029_Stanley 1900PSI ENG-FR-SP.indd 16 16/12/23 下午1:02
Page 17

REPLACEMENT PARTS LIST
For replacement parts, call our customer service department at 1-866-508-1330.
8 a.m. - 5:00 p.m., CST, Monday - Friday or order online at www.stanleypressurewashers.com
F
A
I
B
PART DESCRIPTION PART #
G
D
E
H
PW909SHP1900
C
J
PART DESCRIPTION PART #
A Detergent Tank (28 oz.) PW4220020
B Soft PVC Hose PW4221510
C Spray Gun PW4221400
D High/Low Lance Nozzle PW4221410
E Turbo Lance Nozzle PW50976
Manufactured by:
A.R. North America, Inc.
140 81st Avenue North East Fridley, MN 55432
F Garden Hose Adapter PW4221580
G GFCI Assembly PW4221160
H O-Ring Replacement Kit PW909SHP1900
I Gun Holster PW4220040
J Nozzle Tray PW4220050
Printed in China
© 2016 Stanley Black & Decker, Inc.
STANLEY® and the STANLEY® logo are trademarks of
Stanley Black & Decker, Inc. or an affiliate thereof
and are used under license.Made in China
17
93904_16ANR029_Stanley 1900PSI ENG-FR-SP.indd 17 16/12/23 下午1:02
Page 18

1900 PSI
LAVEUSE À PRESSION
ÉLECTRIQUE
GUIDE D'ASSEMBLAGE,
D'ENTRETIEN ET
D'UTILISATION
Modèle SHP 1900
IMPORTANT :
CONSERVER CE GUIDE ET INSÉRER LA FACTURE
DANS LE GUIDE POUR RÉFÉRENCE ULTÉRIEURE.
LIRE ATTENTIVEMENT
AFIN DE PRÉVENIR LES BLESSURES AUX
YEUX, PORTER TOUJOURS DES LUNETTES
DE SÉCURITÉ PENDANT L’UTILISATION
DE LA LAVEUSE À PRESSION.
Questions, problèmes, pièces manquantes?
Avant de retourner l'appareil chez le marchand,
contactez notre service à la clientèle au
1-866-508-1330, de 8 h à 17 h (HNC) du lundi au
vendredi.
www.stanleypressurewashers.com
© 2016 Stanley Black & Decker, Inc.
STANLEY® and the STANLEY® logo are trademarks of Stanley Black & Decker, Inc.
93904-KP
18
93904_16ANR029_Stanley 1900PSI ENG-FR-SP.indd 18 16/12/23 下午1:02
or an affiliate thereof and are used under license.
Page 19

TABLE DES MATIÈRES
Spécifications du produit ...................................................................................... 19
Contenu de l'emballage ....................................................................................... 20
Matériel inclus ..................................................................................................... 20
Consignes de sécurité .......................................................................................... 21
Instructions d'assemblage .................................................................................... 23
Mode d’emploi ..................................................................................................... 26
Entretien et maintenance ..................................................................................... 30
Dépannage .......................................................................................................... 32
Garantie limitée ................................................................................................... 33
Liste des pièces de rechange ................................................................................ 34
SPÉCIFICATIONS DU PRODUIT
SPÉCIFICATIONS
Modèle PSI
maximum
(k/cm2)
(lb/po2)
SHP 1900 5561
(1900)
93904_16ANR029_Stanley 1900PSI ENG-FR-SP.indd 19 16/12/23 下午1:02
Débit
maximum
(Litre/min)
(Gal./min)
4.92
(1.3)
Eau froide Volts A Poids
(kg)
(lb)
✔
120 13 11.3
(24.9)
19
Page 20

CONTENU DE L'EMBALLAGE
CONTENU DE L'EMBALLAGE
A
B
(Enrouleur,
pour rangement
uniquement)
D
C
AA
J
PW909SHP1900
E
F
G
K
I
PIÈCE DESCRIPTION QUANTITÉ
A Laveuse à pression 1
B PVC souple Tuyau à haute
1
pression
C Tige de nettoyage de la
1
buse
D Étui à pistolet pulvérisateur 1
E Bac à buse 1
F Buse de lance HP et BP 1
G Buse de lance turbo 1
MATÉRIEL INCLUS
AA
Remarque : Les vis se trouvent
dans l’emballage du manuel
H
PIÈCE DESCRIPTION QUANTITÉ
H Verrou de la gâchette de
1
pistolet pulvérisateur
I Pistolet pulvérisateur 1
J Kit de remplacement de
1
joint torique
K Adaptateur de tuyau
1
d’arrosage]
AA Vis 1
Vis
Screw
Qté 1
Qty. 1
20
93904_16ANR029_Stanley 1900PSI ENG-FR-SP.indd 20 16/12/23 下午1:02
Page 21

SAFETY INFORMATION
CONSIGNES DE SÉCURITÉ
CONSIGNES DE SÉCURITÉ
Assurez-vous de lire et de comprendre l’intégralité du
présent manuel avant de tenter d’assembler, d’utiliser ou
d’installer le produit.
Le présent manuel contient des informations concernant
la PROTECTION DE LA SÉCURITÉ PERSONNELLE et
la PRÉVENTION DE PROBLÈMES D'ÉQUIPEMENT Il
est important de lire et de comprendre l'intégralité
du manuel avant d'utiliser le produit. Les symboles
apparaissant ci-dessous sont utilisés pour indiquer ces
informations.
DANGER
Risque potentiel ayant pour conséquence des
blessures graves ou la mort.
AVERTISSEMENT
Risque potentiel pouvant causer des blessures
graves ou la mort.
ATTENTION
Risque potentiel pouvant causer des blessures ou
des dommages à l'équipement.
Remarque : Le mot « Remarque » est utilisé pour
informer l'utilisateur d'un renseignement important
concernant l'utilisation de l'appareil.
AVERTISSEMENT
Pour réduire le risque de blessure, l’utilisateur
doit lire et comprendre les instructions avant
d’utiliser ce produit.
1. Avertissement — Certaines précautions de base
doivent être toujours suivies lors de l'utilisation de
l'appareil, y compris :
2. Lire les instructions avant d'utiliser l'appareil.
3. Savoir comment arrêter l'appareil et le dépressuriser
rapidement. Connaître le fonctionnement de
chaque bouton de commande.
4. Définir un périmètre de sécurité.
5. Ne pas s'étirer trop loin ou prendre place sur un
support instable. Toujours garder une position stable
et sûre.
6. Suivre les directives d'entretien décrites dans le
manuel.
7. Pour éviter des blessures ou des dommages
matériels et pour profiter au maximum de l'appareil,
suivre les conseils de sécurité, instructions,
avertissements et recommandations et se
familiariser avec les commandes.
8. Cette laveuse à pression est conforme aux normes
de la CSA et à d'autres normes de sécurité. NE PAS
modifier ni reconditionner les pièces de cette laveuse
à pression.
9. NE PAS utiliser cette laveuse à pression si vous êtes
sous l'influence d'alcool ou de drogue. Utiliser cet
appareil avec prudence et uniquement lorsque vous
êtes alerte.
10. Toujours garder une position stable et sûre
pendant l'utilisation de la laveuse à pression. Les
surfaces mouillées sont glissantes et l'utilisation de
détergent les rend encore plus dangereuses.
11. NE JAMAIS utiliser la laveuse à pression les pieds
nus, en sandales ou avec des chaussures ouvertes.
12. Lorsque des enfants sont présents autour de la
zone d'utilisation de la laveuse à pression, un
adulte doit assurer la surveillance pour éviter le
risque de blessures. NE JAMAIS permettre à un
enfant d'utiliser la laveuse à pression.
13. Tenir les doigts, les mains, les pieds et toutes les
parties du corps loin du jet d'eau à haute pression.
Le jet d'eau à haute pression peut causer la cécité
ou déchirer la peau. Il peut fracasser une vitre si la
buse est trop proche de la fenêtre lorsqu'on appuie
sur la gâchette du pistolet pulvérisateur.
14. Afin de prévenir les blessures aux yeux,
PORTER toujours des lunettes de sécurité pendant
l'utilisation de la laveuse à pression.
15. Pour éviter les accidents ou les blessures,
VERROUILLER toujours la gâchette à l'aide du
bouton de sûreté lorsque la laveuse à pression
n'est pas en service, même si le jet a été arrêté
temporairement.
16. La laveuse à pression est équipée d'un disjoncteur
de fuite de terre afin de réduire le risque de
décharge électrique pendant l'utilisation de
l'appareil. S'il est nécessaire de remplacer la fiche
ou le cordon d'alimentation, utiliser uniquement
une pièce de remplacement identique.
17. Pointer le pistolet pulvérisateur vers une direction
sécuritaire avant de commencer une séance de
lavage.
18. NE JAMAIS utiliser le pistolet pulvérisateur pour
arroser une personne, un animal, un appareil
électrique ou la laveuse à pression.
19. À la première utilisation du pistolet pulvérisateur,
tenir le pistolet et la lance à deux mains (une
main pour appuyer sur la gâchette et l'autre pour
stabiliser le pistolet et la lance) de manière à évaluer
l'effet de rebond du pistolet pulvérisateur.
20. Lorsque l'alimentation électrique de la laveuse
à pression est coupée, de l'eau sous pression
demeure dans l'appareil. Pour relâcher la pression,
pointer le pistolet pulvérisateur dans une direction
sécuritaire et appuyer sur la gâchette.
21. NE JAMAIS pulvériser de liquide inflammable.
22. NE JAMAIS utiliser la laveuse à pression dans
un espace rempli de poussières, de liquide ou de
vapeurs combustibles.
23. Éviter tout contact entre le tuyau à HP et des
objets tranchants et vérifier le tuyau régulièrement.
Remplacer le tuyau s'il est endommagé. Puisque
c'est un tuyau à haute pression, il ne peut pas à
être réparé
24. Utiliser uniquement un détergent spécialement
conçu pour les laveuses à pression et suivre les
instructions sur l'étiquette de la bouteille de
détergent.
21
93904_16ANR029_Stanley 1900PSI ENG-FR-SP.indd 21 16/12/23 下午1:02
Page 22

SAFETY INFORMATION
CONSIGNES DE SÉCURITÉ
CONSIGNES DE SÉCURITÉ
25. Utiliser des équipements de protection qui
protégeront les yeux, les poumons et la peau
contre l'exposition au détergent. Le savon à
vaisselle et les détergents à lessive sont trop épais
et boucheront la buse de la bouteille à détergent.
IMPORTANT : Lorsque la température extérieure est
sous zéro, entreposer la laveuse à pression à l'intérieur
pour éviter que l'eau dans l'appareil gèle. Le fait que
l'eau gèle et augmente de volume aura pour effet
d'endommager l'appareil et de le rendre inutilisable.
Si l'appareil doit être entreposé à l'extérieur, il est
recommandé d'utiliser un protecteur de pompe (non
compris) pour protéger la pompe.
26. NE JAMAIS utiliser d'eau chaude dans la laveuse
à pression. Cela aura pour effet de surchauffer la
pompe à haute pression et de l'endommager.
27. NE JAMAIS laisser la laveuse à pression sans
surveillance lorsque l'interrupteur est à la position
« ON » (marche).
28. TOUJOURS ouvrir l'alimentation en eau avant de
placer l'interrupteur électrique à la position « ON »
(marche). Le fait de faire fonctionner la pompe à
sec pourrait endommager ses composants internes.
29. NE JAMAIS utiliser une source d'alimentation en
eau ayant une pression supérieure à 150 PSI.
30. NE JAMAIS débrancher le tuyau à haute pression
de la laveuse à pression pendant que le système est
sous pression.
31. NE JAMAIS bloquer la gâchette en position
ouverte de manière permanente.
32. NE JAMAIS faire fonctionner la laveuse à pression
si tous les composants ne sont pas branchés
correctement et de manière sécuritaire.
33. NE JAMAIS laisser fonctionner la pompe de la
laveuse à pression plus d'une minute après que
l'alimentation en eau ait été coupée. Cela pourrait
occasionner la surchauffe du moteur et de la
pompe et causer une défaillance.
34. NE JAMAIS utiliser une lance ou un autre
composant qui n'est pas compatible avec ce
modèle d'appareil AR Blue Clean.
35. NE JAMAIS brancher une rallonge au cordon
d'alimentation de l'appareil. Cela compromettrait
l'efficacité du disjoncteur de fuite de terre
et augmenterait le risque d'électrocution de
l'utilisateur.
36. NE JAMAIS arroser une prise électrique avec le jet
du pistolet pulvérisateur.
37. Inspecter le cordon d'alimentation avant d'utiliser
l'appareil. NE PAS utiliser l'appareil si le cordon
d'alimentation est endommagé.
CONSERVER CES INSTRUCTIONS POUR RÉFÉRENCE ULTÉRIEURE.
Entretien d'un appareil à double isolation
Protection par un disjoncteur de fuite de terre :
cette laveuse à pression est protégée par un disjoncteur
de fuite de terre intégré dans la fiche du cordon
d'alimentation. Ce dispositif fournit une protection
additionnelle contre le risque de décharge électrique.
S'il est nécessaire de remplacer la fiche ou le cordon
d'alimentation, utilisez uniquement une pièce de
remplacement identique comprenant un disjoncteur de
fuite de terre.
Les appareils à double isolation comprennent deux
dispositifs d'isolation à la place d'une prise de terre. Les
appareils à double isolation ne sont pas équipés d'un
dispositif de mise à la terre et ce type de dispositif ne
devrait pas être raccordé au produit.
L'entretien d'un appareil à double isolation nécessite
une attention et un savoir-faire particuliers et doit être
confié à un technicien qualifié.
Les pièces de rechange d'un appareil à double isolation
doivent être identiques à l'original.
Les produits à double isolation portent la marque
« Double Insulation » ou « Double Insulated ». Certains
produits peuvent également être marqués du symbole
illustré ci-dessous.
Double Insolated Product
22
93904_16ANR029_Stanley 1900PSI ENG-FR-SP.indd 22 16/12/23 下午1:02
Page 23

ASSEMBLY INSTRUCTIONS
PRÉPARATION
Screw
Qty. 1
PRÉPARATION
Avant de commencer l'assemblage de l'appareil,
assurez-vous que toutes les pièces sont dans
l'emballage. Comparez les pièces à la liste des pièces et
du matériel. Dans le cas où une pièce est manquante
ou endommagée, N'ESSAYEZ PAS d'assembler
l'appareil.
Temps d'assemblage approximatif : 5 minutes
INSTRUCTIONS D'ASSEMBLAGE
Outil nécessaire pour l'assemblage (non compris) :
Tournevis cruciforme
1
D
A
Assemblage de l'appareil
Placez l’appareil face contre vous, puis faites glisser
l’étui à pistolet (D) sur le côté gauche de l’appareil
(A) tel qu’illustré.
Remarque : Lorsque le pistolet et la lance sont as-
semblé, la buse reste dans son réceptacle.
2
AA
E
Placez l’appareil face contre vous (A). À la base de l’appareil, côté gauche, insérez la languette du bac à buse
(E) dans l’ouverture. Fixez à l’aide des vis (AA).
Remarque : N’UTILISEZ PAS un tournevis mécanique.
Une fois la vis complètement serrée, vissez-la encore de
quelques degrés dans le sens horaire.
NE SERREZ PAS à l’excès.
A
Matériel utilisé :
AA
93904_16ANR029_Stanley 1900PSI ENG-FR-SP.indd 23 16/12/23 下午1:02
Vis x 1
23
Page 24

INSTRUCTIONS D’ASSEMBLAGE
3
2
3
B
A
Assemblage du PVC souple tuyau à haute
pression
Vissez le PVC souple tuyau à haute pression (B)
dans le sens horaire sur le raccord situé en bas à
gauche, sur la face avant (A) de l’appareil. Retirez le
collier vers l'arrière et insérez l'embout dans la sortie
d'alimentation en eau suffisamment profondément
de sorte que le collier puisse être vissé sur le filet et
serré à la main. S'il faut faire moins de six tours, alors
le raccord du PVC souple tuyau à haute pression n'est
pas correctement serré. Il est plus facile d'engager
le collier sur le filet si la laveuse à pression est
positionnée directement devant soi. Le fait de ne
pas serrer correctement le PVC souple tuyau à haute
pression aura pour effet de déconnecter le tuyau
dès que l'appareil sera mis en marche. Une telle
situation n'endommagera pas l'appareil. Reconnectez
simplement le tuyau et assurez-vous de le serrer
correctement sur le raccord de l'appareil.
Remarque : NE SERREZ PAS avec une pince ou une
pince-étau.
4
I
2
B
1
Tirer sur le collier à l’autre extrémité du PVC souple
tuyau haute pression (B). Appuyer fermement pour
raccorder le tuyau pour pistolet (I). Tournez le collet
pour garantir. Confirmer le tuyau est verrouillé en spray
pistolet en tirant légèrement dessus. Le tuyau est main-
tenant solidement fixé pour pistolet.
3
B
5
I
1
B
Collier de torsion puis tirez en arrière pour libérer le
haut raccord de tuyau (B) de la pression du pistolet (I).
3
B
24
93904_16ANR029_Stanley 1900PSI ENG-FR-SP.indd 24 16/12/23 下午1:02
Page 25

ASSEMBLY INSTRUCTIONS
INSTRUCTIONS D'ASSEMBLAGE
6
I
1
Déverrouillage Verrouillage
Pistolet de pulvérisation de blocage (avant
l’installation de la Lance)
À verrouillage gâchette du pistolet de pulvérisation
(I), pointer le pistolet. à vous et tourner à composer à
verrou (position“3” et “9”).
Squeeze ou appuyer sur la gâchette pour s’assurer qu’il
est verrouillé.
TOUJOURS laisser en position verrouillée lorsque pas en
utilisation. Cela garantit que l’arme est en mode « sans
échec » jusqu’à ce qu’il est prêt à l’emploi. Tourner
le cadran pour débloquer (“ 12” et “6”position) à
relâcher la gâchette du pistolet de pulvérisation.
Remarque : Le verrou empêche le déclenchement
d’être engager accidentellement.
7
GF
I
1
G
2
Installation de la lance à buse HP et BP et de la lance
à buse Turbo
Alors que le pistolet pulvérisateur (I) est verrouillé,
insérez la lance haute ou basse pression (F) ou la lance
turbo (G) dans le pistolet, puis poussez et tournez dans
le sens horaire. Pour retirer, poussez en tournant dans
le sens anti-horaire .
Remarque : Poussez toujours le bouton de verrouillage
de sécurité pour verrouiller la gâchette r lorsque vous
changez de lance afin de ne pas risquer d'éjecter
accidentellement la lance durant le démontage.
Remarque : Lorsque vous utilisez la lance turbo,
assurez-vous que la buse turbo est bien vissée à
l’extrémité de la lance avant de l’utilisez.
Remarque : La buse de la lance turbo n’est pas
réglable.
25
93904_16ANR029_Stanley 1900PSI ENG-FR-SP.indd 25 16/12/23 下午1:02
Page 26

INSTRUCTIONS D’ASSEMBLAGE
8
A
K
Installation de l'adaptateur de tuyau d’arrosage
Raccordez l’adaptateur du tuyau d’arrosage (K) dans
l’embout d’alimentation en eau de la laveuse à pression
(A). Serrez à la main.
9
1
K
Fixer un tuyau d’arrosage à l’adaptateur de tuyau d’ar-
rosage (K).
Remarque : Rincez le tuyau d’arrosage avant de le
raccorder à l’adaptateur rapide pour tuyau d’arrosage.
MODE D’EMPLOI
Le montage de la laveuse à pression est maintenant
terminé et l’appareil peut maintenant être utilisé. Assurez-
vous de lire et d'observer toutes les directives de sécurité.
• Ouvrez complètement le robinet d'alimentation en
eau.
• Assurez-vous que l'interrupteur « ON/OFF »
(marche/arrêt) est à la position « OFF » (arrêt).
L'interrupteur est marqué des symboles
internationaux « on » et « off ». On (|) Off (O).
• Déroulez complètement le cordon d'alimentation et
brancher le disjoncteur de fuite de terre dans une
prise 120 V reliée à la terre.
• Relâchez le bouton de sûreté de la gâchette et
remettez-le en place. Pointez le pistolet dans une
direction sécuritaire, puis appuyez sur la gâchette
du pistolet jusqu'à ce que l'eau s'écoule en continu
après avoir purgé l'eau et l'air emprisonnés dans le
tuyau d'arrosage. Poussez le verrou de la gâchette
pour le verrouiller.
26
93904_16ANR029_Stanley 1900PSI ENG-FR-SP.indd 26 16/12/23 下午1:02
Page 27

OPERATING INSTRUCTIONS
MODE D'EMPLOI
OFF/0
OFF/0
ON/I
ON/I
• Placez l’interrupteur à la position « ON » (|).
L'appareil se met en marche pendant une à deux
secondes et s'arrête. Il s'agit du fonctionnement
normal du mode de mise en marche automatique.
Appuyez sur la gâchette du pistolet pulvérisateur
pour commencer le lavage à pression.
• Enfoncez complètement la gâchette jusqu’à la
poignée pour commencer le lavage à pression.
• Relâchez la gâchette pour arrêter le lavage a
pression.
• Laissez le moteur s’arrêter complètement avant
d’appuyer de nouveau sur la gâchette.
• Le fait de serrer la gâchette trop rapidement
nuit au bon fonctionnement de la fonction de
démarrage automatique qui pourrait sauter
un cycle marche/arrêt. Cette situation pourrait
retarder la reprise automatique du moteur. Le
fait d'appuyer lentement sur la gâchette permet
d'éviter ces symptômes.
OFF/0
OFF/0
ON/I
ON/I
• Toujours faire un essai sur une petite surface pour
éviter tout risque d'endommagement.
IN position
Position IN
1
IN position
Position IN
2
2
High Pressure Setting
Conguration à haute pression
Fan Spray Pencil Stream
Jet étroitJet en éventail
Utilisation des buses HP et BP
• Le pulvérisateur haute pression est utilisé pour le
nettoyage, tandis que le pulvérisateur basse pression
active la fonction de détergent.
• La buse de pulvérisation réglable possède deux (2)
positions :
– IN — position fermée pour le jet haute pression.
Tournez-la dans le sens anti-horaire jusqu’à ce
qu’elle s’arrête et que l’ouverture soit refermée.
– OUT — position ouverte pour le jet basse
pression utilisant du détergent. Tournez-la dans
le sens horaire jusqu’à ce qu’elle s’arrête et que
l’ouverture soit ouverte.
• Lorsque vous utilisez le réglage haute pression,
tournez la buse dans le sens horaire ou dans le sens
anti-horaire pour obtenir le jet désiré.
• Lorsque vous utilisez le réglage basse pression,
tournez la buse dans le sens horaire pour ouvrir les
lames du jet en éventail complètement.
27
93904_16ANR029_Stanley 1900PSI ENG-FR-SP.indd 27 16/12/23 下午1:02
Page 28

OPERATING INSTRUCTIONS
MODE D’EMPLOI
1
2
LOW Pressure Setting
Conguration à
BASSE pression
Pencil Stream
Jet étroit
OUT position
Position OUT
Position OUT
OUT position
IMPORTANT : Lorsque vous appliquez le détergent
avec le jet à basse pression, la buse à jet variable
doit être réglée à jet étroit. À ce moment-là, les
lames métalliques au devant de la buse sont grandes
ouvertes afin que le jet de détergent ne soit pas
restreint.
• Lorsque vous utilisez le réceptacle à détergent,
remplissez-le avec un détergent ou un produit
nettoyant correctement formulé conformément aux
• Lorsque vous retirez le réservoir de détergent, retirez
le couvercle et placez un doigt dans le réservoir pour
le soulever tout en le sortant.
instructions indiquées sur le contenant.
• N’UTILISEZ PAS de détergents en gel, car ils
pourraient encrasser la laveuse à pression et
provoquer des dommages.
28
93904_16ANR029_Stanley 1900PSI ENG-FR-SP.indd 28 16/12/23 下午1:02
Page 29

OPERATING INSTRUCTIONS
MODE D'EMPLOI
MODE D’EMPLOI
Vaporisation
Spray
Pressure
Pression
2
1
Conseils d'utilisation
• Il est normal d'entendre le moteur tourner par
intermittence, même lorsque la gâchette n'est pas
enfoncée.
C'est la pompe qui s'amorce pour être en mesure de
fonctionner lorsqu'on appuie sur la gâchette. Éteignez
la laveuse à pression si elle n’a pas été utilisée après
cinq minutes.
• Le joint torique du côté baïonnette de la buse doit être
nettoyé régulièrement et lubrifié avec de la graisse
hydroinsoluble telle que de la gelée de pétrole.
• Gardez le fil de nettoyage de la buse bien propre en
vue de l’utiliser pour désincruster la buse. Si vous
perdez le fil de nettoyage, un trombone déplié peut
aussi faire l’affaire.
Comment éviter d’endommager les surfaces
• Les dommages aux surfaces en cours de nettoyage se
produisent parce que la force d’impact de la pression
d’eau est supérieure à la résistance de la surface. Il est
possible de pénétrer le bois nu, d’écailler la peinture,
etc. On peut modifier la pression de l’appareil en
agissant sur les éléments suivants :
1. L’angle de la surface à nettoyer
2. La distance entre la buse et la surface à nettoyer
• N’UTILISEZ JAMAIS un jet d’eau étroit à haute
pression sur des surfaces lisses susceptibles de
s’endommager.
• Utilisez la lance à jet haute/basse pression pour
nettoyer les vitres. Veillez à régler la buse à l’option
de vaporisation faible et placez-la de quatre à cinq
pieds des vitres en maintenant la buse à un angle
de quarante-cinq degrés. Appuyez sur la gâchette
et variez le motif de vaporisation et d’angle jusqu’à
obtention d’une efficacité de nettoyage optimale.
29
93904_16ANR029_Stanley 1900PSI ENG-FR-SP.indd 29 16/12/23 下午1:02
Page 30

ENTRETIEN ET MAINTENANCE
Détergents
• Utilisez un détergent conçu pour les laveuses à
pression. Vous pouvez l’acheter en ligne à l’adresse
www.stanleypressurewashers.com. Les quincailleries
ou centres de rénovation offrent également des
détergents pour laveuse à pression adaptés à vos
différents projets de nettoyage. La solution de
nettoyage doit présenter la même fluidité que l’eau
pour prévenir toute obstruction de la buse et de la
bouteille de détergent.
• Ce système applique le détergent à basse pression.
La puissance nettoyante des détergents est accrue
lorsque la pression est faible, car la saleté et la crasse
ont plus de temps pour se dissoudre. La combinaison
de la basse pression et de l’action chimique est très
efficace et peut être plus efficace que le frottage
si elle est correctement appliquée. VAPORISEZ
TOUJOURS le détergent sur une surface sèche. NE
MOUILLEZ PAS la zone à nettoyer. Le fait de mouiller
la surface dilue le détergent et réduit sa capacité
de nettoyage. NE LAISSEZ PAS le détergent sécher
sur la surface. Sur les surfaces verticales, appliquez
le détergent à partir de la bases vers le haut pour
empêcher la formation de dégoulinades dans la
saleté. Pour la même raison, rincez le détergent avec
la laveuse à pression en partant de la base.
• Si une tache est particulièrement tenace, vous
devrez peut-être appliquer davantage de détergent
et utiliser une brosse à soie douce pour frotter la
tache. Lavez de nouveau pour compléter le travail.
Nettoyage des buses
• Une buse obstruée ou partiellement obstruée peut
provoquer une importante réduction de la pression
d’eau à la sortie ou provoquer des pulsations du jet
sortant de l’appareil.
• Éteignez l'appareil.
• Coupez l’arrivée d’eau à l’appareil.
• Libérez la pression emprisonnée dans le tuyau. Pour
ce faire, appuyez sur le déclencheur 2 ou 3 fois, puis
verrouillez le pistolet pulvérisateur en déplaçant le
bouton de blocage de gauche à droite.
• Retirez la lance du pistolet pulvérisateur
• À l’aide du nettoyeur de buse (ou d’un trombone
déplié), insérez le fil dans l’orifice de la buse et
déplacez-le d’avant en arrière plusieurs fois jusqu’à
ce que les débris soient délogés.
• Tapez plusieurs fois l’extrémité du raccord rapide de
la lance sur une surface dure.
• Faites passer l’eau de rinçage dans la buse à l’aide
du tuyau d’arrosage. Utilisez la pression la plus
élevée possible (soit avec la buse standard ou avec
votre pouce sur la buse pour créer une pression
d’eau).
Adaptateur de tuyau de jardin de nettoyage
• La crépine qui se trouve dans l’adaptateur doit être
nettoyée périodiquement. Rincez-la à l’eau claire,
puis replacez-la dans l’adaptateur.
30
93904_16ANR029_Stanley 1900PSI ENG-FR-SP.indd 30 16/12/23 下午1:02
Page 31

OPERATING INSTRUCTIONS
ENTRETIEN ET MAINTENANCE
MODE D’EMPLOI
Entreposage
• Lorsque le lavage à pression est terminé, éteignez
l’interrupteur qui se trouve à l’avant de l'appareil.
Débranchez le cordon d'alimentation de la prise.
Coupez l’arrivée d’eau. Tirez sur la gâchette du
pistolet pulvérisateur 2 ou 3 fois pour vider l’excès
d’eau et libérer toute pression résiduelle. Débranchez
l’adaptateur du tuyau d'arrosage de l'embout
d'admission d'eau . NE LAISSEZ PAS la laveuse à
pression fonctionner si l'alimentation en eau n'est
pas ouverte.
• Retirez la bouteille de détergent et nettoyez-la à
fond. Les résidus chimiques collent au contenant
et peuvent obstruer l’injecteur de détergent et
l’empêcher de fonctionner correctement.
• Retirez le flexible à haute pression du pistolet
pulvérisateur.
• Retirez la lance du pistolet. Placez le pistolet dans le
support latéral. Placez les lances dans l'un ou l'autre
des réceptacles qui se trouvent à l’arrière de l’appareil.
Assurez-vous de vider le détergent en excès dans la
bouteille. Rincez la bouteille et la buse à l’eau claire
pour prévenir toute obstruction.
• Accrochez le cordon d’alimentation autour des
languettes en forme de L qui se trouvent du côté droit
de l'appareil lorsque vous y faites face.
31
93904_16ANR029_Stanley 1900PSI ENG-FR-SP.indd 31 16/12/23 下午1:02
Page 32

DÉPANNAGE
Pour toute question concernant le produit, communiquez avec le service à la clientèle au 1-866-508-1330.
PROBLÈME MESURE CORRECTRICE
L’appareil ne se met pas
en marche.
Je n’arrive pas à
connecter le tuyau à
haute pression (HP) au
pistolet pulvérisateur
ou bien il ne reste pas
connecté. Est-ce que le
pistolet pulvérisateur est
défectueux?
L’appareil fonctionne
mais l'eau ne s’écoule
pas.
1. Le disjoncteur de fuite de terre à l’extrémité du cordon d'alimentation doit être branché
directement dans une prise.
2. N’utilisez pas une rallonge électrique.
3. Une fois le disjoncteur de fuite de terre branché, vérifiez que l'appareil est sous tension.
Remarque : Lorsque l’interrupteur d’alimentation est allumé, la laveuse à pression se met en
marche d’elle-même pendant 1 à 2 secondes, puis s’éteint. C'est normal.
1. Dans la plupart des cas, le pistolet pulvérisateur n'est pas en cause. Le problème se trouve
plutôt au niveau du manchon de caoutchouc qui couvre le raccord d’extrémité du tuyau à
haute pression. Il a probablement glissé en direction de l'embout métallique. Pour corriger :
remuez ou tirez le manchon de caoutchouc vers le bas jusqu’à ce que l’embout soit bien visible,
plus de 1/8 po du raccord métallique sous l’embout. Essayez maintenant d’insérer l’embout de
tuyau dans le pistolet pulvérisateur. Vous devriez entendre un clic lorsqu’il s’enclenche et il ne
se déclenchera pas jusqu’à ce que le tuyau soit libéré en poussant le levier qui est sur le côté du
pistolet. Vous pouvez découper l’extrémité du manchon à l’aide d’un couteau pointu si vous
n’arrivez pas à déplacer le manchon vers le bas. Attention de ne pas couper et de ne pas percer
le tuyau.
2. Ne poussez pas le bouton de dégagement lors de la connexion du flexible à haute pression.
1. Vérifiez l'alimentation en eau. Désincrustez la buse de la lance. (Consultez les instructions de
nettoyage sous le thème « Nettoyage des buses »). Ou retirez la lance et arrosez directement à
partir du pistolet pulvérisateur. Ainsi vous saurez si le problème vient vraiment de la lance.
Pourquoi l’eau fuit-elle
lorsque le tuyau à haute
pression se connecte au
pistolet pulvérisateur?
Je n’arrive pas à retirer
la lance du pistolet
pulvérisateur. Que doisje faire?
La laveuse à pression se
met en marche pendant
deux secondes, s’arrête
et ne se remet pas en
marche. Est-ce que mon
appareil est défectueux?
32
1. Assurez-vous qu’il y a un joint torique à l’extrémité de la pointe de métal du tuyau haute
pression. Si aucun joint torique n’est présent, la connexion entre le tuyau et le pistolet de
pulvérisation fuira. Remplacement du joint torique est inclus dans le contenu de l’emballage.
1. Les lances et les bouteilles de détergent sont fixées et retirées du pistolet de la même façon.
Insérez le raccord rapide à l’extrémité de la lance ou de la bouteille de détergent dans la
lance. Enfoncez la lance dans le pistolet (environ 1/8 po) et tournez dans le sens horaire. La
lance se verrouillera en place. Retirez la lance en inversant la procédure. Enfoncez la lance
dans le pistolet et tournez dans le sens anti-horaire. La lance glissera vers l’extérieur.
2. Ou placez la lance et le pistolet en position verticale avec la buse au sol. Poussez l’ensemble
vers le sol pour desserrer le raccord, puis suivez la procédure de retrait. Vous pouvez
également vaporiser de l’eau savonneuse ou du lubrifiant au point de raccordement de la
lance et du pistolet.
1. Il semble que votre laveuse à pression fonctionne parfaitement bien. Lorsque l’eau est
raccordée, que les accessoires sont correctement assemblés et que l’interrupteur est à la
position marche, la laveuse à pression se met en marche pendant 1 à 2 secondes pour
amorcer la pompe. Elle s’éteint ensuite automatiquement et attend que la gâchette du
pistolet pulvérisateur soit enfoncée. Une fois la gâchette enfoncée, l’eau commence à
s’écouler à travers la pompe. Le capteur d’eau de la pompe détecte l’eau qui passe et met
automatiquement en marche la laveuse à pression.
2. Éteignez l’interrupteur, puis maintenez la gâchette du pulvérisateur enfoncée afin d’avoir un
jet d’eau uniforme. Pendant que vous maintenez la gâchette en position ouverte pulvérisateur,
tournez en même temps l’interrupteur d’alimentation pour le mettre en marche.
93904_16ANR029_Stanley 1900PSI ENG-FR-SP.indd 32 16/12/23 下午1:02
Page 33

GARANTIE LIMITÉE
La garantie de ce produit est couvert par A.R.North America.
Ce produit a une garantie de 2 (deux) ans. S’il vous plaît lire attentivement ce qui suit pour comprendre ce que
chaque garantie implique:
Ce produit est sous garantie pour le consommateur au détail original contre les défauts de matériaux et de
fabrication pour une période d’un (1) an et est un «pare-chocs à pare-chocs» complète garantie, y compris le
pistolet,le flexible haute pression et tous les accessoires de la date d’achat. La garantie est non transfèrable ni
cessible. Cette garantie couvre les pièces de rechange. Cette limite un an de garantie applicable uniquement
aux produits utilisés dans les applications grand public et est nul dans la location ou toute autre application
commerciale. Un soin raisonnable doit être utilisé en conformité avec les instructions d’exploitation et de
maintenance en guide de démarrage manuel et rapide du propriétaire. Le non-respect de ces instructions
annulera cette garantie. Cette garantie vous donne des droits lègaux spècifiques et vous pouvez ègalement avoir
d’autres droits qui varient d’un État à État.
La deuxième année de la garantie ne couvre que les défauts de fabrication.
Processus de garantie
Conservez votre reçu d’achat original en cas de réclamation de garantie.
Si la laveuse à pression présente un problème, communiquez avec le service à la clientèle :
• Composez le numéro sans frais 1 866-508-1330. Le service à la clientèle est disponible du lundi au vendredi de
8 h à 17 h heure normale du centre (HNC). La personne du service à la clientèle qui vous répondra vous aidera à
régler le problème.
Si la laveuse à pression doit être retournée en vue d’une réparation, les coûts d’expédition sont à la charge du
client. Un numéro d’autorisation de retour de marchandise sera émis pour le retour. Sur réception de la
laveuse à pression, la compagnie réparera ou remplacera l’appareil. Nous vous retournerons l’appareil sans frais.
Veuillez prendre note : Les laveuses à pression expédiées à la compagnie sans numéro RMA ne seront PAS
acceptées et elles seront retournées au frais de l’expéditeur.
Adresse de l’expéditeur :
A.R. North America, Inc.
140 81st Avenue North East
Fridley, MN 55432
Fabriqué par :
A.R. North America, Inc.
140 81st Avenue North East Fridley, MN 55432
33
93904_16ANR029_Stanley 1900PSI ENG-FR-SP.indd 33 16/12/23 下午1:02
Page 34

LISTE DES PIÈCES DE RECHANGE
Pour commander des pièces de rechange, communiquez avec le service à la clientèle au 1-866-508-1330,
de 8 h à 17 h, HNC, du lundi au vendredi ou en ligne au www.stanleypressurewashers.com.
F
A
I
B
PIÈCE DESCRIPTION NO DE PIÈCE
A Réservoir de détergent
PW4220020
(28 oz)
B PVC souple Tuyau PW4221510
C Pistolet pulvérisateur PW4221400
D Buse de lance HP et BPPW4221410
E Buse de lance turbo PW50976
G
D
E
H
PW909SHP1900
C
J
PIÈCE DESCRIPTION NO DE PIÈCE
G Disjoncteur de fuite
PW4221160
de terre
H Kit de remplacement
PW909SHP1900
de joint torique
I Étui à pistolet PW4220040
J Bac à buse PW4220050
F Adaptateur de tuyau
PW4221580
d’arrosage]
Imprimé en Chine
Fabriqué par :
A.R. North America, Inc.
140 81st Avenue North East Fridley, MN 55432
Made in China
34
93904_16ANR029_Stanley 1900PSI ENG-FR-SP.indd 34 16/12/23 下午1:02
© 2016 Stanley Black & Decker, Inc.
STANLEY® and the STANLEY® logo are trademarks of
Stanley Black & Decker, Inc. or an affiliate thereof
and are used under license.
Page 35

1900 PSI
LAVADORA A
PRESIÓN ELÉCTRICA
INSTRUCCIONES
DE MONTAJE,
CUIDADO Y USO
Modelo SHP 1900
IMPORTANTE:
GUARDE ESTAS INSTRUCCIONES Y ADJUNTE
EL RECIBO AL MANUAL PARA FUTURAS
REFERENCIAS.
LEA CUIDADOSAMENTE
93904-KP
SIEMPRE UTILICE GAFAS DE
PROTECCIÓN PARA EVITAR LESIONES
A LOS OJOS AL OPERAR LA
© 2016 Stanley Black & Decker, Inc.
STANLEY® and the STANLEY® logo are trademarks of Stanley Black & Decker, Inc.
or an affiliate thereof and are used under license.
LAVADORA A PRESIÓN.
¿Preguntas, problemas, piezas faltantes?
Antes de la devolución al distribuidor, llame
a nuestro Departamento de Servicio al Cliente
al 1-866-235-5112, 8:00 a. m.–5:00 p. m., hora
estándar del centro, de lunes a viernes.
www.stanleypressurewashers.com
35
93904_16ANR029_Stanley 1900PSI ENG-FR-SP.indd 35 16/12/23 下午1:02
Page 36

TABLA DE CONTENIDO
Especificaciones del producto ............................................................................................ 36
Contenido del paquete ..................................................................................................... 37
Aditamentos ..................................................................................................................... 37
Información de seguridad ................................................................................................. 38
Instrucciones de montaje .................................................................................................. 40
Instrucciones de operación ................................................................................................ 43
Cuidado y mantenimiento ................................................................................................. 47
Solución de problemas ...................................................................................................... 49
Garantía limitada .............................................................................................................. 50
Lista de piezas de repuesto ............................................................................................... 51
ESPECIFICACIONES DEL PRODUCTO
ESPECIFICACIONES
Modelo Máx. PSI
(kg/cm2)
(lb/pulgada2 )
SHP 1900 5561(1900) 4.92 (1.3)
3636
93904_16ANR029_Stanley 1900PSI ENG-FR-SP.indd 36 16/12/23 下午1:02
Máx. GPM
(Litro/min)
(gal/por min)
Agua fría Voltios Amperios Peso (kg) (lb)
✔
120 13 11.3 (24.9)
Page 37

CONTENIDO DEL PAQUETE
CONTENIDO DEL PAQUETE
A
B
Carrete de
manguera para
almacenamiento
únicamente
D
C
AA
J
PW909SHP1900
E
F
G
I
K
PIEZA DESCRIPCIÓN CANTIDAD
A Unidad de la lavadora a presión 1
B PVC suave Manguera de presión
alta
C Alambre de limpieza de boquilla 1
D Funda de la pistola rociadora 1
E Bandeja de la boquilla 1
F Boquilla de la lanza alta/baja 1
G Boquilla de la lanza turbo 1
ADITAMENTOS
AA
Nota: El tornillo se encuentra en el
paquete con el manual
1
H
PIEZA DESCRIPCIÓN CANTIDAD
H Bloqueo del gatillo de la pistola
rociadora
I Pistola rociadora 1
J Kit de recambio de junta tórica 1
K Adaptador de manguera de
jardín
AA Tornillo 1
1
1
Tornillo
Cantidad 1
37
93904_16ANR029_Stanley 1900PSI ENG-FR-SP.indd 37 16/12/23 下午1:02
Page 38

SAFETY INFORMATION
INFORMACIÓN DE SEGURIDAD
INFORMACIÓN DE SEGURIDAD
Lea y comprenda este manual completo antes de intentar
montar, operar o instalar el producto.
Este manual contiene información relacionada con la
PROTECCIÓN DE LA SEGURIDAD PERSONAL y la PREVENCIÓN
DE PROBLEMAS DEL EQUIPO. Es muy importante que lea
atentamente este manual y que lo comprenda completamente
antes de utilizar el producto. Los símbolos que se describen a
continuación se utilizan para indicar esta información.
PELIGRO
Peligro potencial que puede provocar lesiones graves o
incluso la muerte.
ADVERTENCIA
Peligro que podría provocar lesiones graves o incluso
la muerte.
PRECAUCIÓN
Peligro potencial que puede provocar lesiones
moderadas o daños al equipo.
Nota: La palabra “Nota” se utiliza para informar al lector de
algo que el operador debe saber acerca de la herramienta.
ADVERTENCIA
Para reducir el riesgo de lesiones, el usuario debe leer
y comprender las instrucciones antes de utilizar este
producto.
1. Advertencia: al utilizar este producto, siempre se deben
seguir las precauciones básicas, incluido lo siguiente:
2. Lea todas las instrucciones antes de usar el producto.
3. Obtenga el conocimiento de cómo detener el producto
y purgar la presión rápidamente. Esté completamente
familiarizado con los controles.
4. Mantenga el área de operaciones sin personas.
5. No se estire demasiado ni se pare sobre un soporte
inestable. Mantenga una buena posición y el equilibrio en
todo momento.
6. Siga las instrucciones de mantenimiento como se
especifica en el manual.
7. Para evitar lesiones personales o daños a la propiedad y
para maximizar su experiencia con la lavadora a presión,
siga cuidadosamente todos los consejos de seguridad,
instrucciones, advertencias y salvaguardias, y familiarícese
con todos los controles.
8. Esta lavadora a presión cumple con las normas de
la Asociación de Normas Canadiense (CSA) y otras
normas de seguridad y del consumidor. NO modifique o
reconstruya ninguna pieza de la lavadora a presión.
38
9. NO utilice la lavadora a presión cuando se encuentre
bajo la influencia del alcohol o de drogas. Utilice esta
herramienta a presión cuidadosamente y solo cuando
esté atento.
10. Cuide su equilibrio y postura al utilizar la lavadora a
presión. Las superficies se vuelven resbaladizas al mojarse
y son extraordinariamente resbaladizas al usar un
detergente o limpiador.
11. NUNCA opere la lavadora a presión descalzo, con
sandalias o zapatos abiertos.
12. Cuando utilice la lavadora a presión cerca de niños,
asegúrese de que estén siendo supervisados de cerca por
un adulto para evitar lesiones. NUNCA permita que un
niño utilice la lavadora a presión.
13. Mantenga los dedos, las manos, los pies y cualquier
parte del cuerpo a distancia de la corriente de agua de
alta presión. El rociador de alta potencia puede ocasionar
ceguera o hacer estallar la piel. Puede romper una
ventana si se encuentra demasiado cerca al accionar el
gatillo de la pistola rociadora.
14. SIEMPRE utilice gafas de protección para evitar lesiones
a los ojos al operar la lavadora a presión.
15. Para evitar accidentes o lesiones, SIEMPRE use el
bloqueo de seguridad del gatillo cuando no utilice la
lavadora a presión, incluso si la rociadura se detiene por
un momento.
16. La lavadora a presión está equipada con un interruptor
de circuito por falla a tierra (GFCI), que reduce en gran
medida el riesgo de una descarga eléctrica mientras la
unidad está en uso. Si es necesario reemplazar el conector
o el cable, utilice solo piezas de repuesto idénticas.
17. Apunte la pistola rociadora en una dirección segura al
iniciar una sesión de lavado a presión.
18. NUNCA rocíe directamente a una persona, animal,
dispositivo eléctrico ni rocíe la propia unidad.
19. Cuando use la pistola de rociadora, sostenga la pistola
rociadora y la lanza con las dos manos cuando tire del
gatillo (una mano para tirar el gatillo y la otra para
estabilizar el ensamble de la pistola) hasta que se
acostumbre al “retroceso” de la pistola rociadora.
20. Al presionar el interruptor de alimentación para apagar la
lavadora a presión, la presión del agua puede quedarse
en el sistema. Para descargar la presión, apunte la pistola
rociadora en una dirección segura y tire el gatillo.
21. NUNCA rocíe líquidos inflamables.
22. NUNCA use la lavadora a presión en áreas que
contengan polvo, líquidos o vapores combustibles.
23. Evite el contacto de la manguera de presión con objetos
afilados e inspeccione la manguera con regularidad.
Reemplace si se daña. Debido a la alta presión implicada,
no se puede reparar si se corta o daña.
93904_16ANR029_Stanley 1900PSI ENG-FR-SP.indd 38 16/12/23 下午1:02
Page 39

SAFETY INFORMATION
INFORMACIÓN DE SEGURIDAD
INFORMACIÓN DE SEGURIDAD
24. Solo use el detergente formulado específicamente para
lavadoras a presión y siga las instrucciones en la etiqueta
del detergente.
25. Proteja los ojos, los pulmones y la piel de la exposición
al detergente. El jabón para lavar platos o ropa es
demasiado espeso y obstruirá la boquilla de la botella de
detergente.
IMPORTANTE: Almacene la lavadora a presión bajo
techo para evitar que el agua en la unidad se expanda en
condiciones muy frías. Al congelarse y expandirse el agua,
la lavadora a presión se dañará y dejará de funcionar. O
bien, si se almacena al aire libre, se recomienda que utilice
el protector de la bomba (no incluido) para proteger las
bombas.
26. NUNCA use agua caliente con la lavadora a presión.
Esto sobrecalentará y dañará la bomba de presión alta.
27. NUNCA abandone la lavadora a presión mientras está
encendida “ON”.
28. SIEMPRE abra el suministro de agua “ON” antes de
conectar la alimentación de la lavadora a presión en
“ON”. Poner en funcionamiento la bomba en seco
ocasionará daños en los componentes internos.
29. NUNCA utilice para la lavadora a presión un suministro
de agua que exceda los 150 PSI máximo.
30. NUNCA desconecte la manguera de presión alta de la
lavadora a presión mientras se presuriza el sistema.
31. NUNCA enganche de manera permanente los
dispositivos del gatillo de la pistola rociadora.
32. NUNCA opere la lavadora a presión a menos que todos
los componentes estén conectados de manera correcta y
segura.
33. NUNCA permita que la bomba de la lavadora a presión
funcione por más de un minuto después de cerrar el
suministro de agua. Esto puede ocasionar que el motor y
la bomba se sobrecalienten y fallen.
34. NUNCA utilice lanzas ni otras piezas que no sean
compatibles con esta unidad AR Blue Clean específica.
35. NUNCA utilice un cable de alimentación de extensión
debido a que este anula la efectividad del GFCI e
incrementa la posibilidad de electrocutar al operador.
36. NUNCA rocíe las tomas de corriente con la lavadora a
presión.
37. Inspeccione el cable de alimentación antes de utilizarlo.
NO lo utilice si está dañado.
CONSERVE ESTAS INSTRUCCIONES PARA FUTURAS CONSULTAS.
Servicio de mantenimiento de un dispositivo de doble
aislamiento
Protección del interruptor de circuito por falla a tierra:
Esta lavadora a presión está provista de un interruptor de
circuito por falla a tierra (GFCI) incorporado en los conectores
del cable de suministro de alimentación. Este dispositivo
proporciona protección adicional contra el riesgo de
descarga eléctrica. Si es necesario reemplazar el conector o el
cable, utilice solo piezas de repuesto idénticas que incluyan
protección de GFCI.
En un producto de aislamiento doble, se proporcionan dos
sistemas de aislamiento en lugar de la conexión a tierra.
Para un producto de aislamiento doble no se proporciona
medios de conexión a tierra, ni se deben agregar medios de
conexión a tierra al producto.
El mantenimiento de un producto de doble aislamiento
requiere cuidado extremo y conocimiento del sistema, y solo
lo debe realizar personal de servicio cualificado.
Las piezas de repuesto para un producto de doble
aislamiento deben ser idénticas a las piezas originales.
Un producto de doble aislamiento está marcado con las
palabras “Aislamiento doble” o “Doble aislamiento”. El
producto también podría estar marcado con el símbolo que
se muestra aquí.
Producto de doble aislamiento
39
93904_16ANR029_Stanley 1900PSI ENG-FR-SP.indd 39 16/12/23 下午1:02
Page 40

PREPARATION
PREPARACIÓN
Screw
Qty. 1
PREPARACIÓN
Antes de comenzar el montaje del producto, asegúrese de
que todas las piezas estén presentes. Compare las piezas con
la lista de contenido del paquete y la lista de aditamentos.
Si alguna pieza falta o está dañada, NO intente montar el
producto.
Tiempo de montaje estimado: 5 minutos
INSTRUCCIONES DE MONTAJE
Herramientas requeridas para el montaje (no incluidas):
Destornillador Phillips
1
D
A
Montaje de la unidad de alimentación
Deslice la funda de la pistola rociadora (D) en el lado
izquierdo, estando frente a la unidad de la lavadora a
presión (A).
Nota: Al colocar la pistola con la lanza acoplada, la boquilla descansará en esta bandeja.
2
AA
E
Deslice la pestaña en la ranura y atornille la bandeja de la
boquilla (E) en la parte inferior izquierda, estando de frente,
de la unidad de la lavadora a presión (A). Fije con el tornillo
(AA).
Nota: NO utilice un destornillador eléctrico. Cuando el tornillo esté completamente apretado, de un pequeño giro final
hacia la derecha del destornillador.
NO apriete demasiado.
A
Aditamentos que se utilizan:
AA
40
93904_16ANR029_Stanley 1900PSI ENG-FR-SP.indd 40 16/12/23 下午1:02
Tornillo x 1
Page 41

INSTRUCCIONES DE MONTAJE
3
2
3
B
A
Montaje de la PVC suave manguera de presión alta
Atornille la PVC suave manguera de presión alta (B) hacia
la derecha en la parte inferior izquierda, estando frente a
la unidad de la lavadora a presión (A). Tire hacia atrás el
collarín e inserte la varilla del empaque de anillo en la salida
de agua lo suficiente para que el collarín se pueda enroscar
en la salida hasta que esté apretado con la mano. Si le da
menos de seis vueltas no ha apretado apropiadamente el
conector de la PVC suave manguera de presión alta. Es
más fácil colocar la lavadora a presión frente a usted para
asegurarse de que las roscas inician correctamente. No
apretar correctamente la PVC suave manguera de presión
alta ocasionará que la manguera se deslice o salga disparada
inmediatamente al encender la unidad. No se preocupe por
daños si esto ocurre, simplemente vuélvala a instalar y tenga
especial cuidado al enroscar el conector de la PVC suave
manguera de presión alta.
Nota: NO utilice alicates ni pinzas de presión para apretar.
4
I
2
B
1
Tire hacia atrás el collar en el otro extremo de la PVC
suave manguera de alta presión (B). Empuje firme-
mente para conectar manguera para spray gun (I). Gire
el collar para garantizar. Confirman que la manguera
esté pistola tirando ligeramente de ellas. La manguera
está ahora firmemente Unido al pistola rociadora.
3
B
5
I
1
B
Giro cuello y tirar de nuevo para liberar el alto
conexión de la manguera (B) presión de la pistola (I).
3
B
41
93904_16ANR029_Stanley 1900PSI ENG-FR-SP.indd 41 16/12/23 下午1:02
Page 42

INSTRUCCIONES DE MONTAJE
6
I
1
Desbloquear Bloquear
Pistola de cierre (antes de la instalación de la lanza)
Cerradura de gatillo de pistola (I), apunte la pistola lejos de
usted y gire a la cerradura (posición “3” y “9”). Apretar
o tirar de gatillo para asegurarse de que está bloqueado.
SIEMPRE dejar en posición cerrada cuando no esté en uso.
Esto asegura que el arma está en modo “seguro” hasta
que esté listo para su uso. Gire el dial para desbloquear
(posición “12” y “6”) para liberar el gatillo de la pistola.
7
GF
I
1
G
2
Instalación de la lanza de la boquilla turbo y lanza de
boquilla Alta/baja
Mientras la pistola rociadora (I) está en la posición
bloqueada, inserte la lanza de la boquilla alta/baja (F) o la
lanza de la boquilla turbo (G) en el extremo de la pistola
rociadora, insertando y presionando conjuntamente girando
hacia la derecha simultáneamente. Para retirar, presione
conjuntamente y gire hacia la izquierda.
Nota: El seguro del gatillo impide gatillo enganchado
accidentalmente.
Nota: Siempre presione el botón de bloqueo de seguridad
para bloquear el gatillo cuando cambie las lanzas para
garantizar que no se expulsen accidentalmente con fuerza
durante la desinstalación.
Nota: Cuando utilice la lanza turbo, asegúrese de que la
boquilla turbo esté fuertemente atornillada en el extremo de
la lanza cada vez que la utilice.
Nota: la boquilla turbo no es ajustable.
42
93904_16ANR029_Stanley 1900PSI ENG-FR-SP.indd 42 16/12/23 下午1:02
Page 43

INSTRUCCIONES DE MONTAJE
8
A
K
Instalación del adaptador de manguera de jardín
Acople el collarín del adaptador de la manguera de jardín
(K) directamente a la entrada de agua de la lavadora a pre-
sión (A). Apriete con la mano.
9
1
K
Conecte la manguera al adaptador de manguera de
jardín (K).
Nota: enjuague la manguera de jardín antes de conectarla
al adaptador de la manguera de jardín.
INSTRUCCIONES DE OPERACIÓN
Ahora ya completó el montaje y está listo para comenzar a
utilizar la lavadora a presión eléctrica. Lea y observe todas
las instrucciones de seguridad.
• Abra el suministro de agua con el grifo completamente
abierto.
• Asegúrese de que el interruptor “ON/OFF” esté en
la posición “OFF”. El interruptor de encendido tiene
símbolos internacionales para “on” y “off”: On (|) Off
(O).
• Desenrolle completamente el cable de alimentación y
conecte el GFCI en una toma de 120 voltios a tierra.
• Libere el bloqueo del gatillo a presión de seguridad hacia
arriba y de nuevo hacia el gatillo. Mientras apunta la
pistola rociadora a una dirección segura, apriete el gatillo
de la pistola rociadora hasta que haya un flujo constante
de agua, permitiendo que el agua y el aire salgan de la
manguera. Presione el bloqueo del gatillo de nuevo hacia
abajo para bloquearlo de nuevo en su lugar.
43
93904_16ANR029_Stanley 1900PSI ENG-FR-SP.indd 43 16/12/23 下午1:02
Page 44

OPERATING INSTRUCTIONS
INSTRUCCIONES DE OPERACIÓN
OFF/0
OFF/0
ON/I
ON/I
• Gire el interruptor de alimentación a la posición “ON”
(|). La unidad se encenderá durante 1 o 2 segundos y se
apagará. Este es un procedimiento normal de la función
de arranque automático. Apriete el gatillo de la pistola
rociadora para comenzar el lavado a presión.
• Comience el lavado a presión apretando el gatillo de la
pistola rociadora completamente en la manija.
• Libere el gatillo de la pistola rociadora para detener la
lavadora a presión.
• Deje que el motor se detenga por completo antes de
apretar el gatillo de nuevo.
• Oprimir rápidamente hará que la función de arranque
automático pierda un ciclo de on/off lo que puede
impedir que se encienda mientras aprieta el gatillo
después de oprimir de manera rápida. Mediante jalones
del gatillo pausados lentos evita este proceder.
OFF/0
OFF/0
ON/I
ON/I
• Siempre pruebe en un área pequeña para evitar la
posibilidad de dañar la superficie.
Posición IN
IN position
(hacia adentro)
1
Posición IN
IN position
(hacia adentro)
2
2
Ajuste de presión alta
High Pressure Setting
Fan Spray Pencil Stream
Flujo de lápizRociado de ventilador
Utilización de la boquilla alta/baja
• El rociado de presión alta se utiliza para la limpieza y
el rociado de presión baja activa para la función de
detergente.
• La boquilla de rociado ajustable tiene dos (2) posiciones:
– Posición IN (hacia adentro) para rociado de presión
alta. Gire la boquilla hacia la izquierda hasta que tope
y la abertura esté cerrada.
– Posición OUT (hacia afuera) para rociado de presión
baja para la función de detergente. Gire la boquilla
hacia la derecha hasta que tope y la abertura esté
cerrada.
• Cuando utilice el ajuste de presión alta, gire la cabeza
de la boquilla hacia la derecha o hacia la izquierda para
obtener el flujo deseado.
• Cuando utilice el ajuste de presión baja gire la cabeza de la
boquilla hacia la derecha para abrir las aspas del ventilador
completamente.
44
93904_16ANR029_Stanley 1900PSI ENG-FR-SP.indd 44 16/12/23 下午1:02
Page 45

OPERATING INSTRUCTIONS
INSTRUCCIONES DE OPERACIÓN
1
Posición OUT
OUT position
(hacia afuera)
2
Ajuste de presión BAJA
LOW Pressure Setting
Flujo de lápiz
Pencil Stream
Posición OUT
(hacia afuera)
OUT position
IMPORTANTE: Cuando aplique detergente con el rociado
de presión baja, la cabeza de rociado variable se debe
establecer para “Flujo de lápiz”. Esto ocurre cuando las
aspas de metal en la parte delantera de la boquilla se abren
completamente para que el rociado de detergente no se
restringa.
• Cuando use el detergente, llénela con un detergente
formulado apropiadamente con una proporción de agua
de acuerdo a las instrucciones en el envase.
• NO use detergentes espesos como gel ya que obstruirán
la lavadora a presión y pueden causar daños.
93904_16ANR029_Stanley 1900PSI ENG-FR-SP.indd 45 16/12/23 下午1:02
• Cuando retire el tanque de detergente, retire la tapa y
coloque el dedo en el tanque levantando mientras jala el
tanque hacia afuera.
45
Page 46

OPERATING INSTRUCTIONS
INSTRUCCIONES DE OPERACIÓN
INSTRUCCIONES DE OPERACIÓN
Rociado
Spray
Presión
Pressure
Consejos para la operación
• Si escucha que el motor funciona de forma intermitente
cuando no se aprieta el gatillo, eso es normal.
La bomba se está purgando para que esté lista para
funcionar cuando se apriete el gatillo. Apague la lavadora a
presión si no se usa después de cinco minutos.
• Los empaques de anillo en el extremo de la bayoneta de la
lanza de la boquilla se debe limpiar regularmente y lubricar
con grasa no soluble en agua, como la vaselina.
• Conserve el alambre de limpieza de la boquilla para utilizarlo
para destapar la boquilla. Si pierde el alambre de limpieza,
un sujetapapeles enderezado también funcionará.
Cómo evitar dañar las superficies
• Los daños a las superficies que se limpian se producen
debido a que la fuerza del impacto de la presión del agua
es superior a la durabilidad de la superficie. La madera sin
acabado se puede penetrar, la pintura se puede descascarar,
etc. Puede variar la fuerza de su lavadora a presión mediante
el control de:
1. El ángulo de la superficie que se limpia
2. La distancia de la boquilla de la superficie que se limpia
• NUNCA utilice un flujo de agua de presión alta pequeño
2
1
sobre superficies suaves susceptibles a los daños.
• Utilice la lanza de boquilla alta/baja cuando limpie ventanas.
Asegúrese de ajustar la boquilla para rociado bajo y de
colocar la boquilla aproximadamente a cuatro o cinco pies
de la ventana con la boquilla en un ángulo de cuarenta y
cinco grados. Apriete el gatillo y cambie el patrón de rociado
y el ángulo hasta que se obtenga la eficiencia de limpieza
óptima.
Uso del cable de alimentación
• Retire fácilmente el cordón de alimentación de un lado de
la unidad girando el gancho del cordón azul inferior hacia la
derecha o izquierda hasta que quede hacia arriba. El cable
de alimentación entonces se puede deslizar fácilmente del
lado de la unidad de la lavadora a presión.
• Gire el gancho del cable azul de nuevo hacia abajo cuando
esté listo para enrollar el cable de nuevo en su lugar para el
almacenamiento.
46
93904_16ANR029_Stanley 1900PSI ENG-FR-SP.indd 46 16/12/23 下午1:02
Page 47

CUIDADO Y MANTENIMIENTO
Detergentes
• Utilice detergentes diseñados para lavadoras a presión.
Estos se pueden comprar en línea en nuestro sitio web
www.stanleypressurewashers.com. Las ferreterías o los
centros para el hogar también tienen detergentes para
lavadora a presión para diferentes trabajos de limpieza. La
solución de limpieza debe tener la consistencia del agua
para evitar la obstrucción de la boquilla y de la botella de
detergente.
• Este sistema aplica detergente a baja presión. La
capacidad de limpieza de los detergentes mejora cuando
se aplica con baja presión y se le da el tiempo suficiente
para romper la suciedad y la mugre. La combinación de
baja presión y la acción química es muy eficaz y puede ser
mejor que restregar, si se aplica correctamente. SIEMPRE
rocíe detergente sobre una superficie seca. NO remoje
previamente. Al mojar la superficie primero, se diluye
el detergente y reduce su capacidad de limpieza. NO
permita que el detergente se seque sobre la superficie.
Al limpiar superficies verticales, aplique detergente en
las superficies inferiores y suba poco a poco para evitar
que el detergente haga rayas en la suciedad o mugre.
Enjuague el detergente mediante el lavado a presión de
abajo hacia arriba por la misma razón.
• Si una mancha es particularmente difícil, puede ser
necesario aplicar de nuevo detergente y utilizar un cepillo
de cerdas para restregar la mancha. El lavado a presión
posterior al cepillado debe completar con éxito el trabajo
de limpieza.
Limpieza de las boquillas
• Una boquilla obstruida o parcialmente obstruida puede
ocasionar una reducción significativa de la presión del
agua que sale de la boquilla y hacer que la unidad vibre
durante el rociado.
• Apague la unidad.
• Cierre el suministro de agua a la unidad.
• Alivie cualquier presión atrapada en la manguera
apretando el gatillo de 2 a 3 veces y luego bloquee la
pistola rociadora presionando el botón de bloqueo de
izquierda a derecha.
• Retirar la lanza de la pistola rociadora
• Utilice el limpiador de la punta de la boquilla
proporcionado (o un portapapeles desdoblado), inserte
el alambre en el agujero de la boquilla y muévalo
hacia adelante y hacia atrás hasta que los residuos se
desprendan.
• Golpee ligeramente el extremo de la conexión rápida de
la lanza sobre una superficie dura varias veces
• Lave a contracorriente con agua a través de las boquillas
con la manguera de jardín y a la máxima presión
disponible (ya sea con la boquilla de agua estándar o con
el pulgar sobre la boquilla para crear la presión de agua
para el lavado a contracorriente).
Adaptador de manguera de jardín limpieza
• Las pantallas en el interior del adaptador de la manguera
de jardín transparente se deben limpiar periódicamente.
Enjuáguela con agua limpia y luego colóquela de nuevo
en el adaptador.
47
93904_16ANR029_Stanley 1900PSI ENG-FR-SP.indd 47 16/12/23 下午1:02
Page 48

OPERATING INSTRUCTIONS
CUIDADO Y MANTENIMIENTO
INSTRUCCIONES DE OPERACIÓN
Almacenamiento
• Cuando termine la sesión de lavado a presión, apague
el interruptor de alimentación ubicado en la parte
delantera de la lavadora a presión. Desconecte el cable
de alimentación de la toma de corriente. Cierre el
suministro de agua. Jale el gatillo de la pistola rociadora
de 2 a 3 veces para drenar el exceso de agua y para
liberar cualquier presión de agua que quede. Desconecte
el adaptador de la manguera de jardín de la entrada de
agua. NO permita que la lavadora a presión funcione sin
que pase un flujo de agua a través de ella.
• Retire la botella de detergente y límpiela completamente.
Los restos de químicos se adherirán al recipiente y pueden
ocasionar que el inyector de detergente se obstruya y no
funcione correctamente.
• Retire la manguera de presión alta de la pistola rociadora.
• Retire la lanza de la pistola. Coloque la pistola en el soporte
al lado. Las lanzas se colocan en cualquiera de las ranuras
en la parte trasera de la unidad. Asegúrese de desechar
cualquier resto de detergente de la botella. Enjuague la
botella y la cabeza de la boquilla con agua fresca para evitar
la obstrucción.
• Enganche el cable de alimentación alrededor las pestañas
en forma de L en el lado derecho de la máquina estando de
frente a esta.
48
93904_16ANR029_Stanley 1900PSI ENG-FR-SP.indd 48 16/12/23 下午1:02
Page 49

TROUBLESHOOTING
SOLUCIÓN DE PROBLEMAS
Si tiene alguna pregunta sobre el producto, llame a Servicio al cliente al 1-866-508-1330.
PROBLEMA ACCIÓN CORRECTIVA
La unidad no enciende. 1. El módulo del GFCI en el extremo del cable de alimentación se debe conectar directamente a
una toma de corriente.
2. No utilice un cable de extensión.
3. Con el GFCI conectado asegúrese de que el interruptor de alimentación esté en on.
Nota: Cuando el interruptor de alimentación está en on, la lavadora a presión se encenderá por 1
o 2 segundos y se apagará. Esto es normal.
La manguera de presión
alta (HP) no se conecta/
permanece conectada a
la pistola rociadora. ¿Es
este un problema de la
pistola rociadora?
La unidad está
funcionando, pero no
hay flujo de agua.
¿Por qué hay fugas de
agua en la conexión
de la manguera de
presión alta a la pistola
rociadora?
No puedo retirar la
lanza de la pistola
rociadora. ¿Qué debo
hacer?
1. En la mayoría de los casos, la pistola rociadora no es el problema. El problema es la funda
de caucho que cubre el conector en el extremo de la manguera de presión alta. Es probable
que se haya deslizado hacia la punta de metal. Para arreglarlo: mueva, gire o jale la funda de
caucho hacia abajo hasta que se pueda ver toda la punta más 0,317 cm (1/8 pulgadas) del
conector de metal debajo de la punta. Ahora trate de insertar la punta de la manguera en la
pistola rociadora. Debe hacer “clic” en su lugar y no saldrá hasta que la manguera se libere
presionando la palanca en la parte inferior de la pistola. Puede cortar el extremo de la funda
con un cuchillo afilado si no puede mover la funda hacia abajo. Tenga cuidado de no cortar ni
perforar la manguera.
2. No presione el botón de liberación cuando se conecta la manguera de presión alta.
1. Revise la fuente de agua. Destape la boquilla en la lanza. (Consulte las instrucciones de limpieza
de la boquilla en “Limpieza de boquillas”). O, retire la lanza y simplemente rocíe desde la
pistola rociadora. Esto indicará si el problema está en la lanza.
1. Asegúrese de que hay un anillo en el extremo de la punta metálica de la manguera
de alta presión. Si no junta tórica está presente, la conexión entre la manguera y
pistola se escapará. Reemplazos de empaque están incluidas en el contenido del
paquete.
1. Todas las lanzas y las botellas de detergente se acoplan y se retiran de la lanza de
extensión de la misma forma. Inserte el extremo de liberación rápida de la lanza/botella de
detergente en la lanza de extensión. Presione la lanza de extensión y la lanza conjuntamente
(aproximadamente 0,317 cm [1/8 pulgadas]) y gire hacia la derecha. La lanza se bloqueará
en su lugar. Retire la lanza revirtiendo este procedimiento. Presione la lanza de extensión y la
lanza conjuntamente y gire hacia la derecha. La lanza se deslizará hacia afuera.
2. O bien, sostenga la lanza de extensión y la lanza en posición vertical con el extremo de
la boquilla en el suelo. Presione todo el conjunto hacia abajo para aflojar la conexión y, a
continuación, siga el procedimiento de desinstalación de nuevo. También puede rociar agua
jabonosa o un lubricante en el área de la conexión de la lanza a la lanza de extensión.
La lavadora a presión
se enciende por
2 segundos, se apaga y
no vuelve a encender.
¿Tengo una unidad
defectuosa?
93904_16ANR029_Stanley 1900PSI ENG-FR-SP.indd 49 16/12/23 下午1:02
1. Parece que la lavadora a presión trabaja muy bien. Cuando se conecta el agua, los accesorios
están montados apropiadamente y el interruptor de alimentación está en on, la lavadora a
presión puede encender por 1 o 2 segundos para purgar la bomba. Se apaga automáticamente
y espera que el gatillo de la pistola rociadora se presione. Cuando el gatillo se presiona, el agua
comienza a fluir a través de la bomba. El sensor de agua en la bomba “detecta” el agua en
movimiento y enciende automáticamente la lavadora a presión.
2. Coloque el interruptor de alimentación en off, mantenga presionado el gatillo de la pistola
rociadora, para tener un flujo constante de agua. Mientras mantiene el gatillo abierto en la
pistola rociadora, al mismo tiempo, coloque el interruptor de alimentación a on.
49
Page 50

GARANTÍA LIMITADA
La garantía de este producto está cubierto por A.R.North América.
Este producto tiene una garantía de 2 (dos) años. Por favor lea lo siguiente para entender lo que implica cada uno de
garantía:
Este producto está en garantía al consumidor minorista original contra defectos de material y mano de obra durante un
período de 1 (un) año y es un “parachoques a parachoques” garantía completa que incluye la pistola, la manguera de alta
presión y todos los accesorios de la fecha de compra. La garantía no es transferible o asignable. Esta garantía cubre las piezas
de recambio. Esto limita un año de garantía se aplica únicamente a los productos utilizados en aplicaciones de consumo y es
nula en alquiler o cualquier aplicación comercial. cuidado razonable debe ser utilizado de acuerdo con las instrucciones de
operación y mantenimiento en la guía de inicio manual y rápida del propietario. Si no se siguen estas instrucciones, se
anulará esta garantía. Esta garantía le otorga derechos legales específicos y usted también puede tener otros derechos que
varían de un estado a otro.
El segundo año de la garantía sólo cubre defectos de fabricación.
Proceso de garantía
Guarde su recibo original de compra en caso del reclamo de garantía.
Si la lavadora a presión desarrolla un problema, comuníquese con Servicio al cliente:
• Llame a nuestro número gratuito 1-866-508-1330. Servicio al cliente está disponible de lunes a viernes de 8:00 a. m.
a 5:00 p. m., hora estándar del centro (CST). La persona de Servicio al cliente trabajará con usted para solucionar el
problema.
Si la lavadora a presión se tiene que retornar para su reparación, el cliente debe pagar los costos de envío a la compañía.
Se emitirá un Número de autorización de devolución de mercancía (RMA) para la devolución. Al recibir la lavadora a
presión, la empresa reparará o reemplazará la unidad. Enviaremos de vuelta la unidad al cliente sin cargo alguno.
Tenga en cuenta: las lavadoras a presión que se envíen a la empresa sin número RMA no se aceptarán y se enviarán de
vuelta a expensas del remitente.
Dirección del remitente:
A.R. North America, Inc.
140 81st avenue North East
Fridley, MN 55432
Fabricado por:
A.R. North America, Inc.
140 81st Avenue North East Fridley, MN 55432
50
93904_16ANR029_Stanley 1900PSI ENG-FR-SP.indd 50 16/12/23 下午1:02
Page 51

LISTA DE PIEZAS DE REPUESTO
Para obtener piezas de repuesto, llame a nuestro Departamento de Servicio al cliente al 1-866-508-1330., de 8:00 a.m. - 5:00 p.m.,
hora estándar del centro, de lunes a viernes o realice su pedido en línea en wwwstanleypressurewashers.com
F
A
I
B
PIEZA DESCRIPCIÓN PIEZA N.°
A Tanque de detergente
(28 onzas)
B PVC suave Manguera PW4221510
C Pistola rociadora PW4221400
D Boquilla de la lanza alta/baja PW4221410
E Boquilla de la lanza turbo PW50976
PW4220020
G
D
E
H
PW909SHP1900
C
J
PIEZA DESCRIPCIÓN PIEZA N.°
F Adaptador de manguera de
jardín
G Ensamble del GFCI PW4221160
H Kit de recambio de junta
tórica
I Funda de la pistola PW4220040
J Bandeja de la boquilla PW4220050
PW4221580
PW909SHP1900
Impreso en China
Fabricado por:
A.R. North America, Inc.
140 81st Avenue North East Fridley, MN 55432
Hecho en China
93904_16ANR029_Stanley 1900PSI ENG-FR-SP.indd 51 16/12/23 下午1:02
© 2016 Stanley Black & Decker, Inc.
STANLEY® and the STANLEY® logo are trademarks of
Stanley Black & Decker, Inc. or an affiliate thereof
and are used under license.
51
Page 52

93904_16ANR029_Stanley 1900PSI ENG-FR-SP.indd 52 16/12/23 下午1:02
 Loading...