

Page 1
SAT3S
x
LITHIUM-ION LED SATELLITE LIGHT
INSTRUCTION MANUAL
Transportation of Lithium-Ion Batteries
• Always check all applicable local, national, and international regulations before
transporting a unit containing a Lithium-Ion battery.
• Transporting an end-of-life, damaged, or recalled battery may, in certain cases, be
specifically limited or prohibited.
INSTRUCTIONS PERTAINING TO THE USB PORTS
• IMPORTANT: Some household USB-powered electronics will not operate with
the USB ports provided with this device. Check the manual of the corresponding
electronic device to confirm that it can be used with this type of USB port.
• The USB ports do not support data communication. They only provide
power to an external USB powered device (5V DC/1A using the light’s USB port
or 5V DC/2A using the USB ports on the AC or DC charging adapters). Make sure
the rating of equipment plugged into the each USB port does not exceed the
amperage stated.
• Do not attach USB hubs allowing connection of multiple personal electronic
devices to any of these USB ports on the light or charging adapters.
SAVE THESE INSTRUCTIONS
INTRODUCTION
Congratulations on purchasing your new Stanley Lithium-Ion LED Satellite
Light. Read this Instruction Manual and follow the instructions carefully
before using your new light.
FEATURES
2
SAVE THIS INSTRUCTION MANUAL FOR FUTURE REFERENCE.
Copyright © 2015
Baccus Global LLC, Boca Raton, FL 33432
(877) 571-2391
This device complies with part 15 of the FCC rules. Operation is subject to the following two conditions:
(1) this device may not cause harmful interference, and (2) this device must accept any interference
received, including interference that may cause undesired operation.
This equipment has been tested and found to comply with the limits for a Class B digital device,
pursuant to part 15 of the FCC Rules. These limits are designed to provide reasonable protection against
harmful interference in a residential installation. This equipment generates, uses and can radiate radio
frequency energy and, if not installed and used in accordance with the instructions, may cause harmful
interference to radio communications. However, there is no guarantee that interference will not occur
in a particular installation. If equipment does cause harmful interference to radio or television reception,
which can be determined by turning the equipment off and on, the user is encouraged to try to correct
the interference by one or more of the following measures:
• Reorient or relocate the receiving antenna.
• Increase the separation between equipment and receiver.
• Connect the equipment into an outlet on a circuit different from that to which the receiver is
connected.
• Consult the dealer or an experienced radio/TV technician for help.
Changes or modifications not approved by the party responsible for compliance could void user’s
authority to operate the equipment.
SAFETY GUIDELINES / DEFINITIONS
DANGER: Indicates an imminently hazardous situation which, if not avoided,
will result in death or serious injury.
WARNING: Indicates a potentially hazardous situation which, if not avoided,
could result in death or serious injury.
CAUTION: Indicates a potentially hazardous situation which, if not avoided, may
result in minor or moderate injury.
CAUTION: Used without the safety alert symbol indicates potentially hazardous
situation which, if not avoided, may result in property damage.
RISK OF UNSAFE OPERATION. When using tools or equipment, basic safety
precautions should always be followed to reduce the risk of personal injury.
Improper operation, maintenance or modification of tools or equipment could
result in serious injury and property damage. There are certain applications for
which tools and equipment are designed. Manufacturer strongly recommends that
this product NOT be modified and/or used for any application other than for which
it was designed. Read and understand all warnings and operating instructions
before using any tool or equipment.
IMPORTANT SAFETY INSTRUCTIONS
READ ALL INSTRUCTIONS
WARNING: Read all instructions before operating light. Failure to
follow all instructions listed below may result in electric shock, fire and/or
serious injury.
GENERAL SAFETY WARNINGS AND INSTRUCTIONS
WARNING: This product or its power cord contains lead, a chemical known to
the State of California to cause cancer and birth defect or other reproductive harm.
Wash hands after handling.
INSTRUCTIONS PERTAINING TO RISK OF FIRE, ELECTRIC
SHOCK, OR INJURY TO PERSONS
WARNING – WHEN USING ELECTRICAL APPLIANCES, BASIC PRECAUTIONS
SHOULD ALWAYS BE FOLLOWED, INCLUDING THE FOLLOWING:
• To reduce the risk of injury, close supervision is necessary when the light is used
near children.
• Use only attachments recommended or sold by the manufacturer.
WARNING: TO REDUCE THE RISK OF ELECTRIC SHOCK:
• Charge indoors only.
• Do not expose charging adapters or battery to moisture, water or any other liquid.
• Use only the charging adapter supplied by the manufacturer to recharge.
• When an extension cord is used:
– The marked rating of the detachable power supply cord or extension cord
should be at least as great as the electrical rating of this appliance.
– The cord should be arranged so that it will not drape over the countertop or
tabletop where it can be tripped over, snagged, or pulled on unintentionally
(especially by children).
– The extension cord should be kept dry and off the ground.
WARNING: FIRE HAZARD: Keep light lamp away from materials that may burn.
CAUTION: TO REDUCE THE RISK OF INJURY OR PROPERTY DAMAGE:
• The LED gets hot quickly. Do not touch the hot lens, guard or enclosure.
• Never place the light face down on any surface when lit, charging or not in use.
Never store the light face down on any surface.
• Never look directly into the light or shine the light into another person’s eyes.
• Keep sharp objects away from lens — it can crack or break.
• Do not expose this unit to extremely high temperatures.
• Do not drop or throw light. It contains a lithium-ion battery.
• Use only with either the AC or DC charging adapter and/or the USB charging
cable that are provided with unit. Plug in the charging cable at the light first,
then plug into the charging source.
• Do not overcharge: Recharge up to 5 hours maximum or until the charge status
LED indicator lights blue.
• After charging/recharging, disconnect charging adapter and wait 5 minutes before
use.
• Do not crush, cut, pull or expose the charging cable to extreme heat.
• Position the charging cable so it does not become entangled or become a safety
hazard. Keep the charging cable away from sharp edges.
• Do not open the light body casing. There are no user-serviceable parts inside.
• Do not operate the light without the lens in place.
• To reduce risk of damage to the charging cable, pull by the plug rather than the
cord when disconnecting.
• Do not attempt to charge the unit if the charging adapter is damaged – return
the charging adapter to manufacturer for repair or replacement.
BC
9
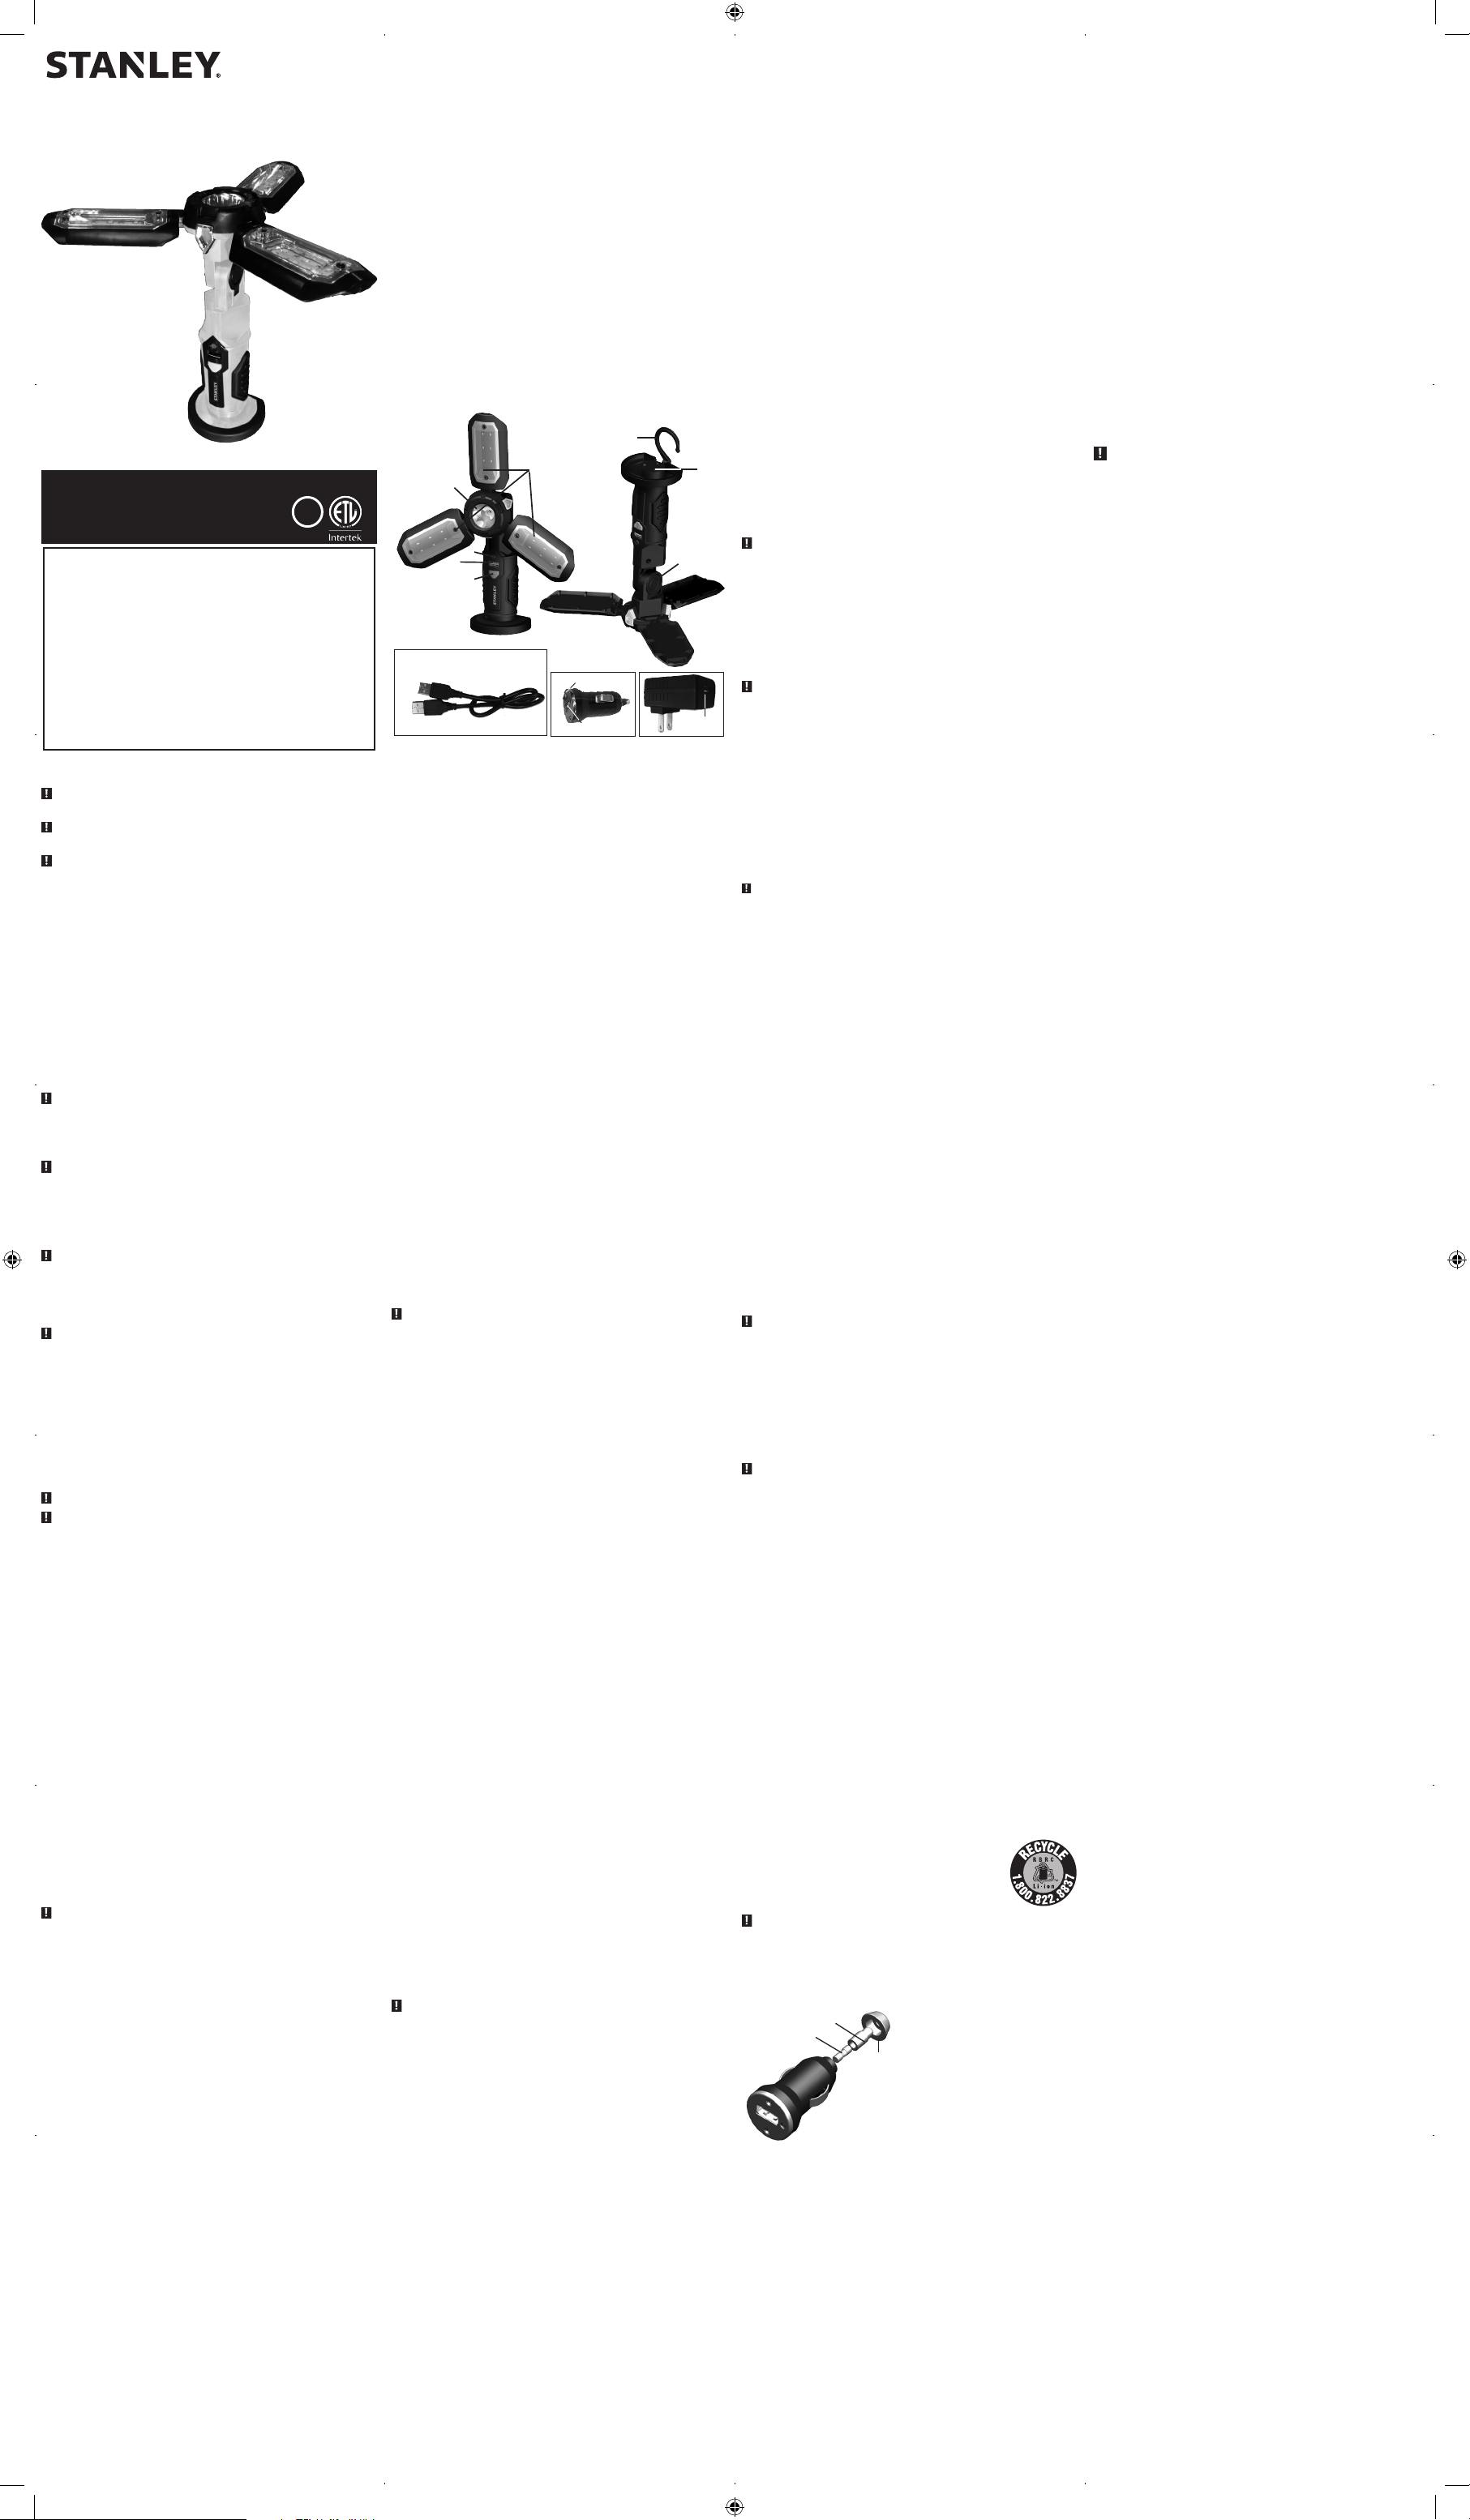
1. Main LED light
2. Folding light panels (3)
3. Battery/charge status LED indicator / translucent USB power button
4. USB port (for use with USB charging cable and charging adapters)
5. Power/light mode button
6. Folding hanging hook
7. Magnetic base
8. Pivoting head
9. USB charging cable (for use with 120 volt AC/USB and 12 volt DC/USB charging
10. 12 volt DC/USB charging adapter
11. 12 volt DC/USB charging adapter LED Indicator
12. 12 volt DC/USB charging adapter USB port
13. 120 volt AC/USB charging adapter
14. 120 volt AC/USB charging adapter USB port
READING THE BATTERY/CHARGE STATUS LED INDICATOR
The battery/charge status LED indicator is located inside the translucent USB Power
Button. It lights or flashes in two colors to indicate the following:
When charging:
Blue: Battery is in a fully charged state.
Blue (flashing): Battery is in a partially charged state.
Red (flashing): Battery needs to be recharged.
When operating the USB port (once the translucent USB power button has
been pressed):
Blue: Battery is operating at full voltage.
Red: Battery is operating at partial voltage.
Red (flashing): Battery is operating at extremely low voltage. The built-in low
voltage protection has activated and the unit will automatically shut down. The unit
must be recharged immediately.
CHARGING/RECHARGING THE LIGHT
This unit is shipped in a partially charged state. Charge unit after purchase and
BEFORE first use using the 120 volt AC/USB charging adapter for up to 5 hours or
until the battery/charge status LED indicator lights blue.
Recharge after each use until the charge status LED indicator lights blue.
IMPORTANT: When the unit is not in use, we recommend that the battery is
charged at least every 3 to 6 months.
• Never place the light face down on any surface when charging.
• Make sure the light is turned OFF during recharging, as operating the light can
slow the recharging process.
• Failure to keep the battery charged will cause permanent damage and result in
poor performance.
Charging/recharging using the 120 Volt AC/USB Charging
Adapter
1. Make sure the power mode button and the translucent USB power button are
* The translucent button does not operate the light, only the USB power port.
2. Insert the USB charging cable into the USB port on the light.
3. Insert the other end of the USB charging cable into the 120 volt AC/USB
4. Plug the 120 volt AC/USB charging adapter into a (powered) standard North
5. Charge up to 5 hours or until the battery/charge status LED indicator lights blue.
6. When charging is complete, first unplug the AC/USB charging adapter from the
Charging/recharging using the 12 Volt DC/USB Charging
Adapter
1. Make sure the power mode button and the translucent USB power button are
* The translucent button does not operate the light, only the USB power port.
2. Insert the USB charging cable into the USB port on the light.
3. Insert the other end of the USB charging cable into the 12 volt DC/USB charging
4. Insert the 12 volt DC/USB charging adapter into the 12 volt DC accessory outlet
SPECIFIC SAFETY INSTRUCTIONS FOR LITHIUM-ION
BATTERIES
WARNING: TO REDUCE THE RISK OF FIRE, ELECTRIC SHOCK, BURST
HAZARD, OR INJURY TO PERSONS OR PROPERTY:
Lithium-ion batteries are small, compact and ideal for providing long-lasting power
to this unit. However, they must be used and charged properly. Improper use can
result in serious injury, fire, or death.
• Lithium-ion batteries can explode in the presence of a source of ignition. Do not
use the product in the presence of an open flame.
• Do not place this lithium-ion battery powered unit in fire or apply heat to it.
• Do not subject this lithium-ion battery powered unit to strong impacts or shocks.
The battery in this unit contains safety and protection devices which, if damaged,
may cause the battery to generate heat, rupture or ignite.
• Do not expose the lithium-ion battery to water or salt water, or allow the battery
to get wet.
• Avoid storing this lithium-ion battery powered unit in the basement, bathroom
or other areas of the house that are or may become wet or where humidity and
moisture may concentrate.
• Do not leave this lithium-ion battery powered unit in direct sunlight, or use
or store the unit inside cars in hot weather. Doing so may cause the battery to
generate heat, rupture, or ignite. Using the battery in this manner may also result
in a loss of performance and a shortened life expectancy.
• Never charge this unit near heat or flammable objects.
• NEVER THROW WATER ON A BURNING LI-ION BATTERY! If a lithium-ion
battery does catch on fire, it will burn even more violently if it comes in
contact with water or even moisture in the air. A fire extinguisher must
be used.
Battery Charging and Capacity
This unit is delivered in a partially charged state – you must fully charge it before
using it for the first time.
When stored at room temperature with a full charge, Li-ion batteries will begin
to discharge from the time they are manufactured, even when unused. Deep
discharges also decrease their capacity. Battery life can be extended by the
following:
• Charge battery to full capacity before storage.
• Optimal storage temperature for this unit is between 5°C and 20°C (41°F and 68°F).
• Never discharge the battery fully.
• Charge after each use.
• Always charge at least once every 3-6 months if not in frequent use to prevent
overdischarge.
5. Charge up to 5 hours or until the battery/charge status LED indicator lights
6. When charging is complete, first unplug the 12 volt DC/USB charging adapter
• NEVER CONNECT THE UNIT TO A POSITIVE GROUNDED VEHICLE.
• The 12 Volt DC charging adapter must only be connected to batteries with a
nominal output voltage of 12 volts. The unit will not operate from a 6 volt battery
and will sustain permanent damage if connected to a 24 volt battery.
Charging/recharging using the USB charging cable and a
device with a USB power port (not supplied)
1. Make sure the power mode button and the translucent USB power button are
* The translucent button does not operate the light, only the USB power port.
2. Insert the USB charging cable into the USB port on the light.
3. Insert the other end of the USB charging cable into a device’s functional USB
4. Charge until the battery/charge status LED indicator lights blue.
5. When charging is complete, disconnect the USB charging cable from the
OPERATING THE LIGHT
The power/light mode button turns the light on and off; and is also used to select
the light mode.
Notes: The battery/charge status LED indicator will not light during cordless operation of
To check the battery status, make sure the light is turned off, then press on the
The battery/charge status LED indicator will automatically turn off if it detects
1
3
4
5
11
10
12
adapters)
CAUTION: TO REDUCE THE RISK OF INJURY OR PROPERTY DAMAGE:
both turned off* (the light is not lit and the translucent USB power indicator/
power button is not lit).
charging adapter.
American 120 volt 60Hz outlet. The battery/charge status LED indicator will light
or flash in one of two colors (as described in the “Reading the Battery/Charge
Status LED Indicator” section) to indicate the charging status.
power source, then disconnect the USB charging cable from the adapter and
the light. Store the adapter and cable in a safe place.
both turned off* (the light is not lit and the translucent USB power indicator/
power button is not lit).
adapter.
of a vehicle or other functioning 12 volt DC power source. The LED indicator
on the 12 volt DC/USB charging adapter will light green when it is properly
plugged into the 12 volt DC power source. The battery/charge status LED
indicator will light or flash in one of two colors (as described in the “Reading
the Battery/Charge Status LED Indicator” section) to indicate the charging
status.
Note: Some vehicles require that the ignition be switched to the accessory position
in order to power the accessory outlet.
blue.
from the 12 volt DC power source, then disconnect the USB charging cable from
the adapter and the light. Store the adapter and cable in a safe place.
CAUTION: TO AVOID THE RISK OF PROPERTY DAMAGE:
both turned off* (the light is not lit and the translucent USB power indicator/
power button is not lit).
power port. The battery/charge status LED indicator will light or flash in one
of two colors (as described in the “Reading the Battery/Charge Status LED
Indicator” section) to indicate the charging status.
device’s USB power port and the light. Store the cable in a safe place.
the light.
translucent USB power button. The battery/charge status LED indicator will light
or flash in one of two colors (as described in the “Reading the Battery/Charge
Status LED Indicator” section) to indicate the internal battery status.
there is no USB output power for 10 seconds.
Operating the light cordless
Disconnect the charging cable or adapter, then select the light mode as follows:
High: To turn the light on and use the main LED light only at high setting,
Low: To turn the light on and use the main LED light only at low setting,
Area: To use the 3 light panels only, press the power/light mode button a
All: To use all LEDs, press the power/light mode button a fourth time.
Off: To turn the light off, press the power/light mode button a fifth time.
Flash: To use all the LEDs flashing, press and hold the power/light mode
To turn the light off in flash mode, press the power/light mode
IMPORTANT: If the light’s battery voltage is low, the built-in low voltage protection
will activate after a short period of operation, then the unit will automatically shut
down This is a special feature to protect the unit’s internal battery from damage.
Recharge the battery before continuing use.
press the power/light mode button once.
press the power/light mode button a
second time.
third time.
button anytime for about 5 seconds.
button once.
Operating the light corded
Attach the appropriate cable or adapter as described in the “Charging/Recharging”
section. Operate normally the light as outlined in the previous section.
IMPORTANT: The light will operate while either charging adapter or the USB cable
is attached, but will continue to draw power from the unit’s Lithium-Ion battery
while the light operates. This may cause the low voltage protection to activate and
6
8
shut the light down. Manufacturer recommends only operating the unit in corded
mode for a short period of time.
Unfolding and Folding the Light Panels
7
The three LED Light Panels can be unfolded or folded entirely or individually.
Unfold the light panels gently outward (to 90 degrees maximum). To return the
light panels to their original position for storage, fold the light panels gently back
until they touch the center of the unit.
CAUTION – TO REDUCE THE RISK OF PRODUCT DAMAGE:
• Do not attempt to “force” the light panel to unfold beyond its maximum angle.
• The light panel was designed to unfold or fold outward and inward only.
• The unfolded light panel is not intended to support additional weight. Do not
shake the light and attach or hang anything additional to the light panel or risk
of breakage may occur.
Adjusting the Pivoting Head
With the three LED Light Panels unfolded, the pivoting head allows the light to be
tilted forward up to 90° to direct the illumination as desired.
CAUTION: TO REDUCE THE RISK OF PRODUCT DAMAGE:
• Do not attempt to “force” the pivot head beyond its maximum angle.
• The pivoting head was designed to tilt forward only. Tilting it backward may
13
14
damage the unit.
• The pivoting head was designed to be used when the unit is hand-held or is
hanging or attached to a surface using its hanging hook or magnetic base. Using
it when the unit is placed on a uneven, inclined or non-metallic surface may cause
the light to fall over and sustain damage.
Using the Folding Hanging Hook and Magnetic Base
The folding hanging hook and magnetic base allow you to position the light
for convenient, hands-free operation. To use the Hanging Hook, unfold it to its
90-degree open position. To use the Magnetic Base, fold the Hanging Hook to its
storage position.
CAUTION: TO REDUCE THE RISK OF PRODUCT DAMAGE:
• When light is hung by the hanging hook or attached using the magnetic base,
do not shake the light or object that it is hanging from or attached to. Do not
hang the light from or attach the light to any electrical wires or anything that it
is not secure.
• Only use the hanging hook for hanging the light. The hanging hook is not
intended to support additional weight. Do not attach or hang anything additional
to the light or risk of breakage may occur.
OPERATING THE LIGHT’S USB PORT
The light’s USB port provides 5 volts/1A of DC power to an external USB powered
device.
1. Disconnect the charging adapter or cable and make sure the light is turned off.
2. Press the translucent USB power button to power on the USB port. The battery/
charge status LED indicator will light or flash in one of two colors (as described
in the “Reading the Battery/Charge Status LED Indicator” section) to indicate
the internal battery status.
3. Simply plug the USB device into the light’s USB port and operate normally.
4. Press the translucent USB power button again to turn off the USB port. Make
sure the translucent USB power button is in the off position (is not lit) when the
unit is being recharged or stored.
Note: The light’s USB port will automatically shut down (the battery/charge status LED
indicator will automatically turn off) if it detects there is no USB output power for
10 seconds.
10 seconds. Press the translucent USB power button again to turn the light’s USB
port back on.
• Make sure the rating of equipment plugged into the light’s USB port does not
exceed 1A continuous.
• The internal battery may be completely discharged. Charge the unit following the
directions given in this manual.
The 120 volt AC/USB charging adapter’s USB port will not operate
• Make sure you have live AC power to the outlet the 120 volt AC/USB charging
adapter is plugged into.
• Make sure the rating of equipment plugged into the charging adapter’s USB port
does not exceed 2A continuous.
The 12 volt DC/USB charging adapter’s USB port will not operate / LED
indicator on the 12 volt DC/USB charging adapter does not come on
• Check the connection to the 12 volt power source. Make sure there is good
contact.
• Confirm there is functioning DC current.
• The fuse inside may have blown. Replace the fuse following the instructions in
this manual.
• Make sure the rating of equipment plugged into the charging adapter’s USB port
does not exceed 2A continuous.
If the unit does not operate after taking the steps given above, contact the
manufacturer at (877) 571-2391.
ACCESSORIES
Recommended accessories for use with this unit may be available from the
manufacturer. If you need assistance regarding accessories, please contact
manufacturer at 1-877-571-2391.
WARNING: The use of any accessory not recommended for use with this
appliance could be hazardous.
SERVICE INFORMATION
Whether you need technical advice, repair, or genuine factory replacement parts,
contact the manufacturer at 877-571-2391.
ONE-YEAR LIMITED WARRANTY
The manufacturer warrants this product against defects in materials and
workmanship for a period of ONE (1) YEAR from the date of retail purchase by the
original end-user purchaser (“Warranty Period”).
If there is a defect and a valid claim is received within the Warranty Period, the
defective product can be replaced or repaired in the following ways: (1) Return the
product to the manufacturer for repair or replacement at manufacturer’s option.
Proof of purchase may be required by manufacturer. (2) Return the product to the
retailer where product was purchased for an exchange (provided that the store is a
participating retailer). Returns to retailer should be made within the time period of
the retailer’s return policy for exchanges only (usually 30 to 90 days after the sale).
Proof of purchase may be required. Please check with the retailer for their specific
return policy regarding returns that are beyond the time set for exchanges.
This warranty does not apply to accessories, bulbs, fuses and batteries; defects
resulting from normal wear and tear, accidents; damages sustained during shipping;
alterations; unauthorized use or repair; neglect, misuse, abuse; and failure to follow
instructions for care and maintenance for the product.
This warranty gives you, the original retail purchaser, specific legal rights and you
may have other rights which vary from state to state or province to province. This
product is not intended for commercial use.
Please complete the Product Registration Card and return within 30 days from
purchase of the product to: Baccus Global LLC, One City Centre, 1 North Federal
Highway, Suite 200, Boca Raton, FL 33432. Baccus Global LLC, toll-free number:
(877) 571-2391.
SPECIFICATIONS
Light
(Conforms to UL STD.73)
Bulb: 1 main LED bulb and 18 ultra bright LEDs
Battery: Lithium-Ion, 3.6 V DC
Input: 5V DC, 2A
USB Output: 5V DC, 1A
120 Volt AC/USB Charging Adapter
(Conforms to UL STD. 60950-1)
Input: 120V AC, 60Hz, 0.25A
Output: 5V DC, 2A
12 Volt DC/USB Charging Adapter
(Conforms to UL STD. 2089)
Input: 12V DC, 1.1A
Output: 5V DC, 2A
Fuse: 2A
Imported by Baccus Global LLC,
One City Centre, 1 North Federal Highway, Suite 200, Boca Raton, FL 33432
www.Baccusglobal.com 1-877-571-2391
RD080615
OPERATING THE 120 VOLT AC/USB CHARGING ADAPTER’S
USB PORT
Plug the 120 volt AC/USB charging adapter into a (powered) standard North
American 120 volt 60Hz outlet. Then simply plug the USB device into the USB outlet
and operate normally.
WARNING – TO AVOID THE RISK OF PROPERTY DAMAGE: Always plug the
120 volt AC/USB charging adapter to the standard North American 120 volt 60Hz
outlet before plugging any devices into it.
OPERATING THE 12 VOLT DC/USB CHARGING ADAPTER’S USB
PORT
Plug the 12 volt DC/USB charging adapter into a vehicle’s 12 volt DC accessory outlet
or other functioning 12 volt DC power source. The LED indicator on the 12 volt DC/
USB charging adapter will light green to indicate that it is properly connected. Then
simply plug the USB device into the USB outlet and operate normally.
WARNING – TO AVOID THE RISK OF PROPERTY DAMAGE:
• NEVER CONNECT THE UNIT TO A POSITIVE GROUNDED VEHICLE.
• The 12 volt DC/USB charging adapter must only be connected to batteries with a
nominal output voltage of 12 volts. The unit will not operate from a 6 volt battery
and will sustain permanent damage if connected to a 24 volt battery.
• Always connect the 12 volt DC/USB charging adapter to the 12 volt DC power
source before plugging any devices into it.
CARE AND MAINTENANCE
All batteries lose energy from self-discharge over time and more rapidly at higher
temperatures. When the unit is not in use, we recommend that the battery is
charged at least every 3 to 6 months.
If the unit gets dirty, gently clean the outer surfaces of the light unit with a soft
cloth moistened with a mild solution of water and detergent.
Except for the fuse in the 12 volt DC/USB charging adapter, there are no userreplaceable parts. Periodically inspect the condition of adapters, connectors and
wires. Contact manufacturer to replace any components that have become worn
or broken.
Battery replacement/disposal
BATTERY REPLACEMENT
The battery should last the service life of the unit. Service life is dependent on a
number of factors including but not limited to the number of recharge cycles, and
proper care and maintenance of the battery by the end user. Contact manufacturer
for any information you may need.
SAFE BATTERY DISPOSAL
Contains a lithium-ion battery, which must be disposed of
properly. Recycling is required. Failure to comply with local, state
and federal regulations can result in fines, or imprisonment.
Please recycle.
WARNINGS:
• Do not dispose of the battery in fire as this may result in an explosion.
• Before disposing of the battery, protect exposed terminals with heavy-duty
electrical tape to prevent shorting (shorting can result in injury or fire).
• Do not expose battery to fire or intense heat as it may explode.
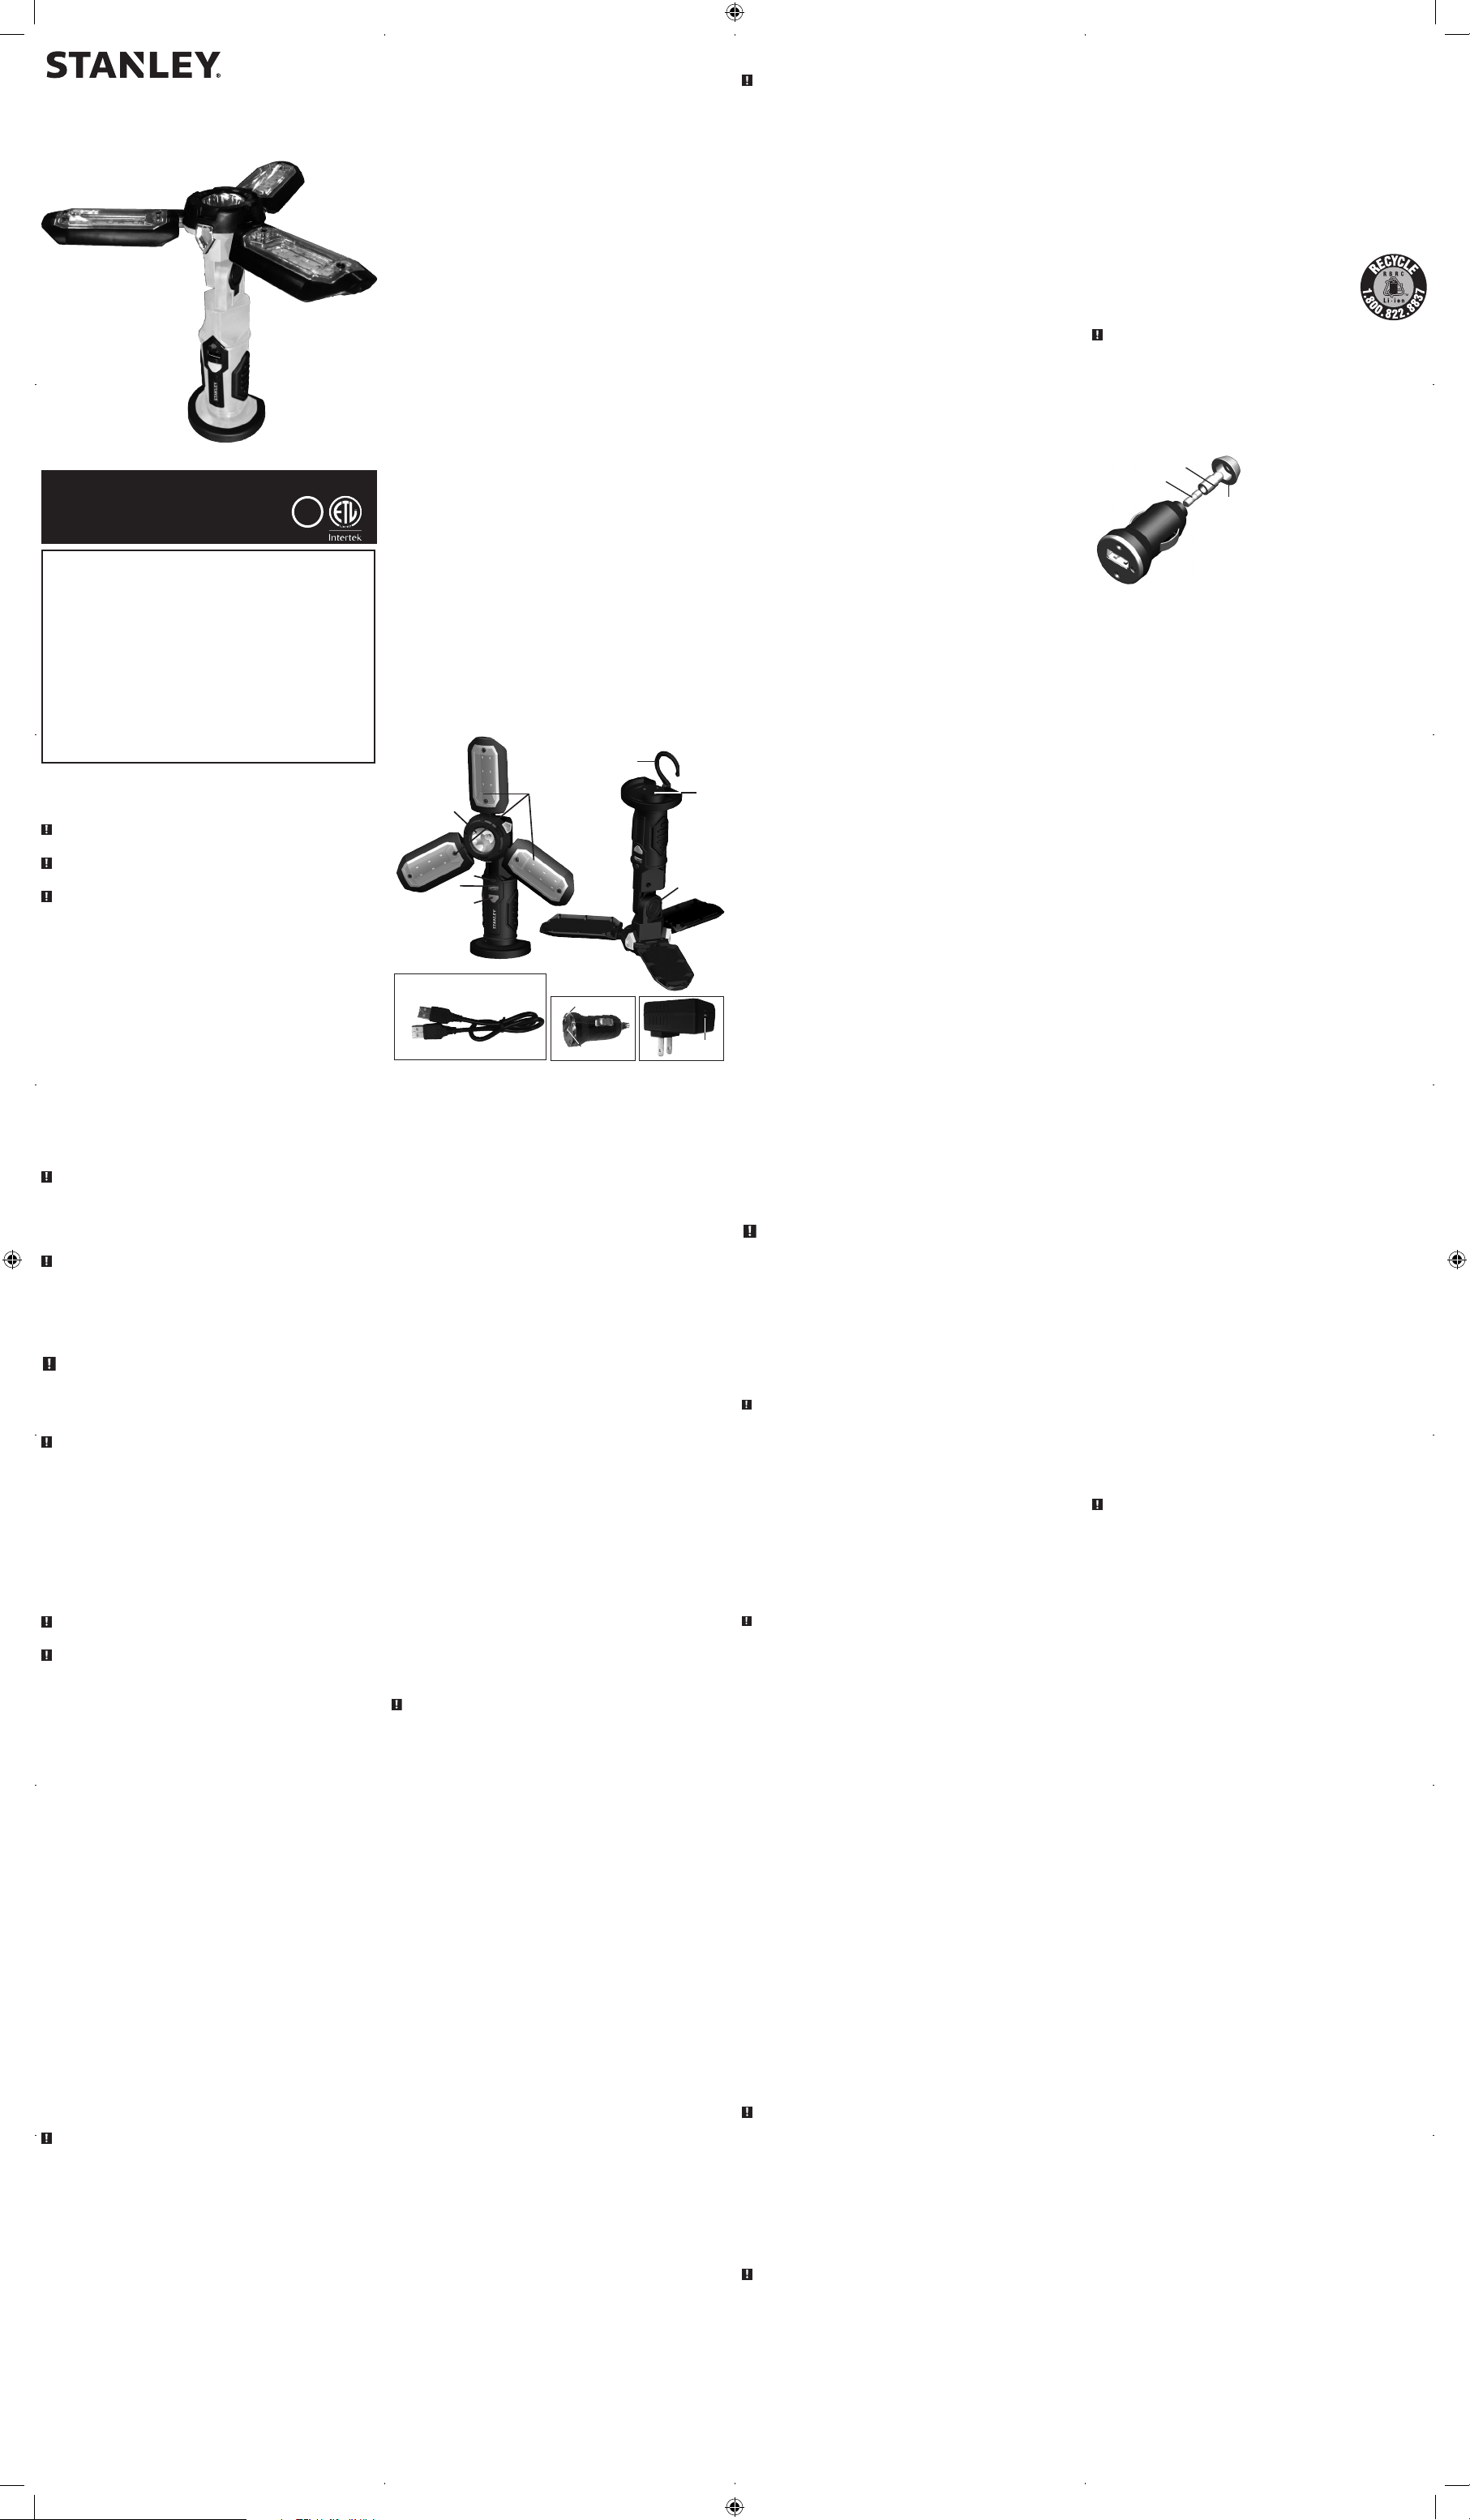
Fuse replacement in the 12 volt DC/USB charging adapter
CENTER CONTACT
2A FUSE
1. Unscrew the end cap
counterclockwise and remove.
2. Remove center contact and fuse.
3. Check fuse with a continuity checker.
4. If blown, locate a replacement
END CAP
2 amp fuse.
5. Replace the fuse, center contact and
end cap.
6. Screw end cap clockwise until it
is finger tight - DO NOT OVERTIGHTEN.
7. Test for proper operation of the
12 volt DC/USB charging adapter.
TROUBLESHOOTING
The light will not charge
• Check that the translucent USB power button is turned off.
• Check the connection to the AC or DC power source. Make sure there is good
contact.
• Confirm that there is functioning AC or DC current.
The light will not operate cordless
• Make sure the power/light mode button has been pressed firmly to turn the light on.
• Check that the translucent USB power button is turned off.
• The internal battery may be completely discharged. Charge the unit following the
directions given in this manual.
The light’s USB port will not operate
• Make sure the cable and/or adapter is disconnected from any live AC or DC power
source.
• Make sure the power/light mode button is turned off.
• Make sure the translucent USB power button is pressed to turn the USB port on.
• The light’s USB port will automatically shut down (the battery/charge status LED
indicator will automatically turn off) if it detects there is no USB output power for
SAT3S_ManualENSP_080615.indd 2 8/6/2015 10:57:26 AM
Page 2
SAT3S
No sumerja este reflector en agua. Si la unidad se ensucia, limpie las superficies
x
LUZ DE SATÉLITE LED DE LITIO-ION
MANUAL DE INSTRUCCIÓN
• Nunca cargue esta unidad cerca de calor o de objetos inflamables.
• ¡NUNCA LANCE EL AGUA EN UNA BATERÍA ARDIENTE DE LI-ION! Si una
batería del litio-ion coge en el fuego, quemará más violentamente si
entra en contacto con el agua o aún la humedad en el aire. Un extintor
debe ser utilizado.
Carga y capacidad de la batería
Esta unidad se entrega en un estado parcialmente cargado – usted debe cargarlo
completamente antes de usarlo por primera vez.
Cuando están almacenadas en la temperatura ambiente con una carga completa,
las baterías del Li-ion querrán comienzan a descargar a partir del tiempo que son
manufacturadas, incluso cuando son inusitadas. Las descargas profundas también
disminuyen su capacidad. La vida de batería se puede ampliar por el siguiente:
• Cargue la batería a la capacidad plena antes de almacenaje.
• Las temperaturas óptimas para el almacenamiento de esta unidad están entre 5 °
C y 20 ° C (41 ° F y 68 ° F).
• Nunca descargue la batería completamente.
• Cargue después de cada uso.
• Cargue siempre por lo menos una vez cada 3 a 6 meses si no en uso frecuente de
prevenir el overdischarge.
Transporte de las baterías del Litio-Ion
• Compruebe siempre todas las regulaciones locales, nacionales, e internacionales
aplicables antes de transportar una unidad que contiene una batería del Litio-Ion.
• El transporte de una fin-de-vida, dañada, o de la batería recordada puede, en
ciertos casos, ser específicamente limitado o prohibió.
INSTRUCCIONES RELATIVAS A LOS PUERTOS USB
• IMPORTANTE: Algunos electródomésticos de uso doméstico alimentados por USB
no funcionan con los puertos USB proporcionan con este dispositivo. Compruebe
CONSERVE ESTE MANUAL PARA FUTURAS CONSULTAS.
Derechos Reservados © 2015
Baccus Global LLC, Boca Raton, FL 33432
(877) 571-2391
Este dispositivo cumple con la parte 15 de las normas de la Comisión Federal de Comunicaciones de Estados
Unidos (FCC). La operación está sujeta a las dos condiciones siguientes: (1) este dispositivo no puede causar
interferencia perjudicial y (2) este mecanismo debe aceptar cualquier interferencia recibida, incluida la
in-terferencia que puede provocar una operación no deseada.
Este equipo ha sido probado y se encontró que cumple con los límites para dispositivo digital Clase B, según
la parte 15 de las normas de la FCC. Estos límites están diseñados para brindar protección razonable contra
interferencia perjudicial en una instalación residencial. Este equipo genera, usa y puede irradiar energía en
frecuencia de radio y, si no se instala y se usa de acuerdo con las instrucciones, puede provocar interferencia
perjudicial en las comunicaciones de radio. Sin embargo, no hay garantía de que la interferencia no ocurra
en una instalación en particular. Si el equipo provoca interferencia perjudicial en la recepción de radio o
televisión, lo que se puede determinar al apagar y encender el equipo, el usuario debe tratar de corregir
la interferencia mediante una o más de las siguientes medidas:
• Cambiar la orientación o la ubicación de la antena de recepción.
• Aumentar la separación entre el equipo y el receptor.
• Conectar el equipo a un tomacorriente sobre un circuito diferente de aquel al que está conectado el
receptor.
• Consultar al vendedor o pedir la ayuda de un técnico en radio y televisión con experiencia.
Los cambios o las modificaciones no aprobados por el partido responsable de conformidad podían anular
la autoridad del usuario para funcionar el equipo.
BC
NORMAS DE SEGURIDAD /
DEFINICIONES
PELIGRO: Indica una situación de peligro inminente que, si no se evita,
provocará la muerte o lesiones graves.
ADVERTENCIA: Indica una situación de peligro inminente que, si no se evita,
provocará la muerte o lesiones graves.
PRECAUCIÓN: Indica una situación de peligro potencial que, si no se evita,
puede provocar lesiones leves o moderadas.
PRECAUCIÓN: Utilizado sin el símbolo de alerta de seguridad indica una situación
de peligro potencial que, si no se evita, puede provocar daños a la propiedad.
RIESGO DE OPERACIÓN INSEGURA. Cuando se utilizan herramientas o equipos,
siempre se deben respetar las precauciones de seguridad para reducir el riesgo de
lesiones personales. La operación, el mantenimiento o la modificación incorrectos
de herramientas o equipos pueden provocar lesiones graves y daños a la propiedad.
Las herramientas y los equipos están diseñados para usos determinados. Fabricante
recomienda encarecidamente que NO se modifique este producto y que NO se
utilice para ningún otro uso que aquél para el que fue diseñado. Lea y comprenda
todas las instrucciones operativas y las advertencias antes de utilizar cualquier
herramienta o equipo.
INSTRUCCIONES IMPORTANTES DE
SEGURIDAD
LEA TODAS LAS INSTRUCCIONES
ADVERTENCIA: Lea todas las instrucciones antes de operar la luz. El
incumplimiento de todas las instrucciones enumeradas a continuación
puede provocar una descarga eléctrica, un incendio o lesiones graves.
ADVERTENCIAS E INSTRUCCIONES DE SEGURIDAD
GENERALES
ADVERTENCIA: Este producto o su cable de alimentación contiene plomo, una
sustancia química reconocida por el Estado de California como causante de cáncer,
defectos de nacimiento u otros problemas reproductivos. Lávese las manos después
de utilizarlo.
INSTRUCCIONES RELATIVAS AL RIESGO DE INCENDIOS,
DESCARGAS ELÉCTRICAS O LESIONES PERSONALES
ADVERTENCIA – AL UTILIZAR ESTA Luz HAY CIERTAS PRECAUCIONES QUE
DEBERÍAN TOMAR MEDIDAS, INCLUIDAS LAS SIGUIENTES:
• Reducir el riesgo de lesión, la supervisión cercana es necesaria cuando la luz se
utiliza cerca de niños.
• Utilice solamente los accesorios recomendados o vendidos por el fabricante.
ADVERTENCIA: PARA REDUCIR EL RIESGO DE DESCARGA ELÉCTRICA:
• Cargue dentro solamente.
• No exponga los adaptadores de carga o batería al agua o cualquie otro líquido.
• Use solamente el cargador provisto por el fabricante a la recarga.
• Cuando un cable de extensión es utilizada:
– El grado marcado de la cuerda desmontable de la fuente de alimentación o
de la cuerda de la extensión debe ser por lo menos tan grande como el grado
eléctrico de esta aplicación.
– La cuerda debe ser arreglada de modo que no cubra sobre el countertop o
el tablero de la mesa donde puede ser disparada encima, snagged, o tiró en
inintencionalmente (especialmente por los niños).
– La cuerda de la extensión se debe mantener seca y de la tierra.
ADVERTENCIA: Riesgo de incendio: Guarde la luz lejos de los materiales que
pueden quemar.
PRECAUCIÓN: PARA REDUCIR EL RIESGO DE LESIONES O DAÑOS A LA
PROPIEDAD:
• La bombilla de LED consigue caliente rápidamente. No toque la lente, el protector
o el recinto caliente.
• Nunca coloque la luz encendida hacia abajo en cualquier superficie, cargando o si
no está en uso. Nunca almacene la luz hacia abajo sobre cualquier superficie.
• Nunca mire directamente a la luz ni la apunte directamente a los ojos de otra
persona.
• Proteja la lente contra objetos agudos. Puede agrietarse o romperse.
• No exponga esta unidad extremadamente a las temperaturas altas.
• No tire ni deje caer el reflector. Contiene une batería de litio-ion.
• Utilizar sólo con el adaptador de carga CA o CC y / o el cable de carga USB que
se proporciona con la unidad. Conecte el cable de carga a la luz primero, luego
conectarlo a la fuente de carga.
• No sobrecargue: Recarga hasta 5 horas como máximo o hasta que se encienda el
indicador LED de estado de carga azul.
• Después de cargar/recargar, desconecte el adaptador de recarga o extensión
eléctrica y espere 5 minutos antes usar el reflector.
• No aplaste, corte, hale o exponga los cables del adaptador de carga al calor
extremo.
• Coloque los cables del adaptador de carga de manera que no se enreden o se
conviertan en un peligro de seguridad. Mantenga los cables del adaptador de
carga alejados de bordes afilados.
• No abra la carcasa del cuerpo de la luz. No contiene piezas serviciables por el
usuario.
• No funcione el proyector sin la lente en el lugar.
• Para reducir el riesgo de daños al enchufe o al cable eléctrico, tire por el enchufe
más bien que por el cable al desconectar del cargador de CA de 120 voltios.
• No intente cargar la unidad si se daña el cargador – vuelven el cargador al
fabricante para la reparación o el reemplazo.
INSTRUCCIONES DE SEGURIDAD ESPECÍFICAS PARA LAS
BATERÍAS DEL LITIO-ION
ADVERTENCIA: PARA REDUCIR EL RIESGO DE FUEGO, DE DESCARGA
ELÉCTRICA, DE PELIGRO DE LA EXPLOSIÓN, O DE LESIONES O DAÑOS A LA
PROPIEDAD:
Baterías del litio-ion son pequeñas, compactas e ideal para proporcionar energía
duradera a esta unidad. Sin embargo, deben ser utilizadas y ser cargadas
correctamente. El uso incorrecto puede dar lugar a lesión serio, a fuego, o a muerte.
• Las del litio-ion pueden estallar en presencia de una fuente de ignición. No utilice
el producto en presencia de una llama abierta.
• No ponga esta unidad con baterías del litio-ion en fuego ni aplique el calor a él.
• No sujete esta unidad con baterías del litio-ion a los impactos o a los choques
fuertes. La batería en esta unidad contiene los dispositivos de la seguridad y de
protección que, si están dañados, pueden hacer la batería generar calor, romper
o encender.
• No exponga esta unidad accionada por la batería del litio-ion para regar o agua
salada, o permita que la batería consiga mojada.
• Evite almacenar esta batería de litio-ion dispositivo eléctrico en el sótano, cuarto
de baño u otras áreas de la casa que están o pueden quedar mojados o húmedos
o donde la humedad puede concentrarse.
• No deje esta unidad accionada por la batería del litio-ion en luz del sol directa,
o utilice o almacene la unidad dentro de los coches en tiempo caliente. El hacer
tan puede hacer la batería para generar calor, para romper, o para encender.
Usando la batería de este modo puede también dar lugar a una pérdida de
funcionamiento y de una esperanza de vida acortada.
el manual del electródoméstico correspondiente para confirmar que se puede
utilizar con este tipo de puerto USB.
• Los puertos USB no son compatibles con la comunicación de datos. Que
sólo proporcionan energía a un dispositivo externo USB alimentado (5V CC / 1A
usando el puerto USB de la luz o 5 V CC / 2 A través de los puertos USB en los
adaptadores de carga CA o CC). Asegúrese de que la calificación de los equipos
conectados al cada puerto USB uno no exceda el amperaje indicado.
• No conecte concentradores USB que permite la conexión de varios dispositivos
electrónicos personales a cualquiera de estos puertos USB en la luz o los
adaptadores de carga.
CONSERVE ESTAS INSTRUCCIONES
INTRODUCCIÓN
Felicitaciones por adquirir su Stanley luz de satélite LED de litio-ion nueva. Lea
el manual de instrucción y siga las instrucciones cuidadosamente antes de
utilizar su luz nueva.
CARACTERÍSTICAS
2
1
3
4
5
9
10
1. Luz LED primaria
2. Plegable paneles de luz (3)
3. Indicador LED del estado de la batería/carga / Botón de encendido USB
translúcido
4. Puerto USB (para uso con cable de carga USB y adaptadores de carga)
5. Botón de encendido/de modo de luz
6. Gancho colgante plegable
7. Base magnética
8. Cabeza pivotante
9. Cable de carga USB (para uso con 120 voltios CA / USB y 12 voltios CC / USB
adaptadores de carga)
10. Adaptador de carga de 12 voltios CC / USB
11. Indicador LED del adaptador de carga de 12 voltios CC / USB
12. Puerto USB del adaptador de carga de 12 voltios CC / USB
13. Adaptador de carga de 120 voltios CA / USB
14. Puerto USB del adaptador de carga de 120 voltios CA / USB
CÓMO LEER EL INDICADOR LED DEL ESTADO DE LA
BATERÍA/CARGA
El indicador LED del estado de la batería/carga se encuentra en el interior del botón
de encendido USB translúcido. Se enciende o parpadea en dos colores para indicar
el siguiente:
Cuando la unidad está cargando:
Azul: La batería está en un estado completamente cargado.
Azul (parpadeando): La batería está en un estado parcialmente cargado.
Rojo (parpadeando): La batería necesita ser recargada.
Al utilizar el puerto USB de carga / potencia (una vez el
botón de encendido USB translúcido se ha pulsado):
Azul: La batería está funcionando en el voltaje completo.
Rojo: La batería está funcionando en el voltaje parcial.
Rojo (parpadeando): La batería está funcionando en la tensión muy baja. La
protección incorporada de la baja tensión ha activado y la unidad cerrará
automáticamente. La unidad se debe recargar inmediatamente.
CARGA Y RECARGA LA LUZ
Esta unidad se envía en un estado parcialmente cargado. Cargue esta unidad
después de compra y ANTES del primer uso usando el adaptador de 120 voltios CA
por 5 horas o o hasta que el indicador LED de estado de carga enciende en azul.
Recargue después de cada uso hasta que las luces de la batería/de indicador del
estado LED de la carga se pongan azul.
IMPORTANTE: Cuando la unidad no esté en uso, recomendamos cargar la
batería al menos cada 3 a 6 meses.
PRECAUCIÓN – PARA REDUCIR EL RIESGO DE DAÑOS A LA PROPIEDAD:
• Nunca coloque la luz hacia abajo en cualquier superficie cuando se carga.
• Asegúrese de que la luz se apaga durante la recarga, ya que operando la luz
puede ralentizar el proceso de recarga.
• Si no se mantiene la batería cargada puede causar daños permanentes y resultar
en un pobre rendimiento.
Carga / recarga con el adaptador de carga de 120 voltios
CA / USB
1. Asegúrese de que el botón encendido/de modo de luz y el botón de
alimentación USB translúcido están apagados * (la luz no está encendido y el
botón de indicador de energía / potencia USB translúcido no está encendido).
* El botón translúcido no opera la luz. Él opera solamente el Puerto USB de
carga / potencia.
2. Inserte el cable de carga USB en el puerto USB de la luz.
3. Inserte el otro extremo del cable de carga en el 120 voltios CA / USB adaptador
de carga USB.
4. Conectar el adaptador de carga de 120 voltios CA / USB a una toma de
corriente de 120 voltios / 60 Hz estándar norteamericana de funcionamiento.
El indicador LED de estado de la batería / carga se ilumina o parpadea en una
de dos colores (como se describe en la sección “Cómo leer el Indicador LED del
estado de la batería/carga”) para indicar el estado de carga.
5. Cargue un máximo de 5 horas o hasta que el indicador LED del estado de la
batería/carga se ilumina en azul.
6. Cuando la carga esté completa, desconecte el adaptador de carga de 120 voltios
CA / USB desde la fuente de alimentación, a continuación, desconecte el cable
de carga USB desde el adaptador y la luz. Guarde el adaptador y el cable en un
lugar seguro.
Carga / recarga con el adaptador de carga de 12 voltios
CC / USB
1. Asegúrese de que el botón encendido/de modo de luz y el botón de
alimentación USB translúcido están apagados * (la luz no está encendido y el
botón de indicador de energía / potencia USB translúcido no está encendido).
* El botón translúcido no opera la luz. Él opera solamente el Puerto USB de
carga / potencia.
2. Inserte el cable de carga USB en el puerto de carga / encendido USB de la luz.
3. Inserte el otro extremo del cable de carga en el 12 voltios CC / USB adaptador
de carga USB.
4. Inserte el adaptador de carga de 12 voltios CC / USB en el tomacorriente CC
de 12 voltios para accesorios de un vehículo u otro de 12 voltios fuente de
alimentación de CC de funcionar. El indicador LED del adaptador de carga de
12 voltios CC / USB se iluminará en verde cuando está conectado correctamente
a la fuente de alimentación de CC de 12 voltios. El indicador LED de estado
de la batería / de carga se ilumina o parpadea en una de dos colores (como
se describe en la sección “cómo leer el indicador LED del estado de la batería/
carga”) para indicar el estado de carga.
Nota: Algunos vehículos requieren que el encendido esté en la posición de accesorios
con el fin de alimentar la tomacorriente para accesorios.
5. Cargue un máximo de 5 horas o hasta que el indicador LED del estado de la
batería/carga se ilumina en azul.
6. Cuando la carga esté completa, desconecte primero el adaptador de carga
de 12 voltios CC / USB desde la fuente de alimentación de 12 voltios CC, a
11
12
continuación, desconecte el cable de carga USB desde el adaptador y la luz.
Guarde el adaptador y el cable en un lugar seguro.
PRECAUCIÓN: PARA REDUCIR EL RIESGO DE LESIONES O DAÑOS A LA
PROPIEDAD:
• NUNCA CONECTE LA UNIDAD A UN VEHÍCULO A TIERRA POSITIVA.
• El adaptador de carga CC de 12 voltios sólo debe conectarse a baterías con un
voltaje nominal de 12 voltios. La unidad no funcionará con una batería de 6
voltios y sufrirá daños permanentes si se conecta a una batería de 24 voltios.
Carga / recarga con el cable de carga USB y un dispositivo
con un puerto de alimentación USB (no suministrado)
1. Asegúrese de que el botón encendido/de modo de luz y el botón de
alimentación USB translúcido están apagados * (la luz no está encendido y el
botón de indicador de energía / potencia USB translúcido no está encendido).
* El botón translúcido no opera la luz. Él opera solamente el puerto de
alimentación USB.
2. Inserte el cable de carga USB en el puerto de carga / encendido USB de la luz.
3. Inserte el otro extremo del cable de carga USB en el puerto de alimentación
USB funcional de un dispositivo. El Indicador LED del estado de la batería/carga
se ilumina o parpadea en una de dos colores (como se describe en la sección
“cómo leer el indicador LED del estado de la batería/carga”) para indicar el
estado de carga.
4. Cargue hasta que el indicador LED del estado de la batería/carga se ilumina en
azul.
5. Cuando la carga esté completa, desconecte el cable de carga USB del puerto de
alimentación USB del dispositivo y la luz. Guarde el cable en un lugar seguro.
FUNCIONAMIENTO DE LA LUZ
Funcionamiento de la luz sin cuerda
El botón de encendido/de modo de luz enciende y apaga la luz; y también se utiliza
para seleccionar el modo de luz.
Notas: No se encenderá el indicador LED de estado de carga durante el funcionamiento
sin cuerda de la luz.
Para verificar la estado de la batería, asegúrese de que la luz está apagada, a
continuación, pulse el botón de encendido USB translúcido. El Indicador LED del
estado de la batería/carga se ilumina o parpadea en una de dos colores (como se
describe en la sección “cómo leer el Indicador LED del estado de la batería/carga”)
para indicar el estado de la batería interna.
El indicador LED del estado de la batería/carga se apagará automáticamente si
detecta que no hay potencia de salida USB durante 10 segundos.
Usando la luz sin cuerda
Desconecte el cable de carga o el adaptador, a continuación, seleccione el modo de
luz de la siguiente manera:
High (alta): Para encender la luz y usar la luz LED primaria solamente
Low (baja): Para encender la luz y usar la luz LED primaria solamente en baja
6
8
Area (área): Para utilizar los 3 paneles de luz solamente, pulse el botón de
7
All (todos): Para utilizar todos los LEDs, pulse el botón de encendido/de
Off (apagado): Para apagar la luz, pulse el botón de encendido/de modo de luz
Flash (destellar): Para utilizar todas los LEDs parpadeantes, presione y mantenga
Para apagar la luz en modo parpadeante, presione el botón de
IMPORTANTE: Si el voltaje de la batería de la luz es bajo, la protección de bajo
voltaje incorporado se activará después de un corto período de funcionamiento,
la unidad se apagará automáticamente. Esta es una característica especial para
proteger la batería interna de la unidad contra daños. Cargue la batería antes de
su uso continuado.
en alta ajuste, pulse el botón de encendido/de modo de luz una
vez.
ajuste, pulse el botón de encendido/de modo de luz una segunda
vez.
encendido/de modo de luz una tercera vez.
modo de luz una cuarta vez.
una quinta vez.
presionado el botón botón de encendido/de modo de luz en
cualquier momento durante unos 5 segundos.
modo de poder / la luz una vez.
Usando la luz con el cable de alimentación
Conecte el cable o adaptador apropiado tal como se describe en la sección “Cómo
cargar / recargar”. Opere normalmente la luz como se indica en la sección anterior.
13
14
MPORTANTE: La luz realizará la operación mientras el adaptador de carga se
adjunta, pero seguirá consumiendo energía de la batería de litio-ion de la unidad
mientras opera la luz. Esto puede causar la protección de bajo voltaje para activar
y apagar la luz. El fabricante recomienda sólo de utilizar la unidad en el modo con
cable durante un corto período de tiempo.
Desplegar y plegar los paneles de luz
Los tres paneles de luz LED se puede desplegar o plegar por completo o de forma
individual. Desdoble los paneles de luz suavemente hacia afuera (a 90 grados
como máximo). Para devolver los paneles de luz a sus posición original para el
almacenamiento, plegar los paneles de luz suavemente de vuelta hasta que toquen
el centro de la unidad.
PRECAUCIÓN – PARA REDUCIR EL RIESGO DE DAÑOS A LA PROPIEDAD:
• No trate de “forzar” la luz del panel a desplegarse más allá de su ángulo máximo.
• El panel de luz fue diseñado a desplegarse o plegar hacia afuera y hacia adentro
solamente.
• El panel de luz desplegada no está destinado a soportar peso adicional. No agite
la luz y adjuntar o colgar nada adicional al panel de luz o el riesgo de rotura
puede ocurrir.
Ajustando la cabezal pivotante
Con los tres paneles de luz LED abren hacia afuera, el cabezal pivotante permite
que la luz para ser inclinado adelante hasta 90° para dirigir la iluminación si lo
deseas.
PRECAUCIÓN: PARA REDUCIR EL RIESGO DE DAÑO A LA PROPIEDAD:
• No trate de “forzar” la cabezal pivotante a desplegarse más allá de su ángulo
máximo.
• El cabezal pivotante fue diseñado para inclinarse hacia delante y hacia atrás
solamente. Inclinación hacia atrás puede dañar la unidad.
• El cabezal pivotante fue diseñado para ser utilizado cuando la unidad es utilizado
por la mano o está colgando o fijado a una superficie usando su gancho colgante
o base magnética. Usarla cuando la unidad se coloca en una superficie desigual,
inclinada o no metálico puede causar que la luz caiga y sostener daños.
Usando el gancho colgante y la base magnética
El gancho colgante y la base magnética permiten que usted coloque la luz para la
operación conveniente, sin manos. Para utilizar el gancho colgado, desdoblarla a su
posición abierta de 90 grados. Para utilizar la base magnética, doblarla el gancho
colgado a su posición de almacenamiento.
PRECAUCIÓN: PARA REDUCIR EL RIESGO DE DAÑO A LA PROPIEDAD:
• Cuando la luz es colgada por el gancho colgante o atada usando la base
magnética, no sacuda la luz o no se oponga que está colgando de o atado a. No
cuelgue la luz de ni ate la luz a ninguna alambres eléctrica o cualquier cosa que
no es seguro.
• Utilice solamente el gancho colgante para colgar la luz. El gancho colgante no se
piensa para apoyar el peso adicional. No ate o colgar cualquier cosa adicional a la
luz o al riesgo de fractura puede ocurrir.
OPERACIÓN DEL PUERTO USB DE LA LUZ
Le puerto USB de la luz proporciona 5 volts/1A de alimentación de CC a un
dispositivo USB con alimentación externa.
1. Desconecte el adaptador de carga cable andy asegúrese de que la luz está
apagada.
2. Presione el botón de encendido USB translúcido al poder el puerto USB de
carga / potencia. El Indicador LED del estado de la batería/carga se ilumina o
parpadea en una de dos colores (como se describe en la sección “cómo leer
el Indicador LED del estado de la batería/carga”) para indicar el estado de la
batería interna.
3. Sólo tienes que conectar el dispositivo USB al puerto USB de carga / potencia de
la luz y funcionar normalmente.
4. Pulse el botón de encendido USB translúcido de nuevo para apagar el puerto
de carga / alimentación USB. Asegúrese de que el botón de encendido USB
translúcido está en la posición de apagado (no está encendido) cuando la
unidad se está recargando o almacenada.
Nota: El puerto USB de carga / potencia de la luz se apagará automáticamente (el
indicador LED de estado de la batería / carga se apagará automáticamente) si
detecta que no hay potencia de salida USB durante 10 segundos.
OPERACIÓN DEL PUERTO USB DEL ADAPTADOR DE CARGA
DE 120 VOLTIOS CA / USB
Enchufe el adaptador de carga de 120 voltios CA / USB en una tomacorriente de
120 voltios 60 Hz estándar de Norteamérica de funcionamiento. Entonces sólo tiene
que conectar el dispositivo USB a la toma USB y funciona con normalidad.
PRECAUCIÓN – PARA REDUCIR EL RIESGO DE DAÑOS A LA PROPIEDAD:
Siempre conecte el adaptador de carga de 120 voltios CA / USB a la toma de
corriente de 120 voltios 60 Hz estándar norteamericano antes de conectar cualquier
dispositivo a él.
OPERACIÓN USB DEL ADAPTADOR DE CARGA DE 12 VOLTIOS
CC / USB
Enchufe el adaptador de carga de 12 voltios CC / USB en el tomacorriente CC de 12
voltios para accesorios de un vehículo u otro de 12 voltios fuente de alimentación
de CC de funcionar. Entonces sólo tiene que conectar el dispositivo USB a la toma
USB y funciona con normalidad.
PRECAUCIÓN – PARA REDUCIR EL RIESGO DE DAÑOS A LA PROPIEDAD:
• NUNCA CONECTE LA UNIDAD A UN VEHÍCULO A TIERRA POSITIVA.
• El adaptador de carga de 12 voltios CC / USB sólo debe conectarse a baterías
con un voltaje nominal de salida de 12 voltios. La unidad no funcionará con una
batería de 6 voltios y sostendrá un daño permanente si está conectado a una
batería de 24 voltios.
• Siempre conecte el adaptador de carga de 12 voltios CC / USB a la fuente de
alimentación de CC de 12 voltios antes de conectar cualquier dispositivo a ello.
CUIDADO Y MANTENIMIENTO
Con el tiempo, todas las baterías pierden energía debido a la descarga automática y
con mayor rapidez en ambientes con temperaturas elevadas. Cuando la unidad no
esté en uso, recomendamos cargar la batería al menos cada 3 a 6 meses.
exteriores con cuidado. Utilize una tela suave humedecida con una mezcla diluida
de agua y detergente.
No hay ningún usuario-sustituibles piezas. Periódicamente inspeccione la condición
de adaptadores, conectores y alambres. Contacto fabricante para sustituir los
componentes que han pasado a ser gastado o rotas.
Reemplazo/desecho de la batería
REEMPLAZO DE LA BATERÍA
La batería debe durar la vida útil de la unidad. La vida de servicio depende en un
número de factores, incluyendo pero no limitado al número de ciclos de recarga, y
el cuidado y mantenimiento adecuado de la batería por el usuario. Comuníquese
con el fabricante para cualquier información que pueda necesitar.
ELIMINACIÓN DE LA BATERÍA
Contiene una batería de iones de litio, que debe ser eliminado
adecuadamente. Se requiere reciclaje. El no cumplir con las
regulaciones locales, estatales y federales puede resultar en
multas o prisión.
Por favor, recicle.
ADVERTENCIAS:
• No deseche la batería en el fuego ya que puede ocasionar una explosión.
• Antes de desechar la batería, proteja las terminales descubiertas con cinta eléctrica
para trabajos pesados. De esta manera previene cortos circuitos (los cortos circuitos
pueden ocasionar lesiones e incendios).
• No exponga la batería al fuego o al calor extremo ya que puede explotar.
Reemplazo del fusible en el adaptador de carga de 12
voltios CC / USB
CONTACTO CENTRAL
2A FUSIBLE
1. Destornille la tapa trasera (la
izquierda) y quitar.
2. Retire el resorte el contacto central
y el fusible.
3. Inspeccione el fusible con un control
de continuidad.
4. En caso de estar quemado, busque un
TAPA DE
EXTREMO
fusible de reemplazo de 2 amperios.
5. Coloque el fusible, el contacto central
y la tapa trasera.
6. Atornille la tapa trasera en sentido
de las manecillas del reloj hasta
que esté apretado. NO LO APRIETE
DEMASIADO.
7. Asegúrese que el adaptador de
carga de 12 voltios CC / USB esté
funcionado de forma correctar.
DETECCIÓN DE PROBLEMAS
La luz no se cargará
• Asegúrese de que el botón de alimentación USB translúcido están apagados.
• Revise la conexión a la fuente de alimentación de CA o CC. Asegúrese de que
haya un buen contacto.
• Confirme que la corriente AC o CC está funcionando..
La luz no funciona sin cuerda
• Asegúrese de que el botón de encendido / de modo de luz se ha presionado con
firmeza (y que escuche un “clic” inconfundible) para encender la luz.
• Asegúrese de que el botón de alimentación USB translúcido están apagados.
• La batería interna puede estar completamente descargada. Cargue la unidad
siguiendo las instrucciones dadas en este manual.
El puerto USB de la luz no funcionará
• Asegúrese de que el cable y / o el adaptador está desenchufado de cualquier
fuente de alimentación AC o CC en vivo.
• Asegúrese de que el botón de encendido/de modo de luz se apaga.
• Asegúrese de que se presione el botón de alimentación USB translúcido para
activar el puerto USB.
• El puerto USB de la luz se apagará automáticamente (el indicador LED de estado
de la batería / carga se apagará automáticamente) si detecta que no hay potencia
de salida USB durante 10 segundos.
• Asegúrese de que la calificación de los equipos conectados al puerto USB de la luz
no supere 1A continuo.
• Algunos productos electrónicos de uso doméstico alimentados por USB no
funcionan con este puerto USB. Compruebe el manual del dispositivo electrónico
correspondiente para confirmar que puede ser utilizado con este tipo de cargador.
• La batería interna puede estar completamente descargada. Cargue la unidad
siguiendo las instrucciones dadas en este manual.
El adaptador de carga de 120 voltios CA/USB no funcionará
• Asegúrese de que tiene poder en la toma de corriente que el adaptador de carga
de 120 voltios CA/USB está conectado a.
• Asegúrese de que la calificación de los equipos conectados al puerto USB del
adaptador de carga de 120 voltios CA/USB no supere 2A continuo.
• Algunos productos electrónicos de uso doméstico alimentados por USB no
funcionan con este puerto USB. Compruebe el manual del dispositivo electrónico
correspondiente para confirmar que puede ser utilizado con este tipo de cargador.
El adaptador de carga de 12 voltios CC/USB no funcionará / El indicador
LED del adaptador de carga de 12 voltios CC/USB no se enciende
• Revise la conexión a la fuente de alimentación de CC. Asegúrese de que haya un
buen contacto.
• Confirme que la corriente CC está funcionando..
• El fusible en el interior del adaptador puede haberse quemado. Reemplace el
fusible siguiendo las instrucciones de este manual.
• Asegúrese de que la calificación de los equipos conectados al puerto USB del
adaptador de carga de 12 voltios CC/USB no supere 2A continuo.
• Algunos productos electrónicos de uso doméstico alimentados por USB no
funcionan con este puerto USB. Compruebe el manual del dispositivo electrónico
correspondiente para confirmar que puede ser utilizado con este tipo de cargador.
Si la unidad no funciona después de haber tomado los pasos indicados
anteriormente, póngase en contacto con el fabricante en el (877) 571-2391.
ACCESORIOS
Accesorios recomendados para uso con esta unidad puede ser disponibles a través
del fabricante. Si necesita ayuda con respecto a los accesorios, por favor póngase en
contacto con el fabricante al (877) 571-2391.
ADVERTENCIA: El uso de cualquier accesorio no recomendado para el uso con
esta unidad podía ser peligroso.
INFORMACIÓN DE SERVICIO
Si usted necesita asesoramiento técnico, reparación, o partes genuinas del
fabricante, póngase en contacto con el fabricante al (877) 571-2391.
UN AÑO DE GARANTÍA LIMITADA
El fabricante garantiza este producto contra defectos de materiales y mano de obra
durante un período de UN (1) AÑO a partir de la fecha de compra del producto
por el comprador usuario final (“Período de Garantía”). Si hay un defecto y una
reclamación válida se recibe dentro del período de garantía, el producto defectuoso
puede ser reemplazado o reparado en el las siguientes maneras: (1) Devuelva el
producto al fabricante para reparación o reemplazo, a opción del fabricante. La
prueba de compra puede ser requerida por el fabricante. (2) Devuelva el producto
a la tienda donde el producto fue comprado para un intercambio (siempre y
cuando se trate de un minorista participante). Devoluciones al minorista deben
hacerse dentro del plazo de póliza de devoluciones del minorista para intercambios
solamente (por lo general 30 a 90 días después de la fecha de compra). La prueba
de compra puede ser requerida por el minorista. Por favor consulte la póliza de
devoluciones del minorista sobre devoluciones que están fuera del plazo establecido
para intercambios.
Esta garantía no se aplica a los accesorios, bombillos, fusibles y baterías; defectos a
consecuencias de desgaste normal; accidentes; daños y perjuicios sufridos durante el
envío y manejo, alteraciones, reparaciones o uso no autorizado, negligencia, abuso,
y si no se siguen instrucciones para el cuidado y mantenimiento del producto.
Esta garantía le otorga al comprador usuario final, derechos legales específicos y
usted puede tener otros derechos que varían de estado a estado o de provincia a
provincia. Este producto no está diseñado para uso comercial.
Por favor completar la tarjeta de registro del producto dentro de un plazo de 30
días a partir de la fecha de compra y remitir a: Baccus Global LLC, One City Centre,
1 North Federal Highway, Suite 200, Boca Raton, FL 33432. Baccus Global LLC,
número de teléfono gratuito: (877) 571 2391.
ESPECIFICACIONES
Luz
(conforme a UL STD. 73)
Bombilla: 1 bombilla LED primaria y 18 LEDs ultra
Batería: Litio-Ion, 3.6 V CC
Entrada: 5V CC, 2A
Salida USB: 5V CC, 1A
Adaptador de carga de 120 voltios CA / USB
(conforme a UL STD. 60950-1)
Entrada: 120V CA, 60Hz, 0.25A
Salida: 5V CC, 2A
Adaptador de carga de 12 voltios CC / USB
(conforme a UL STD. 2089)
Entrada: 12V CC, 1.1A
Salida: 5V CC, 2A
Fusible: 2A
One City Centre, 1 North Federal Highway, Suite 200, Boca Raton, FL 33432
www.Baccusglobal.com 1-877-571-2391
brillantes
Importados por Baccus Global LLC,
RD080615
SAT3S_ManualENSP_080615.indd 3 8/6/2015 10:57:28 AM
 Loading...