

P INTSPY INTPSPY
RECHARGEABLE 7.4 VOLT LI-ION POLYMER BATTERY 2.0 Ah
RECYCLE OR DISPOSE OF PROPERLY
Li-ion
Made in China
|
Fabriqué en Chine v2.3
www.spypoint.com
P INTSPY INTPSPY
Models: LIT-09: Battery only
LIT-C-8: LIT-09 Battery & charger
WARNING: To reduce risk of fire or burns,
- Do not attempt to open, disassemble, or service the battery pack.
- Do not crush, puncture, short external contacts, or dispose
of in fire or water.
ATTENTION: Pour réduire les risques de feu ou de brûlures,
- Ne pas essayer d’ouvrir, désassembler, ou de réparer la pile.
- Ne pas frapper, percer, court-circuiter les contacts externes
de la pile ou mettre dans le feu ni l’eau.
Li-ion
SPY
SPY
RECHARGEABLE 7.4 VOLT LI-ION POLYMER BATTERY 2.0 Ah
RECYCLE OR DISPOSE OF PROPERLY
Li-ion
Made in China | Fabriqué en Chine v2.3
www.spypoint.com
P INTSPY INTPSPY
Models: LIT-09: Battery only
LIT-C-8: LIT-09 Battery & charger
WARNING: To reduce risk of fire or burns,
- Do not attempt to open, disassemble, or service the battery pack.
- Do not crush, puncture, short external contacts, or dispose
of in fire or water.
ATTENTION: Pour réduire les risques de feu ou de brûlures,
- Ne pas essayer d’ouvrir, désassembler, ou de réparer la pile.
- Ne pas frapper, percer, court-circuiter les contacts externes
de la pile ou mettre dans le feu ni l’eau.
Surveillance camera
Getting started
1
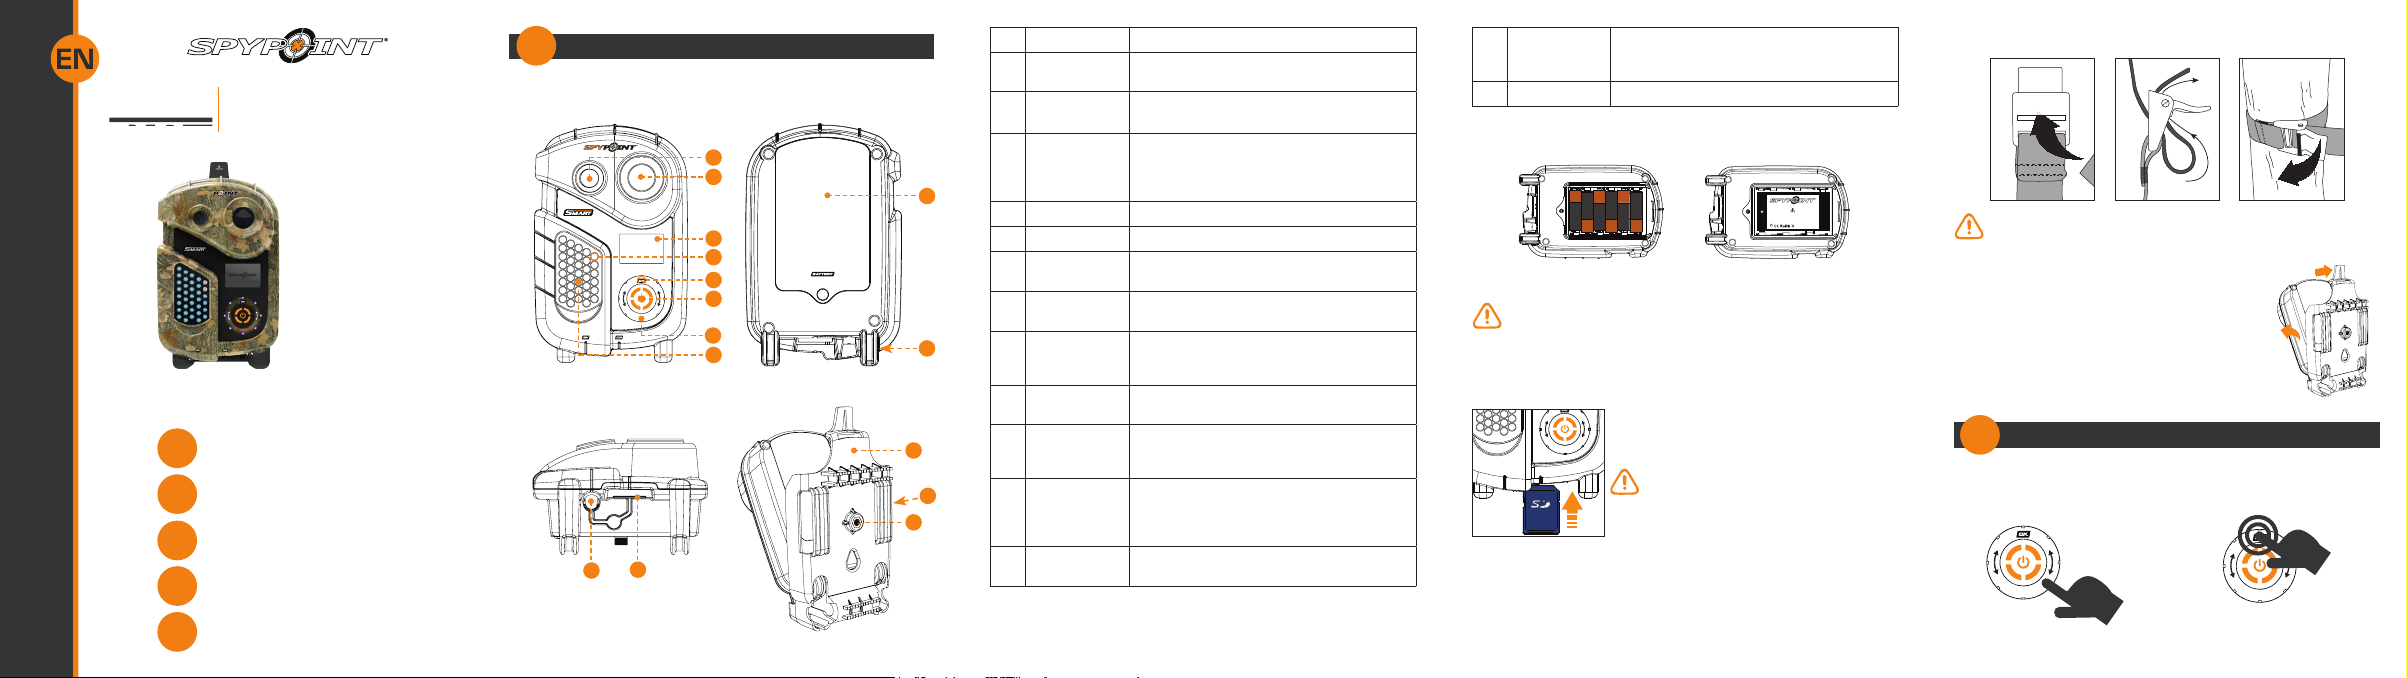
COMPONENTS
Smart series
1
2
Models:
SMART
SMART-8
Quick start guide
Getting started
1
Settings
2
I.T.T. mode
3
Error message
4
Complete instructions
5
www.spypoint.com
v1.2
12
11
3
4
5
6
7
8
9
10
13
14
15
1 Photo lens Image sensor and infrared lter.
2 Fresnel lens Expands the detection area and increases the
3 Conguration
screen
4 Test light Flashes in TEST mode when there is detec-
sensitivity of the camera’s motion sensor.
To see battery level, date, time, number of
recorded les, error messages and options.
tion and ashes 60 seconds in PHOTO/VIDEO
mode to allow the user to leave without being
photographed or recorded.
5 OK button Allows the user to select an option.
6 Power button Allows the user to turn on/off the camera.
7 Touch wheel Touch control interface for navigating
8 Invisible LEDs Night lighting to obtain black and white photos
9 Battery case Insert 6 AA batteries (alkaline or lithium) or
10 Cable lock
hole
11 12V power
jack
12 SD card slot An SD card is required to record photos/
13 Mounting
bracket
through the menus.
and videos.
a rechargeable lithium battery pack (LIT-09/
LIT-C-8, sold separately).
Allows the user to install a cable lock (CL-6FT,
sold separately).
This camera can be powered from an external
12-volt DC input such as a 12V battery or a
12V adapter, sold separately.
videos. The camera is compatible with SD/
SDHC memory card, up to 32 GB capacity
(not included).
Removable support to install the camera.
14 Slot for
installation
strap
Allows the user to install the camera using
the included installation strap.
15 Tripod mount Standard ¼-20" tripod mount.
BATTERY INSTALLATION
P INT
INTP
Models: LIT-09: Battery only
LIT-C-8: LIT-09 Battery & charger
RECHARGEABLE 7.4 VOLT LI-ION POLYMER BATTERY 2.0 Ah
RECYCLE OR DISPOSE OF PROPERLY
WARNING: To reduce risk of fire or burns,
ATTENTION: Pour réduire les risques de feu ou de brûlures,
- Do not attempt to open, disassemble, or service the battery pack.
- Ne pas essayer d’ouvrir, désassembler, ou de réparer la pile.
- Do not crush, puncture, short external contacts, or dispose
- Ne pas frapper, percer, court-circuiter les contacts externes
of in fire or water.
de la pile ou mettre dans le feu ni l’eau.
www.spypoint.com
Made in China | Fabriqué en Chine v2.3
6 alkaline AA batteries
We recommend the use of new batteries to ensure a maximum
performance of the camera. Rechargeable AA batteries are not
recommended.
Lithium battery pack
LIT-09/LIT-C-8
INSERTING THE MEMORY CARD
Insert an SD/SDHC memory card (up to 32 GB
capacity) in the card slot. The card is inserted
correctly when a click is heard.
Before inserting or removing a memory
card, always turn off the camera to prevent loss or damage of the photos already recorded.
INSTALLATION WITH THE SUPPLIED STRAP:
Recommended installation height: about 3 feet above the ground.
Do not place the camera facing the sun.
MOUNTING BRACKET
To remove the camera from the mounting bracket:
1. Push the tab to release the camera from the
mounting bracket.
2. Remove the camera.
Settings
2
Slide one nger on the wheel to
the right or to the left to navigate
on the interface and to change
option.
Touch the top of the wheel (OK) to
select an option.
2.
1.
A
15s
30s
45s 60s
0s
vimeo.com/spypointxcelcam
twitter.com/SpypointCamera
vimeo.com/spypointxcelcam
facebook.com/spypoint
youtube.com/spypointtrailcam
twitter.com/SpypointCamera
vimeo.com/spypointxcelcam
I.T.T
B
C
D
E
A: Indicates that the I.T.T mode is activated
B: Option name
C: Options (Photo, Video, Test, Date/Time)
D: Time (hh:mm)
E: Date (MM/DD/YY)
F: Battery level
G: Number of les recorded or countdown during initialization or error
message of the SD card
PHOTO
After 60 seconds, the camera starts in photo mode to take
photos.
VIDEO
After 60 seconds, the camera starts in photo mode to take videos.
TEST
Allows the user to test the detection system of the camera. When
TEST mode is selected, no photo or video is recorded. Walk perpendicularly in front of the camera. When the camera detects movement, the
light blinks to indicate that normally, a photo or video would have been
recorded. If the system does not detect the movement, increase the de-
tection distance using the “Sensitivity” option in the advanced settings of
the software. You can also realign the camera differently.
DATE/TIME
Allows the user to set the date as Month/Day/Year and the time
as Hour/Minute.
oo:oo
o2/21/14
PHOTO
oooo
F
G
I.T.T. mode
3
The camera is congured by default in I.T.T. mode (Intelligent Triggering
Technology) for the PHOTO or VIDEO mode. To change the settings, see
the ADVANCED CONFIGURATION USING THE SOFTWARE section.
PHOTO (I.T.T)
On detection, one photo is taken. If a new movement is detected by
the camera, a second photo is taken within 60 seconds after taking
the rst photo. This mode allows the user to always have a subject
on the photo.
Photo#1 Photo#2
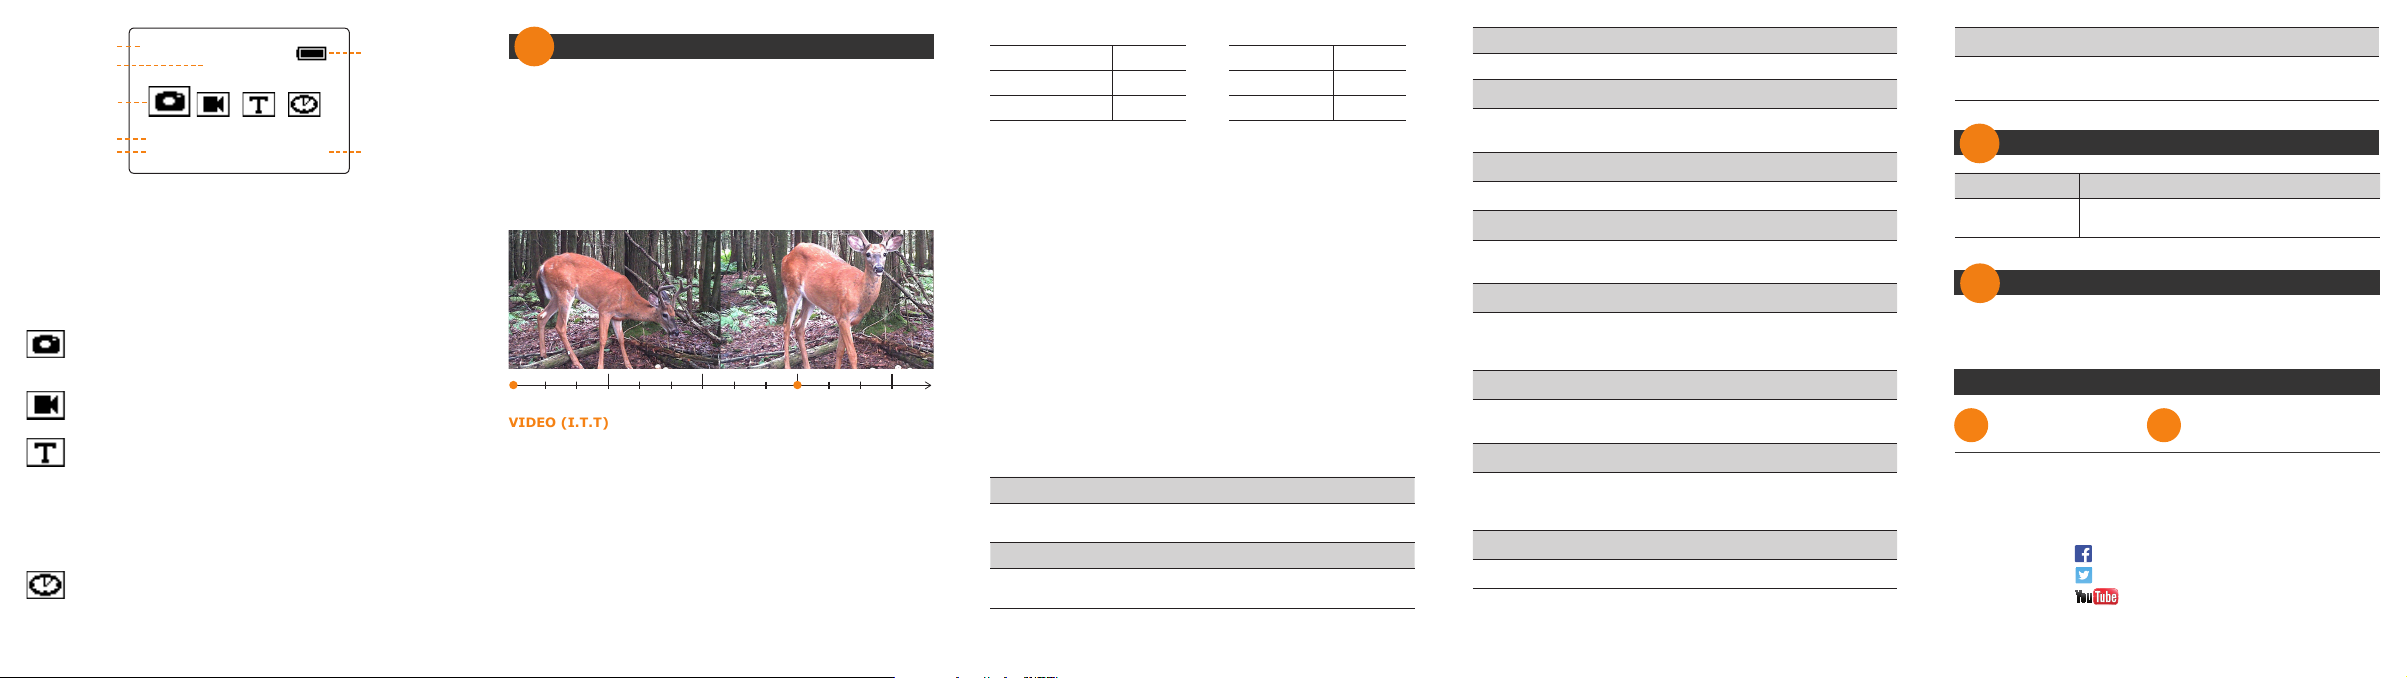
VIDEO (I.T.T)
A video of 10 seconds is taken upon detection. If the subject only
passes in front of the camera, it takes only one video of 10 seconds.
If the subject continues to move in front of the camera, the video
recording is then prolonged by 10 second sections, to a maximum of
90 seconds. This mode allows the user to record the best of the action.
Here are the specications of I.T.T. mode:
Time start 00:00 Stamp Yes
Time stop 00:00 Quality High
Sensitivity High Temperature °F
Refer to ADVANCED CONFIGURATION USING THE SOFTWARE section
for details on each specication.
ADVANCED CONFIGURATION USING THE SOFTWARE
To change the advanced settings using the SMART_conguration software:
1. Remove the memory card from the camera.
2. Insert the memory card into a computer.
3. Open the "SMART_conguration.EXE" application located on the
memory card.
4. Disable the "I.T.T. technology" to change the camera settings.
5. Press "Save" to save the changes.
6. When completed, the "Conguration saved" message appears.
Press "OK".
7. Then press "Exit".
8. Remove the memory card from the computer.
9. Insert the memory card into the camera.
10. Turn on the camera. The message "SETTINGS UPDATED" will
appear to indicate that the camera has recorded the new settings.
Here are the advanced settings of the software:
*Only availabe if I.T.T technology is disabled.
Multi-shot*:
Takes up to 6 consecutive shots at each detection, with a 10 second
delay between each photo.
Delay*:
Allows the user to choose the time interval between each detection
before the camera records the next photo or video.
Time lapse*:
Allows the camera to take photos at regular preset intervals.
Video length*:
Allows the user to select the duration of the recording when the
camera is set in VIDEO mode.
Software language:
Allows the user to select the display language of the software.
Time format:
Allows the user to select the time display over a period of 12 or 24
hours on the photos (e.g. 6:00 pm or 18:00).
Start time/Stop time:
Allows the user to set the operation period of the camera. For an
activation of 24 hours, the same start and stop times must be
entered (e.g.: 00:00/00:00)
Sensitivity:
Allows the user to choose the detection sensitivity of the camera. A
higher sensitivity allows you to take more photos.
Quality:
Allows the user to set the photo resolution. The low resolution
allows you to save space on the card and the high resolution allows
you to get a better photo quality.
Temperature:
Allows the user to select the temperature display (°C/°F).
Stamp:
Allows the user to have date, time, temperature and moon phases
printed on the photos.
Error message
4
Error message Possible solution
CARD
Complete instructions
5
Visit www.spypoint.com, the complete instructions for the camera
can be found in the Support section.
The use of a memory card is required to record
photos and video, insert a memory card.
Support
1-888-779-7646 tech@spypoint.com
Join the SPYPOINT
twitter.com/SpypointCamera
MD
community
youtube.com/spypointtrailcam
 Loading...