


Digital Surveillance Camera
Système de surveillance photographique
ECLYPSE model / Modèle ECLYPSE
User manual / Manuel d'utilisation
www.spypoint.com

2 3
English
English
Thank you for choosing one of our excellent
SPYPOINT products. You can now enjoy many benefits of a
full feature and easy to use digital surveillance camera. This
5 MP digital camera was developed and designed by our team
of highly qualified engineers and can take sharp and clean
photos or videos either day or night without using any flash.
English
v1.2

4 5
FEATURES
Photo recording:
Photo resolution 5 MP
File format JPG
Multi-shot Up to 4 pictures per detection
English
Stamp Date and time
Capture mode Color by day,
Video recording:
Video resolution 640 x 480
File format AVI
Sequence length Adjustable from 10 to 90sec
Capture mode Color by day,
Sound recording:
Memory storage:
Viewing:
TV output Composite video (PAL/NTSC)
Computer output USB 2.0
Power supply: (accessories sold separately, see “Options”)
Alkaline or lithium
batteries
Lithium battery pack Rechargeable battery pack
External (12V jack) 12 volt battery
Solar panel Solar panel (SP-12V)
black and white by night
black and white by night
Automatically recorded
in video mode
SD/SDHC card up to 32 GB
(No internal memory)
6x AA
(LIT-09/LIT-C-8)
(KIT-12V/BATT-12V) /
12 volt adapter (AD-12V)
combined with rechargeable
battery pack (LIT-09)
Detection system:
Motion sensor PIR
Detection angle 30°
Detection range Adjustable from 5 to 50ft
Delay between each
detection
Night time illumination system:
LEDs 35 LEDs
Type Invisible Black LEDs
Optical field of view:
Recommendations:
Operating temperature (-20 °C to + 50 °C)
Storage temperature (-30 °C to + 75 °C)
Adjustable from 1 to 15min
*Additional 10 sec. setting
(see DELAY)
50°
(-4 °F to +122 °F)
(-22 °F to +167 °F)
CONTENTS
• SPYPOINT ECLYPSE
• Installation strap
• USB cable
• Audio/Video cable
• User manual
English

6 7
POWER
Solar panel
This model also offers the possibility of a connection to
The battery level is shown on the LCD screen. When a single
line remains, the camera will continue to take pictures but we
strongly recommend changing the batteries before they are
empty. (See figure below)
English
a solar panel SP-12V (sold separately, refer to the section
« OPTIONS ») to maintain the charge of the lithium battery
(sold separately, refer to the section « OPTIONS ») or the 12
volt battery (sold separately, refer to the section « OPTIONS »).
During the installation of the rechargeable lithium battery or
12 volt battery, slide up the switch inside the battery case up to
« LIT-09 » to activate the charging system of the solar panel.
AA batteries
This camera requires the use of 6 AA batteries (1.5V). The
use of alkaline or lithium batteries is strongly recommended.
MEMORY CARD
Also note that the voltage of rechargeable AA batteries
(1.2V) is insufficient to power your SPYPOINT camera.
During the installation of AA batteries, place the switch inside
the battery case to «ALK». Insert the batteries as indicated
inside the battery case. Exact polarity must be followed. We
also recommend the use of new batteries to ensure maximum
performance of your camera.
Using a memory card is required to operate the camera
SPYPOINT ECLYPSE. When the camera is « ON » and no
memory card is used, the LCD panel displays « CArd » meaning
to insert one. The SD slot of the camera can accept memory
cards up to 32 GB capacity. Before inserting or removing the
memory card, the camera must be turned « OFF ». Failing to do
so may cause loss of or damage the pictures already recorded
Lithium battery pack
The camera SPYPOINT ECLYPSE can be powered by a
rechargeable lithium battery LIT-09/LIT-C-8 (sold separately,
refer to the section «OPTIONS»). This type of battery is less
from the memory card. When the SD card is full, the LCD panel
indicates « FULL ». The following data shows an approximate
quantity of photos which can be recorded by the camera
depending on the memory card capacity.
affected by cold temperatures and lasts up to 3 times more then
an alkaline battery. During the installation of lithium battery,
place the switch inside the battery case to «LIT-09».
External (12V)
The camera can be powered from an external 12 volt DC input
such as a 12 volt battery (KIT-12V/BATT-12V, sold separately)
or a 12 volt adapter (AD-12V, sold separately). When using a
12 volt connection, we recommend removing the AA batteries
to prevent surcharges. During the installation of a 12 volt
RESOLUTION 2.0 GB 4.0 GB 8.0 GB 32 GB
4 MP
5 MP
6 MP
8 MP
10 MP
12 MP
VIDEO RESOLUTION
320 x 240
640 x 480
1900
1740
1580
1190
950
790
2.0 GB 4.0 GB 8.0 GB 32 GB
45 min
30 min
3800
3480
3160
2380
1900
1580
1h30
1h
7600
6960
6320
4760
3800
3160
3h
2h
30400
27840
25280
19040
15200
12640
12h
8h
connection, place the switch inside the battery case to «ALK». If
combined with a lithium battery pack, slide the switch to «LIT-
09». To find the accessories available for the 12 volts, refer to
the section «OPTIONS».
« BUSY » LED
The « BUSY » light, located next to the screen, lights up when
the camera is recording.
English

8 9
SETTINGS
Date, Time and Picture Quality
Turn « OFF » your camera; set switch « MODE » to « SET/
TEST » and turn « ON » the camera. Press « MENU/OK ».
An « H » will flash on the screen indicating that the camera is
in High Resolution (5 MP). Use the « DOWN » button if you
English
want to reduce the resolution to « L » (3 MP). Press « MENU/
OK » to set the date and time (mm/dd/yy, hh/mm). Use « UP »
and « DOWN » to change the blinking digit. Once finished,
press « MENU/OK » and turn « OFF » the system to save the
changes.
MODE
When the « PHOTO » or « VIDEO » mode is selected, the
test light in the front of the camera flashes for 60 seconds to
allow the user to leave without being photographed or filmed.
When the « SET/TEST » mode is selected, no picture or video
is recorded.
the camera detects movement, the light winks to indicate that
normally, a photo or video would be recorded.
not detect the movement, increase the distance detection using the
wheel
understand how the device responds to detections, you can better
adjust the direction or the height of the installation.
switch is set to « VIEW », you can view the recorded pictures
or videos on television.
How to properly install your camera
using the supplied installation strap:
Walk perpendicularly in front of the camera.
« DISTANCE »
or realign the system differently. When you
If the system does
When
When the
DELAY
To select the time interval before the camera records another
photo or video.
Additional setting: it is possible to decrease the delay between
detections to 10 seconds (instead of 1 minute) by using the
following procedure. Note that the battery life will be
affected.
Turn OFF the camera. Press and hold the « UP » button, turn
the camera on. « 10_S » appears on the screen meaning the
1 minute delay has been replaced by a 10 second delay. To
reset the camera to 1 minute delay, follow the same procedure.
« 1_M » appears on the screen (see figure below).
10_5
10 sec. delay 1 min. delay
MULTI-SHOT
To take up to 4 consecutive shots at each detection, with a 10
second delay between each photo. This option is available in
« PHOTO » mode.
VIDEO LENGTH
Allows you to select the recording duration when the camera is
set in « VIDEO » mode.
English
(Recommanded installation height: about 3 feet).
10 11
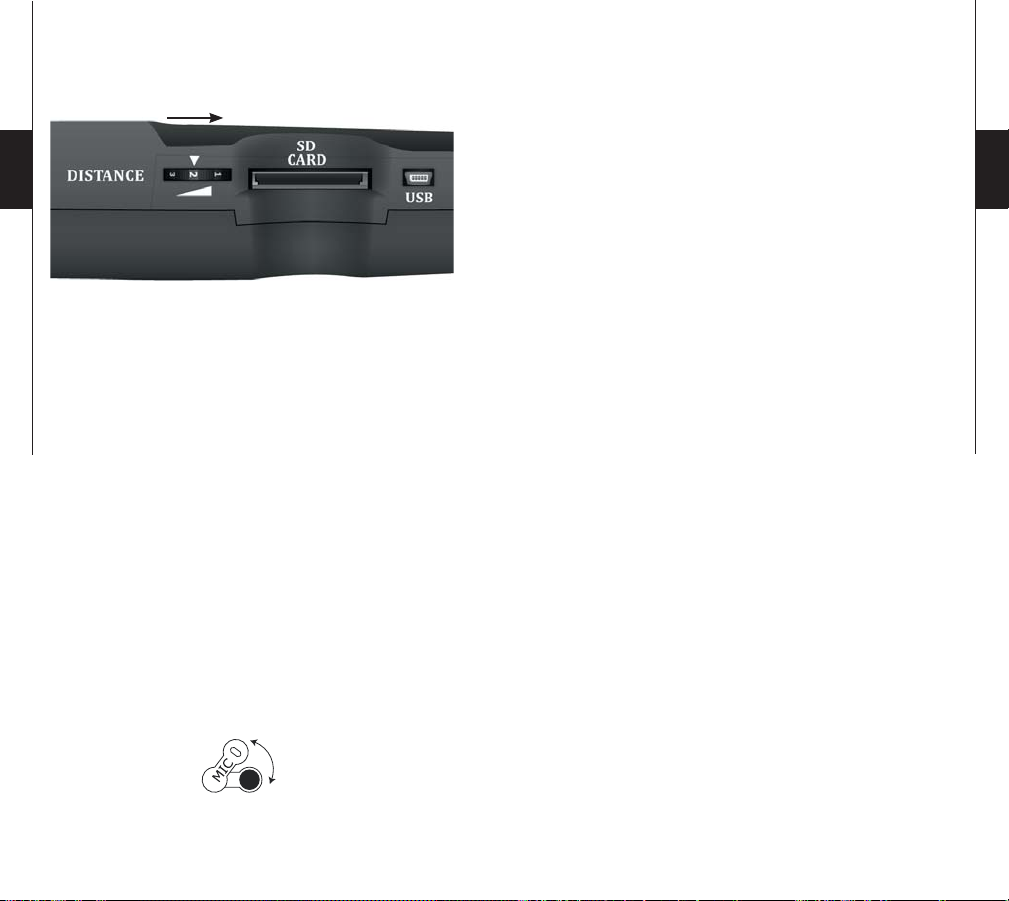
DISTANCE
DOWNLOAD TO A COMPUTER
Turn the dial to the right to increase distance.
English
The « DISTANCE » dial (placed on the side of the camera) can
adjust the sensitivity of the detector. The camera is equipped
with a detector sensitive to infrared. The system detects only heat
source in motion. The greater the mass of heat, more sensitive is the
system. Range of detector is between 5 and 50 feet. The best way
to adjust the distance is to set the camera in « SET/TEST » mode
(see above). Make sure to have the least possible objects in front of
the camera during the positioning. This prevents picture taken by
the camera when oriented towards the sun while an object moves in
front of the camera (eg. a branch)
SOUND RECORDING
The SPYPOINT ECLYPSE offers the possibility to record
the sound in « VIDEO » mode. When the « VIDEO » mode is
selected, the camera automatically records the sound. Under the
camera, you can find a rubber cap with the inscription MIC. If
the user does not want to record the sound, the rubber cap needs
to stay in place. If the sound recording is required, the user must
lift the rubber cap and turned it slightly so that the microphone
receiver is completely cleared (See figure below).
To transfer or view photos and videos on a PC, you must first
turn the camera « OFF » and connect the USB cable (supplied)
from the camera and to your computer. The computer will
recognize the camera and install the software itself. Click on
« My Computer » and select « Removable Disk ». Then click
« DCIM » and « 100DSCIM » to find all your photos
and videos.
Taking the SD card out of the camera and inserting it into the
computer port will achieve same results. If no SD slot is built
into the computer, a multi-card reader RD25-1 (sold separately)
must be used.
TELEVISION
To see photos and videos directly on a TV screen, turn
» your camera and select « VIEW ».
OFF
«
end of the cable (supplied) into the
the other end into the
TV OUT
«
«
»
of the camera
the camera. You will see the last picture or video recorded by
your system. To change the picture or the video, use the key
« UP » or « DOWN ». If you press « MENU/OK », the
following options will appear:
View Date/
Time:
Erase one:
Erase All:
To increase the view of the date and time
imprinted on the picture.
To erase the photo or the video on the screen.
To erase all stored photos and videos,
with the exception of protected photos and
videos.
Format:
To format memory card and to erase all
protected photos and videos.
Protect:
Language:
Exit:
To protect the photo or video on the screen.
To select language.
To return to viewing screen.
Connect the yellow
VIDEO IN
of the TV and
»
. Turn «
ON
»
English

12 13
TROUBLESHOOTING
No person / animal on photos
1. Rising sun or sunset can trigger sensor. Camera must
be reoriented.
2. At night, motion detector may detect beyond range
English
Red light in front of camera winks
The camera screen turns off
of the IR illumination. Reduce distance setting.
3. Small animal may be triggering unit. Reduce
distance setting and/or raise height of camera.
4. Motion detector may sense animals through foliage.
5. If person/animal moves quickly, it may move out
of the camera’s field of view before photo is taken.
Move camera further back or redirect camera.
Camera must be set on a stable and immovable
object i.e. large tree.
6. Make sure the mounting post or tree is stable and
does not move.
1. « MODE » switch is in « SET/TEST ».
2. « MODE » switch is in « PHOTO » or
« VIDEO ». Red light on the front of the camera
flashes for 60 seconds to allow the user to leave
without being photographed or filmed.
The camera may be set to « PHOTO » or « VIDEO » mode
and the screen turns off after a period of 60 seconds in
order to preserve battery life.
OPTIONS
See your local dealer or visit www.spypoint.com to find
available products. The following items are popular options
that can be added to a SPYPOINT camera model ECLYPSE:
SD Memory card, SD-8GB
Allows the user to record photos and videos.
Multi-card reader RD25-1
Allows the download of photos and videos
directly into a personal computer, without using
the SPYPOINT camera. This reader works
with 25 different types of memory cards and is
compatible with SD card.
Picture viewer, PV-2.4
Digital camera. Picture viewer, SD card slot,
2.4" viewing screen, 2GB internal memory,
MP3, radio, headphone, leather transport
pocket, rechargeable lithium battery, charger
and USB cable included.
Photo and video viewer, PV-9
Photo and video viewer. 2.5" viewing screen.
Rechargeable lithium battery pack
including charger, LIT-C-8
Rechargeable lithium battery pack for
camera, to replace alkaline batteries. This
type of battery is much less affected by cold
temperatures and lasts up to 3 times the
alkaline batteries.
English
Additional lithium battery pack, LIT-09
An additional lithium battery pack is a handy
spare.

14 15
IR-Booster, IRB-W
100 LED wireless infrared module that allows
the user to amplify the infrared lights at night
for clearer shots.
Black LEDs IR-Booster, IRB-W-B
100 invisible LED (completely invisible to the
naked eye) wireless infrared module that allows
the user to amplify the infrared lights at night
for clearer shots.
Secure Metal Box, SB-91
Metal Box to secure the camera against theft.
It also protects it from breakage that can be
caused by bears or other animals.
Mouting arm, MA-360
Adjustable mounting arm, compatible with
standard ¼-20" tripod mount screw.
English
Solar Panel, SP-12V
Solar panel with adjustable steel mounting
kit. Can be used to maintain recharged
lithium battery directly into compatible
devices. Can also be combined with any 12
volt battery.
Water resistant battery box, KIT-12V
Water resistant battery box. Includes a 12
volt rechargeable battery, charger, 12 feet
power cable and carrying strap.
12ft power cable, PW-12FT
Spare 12 ft power cable, fits with KIT-12V.
12 volt rechargeable battery and charger,
BATT-12V
To allow using external rechargeable battery
to power the camera.
English
12 volt power cable, CB-12FT
A 12 ft. cable allows connecting the camera
to an external 12 volt DC power.
Water resistant battery box, KIT6V-12V
Universal kit with two 6V rechargeable
batteries (2.8Ah), with 6V (5.6Ah) and 12V
(2.8Ah) output configuration, AC charger
with water resistant ABS plastic case. 12ft
power cable and strap included. Camo
pattern.
12 volt adapter, AD-12V
12 volt adapter for wall outlet,
fits all Spypoint cameras.
Cable lock, CL-6ft
6 feet long locking cable with key used for
maximum theft protection.
Aluminum Tripod, TP-CAM
Lightweight tripod, aluminum, black color,
with unique anchor system. Max height:
4.9ft (1.5m), Min height: 1.7ft (0.5m). Max
load weight: 5kg (11 lbs). With removable
quick release plate. Fits with most Spypoint
product.

16 17
English
English
LIMITED WARRANTY
SPYPOINT ECL YPSE designed by GG Telecom, is covered by
a one (1) year warranty on material and workmanship starting
from its original date of purchase. The sales receipt is your
proof of purchase and should be presented if warranty
service is needed.
This warranty does not cover any GG Telecom product
whichhas been subjected to misuse, neglect and accidents or
has been improperly used or maintained. Any modification or
tampering of the product will affect its operation, performance,
durability and void this warranty.
REPAIR SERVICE
Repairs for damages not covered by the warranty will be
subject to a reasonable charge. For technical assistance, write
to tech@spypoint.com. Give a description of the problem with
a phone number where you can be reached.
IMPORTANT: Under no circumstances will GG Telecom
accept returned products without a Return Material
Authorization number (RMA).
WWW.SPYPOINT.COM
Note: For the latest update of the user manual, refer to our
website. The version number of this manual is on page 2.

16 17
Français
Français
Merci d’avoir choisi un excellent produit
SPYPOINT. Vous pouvez maintenant bénéficier d’un appareil
de surveillance photographique complet et facile d’utilisation.
Cet appareil de 5 MP a été conçu et développé par notre équipe
d’ingénieurs hautement qualifiés et permet la prise de photos et
de vidéos de jour et de nuit sans aucun flash.
Français

18 19
SPÉCIFICATIONS
Enregistrement Photo:
Résolution photo 5 MP
Format de fichier photo JPG
Option Multi-photos Jusqu’à 4 photos par détection
Informations imprimées
sur photo
Mode de capture Couleur de jour,
Français
Enregistrement Vidéo:
Résolution vidéo 640 x 480
Format de fichier vidéo AVI
Durée des séquences Réglable de 10 à 90 secondes
Mode de capture Couleur de jour,
Enregistrement du son:
Mémoire de stockage:
Visionnement:
Sortie TV Vidéo Composite (PAL/NTSC)
Sortie Ordinateur USB 2.0
Alimentation: (accessoires vendus séparément,
voir section «Options disponibles»)
Piles alcalines ou au
lithium
Bloc pile lithium Bloc pile rechargeable
Externe (Prise 12V) Batterie 12 volts
Date et heure
noir et blanc de nuit
noir et blanc de nuit
Automatiquement enregistré
en mode vidéo
Carte SD/SDHC jusqu’à 32Go
(Pas de mémoire interne)
6x AA
/LIT-C-8)
(LIT-09
(KIT-12V/BATT-12V)
/ Adaptateur 12 volts (AD-12V)
Panneau solaire Panneau solaire (SP-12V)
Système de détection:
Détecteur de mouvement PIR
Angle de détection 30°
Distance de détection Réglable de 2 à 15 mètres
Délai entre chaque
détection
Système d’éclairage de nuit:
DEL 35 DEL
Type DEL noires invisibles
Angle de champ de
vision optique:
Recommandations:
Température de
fonctionnement
Température de remisage (-30 °C à + 75 °C)
combiné avec bloc pile lithium
(LIT-09)
Réglable de 1 à 15 minutes
*Réglage additionnel
de 10 sec. (voir section
DELAY)
50°
(-20 °C à + 50 °C)
(-4 °F à +122 °F)
(-22 °F à +167 °F)
CONTENU DE L’EMBALLAGE
• SPYPOINT ECLYPSE
• Courroie d'installation
• Câble USB
• Câble audio/vidéo
• Manuel d'utilisation
Français

20 21
ALIMENTATION
Le niveau des piles est indiqué sur l’écran ACL. Lorsqu’il ne
reste qu’une seule ligne, la caméra continue de prendre des
photos mais nous suggérons fortement de changer les piles
avant qu’elles ne soient vides. (Voir figure plus bas)
Panneau solaire
Ce modèle offre la possibilité d’un branchement à un panneau
solaire SP-12V (vendu séparément, se référer à la section
« Options disponibles ») permettant de maintenir la charge
de la pile lithium ou de la pile 12 volts (vendue séparément,
se référer à la section « Options disponibles »). Lors de
l’installation de la pile au lithium rechargeable ou de la pile 12
volts, glisser le commutateur à l’intérieur du compartiment des
piles à « LIT-09 » pour activer le système de recharge avec le
Piles AA
panneau solaire.
Le système requiert l’utilisation de 6 piles AA (1.5V). L’emploi
de piles alcalines ou au lithium est fortement recommandé. À
Français
noter que la tension des piles AA rechargeables (1.2V) est
CARTE MÉMOIRE
insuffisante pour alimenter votre caméra Spypoint. Lors
de l’installation de piles AA, glisser le commutateur au fond
du compartiment à « ALK ». Insérer les piles dans le sens
indiqué au fond du compartiment. La polarité des piles doit être
respectée. Nous recommandons d’utiliser des piles neuves pour
assurer le rendement maximal de votre caméra.
L’utilisation d’une carte mémoire est nécessaire au
fonctionnement de la caméra SPYPOINT ECLYPSE. Lorsque
l’appareil est à « ON » et qu’aucune carte mémoire n’est
utilisée, l’écran ACL affiche « CArd » pour signifier d’en
insérer une. La fente de carte SD de la caméra accepte les cartes
mémoire jusqu’à une capacité de 32Go. Avant d’insérer ou de
Bloc pile lithium
La caméra SPYPOINT ECL YPSE peut être alimentée au moyen
d’un bloc pile au lithium rechargeable LIT-09/LIT-C-8 (vendu
séparément, se référer à la section « Options disponibles »).
Ce type de pile est moins affecté par le froid et offre un
rendement jusqu’à 3 fois supérieur aux piles alcalines. Lors de
retirer une carte mémoire, mettre l’appareil à « OFF » pour
éviter que les images présentes sur la carte soient supprimées
ou endommagées. Lorsque la carte mémoire est pleine, l’écran
affiche « FULL ». Voici un tableau de la quantité approximative
de photos pouvant être enregistrées avec différentes capacités
de cartes mémoire.
l’installation d’un bloc pile lithium, glisser le commutateur au
fond du compartiment à « LIT-09 ».
Externe (12V)
La caméra peut être alimentée au moyen d’une source externe
de 12 volts telle qu'une batterie 12 volts (KIT-12V/BATT-12V,
vendu séparément) ou un adaptateur 12 volts (AD-12V, vendu
séparément). Lors d’un branchement 12 volts, il est suggéré
RÉSOLUTION 2.0Go 4.0Go 8.0Go 32Go
4 MP
5 MP
6 MP
8 MP
10 MP
12 MP
RÉSOLUTION VIDÉO 2.0Go 4.0Go 8.0Go 32Go
320 x 240
640 x 480
1900
1740
1580
1190
950
790
45 min
30 min
3800
3480
3160
2380
1900
1580
1h30
1h
7600
6960
6320
4760
3800
3160
3h
2h
30400
27840
25280
19040
15200
12640
12h
8h
de retirer les piles AA pour éviter une surcharge. Lors d’un
branchement 12 volts, glisser le commutateur du compartiment
des piles à «ALK». Si ce branchement est combiné à un
bloc pile lithium, glisser le commutateur à « LIT-09 ». Pour
connaître les accessoires disponibles pour l’alimentation 12
DEL « BUSY »
La lumière « BUSY », située à la droite de l’écran, s’allume
lorsque la caméra enregistre un fichier.
volts, se référer à la section « Options disponibles ».
Français

22 23
PROGRAMMATION
Date, Heure, Température et Qualité des photos
Mettre la caméra à « OFF », positionner le commutateur
« MODE » à « SET/TEST » et remettre à « ON ». Appuyer
sur « MENU/OK ». Un « H » clignote à l’écran indiquant que
la caméra est en Haute Résolution (5 MP). Utiliser la touche
« DOWN » si vous désirez réduire la résolution à « L » (3 MP).
Appuyer sur « MENU/OK » pour configurer la date et l’heure.
(mm/jj/aa, hh/mm) Utiliser les touches « UP » et « DOWN »
pour modifier le chiffre clignotant. Une fois terminé, appuyer
sur « MENU/OK » et remettre à « OFF » pour enregistrer les
Français
modifications.
Comment installer correctement votre caméra
à l'aide de la courroie d'installation fournie:
(hauteur d’installation recommandée: environ 1 mètre).
Français
MODE
Lorsque le mode « PHOTO » ou « VIDEO » est choisi, la
lumière de test sur le devant de l’appareil clignote durant 60
secondes pour permettre à l’utilisateur de quitter les lieux sans
être photographié ou filmé. Lorsque le mode « SET/TEST »
est sélectionné, aucune photo ou vidéo n’est enregistrée. Passer
devant l’appareil de façon perpendiculaire. Lorsque l’appareil
détecte un mouvement, la lumière de test clignote pour indiquer
que l’appareil aurait normalement enregistré une photo ou une
vidéo. Si le système ne détecte pas la présence, augmenter la
distance de détection à l’aide de la roulette « DISTANCE »
ou réaligner le système de façon différente. Lorsque vous
comprenez comment l’appareil réagit aux détections,
vous pouvez mieux ajuster la direction ou la hauteur de
l’installation. Le mode « VIEW » vous permet de visionner vos
photos ou vidéos sur un téléviseur.
DELAY
Permet de choisir l’intervalle de temps avant que la caméra
n’enregistre une autre photo ou vidéo.
Réglage additionnel: il est possible de réduire le délai minimum
entre les détections à 10 secondes (au lieu de 1 minute) en
suivant la procédure suivante. À noter que la durée de vie des
piles sera affectée.
Éteindre la caméra. Maintenir enfoncé le bouton « UP »
et remettre la caméra à « ON ». « 10_S » apparait à l’écran,
signifiant que le délai de 1 minute est remplacé par le délai
de 10 secondes. Pour remettre le délai minimum à 1 minute,
refaire la même procédure. « 1_M » apparaît alors à l’écran
(voir image plus bas).
10_5
Délai de 10 sec. Délai de 1 min.

24 25
MULTI-SHOT
Permet de prendre jusqu’à 4 photos consécutives à chaque
détection, avec un délai de 10 secondes entre chaque photo.
Cette option est disponible lorsque la caméra est programmée
en mode « PHOTO ».
VIDEO LENGTH
Permet de configurer la durée d’enregistrement des séquences
vidéo lorsque la caméra est programmée en mode «VIDEO».
DISTANCE
Français
Tourner la roulette vers la droite pour augmenter la sensibilité.
ENREGISTREMENT DU SON
La caméra SPYPOINT ECLYPSE offre la possibilité
d’enregistrer le son en mode « VIDEO ». Lorsque le mode
« VIDEO » est sélectionné, la caméra enregistre le son
automatiquement. Sous la caméra se trouve un capuchon en
caoutchouc avec l’inscription MIC. Si l’utilisateur ne souhaite
pas enregistrer le son, le capuchon de caoutchouc doit demeurer
en place. Si l’enregistrement du son est nécessaire, l’utilisateur
doit soulever le capuchon et le tourner légèrement pour que le
trou du microphone soit complètement dégagé (Voir figure plus
bas).
TRANSFERT VERS L’ORDINATEUR
Pour transférer ou visionner les photos ou les vidéos à un
ordinateur, mettre la caméra à « OFF » et connecter le câble USB
(fourni) de la caméra à l’ordinateur. L’ordinateur reconnaîtra la
caméra et installera le logiciel de lui-même. Cliquer sur « Poste
La roulette « DISTANCE » (placée sur le côté de la caméra)
permet de régler la sensibilité du détecteur. La caméra est
munie d’un détecteur sensible à l’infrarouge. Le système
détecte seulement une source de chaleur en mouvement. Plus
la masse de chaleur est grande, plus le système est sensible.
La distance de détection varie de 2 à 15 mètres. La meilleure
façon de configurer la distance est de mettre l’appareil en mode
« SET/TEST » (voir plus haut). Faire en sorte d’avoir le moins
d’objets possible devant la caméra lors du positionnement de
cette dernière. Ceci évite qu’elle se déclenche lorsque le soleil
pointe en sa direction au même moment qu’un objet est en
mouvement devant l’appareil (par exemple: une branche).
de travail » et choisir « Disque amovible ». Cliquer ensuite sur
« DCIM » et « 100DSCIM » pour y retrouver les photos et les
vidéos emmagasinées.
Une autre façon de procéder est de retirer la carte mémoire
(vendue séparément) de la caméra et de l’insérer dans la fente
SD de l’ordinateur. Si aucune fente SD n’est présente sur
l’ordinateur, utiliser un lecteur de cartes mémoire RD25-1
(vendu séparément).
Français

26 27
TÉLÉVISION (« TV OUT »)
DÉPANNAGE
Permet de visionner les photos et les vidéos directement sur
un téléviseur. Mettre votre système à « OFF » et sélectionner
le mode « VIEW ». Connecter l’extrémité jaune du câble à la
prise « VIDEO IN » du téléviseur et l’autre extrémité à la prise
« TV OUT » de la caméra. Mettre le système à « ON ». Vous
verrez apparaître la dernière photo ou vidéo enregistrée. Pour
changer les photos ou les vidéos, utiliser les touches « UP » et
« DOWN ». Lorsque vous appuyez sur « MENU/OK », voici
les différentes options disponibles:
Français
Date et heure:
Effacer:
Effacer tout:
Formater: Permet d’effacer tout le contenu de la
Protéger:
Langue:
Sortie:
Permet de visualiser la date et l’heure
imprimées sur la photo.
Permet d’effacer la photo ou la vidéo affichée
à l’écran.
Permet d’effacer toutes les photos et
toutes les vidéos enregistrées qui n’ont
pas été protégées.
mémoire, incluant les fichiers protégés.
Permet de protéger une photo ou une
vidéo pour éviter qu’elle ne soit effacée
en sélectionnant « Effacer tout ».
Permet de modifier la langue d’affichage.
Permet de quitter le menu.
Aucune personne ou aucun animal sur les images
1. Vérifier si l’appareil est pointé vers le lever ou le
coucher du soleil, ce qui peut faire déclencher
l’appareil.
2. La nuit, le détecteur de mouvement peut détecter audelà de la portée des DEL infrarouges. Réduire la
sensibilité avec la roulette « DISTANCE ».
3. Les petits animaux peuvent faire déclencher l’unité.
Réduire la distance et/ou augmenter la hauteur de
la caméra.
4. Le détecteur de mouvement peut détecter les
animaux à travers le feuillage.
5. Si la personne ou l’animal se déplace rapidement,
il peut sortir du champ de vision de la caméra avant
que la photo ne soit prise. Déplacer l’appareil vers
l’arrière ou le réorienter.
6. S’assurer que l’arbre sur lequel est installée la
caméra est stable et sans mouvement.
La lumière rouge clignote devant l’appareil
1. Vérifier si l’appareil est configuré en mode
« SET/TEST ».
2. L’appareil est peut-être en mode « PHOTO » ou
« VIDEO » et la lumière de test clignote durant 60
secondes pour permettre à l’utilisateur de quitter les
lieux sans être photographié ou filmé.
L'écran de l'appareil s'éteint
L'appareil est peut-être en mode « PHOTO » ou
« VIDEO » et l'écran s'éteint après une durée de 60
secondes dans le but de préserver la vie des piles.
Français

28 29
OPTIONS DISPONIBLES
Pour connaître et avoir plus d’informations sur les options
disponibles, visiter www.spypoint.com. Voici les principales
options disponibles pour la caméra SPYPOINT ECLYPSE:
Carte Mémoire SD, SD-8GB
Carte mémoire permettant d’enregistrer des
photos ou des vidéos.
Français
Panneau solaire 12 volts, SP-12V
Panneau solaire avec support d’installation
ajustable en métal. Maintient la charge de la
pile lithium directement dans les appareils
compatibles. Peut aussi recharger une pile
12 volts.
Lecteur de cartes portatif, RD25-1
Lecteur permettant le branchement d’une
carte mémoire directement à l’ordinateur,
sans déplacer la caméra SPYPOINT.
Compatible avec 25 types de cartes
différentes incluant les cartes SD.
Lecteur de photos, PV-2.4
Caméra numérique, lecteur de photos
compatible avec carte SD. Écran de
2.4", mémoire interne 2Go, MP3, radio,
écouteurs, pochette de transport en cuir, pile
rechargeable au lithium, chargeur et câble
USB inclus.
Lecteur de photos et vidéos, PV-9
Lecteur de photos et vidéos. Écran de
visionnement de 2.5".
Bloc pile lithium rechargeable avec
chargeur, LIT-C-8
Bloc pile lithium rechargeable permettant
d’alimenter l’appareil, en remplacement de
piles alcalines. Ce type de pile est moins
influencé par les variations de température.
La capacité de la pile au lithium atteint
jusqu’à 3 fois la capacité des piles alcalines.
Pile lithium supplémentaire, LIT-09
Pile permettant d’avoir en sa possession,
une pile de rechange en tout temps en
combinaison de l’achat de l’ensemble
LIT-C-8.
Boîtier d’alimentation 12 volts, KIT-12V
Boîtier d’alimentation 12 volts résistant à
l’eau. Inclus une pile 12 volts, un chargeur,
un câble d’alimentation de 12 pieds et une
courroie de transport.
Câble d’alimentation, PW-12FT
Câble d’alimentation de rechange de 3,6m
pour branchement de la caméra au KIT -12V.
Pile 12 volts rechargeable et chargeur,
BATT-12V
Pile de 12 volts rechargeable permettant
d’alimenter la caméra.
Câble 12 volts, CB-12FT
Câble de 12 pieds permettant de brancher
l’appareil à une pile 12 volts.
Boîtier d’alimentation 6V-12V,
KIT6V-12V
Ensemble universel avec 2 piles 6V (2.8Ah)
rech., sortie 6V (5.6Ah) et 12V (2,8Ah),
chargeur AC avec boîtier en plastique ABS
résistant à l’eau, câble d’alimentation de
3,6m et courroie incluse, style camo.
Français

30 31
Français
Adaptateur 12 volts, AD-12V
Adaptateur 12 volts pour prise murale,
compatible avec toutes caméras Spypoint.
IR-Booster, IRB-W
Module infrarouge de 100 DEL, à transmission
sans fil, permettant d’amplifier la puissance de
l’éclairage infrarouge la nuit.
Black LEDs IR-Booster, IRB-W-B
Module infrarouge de 100 DEL invisibles à
l’œil nu, à transmission sans fil, permettant
d’amplifier la puissance de l’éclairage
infrarouge la nuit.
Boîtier de sécurité en métal, SB-91
Boîtier permettant de sécuriser la caméra
contre le vol. De plus, il la protège des
bris pouvant être engendrés par les ours ou
autres animaux.
Support pour caméras, MA-360
Support ajustable pour caméras, compatible
avec fixations pour trépied standard de
¼-20".
Cadenas, CL-6FT
Cadenas d’une longueur de 6 pieds réduisant
les risques de vol de la caméra.
Trépied en aluminium, TP-CAM
Trépied ultraléger SPYPOINT, en
aluminium, noir, avec système d’ancrage
unique. Hauteur maximale: 1.5m, Hauteur
minimale: 0.5m, poids de charge maximum:
11lbs (5kg) Avec plaque de fixation
amovible. Fonctionne avec la plupart des
produits SPYPOINT.
Français
GARANTIE LIMITÉE
Le système SPYPOINT ECLYPSE, conçu par GG Telecom, est
couvert d’une garantie d’un (1) an incluant les pièces et la main
d’œuvre à compter de la date d’achat. Le coupon de caisse est
la preuve d’achat et devra être présenté si la garantie est
applicable.
La garantie ne couvre pas les produits de GG Telecom ayant
subi des abus, de la négligence, des accidents ou de mauvaises
utilisations ou entretiens. Toutes modifications ou utilisations
non conformes du produit affecteront son fonctionnement, ses
performances, sa durabilité et annuleront la garantie.
SERVICE DE RÉPARATION
Les réparations pour bris ou défectuosités non couverts par la
garantie seront facturées à prix raisonnables. Pour le soutien
technique, s.v.p. écrire un courriel à tech@spypoint.com.
Décrire le problème rencontré et indiquer un numéro de
téléphone pour vous rejoindre.
IMPORTANT: En aucune circonstance, GG Telecom
n’acceptera de réparation sans un numéro d’autorisation.
WWW.SPYPOINT.COM
Note: Pour la plus récente mise à jour du manuel d’utilisateur,
référez-vous à notre site Web. Le numéro de version de ce
manuel se trouve à la page 2
 Loading...