

Spypoint Adventure BF-8, Adventure HD-7, Adventure ECLYPSE, Adventure M8, Adventure 2N1 Quick Start Manual
...
KOMPONENTEN
Starten
1
2
3
4
5
6
7
8
12
13
11
10
18
17
16
9
1
Praxistip! Trennen Sie einen gewünschten
Abschnitt dieser Anleitung ab und platzieren Sie
diesen im Kameragehäuse.
COMPOSANTS
Quick start guide
v1.4
Models:
BF-6 BF-8
HD-7 2N1
C6 ECLYPSE
M8
P INTSPY INTPSPY
Surveillance camera
Adventure series
Getting started
Settings
Error messages
1
2
3
4
Complete instructions
www.spypoint.com
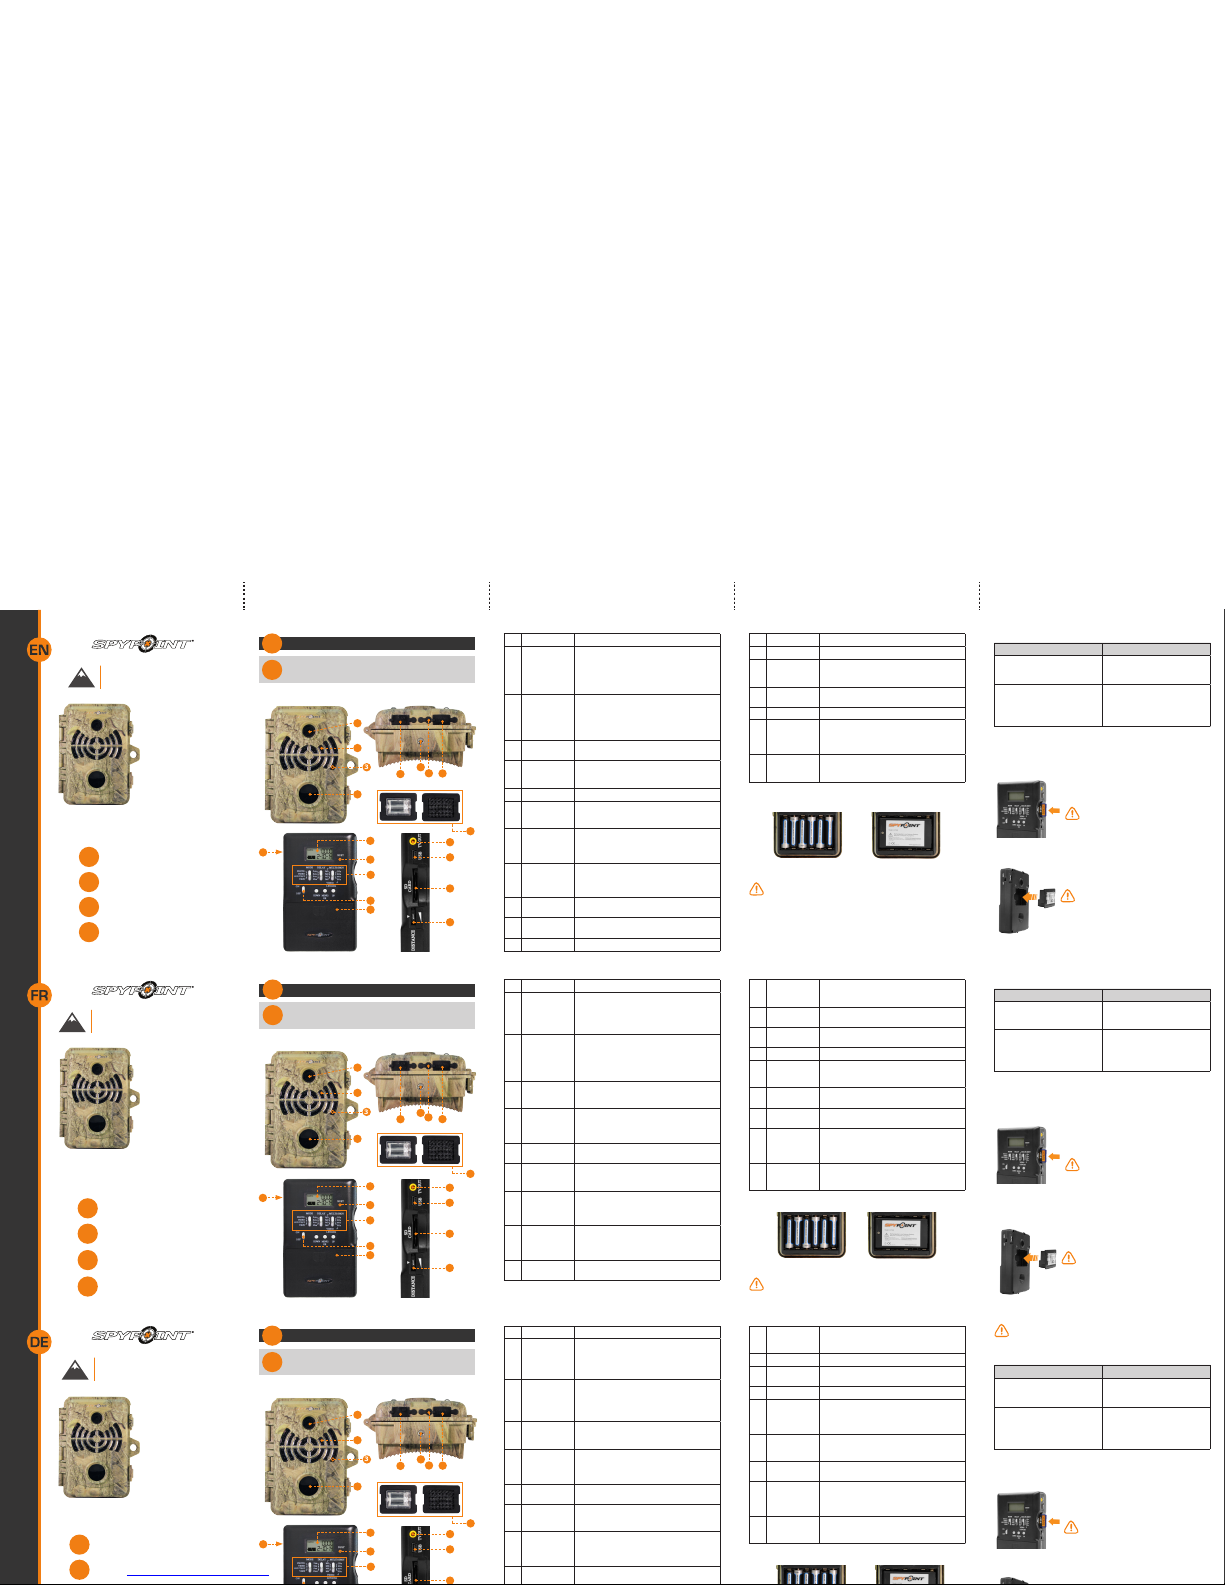
COMPONENTS
Getting started
1
2
3
4
5
6
7
8
15
12
13
11
14
10
19
18
17
16
9
1
Useful! Detach a section and insert it into the
sleeve provided for this purpose within the
housing for the camera.
1 Photo lens Image sensor and infrared lter.
2 Invisible
LEDs or
Infrared LEDs
(depending on the
camera)
Night lighting to obtain black and white
photos and videos.
3 Test light
(located at
the top right
for models
with 35
LEDs)
Flashes in SET/TEST mode when there is
detection and ashes 60 seconds in PHOTO/
VIDEO mode to allow the user to leave with-
out being photographed or recorded.
4 Fresnel lens Expands the detection area and increases
the sensitivity of the camera’s motion sensor.
5 12V power
jack
This camera can be powered from an
external 12-volt DC input such as a 12V
battery or a 12V adapter, sold separately.
6 Tripod mount Standard ¼-20” tripod mount.
7 Microphone
(if applicable)
To record sound, lift the rubber cap and turn
it slightly to completely clear the microphone
receiver.
8 Solar panel
jack
(if applicable)
Allows the user to connect a solar panel
(SP-12V) to maintain the charge of the
lithium battery pack (LIT-09/LIT-C-8), sold
separately.
9 35 invisible
LEDs and
Flash
(if applicable)
Interchangeable units (see FLASH UNIT
INSTALLATION section for more details)
10 Battery
switch
Allows the user to select the power source
according to the type of batteries used.
11 Conguration
screen
To see battery level, date, number of recorded
les, error messages and settings options.
12 BUSY LED Lights up when the camera is recording.
13 Switch panel Buttons to set the camera.
14 ON/OFF Allows the user to turn on/off the camera.
15 Battery case Insert 6 AA batteries (alkaline or lithium) or
a rechargeable lithium battery pack (LIT-09/
LIT-C-8, sold separately).
16 TV OUT To view or delete photos/videos directly on
TV.
17 USB port To transfer photos/videos to a computer.
18 SD card slot An SD card is required to record photos/
videos. The camera is compatible with SD/
SDHC memory card, up to 32 GB capacity
(not included).
19 DISTANCE
dial
Allows the user to adjust the distance of
detection and the sensitivity of the detector.
See DISTANCE section for more details.
BATTERY INSTALLATION
We recommend the use of new batteries to ensure a maximum
performance of the camera. Rechargeable AA batteries are not
recommended.
6 alkaline AA batteries
Lithium battery pack
LIT-09/LIT-C-8
Battery switch position (depending on the power source)
Power source Battery switch position
• 6 AA
• 12V
• 12V + 6 AA
ALK
• LIT-09*
• 12V + LIT-09*
• Solar panel + LIT-09*
(for cameras compatible with
solar panel)
LIT-09 or RECH
(depending on the camera)
* Rechargeable lithium battery pack, sold separately (LIT-09) or with
a charger (LIT-C-8).
MEMORY CARD INSTALLATION
Insert an SD/SDHC memory card (up to 32 GB
capacity) in the card slot. The card is inserted
correctly when a click is heard.
Before inserting or removing a memory
card, always turn off the camera to
prevent loss or damage of the photos already
recorded.
FLASH UNIT INSTALLATION (if applicable)
Install the Flash unit to obtain color photos by
day and night.
It is not possible to take videos at night
with the Flash unit.
Guide de
démarrage rapide
v1.4
Modèles:
BF-6 BF-8
HD-7 2N1
C6 ECLYPSE
M8
P INTSPY INTPSPY
Caméra de surveillance
Série Adventure
Mise en route
Programmation
Messages d’erreur
1
2
3
4
Instructions complètes
www.spypoint.com
Mise en route
1
2
3
4
5
6
7
8
15
12
13
11
14
10
19
18
17
16
9
1
Pratique! Détacher une section et l'insérer dans la
pochette prévue à cet effet à l’intérieur du boîtier
de la caméra.
1 Lentille photo Capteur d’image et ltre infrarouge
2 DEL invisibles
ou DEL
infrarouges
(selon la
caméra)
Éclairage de nuit pour obtenir des photos et
vidéos en noir et blanc.
3 Lumière de
test (située
en haut à
droite pour
les modèles à
35 LED)
Clignote en mode SET/TEST lors d’une
détection et clignote 60 secondes en mode
PHOTO/VIDÉO pour permettre à l’utilisateur
de quitter les lieux sans être photographié
ou lmé.
4 Lentille fresnel Permet d’élargir la zone de détection et
d’augmenter la sensibilité du détecteur de
mouvement de la caméra.
5 Prise 12V La caméra peut être alimentée au moyen
d’une source externe de 12V telle qu’une
batterie 12V ou un adaptateur 12V, vendus
séparément.
6 Support pour
trépied
Fixation pour trépied standard de ¼-20”.
7 Microphone
(si applicable)
Pour enregistrer le son, soulever le capuchon
et le tourner légèrement pour que le trou du
microphone soit complètement dégagé.
8 Prise pour
panneau
solaire
(si applicable)
Permet de brancher un panneau solaire
(SP-12V) qui maintient la charge du bloc pile
lithium (LIT-09/LIT-C-8), vendus séparément.
9 35 DEL
invisibles et
Flash
(si applicable)
Modules interchangeables (voir section
INSTALLATION DU MODULE FLASH pour plus
de détails)
10 Commutateur Permet de sélectionner la source
d’alimentation selon le type de piles utilisées.
11 Écran de
conguration
Permet de voir le niveau des piles, la date, le
nombre de chiers enregistrés, les messages
d’erreur et les options de programmation.
12 Lumière BUSY S’allume lorsque la caméra enregistre un
chier.
13 Boutons de
réglage
Boutons pour programmer la caméra.
14 ON/OFF Permet d’allumer ou d’éteindre la caméra.
15 Compartiment
à piles
Insérer 6 piles AA (alcalines ou lithium) ou un
bloc pile lithium rechargeable (LIT-09/LIT-C-8,
vendus séparément).
16 Sortie TV OUT Pour visionner ou supprimer les photos/
vidéos directement à l’écran d’un téléviseur.
17 Port USB Pour transférer les photos/vidéos à un ordi-
nateur.
18 Fente pour
carte SD
Carte SD nécessaire pour enregistrer des
photos/vidéos. La caméra accepte les cartes
mémoires de type SD/SDHC jusqu’à une
capacité de 32 Go (non-incluse).
19 Roulette
DISTANCE
Permet d’ajuster la distance de détection
et la sensibilité du détecteur. Voir section
DISTANCE pour plus de détails.
INSTALLATION DES PILES
Nous recommandons l’utilisation de piles neuves an d’assurer
un rendement maximal de la caméra. Les piles AA rechargeables
sont déconseillées.
6 piles AA alcalines
Bloc pile lithium
LIT-09/LIT-C-8
Position du commutateur (selon la source d’alimentation)
Source d'alimentation Position du commutateur
• 6 AA
• 12V
• 12V + 6 AA
ALK
• LIT-09*
• 12V + LIT-09*
• Panneau solaire + LIT-09*
(pour caméra compatible avec
un panneau solaire)
LIT-09 ou RECH
(selon le modèle de caméra)
*Bloc pile lithium rechargeable, vendu séparément (LIT-09) ou avec
un chargeur (LIT-C-8).
INSTALLATION DE LA CARTE MÉMOIRE
Insérer une carte mémoire de type SD/SDHC
(jusqu’à une capacité de 32 Go) dans la fente
pour carte SD. La carte est correctement
insérée lorsqu’un clic se fait entendre.
Avant d’insérer ou de retirer une
carte mémoire, toujours mettre la
caméra à OFF pour éviter que les images
présentes sur la carte soient supprimées ou
endommagées.
INSTALLATION DU MODULE FLASH (si applicable)
Installer le module Flash pour obtenir des photos
couleur de jour comme de nuit.
Il n’est pas possible de prendre des vidéos
de nuit avec le module Flash.
Schnellstartanleitung
v1.4
Modelle:
BF-6 BF-8
HD-7 2N1
C6 ECLYPSE
M8
P INTSPY INTPSPY
Überwachungskamera
Adventure-Serie
Starten
Einstellungen
1
2
1 Fotolinse Bildsensor und Infrarot-Filter.
2 Unsichtbare
LEDs oder
Infrarot-LEDs
(anhängig von
der Kamera)
Nachtbeleuchtung für Schwarz/weiß Fotos
und Videos.
3 Test-LED
(bendet sich
oben rechts
bei Modellen
mit 35 LEDs)
Blinkt im SET/TEST Modus, wenn die Kamera
eine Bewegung erfasst hat. Im PHOTO/
VIDEO Modus blinkt die LED 60 Sekunden,
um dem Anwender zu ermöglichen sich zu
entfernen, ohne fotograert zu werden.
4 Fresnel-Linse Erweitert den Erfassungsbereich des Bewe-
gungsmelders und erhöht die Empndlichkeit
der Kamera.
5 12V-Anschluss Diese Kamera kann über den externen
12-Vold-DC-Eingang betrieben werden,
z.B. mit einer 12V Batterie oder einem 12V
Adapter (separat erhältlich).
6 Stativgewinde Befestigung für einen Standart ¼-20”-
Gewindeeinsatz.
7 Mikrofon
(falls
zutreffend)
Für Tonaufnahmen, heben Sie die Gummiabeckung an und drehen diese zur Seite,
damit das Mikrofon frei liegt.
8 Solarpanel-
Eingang
(falls
zutreffend)
Ermöglicht ein Solarpanel (SP-12V) anzuschließen, um die Ladung des Lithium-Akku-
Pack (LIT-09/LIT-C-8) aufrechtzuerhalten
(separate erhältlich).
9 35 Unsich-
tbare-LEDs
Austauschbare Module (siehe Blitzlicht-Modul
Installation Abschnitt, für weitere Details).
11 Kongurations-
Bildschirm
Zeigt den Akkuladezustand, Datum, Anzahl
der aufgenommenen Dateien, Fehlermeldungen und Einstellungsmöglichkeiten an.
12 BUSY-LED Leuchtet auf, wenn die Kamera aufnimmt.
13 Bedienschalt-
äche
Tasten zum bedienen der Kamera.
14 ON/OFF Ermöglicht das Ein/Ausschalten der Kamera
15 Batteriefach Verwenden Sie 6 AA-Batterien (Alkaline oder
Lithium) (LR6) oder einen wiederauadbaren
Lithium-Akku-Pack (LIT-09/LIT-C-8, separate
erhältlich).
16 TV-Ausgang Ermöglicht das Betrachten und Löschen von
aufgenommenen Bildern und Videos über
über ein TV-Gerät.
17 USB-
Anschluss
Um Fotos/Videos auf Ihren Computer zu
übertragen.
18 SD-Kartens-
teckplatz
Für Foto/Video-Aufnahmen wird eine SDKarte benötigt. Die Kamera ist kompatibel
mit SD/SDHC Speicherkarten, bis zu 32GB
(nicht enthalten).
19 DISTANCE
RAD
Regelt die Weite der Erfassung und die Empndlichkeit des Bewegungsmelders.Im DISTANZ-
Abschnitt nden Sie weitere Informationen.
EINSETZEN DER BATTERIEN
Wir empfehlen, neue Batterien zu verwenden, um die maximale
Leistung aus Ihrer Kamera herauszuholen. Weiterhin wird die
Verwendung von wiederauadbaren AA-Batterien nicht empfohlen.
Schalterstellung abhängig (von der Energiequelle)
Energiequelle Schalterstellung
• 6 AA
• 12V
• 12V + 6 AA
ALK
• LIT-09*
• 12V + LIT-09*
• Solarpanel + LIT-09*
(für Kameras kompatibel mit
dem Solarpanel)
LIT-09 oder RECH
(anhängig von der Kamera)
* Wiederauadbarer Lithium-Akku-Pack (LIT-09) oder mit Ladegerät
(LIT-C-8), separat erhältlich.
SPEICHERKARTEN INSTALLATION
Legen Sie eine SD/ SDHC (bis zu 32GB) in den
Kartenschlitz. Wenn ein klicken zu hören ist,
wurde die Karte korrekt eingelegt.
Vor dem Einsetzen oder Entfernen einer
Speicherkarte, schalten Sie die Kamera
immer vorher aus, um einen Verlust oder eine
Beschädigung von den bereits vorhandenen
Aufnahmen zu verhindern.
BLITZLICHT-MODUL INSTALLATION (falls zutreffend)
INSTALLATION WITH THE SUPPLIED STRAP:
Recommended installation height: about 3 feet above the ground.
Do not place the camera facing the sun.
SETTINGS
A: Photo quality (High/Low)
B: Number of recorded les
C: Date/Time (MM/DD/YY, hh:mm)
D: Temperature (Celcius/Farenheit)(if applicable)
1. Set to SET/TEST mode.
2. Press OK to edit option.
3. Press UP and DOWN to modify the option.
4. Press OK to set next option or to conrm.
5. Turn OFF the camera to record settings.
6. Turn ON the camera, then set to PHOTO or VIDEO mode to operate
the camera.
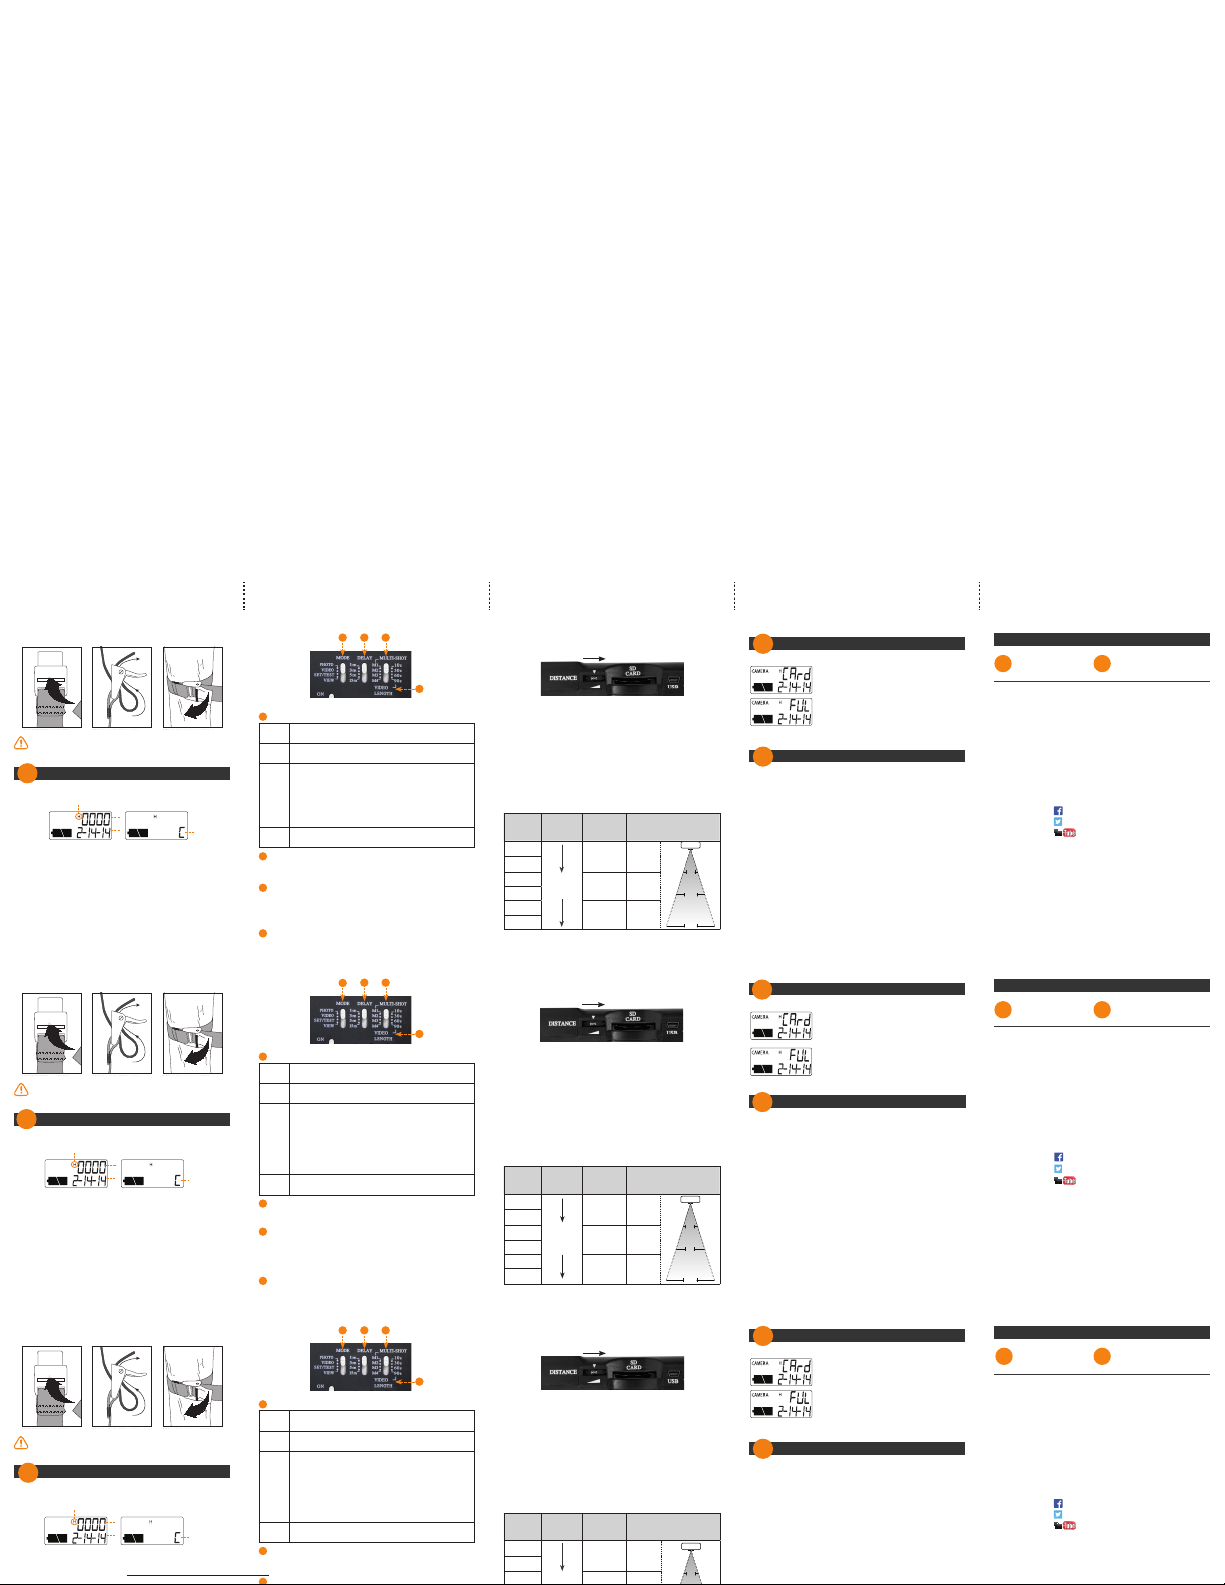
Settings
A
D
B
C
2
MODE
PHOTO After 60 seconds, the camera starts in photo mode to take
photos.
VIDEO After 60 seconds, the camera starts in video mode to take
videos.
SET/
TEST
Allows the user to test the detection system of the
camera. When the SET/TEST mode is selected, no photo
or video is recorded. Pass in front of the camera from left
to right. When the camera detects a motion, the test light
blinks to indicate that the camera would normally have
saved a photo or video. If the system does not detect
the movement, increase the detection distance using the
DISTANCE wheel or realign the system differently.
VIEW Allows the user to view or delete recorded photos and
videos on a television.
DELAY
Allows the user to choose the time interval between each detection
before the camera records the next photo or video.
MULTI-SHOT
Takes up to 4 consecutive shots at each detection, with a 10 second
delay between each photo. For the cameras with a Flash unit, the
delay between each photo will be 15 seconds. This option is available
in PHOTO mode only.
VIDEO LENGTH
Allows the user to select the duration of the recording when the camera
is set in VIDEO mode.
1 2 3
4
1
2
3
4
DISTANCE
Turn the DISTANCE dial to the right to increase the detection distance
and the sensitivity of the detector.
The camera is equipped with a detector sensitive to infrared. The
system will only detect a heat source in motion. The greater the mass
of heat, the more sensitive the system is. The range of detection is
between 5 and 65 feet. The best way to adjust the distance is to set
the camera to SET/TEST mode. Make sure to have the least amount
of objects possible in front of the camera during positioning. This will
prevent photos being taken by the camera when oriented towards the
sun at the same time an object moves in front of the camera (e.g. a
branch).
Here is a table of approximate detection distances and width of the
detection area according to the DISTANCE dial setting. The data can be
affected by the size of the subject and the outside temperature. Note
that this data is for illustrative purposes only.
Value on
dial
Sensitivity
Detection
distance
(ft)
Width of the
detection area(ft)
MIN
Gradually
increases
5-30 3
2
4
30-50 15
6
8
50-65 30
MAX
CAMERA
3
15
30
There is no memory card in the camera,
insert a card.
The memory card is full, delete les or use a
new memory card.
Visit www.spypoint.com, the complete instructions for your camera
can be found in the Support section.
Error messages
3
Complete instructions
4
Support
1-888-779-7646 tech@spypoint.com
Join the SPYPOINT® community
twitter.com/SpypointCamera
vimeo.com/spypointxcelcam
facebook.com/spypoint
youtube.com/spypointtrailcam
twitter.com/SpypointCamera
vimeo.com/spypointxcelcam
youtube.com/spypointtrail
cam
twitter.com/SpypointCamera
vimeo.com/spypointxcelcam
INSTALLATION À L’AIDE DE LA COURROIE FOURNIE:
Hauteur d’installation recommandée: environ 1 mètre du sol.
Ne pas installer la caméra face au soleil.
PROGRAMMATION
A: Qualité photo (High/Low)
B: Nombre de chiers enregistrés
C: Date/Heure (MM/JJ/AA, hh:mm)
D: Température (Celcius/Farenheit)(si applicable)
1. Mettre en mode SET/TEST.
2. Appuyer sur OK pour congurer l’option.
3. Utiliser UP et DOWN pour modier l’option.
4. Appuyer sur OK pour congurer l’option suivante ou conrmer.
5. Mettre la caméra à OFF pour enregistrer les modications.
6. Mettre la caméra à ON, puis mettre le commutateur au mode PHOTO
ou VIDEO pour utiliser la caméra.
A
D
B
C
Programmation
2
MODE
PHOTO Après 60 secondes, la caméra démarre en mode photo
pour prendre des photos.
VIDEO Après 60 secondes, la caméra démarre en mode vidéo
pour prendre des vidéos.
SET/
TEST
Permet de tester la caméra an de déterminer si elle
détecte bien à l’endroit désiré. À noter qu’aucune photo/
vidéo n’est enregistrée. Passer devant la caméra de
façon perpendiculaire. Lorsque la caméra détecte un
mouvement, la lumière de test clignote pour indiquer que
l’appareil aurait normalement enregistré une photo/vidéo.
Si le système ne détecte pas les mouvements, augmenter
la distance de détection à l’aide de la roulette DISTANCE
ou réaligner le système de façon différente.
VIEW Permet de visionner ou de supprimer les photos et les
vidéos directement à l’écran d’un téléviseur.
DELAY
Permet de choisir l’intervalle de temps d’attente avant que la caméra
ne détecte à nouveau et puisse enregistrer la prochaine photo ou vidéo.
MULTI-SHOT
Permet de prendre jusqu’à 4 photos consécutives à chaque détection,
avec un délai de 10 secondes entre chaque photo. Pour les caméras
avec un module FLASH, le délai entre chaque photo sera plutôt de
15 secondes. Cette option est disponible lorsque la caméra est
programmée en mode PHOTO.
VIDEO LENGHT
Permet de congurer la durée d’enregistrement des séquences vidéo
lorsque la caméra est programmée en mode VIDEO.
1
2 3
4
1
2
3
4
DISTANCE
Tourner la roulette vers la droite pour augmenter la distance de
détection et la sensibilité du détecteur.
La caméra est munie d’un détecteur sensible à l’infrarouge qui détecte
seulement une source de chaleur en mouvement. Plus la masse
de chaleur est grande, plus le système est sensible. La distance de
détection varie de 2 à 20 mètres. La meilleure façon de congurer la
distance est de mettre l’appareil en mode SET/TEST. Faire en sorte
d’avoir le moins d’objet possible devant la caméra, ceci évite qu’elle
se déclenche lorsque le soleil pointe en sa direction au même moment
qu’un objet est en mouvement devant l’appareil (par exemple: une
branche).
Voici un tableau des distances de détection approximatives et de la
largeur de la zone de détection selon la valeur de la roulette
DISTANCE. Ces données peuvent être affectées par la grandeur du
sujet et la température extérieure. À noter que ces données sont à
titre indicatif seulement.
Valeur
sur la
roulette
Sensibilité
Distance de
détection
(m)
Largeur de la zone
de détection
(m)
MIN
Augmente
graduelle-
ment
2-10 1
2
4
10-15 5
6
8
15-20 10
MAX
CAMERA
1
5
10
Il n’y a pas de carte mémoire dans la caméra,
insérer une carte.
La carte mémoire est pleine, effacer des
chiers ou utiliser une nouvelle carte
mémoire.
Visiter www.spypoint.com, les instructions complètes de la
caméra se retrouvent sous la section Support.
Messages d’erreur
3
Instructions complètes
4
1-888-779-7646 tech@spypoint.com
Support technique
Rejoignez la communauté SPYPOINT
MD
twitter.com/SpypointCamera
vimeo.com/spypointxcelcam
youtube.com/spypointtrail
cam
twitter.com/SpypointCamera
vimeo.com/spypointxcelcam
facebook.com/spypoint.FR
youtube.com/spypointtrailcam
twitter.com/SpypointCamera
vimeo.com/spypointxcelcam
INSTALLATION DER KAMERA MIT DEM MITGELIEFERTEN
BEFESTIGUNGSGURT:
Empfohlene Montagehöhe: ca. 1m über dem Boden.
Stellen Sie die Kamera nicht mit Blick zur Sonne auf.
EINSTELLUNGEN
A: Bildqualität (High/Low)
B: Anzahl der aufgenommenen Dateien
C: Datum/Uhrzeit (MM/TT/JJ, hh:mm)
D: Temperatur (Celcius/Farenheit)(falls zutreffend)
Einstellungen
A
D
B
C
2
MODE (MODUS)
PHOTO Nach 60 Sekunden beginnt die Kamera im Foto-Modus
Bilder aufzunehmen.
VIDEO Nach 60 Sekunden beginnt die Kamera im Video-Modus
Videos aufzunehmen.
SET/
TEST
Ermöglicht es dem Anwender, die Erfassung der Kamera
zu testen. Wenn der SET/TEST Modus ausgewählt ist, wird
kein Foto oder Video aufgezeichnet. Laufen Sie vor der
Kamera von links nach rechts. Wenn die Kamera die
Bewegung erkennt, blinkt die Testlampe auf, um anzuzeigen,
dass normalerweise ein Foto oder Video augenommen
wurde. Wenn das System die Bewegung nicht erkennt,
erhöhen Sie die Weite der Erfassung mit dem DISTANCE
Rad oder richten Sie die Kamera neu aus.
VIEW Ermöglicht das Betrachten und Löschen von aufgenomm-
enen Bildern und Videos über über ein TV-Gerät.
DELAY (VERZÖGERUNGSZEIT)
Hier stellen Sie die Verzögerungszeit zwischen den einzelnen Aufnahmen ein.
1 2 3
4
1
2
DISTANCE (DISTANZ)
Drehen Sie das DISTANCE Rad nacht rechts, um die Weite der Erfas-
sung und die Empndlichkeit zu erhöhen.
Die Kamera ist mit einem Bewegungsmelder ausgestattet, der emp-
ndlich auf Infrarotstrahlung ist. Die Kamera reagiert nur auf Wärmequellen in Bewegung. Je größer die Masse der Hitze, desto empndli-
cher reagiert das System. Der Erfassungsbereich liegt zwischen 2 und
20 Metern. Der beste Weg, die Entfernung zu ermitteln, ist die Kamera
im SET/TEST Modus einzurichten. Achten Sie darauf, das sich möglichst
wenig Objekte vor der Kamera benden. Dadurch wird verhindert, das
ungewollte Bilder aufgenommen werden, wenn die Kamera in Richtung
Sonne installiert ist und sich solche Objekte bewegen (z.B. Zweige)
Diese Tabelle zeigt die ungefähre Weite der Erfassung und die Breite
des Erfassungsbereichs, entsprechend dem Wert des DISTANCE
Rädchens. Diese Daten können durch die Größe des Motives und der
Außentemperatur beeinusst werden. Beachten Sie, dass diese Daten
ausschließlich zu illustrativen Zwecken gedacht sind.
Wert der
Anzeige
Empnd-
lichkeit
Erfassungs-
reichweite
(m)
Breite des
Erfassungsbereiches(m)
MIN
Zunehmend
2-10 1
2
4
CAMERA
1
Es ist keine Speicherkarte in der Kamera,
legen Sie eine Speicherkarte ein.
Die Speicherkarte ist voll, löschen Sie Dateien
oder verwenden Sie eine neue Speicherkarte.
Besuchen www.spypoint.com oder www.spypoint.info
Die vollständige Bedienungsanleitung für Ihre Kamera können Sie
im Bereich Support (www.spypoint.com) oder im Bereich Produkte
(www.spypoint.info) nden.
Fehlermeldungen
3
Vollständige Instruktionen
4
Support
+49 (0) 36331 50540 info@eurohunt.de
Join the SPYPOINT® community
twitter.com/SpypointCamera
vimeo.com/spypointxcelcam
facebook.com/spypoint
youtube.com/spypointtrailcam
twitter.com/SpypointCamera
vimeo.com/spypointxcelcam
youtube.com/spypointtrailcam
twitter.com/SpypointCamera
vimeo.com/spypointxcelcam
 Loading...