

Page 1
INFRARED THERMOMETERINFRARED THERMOMETER
800106
Instruction Manual
Page 2

TABLE OF CONTENTS
Intr oduction & Feat ures..... .. ......... ........... ......1
Pane l & LCD Descripti on....... .. ......... ........... ..2-4
Dist ance-to-Spo t........ .. ......... ........... ......... .. ..5
Meas urement Proce dures.... ........... ........... ...6
Adva nced Function s........ .. ......... ........... .....7-11
Clea ning....... ......... .. ......... ........... ........... ......
Spec ifications. ......... .. ......... ........... ......... .. ...
Stan dards...... ......... .. ......... ........... ......... .. .....
Batt ery Replaceme nt....... ........... ........... .......
Note s & Precautions ......... .. ......... ........... .......
PLEA SE REVIEW NOTES & P RECAUTION S
BEFO RE USING EQUIPM ENT!
12
12
12
13
13
Page 3

INTRODUCTION
The IR Thermometer is a non-contact,i nf ra re d te mp er ature measuring instrument that can be u se d in : H VAC ,
vehicle diagnostics, process cont ro l in du st ry, food industry, electrica l ma in te na nc e, e qu ip ment diagnostics and
many other industries and applicati on s.
Simply hold the IR gun, press the trigger a nd a im t he l as er
guide at the target. Temp er at ur e re su lt s immediately
appear on the display.
Comes with a carrying case and a 9V battery.
FEATURES
● 4-digit backlit LCD.
● Min-max, average, 10pt data logger, wi de m ea su ri ng
range and automatic shut-off.
● Switchable laser sighting.
● High DS ratio
● °F or °C selectable
● Electronic trigger lock.
● Audible alarms.
● E-mart: Smart Emissivity automa ti c me as ur em en t.
● CIS: Noticeable color signs alert the s et ti ng p oi nt o f
alarm temperature.
1
Page 4

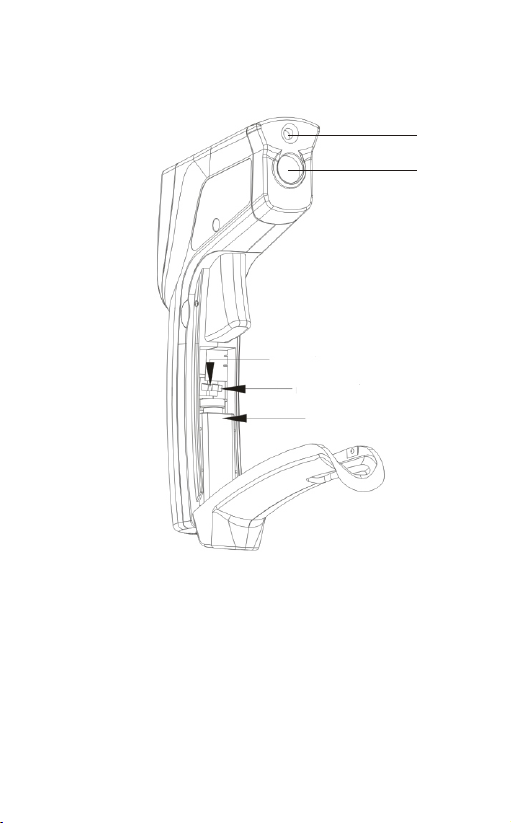
PANEL DESCRIPT ION
2
3
4
1
1. Disp la y Scree n
2. Ther mo coupl e Co nnect or
3. Trigg er
4. Batt er y Cover
2
Page 5
PANEL DESCRIPT ION
5. Lase r Gu ide
6. IR sen so r
7. °C/° F selecto r
8. Lase r On / Off sel ec tor
9. 9V Bat te ry
5
6
7
8
9
3
Page 6

LCD DESCRIPTIO N
10
11
12
13
14
15
16
10. L ow Battery Indicator
11. Laser / Bu zze r On / Off
12. D ata Log
13. T her moc oup le / Emissivity
14. H igh / Low Alarm
15. M emo ry Button
16. D own Button
17
18
19
20
21
22
23
24
17. S CAN /HO LD/ AUTO
18. °C / °F
19. Temperature Reading
20. M ax / Min / Avg
21. S eco nda ry Re adi ng
22. L ock B utt on
23. U p But ton
24. F unc tio n But ton
4
Page 7

DISTANCE-TO- SPOT
The distance-to-spot ratio is 12:1. As t he d is ta nc e fr om
the object increases, the spot size of th e ar ea m ea su re d
also increases.
5
Page 8

MEASUREMENT PR OCEDURES
Measure Temper at ur e( Sc an )
1. Slide the Laser ON/OFF selector sw it ch (8 ) to t ur n th e
Laser Guide(5) on or off.
2. Slide the °C/°F selector switch(7 ) to t he d es ir ed t em p erature scale.
3. Point the IR Gun at the object to be measu re d, p ul l
and hold the Trigger (3) to obtain a conti nu al ly u pd at ed
temperature.
4. SCAN(17) flashes on the display whil e th e Tri gg er i s
depressed.
5. Release the Trigger(3),HOLD(17) a nd t he l as t te mp erature reading is displayed for ap pr ox im at el y si x
seconds until the thermometer tur ns o ff.
6
Page 9

ADVANCED FUN CTIONS
To access the advanced functions, pul l an d ho ld
Trigger (3) and press the Function (24 ) bu tt on , th en
release the Trigger.
Press the Function (24) button to cyc le t hr ou gh t he a dvanced functions :Scan, Max, Min, Av g, Thermocouple
(TC), Data, Emissivity Adjustable( EM S) ,H ig h Ala rm (H AL)
and Low Alarm(LAL).
Data Record
1. While DATA# fl as hes on the left button, the value on
the Secondary Reading(1 2) c an b e recorded in "#"log.
Simply press "M" button.
2. Activate the record function by pus h th e "M " (1 5)
button to delete all the records, pre ss u p( 2 3) o r do wn
(16)buttons to DATA 0 and press "M" (15) button .
3. Recorded temperatures remain in me mo ry u nt il o ve r written.
4. Review the stored readings by using th e up ( 23 ) or d ow n
(16) buttons.
7
Page 10

Maximum/Minimum
The maximum and minimum temperature l ev el s ar e co ntinually recorded while the The rm om eter is in use. Previously recorded max/min temperatur es a re e ra se d wh en
the thermometer turn off.
1. Pull the Trigger (3) ,then press the Fu nc ti on (2 4) bu tton until Max(20) appears on the dis pl ay.
2. The highest re co rd ed t em pe ra tu re i s displayed. The
display will change only if/when a high er t em pe ra tu re is recorded.
3. Press the Function (24) button unt il t he M in ( 11)
appears on the display.
4. The lowest rec or de d te mp er at ur e is d isplayed .The
displayed will change only if/when a lo we r te mp er ature is recorded.
Ave ra ge
1. Pull the Trigger(3),then press th e Fu nc ti on (2 4) b ut ton as needed until Avg (20) appears on the display.
2. The average re co rd ed t em pe ra tu re s is displayed.
3. Max/Min/ and Aver ag e te mp er at ur es a re erased when
the thermometer turns off .
8
Page 11

Thermocouple
1. Pull the Trigger (3) ,then press the Fu nc ti on (2 4) bu tton until TC(13) appears on the disp la y.
2. Activ at e th e functions just by c on necting to the
conn ec t (2 ) and switch to TC function.
E-smart
1. Pull the Trigger (3) ,then press the Fu nc ti on (2 4) bu tton until EMS(13) appears on the dis pl ay.
2. In Emis si vity mode, push the L oc k (2 2) button to
enter th e E- smart function.
3. Conta ct (2)the target sur fa ce w ith thermocoupl e.
4. Point t he t arget with infrar ed t he rmometer
and push t he m easure trigger ti ll t he b uzzer
beep. The cros s- re ference Emissiv it y value will
be memor iz ed in the unit.
5. Press t he “F” (24)button to lea ve t he E -smart
functi on .
9
Page 12

High Al ar m (H AL )
1. Pull the Trigger (3) ,then press the Fu nc ti on (2 4) bu tton until HAL(14) appears on the dis pl ay.
2. Use the up( 23) or down(16) buttons to s et t he h ig h
alarm value.
3. The Th er mo me ter will beep when the temperature
reading is higher than the alarm settin g.
4. When the adjustments are complete, t he t he rm om et er
will return to the SCAN(17) mode afte r ap pr ox im at el y
six seconds.
Low Ala rm ( LA L)
1. Pull the Trigger (3) ,then press the Fu nc ti on (2 4) bu tton until LAL (1 4) a pp ea rs o n th e di sp la y.
2. Use the up ( 23) or down (16) buttons to s et t he l ow
alarm value.
3. The Th er mo me ter will beep when the temperature
reading is lower than the alarm setti ng .
4. When the adjustments are complete, t he t he rm om et er
will return to the SCAN(17) mode afte r ap pr ox im at el y
six seconds.
10
Page 13

Auto Function
In Auto mode the The rm om et er w il l co nt in uously scan
temperature without pulling the Trig ge r( 3) .
1. Push th e Lo ck(22)button to c on ti nuously measure
a n d display t he t emperature withou t pu l l the
mea suring t rigger.
2. Press in g the Lock (22)butt on a gain will disable the
AUTO. AUTO icon will disap pe ar from the display.
CIS Function
The co lo r of b acklight will cha ng e when the target
temp er at ure exceeds the set ti ng p oint of alarm
temp er at ure.
11
Page 14

CLEANING
Clean the lens with compressed air , so ft b ru sh o r a
moist cotton swab, Do not use solvent s on t he l en s.
Clean the housing with mild soap on a cloth o r sp on ge .
SPECIFICATIONS
D:S Ratio
Range/Res
Accuracy
12:1
-25~1400°F, -32~760°C / 0.1°C or °F
±5 F@ -25~-4 F ±3°C@-32~-20 C° ° , °
±3 F@ -4~212 F ±2°C@-20~100 C° ° , °
±2%@212~1400 F ±2%@-100~760 C° , °
Thermopile
Dim
Weight
Response Time
Thermocouple Range
Thermocouple Accuracy
Emissivity
Oper. Temp.
5~14μm
7.09"x5.12"x1.57",180x130x40mm
6.9 oz (195 g).
500 ms
-328 ~2516°F,-200~1380 C°
±1.5%+1degree
Adjustable 0.1~1.0
32~122°F (0~50°C) and10~95%RH
STANDARDS
EN61326: Electrical equipment for measurement, control and
laboratory use.
IEC61000-4-2: Electrostatic discharge immunity test.
IEC61000-4-3: Radiated, radio-frequency, Electromagnetic field
immunity test.
IEC61000-4-8: Power frequency magnetic field immunity test.
CFR 1040.10 subchapter J Class II Laser Product
12
Page 15

BATTERY REPLA CEMENT
Replace the battery when the Low Batter y In di ca to r (1 0)
is displayed. Open the battery cove r, in st al l a fr es h 9V
battery and close the cover.
NOTES & PRECAUTI ONS
Read the following information care fu ll y be fo re a tt em pt ing
to operate or service the IR Gun.Only q ua li fi ed t ec hn ic ia ns
should perform repairs.
● DO NOT submerge t he I R Gu n in w at er.
● Protect the IR Gun from water, shock, du st
and extreme environments.
● The IR Gun may be used to measur e bo dy t em -
p er at ure si mp ly f or r ef er en ce, but is not intended
for med ic al e va lu at io ns .
● Dispose of proper ly.
● Contains a laser po in te r.
● Keep away from children.
● Your reading may fluctuate if the IR Gun is mov ed
during measurement.
● For best results, allow the Gun to adju st t o th e am bient temperature for 30 minutes be fo re u se .
13
Page 16

 Loading...