

Page 1

ADJUSTABLE-VOLUME PIPETTORS
300100—300106
Instruction Manual
SPER
SCIENTIFIC
LTD.
Page 2
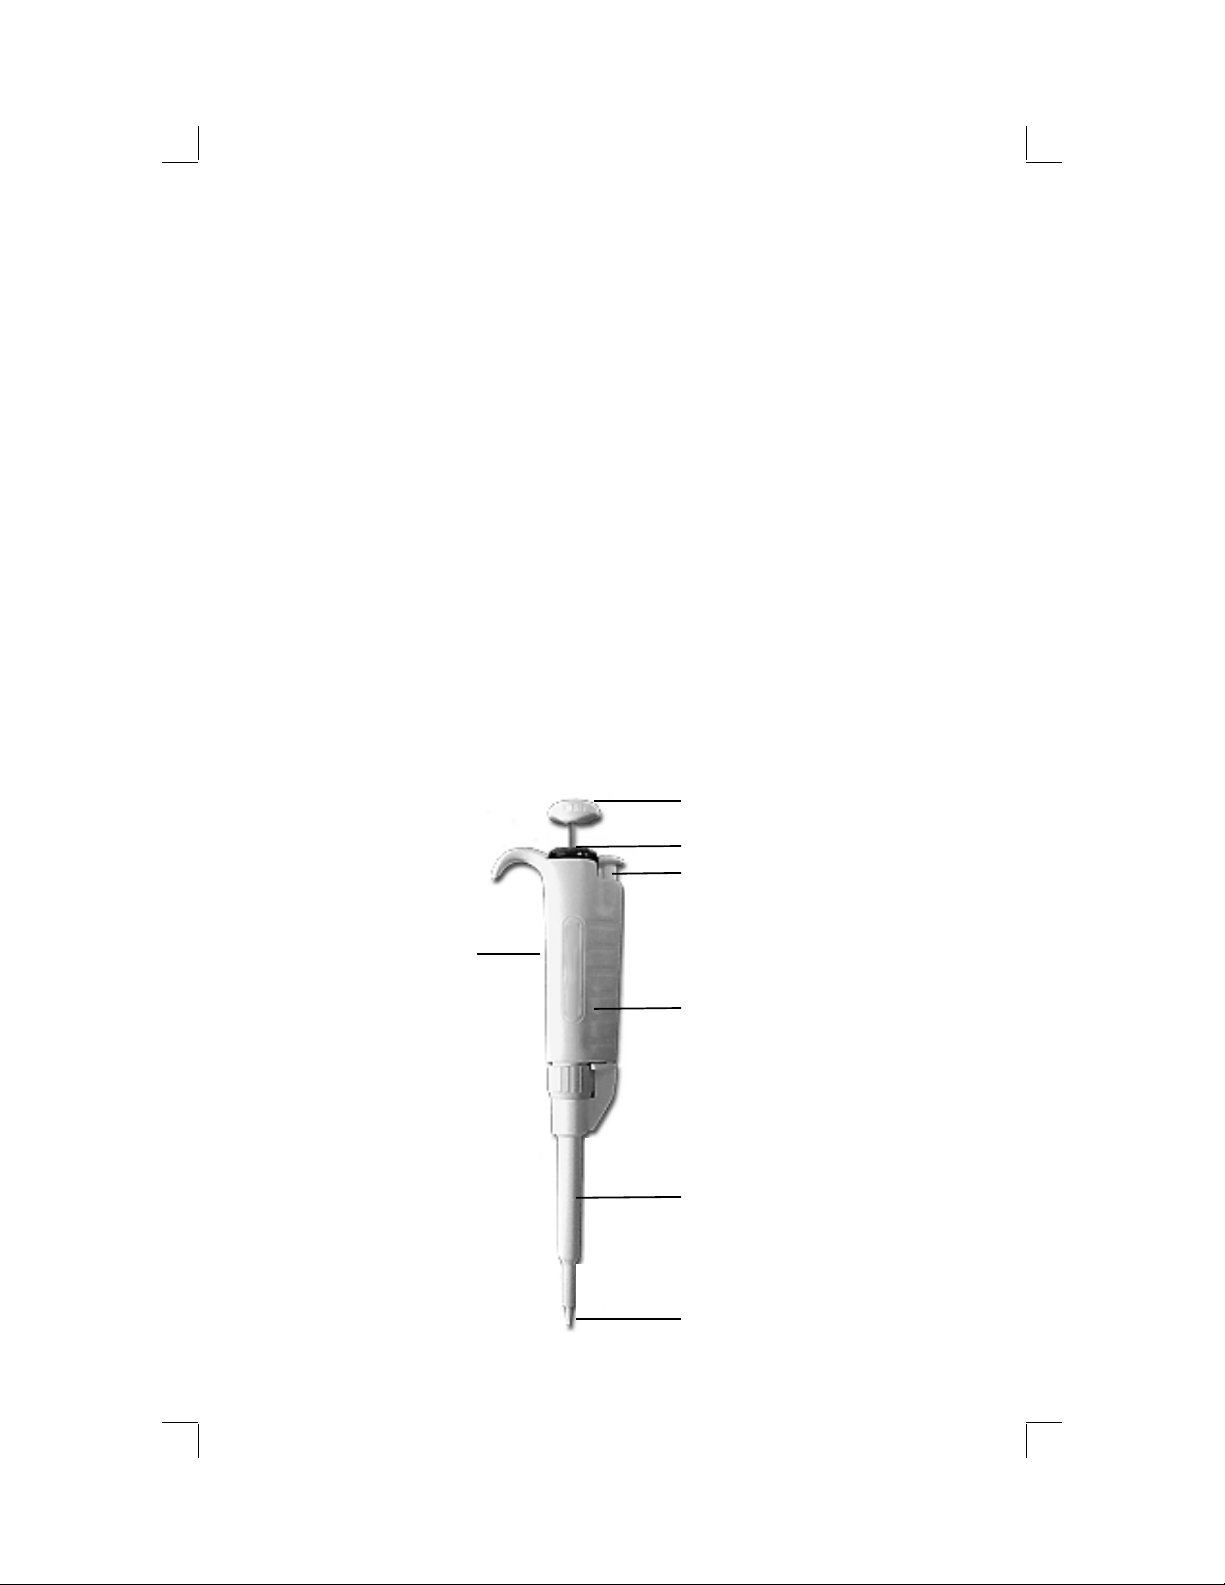
TABLE OF CONTENTS
I. INTRODUCTION ............................................................................. 2
II. DESCRIPTION ............................................................................... 2
III. MEASUREMENT PROCEDURES .................................................. 3
IV. SPECIFICATIONS .......................................................................... 4
VII. WARRANTY .................................................................................... 4
I. INTRODUCTION
Your new air displacement pipettor is ergonomically designed, comfortable
to hold and easy to operate. High-end features include:
• Entire unit (and not the tip cone and tip ejector only) is chemically
resistant and fully autoclavable up to 8 times.
• Adjustable volume that can be locked in place
• Digital volume display
• Tip ejector
• Excellent accuracy
II. DESCRIPTION
Plunger
Adjustable Volume Wheel
Tip Ejector
Digital Display
Handle
- 2 -
Suction Tube
Tip
Page 3

III. MEASUREMENT PROCEDURES
1. Gently pull upwards on the ADJUSTABLE VOLUME WHEEL and turn
it in either direction until the desired setting appears in the DIGITAL
DISPLAY (see chart below).
DIGITAL DISPLAY Settings:
300100 300101 300102 300103
1 0 1 0
2 7 2 7
5 5 5 5
1.25µl 7.25µl 12.5µl 75µl
300104 300105 300106
1 0 0
2 7 2
5 5 5
125µl 0.75ML 2.5ML
2. To lock in your desired volume, push the ADJUSTABLE VOLUME
WHEEL back down into the locked position. The small grooves in the
bottom of the WHEEL align with the handle.
3. Secure a pipette tip to the TIP of the unit.
4. Holding the unit vertically, depress the PLUNGER to the first stop. Next
fully immerse the TIP 2 to 4 mm into the solution.
5. Slowly release the PLUNGER until it returns to the original position.
6. Remove the unit from the solution after 1 to 2 seconds.
7. To discharge the solution from the pipette tip, place the TIP against the
inside wall of the receptacle. Depress the PLUNGER to the first stop,
then depress fully to completely blow out the solution from the TIP.
8. Next move the TIP up and along the inner wall of the receptacle several
times.
9. You may now remove the unit and release the PLUNGER.
10. Depress the TIP EJECTOR to remove the pipette tip.
11. Clean the unit using an autoclave or ultrasonic cleaner as required by
your application. The unit may be autoclaved for a maximum of 8 times,
after which, the unit should be discarded. Calibration remains stable
after occasional autoclaving. Annual recalibration by a professional
service center is recommended to ensure accuracy.
Notes:
• Highly concentrated solutions may require increased or decreased
DIGITAL DISPLAY settings. Make adjustments as needed.
• Inserting objects into the top of the tip assembly can damage the pipette
seal.
- 3 -
Page 4

Specifications
Product
Number
300100 0.2 ~ 2 ±12 ~ 1.5 < 6 ~ 0.7
300101 1 ~ 10 ±2.5 ~ 1 < 1.25 ~ 0.4
300102 2 ~ 20 ±5 ~ 1 < 1.5 ~ 0.3
300103 10 ~ 100 ±2.0 ~0.8 < 0.5 ~ 0.15
300105 100 ~ 1000 ±1.5 ~ 0.8 < 0.3 ~ 0.15
300106 1000 ~ 5000 ±1.2 ~ 0.6 < 0.3 ~ 0.16
Range (ul) Accuracy (%) Repeatability (%)
TWO YEAR WARRANTY
Sper Scientific warrants this product against defects in materials and
workmanship for a period of two years from the date of purchase, and
agrees to repair or replace any defective unit without charge. If your
model has since been discontinued, an equivalent Sper Scientific product
will be substituted if available. This warranty does not cover damage
resulting from accident, misuse, or abuse of the product. In order to obtain
warranty service, simply ship the unit postage prepaid to:
SPER SCIENTIFIC LTD.
7720 East Redfield, Suite 7
Scottsdale, Arizona 85260
(480) 948-4448
www.sperscientific.com
info@sperscientific.com
Please Note: The defective unit must be accompanied by a description of the
problem and your return address. Register online or return your warranty card
within 10 days of purchase.
Rev. 05/16/06.
Check our website for updates.
- 4 -
 Loading...