

Page 1
SETTING THE ALARM TIME
1. Press and hold MODE until you hear “Enter your step length”.
2. Repeatedly press MODE until you hear “ALARM SET”. “AL.SET” appears on the display and
the alarm time flashes.
3. Repeatedly press or hold down “UP” until the correct hour appears.
4. Repeatedly press or hold down “DOWN” until the correct minute appears.
NOTE
For 12H time format, there is a PM INDICATOR, P, located in the left-most of the LCD display. Be
sure to observe the PM indicator when setting the time to make sure the time is set correctly for
AM or PM. If the PM indicator is 'On', the time displayed is "PM". If the PM indicator is 'Off, the
time displayed is "AM ".
5. Press MODE repeatedly and release until you hear “TIME”. The current time will be
displayed on the LCD.
TURNING ALARM ON/OFF
To turn on the alarm, in any mode, press and hold down UP until you hear “Alarm On”.
“ ” appears on the Display.
Note: The Pedometer will announce the time for 60 seconds and stops when it reaches the
chosen alarm time.
To turn off the alarm, in any mode, press and hold UP until you hear “Alarm Off”.
“ ” disappears from the Display.
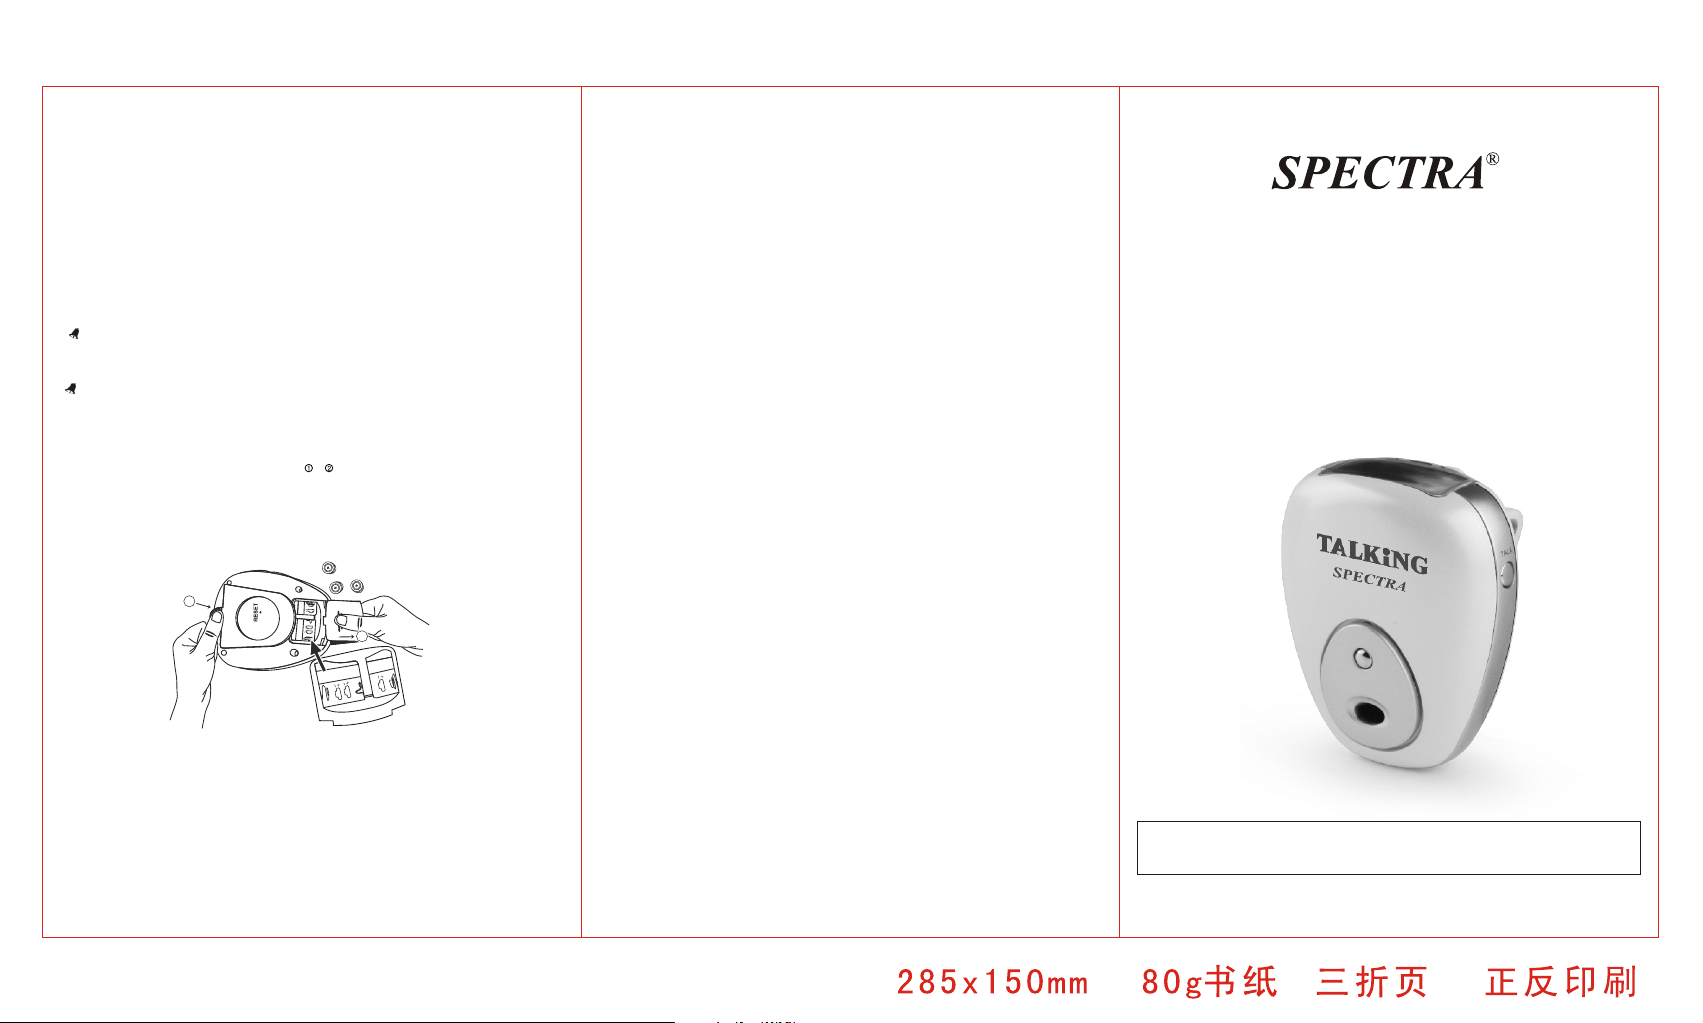
REPLACING BATTERIES
If the sound weakens, distorts, or the display becomes dim, replace the batteries. This pedometer
uses three AG13 (or LR44) cells; follow these steps when installing new batteries.
1. Press down and slide out the battery cover( , )
2. Remove the old cells and install three new AG13 (or LR44) cells as indicated by the
polarity symbols (+ and -) marked on the tray.
3. Replace the battery cover until it snaps into place.
Wait for about 5 seconds after the batteries are installed, the pedometer sounds two
beeps. If the LCD displays blank or random numbers, press RESET on the back to reset.
1
2
RESETTING THE UNIT
If the pedometer becomes erratic or starts functioning abnormal, such as “frozen display”, “broken
segments in the display”, “frozen button operation” etc, you need to re- initialize the unit by
pressing RESET using a pointed object such as paper clip. The RESET button is located on the
back of the unit.
Note: You have to reset the clock and alarm time after resetting your Pedometer.
CARE AND MAINTENANCE
1. Clean your unit with a damp (never wet) cloth. Solvents or detergents should never be used.
2. Avoid leaving your unit in direct sunlight or in hot, humid or dusty places.
4
Printed in China
90 DAY LIMITED WARRANTY AND SERVICE
SPECTRA MERCHANDISING INTERNATIONAL, INC. warrants this unit to be free from defective
materials or factory workmanship for a period of 90 days from the date of original customer
purchase and provided the product is utilized within the U.S.A. This warranty is not assignable or
transferable. Our obligation under this warranty is the repair or replacement of the defective unit
or any part thereof, except batteries, when it is returned to the SPECTRA Service Department,
accompanied by proof of the date of original consumer purchase, such as a duplicated copy of a
sales receipt.
You must pay all shipping charges required to ship the product to SPECTRA for warranty service.
If the product is repaired or replaced under warranty, the return charges will be at SPECTRA's
expense. There are no other express warranties other than those stated herein.
This warranty is valid only in accordance with the conditions set forth below:
1. The warranty applies to the SPECTRA product only while:
a. It remains in the possession of the original purchaser and proof of purchase is demonstrated
b. It has not been subjected to accident, misuse, abuse, improper service, usage outside the
descriptions and warnings covered within the owner's manual or non-SPECTRA approved
modifications
c. Claims are made within the warranty period
2. This warranty does not cover damage or equipment failure caused by electrical wiring not in
compliance with electrical codes or SPECTRA owner's manual specifications, or failure to provide
reasonable care and necessary maintenance as outlined in the owner's manual.
3. Warranty of all SPECTRA products applies to residential use only and is void when products
are used in a nonresidential environment or installed outside the United States.
This warranty gives you specific legal rights, and you may also have other rights which vary from
state to state. TO OBTAIN SERVICE please remove all batteries (if any) and pack the unit
carefully and send it prepaid by insured parcel post or UPS to SPECTRA at the address shown
below. IF THE UNIT IS RETURNED WITHIN THE WARRANTY PERIOD shown above, please
include a proof of purchase (dated cash register receipt) so that we may establish your eligibility
for warranty service and repair of the unit without cost. Also include a note with a description
explaining how the unit is defective. A customer service representative may need to contact you
regarding the status of your repair, so include your name, address, phone number and e-mail
address to speed the process.
IF THE UNIT IS OUTSIDE THE WARRANTY PERIOD, please include a check for $10.00 to
cover the cost of repair, handling and return postage. All out of warranty returns must be sent
prepaid.
It is recommended that you contact SPECTRA first at 1-800-777-5331 or by e-mail at
info@spectraintl.com for updated information on the unit requiring service. In some cases the
model you have may be discontinued and SPECTRA reserves the right to offer alternative
options for repair or replacement.
SPECTRA MERCHANDISING INTERNATIONAL, INC.
4230 North Normandy Avenue,
Chicago, IL60634, USA.
1-800-777-5331
To register your product, visit the link below on the website to enter your information.
Http://www.spectraintl.com/wform.htm
VALID IN THE U.S.A ONLY
TP-10
TALKING PEDOMETER
WITH PULSE METER
OPERATING INSTRUCTIONS
PLEASE READ THIS OPERATING MANUAL COMPLETELY BEFORE OPERATING
THIS UNIT AND RETAIN IT FOR FUTURE REFERENCE.
Page 2
KNOW MORE ABOUT YOUR TALKING PEDOMETER
This talking calorie counting pedometer is designed for everybody and for all day use. It helps
monitor calorie burned, distance traveled and the time you actually spent on walking and jogging
in daily activity. Its feature includes:
Voice Announcement
Announces calories burned, the number of steps taken, distance traveled and time you have
walked or jogged.
Auto Voice Announcement
Automatically announces what is shown on the display (calories, distance, step-count or time)
Intelligent Counting
The pedometer calculates calories, distance and track time based on actual walking by
ignoring false step counts.
Talking Time
The time is announced in a female voice.
Pulse Meter
Monitors your pulse rate.
IMPORTANT INFORMATION ABOUT THE DISPLAYED NUMBERS
This calorie counter/pedometer monitors the up-and-down motions made by the user to count and
register the steps taken. In addition to walking or jogging, there are up-and-down motions
contributing to step-count, such as sitting up or down, jumping or simply moving around. These
non-walking or jogging motions may add erroneous step-counts and result in inaccurate
measurement of distance, calories and time, which are calculated from the overall step-count.
This is the reason why pedometers are typically used by walkers and joggers. The average
person who may want to use the pedometer all day long around the house, in the office or at
shopping malls should understand that these erroneous step-counts could lead to inaccurate
readings. To circumvent this problem, our pedometer has an intelligent mechanism which can
distinguish the step-count of walking or jogging and then use the former to calculate distance,
calories and time.
When used, the displayed step-count on the LCD of the talking pedometer represents only the
counts generated by up-and-down motions including those from non-walking or jogging activities.
The displayed distance, calories and time represents the actual distance, calories and time you
spent walking or jogging.
Depending on your daily activity, you may have a large number of step-count but a small number
of distance, calories and time of your activity occurs at the office or home where most of the
step-counts are not from longer distance walking.
OPERATING YOUR PEDOMETER
To activate your Pedometer, remove the plastic insulator sticking out of its Battery Compartment.
SETTING THE STEP LENGTH AND WEIGHT
In order to calculate the distance and calories, the talking pedometer needs your step (stride)
length and weight. Follow these steps to obtain and enter your step length and weight.
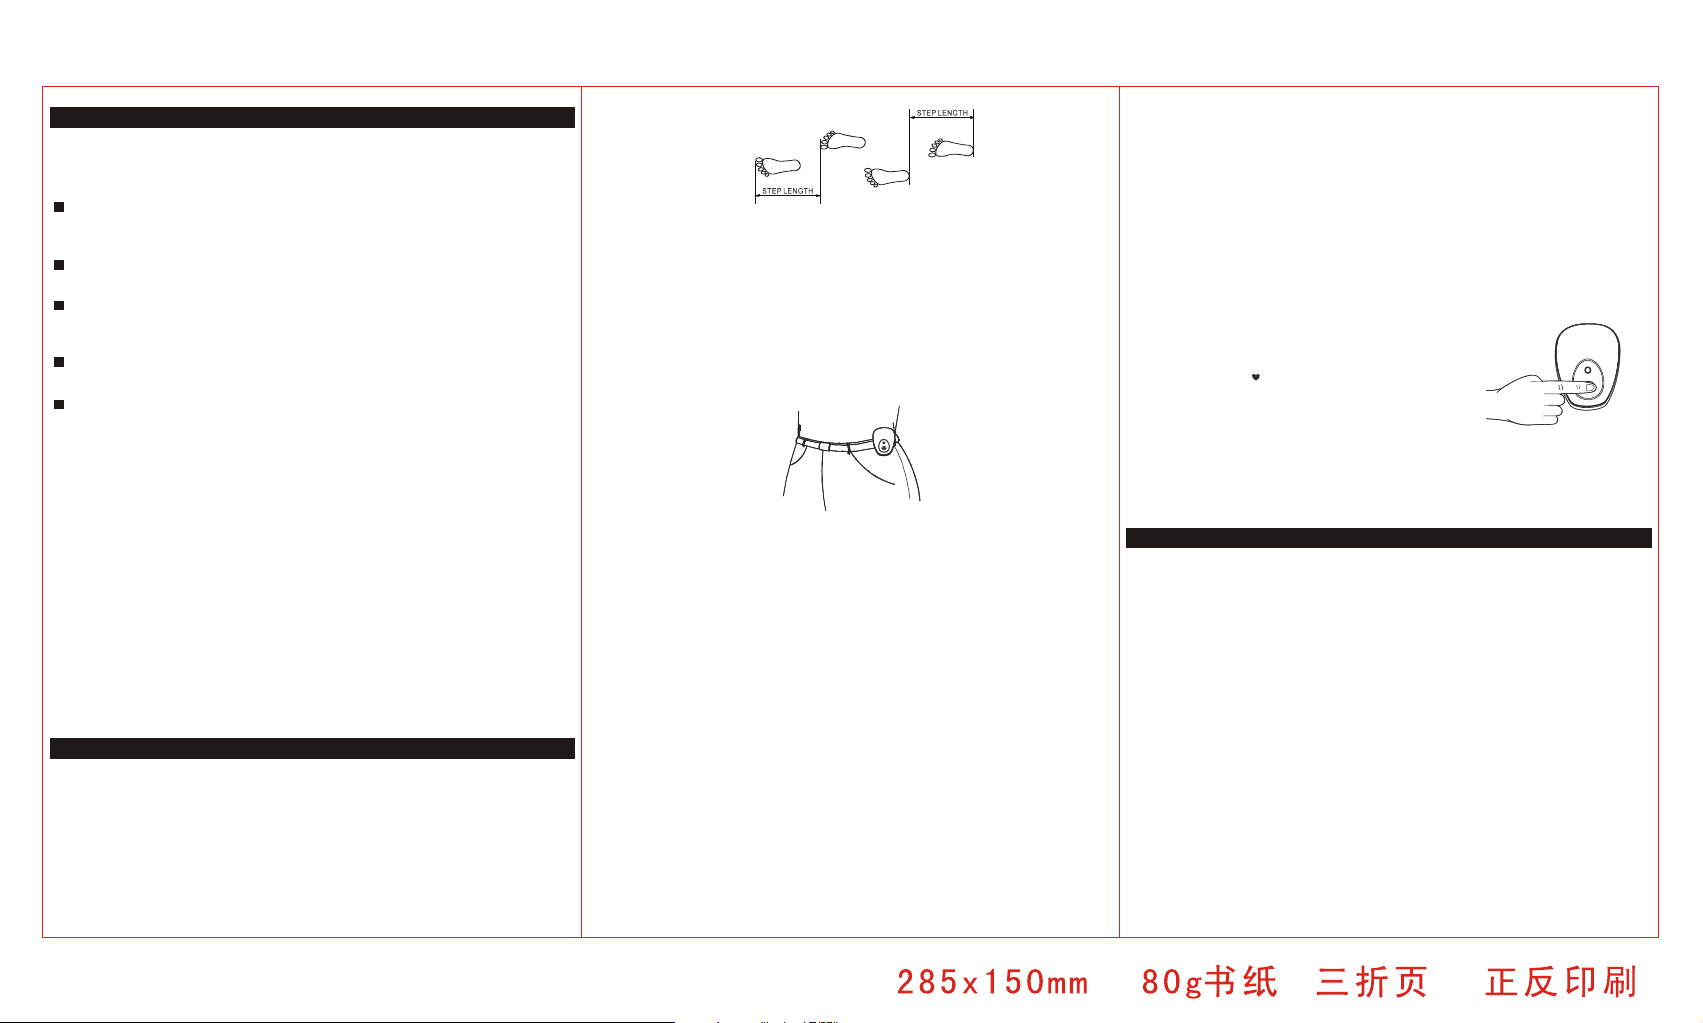
1. Measure your step length toe-to-toe or heel-to-heel. For more accurate result, measure
the distance of 10 steps and average them by dividing 10 to get the step length. For your
reference, the average stride length is around 22 inches (56 cm).
1 2 3
2. To enter the step length and weight, from any mode, press and hold down MODE until you
hear “Enter your step length”. Repeatedly press UP and DOWN to set your step length from
10 inches (or 25 cm) to 80 inches (or 205 cm). Press MODE again and you will hear “Enter
your weight ”. Repeatedly press UP and DOWN to set your weight between 40 pounds
(or 18 Kg) and 300 pounds (or 136 Kg).
3. Press MODE 5 times, the pedometer returns to normal display mode.
USING THE PEDOMETER
1. Press and hold DOWN until you hear “All clear” to reset all numbers to “0”.
2. Clip the pedometer on your belt. The pedometer must be in a vertical position, otherwise,
incorrect readings may result.
3. Start to walk or jog or do you normal routine. You can wear this the whole day and it will
accumulate the total time, distance and calories burned that are generated from your walking
through out the day.
ANNOUNCING CALORIES, NUMBER OF STEPS, DISTANCE AND ACCUMULATED TIME
Press “TALK”, the pedometer announces the numbers displayed on the LCD. To announce a
different function, press MODE repeatedly until you hear the one you want, then press TALK to
hear the announcement.
For example if you want to hear the calories announcement, repeatedly press MODE until
you hear “Calories ”, then press TALK.
To hear the entire announcement, from any mode, press and hold down TALK, the unit
announces the current displayed number followed by the rest. You can release the TALK button
after the unit has started announcing the next number.
USING AUTOMATIC VOICE ANNOUNCEMENT
You can set the unit so it announces the “current” displayed function automatically according to
the following table. For example if the unit is displaying calories on the LCD, you will hear the
calories announcement automatically every time 50 calories have been burned.
Function Voice Announcement
Number of Steps Every 1000 steps
Distance Every 0.5 miles
Calories Every 50 Calories
(1 Calorie = 1 Kcal)
Time Every 10 minutes
To turn the automatic announcement feature on and off, from any mode:
1. Press and release MODE until you hear “Enter your step length”.
2. Repeatedly press MODE until “oFF” appears on the LCD.
3. Press UP once. You will hear “Auto report is on”. “on” appears and “(((.)))” flashes on the
bottom right corner of the display.
4. When “on” appears and “(((.)))” flashes on the bottom right corner of the display, press UP
once. You will hear “Auto Report is off ”, “oFF” is shown and isappears on the LCD. “(((.)))” d
USING THE PULSE METER
A person's pulse rate indicates the number of times that the heart beats in one minute.
The average resting pulse rate for an adult is between 60 and 100 beats per minute.
Follow these steps to take pulse.
1. Press PULSE to enter the pulse meter mode.
2. Lightly place your index finger on the pulse sensor.
3. Maintain a light and even finger pressure on the sensor so
the heart indicator “ ” flashes steadily on the LCD.
4. Within 15 to 60 seconds, the unit sounds a beep and displays
your pulse rate.
5. If no pulse is detected, the unit beeps once and returns to
STEP mode. You can try again by pressing PULSE.
6. To return to current time mode, press MODE repeatedly until you hear “TIME”. The current
time will be displayed on the LCD.
Note: To get an accurate reading, relax and breathe normally and do not talk or move during
measurement.
SETTING THE CLOCK
SETTING TIME FORMAT
1. Press and hold MODE until you hear “Enter your step length”.
2. Repeatedly press MODE until you hear a “BEEP” and the screen displays 12H or 24H.
3. Repeatedly press UP to select 12 H or 24 H time format.
4. To return to current time mode, press MODE repeatedly and release until you hear “TIME”.
The current time will be displayed on the LCD.
SETTING TIME
1. From any operation mode, press and hold down MODE until you hear “Enter your
step length”.
2. Press MODE repeatedly until you hear “TIME SET”. “T.SET” will appear on the display and
the time display flashes.
3. Repeatedly press or hold down “UP” until the correct hour appears.
4. Repeatedly press or hold down “DOWN” until the correct minute appears.
NOTE
For 12H time format, there is a PM INDICATOR, P, located in the left-most of the LCD display. Be
sure to observe the PM indicator when setting the time to make sure the time is set correctly for
AM or PM. If the PM indicator is 'On', the time displayed is "PM". If the PM indicator is 'Off, the
time displayed is "AM ".
5. Press MODE repeatedly and release until you hear “TIME”. The current time will be
displayed on the LCD.
ANNOUNCING THE TIME
1. Repeatedly press MODE until you hear “TIME”.
2. Press TALK to hear the time.
 Loading...