

18 GBPS TRUE 4K60 4:4:4
HDMI MATRIX W/ DUAL AUDIO
DE-EMBEDDING AND SCALING
Quick Installation Guide
Ver. 1.0
INTRODUCTION:
HM-MT404KA is a true 4K60 4:4:4 4x4 HDMI matrix switch. Supporting
HDMI 2.0, HDCP 2.2, HDR and up to 18 Gbps bandwidth. This switch allows
any source (Blu-ray, UHD Blu-ray, satellite receiver, game consoles, PCs,
etc...) to be shown on any of the connected displays.
This matrix equalizes and amplifies the output to ensure that HDMI signals
can be transmitted through long HDMI cables without loss of quality. For
long runs, stretch your distance further with the HM-ET13S HDMI
Extenders.
This is an ideal solution for digital entertainment centers, HDTV retail, show
sites, data centers, schools, conference and training centers and more!
FEATURES:
● HDMI 2.0 supporting up to a 4K resolution at 60HZ (4: 4-4) and 3D
formats
● Deep Color supporting 10 & 12-bit.
● Supports LPCM 7.1CH, Dolby TrueHD, Dolby Digital Plus, Dolby Atmos,
DTS-HD Master Audio and DTS : X
● Allows any source to be displayed on multiple displays at the same time.
● Allows any HDMI display to view any HDMI source at any time.
● Each of the 4-input ports support independent EDID.
● Supports Digital Audio output.
● Controlled via IP, RS-232, Handheld IR Remote and Front Panel Buttons.
● Front-panel LCD display for status feedback.
All brand names and trademarks are properties of
their respective owners
QUICK INSTALLATION:
1. Connect the HDMI input sources (Blu-ray, Set Top Box, etc...) to the
HM-MT404KA AUHD.
2. Connect the HDMI output devices (AVR, Display, Distribution Amplifier,
Extender) to the HM-MT404KA
3. Power on the sources.
4. Connect the power supply into the HM-MT404KA
5. Turn on output devices/displays.
6. Use the front panel controls, supplied IR remote or free PC software to
control the switch.
DEVICE OVERVIEW:
● Definition - Matrix switches provide the ability to route any input to any
output or to multiple outputs at any time.
Depending on the model, a matrix switch can route HD, UHD or AUHD
content in this manner. Additionally, since most venues have both, audio
zones and video zones, the requirement to breakout or strip off the audio
is often necessary and has become almost a standard feature on most
matrix switches.
● Matrix Switches are widely used in both, Commercial and Residential
Applications.
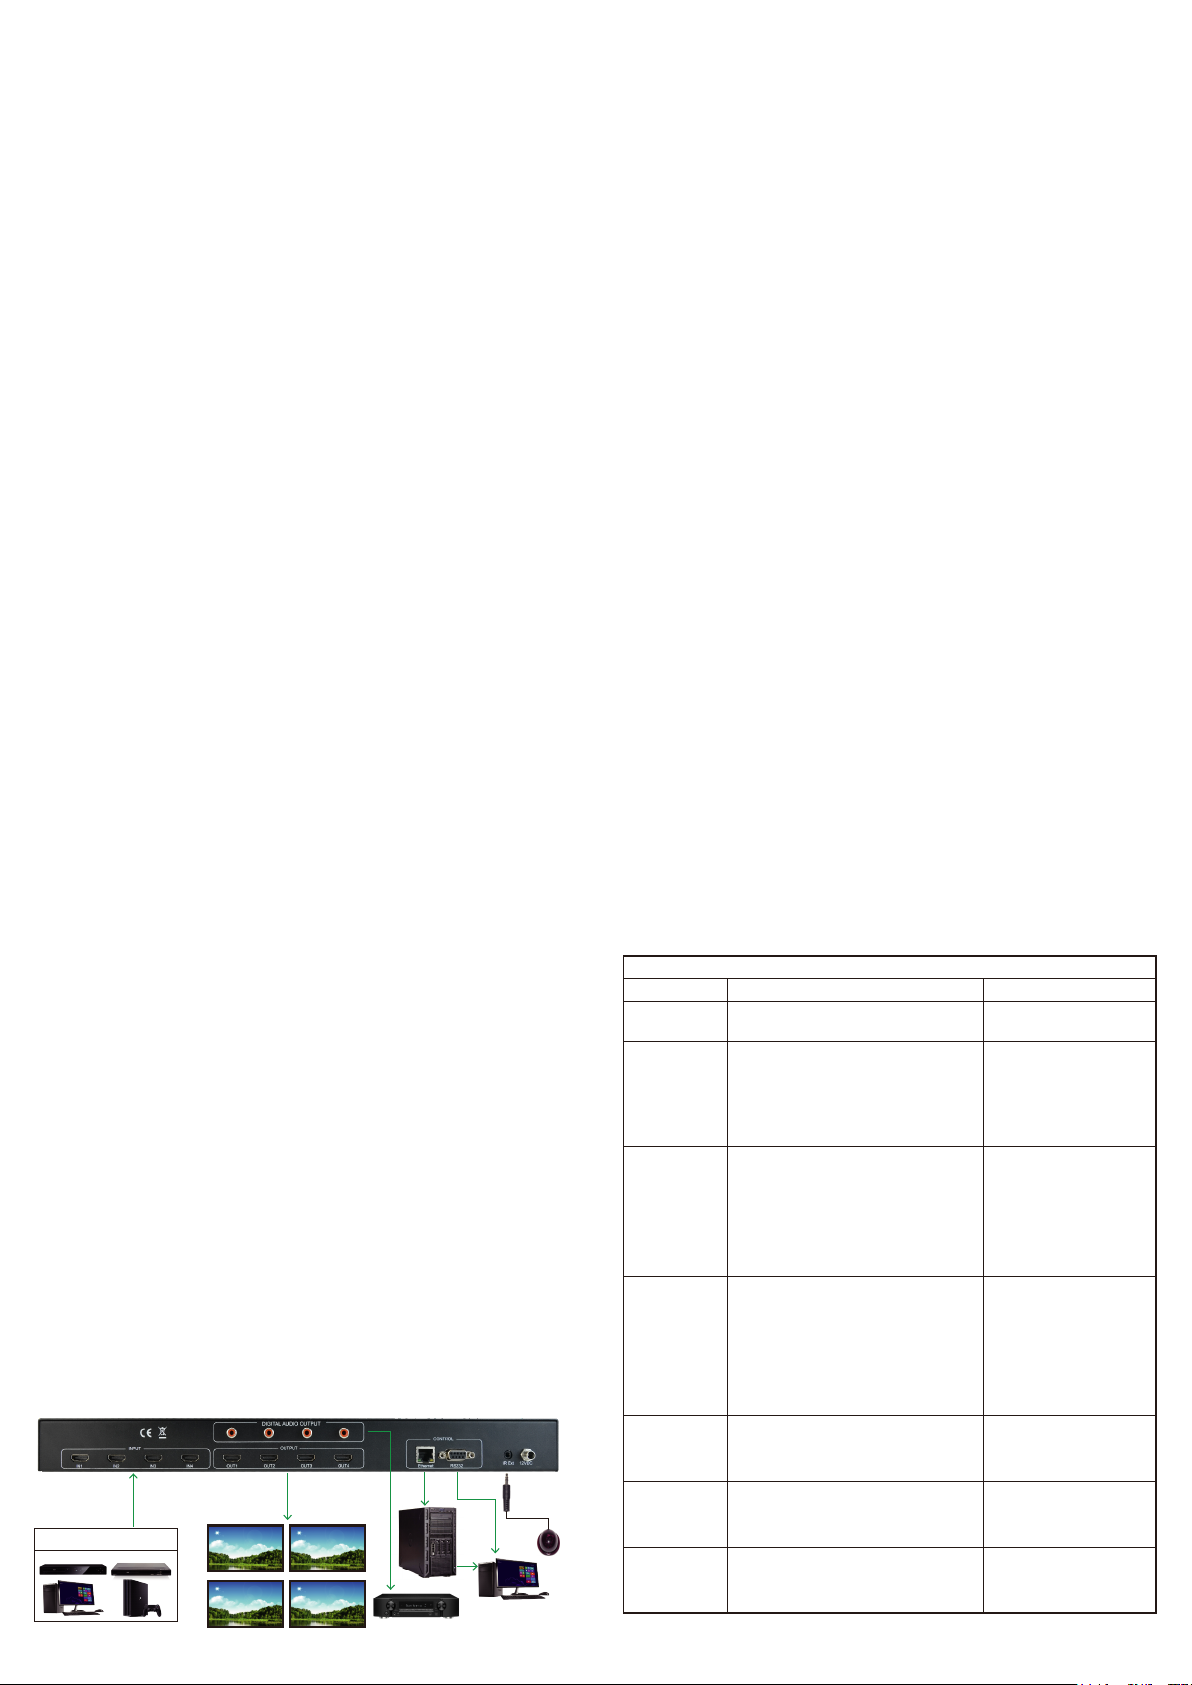
CONNECTION DIAGRAM:
Input x4 Output x4
HDMI Source PS3,PC,STB,
Blu-ray DVD player etc
HD TV
HD TV
HD TV
HD TV
PC or Notebook
Audio Amplifier
EASY TO USE:
● Install in seconds
● Feature rich
● Powerful EDID management
● Front Panel Control
● IR Remote
● IR & RS-232 Control
1
FULL LIST OF QUICK COMMANDS
FROM FRONT PANEL:
HM-MT404KA
Parameter How To Options
Switching Control
MENU
EDID Setup
Scalling Control
Toggle DHCP
Mode
View Network
Setting
View firmware
version
3 4
1. Press the OUTPUT button you want to switch
2. Press the desired INPUT button
1. Press menu button to switch Scaler and EDID.
2. Press MENU button, switch to Scaler interface,
LCD screen displays “Scaler Setting”, and all
output button will light up.
3.Press menu button again, switch to EDID
management interface, LCD screen displays
“EDID Setting”, and all input buttons will light up.
1.Press the menu button, switch to EDID
management interface, LCD display EDID Setting,
all input buttons will light up.
2. Select any input button you wanted, such as
Input1, the other input button will extinguish,
press Input1 to select EDID;
3.When we selected EDID, press Input1 for 2
seconds, LCD will display “EDID Updated
successfully”, then EDID of Input1 will be set.
1.Press the menu button, switch to the Scaler
interface, LCD display Scaler Setting, all of output
button will light up.
2. Select any output button you wanted, such as
Output1, the other output button will extinguish,
press Output1 to select video format;
3.When we selected scaler mode, such as
2160P->1080P, press output1 for 2 seconds, LCD
will display “2160P->1080P OK”, then output1 will
work at 2160P->1080P mode.
Press and hold OUTPUT1 & OUPUT4
together for 3 second
Press and hold OUTPUT3 & OUPUT4
together for 3 second
Press and hold OUTPUT2 & OUPUT4
together for 3 second
HD--->4K
4K---->HD
AUTO (Detects Display)
BYPASS(No Scaling)
Toggle DHCP OFF/ON
NOTE: The default mode is OFF,
and the default IP Address
192.168.1.239
The screen will flash the following:
Device IP
Host IP
Subnet Mask
MAC Address
2
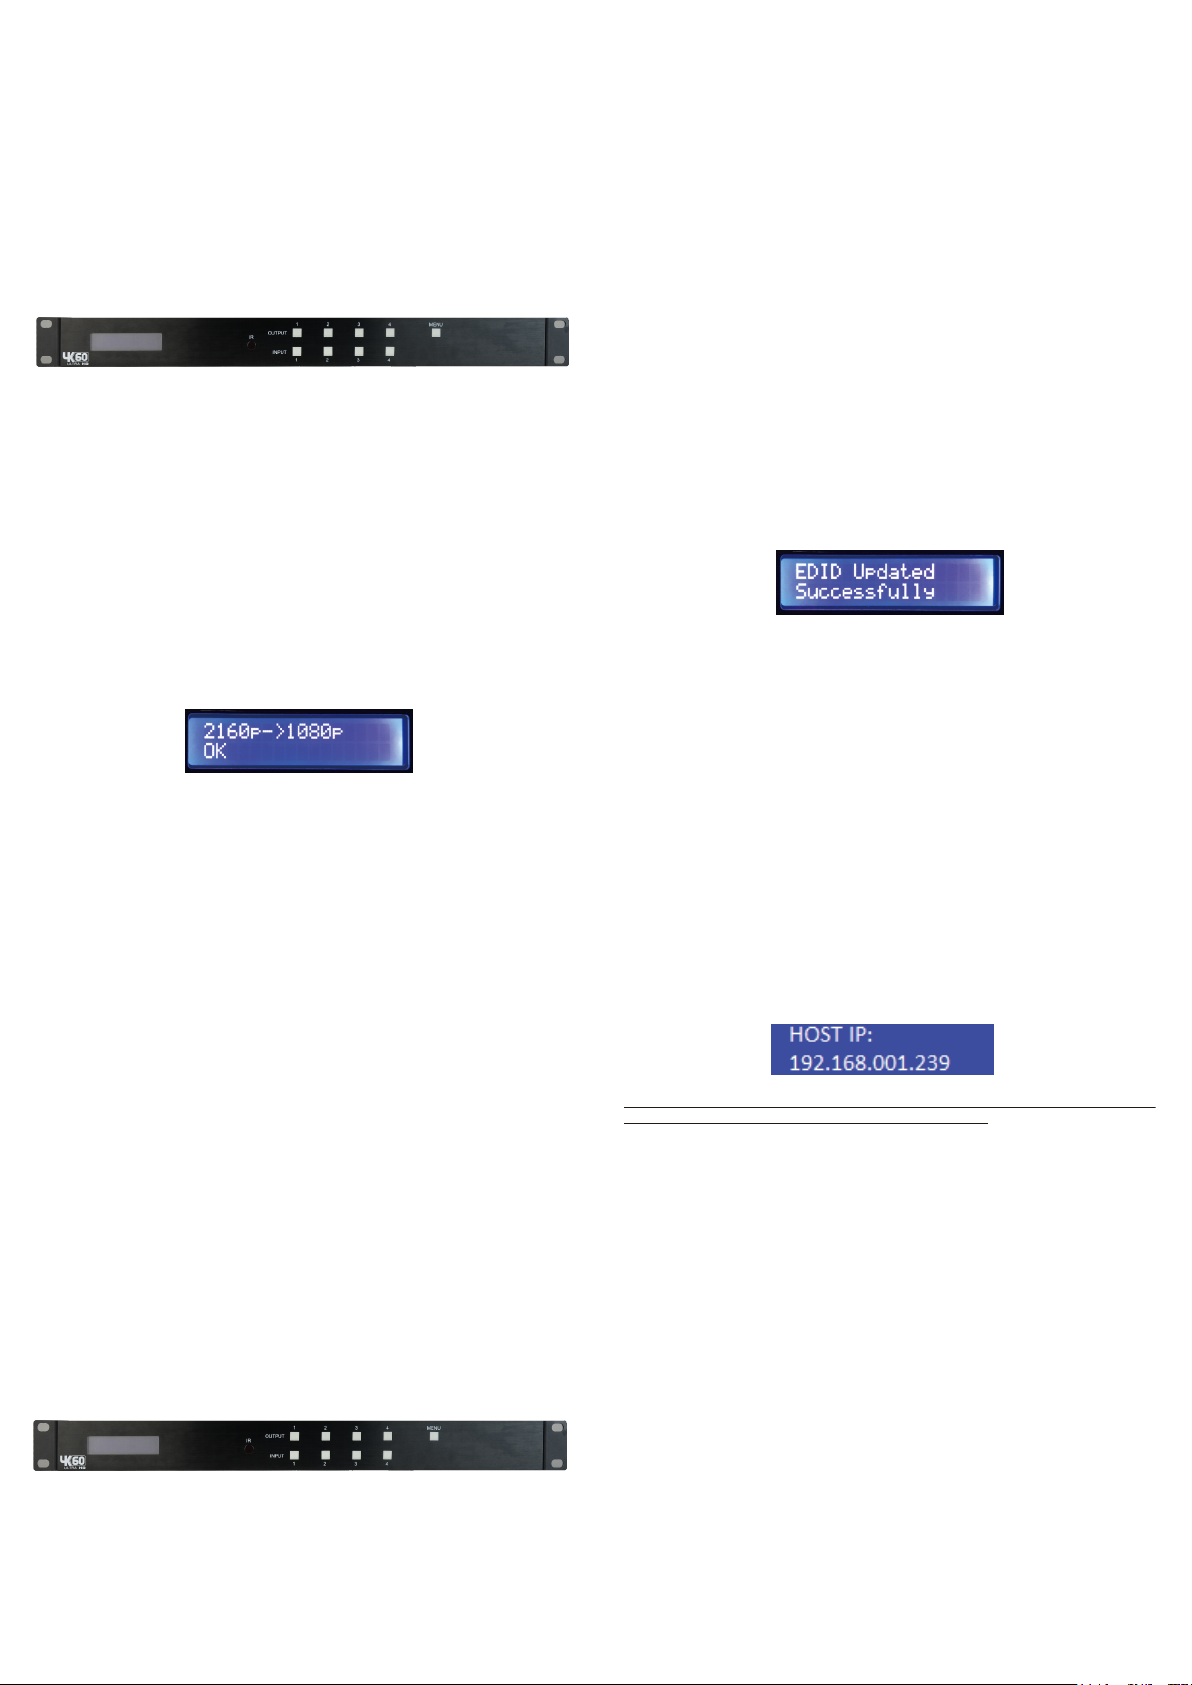
EDID MANAGEMENT:FRONT PANEL CONTROL:
Switching: Switching:
HM-MT404KA can be switched from the front panel by selecting the
OUTPUT button first and then selecting the INPUT button:
1. Press the button (1 through 4) on the bottom row that corresponds with
the OUTPUT (Display, or Sink Device) you would like to send to a
source.
2. Once pressed, the switch will illuminate the OUTPUT button that you
have selected, along with the INPUT row (as picture), indicating that it is
ready for you to select the INPUT.
3. Select the desired INPUT.
Figure 1 – Switching with the front panel controls.
NOTE: Select the OUTPUT and then theINPUT
Scaler Control:
The HM-MT404KA with Scaler Mode, you can scale each HDMI output
indenpendently.
1.Press the menu button, switch to the Scaler interface, LCD display
Scaler Setting, all of output button will light up
2.Select any output button you wanted, such as Output1, the other output
button will extinguish, press output1 to select video format;
3.When we selected scaler mode, such as 2160P - > 1080P, press output1
for 2 seconds, LCD will display “2160P->1080P OK”, then output1 will
work at 2160P - > 1080P mode.
This matrix has 29 factory defined EDID settings. It also has 3 user defined
EDID memories. The user EDID memories are independent to each input
and can be set differently. The user defined EDID can be uploaded using the
free PC Control software or RS-232. In addition, you can choose to read the
EDID from the desired output and the captured EDID will automatically store
and overwrite the EDID in "USER EDID 1" and will be applied to the selected
source.
By default, the matrix is set to a 1080P EDID, this is to maximize plug and
play capability. When using 4K sources, you will want to define a 4K EDID
on each input (or read from the display).
To Change the EDID setting:
1.Press the menu button, switch to EDID management interface, LCD
display EDID Setting,all input button will light up;
2.Select any input button you wanted, such as Input1, the other input button
will extinguish, press Input1 to select EDID;
3.When we selected EDID format, press Input1 for 2 seconds, LCD will
display “EDID Updated successfully” , then EDID of Input1 will be set.
These are the pre-defined EDID settings that you can toggle through:
0.1080P_2CH
1.1080P_6CH
2.1080P_8CH
3.1080P_3D_2CH
4.1080P_3D_6CH
5.1080P_3D_8CH
6.4K30HZ_3D_2CH
7.4K30HZ_3D_6CH
8.4K30HZ_3D_8CH
9.4K60HzY420_3D_2CH
10. 4K60HzY420_3D_6CH
11. 4K60HzY420_3D_8CH
12. 4K60HZ_3D_2CH
13. 4K60HZ_3D_6CH
14. 4K60HZ_3D_8CH
15. 1080P_2CH_HDR
16. 1080P_6CH_HDR
*You may also copy EDID from any output and apply to any input, simply
select “Copy EDID from Output x” (x=1-4). This will copy the EDID from
the display attached and store it into “User EDID 1” and apply it to the
input you haveselected.
17. 1080P_8CH_HDR
18. 1080P_3D_2CH_HDR
19. 1080P_3D_6CH_HDR
20. 1080P_3D_8CH_HDR
21. 4K30HZ_3D_2CH_HDR
22. 4K30HZ_3D_6CH_HDR
23. 4K30HZ_3D_8CH_HDR
24. 4K60HzY420_3D_2CH_HDR
25. 4K60HzY420_3D_6CH_HDR
26. 4K60HzY420_3D_8CH_HDR
27. 4K60HZ_3D_2CH_HDR
28. 4K60HZ_3D_6CH_HDR
29. 4K60HZ_3D_8CH_HDR
30. User EDID 1
31. User EDID 2
32. User EDID 3
5 6
DISPLAY IP DATA:
In order to see the current IP settings, press and hold (for 3 seconds)
OUTPUT 3 and OUTPUT 4 buttons simultaneously. This screen will
change every 3 seconds showing additional settings (host, net mask,
router IP). NOTE : This screen always starts with the current IP address of
the matrix :
In order to toggle DHCP on and off, press and hold (for 3 seconds) the
OUTPUT 1 and OUTPUT 4 buttons simultaneously.
In order to prevent potential IP problems, most IP settings have to be
managed in the Free PC Software or by using RS-232 commands.
NOTE : The default IP address is 192.168.001.239 (as pictured above).
QUICK NETWORK CONNECT TO
WEB INTERFACE:
Use the following steps to quickly and immediately connect to the matrix
switch:
1. Connect the LAN port into an active router port.
2. On most networks you can simply type the Default IP address into any
web browser. The Default IP Address is 192.168.1.239.
If you are on a closed network or non-standard, the following may work
better when using DHCP:
1. Use an Ethernet cable to connect the LAN port on the switch to an
unused, active port on the router.
2. Enable DHCP by pressing the OUTPUT 1 and OUTPUT 4 buttons
simultane ously for 3 seconds.
3. Wait 5 seconds, then press and hold (for 3 seconds) the OUTPUT 3 and
OUTPUT 4 buttons simultaneously. The display will show the assigned
IP address.
4. Input the IP Address into any web browser.
Setting a Static IP:
● Once connected, you can use the web interface to set a static IP
address.
● A static IP can also be set by using the RS-232 software or a direct
command (see RS-232 below for more information).
7 8

WEB INTERFACE: SWITCHING
Use this page to switch between inputs and outputs from the web interface.
WEB INTERFACE: VIDEO SETTING
VIDEO SCALER MODES:
With the video scaler mode, you can scale each HDMI output independently
● BP = Bypass - Scaler is disabled (Default)
● 2K = 4K --> 2K - If incoming signal is 4K, it will be downscaled to 1080P
or 1900x1200 depending on the input format.
● 4K = 2K --> 4K - If the incoming signal is 1080P it will be upscaled to 4K.
● HDBT = HDBaseT Compatibility Mode - If incoming 4K signal is above
9Gbps,it can be compressed to fit through legacy (non-18G)
infrastructures. 4K resolution will still come through, but HDR will not.
● AUTO = Auto detect - Scaler will be set based on the connected display's
EDID (ie, if the EDID is 1080P the scaler will be set to 2K).
WEB INTERFACE: HDCP
WEB INTERFACE: AUDIO
9 10
WEB INTERFACE: EDID MANAGE
11 12

EDID MANAGE:
Using the built-in EDID manager, a multitude of EDID's can be set for each
input, and each input can be assigned a different EDID. This should be
used to optimize sources or to manage infrastructure.
WEB INTERFACE: NETWORK
0. 1080P_2CH
1. 1080P_6CH
2. 1080P_8CH
3. 1080P_3D_2CH
4. 1080P_3D_6CH
5. 1080P_3D_8CH
6. 4K30HZ_3D_2CH
7. 4K30HZ_3D_6CH
8. 4K30HZ_3D_8CH
9. 4K60HzY420_3D_2CH
10. 4K60HzY420_3D_6CH
11. 4K60HzY420_3D_8CH
12. 4K60HZ_3D_2CH
13. 4K60HZ_3D_6CH
14. 4K60HZ_3D_8CH
15. 1080P_2CH_HDR
16. 1080P_6CH_HDR
*You can copy the EDID from any output and apply it to any input. Select
"Copy EDID from Output x" (x=1-4). This will copy the EDID from the
display and apply it to the selected input. This new EDID will be stored as
"USER EDID 1".
17. 1080P_8CH_HDR
18. 1080P_3D_2CH_HDR
19. 1080P_3D_6CH_HDR
20. 1080P_3D_8CH_HDR
21. 4K30HZ_3D_2CH_HDR
22. 4K30HZ_3D_6CH_HDR
23. 4K30HZ_3D_8CH_HDR
24. 4K60HzY420_3D_2CH_HDR
25. 4K60HzY420_3D_6CH_HDR
26. 4K60HzY420_3D_8CH_HDR
27. 4K60HZ_3D_2CH_HDR
28. 4K60HZ_3D_6CH_HDR
29. 4K60HZ_3D_8CH_HDR
30. User EDID 1
31. User EDID 2
32. User EDID 3
IP SETTINGS:
Set network settings such as:
● Static IP
● Subnet Mask
● Router IP
● TCP Port
● Enable DHCP
IR CONTROL:
For IR Control there is an IR Window on the front face of the device. The
supplied IR Extension Cable can also provide a different receiver position.
If needed, plug the IR Extension Cable into the IR Extension Socket on the
back of the matrix and place the receiver in a more convenient location.
IR Receiver Eye
Figure 4 ~ IR Extension CableFigure 3 ~ HM-MT404KA
13 14
IR Hand-held Remote Control
The HDMI routing of the matrix can also be controlled by using the IR
hand-held remote control supplied with the product.
The number labels on the left represent the Output port numbers.
Each Output port has a set of Left and Right arrow buttons, which are used
to select the Input port to connect with.For example, the left arrow button
decrements to the next lower Input port,and the right arrow increments to
the next higher Input port.
Number 1 to 4 are for Output port 1 to output port 4.
IR Sensor Note
The unit supports an IR sensor on the front panel so that it may be
managed via the IR Hand-held
Remote.However an IR Sensor may also be connected to the IR Ext port
on the rear of the unit, in order to extend the IR sensor to a more
convenient location for improving line-of-site with the IR hand-held remote.
15 16

RS-232 AND TCP/IP COMMANDS:
The HM-MT404KA can be controlled with either RS-232 or TCP/IP
commands. Certain switching or format configurations can only be done
using these commands. We recommend using either the MyUART (RS-232
- free) or Hercules (TCP/IP - free) apps as they are very easy to use for
sending commands to the machine.
FOR TCP/IP CONTROL COMMANDS USE
TELNET PORT 23.
For RS-232, use a null modem serial cable adapter and set the serial
communications to: 57600,n,8,1 (baud: 57600, no parity, 8 data bits and 1
stop bit) with no handshaking.
Please add a return (Enter key) after each command when using direct
commands.
SPECIFICATIONS:
Video:
Video Resolutions
VESA Resolutions
HDR Formats/Resolutions
Color Space
Chroma Subsampeling
Deep Color
Audio:
Audio Formats Supported HDMI
Audio Formats Supported Extracted (Toslink)
Audio Formats Supported Extracted (2CH Port)
Distance:
HDMI In/Out (4K60 4:4:4)
HDMI In/Out (w/AOC Cable)(4K60 4:4:4)
Other:
Bandwidth
HDCP
Control:
Ports
PC Software
LAN WebOS
Ports:
HDMI
LAN
Audio (Extracted Digital)
IR Rx
RS232
Emvironmental:
Operating Temprature
Storage Temprature
Humidity Range
Dimensions:
Dimensions (Unit Only Height / Depth / Width)
Dimensions (Packaged Height / Depth / Width)
Rack Units
Weight (Units)
Weight (Packaged)
*Specifications subject to change without notice. Mass & dimentions are approximate.
Up to 4K 60Hz 4:4:4
Up to DCI 4K (4096x2160) 5K (up tp 5120x3200)
420, 422, 444 (10 and 12 Deep Color)
HDR10, HDR10+, Dolby Vision, HLG
YUV (Component), RGB
(CSC:Rec. 601, Rec. 709, BT2020, DCI, P3 D6500)
4:4:4, 4:2:2, 4:2:0 Supported
Up to 16 bit (1080), Up to 12 bit (4K)
PCM 2.0 Ch, LPCM 5.1 & 7.1, Dolby Digital,
DTS 5.1, Dolby Digital Plus, Dolby TrueHD,
DTS-HD Master Audio, DTS-X, Dolby Atmos
PCM 2 Ch, LPCM 6 Ch, LPCM 7 Ch, Dolby
Digital, Dolby Digital Plus, DTS-HD Master Audio,
PCM 2 CH
Up to 50 Feet (using Bullet Train HDMI)
Up to 130 Feet (using Bullet Train AOC)
18 Gbps
HDCP 2.2 and Eralier
LAN, RS232, IR
YES
YES
Type A
RJ45 w/Web Interface/Control
SPDIF
3.5mm Stereo (3 Conductor)
3 pin terminal block
23 to 125°F (-5 to 51°C)
-4 to 140°F (-20 to 60°C)
5-90% RH (No Condensation)
mm : 50.8 x 256 x 441.33
inch : 2 x 10.07 x 17.375
mm : 88.9 x 393.7 x 495.3
inch : 3.5 x 15.5 x 19.5
1 Unit
8 lbs/3.5kg
11 lbs/5kg
17 18
USING THE FREE PC SOFTWARE :
GENERAL MATRIX CONTROL
19 20

USING THE FREE PC SOFTWARE :
EDID MANAGEMENT
USING THE FREE PC SOFTWARE:
IP SETTINGS
PACKAGE CONTENTS:
USING THE FREE PC SOFTWARE:
SCALER SETTINGS
● 1 x Main Product
● 1 x Remote Control
● 1 x IR Extension Cable
● 1 x 12V/3A Adapter
● 1 x Manual
13 14
MAINTENANCE:
To ensure reliable operation of this product as well as protecting the safety
of any person using or handling this device while powered, please observe
the following instructions.
● Use the power supplies provided. If an alternate supply is required, check
voltage, polarity and that it has sufficient power to supply the device it is
connected to.
● Do not operate these products outside the specified temperature and
humidity range given in the above specifications.
● Ensure there is adequate ventilation to allow this product to operate
efficiently.
● Repair of the equipment should only be carried out by qualified
professionals as these products contain sensitive components that may
be damaged by any mistreatment.
● Only use this product in a dry environment. Do not allow any liquids or
harmful chemicals to come into contact with these products.
● Clean this unit with a soft, dry cloth. Never use alcohol, paint thinner or
benzene to clean this unit.
DAMAGE REQUIRING SERVICE:
The unit should be serviced by qualified service personnel if:
● The DC power supply cord or AC adaptor has been damaged
● Objects or liquids have gotten into the unit
● The unit has been exposed to rain
● The unit does not operate normally or exhibits a marked change in
performance
● The unit has been dropped or the housing damaged
15 16
 Loading...