

Page 1
SINGLE AND DUAL WINDSHIELD
WARNING
!
This product contains high intensity LED
devices. To prevent eye damage, DO NOT
stare into light beam at close range.
WARNING: Warning devices are strictly regulated by
Government ordinances. These devices shall be used ONLY
on approved vehicles. It is the sole responsibility of the user
of these devices to ensure compliance.
INSTALLATION
Windshield should be clean and free of grease or oil. The
placement of the warning light should not restrict driver
visibility and the unit should be placed so that air bag
deployment will not be restricted. The best place for the unit
is immediately behind the rear-view mirror.
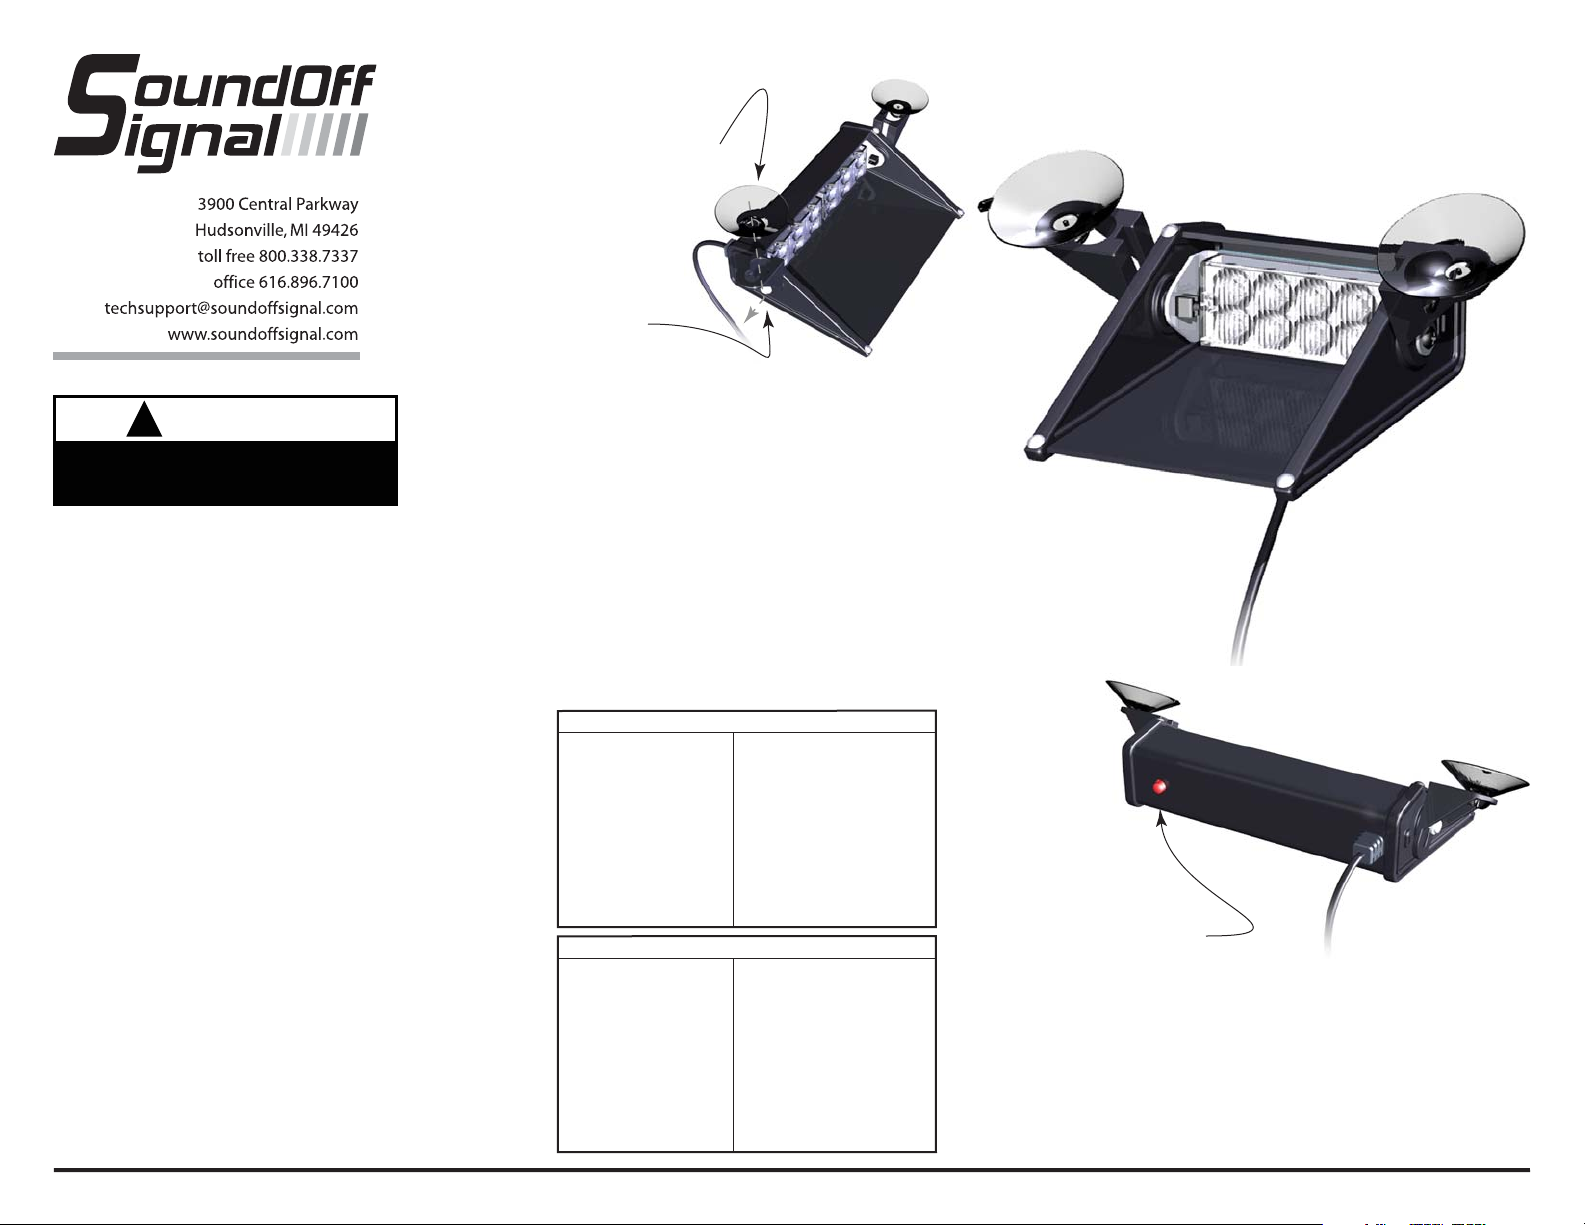
1. Press suction cups into the side yokes of the light as
shown in the illustration.
2. Lightly moisten suction cups and press unit firmly in
place by pressing the domed shape on the back of each
suction cup.
OPERATION AND ADJUSTMENT
The warning light is designed to accomodate various
windshield angles. To align the light:
1. Slightly loosen, but DO NOT REMOVE, pivot screws on
each side of unit.
2. Slide light up until all four bumpers are in contact with
windshield.
3. Pivot light so that unit will project a horizontal pattern.
3. Retighten pivot screws. CAUTION! DO NOT
OVERTIGHTEN SCREWS AS UNIT CAN BE
DAMAGED.
4. Plug light into vehicle's cigarette lighter receptacle, press
the red button on rear of unit to activate light. Press and
HOLD to turn unit off.
Install suction cups by
inserting base of cup
through wide hole in
bracket and pulling
toward small hole.
Slightly loosen
screw to adjust
unit but DO NOT
REMOVE.
Dual Pilot Warning Light
EPLTDWS+(x) (16 Patterns)
PATTERN SELECTION
1. Plug cord into vehicle's receptacle.
2. To activate the Emergency Warning Light push the red
button on the left rear of the unit.
3. To deactivate the light push and HOLD the red button until
unit turns off.
4. The Emergency Warning Light can generate 16 different
light patterns. To change light patterns, momentarily push
the red button while the unit is operating. Each push of the
red button will advance the light to the next pattern. When
desired pattern is reached that pattern will be stored in the
unit's memory and will automatically come up every time
the unit is turned on. After pattern #16 is reached the list
will start over again at pattern #1.
FLASH PATTERNS for EPLTSWS+(x) PORTABLE WARNING LIGHT
1 Quint Flash Both lights alternating
2 Warp Flash " " "
3 Inter-Cycle Flash " " "
4 Double Flash " " "
5 Quad Flash " " "
6 3 Flashes / Second " " "
7 3 Flashes / Second Both lights operating simultaneously
8 Q-Switch Pattern Both lights alternating
9 Driver Side Steady Burn Passenger side Double Flash
10 Driver Side Steady Burn Passenger side Quad Flash
11 Driver Side Steady Burn Passenger side Quint Flash
12 Driver Side Steady Burn Passenger side Warp Flash
13 E-Pattern Single Flash Both lights alternating
14 E-Pattern Double Flash " " "
15 E-Pattern Single Flash Both lights operating simultaneously
16 E-Pattern Double Flash " " " "
SINGLE PILOT
FLASH PATTERNS for EPLTDWS+(x) PORTABLE WARNING LIGHT
1 X-Warp X-Flashing pattern (Warp)
2 X-Double X-Flashing pattern (Double)
3 V-Quint Both lights alternating vert. (Quint)
4 V-Double Both lights alternating vert. (Double)
5 V-3fps Both lights alternating vert. (PP)
6 Q-Switch Pattern Multiple Flash Pattern (Q-Switch)
7 1.9fps Both lights alternating horiz. (RR)
8 Quad Flash Both lights alternating horiz. (Quad)
9 Inter-Cycle Flash Variable flash pattern (Alt. Horiz.)
10 V-Inter Cycle Flash Variable flash pattern (Alt. Vert.)
11 Driver Side Steady Burn Passenger side Warp
12 Driver Side Steady Burn Passenger side Quad
13 E-Pattern Single Flash Both lts alternating horiz. (E-Single)
14 E-Pattern Double Flash Both lts alternating horiz. (E-Double)
15 E-Pattern Single Flash Both lts alternating simul. (E-Single)
16 E-Pattern Double Flash Both lts alternating simul. (E-Double)
DUAL PILOT
PILOT WARNING LIGHT
EPLTDWS+(x) / EPLTSWS+(x)
Single Pilot Warning Light
EPLTSWS+(x) (16 Patterns)
Press and Hold to turn
ON or OFF. Press to
advance pattern.
SoundOff Signal warranties the EPLTxWS+(x) Warning Light for two (2) years from the date of
purchase to the original purchaser against any manufactured defects or workmanship. This warranty
is a 100% replacement value warranty. It applies only to units installed according to manufacturer’s
installation instructions and operated within the units specifications. Warranty is void if the unit was
installed incorrectly or maliciously damaged. All warranty claims must be accompanied by a dated
proof of purchase.
SoundOff Signal retains the right to be the sole mediator of what constitutes defects in performance
or manufacturing.
WARRANTY
EPLTxWS+(x) 11/05
 Loading...