


M
J
M
W
a
D
n
6
X
e
T
e
M
d
l
H
A
/FM/RBDS/
Install
B/USB/AUX-
tion a
91
IN/BT/Sirius
d Op
B
-ReadyTM H
ration
avy Duty Ra
anua
io

C
n
SInWBTU
SiPBCTS
T
.
.
.
.
.
.
.
t
.
.
e
.
.
JHD916BT
ONTEN
I
troduction ................
afety Information ......
stallation ..................
iring .........................
asic Operation .........
uner Operation .........
SB Operation ...........
iriusXM Radio Opera
od® Operation .........
luetooth Operation ...
are and Maintenanc
roubleshooting .........
pecifications .............
S
..................................
..................................
..................................
..................................
..................................
..................................
..................................
ion ............................
..................................
..................................
..................................
..................................
..................................
..................................
..................................
..................................
..................................
..................................
..................................
..................................
..................................
..................................
..................................
..................................
..................................
..................................
..................................
..................................
..................................
..................................
..................................
..................................
..................................
..................................
..................................
..................................
..................................
..................................
..................................
........... 1
........... 2
........... 3
........... 3
........... 5
........... 7
........... 9
......... 10
......... 14
......... 15
......... 17
......... 17
......... 18
ii
I
S
F
U
t
C
k
o
™
f
o
W
n
)
d
C
o
e
M
u
p
H M
Q
R
a
e
a
g
T
w
N
c
s
h
S
a
W
u
P
T
NTROD
yst em Fea
eatures of Jensen JH
Full Dot Matrix L
AM/FM US/ Tur
RBDS (Radio Br
SiriusXM-Ready
USB Playback o
Weatherband Tu
Mute
Bluetooth (Supp
Loudness
Electronic Bass,
Output Power 9
Clock 12/24 Hou
Headphone outp
2-Channel Pre-a
2- Wire Power w
Auxiliary Audio I
Compatible with
CTION
ure s
D916BTmobile audio
D
ey/ Italy/ Brazil Tuner
adcast Data Service
(requires SiriusXM
MP3 and WMA files
ner with SAME Techn
rts A2DP, AVRCP an
Treble and Balance
x 2
r Selectable
ut
mp Line Level Output
ith Non-Volatile Mem
put (Front 3.5mm St
JMICHFP hands free
system include:
with 12 Presets (6A
with PTY Search
Connect Tuner SXV3
ology
HFP)
ontrols
s
ry and Clock/Time s
reo Jack, Rear RCA)
microphone (sold se
, 6FM)
00V1)
pport
arately)
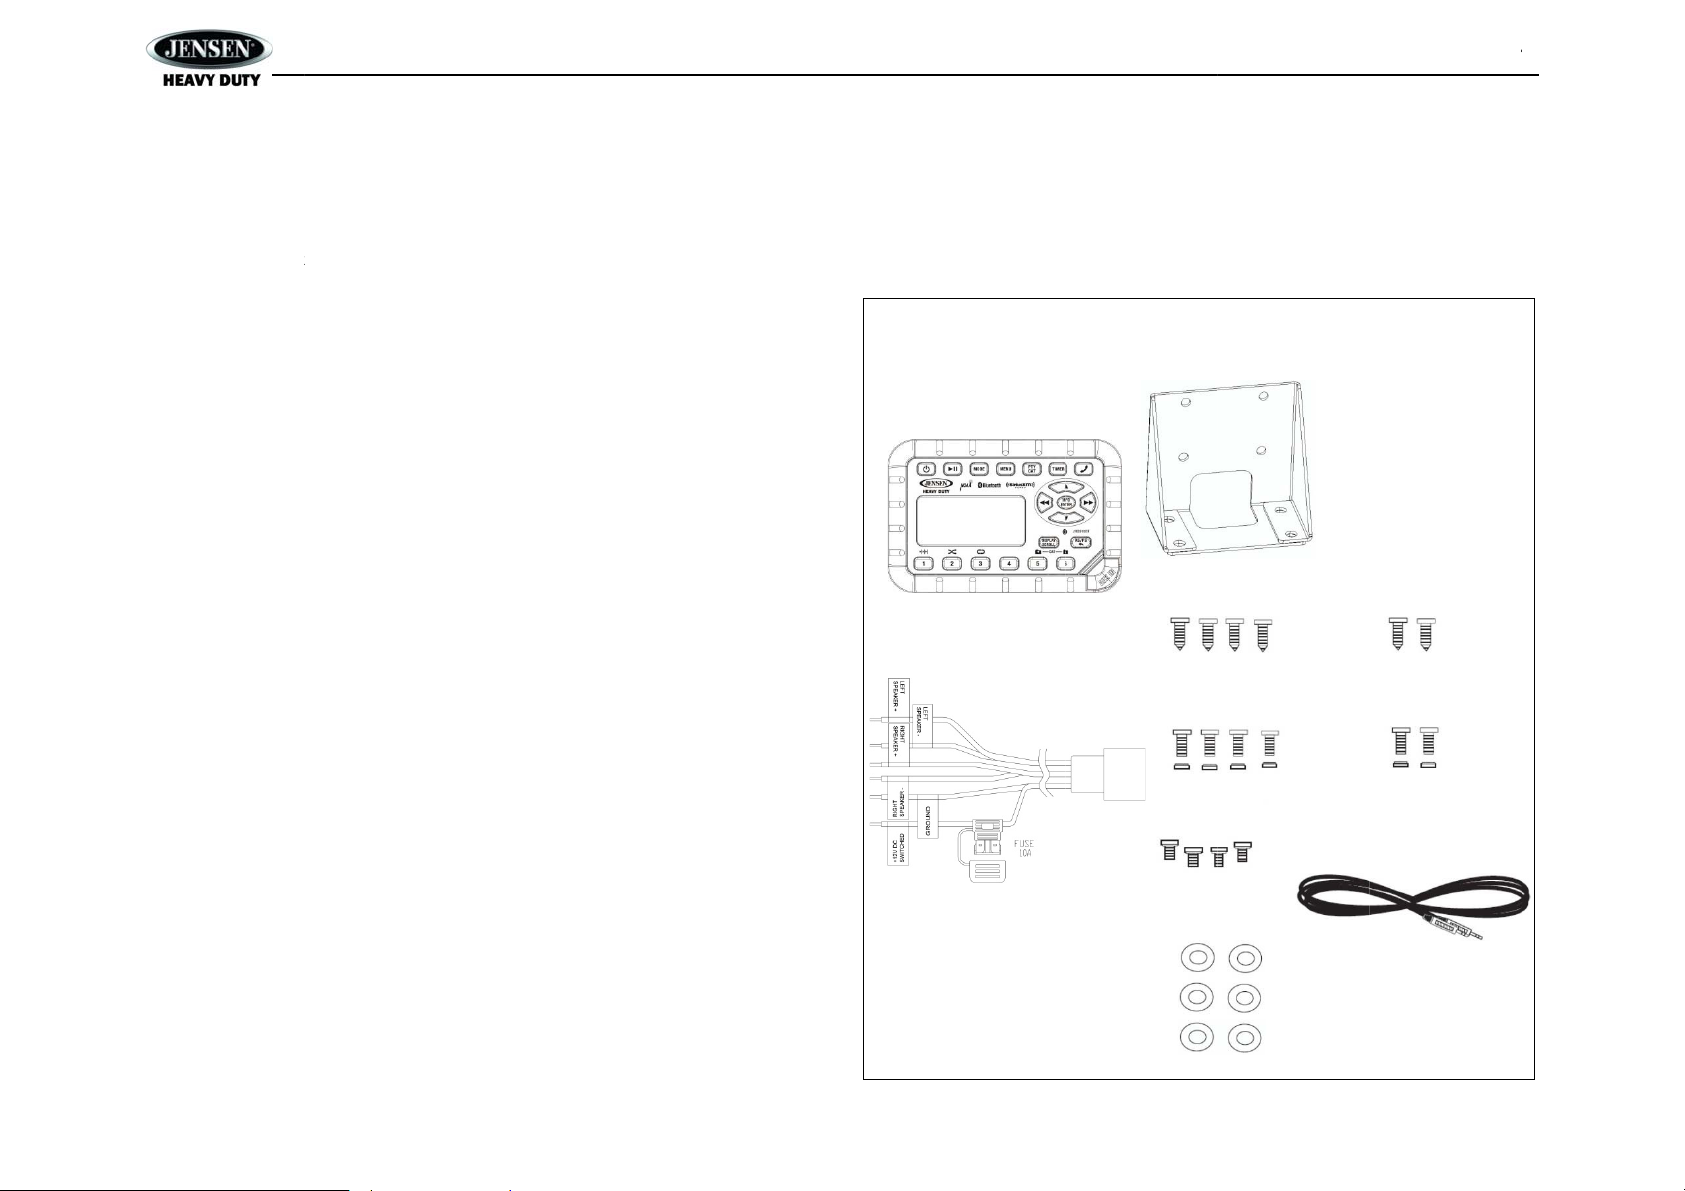
Con
te nt List
J
ensen Heavy Duty R
ardware Kit
ounting Bracket
1
/8” Auxiliary Cable
uick Reference Guid
HA
DWARE KIT
dio
CONTENTS
Mountin
R
dio
Bracket
JHD916B
Commander
Self-
Scre
apping
s (3)
elf-Tapping
Screws (2)
Wiring Harness
Machin
With
e Screws
uts (3)
M
chine Screws
ith Nuts (2)
M4 Ma
hine
Screw
Was
(4)
ers
A
xiliary Input
atch Cord
1

S
W
K W
D
W
Pin U
T W
I
d
o
e
H
O
H
E
A
a
h
g
2
R
E
a
r
d
o
A
E
a
H
JHD916BT
AFETY
hen Driving
eep the volume level
hen Washing Your
o not expose the pro
fi
re or other damage.
hen Parked
arking in direct sunlig
terior a chance to co
se the Proper Powe
his product is design
ARNING:
TO REDUCE T
EQUIPMENT T
TO REDUCE T
INTERFERENC
NFORM
low enough to be aw
Vehicle
uct to water of exces
ht can produce very
l down before startin
r Supply
d to operate with a 1
E RISK OF FIRE OR
RAIN OR MOISTU
E RISK OF FIRE OR
, USE ONLY THE R
TION
re of the road and tr
sive moisture. Moistu
igh temperatures insi
playback.
volt DC negative gr
ELECTRIC SHOCK,
E.
ELECTRIC SHOCK
COMMENDED ACC
ffic conditions.
e can cause electric
e your vehicle. Give
und battery system.
DO NOT EXPOSE T
ND ANNOYING
SSORIES.
l shorts,
the
IS
2
I
M
T
hNmfu
A
O
C
A
e
n
n
e
e
h
c
e
(
)
r
t
p
n
e
h
(
i
c
i
i
m
u
t
)
e
r
l
t
s
u
o
a
n
:
s
a
e
(
e
e
o
o
a
o
)
M
k
l
2
S
N
(
e
n
k
r
w
o
a
e
e
)
T
t
e
n
e
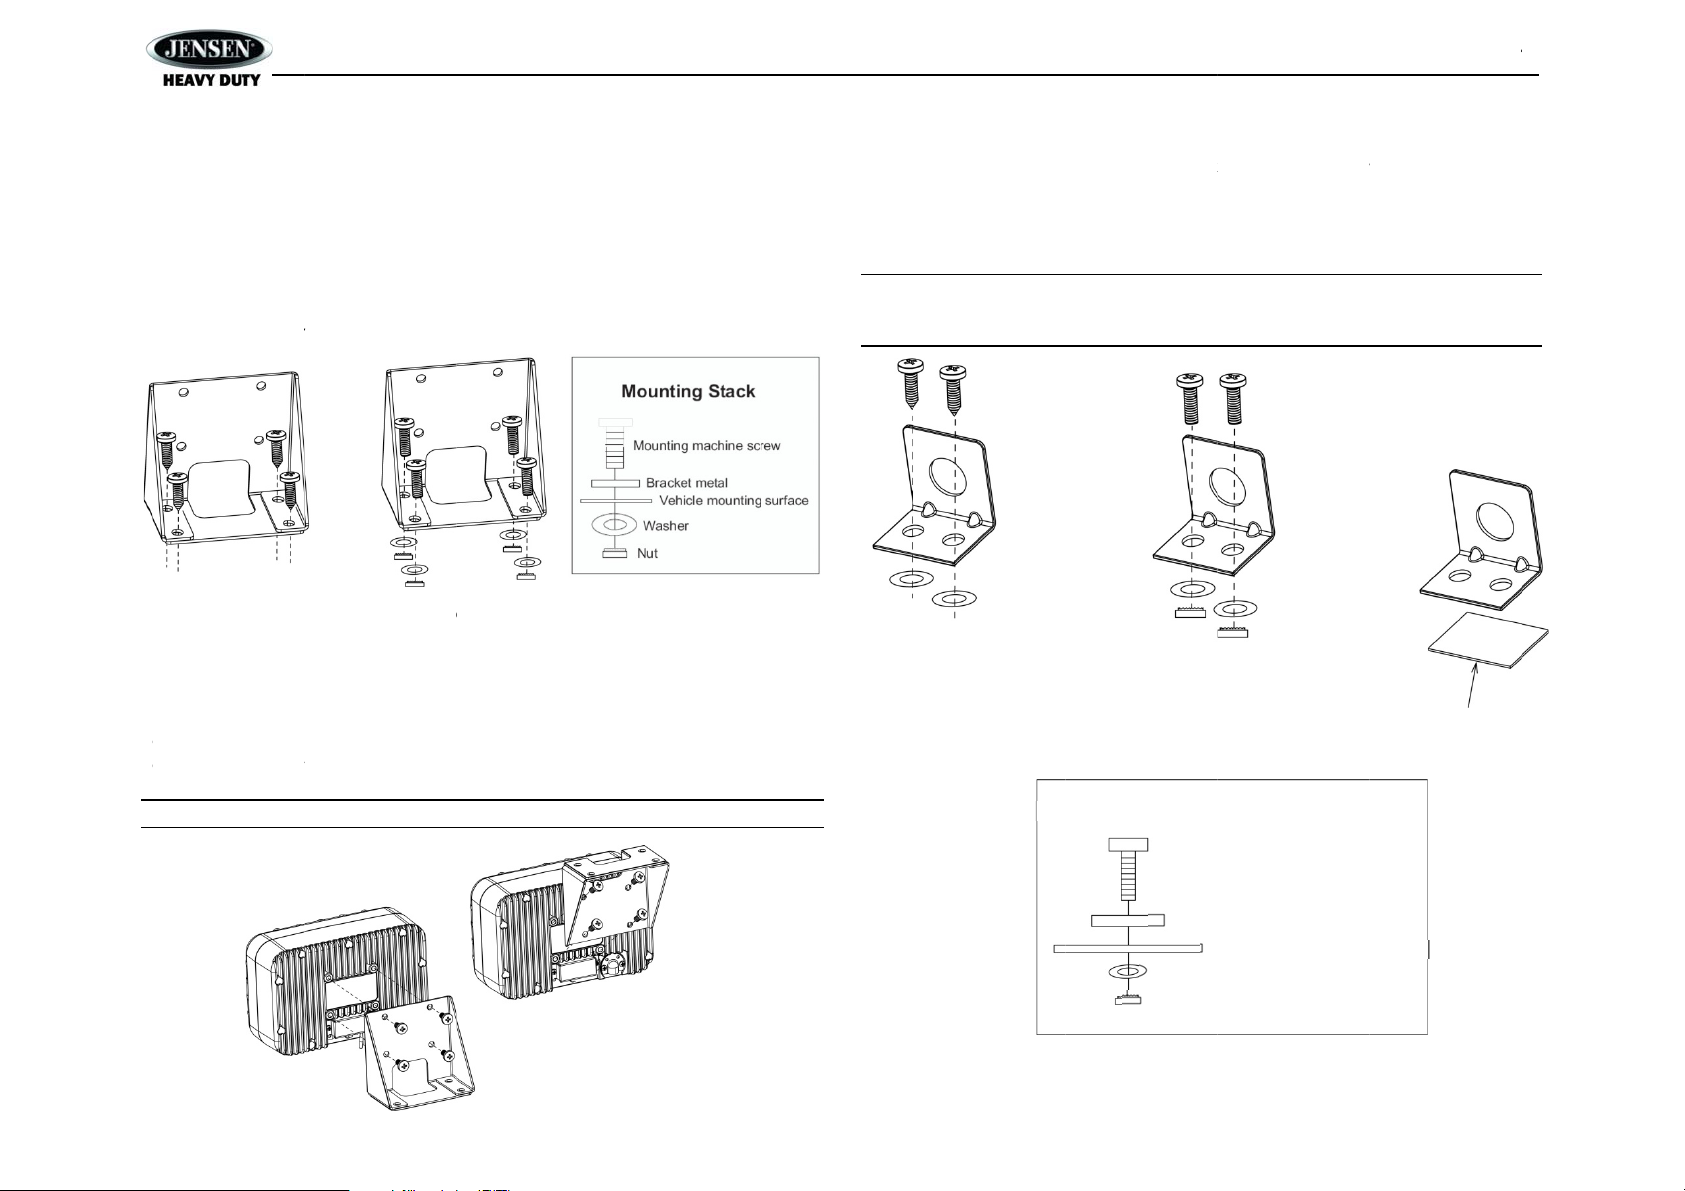
NSTALL
ount ing th
wo options are provid
n
uts) to ensure a mou
t
e rear cooling fins o
otes: Mounting hol
ake sure the area b
els, vacuum and or
TION
Bra cke t
ed for mounting the b
ting option ideal for y
the radio.
s should be drilled
hind the panel whe
brake lines.
racket (self-tapping s
our mounting location
o 7/32”. Before drill
re the holes are des
rews or machine scr
. Avoid obstructing ai
ng the mounting ho
red is clear of wires
ws with
flow to
es,
and
Mo
nting t he H
Three
ptions are provided f
nuts or
double-sided tape) t
Altern
tely, the headphone c
of the i
strument panel is av
Mounting holes sh
NOTE
make
ure the area behind
fuel, v
cuum and or brake
adphone B
r mounting the brac
ensure a mounting o
an be mounted direct
ilable.
uld be drilled to 7/3
the panel where the
lines.
ra cket
et (self-tapping scre
ption ideal for your m
y to the instrument p
”. Before drilling th
holes are to be drill
JHD916B
s, machine screws wi
unting location.
nel if access to the r
mounting holes,
d is clear of wires a
h
ar
d
Self-Tapping
Screws
Hole size 7/32”
tt ac hing t
nce the bracket is se
b
racket to the back of t
p
anel if access to the r
AUTION! Do not ov
Regula
Mounting
e Radio
urely mounted, use t
he radio. Alternatively
ear of the instrument
r tighten the 4 mou
Machin
Screws
wit
Nuts
Hole s
ze 7/32”
he four included M4
, the radio can be mo
anel is available.
ting screws. Hand
achine screws to fas
nted directly to the in
ighten only.
Overhead
Mounting
en the
trument
S
lf-Tapping
Hol
crews
size 7/32”
Machine
Hole siz
ounting Stack
Mounti
Washe
Nut
crews
with
uts
7/32”
g machine Screws
Brac
et metal
Vehicle mounting su
Double-Sided Tap
rface
3
W
e
A
e
t
e
w
C
0
C
R5 G6 G7 W8 W
G
G
t
e
C
p
p
e
e
l
g
M
T
M
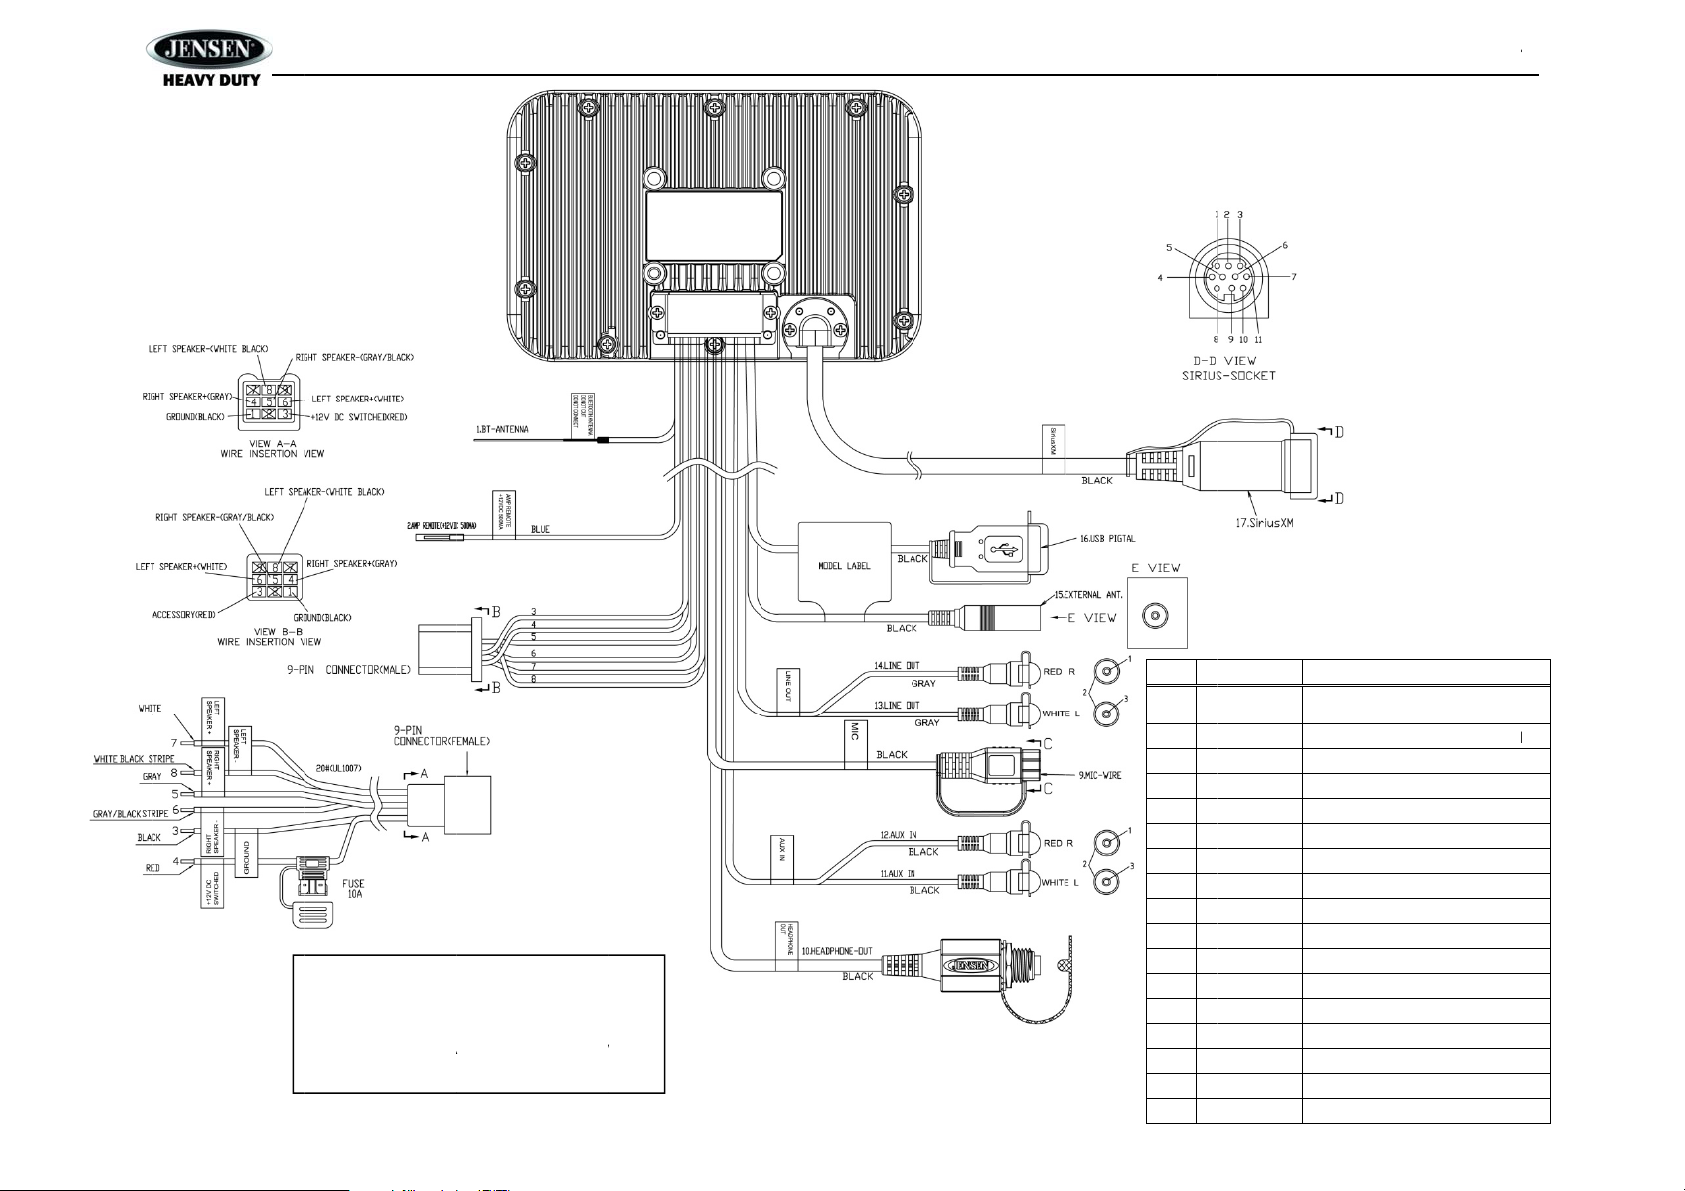
IRING
JHD916B
WARNING!
Do not connect th
wire to the battery.
connected to the
a +12 volts switch
+12VDC ACC swi
This wire MUST b
ccessory/Ignition
d power source.
ched
ire or
No.
1
2 B
3 B
4
9 B
10 B
11 B
12 B
13
14
15 B
16 B
17 B
olor Descrip
5
ohm
able
lue AMP R
lack Ground
ed +12V D
ray Right S
ray/Black Right S
hite Left Sp
hite/BlackLeft Sp
lack Mic
lack Headph
lack Aux-In
lack Aux-In
ray Line-Ou
ray Line-Ou
lack Externa
lack USB Pi
lack SiriusX
ion
BT Ante
nna
mote (+12VDC 500
eaker (+)
eaker (-)
aker (+)
aker ()
one out
t
t
Antenna
tail
A)
SWITCHED
4

B
PPV
T(1PP
M
P
P
N
N
o
P
f
t
t
e
M
2
e
s
u
S
d
k
N
(
l
o
e
d
m
o
e
o
t
d
u
►
d
T
r
t
m
s
n F E
b
t
b
y
a
u
L
e
e
c
e
h
t
P
T
P
P
P
K
s L L T L
p P C S
e
o
s
m
e
o
m
1
d
E
K
o
R
R
u
A
A
1
E
o
s
h
e
n
d
w
r
y
t
u
O
s
y
w
o
v
m
t
”
t
e
u
r
o
w
d
e
d
T
u
w
a
1
u
JHD916B
ASIC O
ow e r On/O
ress the POWER but
olum e Con
o increase the volum
1).
la y/Pa use /
ress the ►|| button (
b
utton again to unmut
ode
ress the MODE butto
p
anel. Available mode
i
od/USB > SXM (Siri
a
vailable.
OTE: iPod, USB or
OTE: Weather Ban
ption is set to“Tur
ERATIO
f
on (1) to turn the unit
rol
, press the ▲button
ute
) on the control pane
or restore the audio
n (3) to select a differ
include the following
sXM). FM is the defa
iriusXM (SXM) mo
or SiriusXM (SXM)
ey / Italy / Brazil”.
on or off.
8). To decrease the v
to pause or mute th
utput to the previous
nt mode of operation
: FM > AM > Weather
ult source when a pri
e will be skipped if
ode will be skippe
lume, press the ▼ b
audio output. Press
level.
, as indicated on the
Band > Auxiliary > B
r source is no longe
he device is not ins
when the Region
tton
||
isplay
Audio >
alled.
enu
Res
The re
I
Use a
the uni
Aud
Press t
items
displa
autom
be adj
Bass
Use th
Treble
Use th
Balan
Use th
to “Rig
Sys
1.
2.
3.
4.
The fol
t
et button (12) should
itial installation of th
unction buttons do n
rror symbol on the di
all point pen or thin
display an error cod
io M enu
he MENU button (4) t
y pressing the MENU
adjust that option by
tically exit the audio
sted.
evel
▲ or ▼ buttons (8,
Level
▲ or ▼ buttons to a
e
▲ or ▼ buttons to a
t 12”.
em M e nu
ress and hold the M
he first menu item, “
ress the ▲ or ▼ butt
ress the INFO/ENTE
ress the INFO/ENTE
owing items can be a
ey Beep (On / Off): T
elected).
CD Backlight (1-10):
CD Contrast (1-10):
uning Region (USA /
oudness (On/ Off): W
erformance.
ower-Off Clock (Off,
lock Format (12Hour
et Clock (HH : MM):
Press the INFO/
Press the ◄◄ o
be activated for the f
unit when all wiring i
t operate
play
etal object to press t
.
access the audio m
button repeatedly. O
pressing the ▲ or ▼
enu after five secon
1) to adjust the Bass
djust the Treble level
just the Balance bet
NU button (4) for mo
ey Beep”, will appear
ns (8, 11) repeatedl
button (9) to select
button again to adj
djusted:
rn the audible beep
djust LCD brightnes
djust LCD contrast.
EURO): Set frequenc
hen the volume is lo
-10): Brightness setti
/ 24Hour): Select 12
NTER button (9) to
r ►► buttons (17, 10
llowing reasons:
completed
e reset button. This
nu. You can navigate
ce the desired menu
buttons (8, 11) within
s of inactivity. The fol
level range from “-6”
range from “-6” to “+6
een the left and righ
e than 2 seconds to
on the display.
to navigate the syste
he desired item.
st the selected menu
n/Off (heard when f
.
spacing for various
, turn the LOUD ON t
ng of clock when po
r 24 hour display mo
iew the clock set scr
) to move to the next
ay be necessary sho
through the audio me
item appears on the
5 seconds. The unit
lowing menu items c
o “+6”.
.
speakers from “Left
nter the system men
m menu.
item.
nctions/buttons are
egions.
improve bass
ered off
e.
en.
igit.
ld
nu
ill
n
2”
.
5

A
T
▲
e
i
g
o
a
C
h
a
o
m
M
d
d
d
d
d
d
d
f
o
o
o
e
E
n
e
e
p
t
E
a
s
c
n
c
o
v
e
l
e
h
A
y
e
a
P
w
r
w
e
n
A
e
u
:
e
a
o
t
t
h
P P
t
o
t
D
c
k
e
D
c
e
a
R
o
n
l
D
d
i
t
e
l
h
m
a
c
e
e
”
n
u
T
o
e
e
r
Press the
Rear AUX Enabl
Preset-Only Tun
Sirius XM Settin
XM mode)
Clock Aut
Time Zone
Daylight S
Set Lock
Locked C
SXi Firmw
Weather Alert C
Min Alert L
Auto-On E
are issued
Alert Volu
Clear SA
SAME Co
SAME Co
SAME Co
SAME Co
SAME Co
SAME Co
SAME Co
Battery Alarm (O
Battery Auto-Off
Bluetooth Setup
BT: (On/O
BT HFP V
BT Device
BT Pair <
BT Auto A
Reset System D
factory default s
or ▼ buttons (8, 11
(On/ Off)
ng (On / Off)
s Menu (only appear
set (On/Off): Sets clo
1 (Atlantic / Eastern /
ving Time (Yes/No)
ode: _ _ _ _
annels: List of Chann
re Version
nfiguration
evel (All / None / War
nable (Yes/No): Sele
. This function only w
e (Select Volume Le
E Codes <ENTER>
e 1: _ _ _ _ _ _
e 2: _ _ _ _ _ _
e 3: _ _ _ _ _ _
e 4: _ _ _ _ _ _
e 5: _ _ _ _ _ _
e 6: _ _ _ _ _ _
e 7: _ _ _ _ _ _
n/Off)
(On/Off)
f)
lume: (Select Volum
List <Enter>: View a
• L
ck
• C
nnect / Disconnect
• D
lete
nter to enable>
swer: (On/Off)
faults <ENTER>: Pr
t up values.
) to adjust the selecte
when Sirius XM tun
k based on SXM dat
Central / Mountain /
els (Locked / Unlocke
ings / Watches)
t “Enabled” to turn on
rks when the +12V s
el 0-40)
Level 0-40) Hands-f
ist of devices paired
ss the INFO/ENTER
d digit.
r is connected and i
acific / Alaska)
d)
the radio when NOA
itched is on.
ee call volume
ith the unit
button (9) to return th
Liq
Sirius
alerts
unit to
id Crysta l
The cu
rent frequency and a
NOTE
LCD panels may ta
an ext
nded period of tim
decre
se slightly. The LC
to a n
rmal range.
Se t
ing the Clo
To set
he clock to display th
Enter t
e system menu and
ress the INFO/ENTE
ress the▲ or ▼ butt
Press
he ◄◄ or ►► butto
for five
seconds, the time wil
Sc r
ll
When
he information is too l
button
16) to view the entire
text.
isplay (LC
tivated functions are
e longer to respon
. In addition, the vis
display will return
k
current time, turn th
djust the clock by se
button (9) to view t
ns (8, 11) to adjust th
s (17, 10) to move to
become set and nor
ong to be displayed o
title. The information
)
shown on the LCD p
when subjected to
bility of the charact
o normal when the t
vehicle ignition on a
ecting the “Set Clock
e clock set screen.
e selected digit.
the next digit. When
al operation will res
n the LCD, press the
will scroll twice and th
nd turn the radio on.
menu item.
me.
DISPLAY/SCROLL
en retu
JHD916B
nel.
old temperatures f
rs on the LCD may
mperature increas
o adjustment is mad
n to abbreviat
r
s
ed
uxilia ry In
o access an auxiliary
1
. Connect the por
2
. Press the MOD
3
. Press MODE ag
ut
device:
able audio player to t
button (3) to select “
in to cancel “Auxiliar
e 1/8” AUX IN on the
uxiliary” mode.
” mode and go to th
front panel (14)
next mode.
6

T
SPMPA
P
N
b
P
SSStwRP
O
n
u
◄
s
s
o
p
f
O
e
e
e
v
l
e
r
t
s
s
s
r
n
t
o
n
(
r
:
o
A
m
a
s
s
D
n
a
:
r
o
m
e
r
P
Pth
A
b
:
c
p
S
r
e
n
n
a
T
d
a
n
T
u
w
i
e
d
n
e
e
s
S
a
y
o
/
C
u
u
N
p
m
n
P
s
b
n
y
o
y
e
)
p
T
f
c
o
UNER
ele ct a Ba
ress the MODE butto
anual Tuni
ress the ◄◄ or ►►
uto Se ek T
ress and hold the ◄
s
trong station.
OTE: Seek tuning i
uttons to manually
re se t St a ti
ix numbered preset b
tore a Station
elect a station, then
o seconds. The pres
ecall a Station
ress a preset button
s
tation.
PERATI
d
n (3) to change betw
ng
buttons (17, 10) to s
uning
or ►► buttons (17,
not available for w
elect any of the se
ns
uttons store and reca
ress and hold a pres
et number will appea
rom 1 – 6 on the num
N
en FM, AM and Wea
ek stations up/down
10) to automatically
ather band channel
en available weathe
l stations.
t button from 1 – 6 o
on the LCD.
ber buttons to select
herband (WB).
tep by step.
eek the next or previ
. Use the up or dow
band channels.
the number buttons
he corresponding sto
us
tuning
(15) for
red
NOTE
Preset buttons are
Aut
ma tica lly
uto
atically Store
Select
n AM or FM band. P
autom
tically select 6 strong
station
replace any stations
Preset
Scan
Select
band. Press AS/PS
for 10
econds at each pres
station
is reached.
RB
S Opera tio
This u
it is equipped to displ
broadc
st by the radio statio
NOTE
Radio stations bro
In FM
adio mode, press the
(PTY)
ptions: ANY / News /
Rock /
op 40 / Country / Ol
Rhyth
& Blues / Foreign L
Colleg
/ Weather / Emerge
To s e a
ch for stations in a P
1.
ress the PTY/CAT b
2.
ress the ◄◄ or ►►
e program type you
3.
fter selecting the des
roadcasts of this type
NOTE
Performing a PTY s
broad
asting RBDS, regar
re-assigned freque
tore / Pre s
ess and hold the AS/
stations. “Storing Pr
already stored.
(13) to scan stations
t station. Press AS/P
ay RBDS (Radio Bro
.
dcasting RBDS ma
PTY/CAT button (5) t
Information / Sports /
ies / Soft / Nostalgia
nguage / Religious M
cy Test / EMERGEN
Y category:
tton (5) to view the c
buttons to move thro
ish to search.
red PTY, press the I
. “PTY Search” is dis
arch on “ANY” will
less of the progra
cies in weather ba
t Sca n (AS/
PS button (13) for mo
sets” appears on the
tored in the current
again to stop scann
dcast Data Service) i
not be available in
list the following Pr
Talk / Rock / Classic
Jazz / Classical / Rh
usic / Religious Talk /
Y
rrent PTY category.
gh the list of availabl
FO/ENTER button (9
layed while the tuner
Seek Tune and sto
type.
JHD916B
d mode.
S)
re than 2 seconds to
creen and the new
and. The unit will pau
ing when the desired
formation when
our listening area.
gram Type
ock / Adult Hits / So
thm and Blues / Soft
Personality / Public /
categories and sele
to search the band f
is searching.
on any station
se
t
t
7

W
W
NbSwTbCTPaWfo Tfrth
UuH
Slo
wIs
D
n
e
n
h
k
o
a
i
i
n
O
p
s
c
u
h
a
a
a
e
s
r
n
e
A
a
a
R
s
s
n
e
c
"
F
u
e
p
c
v
i
?
i
t
v
t
s
e
a
h
e
e
e
n
m
l
b
h
s
a
w
B
n
e
c
a
t
w
n
e
n
w
d
a
c
a
s
e
s
o
a
P
t
e
e
#
:
o
m
a
r
t
c
v
b
B
i
o
T
t
e
h
b
e
l
h
g
o
o
o
e
a
l
g
a
h
e
e
n
a
C
n
p
r
n
-
t
r
n
e
h
e
m
o
p
-
o
t
m
i
“
o
E
t
a
n
-
-
n
n
o
o
e
e
n
o
-
T
f
n
g
e
n
e
w
ea ther Ba
hat is the NOAA W
OAA (National Ocea
roadcasts local weat
ervice (NWS) networ
ell as the adjacent c
erritories. Each local
roadcasting frequenc
anada service admin
uning to Weatherba
ress and hold the M
ppear on the display
B-2", "WB-3", "WB-4
llowing table:
he above table also
equency cannot be a
e tuning controls.
se the ◄◄ or ►► b
ntil you find the weat
ow many stations c
ince the broadcasts
w (much less than st
u
nless you are on the
o or three, and that i
t
it possible I won't
epending on where y
s
ignal or none at all. Al
d Opera tio
ather Radio/Weath
ic and Atmospheric
er emergency inform
. The U.S. network h
astal waters, Puerto
rea has its own tran
es used. A similar sy
stered by Environme
d
DE button (3) to acc
anel, along with the
", "WB-5", "WB-6" or
WB
Frequency (MHz)
162.400
162.425
162.450
162.475
162.500
162.525
162.550
hows which preset b
cessed using a pres
ttons (17, 10) or the
erband station broad
n I expect to recei
re local weather and
ndard AM or FM stat
dge of two or more b
rare.
eceive any stations
ou are located, there
so, similar to AM and
radio Canada?
dministration) is a na
tion 24 hours a day
s more than 530 sta
ico, the U.S. Virgin I
mitting station and th
tem is available in C
t Canada.
ss the Weatherband.
urrent number and c
WB-7". The seven fr
requencies
Pres
2
4
5
3
6
-
1
tton will access the fr
t button. The freque
reset buttons to tune
asting in your area.
e?
nformation, the trans
ions) so you will usua
roadcast signals. The
s a possibility you wil
FM signals, weather
ionwide system that
ia the National Weat
ions covering the 50
lands and the U.S. P
re are a total of seve
nada under the Weat
The indication "WB"
annel indication: "W
quencies are shown i
t
quency. Note that o
cy can only be reach
to each of the seven
ission power is usu
lly receive only one s
most you will receive
receive only a very
and signals are subje
er
tates as
cific
n
heradio
ill
-1",
n the
e
d using
hannels
lly very
ation
will be
eak
ct to
surrou
ding conditions, wea
NOAA
Weather Alert
The W
ather Alert function a
from a
y of the available fun
NOAA
arning tone is recei
secon
s, the unit will switch
6 to le
rn how to turn the W
SAME
Decoding and Filter
Specifi
Area Message Enc
SAME
data contains informa
alert, a
d its effective time.
Geogr
phical Area code and
“SS” is
a two-digit state, terri
county,
province, or major m
the sy
tem setting menu wit
or pow
r on functions descri
SAME
data also includes th
the Sy
tem Setting Menu to
of alert
.
SAME
is activated by progra
FIPS c
de or Federal Inform
states
nd counties (or paris
subdivi
sion. The next two di
The FI
S code for your area
web si
e.
The ph
ne number is 1-888-
will pro
mpt you to enter your
provid
your six digit FIPS c
The w
b site is: www.nws.n
you wil
see a listing of all th
SAME
(FIPS code), the loc
transm
tter power and misce
NOTE
Because broadcast
locati
n. If you live near th
from
ore than one tower.
Your r
dio is capable of bein
default
code has been progr
your a
ea.
her, obstructions of t
dds an additional lev
tion modes to weath
ed/ detected. If no ad
ack to the last know
Alert feature on.
ng
ding (SAME) data is
tion about the geogra
he geographic region
has the form PSSCC
ory, or offshore mari
tropolitan area within
up to seven Geogra
ed above.
type of alert being b
imit the automatic tu
mming a 6 digit code
ation Processing Sys
es) in the United Sta
its identify the state o
can be found by calli
NWS-SAME (1-888-6
state and county. Wh
de.
aa.gov/nwr/indexnw.
counties in that stat
tion of the transmitte
laneous remarks.
areas overlap you
e border between c
programmed with u
mmed at the factory
e signal by hills or m
l of user safety by au
r band for a minimu
ditional warning tone
function mode. See
lso broadcast prior t
phic region affected b
included in the SAM
where “P” represen
e area identifier and “
the state. This unit c
hical Area codes to li
oadcast. This unit ca
ing or power on funct
called a FIPS code
em code is a six digit
tes. The first digit ide
territory, and the last
g the NWS toll free
97-7263). Upon callin
n you confirm the inf
tm. Upon selecting y
. For each county th
r, the WB frequency, t
ay want to set mor
unties, you may wa
to 7 different FIPS l
000000 - to respond
JHD916B
untains, etc.
omatically switching
of 60 seconds if a
s received for 60
System Menu” on pa
alert broadcasts.
y the alert, the type o
data is called the
s a portion of the cou
CCC” identifies the
n be configured throu
mit the automatic tuni
be configured throu
ions based on the typ
into your radio. The
code that identifies th
tifies the county
three identify the cou
umber or visiting the
g, an automated syst
rmation, the system
ur state from the cha
re is a listing of the
he call sign, the
than one S.A.M.E.
t to receive alerts
cation codes. The
to all messages withi
ge
ty,
gh
ng
h
e
ty.
m
ill
rt,
n
8

U
D
f
m
naU W(3
C
S
P
ePP
P
P
U
a
U
o
t
m
h
F
i
2
g
v
C
e
o
s
g
e
m
d
d
s
a
r
u
r
e
)
m
c
d
e
s
t
n
r
r
w
1
t
P P
o
P
s P
P P Pfo P T
3
A M M M M M
a
w
p
r
t
n
s
o
n
u
o
R
u
a
i
s
o
o
M
h
C
1
2
e
u
d
n
e
p
o
e
e
e
v
f
s
t
e
O
u
r
k
u
r
v
e
s
m
p
e
o
T
a
m
n
SB OPE
igit al File
I
the user connects a
a
nd switches to digital
p
layback. Playback sh
ode.
I
nse rt ing a
I
sert your USB drive i
utomatically search f
SB mode from any o
ARNING: Do not re
) to change to anot
RATION
la yba ck
SB mass storage de
file playback mode.
ll resume exactly wh
SB Devic e
nto the USB connect
r MP3 and WMA file
her mode by pressin
ove the USB devic
er mode before re
ice, the radio autom
hanging modes or tu
re paused when ret
r routed from the rea
on the device and b
the MODE button (3
when USB PLAY
oving the device.
tically powers on, if n
ning off the radio pau
rning to digital file pla
of the radio. The uni
gin playback. You ca
.
ode is active. Press
cessary,
es
yback
will
access
MODE
Previe
ing Tracks
Press t
he 1/INT button to pla
Press
/INT again to stop In
Repea
Play
ress the 3/RPT butto
ress 3/RPT again to
Rand
m Play
ress the 2/RDM butt
huffled order.
ress 2/RDM again to
Folder
Navigation (MP3 O
ress the PTY/CAT b
ress the ▲ or ▼ butt
ress the INFO/ENTE
lder. Continue pressi
ress the PTY/CAT b
he unit will automatic
MP
Spe cific at
Notes
n MP3 Playback
ny directory that doe
aximum number of f
aximum number of f
aximum number of
aximum number of c
aximum number of
ID3 Tag version
ID3 Tag version
File Pl
ying Order
Files
ill be continually play
folder,
ress the PTY/CAT b
(8, 11)
o navigate the list an
song o
folder.
y the first 10 seconds
ro Scan and resume
during disc play to r
top repeat play.
n during playback to
stop random play.
ly)
tton (5) to view a list
ns (8, 11) to navigat
button (9) to play th
ng INFO/ENTER until
tton again to navigat
lly exit the folder na
ons
not include an MP3
lders: 512 (including
lder levels: 12
P3 files: 999
aracters for MP3 file
haracters of ID3 Tag:
.0: 32
.x: 32
d sequentially within
tton (5) twice to mov
then press the INF
of each track in the c
ormal play at the cur
peat the current trac
lay all tracks in the c
f all songs in the cur
the list.
highlighted song or
the desired file is sel
up through the file st
igation menu after 5
ile is skipped
kipped directories)
name and folder na
he current folder. To
up a folder level. Pr
/ENTER button (9) t
JHD916B
rrent folder sequenti
ent track.
.
rrent folder in rando
ent folder.
iew files in the select
cted.
ructure.
econds of inactivity.
e: 32
lay songs in another
ss the ▲ or ▼ butto
access the selected
lly.
,
ed
s
ont rolling
electing Tracks
ress the ◄◄ or ►►
n
umber will appear on
verse. Playback beg
r
lay/Pause Playback
ress the ►|| button (
ress the ►|| button a
ile Pla yba c
buttons (17, 10) to a
the display. Press an
ns when the button i
) to suspend playbac
ain to resume play.
k
vance to the next tra
hold the ◄◄ or ►►
released.
k. “Pause” is displaye
k/ file. The selected t
buttons to fast forwa
d on the screen.
ack
d or fast
9

S
Noc
T
A
(PA
T(1
mle
C
M
M
n
n
i
S
p
o
u
e
C
y
E
O
o
l
th
o
U
M
o
l
s
s
A
i
-
v
)
e
M
w
o
s
l
n
a
t
e
o
◄
n
u
a
t
r
e
P
P
d
Pfi
P
P
P
P
c
r
e
e
a
S
P
a
R
o
t
A
s
s
n
e
w
n
s
M
F
t
R
t
R
t
R
C
u
e
t
s
c
s
O
f
e
s
e
o
e
d
e
c
m
T
►
u
n
d
e
o
o
a
n
t
n
T
h
e
e
u
n
n
IRIUSX
OTE: Only SiriusX
ver 140 channels, i
omedy and entertai
uner and Subscript
cc essing
Re quire s o
ress the MODE butto
cc essing y
he SiriusXM ID is req
7) to tune to channel
iddle of the LCD scr
tters I, O, S, or F.
at e gor y Tu
1
. Press the PTY/
2
. While in categor
. Press the ◄◄ o
3
(The current cha
channel tuned.)
. Press the INFO/
4
TM
RADI
TM
brings you more
cluding commercia
ment. Welcome to
on are required. For
IRI USXM M
tional SI RI
n (3) to change the m
ur SiriusX
ired for activation. T
“000”. The screen wi
en. The SiriusXM rad
ning
AT button (5) to acce
mode, press 5/CAT-
r ►► buttons (17, 10
nnel number within th
NTER button (9) to
OPER
f what you love to l
free music plus the
e world of satellite
more information,
de
SX M t une r
ode to SiriusXM mod
I D
display your SiriusX
l display “Radio ID”
io ID is 8 characters l
s Category mode.
OR 6/CAT+ buttons t
) to navigate channel
e chosen category wi
elect the desired cha
TION
sten to, all in one pl
best sports, news,
radio. A SiriusXM V
isit www.siriusxm.c
.
radio ID, use the ◄
ith the ID displayed i
ng and does not incl
o choose a category.
in that category.
l always be the defau
nel.
ce. Get
alk,
hicle
m.
button
the
de the
lt first
Ch
nne l U p/Do
Press
he ◄◄ or ►► butto
◄◄ o
►► buttons to fast
Dir
ct T uning
1.
ress and hold the IN
2.
ress ◄◄ or ►► but
irect entry screen.
3.
ress the INFO/ENTE
eld.
4.
ress ◄◄ or ►► but
5.
ress the INFO/ENTE
6.
ress ◄◄ or ►► but
7.
ress the INFO/ENTE
hannel.
St o
ing Pre set
The pr
set buttons (5-10) ca
favorit
channels.
Progr
mming Channels
1.
elect the channel yo
2.
ress and hold a pres
ppears.
3.
epeat steps 1 and 2
Preset
Recall
Press
ne of the six preset b
band.
Scan
Prese
Press
S/PS button (13) to
preset
tation.
Preset
Tuning
In Pre
et Tuning Mode, you
seque
tial order. Access pre
Set Pr
set-Only Tuning to “
n Tuning
s (17, 10) to search
earch.
ode
O/ENTER button to
ons to change the fir
button to confirm th
ons to select the sec
button to confirm th
ons to select the thir
button to confirm th
hannels
n be used to store 6
want to store in me
t button (15) until the
o program additional
uttons (15) to directly
can stations stored.
an use the ◄◄ or
et tuning mode thro
N.”
or a channel. Press a
nter direct tuning mo
t of three digits for th
entered digit and m
nd digit.
entered digit and m
digit.
three digit channel
hannels, allowing co
ory.
corresponding prese
channels.
select a preset chan
he unit will pause for
► buttons to access
gh the system menu.
JHD916B
d hold the
e.
desired channel in t
ve to the second digi
ve to the third digit fi
nd tune to the select
venient access to yo
button number
el stored in the curre
10 seconds at each
all 6 preset stations i
e
t
ld.
d
t
10

S
T
C
A“S
e
S
c
t
g
◄
I
o
◄
I
o
o
e
◄
I
o
e
n
E
l
h
t
T
1
o
4
1
o
4
h
u
s
1
o
4
a
k
o
D
X
(
s
o
g
c
s
o
g
y
e
s
o
g
◄
c
e
c
d
d
e
o
n
T
P
W
P
P
T
o
e
t
a
u
t
w
h
e
t
e
t
n
s
l
e
e
T
JHD916B
at ellit e Sig
he display will indicat
hannel Lo
ccess Channel Lock
ystem Menu” on pa
1
. Select “Set Lock
2
. Enter the default
a. Press the
b. Press the
c. Repeat ab
d. Press the
e. Press the
f. Repeat ab
g. Repeat ab
3
. After setting a n
Channels” menu
4
. Upon entering th
a. Press the
b. Press the
c. Repeat ab
5
. After entering th
highlight the cha
6
. Press the INFO/
selected channe
nal St rengt
satellite reception s
ignal Strength
No Signal
Weak
Good
Excellent
k
hrough the System M
e 5.
Code” and press the
lock code of “0000”.
◄ or ►► buttons (
NFO/ENTER button t
ve steps to enter all
◄ or ►► buttons (
NFO/ENTER button t
ve steps to enter all
ve steps to confirm t
w four digit code, yo
.
e Locked Channels li
◄ or ►► buttons (
NFO/ENTER button t
ve steps to enter all
code, you can navig
nels.
NTER button to Loc
.
rength as shown bel
Strength
enu under the “Sirius
INFO/ENTER button
o set the lock code:
7, 10) to enter the fir
move to the next di
digits of the default
7, 10) to enter the fir
move to the next di
digits.
e new code.
can lock channels b
t, you will be prompt
7, 10) to enter the fir
move to the next di
digits.
te the list using the
(indicated by a i
w.
isplay
M Satellite Radio” m
9).
t digit of the default
it.
ode.
t digit of the new co
it.
entering the “Locke
d to enter your four di
t digit.
it.
◄ or ►► buttons (1
on) or Unlock th
nu. See
ode.
e.
git code.
7, 10) to
Res
If you f
default
1. I
2.
3.
4.
5.
6.
7.
t SiriusXM
rget your Parental C
“0000”. Resetting the
SiriusXM mode, tun
une the volume to 0.
ress the POWER but
ith power off, press
ress the 3 from the n
ress the POWER but
he lock code has no
Cha nne l Lo
ntrol lock code, use t
lock code will not aff
to CH-0
on (1) to power off th
nd hold the POWER
mber buttons (15) to
on to power on the u
been reset to “0000”
ck Code
e following direction
ct the locked channe
unit.
button to lights on th
lights off the LCD aft
it.
to reset the code to t
s list.
LCD.
r several seconds.
he
11

A
e
a
o
y
A
d
a
b
e
a
d
n
s
X
n
s
C
n
s
o
V
C
w
a
e
c
T
g
t
e
r
u
d
e
u
u
r
a
i
c
o
b
V
V
V V
iabo
p
V
a
e
c
s
V
X
o
s
a
V
V
X
e
n
c
s
s
a
e
x
6
a
n
x
6
a
n
t
u
n
o
l
n
y
o
n
o
d
/
r
n
o
d
/
T
JHD916B
dvisory M
On-Screen Displ
Check Antenna
Check Tuner
No signal
Scrolling “Subscripti
Updated” – press an
key to continue”
Chan Unavailable
Ch Unsubscribed
ssa ges Re p
y
dvisory Me
Check Antenna
Check Tuner
No signal
n Subscription Up
Channel Not Av
Channel Not Su
ort ed by th
SiriusX M
ssage
The radio
antenna c
The ra
The tu
The Siriu
the Sirius
ated The radio
status.
ilable The chan
or the cha
may also
SiriusXM
informatio
scribed The chan
SiriusXM
listening t
package.
has detected a fault
ble is either disconn
io is having difficulty
Conne
ct Vehicle Tuner.
er may be disconne
XM Connect Vehicle
M satellite signal.
has detected a chan
el that you have requ
nnel that you were lis
ee this message bri
onnect Vehicle tune
n about the SiriusXM
el that you have req
ubscription package
is no longer include
ehicle Tun
ause
ith the SiriusXM ante
cted or damaged.
communicating with t
ted or damaged.
uner is having diffic
e in your SiriusXM s
ested is not a valid Si
ening to is no longer
fly when first connect
. Visit www.siriusxm.
channel lineup.
ested is not included
or the channel that y
in your SiriusXM su
nna. The
he SiriusXM
lty receiving
bscription
iusXM channel
vailable. You
ng a new
om for more
in your
u were
scription
erify that the antenn
Connect Vehicle Tun
Inspect the antenna
antenna if the cable i
erify that the Sirius
connected to the radi
If the problem persist
then contact your de
erify that your vehicl
southern sky.
erify that the Sirius
a metal surface on th
Move the SiriusXM a
Inspect the antenna
antenna if the cable i
If the problem persist
then contact your de
Press any key to clea
No further action is r
Questions about your
visit http://www.sirius
Listener Care at 1-86
Questions about your
http://www.siriusxm.c
Care at
1-877-438-9677
Vis
t http://www.siriusxm.
ut the SiriusXM chan
Questions about your
visit http://www.sirius
Listener Care at 1-86
Questions about your
http://www.siriusxm.c
Care at 1-877-438-96
Ex
lanation/Solutio
cable is connected
r.
able for damage and
damaged.
M Connect Vehicle T
SiriusXM mating co
, disconnect and rec
ler.
e is outdoors with a c
M magnetic mount a
outside the vehicle.
tenna away from an
able for damage and
damaged.
, disconnect and rec
ler.
r the message.
quired.
subscription in the U
m.com/activatenow
-635-2349
subscription in Cana
/help/activation-help
com/channellineup fo
el lineup.
subscription in the U
m.com/activatenow
-635-2349.
subscription in Cana
/help/activation-help
77.
o the SiriusXM
kinks. Replace the
ner cable is securely
nector/ cable.
nnect the tuner and
ear view of the
tenna is mounted on
obstructions.
kinks. Replace the
nnect the tuner and
ited States please
r call SiriusXM
a, please visit
or call XM Listener
more information
ited States please
r call SiriusXM
a please visit
or call XM Listener
12

a
A
e
d
n
C
m
C
u
k
e
e
t
p
n
e
t
e
n
f
c
h
t
T
On-Screen Displ
Chan Locked
Enter Code: _ _ _ _
Wrong Code
y
dvisory Me
Channel Locked
Enter Lock Cod
Invalid Lock Co
ssage
The chan
Parental
User pro
e The unloc
el that you have req
ontrol feature.
pted to enter the loc
k code entered by th
ause
ested is Locked by th
/unlock code.
user is incorrect
e radio Se
on
Ent
Ex
the section on Pare
he Parental Control f
er the four digit code
Input the correct four
Reset lock code to d
lanation/Solutio
tal Control, page 11
ature and how to ac
o unlock the channel
digit code to unlock t
fault following instruc
or more information
ess locked channels.
e channel.
ions on page 6
JHD916B
13

I
T
Nreuc
A
C
l
w
M
fra
P
P
w
c
o
i
P
P
S
m
P
b
a
“
n
s
N
c
o
s
T
A
r
o
C
h
c
s
o
n
u
e
d
r
P
e
s
n
o
v
n
s
n
t
P
o
R
D
i
t
w
w
a
:
u
e
t
y
t
◄
c
s
t
d
o
e
n
o
y
►
n
s
n
n
◄
◄
u
a
►
l
i
a
5
h
E
b
o
c
a
a
e
t
a
n
b
a
n
e
u
o
g
e
P
s
d
e
l
a
r
u
P
t
g
v
s
e
c
G
e
T
l
o
n
e
o
►
POD® O
his unit is equipped
c
ompatible) using the
iPod Nano 7
iPod Touch 6
iPhone 4s, 5, 5c,
OTE: Earlier model
quired control prot
tilize the 30-pin App
onnected to the rad
cc essing i
onnect a supported i
p
anel USB (or Rear U
il
luminates in the botto
henever an iPod or i
c
onnector. Music play
e
nter iPod mode from
ODE button (3) until
I
the user connects a
dio will display a me
i
od mode.
ERATIO
ith an iPod ready fun
ontrol panel buttons.
5s, 6, 6 plus, 6s
iPod’s are not supp
col. Also, the iPod
le iPod Connector.
o using one of the
od M ode
od or iPhone to the f
B) connector. The iP
left corner of the L
hone is attached to t
ack begins automati
ny other source, pre
iPod” appears on the
iPod containing no s
sage stating “No So
tion that will allow yo
The following iPod v
rted because they
huffle is not suppo
hese unsupported i
uxiliary Inputs.
ont
d icon
D
e USB
ally. To
s the
display.
ngs, the
gs” in
to control your iPod
rsions are supported:
o not implement th
ted because it doe
od models may be
(if
not
Tu r
ing the iPo
The iP
d power turns on aut
as the
ehicle ignition is turn
ignitio
off. When the ignitio
minute
. While the iPod is c
Con
trolling Pla
Pausi
g Playback
During
playback, press the
on the
CD. Press ►|| agai
Repea
Play
During
playback, press the 3
LCD.
ress 3/RPT again to
Rand
m Play
During
playback, press the 2
order.
andom play will begi
the LC
. Press 2/RDM agai
Select
ng Tracks
During
playback, press the
curren
category. Press the
◄◄ t
ice to play the previo
track
ill play the previous tr
After 2
seconds, this action r
Press
nd hold the ◄◄ or
NOTE
If you press and ho
previo
s/next song, you w
Alt
rnat e Displ
Press
he DISPLAY/SCROL
double
line text display.
Pla
list Se a rch
Press
he PTY/CAT button (
the ◄
or ►► buttons to c
or Pod
ast. Press the INFO/
button
to search the availa
Press
he INFO/ENTER butt
On/Off
matically when it is
d on. You can turn th
is off, the iPod will p
nnected, the power c
back
|| button (2) to paus
to resume playback.
/RPT button to repea
top repeat playback.
/RDM button to play
once the current so
to stop random play
◄ or ►► buttons (1
◄ button once to pl
s track. Pressing the
ck.
eturns to the beginni
► button to fast rev
d the ◄◄ or ►► b
ll exit fast reverse/f
y M ode
L button (16) to chan
) to access Playlist s
oose file search by
NTER button (9) to
le files on the iPod.
n to play the selecte
onnected to the front
e iPod off by disconn
use and then enter s
nnot be turned on o
the iPod player. “Pa
the current song. “R
ll songs in the curren
g has finished playin
ack.
7, 10) to play the pre
y the song from the
◄◄ button during th
g of the current track.
rse/forward the song.
tton to change the
rward mode.
e the display informa
lection mode. While i
laylist, Artist, Album,
elect the search mod
song or file.
JHD916B
panel USB port, as lo
cting it or by turning t
eep mode after 2
off from the iPod itse
se” will appear
T” will appear on the
category in random
. “RDM” will appear
ious or next track in t
tart position or press
first 2 seconds of a
urrent song to the
tion between single a
n Category mode, pr
enre, Song, Audiob
. Use the ◄◄ or ►
ng
he
f.
n
he
d
ss
ok
14

B
TtoABretr
B
N
B
P
8
O
e
o
o
n
s
t
e
h
d
e
e
i
/p
o
h
e
L
R
e
y
o
n
B
s
p
r
u
b
t
T
E
t
T
y
d
2
o
l
o
s
T
s
v
E
D
v
e
n
s
▼
n
W
u
u
c
o
Bto B“O
r
o
nha
n
r
v
nyo
n
:
o
d
A
2
n
i
n
o
U
n
T
o
s
e
d
F
s
s
o
e
o
n
o
O
o
c
o
l
y
r
P
e
◄
►
e
d
B
l
e
u
s
h
b
t
p
h
o
e
e
s
d
y
e
p
s
t
F
N
u
y
t
u
e
o
y
e
h
O
T
e
e
u
h
e
LUETO
he JHD916BT includ
Bluetooth devices f
bout Bluet
luetooth is a short-ra
placement for variou
ansmits voice and da
lue toot h M
OTE: Please note t
luetooth Audio mo
ress and hold the ME
(
, 11) repeatedly to vi
c
hoose the highlighted
BT ON/OFF: Pr
“On”, the LCD w
BT HFP Volume
0-40 (default 35
BT Device List:
phone device m
delete a device t
device. Press th
device.
LOCK/UN
TH OPE
s built-in Bluetooth t
r streaming audio pla
oth Te chn
ge wireless radio co
electronic devices.
ta at speeds up to 2.1
nu Option
at some BT menu o
e.
NU button (4) to ente
w the Bluetooth Set
option.
ss the INFO/ENTER
ll display the Bluetoo
: Press the INFO/EN
revious setting).
Press the INFO/ENT
dels. Press the ▲ or
at is actively connec
▲ or ▼ buttons to c
OCK: The JHD916B
ATION
chnology that allows
back.
logy
nectivity technology
luetooth operates in
Mbit/s over a range
tions are only avai
menu adjustment m
p Menu options. Pre
utton (9) to select "B
h icon (default “B
ER button repeatedly
R button to view a li
▼ buttons to view de
ed. Press the INFO/
hoose Lock/Unlock,
can store up to 5 de
ou to connect this h
eveloped as a cable
.4 GHz frequency ra
f up to 10 meters.
able while the unit i
de. Press the ▲ or
s INFO/ENTER butto
T ON" or "BT OFF".
ON”).
to adjust the ring vol
t of previously paired
ices from the list. Yo
NTER button to sele
isconnect or Delete f
ices for Bluetooth co
ad unit
ge and
in
buttons
(9) to
hen
me from
mobile
cannot
t the
r this
nnection.
The devices are
being bumped fr
device. To lock/
the Locked or U
DISCONNECT:
temporarily rem
phone menu by
DELETE: To del
Device must be
T Pair: Press the IN
search for and be di
T Auto Answer: Pre
ff”.
Pa i
ing a Blue t
Before
you begin, consult th
JHD91
BT.
Bluet
oth Quick Pair:
1. O
your personal Bluet
s Bluetooth turned o
2. E
ter Bluetooth mode
3. P
ess and hold the INF
a
ailable on your Bluet
4. O
your Bluetooth devi
ur device.
E
ter the pairing passw
NOTE
You can alternative
After c
nnecting successfull
enable
device through the
BT
The A
access
While i
Select
During
track.
Pausi
During
udio (A2 D
DP music is available
Bluetooth mode and
Bluetooth mode, th
ng Tracks
playback, press the
g Playback
playback, press the
stored in FIFO (First i
m the list when mor
nlock a device, press
locked icon.
o disconnect a paire
ve the Bluetooth link.
electing the JHD916
te a device from the
isconnected to be d
O/ENTER button to t
covered by Bluetoot
s the INFO/ENTER
oth De vic e
owner’s manual for
oth device, enter the
and is searching for
n the JHD916BT by
/ENTER button for t
oth device.
e, select JHD916BT
rd (0000), if request
y pair from the Blu
, you will be able to li
adio.
)
for Bluetooth enable
play songs stored on
Bluetooth Audio icon
◄ or ►► buttons (1
|| button (2) to paus
n First Out) order. To
than 5 devices are u
the INFO/ENTER bu
device, press the IN
The link can be re-es
T for connection.
ist, press the INFO/E
leted.
rn BT Pair “On” to p
devices.
utton to turn the Auto
he Bluetooth device
Bluetooth settings lis
new devices.
ressing the MODE b
ree seconds to mak
nce it becomes avail
d.
tooth Menu.
ten to music stored
phones when the ph
our phone, press th
will appear on t
7, 10) buttons to play
the Bluetooth AUDI
JHD916B
revent a device from
ed, you must lock th
ton to display/chang
O/ENTER button to
tablished through yo
TER button. NOTE:
t the unit pairing mod
Answer function “On”
ou want to pair with t
. Make sure your devi
tton (3).
the JHD916BT
able to pair and conn
n your Bluetooth
one is connected. To
MODE button.
e LCD.
the previous or next
player. “BT AUDIO
r
e
or
e
ce
ct
15

Pmm NdB
W
wbAIftoIfaWthTDmEPR
T
n
b
e
e
u
D
e
n
f
i
(
a
o
l
c
a
r
b
o
s
w
A
e
”
t
b
u
e
b
r
h
i
e
r
o
a
g
t
u
m
n
AUSE” will appear on
ode, the mobile pho
ode and resume mo
the LCD. Press ►||
e audio will pause. P
ile phone audio play
gain to resume play
ess the MODE (3) bu
ack.
ack. If you change to
tton to return to Bluet
JHD916BT
another
oth
OTE: If a Bluetooth
evice is disconnect
luetooth device wh
I
ncoming/O
hile the mobile devic
ill appear on the LC
roadcasting a Weath
nswer Call
the Bluetooth Auto A
receive an incoming
the BT Auto Answer
fter 5 seconds of ring
hile the microphone
rough the Microphon
ransfer Call
uring the call, press
obile device.
nd Call
ress the “CALL” butt
eject Incoming Cal
o reject an incoming
device is disconnec
d inadvertently, the
n the power is rest
tgoing ca ll
e is connected throug
. The incoming ring
r Band Alert or the P
swer function is turn
call.
unction is turned “On
ng.
JMICHFP) is connec
e.
nd hold the "CALL"
n to end a call. The
all, press and hold th
ted due to the powe
unit will automatica
red.
h Bluetooth, the phon
ill be output through t
system is in use.
d “Off”, the user mus
, the unit will automat
ed to the unit, the us
utton transfer the call
nit will return to the p
“CALL” button.
being turned off or
lly search for the m
e number for incomin
e unit unless the uni
t press the "CALL" b
cally receive the inco
r can answer incomi
between the unit and
evious mode.
if the
tching
calls
is
tton (7)
ing call
g calls
the
16

C
T
U
hmmIReAlin
e
t
n
t
u
h
t
,
u
h
n
n
r
e
t
r
u
t
i
y
p
o
r
m
e
n
d
s
r
v
u
u
t
a
t
m
e
o
e
n
n
y
o
c
n
e
n
a
n
r
a
t
e
n
t
e
y
g
e
o
o
o
o
o
o
O
O
O
O
H
G
s
y
l
k
r
U
S
u
t
m
u
e
c
r
S
e
o
o
c
e
B
e
T
JHD916B
ARE AN
Keep the produc
minerals that ca
Keep the produc
Handle the prod
and can cause t
Wipe the produc
harsh chemicals
Use and store th
can shorten the l
parts.
I
gnit ion
he most common so
b
eing placed close to t
b
ecause it will vary in i
sually, the ignition no
h
igh voltage ignition wi
t
is wire and resistor b
ethod of suppressio
ost CB radio or elect
nterfere nc
adio reception in a m
nvironment (home). I
M reception will dete
nes. Although AM is s
d
istance. This is beca
r
flected back by the u
D MAINT
t dry. If it does get we
corrode the electron
t away from dust and
ct gently and carefull
e product to work im
with a dampened cl
cleaning solvents, o
e product only in nor
ife of electronic devic
rce of noise in recepti
he ignition system (e
tensity of pitch with t
ise can be suppresse
re and suppressor re
ut it may be necessa
is the use of addition
onic supply shops.
oving environment is
is very important to
iorate when passing
ubject to environmen
se broadcasting sign
pper atmosphere.
ENANCE
, wipe it dry immedia
c circuits.
dirt, which can cause
. Dropping it can da
roperly.
th occasionally to ke
strong detergents to
al temperature envir
s, damage batteries,
on is the ignition syst
gine). This type of no
he speed of the engi
considerably by usi
istor in the ignition s
y to check them for c
al noise suppressors.
ery different from re
nderstand the differe
nder a bridge or whe
al noise, it has the ab
ls follow the curvatur
ely. Liquids might co
premature wear of p
age circuit boards an
p it looking new. Do
clean the product.
nments. High tempe
and distort or melt pl
m. This is a result of
ise can be easily det
e.
g a radio suppressio
stem. (Most vehicles
rrect operation.) Ano
These can be obtain
eption in a stationar
ce.
n passing under high
ility to be received at
of the earth and are
tain
rts.
d cases,
ot use
ature
stic
he radio
cted
type
employ
her
d from
voltage
reat
TR
No p
wer
No s
und
The
peration keys do
not w
Cann
statio
not w
ERR
R-01 on LCD
ERR
R-02 on LCD
ERR
R-03 on LCD
ERR
R-04 on LCD
UBLES
Symptom
rk
t tune to radio
, auto-seek does
rk
OOTIN
Cause
The vehicle’s acces
switch is not on
Fuse is blown
Volume too slow
Wiring is not properl
connected
Control panel is not
properly installed
Built-in microcomput
not operating proper
due to noise
Antenna cable is not
connected
Signals are too wea
Database or decode
error
No songs on device
Abnormal current to
device
iPod/iPhone is not
verified
olution
ory If the power s
connected to
accessory ter
ignition key to
Replace the f
Adjust volum
Check wiring
Reinstall cont
er is y Press the RE
Insert the ant
. Select a stati
Change to an
Remove devi
SB Change mod
reconnect US
Unplug and r
pply is properly
he vehicle’s
inal, switch the
“ACC”.
se.
to audible level.
onnections.
ol panel.
ET button.
nna cable firmly.
n manually.
ther mode.
e and add songs.
or unplug and
device.
connect iPod/iPhone.
17

S
USCFFFFSSAFFSGFOGST
PIdFD
C
U
T
B
A
r
r
.
.
.
.
.
.
.
.
.
a
0
1
4
e
p
C
NI
n
e
o
a
t
:
n
a
q
n
e
a
T
t
a
r
r
n
R
n C
c C
o
e
p
e
n
s
i
h
t
b
e
g
n
e
n
a
e
r
p
R
h
n
u
R
e
s
a
n
r
a
c
n
m
r
T
a
u
e
m
h
r
r
i
a
e
n
r
o
y
n
.
T
n
d
d
l
o
n
a
n
r
PECIFI
SB
ignal to Noise Ratio. .
hannel Separation . .
requency Response .
M Radio
requency Coverage (
requency Coverage (
ensitivity (S/N = 30d
tereo Separation . . .
M/MW
requency Range (US
requency Range (Tu
ensitivity (S/N=20dB)
eneral
requency band(s)(fo
perating Voltage . . .
rounding System . . .
peaker Impedance . .
one Controls:
Bass (at 100 Hz) .
Treble (at 10 kHz)
ower Output . . . . . . .
le/Standby Current .
use Rating. . . . . . . . .
imensions . . . . . . . . .
ATIONS
. . . . . . . . . . . . . . . . .
. . . . . . . . . . . . . . . . . .
. . . . . . . . . . . . . . . . .
SA) . . . . . . . . . . . . .
urkey/ Italy/ Brazil) .
) . . . . . . . . . . . . . . . . .
. . . . . . . . . . . . . . . . . .
/ Brazil) . . . . . . . . . .
key/ Italy) . . . . . . . . . .
. . . . . . . . . . . . . . . . .
Bluetooth) . . . . . . ..
. . . . . . . . . . . . . . . . . .
. . . . . . . . . . . . . . . . . .
. . . . . . . . . . . . . . . . .
. . . . . . . . . . . . . . . . . .
. . . . . . . . . . . . . . . . . .
. . . . . . . . . . . . . . . . .
. . . . . . . . . . . . . . . . . .
. . . . . . . . . . . . . . . . .
. . . . . . . . . . . . . . . . .
. . . . . . . . . . . . . . . . . .
. . . . . . . . . . . . . . . . . .
. . . . . . . . . . . . . . . . . .
. . . . . . . . . . . . . . . . .
. . . . . . . . . . . . . . . . . .
. . . . . . . . . . . . . . . . .
. . . . . . . . . . . . . . . . .
. . . . . . . . . . . . . . . . . .
. . . . . . . . . . . . . . . . .
. . . . . . . . . . . . . . . . .
. . . . . . . . . . . . . . . . .
. . . . . . . . . . . . . . . . .
. . . . . . . . . . . . . . . . .
. . . . . . . . . . . . . . . . .
. . . . . . . . . . . . . . . . . .
. . . . . . . . . . . . . . . . . .
. . . . . . . . . . . . . . . . . .
. . . . . . . . . . . . . . . . .
. . . . . . . . . . . . . . . . . .
. . . . . . . . . . . . . . . . .
. . . . . . . . . . . . . . . . . .
. . . . . . . . . . . More th
. . . . . . . . . . . . 20 Hz
. . . . . . . . . 87.5 to 1
. . . . . . . . . . . 87.5 to
. . . . . . . . . . . . . . . . . .
. . . . . . . . . . . . . . . . .
. . . . . . . . . . . . . 530-1
. . . .531-1602/ 522-1
. . . . . . . . . . . . . . . . .
. . . . . .. . . . . . 2.4~2.
. . . . . . . . . . . . . . DC
. . . . . . . . . . Negativ
. . . . . . 4-8 ohms per
. . . . . . . . . . . . . . . . . .
. . . . . . . . . . . . . . . . . .
. . . . . . . . . . . . . . . . .
. . . . . . . . . . . . . . . . .
. . . . . . . . . . . 10 Am
. 131.6 (W) x 61.2 (D)
> 60 dB
n 50 dB
- 20 kHz
7.9 MHz
08 MHz
. . 2.2μV
. >25 dB
710 kHz
620 kHz
. . 30 dB
835GHz
12 Volts
Ground
channel
. ±10 dB
. ±10 dB
. 9W x 2
. . . . 0 A
ere Max
x 86 (H)
FC
N ote s
WAR
NG! Any Changes
respo
sible for complianc
This d
vice complies with
two c
nditions: (1) This d
must
ccept any interfere
opera
on.
NOTE
This equipment ha
digital
device, pursuant to
able protection aga
reaso
FCC R
diation Exposure S
This e
uipment complies wit
enviro
ment. This equipmen
betwe
n the radiator& your
This tr
nsmitter must not be
transm
tter.
Note:
his equipment has b
device,
pursuant to the FCC
agains
harmful interference
radiate
radio frequency ener
may c
use harmful interfere
interfe
ence will not occur in
interfe
ence to radio or televi
off and
on, the user is encou
followi
g measures:
eorient or relocate th
I
crease the separatio
onnect the equipmen
onnected.
onsult the dealer or
r modifications not
could void the use
art 15 of the FCC
vice may not cause
ce received, includi
been tested and fo
Part 15 of the FCC
nst harmful interfer
tatement:
FCC radiation expo
should be installed
ody.
co-located or operati
en tested and found t
Rules. These limits a
in a residential install
y and, if not installed
ce to radio communi
a particular installatio
sion reception, which
raged to try to correct
receiving antenna.
between the equip
t into an outlet on a ci
n experienced radio/
xpressly approved
’s authority to oper
ules. Operation is s
armful interferenc
g interference that
nd to comply with t
ules. These limits a
nce in a residential
ure limits set forth fo
nd operated with min
g in conjunction with
o comply with the limi
e designed to provid
tion. This equipment
and used in accorda
ations. However, the
. If this equipment d
can be determined b
the interference by o
ent and receiver.
cuit different from tha
V technician for help
JHD916B
by the party
te the equipment.
bject to the followi
, and (2) this device
ay cause undesire
e limits for a Class
e designed to provi
installation.
an uncontrolled
mum distance 20cm
ny other antenna or
ts for a Class B digita
reasonable protecti
generates uses and c
ce with the instructio
e is no guarantee th
es cause harmful
turning the equipme
e or more of the
t to which the receive
g
B
e
n
an
s,
t
t
is
18
 Loading...