

Page 1
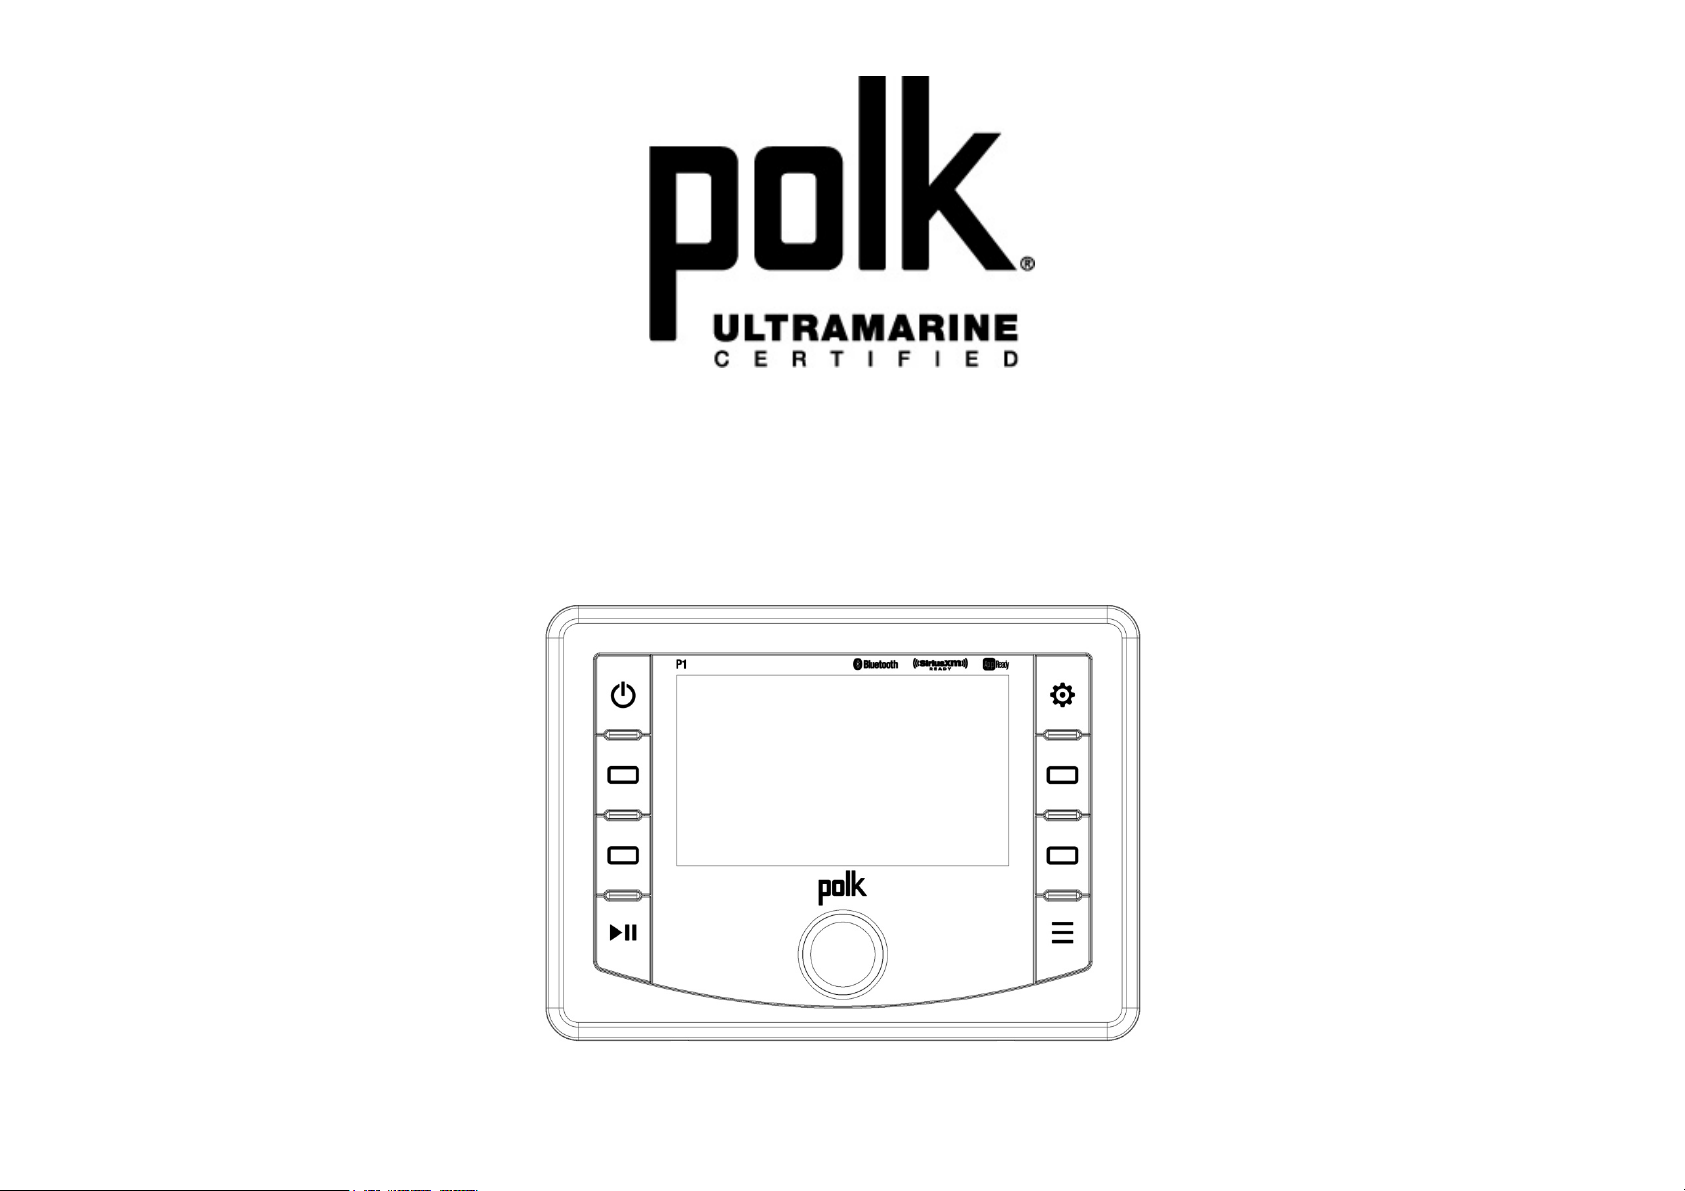
P1
Installation and Operation Manual
Page 2

T
o
.
o
.
.
.
.
i
t
.
.
.
.
.
.
.
.
.
.
.
.
.
.
.
.
.
s87
r
s
a
m
v
w
e
e
r
/
b
e
r
e
p
r
CONTEN
Warnings and C
Introduction .......
Safety Informati
Installation .........
Wiring ................
Basic Operation
Tuner Operation
Weather Band O
SiriusXM Operat
USB MP3 Opera
Bluetooth Opera
APP Operation ..
Specifications ....
Troubleshooting
S
mpliance ..............
..............................
n ...........................
..............................
..............................
..............................
..............................
peration ................
on .........................
tion .......................
ion ........................
..............................
..............................
..............................
..............................
..............................
..............................
..............................
..............................
..............................
..............................
..............................
..............................
..............................
..............................
..............................
..............................
..............................
..............................
..............................
..............................
..............................
..............................
..............................
..............................
..............................
..............................
..............................
..............................
..............................
..............................
..............................
.......... 1
.......... 3
.......... 4
.......... 5
.......... 7
.......... 8
........ 10
........ 12
........ 12
........ 19
........ 21
........ 22
........ 23
........ 23
P1
Copy
ights and Tradem
Sirius,
XM and all related
and it
subsidiaries. Visit
progr
mming/channel lin
other
reser
arks and logos ar
ed.
arks
marks and logos a
ww.siriusxm.com
up/ XM service su
the property of th
e trademarks of Si
xmlineup for updat
ject to change or
ir respective owne
ius XM Radio Inc.
s. All
reemption. All
s. All rights
www.a
aelectronics.com
7.305.0445
ii
Page 3
W
G
i
i
r
s
h
w
c
e
l
a
a
u
o
v
r
t
p
e
a
w
e
g
m
r
u
m
O
n
u
m
w
d
y
t
i
h
r
s
b
s
b
C
t
t
T
e
n
y
e
o
a
o
S
h
j
w
i
a
o
f
e
j
pop
N
r
N
r
h
h
i
u
t
e
p
s
m
o
l
ARNIN
Important Sa
1.
Read these
2.
Keep these
3.
Heed all wa
4.
Follow all in
5.
Do not use t
6.
Clean only
7.
Do not blo
manufactur
8.
Do not insta
or other app
9.
Do not defe
polarized pl
plug has tw
prong is pro
When the p
replacemen
10.
Protect the
convenienc
11.
Only use att
12.
Use only
manufactur
when movin
S AND C
fety Instructio
instructions.
nstructions.
nings.
tructions.
his apparatus near
ith a dry cloth.
k any ventilation
r's instructions.
l near any heat so
ratus (including a
t the safety purpo
g has two blades
blades and a thir
ided for your safet
ovided plug does n
of the obsolete ou
ower cord from be
receptacles, and t
chments/accesso
ith a cart, stand,
r, or sold with the
the cart/apparatu
MPLIAN
s
water.
openings. Install
rces such as radia
plifiers) that produ
se of the polarized
ith one wider than
grounding prong.
.
ot fit into your outl
let.
ng walked on or pi
e point where the
ies specified by th
tripod, bracket,
apparatus. When
combination to av
E
in accordance
ors, heat registers,
ce heat.
or grounding-type
he other. A ground
he wide blade or t
t, consult an electri
ched particularly
exit from the appa
manufacturer.
r table specified
cart is used, use
oid injury from tip-
ith the
stoves,
plug. A
ng type
he third
cian for
t plugs,
ratus.
by the
caution
ver.
paratus, the appa
a
erate normally, or
WAR
ING! To reduce t
appa
tus to rain or mo
WAR
ING! The apparat
that n
o objects filled wi
tus.
appa
ratus has been ex
as been dropped.
e risk of fire of el
sture.
s shall not be ex
h liquids, such a
posed to rain or
ctric shock, do n
osed to dripping
vases, shall be p
P1
oisture, does not
t expose this
or splashing and
aced on
Porta
le Cart Warning
13.
Unplug this
periods of ti
14.
Refer all se
the apparat
plug is da
apparatus during
e.
vicing to qualified
s has been damag
aged, liquid has
lightning storms
ervice personnel.
ed in any way, suc
een spilled or ob
r when unused
ervicing is requir
as power -supply
ects have fallen i
or long
d when
cord or
nto the
1
Page 4

y
b
m
w
e
E
c
m
m
a
o
i
e
r
e
d
f
T
m
a
C
a
s
a
s
d
r
q
e
n
e
e
e
e
.
o
p
u
n
o
c
h
e
n
r
o
n
i
h
y
p
j
e
t
n
i
g
s
e
n
e
n
r
FCC Notes
WARNING! An
party responsi
the equipment.
This device co
the following t
interference, an
including interf
FCC Radiation
This equipment
uncontrolled env
minimum distan
This transmitter
antenna or trans
Note: This equip
Class B digital d
provide reason
installation. This
energy and, if n
cause harmful
guarantee that
equipment does
can be determin
try to correct the
• Reorient or
• Increase th
• Connect the
the receiver
• Consult the
Changes or modi
le for compliance
plies with part 15
o conditions: (1)
d (2) this device
rence that may c
xposure Stateme
complies with FC
ironment. This equ
e 20cm between th
ust not be co-loc
itter.
ment has been te
evice, pursuant to
ble protection ag
equipment gener
t installed and u
nterference to ra
interference will n
cause harmful inte
d by turning the e
interference by on
elocate the receivi
separation betwe
equipment into an
is connected.
ealer or an experi
ications not expr
could void the us
of the FCC Rules
his device may n
ust accept any in
use undesired o
nt:
radiation expos
ipment should be i
e radiator& your b
ted or operating in
ted and found to
the FCC Rules. T
ainst harmful int
tes uses and ca
ed in accordance
io communication
ot occur in a pa
ference to radio or
uipment off and on
or more of the foll
g antenna.
n the equipment a
outlet on a circuit d
nced radio/TV tec
ssly approved b
r’s authority to o
Operation is sub
t cause harmful
terference receiv
eration.
re limits set forth
stalled and opera
dy.
conjunction with a
omply with the lim
ese limits are desi
rference in a re
radiate radio fr
with the instructio
s. However, ther
ticular installation.
television receptio
, the user is encou
wing measures:
d receiver.
ifferent from that to
nician for help.
the
erate
ect to
d,
for an
ed with
y other
ts for a
ned to
idential
quency
s, may
is no
If this
, which
aged to
which
P1
2
Page 5
U
u
P
F
E
e
c
a
a
e
o
P
d
e
r
s
e
n
n
o
W
e
0
A
V
U
o
O
r
r
o
C
e
D
INTROD
System Feat
Features of the
• 4.3” color T
• AM/FM US/
• SiriusXM-R
• USB Playba
• Bluetooth (S
• APP Ready
• Weatherban
• Mute
• Pre-set Equ
• Electronic B
• Output Pow
• Protective C
• Wired Rem
• 4-Channel
• Auxiliary Au
Content List
• Polk P1 Tun
• Polk P1 Wir
• 10’ Extensio
• Commande
• Wire Harne
• Quick Refer
• Cutout Mou
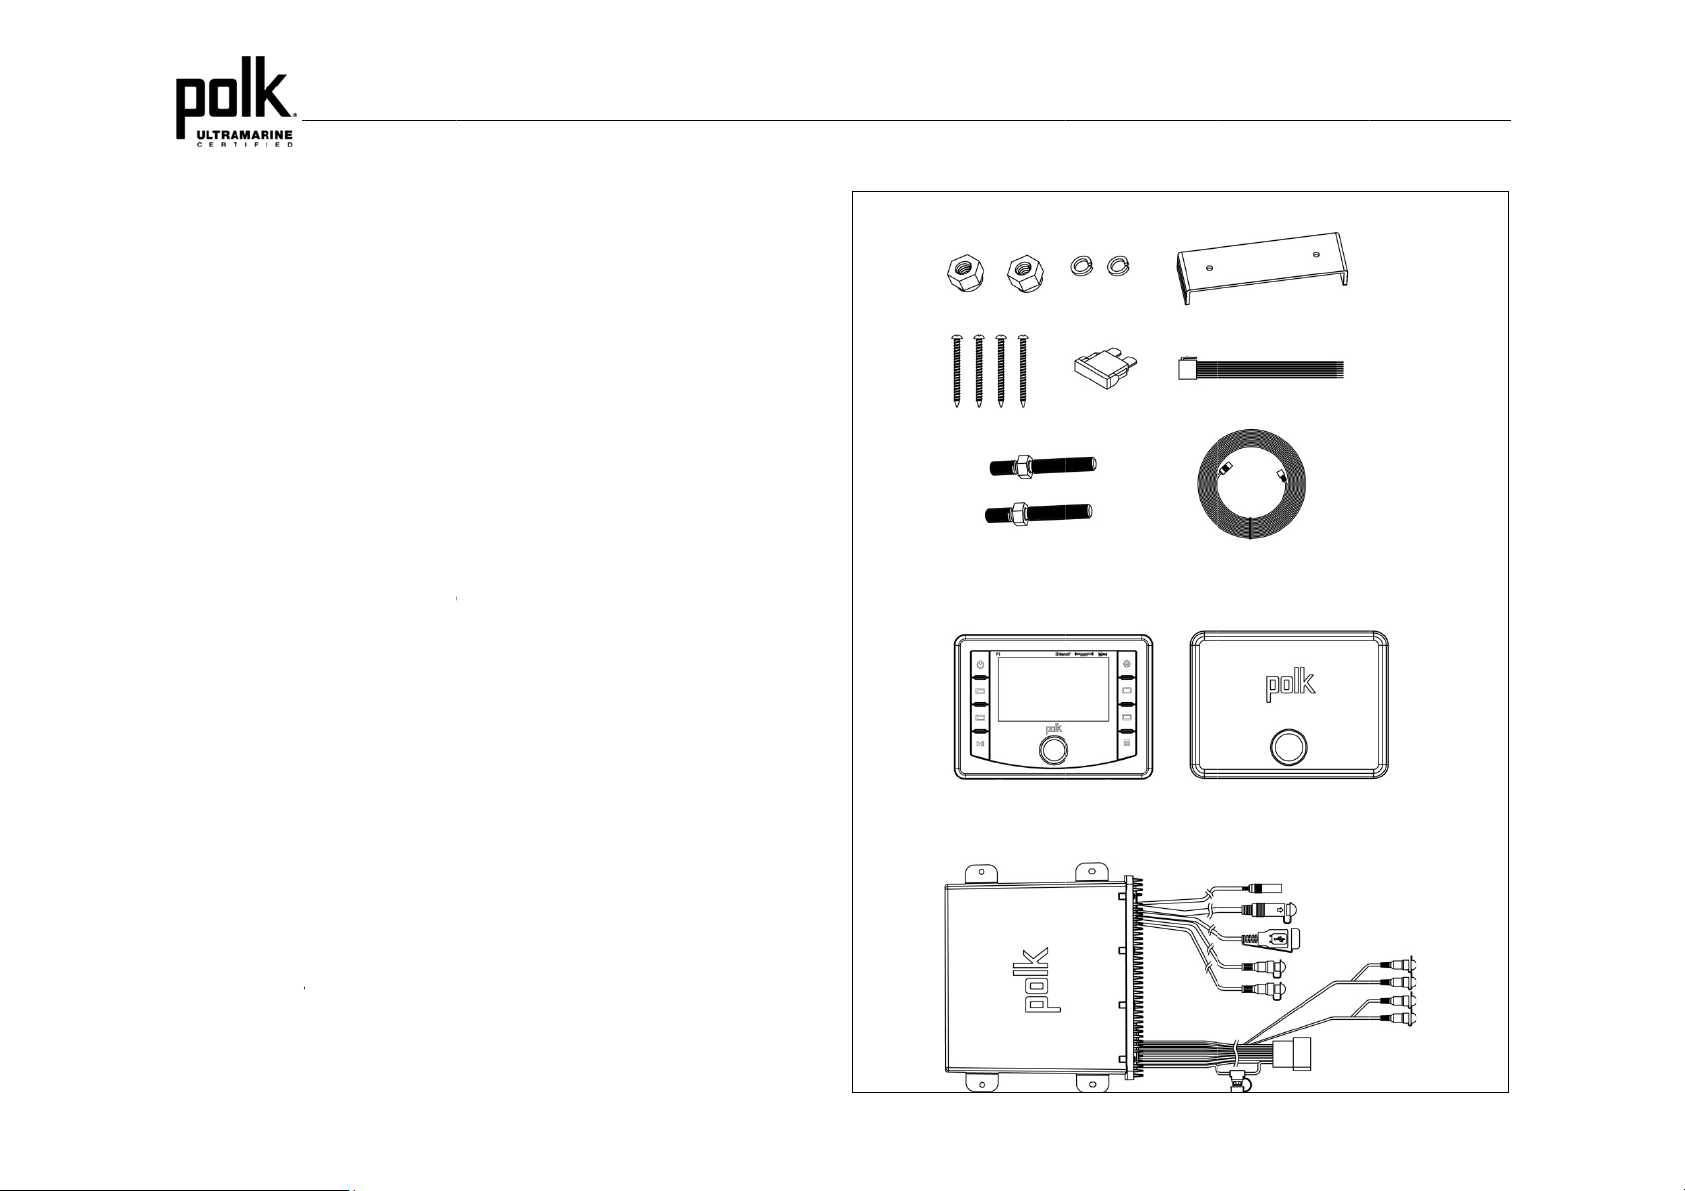
• Hardware Ki
- Rear Mou
- (4x) #8 M
- (2x) Moun
- (2x) Lock
- (2x) Lock
- 15A Blad
CTION
res
olk P1 marine audi
T display
URO Tuner with 3
ady™
k of MP3 and WM
upports A2DP & A
d Tuner with Alerts
lizer – 5 settings (
ss, Treble, Balanc
r 50W x 4
ommander Cover
te Control Ready (
re-amp Line Level
io Input (RCA)
/Amp Module
e
d Commander
n Cable
Cove
s
nce Guide
ting Template
t
nting Bracket
unting Screws
ting Bolt
asher
Nut
Fuse
o system include:
Presents (12 AM,
files
RCP)
ser, Flat, Rock, Cl
e and Fader Contr
ptional PRC100B
utputs (Front & R
18 FM)
assical, Pop)
ls
, PRC200BC)
ar RCA)
HAR
WARE KIT CONTENTS
P1
3
Page 6

e
a
e
e
n
g
d
P
e
C
T
o
e
e
x
s
r
m
e
Y
r
t
t
S
N
E
O
O
M
T
S
SAFETY
When Boating
Keep the volum
Protect from W
Do not submerg
other damage.
Protect from th
Use the included
water while not i
Protect from Hi
Do not mount ra
Use the Proper
This product is d
system.
INFORMA
level low enough t
ter
the product in wat
Elements
cover to protect th
use.
h Temperatures
io within close pro
ower Supply
signed to operate
ION
be aware of your
r, as this can cau
wired commande
imity of engine co
with a 12 volt DC n
surroundings.
e electric shorts, fi
from sunlight, dus
partment.
gative ground bat
e or
, and
ery
WAR
ING:
TO R
DUCE THE RISK
USE
NLY THE RECO
F FIRE OR ELEC
MENDED ACCES
RIC SHOCK AND
ORIES.
P1
INTERFERENCE,
CAUTION:
DO NOT OPEN
REFER SERVIC
OVERS AND DO
ING TO A QUALIFI
NOT REPAIR BY
ED TECHNICIAN.
OURSELF. PLEA
E
4
Page 7
A
B
o
i
c
n
e
u
n
o
w
t
n
r
t
w
A
e
s
t
u
d
e
e
h
n
o
s
t
h
n
e
r
a
d
u
d
c
a
a
t
g
kSc
INSTALL
Before You
Always disconne
Important N
• Before final
connected p
• Consult with
other modifi
• Install the u
cannot injur
• Use the incl
egin
ct the negative batt
tes
nstallation, test the
roperly and the sys
your nearest deal
ations to your ves
it where it does no
passengers.
ded template to c
TION
ery terminal
wiring connection
tem works.
r if installation requ
el.
interfere with oper
t the installation op
to make sure the
ires the drilling of h
ating the vessel an
ening.
nit is
oles or
Brac
et Mount
P1
Commander
• During stora
protecting th
other eleme
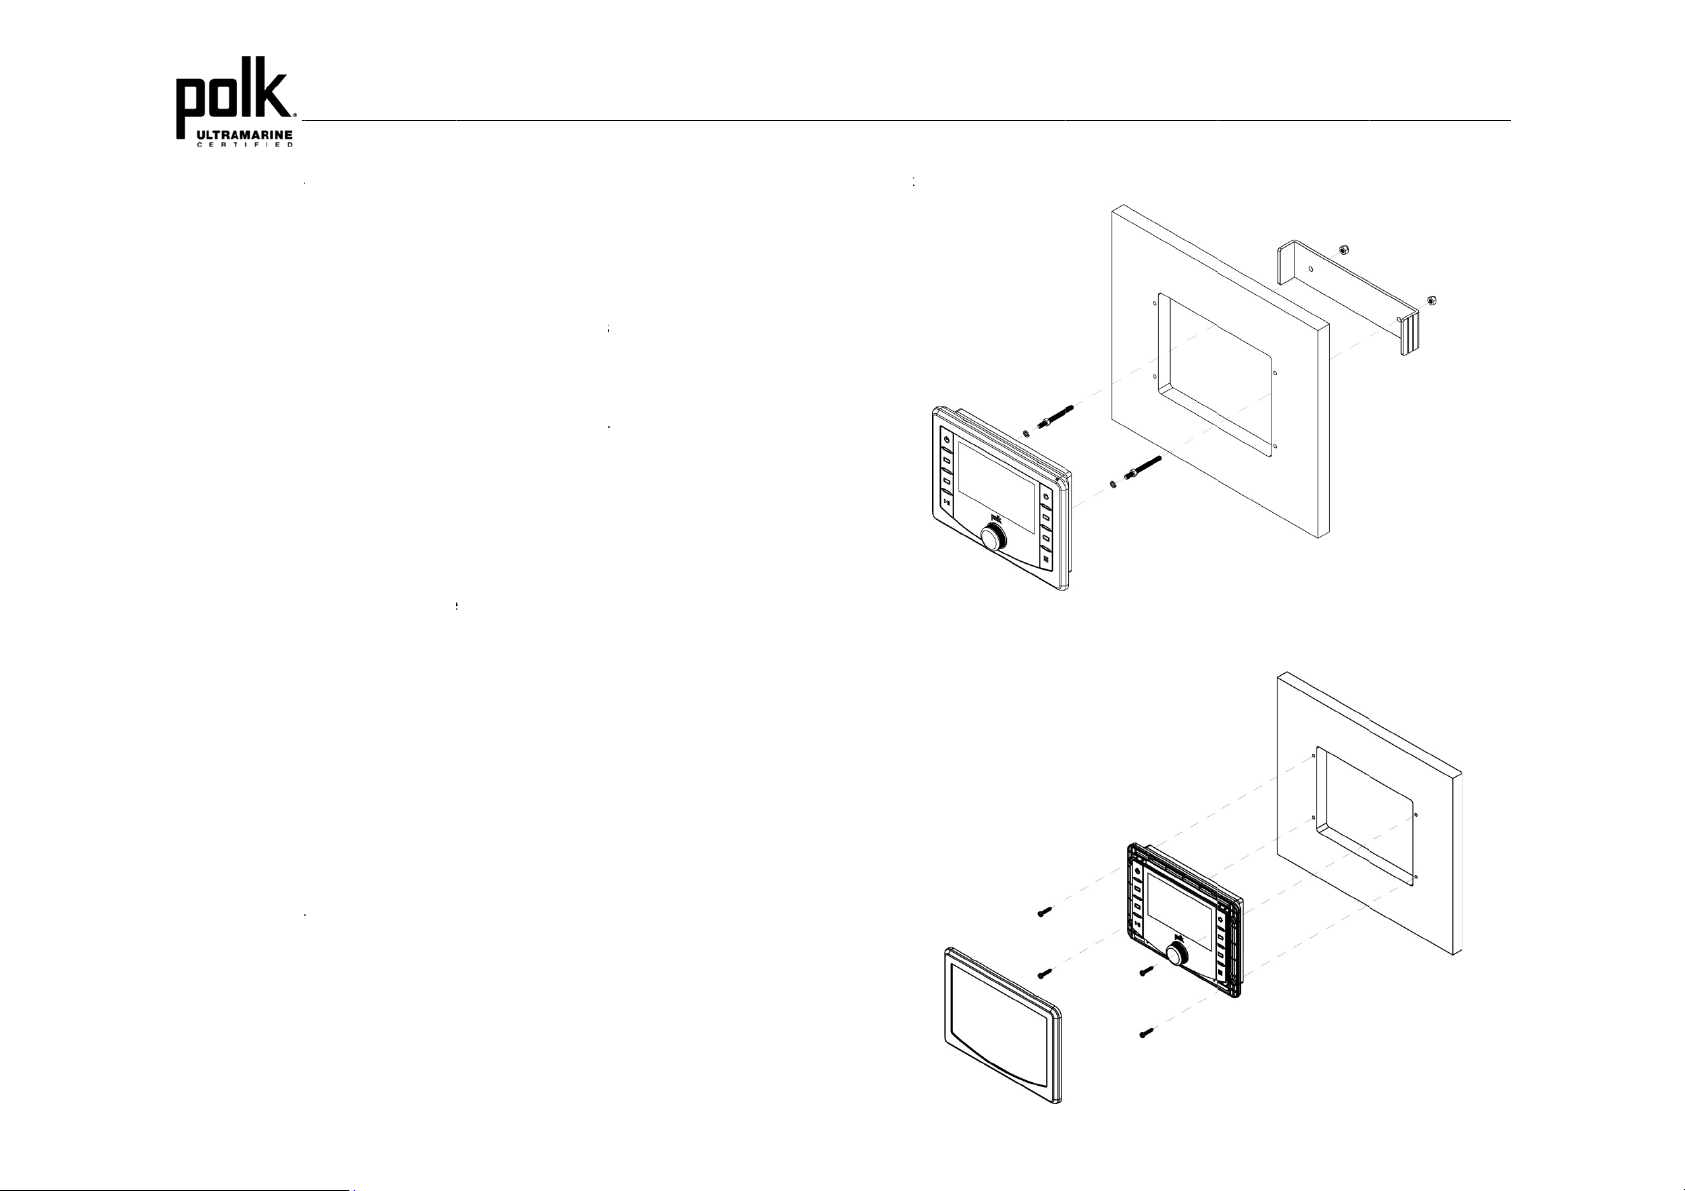
Wired Comm
• Choose a m
allowing the
• Secure the
methods de
Cover
ge, use the include
e wired command
ts.
ander Mountin
unting area for th
rear gasket to fully
ired commander u
ailed below.
Bracket Mou
• Insert wired
included ha
Screw Moun
• Secure the
pan head sc
commander throug
dware as detailed i
ired commander t
rews (not included)
cover to prolong
r from direct sunlig
he life of your devi
t, moisture, dust,
e by
nd
rew Mount
g
wired commander
seal to the mounti
sing either of the r
that is clean and fl
g surface.
commended moun
t,
ing
t
cut-out and secu
the diagram.
the mounting surf
as detailed in the
e with bracket usin
ce using #6 stainle
iagram.
ss steel
5
Page 8
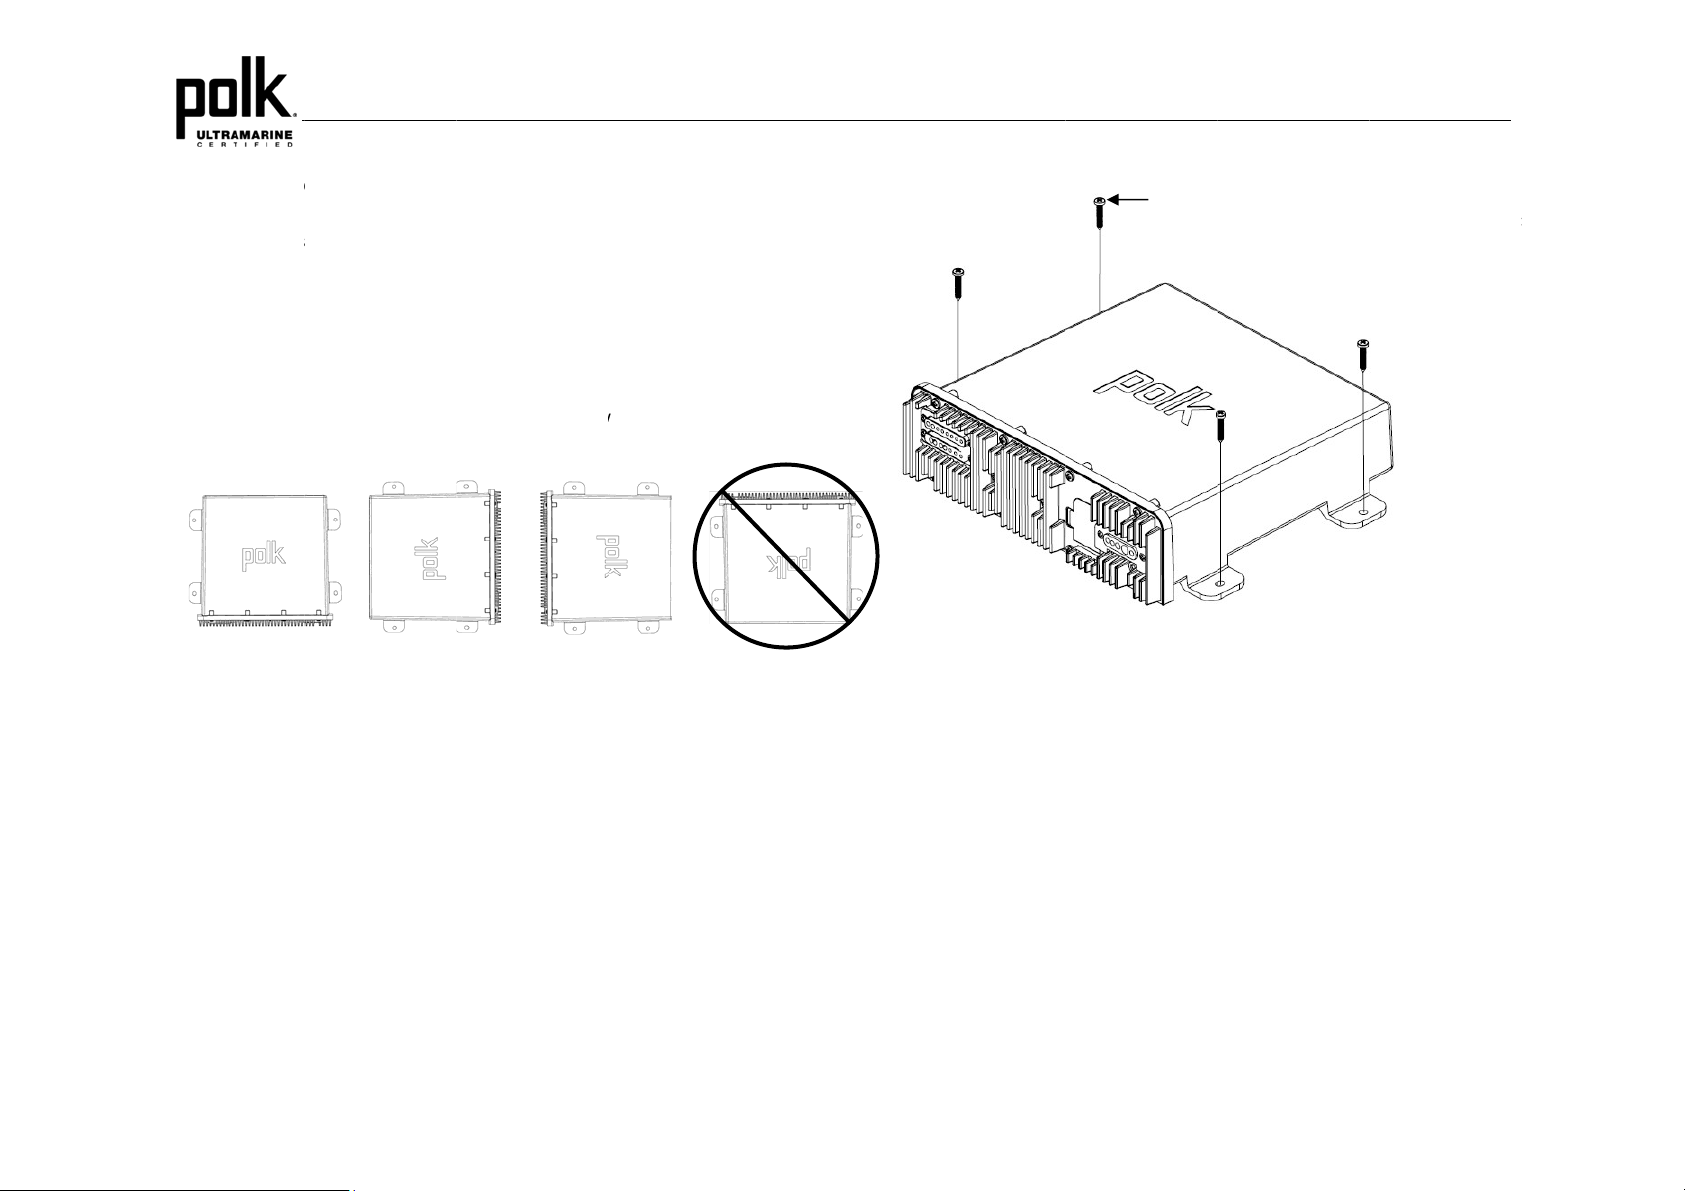
e
o
i
o
n
h
h
m
s
w
i
e
a
.
e
o
o
e
p
h
s
h
w
u
n
t
e
h
d
t
a
w
c
e
h
g
a
p
n
c
e
d
e
p
e
m
h
a
n
y
a
e
O
O
E
G
C
E
Removing th
To remove the c
mounting screws
Unit
mmander, remove
, then slide wired c
bracket mount or r
mmander out of t
move trim ring an
e mounting hole.
P1
STAINLE
SS STEEL #8 SCREWS
1/8” PIL
T HOLES FOR SUPPLI
.180 PIL
T HOLES WHEN USIN
(INCLUDED)
D SELF-STAR TING S
THREADED MACHIN
RWS
SCREWS
Tuner / Ampl
1. Choose a m
of ventilatio
module can
when mount
facing straig
2. Using the s
the tuner/ a
3. Route the tu
required. Ke
this can cau
4. Follow the
secure with
5. After compl
the battery
must be on)
wiring and r
manual.
fier Module M
unting area for th
to prevent the am
be mounted in the
ing in vertical positi
ht up, as water can
ortest length of the
plifier as detailed i
ner/amplifier harne
ep some slack in t
e damage to the
iring diagram caref
nsulated crimp con
ting the wiring con
nd turn the unit on
If the unit does no
fer to the trouble-s
unting
tuner/amplifier mo
lifier from overhea
orizontal or vertic
on, do not mount
collect around the
recommended siz
n the diagram on t
s and cable throu
e harness/cables s
ires.
lly and make cert
nectors to ensure
ections, reconnect
to confirm operatio
operate, disconne
hooting guide locat
ule that will provid
ing. The tuner/am
l position. Please n
ith the harness exit
hassis in these ar
screws possible,
e below.
hout the vessel as
o it won't be too tig
in all connections
roper operation.
the negative termi
(vessel accessor
t battery, recheck
d in the back of th
plenty
lifier
ote that
points
as.
ount
t, as
re
al on
switch
ll
6
Page 9
A
E
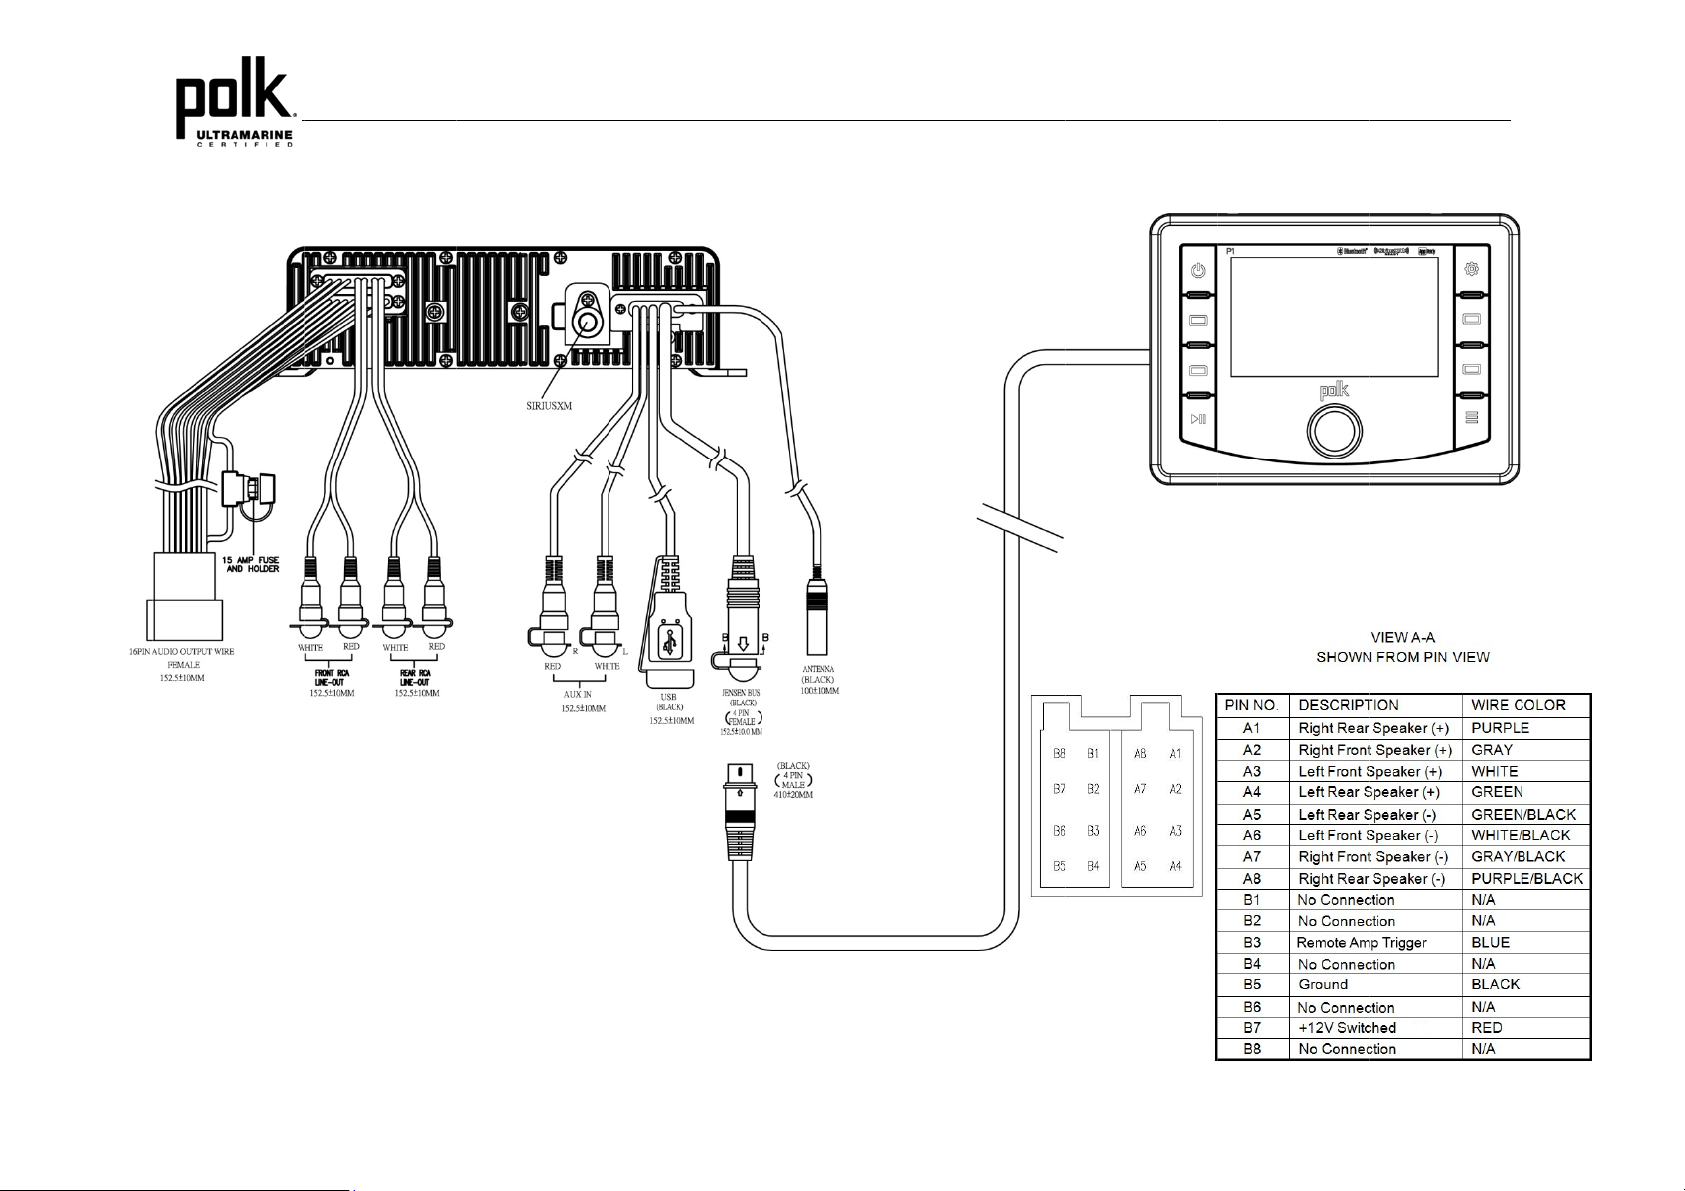
WIRING
TUNER/
MP MODULE
COMMAND
P1
7
Page 10
P
f
r
v
M
t
b
s
a
N
h
E
r
r
o
c
o
o
r
c
a
u
u
s
e
A
a
n
w
L
h
e
h
h
L
r
h
R
l
n
o
n
d
t
o
o
o
1
o
F
t
o
o
o
e
e
l
e
b
l
r
s
d
r
o
u
6
a
n
d
e
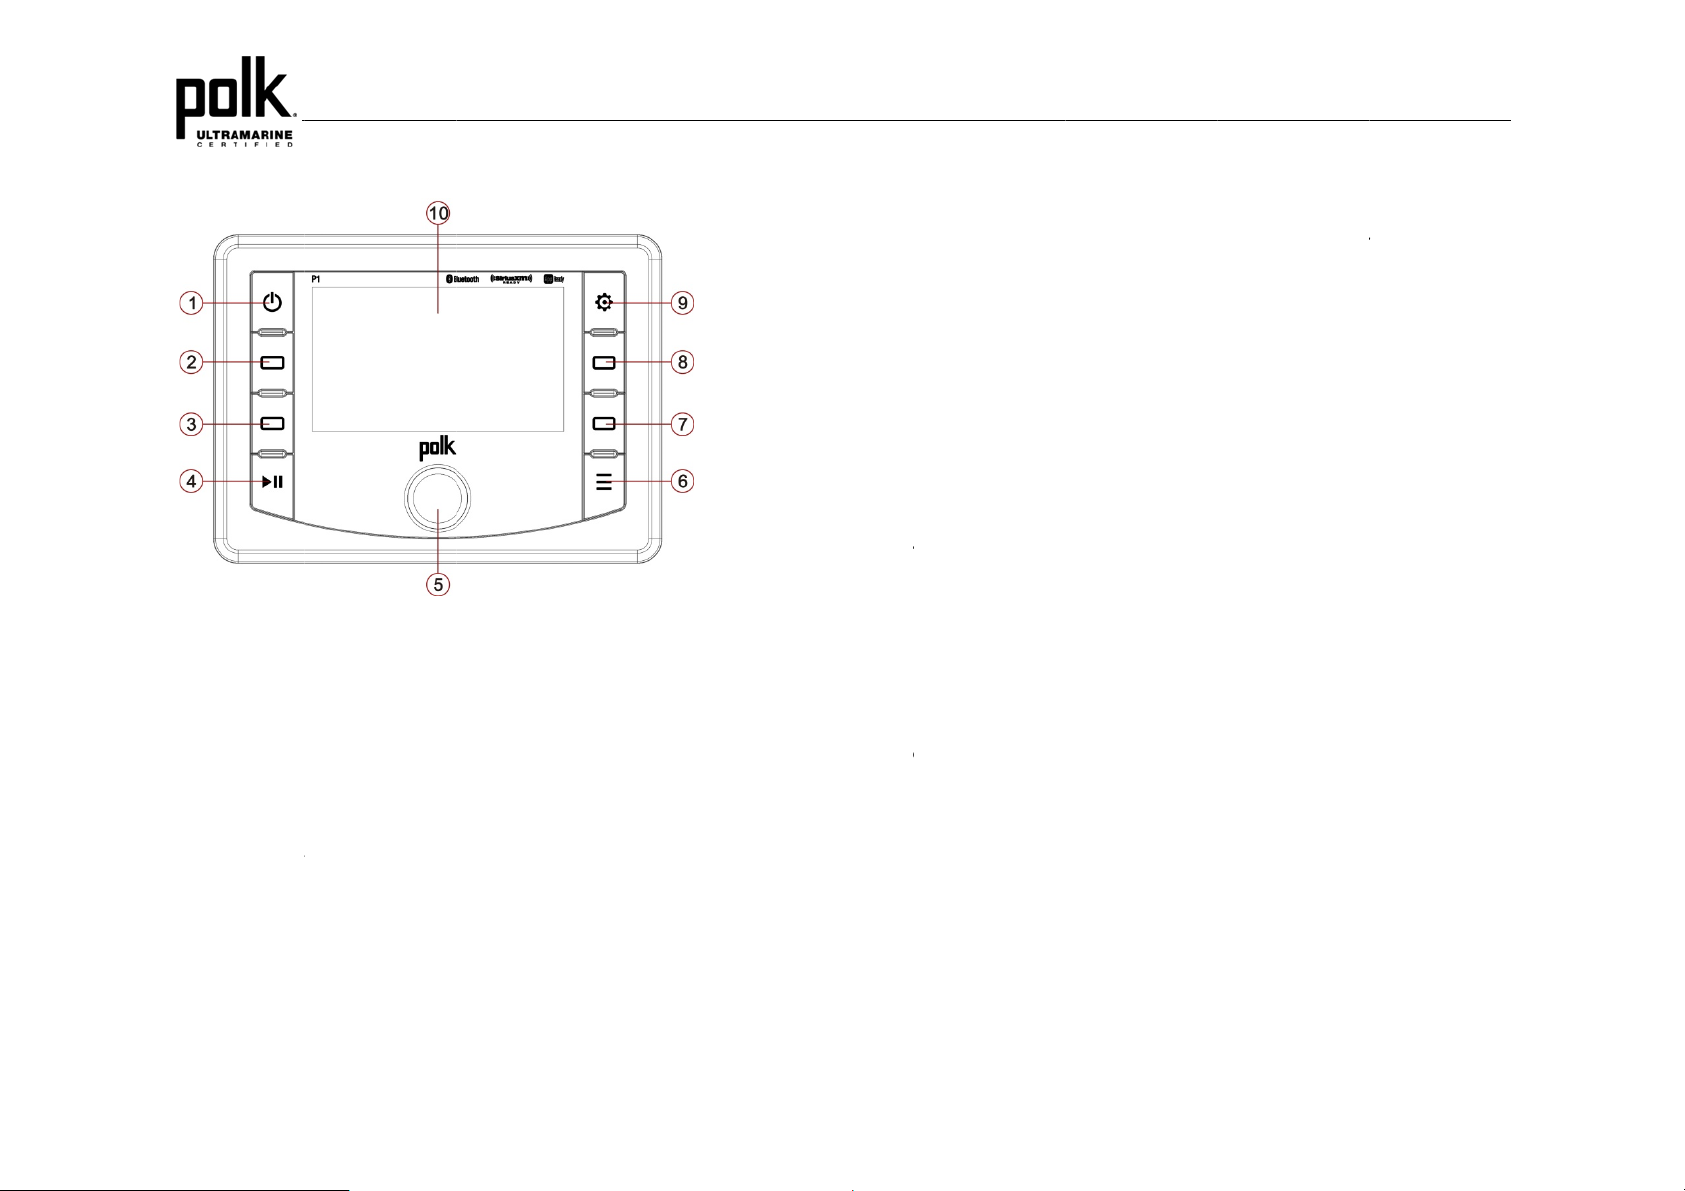
BASIC O
Power On/Of
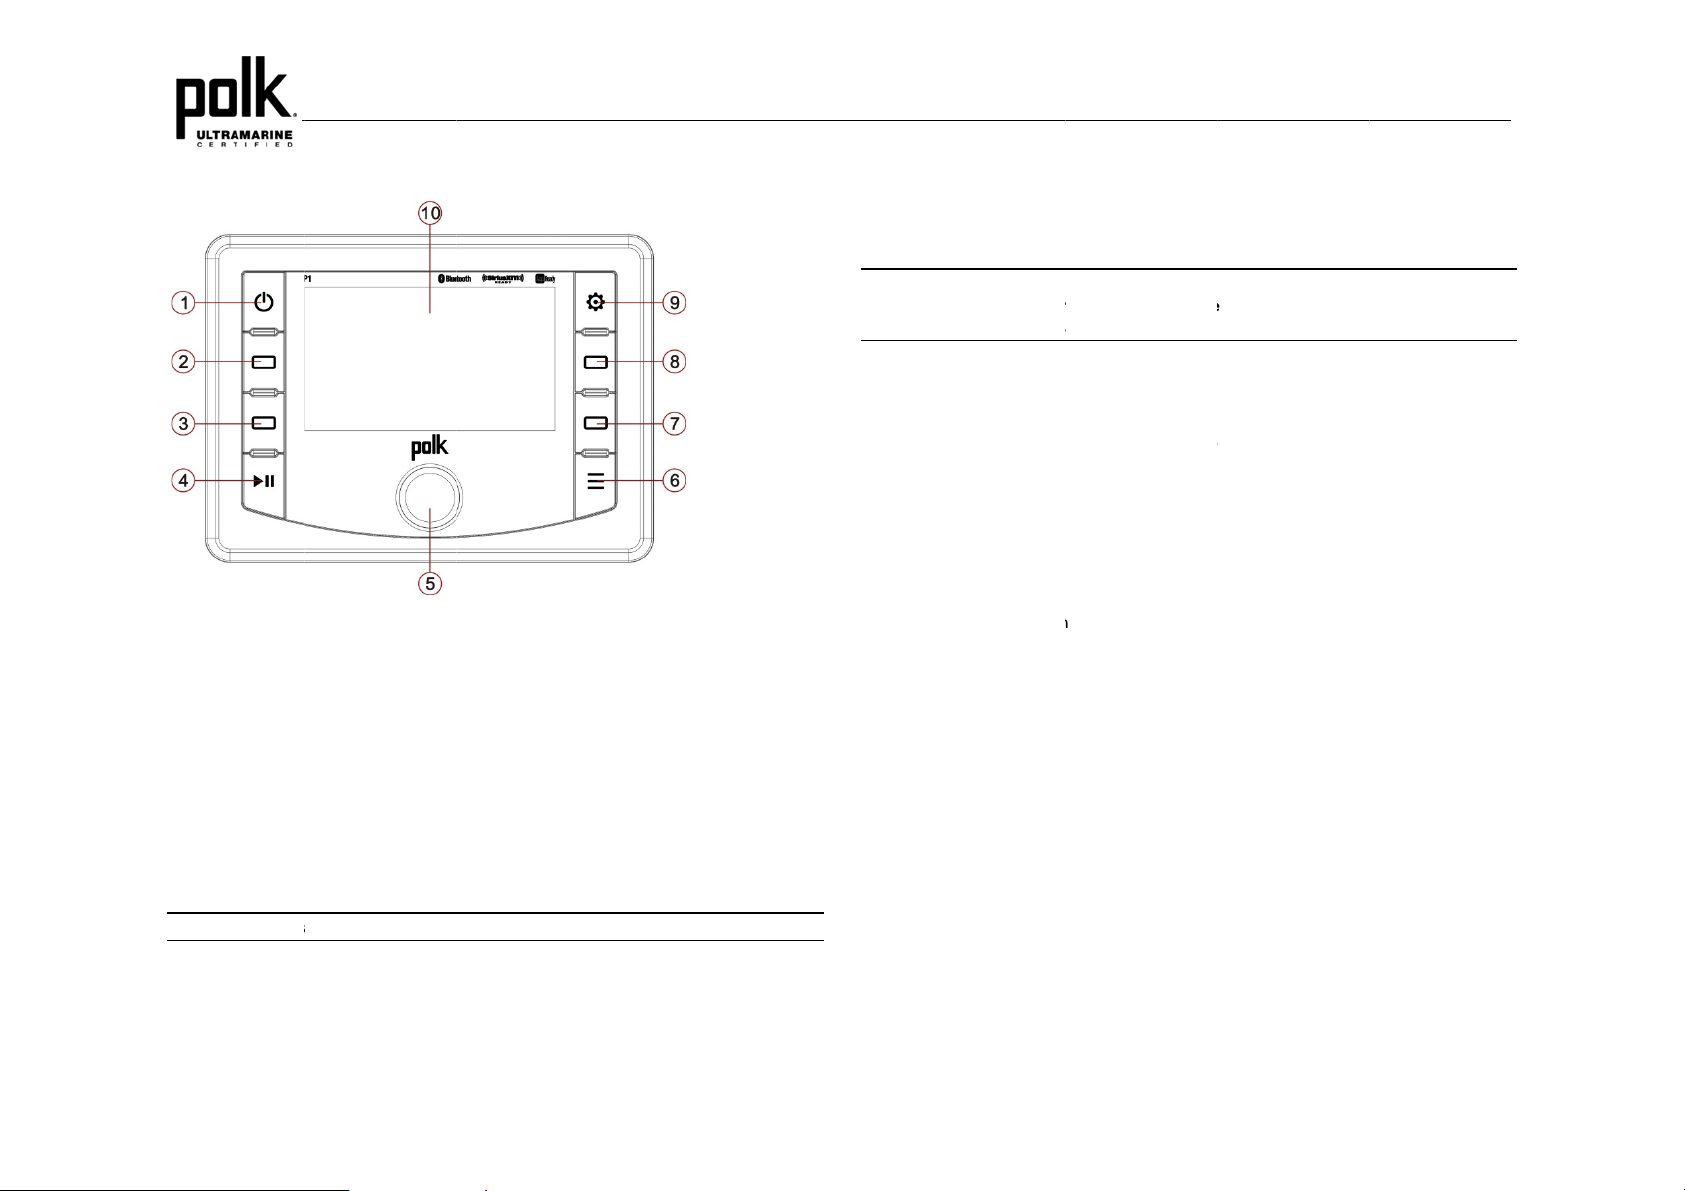
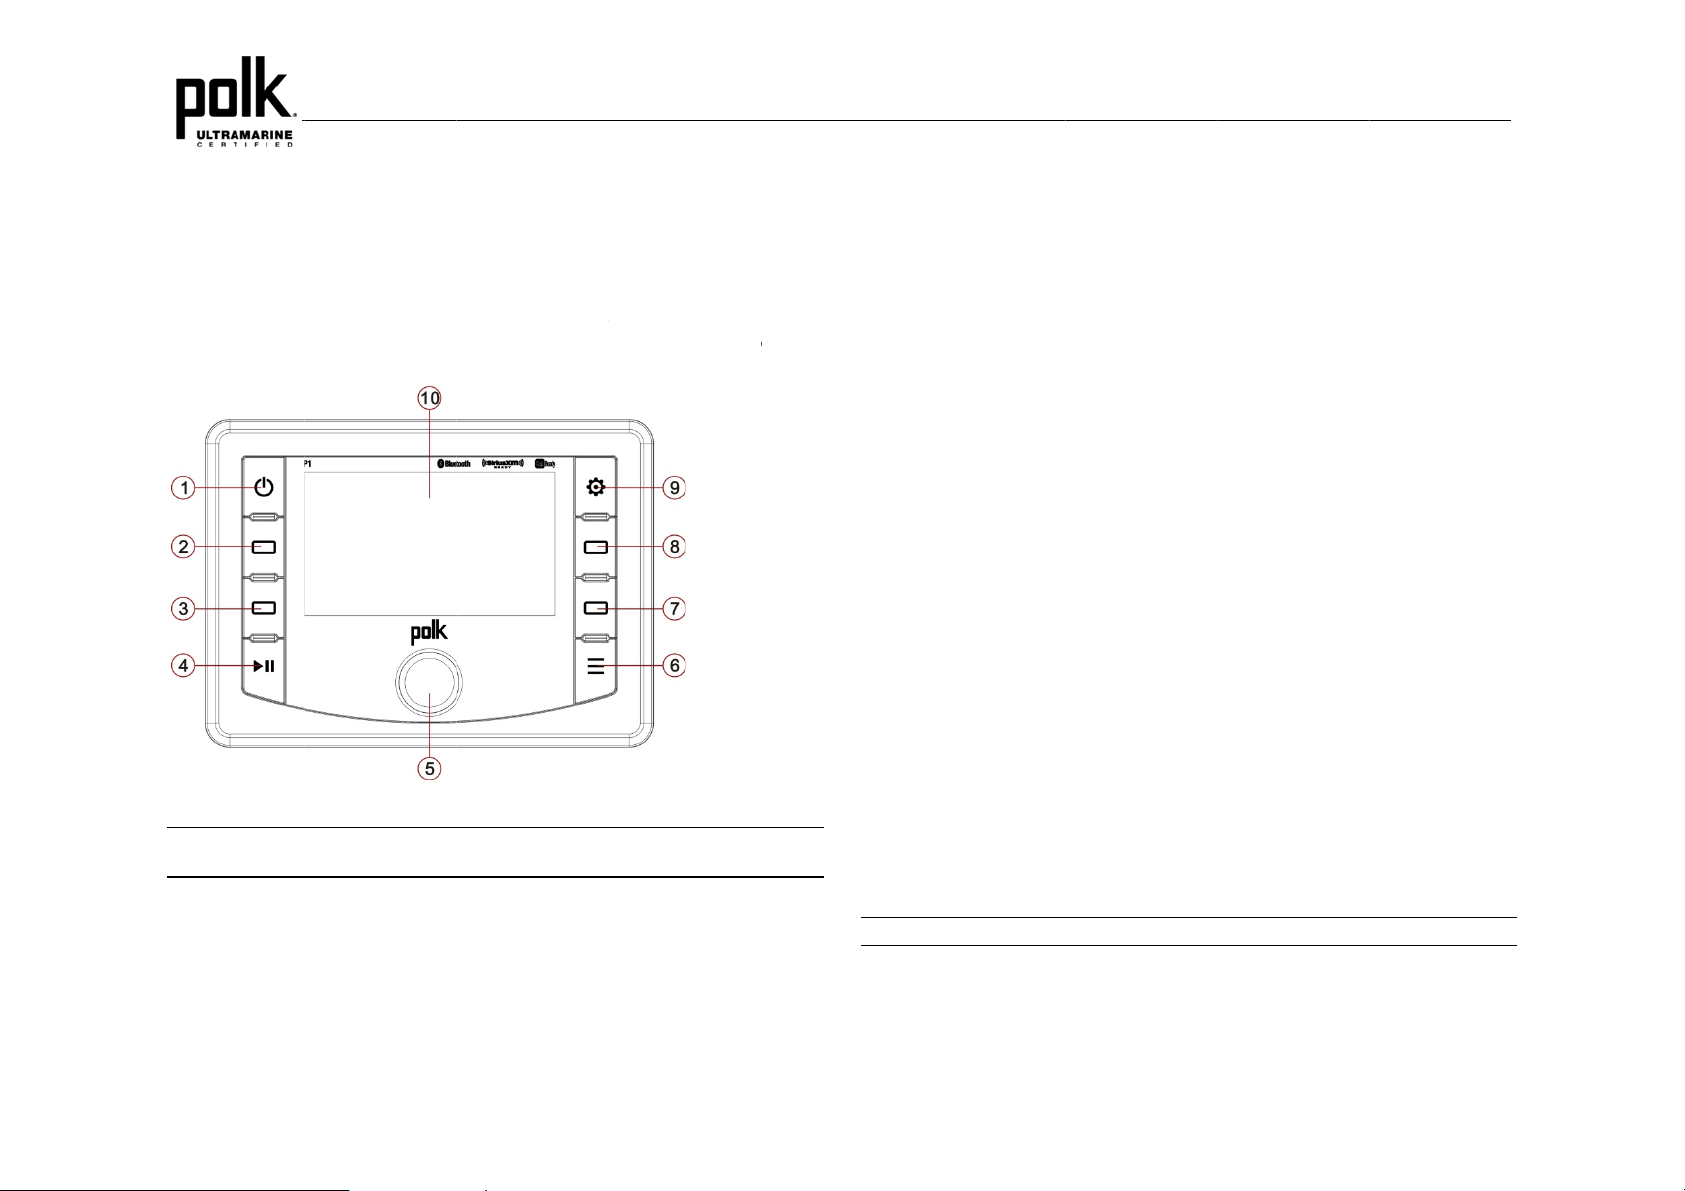
Press the Powe
Volume
To increase the
volume, rotate th
Play/Pause/
Press the ►|| bu
Press ►|| button
Mode
Press the Mode
Continue to pres
Press the associ
ERATIO
button (1) to turn t
olume, rotate the
e Encoder Knob c
ute
tton (4) on the cont
again to unmute o
button (6) on the c
the Mode button t
ted soft button for
e unit on/off.
ncoder Knob (5)
ounter-clockwise.
ol panel to pause
restore the audio
ntrol panel to ente
o page through the
the desired playba
lockwise. To decre
r mute the audio o
utput to the previo
mode selection di
available playback
k mode as display
se the
tput.
s level.
play.
modes.
d.
udi
Menu
Press
the Menu button (9
navig
te through the audi
pressi
g the Encoder K
clock
ise to increase an
autom
atically exit the aud
menu
items can be adjus
evel
Bass
Use t
e Encoder Knob t
Trebl
Level
Use t
e Encoder Knob t
Balan
e
e Encoder Knob t
Use t
from “
12” (full left) to “R
Fade
Use t
e Encoder Knob t
from “
12” (full rear) to “
Equa
zer
Press
the EQ soft button
five pr
-defined bass and
Loud
ess
Press
the Loud soft butt
low v
lumes, this feature
) on the control pan
o menu items by r
ob to make selecti
counter-clockwise
io menu after 10 s
ed.
adjust the Bass l
adjust the Treble
adjust the Balanc
2” (full right).
adjust the Fader
12” (full front).
o turn on the equa
treble curves: Use
n to toggle loudne
will boost the bass
el to access the au
tation the Encode
n. Rotate the Enc
to decrease. The
conds of inactivity.
vel range from “-6”
evel range from “-
between the left
etween the rear a
ization function an
> Flat > Rock > Cl
s on/off. When list
and treble ranges.
P1
io menu. Y ou can
Knob and
der Knob
nit will
The following
to “+6”.
” to “+6”.
nd right speakers
d front speakers
select between
assical > Pop.
ning to music at
8
Page 11

u
o
u
e
E
n
e
n
w
g
e
a
o
B
B
R
a
o
e
t
n
e
a
A
A
o
d
P
a
n
s
o
l
n
u
u
–
p
M
u
o
p
n
o
n
3
e
e
t
c
e
b
n
o
e
l
b
K
h
n
d
w
s
n
i
o
e
e
n
E
o
A
l
c
f
r
r
i
u
E
e
a
k
r
s
a
O
V
a
a
h
v
o
s
l
d
e
a
r
A
n
e
u
s
a
t
w
e
n
s
m
t
o
e
t
L
a
u
n
u
e
c
e
a
e
d
System Men
1. Press and h
system men
first menu it
2. Rotate the
desired item
3. Press the E
adjust the s
4. Press the E
menu list.
5. Press the S
6. The followin
• Key Be
• LCD B
• LCD C
• Button
• Power
• Tuning
• SXM S
- Set L
- Lock
- SXi S
• Bluetoo
- BT O
- BT D
and d
- BT P
pairin
-
• Battery
• Battery
• Reset t
factory
• About:
NOTE: BT Pair
ld the Menu butto
u. “System Setting
m, “Key Beep.”
ncoder Knob (5) t
.
coder Knob to se
lected menu item.
coder Knob agai
oop Arrow soft b
items can be adj
p (On/ Off)
cklight (1 – 10)
ntrast (1 – 10)
acklight (1 – 10)
utton Backlight (1
egion (USA/ Euro
tellite Radio (Sub
ck Code
d Channels
oftware Version
h Setup (Sub Men
/Off: Turn on and
vice List (Lock/Unl
elete from a list of
ir: Press Encoder
g mode.
larm (On/Off)
uto Off (On/Off)
Defaults: Press E
efault settings)
ress Encoder Kn
nd BT Device me
(9) for more than
” will appear on th
navigate the syst
ect the item and ro
to enter your sele
tton to return to th
sted:
10)
e)
enu, only accessi
, only accessible i
ff BT module.
ock, Disconnect/C
reviously paired m
Knob to confirm s
coder Knob once
b to view software
u options are on
seconds to enter
display, followed
m menu and highli
ate the Encoder
tion and return to t
previous operatio
le in SiriusXM mo
Bluetooth mode)
nnect, Delete): Vie
obile devices.
lection and put the
to confirm. (Reset
version informatio
y available while
the
y the
ght the
nob to
e
.
e)
, lock
P1 into
unit to
.
n the
BT m
de.
Batt
ry Alarm Oper
If Batt
ry Alarm is set to “
the vo
tage drops to 10.8
flashi
g on the LCD displ
NOT
: “OFF” is the def
the v
lume is set to 0, t
uxi
iary Input
To ac
ess an auxiliary de
1. C
nnect the portable
o
the radio.
2. P
ess the Mode butt
3. P
ess the Auxiliary
Liqu
d Crystal Disp
The c
rrent frequency an
NOT
: LCD panels may
temp
ratures for an ext
numb
rs on the LCD m
l when the tempe
norm
Bac
Key (Swoop
In vari
us modes and co
lower
ight soft button. Pr
the sy
tem default time o
tion
N”, an alarm will
(+/- 0.3V). A visu
y.
ult setting for Ba
e audible beep
ice:
audio player to th
n (6) twice to view
oft button to select
ay (LCD)
activated functio
take longer to re
nded period of ti
y decrease sligh
ature increases t
rrow)
ditions, the swoop
ss button to exit th
t and returning to
ound (3 beeps eve
l warning (Battery
tery Alarm. If the
ill not be heard.
AUX IN cables ro
the Auxiliary optio
auxiliary audio inp
s are shown on th
pond when subje
e. In addition, th
ly. The LCD displ
a normal range.
arrow option will b
current operation
he previous menu
P1
ry 30 sec) when
ow) will appear
udio is muted or
ted from the rear
.
t mode.
LCD panel (10).
ted to cold
visibility of the
y will return to
available in the
without waiting for
isplay.
9
Page 12
O
o
s
s
n
h
s
i
a
N
u
g
h
u
n
A
a
A
a
s
n
/
r
a
c
n
i
t
a
o
a
l
e
t
s
e
y
d
n
n
e
b
P
t
a
d
e
c
,
r
r
g
8
e
o
c
g
d
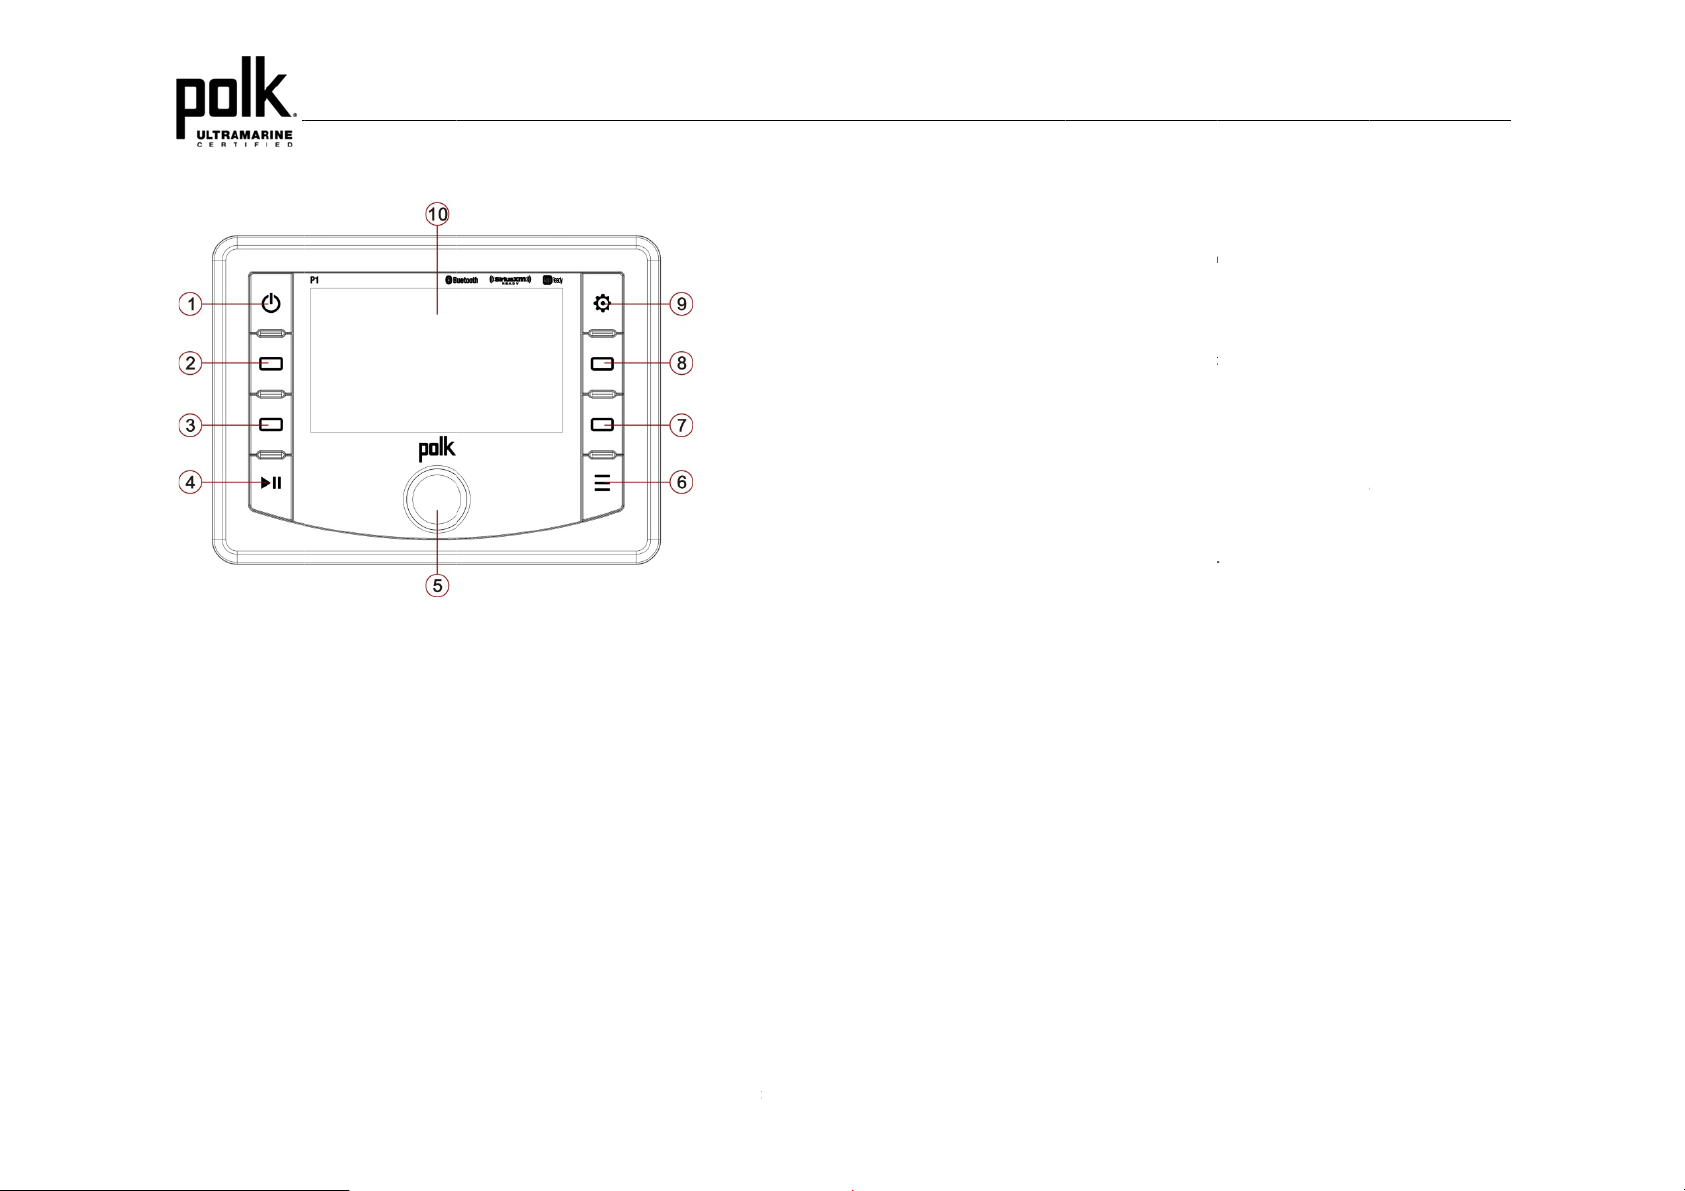
TUNER
Tuner mode opti
BAND
Select a Band
Press the Band
TUNE
Manual Tuning
Press the Tune
increment statio
Seek Tuning
Press and hold t
previous stronge
PRESET
Preset mode opt
Autosave
Press the Autos
store them in the
PERATIO
ns available are T
oft button to chan
oft button. Press t
s down/up step by
e |<< or >>| soft b
t broadcast statio
ons available are
ve soft button to a
preset list for the s
ne, Band, Preset
e between FM or
e |<< or >>| soft bu
step.
ttons to automatic
.
utosave, Scan and
utomatically select
elected Band. The
nd PTY.
M bands.
ttons to decrement
lly seek the next o
List.
trongest stations
ew stations repla
nd
e any
s already stored in
statio
Scan
Press
the Scan soft butto
will pa
use for ten second
ng when the desir
scann
List
Press
the List soft button
prese
locations to store
Store
a Station
While
tuned to the desire
navig
te the preset list a
and h
ld the Encoder K
the st
tion. The station fr
memo
ry location number.
a Station
Recal
Rotat
the Encoder Kno
prese
memory location.
corres
ponding stored sta
that band.
n to scan stations s
at each preset st
d station is reache
to display the pres
our favorite broad
broadcast station
d highlight the desi
ob for 3 seconds o
quency will appea
to navigate the p
ress the Encoder
ion.
tored in the current
tion. Press Scan a
.
t list. There are 1
ast stations.
rotate the Encod
red preset memory
r press the Save s
in the display adja
eset list and highli
Knob to select an
P1
band list. The unit
ain to stop
FM and 12 AM
r Knob (5) to
location. Press
ft button to store
ent to the preset
ht the desired
tune to the
10
Page 13

o
a
e
N
R
B
b
t
E
b
e
y
u
i
o
e
e
n
o
a
n
g
a
P
o
g
n
o
r
n
r
f
e
u
o
o
e
t
k
r
r
s
u
T
o
C
a
t
p
o
n
h
w
PTY
Press the PTY s
RBDS informatio
NOTE: Radio st
listening area.
In FM radio mod
(PTY) options: A
Adult Hits / Soft
/ R&B / Soft R&
Personality / Pu
To search for sta
1. Rotate the
categories a
2. Highlight sel
search the
during the s
automaticall
previously t
NOTE: Perform
station broadca
Stereo (ST)
The unit will aut
stereo mode, th
available, the uni
displayed.
ft button access s
n.
tions broadcasti
, press the PTY s
Y / News / Inform
ock / T op 40 / Cou
/ Foreign Languag
lic / College / Weat
ions in a PTY cate
ncoder Knob cont
nd select the progr
ecting the desired
and or broadcasts
arch. If a matchin
tune to that statio
ned broadcast stat
ng a PTY search
sting RBDS, rega
matically pick up a
“ST” icon appears
t will automatically
arch for stations in
g RBDS may not
ft button to list the
tion / Sports / Talk
try / Oldies / Soft /
e / Religious Music
her / Emergency T
ory:
rol to navigate thro
m type you wish t
TY, press the Enc
f this type. PTY S
broadcast station i
. If none is found,
ion.
n “ANY” will See
dless of the prog
FM stereo signal,
in the display. Whe
evert to mono ope
your area broadca
be available in yo
ollowing Program
/ Rock / Classic R
Nostalgia / Jazz /
/ Religious Talk /
st / Emergency
gh the list of avail
search.
der Knob control
arch…” will be dis
s found, it will
he unit will return t
Tune and stop o
am type.
when available. W
n no stereo signal i
ation, and no icon
ting
r
ype
ck /
lassical
ble
o start
layed
the
any
en in
s
ill be
P1
11
Page 14
W
N
O
o
r
o
E
e
c
n
o
g
n
s
e
s
g
e
e
t
a
d
r
c
n
e
o
t
N
r
o
4
t
c
E
d
t
a
o
"
e
n
b
h
r
s
"
c
a
l
e
t
u
b
P
t
q
p
e
e
d
d
EATHE
What is the
NOAA (National
that broadcasts l
National Weathe
stations covering
the U.S. Virgin Is
transmitting stati
A similar system
administered by
R BAND O
OAA Weather
ceanic and Atmo
cal weather emer
Service (NWS) n
the 50 states as w
lands and the U.S.
n and there are a
is available in Can
nvironment Cana
PERATIO
Radio/Weathe
pheric Administrati
ency information 2
twork. The U.S. ne
ll as the adjacent
Pacific Territories.
otal of seven broa
da under the Wea
a.
adio Canada?
n) is a nationwide
hours a day via t
work has more tha
oastal waters, Pue
ach local area has
casting frequencie
heradio Canada se
system
e
n 530
to Rico,
its own
used.
rvice
LIST
Press
the Presets soft b
Recal
a Station
Rotat
the Encoder Kno
prese
memory location.
corres
ponding stored sta
chang
d by the user
.
tton to display the
(5) to navigate th
ress the Encoder
ion. Note that the p
Weatherband Fr
Fre
uency (MHz)
162.400
162.425
162.450
162.475
162.500
162.525
162.550
reset list.
preset list and hig
Knob to select an
resets are assigne
quencies
Preset
2
4
5
3
6
7
1
P1
hlight the desired
tune to the
and cannot be
Tuning to W
Press the Weath
frequency broad
with the current
"WB-5", "WB-6"
tune to the stron
Manual Tuni
Press the Tune
tuning step-by-st
atherband
e
soft button to ac
ast). The indicatio
umber and chann
r "WB-7". Under n
est station in the a
g
oft button and use
p.
ess the weather b
"WB" will appear
l indication: "WB-1
rmal conditions th
rea within 10 seco
he |<< or >>| soft
nd (NOAA seven
n the display pane
, “WB-2", "WB-3",
unit will automati
ds.
uttons to adjust st
l, along
WB-4",
ally
tion
12
Page 15
X
X
l
a
u
a
b
o
h
o
T
d
s
e
e
d
e
e
m
M
t
M
f
a
v
s
i
p
a
a
.
v
e
u
a
e
X
X
n
r
o
W
E
A
v
W
och
oww1-Foht1-
E
a
s
v
t
N
u
s
e
e
pr
y
K
s
i
a
v
r
c
c
C
c
y
X
”
m
i
r
X
i
u
c
n
h
c
t
e
v
h
n
k
p
t
e
t
d
i
d
e
o
m
o
0
t
M
c
w
w
s
a
n
l
S
o
n
n
SIRIUS
About Sirius
Sirius, XM and a
and its subsidiari
programming/ch
other marks and
reserved.
NOTE: The Siri
when an option
Switching to
Press the Mode
soft button (8) to
Accessing y
To subscribe to t
identify the Radi
M OPERA
M
l related marks an
es. Visit www.siriu
nnel lineup/ XM s
logos are the prop
sXM Satellite Ra
l SiriusXM Conn
SiriusXM Mod
button (6) to enter
change to SiriusX
ur SiriusXM R
e SiriusXM Satelli
ID of your SiriusX
ION
logos are tradema
xm.com/xmlineup
rvice subject to ch
rty of their respecti
io controls on thi
ct Vehicle Tuner
ode selection dis
mode.
adio ID
e Radio service, it i
Tuner. With the r
rks of Sirius XM R
or updates. All
nge or preemption
e owners. All right
unit are availabl
s connected.
lay. Press the Siri
s necessary to loc
dio turned on, tun
dio Inc.
All
s
only
sXM
te and
to the
Sirius
M preview chann
Sirius
M preview chann
1. I
SiriusXM mode,
D
rect Channel Entr
2. R
tate the Encoder
ess the Encoder
3. P
4. U
on entering the la
y
ur tuner.
5.
rite down the 8 dig
NOT
: The SiriusXM R
cti
ating Your Ser
1.
ith the radio still tu
C
annel 1. You shou
y
ur service is not a
eck the installation
in
stalled.
2. F
r subscriptions in t
w.siriusxm.com/a
866-635-2349.
r subscriptions in
tp://www.siriusxm.
877-438-9677
NOT
: As part of the ac
activ
tion message to
Siriu
recei
Upda
plan.
take
Siriu
M Vehicle Tuner
ed the activation
ed”. Once subscr
ote, the activatio
p to an hour. You
M signal to rece
l on Channel 1. Yo
l even if your servi
ess and hold the E
mode.
Knob to select eac
nob button for ea
t digit, the unit will
t ID number for ref
dio ID does not in
ice
ned on, tune to the
ld be able to hear t
tivated. If you can
instructions to ma
he United States,
tivatenow or call S
anada, please visi
a/help/activation-h
tivation process,
our tuner (see “A
). When your rad
essage, your ra
bed, you can tun
n process usually
radio will need t
ve the activation
should be able to
e is not activated.
coder Knob butt
digit.
h digit to enter “00
une to the SiriusX
rence.
clude the letters I,
SiriusXM preview
e SiriusXM previe
ot hear the previe
e sure your tuner i
lease visit
iriusXM Listener C
lp or call XM Liste
he SiriusXM satel
visory Messages
o detects that the
io will display: “
to channels in y
takes 10 to 15 mi
be powered on a
essage.
P1
hear the
n (5) to select
”.
ID number for
O, S or F.
hannel on
channel even if
channel, please
properly
re at
er Care at
ites will send an
Reported by the
tuner has
ubscription
ur subscription
utes, but may
d receiving the
13
Page 16

o
s
e
<
i
s
c
o
w
s
c
o
d
s
<
h
b
n
P
s
e
p
s
s
t
e
e
a
e
i
e
e
r
h
e
e
e
n
r
n
n
s
c
o
P
o
h
t
E
o
g
rbe
a
r
n
r
r
s
a
i
e
g
d
r
f
w
b
T
_
K
s
X
u
a
o
b
n
e
w
h
t
r
o
g
f
t
m
h
e
g
h
t
o
T
n
m
t
i
a
d
TUNE
Tune mode opti
Manual Tuning
Press the Tune
increment chann
Rapid Tuning
Press and hold |
sequence.
PRESETS
Preset mode opt
SCAN
Press the Scan
pause for ten se
or the Scan soft
reached.
LIST
Press the List s
to store and allo
Store a Station
While tuned to th
navigate the pre
and hold the En
the channel. The
preset memory l
Recall a Station
Rotate the Enco
desired preset m
tune to the corre
ns available are |<
oft button. Press t
ls down/ up step
< or >>| soft butto
ons available are
oft button to scan
onds at each pres
button again to sto
ft button to display
convenient acces
e desired broadca
et list and highligh
oder Knob for 3 s
channel informatio
cation number.
er Knob button to
emory location. Pr
ponding stored ch
, >>| and Info.
e |<< (3) or >>| (2)
y step.
s to quickly tune n
reset, Tune and L
tations stored in th
t channel. Press th
scanning when th
the preset list. The
to your favorite c
t channel, rotate th
the desired preset
conds or press th
n will appear in the
navigate the pres
ss the Encoder K
nnel.
soft buttons to dec
xt or previous cha
st.
preset list. The u
e Encoder Knob b
desired channel i
e are 18 preset lo
annels.
Encoder Knob t
memory location.
Save soft button t
display adjacent to
t list and highlight t
ob button to selec
ement/
nels in
it will
utton (5)
ations
ress
store
the
e
and
CAT
GORY
Categ
ry mode options a
ory Tuning
Cate
1. P
ess the Cat - /+ so
displayed along
2. R
tate the Encoder
c
tegory.
3. P
ess Encoder Kno
Chan
el Direct Access
1. P
ess and hold the E
C
annel Number: 0
2. R
tate the Encoder
3. P
ess the Encoder
di
git.
4. U
on entering the la
Siriu
The P
includ
requir
settin
locke
M Channel Lock
rental Control feat
ng those with matu
s you to enter a p
up the user passc
channels is descri
e Cat+, Cat- and I
t buttons to chang
ith the channel list
Knob to navigate t
button to confirm
uning
ncode
Knob butt
_” will appear on t
Knob to select a di
nob button to con
t digit, the unit will
Feature
re allows you to li
re content. When e
sscode to tune to t
de, locking chann
ed on the next pa
fo.
the category. Eac
ithin the selected
e channel list withi
he channel selecti
n to access Direct
he display.
it (0 – 9) for each
irm each digit and
une to the desired
it access to any S
nabled, the Parent
e locked channels
ls, and the metho
e.
P1
category title will
category.
n the selected
n.
une mode. “Enter
umber position.
ove to the next
channel number.
riusXM channels,
l Control feature
. Information on
to access the
14
Page 17
r
e
t
E
E
o
t
a
r
e
E
s
L
E
e
c
e
L
L
e
o
t
t
a
s
P
x
e
o
n
"
t
c
s
t
s
0
e
n
c
c
)
o
n
l
…
d
s
w
)
e
c
p
n
t
_
_
e
n
t
n
x
t
f
R
s
P
R
P
P
P
P
P
n
O
n
p
i
0
t
r
r
u
m
h
s
aGoo
l
R
c
w
f
n
s
a
n
h
r
d
a
o
e
e
e
a
Setting the Use
1. Press and
system m
2. Rotate the
MENU" op
3. Press the
4. Press the
0 _ _ _” pr
5. Rotate the
The defaul
each digit
6. Upon ente
7. Repeat th
Locking a Chan
1. Press and
system me
2. Rotate the
Radio" opti
3. Rotate the
4. Press the
prompt me
5. Enter the
6. Rotate the
7. Press the
indicate th
Accessing a Lo
1. Tune to th
direct acce
2. An “Enter
3. Enter the
4. The devic
cycle.
Passcode
hold the Menu butt
nu.
Encoder Knob (5)
ion.
ncoder Knob but
ncoder Knob but
mpt message will
Encoder Knob to
code is "0000".
nd move to the ne
ing the last digit, th
same steps to ent
nel
hold the Menu butt
nu.
Encoder Knob to
on.
Encoder Knob to
ncoder Knob but
sage will appear.
ock Code, a list of
Encoder Knob to
ncoder Knob but
channel has been
ked Channel
desired channel u
ss tuning method.
ock Code: 0 _ _ _”
ock Code within 1
will remain in “unr
n (9) for more tha
to navigate the me
on to view "Set Lo
on to select Set Lo
ppear.
elect a digit (0 – 9
ress the Encoder
t digit.
e unit will prompt f
r the code again.
n (9) for more tha
avigate the menu
Locked Channels
on to select. “Enter
hannels with open
elect a channel yo
on to lock the chan
successfully locke
ing the |<< or >>|
prompt message
seconds to unlock
stricted” (unlocked
3 seconds to ent
nu list to the "SXM
k Code".
k Code. “Enter Lo
for each number
Knob button to co
r confirmation of th
3 seconds to ente
ist to the "SXM Sa
".
Lock Code: 0
lock icons will app
u wish to lock
nel. The locked ico
.
oft buttons or use
ill appear.
and tune the chan
mode until the ne
_
r the
SETUP
k Code:
osition.
firm
e code.
r the
ellite
”
ar.
will
he
el.
t power
SiriusXM Channe
Rese
If you
orget your Parenta
the co
e to the default “0
chann
ls list.
1.
n SiriusXM mode,
2.
3.
4.
5.
6.
7.
8.
9.
otate the Encode
etting to 0.
ress and hold the
otate the Encode
ress the Encoder
ress the Encoder
ress the Encoder
ress the Return b
ress the Power b
ow been reset to “
INF
Alter
ate Display Infor
Info o
tion is available in
button
to change the disp
Name
(Artist) > Song (Tit
Name
(Artist).
te Signal Strengt
Satell
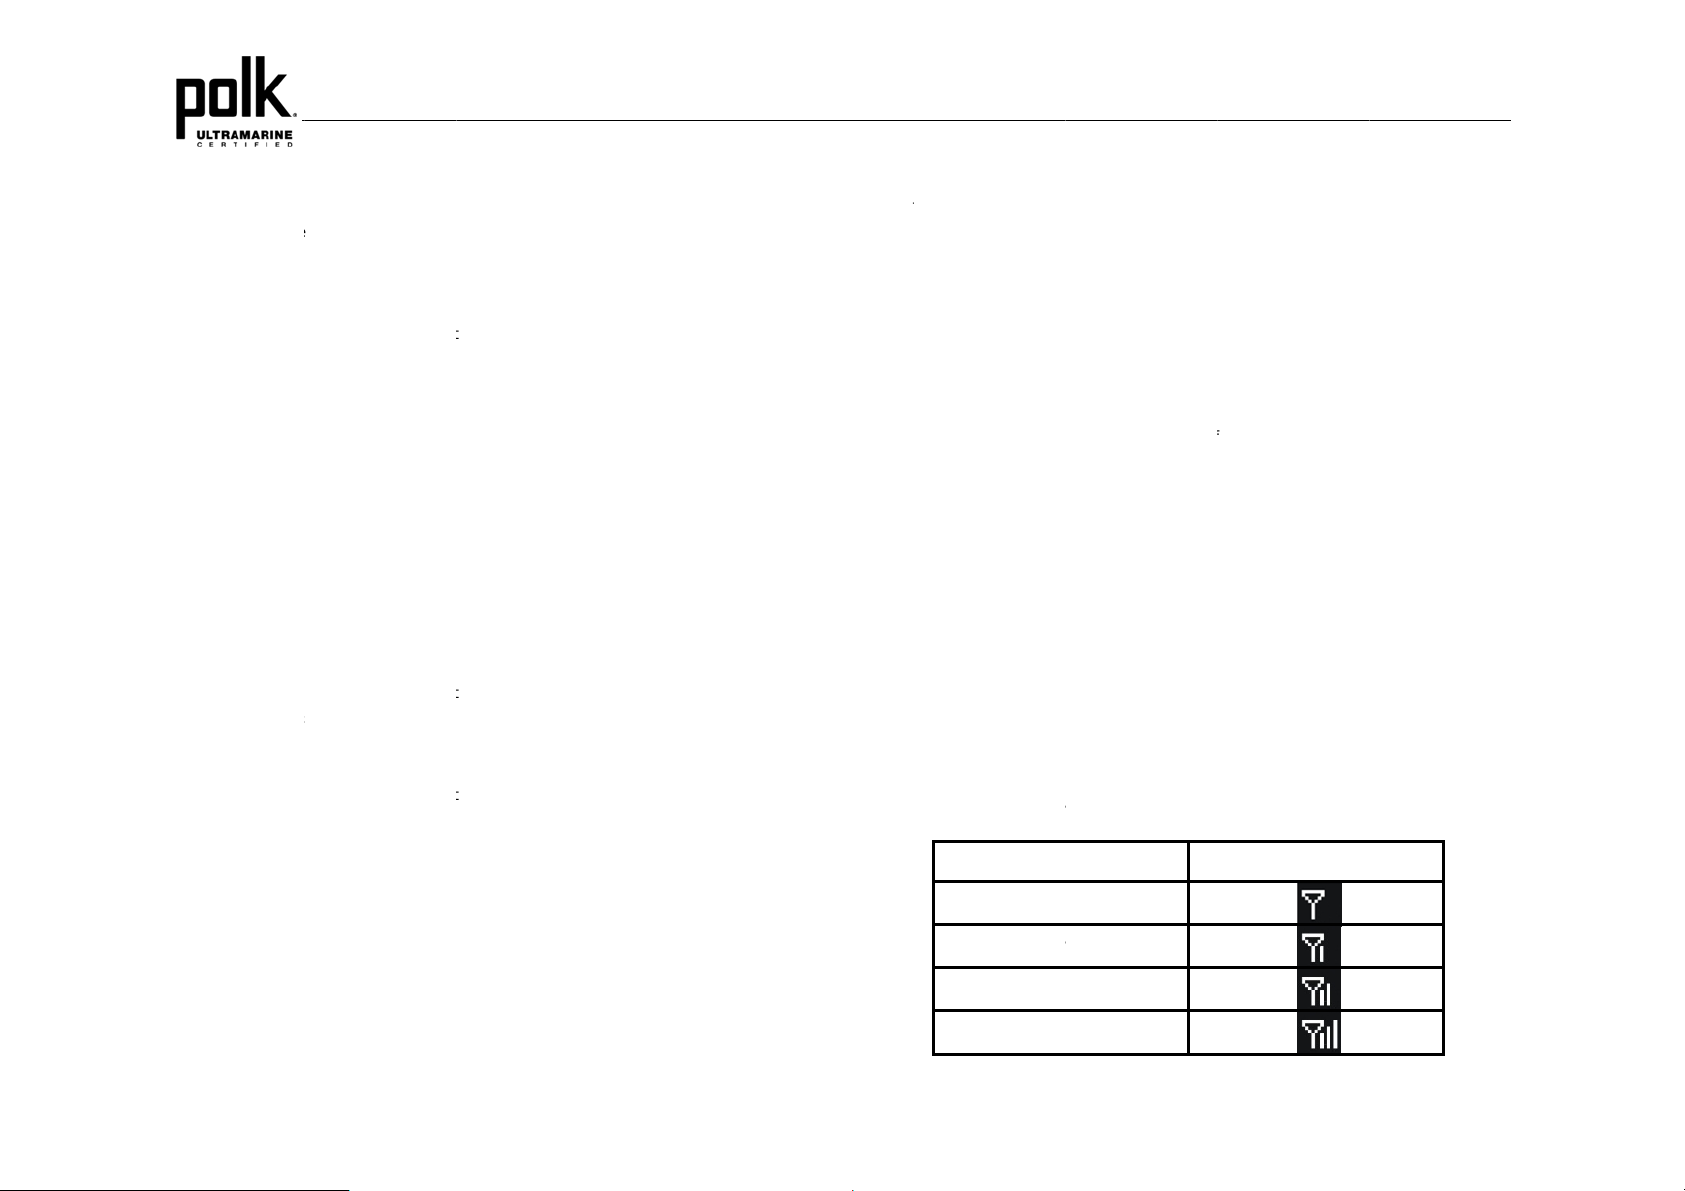
The di
splay will indicate
Signal S
No Si
We
Exce
l Lock Code
l Control lock code,
00”. Resetting the
une to Channel 0 (
Knob counter-clo
Setting button to e
Knob to view the
Knob to view soft
Knob once to con
Knob button to tur
utton to exit the sy
tton (1) to turn off
0000”.
ation
Tune, Category a
lay information in t
le) > Info (Content,
atellite reception st
trength
gnal
k
d
lent
use the following
lock code will not a
adio ID).
kwise to decrease
nter the System Se
“About”.
are version inform
irm.
the LCD display
tem menu..
nd on the unit. Th
d Preset List mod
e following order:
if available) > Cate
ength as shown b
Strength Displ
P1
irections to reset
ffect the locked
the volume
tting Menu.
tion.
ff.
lock code has
s. Press Info soft
gory (Category) >
low.
y
15
Page 18

O
hChNoSuPrCoChCh
A
s
d
A
a
b
d
n
X
M
a
e
t
Yo
e
u
i
R
a
w
e
y
c
T
s
n
o
d
e
h
u
u
S
n
d
h
u
sthe
E
e
e
u
d
t
e
M
n
e
d
l
s
o
-
o
m
-
m
o
-
o
m
-
o
t
a
a
t
u
h
C
h
m
h
h
h
t
r
a
c
t
a
a
e
e
a
e
n-Screen Display
C
eck Antenna
eck Tuner
Signal
bscription update
ess Any Key to
ntinue
an Unavailable
UnSubscribed
dvisory Mes
Check Antenna
Check Tuner
No Signal
Subscription Up
Channel Not Ava
Channel Not
Subscribed
age
The radio h
antenna ca
• The ra
Tuner.
• The tu
The Sirius
the SiriusX
ated The radio h
status.
ilable The chann
channel or
available.
connecting
The chann
SiriusXM s
listening to
d
visory Messages
s detected a fault
le is either disconn
io is having difficult
er may be disconne
M Connect Vehicle
satellite signal
s detected a chang
l that you have requ
he channel that you
u may also see thi
a new SiriusXM Co
l that you have requ
bscription package
s no longer include
eported by the S
C
use
ith the SiriusXM ant
cted or damaged.
communicating wit
ted or damaged.
uner is having diffic
e in your SiriusXM s
ested is not a valid
were listening to is
message briefly wh
nect Vehicle tuner.
ested is not include
r the channel that y
in your SiriusXM c
iriusXM Vehicle T
nna. The •
the SiriusXM •
lty receiving •
bscription •
iriusXM
o longer
n first
in your
u were
annel lineup.
ner
Verify that the ant
Tuner.
•
Inspect the antenn
antenna if the cabl
Verify that the Siri
the radio SiriusXM
•
If the problem pers
then contact your
Verify that your an
southern sky.
•
Verify that the Siriu
area on the outsid
•
Move the SiriusX
Inspect that anten
•
antenna if the cabl
If the problem pers
•
then contact your
Press any key to c
No further action i
•
Questions about y
•
visit www.siriusxm.
Care at 1-866-635
Questions about y
•
http://www.siriusx
Care at 1-877-438
it www.siriusxm.co
Vi
SiriusXM channel li
Questions about y
•
visit www.siriusxm.
Care at 1-866-635
Questions about y
•
http://www.siriusx
Care at 1-877-438
xplanation/Soluti
nna cable is connec
a cable for damage
is damaged.
sXM Tuner cable is
mating connector/c
ists, disconnect and
ealer.
enna is outdoors wi
sXM antenna is mo
of the vessel.
antenna away from
a cable for damage
is damaged.
ists, disconnect and
ealer.
ear the message.
required.
ur subscription in t
com/activatenow or
2349.
ur subscription in
.ca/help/activation-
9677
/channellineup for
neup.
ur subscription in t
com/activatenow or
2349.
ur subscription in C
.ca/help/activation-
9677
P1
n
ed to the SiriusXM
nd kinks. Replace t
ecurely connected
ble.
reconnect the tune
h a clear view of the
nted in an unobstru
any obstructions.
and kinks. Replace
reconnect the tuner
e United States ple
call SiriusXM Listen
anada, please visit
elp/ or call XM List
ore information abo
e United States ple
call SiriusXM Listen
anada, please visit
elp/ or call XM Liste
ut
ner
e
o
nd
ted
he
nd
se
r
ner
se
r
16
Page 19
O
hEn
W
A
s
e
A
y
e
o
p
t
a
/
M
h
C
e
a
E
r
e
o
o
1
c
o
n-Screen Display
C
an Locked
ter Code:_ _ _ _
dvisory Mes
Channel Locked
Enter Lock Code
dvisor
age
The chann
Parental C
User prom
Messages Repor
l that you have requ
ntrol feature.
ted to enter the lock
ed by the SiriusX
C
use
ested is Locked by t
unlock code.
Vehicle Tuner (
e radio S
ontinued)
e the section on Pa
on
the Parental Contro
nnels.
ch
En
ter the four digit cod
xplanation/Soluti
ental Control, page
l feature and how to
to unlock the chan
P1
n
5 for more informati
access locked
nel.
on
rong Code
Invalid Lock Cod
The unlock
code entered by the
user is incorrect.
•
Input the correct f
Reset lock code to
•
ur digit code to unlo
default instructions
k the channel.
n page 15.
17
Page 20
3
c
h
q
x
i
i
s
d
e
d
e
2
l
9
s
p
U
j
w
d
a
M
w
m
2
K
d
w
o
h
E
n
Acce
h
c
m
t
h
u
s
s
e
K
o
P
R
e
e
U
re
s
d
e
d
m
s
b
b
r
o
n
n
d
n
e
h
o
S
e
e
r
n
e
d
k
t
e
e
h
e
h
t
d
d
h
t
h
USB MP
MP3 Specifi
• A directory t
• Maximum nu
• Maximum nu
• Maximum nu
• Maximum nu
• Sampling fre
• Bit rates: ma
• Maximum nu
• ID3 Tag vers
• ID3 Tag vers
NOTE: USB fla
Inserting an
Inserting a USB
Insert the USB d
USB mode, the
the files on the U
OPERATI
ations
at does not includ
mber of folders: 51
mber of folder leve
mber of MP3 files:
mber of characters
uency: 16KHz, 22
imum 384 Kbps.
mber of Character
on 1.0: 32
on 2.x: 32
h drives with a ca
Removing a
Device
vice into the USB
isplay will then sho
SB device automat
ON
an MP3 file is skip
(including skippe
s: 12
99
for MP3 file name
.05KHz, 24KHz, 32
of ID3 Tag:
acity of up to 64
SB Device
ack and press the
the “Loading…”
ically.
ped.
directories)
nd folder name: 3
KHz, 44.1KHz, 48
GB are supporte
ode button (6) to
essage. The unit
Hz.
.
enter
ill read
Rem
ving a USB Devic
Press
the Mode button to
e USB connector.
from t
NOT
: After loading a
order
in which they we
ot be the same a
may
ssing USB Mo
Switc
ing to USB Mod
Press
the Mode button to
hange to USB mo
(2) to
USB
ode options availa
Selec
ing Tracks
Press
the |<< (3), >>| (2)
e selected file na
file. T
soft b
ttons to fast forwar
begin
when the button i
LIST
Brow
e Files/Folders
Rotat
the Encoder Kno
Press
the Encoder Kno
soft button to reve
BAC
direct
ry.
ause
Play/
Press
the || button (4) t
resum
e playback.
epeat, Random, I
RRI (
Previ
wing Tracks
Press
the Intro soft butto
select another mo
SB device, files a
written to the d
the order in whic
e
enter mode selecti
e.
ble are |<<, >>|, LI
soft buttons to incr
e will appear on th
d or fast reverse th
released.
(5) to navigate a
button to select th
se navigate the fol
suspend playbac
tro)
(8) to play the firs
e and then remov
d folders are acc
vice. Therefore, t
they are expect
n display. Press t
T and RRI.
ment or decremen
display. Press an
ough the current fil
d view the list of all
highlighted file/fol
ers and return to t
. Press the || but
10 seconds of eac
P1
the USB device
ssed in the
e playing order
d to be played.
e USB soft button
to the next song
hold the |<<, >>|
e. Playback
files/folders.
er. Press the
e root level
on again to
file in the current
19
Page 21

l
p
a
b
o
r
s
e
r
p
o
s
p
s
d
n
folder sequential
resume normal
Repeat Play
Press the Repe
the Repeat soft
Random Play
Press the Rand
shuffled order. P
y. Press the Intro
layback of the curr
t soft button (2) du
utton again to sto
m soft button (3) t
ess the Random s
oft button again to
nt file.
ing song play to re
repeat play.
play all files in the
oft button again to
stop Intro Scan an
eat the current file
current folder in ra
top random play.
. Press
dom,
P1
20
Page 22
O
b
s
o
o
e
s
h
o
R
h
L
E
n
R
o
g
a
s
e
i
)
m
i
r
b
o
e
n
a
v
o
u
o
u
B
s
o
s
c
c
z
o
a
a
m
e
o
a
odebe
ure
n
e
i
o
u
nBl
r
v
o
n
v
n
s
k
c
pck
h
o
o
o
g
d
u
e
e
s
v
L
s
a
c
o
s
h
e
d
o
u
a
e
s
h
c
q
B
l
e
r
n
v
u
e
E
n
d
t
f
a
a
i
BLUETO
The P1 includes
Bluetooth device
About Bluet
Bluetooth is a sh
it transmits voice
meters.
Bluetooth M
NOTE: Please n
while the unit i
Press and hold t
Encoder Knob (
Encoder Knob t
• BT On/Off:
then press t
• BT Device
Rotate the
Press the E
TH OPE
uilt-in Bluetooth te
to this head unit f
oth Technolo
rt-range wireless r
and data at speed
nu Options
ote that some Blu
in Bluetooth Aud
e MENU button (9
5) to navigate the
access the follow
otate the Encode
e Encoder Knob
ist: Press the Enc
ncoder Knob to vi
coder Knob butto
ATION
chnology that allow
r streaming audio
y
dio protocol. Oper
up to 2.1 Mbit/s o
tooth menu opti
o mode.
to enter menu adj
enu list to “Blueto
ng Bluetooth Men
Knob to choose “
utton to enter the
der Knob button t
w a list of previou
to select the devi
s you to wirelessly
playback.
ting in the 2.4 GH
er a range of up t
ns are only avail
stment mode. Rot
th Setup” and pres
options:
T On” or “BT Off”,
election.
view devices fro
ly paired mobile d
e. Rotate the Enc
onnect
range,
10
ble
te the
s the
and
the list
vices. .
der
nob to choose Loc
K
nnot delete a devi
c
• B
T Pair: Press the E
K
nob again to start
• L
• D
• D
Pairi
Befor
pair w
Bluet
1. O
2. E
3. P
4. O
E
Note:
Recei
When
hangi
neces
/Unlock: The P
vices are stored in
ing bumped from t
lo
ck the device. To L
splay/change the L
di
sconnect: To disc
tton to temporarily
b
-established throu
lete: To delete a
g a Bluetooth
you begin, consult
th the P1.
oth Quick Pair:
n your personal Bl
s
re your device has
ter Bluetooth mod
uetooth.
ess and hold the E
a
ailable on your Blu
n your Bluetooth d
c
nnect your device.
ter the pairing pa
You can alternati
ing a Call While
answering a call u
g up from the call,
ary to press the pl
/Unlock, Disconne
e that is actively c
ncoder Knob to di
airing mode.
1 can store up to 5
FIFO (First in First
e list when more t
ck/Unlock a devic
cked or Unlocked
nnect a connecte
remove the Blueto
h your phone men
evice from the list,
Device
the owner’s manu
etooth device, ent
Bluetooth turned o
on the P1 by pre
ncoder Knob for t
etooth device.
vice, select P1 on
sword (0000), if re
ely pair from the
istening to Music
ing a connected ph
Bluetooth audio wil
y button to resum
t or Delete for this
nnected.
play “Pair?” and p
devices for BT con
Out) order. To pre
an 5 devices are
, press the Encod
icon.
device, press the
th link. The link ca
by selecting the P
press the Encoder
l for the Bluetooth
r the Bluetooth set
n and is searching
sing the Mode butt
ree seconds to m
e it becomes avail
uested.
luetooth Menu.
one, Bluetooth aud
continue on some
Bluetooth audio.
P1
device. You
ess the Encoder
ection. The
ent a device from
sed, you must
r Knob button to
ncoder Knob
be
1 for connection.
Knob button.
evice you want to
ings list. Make
or new devices.
on and selecting
ke the P1
ble to pair and
o will pause. After
phones. It may be
21
Page 23

Au
h
s
e
a
n
t
i
m
e
n
>
o
g
m
o
m
s
d
h
o
t
B
y
o
m
d
h
e
M
s
y
t
t
d
P
®
r
o
u
P• V• A• S• N• B• F
U• A• A
s• V
s
n
d
e
a
o
I
e
c
d
n
i
e
b
i
s
d
d
a
i
f
o
c
s
t
a
a
e
e
t
r
e
r
r
v
u
u
e
u
u
s
o
Bluetooth
When connected
access Bluetoot
button (9). While
LCD.
Selecting Track
During playback,
track.
Pausing Playba
During playback,
will appear on th
If you change to
Mode button (6)
playback.
INFO
Press Info butto
NOTE: If a Blue
off or if the dev
search for the
dio (A2DP)
, a Bluetooth enabl
mode and play so
in Bluetooth mode,
press the |<< (3) /
ck
press the || butt
LCD. Press || a
nother mode, the
to return to Blueto
(7) to view the na
ooth device is di
ce is disconnecte
atching Bluetoot
d device is able to
gs stored on your
the Bluetooth audi
>| (2) soft buttons
n (4) to pause the
ain to resume pla
obile phone audi
th mode and resu
e of the connecte
connected due to
inadvertently, t
device when the
stream audio to th
phone, press the
icon illuminates o
o play the previou
luetooth audio pla
back.
will pause. Press
e mobile phone au
device.
the power being
e unit will automa
power is restore
P1. To
ode
n the
or next
er. “||”
he
dio
urned
tically
.
AP
POLK
stereo
prima
transf
OPERAT
Specialty Controll
system. Store awa
y functions of your
rming your mobile
Feat
res
This a
pp controls all of th
•
ower on/off
olume and mute
M/FM radio tuner:
iriusXM radio: ac
OAA weather ban
luetooth® streami
ile structure visibil
SB
uxiliary audio inpu
udio menu control
peaker selection s
isual display feed
creen
ON
er is the ultimate w
y your old remotes
POLK stereo right
device into a functi
primary functions
access station, re
ess station, recall,
and alert
g audio
ty, track selection,
t control –auxiliary
s- bass, treble, bal
ttings
ack so you can se
reless remote cont
and enjoy the con
rom your phone or
nal stereo remote
of your stereo feat
all, store presets, s
tore presets, switc
rack audible scan
nalog 1
nce, fader, equaliz
artist title and alb
P1
ol for your POLK
enience of all the
tablet by
control!
res including:
witch songs
h songs
p and down via
r, volume and
m on your mobile
Con
ecting and us
After
ownloading and in
devic
to the P1 as state
you c
n open the app an
When
Ultramarine is inst
Bluet
oth pairing, otherwi
22
ng Ultramarin
talling Ultramarine
above for Bluetoo
use with your P1
lled on Android op
se there may be er
app
app on your apple
h pairng. Once yo
adio.
rating system, clo
ors on Bluetooth c
device, pair your
r device is paired
e the app before
nnection.
Page 24
C
r
r
=
r
r
=
(
n
H
k
.
D
e
.
.
.
.
.
.
.
.
L
L
7
0
.
7
4
1
c
5
e
)
)
O
w
u
p
O
e
w
p
e
p
o
y
s
l
e
v
w
w
h
A
SPECIFI
FM Radio
Frequency Cove
Frequency Cove
Sensitivity (S/N
Image Rejection
Stereo Separatio
AM/MW
Frequency Cove
Frequency Cove
Sensitivity (S/N
General
Frequency band
Operating Voltag
Grounding Syste
Speaker Impeda
Tone Controls:
Bass (at 100
Treble (at 10
Power Output . .
Current Drain . .
Tuner/Amp Box
Front Panel Dim
ATIONS
age (USA) . . . . . .
age (Europe) . . . .
30dB) . . . . . . . . . .
. . . . . . . . . . . . . . . .
n . . . . . . . . . . . . .
age (USA) . . . . . .
age (Europe) . . . .
20dB) . . . . . . . . . .
s) (for Bluetooth). .
e . . . . . . . . . . . . . .
m . . . . . . . . . . . .
ce . . . . . . . . . . . . .
z) . . . . . . . . . . . . .
Hz) . . . . . . . . . . . .
. . . . . . . . . . . . . . . .
. . . . . . . . . . . . . . .
imension . . . . . . .
nsions . . . . . . . . . .
. . . . . . . . . . . . . . .
. . . . . . . . . . . . . . . .
. . . . . . . . . . . . . . .
. . . . . . . . . . . . . . . .
. . . . . . . . . . . . . . . .
. . . . . . . . . . . . . . .
. . . . . . . . . . . . . . . .
. . . . . . . . . . . . . . . .
. . . . . . . . . . . . . . .
. . . . . . . . . . . . . . .
. . . . . . . . . . . . . . .
. . . . . . . . . . . . . . .
. . . . . . . . . . . . . . .
. . . . . . . . . . . . . . . .
. . . . . . . . . . . . . . .
. . . . . . . . . . . . . . . .
. . . . . . . . . . . . .7.4(
. . . . . . . . . . . . 6.8(
. . . . . . . 87.5 to 10
. . . . . . . . .87.5 to 1
. . . . . . . . . . . . . . .
. . . . . . . . . . . . . . .
. . . . . . . . . . . . . . . .
. . . . . . . . . . .530-1
. . . . . . ...526.5-160
. . . . . . . . . . . . . . . .
. . . . . . . . 2402~2
. . . . . . . . . . . .DC
. . . . . . . Negative
. . . . 4-8 ohms per
. . . . . . . . . . . . . . .
. . . . . . . . . . . . . . . .
. . . . . . . . . . . . . . .
. . . . . . . 15 Amper
) x 7.4(W) x 2.2(H
) x 5.0(W) x 2.8(H
.9 MHz
8 MHz
. . . 4uV
>45 dB
>25 dB
10 kHz
6.5 kHz
. .36dB
80MHz
2 Volts
Ground
hannel
..±10dB
.±10dB
0W x 4
(max.)
Inches
Inches
TR
No Po
No So
The O
work
UBLESH
Symptom
er
nd
eration keys do not
OTING
Cause
The vessel’s acc
switch is not on
Fuse is blown
Volume is too lo
Wiring is not pro
connected
Wired command
properly installed
Built-in microcont
not operating pro
Solution
ssory If the p
Adjust
erly Check
r is not Check
roller is
erly
wer supply is
properl
connected to the
vessel’
accessory
termina
, switch the
key to “ACC”
ignition
Replac
level
installat
Press t
located
Tuner/
the fuse
olume to audible
iring connections
ired commander
ion and connection
e RESET button
on the back of the
mp Module
P1
23
Page 25

Sounding Audio Industrial Ltd
www.asaelectronics.com
v.150517
 Loading...