

Page 1
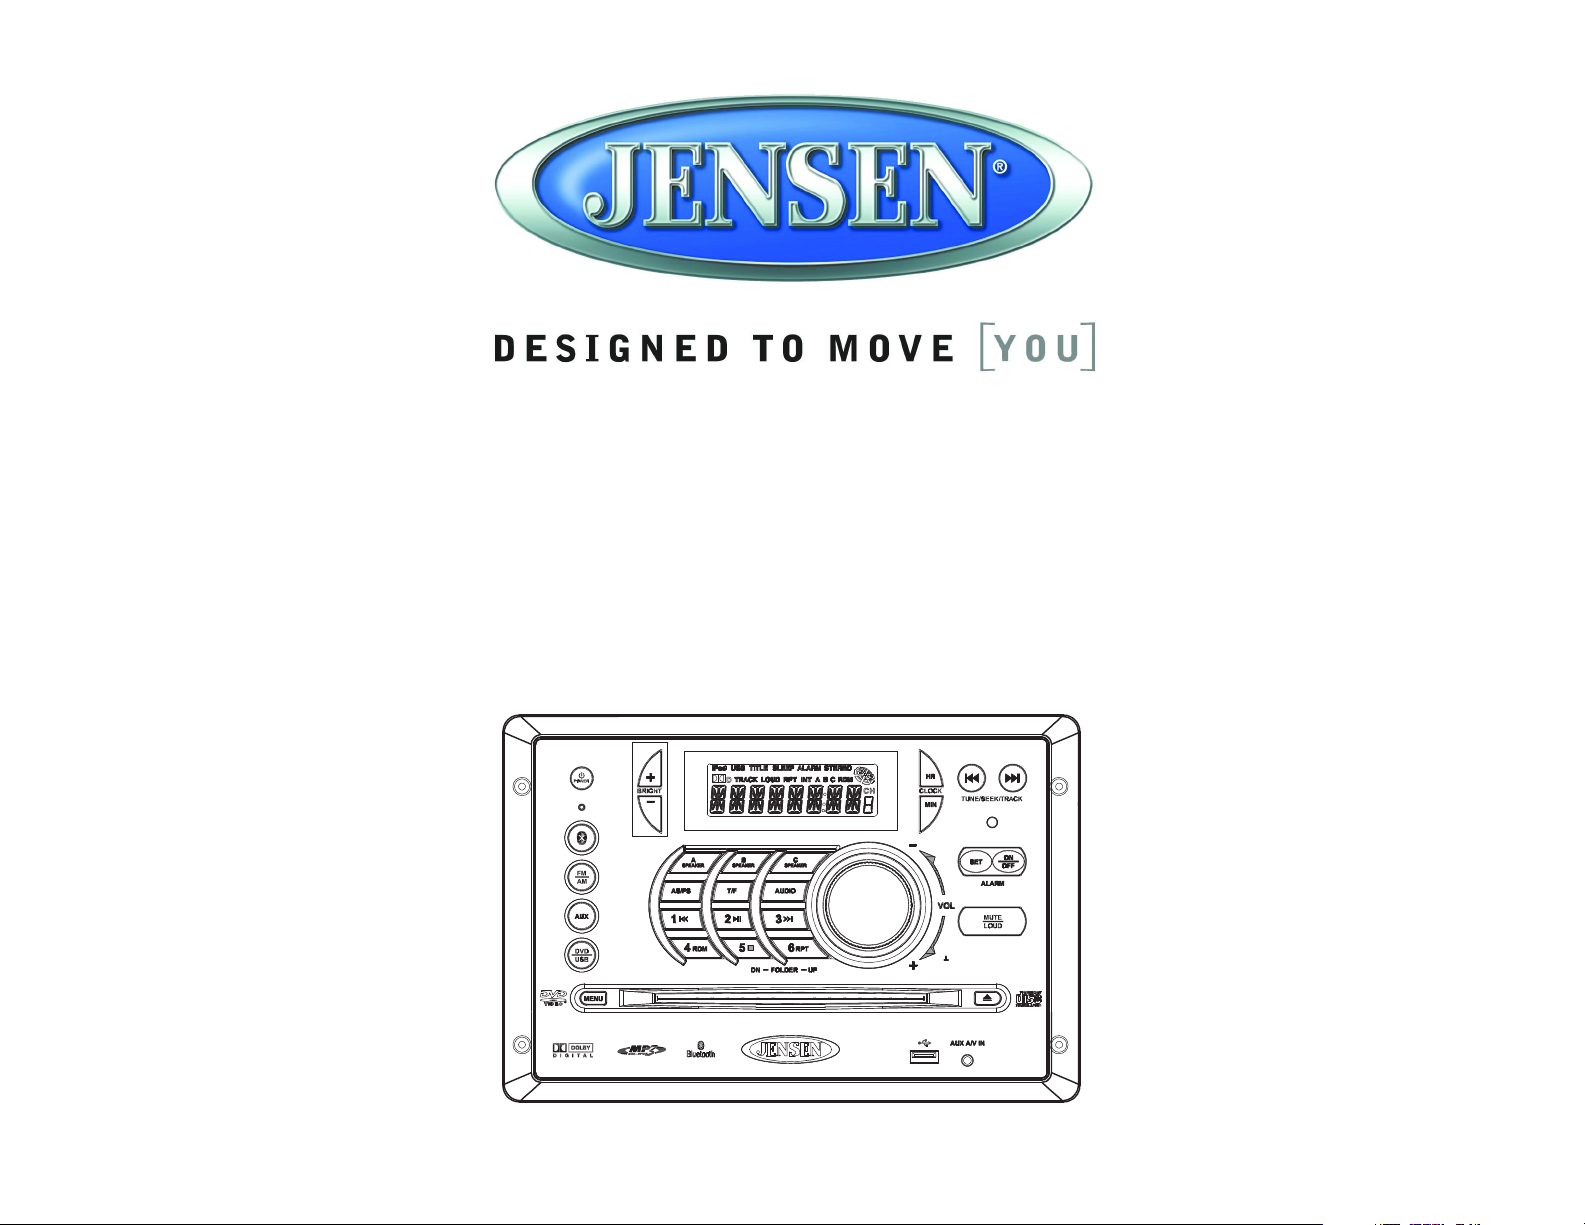
AWM968
PUSH/ENTER
AWM968
MOBILE AUDIO SYSTEM
Installation and Operation Manual
Page 2

TABLE OF CONTENTS
Installation........................................................................................................... 2
Wiring................................................................................................................... 3
Basic Operation .................................................................................................. 4
AM/FM Tuner Operation ..................................................................................... 6
CD Operation....................................................................................................... 7
DVD/VCD Operation............................................................................................ 9
MP3/USB Operation.......................................................................................... 11
Bluetooth Operation ......................................................................................... 13
Remote Control Operation............................................................................... 14
Setup Menu........................................................................................................ 15
Specifications ................................................................................................... 17
Troubleshooting ................................................................................................17
AWM968
ii
Page 3
AWM968
AWM968
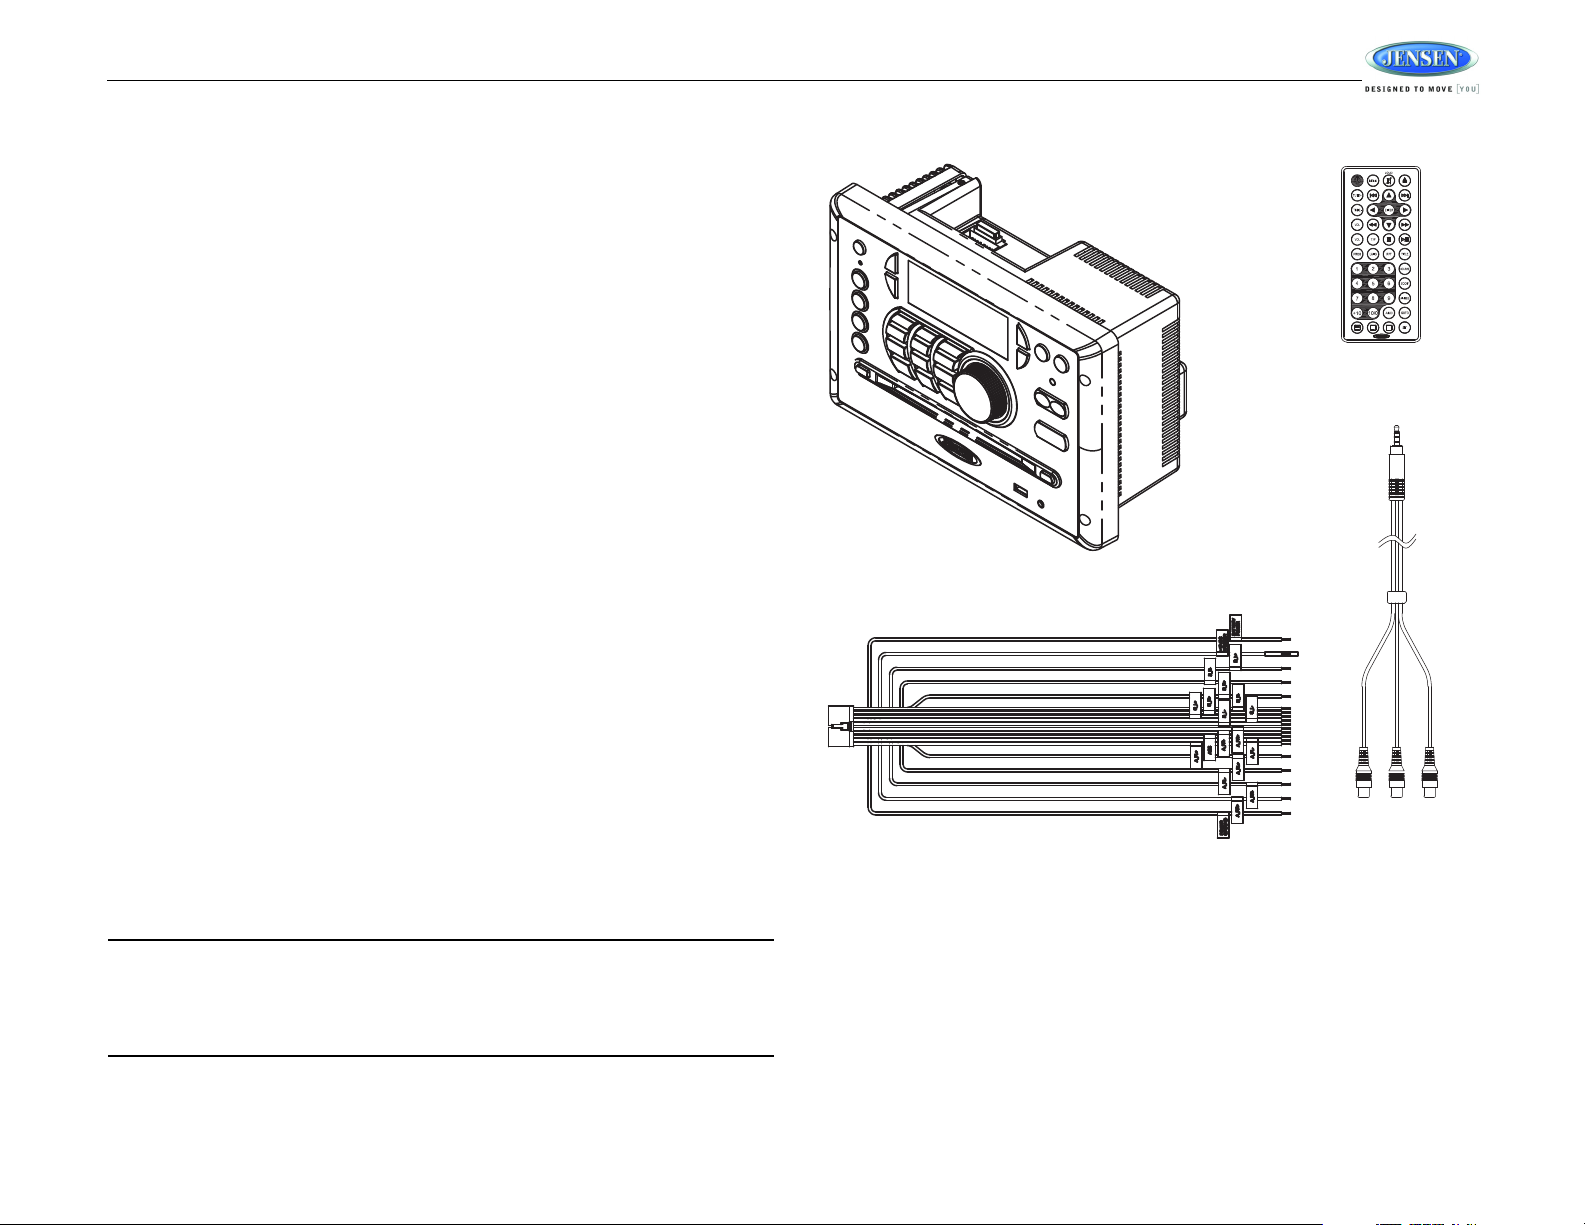
REMOTE CONTROL
WITH BATTERY
20-PIN POWER/A-B SPEAKER MATING PIGTAIL
AUX AUDIO /
VIDEO CABLE
Thank You!
Thank you for choosing a Jensen product. We hope you will find the instructions in this owner’s
manual clear and easy to follow. If you take a few minutes to look through it, you’ll learn how to
use all the features of your new Jensen receiver for maximum enjoyment.
Features
Features of the Jensen AWM968 mobile audio system include:
• Digital AM/FM Tuner/30 Preset stations (12 AM12/18 FM)
• Bluetooth Ready with A2DP/AVRCP Streaming Audio
• Skip Protected Disc Mechanism
• CD, CD-R, CD-RW, DVD/DVD+R, DVD RW, DVD-R, DVD -RW, DVD-Video, MPEG-4,
VCD, JPEG and MP3/WMA Compatible
• Last Track Memory
• Time/Alarm Clock
• LCD Backlight Controls
• 1/8” Front Auxiliary Audio/Video Input
• Rear Audio/Video RCA Inputs/Outputs
• USB Input
• 3 Zone / 8 Speaker Output
• Wireless Remote Control Included
Precautions
• Use the Proper Power Supply.
• Protect the Disc Mechanism.
• Use Authorized Service Centers.
• Avoi d Moisture.
• Avoid Cleaning Products.
• Use Recommended Accessories.
This product is designed to operate with a 12 volt DC, negative ground battery system
(the standard system in a North American vehicle).
Avoid inserting any foreign objects into the slot of this player. Failure to observe this may
cause malfunction due to the precise mechanism of this unit.
Do not attempt to disassemble or adjust this precision product; contact a professional for
assistance.
To reduce the risk of fire or electric shock, do not expose this equipment to rain or
moisture.
The front of this unit should only be cleaned with a slightly damp cloth. Do not use
cleansers.
TO REDUCE THE RISK OF FIRE OR ELECTRIC SHOCK AND ANNOYING
INTERFERENCE, USE ONLY THE RECOMMENDED ACCESSORIES.
Packing List
CAUTION: This mobile DVD player is a Class I laser product that uses a visible/invisible
laser beam which could cause hazardous radiation exposure if improperly directed. Be
sure to operate the mobile DVD player as instructed. Use of controls or adjustments or
performance of procedures other than those specified herein may result in hazardous
radiation exposure. Do not open covers and do not attempt to repair the unit yourself.
Refer servicing to qualified personnel.
1
Page 4
INSTALLATION
It’s a good idea to read all of the instructions before beginning the installation. We recommend
having your JENSEN AWM968 installed by a reputable RV dealership.
Tools and Supplies
You will need these tools and supplies to install your AWM968:
• Phillips screwdriver
• Wire cutters and strippers
• Tools to remove existing radio (screwdriver, socket wrench set or other tools)
• Electrical tape
• Crimping tool
• Volt meter/test light
• Crimp connections
• 16 gauge wire for power connections
• 16 – 18 gauge speaker wire
Disconnecting the Battery
To prevent a short circuit, be sure to turn off the ignition and remove the negative (-) battery
cable prior to installation.
NOTE: If the AWM968 is to be installed in a vehicle equipped with an on-board drive or
navigation computer, do not disconnect the battery cable. If the cable is disconnected,
the computer memory may be lost. Under these conditions, use extra caution during
installation to avoid causing a short circuit.
AWM968
Selecting the Mounting Location
Select a mounting location, taking care to avoid the following:
• Places exposed to heat-radiating appliances such as electric heaters
• Adjacent to other equipment that radiates heat
• Poorly-ventilated or dusty places
• Moist or humid locations
Preparing the Opening
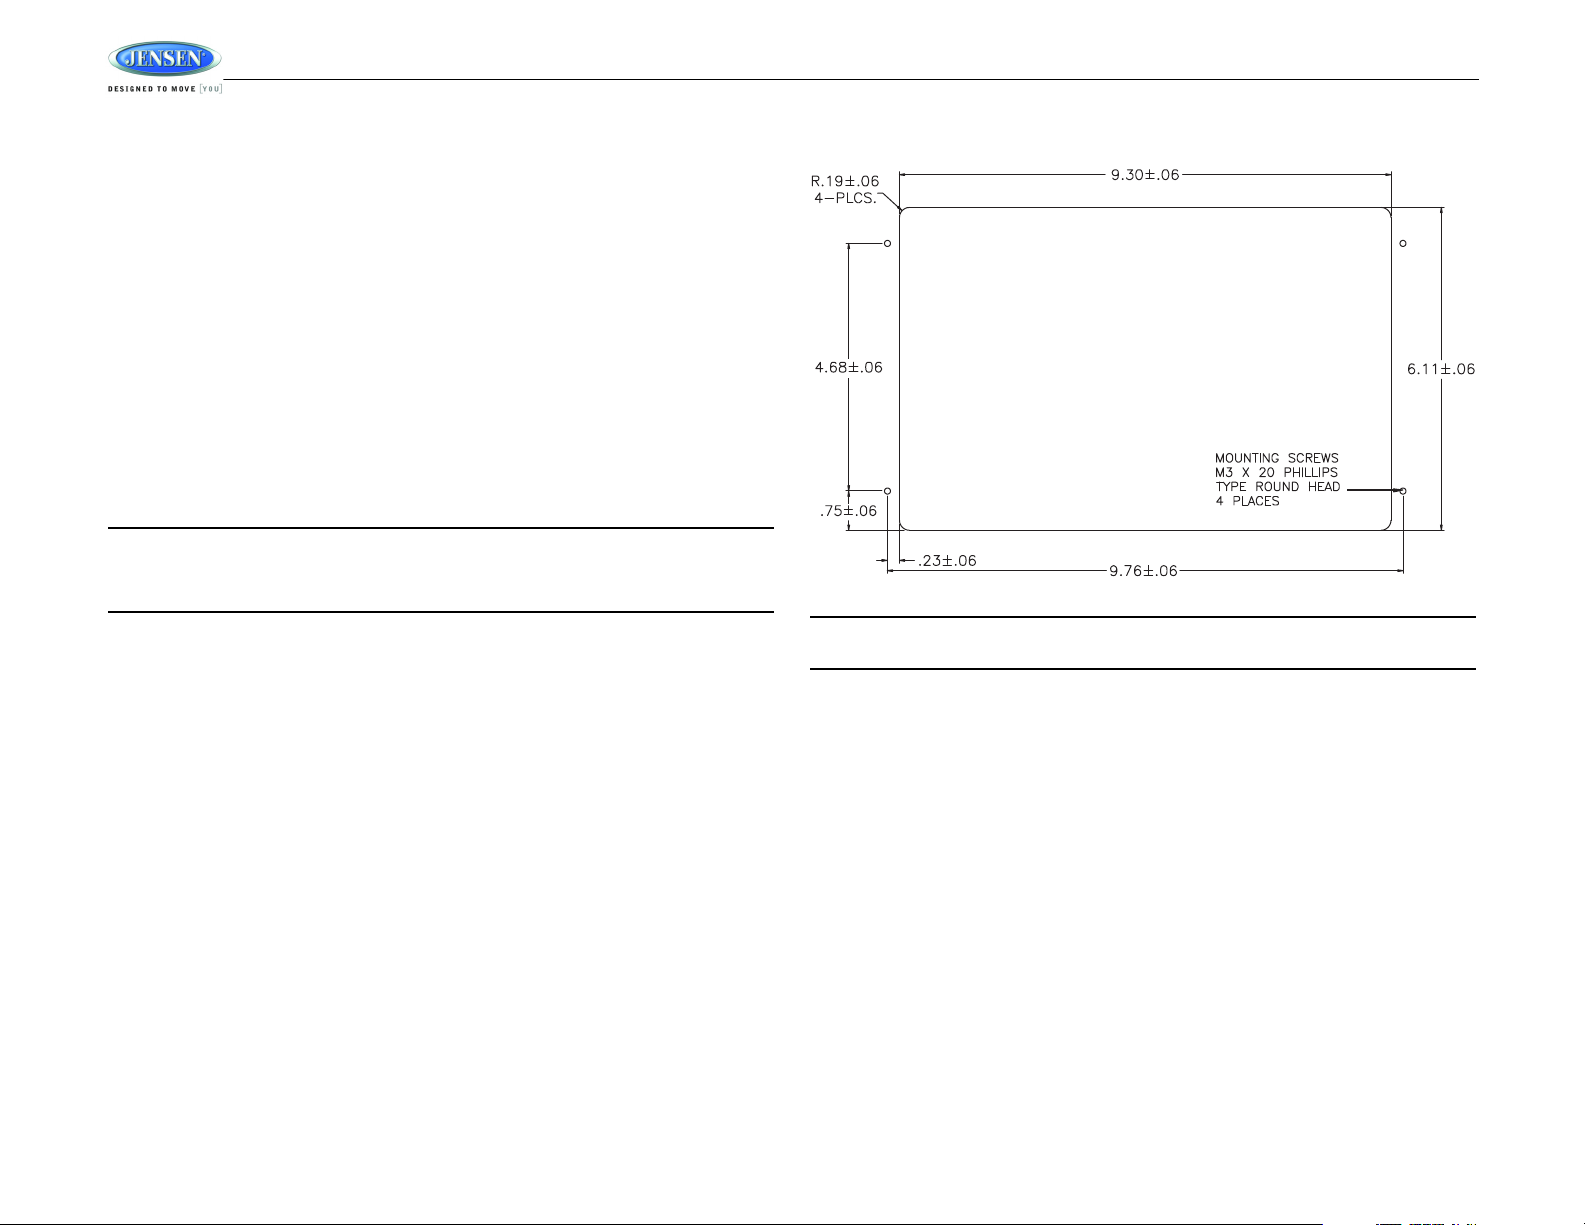
Use the mounting hole diagram (below) to measure and cut a mounting hole, then mount the
unit using four M3x20mm screws.
NOTE: Before cutting the mounting hole, make sure the area behind the mounting
location is clear of wires, fuel and vacuum or brake lines.
Mounting the Radio
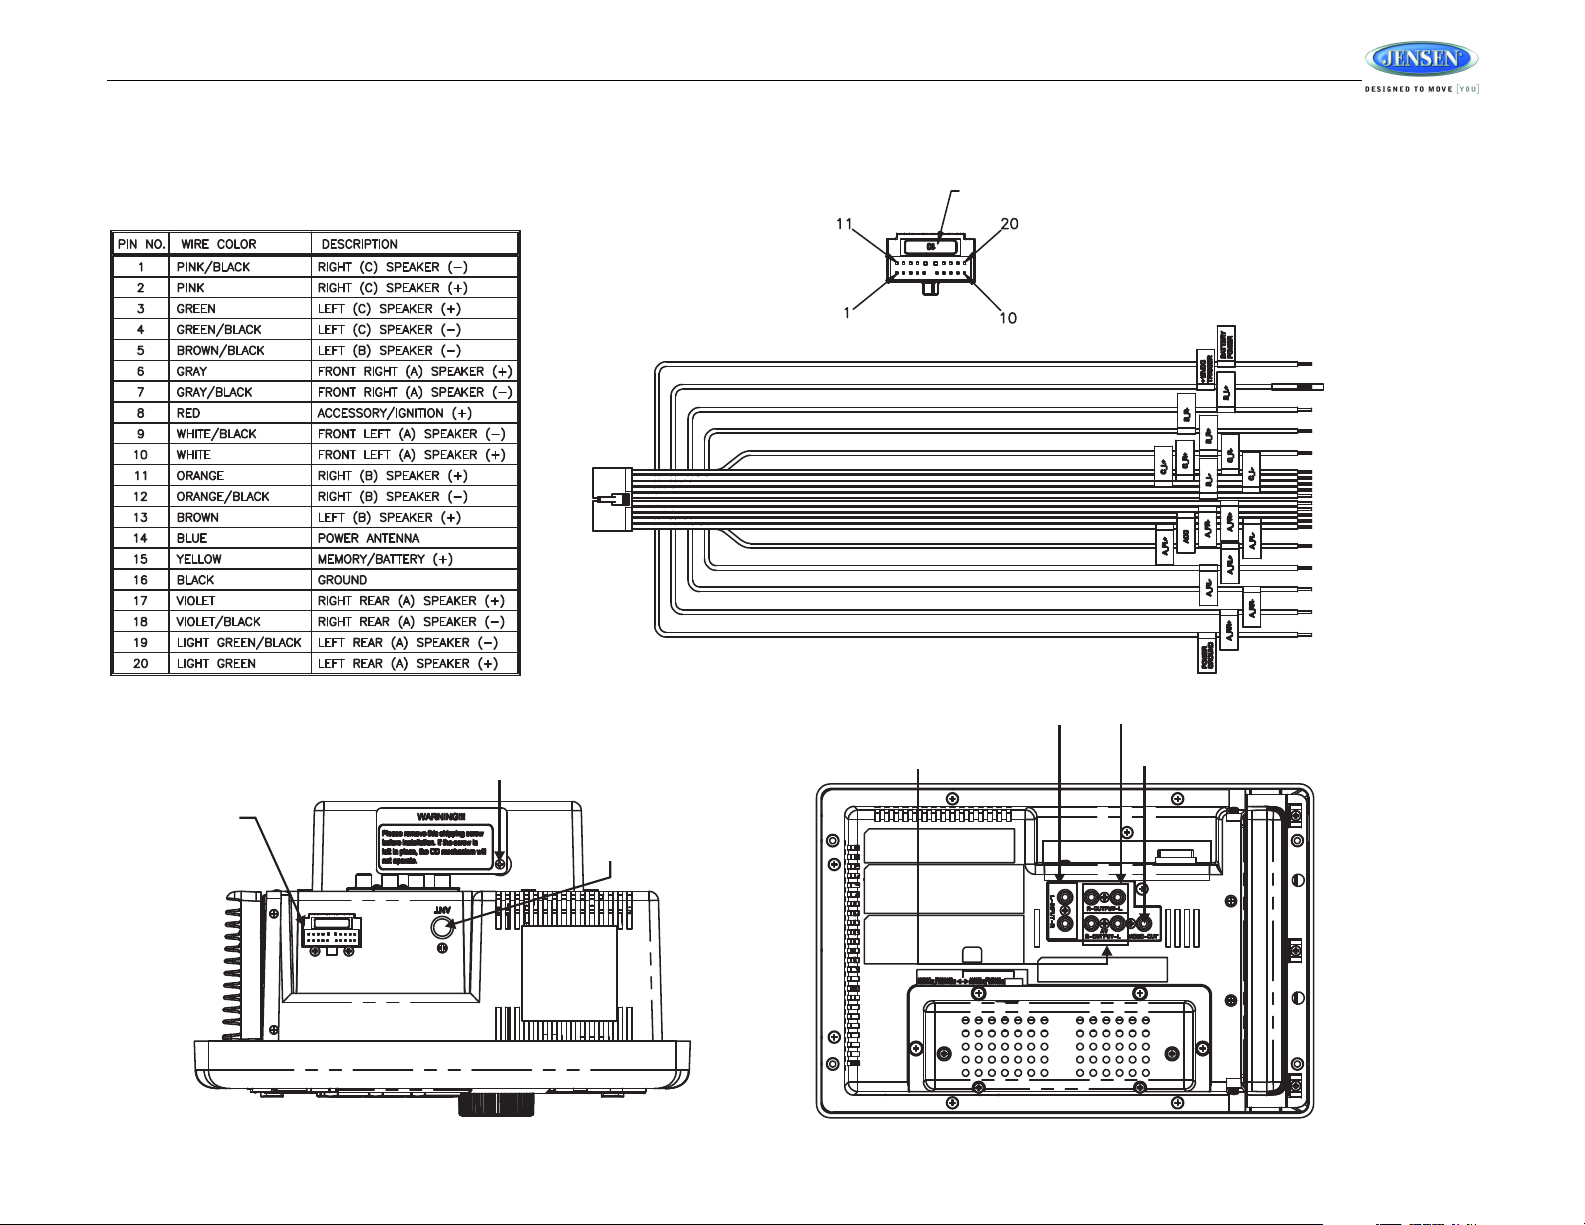
Route power, speaker and antenna cables through the hole, and connect them to the unit as
outlined in the wiring diagram. After ensuring correct connections, test operation.
2
Page 5
AWM968
AM/FM
MOTOROLA
ANTENNA
SHIPPING SCREW
WITH LABEL
AUDIO IN (RIGHT, LEFT) AUDIO OUT (RIGHT, LEFT)
VIDEO OUT
AUDIO/VIDEO OUT (RIGHT, LEFT)
WIRING HARNESS
CONNECTOR
(SEE DETAIL A)
DETAIL A
SHOWN FROM PIN VIEW
10 AMP FUSE
WIRING
The wiring diagram depicts all the wiring connections required for proper operation of the unit.
3
Page 6
AWM968
3
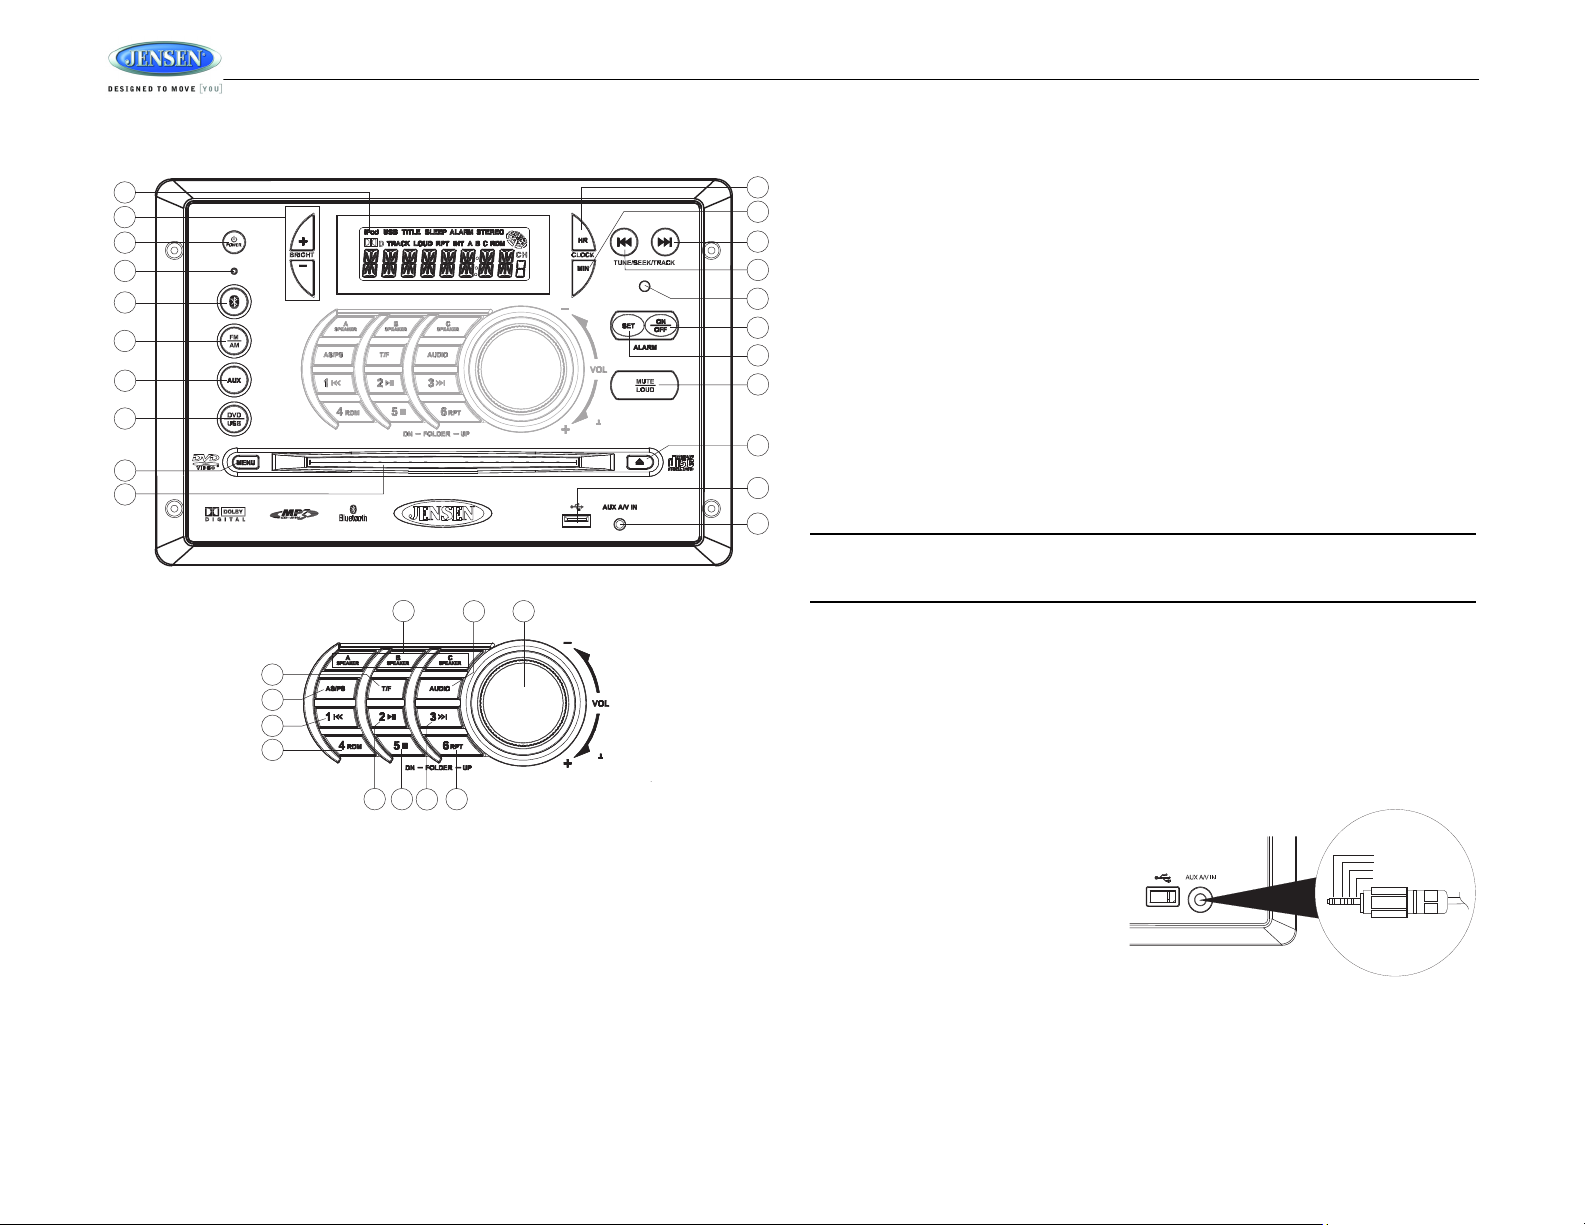
18
6
28
7
26
24
22
23
14
15
13
29
30
17
16
32
31
19
20
21
27
9
8
4
5
2
11
12
10
1
25
AWM968
PUSH/ENTER
PUSH/ENTER
3.5 mm A/V Cable
Left Audio
Right Audio
Ground
Video
BASIC OPERATION
This function will time out after three seconds of inactivity and the unit will resume normal
operation.
Mute/Loudness
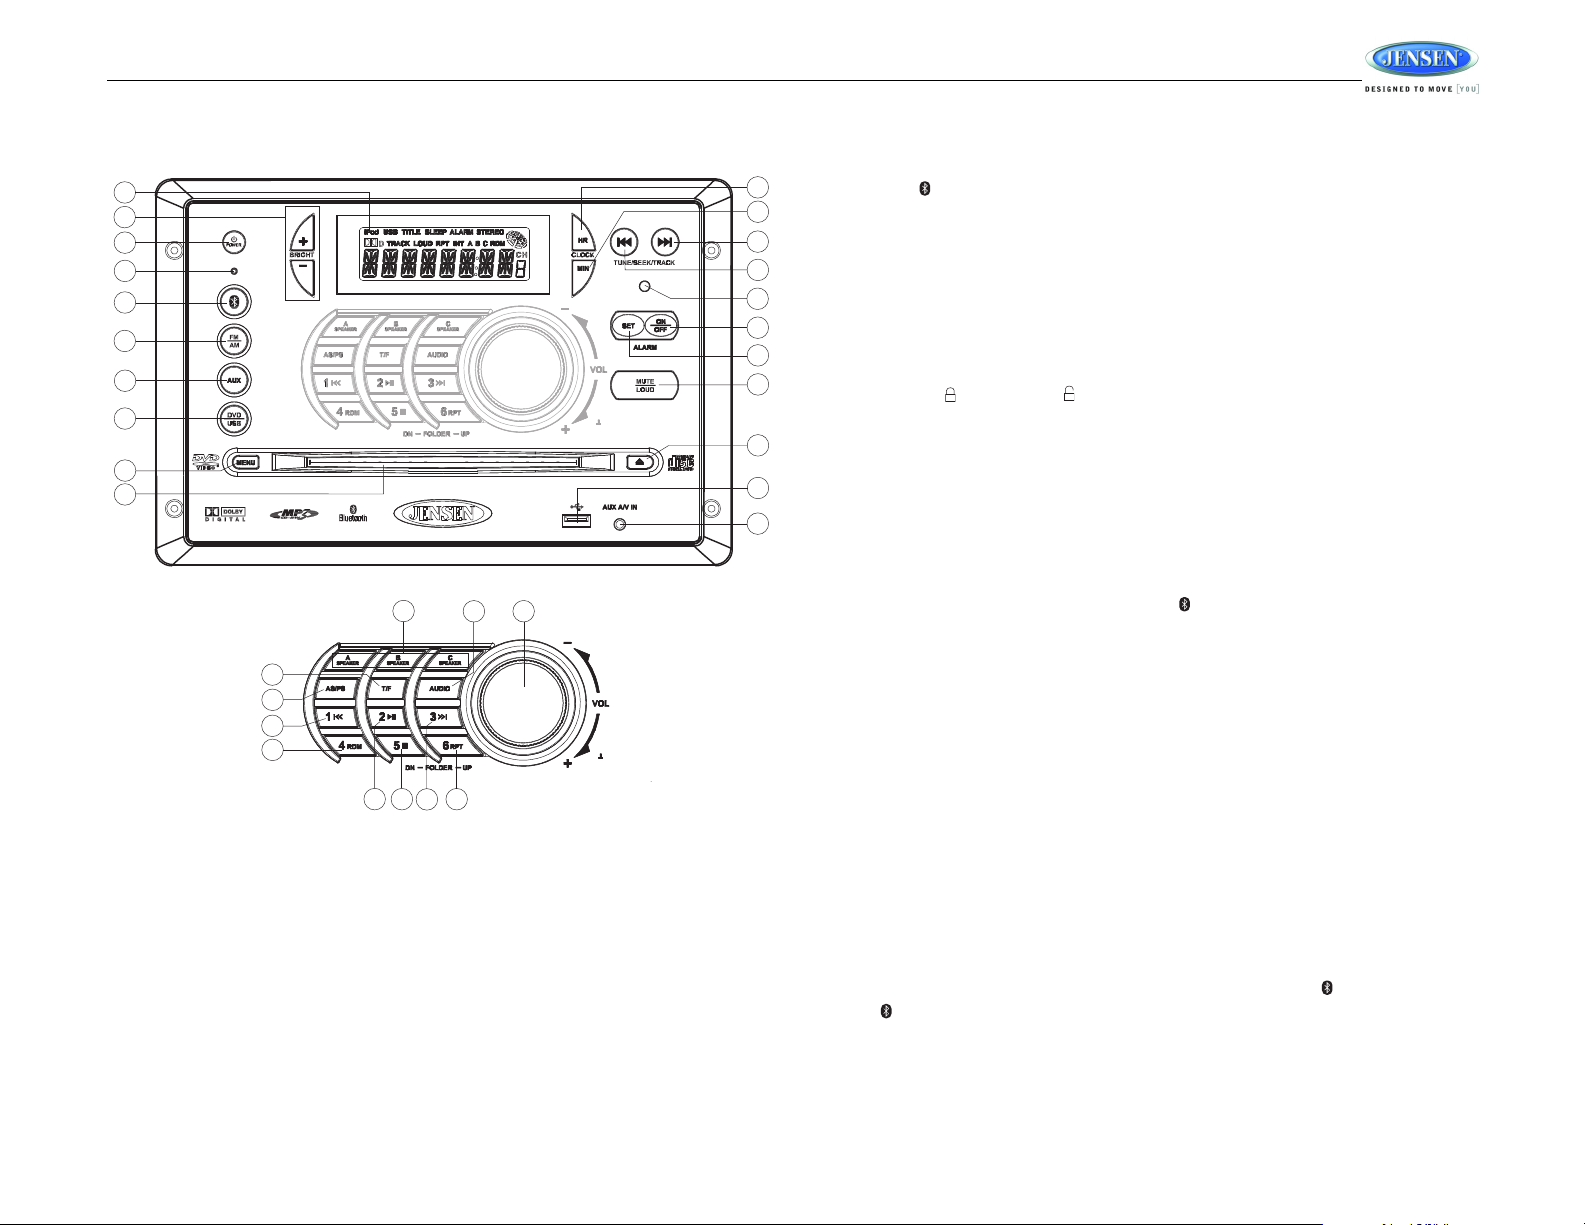
Press the MUTE/LOUD button (18) to silence the audio output in tuner, CD, DVD, USB or
auxiliary input mode. Press again to restore the previous volume level.
Press and hold the MUTE/LOUD button to toggle the Loudness function on/off.
Audible Beep Confirmation
Press and hold the AUDIO button (23) to access the system menu. Rotate the VOL/PUSH/
ENTER control (24) to turn the audible beep confirmation “ON” or “OFF”.
This function will time out after three seconds of inactivity and the unit will resume normal
operation.
Liquid Crystal Display (LCD)
The liquid crystal display (LCD) panel (1) displays the frequency, time and activated functions.
To adjust the brightness of the LCD, press the BRIGHT +/- buttons (2) to adjust the LCD
brightness from “LEVEL OFF” to “LEVEL 9” (brightest).
NOTE: When subjected to cold temperatures for an extended period of time, LCD panels
will take longer to illuminate and the display visibility may slightly decrease. Optimal
Power
Press the POWER button (3) to turn the unit on or to enter standby mode.
Volume Control/Audio Adjustment / Menu
• Rotate the VOL/PUSH/ENTER control (24) clockwise to increase or counter-clockwise to
decrease the volume output.
• Press the AUDIO button (23) to step through the following audio adjustment options.
Rotate the VOL/PUSH/ENTER control (24) to adjust the selected audio feature.
• BAS: Adjust the Bass level from “-7” to “+7”.
• TRE: Adjust the treble from “-7” to “+7”.
• BAL: Adjust the speaker output balance between “L7” (left) and “R7” (right). “BAL 0”
indicates an equal balance between the left and right speakers.
• FAD: Adjust the speaker fade between “R7” (rear) and “F7” (front). “FAD 0” indicates
and equal balance between the rear and front speakers.
LCD operation will return to normal when the temperature increases to a normal range.
Auxiliary Input Function
Press the AUX button (7) to directly access auxiliary input modes (AUX 1 IN and AUX 2 IN)
from any other mode when a portable audio device is connected to the unit. To connect a
portable audio device, insert a standard 3.5mm (audio line output or headphone output from
your portable CD / MP3 / iPod or other media player) into the AUX A/V IN (AUX 2 IN)
connector (21) on the front of the unit or the AUDIO IN (AUX 1 IN) on the back of the unit (see
“Wiring” on page 3).
Auxiliary Input Connector
For front panel A/V input, an external audio/
video (A/V) source such as a video game
player, camera, etc. can be connected to the
front panel A/V input with the provided
3.5mm A/V cable adapter. Connect the
device to the AUX A/V IN connector (21) on
the front panel, and then press AUX to
engage the input circuit to “AUX 2 IN”. Please
note that there are several different
A/V cable "standards". The AWM968 is
designed to support the Apple Video iPod cable type, as shown in the inset drawing.
4
Page 7
AWM968
USB Interface Connector
You can connect a USB device directly to USB interface (20) on the front of the AWM968 for
playback of compatible files. Playback begins automatically. Press the DVD/USB button (8) to
switch to USB mode from another source. Refer to “MP3/USB Operation” on page 11 for
additional operating instructions.
NOTE: USB will not support Apple device playback or charging.
Clock Display
Press the T/F button (25) to alternate between playing time and clock time while in Tuner, CD,
DVD, USB or auxiliary input mode.
Clock Setup
Press and hold the CLOCK HR button (11) to adjust the hour. Continue adjusting the hour to
move from AM to PM. Press and hold the CLOCK MIN button (12) to adjust minutes. The new
time will be saved five seconds after the last adjustment is made.
Setting the Sleep Time
The Sleep Timer will automatically turn off the AWM968 in the designated number of minutes.
To set the Sleep Time, press the ALARM SET button (17) and the sleep time will appear in the
display with the number representing the minutes (SLEEP 0). Press ALARM SET repeatedly
to change the sleep time from 15 to 30, 45 or 60 minutes.
Setting the Alarm
To set the alarm, press and hold the ALARM SET button (17). The clock digits will flash.
Repeatedly press the HR button (11) to adjust the hour one digit at a time, or press and hold to
advance rapidly. Repeatedly press the MIN button (12) to adjust the minutes one digit at a
time, or press and hold to advance rapidly. Press the ALARM SET button (17) to save the
alarm time.
Once a time is set, press ALARM ON/OFF (16) to turn the alarm function on or off.
Speaker Output
The three speaker output buttons (22) (A SPEAKER, B SPEAKER and C SPEAKER) control
speaker output from the radio. Press any of the three buttons to turn the corresponding
speaker sets on or off. SPK A, SPK B or SPK C will appear on the display.
Reset
The reset button should be activated for the following reasons:
• initial installation of the unit when all wiring is completed
• function buttons do not operate
• error symbol on the display
Use a ball point pen or similar object to press the reset button (4). This may be necessary
should the unit display an error code.
5
Page 8
AWM968
3
18
6
28
7
26
24
22
23
14
15
13
29
30
17
16
32
31
19
20
21
27
9
8
4
5
2
11
12
10
1
25
AWM968
PUSH/ENTER
PUSH/ENTER
AM/FM TUNER OPERATION
Preset Stations
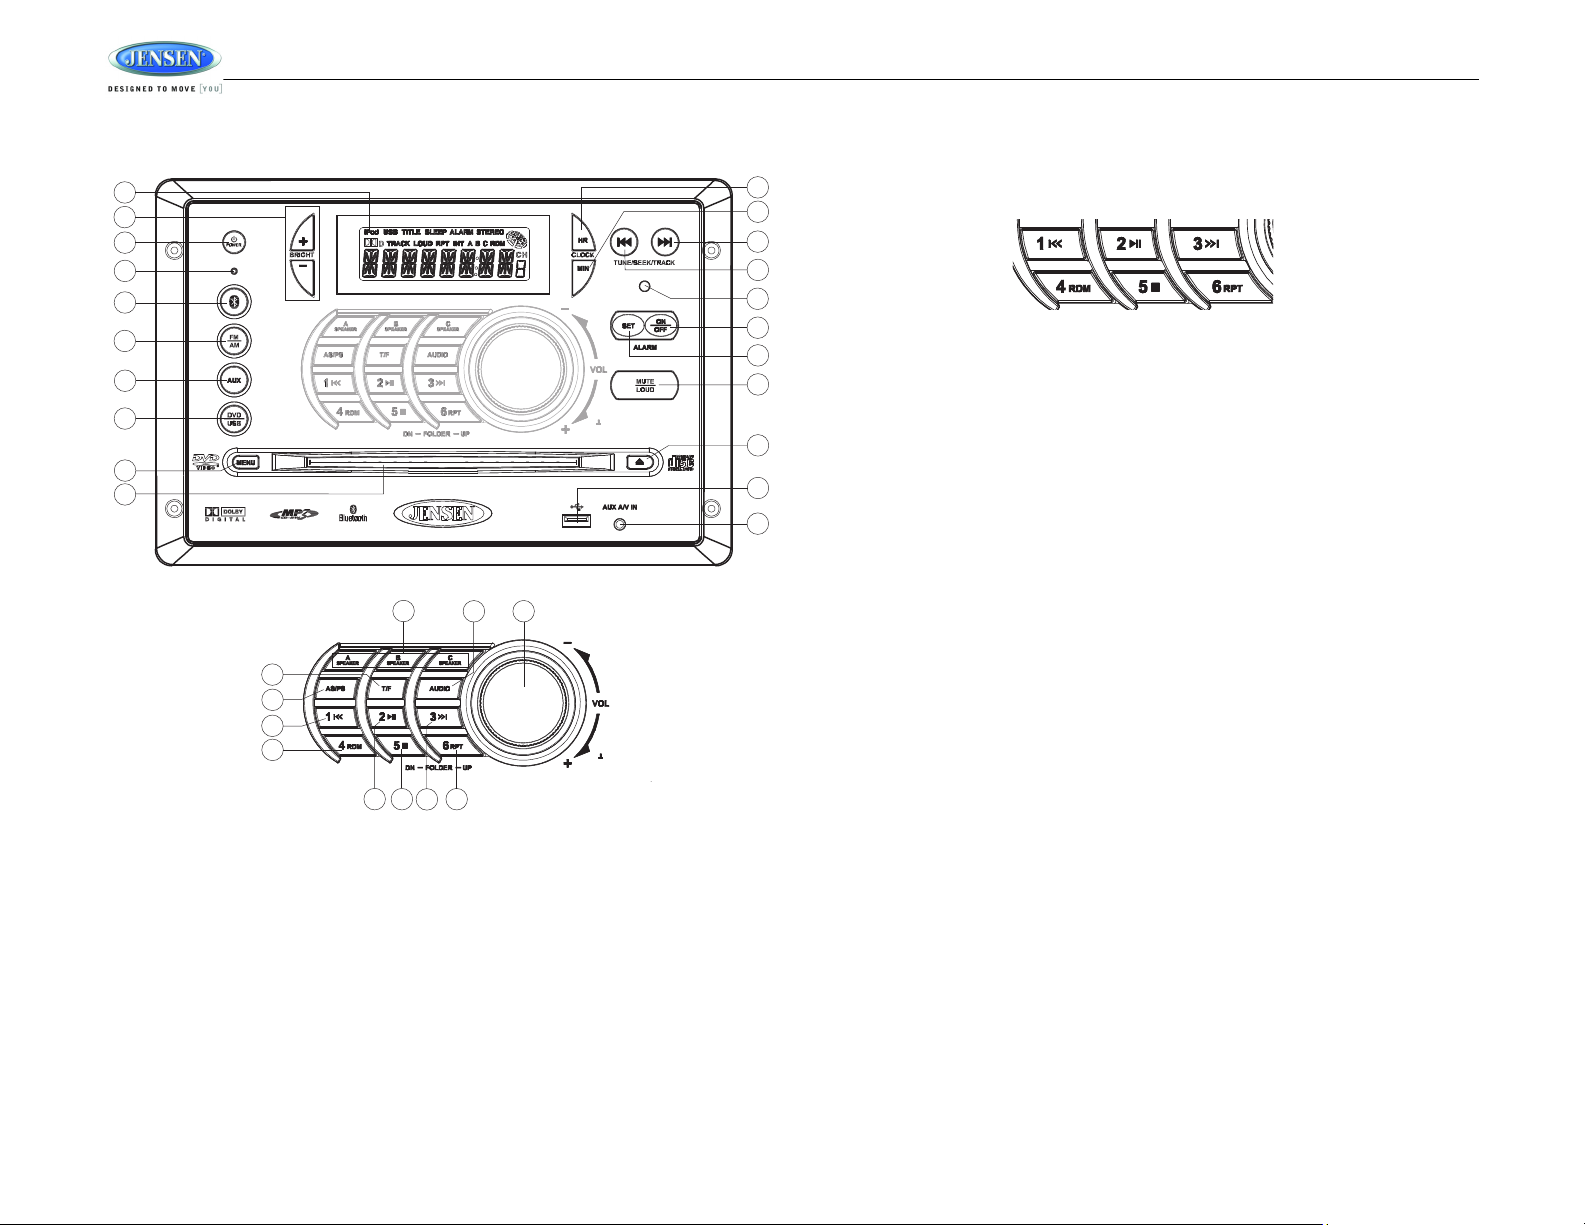
Six numbered preset buttons store and recall stations for each AM and FM band.
To store a station, select a band (if needed), and then select a station. Press and hold a preset
button for three seconds to store the current station. The corresponding preset number will
appear on the right side of the LCD under the letters “CH”.
To recall a station, select the preferred band and then press a preset button. The unit will
automatically tune to the corresponding stored station.
Automatic Store/Preset Scan (AS/PS)
Automatically Store
Press and hold the AS/PS button (26) for more than three seconds, and the unit will
automatically scan for and store the six strongest stations for all bands. To stop this function
before the automatic storing is complete, press AS/PS again.
Preset Scan
Briefly press AS/PS to scan all preset stations in the current band. The unit will play each
station for five seconds before moving on to the next station. To stop this function and play the
current station, press the AS/PS button again.
Selecting a Band
Press the FM/AM button (6) to directly access tuner mode from any other function mode or to
change between two AM bands (AM1 and AM2) and three FM bands (FM1, FM2 and FM3).
Tuning/Preset Stations
Manual Tuning
Press the TUNE/SEEK/TRACK >>| button (13) to tune the frequency one step higher. Press
the TUNE/SEEK/TRACK |<< button (14) to tune the frequency one step lower.
Seek Tuning
Press and hold the TUNE/SEEK/TRACK >>| or |<< button (13, 14) to automatically tune to the
previous/next strong station.
6
Page 9
AWM968
3
18
6
28
7
26
24
22
23
14
15
13
29
30
17
16
32
31
19
20
21
27
9
8
4
5
2
11
12
10
1
25
AWM968
PUSH/ENTER
PUSH/ENTER
CD OPERATION
Track Select
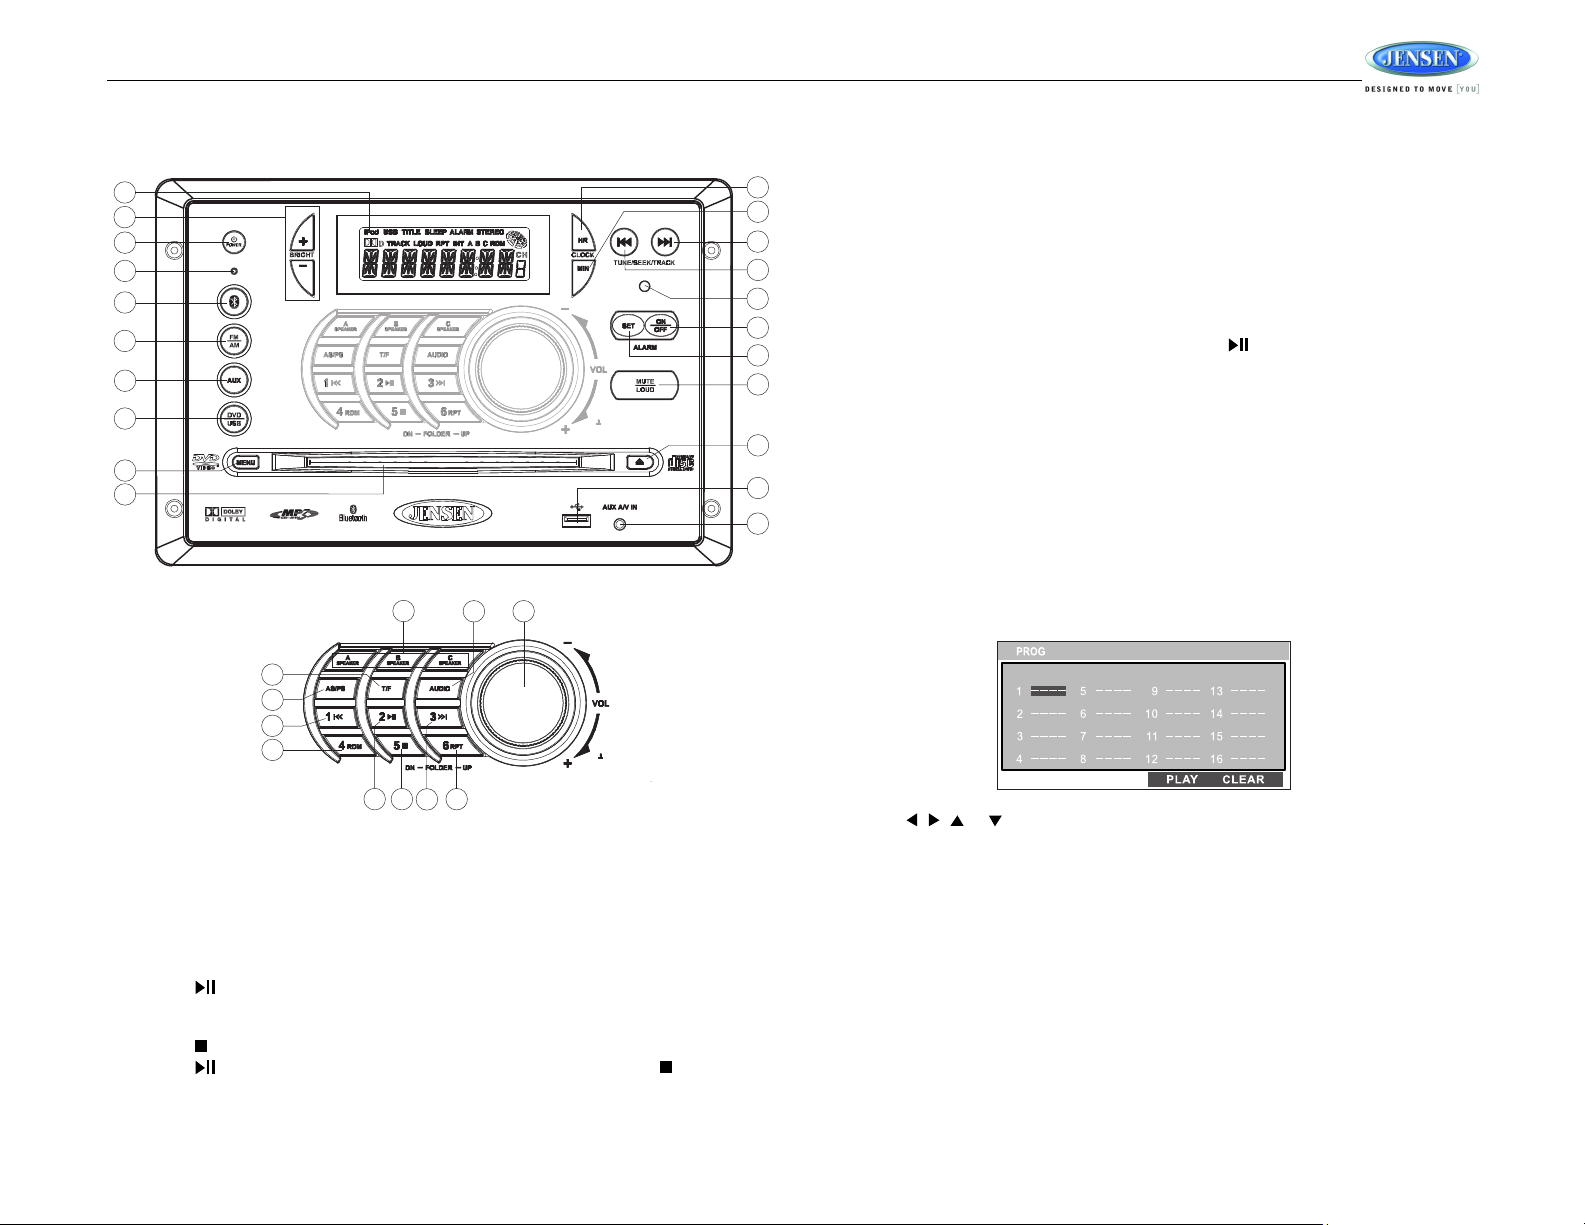
Press the TUNE/SEEK/TRACK >>| or |<< button (13, 14) to advance to the previous or next
track on the CD. The selected track number will appear on the display. Press and hold the
TUNE/SEEK/TRACK >>| or |<< button for more than three seconds to fast forward or fast
reverse through the disc. CD play starts when the play/pause button is pressed.
Fast Forward/Reverse
Press and hold the TUNE/SEEK/TRACK >>| or |<< button (13, 14) or press the >> or <<
buttons on the remote control (17) once for FORWARD X 2. Press and hold additional times for
FORWARD X 4, X 8, X 20 or PLAY. Press the play/pause 2/ button on the control panel (28)
or remote control (18) to end fast forward or reverse and resume normal playback.
Repeat (RPT)
Press the 6/RPT button (32) during disc play to access the repeat function. Press again to
continuously repeat the selected track (REP ONE). Press a third time to repeat all tracks (REP
ALL). Press once more to stop repeating (REP OFF).
Random Shuffle (RDM)
Press the 4/RDM button (30) during disc play to play all tracks on a CD in random, shuffled
order (RDM ON). Press 4/RDM again to stop random play (RDM OFF).
Programmed Playback
Inserting a CD
Insert a CD label-side up into the disc slot (10) and the disc will begin to play.
Ejecting a CD
Press the eject button (19) to stop CD play and eject the CD.
Pausing Playback
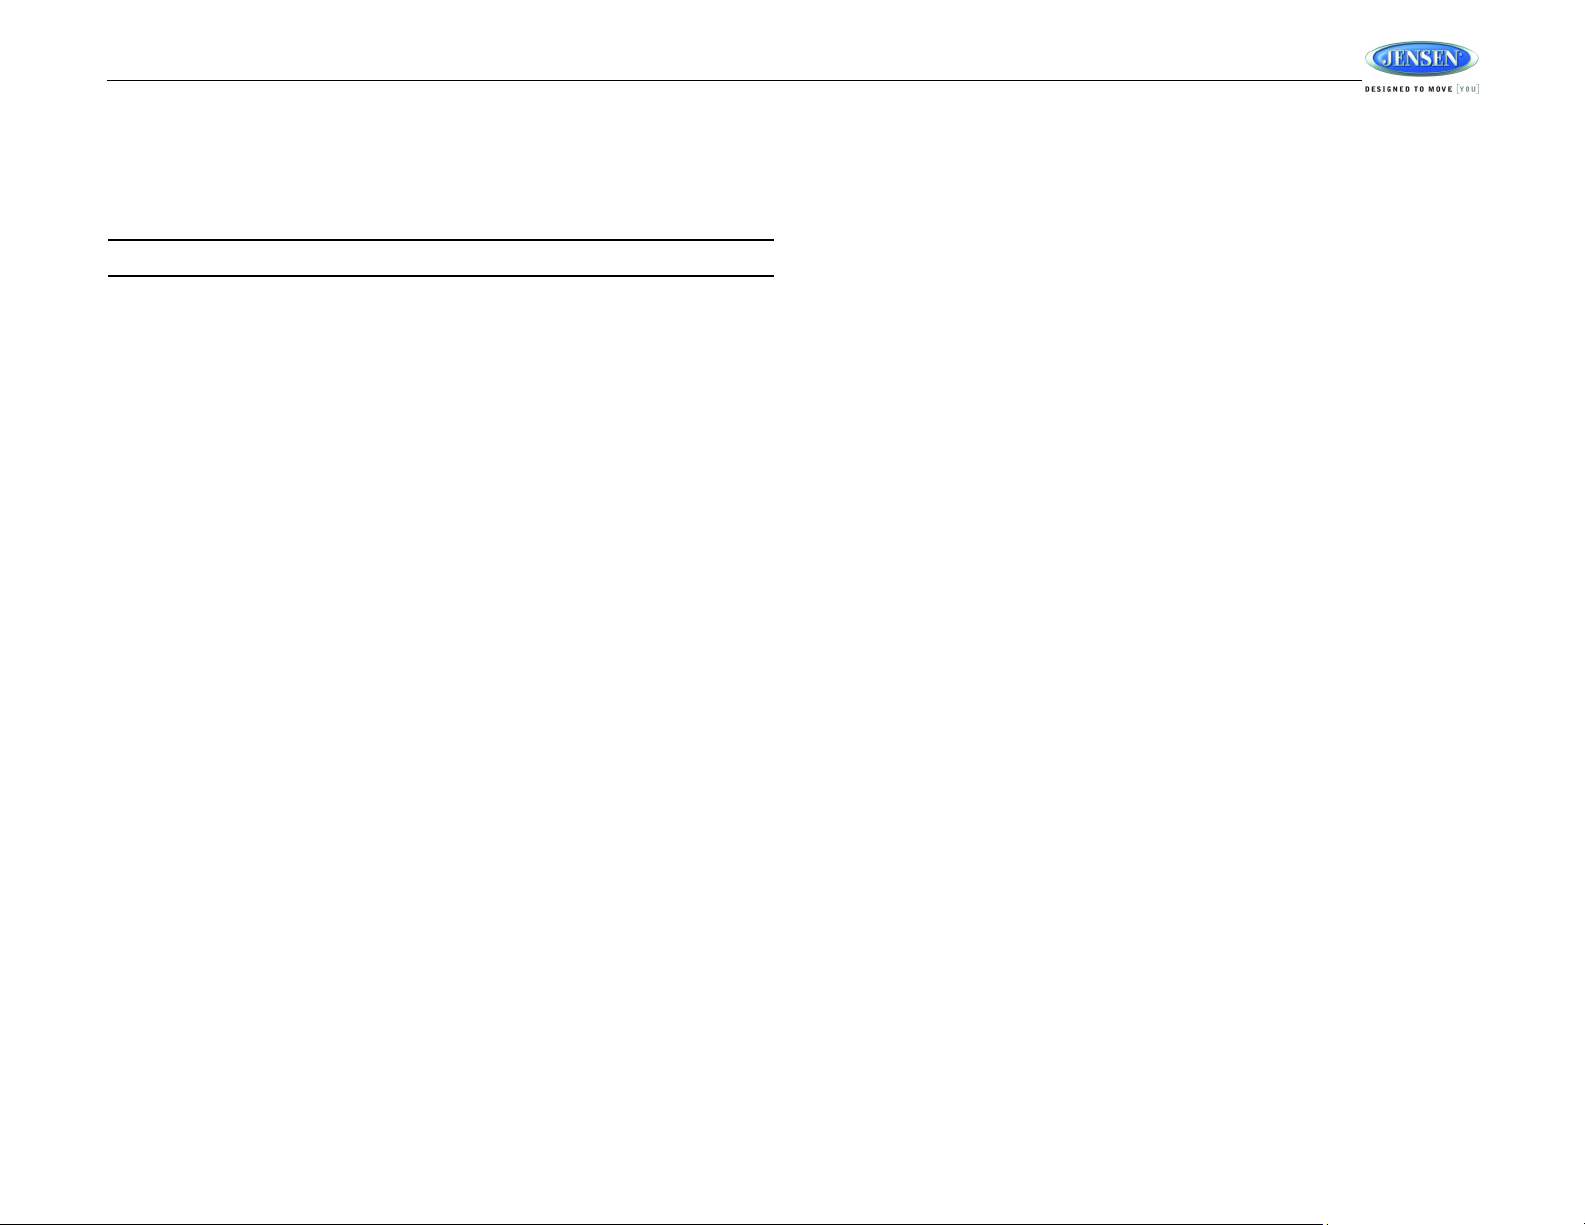
Press the 2/ button (28) to suspend or resume disc play.
Stopping Playback
Press the 5/ button (31) to suspend disc play, and “PRE STOP” will appear in the display.
Press the 2/ button (28) to resume disc play from the last position. Press 5/ twice and
“STOP” appears.
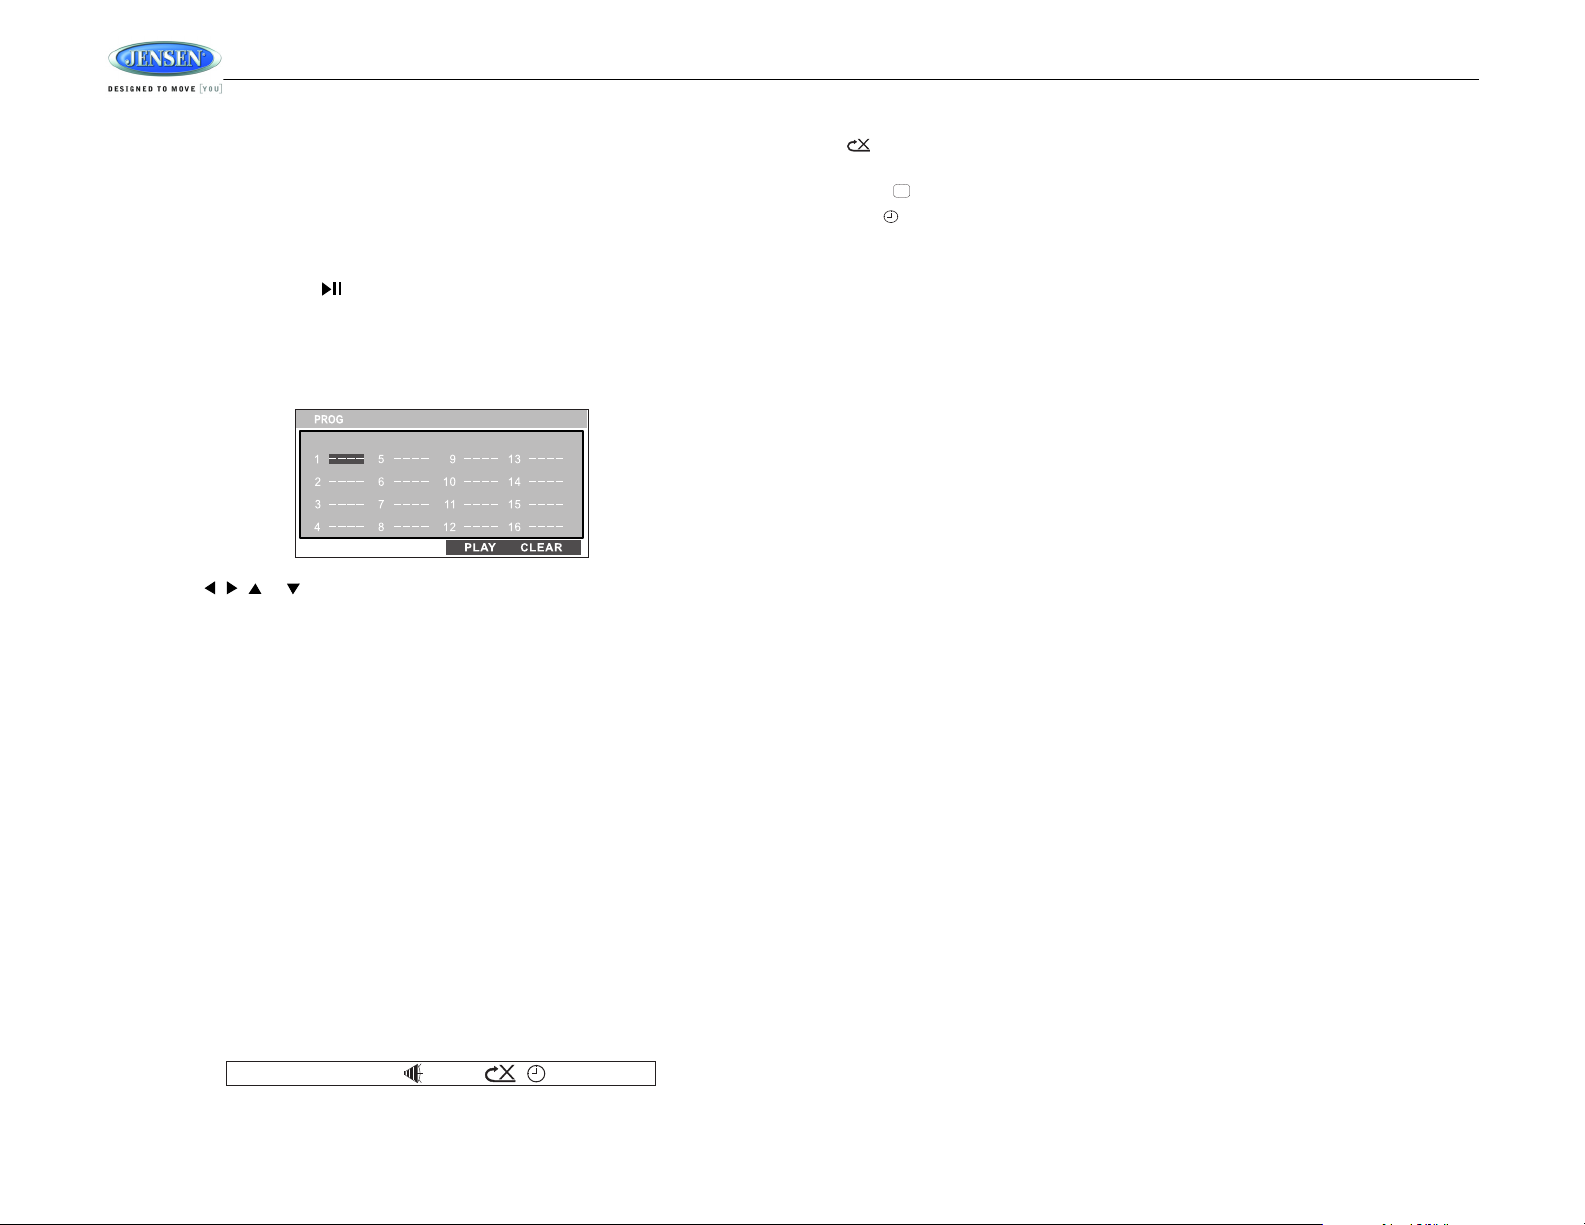
1. Press the PROG button (8) on the remote control to access the programmed playback
screen:
2. Use the , , or cursor buttons (16) on the remote control to access the fields on
the “PROG” screen.
3. Use the number buttons on the remote control to enter a track number in each field.
4. Press the >/|| button (19) on the remote control or highlight “PLAY” on screen and then
press the ENTER button (5) to begin playback in the numbered order indicated.
To delete the list, highlight “CLEAR” and then press ENTER. Press PROG to exit the
programmed playback screen.
Remote Control Direct Track Entry
To select a track directly, use the number pad on the remote control (10). For single digit
entries, press the corresponding number. For two digit entries, press the 10+ button followed
by the last digit (i.e., for track 16, press 10+ and then 6).
7
Page 10
GOTO Direct Track/Chapter Access
CD TRK 1/18 00 :03 :26
Use the GOTO function to access a track (chapter) directly.
1. Press the GOTO button (26) on the remote control. The On Screen Display information
will appear with the track number highlighted.
2. Use the number keys on the remote control to enter the 3-digit track number directly (i.e.
for track 10, enter “010”.
3. Press the ENTER button (5) to confirm and begin playback.
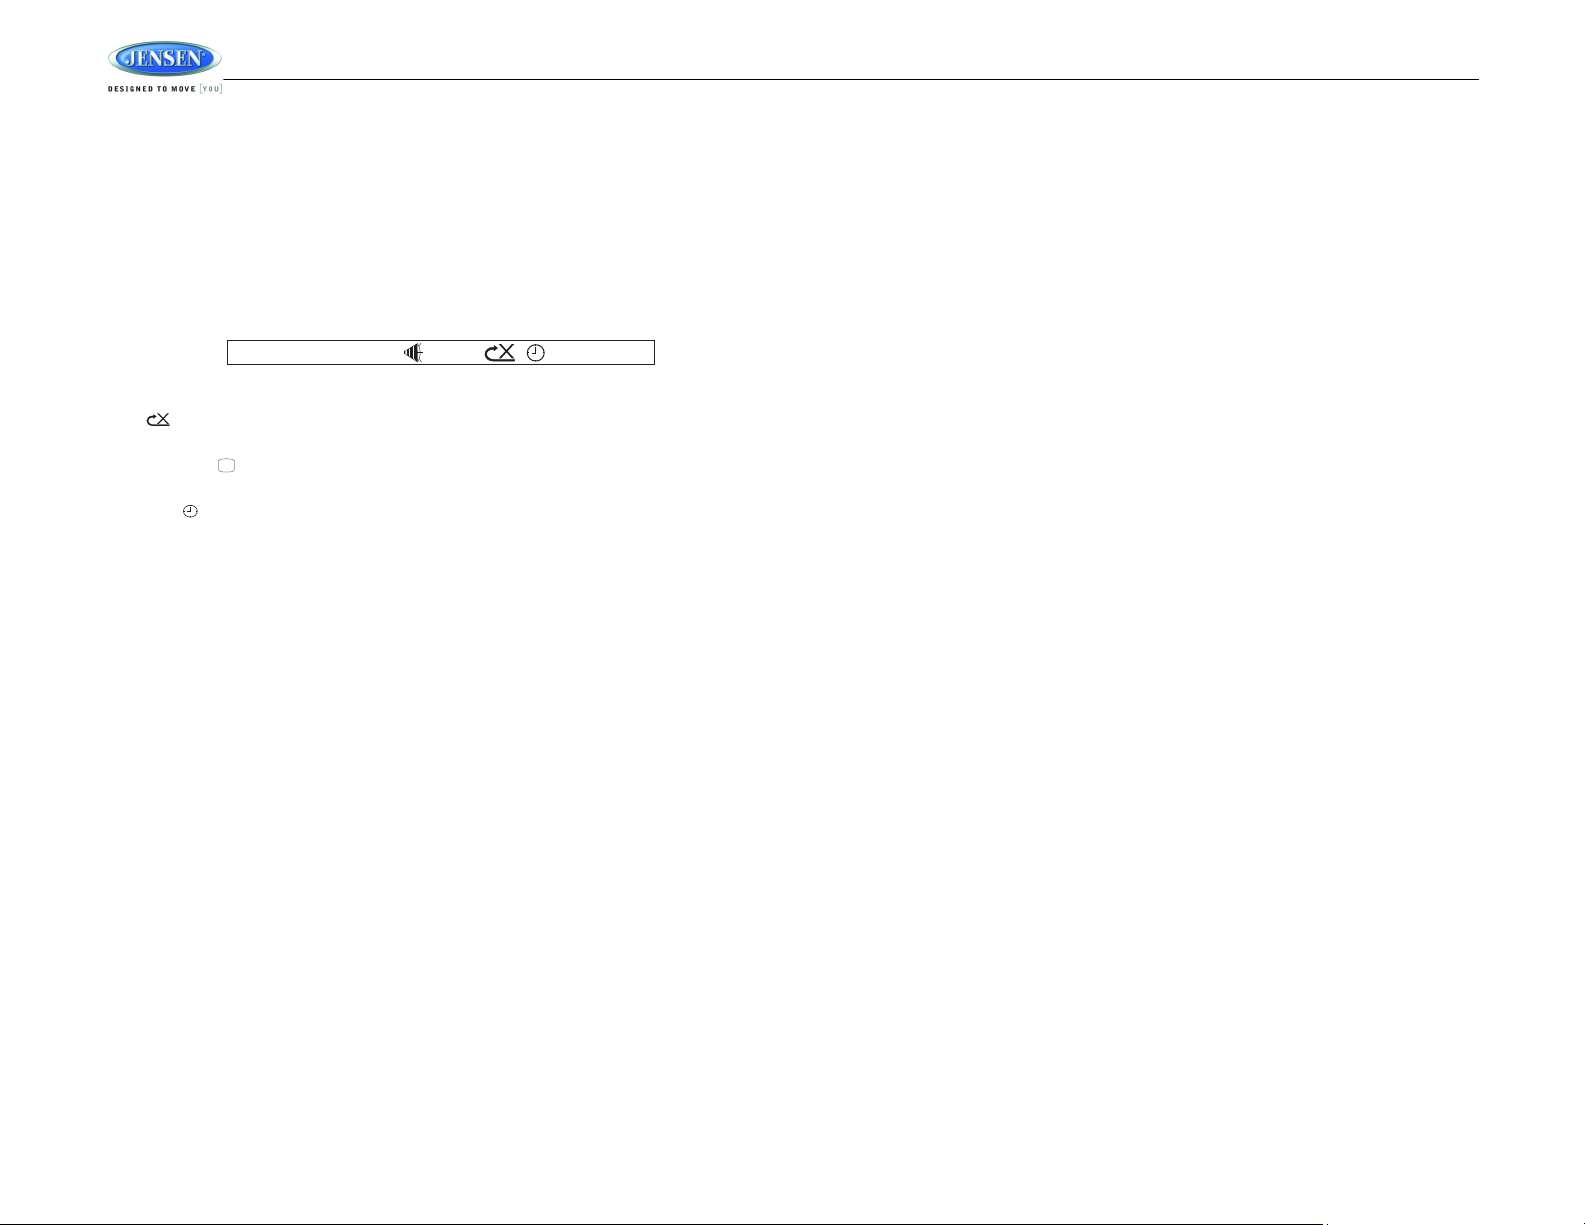
CD Playback Information
The following information is displayed at the top of the screen during CD playback:
• TRK ##/## – “1/18” indicates the first of 18 tracks on the CD is currently playing.
• – “X” indicates repeat play is OFF, “1” indicates repeat track, and “A” indicates repeat
disc.
• Press the button on the remote control (28) repeatedly to view the following
information for elapsed/remaining playing time:
• 00:02:18 – total elapsed playing time for disc
• C –00 :34 :37 – remaining playing time
• T 00:02:18 – total elapsed playing time for current track
• C –00 :34 :37 – remaining playing time for current track
AWM968
8
Page 11
AWM968
....
DVD TT 5/8 CH 2/16 00 :33 :34–
1/5 ENG 5.1 CH 1/4 ENG OFF
DVD/VCD OPERATION
Inserting a Disc
Insert a disc label-side up into the disc slot (10) and the disc will begin to play.
NOTE: Press the DVD/USB button (8) to alternate between the USB and DVD source.
Ejecting a DVD
Press the eject button (19) to stop DVD play and eject the DVD.
Pausing Playback
Press the 2/ button (28) to suspend or resume disc play.
Stopping Playback
Press the 5/ button (31) to stop disc play, and “STOP” will appear in the display.
Track Select
Press the TUNE/SEEK/TRACK >>| or |<< button (13, 14) to advance to the next or previous
track on the disc. The selected track number will appear on the display.
Enter/Select
While in menu mode, press the VOL/PUSH/ENTER button (24) to select a menu option.
Language Selection
While playing a DVD, press the 6/RPT button (32) to change the DVD audio language.
Fast Forward/Reverse
Press and hold the TUNE/SEEK/TRACK >>| or |<< button (13, 14) or press the >> or <<
buttons on the remote control (17) once for FORWARD X 2. Press and hold additional times for
FORWARD X 4, X 8, X 20 or PLAY. Press the play/pause 2/ button on the control panel (28)
or remote control (18) to end fast forward or reverse and resume normal playback.
Repeat Chapter/Title
Press the 6/RPT button (32) on the control panel or the RPT button (21) on the remote control
multiple times during playback to select from the following repeat play options:
• VCD: REP 1 (track), REP ALL (disc), REP OFF
• DVD: REP Chapter, REP Title, REP All, REP OFF
Playback Control (VCD Only)
Press the MENU button (6) on the remote control to turn Playback Control on/off when this
feature is available on your VCD.
Programmed Playback
1. Press the PROG button (8) on the remote control to access the programmed playback
screen:
2. Use the , , or cursor buttons (16) on the remote control to access the fields on
the “PROG” screen.
3. Use the number buttons on the remote control to enter a track number in each field.
4. Press the >/|| button (18) on the remote control or highlight “PLAY” on screen and then
press the ENTER button (5) to begin playback in the numbered order indicated.
To delete the list, highlight “CLEAR” and then press ENTER. Press PROG to exit the
programmed playback screen.
DVD Playback Features
The following remote control features, along with many others, are available during DVD
playback (see “Remote Control Operation” on page 14 for complete functionality):
• LANG: Press to choose an alternate audio language, if available.
• SUBTITLE: Press to select an alternate subtitle language, if available.
• ANGLE: Press to select an alternate viewing angle, if available.
• ZOOM: Press to zoom the picture at ZOOM 2, ZOOM 3, ZOOM 4, ZOOM 1/2, ZOOM 1/3
or ZOOM 1/4, or select OFF to return to normal view.
NOTE: Feature availability is dependent upon DVD embedded information.
Playback Information
During DVD and VCD playback, press the button (28) on the remote control to display
playback information on the screen, including the media playing and current playback time.
Continue pressing the button to display additional information, as indicated below.
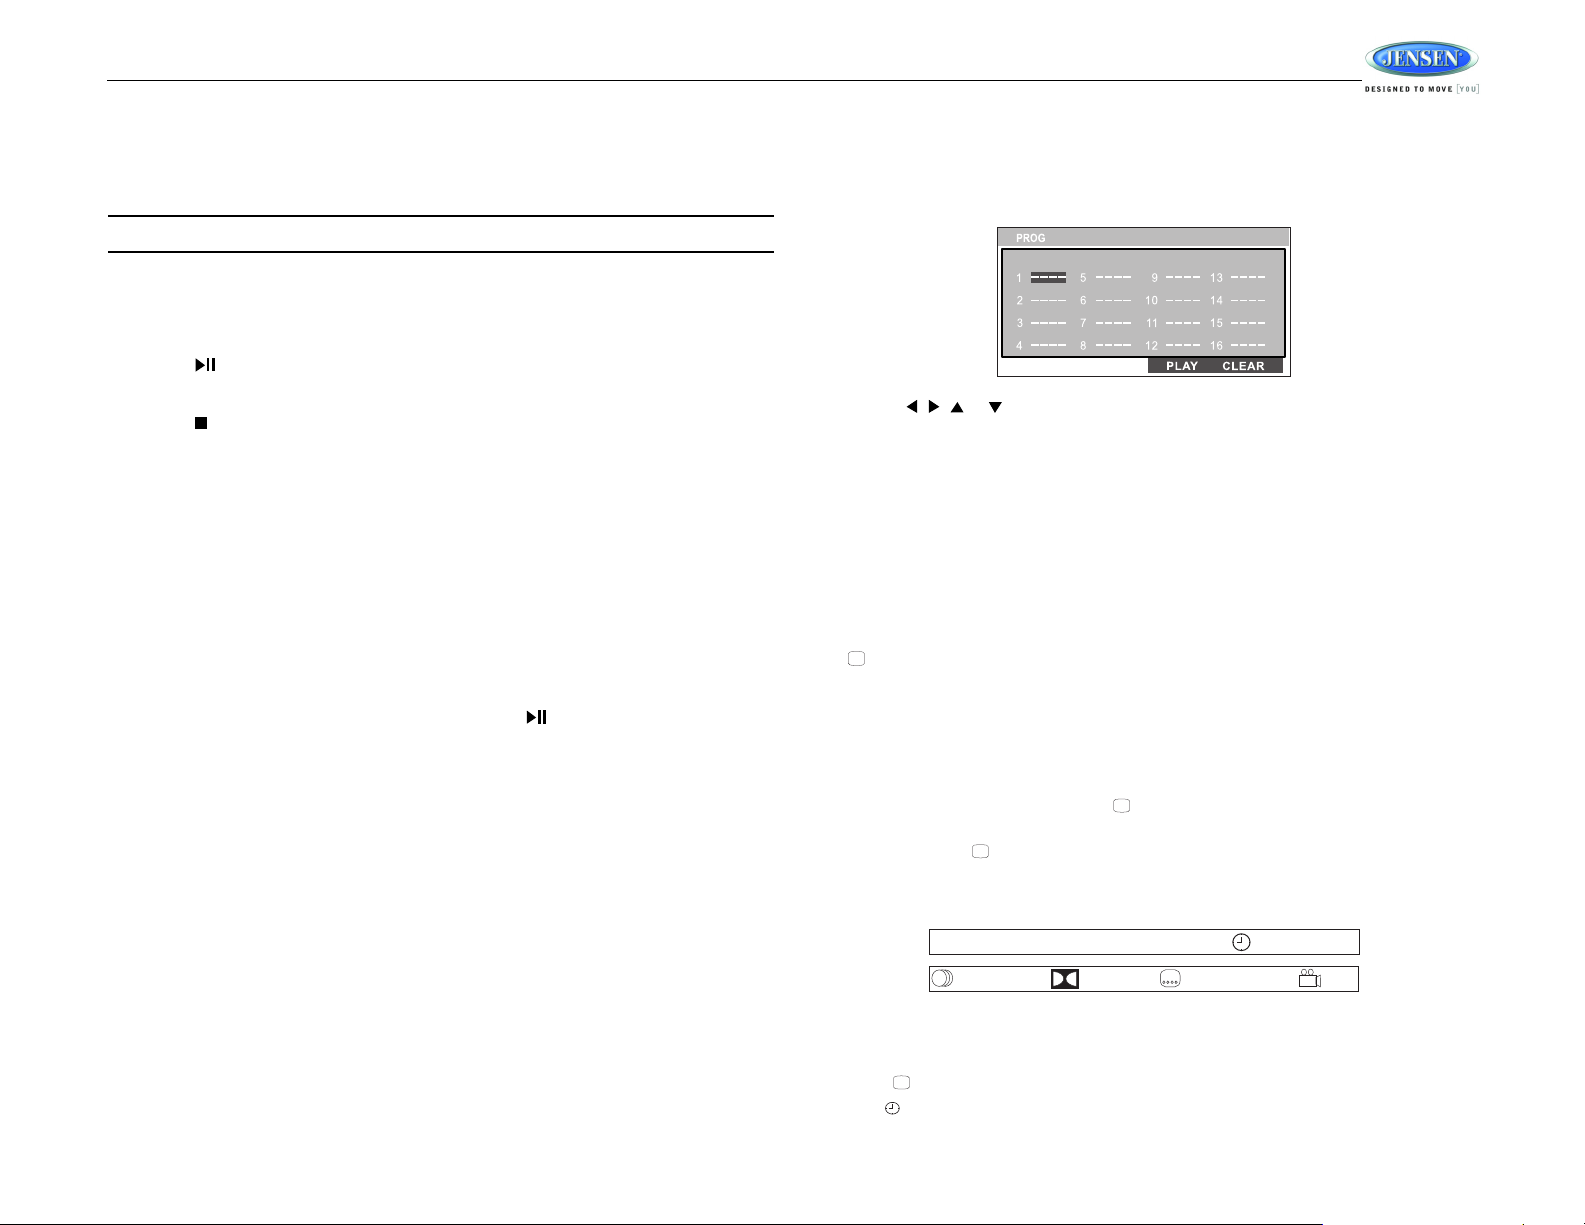
DVD Playback Information
The following information is displayed at the top of the screen during DVD playback:
• TT 5/8 – “5 / 8" indicates the fifth of 8 titles on the DVD is currently playing.
• CH 2/16 – “2 / 16" indicates that the second of 16 chapters on the DVD is currently
playing.
• Press repeatedly to view the following information: for elapsed/remaining playing time:
• 00:02:18 – total elapsed playing time for disc
9
Page 12
• C –00 :34 :37 – remaining playing time
VCD TRK 1/18 00 :33 :34–
• T 00:02:18 – total elapsed playing time for current track
• C –00 :34 :37 – remaining playing time for current track
• 1/5 ENG – English is the selected audio language out of 5 possible choices
• 5.1 CH – The current language is recorded in 5.1 surround sound
• 1/4 ENG – English is the selected subtitle language out of 4 possible choices
• OFF – There are no alternate angles recorded for this scene
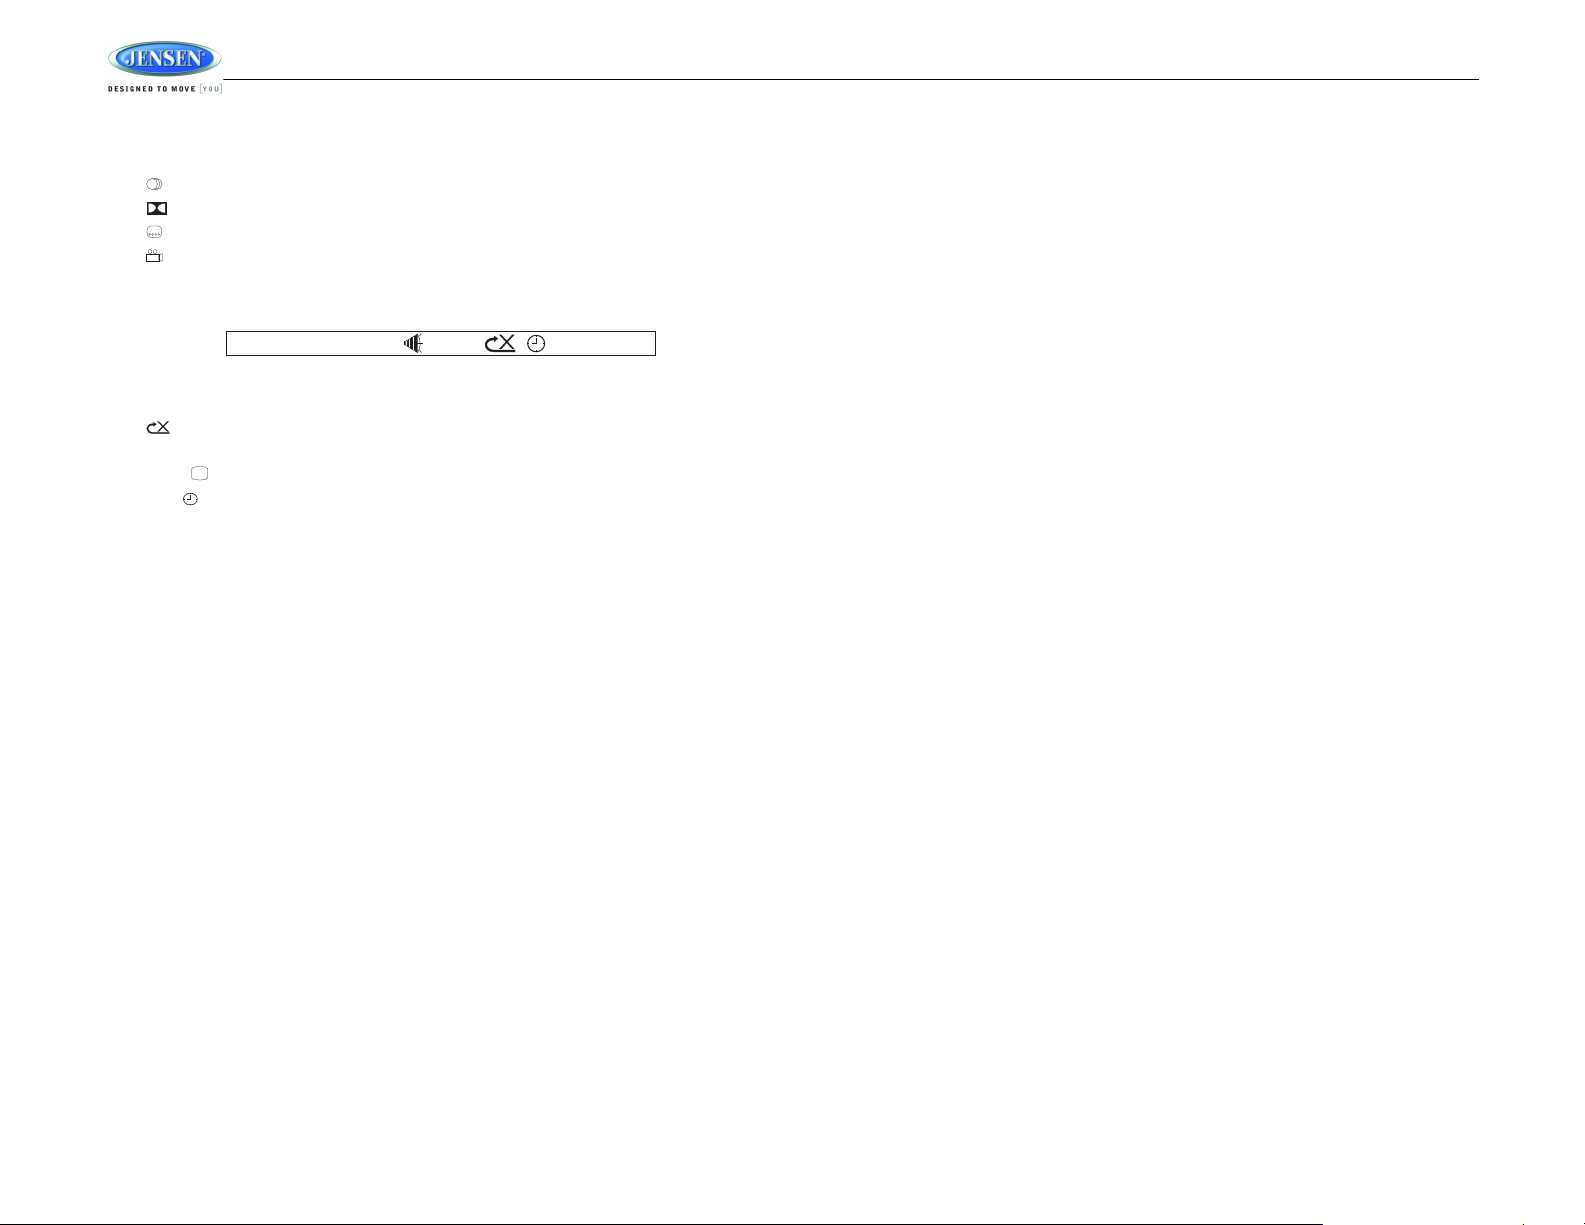
VCD Playback Information
The following information is displayed at the top of the screen during VCD playback:
• TRK ##/## – “1/18” indicates the first of 18 tracks on the VCD is currently playing.
• PBC: Indicates when PBC (Playback Control) is turned on.
• – “X” indicates repeat play is OFF, “1” indicates repeat track, “D” indicates repeat
directory, and “A” indicates repeat disc.
• Press repeatedly to view the following information for elapsed/remaining playing time:
• 00:02:18 – total elapsed playing time for disc
• C –00 :34 :37 – remaining playing time
• T 00:02:18 – total elapsed playing time for current track
• C –00 :34 :37 – remaining playing time for current track
Remote Control Direct Track Entry
To select a track directly, use the number pad on the remote control (10). For single digit
entries, press the corresponding number. For two digit entries, press the 10+ button followed
by the last digit (i.e., for track 16, press 10+ and then 6).
GOTO Direct Track/Chapter Access
Use the GOTO function to access a track (chapter) directly.
1. Press the GOTO button (26) on the remote control. The On Screen Display information
will appear with the track number highlighted.
2. Use the number keys on the remote control to enter the 3-digit track number directly (i.e.
for track 10, enter “010”.
3. Press the ENTER button to confirm and begin playback.
AWM968
10
Page 13
AWM968
3
18
6
28
7
26
24
22
23
14
15
13
29
30
17
16
32
31
19
20
21
27
9
8
4
5
2
11
12
10
1
25
AWM968
PUSH/ENTER
PUSH/ENTER
01. CHERRY POP
02. CHRIS ISSA
03. CRAZY TOWN
04. PHISH BI
05. PHISH BO
06. PHISH FR
07. PHISH GI
08. PHISH... GU
09. PHISH CH
—
—
—
—
—
—
01. -
02. 80'S
03. ALLMAN BRO
04. DISCO-FUNK
05. OLDIES
[ - ]PHISH GUMBO.MP3—
MP3/USB OPERATION
NOTE: MP4 streaming video format is not supported.
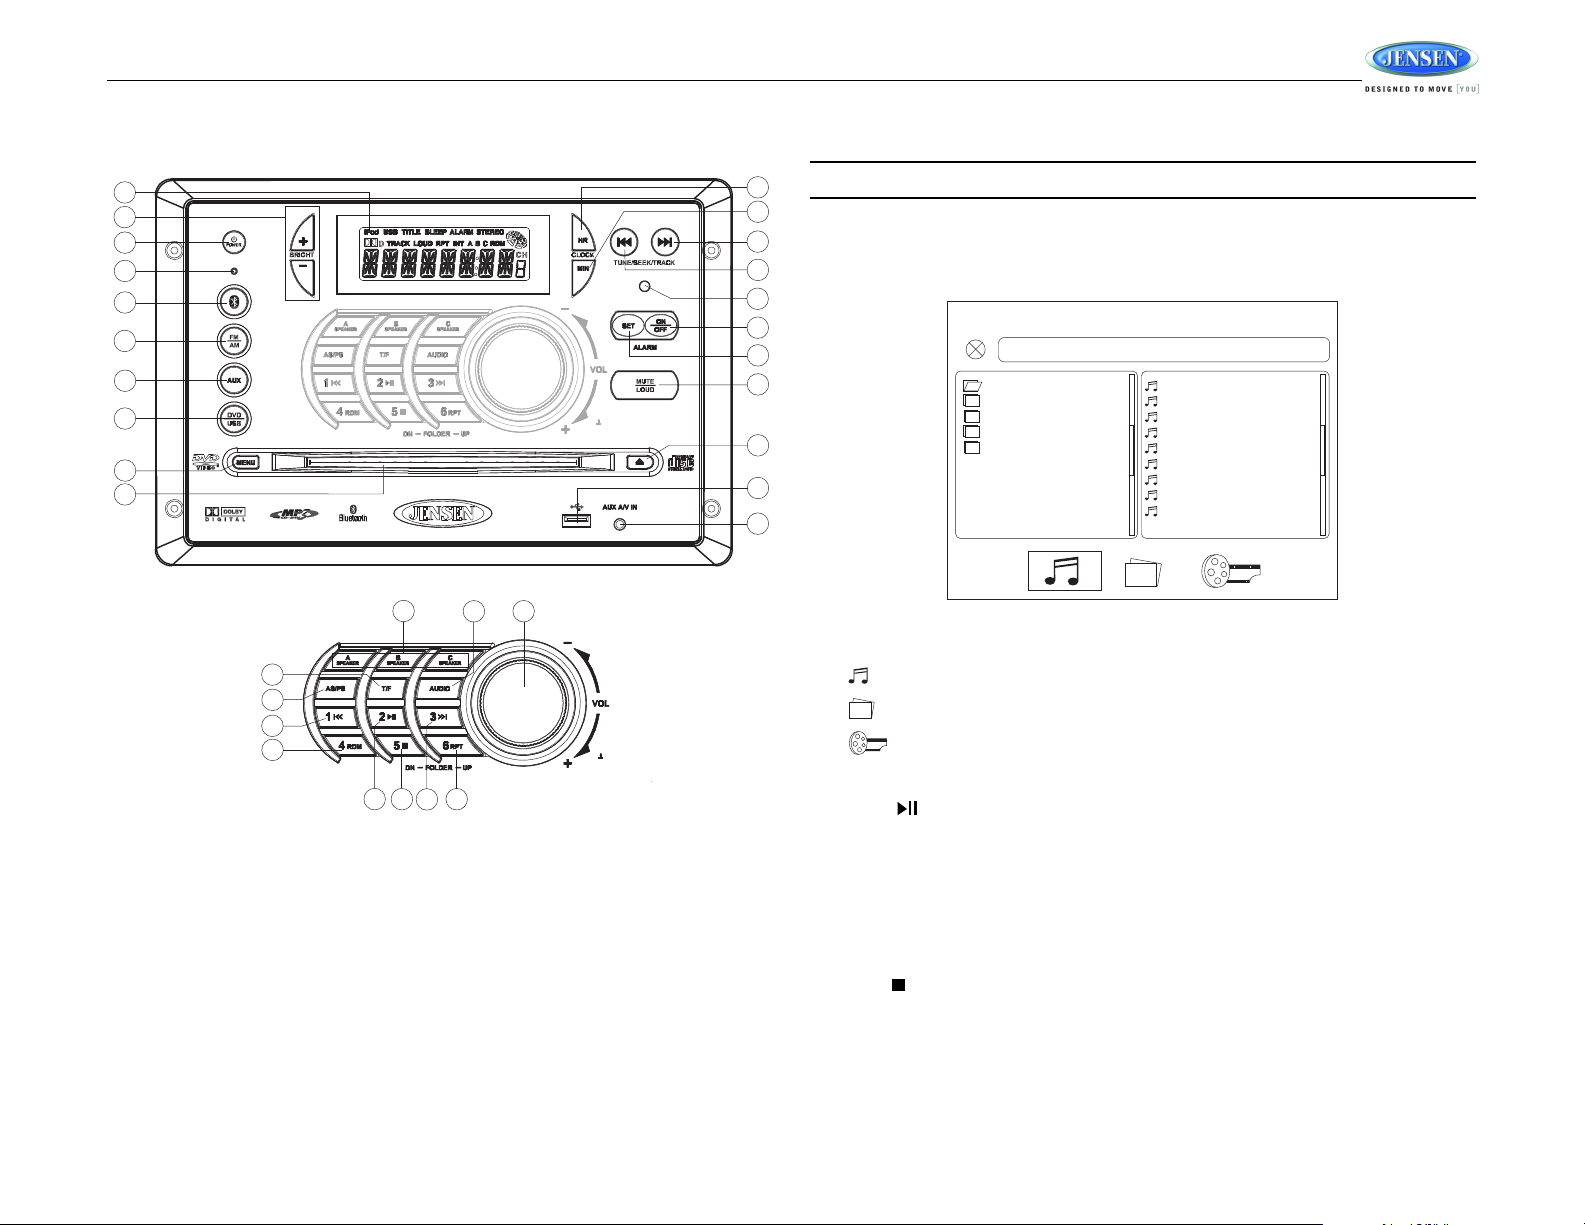
MP3 Monitor Display
After loading an MP3 disc or USB device, the following screen will appear on your output
monitor.
Insert/Eject Disc
Insert a disc label-side up into the disc slot (10), and the disc will begin to play. Press the eject
button (19) to stop playback and eject the disc.
Insert/Remove USB Device
To connect a USB device, locate the USB interface connector (20) located near the bottom
right corner on the front of the radio. Insert the USB device into the USB jack and the unit will
read the files on the USB device automatically, displaying “USB LOAD” while files are initially
loaded. To remove the USB device, press the FM/AM button (6), DVD/USB button (8) or AUX
button (7) to change to another mode and then remove the USB device from the USB
connector.
Press the DVD/USB button (8) to access USB mode from any other mode.
Select one of these icons to access the corresponding media on your disc or USB device. If the
media type is not present, the icon will not be selectable.
• : Audio
• : Photos
• : Video
Play/Pause
Press the 2/ button (28) to suspend or resume playback.
Track Select
When playback is stopped, press the TUNE/SEEK/TRACK >>| or |<< button (13, 14) to search
in current folder. During playback,
press the TUNE/SEEK/TRACK >>| or |<< button to access
the previous/next file. The selected file number will appear on the display.
Folder Up/Down
Press the 6/RPT button (32) to access a higher folder level (FOLDER UP).
Press the 5/ button (31) to access a lower folder level (FOLDER DN).
Repeat (RPT)
Press the 6/RPT button (32) on the control panel or the RPT button (21) on the remote control
multiple times during playback to select from the following repeat play options: REP 1 (track),
REP DIR (folder), REP ALL (disc), OFF.
11
Page 14
AWM968
CDrom TRK 9/150 00 :03 :26
Random Shuffle (RDM)
Press the 4/RDM button (30) during disc play to play all files in random, shuffled order. Press 4/
RDM again to stop random play.
Fast Forward/Reverse
Press the TUNE/SEEK/TRACK >>| or |<< button (13, 14) for more than three seconds or
press the >> or << button on the remote control (17) to fast forward or fast reverse. Press and
hold once for FORWARD X 2. Press and hold additional times for FORWARD X 4, X 8, X 20 or
PLAY. Press the play/pause 2/ button on the control panel (28) or remote control (18) to end
fast forward or reverse and resume normal playback.
Programmed Playback
1. Press the PROG button (8) on the remote control to access the programmed playback
screen:
2. Use the , , or cursor buttons (16) on the remote control to access the fields on
the “PROG” screen.
3. Use the number buttons on the remote control to enter a track number in each field.
4. Press the >/|| button (18) on the remote control or highlight “PLAY” on screen and then
press the ENTER button (5) to begin playback in the numbered order indicated.
To delete the list, highlight “CLEAR” and then press ENTER. Press PROG to exit the
programmed playback screen.
Remote Control Direct Track Entry
To select a file directly, use the number pad on the remote control (10). For single digit entries,
press the corresponding number. For two digit entries, press the 10+ button followed by the
last digit (i.e., for file 16, press 10+ and then 6).
GOTO Direct Track/Chapter Access
Use the GOTO function to access a track (chapter) directly.
1. Press the GOTO button (26) on the remote control. The On Screen Display information
will appear with the file number highlighted.
2. Use the number keys on the remote control to enter the 3-digit file number directly (i.e. for
file 10, enter “010”.
3. Press the ENTER button to confirm and begin playback.
MP3 Playback Information
The following information is displayed at the top of the screen during CD playback:
• TRK ##/## – “9/150” indicates the ninth of 150 tracks on the disc is currently playing.
• – “X” indicates repeat play is OFF, “1” indicates repeat song, and “D” indicates repeat
directory (folder).
• Press repeatedly to view the following information for elapsed/remaining playing time:
• 00:02:18 – total elapsed playing time for disc
• C –00 :34 :37 – remaining playing time for disc
12
Page 15
AWM968
3
18
6
28
7
26
24
22
23
14
15
13
29
30
17
16
32
31
19
20
21
27
9
8
4
5
2
11
12
10
1
25
AWM968
PUSH/ENTER
PUSH/ENTER
BLUETOOTH OPERATION
Bluetooth Menu Options
1. Press the button (5) to enter menu adjustment mode.
2. With “Device” displayed, press the VOL/PUSH/ENTER button (24) to select.
3. Rotate the VOL/PUSH/ENTER button to view paired BT devices and press to select.
4. Once a device is selected, rotate the VOL/PUSH/ENTER button to choose one of the
following options: connect/disconnect, lock/unlock or delete (delete displays only if the
device is not connected).
• LOCK/UNLOCK: The AWM968 can store up to 5 devices for BT connection. The
devices are stored in FIFO (First In First Out) order. To prevent a device from being
bumped from the list when more than 5 devices are used, you must lock the device.
To Lock/Unlock a device, press the VOL/PUSH/ENTER button to display/change the
Locked ( ) or Unlocked ( ) icon.
• DISCONNECT: To disconnect a paired device, press the VOL/PUSH/ENTER button
to temporarily remove the BT link. The link can be re-established through your phone
menu by selecting the AWM968 for connection.
• DELETE: To delete a device from the list, press the VOL/PUSH/ENTER button.
5. Press the VOL/PUSH/ENTER button to enter.
Pairing a Bluetooth Device
Before you begin, consult the owner’s manual for the Bluetooth device you want to pair.
The AWM968 includes built-in Bluetooth technology that allows you to connect this head unit to
Bluetooth devices for streaming audio playback.
About Bluetooth Technology
Bluetooth is a short-range wireless radio connectivity technology developed as a cable
replacement for various electronic devices. Bluetooth operates in 2.4 GHz frequency range
and transmits voice and data at speeds up to 1 megabit per second. Bluetooth was launched
by a special interest group (SIG) comprised of Ericsson Inc., Intel Corp., Nokia Corp., Toshiba
and IBM in 1998, and it is currently developed by nearly 2,000 companies worldwide. The
Bluetooth word mark and logos are owned by the Bluetooth SIG, Inc. and any use of such
marks is under license. Other trademarks and trade names are those of their respective
owners.
1. Make sure the device you want to pair is on and ready to receive a signal from the
AWM968. To begin pairing, press and hold the button (5). The unit will automatically
attempt to pair to available devices. When pairing with a smart phone/iPhone, the
AWM968 becomes “discoverable” by your smart phone and can be paired using the
phone menu.
2. When the Bluetooth device has completed it’s search, the mobile phone will display the
Bluetooth device name (AWM968).
3. Select AWM968.
4. Enter the pairing password (0000), if requested.
5. If successful, the unit will display “PAIR OK”.
After connecting successfully, you are able to listen to music stored on your Bluetooth enabled
device through the radio.
Answering a Call
When answering a call using the connected phone, BT AUDIO will pause. After hanging up
from the call, BT AUDIO to continue on some phones. It may be necessary to press the play
button to resume BT AUDIO.
BT Audio (A2DP)
The A2DP music is available for Bluetooth enabled phones when the phone is connected. To
access Bluetooth mode and play songs stored on your phone, press the button (5). While in
BT mode , the “BT AUDIO” is displayed on the LCD.
Selecting Tracks
During playback, press the TUNE/SEEK/TRACK >>| or |<< button (13, 14) to play the previous
or next track. You can also use the 1|<< and 3>>| buttons (27, 29) to select tracks.
13
Page 16
Pausing Playback
During playback, press the 2 button (28) to pause the BT AUDIO player. Press 2 again to
resume playback.
If you change to another mode, the mobile phone audio will pause. Press the button (5) to
return to BT mode and resume mobile phone audio playback.
NOTE: If a Bluetooth device is disconnected due to the power being turned off or if the
device is disconnected inadvertently, the unit will automatically search for the matching
BT mobile phone when the power is restored.
AWM968
14
Page 17
AWM968
1
23
4
56
7
89
+10
10/0
MENU
TUNE+
TUNE-
ENTER
VOL
VOL
T/F
PROG
LANG RPT TITLE
SOURCE
ZOOM
ANGLE
GOTO
BT
AUD
....
14
15
16
17
18
19
20
22
21
23
24
25
26
28
27
1
3
5
7
8
9
10
11
12
13
6
4
2
LOUD
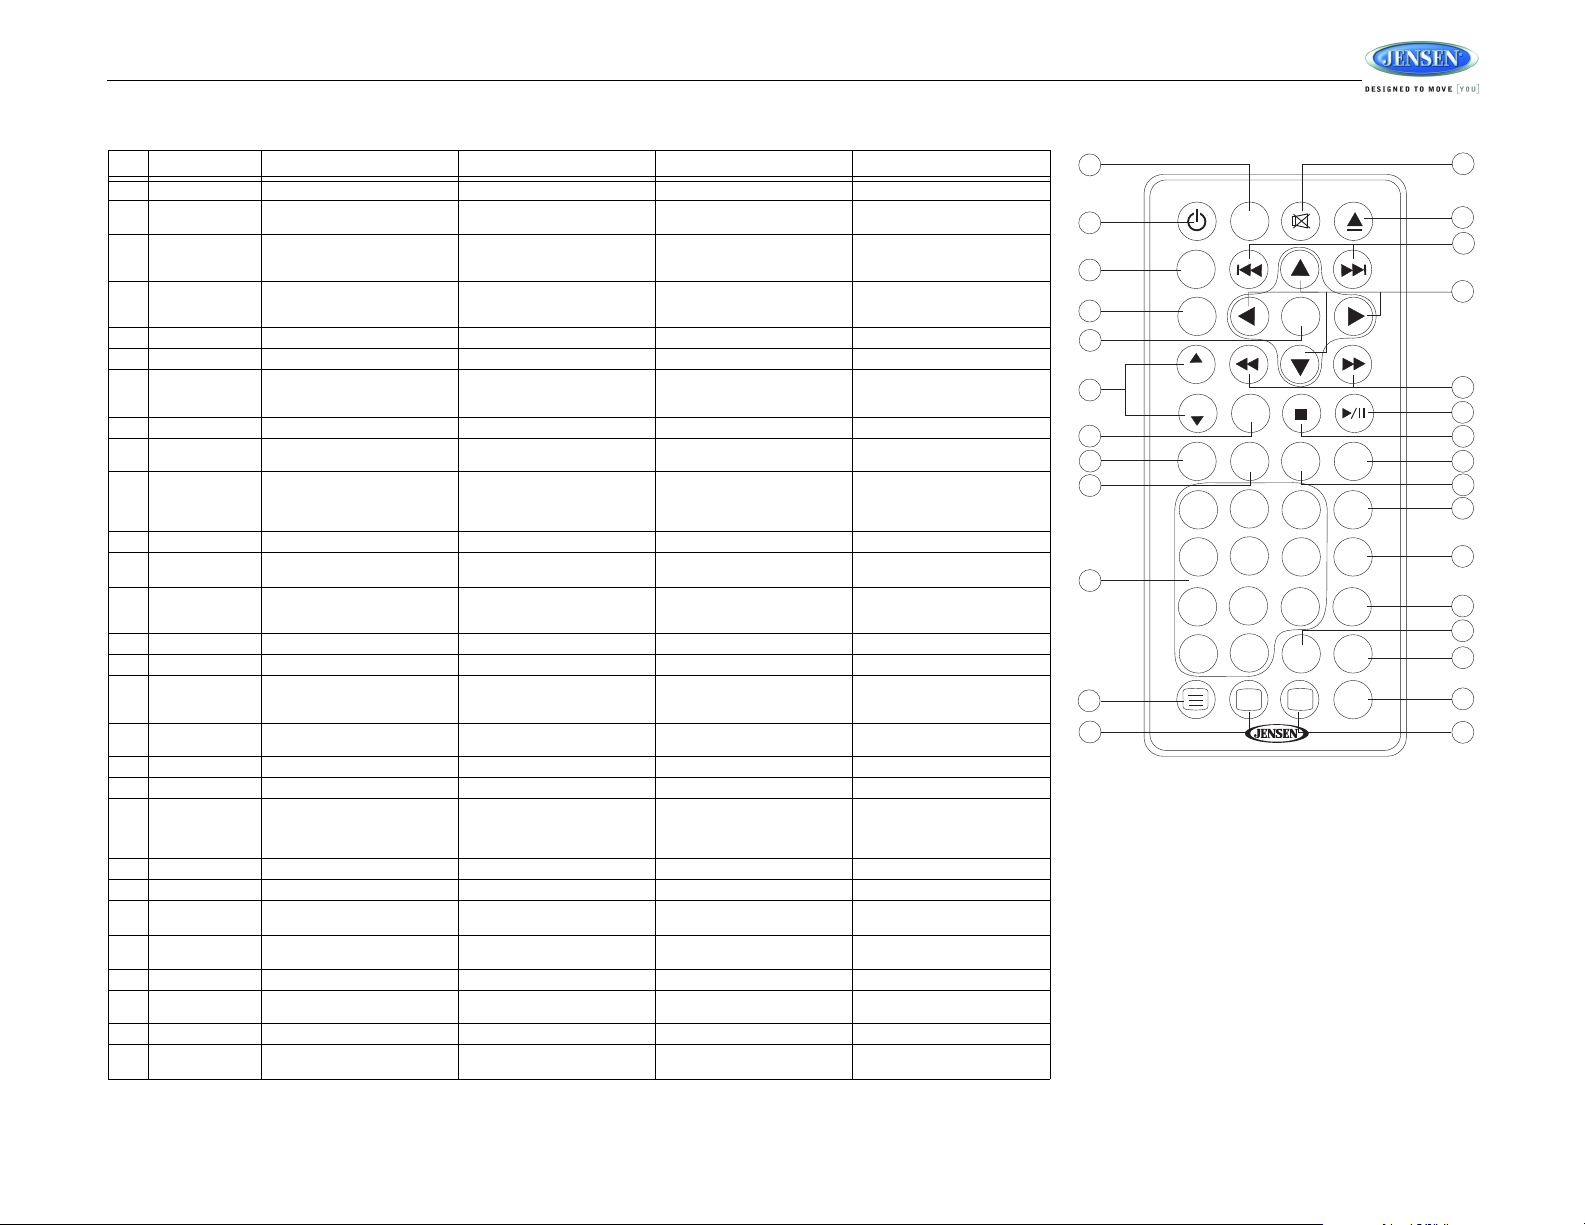
REMOTE CONTROL OPERATION
REF DESCRIPTION TUNER CD/MP3/USB DVD Bluetooth
1 Power Turn radio on/standby mode. Turn radio on/standby mode. Turn radio on/standby mode. Turn radio on/standby mode.
2 VOL +/- Adjust volume up/down. Press
3 TUNE + Search higher station. Stopping State: UP - Search in
4 TUNE - Search lower station. Stopping State: DN - Search in
5ENTER Confirm menu selection.
6MENU Access main DVD menu.
7 T/F Press to toggle clock time/play-
8 PROG Display Setup Program. Display Setup Program.
9 LANG Display MONO/L, MONO/R, or
10 Numeric Keypad Use 1-6 to access preset sta-
11 Setup View SETUP menu. View SETUP menu.
12 Subtitle Choose subtitle language, if
13 Mute/LOUD Silence Audio output. Press and
14 Eject Eject Disc. Eject Disc. Eject Disc.
15 Previous/Next Select next/previous track. Select next/previous chapter. Select next/previous track.
16 Directional But-
tons
17 Fast Reverse/For-
ward
18 Play/Pause Pause/resume playback. Pause/resume playback.
19 Stop Stop playback. Stop playback.
20 TITLE Press to view title menu. Use
21 RPT Repeat track. Repeat chapter.
22 SOURCE Select source for playback. Select source for playback. Select source for playback. Select source for playback.
23 ZOOM Zoom picture or press repeatedly
24 ANGLE Select alternate viewing angle, if
25 AUD Access Audio Menu options.
26 GOTO Select exact time, track or chap-
27 BT Access BT mode.
28 Display Display current playback infor-
for Audio Control Setup menu.
ing time. Press and hold to set
clock.
tions.
hold to turn LOUDNESS feature
on/off.
Adjust volume up/down. Press
for Audio Control Setup menu.
current folder. Playing State: UP
- Next Track.
current folder. Playing State: DN
- Prev Track.
Press to toggle clock time/playing time. Press and hold to set
clock.
STEREO.
Enter track number to access
track directly. For track number >
10, use 10+ followed by second
digit.
Silence Audio output. Press and
hold to turn LOUDNESS feature
on/off.
Move to desired menu item and
then press ENTER to confirm.
Fast Forward 2X, 4X, 8X, 20X.
Fast Reverse 2X, 4X, 8X, 20X.
ter for playback.
mation on the screen.
Adjust volume up/down. Press
for Audio Control Setup menu.
Stopping State: UP: Next Item.
Playing State: UP: Next Track.
Stopping State: DN: Previous
Item. Playing State: DN: Previous Track.
Press to toggle clock time/playing time. Press and hold to set
clock.
Select alternate audio language,
if available.
Enter track number to access
track directly. For track number >
10, use 10+ followed by second
digit.
available.
Silence Audio output. Press and
hold to turn LOUDNESS feature
on/off.
Use with DVD menu to move to
desired menu item and then
press ENTER to confirm.
Fast Forward 2X, 4X, 8X, 20X.
Fast Reverse 2X, 4X, 8X, 20X.
directional arrows and play button play selected title. May not
be supported by all discs.
to change magnification level.
available.
Select exact time, track or chapter for playback.
Display current playback information on the screen.
Adjust volume up/down. Press
for Audio Control Setup menu.
Press to toggle clock time/playing time. Press and hold to set
clock.
15
Page 18
SETUP MENU
SYSTEM SETUP
TV SYSTEM
SCREEN SAVER
TV TYPE
PASSWORD
RATING
DEFAULT
AUTO
NTSC
PAL
LANGUAGE SETUP
OSD LANGUAGE
AUDIO LANG
SUBTITLE LANG
MENU LANG
ENGLISH
GERMAN
SPANISH
FRENCH
AUDIO SETUP
AUDIO OUT
KEY
SPDIF/OFF
SPDIF/RAW
SPDIF/PCM
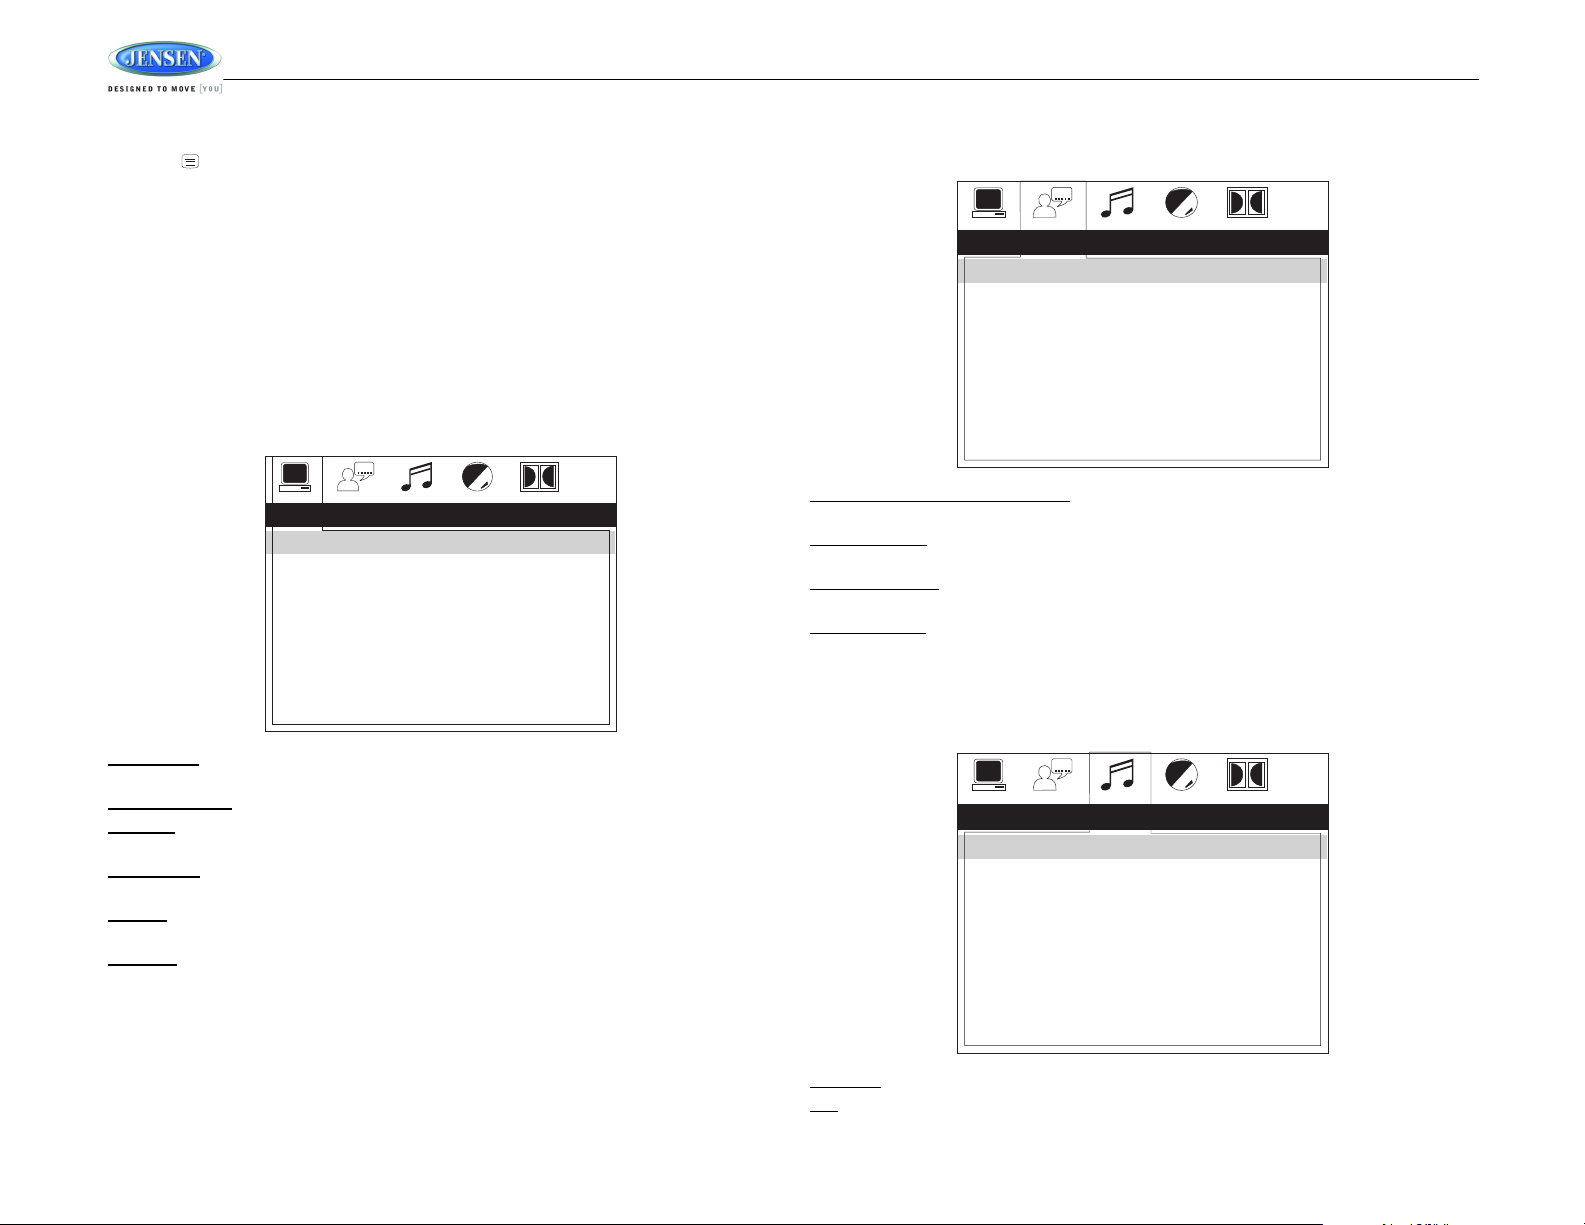
Press the (setup) button (11) on the remote control to access the SETUP menu and adjust
system settings for the following categories:
• System Setup
• Language Setup
• Audio Setup
• Video Setup
• Digital Setup
While in the setup menus, use your directional arrows to select and change settings. The “up”
and “down” arrows highlight the options, and the “right” and “left” arrows will change the setting
for the highlighted option.
System Setup
The System Setup menu controls the following features:
AWM968
TV SYSTEM
of the following options: AUTO, NTSC or PAL.
SCREEN SAVER
TV TYPE
selection, and 16:9 is wide screen.
PASSWORD
purposes.
RATING
make changes to this feature.
DEFAULT
Language Setup
The Language Setup menu controls the following features:
: This item is used to select a TV signal system to match your TV set. Select one
: Turn Screen Saver feature On/Off.
: Select one of the following picture formats: 4:3PS, 4:3 LB or 16:9. 4:3 is a letterbox
: This item allows the selection of a new four-digit code to use for security
: Select the parental control level for all DVD play. The security password is required to
: Use this item to restore default settings at any time.
On-Screen Display (OSD) Language
Chinese, German, Spanish, French, or Russian.
Audio Language
French, Spanish, Russian, Latin or German.
Subtitle Language
French, Spanish, Russian, German or OFF.
Menu Language
French, Spanish, Russian, German or Latin.
: Set the audio language to one of the following: Chinese, English, Japan,
: Set the subtitle language to one of the following: Chinese, English, Japan,
: Set the menu language to one of the following: Chinese, English, Japan,
: Set the OSD language to one of the following: English,
Audio Setup
The Audio Setup menu controls the following features:
Audio Out
Key
16
: This item defines the digital output format.
: This item changes the audio output key.
Page 19
AWM968
VIDEO SETUP
BRIGHTNESS
CONTRAST
HUE
SATURATION
SHARPNESS
12
10
8
6
4
2
0
DIGITAL SETUP
OP MODE
DYNAMIC RANGE
DUAL MONO
LINE OUT
RF REMOD
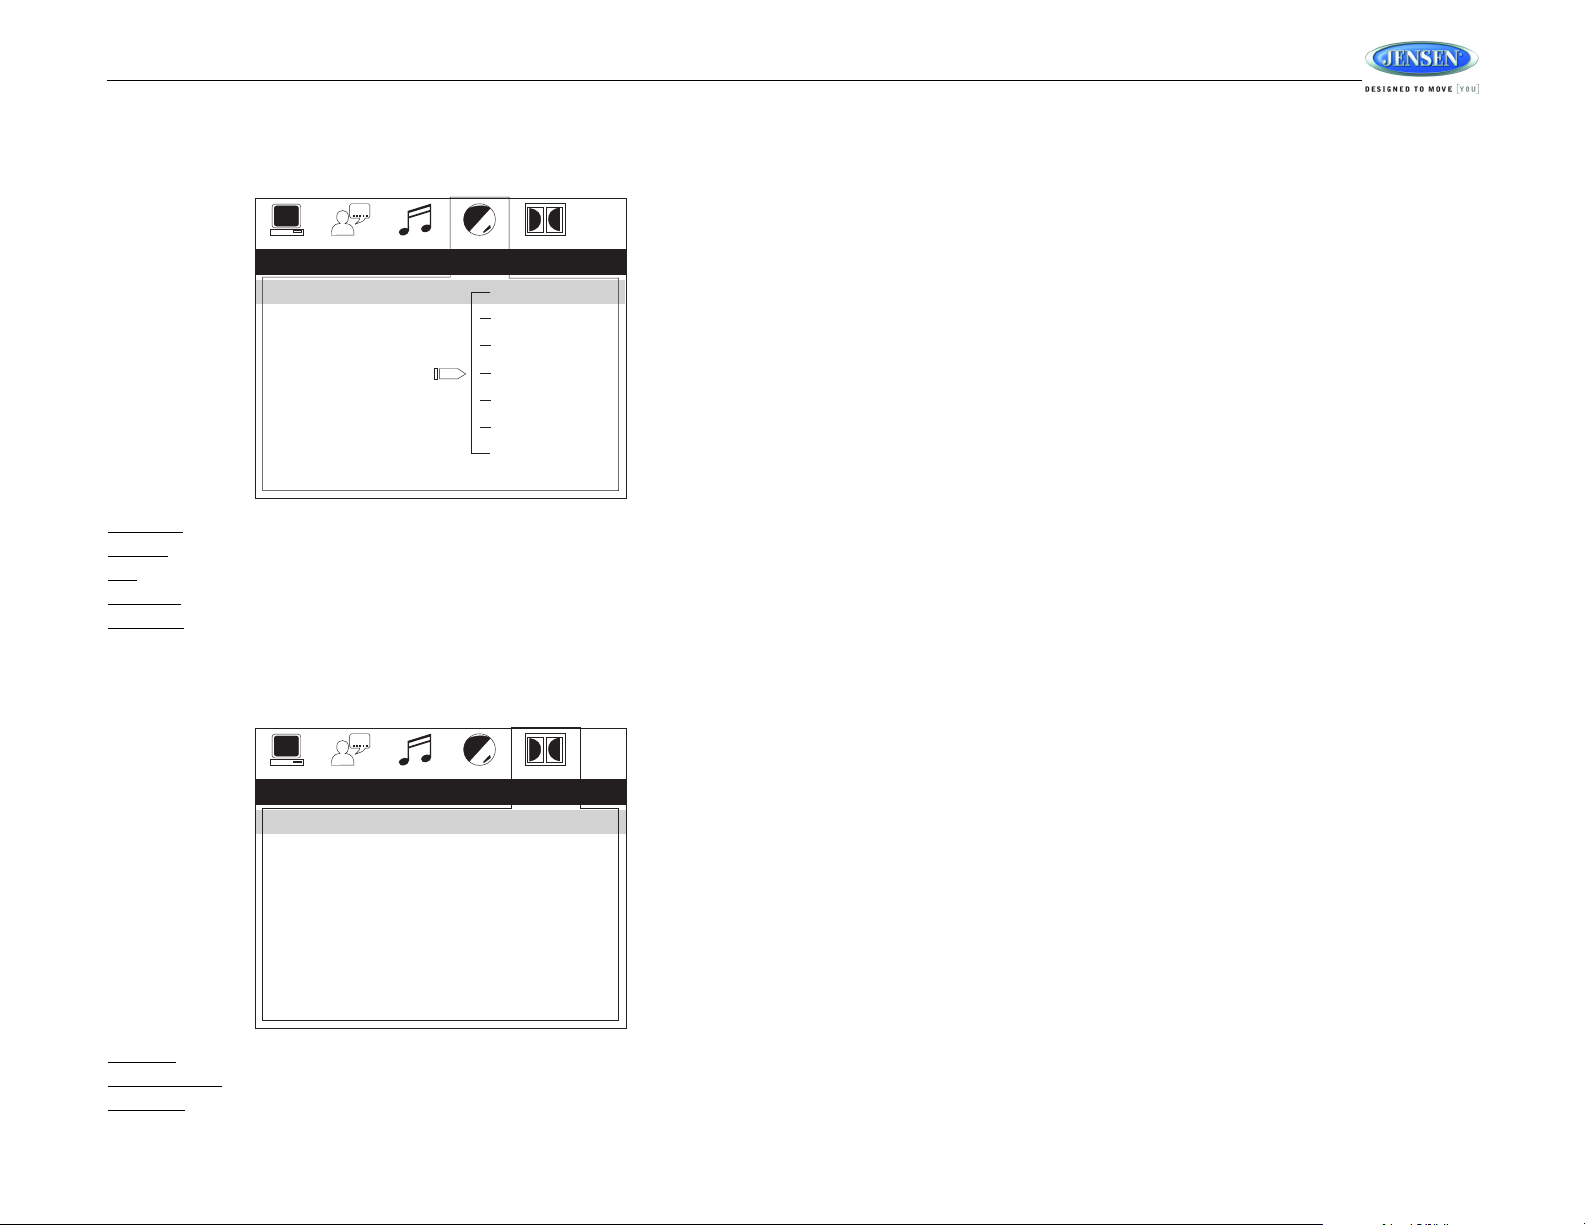
Video Setup
The Video Setup menu controls the following features:
Brightness
Contrast
Hue
Saturation
Sharpness
Digital Setup
The Digital Setup menu controls the following features:
OP Mode
Dynamic Range
Dual Mono
: Adjust the brightness of the screen from the following levels: 12, 10, 8, 6, 4, 2 or 0.
: Adjust the contrast of the screen from the following levels: 12, 10, 8, 6, 4, 2 or 0.
: Adjust the hue of the screen from the following levels: +6, +4, +2, 0, -2,- 4 or - 6.
: Adjust the saturation of the screen from the following levels: 12, 10, 8, 6, 4, 2 or 0.
: Adjust the sharpness of the screen from the following levels: 8, 6, 4, 2 or 0.
: Select LINE OUT or RF REMOD.
: Select STEREO, MONO/L, MONO/R or MIX MONO.
: Select FULL, 6/8, 4/8, 2/8 or OFF.
17
Page 20
AWM968
SPECIFICATIONS
General
Power Supply Requirements. . . . . . . . . . . . . . . . . . . . . . . . . . DC 12 Volts, Negative Ground
Operating Voltage . . . . . . . . . . . . . . . . . . . . . . . . . . . . . . . . . . . . . . . . . . . . . . . . . .10-16VDC
Overall Dimensions . . . . . . . . . . . . . . . . . . . . . . . . . . . . . 265mm(W)x178mm(H)x159mm(D)
Mounting Dimensions . . . . . . . . . . . . . . . . . . . . . . . . . . . 235mm(W)x154mm(H)x133mm(D)
Weight . . . . . . . . . . . . . . . . . . . . . . . . . . . . . . . . . . . . . . . . . . . . . . . . . . . . . . . . . . . . . 5.5 lbs.
FM Tuner
Tuning range . . . . . . . . . . . . . . . . . . . . . . . . . . . . . . . . . . . . . . . . . . . . . . . . . . . . . 87.5-107.9
Sensitivity . . . . . . . . . . . . . . . . . . . . . . . . . . . . . . . . . . . . . . . . . . . . . . . . . . . . . . . . . . . . <4uV
Stereo separation @ 1 kHz . . . . . . . . . . . . . . . . . . . . . . . . . . . . . . . . . . . . . . . . . . . . . . >25dB
AM Tuner
Tuning range . . . . . . . . . . . . . . . . . . . . . . . . . . . . . . . . . . . . . . . . . . . . . . . . . . . . . . 530-1710
Sensitivity . . . . . . . . . . . . . . . . . . . . . . . . . . . . . . . . . . . . . . . . . . . . . . . . . . . . . . . . . . . <63uV
Amplifier
Output Power . . . . . . . . . . . . . . . . . . . . . . . . . . . . . . . . . 48 Watts Total (6 Watts, 8 Channel)
Output Impedance. . . . . . . . . . . Compatible with 4-8 Ohm Speakers, 4 Ohm Load Minimum
DVD
Frequency Response . . . . . . . . . . . . . . . . . . . . . . . . . . . . . . . . . . . . . . . . . . . . 20-20,000 Hz
Channel Separation . . . . . . . . . . . . . . . . . . . . . . . . . . . . . . . . . . . . . . . . . . . . . . . . . . . . 50dB
S/N Ratio. . . . . . . . . . . . . . . . . . . . . . . . . . . . . . . . . . . . . . . . . . . . . . . . . . . . . . . . . . . . . 70dB
Distortion . . . . . . . . . . . . . . . . . . . . . . . . . . . . . . . . . . . . . . . . . . . . . . . . . . . . . . . . . . . . . 0.2%
Specifications subject to change without notice.
FCC Warnings
This device complies with Part 15 of the FCC Rules. Operation is subject to the following two
conditions:
(1) This device may not cause harmful interference, and
(2) This device must accept any interference received, including interference that may cause
undesired operation.
Changes or modifications not expressly approved by the party responsible for
compliance could void the user's authority to operate the equipment.
NOTE: THE MANUFACTURER IS NOT RESPONSIBLE FOR ANY RADIO OR TV
INTERFERENCE CAUSED BY UNAUTHORIZED MODIFICATIONS TO THIS
EQUIPMENT.SUCH MODIFICATIONS COULD VOID THE USER’S AUTHORITY TO
OPERATE THE EQUIPMENT.
TROUBLESHOOTING
Symptom Solution
Radio will not turn ON or No
front panel operation
Radio turns ON, but no
sound
CD/DVD does not load fully Make sure unit has power and no other CD/DVD is currently inside.
CD/DVD does not play
correctly
No AM or FM reception Verify you are tuned to a valid station.
DVD plays sound but no
video
Unit does not respond to
Remote Control
Wired remote control not
functioning
Try the reset button.
Check fuse.
Check 12V+ on battery wire to radio (YELLOW wire).
Check 12V+ on accessory wire to radio (RED wire).
Check Ground.
Verify Volume, Fader/Balance, Mute controls are set correctly (see owners manual).
Try the reset button.
Verify proper speaker selection.
Verify proper speaker connections.
Check for shorts or open circuits on speaker wires.
• If short on “A” channel, “B & C” channels will continue to function.
• If short on “B and/or C” channels, “A” channel will continue to function.
Make sure transport screw has been removed from rear of unit. Disc will load for several
seconds and then eject if transport screw has not been removed.
Check to make sure disc is inserted correctly.
Verify disc is free from dirt, scratches, etc.
Check with factory CDs.
Inspect radio’s chassis to verify shipping screw(s) have been removed.
Check factory original CDs for compatibility warnings (due to various copy-protection, multimedia content, etc.).
Check your antenna connection on rear of stereo.
Try a different antenna
Make sure the video cable is routed from the video output (yellow RCA) to the input on the
television.
Verify that you have a clear line of sight for the IR signal.
Check the batteries.
Confirm the remote IR sensor in plugged into IR input (if applicable).
Try the reset button.
Verify remote is securely connected to the radio directly or via extension cable.
If using extension cable, try connecting directly to radio. If the remote works in this manner,
the extension cable is likely damaged. Replace extension cable.
If the remote still does not work when connected direct to radio, the remote could be
defective. Replace with new remote.
Verify compatible remote is used. Only the MWR75 is compatible.
18
Page 21

AWM968
19
Page 22
www.asaelectronics.com
www.jensenrvdirect.com
© 2012 ASA Electronics Corporation
v.080812
 Loading...