

Page 1

V 2.0
MOTU Digital Performer
Setup Guide
Setup Guide
Setup GuideSetup Guide
Revised: 13-12-00
Page 2

Digital Performer and the
Digital Performer and the
Digital Performer and theDigital Performer and the
Digital 328
Digital 328
Digital 328Digital 328
Contents
1111Introduction 2
2222 MIDI Setup 3
3333 Digital 328 Settings 6
4444 Digital Performer “Virtual”
Mixer Settings 8
5555 Transport Control Setup 11
6666 Digital 328 Automation 15
7777 Digital Performer & the 328 19
8888 Automating A Mix 21
9999 Using two Linked Consoles 24
10
10 Using two Linked Consoles 25
1010
Digital Performer Setup Guide
1
Page 3

1
Introduction
Introduction
IntroductionIntroduction
This Setup Guide is for interfacing Mark Of The Unicorn’s Digital Performer with the Digital 328.
As the MIDI features of Digital Performer and Performer are identical, this guide will refer to
Digital Performer for setup illustration. AudioDesk and Performer users should be able to
implement most of the procedures described in this document.
This guide assumes that you have a working knowledge of the Macintosh environment and a
familiarity with Digital Performer and the Digital 328.
The procedure will show the user how to integrate MIDI CONTROLLER BANK on the 328 as
a limited control surface for the internal mixer within Digital Performer.
This guide will also outline the steps to take to allow automated control of the 328 from
Digital Performer.
You must have Digital Performer 2.61 or later, Performer 6.0 or later and FreeMIDI
1.41 or later to achieve results outlined in this guide.
Digital Performer uses MIDI Control Change parameters to control the Virtual Mixer found in
Digital Performer, and the 328 is perfectly suited for this task. There may be limitations in the
operation of the Digital 328 as a control surface for Digital Performer, yet these limitations are
Usually, however,
inherent to the design of software, and therefore must be accepted as such.
utilizing the 328 together with Digital Performer is simply amazing – many benefits will be
realized with this system.
The Digital Performer Internal Mixer
The Digital Performer Internal Mixer
The Digital Performer Internal MixerThe Digital Performer Internal Mixer
MOTU offers a fully functioning “virtual” mixing console from within the Digital Performer
environment, and it perfectly compliments many of the functions found on the Digital 328,
offering the ultimate in flexibility when the two products are joined together. However, to
understand the power of this system, it is important to separate the two mixing
environments in your mind: the Digital Performer internal mixer, and the Spirit
Digital 328 mixing console.
The first part of this guide will explain how the Digital 328 can control fader and pan controls for
the Digital Performer INTERNAL mixer. We will discuss how Digital Performer can control the
Digital 328 in a later section.
Please make sure that FreeMIDI 1.41 or later is installed and activated on your
Macintosh before proceeding.
Spirit Digital 328 v2.0
2
Page 4
It is essential that 2-way MIDI
communication occurs between
the 328 and Digital Performer.
MIDI Setup
MIDI Setup
MIDI SetupMIDI Setup
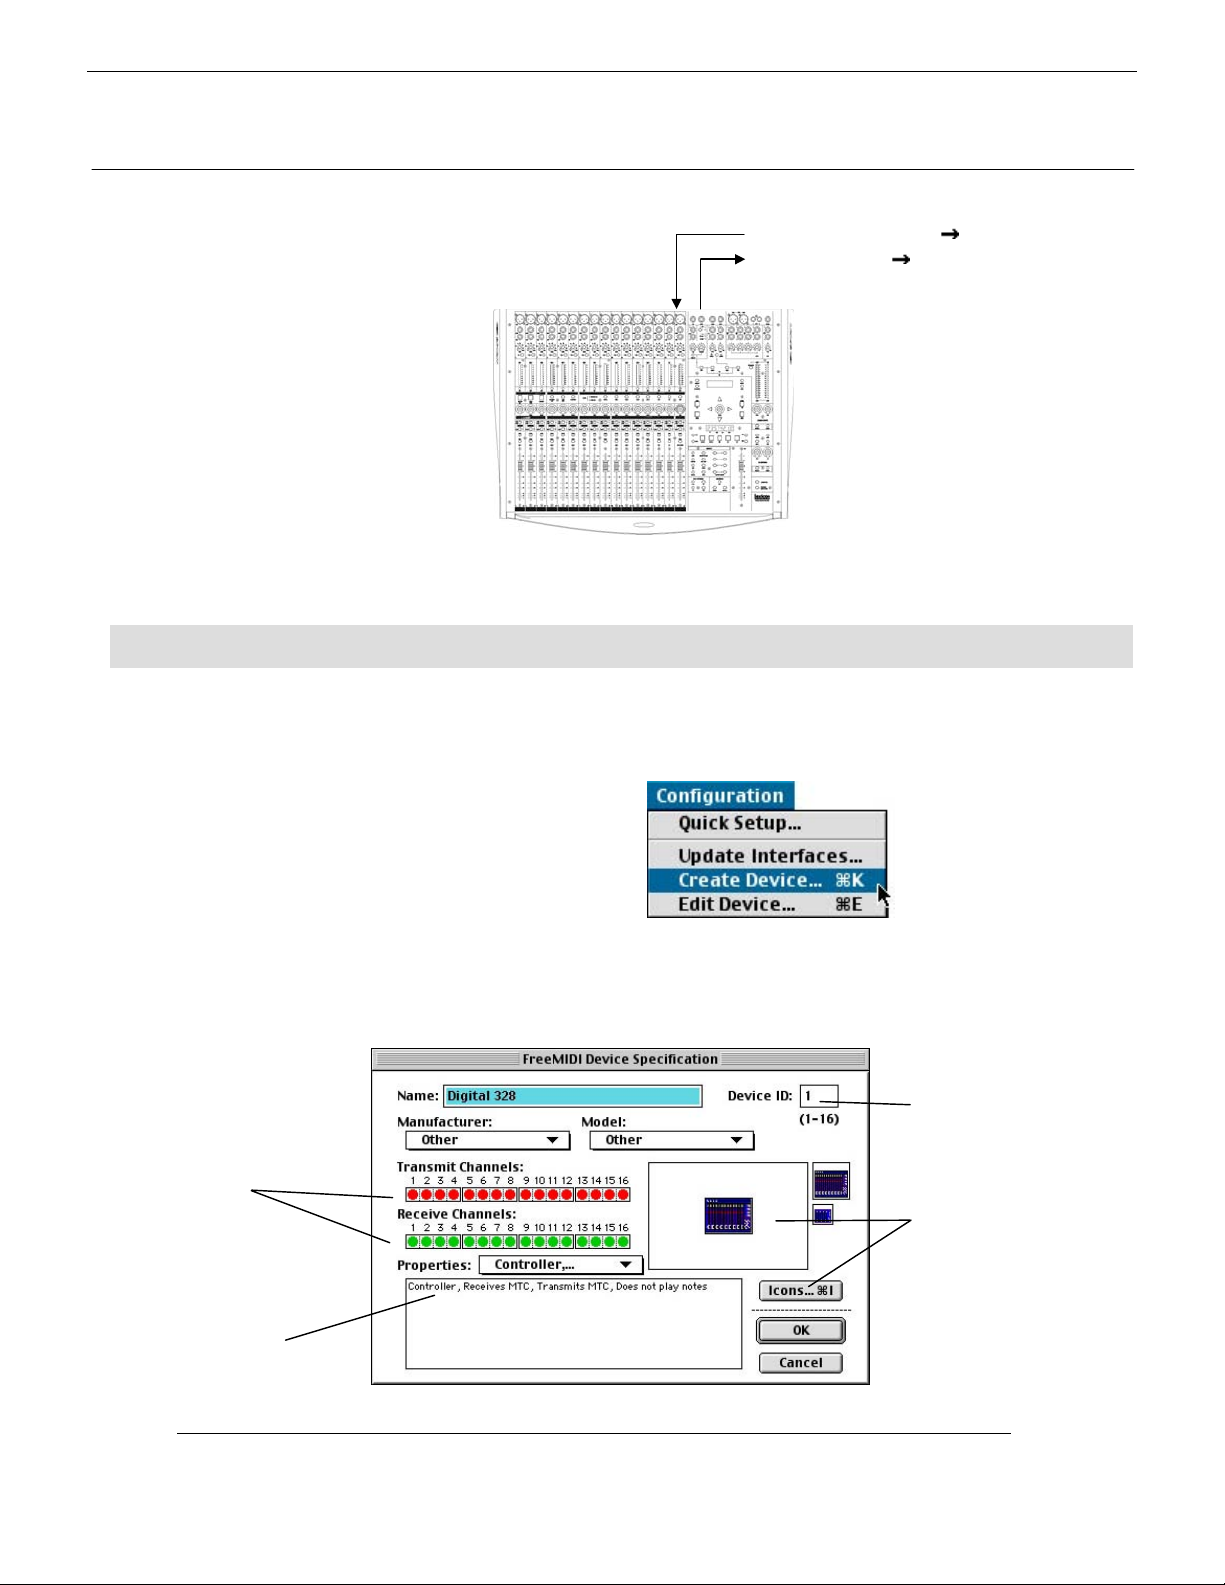
Interface MIDI Out 328 MIDI In
Interface MIDI In
328 MIDI Out
2
Using standard MIDI cables,
connect the 328 MIDI Out Port to
a MIDI In Port on a compatible
MIDI interface. Connect MIDI Out
from the Interface to MIDI In on
the 328.
FreeMIDI Setup
FreeMIDI Setup
FreeMIDI SetupFreeMIDI Setup
Before launching Digital Performer, we must configure FreeMIDI to account for the
328. This guide will refer to FreeMIDI version 1.44.
1) Launch FreeMIDI.
2) Under “Configuration” select
Create Device
This 2-way communicatio n
configuration will allow full
dynamic automation of the
and
Digital 328,
control of the
within Digital Performer
the 328.
it will allow
internal mixer
from
3) Configure the new device as described below:
Enable all receive and
transmit channels
Check the attributes listed
here – do not check
additional items.
Set the Device ID to 1.
Change the icon to the one
shown here (if desired).
Digital Performer Setup Guide
3
Page 5

4) Hit OK – the Digital
328 device should now
appear in your
FreeMIDI Setup as
indicated here.
Configuring an Additional 328
Configuring an Additional 328
Configuring an Additional 328Configuring an Additional 328
If you have two 328 consoles in your configuration, follow these additional
steps. Also, refer to Section 9, “Using Two Linked Consoles”. If configuring
only one console proceed to the next section, “OMS Compatability”.
1) Select CREATE DEVICE as in step 2 above
2) Configure the new device as shown:
Enable all receive and
transmit channels
Check the attributes listed
here – do not check
additional items.
Set the Device ID to 2.
Change the icon to the one
shown here (if desired).
4
Spirit Digital 328 v2.0
Page 6
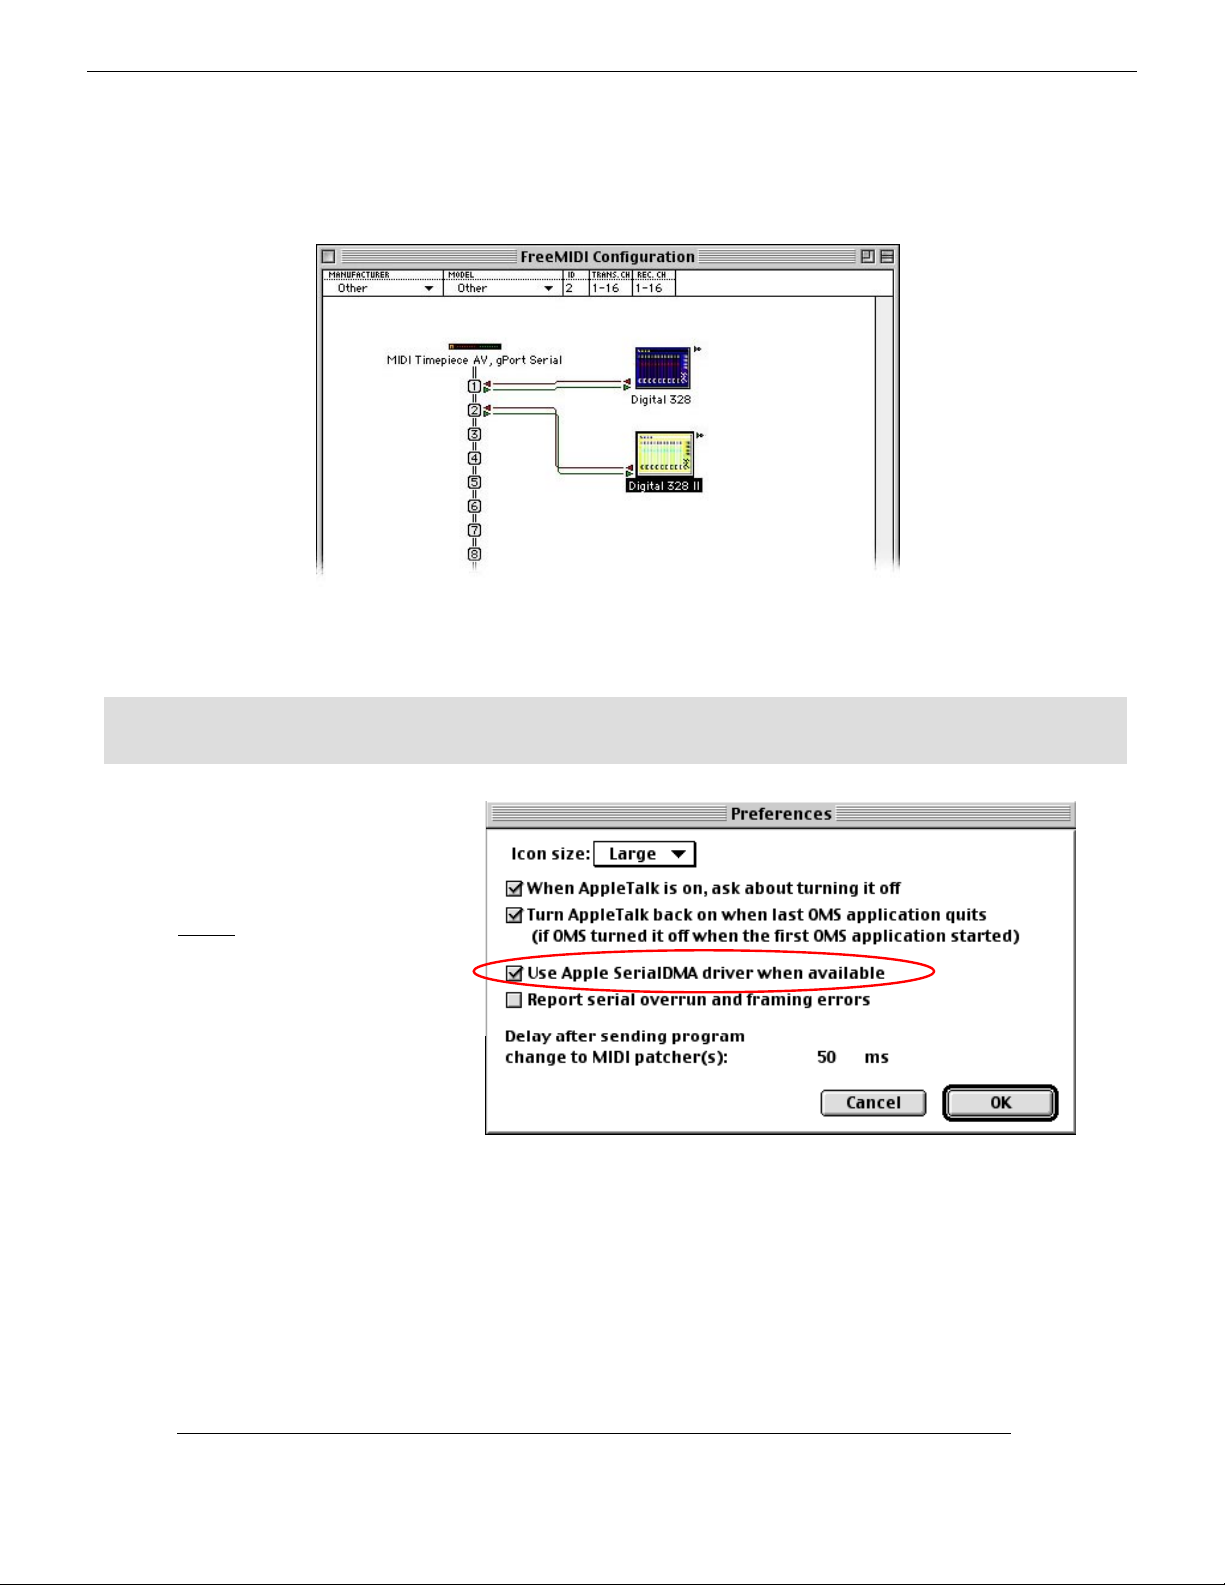
3) Hit OK – the FreeMIDI Studio setup will show your new device.
Using OMS compatibility Mode under FreeMIDI
Using OMS compatibility Mode under FreeMIDI
Using OMS compatibility Mode under FreeMIDIUsing OMS compatibility Mode under FreeMIDI
* OMS users only
* OMS users only
* OMS users only* OMS users only
If you are using OMS in
place of FreeMIDI, you
MUST engage Apple Serial
DMA driver, found under
OMS preferences.
This must be engaged to
receive the large data stream
from the 328.
The FreeMIDI Setup is now complete. Quit FreeMIDI and re-enter Digital Performer
to continue setup.
Digital Performer Setup Guide
5
Page 7

Digital 328 Settings
Chan: 1
Id:OFFChan: 1
Id:OFF
C
Digital 328 Settings
Digital 328 SettingsDigital 328 Settings
3
First, the Continuous Controller values must be input into the 328 so that it can take
control of the INTERNAL “virtual” mixer inside Digital Performer. The settings for 328
automation will be covered in a later section.
Entering Controller Settings into the 328
Entering Controller Settings into the 328
Entering Controller Settings into the 328Entering Controller Settings into the 328
1) Press MENU on the 328 – scroll to the MIDI CONTROLLERS menu and press ENTER.
Controller No
Controller No: 1
Controller NoController No
Chan: 1 Id:OFF
han: 1 Id:OFF
2) You may choose to download the Digital Performer SYSEX file from the Digital 328 website or
you may find it quicker to program the changes by hand.
3) Configure the Continuous Controller settings as follows:
: 1
: 1: 1
Physical
Controller #
1 1 90 17 1 106
2 1 91 18 1 107
3 1 92 19 1 108
4 1 93 20 1 109
5 1 94 21 1 110
6 1 95 22 1 111
7 1 96 23 1 112
8 1 97 24 1 113
9 1 98 25 1 114
10 1 99 26 1 115
11 1 100 27 1 116
12 1 101 28 1 117
13 1 102 29 1 118
14 1 103 30 1 119
15 1 104 31 1 120
16 1 105 32 1 121
Leave Controllers 33-64 unassigned - there are no more automatable parameters in Digital Performer.
4) When the settings are entered correctly, press ENTER – the 328 will prompt you to store the
settings as a MIDI CONTROLLER PRESET.
MIDI Channel 328 ID Physical
Controller #
MIDI Channel 328 ID
6
5) Select an empty location, and press ENTER again to store the new preset.
6) Next, the standard naming dialogue will appear. Name the preset “Dig Perf” (or similar).
Spirit Digital 328 v2.0
Page 8

To access the MIDI FADER bank, follow these steps:
1) Press any of the FADER BANK switches (over the first three Rotary Encoders). The associated
switch should illuminate.
2) Next, press the illuminated switch again (it’s the same switch you just pressed). The faders
should react accordingly, yet there will be no switch illuminated under FADER BANK. This is
the MIDI FADER bank.
3) Feel free to switch in and out of this mode (or bank) as often as you wish. Whenever you
return, Digital Performer control will be at your fingertips.
Digital Performer Setup Guide
7
Page 9

Digital Performer “Virtual” Mixer settings
Digital Performer “Virtual” Mixer settings
Digital Performer “Virtual” Mixer settingsDigital Performer “Virtual” Mixer settings
4
Settings for Digital Performer Control -
Settings for Digital Performer Control -
Settings for Digital Performer Control -Settings for Digital Performer Control -
1) Launch Digital Performer
2) Create a New file (we will make a “New Template” for Digital Performer).
3) Create at least 16 Audio tracks.
4) View the Mixer Page in Digital Performer by pressing the “fader” soft-button in Digital
Performer.
8
5) The Digital Performer Virtual Mixer will be displayed.
Spirit Digital 328 v2.0
Page 10

6) Enter the MIDI Controller Bank on the 328 (see page 7).
Make sure the Continuous Controller settings on page 6 have been
entered into the 328 and activated.
Attaching MIDI Controllers to DP Channel Strips
Attaching MIDI Controllers to DP Channel Strips
Attaching MIDI Controllers to DP Channel StripsAttaching MIDI Controllers to DP Channel Strips
1) Go to the pull-down menu in the DP
Mixer page and select “Attach MIDI
Controller.”
2) The Cursor will turn into a crosshair.
*Click on a destination for your
controller.
If you inadvertently click somewhere else
rather than on a destination channel strip,
the crosshair will disappear and the arrow
cursor will return. Repeat step 1 above to
regain the crosshair.
*Both Voume Faders and Pan knobs can be enabled for MIDI Control.
Digital Performer Setup Guide
9
Page 11

3) Next, move a corresponding fader on
the 328 (in MIDI Fad er Mode).
4) The Red Rectangle should turn green,
and the DP fader should now mirror
movements made on the 328.
5) Click on another virtual object in DP
and repeat steps 1-4. When you are
finished, hit ENTER on you computer
keyboard to regain the cursor arrow.
If the Red Rectangle does not turn green and the
fader does not mirror 328 movements, check your
settings and try again.
NOTE: Digital Performer will not send MIDI information to the 328 from its virtual mixing
environment, so the motorized MIDI Faders on the 328 will not reflect realtime fader movements
from within this environment. Do not expect the MIDI Controller Bank to respond to any
adjustment of the Digital Performer 2.7 Virtual Mixer. Other fader banks on the 328 act normally.
At this point, you should be able to configure Digital Performer exactly the way you
want it.
When you are ready, you should consider saving this as a New Template, so that
every time Digital Performer is launched, these settings are included with every new
file.
Saving the current state as a New Template
Saving the current state as a New Template
Saving the current state as a New TemplateSaving the current state as a New Template
1) Select “Save as New Template” from the File menu in Digital Performer.
2) Digital Performer will ask you to confirm or cancel this
action. If confirmed, these controller settings will
automatically activate at each ‘New File’ launch.
10
Spirit Digital 328 v2.0
Page 12

Transport Control Setup
<T
>
<T
>
C
C
<Cust
>
<Cust
>
<Cust
>
<Cust
>
<Cust
>
<Cust
>
M
M
Transport Control Setup
Transport Control SetupTransport Control Setup
There are several different configurations that allow Digital Performer Transport Control from the
328, but most of these setups require external hardware. If you have a MOTU MIDI Time Piece
AV for instance, you are no doubt aware of MMC and MTC possibilies involving the 328 and
MOTU products. Since we are concerned with only Digital Performer and the Digital 328, we will
outline the best approach for transport control utilizing only these two units.
We will be modifying the Remote Controls window in Digital Performer, and taking advantage
of features found within.
328 Settings for Transport Control
328 Settings for Transport Control
328 Settings for Transport Control328 Settings for Transport Control
First, we will need to configure the 328 to transmit the proper commands to Digital Perf ormer.
1) On the 328, hit MENU and go to TAPE MACHINE SETUP – hit ENTER.
ape Mach Type
ape Mach Type
2) Under TAPE MACHINE TYPE, select CUSTOM MACHINE.
<Tape Mach Type><Tape Mach Type>
Custom Machine
ustom Machine
ustom MachineCustom Machine
5
3) Press ENTER again, and select MTC as the Timecode Source.
4) Press the DOWN ARROW and select SLAVE status.
5) Press the DOWN ARROW again and select NOTE ON for MIDI.
6) The Factory Default settings for MIDI Note On comma nds are as follow s :
Play: Bb5 FF: G#5
Stop: B5 Loc 1: F6
Rec: A5 Loc 2: F#6
Rew: G5 Shift: C6 (TURN OFF)
Digital 328 Setup is complete for now – move back to
Digital Performer to finish Transport Setup.
<Custom Machine><Custom Machine>
Status: Slave
Status: Slave
Status: SlaveStatus: Slave
Use MIDI Channel 16
Set the Frame Rate to 30 FPS.
<Custom Machine><Custom Machine>
Timecode src:MTC
Timecode src:MTC
Timecode src:MTCTimecode src:MTC
om Machine
om Machine
<Custom Machine><Custom Machine>
MIDI: Note On
IDI: Note On
IDI: Note OnMIDI: Note On
om Machine
om Machine
om Machine
om Machine
Digital Performer Setup Guide
11
Page 13

Configuring the Remote Controls window in DP
Configuring the Remote Controls window in DP
Configuring the Remote Controls window in DPConfiguring the Remote Controls window in DP
1) Select “Remote Controls” from
the WINDOWS Menu.
Turn the REMOTE
MASTER switch ON.
2) It is wise to erase ALL existing
remote control note-on
commands, to make sure that
connected keyboards do not
trigger unwanted events.
Select all note-on events, and
delete them as shown
Do this for each existing Note
On event.
3) Next, input control events from the Digital 328.
Click inside the EVENT column – the nowactive event box will wait for incoming
MIDI data.
Press the PLAY button on the 328
transport panel. The event box in Digital
Performer will display the received
command.
.
12
Spirit Digital 328 v2.0
Page 14

Make sure the ‘arrow’ inside the event box indicates a Note On command, displayed
by a DOWN arrow and not a Note Off command, indicated by an UP arrow. If Digital
Performer registers a Note Off command, repeat step 3 above.
Enable the following:
Play control from the PLAY button
on the 328
Stop from the STOP button
Rewind-to-top from the REWIND
button
Record from the RECORD button
Marker from the LOC 1 button
Numeric Remote from the LOC 2
button
Digital Performer Setup Guide
13
Page 15

Notes on Transport Control
Notes on Transport Control
Notes on Transport ControlNotes on Transport Control
With the above settings, you will be able to control Play, Stop, Record, and Rewind-to-
top functions within Digital Performer from the Digital 328.
In addition, you will be able to set Markers on-the-fly with the LOC 1 button on the 328.
LOC 2 will bring up a dialog that enables “jumps” to different markers. The default jump is
set at ‘Marker 1’ and can be automatically confirmed by another press of the LOC 2 button
on the 328.
Recording can be instantly engaged by pressing the Record button on the 328.
Punch-in Recording is best enabled by pressing and holding Play, then hittng Record.
Utilize this same proceedure for punching in and out.
This Concludes the section for 328 control of the
Digital Performer Mixer environment.
The next section is the reverse: allowing Digital Performer to
automate the Digital 328 Mixer with moving faders.
14
Spirit Digital 328 v2.0
Page 16

Digital 328 Automation
Digital 328 Automation
Digital 328 AutomationDigital 328 Automation
The Digital 328 offers full dynamic automation via MIDI. This means that any encoder/fader
movement, button press, or any other control surface setting can be recorded in real-time via
MIDI to Digital Performer for playback at a later time.
The 328 not only allows every control surface parameter to be automated, but also allows full
automation of both Dynamic Processors and both FX Processors.
This means that a fully automated mix can be integrated into a recording session, containing any
fade-ins, mutes, or snapshot recalls that occur at certain points during a song.
As automation data is recorded, any event may be isolated and edited from within the sequencer
track, or new automation events can be created from within the sequencer itself.
Snapshot Automation
Snapshot Automation
Snapshot AutomationSnapshot Automation
The 328 also offers Snapshot automation: any Snapshot (or User Setup) can be recalled within
an automation track. Standard MIDI Program Change messages are used for this function.
The following table indicates the Program Change required to recall each individual Snapshot and
User Setup.
Program
Program
ProgramProgram
Change
Change
ChangeChange
00 (00H) Snapshot 001
01 (01H) Snapshot 002
--- --98 (62H) Snapshot 099
99 (63H) Snapshot 100
100 (64H) User Setup 01
101 (65H) User Setup 02
--- ---
124 (7CH) User Setup 25
125 (7DH) User Setup 26
Recalled
Recalled
RecalledRecalled
6
So, to recall Snapshot #1, P rogram Change 0 should be sent to the 328. To recall Snapshot #69,
Program Change 68 should be sent to the 328, and so on.
However, there is one other thing to bear in mind. Every individual Snapshot has a ‘MIDI Recall’
selection that can be enabled/disabled. If MIDI Recall is turned OFF for a particular Snapshot,
then it cannot be recalled via a Program Change command. Therefore, any Snapshot you wish to
recall from within an automation track must have MIDI Recall turned ON, or else the Snapshot
will not recall. When the Global MIDI Recall of Snapshots is switched to ON, any Snapshot
subsequently created will automatically have MIDI Recall switched to ON. To do this, enter the
Snapshot Setup menu and toggle MIDI Recall to ON.
Digital Performer Setup Guide
15
Page 17

M
M
y
M
M
Automation Settings On The 328
Automation Settings On The 328
Automation Settings On The 328Automation Settings On The 328
First, set the MIDI Channel for Program Change data. Press MENU on the 328, then scroll to
User Options and press ENTER. Configure the MIDI Channel for the 328.
< User Options >
< User Options >
< User Options >< User Options >
IDI Channel: 1
MIDI Channel: 1
IDI Channel: 1MIDI Channel: 1
NOTE: If Omni Mode is enabled, the 328 will respond to Program Changes on all
MIDI Channels for Snapshot recall. The MIDI Channel setting has no effect on
automation data.
Next, to make use of automation facilities offered by the 328, MIDI DYNAUTO must be enabled
in the AUTOMATION SETUP menu.
Press MENU, then scroll to AUTOMATION SETUP and press ENTER. MIDI DYNAUTO must
be enabled for the 328 to transmit or respond to any automation data.
<Automation Set>
<Automation Set>
<Automation Set><Automation Set>
IDI Dynauto: On
MIDI D
IDI Dynauto: OnMIDI Dynauto: On
Scroll down one page (
modes are available on the 328: Read Only, Write Only, Read/Write, Update, and
Controller. Each mode determines how the 328 will transmit/respond to automation data, and
each has its own applications.
Automation Modes On The 328
Automation Modes On The 328
Automation Modes On The 328Automation Modes On The 328
with your DOWN Arrow
nauto: On
) to the automation ‘Mode’ page. Five automation
Read Only Mode
<Automation Set>
<Automation Set>
<Automation Set><Automation Set>
Mode: READ ONLY
Mode: READ ONLY
Mode: READ ONLYMode: READ ONLY
When the 328 is in Read Only mode, it only responds to automation data. The 328 does not
transmit any automation data in Read Only Mode. This mode may be useful when a final
automation performance has been completed in Digital Performer, and no more automation data
is to be recorded. In this case the desk could be set to Read Only as a ‘safe’ mode, to ensure that
no further automation data is recorded over the final automation performance.
Spirit Digital 328 v2.0
16
Page 18

Write Only Mode
<Automation Set>
<Automation Set>
<Automation Set><Automation Set>
When the 328 is in Write Only mode, it only transmits automation data, and ignores any
incoming automation data received at its MIDI IN port. This mode is useful for quickly recording
several versions of an automation take into Digital Performer, where each previous pass is
ignored by the 328. Each take can then later be previewed (in Read mode), and the preferred
take kept as a performance.
Read/Write Mode
<Automation Set>
<Automation Set>
<Automation Set><Automation Set>
Mode: READ/WRITE
Mode: READ/WRITE
Mode: READ/WRITE Mode: READ/WRITE
Read/Write mode is simply an amalgamation of Read Only mode and Write Only mode. In this
mode, the 328 transmits automation data and responds to any automation data received at its
MIDI IN port. Read/Write is the most commonly used automation mode – a single automation
take can be recorded into a sequencer, then instantly previewed on playback.
Update Mode
<Automation Set>
<Automation Set>
<Automation Set><Automation Set>
Mode: UPDATE
Mode: UPDATE
Mode: UPDATE Mode: UPDATE
This mode allows live changes to be made to any individual automation parameter within a
previously recorded automation take. For example, say a complex automated mix has been
recorded containing many automation parameters. This might be the perfect mix if it weren’t for
an inaccurate FX2 fade-out just before the end of the track! Update mode could be used here to
‘punch-in’ a new FX2 fade-out at the desired point while preserving all other automation data.
Essentially, Update mode is identical to Read mode, only that the automation data received by
the 328 is re-transmitted back to the sequencer. However, the moment a parameter change is
made on the 328, only that parameter enters Write mode, while all other parameters continue to
be passed through the 328.
This may seem a bit complex in theory, but in practice it is a very simple concept – Update mode
essentially lets you punch-in parameter specific edits into an existing automation mix.
Note: If you wish to update an automated fader movement, you should not attempt
to ‘take over’ a moving fader when you wish to punch-in your change – use the rotary
encoder equivalent on the E-Strip. This is simply due to the motorized nature of the
328’s faders – too much resistance may burn out the motors.
Digital Performer Setup Guide
17
Page 19

Note: Once an automatable 328 object has been adjusted in Update mode, it will not
enter Read mode again until READ ONLY or READ/WRITE is selected in the 328
Automation Setup menu. This means that the newly adjusted parameter will continue
to be overwritten until the mode is changed.
Controller Mode
<Automation Set>
<Automation Set>
<Automation Set> <Automation Set>
Mode: CONTROLLER
Mode: CONTROLLER
Mode: CONTROLLER Mode: CONTROLLER
The final automation mode is Controller mode. This mode motorizes the MIDI Fader Ba nk in
order to display received controller data. Since Digital Performer does not output data from its
internal “virtual” mixer, this mode is not applicable for Digital Performer.
Since Controller Mode has no effect with Digital Performer, we can essentially ignore this mode in
our configuration. However, if you have the ability to do real-time MIDI editing with certain
synthesizers or software, this mode may open up several possibilities when programmed
appropriately.
18
Spirit Digital 328 v2.0
Page 20

Digital Performer & the 328
Digital Performer & the 328
Digital Performer & the 328Digital Performer & the 328
This section deals with settings and proceedures for the final steps in the Digital Performer/328
marriage – total dynamic automation of the Digital 328.
Digital Performer MIDI Settings
Digital Performer MIDI Settings
Digital Performer MIDI SettingsDigital Performer MIDI Settings
1) Under the BASICS Menu in
Digital Performer, disable MIDI
Thru. Leaving this item checked
while operating 328 automation,
will result in a MIDI feedback
loop.
7
2) Add one or two MIDI Tracks.
3) Locate the new MIDI track and route its
output to the Digital 328, channel 1.
Digital Performer Setup Guide
19
Page 21

4) Make Sure MIDI DYNAUTO is enabled on the 328. Set Automation mode to READ/WRITE.
<Automation Set>
<Automation Set>
<Automation Set><Automation Set>
Mode: READ/WRITE
Mode: READ/WRITE
Mode: READ/WRITE Mode: READ/WRITE
5) In DP, enable automation for MIDI tracks that
control 328 automation. Otherwise, DP will
‘swallow’ CC parameters 7 (volume) and 10 (pan)
resulting in 328 faders 7 and 10 being disabled.
6) In Digital Performer, arm the new MIDI track to record, and verify MIDI data reception.
7) Once MIDI data has been verified, you are ready to record a pass of automation. Grab a
handful of faders, and do a test pass while in MIC/LINE Fader bank.
8) After the test pass has been recorded, rewind Digital Performer and play back the pass.
9) Faders should move accordingly – if they do not, verify your settings and try again. If MIDI
data is registering on the Digital Performer level meter when faders are being recorded, yet
there is no response on playback, check your MIDI Cables returni ng to the 328.
20
If you cannot automate more that 2 or 3 faders without serious side effects, such as
‘jumpy’ or ‘stuttering’ faders, check the Extensions Manager for possible conflicts.
Make sure that AppleTalk is turned off, disable any Fax software (such as FAX STF),
and turn off any Microsoft serial or USB extensions. If you use a USB based computer,
make sure the effect of each USB device (as it relates to the MIDI Data stream) is
known.
Spirit Digital 328 v2.0
Page 22

Automating a Mix
Automating a Mix
Automating a MixAutomating a Mix
Now that you’ve been able to automate both the 328 and Digital Performer, it is only a matter of
time before automated mixes will be commonplace for your new studio. Before you dive in
however, you may want to read through this section – it contains answers to questions
concerning mix overdub stat us, track status, and mix punch-in techniques.
Starting a Mix – A Tutorial
Starting a Mix – A Tutorial
Starting a Mix – A TutorialStarting a Mix – A Tutorial
1) Option-Click the Tracks sub menu, and
add two new MIDI tracks. Assign them
both to Digital 328, channel 1 as
outlined on Page 19.
2) Start a “static” (non-automated) mix on
the 328. Once your static levels are set
and you are happy with EQ, panning,
reverb, etc., store this mix as a
snapshot on the 328.
8
Without a 328 snapshot as a foundation,
automated moves will have no official “start”
position, and will not reflect your mix
intentions. Always start an automation
session with a stored snapshot on the 328.
3) In Digital Performer, ready your MIDI
track for automation. Start by recording
a Snapshot Recall command.
With Performer recording, go to the
Snapshot list on the 328, select the
appropriate snapshot, and hit RECALL
on the 328. The recall command will be
recorded as a Program Change
command in Performer.
4) Lastly, make sure the recorded
command indeed recalls the appropriate
snapshot.
Simply play DP and ensure that the
correct snapshot recalls. If it does not,
check your settings and try again.
Saved Snapshot!
Saved Snapshot!
Saved Snapshot!Saved Snapshot!
1:SNAPSHOT#001
1:SNAPSHOT#001
1:SNAPSHOT#001 1:SNAPSHOT#001
The Program Change command will register in the
DP track view. If it does not, check your settings
and try again.
Recall Snapshot!
Recall Snapshot!
Recall Snapshot!Recall Snapshot!
1:SNAPSHOT#001
1:SNAPSHOT#001
1:SNAPSHOT#001 1:SNAPSHOT#001
Digital Performer Setup Guide
21
Page 23

5) Once you are able to recall a snapshot,
T
you are ready to automate a mix.
Enter Read/Write mode on the 328, and
ride an automation pass. When you
finish, verify your pass by playing it
back. Faders should move accordingly.
Updating a Mix – A Tutorial
Updating a Mix – A Tutorial
Updating a Mix – A TutorialUpdating a Mix – A Tutorial
Any number of Digital 328 automation tracks can be created within Digtal Performer. If you do
not wish to edit recorded data visually within Digital Performer’s editing pages, however, Update
Mode can also be used.
6) To Update a mix, first copy the existing
automation data to another track in
Digital Performer.
<Automation Set>
<Automation Set>
7) Enter Update Mode on the 328.
<Automation Set><Automation Set>
Mode: UPDATE
Mode: UPDATE
Mode: UPDATE Mode: UPDATE
Data from recorded pass.
Note: Due to the motorized nature of the 328’s faders, If you wish to update an
automated fader movement, you should not attempt to ‘take over’ a moving fader
when you wish to punch-in your change – use the rotary encoder equivalent on the EStrip.
Note: Once an automatable 328 object has been adjusted in Update mode, it will not
enter Read mode again until READ ONLY or READ/WRITE is selected in the 328
Automation Setup menu. This means that the newly-adjusted parameter will continue
to be overwritten until recording is stopped, or the mode is changed.
rack is muted for now.
8) Locate the place you would like to update,
and get ready to record.
9) Play-enable your first track of automation,
and Record-enable the second (copied)
automation track, but DO NOT PLAY
ENABLE THIS TRACK.
With this configuration, original data will
be copied to the second track. “Punchins” will read data from the first track
and re-record both old and new data to
the second track.
Punch in, and the 328 reads data from one track, and rerecords it to the other. The second track is muted for overdubs.
Spirit Digital 328 v2.0
22
Page 24

10) When the Update pass is complete, erase the first (old) automation track and play-enable the
second (updated) track.
If you require another Update pass, create a new MIDI track and repeat step 6 above.
Editing the Automation Pass
Editing the Automation Pass
Editing the Automation PassEditing the Automation Pass
Once your pass has been recorded, you may want to edit it within Digital Performer.
1) Go to the Edit window in Digital Performer, and locate the MIDI track containing the
automation pass.
2) Double-click the track, or open the Graphic Editor window within Digital Performer.
3) Use the View Filter in Digital Performer to control Data display.
NOTE: Please refer to the MIDI Specification included in the Digital 328 v2.0 manual.
Even though data such as EQ changes, Panning, or Aux sends will appear to record
correctly, playback routed to the wrong MIDI channel will cause unwanted results.
Make sure that recorded data is targeted to the correct MIDI channel when
automating.
Digital Performer Setup Guide
23
Page 25

Using Two Linked Consoles
Using Two Linked Consoles
Using Two Linked ConsolesUsing Two Linked Consoles
9
Setup
Setup
SetupSetup
1) When setting up, make sure separate MIDI cables are connected to separate ports on your
MIDI interface – one set of cables for each 328. Ensure that the 328 Link cable is attached.
Interface MIDI Out 1 328 MIDI In 1
Interface MIDI In 1
328 MIDI Out 1
2) When setting up FreeMIDI, make sure that each 328 is defined as a separate device on a
separate MIDI port as shown on page 4. This setup WILL NOT WORK without a multi-port
MIDI interface.
3) Refer to Section 3, “328 Settings” (page 6). For control of Digital Performer’s internal Mixing
Board, set up the first 328 as shown on page 6, and set up the second 328 exactly the same.
4) In Digital Performer, configure one track for 328 #1, and another track for 328 #2. Record
automation to both tracks simultaneously – the data from each console will be routed to the
proper track.
328 Link Cable
328 Link Cable
328 Link Cable328 Link Cable
Interface MIDI Out 2 328 MIDI In 2
Interface MIDI In 2
328 MIDI Out 2
24
This concludes the section for Digital Performer control of 328 Automation.
Spirit Digital 328 v2.0
Page 26

Using Digital Performer Custom Consoles
Using Digital Performer Custom Consoles
Using Digital Performer Custom ConsolesUsing Digital Performer Custom Consoles
Loading DP Custom Consoles
Loading DP Custom Consoles
Loading DP Custom ConsolesLoading DP Custom Consoles
We have provided 6 Custom Consoles for the Digital Performer Environment, ranging from fader
control to reverb and effects parameters. You will need to load them into an existing Project, or
into a New Template in Digital Performer in order to have them available for each new session.
1) Make sure the 328 v2.0 Custom Console file is available on your computer.
2) Create a New file (or use an existing one)
and select Load from the File menu.
3) Find the file named “328 V2.0 Custom Consoles”.
10
4) Select Consoles and Seq-1. Hit OK.
5) If prompted, remap to the correct Digital
328 device(s).
Digital Performer Setup Guide
25
Page 27

6) In Digital Performer, Activate the Custom Consoles from the Windows menu.
Enjoy two-way communication for the provided parameters.
26
Spirit Digital 328 v2.0
Page 28

Spirit by Soundcraft
Harman International Industries Ltd., Cranborne House,
Cranborne Road, Potters Bar, Herts EN6 3JN, England.
Tel: +44 (0)1707 665000 Fax: +44 (0)1707 665461
web: http://www.spiritbysoundcraft.com
e-mail: spiritsupport@soundcraft.com (UK)
spiritdig@harman.com (US only)
Digital Performer Setup Guide
27
 Loading...