

Page 1

Operating Instructions
Sophos Access Points
Page 2
Operating Instructions
Foreword
We are pleased to welcome you as a new Sophos Access Point customer.
These operating instructions will help you install and configure the access point
and provide technical specifications of all Sophos access point models. In addition,
please also see the following documents that contain useful information on safety,
regulatory compliance, and configuration options:
Ì Sophos Access Points Safety Instructions and Regulatory Information
Ì Sophos UTM Administration Guide: Configuring the
UTM hardware and software appliance
The instructions must be read carefully prior to using the device and should be kept
in a safe place. You may download all user manuals and additional documentation
from the Sophos Knowledgebase at http://www.sophos.com/en-us/support/
knowledgebase.aspx.
Introduction
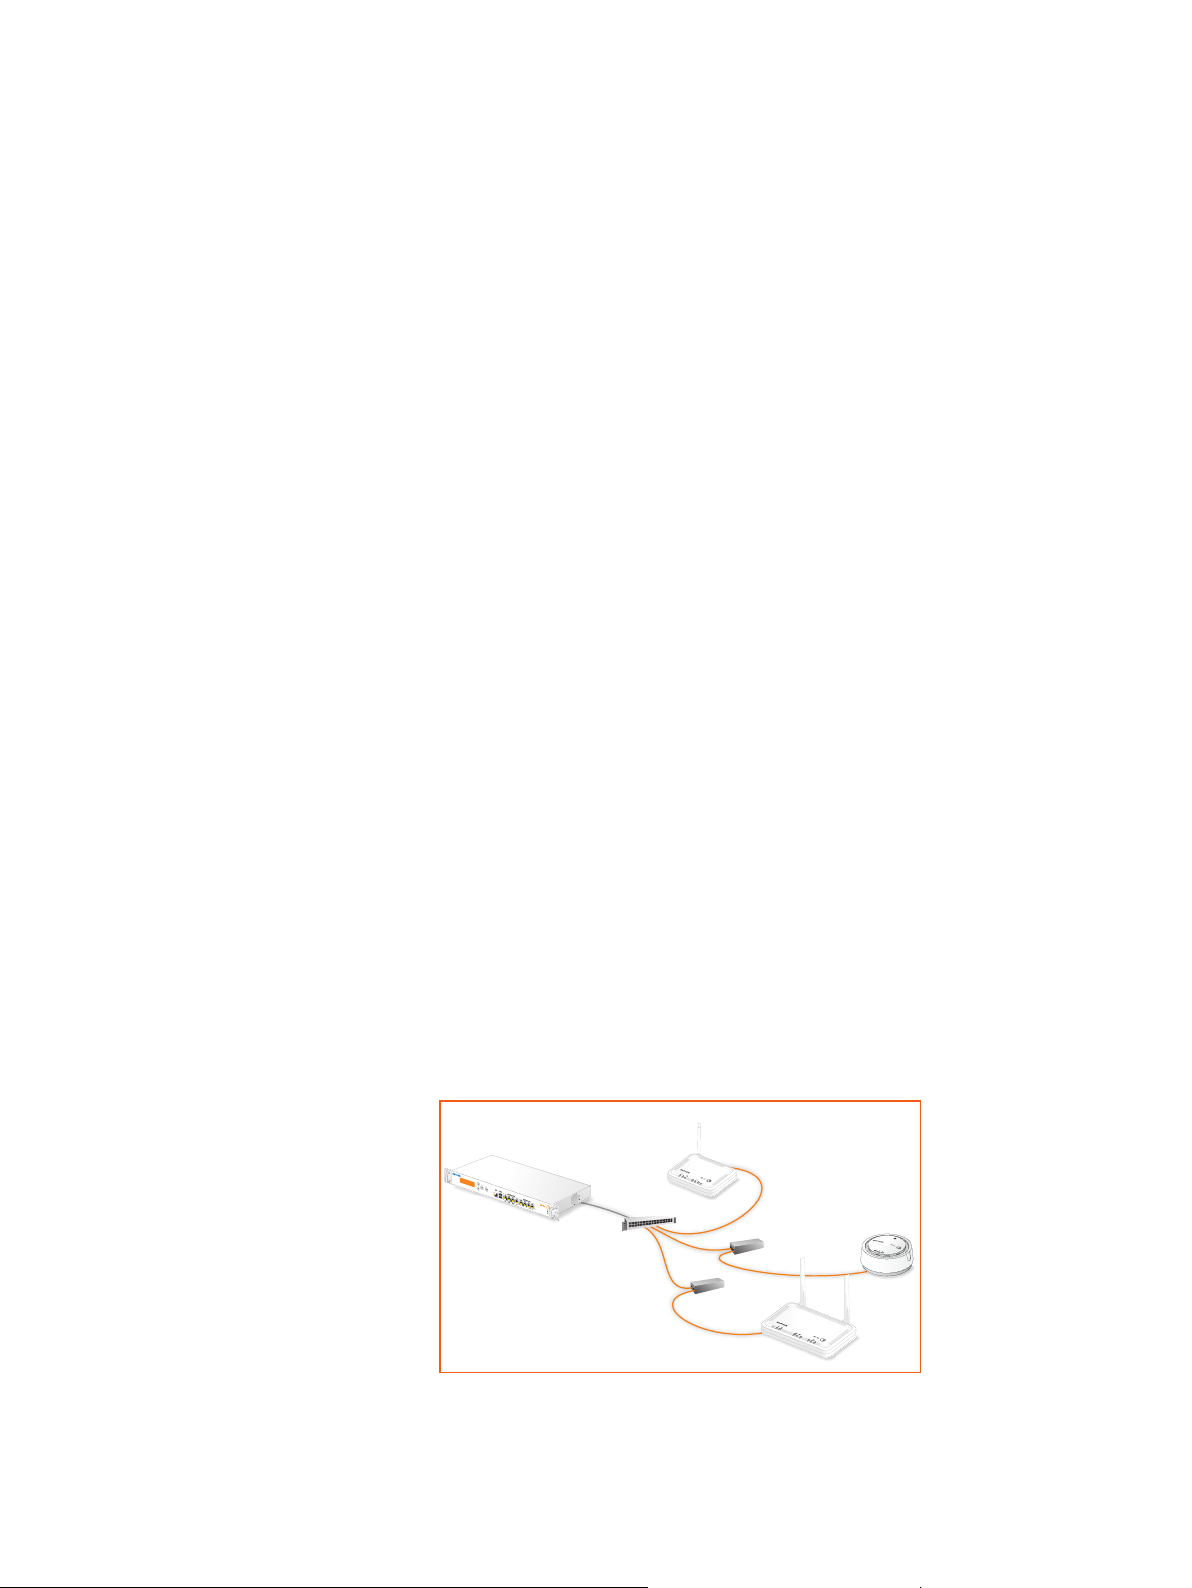
UTM Wireless Protection simplifies the operation of secure and reliable wireless
networks. It combines affordable and configuration-less access points through a builtin wireless controller in the in Sophos UTM. The wireless controller itself centrally
manages all wireless access points; all you need to do is plug in the device anywhere
in your network. The access point will find the controller, fetch its configuration and
become operable within seconds. In addition, it easily provides wireless guest Internet
access during the initial setup, unless you explicitly deny automatic configuration.
Installation
AP 10/15/30/50/100
Preliminary steps
Please update your UTM appliance to the latest version available. Note that you also
need a valid UTM Wireless Protection subscription to operate the Sophos Access
Points.
Connect the access point to the internal network
Decide where you would prefer to place the access point, and put the access point in
that location. For mounting instructions, see below. Now connect the access point to
your internal network by plugging in the network cable to the access point’s RJ45 or
LAN (PoE) Ethernet interface, respectively.
1Wireless Access Points
Page 3
Operating Instructions
Connect the access point to the power supply
The AP 30, AP 50, and AP 100 can be powered directly through the Power-overEthernet-injector. Note that it is also possible to power them by a PoE-compliant
switch. For more information on PoE-injectors, see below.
Connect the AP 10 and AP 15 to the power supply. Please use the power supply from
the scope of supply.
Start the communication between the access point and the UTM appliance
When connected to the network, the access point will try to receive an IP address via
DHCP. Therefore, you need either the UTM appliance (with a DHCP server enabled
and listening on the interface the access point is connected to) or any other DHCP
server to provide an IP address for the access point.
After successfully receiving an IP address, the access point will communicate with
the UTM appliance. For this to happen, the UTM appliance needs to be put in the
upstream of the access points, either being the default gateway of the access points
(which was provided by the DHCP service) or on the default route (most likely your
route to the Internet).
Please note that the actual Internet access is not necessary to use UTM Wireless
Protection. While waiting for DHCP and searching for the UTM appliance, the access
point’s power LED will blink slowly.
Enable UTM Wireless Protection on the UTM appliance
In WebAdmin, navigate to the Wireless Protection menu entry. On the Global Settings
tab, click the Enable button. When enabling Wireless Protection for the first time,
the Initial Setup frame will appear. It shows the configuration which will be created:
A separate Wireless “Guest” network using WPA2 personal with DHCP for wireless
clients, which will be allowed to use DNS on the UTM appliance and the “Web
Surfing” service.
The pre-shared key is auto-generated and will only be shown in this section. This
configuration is intended as a template, you can edit the settings at any time on the
Wireless Protection > Wireless Networks tab. You can also skip the initial setup by
ticking the checkbox on the bottom of the section.
2Wireless Access Points
Page 4
Operating Instructions
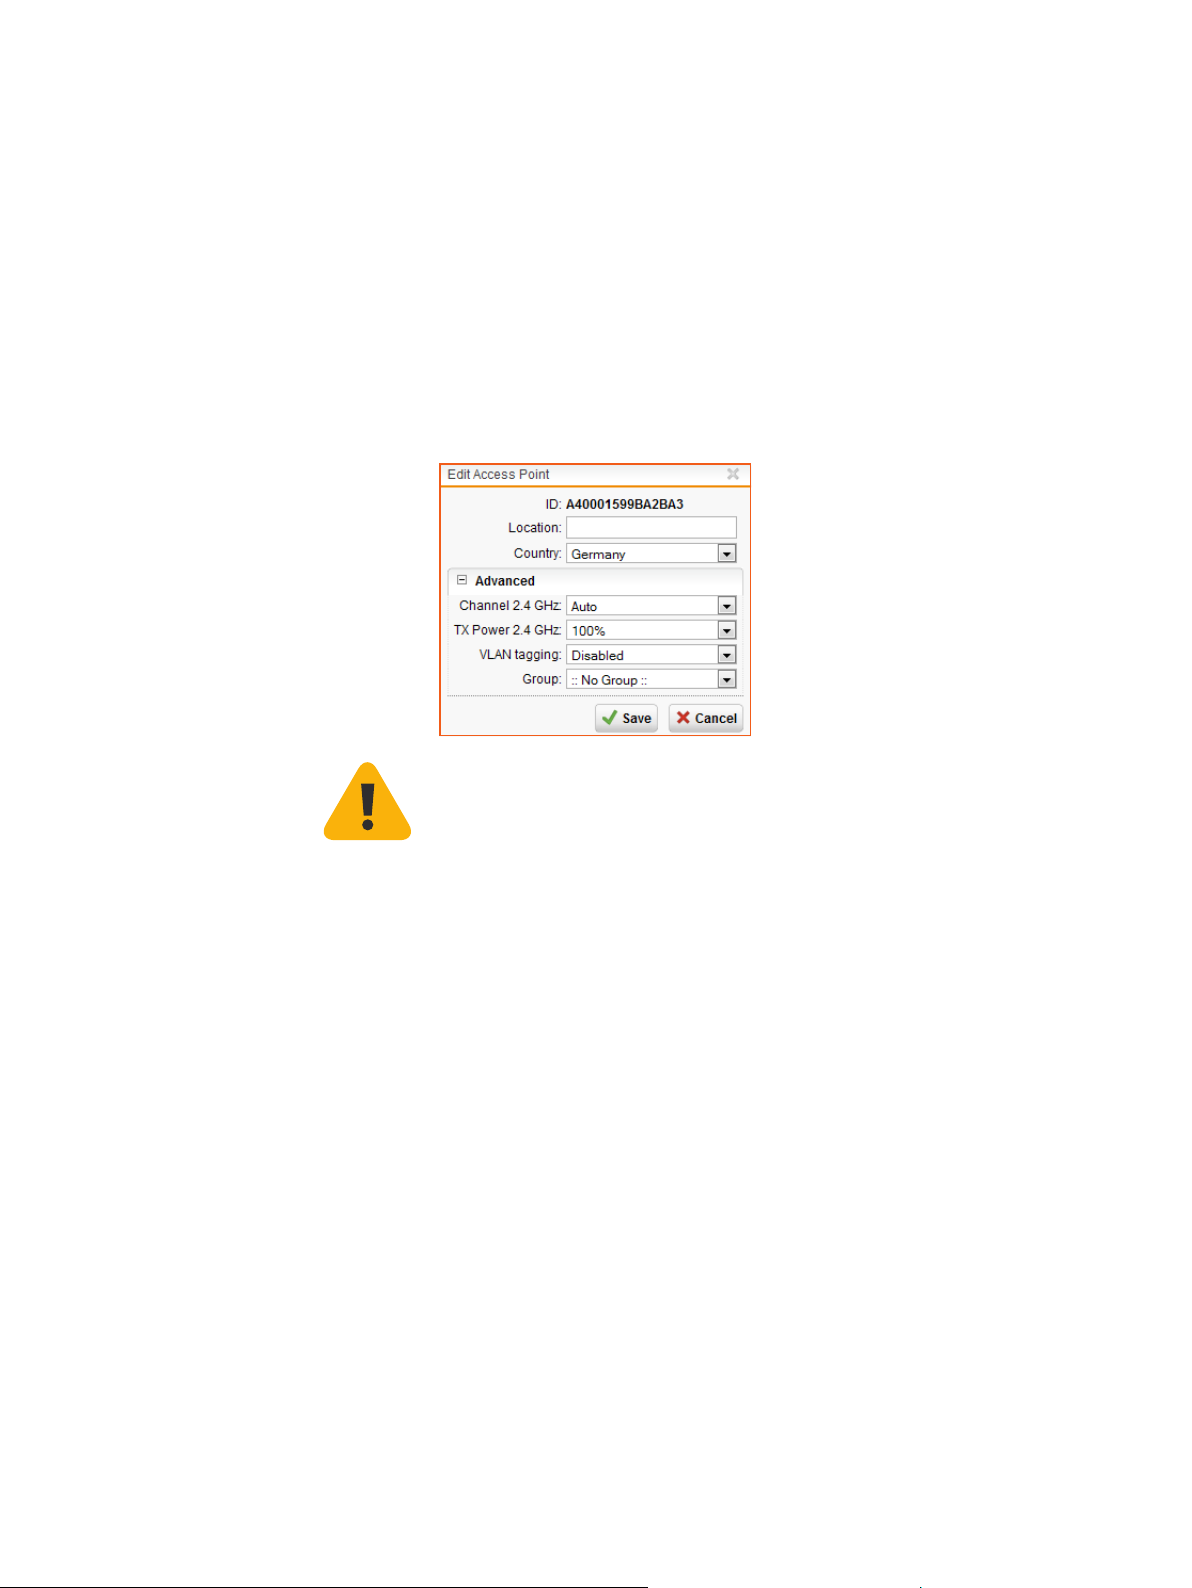
Accepting the access point
The UTM appliance will start to communicate with the access point and they will
show up as “Pending” on the Wireless Protection > Access Points tab in WebAdmin.
The ID of the Access Points, shown in square brackets, is also printed on the bottom
of the device. It can be used to distinguish the access point. By clicking the Accept
button, you are given the option to select the channel this access point will transmit
on. When leaving the channel setting on “Auto”, the access point will use the least
used channel.
We also suggest to give the access point a meaningful location (e.g., “Meeting Room”)
as this will ease handling multiple access points. After clicking the Save button,
the access points will reboot. Upon reconnect, the access point will check if a more
recent firmware is available. If so, they will automatically perform a firmware update.
During the firmware update, the access point’s power LED will blink rapidly.
Important note: Do not unplug the power while the firmware is updating. Otherwise
the access point will be rendered inoperable and must be returned to the reseller.
The access point will then reboot to complete the firmware update. If no new
firmware is available, the access point is operational and appears as “Active” in
WebAdmin.
3Wireless Access Points
Page 5
Operating Instructions
AP 10
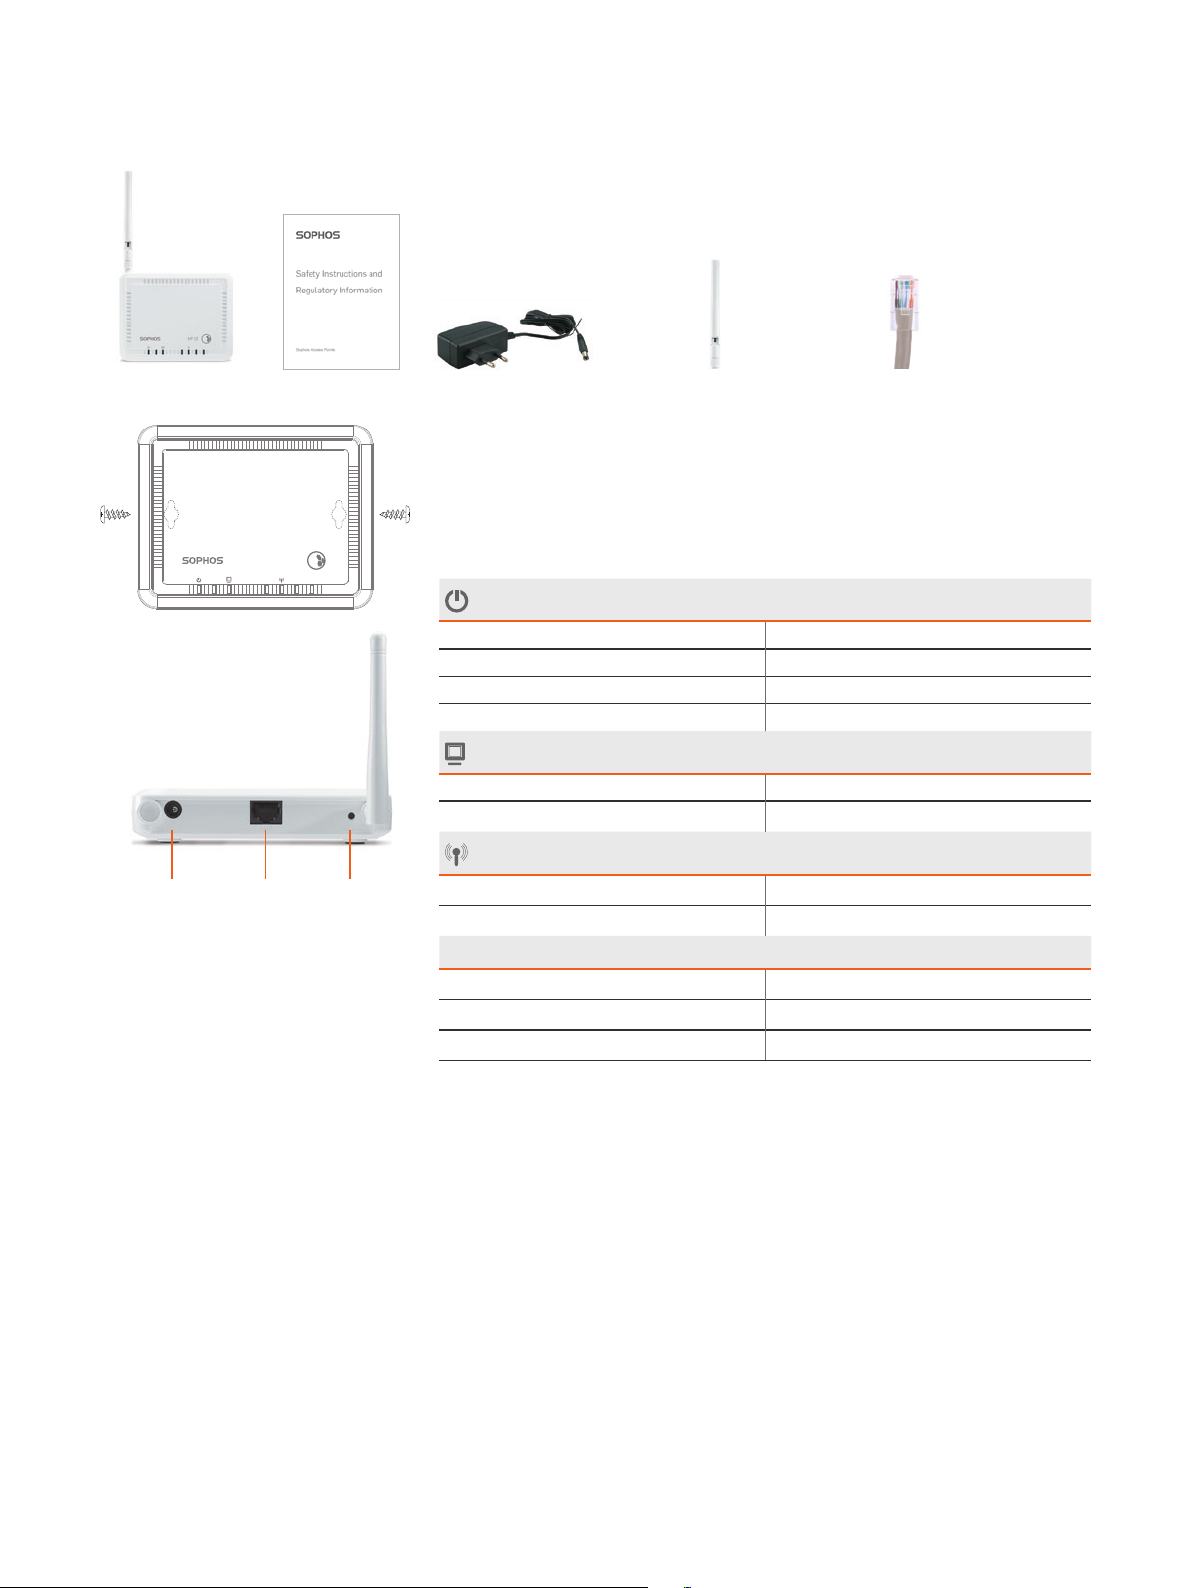
Scope of supply
Sophos AP 10 Security Notes Power supply Detachable dipole antenna Ethernet cable
Mounting instructions
The Sophos AP 10 can be mounted on the wall. Screws are not included in delivery.
Only use screws whose dimensions correspond with the mounting holes on the back
side.
AP 10
Controls
Power (LED display)
Off Power off
On continuously Power on
Blinking rapidly Firmware update
Blinking slowly No connection to the Sophos UTM
LAN connection (LED display)
On continuously Network connection, no activity
Blinking Network activity
WLAN access (LED display)
Reset10/100 Base-TXPower
On continuously Network connection, no activity
Blinking Network activity
Interfaces and buttons
DC-IN Power
RJ45 10/100 Base-TX interface
Reset Currently not supported
4Wireless Access Points
Page 6
Operating Instructions
Technical specifications
Sophos AP 10
Chassis Plastic housing, white
Maximum throughput 150 Mbit/s
LAN interfaces 1 x 10/100 Base-TX
Supported WLAN standards 802.11 b/g/n 2.4 GHz
Antenna 1 x detachable dipole antenna (2 dBi) Connector type: RP-SMA
Frequencies / channels 2.412~2.462 GHz Channels 1-11
Power supply 100-240 VAC, 50/60 Hz, max. 0.3 A
Power consumption 8 W (max.)
Power-over-Ethernet No
Dimensions W x H x D 124 x 25 x 96 mm
Weight 130 g
Temperature range Operating: 0°C to 45°C Storage: -20°C to 70°C
Humidity (non-condensing) 5% to 95%
Mounting Desktop / wall
Supported security standards WPA/WPA2, WEP, 802.1X (RADIUS)
Number of supported SSIDs 8
Regulatory compliance CE FCC MIC/VCCI (Japan)
Radio: EN 300328 CFR 47, Part 15
EMC: EN 301489-1, EN
301489-17
EMF: EN 50385 FCC 1.1310, IEEE C95.1 N/a
Safety: EN 60950-1 N/a N/a
Subpart C
CFR 47, Part 15
Subpart B
Certification ID:
201 WW 11215237
V-3/2011.04
V-4/2010.04
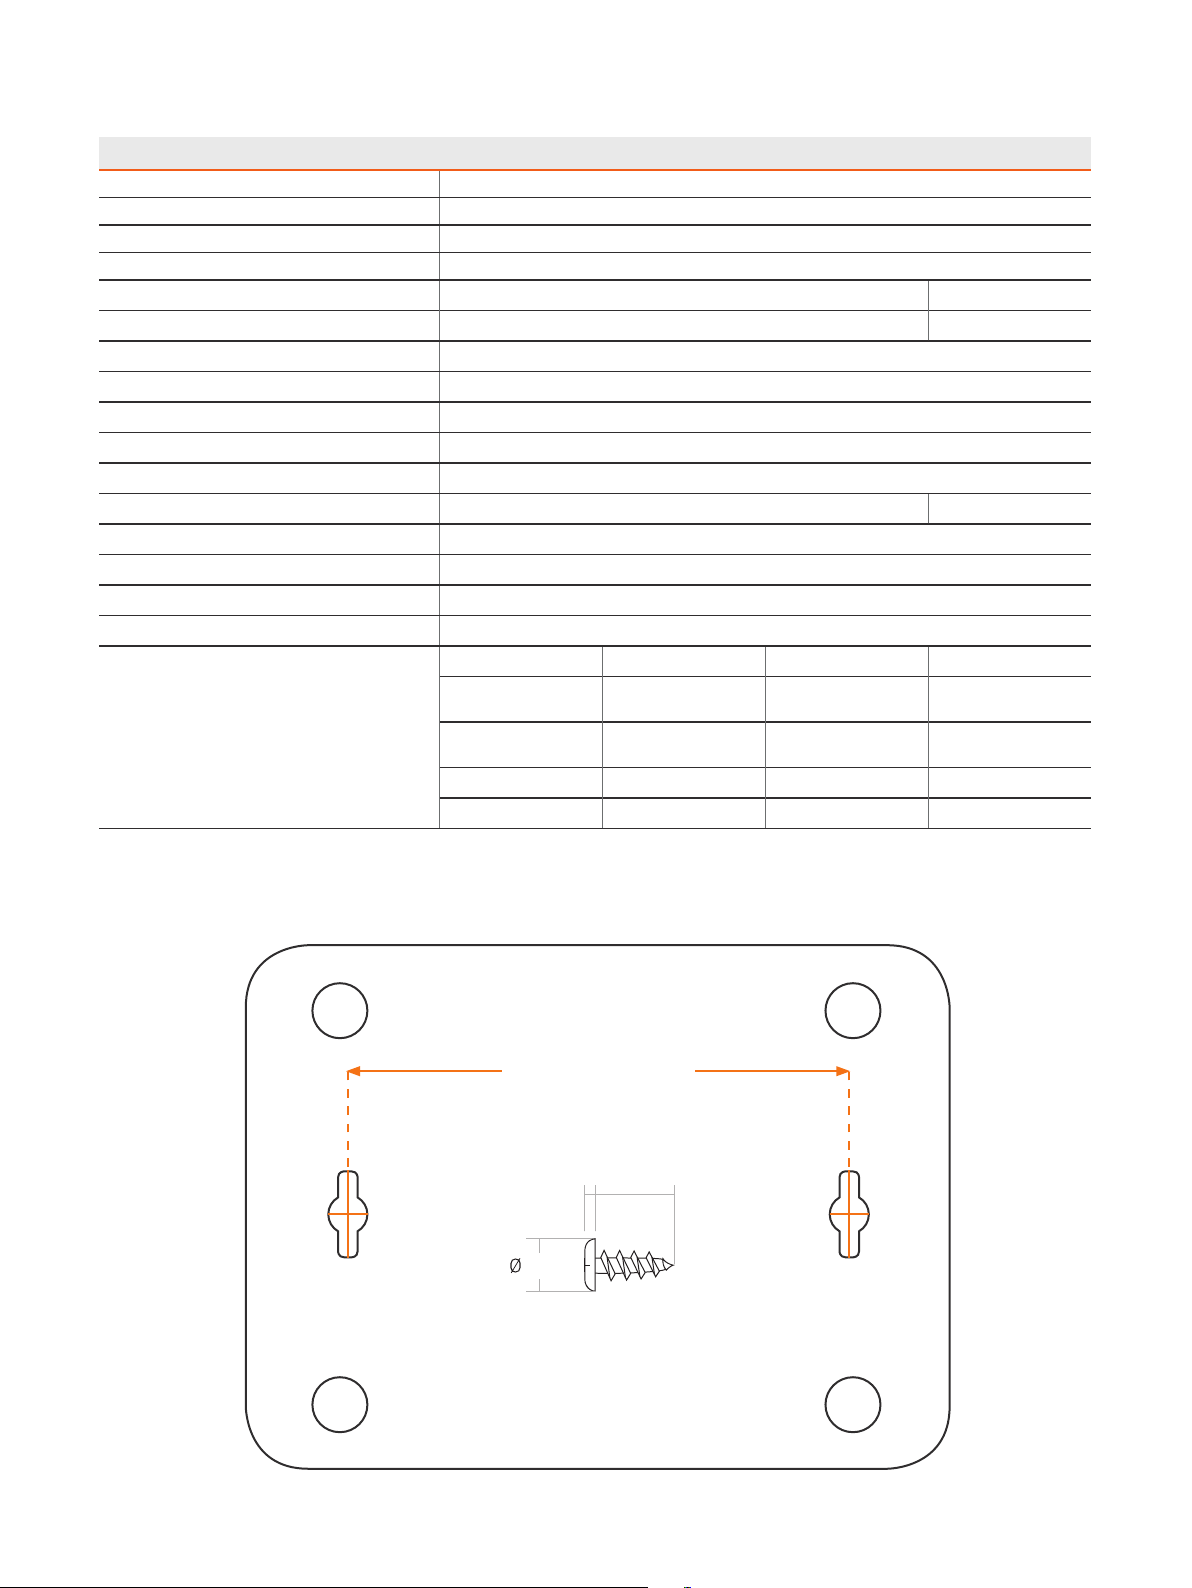
AP 10 Mounting template
Do not shrink to fit when printing
8,85 cm (3,48 in)
2mm
5mm
16mm
5Wireless Access Points
Page 7

Operating Instructions
AP 15
Scope of supply
Sophos AP 15 Security Notes Power supply 2 Detachable dipole antenna Ethernet cable2 screws and dowels
Important note: Sophos AP15 requires Sophos UTM V 9.207 to be installed.
Mounting instructions
The Sophos AP 15 can be mounted on the wall. Screws are included in delivery.
Controls
10/100/1000 Base-TX Power
LED
Green - blinking slowly AP is booting
Green - blinking rapidly Network connectivity
Orange - blinking slowly No connection to the Sophos UTM
Orange - blinking rapidly Firmware update
Interfaces and buttons
12V DC-IN Power
LAN (PoE) 10/100/1000 Base-TX interface
6Wireless Access Points
Page 8

Operating Instructions
Technical specifications
Sophos AP 15
Chassis Plastic housing, white
Maximum throughput 300 Mbit/s
LAN interfaces 1 x 10/100/1000 Base-TX
Supported WLAN standards 802.11 b/g/n 2.4 GHz
Antenna 2 x detachable dipole antenna (2 dBi) Connector type: RP-SMA
Frequencies / channels ETSI FCC
2.412–2.472 GHz (Channels 1-13) 2.412-2.462 GHz (channels 1-11)
Power supply 12 Vdc / 1 A
Power consumption 2.5 W (max.)
Power-over-Ethernet 802.3af, 802.3at
Dimensions W x H x D 194 x 32 x 115 mm
Weight 260 g
Temperature range Operating: 0°C to 45°C Storage: -20°C to 60°C
Humidity (non-condensing) 0% to 90%
Mounting Desktop / wall
Supported security standards WPA/WPA2, WEP, 802.1X (RADIUS)
Number of supported SSIDs 8
Regulatory compliance CE FCC
Radio: EN 300328 CFR 47, Part 15 Subpart C
EMC: EN 301489-1, EN 301489-17 CFR 47, Part 15 Subpart B
EMF: EN 50385 FCC 1.1310, IEEE C95.1
Safety: EN 60950-1 N/a
7Wireless Access Points
Page 9

Operating Instructions
AP 15 Mounting template
Do not shrink to fit when printing
12 cm (4,72 in)
8Wireless Access Points
Page 10

Operating Instructions
AP 30
Scope of supply
Sophos AP 30 Security Notes Power-over-Ethernet (PoE)
injector + power cord
Mounting instructions
The Sophos AP 30 can be mounted on the ceiling. Screws are included in delivery.
Use the screws from the scope of supply or screws whose dimensions correspond
with the mounting holes in the bracket.
1. Remove the bracket from the housing
Unlock the bracket on the backside by turning it (approx. 5°)
counter-clockwise. Then you can take off the bracket.
2. Mount the bracket on the ceiling
Use the screws and anchors from the scope of supply.
3. Place the access point on the bracket
Place the housing on the bracket and lock it by turning clockwise until stop.
Controls
Power (LED display)
Off Power off
On continuously Power on
Blinking rapidly Firmware update
Blinking slowly No connection to the Sophos UTM
2 Detachable dipole antenna Ethernet cable2 screws and dowels
Power
10/100 Base-TX
LAN connection (LED display)
On continuously Network connection, no activity
Blinking Network activity
WLAN access (LED display)
On continuously Network connection, no activity
Blinking Network activity
Interfaces and buttons
Reset
Ethernet 10/100 Base-TX interface
12 V DC IN Power
Currently not supported
9Wireless Access Points
Page 11

Operating Instructions
Technical specifications
Sophos AP 30
Chassis Plastic housing, white (smoke detector design)
Maximum throughput 300 Mbit/s
LAN interfaces 1 x 10/100 Base-TX
Supported WLAN standards 802.11 b/g/n 2.4 GHz
Antennas 2 x directional internal antennas (4 dBi)
Frequencies / channels 2.412~2.462 GHz Channels 1-11
Power supply 100-240 VAC, 50/60 Hz, max. 0.5 A
Power consumption 8 W (max.)
Power-over-Ethernet Yes (IEEE 802.3af) – 48 VAC/0.375A
Dimensions ø 120 mm, height 50 mm
Weight 230 g
Temperature range Operating: 0°C to 45°C Storage: -20°C to 70°C
Humidity (non-condensing) 5% to 95%
Mounting Desktop / ceiling
Supported security standards WPA/WPA2, WEP, 802.1X (RADIUS)
Number of supported SSIDs 8
Regulatory compliance CE FCC MIC/VCCI (Japan)
Radio: EN 300328 CFR 47, Part 15
EMC: EN 301489-1, EN
301489-17
EMF: EN 50385 FCC 1.1310, IEEE C95.1 N/a
Safety: EN 60950-1 N/a N/a
Subpart C
CFR 47, Part 15
Subpart B
Certification ID:
201 WW 11215238
V-3/2011.04
V-4/2010.04
10Wireless Access Points
Page 12

Operating Instructions
AP 50
Scope of supply
Sophos AP 50 Security Notes Power-over-Ethernet (PoE)
injector + power cord
Mounting instructions
The Sophos AP 50 can be mounted on the wall. Screws are not included in delivery.
Only use screws whose dimensions correspond with the mounting holes on the back
side.
AP 50
10/100/1000 Base-TX
Reset
Power
Power on/off switch
Controls
Power (LED display)
Off Power off
On continuously Power on
Blinking rapidly Firmware update
Blinking slowly No connection to the Sophos UTM
LAN connection (LED display)
On continuously Network connection, no activity
Blinking Network activity
Wireless LAN access with 2.4 GHz (LED display)
On continuously Network connection, no activity
Blinking Network activity
Wireless LAN access with 5 GHz (LED display)
On continuously Network connection, no activity
Blinking Network activity
2 Detachable dipole antenna Ethernet cable
Interfaces and buttons
WPS button
OI Power on/off switch
DC 12V IN Power
Reset Currently not supported
PoE/LAN 10/100/1000 Base-TX interface
Currently not supported
11Wireless Access Points
Page 13

Operating Instructions
Technical specifications
Sophos AP 50
Chassis Plastic housing, white
Maximum theoretical throughput 300 Mbit/s
LAN interfaces 1 x 10/100/1000 Base-TX
Supported WLAN standards 802.11 a/b/g/n 2.4 GHz / 5 GHz
Antennas 2 x 2.4G/5G (3dBi/5dBi) dual-band antenna
Frequencies / channels Radio I: 11b/g/n: 2.412-2.472 GHz (ETSI) Channels 1-11
2.412-2.462 (FCC) Channels 1-11 (FCC)
Radio II: 11a/n: 5.180-5.240 GHz (ETSI / FCC) Channels 36, 40, 44, 48 (ETSI / FCC)
5.745-5.825 GHz (FCC) Channels 149, 153, 157, 161, 165 (FCC)
Power supply 100-240 VAC, 50/60 Hz, max. 0.3 A
Power consumption 9,6 W (800 mA/12 V)*
Power-over-Ethernet Yes (802.3at)
Dimensions 154 x 119 x 30 mm
Weight 390 g
Temperature range Operating: 0°C to 45°C Storage: -10°C
Humidity (non-condensing) 15% to 95%
Mounting Desktop / wall
Supported security standards WPA/WPA2, WEP, 802.1X (RADIUS)
Number of supported SSIDs 8
Regulatory compliance CE FCC MIC/VCCI (Japan)
Radio: EN 300328,
EN 301893
EMC: EN 301489-1,
EN 301489-17
EN 60601-1-2
(medical electrical
equipment)
EMF: EN 50385 FCC 1.1310, IEEE C95.1 N/a
Safety: EN 60950-1 N/a N/a
CFR 47, Part 15 Subpart C, E Certification ID:
CFR 47, Part 15 Subpart B V-3/2013.04
to 70°C
201-140005
V-4/2012.04
* It is recommended to only use PoE+ capable (IEEE 802.3at) equipment to power the Sophos AP 50.
12Wireless Access Points
Page 14

Operating Instructions
AP 50 Mounting template
Do not shrink to fit when printing
2mm
5mm
17,05 cm (6,71 in)
16mm
13Wireless Access Points
Page 15

Operating Instructions
AP 100
Scope of supply
Sophos AP 100 Security Notes Power-over-Ethernet (PoE)
injector + power cord
Important note: Sophos AP 100 requires Sophos UTM V 9.207 to be installed.
Mounting instructions
The Sophos AP 100 can be mounted on the wall. A mounting kit is included in
delivery.
Controls
LED
Green - blinking slowly AP is booting
Green - blinking rapidly Network connectivity
Orange - blinking slowly No connection to the Sophos UTM
Orange - blinking rapidly Firmware update
Interfaces and buttons
12V DC-IN Power
LAN (PoE) 10/100/1000 Base-TX interface
Console Console access for debugging purposes
USB Currently not used; reserved for future use
3 Detachable dipole antenna
Ethernet cable4 screws, dowels
and metal plates
Console
USB
10/100/1000 Base-TX
Power
14Wireless Access Points
Page 16

Operating Instructions
Technical specifications
Sophos AP 100
Chassis Plastic housing, white
Physical security Kensington lock
Maximum theoretical throughput 1.3 Gbps (5GHz / 802.11ac) + 450 Mbps (2.4GHz / 802.11n)
LAN interfaces 1 x 10/100/1000 Base-TX
Supported WLAN standards 802.11a/b/g/n/ac
Antenna 3 x detachable dipole antenna (2 dBi) Connector type: RP-SMA
Frequencies / channels ETSI
2.412–2.472 GHz (Channels 1-13) RLAN sub-band 1:
FCC
2.412-2.462GHz (channels 1-11) U-NII-1:
Power supply 12 Vdc / 4 A
Power consumption 13 W (max.)
Power-over-Ethernet 802.3af, 802.3at
Dimensions W x H x D 183 x 36 x 183 mm
Weight 505 g
Temperature range Operating: 0°C to 50°C
Humidity (non-condensing) 0% to 90%
Mounting Desktop / wall
Supported security standards WPA/WPA2, WEP, 802.1X (RADIUS)
Number of supported SSIDs 8 per radio (16 in total)
Regulatory compliance CE FCC
Radio: EN 300 328, EN 301 893 CFR 47, Part 15 Subpart C, E
EMC: EN 301 489-1, EN 301 489-17 CFR 47, Part 15 Subpart B
EMF: EN 50385 FCC 1.1310, IEEE C95.1
Safety: EN 60950-1 N/a
5.180-5.320GHz (channels 36-64)
RLAN sub-band 2:
5.500-5.580GHz (channels 100-116)
5.660-5.700GHz (channels 132-140)
5.180-5.240GHz (channels 36-48)
U-NII-2:
5.260-5.320GHz (channels 52-64)
U-NII-2e:
5.500-5.580GHz (channels 100-116)
5.660-5.700GHz (channels 132-140)
U-NII-3:
5.745-5.825GHz (channels 149-165)
15Wireless Access Points
Page 17

Operating Instructions
Power-over-Ethernet injector
(Optionally included with AP 30,AP 50, and AP 100)
The PoE injector converts alternating current (AC) to direct current (DC), which is
then provided over the Ethernet cable to power the Sophos Access Points AP 30,AP
50, and AP 100.
Installation
Warning: Do not use crossover cable between the PoE injector’s output port and the
access point.
Before placing the PoE injector, please pay attention to the following safety
instructions:
Ì Do not cover the PoE injector or block the airflow to the PoE
with any foreign objects. Keep the PoE away from excessive
heat and humidity and free from vibration and dust.
Ì Ensure that the cable length from Ethernet network source to the access point
does not exceed 100 m
(330 ft). The PoE is not a repeater and does not amplify the Ethernet data signal.
To install the PoE injector, proceed as follows:
LED
Data & Power Out
Data In
Power
1. Connect an Ethernet cable to the Data & Power Out interface.
2. Connect the other end of this Ethernet cable to the
Ethernet interface of the access point.
3. Connect an Ethernet cable to the Data In interface.
4. Connect the other end of this Ethernet cable to your network switch.
5. Connect the AC power cord from the scope of supply to the PoE injector.
6. Connect the AC power cable to an AC outlet
(100-240 VAC).
Controls
PoE injector PD-3501/AC
(AP 30)
LED display
Off Power off
Yellow continuously Power on
Green continuously A remote terminal is connected A remote terminal is connected
Green blinking Overload state or short-circuit Overload state or short-circuit
Interfaces
Input (Data In) 1 x 10/100 Base-TX 1 x 10/100/1000 Base-TX
Output (Data & Power Out) 1 x 10/100 Base-TX, plus 50 VDC 1 x 10/100/1000 Base TX, plus 55 VDC
PoE injector PD-9001GR/AC
(AP 50/AP 100)
16Wireless Access Points
Page 18

Operating Instructions
Technical specifications
PoE injector PD-3501/AC (AP 30) PoE injector PD-9001GR/AC (AP 50/AP 100)
Chassis Plastic housing Plastic housing
Input power AC input voltage: 90-264 VAC AC Input Voltage: 100 to 240 VAC
AC input current: 0.5 A, 100-240 VAC AC Input Current: 0.8A @ 100-240 VAC
AC frequency: 47/63 Hz AC Frequency: 50 to 60 Hz
Power-over-Ethernet output (max.) Output power voltage: 50 VDC Output power voltage: 55 VDC
Output power: 15.4 W Output power: 30 W
Supported PoE standard 802.3af compliant 802.3at compliant
Weight 200 g 200 g
Dimensions W x H x D 53 x 33 x 140 mm 1 x 10/100/1000 Base TX, plus 55 VDC
Mounting Desktop / wall Desktop / wall
Temperature 0°C to 40°C (operating) 0°C to 40°C (operating)
-20°C to 70°C (storage) -20°C to 70°C (storage)
Humidity (non-condensing) 10% to 90% 10% to 90%
Regulatory compliance CE, FCC, VCCI, UL, GS, RoHS, WEEE CE, FCC, VCCI, UL, GS, RoHS, WEEE
United Kingdom and Worldwide Sales
Tel: +44 (0)8447 671131
Email: sales@sophos.com
Oxford, UK | Boston, USA
© Copyright 2014. Sophos Ltd. All rights reserved.
Registered in England and Wales No. 2096520, The Pentagon, Abingdon Science Park, Abingdon, OX14 3YP, UK
Sophos is the registered trademark of Sophos Ltd. All other product and company names mentioned are
trademarks or registered trademarks of their respective owners.
2024-08.14DD.oina.simple
North American Sales
Toll Free: 1-866-866-2802
Email: nasales@sophos.com
Australia and New Zealand Sales
Tel: +61 2 9409 9100
Email: sales@sophos.com.au
Asia Sales
Tel: +65 62244168
Email: salesasia@sophos.com
 Loading...