

Page 1

User manual
Sophos Anti-Virus for NetWare
Document date: July 2007
Page 2

Sophos Anti-Virus NetWare user manual
About this manual
This user manual explains how to use Sophos Anti-Virus for NetWare and
how to configure
virus scanning
virus alerts
disinfection
logging
reporting.
The manual also provides help in resolving common problems.
For information on automatically installing and updating Sophos
Anti-Virus, see one of the following documents:
If the network uses Microsoft networking, see the Sophos Endpoint
Security and Control network startup guide on the Sophos website or
the Sophos Network Install CD.
If the network uses NDS networking, see the Sophos Endpoint Security
and Control network startup guide: NetWare edition on the Sophos
website or the Sophos Network Install CD.
For information on manually installing and updating Sophos Anti-Virus, see
the Sophos Anti-Virus NetWare startup guide on the Sophos Anti-Virus
Supplementary CD.
2
Page 3

Sophos Anti-Virus NetWare user manual
Contents
Using Sophos Anti-Virus
1 Loading and unloading Sophos Anti-Virus 6
2 Using the Sophos Anti-Virus screen 7
3 Scanning the server 9
4 Scheduled scanning 11
5 Viewing the log file 15
6 Disinfection 16
Configuration
7 Configuring immediate or scheduled scanning 22
8 Configuring InterCheck (central reporting) 35
9 Configuring real-time scanning 37
10 Purging checksums (for real-time scanning) 45
11 Setting administration options 46
12 Restoring or saving configuration settings 52
13 Command line options 53
Troubleshooting
14 Troubleshooting 56
Glossary and index
Glossary 60
Index 62
Technical support 64
3
Page 4

Sophos Anti-Virus NetWare user manual
4
Page 5

Using Sophos Anti-Virus
Loading and unloading Sophos Anti-Virus
Using the Sophos Anti-Virus screen
Scanning the server
Scheduled scanning
Viewing the log file
Disinfection
Page 6

Sophos Anti-Virus NetWare user manual
1 Loading and unloading Sophos Anti-Virus
1.1 Loading Sophos Anti-Virus
At a workstation running RCONSOLE, or at the server console, enter
LOAD SWEEP
The main Sophos Anti-Virus screen is displayed. For information on using
this screen, see section 2 below.
The first time Sophos Anti-Virus is loaded, it prompts for the fully qualified
distinguished name of an administrator and a password.
1.2 Unloading Sophos Anti-Virus
To unload Sophos Anti-Virus at any stage, press ‘Esc’ repeatedly until the
Exit menu is displayed. Select Unload SWEEP and press Return. If you
have made changes to the configuration, you will be prompted to save them.
To unload Sophos Anti-Virus from the command line, enter
UNLOAD SWEEP
6
Page 7

Sophos Anti-Virus NetWare user manual
2 Using the Sophos Anti-Virus screen
The Sophos Anti-Virus screen has a menu and three boxes.
!!
! Main menu enables you to configure and start scans (see section 2.1).
!!
!!
! InterCheck/Real-time shows whether InterCheck central reporting and
!!
Real-time (on-access) scanning are active, and shows details of real-time
activity.
!!
! Server shows the scanning job currently being run (if any), the next
!!
scheduled job, and details of files scanned and viruses found.
!!
! Last Virus shows details of the last virus discovered and the action
!!
taken.
2.1 The Main menu
The Main menu enables you to control and configure scanning and
reporting. The options include the following:
! Immediate mode scans files on the server now (see section 3).
! Scheduled mode runs scans on the server at set times and on set days
(see section 4).
! InterCheck receives reports from workstations (see section 8).
! Real-time mode checks files copied to or accessed on the server (see
section 9).
7
Page 8

Sophos Anti-Virus NetWare user manual
2.2 Using menus and screens
To use menus and screens in Sophos Anti-Virus for NetWare, do as follows.
Selecting items
To select an option, position the selection bar on it (using the cursor
up/down keys) and press Return.
Closing a screen
To quit a screen and return to the previous one, press ‘Esc’.
Adding or removing items from a list
To add an item to a list, press ‘Insert’. To delete an item from a list, position
the selection bar on the item and press ‘Delete’.
8
Page 9

Sophos Anti-Virus NetWare user manual
3 Scanning the server
This section describes immediate scanning. For details of Scheduled
scanning, see section 4. For details of Real-time scanning, see section 9.
3.1 To start a scan
To scan the server for viruses now (an immediate scan)
1. On the Main menu, select Immediate Mode and press Return.
2. In the Immediate Mode screen, select Start and press Return.
Sophos Anti-Virus checks the file server and displays the results in the
Server window. It also enters the results in the SWEEP.LOG file in the
SWEEP directory on the server.
To configure immediate scanning, in the Immediate Mode screen, select
Configuration. See section 7 for details.
If you want Sophos Anti-Virus to run a scan as soon as it is loaded, enter
LOAD SWEEP -I
If a scheduled scan is running and you try to start an immediate scan, a
menu is displayed containing options to postpone or cancel the immediate
scan. If you choose Postpone, the immediate scan runs when the scheduled
scan is finished.
9
Page 10

Sophos Anti-Virus NetWare user manual
3.2 Stopping a scan
To stop an immediate scan that is in progress
1. On the Main menu, select Immediate Mode and press Return.
2. In the Immediate Mode screen, select Stop and press Return.
10
Page 11

Sophos Anti-Virus NetWare user manual
4 Scheduled scanning
4.1 Creating a scheduled job
To schedule Sophos Anti-Virus to run at set times on specified days of the
week, do as follows.
1. On the Main menu, select Scheduled mode and press Return.
2. A list of Scheduled jobs is displayed. By default, there is a job called Daily
that runs at 21.00 each day. Press ‘Insert’ to add a new job.
3. In the Enter job name text box, type a name and press Return.
4. In the Scheduled jobs list, select the new job and press Return.
11
Page 12
Sophos Anti-Virus NetWare user manual
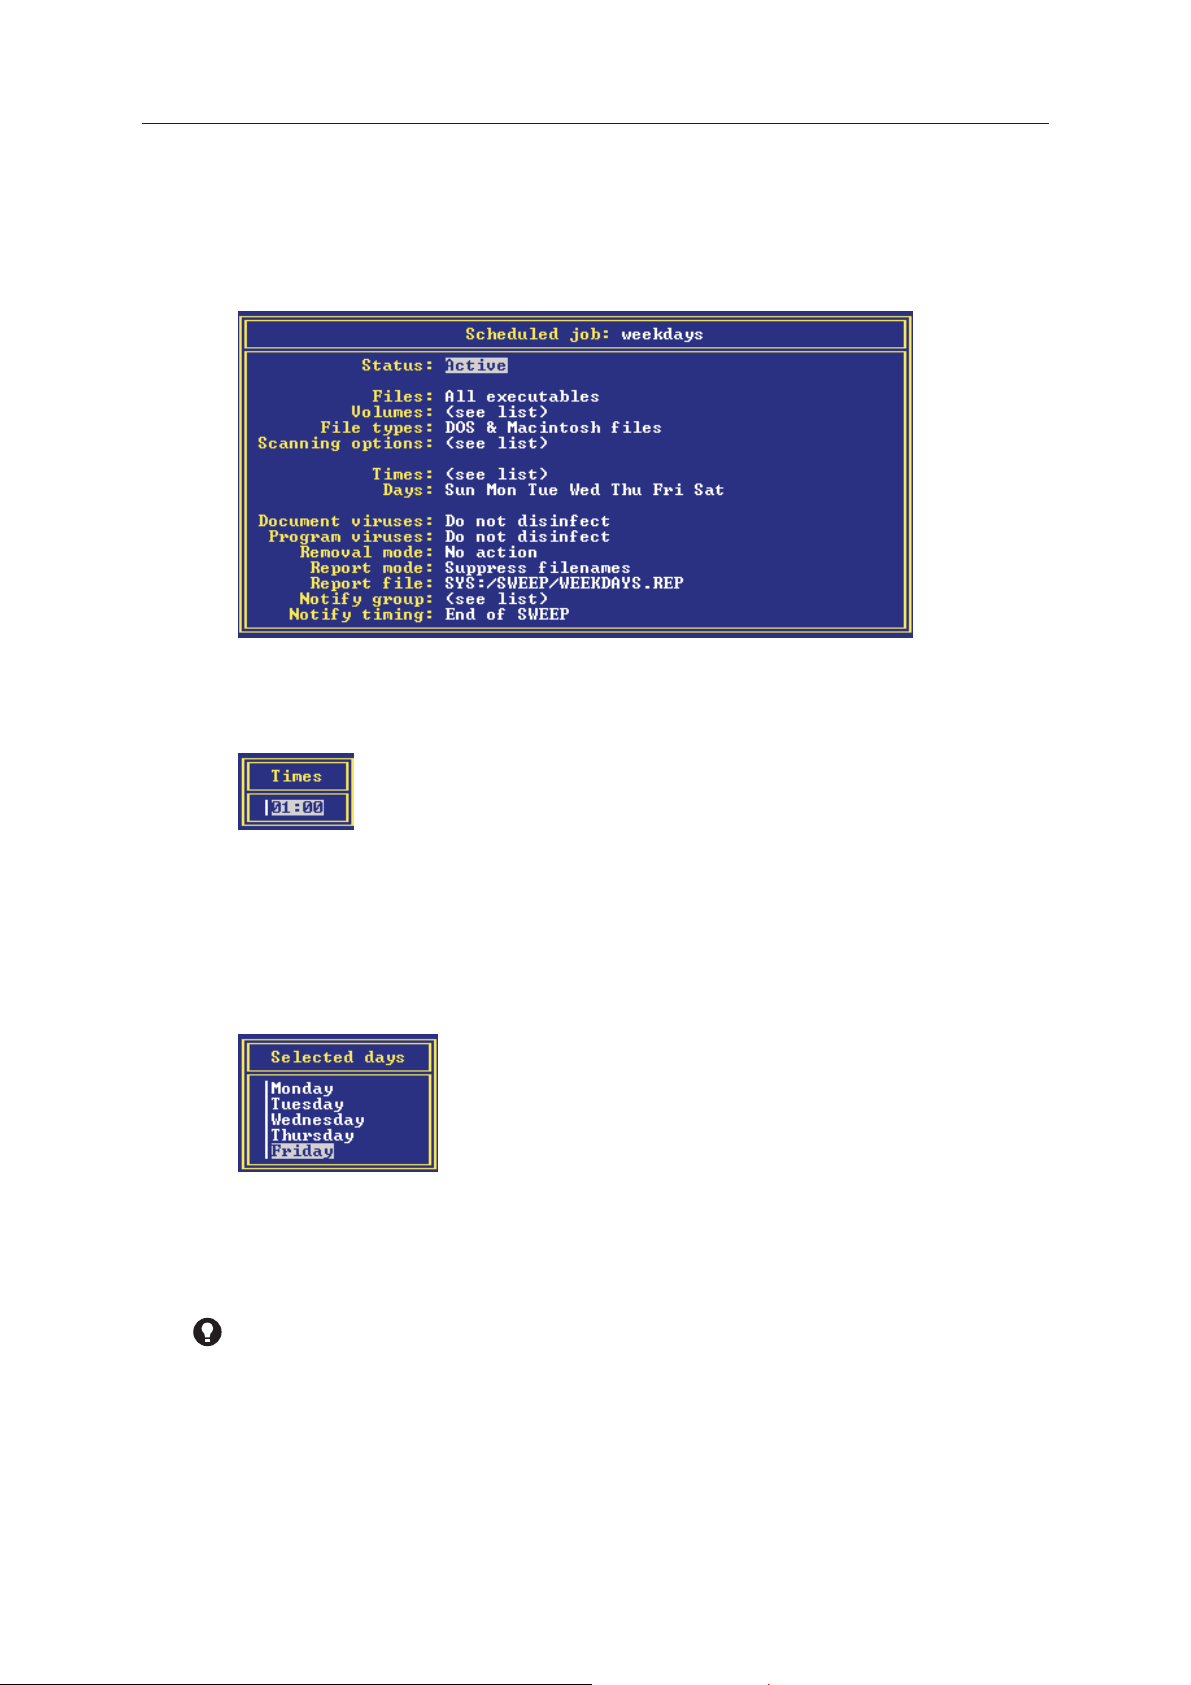
5. In the Scheduled job: <jobname> screen, the configuration settings for
the job are displayed. The job is already Active by default (i.e. it will run at
the times shown). Select Times and press Return.
6. In the Times text box, press ‘Insert’, type a time and press Return.
7. In the Scheduled job: <jobname> screen, select Days. By default all the
days of the week are included. To remove a day, select it and press ‘Delete’.
To add a day, press ‘Insert’ and select a day from the menu that is
displayed.
For details of the other configuration options for scheduled jobs, see section
7.
12
If an immediate scan is taking place and a scheduled scan is due to start,
the immediate scan is stopped and a message written to the log file.
Page 13

Sophos Anti-Virus NetWare user manual
4.2 Editing a scheduled job
To edit a scheduled job
1. On the Main menu, select Scheduled Mode and press Return.
2. In the Scheduled jobs list, select the job to be edited and press Return.
3. In the Scheduled job: <jobname> screen, specify the times and days as
described in section 4.1.
13
Page 14

Sophos Anti-Virus NetWare user manual
4.3 Removing a scheduled job
To remove a scheduled job
1. On the Main menu, select Scheduled mode and press Return.
2. In the Scheduled jobs list, select the job to be removed and press ‘Delete’.
4.4 Stopping a scheduled job
To stop a scheduled job that has already started
1. On the Main menu, select Immediate mode (not Scheduled mode) and
press Return.
2. In the Immediate mode screen, select Stop and press Return.
14
Page 15

Sophos Anti-Virus NetWare user manual
5 Viewing the log file
To view the Sophos Anti-Virus log file, do as follows.
1. On the Main menu, click Administration and press Return.
2. The Administration menu is displayed. Select Log file and press Return.
3. In the Log file screen, select View and press Return.
The log file is displayed. The latest entries are at the end of the file.
To go directly to the end of the log file, press Ctrl+PgDn (or, on versions of
RCONSOLE that do not support this key combination, press Ctrl+x).
15
Page 16

Sophos Anti-Virus NetWare user manual
6 Disinfection
This section provides some general information about disinfection. It does
not explain how to disinfect a computer of specific viruses, as disinfection
methods are varied and can be virus-specific.
It is recommended that you get information about the virus (see below),
then either use the Sophos website for help with disinfection or contact
Sophos technical support.
This section describes how to disinfect infected items on a NetWare server.
For information on disinfecting client workstations, see the Sophos Anti-Virus
documentation for that platform.
6.1 Getting information about the virus
If Sophos Anti-Virus reports a virus, first isolate the infected computers from
the network and internet.
Write down the name of the virus, then, from an uninfected computer, look
up its virus analysis on the Sophos website. The virus analysis search page
is located at
www.sophos.com/virusinfo/analyses
The analysis tells you what types of files the virus infects, and provides
information about disinfection. It may also include a link to detailed
disinfection instructions.
If there are no instructions, or if the virus analysis tells you to seek advice,
contact Sophos technical support.
16
Page 17

Sophos Anti-Virus NetWare user manual
6.2 Disinfection
Sophos Anti-Virus can automatically disinfect documents containing
document viruses and can automatically disinfect some infected programs.
Disinfected programs may be unstable, and put valuable data at risk. We
recommend that disinfection of programs is used only as a temporary
measure, and that you subsequently replace disinfected programs from
original installation disks, a clean computer or sound backups.
To attempt disinfection of documents or programs with an immediate scan,
do as follows.
1. On the Main menu, select Immediate mode and press Return.
2. In the Immediate mode screen, select Configuration and press Return.
3. To attempt disinfection of documents, in the Immediate mode
configuration screen, select Document viruses and press Return.
To attempt disinfection of programs, in the Immediate mode configuration
screen, select Program viruses and press Return.
17
Page 18

Sophos Anti-Virus NetWare user manual
4. To attempt disinfection of documents, in the Document viruses screen,
select Disinfect and press Return.
To attempt disinfection of programs, in the Program viruses screen, select
Disinfect and press Return.
5. Exit from the configuration screen. In the Immediate mode screen, select
Start and press Return.
6. In the Sophos Anti-Virus screen, watch the results of the scan in the Server
window. If the number of viruses reported in the on-screen log decreases,
continue running scans until no viruses are found.
If disinfection fails, you should carry out a manual disinfection, specific to
that virus. This is described on the Sophos website, either in its virus
analysis, or on the web page that describes how to disinfect that type of
virus.
18
Page 19

6.3 Recovering from virus side-effects
How you recover from a virus infection depends on how the virus affected
the infected computer. Some viruses have no side-effects, whereas others
corrupt or delete data.
Some viruses gradually make minor changes to data. This type of corruption
can be very hard to detect. It is therefore very important that you read the
virus analysis on the Sophos website, and check documents carefully after
disinfection.
Sound backups are crucial. If you did not have them before you were
infected, ensure you create or obtain them in case of future infections.
Sometimes you can recover data from disks damaged by viruses. Sophos
can supply utilities for repairing the damage caused by some viruses.
Contact Sophos technical support for help.
Sophos Anti-Virus NetWare user manual
19
Page 20

Sophos Anti-Virus NetWare user manual
20
Page 21

Configuration
Configuring immediate or scheduled scanning
Configuring InterCheck (central reporting)
Configuring real-time scanning
Purging checksums (for real-time scanning)
Restoring or saving configuration settings
Command line options
Page 22

Sophos Anti-Virus NetWare user manual
7 Configuring immediate or scheduled scanning
Immediate mode scans the server now. Scheduled mode scans the server at
set times you specify.
You configure immediate and scheduled scanning separately.
1. On the Main menu, select Immediate mode or Scheduled mode and press
Return.
2. In the next screen, select Configuration and press Return.
3. The configuration screen is displayed.
22
You can specify
! which types of files are scanned (Files)
! which volumes are scanned (Volumes)
! whether DOS and Mac files are scanned (File types)
! how files are scanned (Scanning options)
Page 23

Sophos Anti-Virus NetWare user manual
! whether Sophos Anti-Virus is run once or as a background process
(Repeat mode)
! whether to disinfect infected documents (Document viruses)
! whether to disinfect infected programs (Program viruses)
! how to remove infected files (Removal mode)
! specify what is included in the report file (Report mode)
! where to create the report file
! which users to notify of viruses (Notify group)
! when to notify users of viruses (Notify timing).
For details of all the options, see the following sections.
23
Page 24

Sophos Anti-Virus NetWare user manual
7.1 Files
This option specifies the files or file types that will be scanned.
All executables
By default, Sophos Anti-Virus checks all the file types listed in the
‘Executables’ list.
To view or modify the executables list, go to the Administration menu, select
Executables and then View/Modify.
All files
If this option is selected, Sophos Anti-Virus scans all files regardless of their
extension.
Specify files
If this option is selected, Sophos Anti-Virus scans a set of files specified by
you. A list of the files currently selected is displayed.
To remove files from the list, select them and press ‘Delete’.
To add files to the list, press ‘Insert’ and enter the filename(s).
24
When adding new files, an entry such as USERS\*.DOC instructs Sophos
Anti-Virus to scan all .DOC files in the given directory. To scan in the given
directory, and all subdirectories below it, use the recursion operator at the
start of the entry, e.g. >USERS\*.DOC. Conventional wildcard characters
are supported.
Page 25

7.2 Volumes
This option specifies the volumes to be scanned.
By default a list of the local or shared volumes is displayed. Volumes that
are not mounted are marked by a * after the volume name. Press ‘Delete’ to
remove volumes and ‘Insert’ to add new volumes.
Sophos Anti-Virus NetWare user manual
Only mounted volumes in the list are scanned.
7.3 File types
This option specifies scanning for DOS or Macintosh files on the server.
You can configure Sophos Anti-Virus to examine
! DOS files (including Windows files) for DOS viruses.
! Macintosh files for Macintosh and document viruses.
! Both DOS and Macintosh files. This is the default setting.
25
Page 26

Sophos Anti-Virus NetWare user manual
7.4 Scanning options
This set of options specifies the level and priority of scanning.
The options are as follows.
7.4.1 Scanning level
Quick scanning checks only the parts of a file that are likely to contain a virus.
Quick scanning is sufficient for normal operation and is the default setting.
Full scanning examines every part of a file. The Full level is more secure, but
is slower than Quick scanning.
7.4.2 Priority
Low priority minimises impact on network performance. Use it when the
server is likely to be busy.
26
Normal priority maximises scanning speed. This is the default setting.
Page 27

Sophos Anti-Virus NetWare user manual
7.4.3 InterCheck checksums
This option is useful only if you run real-time scanning (see section 9).
When an immediate or scheduled scan checks a file and finds it to be
virus-free, it can add the file’s checksum to a list. This list is used by
real-time scanning, which checks the checksum of a file against this list, and
only scans it if the checksum is different (i.e. if the file has been modified).
Select Generate to create a checksum list. This is the default setting.
7.4.4 Compressed files
Sophos Anti-Virus can look for viruses inside files compressed with PKLite,
LZEXE and Diet. The default setting is Yes.
Sophos Anti-Virus can also be configured to scan inside archive files. For
more details, see the -ARCHIVE option in section 13.
7.4.5 Migrated files
You can configure Sophos Anti-Virus to avoid checking files that have been
migrated (i.e. moved to another server or to other media) with Cheyenne’s
Hierarchical Storage Management system.
If the Migrated files option is set to Yes, Sophos Anti-Virus checks a file to
see whether it is migrated or not. If the file is migrated, checking causes it to
be demigrated. This is the default setting.
If the option is set to No, Sophos Anti-Virus passes over migrated files, so
that running a virus check does not cause demigration. Sophos Anti-Virus
will not report viruses in these files.
27
Page 28

Sophos Anti-Virus NetWare user manual
7.5 Repeat mode
This option specifies whether Sophos Anti-Virus is run once or continuously.
It is available for immediate scanning only.
Single run
Select this if you want Sophos Anti-Virus to run once.
Continuous
Select this if you want Sophos Anti-Virus to run an immediate scan
continuously. If the server will sometimes be busy, you can run this scan at
low priority (see section 7.4.2).
7.6 Times
This option specifies the times when a scheduled job is run. It is available
for scheduled scanning only.
28
To add a time, press ‘Insert’ and type a time. To remove a time, select it and
press ‘Delete’.
Page 29

7.7 Days
This option specifies the day(s) when a scheduled job is run.
Sophos Anti-Virus NetWare user manual
To remove a day, select it and press ‘Delete’. To add a day, press ‘Insert’,
select a day from the menu and press Return.
7.8 Document viruses
This option specifies disinfection of files containing document viruses.
By default, Sophos Anti-Virus does not disinfect files containing document
viruses.
Select Disinfect if you want Sophos Anti-Virus to attempt to disinfect
documents automatically. If disinfection fails, the chosen removal mode (see
section 7.10) is applied.
Occasionally a document can be infected with more than one document
virus. In that case, you must scan it (with disinfection enabled) more than
once, until you have eliminated all the document viruses.
29
Page 30

Sophos Anti-Virus NetWare user manual
7.9 Program viruses
This option specifies disinfection of files containing program viruses.
By default, Sophos Anti-Virus does not disinfect files containing program
viruses.
Select Disinfect if you want Sophos Anti-Virus to attempt to disinfect
programs automatically. If disinfection fails, the chosen removal mode (see
section 7.10) is applied.
Occasionally a program can be infected with more than one program virus.
In that case, you must scan it (with disinfection enabled) more than once,
until you have eliminated all the program viruses.
7.10 Removal mode
This option specifies the action that Sophos Anti-Virus takes when a virus is
found.
30
No action
Sophos Anti-Virus takes no action. This is the default setting.
Page 31

Sophos Anti-Virus NetWare user manual
Rename infected files
The last character of the file extension is changed to a digit.
For example INFECTED.COM will be renamed to INFECTED.CO0, or if
INFECTED.CO0 already exists, INFECTED.COM will be renamed to
INFECTED.CO1 and so on. If more than 10 files with such extensions exist,
an error will be reported.
Note that renaming a COM or EXE file to CO0 or EX0 will prevent it from
being directly executed by the user.
Move infected files
The infected files are moved to the isolation directory and renamed to have
extension 000, 001 etc.
It is important to set the access rights to this directory so that only
authorised users are allowed to examine its contents (see Novell
documentation for details on using utilities to set directory rights). This
ensures that it acts as a ‘quarantine area’ from which users cannot recover
data or run infected files.
Delete infected files
This deletes infected files. Deleted files can be recovered easily under NetWare.
Purge infected files
This purges infected files. Once a file is purged it cannot be recovered.
31
Page 32

Sophos Anti-Virus NetWare user manual
7.11 Report mode
This option specifies what is included in the report file.
Suppress filenames
Select this if you want only infected items and errors to be recorded. This is
the default setting.
List filenames
Select this if you want Sophos Anti-Virus to record in the report file the
name of every item examined.
This option typically produces large report files because the name of every
file checked is entered. This option is useful for periodic audit purposes.
7.12 Report file
This option specifies a report filename.
By default, the report file for immediate scans is SWEEP.REP in the server
SWEEP directory, and the file for scheduled scans is given the name of the
job, with a .REP extension.
32
To specify a different report filename, enter the required filename.
Page 33

7.13 Notify group
This option specifies groups of users who receive virus reports.
If you are using a version of NetWare that does not support eDirectory,
contact Sophos technical support.
Selecting Notify group displays any currently selected groups.
Sophos Anti-Virus NetWare user manual
To add a group, press ‘Insert’, which displays the eDirectory browser.
Browse the tree and select a group.
To remove a group, highlight its entry in the Active groups screen and press
‘Delete’.
Sophos Anti-Virus attempts to deliver a virus message via connections on
the local server. If it cannot do so, it attempts to send the message (along
with any stored messages) via the user’s connections on their default server.
If the message cannot be delivered via connections on either server, Sophos
Anti-Virus will store the message and deliver it when the user next acquires
a licensed connection on the local server.
To make use of this service, a user should set their default server field using
NWADMIN/NETADMIN and ensure that they have a licensed connection on
this server. They will then be notified of viruses found by Sophos Anti-Virus
for NetWare running on any server in the eDirectory tree, provided that an
appropriate Notify group has been selected on each of these servers.
33
Page 34

Sophos Anti-Virus NetWare user manual
7.14 Notification timing
This option specifies when users are notified of a virus discovery.
End of SWEEP
Select this if you want users to be notified of a virus discovery at the end of
the scan. This is the default setting.
1st infected file
Select this if you want users to be notified on discovery of the first infected
file.
Every infected file
Select this if you want users to be notified on discovery of every infected
file.
34
Page 35

Sophos Anti-Virus NetWare user manual
8 Configuring InterCheck (central reporting)
InterCheck mode enables the NetWare server to receive virus reports from
client workstations that are running InterCheck on-access scanning.
You can configure InterCheck central reporting as follows.
1. On the Main menu, select InterCheck and press Return.
2. The InterCheck configuration screen is displayed.
You can specify
! whether InterCheck central reporting is enabled (Status)
! which groups of users are notified of virus finds (Notify group).
Scanning options and Removal mode refer to on-access scanning over the
network, which is no longer used in Sophos Anti-Virus.
8.1 Status
This option enables or disables central virus reporting.
By default, central reporting is Inactive. Select Active to start it.
35
Page 36

Sophos Anti-Virus NetWare user manual
8.2 Notify group
This option specifies which groups of users are notified of virus finds.
To add a group, press ‘Insert’ to display the eDirectory browser, and select a
group. To remove a group, select the group in the list and press ‘Delete’. See
section 7.13 for details.
36
Page 37

Sophos Anti-Virus NetWare user manual
9 Configuring real-time scanning
Real-time mode scans files on the server when they are accessed.
You should use Real-time scanning only if you have client workstations that
cannot run InterCheck on-access scanning.
You can configure real-time scanning as follows.
1. On the Main menu, select Real-time mode and press Return.
2. The Real-time configuration screen is displayed.
You can specify
! whether Real-time scanning is enabled (Status)
! how each volume is scanned (Volumes)
! which client workstations activate real-time scanning when they access
files on the server (Workstations)
! which processes on the server activate real-time scanning (Server
processes)
! how files are scanned (Scanning options)
! whether to disinfect infected documents (Document viruses)
! whether to disinfect infected programs (Program viruses)
! how to remove infected files (Removal mode)
! which users to notify of viruses (Notify group).
37
Page 38

Sophos Anti-Virus NetWare user manual
For details of all the options, see the following sections.
9.1 Status
This option enables or disables real-time scanning.
By default, real-time scanning is Inactive. Select Active to start real-time
scanning.
You can exclude particular volumes from real-time scanning. See the
Volumes option below.
9.2 Volumes
This option specifies how real-time scanning is applied to each volume.
38
Read only
If this is selected, every time a file on the volume is read from, that file is
scanned. This is the default setting.
Page 39

Sophos Anti-Virus NetWare user manual
Write only
If this is selected, every time a file on the volume is written to, that file is
scanned.
Read and write
If this is selected, every time a file on the volume is read from or written to,
that file is scanned.
None
If this is selected, real-time scanning is not used for that volume.
Other volumes
This refers to volumes that don't usually appear in the list (e.g. virtual
volumes created by backup software).
Only mounted volumes in the list are scanned.
You can delete from the list volumes that are not currently mounted and that
are not represented by a Volume object in the eDirectory tree. To do this,
select the volume and press ‘Delete’.
9.3 Workstations
This option enables you to specify which client workstations will activate
real-time scanning when they access files on the server.
All
Select this if you want all workstations to activate real-time scanning. This
is the default setting.
39
Page 40

Sophos Anti-Virus NetWare user manual
Specify
Select this to restrict real-time scanning to any workstations, e.g. DOS
clients, which are not protected by InterCheck on-access scanning.
9.4 Server processes
This option specifies whether processes running on the server activate
real-time scanning or not.
Monitor file access
This activates real-time scanning for all file accesses, whether originating
from other processes on the server itself (e.g. by another NLM), or from
file operations from outside the server. This is the default setting.
Do not monitor file access
This activates real-time scanning only for file accesses originating from
outside the server. This might be useful if, for example, a backup NLM is
run on the server.
9.5 Scanning options
This set of options specifies the level and priority of scanning.
40
Page 41

Sophos Anti-Virus NetWare user manual
The options are as follows.
9.5.1 Scanning level
Quick scanning checks only the parts of a file that are likely to contain a
virus. Quick scanning is sufficient for normal operation and is the default
setting.
Full scanning examines every part of a file. The Full level is more secure, but
is slower than Quick scanning.
9.5.2 InterCheck checksums
When Sophos Anti-Virus scans a file on the server and finds it to be
virus-free, it can add its checksum to a central list. This list is used by
real-time scanning, which checks the checksum of a file against this list,
and only scans that file if its checksum is found to differ from the checksum
on the list.
Select Generate to create a checksum list. This is the default setting.
9.5.3 Compressed files
Sophos Anti-Virus is capable of looking for viruses inside files compressed
with PKLite, LZEXE and Diet.
Sophos Anti-Virus can also be configured to scan inside archive files. For
more details, see the -ARCHIVEOA option in section 13.
41
Page 42

Sophos Anti-Virus NetWare user manual
9.6 Document viruses
This option specifies disinfection of files containing document viruses.
By default, Sophos Anti-Virus does not disinfect files containing document
viruses.
Select Disinfect if you want Sophos Anti-Virus to attempt to disinfect
documents automatically. If disinfection fails, the chosen removal mode
(see section 9.8) is applied.
9.7 Program viruses
This option specifies disinfection of files containing program viruses.
By default, Sophos Anti-Virus does not disinfect files containing program
viruses.
42
Select Disinfect if you want Sophos Anti-Virus to attempt to disinfect
programs automatically. If disinfection fails, the chosen removal mode (see
section 9.8) is applied.
Page 43

9.8 Removal mode
This option specifies how Sophos Anti-Virus deals with infected files.
No action
Sophos Anti-Virus NetWare user manual
Sophos Anti-Virus takes no action. This is the default setting.
Move infected files
The infected files are moved to the isolation directory and renamed to have
extension 000, 001 etc.
It is important to set the access rights to this directory so that only
authorised users are allowed to examine its contents (see Novell
documentation for details on using utilities to set directory rights). This
ensures that it acts as a ‘quarantine area’ from which users cannot recover
data or run infected files.
Purge infected files
This purges infected files. Once a file is purged it cannot be recovered.
43
Page 44

Sophos Anti-Virus NetWare user manual
9.9 Notify group
This option specifies which groups of users are notified of virus finds.
To add a group, press ‘Insert’ to display the eDirectory browser, and select
a group. To remove a group, select the group in the list and press ‘Delete’.
See section 7.13 for details.
44
Page 45

Sophos Anti-Virus NetWare user manual
10 Purging checksums (for real-time scanning)
Central checksums are used only by real-time scanning.
When Sophos Anti-Virus scans a file and finds it to be virus-free, it can add
its checksum to a list (see section 9.5.2). Real-time scanning checks the
checksum of a file against this list, and only scans the file if the checksum
differs.
The list needs to be purged every time Sophos Anti-Virus is updated so that
it always lists items authorised with the most recent version.
By default, the checksum list is purged when Sophos Anti-Virus is loaded,
even if Sophos Anti-Virus has not been updated.
1. On the Main menu, select Central checksums and press Return.
2. The Central checksums screen is displayed.
Purge checksums
This purges the checksum file immediately. You are prompted for confirmation.
Automatic purging
If you select this, Sophos Anti-Virus purges the checksum file automatically.
You are prompted to specify when purging occurs.
Purge on virus detection enables the file to be purged every time a virus is
detected. The default setting is No.
45
Page 46

Sophos Anti-Virus NetWare user manual
11 Setting administration options
This section describes how to set administration options and how to view
the virus library and the log file.
1. On the Main menu, click Administration and press Return.
2. The Administration menu is displayed.
You can
! reset on-screen counters, e.g. for files scanned, viruses etc (Zero
counters)
! view the virus library (Virus library)
! view the currently loaded virus identity files (Virus identity files)
! specify the file types to be treated as executables (Executables)
! exclude files from scanning (Exclusions)
! administer the log file (Log file)
! specify auto-updating (Auto-updating).
11.1 Zero counters
This option zeroes the on-screen counters (such as the number of files
checked and viruses detected).
46
Page 47

11.2 Virus library
This option displays a list of the viruses that Sophos Anti-Virus can detect.
After you have added new virus identities to the server, you can open the
virus library view to check that the number of viruses detected has
increased. This confirms that Sophos Anti-Virus is using the new identities.
Sophos Anti-Virus NetWare user manual
11.3 Virus identity files
This option displays a list of the virus identity files that are currently
loaded.
47
Page 48

Sophos Anti-Virus NetWare user manual
11.4 Executables
This option enables you to modify the list of file types that Sophos
Anti-Virus treats as executable files.
View/modify
This displays a list of file extensions to be treated as executables. Press
‘Insert’ to insert a new entry and ‘Delete’ to delete a highlighted entry.
This list is used for immediate and scheduled scanning if the Files
configuration option is set to All Executables (see section 7.1) .
The list is also used by real-time scanning.
Set default
This option replaces the existing list of file extensions, as shown by the
View/modify option, with the default list.
If you use the default list, it is automatically updated with new extensions
when Sophos Anti-Virus is updated, if necessary. If you do not use the
default list, you must apply any such updates to the list manually, by
inserting or deleting entries.
11.5 Exclusions
This option specifies files and subdirectories to be excluded from
virus-checking.
Press ‘Insert’ to insert a new entry and ‘Delete’ to delete an entry from the
list.
48
Files may be specified by the full path (volume, directory and full
filename), relative path or filename only. If filename only is used, files of
that name will be excluded regardless of the directory they appear in. The
wildcards ? and * can be used. For example
???.pdf
excludes all files with a three-character name and a .pdf extension.
Page 49

Sophos Anti-Virus NetWare user manual
SYS:/MIKE/NEW
excludes a file with this path or all files in this directory.
MIKE/NEW
excludes all files whose path ends with MIKE/NEW.
SYS:/MIKE/B??A
excludes all files that match B??A in the SYS:/MIKE directory.
SYS:/MIKE/B??A/*.*
excludes all files in all directories that match SYS:/MIKE/B??A.
When you use the recursion operator >, the last part of the path is always
considered to be a filename, not a directory. For example
>SYS:/MIKE/INFO
excludes all files that match INFO in the SYS:/MIKE directory and all its
subdirectories.
Exclusions apply to all forms of scanning (immediate, scheduled and
real-time).
49
Page 50

Sophos Anti-Virus NetWare user manual
11.6 Log file
This option enables you to view and administer the log file.
View
This displays the log file. The latest entries are at the end of the file.
To go directly to the end of the log file, press Ctrl+PgDn (or, on versions of
RCONSOLE that do not support this key combination, press Ctrl+x).
50
Clear
This purges the log file.
Maximum size
This option specifies the maximum size of the log file. Enter a figure (in
KB). When the log file exceeds this size, the oldest entries in the file are
discarded.
Page 51

11.7 Auto-updating
This option enables you to configure Sophos Anti-Virus to check for an
updated version of the Sophos Anti-Virus for NetWare files on the server,
and to perform an update automatically.
Status
By default, auto-updating is Active. To disable automatic updating, select
Inactive.
Sophos Anti-Virus NetWare user manual
Directory
This configures the path in which Sophos Anti-Virus will check for an update
of the Sophos Anti-Virus for NetWare files. By default, this is set to
SYS:SWEEP\NLMINST, but any path on any volume can be specified.
The auto-updating directory must be a directory other than the one from
which Sophos Anti-Virus was loaded (typically SYS:SWEEP).
The auto-updating directory can only be set to a directory on the local
server.
Timing
This option determines when Sophos Anti-Virus will check for the presence
of an update.
If set to ‘On arrival’, Sophos Anti-Virus will check for an update every five
minutes and initiate the updating process as soon as an update is detected.
If set to ‘Specified’, Sophos Anti-Virus will check for an update and initiate
updating only at the specified time.
Sophos recommends that you select Specified and specify a time when
Sophos Anti-Virus will not be performing an immediate or scheduled job. If
a scanning job is in progress when updating is initiated, the job will be
terminated early.
51
Page 52

Sophos Anti-Virus NetWare user manual
12 Restoring or saving configuration settings
The Configuration file option enables you to restore previous configuration
settings for Sophos Anti-Virus, or save changes you have made in the
settings, at any time.
1. On the Main menu, select Configuration file and press Return.
2. The Configuration file screen is displayed.
Read configuration
Select this option if you want Sophos Anti-Virus to read and use the
settings already in the configuration file.
Sophos Anti-Virus does this by default whenever it is loaded.
When you update Sophos Anti-Virus for NetWare, you can restore the
previous configuration settings by using this option.
Save configuration
Select this option to save any changes you have made to the configuration
settings.
If you make changes to the configuration, you are prompted to save them
when you unload Sophos Anti-Virus.
52
Page 53

13 Command line options
The command line options listed in this section enable you to configure
scanning and alerts. They are case-insensitive.
-ARCHIVE Scan archive files (immediate and scheduled scans only)
If Sophos Anti-Virus is loaded with this option, it scans inside archive files
when it performs immediate or scheduled scans. The archive types that can
be scanned are listed in the release notes.
Alternatively, you can specify scanning of particular types of archive, e.g. to
scan TAR archives, enter
LOAD SWEEP -TAR
Precede the option with an N to exclude an archive type from checking, e.g.
Sophos Anti-Virus NetWare user manual
LOAD SWEEP -ARCHIVE -NTAR
would scan all archive types except TAR.
Note that when -ARCHIVE is used in combination with individual options,
later options override earlier ones.
-ARCHIVEOA Scan archive files (real-time scans only)
If Sophos Anti-Virus is loaded with this option, it scans inside archive files
when it performs real-time scans. The archive types that can be scanned
are listed in the release notes.
You can’t specify scanning of particular types of archive for real-time
scans.
-BW Black and white display
If using a black and white or monochrome display, you can achieve better
contrast if Sophos Anti-Virus is started with this option.
-I Start immediate scan
If Sophos Anti-Virus is loaded with this option, it starts an immediate scan.
Sophos Anti-Virus can load and start from the AUTOEXEC.NCF file, if the
administrator wants it to do so.
-IDEDIR Use alternative directory for virus identity files (IDEs)
This option enables you to specify an alternative directory for individual
IDEs. For example
53
Page 54

Sophos Anti-Virus NetWare user manual
LOAD SWEEP -IDEDIR=SYS:/SAVIDES
directs Sophos Anti-Virus to read IDEs from the SAVIDES directory instead
of the default directory (SYS:/SWEEP or the directory specified with -WD).
-PRESERVELAD Don’t restore “last accessed” date of files scanned
If you load Sophos Anti-Virus with the option -PRESERVELAD=NO,
Sophos Anti-Virus doesn't restore the “last accessed” date of files after it
has scanned them. This is to avoid problems with certain backup software
that would otherwise back up every file that has been scanned, regardless
of whether it had changed.
-SSNA Scan files that Sophos Anti-Virus incorrectly identifies as “zip bombs”
By default, Sophos Anti-Virus stops scanning “zip bombs” when detected.
“Zip bombs” are malicious files that are designed to disrupt the action of
anti-virus scanners. These files usually take the form of innocent looking
archive files that, when unpacked in order to be scanned, require enormous
amounts of time, disk space, or memory.
When a “zip bomb” is detected, Sophos Anti-Virus displays a message such as
Aborted scanning C:\TEMP\BOMB.ZIP - appears to be a 'zip bomb'.
Occasionally, Sophos Anti-Virus incorrectly identifies files that have
complex and/or multiple levels of archiving as “zip bombs”, and stops
scanning them. To scan such files, reload Sophos Anti-Virus using the
option -SSNA, for example
LOAD SWEEP -SSNA
and then rescan them.
Use this option only if absolutely necessary. If a genuine “zip bomb” is
accessed with this option, Sophos Anti-Virus continues to scan it.
-WD Use non-standard directory
By default, Sophos Anti-Virus creates and uses the directory SYS:SWEEP
for all file-based operations. By using
LOAD SWEEP -WD=<directory>
it can be made to use the directory <directory>.
54
If this option is used, InterCheck on any client workstations that report to
the NetWare server must be set up to use the same directory.
Page 55

Troubleshooting
Page 56

Sophos Anti-Virus NetWare user manual
14 Troubleshooting
This section provides answers to some common problems that you may
encounter when using Sophos Anti-Virus for NetWare.
If your problem is not described in this section, refer to the Sophos website
www.sophos.com which includes a support knowledgebase, virus analyses,
the latest IDEs, product downloads and technical articles.
If your problem is not described on the website, contact Sophos technical
support.
14.1 Sophos Anti-Virus slows the server down
If you run Sophos Anti-Virus in Normal priority mode, it may noticeably slow
down the server.
If your server slows down, make sure priority is set to Low. Check the
Priority option in Immediate mode configuration and in the Scheduled job
configuration menu for each scheduled job.
14.2 Sophos Anti-Virus uses a high proportion of processing time
To see the percentage of processing time being used on the file server, use
the Novell program MONITOR.NLM.
56
When the network is idle, the usage may be 1% or 2%. When you run an
immediate scan with Sophos Anti-Virus, or while a scheduled scan is
running, usage may jump to over 70%.
However, Sophos Anti-Virus utilises any processing time during which the
server would otherwise be idle. If other requests for resources are made,
Sophos Anti-Virus gives up those resources to the requesting process.
Sophos Anti-Virus should not impact on server performance.
Page 57

14.3 Scheduled scans do not run
For scheduling to work, Sophos Anti-Virus for NetWare must remain loaded.
The user must not unload the software either via the menu system, or by
using the UNLOAD command.
In NetWare, several processes can run at the same time. You can switch
between screens by pressing ‘Alt’ + ‘Esc’.
14.4 Scanning runs slowly
Full scan
By default, Sophos Anti-Virus performs a quick scan, which scans only the
parts of files likely to contain viruses. However, if scanning is set to full, it
scans everything, and takes significantly longer to carry out a scan. See
section 7.4.1.
Sophos Anti-Virus NetWare user manual
Full scanning is needed in order to detect some viruses, but should only
be enabled on a case-by-case basis (e.g. on advice from Sophos technical
support).
Checking all files
By default, Sophos Anti-Virus checks only files defined as executables. If it is
configured to check all files the process takes longer. If you would like to
scan other specific extensions, as well as executable files, add those
extensions to the list of extensions Sophos Anti-Virus defines as executables.
For more information see section 7.1.
14.5 Virus fragment reported
If a virus fragment is reported, contact Sophos technical support for advice.
The report of a virus fragment indicates that part of a file matches part of a
virus. There are three possible causes:
Variant of a known virus
Many new viruses are based on existing ones, so that code fragments typical
of a known virus may appear in files infected with a new one. If a virus
fragment is reported, it is possible that Sophos Anti-Virus has detected a
new virus, which could become active.
Corrupted virus
Many viruses contain bugs in their replication routines that cause them to
infect target files incorrectly. An inactive portion of the virus (possibly a
57
Page 58

Sophos Anti-Virus NetWare user manual
substantial part) may appear within the host file, and this is detected by
Sophos Anti-Virus. A corrupted virus cannot spread.
Database containing a virus
When running a full scan, Sophos Anti-Virus may report that there is a virus
fragment in a database file.
58
Page 59

Glossary and index
Page 60

Sophos Anti-Virus NetWare user manual
Glossary
Checksum A value calculated from item(s) of data. InterCheck
creates a list of checksums of the files on each client.
If the checksum of a file is found to have changed, it
is sent for scanning as it may have been infected
with a virus.
CID Central installation directory; a central copy of
Sophos Anti-Virus files from which Sophos Anti-Virus
is installed and updated automatically on the server
and workstations. You must create a different CID for
each platform on the network, and remember to keep
every CID up to date.
Document virus A type of virus that uses macros in a data file to
become active in memory and attach itself to other
data files. Unlike other types of virus, document
viruses can attain a degree of platform
independence.
Executables By default Sophos Anti-Virus will check only files it
defines as executables (even when full scanning is
enabled). It is possible to configure Sophos
Anti-Virus to check all files or to change the list of
files defined as executables. See section 7.1.
Full scan If configured to perform full scanning, Sophos
Anti-Virus scans all files and all parts of files in the
area it has been configured to scan. A full scan takes
significantly longer than a quick scan. It is
occasionally necessary in order to locate certain
viruses. See section 7.4.1.
IDE Virus identity file; enables Sophos Anti-Virus to
detect a specific virus. You need IDEs to protect your
computer against new viruses discovered since your
version of Sophos Anti-Virus was compiled.
Immediate scan A virus scan that is triggered by the user from the
Sophos Anti-Virus screen. It is possible to configure
what is scanned, how it is scanned and what action
should be taken if a virus is found.
60
Page 61

Sophos Anti-Virus NetWare user manual
InterCheck In Sophos Anti-Virus for NetWare, InterCheck is the
component of Sophos Anti-Virus that enables it to
receive virus reports from clients. On Windows or
Macintosh clients, InterCheck is the component of
Sophos Anti-Virus that intercepts files as they are
accessed, and uses checksumming to determine
whether or not they should be sent for virus
scanning.
NLM NetWare Loadable Module; a program which runs as
a process on a Novell NetWare file server.
Quick scan The default scan type. Sophos Anti-Virus scans only
the parts of files that can potentially contain
executable code. See section 7.4.1.
Real-time scanning In Sophos Anti-Virus for NetWare, real-time scanning
is the component of Sophos Anti-Virus that checks
files for viruses as they are accessed by clients. It is
not necessary to enable real-time scanning on the
NetWare server if clients are running InterCheck
locally.
Scheduled scan A virus scan that is scheduled by the user to take
place at a particular time. As with immediate
scanning, it is possible to configure what is scanned,
how it is scanned and what action should be taken if
a virus is found.
Virus A computer program that can spread across
computers and networks by attaching itself to a
program (such as a macro or boot sector) and
making copies of itself.
61
Page 62

Sophos Anti-Virus NetWare user manual
Index
A
administration options 46–51
archive files 53
automatic updating 51
C
central virus reporting
configuring 35–36
checksum files
central 27, 41, 45
command line options 53
compressed files
real-time scanning 41
scanning 27
configuration
restoring 52
saving 52
D
disinfection 16–19, 29, 30
E
excluding files from checking 48
executables list 47
infected file
deleting 31
moving 31, 43
purging 31, 43
renaming 31
infected programs
dealing with 30, 42
InterCheck 7
InterCheck server
configuring 35
L
loading Sophos Anti-Virus 6
log file
clearing 50
maximum size 50
viewing 50
M
Macintosh virus 25
menus
main 7
using 8
migrated files
scanning 27
F
files defined as executables 47
files scanned 24
full scanning 26, 41
I
IDEs
specifying location 54
immediate scanning
compressed files 27
configuring 22–34
disinfection 29, 30
migrated files 27
notification timing 34
notify group 33
priority 26
removal mode 30
report file 32
report mode 32
scanning level 26
specifying file types 25–54
specifying files 24
specifying volumes 25
infected documents
dealing with 29, 42
N
notification 33
timing 34
Q
quick scanning 26, 41
R
real-time scanning 7
compressed files 41
configuring 37–44
enabling 38
scanning level 41
server processes 40
volumes 38
recursion operator 24
repeat mode 28
reporting 32
62
Page 63

S
scanning the server 9
scheduled scanning 11–14
compressed files 27
configuring 22–34
days 29
disinfection 29, 30
migrated files 27
notification timing 34
notify group 33
priority 26
removal mode 30
report file 32
report mode 32
scanning level 26
specifying file types 25–54
specifying files 24
specifying volumes 25–54
times 28
troubleshooting 57
Sophos Anti-Virus
InterCheck 7
main menu 7
real-time scanning 7
screen 7
SWEEP.REP 32
SYSCON 31
Sophos Anti-Virus NetWare user manual
T
troubleshooting 56–58
U
unloading Sophos Anti-Virus 6
updating
auto-updating 51–54
V
virus
fragment 57
information 16
library 47
Macintosh 25
recovery from 19
side-effects 19
volumes 25
volumes scanned 25, 38
Z
zero counters 46
zip bomb 54
63
Page 64

Sophos Anti-Virus NetWare user manual
Technical support
For technical support, visit
www.sophos.com/support
If you contact technical support, provide as much information as possible,
including Sophos software version number(s), operating system(s) and patch
level(s), and the exact text of any error messages.
64
Copyright 2002–2007 Sophos Group. All rights reserved. No part of this
publication may be reproduced, stored in a retrieval system, or transmitted, in
any form or by any means, electronic, mechanical, photocopying, recording or
otherwise unless you are either a valid licensee where the documentation can be
reproduced in accordance with the licence terms or you otherwise have the prior
permission in writing of the copyright owner.
Sophos and Sophos Anti-Virus are registered trademarks of Sophos Plc and
Sophos Group. All other product and company names mentioned are trademarks
or registered trademarks of their respective owners.
 Loading...