

Page 1

Sophos Anti-Virus for Linux, version 6
user manual
Document date: August 2008
Page 2

User manual
About this manual
This user manual explains how to use Sophos Anti-Virus for Linux and how
to configure
virus/spyware scanning
virus/spyware alerts
cleanup
logging
updating.
The manual also provides help in resolving common problems.
If you want to install, upgrade, or uninstall Sophos Anti-Virus on networked
and single Linux computers, refer to the Sophos Anti-Virus for Linux, version
6 startup guide.
If you want to install Sophos Anti-Virus on a mixed Linux and Windows
network, or you want to centrally manage Sophos Anti-Virus using Sophos
Enterprise Console, refer to the Sophos Endpoint Security and Control
network startup guide.
If you want to upgrade Sophos Anti-Virus version 5 and you are using
EM Library, refer to the Sophos Endpoint Security and Control network
upgrade guide.
Sophos documentation is published at www.sophos.com/support/docs/ and
on the Sophos CDs.
2
Page 3

Contents
Conventions used in this manual 5
Using Sophos Anti-Virus
1 About Sophos Anti-Virus for Linux 8
2 Running on-access scanning 11
3 Running on-demand scans 14
4 What happens if viruses/spyware are found? 17
5 Cleaning up viruses/spyware 19
Sophos Anti-Virus for Linux, version 6
6 Viewing the logs 22
Configuring Sophos Anti-Virus
7 Overview of configuration 26
8 Configuring on-access scanning 32
9 Configuring on-demand scanning 40
10 Configuring alerts 50
11 Configuring the Sophos Anti-Virus log 58
12 Configuring the Sophos Anti-Virus GUI 59
Updating Sophos Anti-Virus
13 Updating Sophos Anti-Virus immediately 62
14 Kernel support 63
15 Configuring updating 64
Troubleshooting
16 Troubleshooting 70
3
Page 4

User manual
Glossary and index
Glossary 76
Index 80
Technical support 82
Copyright 83
4
Page 5

Conventions used in this manual
Where command-line input continues over more than one line, subsequent
lines are shown indented, for example
/opt/sophos-av/bin/savconfig remove ExcludeFilesLike
/home/fred/Report.txt
You should type what is printed without inserting a line break.
Sophos Anti-Virus for Linux, version 6
5
Page 6

User manual
6
Page 7

Using Sophos Anti-Virus
About Sophos Anti-Virus for Linux
Running on-access scanning
Running on-demand scans
What happens if viruses/spyware are found?
Cleaning up viruses/spyware
Viewing the logs
Page 8
User manual
1 About Sophos Anti-Virus for Linux
Sophos Anti-Virus for Linux enables you to protect your network from
viruses/spyware.
1.1 User interfaces
Sophos Anti-Virus has
a command line user interface
a graphical user interface (GUI).
The command line enables you to access all the Sophos Anti-Virus
functionality and to perform all configuration. The command line is the only
way to use and configure on-demand scanning and updating.
You must have root privileges to use all Sophos Anti-Virus commands
except savscan, which is used for on-demand scanning.
This manual assumes that you have installed Sophos Anti-Virus in the
default location. Therefore, the paths of the commands described are based
on this location.
The Sophos Anti-Virus GUI enables you to
check the status of on-access scanning
start and stop on-access scanning
configure archive scanning
configure what is excluded from scanning
configure alerts
view the Sophos Anti-Virus log
configure cleanup.
Although the GUI can be run by the root user (as well as other users), it
doesn’t run with root privileges. Therefore, it can’t access all files on the
computer.
To use the GUI, open a browser. In the address text box, type
http://localhost:8081
If you want to use a different http port in the address, configure the GUI as
explained in section 12.
8
Page 9

Sophos Anti-Virus for Linux, version 6
The browser displays the home page of the GUI.
When you browse to another page, the browser asks you for credentials so
that you can use the GUI to configure Sophos Anti-Virus.
To find out your username, either ask your system administrator or, at the
command line, type
/opt/sophos-av/bin/savconfig query HttpUsername
To find out your password, ask your system administrator.
To change your credentials, refer to section 12.
9
Page 10

User manual
1.2 Scanning modes
Sophos Anti-Virus has two modes of scanning:
on-access
on-demand.
On-access scanning intercepts files as they are accessed, and grants access
to only those that do not pose a threat to your network.
An on-demand scan is a virus/spyware scan of the computer, or parts of
the computer, that you can run immediately or schedule to run at another
time.
1.3 Integration with management console
Sophos Anti-Virus is integrated with Sophos Enterprise Console, which runs
on Windows and enables network administrators to centrally manage
Sophos Anti-Virus on endpoints.
10
Page 11

2 Running on-access scanning
On-access scanning intercepts files as they are accessed, and grants access
to only those that do not pose a threat to your network.
This section tells you how to use on-access scanning. To configure it, refer
to section 8.
2.1 Checking on-access scanning is active
Command line
Type
/opt/sophos-av/bin/savdstatus
Sophos Anti-Virus displays the status of on-access scanning.
Sophos Anti-Virus for Linux, version 6
GUI
On each page, in the Status panel, the status of on-access scanning is
displayed.
2.2 Checking on-access scanning will be started automatically on
system boot
Command line
Assuming that you have root privileges, type
chkconfig --list
This command might not work on TurboLinux.
11
Page 12

User manual
If the list contains an entry for sav-protect with 2:on, 3:on, 4:on and 5:on,
on-access scanning will be started automatically on system boot.
Otherwise, to start on-access scanning automatically on system boot, type
/opt/sophos-av/bin/savdctl enableOnBoot savd
GUI
On the Control page, in the Startup panel, see if the check box labeled
Start on-access scanning on system boot is selected. If it is not, select it to
start on-access scanning automatically on system boot. Click Set to apply
the change.
2.3 Starting on-access scanning
Command line
Type
/opt/sophos-av/bin/savdctl enable
GUI
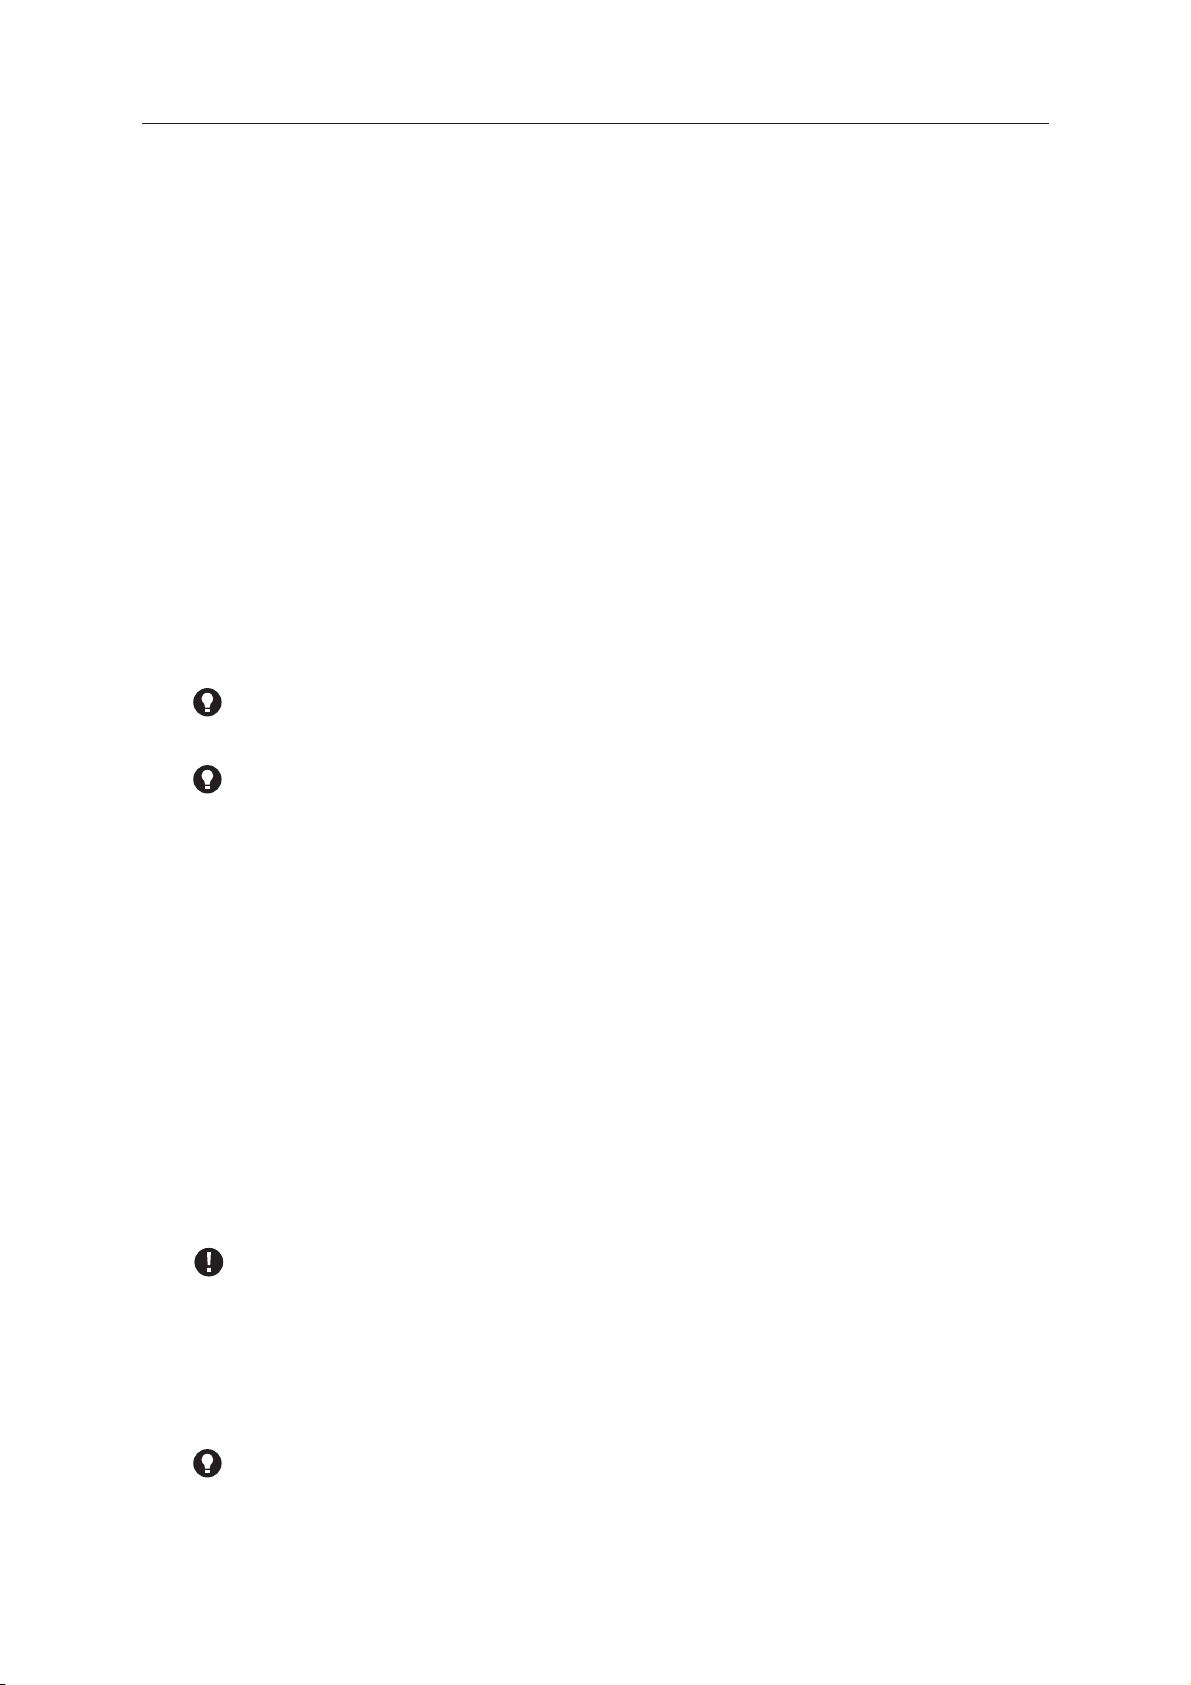
On the Control page, in the Control panel, click Enable On-access
Scanning.
12
Page 13
2.4 Stopping on-access scanning
Command line
Type
/opt/sophos-av/bin/savdctl disable
GUI
On the Control page, in the Control panel, click Disable On-access
Scanning.
Sophos Anti-Virus for Linux, version 6
13
Page 14

User manual
3 Running on-demand scans
An on-demand scan is a virus/spyware scan of the computer, or parts of
the computer, that you can run immediately or schedule to run at another
time.
By default, Sophos Anti-Virus scans
Windows/DOS executables
.sh and .pl files
files of a type that can be infected by macro viruses
HTML files
files compressed with PKLite, LZEXE and Diet
directories below the one specified
items pointed to by symbolic links.
For a full list of the file types scanned, type
savscan -vv
For information on changing these settings, see section 9.
3.1 Scanning the computer
To scan the computer, type
savscan /
3.2 Scanning a particular directory or file
To scan a particular directory or file, use the path of the item to be
scanned, for example
savscan /usr/mydirectory/myfile
3.3 Scanning a filesystem
To scan a filesystem, use the name of the filesystem, for example
savscan /home
More than one filesystem can be entered at the command line.
14
Page 15

3.4 Scanning a boot sector
You can scan boot sectors of logical and physical drives.
To scan boot sectors, log in as superuser (to get sufficient permission to
access the disk devices) and then use one of the commands shown below.
To scan the boot sectors of specified logical drives, type
savscan -bs=XXX, XXX, ...
where XXX is the name of a drive (for example /dev/fd0 or /dev/hda1).
To scan boot sectors for all logical drives that Sophos Anti-Virus recognises,
type
savscan -bs
To scan the master boot records for all the fixed physical drives on the
computer, type
Sophos Anti-Virus for Linux, version 6
savscan -mbr
3.5 Scheduling a scan
To scan the computer at set times automatically, use the crontab facility.
For more information, refer to Sophos support knowledgebase article
12176 (www.sophos.com/support/knowledgebase/article/12176.html).
3.6 Error codes
savscan returns error codes if there is an error or if viruses or spyware are
found.
0 If no errors are encountered and no viruses/spyware are found.
1 If the user interrupts the execution by pressing ‘Ctrl’+‘c’.
2 If some error preventing further execution of a scan is discovered.
3 If viruses/spyware or virus fragments are discovered.
15
Page 16

User manual
3.6.1 Extended error codes
A different set of error codes are returned if the savscan command is run
with the -eec option.
0 If no errors are encountered and no viruses/spyware are found.
8 If survivable errors have occurred.
16 If password-protected files have been found. (They are not scanned.)
20 If viruses/spyware have been found and disinfected.
24 If viruses/spyware have been found and not disinfected.
28 If viruses/spyware have been found in memory.
32 If there has been an integrity check failure.
36 If unsurvivable errors have occurred.
40 If execution has been interrupted.
16
Page 17

Sophos Anti-Virus for Linux, version 6
4 What happens if viruses/spyware are found?
4.1 If viruses/spyware are found during on-access scanning
If Sophos Anti-Virus finds a virus or item of spyware during an on-access
scan, it denies access to the file and displays a message box like the one
shown below.
If the message box cannot be displayed, the alert is shown at the command
line.
Sophos Anti-Virus also logs the event in the Sophos Anti-Virus log, and
sends an alert to Enterprise Console if this is managing the computer.
Refer to section 5 for information on cleaning up viruses/spyware.
17
Page 18

User manual
4.2 If viruses/spyware are found when you run an on-demand scan
If Sophos Anti-Virus finds a virus or item of spyware, it reports it on the line
which starts with >>> followed by either “Virus” or “Virus Fragment”:
SAVScan virus detection utility
Version X.XX.XX [Linux/Intel]
Virus data version X.XX, February 2007
Includes detection for 201433 viruses, trojans and worms
Copyright (c) 1989-2007 Sophos Plc, www.sophos.com
System time 10:23:49, System date 11 February 2007
Quick Scanning
>>> Virus 'EICAR-AV-Test' found in file /usr/mydirectory/eicar.src
33 files scanned in 2 seconds.
1 virus was discovered.
1 file out of 33 was infected.
Please send infected samples to Sophos for analysis.
For advice consult www.sophos.com, email support@sophos.com
or telephone +44 1235 559933
End of Scan.
Sophos Anti-Virus also logs the event in the Sophos Anti-Virus log.
Refer to section 5 for information on cleaning up viruses/spyware.
18
Page 19

5 Cleaning up viruses/spyware
5.1 Getting cleanup information
If viruses/spyware are reported, you can get information and cleanup
advice from the Sophos website. Go to the threat analyses page
(www.sophos.com/security/analyses). Search for the analysis of the virus
or item of spyware, by using the name that was reported by Sophos
Anti-Virus.
5.2 Quarantining infected files
You can configure Sophos Anti-Virus to put infected files into quarantine
(i.e. to prevent them from being accessed). It does this by changing the
ownership and permissions for the file.
Sophos Anti-Virus for Linux, version 6
To specify quarantining, type
savscan PATH --quarantine
where PATH is the path to be scanned.
By default, Sophos Anti-Virus changes
the user ownership of an infected file to the user running Sophos
Anti-Virus
the group ownership of the file to the group to which that user belongs
the file permissions to -r -------- (0400).
If you prefer, you can change the user or group ownership and file
permissions that Sophos Anti-Virus applies to infected files. You do so by
using these parameters:
uid=NNN
user=USERNAME
gid=NNN
group=GROUP-NAME
mode=PPP
You cannot specify more than one parameter of each type, e.g. you cannot
enter the same username twice, or enter a uid and a username.
For each parameter you do not specify, the default setting (as given above)
is used.
For example:
19
Page 20

User manual
savscan fred --quarantine:user=virus,group=virus,mode=0400
will change an infected file’s user ownership to virus, the group ownership
to virus, and the file permissions to -r--------. This means the file is owned
by the user virus and group virus, but only the user virus can access the file
(and only for reading). No one else can do anything to the file (apart from
root).
If you specify disinfection (refer to section 5.3) as well as quarantining,
Sophos Anti-Virus attempts to disinfect infected items and quarantines
them only if disinfection fails.
5.3 Setting up automatic cleanup for on-demand scanning
Sophos Anti-Virus can disinfect or delete infected items automatically, when
you run an on-demand scan. Any actions that Sophos Anti-Virus takes
against infected items are listed in the scan summary and logged in the
Sophos Anti-Virus log. By default, automatic cleanup is disabled.
The method you use depends on whether you want to clean up a file or a
boot sector.
5.3.1 Cleaning up files
To disinfect a specific file, type
savscan FILE-PATH -di
Alternatively, to disinfect all files on the computer, type
savscan / -di
In either case, Sophos Anti-Virus asks for confirmation before it disinfects.
Disinfection of documents does not repair any changes the virus has made
in the document. (Refer to section 5.1 to find out how to view details on
the Sophos website of the virus’s side-effects.)
To delete a specific infected file, type
savscan FILE-PATH -remove
Alternatively, to delete all infected files on the computer, type
20
savscan / -remove
In either case, Sophos Anti-Virus asks for confirmation before it deletes.
Page 21

5.3.2 Disinfecting a boot sector
To disinfect a boot sector, type
savscan -bs=XXX -di
where XXX is the name of a drive.
For example, to eliminate a virus in the floppy drive, type
savscan -bs=/dev/fd0 -di
5.4 Recovering from virus side-effects
Recovery from virus infection depends on how the virus infected the
computer. Some viruses leave you with no side-effects to deal with, others
may have such extreme side-effects that you have to restore a hard disk in
order to recover.
Sophos Anti-Virus for Linux, version 6
Some viruses gradually make minor changes to data. This type of
corruption can be hard to detect. It is therefore very important that you
read the virus analysis on the Sophos website, and check documents
carefully after disinfection.
Sound backups are crucial. If you did not have them before you were
infected, start keeping them in case of future infections.
Sometimes you can recover data from disks damaged by a virus. Sophos
can supply utilities for repairing the damage caused by some viruses.
Contact Sophos technical support for advice.
21
Page 22

User manual
6 Viewing the logs
Sophos Anti-Virus logs details of scanning activity in the Sophos Anti-Virus
log and syslog. In addition, virus/spyware and error events are logged in
the Sophos Anti-Virus log. Messages in the Sophos Anti-Virus log are
translated into the languages that the product supports.
Command line
Use the command savlog. This can be used with various command-line
options to restrict the output to certain messages and control the display.
For example, to display all messages logged to the Sophos Anti-Virus log in
the last 24 hours, and to display the date and time in UTC/ISO 8601
format, type
/opt/sophos-av/bin/savlog --today --utc
To see a complete list of the options that can be used with savlog, type
man savlog
22
Page 23

GUI
Go to the Log Viewer page.
Sophos Anti-Virus for Linux, version 6
Using the text boxes and radio buttons in the Log Selection panel, specify
the messages that you want to display. Then click View Log to display the
messages in the Log Contents panel.
23
Page 24

User manual
24
Page 25

Configuring Sophos Anti-Virus
Overview of configuration
Configuring on-access scanning
Configuring on-demand scanning
Configuring alerts
Configuring the Sophos Anti-Virus log
Configuring the Sophos Anti-Virus GUI
Page 26

User manual
7 Overview of configuration
This section applies to all configuration except that for on-demand scanning,
which is explained in section 9. Use of Sophos Enterprise Console or the
commands savconfig or savsetup has no effect on on-demand scanning.
7.1 Console-based configuration of Sophos Anti-Virus across a
network
You can manage version 6 of Sophos Anti-Virus on endpoints using
Enterprise Console, which runs on Windows. It enables you to perform most
configuration using a user-friendly GUI. Installation of the console is
described in the Sophos Endpoint Security and Control network startup
guide, published at www.sophos.com/support/docs/ and on the Sophos
CDs.
For more information on using the console to configure Sophos Anti-Virus,
refer to the console help. Also, if you use the console, the following apply
concerning configuration:
Parameters that cannot be set using the console can be set on each
endpoint locally, using savconfig (section 7.4). These parameters are
ignored by the console.
Auto-updating is configured using only the console: it can’t be configured
on the endpoint.
Sophos does not support the use of console-based and CID-based
configuration, formerly known as corporate configuration, together. If you
used CID-based configuration with version 5 of Sophos Anti-Virus, you must
choose whether to continue using this or to start using Enterprise Console
instead. If you choose to start using Enterprise Console, refer to Sophos
support knowledgebase article 22297
(www.sophos.com/support/knowledgebase/article/22297.html).
7.2 CID-based configuration of Sophos Anti-Virus across a network
26
Central installation directory (CID)-based configuration, formerly known as
corporate configuration, doesn’t require a Windows computer. It involves
making changes to a configuration file that is stored in the CID, by setting
the values of parameters using the command savconfig (section 7.4). Then,
when endpoints update from the CID, they use this configuration. You can
also lock any parameters so that they can’t be modified on endpoints. In this
way, you can determine the configuration of Sophos Anti-Virus on each
endpoint, without fear that the settings will be changed by an endpoint user.
Page 27

Sophos Anti-Virus for Linux, version 6
There are two configuration files: the live configuration file in the CID and
the offline configuration file stored elsewhere. When you want to change the
live file, you change the offline file, and use a program to replace the live file
with the offline file.
7.2.1 Creating the live configuration file in the CID
1. Create the offline configuration file in a directory of your choice other than
the CID. You must use the command savconfig, and specify
the name of the offline file, including the filename extension cfg
that you are accessing the Corporate layer of the file (for more
information on layers, refer to section 7.2.3)
the setting of a parameter.
Use the following syntax:
/opt/sophos-av/bin/savconfig -f CONFIG-FILE -c set PARAMETER VALUE
where CONFIG-FILE is the path of the offline file, -c indicates that you want
to access the Corporate layer, “set” indicates that you want to set the value
of a parameter, PARAMETER is the parameter that you want to set and
VALUE is the value to which you want to set the parameter. For example, to
create a file called CIDconfig.cfg and to start on-access scanning when the
Sophos Anti-Virus daemon is started, type
/opt/sophos-av/bin/savconfig -f CIDconfig.cfg -c set EnableOnStart
Enabled
For information on using savconfig, refer to section 7.4.
2. Set other parameters, as necessary, using the command savconfig. You must
specify the name of the offline file and that you are accessing the Corporate
layer, as above.
3. To view the settings of parameters, use the query operation. You can view
the setting of an individual parameter or all parameters. For example, to
view the settings of all the parameters that you have set, type
/opt/sophos-av/bin/savconfig -f CIDconfig.cfg -c query
4. When you have finished setting parameters, run the addcfg utility to copy
the configuration to the CID, ready for endpoints to download when they
next update. The utility is in the CID. Depending on where the CID is, type
/opt/sophos-av/update/cache/Primary/addcfg.sh -f CONFIG-FILE
where CONFIG-FILE is the path of the offline file.
27
Page 28

User manual
7.2.2 Updating the live configuration file in the CID
1. Update the offline configuration file. You must use the command savconfig,
and specify
the name of the offline file
that you are accessing the Corporate layer of the file (for more
information on layers, refer to section 7.2.3)
the setting of a parameter.
Use the following syntax:
/opt/sophos-av/bin/savconfig -f CONFIG-FILE -c set PARAMETER VALUE
where CONFIG-FILE is the path of the offline file, -c indicates that you want
to access the Corporate layer, “set” indicates that you want to set the value
of a parameter, PARAMETER is the parameter that you want to set and
VALUE is the value to which you want to set the parameter. For example, to
update a file called CIDconfig.cfg and to start on-access scanning when the
Sophos Anti-Virus daemon is started, type
/opt/sophos-av/bin/savconfig -f CIDconfig.cfg -c set EnableOnStart
Enabled
For information on using savconfig, refer to section 7.4.
2. Set other parameters, as necessary, using the command savconfig. You must
specify the name of the offline file and that you are accessing the Corporate
layer, as above.
3. To view the settings of parameters, use the query operation. You can view
the setting of an individual parameter or all parameters. For example, to
view the settings of all the parameters that you have set, type
/opt/sophos-av/bin/savconfig -f CIDconfig.cfg -c query
4. When you have finished setting parameters, run the addcfg utility to copy
the configuration to the CID, ready for endpoints to download when they
next update. The utility is in the CID. Depending on where the CID is, type
/opt/sophos-av/update/cache/Primary/addcfg.sh -fCONFIG-FILE
where CONFIG-FILE is the path of the offline file.
7.2.3 Configuration layers
Each installation of Sophos Anti-Virus includes a local configuration file,
which includes settings for all parts of Sophos Anti-Virus.
Each local configuration file contains a number of layers:
28
Page 29

Sophos Anti-Virus for Linux, version 6
Sophos: This is always present in the file. It includes the factory settings,
which are changed only by Sophos.
Corporate: This is present if the installation is configured from the central
installation directory (CID), as described in sections 7.2.1 and 7.2.2.
User: This is present if any local configuration is performed. It includes
settings that apply only to the installation on this computer.
Each layer uses the same parameters, so that the same parameter can be
set in more than one layer. However, when Sophos Anti-Virus checks the
value of a parameter, it does so according to the layer hierarchy:
By default, Corporate layer overrides User layer.
Corporate and User layers override Sophos layer.
For example, if a parameter is set in the User layer and the Corporate layer,
the value in the Corporate layer is used. Nevertheless, you can unlock the
values of individual parameters in the Corporate layer, so that they can be
overridden.
When the local configuration file is updated from the configuration file in the
CID, the Corporate layer in the local file is replaced by that of the file in the
CID.
7.3 Configuration of Sophos Anti-Virus on a single computer
Use the command savconfig to perform configuration on a single computer.
For information on using savconfig, refer to section 7.4. By default,
savconfig applies configuration to the User layer of the local configuration
file.
7.4 savconfig configuration command
savconfig is the command that you use to set or query configuration of
Sophos Anti-Virus. The path of the command is /opt/sophos-av/bin. Using
the command to configure specific functions of Sophos Anti-Virus is
explained in the remainder of this manual. The rest of this subsection
explains the syntax.
The syntax of savconfig is
savconfig [OPTION] ... [OPERATION] [PARAMETER] [VALUE] ...
29
Page 30

User manual
7.4.1 OPTION
To view a complete list of the options, operations and parameters, type
man savconfig
However, the following is an overview.
You can specify one or more options. The options are mainly associated with
the layers in the local configuration files in each installation. For information
on layers, refer to section 7.2.3. By default, the command accesses the
User layer. Therefore, if you want to access the Corporate layer for example,
use the option -c or --corporate.
By default, the values of parameters in the Corporate layer are locked, so
that they override values in the User layer. However, if you want to allow a
corporate setting to be overridden by users, use the option --nolock. For
example, to set the value of LogMaxSizeMB and allow it to be overridden,
type
/opt/sophos-av/bin/savconfig --nolock -f corpconfig.cfg -c
LogMaxSizeMB 50
If you are using Enterprise Console, you can display just the values of the
anti-virus policy parameters, by using the option --consoleav. For example,
type
/opt/sophos-av/bin/savconfig --consoleav query
Also, you can display just the values of the console update policy, by using
the option --consoleupdate. For example, type
/opt/sophos-av/bin/savconfig --consoleupdate query
7.4.2 OPERATION
You can specify one operation. The operations are mainly associated with
how you want to access a parameter. Some parameters can have only one
value but others can have a list of values. Therefore, the operations enable
you to add values to a list or remove values from a list. For example, the
CacheFilesystems parameter is a list of filesystem types.
To display the values of parameters, use the operation query. For example,
to display the value of the ExcludeFileOnGlob parameter, type
30
/opt/sophos-av/bin/savconfig query ExcludeFileOnGlob
If you are using Enterprise Console, when savconfig returns values of
parameters, those that conflict with the relevant console policy are clearly
marked with the word “Conflict”.
Page 31

7.4.3 PARAMETER
You can specify one parameter. To list all the basic parameters that can be
set, type
/opt/sophos-av/bin/savconfig -v
Some parameters require secondary parameters to be specified as well.
7.4.4 VALUE
You can specify one or more values that will be assigned to a parameter. If a
value contains spaces, you must enclose it in single quotes.
7.5 savsetup configuration command
savsetup is the utility that you use to set or query configuration of updating
and the Sophos Anti-Virus GUI. Although it enables you to access only some
of the parameters that you can access with savconfig, it is easier to use. It
prompts you for values of parameters, and you simply respond by selecting
or typing the values. To run savsetup, type
Sophos Anti-Virus for Linux, version 6
/opt/sophos-av/bin/savsetup
When you run savsetup, it gives you a choice of configuration: updating or
the Sophos Anti-Virus GUI. Enter the appropriate number to make your
choice. Continue by responding to the questions that are displayed.
31
Page 32

User manual
8 Configuring on-access scanning
If you are configuring a single computer that is on a network, such
configuration might be discarded if the computer downloads a new consolebased or CID-based configuration.
8.1 Excluding files and directories from scanning
You can exclude files and directories from scanning in several ways:
using file or directory name (section 8.1.1)
using file type (section 8.1.2)
using wildcards (section 8.1.3).
If you want to exclude files and directories whose names are encoded using
non-UTF-8, refer to section 8.1.4.
8.1.1 Using file or directory name
If you are using Enterprise Console, and you have an anti-virus policy that
specifies exclusions using file or directory name, any such exclusions that
you set on an endpoint locally cause the console to show the endpoint as
not complying with policy. The console user can then force the endpoint to
comply with policy, thus discarding the locally set exclusion.
Command line
To exclude a particular file or directory, use the ExcludeFilePaths parameter.
For example, to add the file /tmp/report to the list of files and directories to
exclude, type
/opt/sophos-av/bin/savconfig add ExcludeFilePaths /tmp/report
To remove an exclusion from the list, use the remove operation. For
example, type
/opt/sophos-av/bin/savconfig remove ExcludeFilePaths /tmp/report
GUI
32
To exclude a particular file or directory, on the Exclusion Configuration page,
in the File Scanning Exclusions panel, type the path in the text box labeled
Page 33

Sophos Anti-Virus for Linux, version 6
Files or directories (with or without wildcards). Click Add New Entry to add
the path to the list.
To remove an exclusion from the list, select the exclusion and click Remove
Selected Entry.
8.1.2 Using file type
Specifying exclusions in this way means that scanning is less efficient than if
you specify exclusions using file or directory name, wildcards or regular
expressions.
Command line
To exclude files that are the same type as a specific file, use the
ExcludeFilesLike parameter. For example, to add the type of the file
Report.txt to the list of file types to exclude, type
/opt/sophos-av/bin/savconfig add ExcludeFilesLike
/home/fred/Report.txt
To remove an exclusion from the list, use the remove operation. For
example, type
/opt/sophos-av/bin/savconfig remove ExcludeFilesLike
/home/fred/Report.txt
To exclude files that are of a specific type, use the ExcludeFileOnType
parameter. The file type must be a value that is returned by the file
command. (For more information on the file command, type man file.)
For example, to add files of type ASCII text to the list of file types to exclude,
type
/opt/sophos-av/bin/savconfig add ExcludeFileOnType 'ASCII text'
To remove an exclusion from the list, use the remove operation. For
example, type
/opt/sophos-av/bin/savconfig remove ExcludeFileOnType 'ASCII text'
33
Page 34

User manual
Sophos Anti-Virus performs partial matching of file types. Thus, it excludes
all file types that match the specified file type up to the number of
characters in the specified file type, starting from the left. For example,
'TIFF' excludes all types of TIFF file, but 'TIFF image data, little-endian'
excludes only certain types of TIFF file.
GUI
To exclude files that are the same type as a specific file, on the Exclusion
Configuration page, in the File Scanning Exclusions panel, type the path of
the file in the text box labeled File type of this file. Click Add New Entry to
add the file type to the list of file types to exclude.
To exclude files that are of a specific type, on the Exclusion Configuration
page, in the File Scanning Exclusions panel, type the file type in the text
box labeled File type as returned by the ‘file’ command. (For more
information on the file command, type man file.) Click Add New Entry to
add the file type to the list.
34
Page 35

Sophos Anti-Virus for Linux, version 6
To remove an exclusion from the list, select the exclusion and click Remove
Selected Entry.
Sophos Anti-Virus performs partial matching of file types. Thus, it excludes
all file types that match the specified file type up to the number of
characters in the specified file type, starting from the left. For example,
'TIFF' excludes all types of TIFF file, but 'TIFF image data, little-endian'
excludes only certain types of TIFF file.
8.1.3 Using wildcards
If you are using Enterprise Console, and you have an anti-virus policy that
specifies exclusions using wildcards, any such exclusions that you set on an
endpoint locally cause the console to show the endpoint as not complying
with policy. The console user can then force the endpoint to comply with
policy, thus discarding the locally set exclusion.
Command line
To exclude files and directories by using wildcards, use the
ExcludeFileOnGlob parameter. Valid wildcards are * which matches any
number of any characters, and ? which matches any one character. For
example, to add all text files in the /tmp directory to the list of files and
directories to exclude, type
/opt/sophos-av/bin/savconfig add ExcludeFileOnGlob '/tmp/*.txt'
If you don’t enclose the expression with quotes, Linux expands the
expression and passes the list of files to Sophos Anti-Virus. This is useful for
excluding only files that exist already, and enabling files that are created
later to be scanned. For example, to add just text files that exist already in
the /tmp directory to the list, type
/opt/sophos-av/bin/savconfig add ExcludeFileOnGlob /tmp/*.txt
To remove an exclusion from the list, use the remove operation. For
example, type
/opt/sophos-av/bin/savconfig remove ExcludeFileOnGlob
'/tmp/notes.txt'
GUI
To exclude files and directories by using wildcards, on the Exclusion
Configuration page, in the File Scanning Exclusions panel, type the path in
the text box labeled Files or directories (with or without wildcards). Valid
35
Page 36

User manual
wildcards are * which matches any number of any characters, and ? which
matches any one character. Click Add New Entry to add the path to the list.
To remove an exclusion from the list, select the exclusion and click Remove
Selected Entry.
8.1.4 Specifying character encoding of directory names and filenames
Linux enables you to name directories and files using any character
encoding that you choose (e.g. UTF-8, EUC_jp). However, Sophos Anti-Virus
stores exclusions only in UTF-8. Therefore, if you want to exclude directories
and files from scanning whose names are encoded using non-UTF-8, you
specify the exclusions in UTF-8, and specify the encodings using the
ExclusionEncodings parameter. Then, the names of any directories or files
that you exclude are evaluated in each of the encodings that you specified,
and all matching directories and files are excluded. This applies to
exclusions that have been specified using the ExcludeFilePaths and
ExcludeFileOnGlob parameters. By default, UTF-8, EUC_jp, and
ISO-8859-1 (Latin-1) are specified.
36
For example, if you want to exclude directories and files whose names are
encoded in EUC_cn, you specify the names of the directories and files using
the ExcludeFilePaths and/or the ExcludeFileOnGlob parameter. Then, you
add EUC_cn to the list of encodings:
/opt/sophos-av/bin/savconfig add ExclusionEncodings EUC_cn
Then, Sophos Anti-Virus evaluates in UTF-8, EUC_jp, ISO-8859-1 (Latin-1),
and EUC_cn all the directory names and filenames that you specified. It
then excludes all directories and files whose names match.
Page 37

8.2 Excluding filesystems from file scanning
Command line
To exclude filesystems from file scanning by using filesystem type, use the
ExcludeFilesystems parameter. By default, no filesystem types are excluded.
Valid filesystem types are listed in the file /proc/filesystems. For example, to
add nfs to the list of filesystem types to exclude, type
/opt/sophos-av/bin/savconfig add ExcludeFilesystems nfs
To remove an exclusion from the list, use the remove operation. For
example, type
/opt/sophos-av/bin/savconfig remove ExcludeFilesystems nfs
GUI
To exclude filesystems from file scanning by using filesystem type, on the
Exclusion Configuration page, in the File Scanning Exclusions panel, click
the drop-down arrow on the box labeled Filesystem types. Select one of the
filesystem types in the list. Click Add New Entry to add the filesystem type
to the list.
Sophos Anti-Virus for Linux, version 6
To remove an exclusion from the list, select the exclusion and click Remove
Selected Entry.
8.3 Scanning within archives
Scanning within archive files makes scanning significantly slower and is
rarely required. Even if you don’t enable the option, when you attempt to
access a file extracted from an archive file, the extracted file is scanned.
Command line
To enable scanning within archives, type
/opt/sophos-av/bin/savconfig set ScanArchives enabled
To disable scanning within archives, type
/opt/sophos-av/bin/savconfig set ScanArchives disabled
37
Page 38

User manual
GUI
To configure scanning within archives, go to the Scanning Configuration
page, Archive Scanning panel.
Configure scanning within archives as described below. When you have
done this, click Set to apply the changes. To undo any changes that you
have made since you last clicked Set, click Cancel.
To enable scanning within archives, select the Scan inside archives check
box.
To disable scanning within archives, clear the Scan inside archives check
box.
8.4 Setting up automatic cleanup
Sophos Anti-Virus can disinfect or delete infected items automatically, when
on-access scanning is running. Any actions that Sophos Anti-Virus takes
against infected items are logged in the Sophos Anti-Virus log. By default,
automatic cleanup is disabled.
Command line
To enable automatic disinfection of infected files and boot sectors, type
/opt/sophos-av/bin/savconfig add AutomaticAction disinfect
Disinfection of documents does not repair any changes the virus has made
in the document. (Refer to section 5.1 to find out how to view details on the
Sophos website of the virus’s side-effects.)
38
To disable automatic disinfection, type
/opt/sophos-av/bin/savconfig remove AutomaticAction disinfect
To enable automatic deletion of infected files, type
/opt/sophos-av/bin/savconfig add AutomaticAction delete
Page 39

Sophos Anti-Virus for Linux, version 6
You should use this option only if advised to by Sophos technical support. If
the infected file is a mailbox, Sophos Anti-Virus might delete the whole
mailbox.
To disable automatic deletion, type
/opt/sophos-av/bin/savconfig remove AutomaticAction delete
You can enable both automatic deletion and disinfection, but Sophos doesn’t
recommend it. If you do this, Sophos Anti-Virus first tries to disinfect the
item. If disinfection fails, it deletes it.
GUI
To set up automatic cleanup, go to the Scanning page, Cleanup panel.
Configure cleanup as described below. When you have done this, click Set
to apply the changes. To undo any changes that you have made since you
last clicked Set, click Cancel.
To enable automatic disinfection of infected files and boot sectors, select the
Automatically disinfect infected items check box. Disinfection of documents
does not repair any changes the virus has made in the document. (Refer to
section 5.1 to find out how to view details on the Sophos website of the
virus’s side-effects.)
To enable automatic deletion of infected files, select the Automatically
delete infected items check box.
You should use this option only if advised to by Sophos technical support. If
the infected file is a mailbox, Sophos Anti-Virus might delete the whole
mailbox.
You can enable both automatic deletion and disinfection, but Sophos doesn’t
recommend it. If you do this, Sophos Anti-Virus first tries to disinfect the
item. If disinfection fails, it deletes it.
39
Page 40

User manual
9 Configuring on-demand scanning
In this section, where PATH appears in a command, it refers to the path to
be scanned.
9.1 Scanning all file types
By default, Sophos Anti-Virus scans executable files only. To scan all files,
irrespective of their type, type
savscan PATH -all
This takes longer than scanning only executables, and can compromise
performance on servers. It can also cause false virus/spyware reports.
9.2 Scanning inside archives
Sophos Anti-Virus can scan inside archives if it is run with the -archive
option.
savscan PATH -archive
Archive types that can be scanned include: ARJ, bzip2, CMZ, GZip, RAR,
RPM, BZTAR, Zip.
Archives ‘nested’ within other archives (e.g. a TAR archive within a Zip
archive) are scanned recursively.
Alternatively, you can specify scanning of particular types of archive. For
example, to scan inside TAR archives, type
savscan PATH -tar
or to scan inside TAR and Zip archives, type
savscan PATH -tar -zip
If you have numerous complex archives, the scan may take longer to run.
Bear this in mind when scheduling unattended scans.
For a full list of the archive types scanned, use the -vv option.
40
Page 41

Sophos Anti-Virus for Linux, version 6
9.3 Scanning remote computers
By default, Sophos Anti-Virus does not scan items on remote computers (i.e.
does not traverse remote mount points). To enable scanning of remote
computers, type
savscan PATH --no-stay-on-machine
9.4 Disabling scanning of symbolically linked items
By default, Sophos Anti-Virus scans symbolically linked items. To disable
this type of scanning, type
savscan PATH --no-follow-symlinks
To avoid scanning items more than once, use the --backtrack-protection
option.
9.5 Scanning the starting filesystem only
Sophos Anti-Virus can be configured not to scan items that are beyond the
starting filesystem (i.e. not to traverse mount points). Type
savscan PATH --stay-on-filesystem
9.6 Command-line options
The command-line options listed in this section enable you to configure
scanning and disinfection. There are
options that Sophos Anti-Virus for Linux has in common with Sophos
Anti-Virus for UNIX and other platforms (section 9.6.1)
options that Sophos Anti-Virus for Linux has in common with just Sophos
Anti-Virus for UNIX (section 9.6.2)
options specific to Sophos Anti-Virus for Linux (section 9.6.3).
9.6.1 Sophos Anti-Virus command-line options
To invert the meaning of a command-line option, prefix it with ‘n’. For
example, -nsc is the inverse of -sc.
For a listing of these options on screen, type
savscan -h
41
Page 42

User manual
-all Scan all files
If this option is used, Sophos Anti-Virus will scan all files in a filesystem,
rather than just the executable files.
This takes longer than scanning only executables, and can compromise
performance on servers. It can also cause false virus/spyware reports.
-archive Scan inside archives
If this option is used, Sophos Anti-Virus scans inside archives. The archive
types scanned include ARJ, bzip2, CMZ, GZip, RAR, RPM, TAR, Zip.
Archives ‘nested’ within other archives (e.g. a TAR archive within a Zip
archive) are scanned recursively.
Alternatively, you can specify scanning of particular types of archive. For
example, to scan inside TAR archives, type
savscan PATH -tar
or to scan inside TAR and Zip archives, type
savscan PATH -tar -zip
If you have numerous complex archives, the scan may take longer to run.
Bear this in mind when scheduling unattended scans.
For a full list of the archive types scanned, use the -vv option.
-b Sound bell on virus/spyware detection
This option directs Sophos Anti-Virus to sound a bell when viruses/spyware
or fragments of viruses/spyware are discovered. It is enabled by default.
-c Ask for confirmation before disinfection or deletion
This option directs Sophos Anti-Virus to ask for confirmation before
disinfecting or deleting files. It is enabled by default.
-di Disinfect
This option enables Sophos Anti-Virus to perform automatic disinfection of
data files, programs and boot sectors. Refer to section 5.2.
42
-dn Display names of files as they are scanned
This option displays files being scanned. The display consists of the time
followed by the item being checked.
Page 43

Sophos Anti-Virus for Linux, version 6
-eec Use extended set of error codes
This option directs Sophos Anti-Virus to use an extended set of error codes.
For details, refer to section 3.6.1.
-exclude Exclude items from scanning
This option enables you to specify that any items (files, directories or
filesystems) that follow the option on the command line must be excluded
from scanning.
After using the option -exclude, you can use the option -include to specify
that items that follow this option on the command line must be scanned.
For example
savscan fred harry -exclude tom peter -include bill
scans items fred, harry and bill, but not tom or peter.
The option -exclude can be used for files or directories under another
directory. For example
savscan /home/fred -exclude /home/fred/games
scans all of Fred's home directory, but excludes the directory games (and all
directories and files under it).
-ext= File types defined as executables
By default, Sophos Anti-Virus scans DOS and Windows executable files with
certain file extensions (run savscan with the -vv option to see a list of the file
extensions used).
To specify additional file extensions that Sophos Anti-Virus will scan, use the
-ext= option with a comma-separated list of extensions.
To exempt file extensions from scanning, use -next.
If you want to scan files that UNIX defines as executables, refer to the
examine-x-bit option in section 9.6.2.
-f Full scan
By default, Sophos Anti-Virus checks only those parts of each file that are
likely to contain viruses/spyware. A ‘full’ scan examines the complete
contents of each file and can be specified using this option.
Full scanning is slower than default scanning.
43
Page 44

User manual
-h Help
This option lists all the command-line options, including Linux-specific
options.
-idedir= Use alternative directory for virus/spyware identity files (IDEs)
This option enables you to specify an alternative directory for IDEs. For
example
savscan PATH -idedir=/ide
directs Sophos Anti-Virus to read IDEs from the /ide directory instead of
the default directory (normally /opt/sophos-av/lib/sav).
-mime Scan MIME files
This option enables Sophos Anti-Virus to scan MIME files when it does a
scan. By default, it is not enabled to scan MIME files.
-oe Scan Outlook Express mailboxes
This option directs Sophos Anti-Virus to scan Outlook Express mailboxes
when it does a scan. By default, it is not enabled to scan Outlook Express
mailboxes. You must also use the -mime option with this option.
-p=<file|device> Copy screen output to file or device
This option directs Sophos Anti-Virus to send whatever it sends to the screen
to a particular file or device as well. For example
savscan PATH -p=log.txt
directs Sophos Anti-Virus to send screen output to the file log.txt.
-rec Do recursive scan
This option directs Sophos Anti-Virus to scan directories below the ones
specified in the command line. It is enabled by default.
-remove Remove infected objects
This option directs Sophos Anti-Virus to remove infected items.
44
-s Silent running without displaying checked areas
If this option is used, Sophos Anti-Virus does not display on the screen the
files it is scanning. It is enabled by default.
Page 45

Sophos Anti-Virus for Linux, version 6
-sc Scan inside compressed files
If this option is used, Sophos Anti-Virus looks for viruses/spyware inside files
compressed with PKLite, LZEXE and Diet. It is enabled by default.
--stop-scan Stop scanning “zip bombs”
If this option is used, Sophos Anti-Virus stops scanning “zip bombs” when
they are detected.
“Zip bombs” are malicious files that are designed to disrupt the action of
anti-virus scanners. These files usually take the form of innocent looking
archive files that, when unpacked in order to be scanned, require enormous
amounts of time, disk space, or memory.
For example
savscan -all /home/fred/misc --stop-scan
directs Sophos Anti-Virus to scan all objects (files and directories) under
/home/fred/misc, and to stop scanning any “zip bombs” that are detected.
When a “zip bomb” is detected, a message such as
Aborted checking /home/fred/misc/b.zip - appears to be
a 'zip bomb'
is displayed.
-v Version number
If this option is used, Sophos Anti-Virus displays the version number and a
list of the virus/spyware identities (IDEs) currently in use.
-vv Full version information
If this option is used, Sophos Anti-Virus displays the version number and
lists of the virus/spyware identities (IDEs) currently in use, the file extensions
that are scanned, and the archive types scanned.
9.6.2 UNIX-specific command-line options
The following options are UNIX-specific, and may be prefixed with ‘no-’ to
invert their meaning.
For example, ‘--no-follow-symlinks’ is the inverse of ‘--follow-symlinks’.
45
Page 46

User manual
--args-file=[filename] Read command-line arguments from file
Sophos Anti-Virus reads command-line arguments from a file. The
arguments may include (lists of) directory names, filenames and options. For
example
savscan --args-file=scanlist
directs Sophos Anti-Virus to read command-line arguments from the
scanlist file. When Sophos Anti-Virus reaches the end of the file, it
continues reading arguments from the command line.
If [filename] is ‘-’, Sophos Anti-Virus reads arguments from stdin. Some
command-line options may not be used in the file: -eec, -neec, -p=, -s, -ns,
-dn and -ndn.
--backtrack-protection Prevent backtracking
Sophos Anti-Virus avoids scanning the same files more than once
(‘backtracking’), a problem that can arise due to symbolic links. This option
is enabled by default.
--examine-x-bit Scan all items that UNIX defines as executables
If this option is used, Sophos Anti-Virus scans all items that UNIX defines as
executables, as well as items with the file extensions in Sophos Anti-Virus’s
own executables list (for details of the file extensions listed, run savscan
with the -vv option). This option is disabled by default.
--follow-symlinks Scan the object pointed to by symbolic links
Sophos Anti-Virus scans objects pointed to by symbolic links. This option is
enabled by default.
--preserve-backtrack Preserve backtracking information
Sophos Anti-Virus preserves the backtracking information for the duration of
the run. This option is enabled by default.
--quarantine Quarantine infected files
If this option is used, Sophos Anti-Virus puts infected files into quarantine.
Sophos Anti-Virus does this by changing the ownership and permissions for
the file.
46
If you have specified disinfection, Sophos Anti-Virus attempts to disinfect the
file and quarantines the file only if disinfection fails.
Page 47

Sophos Anti-Virus for Linux, version 6
By default, Sophos Anti-Virus changes
the user ownership of an infected file to the user running Sophos
Anti-Virus
the group ownership of the file to the group to which that user belongs
the file permissions to -r -------- (0400).
If you prefer, you can change the user or group ownership and file
permissions that Sophos Anti-Virus applies to infected files. You do so by
using these parameters:
uid=NNN
user=USERNAME
gid=NNN
group=GROUP-NAME
mode=PPP
You cannot specify more than one parameter of each type (e.g. you cannot
enter username twice, or enter a uid and a username).
For each parameter you do not specify, the default setting (as given above)
is used.
For example:
savscan fred -quarantine:user=virus,group=virus,mode=0400
will change an infected file’s user ownership to virus, the group ownership to
virus, and the file permissions to -r--------. This means the file is owned by
the user virus and group virus, but only the user virus can access the file
(and only for reading). No one else can do anything to the file (apart from
root).
You may need to be running as a special user or as superuser to set the
ownership and permissions.
--reset-atime Reset the access time on files
After Sophos Anti-Virus scans a file, it resets the access time (the atime) to
the time shown before scanning. However, if a file is disinfected, the access
and modification times are updated. This option is enabled by default.
You may find that your archiver always backs up all the files that have been
scanned. This could happen because resetting the atime has the effect of
changing the inode status-changed time (ctime). In this case, run savscan
with the --no-reset-atime option.
47
Page 48

User manual
--show-file-details Show details of file ownership
If this option is used, Sophos Anti-Virus shows details of the file ownership
and permissions when filenames are displayed or written to a log.
--skip-special Do not scan ‘special’ objects
Sophos Anti-Virus does not scan special objects, such as /dev, /proc,
/devices etc. This option is enabled by default.
--stay-on-filesystem Do not leave the starting filesystem
If this option is used, Sophos Anti-Virus scans only the starting filesystem,
i.e. it does not traverse mount points.
--stay-on-machine Do not leave the starting computer
Sophos Anti-Virus scans only the starting computer, i.e. it does not traverse
remote mount points. This option is enabled by default.
9.6.3 Linux-specific command-line options
The following boot sector scanning options are only available with Sophos
Anti-Virus for Linux.
-bs=xxx, xxx,... Scan boot sector of specific logical drive
Sophos Anti-Virus scans the boot sectors of specified logical drives, where
xxx is the name of the drive (for example /dev/fd0 or /dev/hda1). The floppy
drive is considered a logical device for the purposes of this option.
You can use this option to scan the boot sectors of floppy disks that were
created for other operating systems (e.g. Windows and DOS).
-bs Scan all known boot sectors
Sophos Anti-Virus extracts partition table information from all the physical
drives it knows about, then scans all logical drive boot sectors. This includes
boot sectors that are not Linux (e.g. Windows and DOS).
-cdr= Scan CD boot image
To scan the boot image of a bootable CD, use the -cdr option. For example
48
savscan -cdr=/dev/cdrom
scans the boot image (if any) of the CD on device /dev/cdrom. If Sophos
Anti-Virus finds a boot image, it scans the boot sector of that image for boot
sector viruses.
Page 49

Sophos Anti-Virus for Linux, version 6
To scan for program viruses all files in the boot image whose file type is in
Sophos Anti-Virus’s own executables list, use the -loopback option. For
example
savscan -cdr=/dev/cdrom -loopback
scans the boot image (if any) of the CD on device /dev/cdrom. If Sophos
Anti-Virus finds a boot image, it scans the boot sector of that image for boot
sector viruses and scans for program viruses all files in that image whose file
type is in the executables list.
-mbr Scan master boot records
Sophos Anti-Virus attempts to scan the master boot records for all the
physical drives on the system.
49
Page 50

User manual
10 Configuring alerts
If you are configuring a single computer that is on a network, such
configuration might be discarded if the computer downloads a new consolebased or CID-based configuration.
You can configure Sophos Anti-Virus to send an alert when it finds
viruses/spyware, there is a scanning error or some other type of error. Alerts
can be sent in different languages, and via the following methods:
Desktop pop-ups (on-access scanning only)
Command-line (on-access scanning only)
Email (on-access and on-demand scanning)
10.1 Configuring desktop pop-up alerts
By default, desktop pop-up alerts are enabled. They are sent in the language
of the computer that raises the alert.
The additional messages that are described below are not translated.
Command line
To enable desktop pop-up alerts, set the parameters UINotifier and
UIpopupNotification to “enabled”. UINotifier provides overall control of
desktop pop-up and command-line alerts; UIpopupNotification controls just
desktop pop-up alerts. For example, type
/opt/sophos-av/bin/savconfig set UINotifier enabled
/opt/sophos-av/bin/savconfig set UIpopupNotification enabled
You can specify what message is sent in addition to the alert itself. A default
message is supplied in English. To change this, use the parameter
UIContactMessage. For example, type
/opt/sophos-av/bin/savconfig set UIContactMessage 'Contact IT'
The same messages are used for desktop pop-up and command-line alerts.
50
To disable desktop pop-up alerts, type
/opt/sophos-av/bin/savconfig set UIpopupNotification disabled
To disable both desktop pop-up and command-line alerts, type
/opt/sophos-av/bin/savconfig set UINotifier disabled
Page 51

Sophos Anti-Virus for Linux, version 6
GUI
To configure desktop pop-up alerts, go to the Alerts Configuration page,
Desktop Pop-up and Command-line panel.
Configure desktop pop-up alerts as described below. When you have done
this, click Set to apply the changes. To undo any changes that you have
made since you last clicked Set, click Cancel.
To enable desktop pop-up alerts, select the Enable desktop pop-up alerts
check box.
You can specify what message is sent in addition to the alert itself. A default
message is supplied in English. To change this, type in the text box.
The same messages are used for desktop pop-up and command-line alerts.
To disable desktop pop-up alerts, clear the Enable desktop pop-up alerts
check box.
10.2 Configuring command-line alerts
By default, command-line alerts are enabled. They are sent in the language
of the computer that raises the alert.
The additional messages that are described below are not translated.
Command line
To enable command-line alerts, set the parameters UINotifier and
UIttyNotification to “enabled”. UINotifier provides overall control of desktop
51
Page 52

User manual
pop-up and command-line alerts; UIttyNotification controls just commandline alerts. For example, type
/opt/sophos-av/bin/savconfig set UINotifier enabled
/opt/sophos-av/bin/savconfig set UIttyNotification enabled
You can specify what message is sent in addition to the alert itself. A default
message is supplied in English. To change this, use the parameter
UIContactMessage. For example, type
/opt/sophos-av/bin/savconfig set UIContactMessage 'Contact IT'
The same messages are used for desktop pop-up and command-line alerts.
To disable command-line alerts, type
/opt/sophos-av/bin/savconfig set UIttyNotification disabled
To disable both desktop pop-up and command-line alerts, type
/opt/sophos-av/bin/savconfig set UINotifier disabled
GUI
To configure command-line alerts, go to the Alerts Configuration page,
Desktop Pop-up and Command-line panel.
52
Configure command-line alerts as described below. When you have done
this, click Set to apply the changes. To undo any changes that you have
made since you last clicked Set, click Cancel.
To enable command-line alerts, select the Enable command-line alerts
check box.
You can specify what message is sent in addition to the alert itself. A default
message is supplied in English. To change this, type in the text box.
Page 53

The same messages are used for desktop pop-up and command-line alerts.
To disable command-line alerts, clear the Enable command-line alerts
check box.
10.3 Configuring email alerts
By default, email alerts are
enabled
sent when viruses/spyware are detected, there is a scanning error, or an
event is logged in the Sophos Anti-Virus log
sent only when there is a fatal event
sent to root@localhost
and the hostname and port of the SMTP server are localhost:25.
Sophos Anti-Virus for Linux, version 6
10.3.1 General settings
Command line
To enable email alerts, set the parameter EmailNotifier to “enabled”:
/opt/sophos-av/bin/savconfig set EmailNotifier enabled
To set the hostname or IP address of the SMTP server, use the parameter
EmailServer. For example, type
/opt/sophos-av/bin/savconfig set EmailServer 171.17.31.184
To specify the language that is used for the email alerts, use the parameter
EmailLanguage. Currently, valid values are just “en”, “English”, or
“Japanese”. For example, type
/opt/sophos-av/bin/savconfig set EmailLanguage Japanese
This language selection applies only to the alert itself, not the additional
messages that are described below.
To disable email alerts, type
/opt/sophos-av/bin/savconfig set EmailNotifier disabled
53
Page 54

User manual
GUI
To configure email alerts via the GUI, go to the Alerts Configuration page,
Email panel.
To enable email alerts, select the Enable email alerts check box.
To set the hostname or IP address of the SMTP server, type the address in
the text box labeled Hostname or IP address of the SMTP server.
To specify the language that is used for the email alerts, select the language
in the drop-down list box labeled Language to use in notification emails.
This language selection applies only to the alert itself, not the additional
messages that are described below.
To disable email alerts, clear the Enable email alerts check box.
When you have finished configuring email alerts, click Set to apply the
changes. To undo any changes that you have made since you last clicked
Set, click Cancel.
10.3.2 Email recipients
Command line
To specify who receives email alerts, use the parameter Email. You can
specify more than one recipient. For example, type
/opt/sophos-av/bin/savconfig add Email admin@localhost
54
Page 55
Sophos Anti-Virus for Linux, version 6
GUI
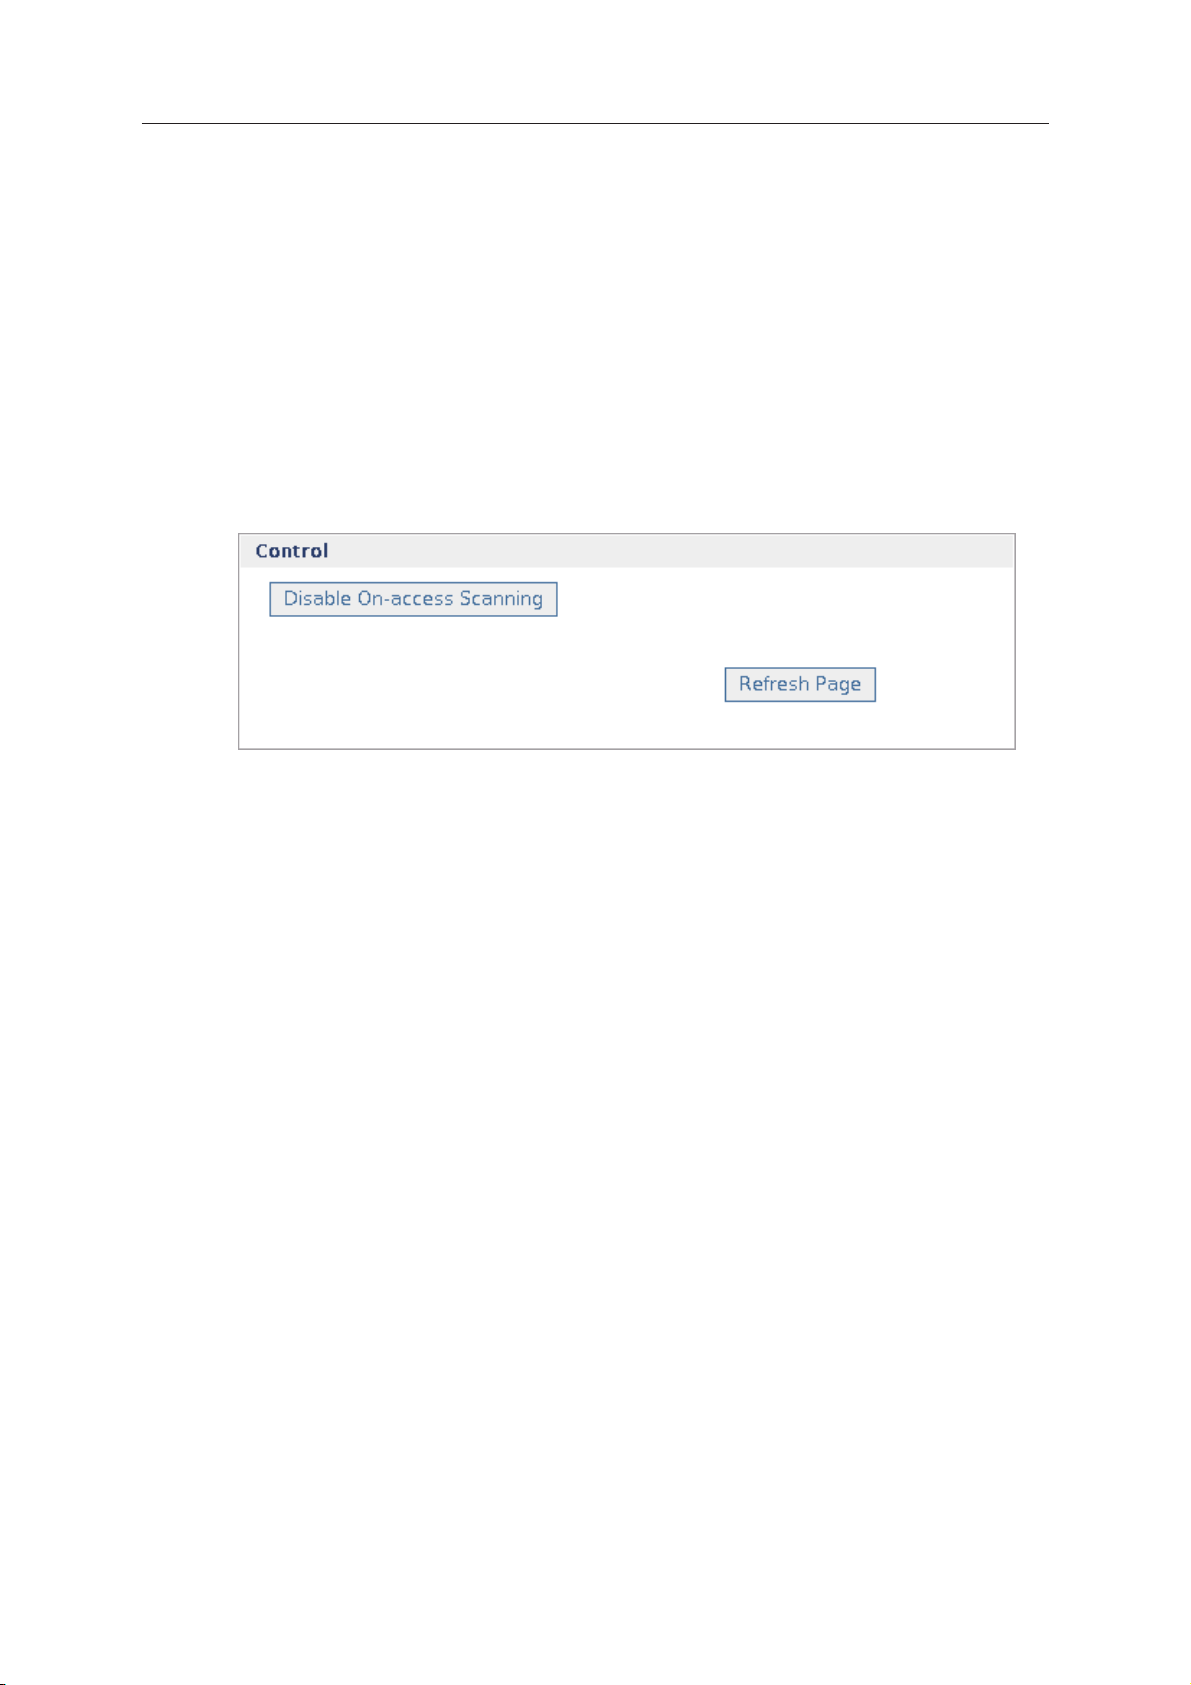
To specify who receives email alerts, add or delete recipients from the list of
Email recipients.
To add a new email recipient to the list, type the text in the address box and
click Add New Entry.
To delete an email recipient from the list, select it and click Remove
Selected Entry.
10.3.3 What happens when viruses/spyware are detected
Command line
To enable email alerts to be sent when viruses/spyware are detected, set the
parameter SendThreatEmail to “enabled”:
/opt/sophos-av/bin/savconfig set SendThreatEmail enabled
You can specify what message is sent in addition to the alert itself when
viruses/spyware are detected. A default message is supplied in English. To
change this, use the parameter ThreatMessage. For example, type
/opt/sophos-av/bin/savconfig set ThreatMessage 'Contact IT'
GUI
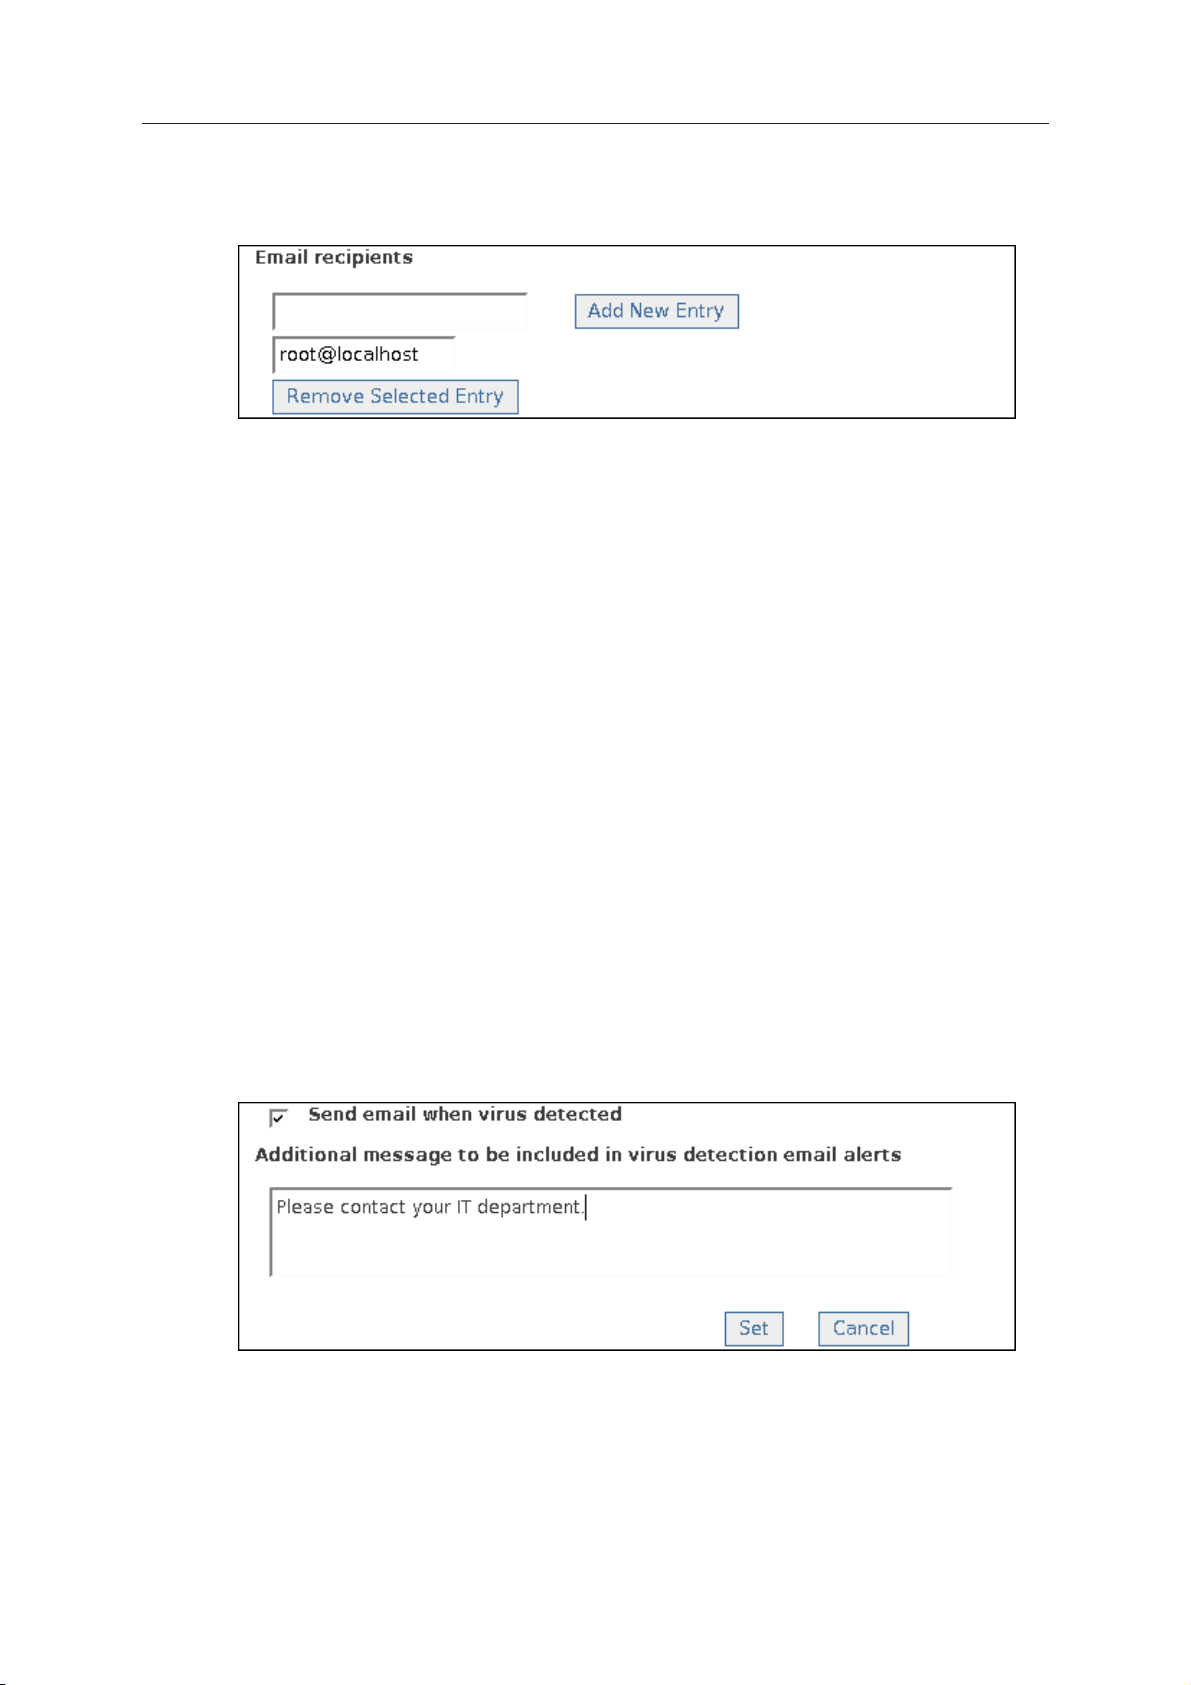
To enable email alerts to be sent when viruses/spyware are detected, select
the check box labeled Send email when virus detected.
You can specify what message is sent in addition to the alert itself when
viruses/spyware are detected. A default message is supplied in English. To
change this, type in the text box.
55
Page 56

User manual
When you have finished configuring email alerts, click Set to apply the
changes. To undo any changes that you have made since you last clicked
Set, click Cancel.
10.3.4 What happens when there is a scanning error
Command line
To enable email alerts to be sent when there is a scanning error, set the
parameter SendErrorEmail to “enabled”:
/opt/sophos-av/bin/savconfig set SendErrorEmail enabled
You can specify what message is sent in addition to the alert itself when
there is a scanning error. A default message is supplied in English. To
change this, use the parameter ScanErrorMessage. For example, type
/opt/sophos-av/bin/savconfig set ScanErrorMessage 'Contact IT'
GUI
To enable email alerts to be sent when there is a scanning error, select the
check box labeled Send email when there is a scan error.
You can specify what message is sent in addition to the alert itself when
there is a scanning error. A default message is supplied in English. To
change this, type in the text box.
When you have finished configuring email alerts, click Set to apply the
changes. To undo any changes that you have made since you last clicked
Set, click Cancel.
10.3.5 What happens when an event is logged
Command line
You can specify what message is sent in addition to the alert itself when an
event is logged in the Sophos Anti-Virus log. A default message is supplied
56
Page 57

Sophos Anti-Virus for Linux, version 6
in English. To change this, use the parameter LogMessage. For example,
type
/opt/sophos-av/bin/savconfig set LogMessage 'Contact IT'
GUI
You can specify what message is emailed when an event is logged in the
Sophos Anti-Virus log. A default message is supplied in English. To change
this, type in the text box.
When you have finished configuring email alerts, click Set to apply the
changes. To undo any changes that you have made since you last clicked
Set, click Cancel.
57
Page 58

User manual
11 Configuring the Sophos Anti-Virus log
If you are configuring a single computer that is on a network, such
configuration might be discarded if the computer downloads a new consolebased or CID-based configuration.
By default, scanning activity is logged in the Sophos Anti-Virus log. When it
reaches 1 MB in size, it is backed up automatically and a new log is started.
To see the default number of logs that are kept, type
/opt/sophos-av/bin/savconfig -s query LogMaxSizeMB
To specify the maximum number of logs that are kept, use the parameter
LogMaxSizeMB. For example, type
/opt/sophos-av/bin/savconfig set LogMaxSizeMB 50
The path of the log is /opt/sophos-av/log/savd.log.
58
Page 59

Sophos Anti-Virus for Linux, version 6
12 Configuring the Sophos Anti-Virus GUI
If you are configuring a single computer that is on a network, such
configuration might be discarded if the computer downloads a new consolebased or CID-based configuration.
You can configure the Sophos Anti-Virus GUI using either
the utility savsetup, or
the command savconfig.
savsetup
1. At the computer, run the utility savsetup, which is in the bin subdirectory of
the installation:
/opt/sophos-av/bin/savsetup
2. The utility asks you to select what you want to do. Select Sophos Anti-Virus
GUI configuration.
3. The utility asks you a series of questions about the GUI. Type your responses
to configure the GUI.
savconfig
To set the http port on which the GUI runs, use the parameter HttpPort.
(The GUI is not accessible via an external port.) To see the default port, type
/opt/sophos-av/bin/savconfig -s query HttpPort
To change the port, type for example
/opt/sophos-av/bin/savconfig set HttpPort 1880
To set the username for using the GUI, use the parameter HttpUsername.
For example, type
/opt/sophos-av/bin/savconfig set HttpUsername sysadmin
To set the password for using the GUI, use the parameter HttpPassword. For
example, type
/opt/sophos-av/bin/savconfig set HttpPassword 0jf09jf
These settings don’t take effect until the GUI daemon is restarted. To do this
manually, close the GUI and, at the command line, type
/etc/init.d/sav-web restart
59
Page 60

User manual
60
Page 61

Updating Sophos Anti-Virus
Updating Sophos Anti-Virus immediately
Kernel support
Configuring updating
Page 62

User manual
13 Updating Sophos Anti-Virus immediately
Provided that you have enabled auto-updating, Sophos Anti-Virus is kept
updated automatically.
To update a computer between regular updates, run the update script:
/opt/sophos-av/bin/savupdate
62
Page 63

14 Kernel support
14.1 Support for new kernel releases
When one of the Linux vendors supported by Sophos Anti-Virus releases an
update to its Linux kernel, Sophos releases an update to the Sophos kernel
interface module to support this. If you apply a Linux kernel update before
you apply the matching Sophos kernel interface module update, on-access
scanning is disabled and an error is reported.
To avoid this problem, you must confirm that the matching Sophos kernel
interface module update has been released before applying the Linux kernel
update. A list of supported Linux distributions and updates is available in
Sophos support knowledgebase article 14377
(www.sophos.com/support/knowledgebase/article/14377.html). When the
required Sophos kernel interface module update is listed, it is available for
download. Provided that you have enabled auto-updating, Sophos Anti-Virus
downloads the update automatically. Alternatively, to update a computer
between regular updates, run the update script:
Sophos Anti-Virus for Linux, version 6
/opt/sophos-av/bin/savupdate
You can then apply the Linux kernel update.
14.2 Support for customized kernels
If you customize your Linux kernels, this manual doesn’t explain how to
configure updating to support this. Refer to Sophos support knowledgebase
article 13503 (www.sophos.com/support/knowledgebase/article/13503.html).
63
Page 64

User manual
15 Configuring updating
If you manage Sophos Anti-Virus for Linux using Enterprise Console, you
must configure updating using the console. For information on how to do
this, refer to the console help instead of this section.
15.1 Basic concepts
Update server
An update server is a computer on which you have installed Sophos
Anti-Virus for Linux and which also acts as an update source for other
computers. These other computers are either update servers or update
endpoints, depending on how you deploy Sophos Anti-Virus across the
network.
Update endpoint
An update endpoint is a computer on which you have installed Sophos
Anti-Virus for Linux and which doesn’t need to act as an update source for
other computers.
Primary update source
The primary update source is the location of the updates that a computer
usually accesses. It might need access credentials.
Secondary update source
The secondary update source is the location of the updates that a computer
accesses when the primary update source is unavailable. It might need
access credentials.
15.2 Checking the auto-updating configuration for a computer
1. At the computer that you want to check, run the utility savsetup:
/opt/sophos-av/bin/savsetup
2. The utility asks you to select what you want to do. Select Auto-updating
configuration.
3. The utility asks you to select what you want to do. Select Display update
configuration to see the current configuration.
64
Page 65

Sophos Anti-Virus for Linux, version 6
15.3 Configuring the update server to update from Sophos directly
1. At the update server, run the utility savsetup:
/opt/sophos-av/bin/savsetup
2. The utility asks you to select what you want to do. Select Auto-updating
configuration.
3. The utility asks you to select what you want to do. Select the option to
configure the primary update source to be Sophos. When prompted, enter
the username and password that are included with your licence.
4. The utility asks you if you need a proxy to access Sophos. If you do, type “Y”
and then type the proxy details.
15.4 Configuring multiple update endpoints to update from the
update server
If you want to change the configuration for a single update endpoint, refer to
section 15.6 instead.
At the update server, you update the offline configuration file in the CID, and
then apply the changes to the live configuration file, ready for the update
endpoints to download the next time that they update. In the procedure
below, CONFIG-FILE represents the path of the offline configuration file.
1. Set the primary update source address to the location of the CID, using the
parameter PrimaryUpdateSourcePath. You can specify either an HTTP
address or a UNC path, depending on how you have set up the update
server. For example, type
/opt/sophos-av/bin/savconfig -f CONFIG-FILE -c set
PrimaryUpdateSourcePath 'http://www.mywebcid.com/cid'
2. If the primary update source requires authentication, set the username and
password using the parameters PrimaryUpdateUsername and
PrimaryUpdatePassword, respectively. For example, type
/opt/sophos-av/bin/savconfig -f CONFIG-FILE -c set
PrimaryUpdateUsername 'fred'
/opt/sophos-av/bin/savconfig -f CONFIG-FILE -c set
PrimaryUpdatePassword 'j23rjjfwj'
65
Page 66

User manual
3. If you access the primary update source via a proxy, set the address,
username, and password of the proxy server, using the parameters
PrimaryUpdateProxyAddress, PrimaryUpdateProxyUsername, and
PrimaryUpdateProxyPassword, respectively. For example, type
/opt/sophos-av/bin/savconfig -f CONFIG-FILE -c set
PrimaryUpdateProxyAddress 'http://www-cache.xyz.com:8080'
/opt/sophos-av/bin/savconfig -f CONFIG-FILE -c set
PrimaryUpdateProxyUsername 'penelope'
/opt/sophos-av/bin/savconfig -f CONFIG-FILE -c set
PrimaryUpdateProxyPassword 'fj202jrjf'
4. Use the utility addcfg to apply the changes to the live configuration file,
ready for the update endpoints to download the next time that they update.
/opt/sophos-av/update/cache/Primary/addcfg.sh -f CONFIG-FILE
15.5 Configuring multiple update endpoints to update from Sophos
directly when the update server is unavailable
If you want to change the configuration for a single update endpoint, refer to
section 15.7 instead.
At the update server, you update the offline configuration file in the CID, and
then apply the changes to the live configuration file, ready for the update
endpoints to download the next time that they update. In the procedure
below, CONFIG-FILE represents the path of the offline configuration file.
1. Set the secondary update source address to “sophos:”, using the parameter
SecondaryUpdateSourcePath. For example, type
/opt/sophos-av/bin/savconfig -f CONFIG-FILE -c set
SecondaryUpdateSourcePath 'sophos:'
2. Set the secondary update source username to the username that is included
with your licence, using the parameter SecondaryUpdateUsername. For
example, type
/opt/sophos-av/bin/savconfig -f CONFIG-FILE -c set
SecondaryUpdateUsername 'cust123'
3. Set the secondary update source password to the password that is included
with your licence, using the parameter SecondaryUpdatePassword. For
example, type
/opt/sophos-av/bin/savconfig -f CONFIG-FILE -c set
SecondaryUpdatePassword 'j23rjjfwj'
66
Page 67

Sophos Anti-Virus for Linux, version 6
4. If you access the internet via a proxy, set the address, username, and
password of the proxy server, using the parameters
SecondaryUpdateProxyAddress, SecondaryUpdateProxyUsername, and
SecondaryUpdateProxyPassword, respectively. For example, type
/opt/sophos-av/bin/savconfig -f CONFIG-FILE -c set
SecondaryUpdateProxyAddress 'http://www-cache.xyz.com:8080'
/opt/sophos-av/bin/savconfig -f CONFIG-FILE -c set
SecondaryUpdateProxyUsername 'fred'
/opt/sophos-av/bin/savconfig -f CONFIG-FILE -c set
SecondaryUpdateProxyPassword 'fj202jrjf'
5. Use the utility addcfg to apply the changes to the live configuration file,
ready for the update endpoints to download the next time that they update.
/opt/sophos-av/update/cache/Primary/addcfg.sh -f CONFIG-FILE
15.6 Configuring a single update endpoint to update from the update
server
If you want to change the configuration for multiple update endpoints, refer
to section 15.4 instead.
This section assumes that the update server will be the primary update
source for this computer. However, if it will be the secondary update source,
use the secondary options or parameters where indicated below.
1. At the computer that you want to configure, run the utility savsetup:
/opt/sophos-av/bin/savsetup
2. The utility asks you to select what you want to do. Select Auto-updating
configuration.
3. The utility asks you to select what you want to do. Select the option to
configure the primary (or secondary) update source to be your own server.
When prompted, enter the address of the source, and the username and
password if required. You can specify either an HTTP address or a UNC
path, depending on how you have set up the update server.
4. The utility asks you if you need a proxy to access the update server. If you
do, type “Y” and then type the proxy details.
67
Page 68

User manual
15.7 Configuring a single update endpoint to update from Sophos
directly
If you want to change the configuration for multiple update endpoints, refer
to section 15.5 instead.
This section assumes that Sophos will be the primary update source for this
computer. However, if it will be the secondary update source, use the
secondary options or parameters where indicated below.
1. At the computer that you want to configure, run the utility savsetup:
/opt/sophos-av/bin/savsetup
2. The utility asks you to select what you want to do. Select Auto-updating
configuration.
3. The utility asks you to select what you want to do. Select the option to
configure the primary (or secondary) update source to be Sophos. When
prompted, enter the username and password that are included with your
licence.
4. The utility asks you if you need a proxy to access Sophos. If you do, type “Y”
and then type the proxy details.
68
Page 69

Troubleshooting
Page 70

User manual
16 Troubleshooting
This section provides answers to some common problems that you may
encounter when using Sophos Anti-Virus. (For more information about
Sophos Anti-Virus error codes for on-demand scans, refer to section 3.6.)
16.1 Unable to run a command
If you are unable to run a command, it might be because you don’t have
sufficient privileges. Try logging in with root privileges.
16.2 Exclusion configuration hasn’t been applied
Occasionally, when you configure Sophos Anti-Virus to include items for
scanning that were previously excluded, the items remain excluded. Try
flushing the cache of files that have previously been scanned:
echo 'disable' > /proc/sys/talpa/intercept-filters/Cache/status
echo 'enable' > /proc/sys/talpa/intercept-filters/Cache/status
16.3 man page not found
If the system returns this message when you try to view a Sophos Anti-Virus
man page, you probably need to change your system settings. Ensure that
the environment variable MANPATH in your login script or profile includes
/usr/local/man. If it does not include this path, add it to the environment
variable as shown in the examples below. Do not alter any of the existing
settings.
If you are running the sh, ksh or bash shell, enter
MANPATH=$MANPATH:/usr/local/man
export MANPATH
If you are running the csh or tsh shell, enter
setenv MANPATH [values]:/usr/local/man
where [values] are the existing settings.
70
You should make these variables system-wide. To do this, amend
/etc/login or /etc/profile.
If you do not have a login script, you will need to reset these values every
time you restart the computer.
Page 71

16.4 Sophos Anti-Virus runs out of disk space
This problem may arise when scanning complex archive files.
When it unpacks archive files, Sophos Anti-Virus uses the /tmp directory to
store its working results. If this directory is not very large, Sophos Anti-Virus
may run out of disk space. Specific users may encounter the same problem
if Sophos Anti-Virus exceeds their quota.
The solution is to enlarge /tmp or increase the users’ quota. Alternatively,
change the directory Sophos Anti-Virus uses for working results. You can do
this by setting the environment variable SAV_TMP.
16.5 On-demand scanning runs slowly
Full scan
Sophos Anti-Virus for Linux, version 6
By default, Sophos Anti-Virus performs a quick scan, which scans only the
parts of files likely to contain viruses. However, if scanning is set to full, it
scans everything, and takes significantly longer to carry out a scan.
See the -f option in section 9.6.1.
Full scanning is needed in order to detect some viruses, but should only be
enabled on a case-by-case basis (e.g. on advice from Sophos technical
support).
Scanning all files
By default, Sophos Anti-Virus checks only files defined as executables. If it is
configured to check all files the process takes longer. If you would like to
scan other specific extensions, as well as executable files, add those
extensions to the list of extensions Sophos Anti-Virus defines as executables.
See the -all and -ext= options in section 9.6.1.
16.6 Archiver backs up all files that have been scanned on demand
Your archiver may always back up all the files that Sophos Anti-Virus has
scanned on demand. This can happen due to changes that Sophos
Anti-Virus makes in the ‘status-changed’ time of files.
By default, Sophos Anti-Virus attempts to reset the access time (atime) of
files to the time shown before scanning. However, this has the effect of
changing the inode status-changed time (ctime). If your archiver uses the
ctime to decide whether a file has changed, it backs up all files scanned by
Sophos Anti-Virus.
71
Page 72

User manual
To prevent such backups, run the savscan command with the
--no-reset-atime option.
16.7 Virus/spyware not cleaned up
If Sophos Anti-Virus has not attempted to clean up a virus or item of
spyware, check that automatic cleanup has been enabled.
If Sophos Anti-Virus could not disinfect the virus (‘Disinfection failed’), it
may be that it cannot disinfect that type of virus.
You should also check the following:
If dealing with a removable medium (e.g. floppy disk, CD), make sure
that it is not write-protected.
If the files are on an NTFS filesystem, deal with them on the local
computer instead.
Sophos Anti-Virus does not clean up a virus/spyware fragment because it
has not found an exact virus/spyware match. Refer to section 16.8.
16.8 Virus/spyware fragment reported
If a virus/spyware fragment is reported, update Sophos Anti-Virus on the
affected computer, so that it has the latest virus identity files. Then run a
scan of the computer. If virus/spyware fragments are still reported, contact
Sophos technical support for advice.
The report of a virus/spyware fragment indicates that part of a file matches
part of a virus or item of spyware. There are three possible causes:
Variant of a known virus or item of spyware
Many new viruses or items of spyware are based on existing ones, so that
code fragments typical of a known virus or item of spyware may appear as
part of a new one. If a virus/spyware fragment is reported, it is possible that
Sophos Anti-Virus has detected a new virus or item of spyware, which could
become active.
72
Corrupted virus
Many viruses contain bugs in their replication routines that cause them to
infect target files incorrectly. An inactive portion of the virus (possibly a
substantial part) may appear within the host file, and this is detected by
Sophos Anti-Virus. A corrupted virus cannot spread.
Page 73

Sophos Anti-Virus for Linux, version 6
Database containing a virus or item of spyware
When running a full scan, Sophos Anti-Virus may report that there is a
virus/spyware fragment in a database file.
16.9 “Connection refused” error when accessing the GUI
When you try to access the Sophos Anti-Virus GUI, if an error message is
displayed that tells you that the connection was refused, it might be
because the Sophos Anti-Virus GUI daemon is not running. To start it, type
/etc/init.d/sav-web start
16.10 Unable to access disk with infected boot sector
By default, Sophos Anti-Virus prevents access to removable disks whose
boot sectors are infected. To allow access (e.g. to copy files from a floppy
disk infected with a boot sector virus), type
/opt/sophos-av/bin/savconfig set AllowIfBootSectorThreat enabled
When you have finished accessing the disk, disable the parameter. Remove
the disk from the computer so that it can’t try to re-infect the computer on
restart.
73
Page 74

User manual
74
Page 75

Glossary and index
Page 76

User manual
Glossary
Boot sector: The first part of the operating system to be read into
memory when a computer is switched on (booted).
The program stored in the boot sector is then
executed, which loads the rest of the operating
system from the system files on disk.
Boot sector virus: A type of virus that subverts the initial stages of the
booting process. A boot sector virus attacks either
the master boot sector or the DOS boot sector.
Central installation directory: Refer to CID.
CID-based configuration file: Located in the CID. Stores Sophos Anti-Virus
configuration that is to be applied across a network.
Usually, changes are made to an offline file that is
located elsewhere, and then these changes are
applied to the live file in the CID using a utility.
CID: Central installation directory; a central location on a
network from which Sophos Anti-Virus is installed
and updated. You must install a different CID for
each platform, and make sure every CID is kept up to
date.
CID-based configuration: Central installation directory (CID)-based
configuration, formerly known as corporate
configuration, involves making changes to a
configuration file that is stored in the CID, by setting
the values of parameters using the command
savconfig. Then, when endpoints update from the
CID, they use this configuration.
Cleanup: Cleanup is a general term that includes disinfection
and deletion.
Console-based configuration: You can manage version 6 of Sophos Anti-Virus on
endpoints using Sophos Enterprise Console. This
runs only on Windows. It enables you to perform
most configuration using a user-friendly GUI.
76
Page 77

Sophos Anti-Virus for Linux, version 6
Daemon: A process that runs in the background (i.e.
independently of any user) with no input from or
output to a terminal.
Disinfection: Disinfection removes a virus from a file or boot
sector. However, it doesn’t undo any actions the virus
has already taken.
Executables: By default, when Sophos Anti-Virus performs an on-
demand scan, it scans only files it defines as
executables (even when full scanning is enabled). It
is possible to: configure Sophos Anti-Virus to scan all
files that Linux defines as executables; configure
Sophos Anti-Virus to scan all files; and to change the
list of files defined as executables. Refer to sections
9.6.1 and 9.6.2.
Full scan: If configured to perform full on-demand scanning,
Sophos Anti-Virus scans all files and all parts of files
in the area it has been configured to scan. A full scan
takes significantly longer than a quick scan. It is
occasionally necessary in order to locate certain
viruses. Refer to section 9.6.1.
Local configuration file: Located on an endpoint. Stores Sophos Anti-Virus
configuration that applies to that endpoint.
Macro virus: A type of virus that uses macros in a Windows or
Mac data file to become active in memory and attach
itself to other data files. Unlike other types of virus,
macro viruses can attain a degree of platform
independence.
Master boot sector: The first physical sector on the hard disk (sector 1,
head 0, track 0) which is loaded and executed when
the computer is switched on (booted). It contains the
partition table as well as the code to load and
execute the boot sector of the ‘active’ partition.
Mount point: The point on a filesystem at which there is a
transparent link to an item or items on another
filesystem on the same computer. Refer also to
Symbolic link.
77
Page 78

User manual
On-access scanning: Intercepts files as they are accessed, and grants
access to only those that do not pose a threat to your
network.
On-demand scan: A virus/spyware scan of the computer, or parts of the
computer, that you can run immediately or schedule
to run at another time.
Quick scan: The default on-demand scan type. Sophos Anti-Virus
scans only the parts of files that can potentially
contain executable code.
Remote mount point: The point on a filesystem at which there is a
transparent link to an item or items on another
filesystem on a remote computer. Refer also to
Symbolic link.
Sophos Anti-Virus daemon: Controls on-access scanning, and performs logging
and alerting for on-access and on-demand scanning.
Spyware: A program that installs itself onto a user’s computer
by stealth, subterfuge, or social engineering and
sends information from that computer to a third party
without the user’s permission or knowledge. Spyware
includes key loggers, backdoor Trojans, password
stealers, and botnet worms, which cause corporate
data theft, financial loss and network damage.
Symbolic link: A link to a file or directory on another filesystem or
another computer.
Syslog: A facility that logs system messages (e.g. messages
from a daemon).
Trojan horse: A computer program which carries out hidden and
harmful functions. Generally Trojan horses trick the
user into running them by claiming to have legitimate
functionality. Backdoor Trojans enable other users to
take control of your computer over the internet.
Virus: A computer program that can spread across
computers and networks by attaching itself to a
78
Page 79

Sophos Anti-Virus for Linux, version 6
program (such as a macro or boot sector) and
making copies of itself.
Worm: A type of virus that doesn’t need a carrier program in
order to replicate. Worms replicate themselves and
then use communications between computers (e.g.
email programs) to spread.
79
Page 80

User manual
Index
A
accessing disks 73
alert
command-line 18, 51
desktop pop-up 17, 50
email 53
archive
on-access scanning 37
on-demand scanning 40, 42
B
backtracking
preserving information 46
preventing 46
backups of scanned files 71
boot sector
infected 73
on-demand scanning 15
C
CD boot image 48
CID-based configuration 26
cleanup
getting information 19
on-access scanning 38
on-demand scanning 20, 42, 44
command line
overview 8
reading arguments from file 46
compressed file 45
computer, scanning 14
configuring across a network 26
configuring on a single computer 29
console-based configuration 26
D
directory or file, scanning 14
disinfection. See cleanup
disk space insufficient 71
E
Enterprise Console 26
error codes 15, 43
excluding items, on-access scanning
file or directory 32
character encoding 36
filesystem
from file scanning 37
excluding items, on-demand scanning
file, directory or filesystem 43
executables
UNIX 46
Windows/DOS 43
F
file types, all 40
filesystem, scanning 14
full scan 43
G
GUI
configuring 59
connection problem 73
overview 8
I
infected boot sector 73
K
kernel
customized 63
new release 63
L
layer, in configuration 28
log, Sophos Anti-Virus
configuring 58
viewing 22
M
mailbox 44
man page not found 70
MIME file 44
Q
quarantine 19, 46
R
recursive scanning 44
remote computers, scanning 41
S
savconfig, overview 29
savsetup, overview 31
scheduling scanning 15
screen output, copy to file/device 44
slow on-demand scan 71
special objects 48
80
Page 81

spyware
analysis 19
fragment reported 72
not cleaned up 72
spyware data
specifying location 44
spyware found
on-access scanning 17
on-demand scanning 18
starting filesystem only, scanning 41
starting on-access scanning 12
automatically on system boot 11
status of on-access scanning 11
stopping on-access scanning 13
symbolically linked items 41, 46
U
updating
configuring 64
immediate 62
kernel, customized 63
kernel, new release 63
Sophos Anti-Virus for Linux, version 6
V
virus
analysis 19
fragment reported 72
not cleaned up 72
side-effects 21
virus data
specifying location 44
virus found
on-access scanning 17
on-demand scanning 18
Z
zip bomb 45
81
Page 82

User manual
Technical support
For technical support, visit www.sophos.com/support.
If you contact technical support, provide as much information as possible,
including the following:
Sophos software version number(s)
Operating system(s) and patch level(s)
The exact text of any error messages
82
Page 83

Copyright
Copyright 2005–2008 Sophos Group. All rights reserved. No part of this publication may be
reproduced, stored in a retrieval system, or transmitted, in any form or by any means,
electronic, mechanical, photocopying, recording or otherwise unless you are either a valid
licensee where the documentation can be reproduced in accordance with the licence terms or
you otherwise have the prior permission in writing of the copyright owner.
Sophos and Sophos Anti-Virus are registered trademarks of Sophos Plc and Sophos Group. All
other product and company names mentioned are trademarks or registered trademarks of
their respective owners.
Some software programs are licensed (or sublicensed) to the user under the GNU General
Public License (GPL) or similar Free Software licenses which, among other rights, permit the
user to copy, modify, and redistribute certain programs, or portions thereof, and have access
to the source code. The GPL requires for any software licensed under the GPL, which is
distributed to a user in an executable binary format, that the source code also be made
available to those users. For any such software which is distributed along with this Sophos
product, the source code is available via mail order by submitting a request to Sophos:
Sophos Anti-Virus for Linux, version 6
• Email: savlinuxgpl@sophos.com
• Mail: Sophos Plc, The Pentagon, Abingdon Science Park, Abingdon, OX14 3YP, United
Kingdom.
A copy of the GPL terms can be found at www.gnu.org/copyleft/gpl.html
libmagic - file type detection
Copyright (c) Ian F. Darwin 1986, 1987, 1989, 1990, 1991, 1992, 1994, 1995.
Software written by Ian F. Darwin and others; maintained 1994-2004 Christos Zoulas.
This software is not subject to any export provision of the United States Department of
Commerce, and may be exported to any country or planet.
Redistribution and use in source and binary forms, with or without modification, are permitted
provided that the following conditions are met:
1. Redistributions of source code must retain the above copyright notice immediately at the
beginning of the file, without modification, this list of conditions, and the following
disclaimer.
2. Redistributions in binary form must reproduce the above copyright notice, this list of
conditions and the following disclaimer in the documentation and/or other materials
provided with the distribution.
THIS SOFTWARE IS PROVIDED BY THE AUTHOR AND CONTRIBUTORS ``AS IS'' AND ANY
EXPRESS OR IMPLIED WARRANTIES, INCLUDING, BUT NOT LIMITED TO, THE IMPLIED
WARRANTIES OF MERCHANTABILITY AND FITNESS FOR A PARTICULAR PURPOSE ARE
DISCLAIMED. IN NO EVENT SHALL THE AUTHOR OR CONTRIBUTORS BE LIABLE FOR
ANY DIRECT, INDIRECT, INCIDENTAL, SPECIAL, EXEMPLARY, OR CONSEQUENTIAL
DAMAGES (INCLUDING, BUT NOT LIMITED TO, PROCUREMENT OF SUBSTITUTE GOODS
OR SERVICES; LOSS OF USE, DATA, OR PROFITS; OR BUSINESS INTERRUPTION)
HOWEVER CAUSED AND ON ANY THEORY OF LIABILITY, WHETHER IN CONTRACT,
STRICT LIABILITY, OR TORT (INCLUDING NEGLIGENCE OR OTHERWISE) ARISING IN ANY
83
Page 84

User manual
WAY OUT OF THE USE OF THIS SOFTWARE, EVEN IF ADVISED OF THE POSSIBILITY OF
SUCH DAMAGE.
Python
PYTHON SOFTWARE FOUNDATION LICENSE VERSION 2
1. This LICENSE AGREEMENT is between the Python Software Foundation ("PSF"), and the
Individual or Organization ("Licensee") accessing and otherwise using this software
("Python") in source or binary form and its associated documentation.
2. Subject to the terms and conditions of this License Agreement, PSF hereby grants Licensee
a nonexclusive, royalty-free, world-wide license to reproduce, analyze, test, perform and/or
display publicly, prepare derivative works, distribute, and otherwise use Python alone or in
any derivative version, provided, however, that PSF's License Agreement and PSF's notice
of copyright, i.e., "Copyright (c) 2001, 2002, 2003, 2004 Python Software Foundation;
All Rights Reserved" are retained in Python alone or in any derivative version prepared by
Licensee.
3. In the event Licensee prepares a derivative work that is based on or incorporates Python or
any part thereof, and wants to makethe derivative work available to others as provided
herein, then Licensee hereby agrees to include in any such work a brief summary of the
changes made to Python.
4. PSF is making Python available to Licensee on an "AS IS" basis. PSF MAKES NO
REPRESENTATIONS OR WARRANTIES, EXPRESS OR IMPLIED. BY WAY OF EXAMPLE,
BUT NOT LIMITATION, PSF MAKES NO AND DISCLAIMS ANY REPRESENTATION OR
WARRANTY OF MERCHANTABILITY OR FITNESS FOR ANY PARTICULAR PURPOSE OR
THAT THE USE OF PYTHON WILL NOT INFRINGE ANY THIRD PARTY RIGHTS.
5. PSF SHALL NOT BE LIABLE TO LICENSEE OR ANY OTHER USERS OF PYTHON FOR
ANY INCIDENTAL, SPECIAL, OR CONSEQUENTIAL DAMAGES OR LOSS AS A RESULT OF
MODIFYING, DISTRIBUTING, OR OTHERWISE USING PYTHON, OR ANY DERIVATIVE
THEREOF, EVEN IF ADVISED OF THE POSSIBILITY THEREOF.
6. This License Agreement will automatically terminate upon a material breach of its terms
and conditions.
7. Nothing in this License Agreement shall be deemed to create any relationship of agency,
partnership, or joint venture between PSF and Licensee. This License Agreement does not
grant permission to use PSF trademarks or trade name in a trademark sense to endorse or
promote products or services of Licensee, or any third party.
8. By copying, installing or otherwise using Python, Licensee agrees to be bound by the terms
and conditions of this License Agreement.
Medusa web server
Medusa was once distributed under a 'free for non-commercial use' license, but in May of
2000 Sam Rushing changed the license to be identical to the standard Python license at the
time. The standard Python license has always applied to the core components of Medusa,
this change just frees up the rest of the system, including the http server, ftp server, utilities,
etc. Medusa is therefore under the following license:
84
Permission to use, copy, modify, and distribute this software and its documentation for any
purpose and without fee is hereby granted, provided that the above copyright notice appear in
Page 85

Sophos Anti-Virus for Linux, version 6
all copies and that both that copyright notice and this permission notice appear in supporting
documentation, and that the name of Sam Rushing not be used in advertising or publicity
pertaining to distribution of the software without specific, written prior permission.
SAM RUSHING DISCLAIMS ALL WARRANTIES WITH REGARD TO THIS SOFTWARE,
INCLUDING ALL IMPLIED WARRANTIES OF MERCHANTABILITY AND FITNESS, IN NO
EVENT SHALL SAM RUSHING BE LIABLE FOR ANY SPECIAL, INDIRECT OR
CONSEQUENTIAL DAMAGES OR ANY DAMAGES WHATSOEVER RESULTING FROM LOSS
OF USE, DATA OR PROFITS, WHETHER IN AN ACTION OF CONTRACT, NEGLIGENCE OR
OTHER TORTIOUS ACTION, ARISING OUT OF OR IN CONNECTION WITH THE USE OR
PERFORMANCE OF THIS SOFTWARE.
Sam would like to take this opportunity to thank all of the folks who supported Medusa over
the years by purchasing commercial licenses.
pycrypto
Distribute and use freely; there are no restrictions on further dissemination and usage except
those imposed by the laws of your country of residence. This software is provided "as is"
without warranty of fitness for use or suitability for any purpose, express or implied. Use at
your own risk or not at all.
Incorporating the code into commercial products is permitted; you do not have to make source
available or contribute your changes back (though that would be nice).
--amk (www.amk.ca)
OpenSSL cryptographic toolkit
The OpenSSL toolkit stays under a dual license, i.e. both the conditions of the OpenSSL
License and the original SSLeay license apply to the toolkit. See below for the actual license
texts. Actually both licenses are BSD-style Open Source licenses. In case of any license issues
related to OpenSSL please contact openssl-core@openssl.org.
OpenSSL LICENSE
Copyright (c) 1998–2005 The OpenSSL Project. All rights reserved.
Redistribution and use in source and binary forms, with or without modification, are permitted
provided that the following conditions are met:
1. Redistributions of source code must retain the above copyright notice, this list of conditions
and the following disclaimer.
2. Redistributions in binary form must reproduce the above copyright notice, this list of
conditions and the following disclaimer in the documentation and/or other materials
provided with the distribution.
3. All advertising materials mentioning features or use of this software must display the
following acknowledgment:
“This product includes software developed by the OpenSSL Project for use in the OpenSSL
Toolkit. (http://www.openssl.org/)”
85
Page 86

User manual
4. The names “OpenSSL Toolkit” and “OpenSSL Project” must not be used to endorse or
promote products derived from this software without prior written permission. For written
permission, please contact openssl-core@openssl.org.
5. Products derived from this software may not be called “OpenSSL” nor may “OpenSSL”
appear in their names without prior written permission of the OpenSSL Project.
6. Redistributions of any form whatsoever must retain the following acknowledgment:
“This product includes software developed by the OpenSSL Project for use in the OpenSSL
Toolkit (http://www.openssl.org/)”
THIS SOFTWARE IS PROVIDED BY THE OpenSSL PROJECT “AS IS” AND ANY EXPRESSED
OR IMPLIED WARRANTIES, INCLUDING, BUT NOT LIMITED TO, THE IMPLIED
WARRANTIES OF MERCHANTABILITY AND FITNESS FOR A PARTICULAR PURPOSE ARE
DISCLAIMED. IN NO EVENT SHALL THE OpenSSL PROJECT OR ITS CONTRIBUTORS BE
LIABLE FOR ANY DIRECT, INDIRECT, INCIDENTAL, SPECIAL, EXEMPLARY, OR
CONSEQUENTIAL DAMAGES (INCLUDING, BUT NOT LIMITED TO, PROCUREMENT OF
SUBSTITUTE GOODS OR SERVICES; LOSS OF USE, DATA, OR PROFITS; OR BUSINESS
INTERRUPTION) HOWEVER CAUSED AND ON ANY THEORY OF LIABILITY, WHETHER IN
CONTRACT, STRICT LIABILITY, OR TORT (INCLUDING NEGLIGENCE OR OTHERWISE)
ARISING IN ANY WAY OUT OF THE USE OF THIS SOFTWARE, EVEN IF ADVISED OF THE
POSSIBILITY OF SUCH DAMAGE.
This product includes cryptographic software written by Eric Young (eay@cryptsoft.com).
This product includes software written by Tim Hudson (tjh@cryptsoft.com).
ORIGINAL SSLeay LICENSE
Copyright (c) 1995–1998 Eric Young (eay@cryptsoft.com) All rights reserved.
This package is an SSL implementation written by Eric Young (eay@cryptsoft.com). The
implementation was written so as to conform with Netscapes SSL.
This library is free for commercial and non-commercial use as long as the following conditions
are aheared to. The following conditions apply to all code found in this distribution, be it the
RC4, RSA, lhash, DES, etc., code; not just the SSL code. The SSL documentation included
with this distribution is covered by the same copyright terms except that the holder is Tim
Hudson (tjh@cryptsoft.com).
Copyright remains Eric Young’s, and as such any Copyright notices in the code are not to be
removed. If this package is used in a product, Eric Young should be given attribution as the
author of the parts of the library used. This can be in the form of a textual message at
program startup or in documentation (online or textual) provided with the package.
Redistribution and use in source and binary forms, with or without modification, are permitted
provided that the following conditions are met:
1. Redistributions of source code must retain the copyright notice, this list of conditions and
the following disclaimer.
86
2. Redistributions in binary form must reproduce the above copyright notice, this list of
conditions and the following disclaimer in the documentation and/or other materials
provided with the distribution.
Page 87

Sophos Anti-Virus for Linux, version 6
3. All advertising materials mentioning features or use of this software must display the
following acknowledgement:
“This product includes cryptographic software written by Eric Young (eay@cryptsoft.com)”
The word “cryptographic” can be left out if the rouines from the library being used are not
cryptographic related :-).
4. If you include any Windows specific code (or a derivative thereof) from the apps directory
(application code) you must include an acknowledgement:
“This product includes software written by Tim Hudson (tjh@cryptsoft.com)”
THIS SOFTWARE IS PROVIDED BY ERIC YOUNG “AS IS” AND ANY EXPRESS OR IMPLIED
WARRANTIES, INCLUDING, BUT NOT LIMITED TO, THE IMPLIED WARRANTIES OF
MERCHANTABILITY AND FITNESS FOR A PARTICULAR PURPOSE ARE DISCLAIMED. IN
NO EVENT SHALL THE AUTHOR OR CONTRIBUTORS BE LIABLE FOR ANY DIRECT,
INDIRECT, INCIDENTAL, SPECIAL, EXEMPLARY, OR CONSEQUENTIAL DAMAGES
(INCLUDING, BUT NOT LIMITED TO, PROCUREMENT OF SUBSTITUTE GOODS OR
SERVICES; LOSS OF USE, DATA, OR PROFITS; OR BUSINESS INTERRUPTION) HOWEVER
CAUSED AND ON ANY THEORY OF LIABILITY, WHETHER IN CONTRACT, STRICT LIABILITY,
OR TORT (INCLUDING NEGLIGENCE OR OTHERWISE) ARISING IN ANY WAY OUT OF THE
USE OF THIS SOFTWARE, EVEN IF ADVISED OF THE POSSIBILITY OF SUCH DAMAGE.
The licence and distribution terms for any publically available version or derivative of this code
cannot be changed. i.e. this code cannot simply be copied and put under another distribution
licence [including the GNU Public Licence.]
TinyXml Xml parser
This software is provided 'as-is', without any express or implied warranty. In no event will the
authors be held liable for any damages arising from the use of this software.
Permission is granted to anyone to use this software for any purpose, including commercial
applications, and to alter it and redistribute it freely, subject to the following restrictions:
1. The origin of this software must not be misrepresented; you must not claim that you wrote
the original software. If you use this software in a product, an acknowledgment in the
product documentation would be appreciated but is not required.
2. Altered source versions must be plainly marked as such, and must not be misrepresented
as being the original software.
3. This notice may not be removed or altered from any source distribution.
Zlib compression tools
(C) 1995-2002 Jean-loup Gailly and Mark Adler
This software is provided 'as-is', without any express or implied warranty. In no event will the
authors be held liable for any damages arising from the use of this software.
Permission is granted to anyone to use this software for any purpose, including commercial
applications, and to alter it and redistribute it freely, subject to the following restrictions:
87
Page 88

User manual
1. The origin of this software must not be misrepresented; you must not claim that you wrote
the original software. If you use this software in a product, an acknowledgment in the
product documentation would be appreciated but is not required.
2. Altered source versions must be plainly marked as such, and must not be misrepresented
as being the original software.
3. This notice may not be removed or altered from any source distribution.
Jean-loup Gailly Mark Adler
jloup@gzip.org madler@alumni.caltech.edu
If you use the zlib library in a product, we would appreciate *not* receiving lengthy legal
documents to sign. The sources are provided for free but without warranty of any kind. The
library has been entirely written by Jean-loup Gailly and Mark Adler; it does not include thirdparty code.
If you redistribute modified sources, we would appreciate that you include in the file
ChangeLog history information documenting your changes.
Copyright and licensing information for ACE™, TAO™, CIAO™, and CoSMIC™
ACE1, TAO2, CIAO3, and CoSMIC4 (henceforth referred to as “DOC software”) are copyrighted by
Douglas C. Schmidt5 and his research group6 at Washington University7, University of California8,
Irvine, and Vanderbilt University9, Copyright ©1993–2005, all rights reserved.
Since DOC software is open-source10, free software, you are free to use, modify, copy, and
distribute–perpetually and irrevocably–the DOC software source code and object code produced
from the source, as well as copy and distribute modified versions of this software. You must,
however, include this copyright statement along with code built using DOC software.
You can use DOC software in commercial and/or binary software releases and are under no
obligation to redistribute any of your source code that is built using DOC software. Note, however,
that you may not do anything to the DOC software code, such as copyrighting it yourself or
claiming authorship of the DOC software code, that will prevent DOC software from being
distributed freely using an open-source development model. You needn’t inform anyone that
you’re using DOC software in your software, though we encourage you to let us11 know so we can
promote your project in the DOC software success stories12.
DOC software is provided as is with no warranties of any kind, including the warranties of
design, merchantability, and fitness for a particular purpose, noninfringement, or arising from a
course of dealing, usage or trade practice. Moreover, DOC software is provided with no support
and without any obligation on the part of Washington University, UC Irvine, Vanderbilt University,
their employees, or students to assist in its use, correction, modification, or enhancement. A
number of companies13 around the world provide commercial support for DOC software, however.
DOC software is Y2K-compliant, as long as the underlying OS platform is Y2K-compliant.
Washington University, UC Irvine, Vanderbilt University, their employees, and students shall
have no liability with respect to the infringement of copyrights, trade secrets or any patents by
DOC software or any part thereof. Moreover, in no event will Washington University, UC Irvine, or
Vanderbilt University, their employees, or students be liable for any lost revenue or profits or
other special, indirect and consequential damages.
88
The ACE14, TAO15, CIAO16, and CoSMIC17 web sites are maintained by the DOC Group18 at the
Institute for Software Integrated Systems (ISIS)19 and the Center for Distributed Object Computing
of Washington University, St. Louis20 for the development of open-source software as part of the
open-source software community21. By submitting comments, suggestions, code, code snippets,
techniques (including that of usage), and algorithms, submitters acknowledge that they have the
Page 89

Sophos Anti-Virus for Linux, version 6
right to do so, that any such submissions are given freely and unreservedly, and that they waive
any claims to copyright or ownership. In addition, submitters acknowledgethat any such submission
might become part of the copyright maintained on the overall body of code, which comprises the
DOC software. By making a submission, submitter agree to these terms. Furthermore, submitters
acknowledge that the incorporation or modification of such submissions is entirely at the discretion
of the moderators of the open-source DOC software projects or their designees.
The names ACE, TAO, CIAO, CoSMIC, WashingtonUniversity, UC Irvine, and Vanderbilt University,
may not be used to endorse or promote products or services derived from this source without
express written permission from Washington University, UC Irvine, or Vanderbilt University. Further,
products or services derived from this source may not be called ACE, TAO, CIAO, or CoSMIC nor
may the name Washington University, UC Irvine, or Vanderbilt University appear in their names,
without express written permission from Washington University, UC Irvine, and Vanderbilt
University.
If you have any suggestions, additions, comments, or questions, please let me22 know.
Douglas C. Schmidt
23
The ACE home page is http://www.cs.wustl.edu/ACE.html
References
1. http://www.cs.wustl.edu/~schmidt/ACE.html
2. http://www.cs.wustl.edu/~schmidt/TAO.html
3. http://www.dre.vanderbilt.edu/CIAO/
4. http://www.dre.vanderbilt.edu/cosmic/
5. http://www.dre.vanderbilt.edu/~schmidt/
6. http://www.cs.wustl.edu/~schmidt/ACE-members.html
7. http://www.wustl.edu/
8. http://www.uci.edu/
9. http://www.vanderbilt.edu/
10. http://www.the-it-resource.com/Open-Source/Licenses.html
11. mailto:doc_group@cs.wustl.edu
12. http://www.cs.wustl.edu/~schmidt/ACE-users.html
13. http://www.cs.wustl.edu/~schmidt/commercial-support.html
14. http://www.cs.wustl.edu/~schmidt/ACE.html
15. http://www.cs.wustl.edu/~schmidt/TAO.html
16. http://www.dre.vanderbilt.edu/CIAO/
17. http://www.dre.vanderbilt.edu/cosmic/
18. http://www.dre.vanderbilt.edu/
19. http://www.isis.vanderbilt.edu/
20. http://www.cs.wustl.edu/~schmidt/doc-center.html
21. http://www.opensource.org/
22. mailto:d.schmidt@vanderbilt.edu
23. http://www.dre.vanderbilt.edu/~schmidt/
89
 Loading...