

Page 1
User manual
Sophos Anti-Virus 5.0 for Windows 2000/XP/2003
Document version 1.0
Page 2

Sophos Anti-Virus for Windows 2000/XP/2003
About this manual
This user manual explains how to use Sophos Anti-Virus for
Windows 2000/XP/2003, and how to configure
• virus scanning
• virus alerts
• disinfection
• logging
• updating.
The manual also provides help in resolving common problems.
Page 3

Sophos Anti−Virus for Windows 2000/XP/2003
Contents
About Sophos Anti−Virus.....................................................................................1
What is Sophos Anti−Virus?.........................................................................1
Sophos Anti−Virus window...........................................................................1
Sophos Anti−Virus system tray icon.............................................................3
What is on−access scanning?......................................................................3
What is an on−demand scan?......................................................................3
What is a right−click scan?...........................................................................4
Checking the computer is protected...................................................................5
Checking protection is on..............................................................................5
Turning protection on or off for the computer................................................5
Scanning items on demand..................................................................................7
What is an on−demand scan?......................................................................7
Scanning local disks.....................................................................................7
Setting up a scan..........................................................................................8
Scheduling a scan.........................................................................................9
Running a scan...........................................................................................10
Editing a scan.............................................................................................11
Scanning a single item.......................................................................................14
Scanning a single item................................................................................14
Restricting access rights....................................................................................15
Types of user..............................................................................................15
Changing membership of Sophos user groups...........................................16
Changing settings for multiple users................................................................17
Changing settings for all computers............................................................17
Changing settings for all users on the computer.........................................17
Configuring scanning.........................................................................................18
Changing types of file scanned...................................................................18
Excluding items from scanning...................................................................20
Changing when on−access scanning occurs..............................................23
Scanning inside archive files.......................................................................24
Scanning Macintosh files............................................................................27
Scanning all files.........................................................................................30
Configuring alerts...............................................................................................35
Desktop messaging....................................................................................35
Email alerting..............................................................................................36
Event logging..............................................................................................38
SNMP messaging.......................................................................................40
Page 4

Sophos Anti−Virus for Windows 2000/XP/2003
Logging................................................................................................................42
Viewing the log for this computer................................................................42
Configuring the log for this computer..........................................................42
Viewing the log for an on−demand scan.....................................................43
Updating...............................................................................................................45
Updating immediately.................................................................................45
Setting up automatic updating....................................................................45
Setting a source for updates.......................................................................47
Setting an alternative source for updates...................................................48
Scheduling updates....................................................................................49
Updating via a proxy server........................................................................50
Limiting the bandwidth used.......................................................................51
Logging updates.........................................................................................52
Disinfection..........................................................................................................54
What is disinfection?...................................................................................54
Getting disinfection information...................................................................54
Setting up automatic disinfection................................................................55
Disinfecting on demand..............................................................................57
Disinfecting with a right−click scan.............................................................58
Recovering from virus side−effects.............................................................59
Managing quarantine items................................................................................60
What is Quarantine manager?....................................................................60
Dealing with viruses in quarantine..............................................................60
Configuring user rights for Quarantine manager.........................................62
Troubleshooting..................................................................................................64
System tray icon has a white cross.............................................................64
System tray icon is greyed out....................................................................65
Virus not disinfected....................................................................................65
Virus fragment reported..............................................................................66
Unable to access disk with infected boot sector.........................................66
Unable to access areas of Sophos Anti−Virus............................................67
Getting further help.....................................................................................67
Page 5

About Sophos Anti−Virus
This section includes the following.
What is Sophos Anti−Virus?•
Sophos Anti−Virus window•
Sophos Anti−Virus system tray icon•
What is on−access scanning?•
What is an on−demand scan?•
What is a right−click scan?•
What is Sophos Anti−Virus?
Sophos Anti−Virus is software that detects viruses, worms and Trojans on your
computer or network. It can also disinfect infected items. In particular, it can
check each file you access for viruses•
scan your computer or network for viruses•
eliminate viruses•
alert you when it finds a virus•
keep a log of its activity•
be updated to detect the latest viruses.•
Sophos Anti−Virus can be used in two ways:
via the Sophos Anti−Virus window•
via the Sophos Anti−Virus system tray icon.•
Sophos Anti−Virus can perform three types of scanning:
on−access•
on−demand•
right−click.•
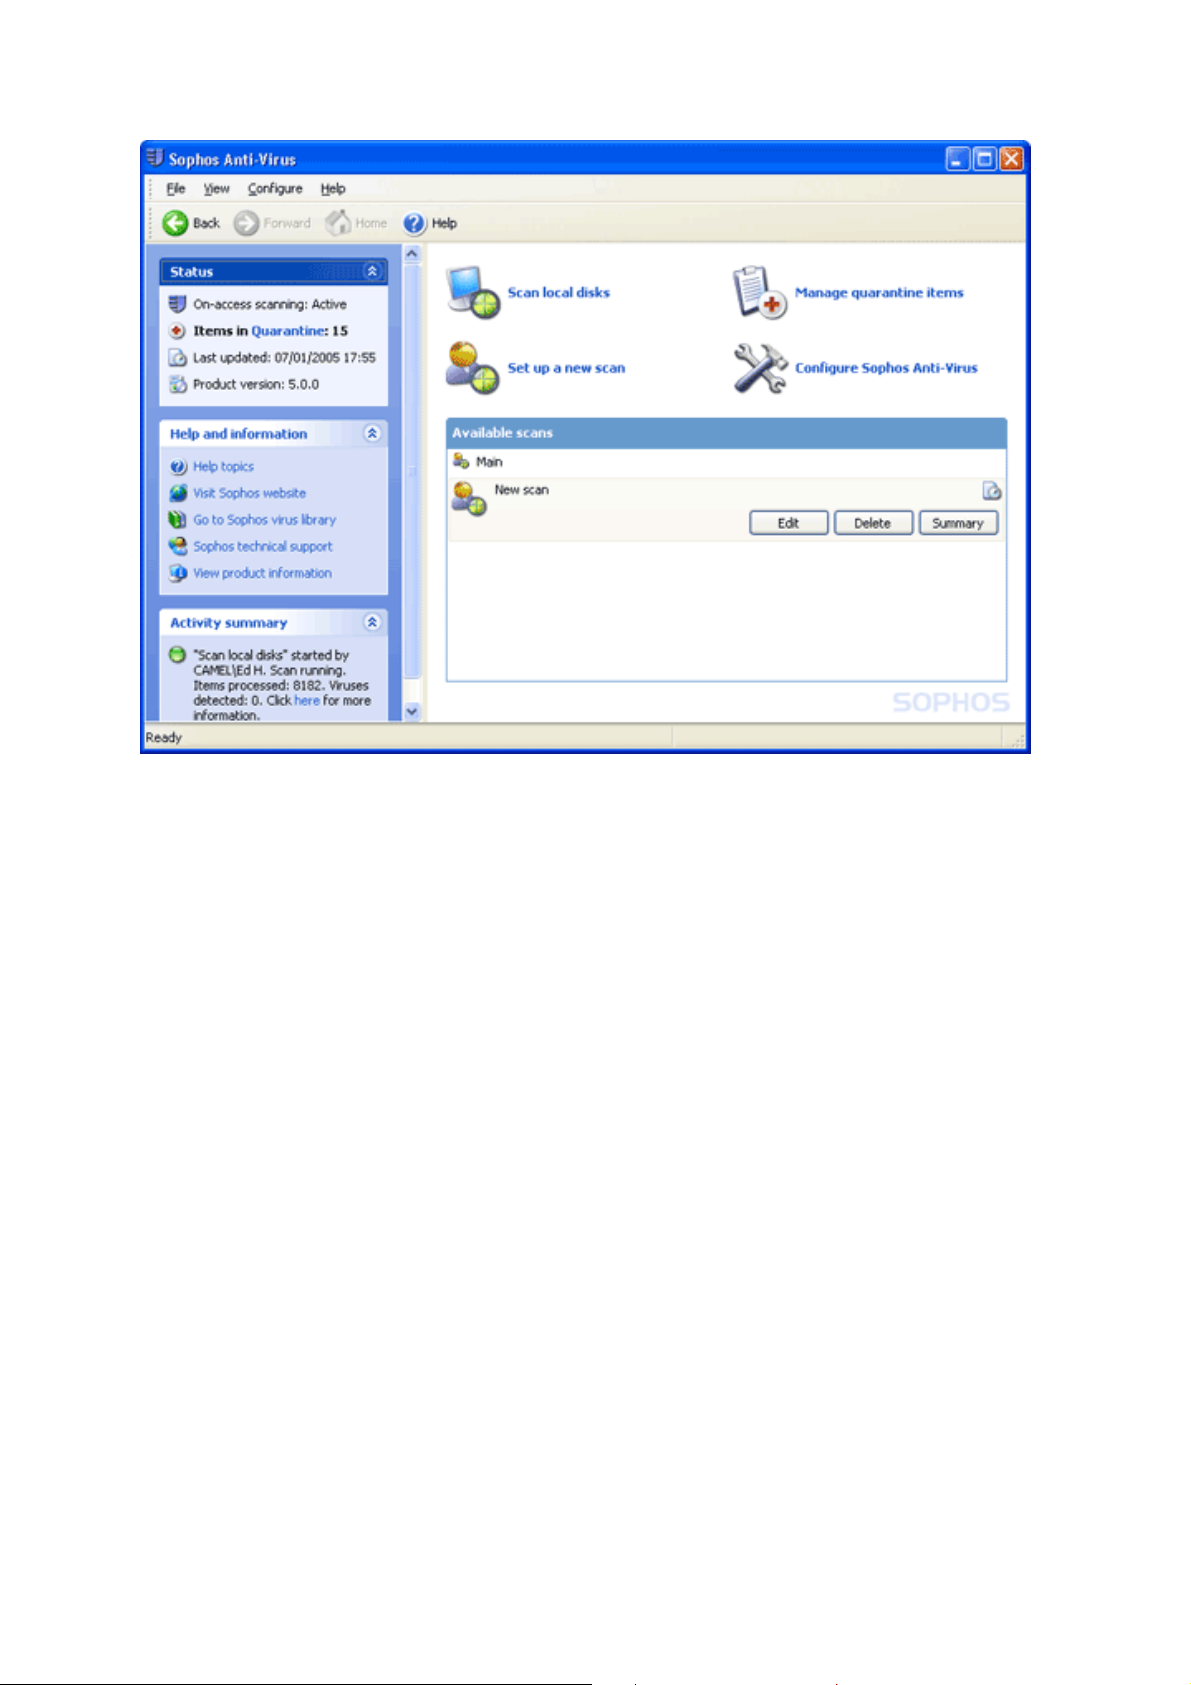
Sophos Anti−Virus window
To open the Sophos Anti−Virus window, right−click the Sophos Anti−Virus
system tray icon to display a menu.
Select Open Sophos Anti−Virus. The components of the window are described
below.
1
Page 6
Sophos Anti−Virus for Windows 2000/XP/2003 About Sophos Anti−Virus
Toolbar
This contains buttons for getting help and navigating between the pages in the
right−hand pane of the Sophos Anti−Virus window.
Status
This contains the status of on−access scanning, the number of items in
Quarantine, the last time Sophos Anti−Virus was updated and the product version
number.
Help and information
This enables you to contact Sophos technical support, and access help with
Sophos Anti−Virus and information on viruses. To see more detailed information
about your version of Sophos Anti−Virus and your computer, click View product
information.
Activity summary
This appears when you run a scan, and contains information about any viruses
found.
2
Page 7

Sophos Anti−Virus for Windows 2000/XP/2003 About Sophos Anti−Virus
Home page
This is displayed in the right−hand pane when you open the Sophos Anti−Virus
window. It includes the task list and the Available scans list. As you use the
Sophos Anti−Virus window, the content of the right−hand pane may change.
You can return to the home page by clicking the Home button.
The task list is displayed at the top of the home page. It enables you to scan local
disks, set up scans, manage infected items and configure Sophos Anti−Virus.
The Available scans list lists the scans that have been set up. From here, you
can run, edit or delete each scan, and view a summary of what happened the last
time the scan was run.
Sophos Anti−Virus system tray icon
The Sophos Anti−Virus system tray icon is always displayed, even if the Sophos
Anti−Virus window is closed. The appearance of the icon changes depending on
whether on−access scanning is active, whether Sophos Anti−Virus is updating
and whether Sophos Anti−Virus updated successfully last time.
If you pass the mouse over the icon, the tool tip displays the last time Sophos
Anti−Virus was updated.
If you right−click the icon, a menu is displayed. From here, you can
update Sophos Anti−Virus•
configure updating•
check the progress of an update•
open the Sophos Anti−Virus window.•
What is on−access scanning?
On−access scanning intercepts files as they are accessed, and grants
access to only those that are virus free.
What is an on−demand scan?
An on−demand scan is a virus scan of the computer, or parts of the
computer, that you can run immediately or schedule to run at another time.
3
Page 8

Sophos Anti−Virus for Windows 2000/XP/2003 About Sophos Anti−Virus
What is a right−click scan?
A right−click scan is a virus scan of selected item(s) in Windows Explorer,
that you can run by right−clicking the selection to display a menu, and
selecting Scan with Sophos Anti−Virus.
4
Page 9

Checking the computer is protected
This section includes the following.
Checking protection is on•
Turning protection on or off for the computer•
Checking protection is on
The computer is protected by on−access scanning.
On−access scanning intercepts files as they are accessed, and grants
access to only those that are virus free.
When on−access scanning is active, a blue shield is displayed in the system tray.
When on−access scanning is inactive, the shield is grey.
The status of on−access scanning is also indicated in the Sophos
Anti−Virus window under Status.
If your computer is on a network, on−access scanning has probably already been
configured. However, if you want to change the settings, refer to Configuring
scanning.
Turning protection on or off for the computer
If you turn protection off, Sophos Anti−Virus does not scan files that you
access for viruses.
In the home page of the Sophos Anti−Virus window, click Configure
1.
Sophos Anti−Virus.
Click On−access scanning.2.
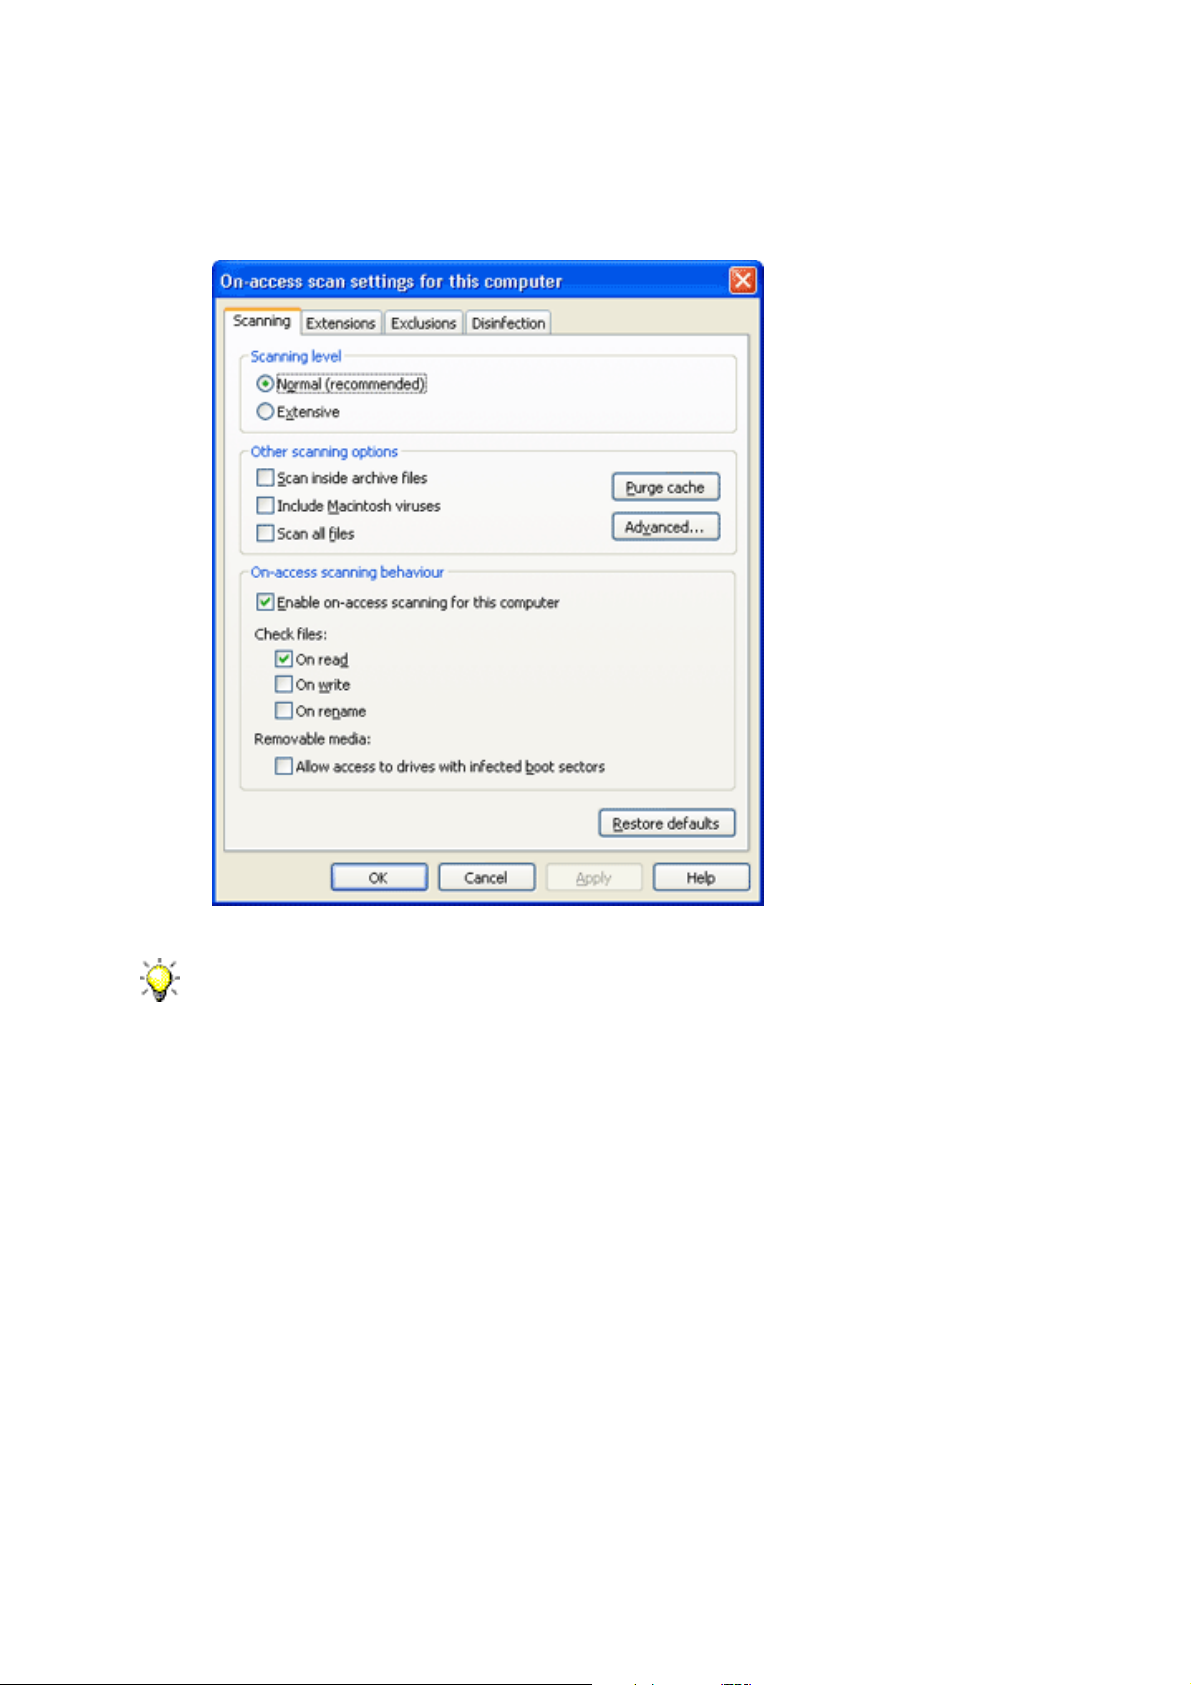
In the On−access scan settings for this computer dialog box, click the
3.
Scanning tab.
To turn on−access scanning on for the computer, select Enable
on−access scanning for this computer, and click OK. The Sophos
Anti−Virus system tray icon turns blue.
To turn on−access scanning off for the computer, deselect Enable
on−access scanning for this computer, and click OK. The Sophos
5
Page 10
Sophos Anti−Virus for Windows 2000/XP/2003 Checking the computer is protected
Anti−Virus system tray icon turns grey.
In the Sophos Anti−Virus window, the Status menu is updated.
Sophos Anti−Virus retains the settings you make here, even after you reboot
the computer. If you have turned on−access scanning off, it remains inactive
until you turn it on again.
6
Page 11
Scanning items on demand
This section includes the following.
What is an on−demand scan?•
Scanning local disks•
Setting up a scan•
Scheduling a scan•
Running a scan•
Editing a scan•
What is an on−demand scan?
An on−demand scan is a virus scan of the computer, or parts of the
computer, that you can run immediately or schedule to run at another time.
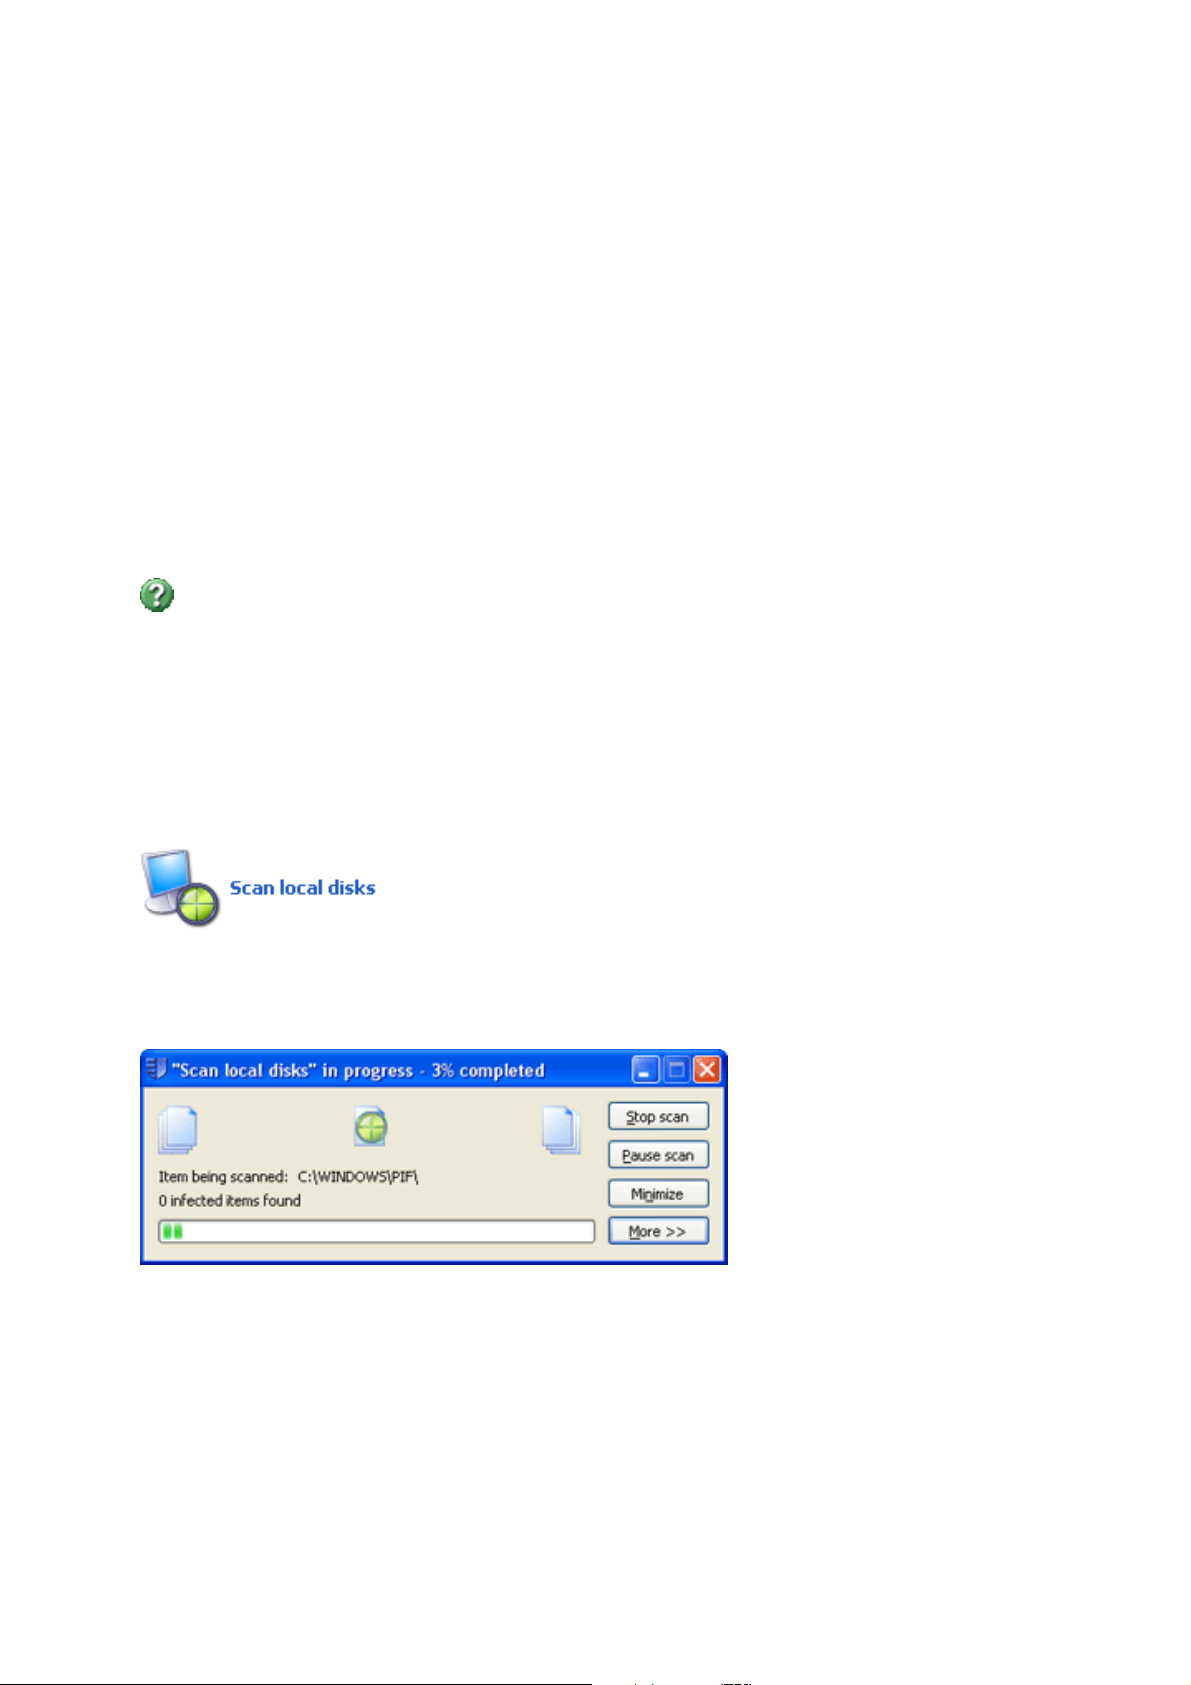
Scanning local disks
To run a scan of all disk drives, including boot sectors, on the computer, do as
follows.
In the home page of the Sophos Anti−Virus window, click Scan local disks.
A progress dialog box is displayed and the Activity summary appears in the
Sophos Anti−Virus window.
If any viruses are found, click More and refer to Disinfection.
To stop scanning, click Stop scan.
For information on setting up, scheduling, running and configuring a scan, refer to
the rest of this section and Configuring scanning.
7
Page 12
Sophos Anti−Virus for Windows 2000/XP/2003 Scanning items on demand
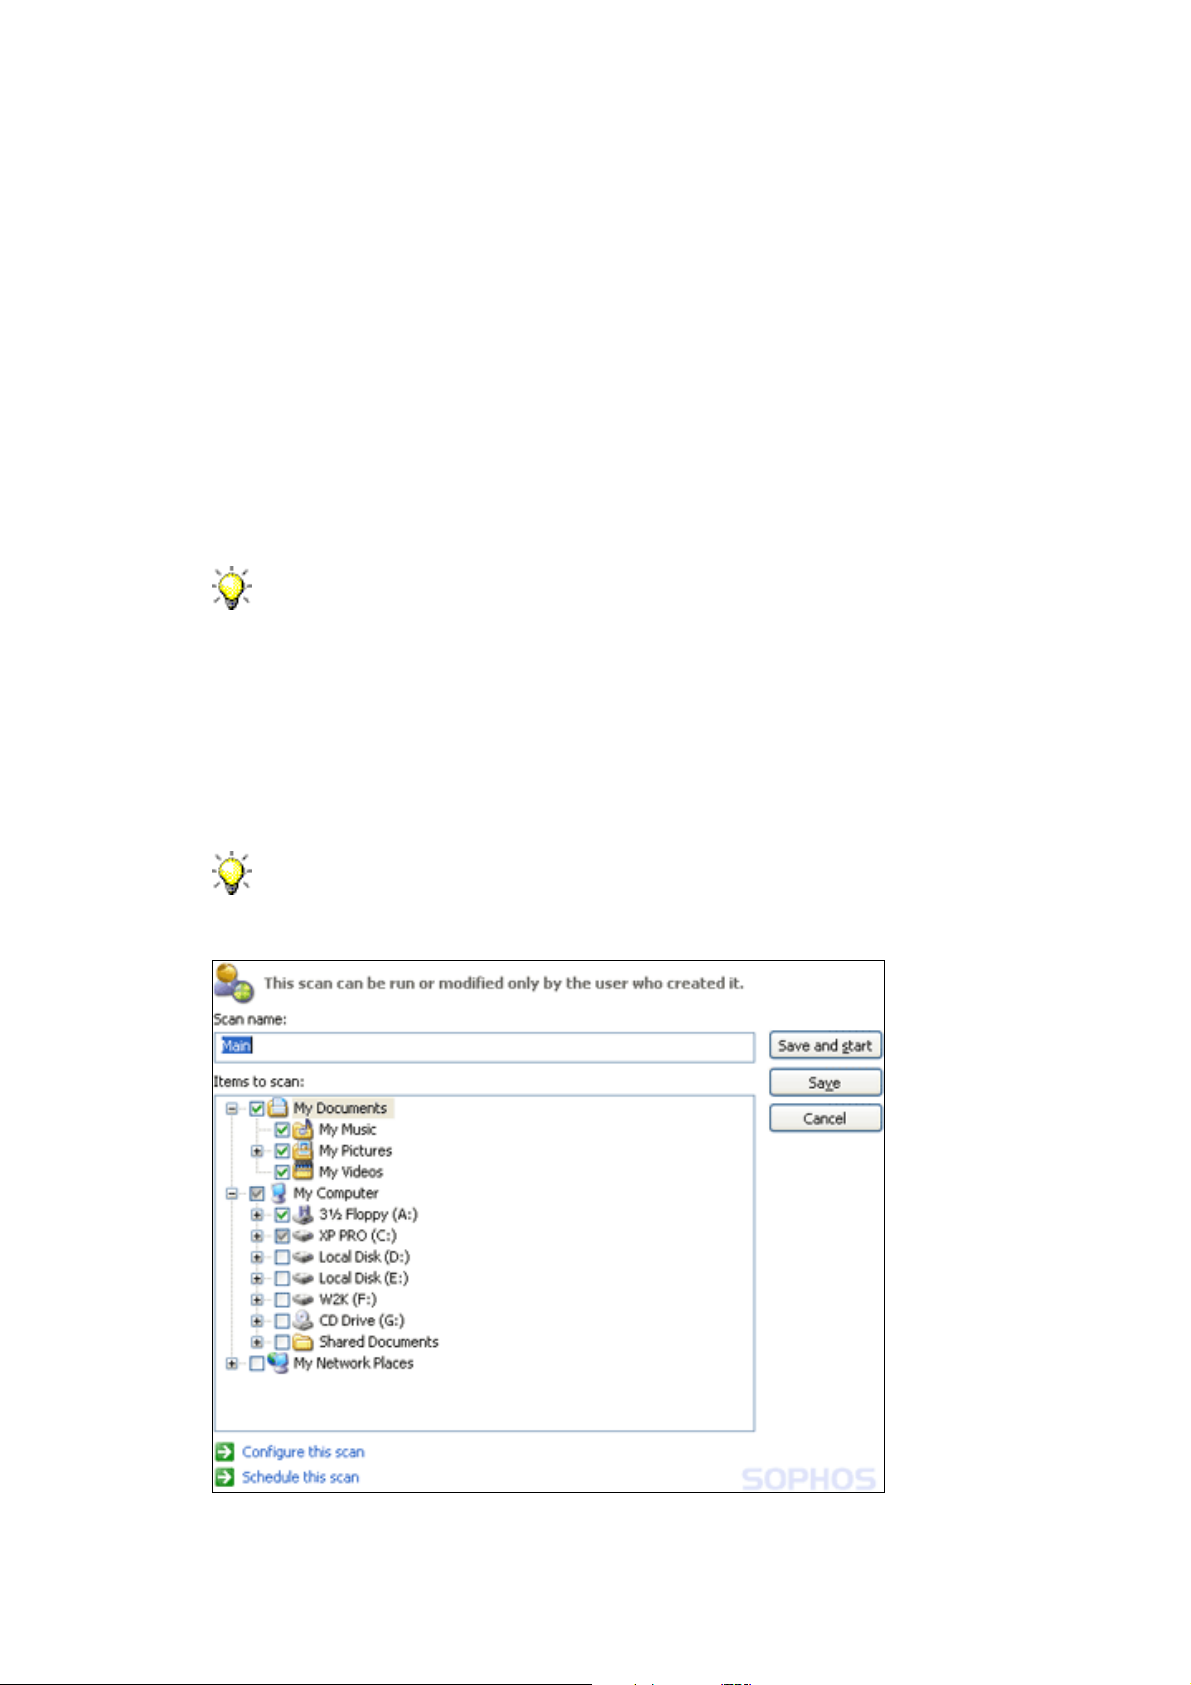
Setting up a scan
In the home page of the Sophos Anti−Virus window, click Set up a new
1.
scan to display the scan setup page.
In the Scan name text box, type a name for the scan.2.
In the Items to scan panel, select the drives and folders you want to scan.
To do this, click the check box to the left of each drive or folder. To learn
about the icons that appear in the check boxes, refer to Representation of
items to scan.
Drives or folders that are unavailable (because they are offline
or have been deleted) are displayed in a strikethrough font.
They are removed from the Items to scan panel if they are
deselected or there is a change in the selection of their parent
drive or folder(s).
To configure the scan further, click Configure this scan. (Refer to
Configuring scanning for more information.)
To schedule the scan, click Schedule this scan. (Refer to Scheduling a
scan for more information.)
You can't manually run a scan that you have scheduled. Scheduled
scans are displayed in the Available scans list with a clock icon.
Click Save to save the scan or Save and start to save and run the scan.
8
Page 13

Sophos Anti−Virus for Windows 2000/XP/2003 Scanning items on demand
Representation of items to scan
In the Items to scan panel, different icons are displayed in the check box next to
each item, depending on which items will be scanned. These icons are shown
below with explanations.
The item and all sub−items are not selected for scanning.
The item and all sub−items are selected for scanning.
The item is partially selected: some sub−items are not selected for scanning.
The item and all sub−items are excluded from this particular scan.
The item is partially excluded: some sub−items are excluded from this particular
scan.
The item and all sub−items are excluded from all on−demand scans, because of
an on−demand exclusion that has been set up.
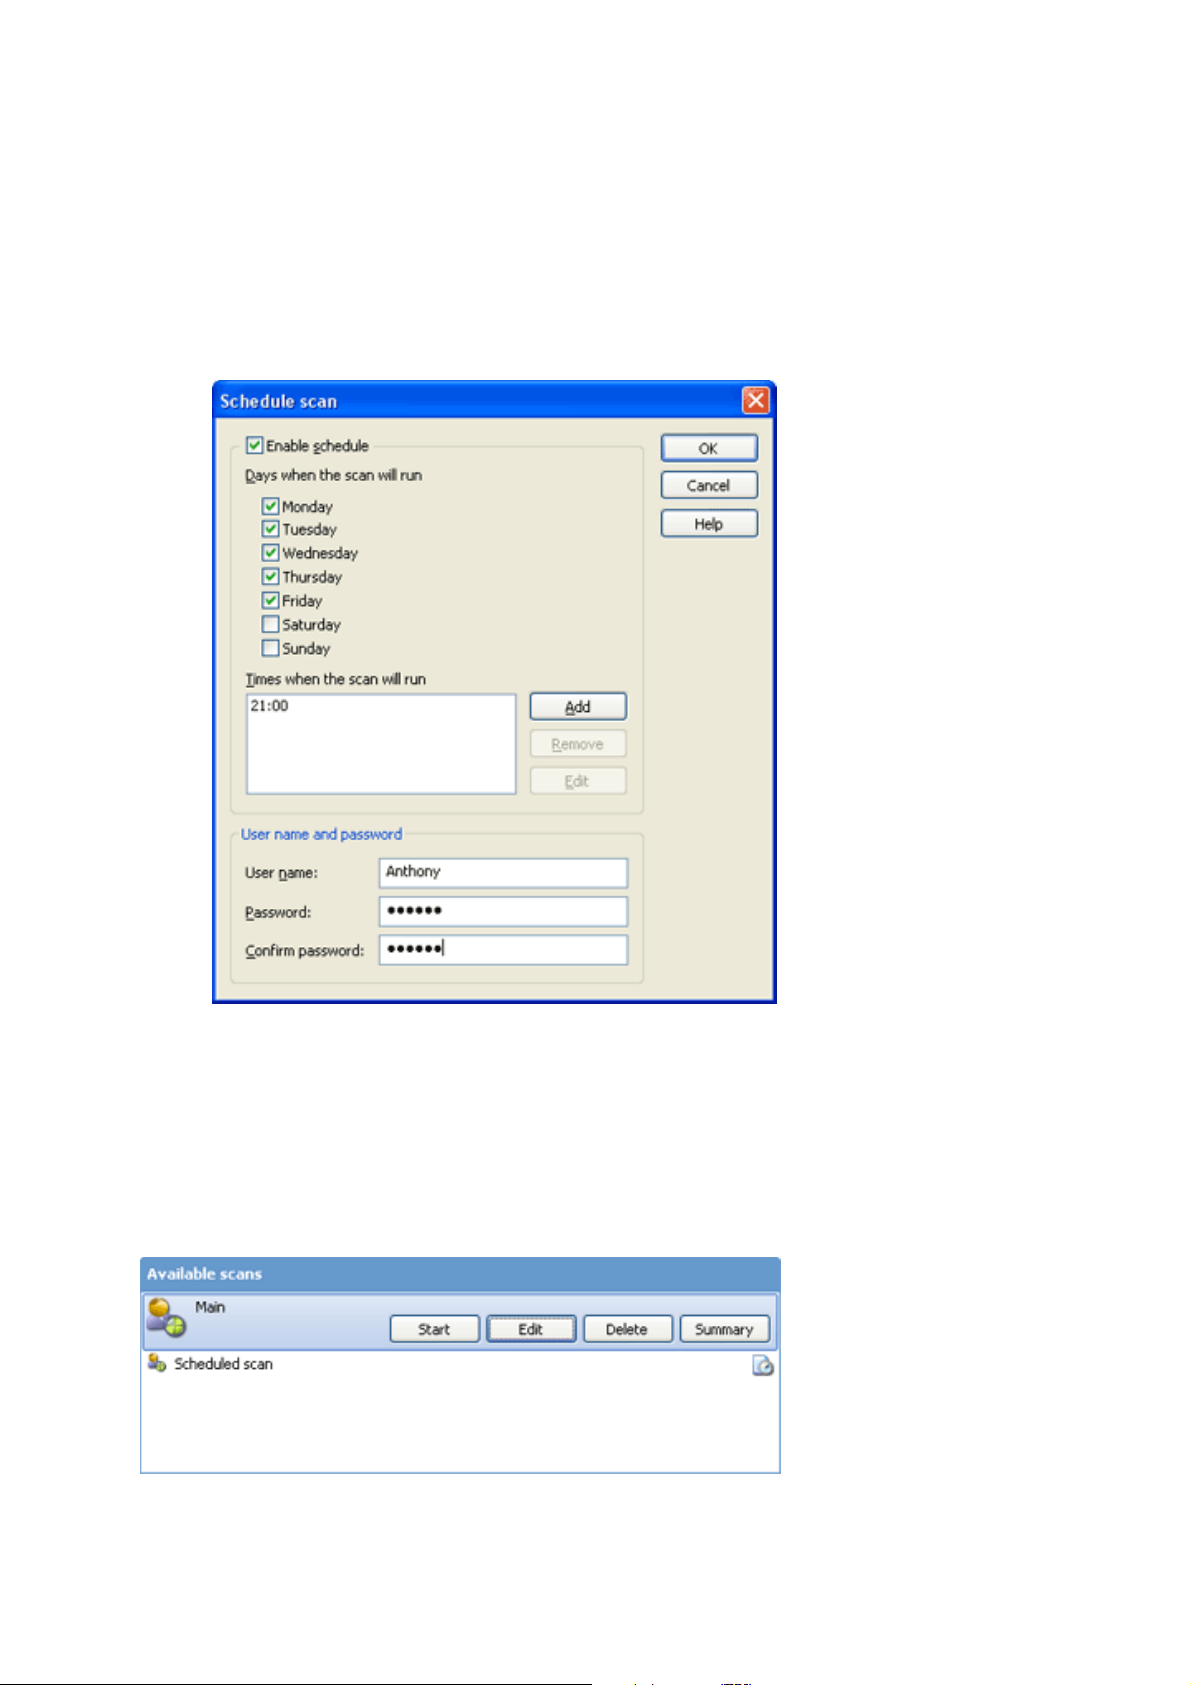
Scheduling a scan
To schedule a scan that you are setting up or editing, do as follows.
You can't manually run a scan that you have scheduled. Scheduled scans are
displayed in the Available scans list with a clock icon.
In the right−hand pane of the Sophos Anti−Virus window, click Schedule
1.
this scan.
In the Schedule scan dialog box, select Enable schedule.2.
Select the day(s) on which the scan should run.
Add the time(s) by clicking Add.
9
Page 14
Sophos Anti−Virus for Windows 2000/XP/2003 Scanning items on demand
If necessary, remove or edit a time by selecting it and clicking Remove or
Edit, respectively.
Type a user name and password. The scheduled scan runs with the
access rights of that user.
Click OK.
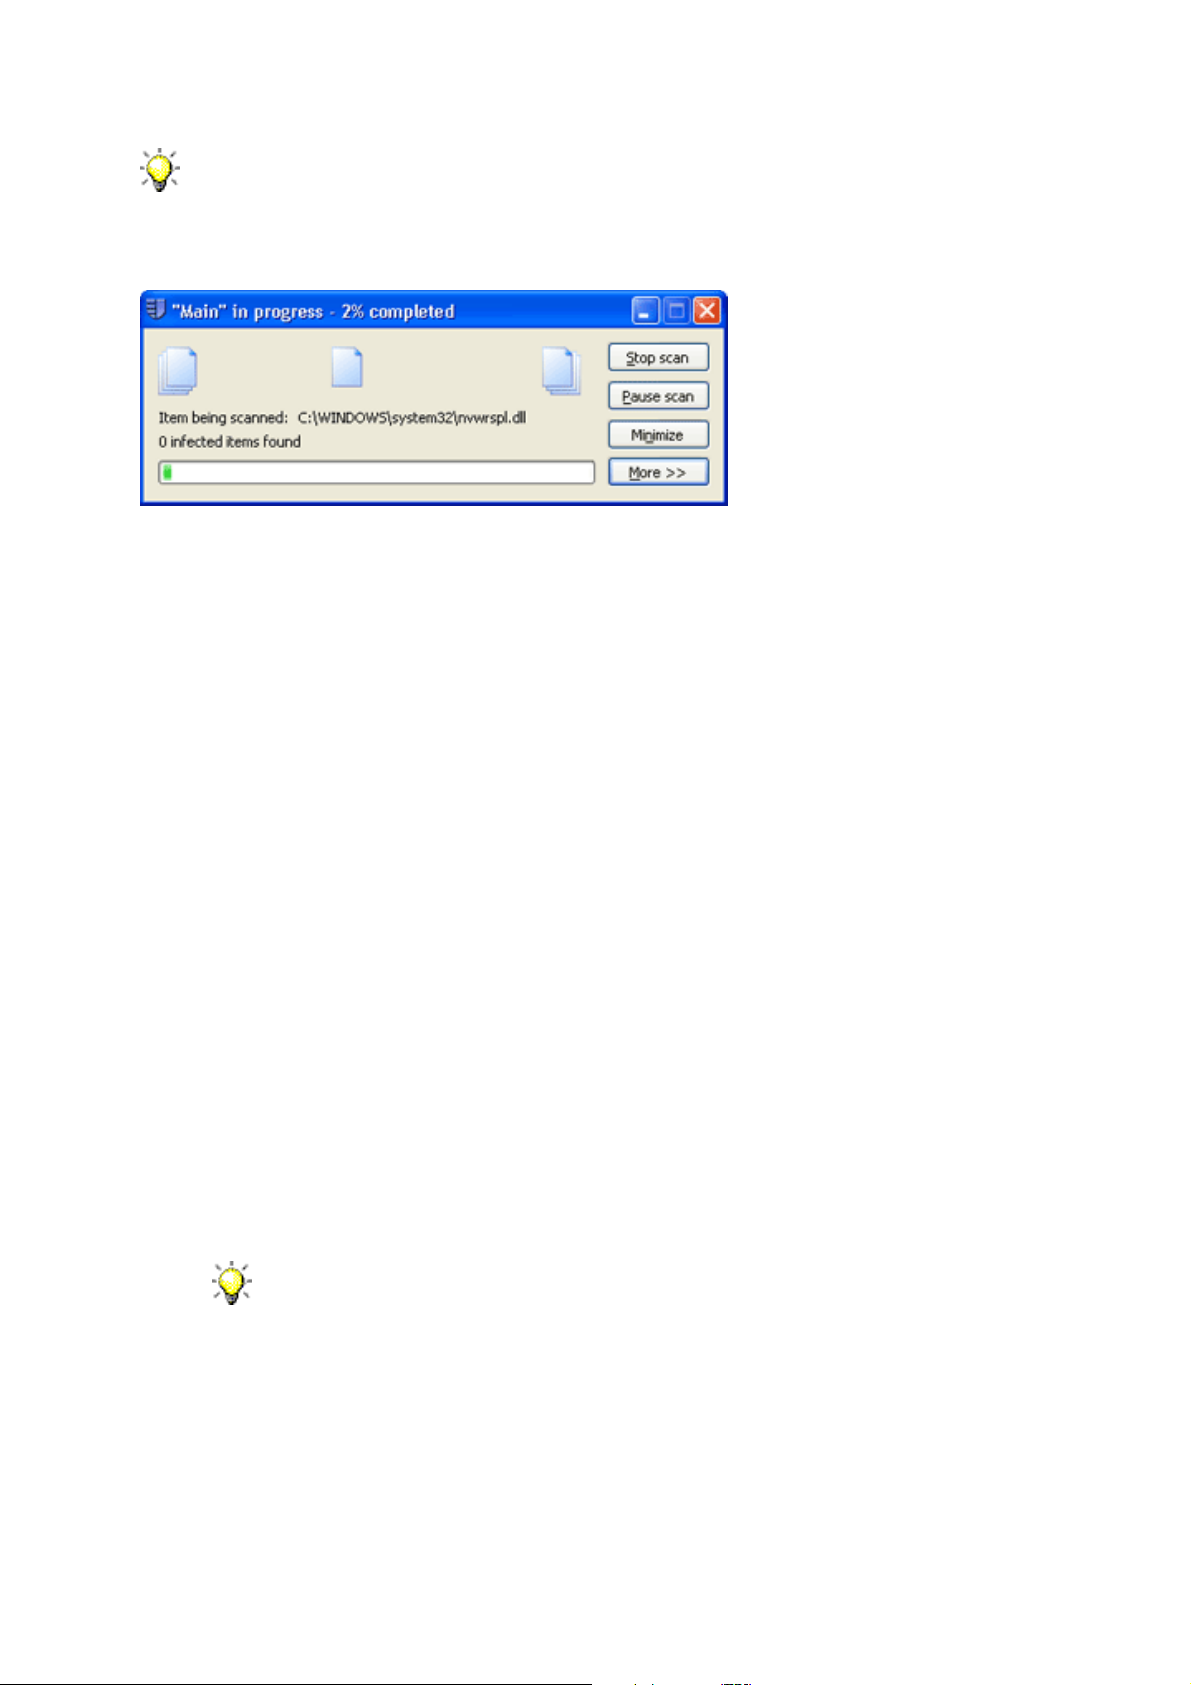
Running a scan
To run a scan that has been set up, do as follows.
In the home page of the Sophos Anti−Virus window, in the Available scans list,
select the scan you want to run. Click Start.
10
Page 15
Sophos Anti−Virus for Windows 2000/XP/2003 Scanning items on demand
You can't manually run a scan that you have scheduled. Scheduled scans are
displayed in the Available scans list with a clock icon.
A progress dialog box is displayed and the Activity summary appears in the
Sophos Anti−Virus window.
If any viruses are found, click More and refer to Disinfection.
To stop scanning, click Stop scan.
For information on setting up, scheduling and configuring a scan, refer to the rest
of this section and Configuring scanning.
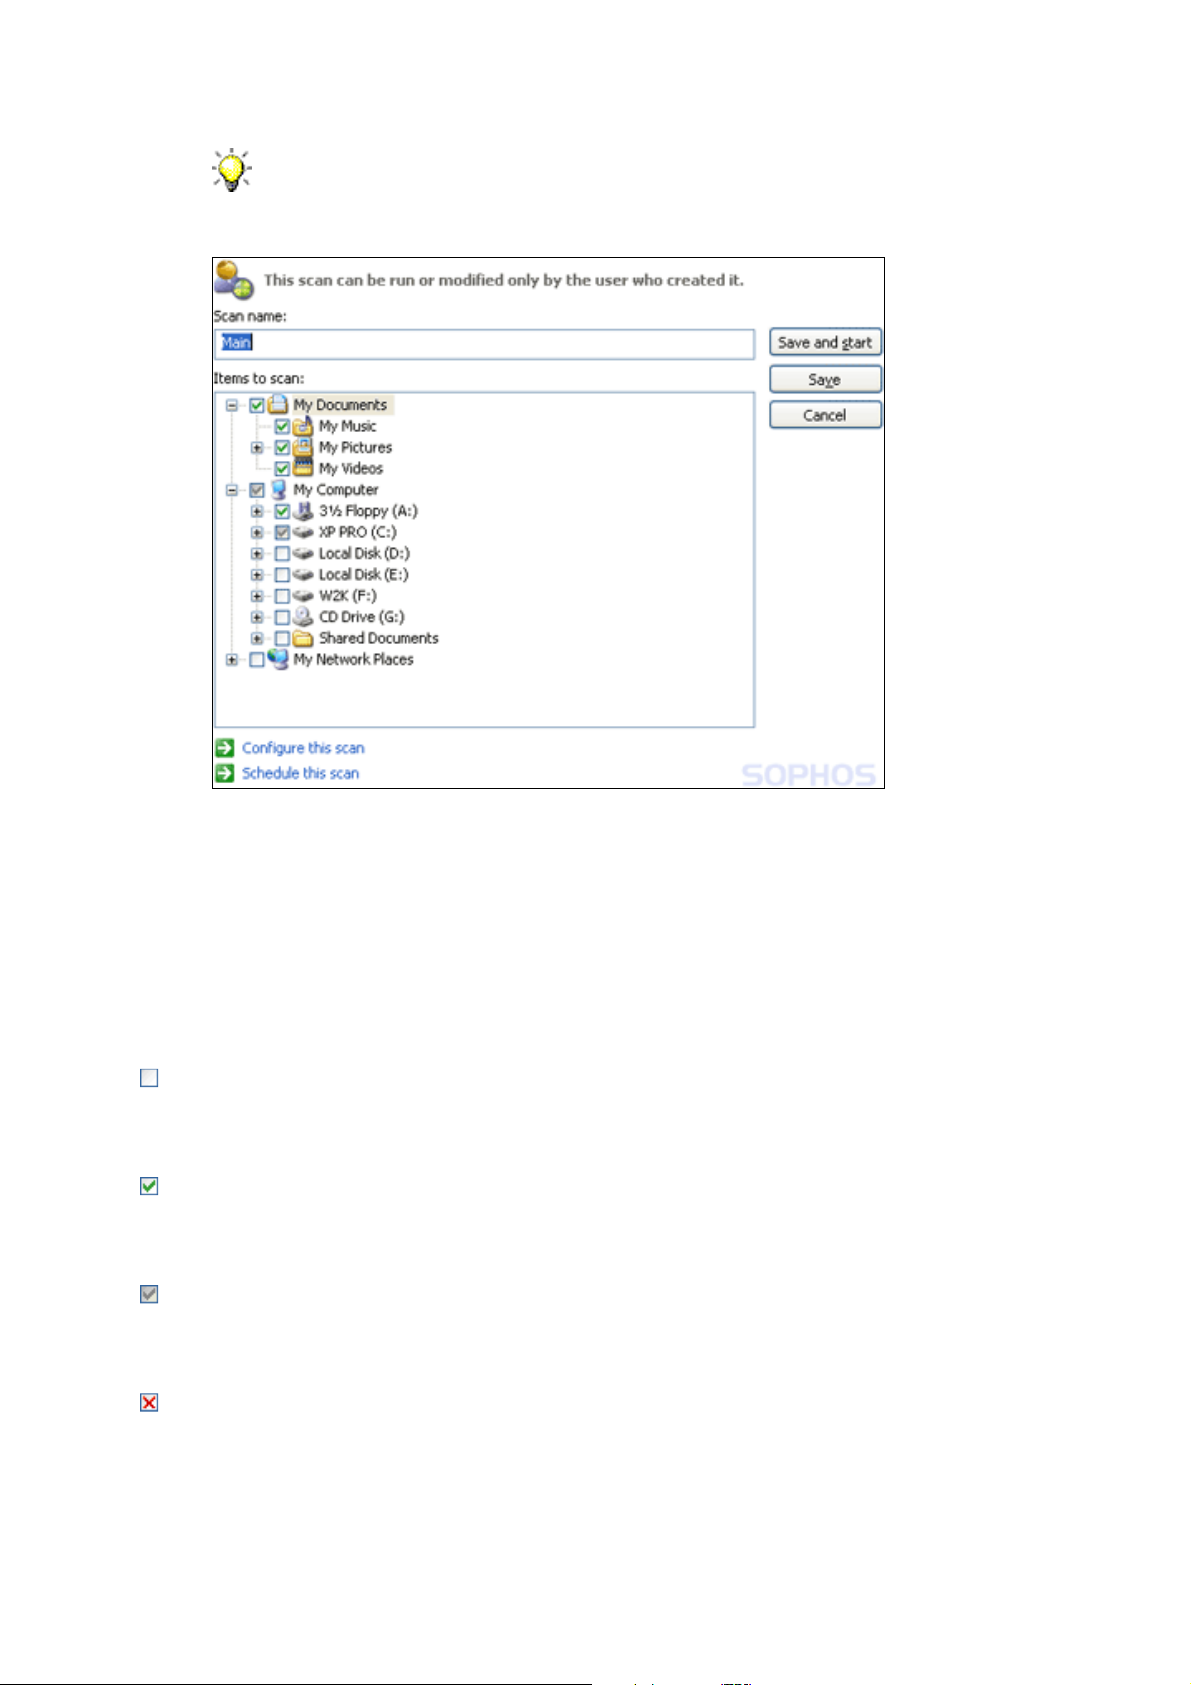
Editing a scan
To edit a scan that has been set up, do as follows.
In the home page of the Sophos Anti−Virus window, in the Available
1.
scans list, select the scan you want to edit. Click Edit to display the scan
setup page.
To rename the scan, in the Scan name text box, type a name for the scan.2.
To change which items to scan, in the Items to scan panel, select or
deselect the drives and folders you want to scan. To do this, click the check
box to the left of each drive or folder. To learn about the icons that appear
in the check boxes, refer to Representation of items to scan.
Drives or folders that are unavailable (because they are offline
or have been deleted) are displayed in a strikethrough font.
They are removed from the Items to scan panel if they are
deselected or there is a change in the selection of their parent
drive or folder(s).
To configure the scan further, click Configure this scan. (Refer to
Configuring scanning for more information.)
To schedule the scan, click Schedule this scan. (Refer to Scheduling a
scan for more information.)
11
Page 16
Sophos Anti−Virus for Windows 2000/XP/2003 Scanning items on demand
You can't manually run a scan that you have scheduled. Scheduled
scans are displayed in the Available scans list with a clock icon.
Click Save to save the scan or Save and start to save and run the scan.
Representation of items to scan
In the Items to scan panel, different icons are displayed in the check box next to
each item, depending on which items will be scanned. These icons are shown
below with explanations.
The item and all sub−items are not selected for scanning.
The item and all sub−items are selected for scanning.
The item is partially selected: some sub−items are not selected for scanning.
The item and all sub−items are excluded from this particular scan.
The item is partially excluded: some sub−items are excluded from this particular
scan.
12
Page 17

Sophos Anti−Virus for Windows 2000/XP/2003 Scanning items on demand
The item and all sub−items are excluded from all on−demand scans, because of
an on−demand exclusion that has been set up.
13
Page 18
Scanning a single item
This section includes the following.
Scanning a single item•
Scanning a single item
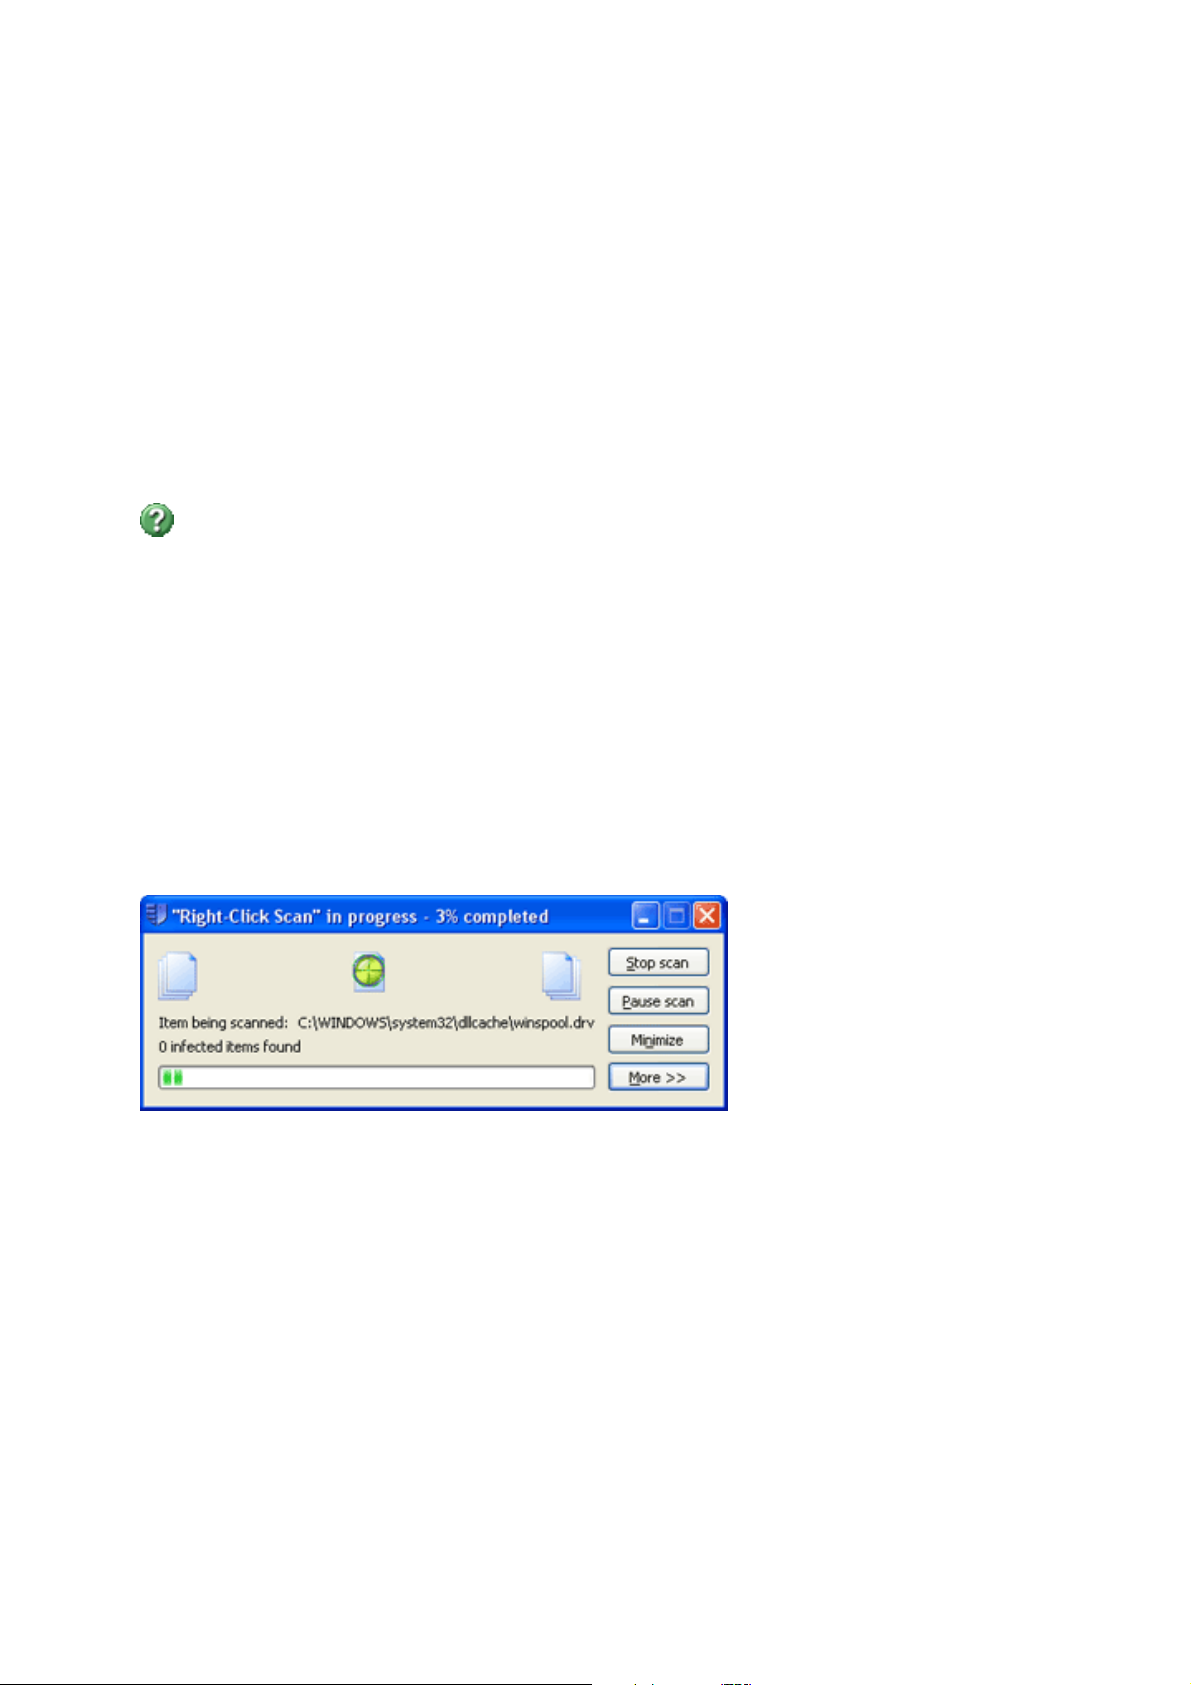
You can scan a single item by performing a right−click scan.
A right−click scan is a virus scan of selected item(s) in Windows Explorer,
that you can run by right−clicking the selection to display a menu, and
selecting Scan with Sophos Anti−Virus.
Open Windows Explorer. To do this, at the taskbar, click
1.
Start|Programs|Accessories|Windows Explorer.
Select the file(s), folder(s) and/or disk drives you want to scan.2.
Right−click the selection to display a menu, and select Scan with Sophos
3.
Anti−Virus.
A progress dialog box is displayed.
If any viruses are found, click More and refer to Disinfection.
To stop scanning, click Stop scan.
For information on configuring a scan, refer to Configuring scanning.
14
Page 19

Restricting access rights
This section includes the following.
Types of user•
Changing membership of Sophos user groups•
Types of user
Sophos Anti−Virus restricts access to certain parts of the software to certain types
of user. This security is based on the user groups that have been set up in
Windows on this computer. When Sophos Anti−Virus is installed, each user is
assigned to one of the Sophos user groups depending on their Windows user
group, as follows.
Members of the Windows Administrators group are assigned to the
•
SophosAdministrator group.
Members of the Windows Power Users group are assigned to the
•
SophosPowerUser group.
Members of the Windows Users group are assigned to the SophosUser
•
group.
Any user who is not assigned to one of the Sophos user groups, including Guest
users, can perform only
on−access scanning•
scans run from a right−click menu.•
Members of the SophosUser group can perform the above functions and
access the Sophos Anti−Virus window•
set up and run on−demand scans•
configure scans run from a right−click menu•
manage, with limited privileges, quarantined items.•
Members of the SophosPowerUser group have the same rights as members of
the SophosUser group with the addition of greater privileges in Quarantine
manager.
Members of the SophosAdministrator group can use or configure any part of
Sophos Anti−Virus.
15
Page 20

Sophos Anti−Virus for Windows 2000/XP/2003 Restricting access rights
Changing membership of Sophos user groups
To change the Sophos user group for a user, you must do as follows. (Refer to
your Windows documentation if necessary.)
Use Windows to move the user from one Sophos user group to another.1.
When that user logs on to Windows again, they should find that their
2.
access rights have changed accordingly.
16
Page 21

Changing settings for multiple users
This section includes the following.
Changing settings for all computers•
Changing settings for all users on the computer•
Changing settings for all computers
To configure Sophos Anti−Virus on workstations from a central location on the
network, refer to the Sophos Enterprise Console help.
Changing settings for all users on the computer
To configure Sophos Anti−Virus for all users on the computer, in the home page
of the Sophos Anti−Virus window, click Configure Sophos Anti−Virus. From
the Configure page, you can change the following settings.
On−access scanning•
On−demand extensions and exclusions•
User rights for Quarantine manager•
Messaging•
Log for this computer•
Updating•
You need to be a Sophos Administrator to change these settings.
17
Page 22

Configuring scanning
This section includes the following.
Changing types of file scanned•
Excluding files from scanning•
Changing when on−access scanning occurs•
Scanning inside archive files•
Scanning Macintosh files•
Scanning all files•
Changing types of file scanned
If the Sophos Enterprise Console is used to administer Sophos
Anti−Virus on workstations, it may override changes made here. To
avoid this, refer to the console help.
In the home page of the Sophos Anti−Virus window, click Configure
1.
Sophos Anti−Virus.
To change the settings for on−access scanning, click On−access
2.
scanning.
To change the settings for on−demand and right−click scanning, click
On−demand extensions and exclusions.
Click the Extensions tab. Set the options as described below.3.
18
Page 23

Sophos Anti−Virus for Windows 2000/XP/2003 Configuring scanning
Scan all files
Click this to enable scanning of all files, regardless of the filename
extension.
Allow me to control exactly what is scanned
Click this to restrict scanning to only files with a particular filename
extension, specified in the extension list.
The extension list includes file types that Sophos recommends
are scanned. Be careful if you alter the list as explained below.
To add a filename extension to the list, click Add. You can use the wildcard
? to match any single character.
To remove a filename extension from the list, select the extension and click
Remove.
To change a filename extension in the list, select the extension and click
Edit.
To enable scanning of files with no filename extension, select Scan files
with no extension.
19
Page 24

Sophos Anti−Virus for Windows 2000/XP/2003 Configuring scanning
Excluding items from scanning
If the Sophos Enterprise Console is used to administer Sophos
Anti−Virus on workstations, it may override changes made here. To
avoid this, refer to the console help.
The procedure described below applies to all on−demand scans. To
exclude items from a particular on−demand scan, refer to Editing a
scan.
In the home page of the Sophos Anti−Virus window, click Configure
1.
Sophos Anti−Virus.
To change the settings for on−access scanning, click On−access
2.
scanning.
To change the settings for on−demand and right−click scanning, click
On−demand extensions and exclusions.
Click the Exclusions tab. Set the options as described below.3.
20
Page 25

Sophos Anti−Virus for Windows 2000/XP/2003 Configuring scanning
Excluded item
To specify items that should be excluded from scanning, click Add. In the
Exclude item dialog box, specify the type and name of the item to be
excluded. Refer to Specifying excluded items.
To remove items from the list of excluded items, click Remove.
To change items in the list of excluded items, click Edit.
Specifying excluded items
In the Exclude item dialog box, select the Item type. All remote files means all
files not on this computer. Unless you select All remote files, specify the Item
name by using the Browse button or typing in the text box. Further details on
specifying item names are given below.
Filename•
You can specify only the name of a file, and Sophos Anti−Virus excludes all
files with that name, wherever they are located. For example
fred.bmp
causes Sophos Anti−Virus to exclude all files called fred.bmp, wherever
they are located.
Full path•
You can specify the exact location and name of a file, and Sophos
Anti−Virus excludes only that particular file. The path can include the drive
or the share. For example
C:\Miscellaneous\fred.bmp
21
Page 26

Sophos Anti−Virus for Windows 2000/XP/2003 Configuring scanning
causes Sophos Anti−Virus to exclude fred.bmp in the Miscellaneous folder
on the C: drive.
\\Server1\Users\Fred\Letter.rtf
causes Sophos Anti−Virus to exclude Letter.rtf in the Fred folder in the
Users share on Server1.
If you don't specify the drive or share, Sophos Anti−Virus matches the path
at the root of any drive or share.
Partial path•
You can specify a drive or share, and Sophos Anti−Virus excludes
everything from that drive or share and below. For example
A:
causes Sophos Anti−Virus to exclude everything on the A: drive.
You can specify a folder, and Sophos Anti−Virus excludes everything from
that folder and below. For example
D:\Tools\
causes Sophos Anti−Virus to exclude everything from the Tools folder on
the D: drive and all subfolders.
You can specify a folder and filename, and Sophos Anti−Virus excludes
any folder and filename that match. For example
logs\log.txt
causes Sophos Anti−Virus to exclude log.txt in any folder called logs on any
drive or share.
Wildcards
The wildcard ? can be used only in a filename or extension. It generally matches
any single character. However, when used at the end of a filename or extension, it
matches zero or one character. For example file??.txt matches file.txt, file1.txt and
file12.txt but not file123.txt.
The wildcard * can be used only in a filename or extension, in the form
[filename].* or *.[extension]. For example, file*.txt, file.txt* and file.*txt are invalid.
22
Page 27

Sophos Anti−Virus for Windows 2000/XP/2003 Configuring scanning
Multiple filename extensions
Filenames with multiple extensions are treated as if the last extension is the
extension and the rest are part of the filename. For example,
[filename].[extension1].[extension2] means the filename is [filename].[extension1]
and the extension is [extension2].
Standard naming conventions
The filename or path is validated against standard naming conventions (e.g. a
folder name may contain spaces but may not contain only spaces).
Changing when on−access scanning occurs
If the Sophos Enterprise Console is used to administer Sophos
Anti−Virus on workstations, it may override changes made here. To
avoid this, refer to the console help.
You can specify whether Sophos Anti−Virus scans files when they're opened,
when they're saved or when they're renamed.
In the home page of the Sophos Anti−Virus window, click Configure
1.
Sophos Anti−Virus.
In the Configure page, click On−access scanning.2.
In the On−access scan settings for this computer dialog box, click the
3.
Scanning tab. Set the options as described below.
To specify that files must be scanned when they're opened, click On read.
To specify that files must be scanned when they're saved, click On write.
To specify that files must be scanned when they're renamed, click On
rename.
23
Page 28

Sophos Anti−Virus for Windows 2000/XP/2003 Configuring scanning
Scanning inside archive files
You can enable Sophos Anti−Virus to scan inside archive files. You can do this for
on−access scanning•
on−demand scanning•
scans run from a right−click menu.•
Scanning inside archives on access
If the Sophos Enterprise Console is used to administer Sophos
Anti−Virus on workstations, it may override changes made here. To
avoid this, refer to the console help.
Scanning inside archive files makes scanning significantly
slower and is rarely required. Even if you don't select the option,
when you attempt to access a file extracted from the archive file,
the extracted file is scanned.
Whether you select this option or not, files compressed with dynamic compression
utilities (PKLite, LZEXE and Diet) are scanned.
In the home page of the Sophos Anti−Virus window, click Configure
1.
Sophos Anti−Virus.
24
Page 29

Sophos Anti−Virus for Windows 2000/XP/2003 Configuring scanning
In the Configure page, click On−access scanning.2.
In the On−access scan settings for this computer dialog box, click the
3.
Scanning tab.
Select Scan inside archive files.4.
To enable scanning inside only particular archive file types, click
Advanced. In the Advanced scanning settings dialog box, select the
archive file types that you want Sophos Anti−Virus to scan inside.
The advanced settings are very specialised and you should use them
only with advice from Sophos technical support.
Scanning inside archives on demand
Scanning inside archive files makes scanning significantly
slower and is rarely required. Even if you don't select the option,
when you attempt to access a file extracted from the archive file,
the extracted file is scanned.
Whether you select this option or not, files compressed with dynamic compression
utilities (PKLite, LZEXE and Diet) are scanned.
25
Page 30

Sophos Anti−Virus for Windows 2000/XP/2003 Configuring scanning
In the home page of the Sophos Anti−Virus window, in the Available
1.
scans list, select the scan you want to edit. Click Edit.
In the scan setup page, click Configure this scan.2.
In the Individual scan settings dialog box, click the Scanning tab.3.
Select Scan inside archive files.4.
To enable scanning inside only particular archive file types, click
Advanced. In the Advanced scanning settings dialog box, select the
archive file types that you want Sophos Anti−Virus to scan inside.
The advanced settings are very specialised and you should use them
only with advice from Sophos technical support.
Scanning inside archive files from a right−click menu
Scanning inside archive files makes scanning significantly slower. Even
if you don't select the option, when you attempt to access a file
extracted from the archive file, the extracted file is scanned.
Whether you select this option or not, files compressed with dynamic compression
utilities (PKLite, LZEXE and Diet) are scanned.
26
Page 31

Sophos Anti−Virus for Windows 2000/XP/2003 Configuring scanning
On the Configure menu, click Right−click scanning.1.
In the Right−click scan settings for this user dialog box, click the
2.
Scanning tab.
Select Scan inside archive files.3.
To enable scanning inside only particular archive file types, click
Advanced. In the Advanced scanning settings dialog box, select the
archive file types that you want Sophos Anti−Virus to scan inside.
The advanced settings are very specialised and you should use them
only with advice from Sophos technical support.
Scanning Macintosh files
You can enable Sophos Anti−Virus to scan Macintosh files stored on Windows
computers. You can do this for
on−access scanning•
on−demand scanning•
scans run from a right−click menu.•
27
Page 32

Sophos Anti−Virus for Windows 2000/XP/2003 Configuring scanning
Scanning Macintosh files on access
If the Sophos Enterprise Console is used to administer Sophos
Anti−Virus on workstations, it may override changes made here. To
avoid this, refer to the console help.
In the home page of the Sophos Anti−Virus window, click Configure
1.
Sophos Anti−Virus.
In the Configure page, click On−access scanning.2.
In the On−access scan settings for this computer dialog box, click the
3.
Scanning tab.
Select Include Macintosh viruses. This enables Sophos Anti−Virus to
4.
scan executable Macintosh files.
Scanning Macintosh files on demand
In the home page of the Sophos Anti−Virus window, in the Available
1.
scans list, select the scan you want to edit. Click Edit.
In the scan setup page, click Configure this scan.2.
28
Page 33

Sophos Anti−Virus for Windows 2000/XP/2003 Configuring scanning
In the Individual scan settings dialog box, click the Scanning tab.3.
Select Include Macintosh viruses. This enables Sophos Anti−Virus to
4.
scan executable Macintosh files.
Scanning Macintosh files from a right−click menu
On the Configure menu, click Right−click scanning.1.
In the Right−click scan settings for this user dialog box, click the
2.
Scanning tab.
Select Include Macintosh viruses. This enables Sophos Anti−Virus to
3.
scan executable Macintosh files.
29
Page 34

Sophos Anti−Virus for Windows 2000/XP/2003 Configuring scanning
Scanning all files
You can enable Sophos Anti−Virus to scan all files, regardless of the filename
extension. You can do this for
on−access scanning•
on−demand scanning•
scans run from a right−click menu.•
Scanning all files on access
If the Sophos Enterprise Console is used to administer Sophos
Anti−Virus on workstations, it may override changes made here. To
avoid this, refer to the console help.
In the home page of the Sophos Anti−Virus window, click Configure
1.
Sophos Anti−Virus.
In the Configure page, click On−access scanning.2.
In the On−access scan settings for this computer dialog box, click the
3.
Scanning tab.
30
Page 35

Sophos Anti−Virus for Windows 2000/XP/2003 Configuring scanning
Select Scan all files.4.
Scanning all files on demand
You can enable
all on−demand scans•
a particular on−demand scan•
to scan all files.
Enabling all on−demand scans to scan all files
In the home page of the Sophos Anti−Virus window, click Configure
1.
Sophos Anti−Virus.
In the Configure page, click On−demand extensions and exclusions.2.
In the On−demand extensions and exclusions dialog box, click the
3.
Extensions tab.
Click Scan all files.4.
31
Page 36

Sophos Anti−Virus for Windows 2000/XP/2003 Configuring scanning
Enabling a particular on−demand scan to scan all files
In the home page of the Sophos Anti−Virus window, in the Available
1.
scans list, select the scan you want to edit. Click Edit.
In the scan setup page, click Configure this scan.2.
In the Individual scan settings dialog box, click the Scanning tab.3.
Select Scan all files.4.
32
Page 37

Sophos Anti−Virus for Windows 2000/XP/2003 Configuring scanning
Scanning all files from a right−click menu
On the Configure menu, click Right−click scanning.1.
In the Right−click scan settings for this user dialog box, click the
2.
Scanning tab.
Select Scan all files.3.
33
Page 38

Sophos Anti−Virus for Windows 2000/XP/2003 Configuring scanning
34
Page 39

Configuring alerts
This section includes the following.
Desktop messaging•
Email alerting•
SNMP messaging•
Event logging•
Desktop messaging
If the Sophos Enterprise Console is used to administer Sophos
Anti−Virus on workstations, it may override changes made here. To
avoid this, refer to the console help.
Sophos Anti−Virus can display desktop messages like the one shown below when
a virus is found. This applies only to on−access scanning.
To enable Sophos Anti−Virus to display desktop messages, do as follows.
In the home page of the Sophos Anti−Virus window, click Configure
1.
Sophos Anti−Virus.
In the Configure page, click Messaging.2.
In the Messaging dialog box, click the Desktop messaging tab. Set the
3.
options as described below.
35
Page 40

Sophos Anti−Virus for Windows 2000/XP/2003 Configuring alerts
Enable desktop messaging
Select this to enable Sophos Anti−Virus to display desktop messages when
a virus is found.
User−defined message
In this text box, you can type a message that will be added to the end of the
standard message.
Email alerting
If the Sophos Enterprise Console is used to administer Sophos
Anti−Virus on workstations, it may override changes made here. To
avoid this, refer to the console help.
To enable Sophos Anti−Virus to send email alerts when a virus is found or an
error occurs, do as follows. This applies to on−access, on−demand and right−click
scanning.
In the home page of the Sophos Anti−Virus window, click Configure
1.
Sophos Anti−Virus.
In the Configure page, click Messaging.2.
36
Page 41

Sophos Anti−Virus for Windows 2000/XP/2003 Configuring alerts
In the Messaging dialog box, click the Email alerting tab. Set the options
3.
as described below.
Enable email alerting
Select this to enable Sophos Anti−Virus to send email alerts.
Messages to send
Select the events for which you want Sophos Anti−Virus to send email
alerts. Scanning errors include instances when Sophos Anti−Virus is
denied access to an item that it attempts to scan.
Recipients
Click Add or Remove to add or remove, respectively, email addresses to
which email alerts should be sent. Click Edit to change an email address
you have added.
Configure SMTP
Click this to change the settings for the SMTP server and the language of
the email alerts. (Refer to Configure SMTP settings.)
37
Page 42

Sophos Anti−Virus for Windows 2000/XP/2003 Configuring alerts
Configure SMTP settings
SMTP server
In the text box, type the host name or IP address of the SMTP server. Click Test
to test that a connection to the SMTP server can be made. (This does not send a
test email.)
SMTP 'sender' address
In the text box, type an email address to which bounces and non−delivery reports
can be sent.
SMTP 'reply to' address
As email alerts are sent from an unattended mailbox, you can type in the text box
an email address to which replies to email alerts can be sent.
Language
Click the drop−down arrow, and select the language in which email alerts should
be sent.
38
Page 43

Sophos Anti−Virus for Windows 2000/XP/2003 Configuring alerts
Event logging
If the Sophos Enterprise Console is used to administer Sophos
Anti−Virus on workstations, it may override changes made here. To
avoid this, refer to the console help.
To enable Sophos Anti−Virus to add alerts to the Windows 2000/XP/2003 event
log when a virus is found or an error occurs, do as follows. This applies to
on−access, on−demand and right−click scanning.
In the home page of the Sophos Anti−Virus window, click Configure
1.
Sophos Anti−Virus.
In the Configure page, click Messaging.2.
In the Messaging dialog box, click the Event log tab. Set the options as
3.
described below.
Enable event logging
Select this to enable Sophos Anti−Virus to send messages to the Windows
event log.
39
Page 44

Sophos Anti−Virus for Windows 2000/XP/2003 Configuring alerts
Messages to send
Select the events for which you want Sophos Anti−Virus to send messages.
Scanning errors include instances when Sophos Anti−Virus is denied
access to an item that it attempts to scan.
SNMP messaging
If the Sophos Enterprise Console is used to administer Sophos
Anti−Virus on workstations, it may override changes made here. To
avoid this, refer to the console help.
To enable Sophos Anti−Virus to send SNMP messages when a virus is found or
an error occurs, do as follows. This applies to on−access, on−demand and
right−click scanning.
In the home page of the Sophos Anti−Virus window, click Configure
1.
Sophos Anti−Virus.
In the Configure page, click Messaging.2.
In the Messaging dialog box, click the SNMP messaging tab. Set the
3.
options as described below.
40
Page 45

Sophos Anti−Virus for Windows 2000/XP/2003 Configuring alerts
Enable SNMP messaging
Select this to enable Sophos Anti−Virus to send SNMP messages.
Messages to send
Select the events for which you want Sophos Anti−Virus to send email
alerts. Scanning errors include instances when Sophos Anti−Virus is
denied access to an item that it attempts to scan.
SNMP trap destination
In the text box, type the IP address or name of the computer to which alerts
are sent.
SNMP community name
In the text box, type the SNMP community name.
Test
Click this to send a test SNMP message to the SNMP trap destination you
have specified.
41
Page 46

Logging
This section includes the following.
Viewing the log for this computer•
Configuring the log for this computer•
Viewing the log for an on−demand scan•
Viewing the log for this computer
The log for this computer is a log of all scanning on the computer.
In the home page of the Sophos Anti−Virus window, click Configure
1.
Sophos Anti−Virus.
In the Configure page, click View log to display the log for the computer.2.
From the log page, you can copy the log to the clipboard, or email or print
3.
the log.
To find specific text in the log, click Find and enter the text you want to find.
The times in the Time column refer to the local time zone, but
those in the Message column refer to UTC.
Configuring the log for this computer
The log for this computer is a log of all scanning on the computer.
It is stored in the following location:
42
Page 47

Sophos Anti−Virus for Windows 2000/XP/2003 Logging
C:\Documents and Settings\All Users\Application Data\Sophos\Sophos
Anti−Virus\logs\SAV.txt
In the home page of the Sophos Anti−Virus window, click Configure
1.
Sophos Anti−Virus.
In the Configure page, click View log.2.
In the log page, click Configure log to display the Configure logging for
3.
this computer dialog box. Set the options as described below.
Logging level
To stop anything being logged, click None. To log summary information,
error messages and so on, click Normal. To log most information, including
files scanned, major stages of a scan, and so on, click Verbose.
Log archiving
To enable the log file to be archived monthly, select Enable archiving.
Select the Number of archive files to store before the oldest one is
deleted. Select Compress log to reduce the size of the log file.
Viewing the log for an on−demand scan
The log for an on−demand scan is a log of what happened each time
43
Page 48

Sophos Anti−Virus for Windows 2000/XP/2003 Logging
that scan was run.
In the home page of the Sophos Anti−Virus window, in the Available
1.
scans list, select the scan for which you want to view the log. Click
Summary.
In the summary dialog box, click the link at the bottom.2.
From the log window, you can copy the log to the clipboard, or email or
3.
print the log.
The times in the Time column refer to the local time zone, but
those in the Message column refer to UTC.
44
Page 49

Updating
This section includes the following.
Updating immediately•
Setting up automatic updating•
Setting a source for updates•
Setting an alternative source for updates•
Scheduling updates•
Updating via a proxy•
Limiting the bandwidth used•
Logging updates•
Updating immediately
If you have installed Sophos Anti−Virus as recommended in Sophos
documentation, updating occurs automatically.
If you want to update Sophos Anti−Virus immediately, you can do so.
Locate the Sophos Anti−Virus icon in the system tray (shown below).1.
Right−click the icon to display a menu, and select Update now.2.
Alternatively, double−click the Sophos Anti−Virus system tray icon.
Provided Sophos Anti−Virus has been correctly configured, it checks the usual
source for new software and, if necessary, updates itself.
For information on configuring updating, refer to the other pages in this section.
Setting up automatic updating
If your computer is on a network, or if your administrator installed Sophos
Anti−Virus for you, Sophos Anti−Virus should have been set to update itself
automatically.
If automatic updating has not been set up, follow the steps below. For full
information on the options at each step, refer to the section describing that
configuration page.
Locate the Sophos Anti−Virus icon in the system tray (shown below).1.
45
Page 50

Sophos Anti−Virus for Windows 2000/XP/2003 Updating
Right−click the icon to display a menu, and select Configure updating.2.
In the Properties for Sophos AutoUpdate dialog box, click the Primary
3.
server tab and set the source for updates. Your administrator can give you
the details you need to enter.
Click the Schedule tab and schedule updates.4.
46
Page 51

Sophos Anti−Virus for Windows 2000/XP/2003 Updating
Setting a source for updates
If you want Sophos Anti−Virus to update itself automatically, you must specify
where it fetches updates from.
Locate the Sophos Anti−Virus icon in the system tray (shown below).1.
Right−click the icon to display a menu, and select Configure updating.2.
In the Properties for Sophos AutoUpdate dialog box, click the Primary
3.
server tab and enter the details needed as described below.
Address
Enter the address (UNC (network) path or web address) from which
Sophos Anti−Virus will usually fetch updates. If you select Sophos, Sophos
Anti−Virus will download updates directly from Sophos via the internet.
Your administrator can give you the address and account details
you need.
User name
If necessary, enter the User name for the account that will be used to
access the server, and then enter and confirm the Password.
47
Page 52

Sophos Anti−Virus for Windows 2000/XP/2003 Updating
If the User name needs to be qualified to indicate the domain, use the
form domain\username.
If you want to limit the bandwidth used, click Advanced.
If you access the internet via a proxy server, click Apply and then Proxy
Details. Note that some internet service providers require web requests to
be sent to a proxy server.
Setting an alternative source for updates
You can set an alternative source for updates. If Sophos Anti−Virus cannot
contact its usual source, it will attempt to update from this alternative source.
Locate the Sophos Anti−Virus icon in the system tray (shown below).1.
Right−click the icon to display a menu, and select Configure updating.2.
In the Properties for Sophos AutoUpdate dialog box, click the
3.
Secondary server tab. Then enter the details as described below.
Address
Enter the Address (UNC (network) path or web address) from which
Sophos Anti−Virus will fetch updates if it cannot contact the usual source. If
you select Sophos, Sophos Anti−Virus will download updates directly from
Sophos via the internet.
48
Page 53

Sophos Anti−Virus for Windows 2000/XP/2003 Updating
Your administrator can give you the address and account details
you need.
User name
If necessary, enter the User name for the account that will be used to
access the server, and then enter and confirm the Password.
If the User name needs to be qualified to indicate the domain, use the
form domain\username.
If you want to limit the bandwidth used, click Advanced.
If you access the address via a proxy server, click Apply and then Proxy
Details. Note that some internet service providers require web requests to
be sent to a proxy server.
Scheduling updates
You can specify when or how often Sophos Anti−Virus updates itself.
If the Sophos Enterprise Console is used to administer Sophos
Anti−Virus on workstations, it may override changes made here. To
avoid this, refer to the console help.
Locate the Sophos Anti−Virus icon in the system tray (shown below).1.
Right−click the icon to display a menu, and select Configure updating.2.
In the Properties for Sophos AutoUpdate dialog box, click the Schedule
3.
tab. Then enter the details as described below.
49
Page 54

Sophos Anti−Virus for Windows 2000/XP/2003 Updating
If you want Sophos Anti−Virus to update itself at regular intervals, select
Enable automatic updates. Then enter the frequency (in minutes) with
which Sophos Anti−Virus will check for updated software. The default is 60
minutes.
If the updates are downloaded directly from Sophos, you cannot
update more frequently than every 60 minutes.
If you update via a dial−up connection to the internet, select Check for
updates on dial−up. Sophos Anti−Virus will attempt to update whenever
you connect to the internet.
Updating via a proxy server
If Sophos Anti−Virus fetches updates via the internet, you must enter details of
any proxy server that you use to connect to the internet.
Locate the Sophos Anti−Virus icon in the system tray (shown below).1.
Right−click the icon to display a menu, and select Configure updating.2.
In the Properties for Sophos AutoUpdate dialog box, click the Primary
3.
server tab or the Secondary server tab as required. Ensure that all the
details have been correctly entered. Then click Apply and then Proxy
Details.
50
Page 55

Sophos Anti−Virus for Windows 2000/XP/2003 Updating
In the Proxy details dialog box, select Access the server via a proxy.
4.
Then enter the proxy server Address and Port number. Enter a User
name and Password that give access to the proxy server. If the user name
needs to be qualified to indicate the domain, use the form
domain\username.
Limiting the bandwidth used
You can limit the bandwidth used for updating. This prevents Sophos Anti−Virus
from using all your bandwidth when you need it for other purposes, e.g.
downloading your email.
Locate the Sophos Anti−Virus icon in the system tray (shown below).1.
51
Page 56

Sophos Anti−Virus for Windows 2000/XP/2003 Updating
Right−click the icon to display a menu, and select Configure updating.2.
In the Properties for Sophos AutoUpdate dialog box, click the Primary
3.
server tab or the Secondary server tab as required. Then click Advanced.
In the Advanced settings dialog box, select Limit amount of bandwidth
4.
used and use the slider control to specify the bandwidth in Kbits/second. If
you specify more bandwidth than the computer has available, Sophos
Anti−Virus uses all that is available.
Logging updates
You can configure Sophos Anti−Virus to record updating activity in a log file.
Locate the Sophos Anti−Virus icon in the system tray (shown below).1.
52
Page 57

Sophos Anti−Virus for Windows 2000/XP/2003 Updating
Right−click the icon to display a menu, and select Configure updating.2.
In the Properties for Sophos AutoUpdate dialog box, click the Logging
3.
tab. Ensure that Log Sophos AutoUpdate activity is selected. Then set
other options as described below. When you want to open the log, click
View Log File.
Maximum log size
Specify a maximum size for the log in MB.
Log level
You can select Normal or Verbose logging. Verbose logging provides
information on many more activities than usual, so the log will grow faster.
Use this setting only when detailed logging is needed for troubleshooting.
53
Page 58

Disinfection
This section includes the following.
What is disinfection?•
Getting disinfection information•
Setting up automatic disinfection•
Disinfecting on demand•
Disinfecting with a right−click scan•
Recovering from virus side−effects•
What is disinfection?
Disinfection removes a virus from a file or boot sector. However, it doesn't
undo any actions the virus has already taken.
Getting disinfection information
If a virus is reported, you can get information and disinfection advice via
the scan progress dialog box (on−demand and right−click scanning)•
Quarantine manager (all scanning types).•
Getting information via the scan progress dialog box
For an on−demand scan or a scan run from a right−click menu, in the log that is
displayed in the scan progress dialog box, click the name of the virus you want to
find out about.
54
Page 59

Sophos Anti−Virus for Windows 2000/XP/2003 Disinfection
Sophos Anti−Virus connects you to the analysis of the virus on the Sophos
website.
Getting information via Quarantine manager
Open Quarantine manager. To do this, in the home page of the Sophos
Anti−Virus window, click Manage quarantine items.
In the Virus name column, click the name of the virus you want to find out about.
Sophos Anti−Virus connects you to the analysis of the virus on the Sophos
website.
Setting up automatic disinfection
If the Sophos Enterprise Console is used to administer Sophos
Anti−Virus on workstations, it may override changes made here. To
avoid this, refer to the console help.
Sophos Anti−Virus can disinfect many infected items, or make them safe,
automatically, when on−access scanning is turned on. Any actions that Sophos
Anti−Virus takes against infected items are logged in the log for this computer.
In the home page of the Sophos Anti−Virus window, click Configure
1.
Sophos Anti−Virus.
In the Configure page, click On−access scanning.2.
Click the Disinfection tab. Set the options as described below.3.
55
Page 60

Sophos Anti−Virus for Windows 2000/XP/2003 Disinfection
Disinfect items that contain a virus
Select this to enable Sophos Anti−Virus to disinfect floppy disk boot
sectors, documents, programs and anything else that is selected for
scanning. Disinfection of documents does not repair any changes the virus
has made in the document. (Refer to Getting disinfection information to find
out how to view details on the Sophos website of the virus's side−effects.)
Disinfection of programs should be used only as a temporary measure. You
should subsequently replace disinfected programs from the original disks or
a clean backup.
Other actions against infected files
You should use this option only if advised to by Sophos technical
support.
Sophos Anti−Virus can make an infected file safe in ways other than
disinfection. Click Delete to dispose of the file. Click Move to to move the
file to another folder, which you can select using Browse. Moving an
executable file reduces the likelihood of it being run.
You can't automatically delete or move infected mailboxes.
56
Page 61

Sophos Anti−Virus for Windows 2000/XP/2003 Disinfection
Disinfecting on demand
Sophos Anti−Virus can disinfect many infected items, or make them safe, when
you run an on−demand scan. Any actions that Sophos Anti−Virus takes against
infected items are logged in the log for the on−demand scan.
In the home page of the Sophos Anti−Virus window, in the Available
1.
scans list, select the scan for which you want to enable disinfection. Click
Edit to display the scan setup page.
Click Configure this scan.2.
Click the Disinfection tab. Set the options as described below.3.
Disinfect items that contain a virus
Select this to enable Sophos Anti−Virus to disinfect floppy disk boot
sectors, documents, programs and anything else that is selected for
scanning. Disinfection of documents does not repair any changes the virus
has made in the document. (Refer to Getting disinfection information to find
out how to view details on the Sophos website of the virus's side−effects.)
Disinfection of programs should be used only as a temporary measure. You
should subsequently replace disinfected programs from the original disks or
57
Page 62

Sophos Anti−Virus for Windows 2000/XP/2003 Disinfection
a clean backup.
Other actions against infected files
You should use this option only if advised to by Sophos technical
support.
Sophos Anti−Virus can make an infected file safe in ways other than
disinfection. Click Delete to dispose of the file. Click Move to to move the
file to another folder, which you can select using Browse. Moving an
executable file reduces the likelihood of it being run.
You can't automatically delete or move infected mailboxes.
Disinfecting with a right−click scan
Sophos Anti−Virus can disinfect many infected items, or make them safe, when
you run a scan from a right−click menu. Any actions that Sophos Anti−Virus takes
against infected items are logged in the log for this computer.
In the Sophos Anti−Virus window, on the Configure menu, click
1.
Right−click scanning.
Click the Disinfection tab. Set the options as described below.2.
58
Page 63

Sophos Anti−Virus for Windows 2000/XP/2003 Disinfection
Disinfect items that contain a virus
Select this to enable Sophos Anti−Virus to disinfect floppy disk boot
sectors, documents, programs and anything else that is selected for
scanning. Disinfection of documents does not repair any changes the virus
has made in the document. (Refer to Getting disinfection information to find
out how to view details on the Sophos website of the virus's side−effects.)
Disinfection of programs should be used only as a temporary measure. You
should subsequently replace disinfected programs from the original disks or
a clean backup.
Other actions against infected files
Sophos Anti−Virus can make an infected file safe in ways other than
disinfection. Click Delete to dispose of the file. Click Move to to move the
file to another folder, which you can select using Browse. Moving an
executable file reduces the likelihood of it being run.
You can't automatically delete or move infected mailboxes.
Recovering from virus side−effects
Recovery from virus infection depends on how the virus infected the computer.
Some viruses leave you with no side−effects to deal with, others may have such
extreme side−effects that you have to restore a hard disk in order to recover.
Some viruses gradually make minor changes to data. This type of corruption can
be hard to detect. It is therefore very important that you read the virus analysis on
the Sophos website, and check documents carefully after disinfection.
Sound backups are crucial. You should keep original executables on
write−protected disks so that infected programs can easily be replaced. If you did
not have them before you were infected, create or obtain them in case of future
infections.
Sometimes you can recover data from disks damaged by a virus. Sophos can
supply utilities for repairing the damage caused by some viruses. Contact Sophos
technical support for advice.
59
Page 64

Managing quarantine items
This section includes the following.
What is Quarantine manager?•
Dealing with viruses in quarantine•
Configuring user rights for Quarantine manager•
What is Quarantine manager?
Quarantine manager enables you to deal with all viruses found by a scan. Each
item is here for one of the following reasons.
No disinfection options (disinfect, delete, move) were chosen for the scan
•
that found the item.
A disinfection option was chosen for the scan that found the item but the
•
option failed.
The item is multiply−infected and still contains viruses.•
A disinfection option may have failed because of insufficient access rights. If you
have greater rights, you can use Quarantine manager to disinfect, delete or move
the item.
Dealing with viruses in quarantine
Open Quarantine manager. To do this, in the home page of the Sophos
1.
Anti−Virus window, click Manage quarantine items.
In the Quarantine manager page, all the infected items are listed.
2.
Location displays whereabouts the item is stored on disk. You can click
this to list the items in order of location. Virus name displays the virus with
which the item is infected. Actions available displays whether you can
disinfect, delete or move the item. To configure what you can do, refer to
Configuring user rights for Quarantine manager. To deal with the viruses,
use the buttons described below.
60
Page 65

Sophos Anti−Virus for Windows 2000/XP/2003 Managing quarantine items
Select all/Deselect all
Click these buttons to select or deselect all the items. This enables you to
perform the same action on a group of items. To select or deselect a
particular item, click the check box to the left of the item name.
Clear from list
Click this to remove selected items from the list, if you are sure they don't
contain a virus. This doesn't delete the items from disk, however.
Disinfect
Click this to disinfect the selected items. Disinfection of documents does not
repair any changes the virus has made in the document. Disinfection of
programs should be used only as a temporary measure. You should
subsequently replace disinfected programs from the original disks or a
clean backup.
Delete
Click this to dispose of the selected items. Use this function with care.
Move
Click this to move the selected items to another folder. Each item is moved
to the folder that was specified when disinfection was set up. Moving an
executable file reduces the likelihood of it being run. Use this function with
care.
61
Page 66

Sophos Anti−Virus for Windows 2000/XP/2003 Managing quarantine items
Configuring user rights for Quarantine manager
In the home page of the Sophos Anti−Virus window, click Manage
1.
quarantine items.
In the Quarantine manager page, click Configure user rights for
2.
Quarantine manager.
In the Configure user rights for Quarantine manager dialog box, select
3.
the rights that each level of user should have, as explained below.
User type
You can change the rights for each of the three types of user, depending on
the type of user you are logged on as. For more information on user types,
refer to Types of user. Remember that the rights you set here apply only to
Quarantine manager.
Disinfect sectors
Select this to enable Sophos Anti−Virus to disinfect floppy disk boot
sectors.
Disinfect files
Select this to enable Sophos Anti−Virus to disinfect documents and
programs. Disinfection of documents does not repair any changes the virus
has made in the document. Disinfection of programs should be used only
as a temporary measure. You should subsequently replace disinfected
programs from the original disks or a clean backup.
62
Page 67

Sophos Anti−Virus for Windows 2000/XP/2003 Managing quarantine items
Delete files
Select this to enable Sophos Anti−Virus to dispose of infected files.
Move files
Select this to enable Sophos Anti−Virus to move infected files to another
folder. Moving an executable file reduces the likelihood of it being run.
63
Page 68

Troubleshooting
This section includes the following.
System tray icon has a white cross•
System tray icon is greyed out•
Virus not disinfected•
Virus fragment reported•
Unable to access disk with infected boot sector•
Unable to access areas of Sophos Anti−Virus•
Getting further help•
System tray icon has a white cross
If a white cross is superimposed on the Sophos Anti−Virus system tray icon,
updating has failed.
To find out more about an update failure, look at the update log. Right−click the
Sophos Anti−Virus system tray icon to display a menu. Select Configure
updating. Then click the Logging tab and click View Log File.
The sections below explain why updating may fail, and how you can change the
settings to correct the problem.
You need Sophos Administrator rights to change the updating
settings.
Sophos Anti−Virus contacts the wrong source for updates
Right−click the Sophos Anti−Virus system tray icon to display a menu.
1.
Select Configure updating.
Click the Primary server tab. Check that the address and account details
2.
are those supplied by your administrator.
Sophos Anti−Virus cannot use your proxy server
If your copy of Sophos Anti−Virus updates itself via the internet, you must ensure
that it can use your proxy server (if there is one).
Right−click the Sophos Anti−Virus system tray icon to display a menu.
1.
Select Configure updating.
Click the Primary server tab. Then click Proxy Details.2.
64
Page 69

Sophos Anti−Virus for Windows 2000/XP/2003 Troubleshooting
In the Proxy details dialog box, enter the proxy server address and port
3.
number, and the account details.
Automatic updating is not correctly scheduled
Right−click the Sophos Anti−Virus system tray icon to display a menu.
1.
Select Configure updating.
Click the Schedule tab. If your computer is networked, or if you update via
2.
a broadband internet connection, select Enable automatic updates and
enter the frequency of updating. If you update via a dial−up connection,
select Check for updates on dial−up.
The source for updates is not being maintained
Your company may have moved the directory (on the network or on a web server)
from which you should update. Alternatively, they may not be maintaining the
directory. If you think this may be the case, contact your network administrator.
System tray icon is greyed out
If the Sophos Anti−Virus system tray icon is greyed out, the computer is not
protected by on−access scanning.
To enable on−access scanning for all users on the computer, refer to Turning
protection on or off for the computer.
Virus not disinfected
If Sophos Anti−Virus has not attempted to disinfect a virus, check that automatic
disinfection has been enabled.
If Sophos Anti−Virus could not disinfect the virus ("Disinfection failed"), it may be
that it cannot disinfect that type of virus.
You should also check the following:
If dealing with a removable medium (e.g. floppy disk, CD), make sure that it
•
is not write−protected.
If dealing with files on an NTFS volume (Windows 2000/XP/2003), make
•
sure that it is not write−protected.
Sophos Anti−Virus does not disinfect a virus fragment because it has not found an
exact virus match. Refer to Virus fragment reported.
65
Page 70

Sophos Anti−Virus for Windows 2000/XP/2003 Troubleshooting
Virus fragment reported
If a virus fragment is reported, contact Sophos technical support for advice.
The report of a virus fragment indicates that part of a file matches part of a virus.
There are three possible causes:
Variant of a known virus
Many new viruses are based on existing ones, so that code fragments typical of a
known virus may appear in files infected with a new one. If a virus fragment is
reported, it is possible that Sophos Anti−Virus has detected a new virus, which
could become active.
Corrupted virus
Many viruses contain bugs in their replication routines that cause them to infect
target files incorrectly. An inactive portion of the virus (possibly a substantial part)
may appear within the host file, and this is detected by Sophos Anti−Virus. A
corrupted virus cannot spread.
Database containing a virus
When running a full scan, Sophos Anti−Virus may report that there is a virus
fragment in a database file.
Unable to access disk with infected boot sector
If the Sophos Enterprise Console is used to administer Sophos
Anti−Virus on workstations, it may override changes made here. To
avoid this, refer to the console help.
By default, Sophos Anti−Virus prevents access to removable disks whose boot
sectors are infected. To allow access (e.g. to copy files from a floppy disk infected
with a boot sector virus), do as follows.
In the home page of the Sophos Anti−Virus window, click Configure
1.
Sophos Anti−Virus.
In the Configure page, click On−access scanning.2.
In the On−access scan settings for this computer dialog box, click the
3.
Scanning tab.
Select Allow access to drives with infected boot sectors.4.
66
Page 71

Sophos Anti−Virus for Windows 2000/XP/2003 Troubleshooting
Deselect the option when you have finished accessing the disk.
Unable to access areas of Sophos Anti−Virus
If you are unable to use or configure particular areas of Sophos Anti−Virus, it
might be because access to these areas is restricted to particular types of user.
Refer to Restricting access rights.
Getting further help
For technical support information, visit
www.sophos.com/support
If you contact technical support, provide as much information as possible,
including Sophos software version number(s), operating system(s) and patch
level(s), and the exact text of any error messages.
67
Page 72

Sophos Anti-Virus for Windows 2000/XP/2003
200501
Copyright © 2004, 2005 by Sophos Plc
All rights reserved. No part of this publication may be reproduced, stored in a
retrieval system, or transmitted, in any form or by any means, electronic,
mechanical, photocopying, recording or otherwise unless you are either a valid
licensee where the documentation can be reproduced in accordance with the
licence terms or you otherwise have the prior permission in writing of the
copyright owner.
Any name should be assumed to be a trademark unless stated otherwise.
InterCheck and Sophos are registered trademarks of Sophos Plc.
68
 Loading...