

Page 1

A-CJS-100-01(1)
Intelligent Camera
Technical Manual
XCI-SX1
XCI-V3
2006 Sony Corporation
Page 2

Table of Contents
Overview
Functions
GUI application
Features ..................................................................... 3
System Components................................................. 4
Connection Diagram ................................................. 4
Location and Function of Parts and Controls ........ 5
Front/Top/Bottom ........................................................ 5
Rear............................................................................ 6
Connecting the cables ................................................ 7
Input Specification .................................................... 8
About the camera functions ..................................... 8
Normal mode .............................................................. 8
Tr igger mode .............................................................. 9
Binning mode ............................................................. 9
Partial scan mode..................................................... 10
Before starting the GUI application ....................... 13
Basic operation ....................................................... 14
HOME screen ........................................................... 15
SHUTTER screen ..................................................... 16
GAIN/LUT (Look Up Table) screen ......................... 17
HRS (High Rate Scan) screen ................................ 18
GENERAL screen .................................................... 19
NETWORK screen ................................................... 20
SERIAL I/F screen ................................................... 21
External Control Commands
Overview .................................................................. 22
Command Specifications ....................................... 24
Specifications
Specifications .......................................................... 34
Spectral Sensitivity Characteristics
(Typical Values) ..................................................... 36
Dimensions .............................................................. 37
Serial Communication Specifications ....................... 22
Telnet Communication Specifications ....................... 22
Telnet Authentication Specification ........................... 22
Multiple Session Specification .................................. 23
Command Format .................................................... 23
Command Specification ........................................... 23
2
Page 3

Overview
Overview
The XCI-SX1/V3 is a monochrome intelligent camera
that can capture and process pictures, and control
peripheral devices by itself.
Features
High image quality
The XCI-SX1 (SXGA) has a progressive scan CCD of
1,450,000 pixels. The XCI-V3 (VGA) has a
progressive scan CCD of 330,000 pixels. This camera
produces high-resolution images. By adopting square
pixels, images can be processed using the original
aspect ratio without a converting procedure.
Various mode settings
You can adjust the following mode settings.
• Gain
•Read mode: normal /binning
• Partial scan
• Shutter: Normal/Trigger shutter
• Shutter speed
• LUT
•3 × 3 filter (XCI-V3 only)
Partial scan
The camera module can limit the effective video
output area to achieve high frame rates, enabling highspeed image processing.
Binning
By binning two pixels that align vertically or
horizontally, you can acquire a frame rate twice that of
the normal mode vertically, and sensitivity twice that
of normal mode horizontally.
Built-in processor
• x86 CPU
• 256MB DDR-SDRAM
• 128MB Compact Flash
PC standard input/output interface
•LAN connector
• VGA monitor output
•USB connector
Body fixing
Electronic shutter function
Shutter speed can be selected from variety of available
speeds.
External trigger shutter function (2 to
1/50000 sec.)
You can obtain a freeze picture by inputting an
external trigger. This function is useful to shoot a fastmoving object clearly.
Four screw holes to be used to install the camera are
provided both on the top and the bottom of the camera.
Installing the camera module on the front panel
minimizes deviation of the optical axis.
Tripod hole
You can mount the camera on a tripod by using this
hole.
3
Page 4
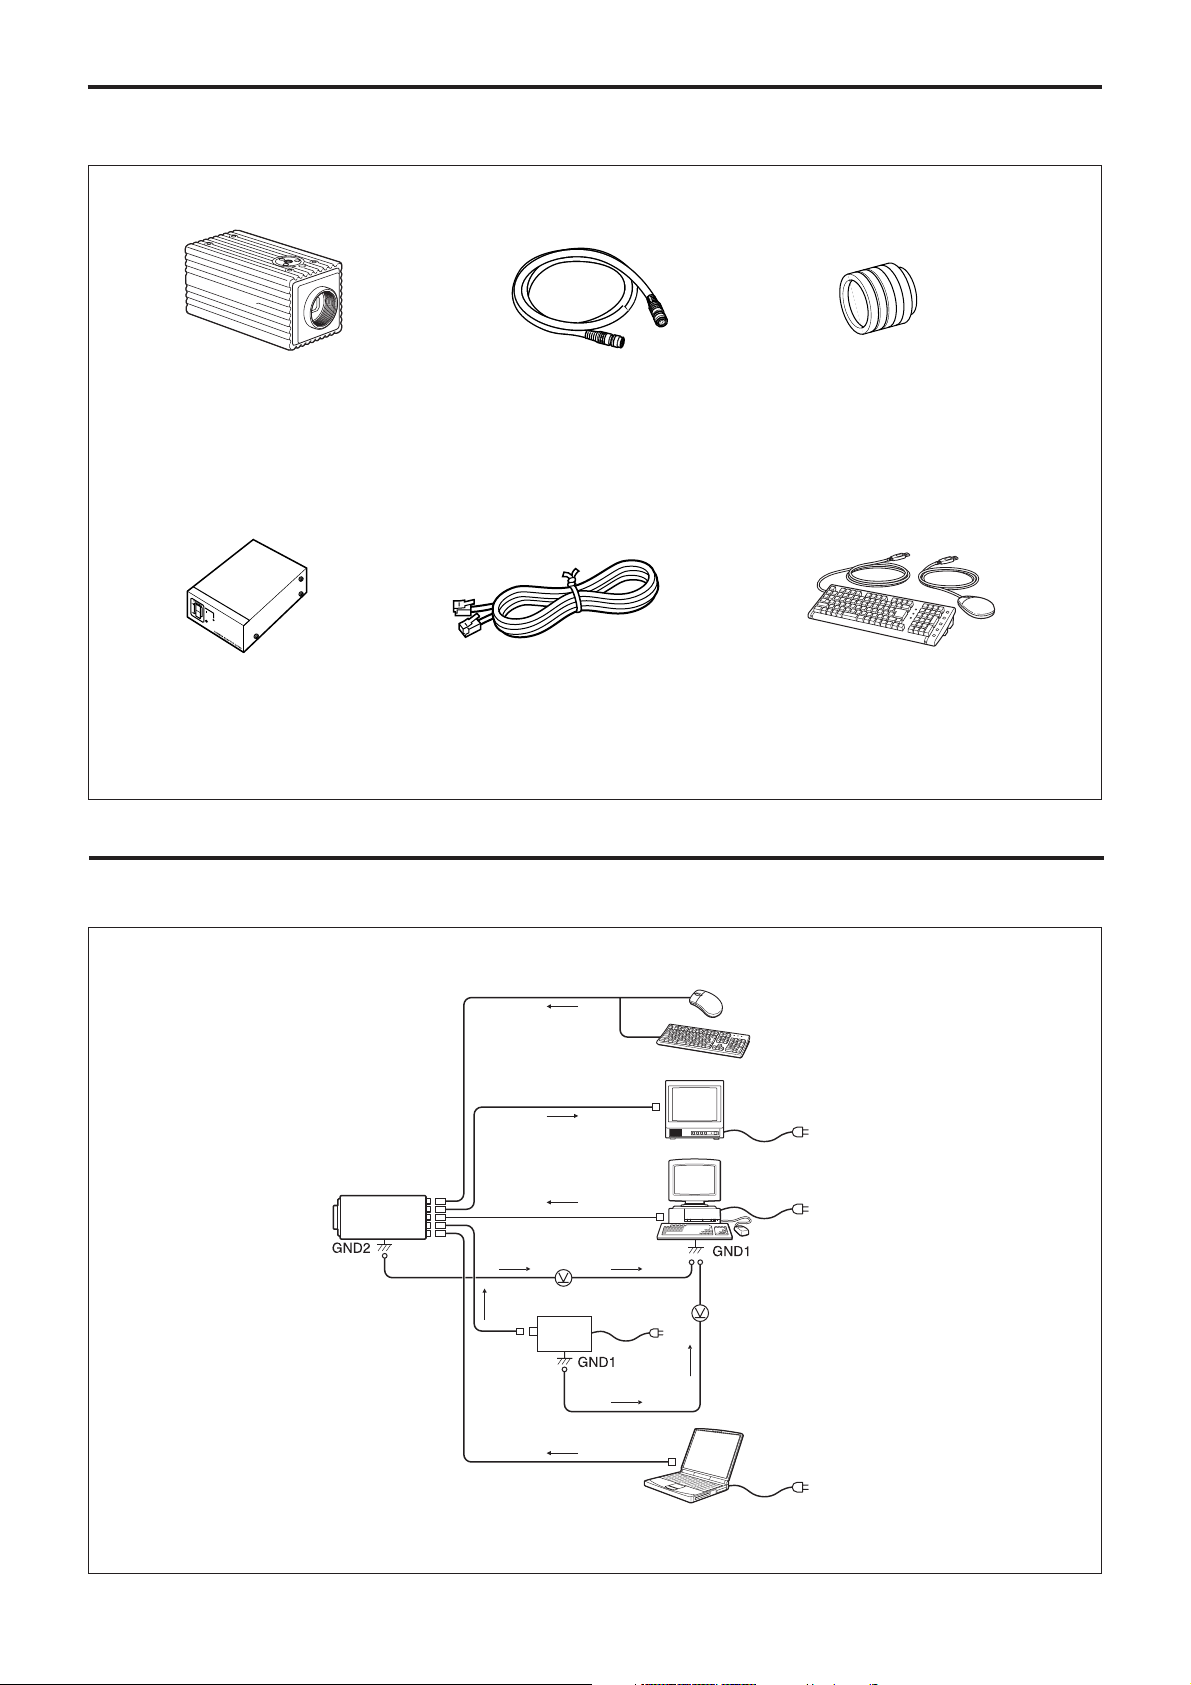
System Components
Overview
Intelligent camera
XCI-SX1/V3
Camera adaptor
DC-700/700CE
Connection Diagram
Camera cables
CCXC-12P02N(2 m)
CCXC-12P05N(5 m)
CCXC-12P10N(10 m)
CCXC-12P25N(25 m)
LAN cable
(UTP, category 5)
C-mount lens
XCI-SX1: High-resolution lens
XCI-V3: VCL-50Y-M
VCL-25Y-M
VCL-16Y-M
VCL-12YM
VCL-08YM
USB mouse/keyboard
Camera
Abnormal
electricity
Groundelectric potential
difference
Power
supply
unit
(DC-700/
700CE)
Abnormal
electricity
USB mouse/keyboard
Monitor
Host device (e.g., PC)
Groundelectric potential
difference
Camera control device (e.g., PC)
4
Page 5
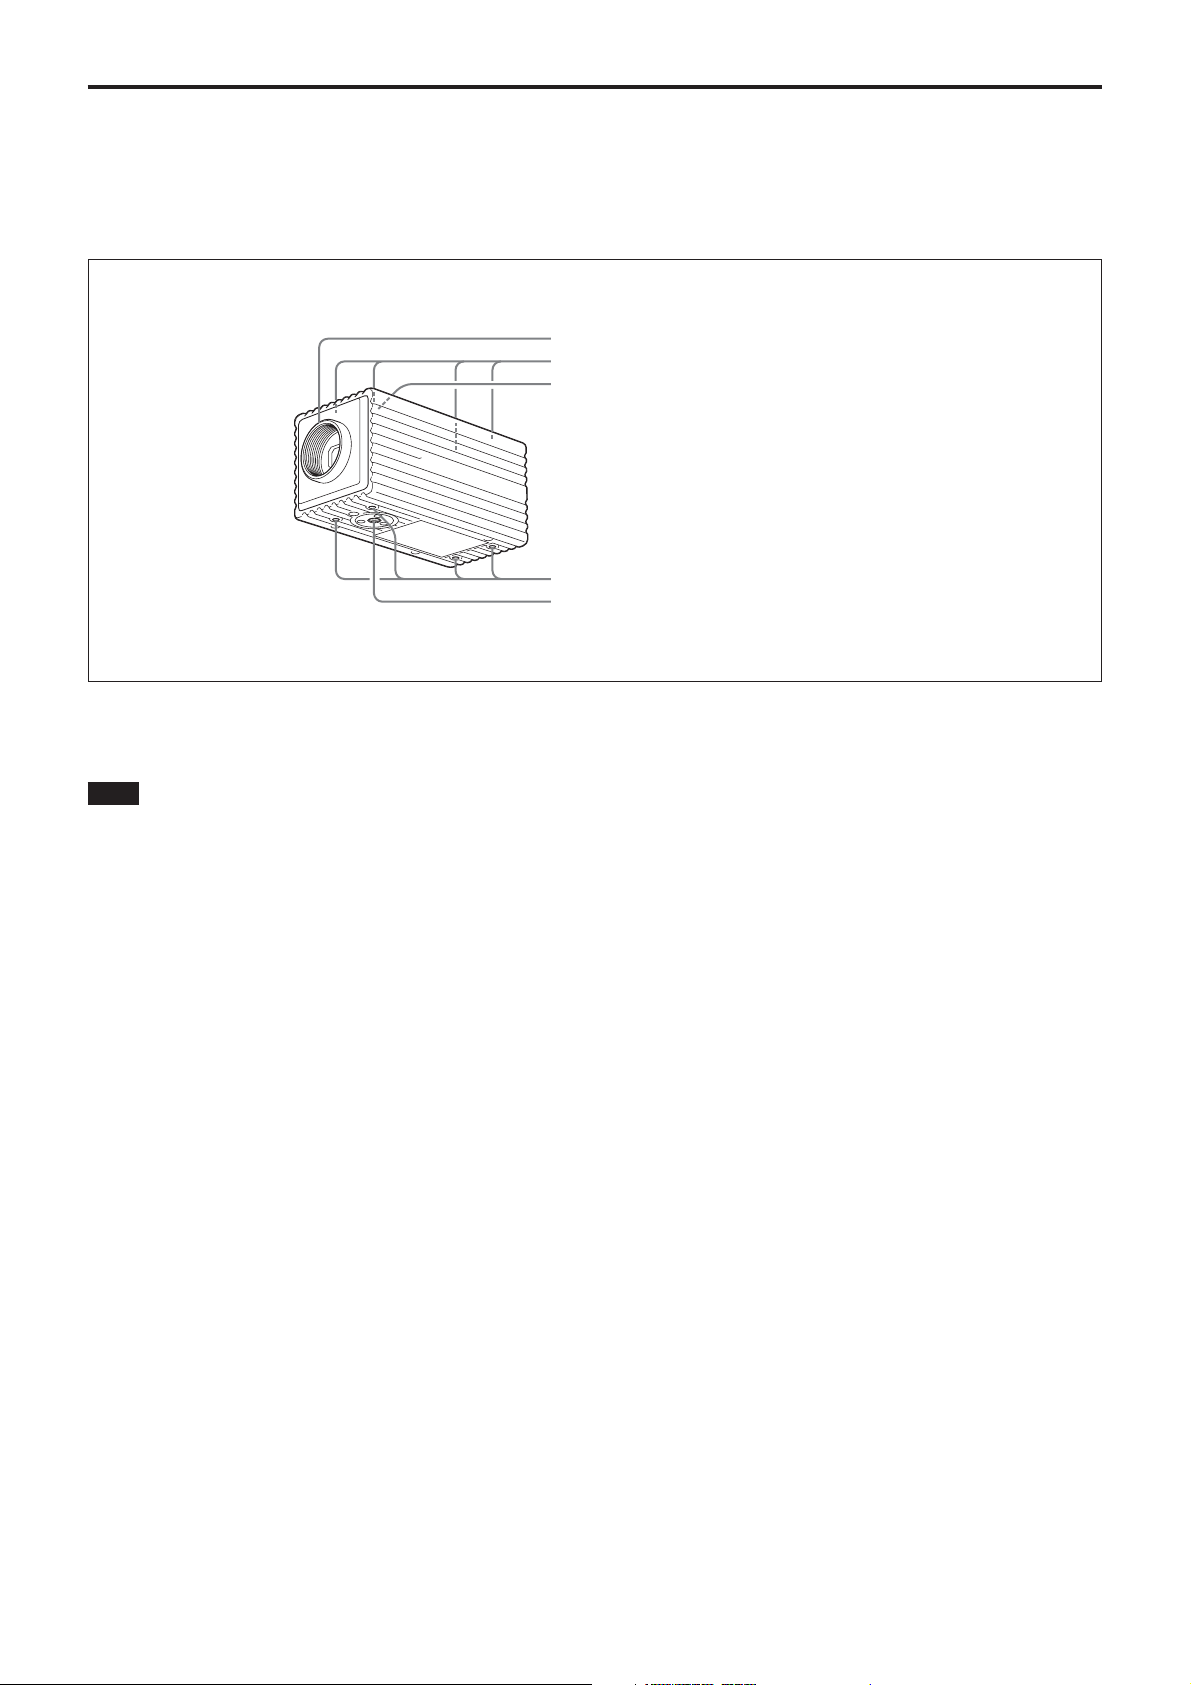
Location and Function of Parts and Controls
Front/Top/Bottom
Lens mount (C-mount)
1
Auxiliary reference screw holes (Top)
2
Tripod screw holes (Top)
3
Reference screw holes (Bottom)
4
Tripod screw holes (Bottom)
5
Overview
1 Lens mount (C-mount)
Attach any C-mount lens or other optical equipment.
Note
The lens must not project more than 10 mm (13/32
inch) from the lens mount.
2 Auxiliary reference screw holes (Top)
3 Tripod screw holes (Top)
4 Reference screw holes (Bottom)
These precision screw holes are for locking the
camera. Locking the camera into these holes secures
the optical axis alignment.
5 Tripod screw holes (Bottom)
5
Page 6
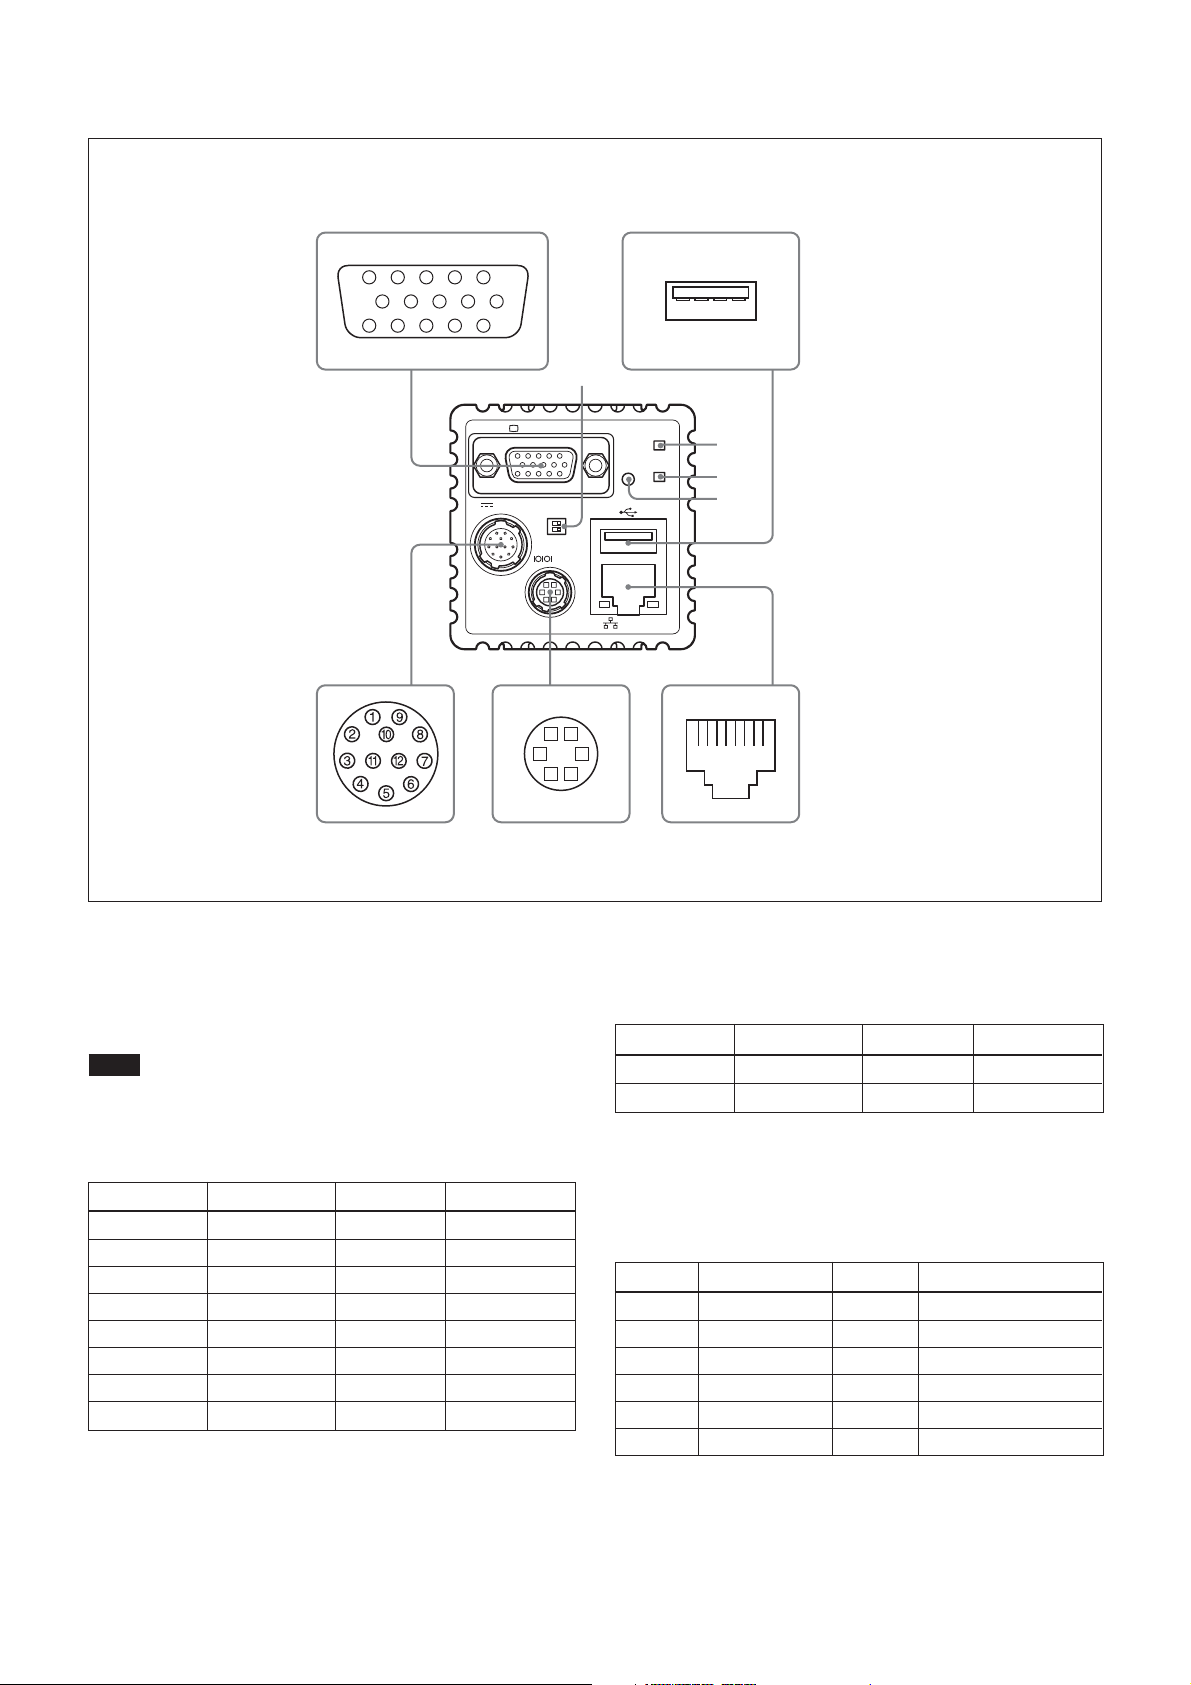
Rear
Overview
6 MONITOR (monitor output)
connector (15-pin) 7 USB connector
6
54321
10
15 14 13 12 11
9876
7
qa
DC IN
MONITOR
MODE
SERIAL
RESET
POWER
STATUS
LAN
89
61
25
43
1234
q;
87654321
qs
qd
qf
qa MODE switches
qs POWER LED
qd STATUS LED
qf RESET switch
q; LAN connector
8 DC IN (DC power
input) connector
(12-pin)
9 SERIAL connector
(6-pin)
6 MONITOR (monitor output) connector (15-pin)
You can connect a monitor cable to this connector to
display an image on a multiscan monitor supporting
SXGA resolution.
Note
If you connect a multiscan monitor that does not
support SXGA resolution, an image may not be
displayed.
Pin No. Signal Pin No. Signal
1R output 9 NC
2G output 10 Ground
3B output 11 NC
4NC 12NC
5 Ground 13 HD output
6 Ground 14 VD output
7 Ground 15 NC
8 Ground
7 USB connector
You can connect a USB mouse/keyboard to this
connector to contol a camera.
Pin No. Signal Pin No. Signal
1 VBUS 3 D+
2D–4Ground
8 DC IN (DC power input) connector (12-pin)
You can connect a CCXC-12P05N camera cable to
input the +12 V DC power supply. The pin
configuration of this connector is as follows.
Pin No. Signal Pin No. Signal
1 Ground 7 TTL output
2 +12 V DC 8 Ground
3 Ground 9 ISO output –
4 ISO output + 10 Exposure pulse output
5 Ground 11 Triger pulse input
6 TTL input 12 Ground
6
Page 7
Overview
76 1
9 SERIAL connector (6-pin)
You can connect a serial cable to this connector to
control a camera from a camera control device (e.g.,
PC).
Pin No. Signal Pin No. Signal
1 TXD 4 ISO input +
2 RXD 5 ISO input –
3 Ground 6 XCI-SX1: NC
XCI-V3: TTL output 2
q; LAN connector
You can connect a LAN cable to this connector to
output a video signal to the host device.
Pin No. Signal Pin No. Signal
1 TD+ 5 NC
2 TD– 6 RD–
3 RD+ 7 NC
4NC8NC
qa MODE switches
For service use. Both switches are set to the left side as
the factory setting.
Note
If either of these switches is set to the right side, the
camera doesn’t start normally.
qs POWER LED
Lights in green when power is input.
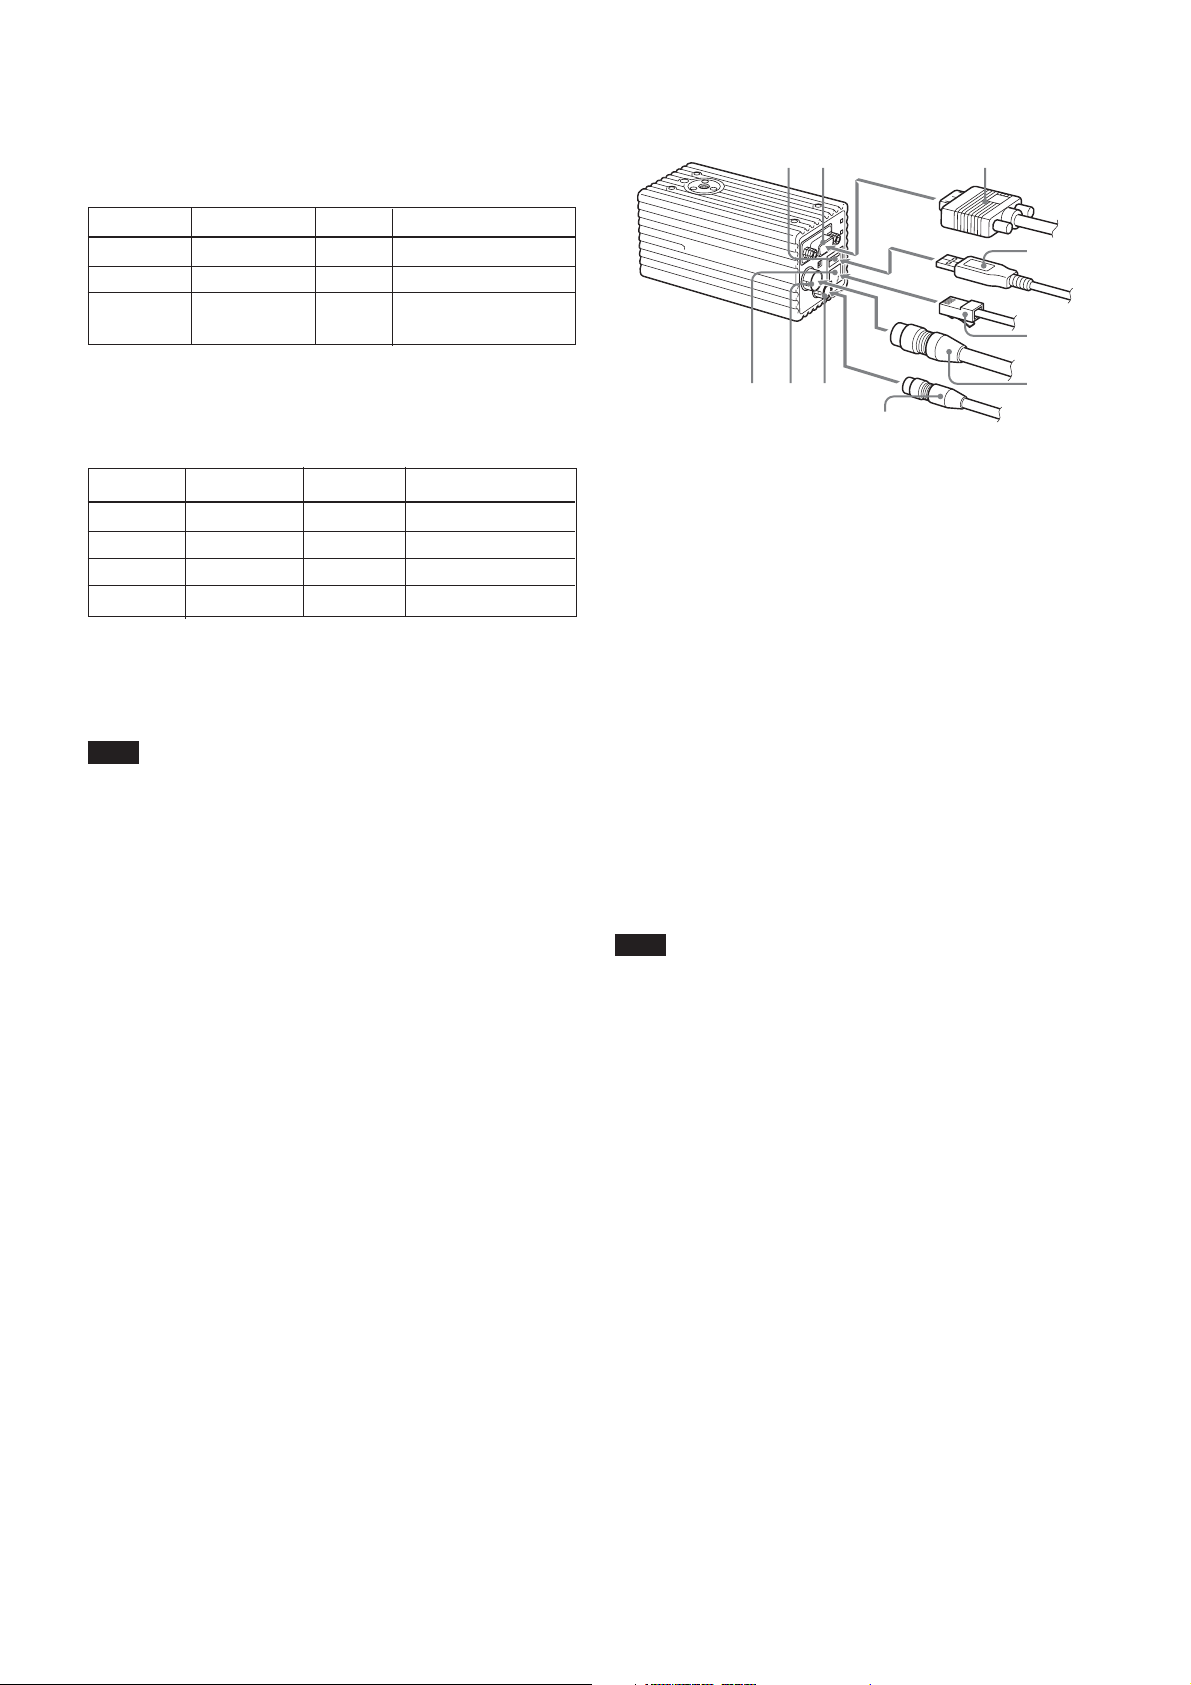
Connecting the cables
2
3
q; 8 9
5
1 Monitor cable 6 MONITOR connector
2 USB cable 7 USB connector
3 LAN cable 8 DC IN connector
4 Camera cable 9 SERIAL connector
5 Serial cable 0 LAN connector
Connect the camera cable to the DC IN connector.
Also, if needed, connect the LAN cable to the LAN
connector, the monitor cable to the MONITOR
connector, the serial cable to the SERIAL connector,
and the USB mouse/keyboard to the USB connector
respectively.
When you connect the monitor cable, turn the two
fastening screws to secure the cable tightly.
Connect the other end of the camera cable to the DC700/700CE. Also, if needed, connect the LAN cable to
the host device, and the monitor cable to the monitor,
and the serial cable to the camera control device.
4
qd STATUS LED
Lights in red when the BIOS is starting up.
qf RESET switch
Push to restart the camera.
Note
Make sure to supply power to the camera module and
confirm that the camera module is operating before
inputting a trigger signal. If you input external signals
to a camera module without the power supplied, this
may cause a malfunction of the camera module.
7
Page 8
Functions
Functions
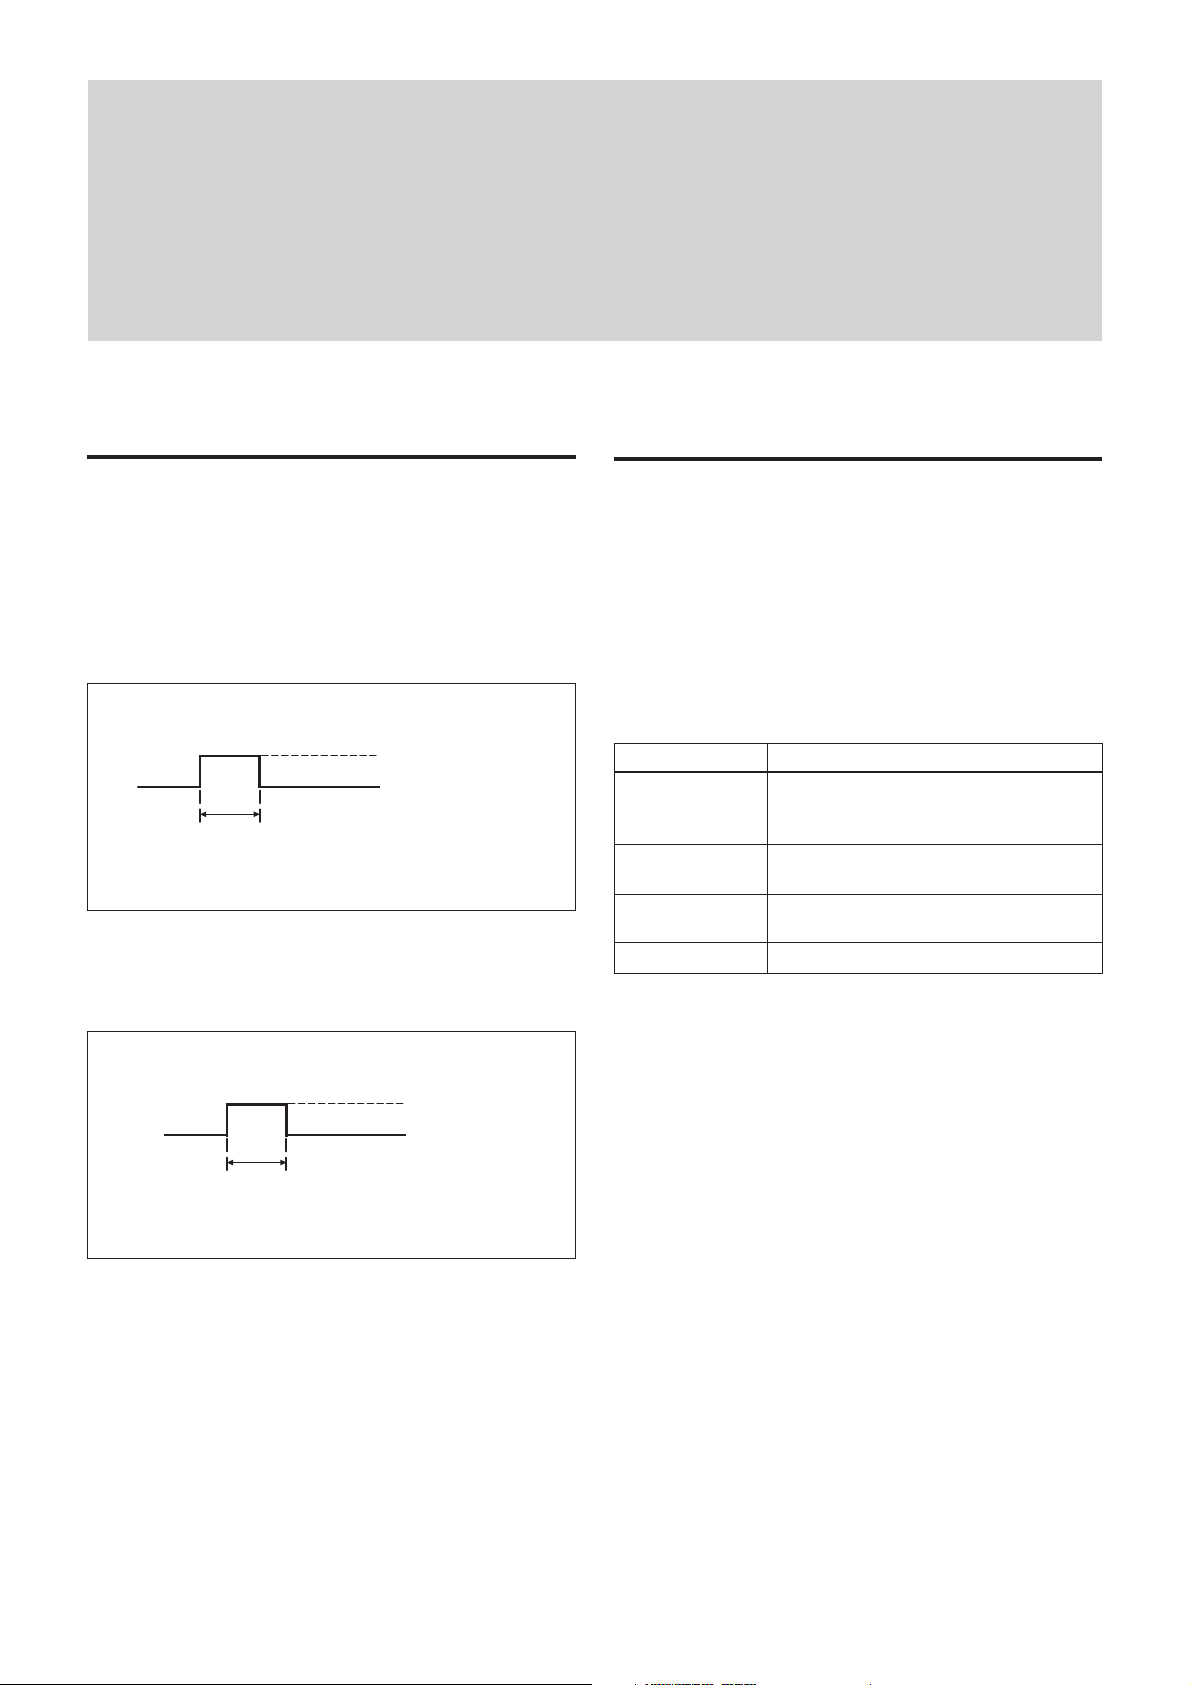
Input Specification
The voltages and pulse widths are values that are
measured by the DC IN (12-pin) and SERIAL (6-pin)
connectors on the rear of the camera.
Trigger input (DC IN 12-pin connector)
4.5 – 5.0 V (XCI-SX1)
4.5 – 24 V (XCI-V3)
0.0 – 0.5 V
2 µs or more
Exposure output (DC IN 12-pin connector)
The amplitude level is the measure of central tendency
terminated with 10 kΩ.
About the camera functions
This unit has the following camera modes. Set your
required camera mode in the GUI application in
accordance with your requirements.
For details regarding operation of the GUI application,
see page 13.
Mode Application
Normal mode To output continuous normal images
To capture a high-speed moving object with vivid
clarity
Trigger mode To capture a high-speed moving object with vivid
clarity
Binning mode To output images at a higher frame rate or higher
sensitivity
Partial scan mode To output images at a higher frame rate
Normal mode
This value depends on
the shutter settings.
4.0 – 4.5 V
0 V
This mode can be set on the SHUTTER screen in the
GUI application for camera settings.
For the XCI-SX1, output of all individual video signals
[1280 (H) × 1024 (V)] is at 15 frames per second as
continuous video.
For the XCI-V3, output of all individual video signals
[640 (H) × 480 (V)] is at 60 frames per second as
continuous video.
Continuous normal images can be captured in this
mode.
When you set the shutter speed higher, you can capture
the high-speed movement of objects with vivid clarity.
8
Page 9

Functions
Trigger mode
This mode can be set on the SHUTTER screen in the
GUI application for camera settings.
In this mode video signals begin to accumulate by
synchronizing with external trigger input. The video
signals are output after the exposure is finished.
The high-speed movement of objects can be captured
with vivid clarity in this mode.
Set the shutter speed in accordance with the recording
conditions.
Select the shutter speed from the following:
[2, 1, 1/15, 1/30, 1/60, 1/100, 1/120, 1/250, 1/500, 1/
1000, 1/2000, 1/4000, 1/10000, 1/25000, 1/50000,
Trigger Width] (sec)
When selecting Trigger Width
The mode is set to trigger pulse width detection mode.
The following is the formula for the shutter speed T[s]:
XCI-SX1: T[s] = Trigger width + 6µs
XCI-V3: T[s] = Trigger width + 5µs
You can also set the following on the SHUTTER
screen in the GUI application for camera settings:
• Trigger polarity
This is set to select a trigger input polarity for the
camera.
• Trigger delay function
This function is to delay trigger input to this unit, so
the exposure start time can be delayed until the set
time.
You can fine adjust the capture timing without
changing the camera position even after the camera is
installed.
Trigger delay setting range:
[0 to 4 (sec)] (In units of 1ms)
Binning mode
This mode can be set on the HIGH RATE SCAN
screen in the GUI application for camera settings.
This mode is used to increase the frame rate and/or
sensitivity by adding pixels in both vertical and
horizontal directions.
Select one of the following modes depending on the
binning method.
•1 × 2 (V-binning) mode
In this mode the frame rate almost doubles and the
data volume becomes half by adding two vertical
lines.
When the shutter speed is set, the sensitivity almost
doubles.
For the XCI-SX1, the output data size becomes
1280 (H) × 512 (V).
For the XCI-V3, the output data size becomes
640 (H) × 240 (V).
•2 × 1 (H-binning) mode
In this mode the sensitivity almost doubles and the
data volume becomes half by adding two horizontal
pixels.
As the horizontal synchronization signal frequency is
the same as when in normal mode, the frame rate
doesn’t change.
For the XCI-SX1, the output data size becomes
640 (H) × 1024 (V).
For the XCI-V3, the output data size becomes 320(H)
× 480 (V).
•2 × 2 (HV-binning) mode
In this mode the frame rate and sensitivity almost
double and the data volume becomes 1/4 by adding
two vertical lines and two horizontal pixels.
Moreover, when the shutter speed is set, the
sensitivity almost doubles again.
For the XCI-SX1, the output data size becomes
640 (H) × 512 (V).
For the XCI-V3, the output data size becomes
320 (H) × 240 (V).
• Software trigger function
A trigger is generated within this unit to capture a
still image at any timing.
9
Page 10
Partial scan mode
Functions
This mode can be set using the HIGH RATE SCAN
screen in the GUI application for camera settings.
In this mode, the desired rectangle area is read out, and
the redundant image area is transmitted at high speed
to raise the frame rate. The read out area can be set
separately as an effective image area vertically and
horizontally. For the XCI-SX1, the effective image
area is vertically divided into 32 areas and horizontally
divided into 10 areas. You can select a specific portion
among those from 1 block to 32 blocks vertically in
units of one block separately or succesively, and 3
blocks to 10 blocks horizontally in minimum units of
successive 3 blocks. For the XCI-V3, the effective area
is vertically divided into 16 areas and horizontally
divided into 10 areas. You can select a specific portion
among those from 1 block to 16 blocks vertically.
Partial scan can be individually set in a horizontal or
vertical direction.
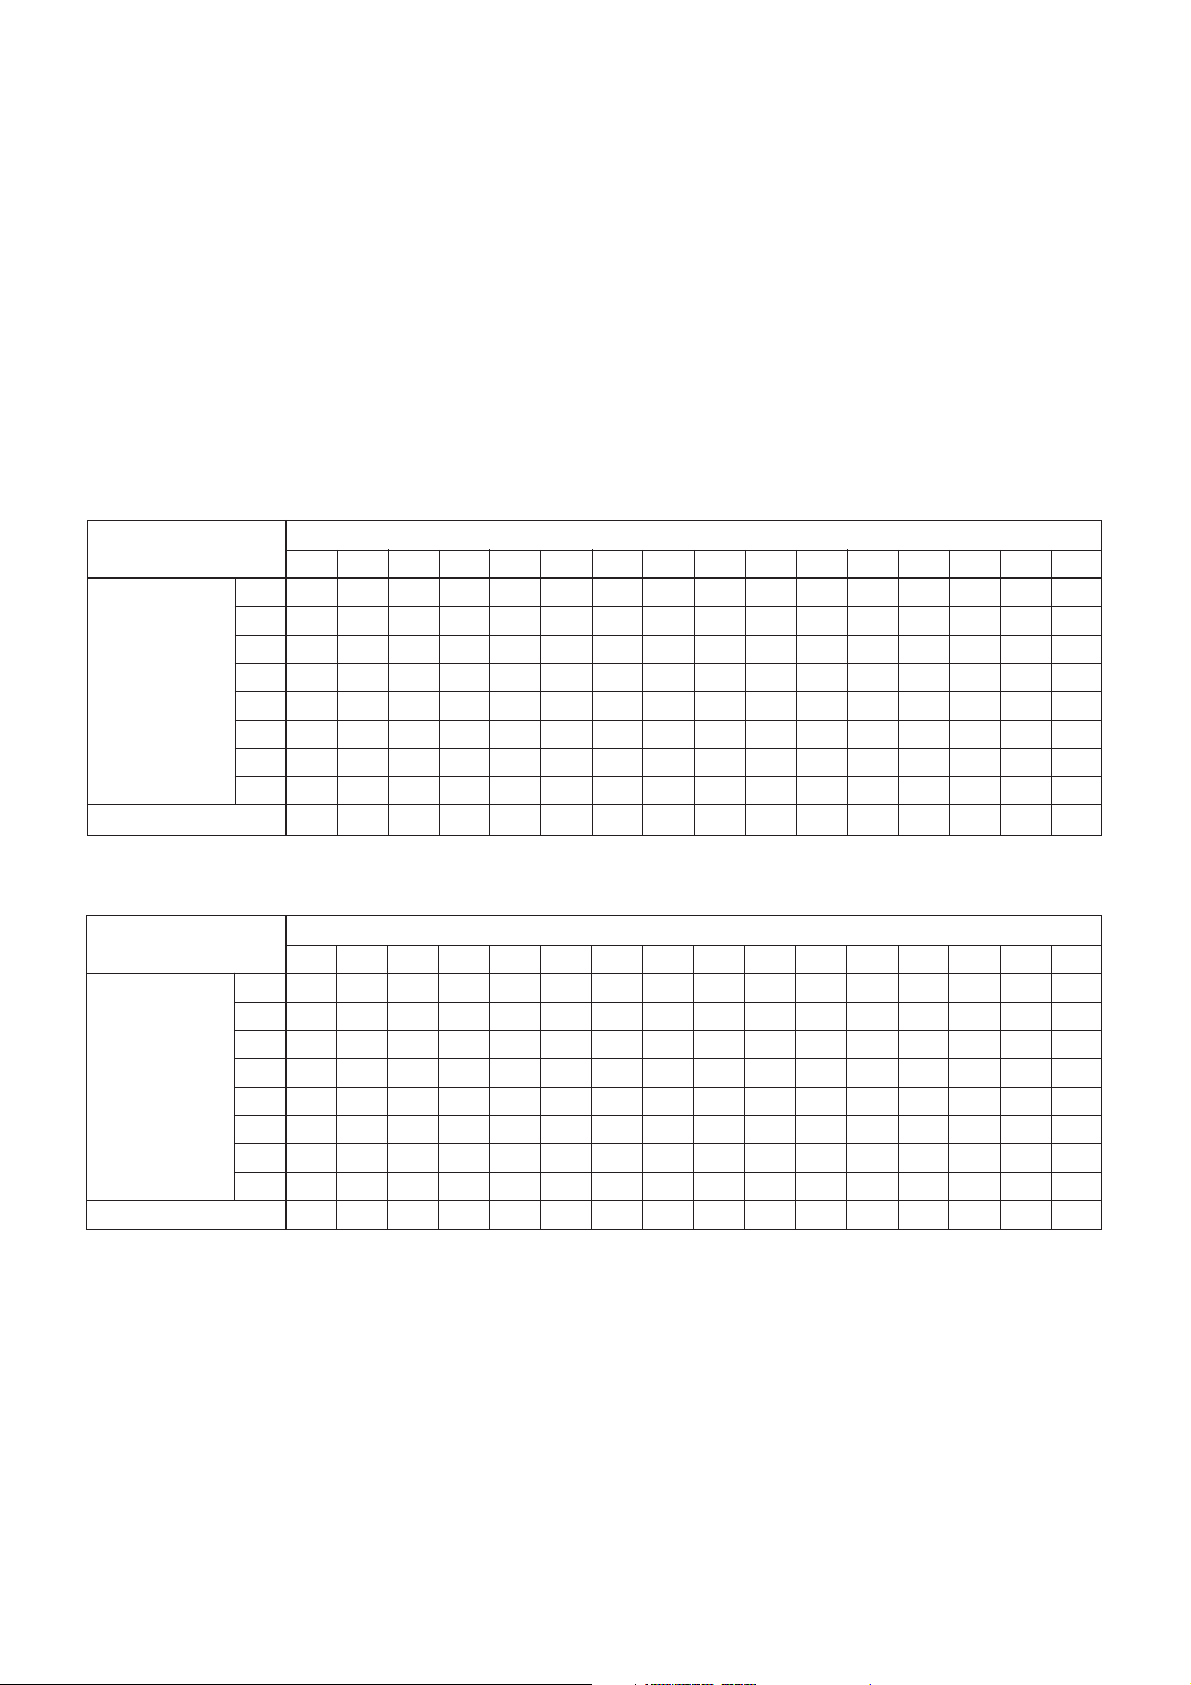
The tables below show approximate frame rate values
when the partial scan mode is used.
Frame rate tables when V-binning is OFF (XCI-SX1)
Number of vertical effective lines (L)
32 64 96 128 160 192 224 256 288 320 352 384 416 448 480 512
384 119 103 92 82 74 68 63 58 54 51 48 45 43 40 38 37
512 113 98 87 78 71 65 60 55 51 48 45 43 40 38 36 35
Number of
horizontal effective
pixels (PIX) when
horizontal partial
scan (HPS) is ON
When HPS is OFF 86 74 66 59 53 49 45 42 39 36 34 32 31 29 28 26
640 108 94 83 74 67 62 57 53 49 46 43 41 38 37 35 33
768 103 89 79 71 64 59 54 50 47 44 41 39 37 35 33 32
896 98 85 76 68 61 56 52 48 45 42 39 37 35 33 32 30
1024 94 82 72 65 59 54 50 46 43 40 38 36 34 32 30 29
1152 90 79 70 62 57 52 48 44 41 38 36 34 32 31 29 28
1280 87 76 67 60 54 50 46 42 40 37 35 33 31 29 28 27
(Unit: fps)
Number of vertical effective lines (L)
544 576 608 640 672 704 736 768 800 832 864 896 928 960 992 1024
384 35 34 32 31 30 29 28 27 26 25 24 24 23 22 22 21
512 33 32 31 29 28 27 26 25 25 24 23 22 22 21 21 20
Number of
horizontal effective
pixels (PIX) when
horizontal partial
scan (HPS) is ON
When HPS is OFF 25 24 23 22 21 21 20 19 19 18 17 17 16 16 16 15
640 32 30 29 28 27 26 25 24 23 23 22 21 21 20 20 19
768 30 29 28 27 26 25 24 23 22 22 21 20 20 19 19 18
896 29 28 27 26 25 24 23 22 21 21 20 19 19 18 18 17
1024 28 27 25 24 24 23 22 21 20 20 19 19 18 18 17 17
1152 27 25 24 23 23 22 21 20 20 19 18 18 17 17 16 16
1280 26 25 24 23 22 21 20 20 19 18 18 17 17 16 16 15
(Unit: fps)
10
Page 11

Functions
Frame rate tables when V-binning is ON (XCI-SX1)
Number of vertical effective lines (L)
16 32 48 64 80 96 112 128 144 160 176 192 208 224 240 256
384 130 122 114 107 102 96 92 87 83 80 76 73 71 68 66 63
512 124 115 108 102 96 91 87 83 79 76 73 70 67 65 62 60
Number of
horizontal effective
pixels (PIX) when
horizontal partial
scan (HPS) is ON
When HPS is OFF 94 87 82 77 73 69 66 63 60 57 55 53 51 49 47 46
Number of
horizontal effective
pixels (PIX) when
horizontal partial
scan (HPS) is ON
When HPS is OFF 44 43 41 40 39 38 37 36 35 34 33 32 32 31 30 29
640 118 110 103 97 92 87 83 79 75 72 69 66 64 62 59 57
768 112 105 98 93 88 83 79 75 72 69 66 63 61 59 57 55
896 107 100 94 89 84 80 76 72 69 66 63 61 58 56 54 52
1024 103 96 90 85 80 76 72 69 66 63 60 58 56 54 52 50
1152 99 92 87 82 77 73 70 66 63 61 58 56 54 52 50 48
1280 95 89 83 78 74 70 67 64 61 58 56 54 52 50 48 46
(Unit: fps)
Number of vertical effective lines (L)
272 288 304 320 336 352 368 384 400 416 432 448 464 480 496 512
384 61 59 57 56 54 53 51 50 48 47 46 45 44 43 42 40
512 58 56 55 53 51 50 49 47 46 45 44 43 42 41 40 38
640 55 54 52 50 49 48 46 45 44 43 42 41 40 39 38 36
768 53 51 50 48 47 45 44 43 42 41 40 39 38 37 36 35
896 51 49 47 46 45 43 42 41 40 39 38 37 36 35 35 33
1024 48 47 45 44 43 42 40 39 38 37 36 36 35 34 33 32
1152 47 45 44 42 41 40 39 38 37 36 35 34 33 33 32 30
1280 45 43 42 41 40 38 37 36 35 34 34 33 32 31 31 29
(Unit: fps)
11
Page 12

Functions
Frame rate table when V-binning is OFF (XCI-V3)
Number of vertical effective lines (L)
30 60 90 120 150 180 210 240 270 300 330 360 390 420 450 480
192 419 333 277 236 206 183 165 149 137 126 117 109 102 96 91 86
256 396 315 262 224 195 173 156 141 129 119 111 103 97 91 86 81
Number of
horizontal effective
pixels (PIX) when
horizontal partial
scan (HPS) is ON
When HPS is OFF 299 237 197 168 147 130 117 106 97 90 83 78 73 68 65 61
320 376 299 248 212 185 164 148 134 123 113 105 98 92 86 81 77
384 357 284 236 202 176 156 140 127 117 107 100 93 87 82 77 73
448 341 271 225 192 168 149 134 121 111 102 95 89 83 78 74 70
512 325 259 215 183 160 142 128 116 106 98 91 85 79 75 70 67
576 311 248 206 176 153 136 122 111 102 94 87 81 76 71 67 64
640 299 237 197 168 147 130 117 106 97 90 83 78 73 68 65 61
(Unit: fps)
Frame rate table when V-binning is ON (XCI-V3)
Number of vertical effective lines (L)
15 30 45 60 75 90 105 120 135 150 165 180 195 210 225 240
192 550 478 423 379 344 314 289 268 250 234 220 207 196 186 177 169
256 520 452 400 359 325 297 274 254 236 221 208 196 186 176 168 160
Number of
horizontal effective
pixels (PIX) when
horizontal partial
scan (HPS) is ON
When HPS is OFF 392 341 302 270 245 224 206 191 178 167 157 148 140 133 126 120
320 493 429 379 340 308 282 259 240 224 210 197 186 176 167 159 151
384 469 408 361 323 293 268 247 229 213 199 187 177 167 159 151 144
448 447 389 344 308 279 255 235 218 203 190 179 168 159 151 144 137
512 427 371 329 294 267 244 225 208 194 182 171 161 152 144 137 131
576 409 356 314 282 255 233 215 199 186 174 163 154 146 138 132 125
640 392 341 302 270 245 224 206 191 178 167 157 148 140 133 126 120
(Unit: fps)
12
Page 13

GUI application
This unit has a graphical user interface (GUI) that
allows you to easily set camera functions and modes
on an SXGA monitor.
The GUI application can be operated by a USB mouse
connected with this unit.
The following settings can be accomplished by using
this application:
•Display of camera images
• Setting of camera device
• Settings of time and keyboard options
• Setting of network
• Setting of serial communication speed
GUI application
Before starting the GUI application
1 Connect the following with this unit:
• Camera adaptor DC-700/700CE
• Computer monitor compatible with SXGA images
(1280 × 1024)
•USB mouse
Connect a USB keyboard or LAN cable with this
unit if needed.
2 Turn on the power to the camera adaptor.
This unit is powered on and the POWER LED on the
rear panel lights in green.
When this unit boots up, the GUI application is
automatically displayed on the monitor.
13
Page 14

Basic operation
To operate the GUI application, connect and use a
USB mouse (use left clicks only).
When you connect a USB keyboard with this unit,
shortcut keys can be used.
Regarding specific shortcut keys for each screen, refer
to the HELP information by clicking on the
upper right of the screen.
on
GUI application
Note
The ADMIN screen is exclusively for service
personnel. If the CDS gain or pedestal level is
changed, the performance of the camera may be
degraded. Refer all such adjustments to qualified
service personnel.
3 SETUP tool bar
Press the icon corresponding to the screen to which
you want to move for settings except camera settings.
To move to a desired screen
Select an icon on the tool bar located at the top of the
screen.
When you connect a USB keyboard, you can move to
a desired screen by pressing the underlined letter of an
icon and the Ctrl key in the keyboard simultaneously.
1
2
3
4
GENERAL: Date, time, Web monitor and keyboard
settings
NETWORK: Network functions
SERIAL I/F: Serial communication speed
4 Camera image display area
A camera image is displayed here on the HOME,
SHUTTER, GAIN/LUT, HIGH RATE SCAN, and
ADMIN screens.
Note
The CCD pixels of the XCI-SX1/V3 are in the 256level gray scale. However, the camera images are
displayed on the monitor in 16-bit RGB mode. Strictly
speaking, display of 256-level camera images is not
possible.
The current selected screen is one with the icon in
yellow on the tool bar.
1 HOME button
Press this icon to move to the HOME screen.
2 CAMERA setting tool bar
Press the icon corresponding to the screen to which
you want to move for the camera settings.
Camera images can be displayed on the following
screens:
SHUTTER: Shutter mode and shutter speed
GAIN/LUT: Gain and LUT (look up table)
HIGH RATE SCAN: High rate scan (partial scan of
an image and binning)
ADMIN: Camera settings made at the factory
(pedestal level and CDS gain)
14
Page 15

HOME screen
This screen is used for displaying the system
conditions and initializing each setting.
1
5
GUI application
When you click the APPLY&SAVE button, the
current settings are applied and saved.
The saved values are applied the next time you boot
the system.
Note
Depending on your network setting, the message
“MAC Address: Unknown” may be displayed after
selecting “Default (Network)” or “Default (All)” and
clicking the APPLY&SAVE button. This is not
malfunction.
3 REBOOT SYSTEM button
This button is used to reboot the system.
4 FULL SCREEN button
This button is used to display a camera image on the
full screen.
5 ? (HELP) button
This button is used to display HELP information.
2
3
4
1 System information display area
The following system information is displayed on the
HOME screen:
Version
– Hardware: Hardware version
– Software: Software version
Network
– Hostname: Host name
– IP Address: IP address
– MAC Address: MAC address
Serial Baud Rate: Communication speed for the serial
interface
Serial Number: Production serial number
2 Initialization setting area
Each setting can be initialized in this area.
Select an item you want to initialize and click the
APPLY button or APPLY&SAVE button.
The following items to be initialized by selecting the
appropriate radio buttons:
Default (Camera): The basic settings (SHUTTER,
GAIN/LUT and HIGH RATE SCAN) for the
camera are returned to the factory default settings.
Default (Network): The network settings are returned
to the factory default settings.
Default (All): All the settings are returned to the
factory default settings. (The pedestal and CDS
gain settings are not affected.)
Saved Settings: All the settings are returned to the
currently saved settings. The pedestal and CDS
gain settings are not affected.)
Shortcut keys
When you connect a USB keyboard with this unit, you
can use the following shortcut keys in the HOME
screen:
Shortcut Applicable button
Alt + P APPLY
Alt + V APPLY & SAVE
Alt + R REBOOT SYSTEM
Alt + F FULL SCREEN
Alt + H HELP
15
Page 16

SHUTTER screen
This screen is used for setting the shutter mode and
shutter speed.
You can select one of the following two shutter modes:
•Monitoring mode
• Trigger mode
GUI application
Note
The SOFTWARE TRIGGER button is effective when
the trigger polarity is set to Positive.
1
2
1
23
1 Monitoring (normal mode) setting area
XCI-SX1: In normal mode all individual video signals
[1280 (H) × 1024 (V)] are output continuously at
15 frames per second. You can select one of the
following shutter speeds in normal mode:
[OFF, 2, 1, 1/30, 1/60, 1/100, 1/120, 1/250, 1/500,
1/1000, 1/2000, 1/4000, 1/10000, 1/25000, 1/
50000, 1/100000] (sec)
XCI-V3: In normal mode all individual video signals
[640 (H) × 480 (V)] are output continuously at 60
frames per second. You can select one of the
following shutter speeds in normal mode:
[2, 1, 1/15, 1/30, 1/60, 1/100, 1/120, 1/250, 1/500,
1/1000, 1/2000, 1/4000, 1/10000, 1/25000, 1/
50000, 1/100000] (sec)
4
5
7
6
3
1 Trigger mode selection radio button
2 Shutter speed selection pull down
You can select one of the following shutter speeds in
trigger mode:
[1/15, 2, 1, 1/30, 1/60, 1/100, 1/120, 1/250, 1/500,
1/1000, 1/2000, 1/4000, 1/10000, 1/25000, 1/50000,
Trigger Width] (sec)
3 Trigger polarity selection radio buttons
These are used to set the polarity of external trigger
signals.
Positive: To set it positive
Negative: To set it negative
5
4
2 Trigger (trigger mode) setting area
In trigger mode video signals begin accumulating by
synchronizing with the external trigger input. The
video signals are output after the exposure is finished.
The monitor displays a still image of the camera
immediately after clicking the trigger mode radio
button.
The displayed image will be updated each time when
inputting external trigger signals or clicking the
SOFTWARE TRIGGER button.
4 Trigger delay setting area
This is used to set the start time of exposure to delay
the trigger input to this unit.
You can set a delay time from the following range in
units of 1 millisecond.
[0 to 4095] (ms)
16
Page 17

Note
When the cycle of the input trigger is smaller than the
trigger delay value set, the image is not output
correctly. Pay attention to this fact when you set the
trigger delay value.
5 SOFTWARE TRIGGER button
This button is used to capture an image immediately
after pressing the button.
3 SAVE button
This button is used to save the currently set values.
4 CANCEL button
This button is used to cancel changes.
5 Note button
This button is used to display the trigger instruction.
6 FULL SCREEN button
This button is used to display a camera image on the
full screen.
GUI application
GAIN/LUT (Look Up Table) screen
This screen is used for setting the camera gain and
gamma.
1
6
7 ? (HELP) button
This button is used to display HELP information.
Shortcut keys
When you connect a USB keyboard with this unit, you
can use the following shortcut keys in the SHUTTER
screen:
Shortcut Applicable button
Alt + W SOFTWARE TRIGGER
Alt + S SAVE
Alt + C CANCEL
Alt + F FULL SCREEN
Alt + H HELP
When you press the Alt and S keys on the keyboard to
save, the confirmation guidance is displayed on the
screen. You can press one of the following keys to be
assigned:
ENTER: Press the ENTER key if it’s OK.
ESC: Press the ESC key if you want to cancel.
234 5
1 GAIN up down counter
You can set the gain of this unit from the following
range in units of 1 dB:
[0 to 18] (dB)
2 LUT radio buttons
The look up table is used to change the gamma setting
of this unit.
You can select one of the following settings using a
radio button:
• γ = 1 (OFF)
• γ = 0.45
• γ = 2.2
• Reverse
• Binarization
Binarization is selected for changing the look up table
to binary.
You can set the threshold within the following range of
the threshold up down counter:
[1 to 1023]
3 SAVE button
This button is used to save the currently set values.
4 CANCEL button
This button is used to cancel changes.
17
Page 18

5 FULL SCREEN button
This button is used to display a camera image on the
full screen.
6 ? (HELP) button
This button is used to display HELP information.
GUI application
HRS (High Rate Scan) screen
This screen is used for setting the partial scan function
and binning of the camera.
Shortcut keys
When you connect a USB keyboard with this unit, you
can use the following shortcut keys in the GAIN/LUT
screen:
Shortcut Applicable button
Alt + S SAVE
Alt + C CANCEL
Alt + F FULL SCREEN
Alt + H HELP
1
4
56
1 Frame Rate (fps)
The ideal value of the frame rate transmitted from
CCD is displayed.
2
3
7
Note
This value is the frame rate estimated based on the
tables on pages 10, 11 and 12 not the frame rate of the
actual display on the screen.
2 Vertical binning/partial scan setting area
Partial Scan check-off box: You can select a specific
portion of the image by using the partial scan
function. Check off this box to display 2 sliders in
the outer frame of the camera image. In order to
specify the area for partial scan, drag any of the 2
sliders on the left sides of the image with the
mouse.
Top and Bottom: These boxes display the line
positions of the top and bottom lines of the
displayed image.
Binning check-off box: Check off this box to set
binning.
18
Page 19

3 Horizontal binning/partial scan setting area
Partial Scan check-off box: You can select a specific
portion of the image by using the partial scan
function. Check off this box to display 2 sliders in
the outer frame of the camera image. In order to
specify the area for partial scan, drag any of the 2
sliders on the bottom sides of the image with the
mouse.
Left and Right: These boxes display the pixel
positions of the right and left lines of the displayed
image.
Binning check-off box: Check off this box to set
binning.
4 SAVE button
This button is used to save the currently set values.
5 CANCEL button
This button is used to cancel changes.
6 FULL SCREEN button
This button is used to display a camera image on the
full screen.
GUI application
GENERAL screen
This screen is used for setting time, Web monitor
functions and keyboard.
1
6
7 ? (HELP) button
This button is used to display HELP information.
Shortcut keys
When you connect a USB keyboard with this unit, you
can use the following shortcut keys in the HRS screen:
Shortcut Applicable button
Alt + W, Alt + Z Vertical movement of the top slider
(W: Upward, Z: Downward)
Alt + I, Alt + M Vertical movement of the bottom slider
(I: Upward, M: Downward)
Alt + A, Alt + D Horizontal movement of the left slider
(A: To the left, D: To the right)
Alt + J, Alt + L Horizontal movement of the right slider
(J: To the left, L: To the right)
Alt + V To select Vertical Partial Scan
Alt + E To select Vertical Binning
Alt + P To select Horizontal Partial Scan
Alt + O To select Horizontal Binning
Alt + S SAVE
Alt + C CANCEL
Alt + F FULL SCREEN
Alt + H HELP
234
5
1 Date & Time
Date and time can be set using the up down counters.
2 Web Monitor
This unit has a Web server function. Using this
function, a camera image can be displayed in the
Internet browser on an external PC.
Camera Image: Set this “on” to display a camera
image on the Internet browser.
Frame Rate (fps): Set the frame rate.
View Size: Set the image size.
Image Quality (1-10): Quality of the JPEG
compression (When the value is larger, the
compression rate is smaller.)
3 Keyboard
Keyboard options to be used. Select US or JP.
4 SAVE button
This button is used to save the currently set values.
5 CANCEL button
This button is used to cancel changes.
6 ? (HELP) button
This button is used to display HELP information.
19
Page 20

GUI application
Shortcut keys
When you connect a USB keyboard with this unit, you
can use the following shortcut keys in the GENERAL
screen:
Shortcut Applicable button
Alt + M Month
Alt + S SAVE
Alt + C CANCEL
Alt + H HELP
You can move between the items in the screen by
pressing the tab key.
NETWORK screen
This screen is used for setting the XCI-SX1/V3 when
connecting it to a LAN.
This screen consists of three areas for the following
settings:
•LAN (Local Area Network)
•SNMP (Simple Network Management Protocol)
•NTP (Network Time Protocol)
1
7
8
23456
1 LAN
The basic settings for connecting to the network are
made in this area.
DHCP Mode: Set if you obtain the IP address
automatically from the DHCP server or a fixed IP
address.
Host Name: Host name
IP Address: Fixed IP address
Network Mask: Network mask
Gateway Address: Gateway address
DNS Address: DNS server address
Notes
•At the factory, the DHCP Mode is set to Auto and the
XCI-SX1/V3 gets an IP address from a DHCP server
automatically. When there is no DHCP server on
your network, set DHCP Mode to Off and input the
fixed IP address.
•Reboot the XCI-SX1/V3 when the network settings
are changed after getting the IP address from the
DHCP server.
2 SNMP (Simple Network Management Protocol)
The setting to make the agent service effective is made
in this area.
SNMP Mode: Select “On” to make the agent service
effective.
TRAP Destination: SNMP management station
address used to receive trap notifications
20
Page 21

Community: Community name administrated by the
SNMP manager
Description: Description of this unit
Location: Location of this unit
Contact: Administrator contact information
GUI application
SERIAL I/F screen
This screen is used for setting the serial interface
communication speed.
3 NTP (Network Time Protocol)
The protocol setting to synchronize the internal clock
of this unit with the NTP server is made in this area.
Input the time zone and effective NTP server. Press
the SYNCHRONIZE button to synchronize.
NTP Mode: Select “On” to synchronize internal clock
with by the NTP server.
Time Zone: Select your time zone.
Timeout: Timeout value
Sync Interval: Renewal cycle
NTP Server: NTP server address
Notes
•When NTP mode is set to “On”, you cannot change
the date and time in the GENERAL screen.
•When the network you are using is in your intranet
proxy connection environment, you cannot connect
this unit with a NTP server on the Internet.
Therefore, specify the NTP server operated in the
intranet.
4 SYNCHRONIZE button
This button is used to activate the synchronization of
the set values.
1
23
1 Baud Rate
Set the baud rate here.
You can select one of the following baud rates:
[4800, 9600, 19200, 38400, 57600, 115200] (bps)
4
5 SAVE button
This button is used to save the currently set values.
6 CANCEL button
This button is used to cancel changes.
7 ? (HELP) button
This button is used to display HELP information.
8 Software Keyboard
Enters alphabets or numbers.
Shortcut keys
When you connect a USB keyboard with this unit, you
can use the following shortcut keys in the NETWORK
screen:
Shortcut Applicable button
Alt + D DHCP
Alt + N SYNCHRONIZE
Alt + S SAVE
Alt + C CANCEL
Alt + H HELP
2 SAVE button
This button is used to save the currently set values.
3 CANCEL button
This button is used to cancel changes.
4 ? (HELP) button
This button is used to display HELP information.
Shortcut keys
When you connect a USB keyboard with this unit, you
can use the following shortcut keys in the SERIAL I/F
screen:
Shortcut Applicable button
Alt + S SAVE
Alt + C CANCEL
Alt + H HELP
You can move between the items in the screen by
pressing the tab key.
21
Page 22

External Control Commands
Overview
The XCI-SX1/V3 can be controlled externally from a
host device via a serial communication and telnet using
such communication softwares as “HyperTerminal” or
“Tera Term.”
Serial Communication Specifications
The serial communication system for the XCI-SX1/V3
is an asynchronous method compliant with RS-232C.
The following table shows the transmission control
specifications.
External Control Commands
XCI-SX1/V3 RS-232C connection
6PIN
TXD 1
RXD 2
GND 3
NC 4
NC 5
NC 6
D-SUB 9PIN
1–
2 RXD
3 TXD
4–
5 GND
6–
7–
8–
9–
Telnet Communication Specifications
Baud rate
Data bits 8
Parity None
Stop bit 1
Flow control None
Authentication None
115200/57600/38400/19200/9600/4800 [bps]
Default setting: 38400 [bps]
The external interface for serial communication is RS232C DCE (Data Communication Equipment) whose
connector form is D-sub 9pin(male).
When connecting the XCI-SX1/V3 to a PC, use a cross
cable.
The following table shows the specification for telnet
communication.
Port Number 23
Authentication login, password authentication
For the login, use the following login account.
user: admin
password: 1227
Telnet Authentication Specification
When you access the XCI-SX1/V3 from external
equipment, the following message appears on the
monitor.
SMARTCAM Telnet Server
SMARTCAM login:
Enter the login account and then the password.
SMARTCAM Telnet Server
SMARTCAM login: admin
password: ******
22
Page 23

External Control Commands
Note
The password entered is replaced with “*” on the
monitor.
When you enter the correct password, the following
message appears and the external command input is
validated.
Welcome to the Sony Smart Camera
Configuration Environment
When you enter a login account other than “admin” or
the wrong password, the following message appears.
Login incorrect
Note
If you enter the wrong password three times in a row,
the following message appears and the telnet
connection is disconnected.
Login incorrect
bye.
Depending on your telnet client software, this message
may not appear and the window may just close.
Command Format
To send a command, input a command name and
parameters and press [Enter] (<CR(Carriage Return)>
or <CR+LF(Line Feed)>) key.
Command inputs are echoed back to the 23rd port of
telnet/RS-232C except when the XCI-SX1/V3 is
transferring the LUT binary.
Notes
• Input characters are case-sensitive.
• Input decimal numbers for parameters.
•Maximum number of commands that can be input is
256 (except in Transparent mode).
Command Specification
The XCI-SX1/V3 returns an echo to valid inputs:
letters of the alphabet, numbers, “-,” spaces,
backspaces and [ENTER] (<CR> or <CR+LF>).
Input of letters and symbols other these above are all
ignored.
Multiple Session Specification
The XCI-SX1/V3 can be controlled via an RS-232C or
telnet connection asynchronously and can be
controlled via telnet in multiple sessions seperately.
1
1
2
2
4
1 Camera control device (e.g., PC) 1 SNMP Settings
2 RS-232C 2 Shutter Settings
3 XCI-SX1/V3 3 Time Settings
4 Telnet client
3
3
4
•When command execution is completed normally, the
response message to each command is displayed.
• If an invalid command is input, the following
messages are displayed.
error: invalid command or parameter.<CR>
Type ‘-
-help’ to display all possible
commands.<CR>
•When no parameter is input for a command with
parameters, the current status of the command is
displayed.
•When “-
-help” is input instead of parameters for a
command with parameters, the help of the command
is displayed.
•When the Enter key is pressed with no command
input, only the carriage return is carried out.
The commands described in this chapter are valid
when the GUI application is operating.
23
Page 24

Command Specifications
This section describes the details of control commands
available for the XCI-SX1/V3, classified by category.
The underlined words of the [Command] represent
parameters.
The bold words of the <Example> represent
commands, and the others the response to the
command.
External Control Commands
• Setting the fixed IP address (1)
setup lan off/SMARTCAM/
11.22.33.44/255.255.255.0/
55.66.77.88/1.2.3.4<CR>
setup save complete lan<CR>
• Setting the fixed IP address (2)
setup lan off//111.22.33.44///<CR>
setup save complete lan<CR>
Note
• The currently set value is applied to a parameter
for which no specific value is input.
• If you change a network setting, reboot the XCISX1/V3.
Serial Communication Setting
■ Baud Rate Setting
[Command] setup serial
[Parameter] BaudRATE: 4800, 9600, 19200,
38400, 57600, 115200
[Process] Sets the serial baud rate.
<Example> Setting the serial baud rate to 115200
bps
setup serial 115200<CR>
setup save complete serial<CR>
■ Current Baud Rate Setting
[Command] setup serial
[Process] Displays the current baud rate.
■ Help of the Baud Rate Setting
[Command] setup serial [Process] Displays the help of the Baud Rate
Setting command.
BRATE
-help
Network Settings
■ Use the default LAN Setting
[Command] setup lan default
[Process] Uses the default settings for the
following items.
•Mailer
• NTP
• LAN
• SNMP
<Example> Restoring the default settings
setup lan default<CR>
setup save complete lan<CR>
the network will be restarted... you
may have to re-login if you are linked
via telnet...<CR>
Note
If you change a network setting, reboot the XCISX1/V3.
■ Current LAN Setting
[Command] setup lan
[Process] Displays the current LAN setting.
■ LAN Settings
[Command] setup lan
GTW/DNS
[Parameter] DHCP: auto, off
HOST: Host Name
IP: IP Address
NETmask: Net Mask
GaTeWay: Gateway Address
DNS: DNS Address
[Process] Sets up the network.
<Example> • Getting the IP address from the
DHCP server
setup lan auto<CR>
setup save complete lan<CR>
warning: the network will be
DHCP/HOST/IP/NET/
restarted...<CR>
you may have to re-login if
you are linked via
telnet...<CR>
■ Help of the LAN Setting
[Command] setup lan [Process] Displays the help of the LAN Setting
command.
-help
SNMP Settings
■ SNMP Settings
[Command] setup snmp
LOC/CTC
[Parameter] SNmp Mode: off, on
TRaP: TRAP address
COMmunity: Community name
DeSCription: System Description
LOCation: System Location
ConTaCt: System Contact
[Process] Makes SNMP settings.
SNM/TRP/COM/DSC/
24
Page 25

External Control Commands
<Example> • Example of settings for SNMP (1)
setup snmp on/11.22.33.44/public/
Sony Smart Camera/Tokyo/
9876<CR>
setup save complete snmp<CR>
setup applying new SNMP
settings...<CR>
• Example of settings for SNMP (2)
setup snmp on////Shinagawa
Office/mail@contact.com<CR>
setup save complete snmp<CR>
• Setting the SNMP to OFF
setup snmp off<CR>
setup save complete snmp<CR>
Note
The currently set value is applied to the parameter
for which no specific value is input.
■ Current SNMP Setting
[Command] setup snmp
[Process] Displays the current SNMP setting.
■ Help of the SNMP Setting
[Command] setup snmp -
-help
[Process] Displays the help of the SNMP Setting
command.
■ SNMP Mailer Settings
[Command] setup mailer
mode/rcpt address
[Parameter] Mailer mode: off, on
Recipient Address: e-mail address
(user@domain-name.com)
You can input the multiple e-mail
addresses separated by commas.
[Process] Sets up the SNMP Mailer.
<Example> Setting the mailer to ON
setup mailer on/add1@domain.com,
add2@domain.com<CR>
setup save complete mailer<CR>
NTP Settings
■ NTP Settings
[Command] setup ntp
[Parameter] NTP: on, off
TimeZone: City time zone String
(Refer to the GUI application)
TimeOut: Server request timeout in
seconds (1 to 10 [sec] )
SERVer: IP address or hostname of the
NTP server
SYNC: Interval to synchronization
time with the NTP server (1hour,
6hours, 12hours, 24hours)
[Process] Sets the system clock connected the
NTP server
<Example> Set the NTP Clock Synchronization to
ON
setup ntp on/asia:tokyo//
11.22.33.44/24hours<CR>
setup save complete ntp<CR>
■ NTP Synchronization Test
[Command] setup ntp test
[Process] Tests the system clock
synchronization.
<Example> Synchronizing the clock with the NTP
server
setup ntp test<CR>
setup ntp sync complete<CR>
offset: -0.390111 sec<CR>
■ Current NTP Setting
[Command] setup ntp
[Process] Displays the current NTP setting.
■ Help of the NTP Setting
[Command] setup ntp [Process] Displays the help of the NTP Setting
command.
NTP/TZ/TO/SERV/SYNC
-help
Note
The currently set value is applied to a parameter
for which no specific value is input.
■ Current SNMP Mailer Setting
[Command] setup mailer
[Process] Displays the current SNMP mailer
setting.
■ Help of the SNMP Mailer Setting
[Command] setup mailer -
-help
[Process] Displays the help of the SNMP Mailer
Setting command.
Date Settings
■ Date Settings
[Command] setup date
[Parameter] DATE: MM-DD-YYYY
[Process] Set the date.
<Example> Setting the date to October 1st 2006
setup date 10-01-2006<CR>
setup save complete date<CR>
■ Current Date Setting
[Command] setup date
[Process] Displays the current date.
DATE
25
Page 26

External Control Commands
■ Help of the Date Setting
[Command] setup date -
-help
[Process] Displays the help of the Date Setting
command.
Note
You can set the DATE settings when NTP setting is
set to off.
When NTP setting is set to on, the following
messages are displayed.
setup date 10-01-2006<CR>
warning: NTP mode is currently set to
on; please turn it off to
manually set the date.<CR>
Time Settings
■ Time Settings
[Command] setup time
TIME
[Parameter] TIME: HH:MM:SS
[Process] Sets the time.
<Example> Setting the time to 15:00:00
setup time 15:00:00<CR>
setup save complete time<CR>
Note
Time Setting is available only when the NTP Setting
is set to OFF.
When the NTP Setting is set to ON, the following
message appears.
setup time 15:00:00<CR>
warning: NTP mode is currently set to
on; please turn it off to
manually set the time.<CR>
■ Current Time Setting
[Command] setup time
[Process] Displays the current time.
■ Help of the Time Setting
[Command] setup time -
-help
[Process] Displays the help of the Time Setting
command.
Web Monitor Settings
■ Web Monitor Settings
[Command] setup web
[Parameter] MONitor: on, off
frame RATE: 1 to 5 (1 step)
view SIZE: 320, 160
image QUAlity: 1 to 10 (1 step)
[Process] Sets the Web monitor.
<Example> Example of the Web monitor settings
setup web on/2/320/5<CR>
setup web complete<CR>
MON/RATE/SIZE/QUA
■ Current Web Monitor Setting
[Command] setup web
[Process] Displays the current web monitor
setting.
■ Help of the Web Monitor Setting
[Command] setup web -
-help
[Process] Displays the help of the Web Monitor
Setting command.
Camera Administrator: CDS Gain Settings
■ CDS Gain Settings
[Command] cds
[Parameter] GAIN: 0 to 63 (1step)
[Process] Sets the CDS gain manually.
<Example> Example of the CDS gain setting
■ Auto CDS Gain Settings
[Command] cds
[Parameter] AUTO: auto
[Process] Sets the CDS gain automatically.
<Example> Adjusting the CDS gain automatically
■ Current CDS Gain Setting
[Command] cds
[Process] Displays the current CDS gain setting.
■ Help of the CDS Gain Setting
[Command] cds [Process] Displays the help of the CDS Gain
GAIN
cds 63<CR>
camera cds complete<CR>
AUTO
or
AUTO X Y
cds
X: x-coordinate of the start point of the
rectangular area of the image data to
be used for adjustment
Y: y-coordinate of the start point of the
rectangular area of the image data to
be used for adjustment
*The size of the rectangular area of the
image to be adjusted is 160 × 128 for
the XCI-SX1 and 80 × 64 for the XCIV3. You are allowed to not input the X
and Y parameters. (When the X and Y
parameters are not input, the
rectangular area of the image data to
be used for adjustment is the center of
the image area.)
using the x-coordinate and ycoordinate of the top left point of the
rectangular area
cds auto 560 448<CR>
camera cds complete<CR>
-help
Setting command.
26
Page 27

External Control Commands
Camera Administrator: Pedestal Level
Setting
■ Pedestal Level Setting
[Command] pedestal
LVL
[Parameter] LeVeL: 0 to 255 (1step)
[Process] Sets the pedestal level.
<Example> Setting the pedestal level to 128
pedestal 128<CR>
camera pedestal complete<CR>
■ Auto Pedestal Level Settings
[Command] pedestal AUTO or pedestal AUTO
X Y
[Parameter] AUTO: auto
X: x-coordinate of the start point of the
rectangular area of the image data to
be used for adjustment
Y: y-coordinate of the start point of the
rectangular area of the image data to
be used for adjustment
*The size of the rectangular area of the
image to be adjusted is 160 × 128 for
the XCI-SX1 and 80 × 64 for the
XCI-V3. You are allowed to not input
the X and Y parameters. (When the X
and Y parameters are not input, the
rectangular area of the image data to
be used for adjustment is the center of
the image area.)
[Process] Adjusts the pedestal level
automatically.
<Example> Adjusting the pedestal level
automatically using the x-coordinate
and y-coordinate of the top left point
of the rectangular area
pedestal auto 560 448<CR>
camera pedestal complete<CR>
■ Current Pedestal Level Setting
[Command] pedestal
[Process] Displays the current pedestal level.
■ Help of the Pedestal Level Setting
[Command] pedestal -
-help
[Process] Displays the help of the Pedestal Level
Setting command.
Camera Shutter: Shutter Mode Setting
■ Shutter Mode Setting
[Command] shutter -m
or
shutter soft
[Parameter] MODE: monitor, trigger
MODE
[Process] Sets the shutter mode and generates a
software trigger.
<Example> • Setting the shutter mode to monitor
mode
shutter -m monitor<CR>
camera shutter mode complete<CR>
•Generating a software trigger
shutter soft<CR>
camera shutter mode complete<CR>
Note
A software trigger function is valid only when the
shutter mode is set to trigger mode.
■ Current Shutter Mode Setting
[Command] shutter -m
[Process] Displays the current shutter mode.
■ Help of the Shutter Mode Setting
[Command] shutter -m -
-help
[Process] Displays the help of the Shutter Mode
Setting command.
Camera Shutter: Shutter Speed Setting
■ Shutter Speed Settings
[Command] shutter -s
[Parameter] SPeeD: 2, 1, 1/15, 1/30, 1/60,
1/100, 1/120, 1/250, 1/500, 1/1000,
1/2000, 1/4000, 1/10000, 1/25000,
1/50000, 1/100000(t-width) [sec]
[Process] Sets the shutter speed.
<Example> Setting the shutter speed to 1/30 sec
shutter -s 1/30<CR>
camera shutter speed complete<CR>
■ Current Shutter Speed Setting
[Command] shutter -s
[Process] Displays the current shutter speed.
Note
For the XCI-SX1, when the shutter speed is set to 1/
15 sec, the display depends on the shutter mode
currently set.
•When the shutter mode is set to “monitor”
shutter -s<CR>
shutter -s off<CR>
•When the shutter mode is set to “trigger”
shutter -s<CR>
shutter -s 1/15<CR>
■ Help of the Shutter Speed Setting
[Command] shutter -s [Process] Displays the help of the Shutter Speed
Setting command.
SPD
-help
27
Page 28

External Control Commands
Camera Shutter: Trigger Polarity Setting
■ Trigger Polarity Setting
[Command] shutter -p
POL
[Parameter] POLarity: posi, nega
[Process] Sets the polarity of the external trigger
pulse.
<Example> Setting the trigger pulse to positive
shutter -p posi<CR>
camera shutter polarity
complete<CR>
■ Current Trigger Polarity Setting
[Command] shutter -p
[Process] Displays the current polarity of the
external trigger pulse.
■ Help of the Trigger Polarity Setting
[Command] shutter -p -
-help
[Process] Displays the help of the Trigger
Polarity Setting command.
Camera Shutter: Trigger Delay Setting
■ Trigger Delay Setting
[Command] shutter –d
or
tdly
[Parameter] DeLaY: 0 to 4095 [ms] (1 step)
[Process] Sets the trigger delay.
<Example> Setting the trigger delay to 100 ms
shutter -d 100<CR>
camera shutter delay complete<CR>
DLY
DLY
Camera Shutter: All Settings
■ Camera Shutter Settings
[Command] shutter -m
DLY
-d
MODE -s SPD -p POL
[Parameter] MODE: monitor, trigger
SPeeD: 2, 1, 1/15, 1/30, 1/60,
1/100, 1/120, 1/250, 1/500, 1/1000,
1/2000, 1/4000, 1/10000, 1/25000,
1/50000, 1/100000 (t-width) [sec]
POLarity: posi, nega
DeLaY: 0 to 4095 [ms]
[Process] Makes the multiple camera settings at
a once.
<Example> Setting the shutter mode to trigger
mode, shutter speed to 1/100 sec,
trigger pulse to negative, trigger delay
to 300 ms
shutter -m trigger -s 1/100 -p nega
-d 300 <CR>
camera shutter complete<CR>
■ Current Camera Shutter Setting
[Command] shutter
[Process] Displays the current camera shutter
setting.
■ Help of the Camera Shutter Setting
[Command] shutter -
-help
[Process] Displays the help of the Camera
Shutter Setting command.
Camera Look up Table: GAMMA Settings
■ Current Trigger Delay Setting
[Command] shutter -d
or
tdly
[Process] Displays the current trigger delay.
■ Help of the Trigger Delay Setting
[Command] shutter -d -
-help
or
-help
tdly [Process] Displays the help of the Trigger Delay
Setting command.
■ GAMMA Settings
[Command] lut
GAM –t THR
[Parameter] GAMma: off, 0.45, 2.2, reverse, bin
THReshold: 1 to 1023 (available
only when the gamma is set to bin)
[Process] Sets the gamma of the LUT (look up
table).
<Example> • Setting γ = 1 (OFF)
lut off<CR>
camera gamma complete<CR>
• Setting the gamma to binarization
(threshold to 512)
lut bin -t 512<CR>
camera gamma complete<CR>
28
Page 29

External Control Commands
■ Transferring the LUT Binary
[Command] lut transfer
[Process] Transfers the binary file of 1024 bytes
using the Kermit protocol.
<Example> lut transfer<CR>
G-Kermit CU-1.00, Columbia
University, 1999-12-25
Escape back to your local Kermit and
give a SEND command.
KERMIT READY TO
RECEIVE...<CR>
Note
To stop the transfer, press Ctrl + C.
■ Current GAMMA Setting
[Command] lut
[Process] Displays the gamma value of the
Look-up Table.
■ Help of the GAMMA Setting
[Command] lut -
-help
[Process] Displays the help of the GAMMA
Setting command.
■ LUT Inquiry
[Command] lut query
[Process] Dumps the LUT setting presently set
to the computer.
Camera Gain Control Setting
■ GAIN Setting
[Command] gain
[Parameter] GAIN: 0 to 18 [dB] (1 step)
[Process] Sets the gain.
<Example> Setting the gain to 18 dB
■ Current GAIN Setting
[Command] gain
[Process] Displays the current gain value.
■ Help of the GAIN Setting
[Command] gain [Process] Displays the help of the GAIN Setting
GAIN
gain 18<CR>
camera gain complete<CR>
-help
command.
Camera BINNING Settings
■ BINNING Settings
[Command] binning
VALUE
[Parameter] VALUE: 0 to 3
0: Horizontal = OFF, Vertical = OFF
1: Horizontal = OFF, Vertical = ON
2: Horizontal = ON, Vertical = OFF
3: Horizontal = ON, Vertical = ON
[Process] Sets the binning.
<Example> Setting both the Horizontal and
Vertical to OFF
binning 0<CR>
camera binning complete<CR>
■ Current BINNING Setting
[Command] binning
[Process] Displays the current binning setting.
■ Help of the BINNING Setting
[Command] binning -
-help
[Process] Displays the help of the BINNING
Setting command.
Camera Partial Scan Settings
■ Partial Scan Settings
[Command] -h
[Parameter] HORIZONTAL: off, on
[Process] Sets the partial scan.
<Example> Setting the partial scan.
Note
When setting the Partial Scan Setting to ON, input
both the start-point and the area at one time.
HORIZONTAL H-START H-WID
VERTICAL V-START V-HEI
-v
H-START: 0 to 7 (Valid when
Horizontal is set to on.)
H-WIDth: 0 to 7 (Valid when
Horizontal is set to on.)
VERTICAL: off, on
V-START: XCI-SX1: 0 to 31 (Valid
when Veritical is set to on.)
XCI-V3: 0 to15 (Valid when Veritical
is set to on.)
V-HEIght: XCI-SX1: 0 to 31 (Valid
when Veritical is set to on.)
XCI-V3: 0 to 15 (Valid when Veritical
is set to on.)
partial -h on 2 4 -v on 5 20<CR>
camera partial complete<CR>
■ Current Partial Scan Setting
[Command] partial
[Process] Displays the current partial scan
setting.
29
Page 30

External Control Commands
■ Help of the Partial Scan Setting
[Command] partial -
-help
[Process] Displays the help of the Partial Scan
Setting command.
Version Information Request
■ Version Information Request
[Command] version
[Process] Displays the model name and software
version.
Status Request
■ Status Request
[Command] status
[Process] Displays the following items.
•Model Name
•Hardware Version
• Software Version
• Hostname
• IP Address
• MAC Address
• Serial Baud Rate
• Serial number
Help Request
■ Help Request
[Command] help
Reboot Request
■ Reboot Request
[Command] reboot
[Process] Reboots the XCI-SX1/V3.
Factory Default Settings
■ Factory Default Setting
[Command] setup factory
[Process] Sets all the camera setting and Setup
values to the factory default setting
(except for the CDS gain and pedestal
level).
Note
This command works same as the “Default (All)” on
the HOME screen of the GUI application (page 15).
Resetting the Camera Settings
■ Resetting the Camera Stettings
[Command] setup default
[Process] Sets all the camera settings other than
CDS gain and pedestal level to the
factory setting.
Note
This command works same as the “Default
(Camera)” on the HOME screen of the GUI
application (page 15).
Local Echo Setting
■ Local Echo Setting
[Command] setup echo
[Parameter] ECHO: off, on
[Process] Sets the local echo setting.
<Example> Setting the local echo to OFF
setup echo off <CR>
setup save complete echo<CR>
■ Current Local Echo Setting
[Command] setup echo
[Process] Displays the current local echo setting.
■ Help of the Local Echo Setting
[Command] setup echo [Process] Displays the help of the Local Echo
Setting command.
ECHO
-help
Saving the Camera Settings
■ Saving the Camera Settings
[Command] save
[Process] Saves the camera settings (except for
the CDS gain, pedestal level, TRGINH
and DMAINH).
Notes
• The camera settings aren’t saved until the Save
command is received.
• For the XCI-SX1, this command works same as
the “SAVE” command of the GUI application and
the Web application (only for the camera settings).
For the XCI-V3, to save the settings of particular
functions of this unit (such as FILTER, and so on),
only this command can be used. You cannot use
the “SAVE” command of the GUI application or
the Web application.
30
Page 31

External Control Commands
Loading the Camera Settings
■ Loading the Camera Settings
[Command] load
[Process] Loads the camera settings.
Note
After loading, the camera’s basic settings are
reconfigured (except for the CDS gain, pedestal
level, TRGINH and DMAINH).
Ethernet Mode Setting
■ Ethernet Setting
[Command] setup ether
MODE
[Parameter] MODE: auto, 10half, 10full, 100half,
100full
[Process] Sets the ethernet mode.
<Example> Setting the ethernet mode to 100 Base
Half
setup ether 100half<CR>
setup save complete ether<CR>
warning: the network will be
restarted...<CR>
you may have to re-login if
you are linked via
telnet...<CR>
■ Current Ethernet Setting
[Command] setup ether
[Process] Displays the current Ethernet mode.
■ Help of the Ethernet Setting
[Command] setup ether -
-help
[Process] Displays the help of the Ethernet
Setting command.
Notes
•Reboot the XCI-SX1/V3 after changing the
ethernet setting.
• Set this to the same setting as the connected
network.
Ideal Figure of fps
■ Display the Ideal Figure of fps
[Command] fps
[Parameter] VB (Vertical Binning): 0[off],
VB HPS VPS HEND VEND
1[on]
HPS (Horizontal Pertial Scan): 0[off],
1[on]
VPS (Vertical Pertial Scan): 0[off],
1[on]
HEND (Horizontal pertial scan END):
0-7
VEND (Vertical pertial scan END):
0-31
[Process] Displays the ideal figure of fps
according to the parameters.
<Example> Ideal fps: 29.30 of 1-1-1-7-31
(v-hs-vs-he-ve)<CR>
■ Current Ideal Figure of fps
[Command] fps
[Process] Displays the ideal value of fps
according to the current register
setting.
■ Help of the Ideal Figure of fps
[Command] fps -
-help
[Process] Displays the help of the Ideal Figure of
fps command.
Keyboard Setting
■ Keyboard Setting
[Command] setup kbmap
TYPE
[Parameter] TYPE: en, jp
[Process] Sets the keyboard map and preserve
the setting.
<Example> Setting the layout of the keyboard to
English and saving the setting
setup kbmap en<CR>
setup save complete kbmap<CR>
■ Current Keyboard Setting
[Command] setup kbmap
[Process] Displays the current keyboard map
setting.
■ Help of the Keyboard Setting
[Command] setup kbmap -
-help
[Process] Displays the help of the Keyboard
Setting command.
Camera TRGINH Setting
■ TRGINH Setting
[Command] trginh
[Parameter] VALUE: on, off
[Process] Switches between invalidation and
<Example> Setting the trigger to invalidation
■ Current TRGINH Setting
[Command] trginh
[Process] Displays the current trginh setting.
VALUE
on: Invalidates the trigger.
off: Validates the trigger
validation of the trigger.
trginh on<CR>
camera trginh complete<CR>
31
Page 32

External Control Commands
■ Help of the TRGINH Setting
[Command] trginh -
-help
[Process] Displays the help of the TRGINH
Setting command.
Camera DMAINH Setting
■ DMAINH Setting
[Command] dmainh
[Parameter] VALUE: on, off
on: Prohibits the camera block from
transferring the image signal.
off: Allows transfer of the image
signals
[Process] Switches between prohibiting and
allowing of transfer of the image
signals from the camera block to the
CPU block.
<Example> Prohibiting transfer of the image
signal
dmainh on<CR>
camera dmainh complete<CR>
VALUE
Camera FILTER Setting (XCI-V3 only)
■ FILTER Setting
[Command] filter
[Parameter] FILTER: off, lut, filter1 or filter2
[Process] Sets the validation, invalidation, and
<Example> Validating the 3 x 3 filter and the
■ Current FILTER Setting
[Command] filter
[Process] Displays the current filter setting.
FILTER
off: Invalidates the 3 x 3 filter.
lut: The 3 x 3 filter becomes valid.
The circuit operation functions in
order of LUT and the 3 x 3 filter.
filter1 or filter2: The 3 x 3 filter
becomes valid. The circuit operation
functions in order of the 3 x 3 filter
and LUT.
order of the 3 x 3 filter.
circuit operation functions in order of
the 3 x 3 filter and LUT.
filter filter1<CR>
camera filter function complete<CR>
■ Current DMAINH Setting
[Command] dmainh
[Process] Displays the current dmainh setting.
■ Help of the DMAINH Setting
[Command] dmainh -
-help
[Process] Displays the help of the DMAINH
Setting command.
Camera STROBE Setting (XCI-V3 only)
■ STROBE Setting
[Command] strobe
[Parameter] DELAY: -67 to +60 (µs) (1 step)
[Process] Sets the strobe delay.
<Example> Setting the strobe delay to -10µs
■ Current STROBE Setting
[Command] strobe
[Process] Displays the current strobe setting.
DELAY
strobe -10<CR>
camera strobe delay complete<CR>
■ Help of the FILTER Setting
[Command] filter -
-help
[Process] Displays the help of the FILTER
Setting command.
Camera MATRIX Setting (XCI-V3 only)
■ MATRIX Setting
[Command] matrix
A31 A32 A33
[Parameter] Axx: -31.9688 to 31.9688 (1/32 of a
step)
[Process] Sets the 9 matrix coefficients of the 3 x
3 filter.
<Example> Setting the filter matrix to -1 -1 -1 -1 8
-1 -1 -1 -1
matrix -1 -1 -1 -1 8 -1 -1 -1 -1<CR>
camera filter matrix function
complete<CR>
A11 A12 A13 A21 A22 A23
A11 A12 A13
A21 A22 A23
A31 A32 A33
■ Help of the STROBE Setting
[Command] strobe -
-help
[Process] Displays the help of the STROBE
Setting command.
■ Current MATRIX Setting
[Command] matrix
[Process] Displays the current matrix setting.
■ Help of the MATRIX Setting
[Command] matrix -
-help
[Process] Displays the help of the MATRIX
Setting command.
32
Page 33

Camera GRAY Setting (XCI-V3 only)
■ GRAY Setting
[Command] gray
[Parameter] PATTERN: -ccd, pscan, grad1 or
[Process] Sets the output from among
<Example> Outputting test pattern 1
■ Current GRAY Setting
[Command] gray
[Process] Displays the current gray setting.
PATTERN
grad2
ccd: Outputs CCD image.
pscan: Outputs test pattern 1
grad1: Outputs test pattern 2.
grad2: Outputs test pattern 3.
the CCD image and the test patterns.
gray pscan<CR>
camera gray test pattern
complete<CR>
External Control Commands
■ Help of the GRAY Setting
[Command] gray -
-help
[Process] Displays the help of the GRAY
Setting command.
33
Page 34

Specifications
XCI-SX1
Imaging sensor system
Pickup device Progressive scan 1/2 type CCD
CCD effective picture elements
1392 × 1040 (horizontal/
vertical)
CCD vertical drive frequency
15.995 kHz
CCD horizontal drive frequency
27.0 MHz
Cell size 4.65 × 4.65 µm (horizontal/
vertical)
Chip size 7.6 × 6.2 mm (horizontal/
vertical)
LUT γ = OFF/ON, REVERSE/
BINARIZATION
Shutter speed Normal mode:
2 to 1/100000 sec.
External trigger mode:
2 to 1/50000 sec.
Processor and interface system
CPU x86 400 MHz
Memory 256 MB DDR-SDRAM
128 MB CompactFlash
OS Linux (Kernel version 2.4.18)
LAN 10Base-T/100Base-TX
Network Protocol TCP/IP(IPv4), HTTP, FTP
USB USB 1.1 full-speed/low-speed
Specifications
Specifications
Output signal frequency
15 Hz
Effective lines 1280 × 1024 (horizontal/
vertical)
Sensitivity 400 lx, F5.6
Minimum illumination
4 lx (gain: +18 dB, F1.4)
Gain 0 to +18 dB
Read mode Normal/binning/partial scan
Shutter External trigger shutter
Power +12 V DC (Range: +10.5 to
26.4 V)
Power consumption 7.8 W
Operating temperature
–5 to +45 °C (23 to 113 °F)
Storage temperature –30 to +60 °C (–22 to 140 °F)
Operating relative humidity
20 to 80 % (no condensation)
Storage relative humidity
20 to 95 % (no condensation)
Vibration resistance 10 G (20 Hz to 200 Hz)
Shock resistance 70 G
MTBF 37931 hours (Approx. 4.3 years)
External dimension 55 × 55 × 110 mm (w/h/d)
(2 1/8 × 2 1/8 × 4 3/8 inches)
Mass 400 g (14 1/8 oz)
Accessories Lens mount cap (1)
Operating Instructions (1)
Design and specifications are subject to change
without notice.
IMPORTANT
The nameplate is located on the bottom.
Optical system and others
Lens mount C-mount
Flange focal length 17.526 mm (in air)
Synchronization Internal
Video output Monitor output (analog output)
Reference video output level:
700 mV
HD frequency: 64 kHz positive
VD frequency: 60 Hz positive
34
Page 35

Specifications
XCI-V3
Imaging sensor system
Pickup device Progressive scan 1/3 type CCD
CCD effective picture elements
659 × 494 (horizontal/vertical)
CCD vertical drive frequency
31.37 kHz
CCD horizontal drive frequency
24.47 MHz
Cell size 7.4 × 7.4 µm (horizontal/
vertical)
Chip size 5.79 × 4.89 mm (horizontal/
vertical)
LUT γ = OFF/ON, REVERSE/
BINARIZATION
Shutter speed Normal mode:
2 to 1/100000 sec.
External trigger mode:
2 to 1/50000 sec.
Processor and interface system
CPU x86 400 MHz
Memory 256 MB DDR-SDRAM
128 MB CompactFlash
OS Linux (Kernel version 2.4.18)
LAN 10Base-T/100Base-TX
Network Protocol TCP/IP(IPv4), HTTP, FTP
USB USB 1.1 full-speed/low-speed
20 to 80 % (no condensation)
Storage relative humidity
20 to 95 % (no condensation)
Vibration resistance 10 G (20 Hz to 200 Hz)
Shock resistance 70 G
MTBF 37931 hours (Approx. 4.3 years)
External dimension 55 × 55 × 110 mm (w/h/d)
(2 1/8 × 2 1/8 × 4 3/8 inches)
Mass 400 g (14 1/8 oz)
Accessories Lens mount cap (1)
Operating Instructions (1)
Design and specifications are subject to change
without notice.
IMPORTANT
The nameplate is located on the bottom.
Trademarks
The following words are trademarks of their respective
owners.
• Linux is a trademark or registered trademark of Linus
Torvalds in the United States and other countries.
•CompactFlash is a trademark of SanDisk
Corporation, registered in the United States and other
countries.
Optical system and others
Lens mount C-mount
Flange focal length 17.526 mm (in air)
Synchronization Internal
Video output Monitor output (analog output)
Reference video output level:
700 mV
HD frequency: 64 kHz positive
VD frequency: 60 Hz positive
Output signal frequency
60 Hz
Effective lines 640 × 480 (horizontal/vertical)
Sensitivity 400 lx, F5.6
Minimum illumination
1 lx (gain: +18 dB, F1.4)
Gain 0 to +18 dB
Read mode Normal/binning/partial scan
Shutter External trigger shutter
Power +12 V DC (Range: +10.5 to
26.4 V)
Power consumption 7.5 W
Operating temperature
–5 to +45 °C (23 to 113 °F)
Storage temperature –30 to +60 °C (–22 to 140 °F)
Operating relative humidity
35
Page 36

Spectral Sensitivity Characteristics (Typical Values)
XCI-SX1
1.0
0.9
0.8
0.7
0.6
0.5
0.4
Relative Response
0.3
Specifications
XCI-V3
0.2
0.1
0
400 600 800 1000500 700 900
Wave Length [nm]
(Lens characteristics included, and light source characteristics excluded.)
(Lens characteristics and light source characteristics excluded.)
36
Page 37

Dimensions
4-M3
Specifications
36 (13/8)
25 (1)
)
8
/
1
55 (2
55 (2 1/8)
4-M3
)
8
/
1
φ 27.5 (1
25 (1)
22 (7/8)
8 ( 3/8)
22 (7/8)
36 (1 3/8)
85 (3 3/8)
110 (4 3/8)
85 (3 3/8)
7.3 (1/4)
DC IN
MONITOR
MODE
SERIAL
RESET
POWER
STATUS
LAN
Unit: mm (inches)
Sony reserves the right to change specifications of the products and discontinue products without notice.
Technical information contained herein is for reference only and does not convey any license by any implication or
otherwise under any intellectual property right or other right of Sony or third parties.
Sony cannot assume responsibility for any right infringements arising out of the use of this information.
37
 Loading...