

Page 1

Extended User guide
Please read the user instructions before installation and use
WT18i G3 Phone
Page 2

Contents
Experience more. Discover how.................................................5
User guide in the phone...............................................................6
Getting started..............................................................................7
Charging the battery...........................................................................7
Notes on USB cable usage and battery charging................................8
Settings.........................................................................................9
Settings for calling, messaging and the Internet.................................10
Call settings......................................................................................10
Mobile network setting......................................................................12
Display setting...................................................................................12
Home settings...................................................................................12
Sound settings..................................................................................13
Date & time settings..........................................................................13
Language and input method setting..................................................13
About phone.....................................................................................14
Security.............................................................................................14
Backup.............................................................................................15
Alarm clock.......................................................................................15
Getting to know your phone......................................................17
Phone overview.................................................................................17
Using the touch screen.....................................................................18
Using the hardware keys...................................................................18
Status bar.........................................................................................18
Home screen...............................................................................20
Widgets............................................................................................20
Rearranging your Home screen.........................................................20
Entering text...............................................................................22
Using the on-screen keypad.............................................................22
Calling..........................................................................................23
Call options.......................................................................................23
Contacts......................................................................................24
Managing contacts...........................................................................24
Backing up contacts.........................................................................24
2
This is an Internet version of this publication. © Print only for private use.
Page 3

Text and multimedia messages................................................25
Email............................................................................................26
Calendar......................................................................................27
Music...........................................................................................28
Using the Walkman™ player.............................................................28
TrackID™ Application................................................................30
Radio...........................................................................................31
Recording....................................................................................32
My Favorites...............................................................................33
Videos...............................................................................................33
Pictures.............................................................................................33
All files...............................................................................................33
G+ Game..........................................................................................33
Camera........................................................................................34
Viewfinder and camera keys..............................................................34
Using the still camera........................................................................35
Using the video mode.......................................................................35
CMCC services...........................................................................36
CMCC e100......................................................................................36
Fetion................................................................................................36
MM (Mobile Application Market)........................................................36
My PIM.............................................................................................36
Navigation.........................................................................................36
Mobile Music.....................................................................................37
Mobile TV..........................................................................................37
Search.........................................................................................39
WLAN...........................................................................................40
Bluetooth™ wireless technology..............................................41
Updating your phone.................................................................42
Synchronising with the desk suite............................................43
Compass.....................................................................................44
IMEI..............................................................................................45
Troubleshooting.........................................................................46
Common questions...........................................................................46
Error messages.................................................................................47
Legal information.......................................................................48
Index............................................................................................49
3
This is an Internet version of this publication. © Print only for private use.
Page 4

Important information
Please read the Important information leaflet before you use your mobile phone.
Some of the services and features described in this User guide are not supported in all countries/
regions or by all networks and/or service providers in all areas. Without limitation, this applies to
the GSM International Emergency Number 112. Please contact your network operator or service
provider to determine availability of any specific service or feature and whether additional access
or usage fees apply.
4
This is an Internet version of this publication. © Print only for private use.
Page 5

Experience more. Discover how.
Need help? Get more, do more. Miss nothing. Visit www.sonyericsson.com/WT18i to learn
more about your phone.
5
This is an Internet version of this publication. © Print only for private use.
Page 6

User guide in the phone
An extended User guide is available in your phone. The extended User guide and more
information is also available at www.sonyericsson.com/support.
To access the User guide in your phone
•
From the Home screen, tap the applications bar, then tap Emanual.
6
This is an Internet version of this publication. © Print only for private use.
Page 7
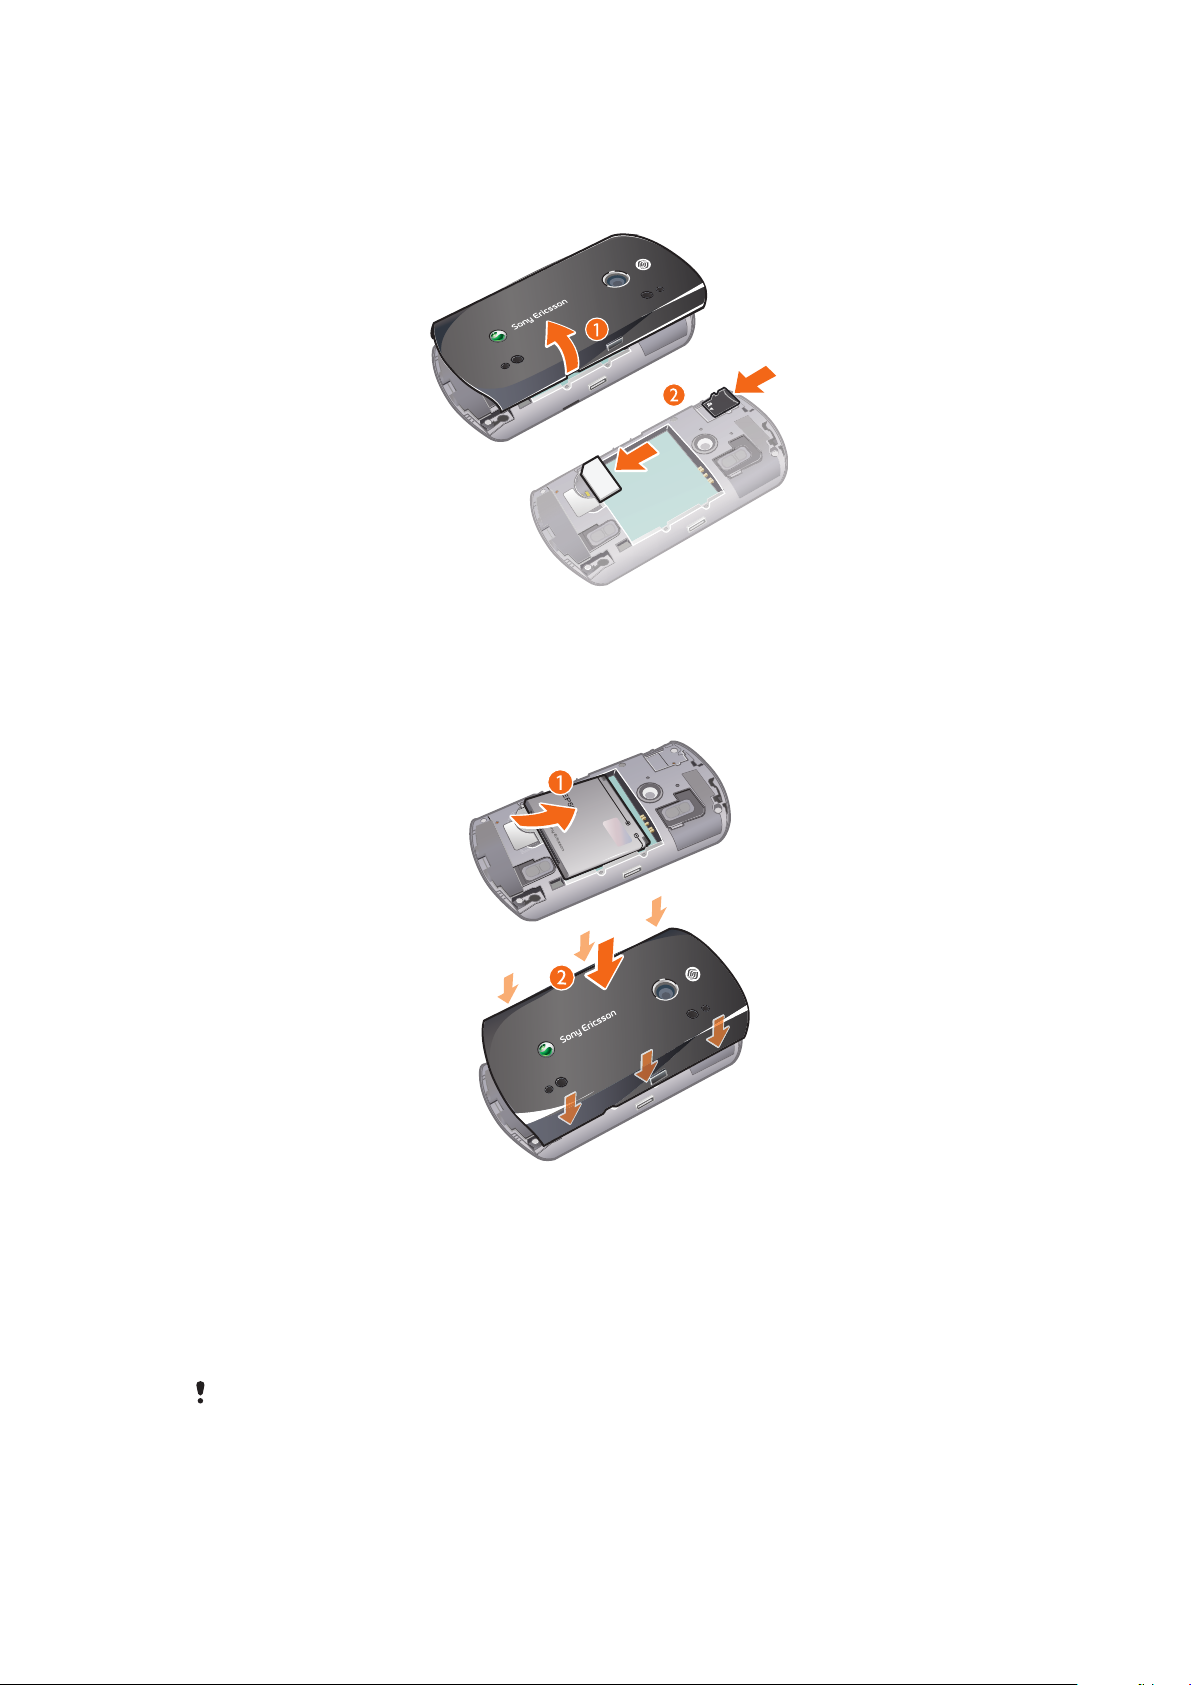
Getting started
To insert the SIM card and the storage card
1
Remove the battery cover.
2
Slide the SIM card and the storage card into the holders with the gold-coloured
contacts facing down.
To insert the battery
1
Insert the battery with the label side up and the connectors facing each other.
2
Attach the battery cover.
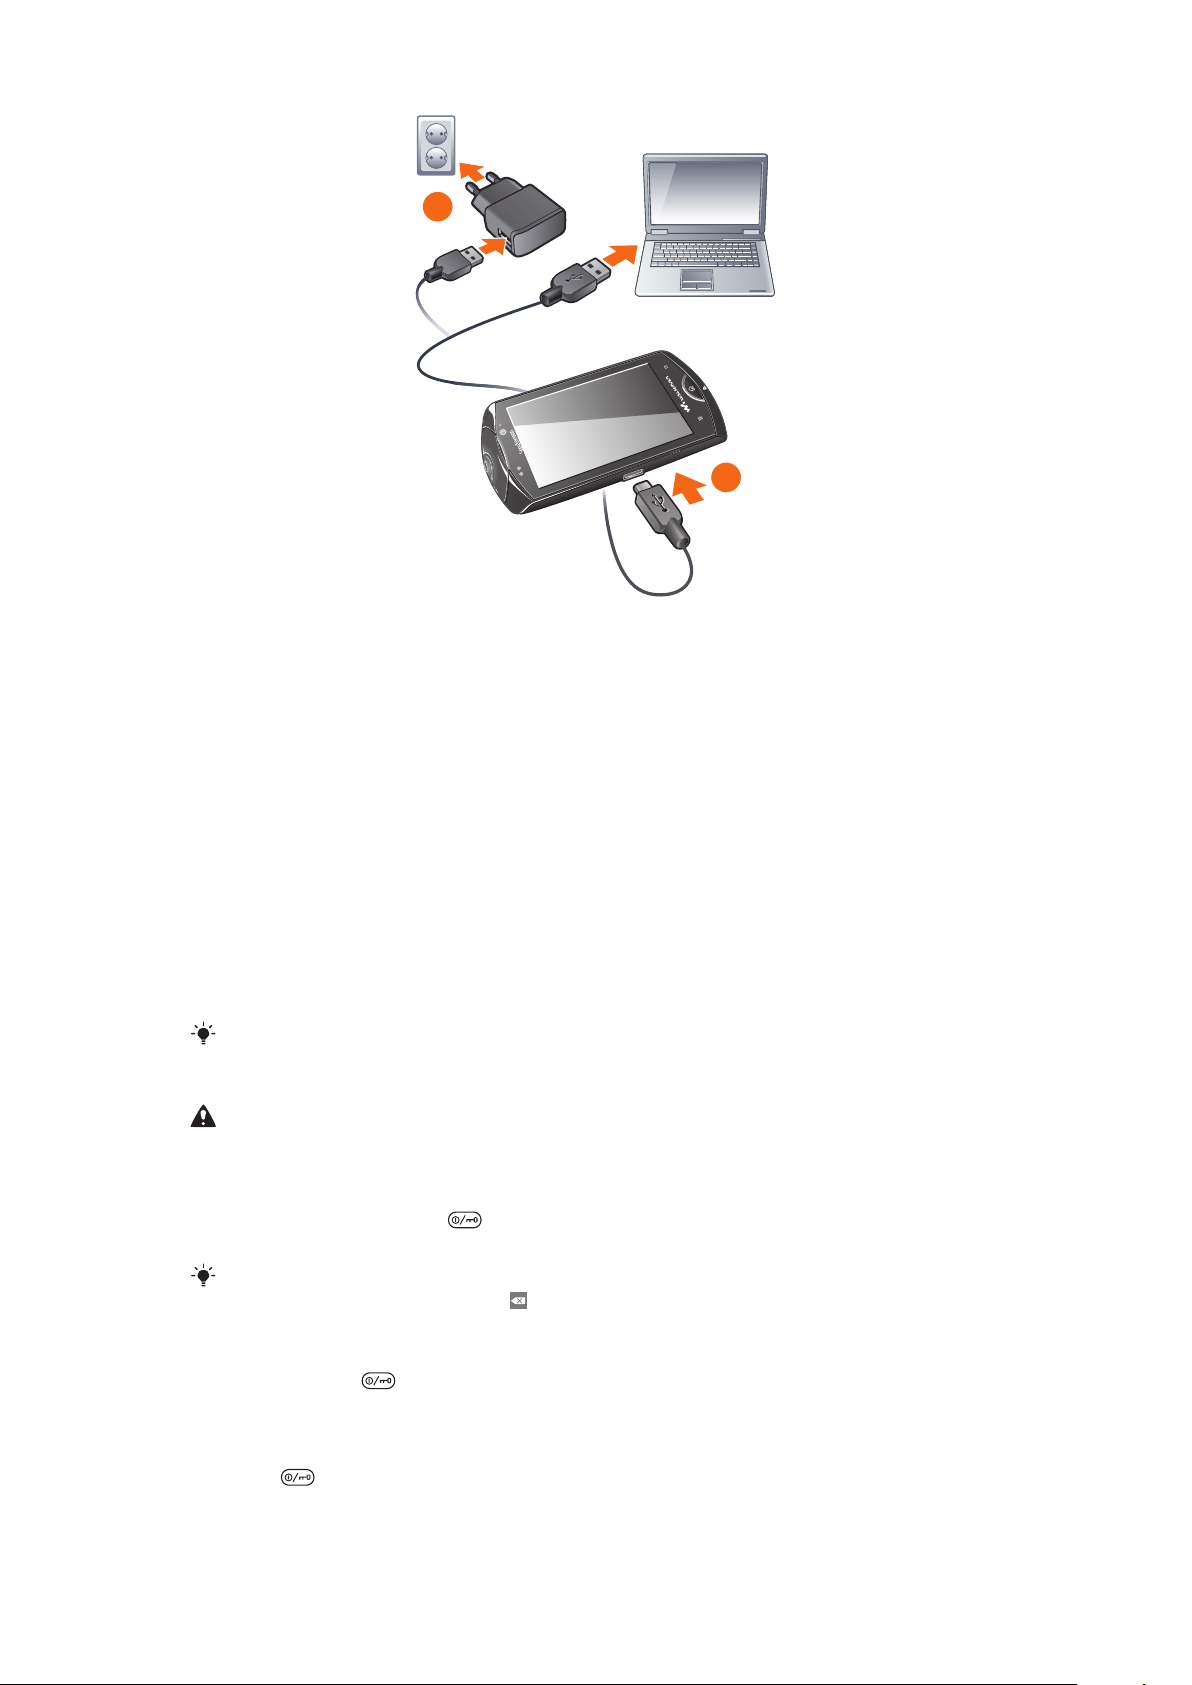
Charging the battery
The phone battery is partly charged when you buy the phone. It may take a few minutes
before the battery icon appears on the screen when you connect the phone to a power
source. You can still use your phone while it is charging.
The notification LED is orange when the battery is charging and will turn green when fully charged.
7
This is an Internet version of this publication. © Print only for private use.
Page 8
1
2
Notes on USB cable usage and battery charging
•
If there are two USB cables in the kit (a USB cable for charging and a USB cable for data
transfer), the USB cable for charging is only intended for charging your phone. Do not
use it for transferring data. The USB cable for the USB charger is only intended for
connection to the AC adapter to charge your phone. It must not be used for connection
to a computer. It can only be used for charging your phone. Never use it for charging
accessories.
•
If there is only one USB cable in the kit, it is intended for charging your phone as well as
transferring data.
•
If there is only one USB cable for the USB charger in the phone kit, this USB cable is only
intended for charging your phone.
•
To charge your phone, Sony Ericsson strongly recommends that you use only
Sony Ericsson branded original batteries, a power supply which is in accordance
with specification YD/T 1591-2006 (a Communications Industry standard of P. R.
China), and the USB cable supplied with your phone. The use of third-party products
may decrease the performance of your phone and/or pose a risk to your health or safety
You can charge the battery for more or less than 3 hours. Interrupted charging does not damage
the battery. Performance depends on temperature, signal strength, usage patterns, features
selected and voice or data transmissions. The standby time for this battery is up to 200 hours.
Use only Sony Ericsson branded original batteries intended for use with your mobile phone. If
you use other batteries you may not be able to charge your phone.
To turn on the phone
1
Press and hold down the key on the top of the phone.
2
Enter your SIM card PIN, if requested, and select OK.
Your PIN is supplied by your network operator. If you want to correct a mistake made while
entering your SIM card PIN, press .
To turn off the phone
1
Press and hold until the options menu opens.
2
In the options menu, tap Power off.
To unlock the screen
1
Press
2
Drag the floating object to the bottom left corner of the screen. When the two objects
overlap, the screen is unlocked.
to activate the screen.
This is an Internet version of this publication. © Print only for private use.
8
Page 9

Settings
You can setup your mobile phone to meet your requirements.
9
This is an Internet version of this publication. © Print only for private use.
Page 10

Settings for calling, messaging and the Internet
In order to make calls, send messages and use the Internet you will need a 2G/3G mobile
data connection. You can also send emails and access the Internet by connecting to a
WLAN network. For most mobile phone networks and operators, settings for calling,
messaging and the Internet will be preinstalled on the phone.
You can use a WLAN connection to access the Internet wirelessly with your phone. You can
browse the Internet at home (personal WLAN networks) or in public access zones (hot spots).
Personal WLAN networks are usually protected. A pass phrase or a key is then required from
the WLAN network administrator. Hot spots are usually non-protected but often require you to
log on to the operator’s service before you get Internet access.
Call settings
Basic call settings
To activate the Fixed Dialing Number
1
Find and tap Settings in the Home screen.
2
Tap Call settings in Settings.
3
Tap Fixed dialing number.
4
Tap FDN is disabled, you could activate it by inputting correct PIN2 code.
You have only two chances for entering PIN2, and wrong input would lead to mobile SIM card
locked, which needs PUK2 code for unlocking. However, this will not affect you using other
functions.
Please also save the area code when saving the fixed number.
To set voice call barring
1
Find and tap Settings in the Home screen.
2
Tap Call settings in Settings.
3
Tap Voice call barring.
4
Tap Incoming call barring or Outgoing call barring to make the setting.
To set voice call forwarding
1
Find and tap Settings in the Home screen.
2
Tap Call settings in Settings.
3
Tap Voice call forwarding, and select the conditions for the Voice call
forwarding.
During the voice call forwarding, you could set it to
Forward when unanswered/Forward when unreachable, and then input the number you wish
to forward the call to.
You could also enable or disable Call waiting/Auto answer/Auto redial functions in Other basic
settings.
Always forward/Forward when busy/
Setting video call
To set fall back to voice call
1
Find and tap Settings in the Home screen.
2
Tap Call settings in Settings.
3
Tap Fall back to voice call, and choose one of the settings.
To set video call barring
1
Find and tap Settings in the Home screen.
2
Tap Call settings in Settings.
3
Tap Video call barring to set the Incoming video call barring or Outgoing video
call barring.
10
This is an Internet version of this publication. © Print only for private use.
Page 11

To set video call forwarding
1
Find and tap Settings in the Home screen.
2
Tap Call settings in Settings.
3
Tap Video call forwarding, and select the conditions for the Video call
forwarding.
To set video call alternative picture
1
Find and tap Settings in the Home screen.
2
Tap Call settings in Settings.
3
Tap Alternative picture.
When the video camera is off, the default picture or other pictures could be used as your portrait
during the video call.
To set my caller number
1
Find and tap Settings in the Home screen.
2
Tap Call settings in Settings.
3
Tap My caller number, input the Name and Number of this mobile phone.
To set dialing prefix number
1
Find and tap Settings in the Home screen.
2
Tap Call settings in Settings.
3
Tap the Dialing prefix number, edit the pre-fix number added before the number
you want to dial.
To find the dialing prefix number
1
Find and tap Phone in the Home screen.
2
Input the number of the called party.
3
Press , and tap IP call.
4
Choose the pre-set number.
5
Tap Call.
To set the speed call
1
Find and tap Settings in the Home screen.
2
Tap Call settings in Settings.
3
Tap Speed call, edit the corresponding phone numbers represented by 2-9.
4
Tap Save.
To set SMS to drop call
1
Find and tap Settings in the Home screen.
2
Tap Call settings in Settings.
3
Tap SMS to drop call, and edit its contents.
4
Tap Save and it could be saved automatically.
To set the in-call timer
1
Find and tap Settings in the Home screen.
2
Tap Call settings in Settings.
3
Tap In-call timer, and select the time to be counted.
4
Tap OK.
During the call, you will hear a notification tone when the time has reached the limit you set.
To activate the outgoing call connected notification
1
Find and tap Settings in the Home screen.
2
Tap Call settings in Settings.
3
Tap Vibration notification.
When making a phone call, you mobile phone will vibrate when the receiving party is connected.
You could answer the call at this time, which will reduce the waiting time, and thus it will reduce
the harm caused by the mobile phone.
11
This is an Internet version of this publication. © Print only for private use.
Page 12

Mobile network setting
According to the availability of 2G and 3G network, the mobile phone could switch between
the networks and you could also manually switch between the networks.
To view the current network
1
Find and tap Settings in the Home screen.
2
Tap Mobile networks in Settings.
3
Tap Current network.
To set the search mode
1
Find and tap Settings in the Home screen.
2
Tap Wireless & networks in Settings, then tap Mobile networks.
3
Tap Search mode, and choose Manual or Auto.
4
Tap OK.
To set the network mode
1
Find and tap Settings in the Home screen.
2
Tap Mobile networks in Settings.
3
Tap Network mode, and select the mode you want to set to.
4
Tap OK.
Data connection setting
During the data connection process, you could make the data connection setting while
switching on the mobile phone and roaming. You could also check the access point of the
current network, edit the current access point and create a new one.
Display setting
To set the brightness
1
Find and tap Settings in the Home screen.
2
Tap Display settings in Settings.
3
Tap Auto brightness to set to auto brightness mode, or tap Brightness to make
the setting manually.
To set the font
1
Find and tap Settings in the Home screen.
2
Tap Display settings in Settings.
3
Tap Font settings, and select a size from Big, Normal and Small.
To set the screen timeout
1
Find and tap Settings in the Home screen.
2
Tap Display settings in Settings.
3
Tap Screen timeout, and you could choose any time from the time list. If you don’t
want to lock the screen, you could select Never timeout.
Home settings
You could set unlock icon in the home settings. When the screen is locked, the selected
pictures will be displayed on the screen in a cyclic manner.
To set the unlock icon
1
Find and tap Settings in the Home screen.
2
Tap Security in Settings.
3
Tap Phone lock settings, then tap Change unlock icon.
4
In Unlock icon, tap Add image.
5
Tap Insert new picture, and choose one from the existing images.
6
Tap Save.
12
This is an Internet version of this publication. © Print only for private use.
Page 13

To set Take picture as the unlock icon
1
Find and tap Settings in the Home screen.
2
Tap Security in Settings.
3
Tap Phone lock settings, then tap Change unlock icon.
4
In Unlock icon, tap Add image.
5
Tap Take camera picture to take a picture.
6
In the picture review window, tap OK.
Sound settings
You could set the notification method and volume in Sound settings. In addition, you could
also set the incoming call notification tone and message notification tone, using the music
you like as the tones.
Date & time settings
To set date
1
Find and tap Settings in the Home screen.
2
Tap Date & time in Settings.
3
Tap Set date, and scroll the number bar up or down to choose the year, month and
day you want.
4
Tap Save.
To set time
1
Find and tap Settings in the Home screen.
2
Tap Date & time in Settings.
3
Tap Set time, and scroll the number bar up or down to choose the hour and minute
you want.
4
Tap Save.
To set time zone
1
Find and tap Settings in the Home screen.
2
Tap Date & time in Settings.
3
Tap Select time zone, and scroll the number bar down to choose the time zone
you want.
To set the date format
1
Find and tap Settings in the Home screen.
2
Tap Date & time in Settings.
3
Tap Select date format, and choose the format you want.
Language and input method setting
To set the language
1
Find and tap Settings in the Home screen.
2
Tap Language and input.
3
Tap Select language, select the language you want.
To set the input method
1
Find and tap Settings in the Home screen.
2
Tap Language and input.
3
Tap Enable favorite input method, select the input method you want, and it is
possible to set the input method you have selected or define the vocabulary by
yourself.
The default input method is sogou input.
13
This is an Internet version of this publication. © Print only for private use.
Page 14

About phone
To view the equipment information
1
Find and tap Settings from the Home screen.
2
Tap About phone.
You can also check information such as product model, hardware version and software version.
Security
SIM lock could only protect your subscription, and your mobile phone could still be used
together with a new SIM card. If you want to unlock the SIM card, you have to input the
PIN (Personal Identification Number) code. If the number of wrong input of the PIN code
surpasses the maximum attempts allowed, the SIM card will be locked. You could input
the PUK (Personal Unlocking Number) code, and key in the new PIN code.PIN code,
PIN2 code and PUK code are provided by your network operator.
To unlock the locked PIN code
1
Find and tap Settings in the Home.
2
Tap Security in Settings, and tap SIM lock settings.
3
Tap Lock SIM.
4
Input PIN code, and tap OK.
To change PIN code
1
Find and tap Settings in the Home.
2
Tap Security in Settings.
3
Tap SIM lock settings, activate Lock SIM, enter the SIM PIN.
4
Tap Change PIN code.
5
Input the old PIN code and tap OK.
6
Input the new PIN code and tap OK.
To change PIN2 code
1
Find and tap Settings in the Home.
2
Tap Security in Settings, then tap Change PIN2.
3
Input the old PIN2 code.
4
Input the new PIN2 code.
5
Input the new PIN2 code again to confirm.
To lock the mobile phone
1
Find and tap Settings in the Home.
2
Tap Security in Settings, then tap Phone lock settings.
3
Tap Set up screen lock.
4
Tap Password.
5
Input your password and tap OK.
To change the phone lock code
1
Find and tap Settings in the Home.
2
Tap Security in Settings, then tap Phone lock settings.
3
Tap Change screen lock.
4
Input the old password and tap OK.
5
Tap Password.
6
Input the new password and tap OK, then confirm your password and tap OK.
To change the call barring password
1
Find and tap Settings in the Home.
2
Tap Security in Settings, then tap Change call barring password.
3
Input the old password and tap OK.
4
Input the new password and tap OK.
14
This is an Internet version of this publication. © Print only for private use.
Page 15

Backup
You could use the backup application pre-installed in your mobile phone to backup
information such as phonebook, SMSs and settings etc. to the storage card. On the other
hand, you could also restore the original information saved on the storage card.
To backup material
1
Find and tap Backup in the Home.
2
Tap Backup option, and tick information you want to backup in the Backup option.
3
Tap To storage card, so as to backup the information to the mobile storage card.
To restore the information
1
Find and tap Backup in the Home.
2
Tap Restore option, tap the backup file you want to restore in the Restore option.
3
Tick the data you want to restore, and tap Restore.
Alarm clock
You could use the mobile phone as an alarm clock, and set the ringtone as the alarm signal.
The mobile phone has pre-installed several alarm clocks for fast activation. You could
change the setting of the pre-installed alarm clock or create a new alarm clock.
To set the alarm clock
1
Find and tap Clock in the Home, then tap Alarm clock.
2
Tap one of the alarm clocks.
3
Tap Time.
4
Tap a number field, and scroll up or down to choose the time you want.
5
Tap Save.
To set the sound of the alarm
1
Find and tap Clock in the Home, then tap Alarm clock.
2
Tap one of the alarm clocks.
3
Tap Alarm ringtone.
4
Choose one of the options.
5
Choose the alarm ringtone, then tap OK.
To set the volume of the alarm signal
1
Find and tap Clock in the Home, then tap Alarm clock.
2
Tap one of the alarm clocks.
3
Tap Alarm ringtone.
4
Choose one of the options.
5
Scroll the volume key up or down.
The changed alarm volume will be applicable to all the alarm clocks.
To repeat the alarm
1
Find and tap Clock in the Home, then tap Alarm clock.
2
Tap one of the alarm clocks.
3
Choose the alarm repeat type.
You could tap
To activate or de-activate the alarm clock
1
Find and tap Clock in the Home, then tap Alarm clock.
2
Tap one of the alarm clocks.
3
Mark or unmar Turn on alarm checkbox..
Repeat to make detailed alarm repetition setting.
15
This is an Internet version of this publication. © Print only for private use.
Page 16

To delete alarm clock
1
Find and tap Clock in the Home, then tap Alarm clock.
2
Tap the alarm clock that need to be deleted.
3
Press , tap Delete.
4
Tap OK.
16
This is an Internet version of this publication. © Print only for private use.
Page 17

Getting to know your phone
12
10
13
1
2
4
6
7
8
9
3
5
11
15
16
18
19
20
14
17
Phone overview
1 Mobile TV antenna
2 Power key/screen lock
3 3.5 mm headset connector
4 Walkman™
5 Ear speaker
6 Proximity sensor
7 Light sensor
8 Video call camera lens
9 Notification LED
10 Connector for charger/USB cable
11 Back key
12 Home key
13 Menu key
14 Camera lens
15 Volume keys/zoom keys
16 Volume keys/zoom keys
17 Speaker hole
18 Camera key
19 Microphone
20 Strap hole
This is an Internet version of this publication. © Print only for private use.
17
Page 18

Using the touch screen
To open or highlight an item
•
Tap the item.
To mark or unmark options
•
Tap the relevant checkbox to mark or unmark a particular option.
Marked checkbox
Unmarked checkbox
Marked list option
Unmarked list option
Using the hardware keys
Menu key
Open a list of options available in the current screen or application
Home key
•
Go to the Home screen or to the applications panes from any application or
screen
•
Open the recently used applications window
Back key
•
Go back to the previous screen
•
Close the onscreen keypad, a dialog box, an options menu, or the
Notifications panel
Status bar
A status bar at the top of the screen displays phone status information and notifications.
Notification icons appear on the left side of the status bar. Phone status icons appear on
the right side. From the status bar you can access the notification panel.
18
This is an Internet version of this publication. © Print only for private use.
Page 19

Phone status icons
The following status icons may appear on your screen:
The battery is charging
Edge available
3G available
Missed call
New text message
New multimedia message
New email message
GPS is activated
The Bluetooth function is activated
An alarm is set
SIM card missing
Airplane mode is activated
Vibrate mode
Phone speaker is mute
No signal
Signal strength
19
This is an Internet version of this publication. © Print only for private use.
Page 20

Home screen
The Home screen is the starting point of your phone. You can compare the Home screen
to the desktop on your computer. You can customise your Home screen with widgets,
shortcuts, and other features. The Home screen extends beyond the screen width, so you
need to flick left or right to view content in one of the screen's four extensions.
To go to the Home screen
•
When the screen is unlocked, press .
To browse the Home screen
•
Flick right or left.
Widgets
Widgets are small applications that you can use directly on your Home. For example, the
Music widget allows you to start playing music directly and the Messaging widget displays
incoming messages.
To add widgets to the Home screen
1
From your Home, press .
2
Tap Add > Widgets.
3
Tap a widget.
Rearranging your Home screen
Change the appearance of your Home screen and what to access from it. For example,
change the background, move items around, create folders and add shortcuts to contacts,
bookmarks and more.
Replace the items at the bottom of your Home screen with the items you access most frequently.
To add a shortcut to the Home screen
1
From your Home, press .
2
Tap Add > Shortcuts.
3
Find and select a shortcut.
Add application shortcuts directly from the Application screen by touching and holding the
application.
To add a folder to the Home screen
1
From your Home, press .
2
Tap Add > Folders.
3
Enter a name for the folder, select an icon and tap Done.
To add items to a folder
•
Touch and hold an item until it magnifies and the phone vibrates, then drag the item
to the folder.
To rename a folder
1
Tap the folder to open it.
2
Touch and hold the folder's title bar to show the Folder name field.
3
Enter the new folder name and tap Done.
20
This is an Internet version of this publication. © Print only for private use.
Page 21

To move an item on the Home screen
1
Press to open your Home.
2
Touch and hold an item until it magnifies and the phone vibrates, then drag the item
to the new location.
To delete an item from the Home screen
•
Touch and hold an item until it magnifies and the phone vibrates, then drag the item
to .
Changing the background of your Home screen
Make your Home more personal with wallpapers. You can use animations or a photo you
have taken. Go to other sources to download, for example, live wallpapers that change
with the changing hours of the day.
To change your Home screen wallpaper
1
From your Home, press
2
Tap Wallpaper, then select a wallpaper.
.
21
This is an Internet version of this publication. © Print only for private use.
Page 22

Entering text
65
1
9 8
2
3
4
7
You can enter letters, numbers and special characters using the on-screen keypad. You
can switch between different input methods.
Using the on-screen keypad
You can tap icons on the on-screen keypad to enter text and adjust input settings.
1 Close the on-screen keypad
2 Delete a character before the cursor
3 Display numbers
4 Switch between upper and lower case. Tap and hold this icon to turn on the Caps lock
5 Enter a carriage return
6 Turn text prediction on or off
7 Switch between different input methods
8 Enter a space
9 Display symbols and smileys
To enter text
1
Tap any text input field. For example, select Messaging > .
2
A text input window opens.
3
Use the on-screen keypad to enter text.
To copy and paste text
1
Open the text you want to select for copying, then tap and hold on the text field. A
window pops up.
2
Select Select text.
3
Tap to place the cursor at the beginning of the text you want to select for copying.
Then drag your fingertip to the end of the text. A window pops up.
4
Select Copy.
5
To paste the text, move the cursor to where you want the text be inserted, then tap
and hold on the target text field.
6
Select Paste from the popup window.
You can also copy all text in the text field. Tap and hold on a text field and select
Copy all.
22
This is an Internet version of this publication. © Print only for private use.
Page 23

Calling
To make a call
1
From the Home screen, find and tap Phone.
2
Enter the number of the recipient and tap . To delete a number, tap .
To answer a call
•
Drag to the right across the screen.
To decline a call
•
Drag to the left across the screen.
Call options
During a call, you can select from the following options:
Make another call
Open the keypad to enter numbers
Return to the Home screen
Mute the microphone
Turn on the loudspeaker
Record the call
When you put the phone close to ear (or the upper screen is covered) during a call, the phone
display will be deactivated and the touch screen will be locked temporarily.
To make a video call
1
From the Home screen, find and tap Phone.
2
Enter the number of the recipient, then press and tap . To delete a number,
tap .
To make a video call, both parties to the call must have phones that support video calls and 3G
services, as well as having access to 3G coverage with a compatible subscription.
In order for your face to be seen by the other party during a video call, you need to look into the
video call camera lens on your phone.
To make an international call
1
From the Home screen, find and tap Phone.
2
Touch and hold 0 until a “+” sign appears.
3
Enter the country code, area code (without the first zero) and phone number, then
. To delete a number, tap .
tap
To call a number from the call log
1
From the Home screen, find and tap Phone.
2
General call log open by default.
3
Tap the number you want to call.
To change the ear speaker volume during a call
•
Press the volume keys up or down.
To mute the ringtone for an incoming call
•
When the phone rings, press the volume key.
23
This is an Internet version of this publication. © Print only for private use.
Page 24

Contacts
In Contacts you can store and manage all your personal contacts.
Managing contacts
To add a contact
1
From the Home screen, tap Contacts.
2
Tap New.
3
Enter the name of the contact.
4
Enter or select the desired additional information for the contact.
5
When you are finished, tap Save.
To call a contact
1
From the Home screen, tap Contacts.
2
Tap the contact.
3
Tap the desired phone number of the contact.
To delete contacts
1
From the Home screen, tap Contacts.
2
Press
3
Mark the contacts you want to delete, or tap Select all if you want to delete all
contacts.
4
Tap Delete.
and tap .
To search for a contact
1
From the Home screen, tap Contacts.
2
Enter the first few letters of the contact name in the search field. All contacts
beginning with those letters appear.
Backing up contacts
You can use the storage card to back up contacts. This is useful, for example, when you
want to transfer your contact information to another phone.
To back up all contacts to the storage card
1
From the Home screen, tap Contacts.
2
Press
3
Select an option, and press OK.
and tap Backup.
24
This is an Internet version of this publication. © Print only for private use.
Page 25

Text and multimedia messages
To create and send a message (via SMS or MMS)
1
From the Home screen, tap Messaging.
2
Tap .
3
Enter one or more recipient numbers in the To: field.
4
Enter your text.
5
If you want to add a photo, video or sound, press , then tap and select an
option.
6
Tap Send.
To receive and read a text message
1
From the Home screen, tap Messaging.
2
Select a message thread from the list.
3
If the received message is a multimedia message, tap Download if you have not
enabled automatic downloads.
4
If the received message contains music or video, tap
to play this content.
When you receive a text or multimedia message,
message, you can also drag the status bar downwards.
appears in the status bar. To read the
25
This is an Internet version of this publication. © Print only for private use.
Page 26

You can use your phone to send and receive emails through your regular email account.
First, you need the correct Internet settings in your phone.
To set up an email account in your phone for the first time
1
From the Home screen, tap Mail.
2
Tap Others.
3
Enter your email address and password, and tap Next.
4
Tap Save.
5
If the phone cannot download your email account settings automatically, press
, then tap Account Settings and enter the account settings manually.
If you need to enter the settings manually, contact your email service provider for the correct
email account settings. For example, you need to know if the account type is POP3 or IMAP.
To create and send an email message
1
From the Home screen, tap Mail.
2
If you have several accounts, select the account you want to access.
3
tap
4
Enter the email address of the recipient.
5
If you want to add a Cc or Bcc recipient, press
6
Enter a subject.
7
Enter text.
8
To attach a file, press , then tap and select a file.
9
Tap Send.
.
and tap Add Cc/Bcc.
To receive and open email messages
1
From the Home screen, tap Mail.
2
If you have several accounts, select the account you want to access.
3
To update the inbox with new messages, press
4
To open and read a message, tap the message.
If you have changed the email settings and set a Poll frequency,
when you receive a new message. You can drag the status bar downwards to read the message.
, then tap Receive/Send.
appears in the status bar
26
This is an Internet version of this publication. © Print only for private use.
Page 27

Calendar
Your mobile phone has a calendar for time management. Important meetings could be
tracked with the calendar. It can also be synchronized with the calendar on computers or
the Internet.
To open the calendar application
•
Find and tap Calendar from the Home screen.
When the calendar application is opened for the first time, it will be shown in the month view. If
the application has been used before, it will be opened in the default view.
To view other months and weeks
•
In the Month and Week view, you could view the next month or week by sliding the
touch screen to the left-hand side, or view the previous month or week by sliding
the touch screen to the right-hand side.
To create the calendar items
1
Find and tap Calendar in the Home screen.
2
Tap New or any day or any time in the month or week view.
3
Tap Event name name, and then input one name.
4
Tap From and To, and then tap a number field, scroll up or down to choose the
date, hour and minute you need.
5
Tap Event location, then input the location of this event.
6
Tap Event description, then give a description of this event.
7
Tap Add reminders, then choose the time when a notification is needed for the
event.
8
Tap Repetition, then choose the repetition cycle of the event notification.
9
Tap Save.
If you want to setup an around the clock notification, you could tick All day, and neither hour nor
minute shall be set for the start and end time.
When the appointment is coming near, you mobile phone will play a brief alarm.
To view the calendar events
1
Find and tap Calendar from the Home screen.
2
Navigate to the date you need and tap the event.
To edit the calendar events
1
From the Home screen, tap Calendar.
2
Navigate to the date you need and tap the event.
3
Tap Edit, then edit the event and tap Save.
27
This is an Internet version of this publication. © Print only for private use.
Page 28

Music
Get the most out of your Walkman™ player. Listen to music and other audio content, create
and manage your own playlists.
Using the Walkman™ player
To start the Walkman™ player
•
Unlock the screen, then press the key.
•
From the Home screen, tap , then find and tap .
To play audio content
1
Start the Walkman™ player.
2
Tap to browse audio by artist. Tap to browse by album. Tap to use playlists.
Tap to browse audio by track.
3
Scroll up or down and browse to a track.
4
Tap a track to play it.
To change tracks
•
In the Walkman™ player, tap or .
To shake control the tracks
•
To shuffle play the tracks, during tracks playing in the Walkman™ player, press and
hold the key, and shake the phone.
•
To switch the tracks, during tracks playing in the Walkman™ player, press and hold
key, and shake the phone left or right.
the
To pause a track
•
In the Walkman™ player, tap
To fast forward and rewind music
•
In the Walkman™ player, touch and hold or .
You can also drag the progress indicator marker right or left.
To delete a track
1
When browsing your tracks in the Walkman™ player library, touch and hold a track
title.
2
Tap Delete.
You can also delete albums this way.
To adjust the audio volume
•
In the Walkman™ player, press the volume key.
To add lyrics for a song
1
Connect your phone to PC to transfer the lyrics file you have to the storage card.
2
For more information, Go to the Walkman™ player, press , then tap Lyrics
help.
Song lyrics are displayed when there is a lyric file for the song saved in the same folder, and the
lyric file must have the same file name as the song file, with extension “.lrc” or “.txt”.
.
28
This is an Internet version of this publication. © Print only for private use.
Page 29

To turn on or turn off lyrics
•
In the Walkman™ player, press , then tap Lyric on to turn on lyrics, or tap Lyric
off to turn off lyrics.
The default for lyrics is set as on.
To play smart playlists
1
In the Walkman™ player, tap
2
Tap .
3
Under Smart playlists, tap a playlist.
4
Tap a track to play.
To view or edit current playlist
1
In the Walkman™ player, tap
2
Tap and hold a track title, then select an option.
..
To add the Music widget to the Home screen
1
From the Home screen, tap
> Add > Widgets > . The Music widget is now
on the Home screen.
2
Tap and hold the Music widget to drag it to the desired place.
29
This is an Internet version of this publication. © Print only for private use.
Page 30

TrackID™ Application
TrackID™ is a music identification service. When you listen to the music piece from a
speaker or from the radio, you could search the track by title, artist or name of the album.
In order to get the best performance, it is advisable to use the TrackID™ application in a
low noise environment.
Not all the countries/regions(or all the networks and/or service providers in the regions)
support the TrackID™ application and TrackID™ service.
Before using TrackID™ application, please confirm the network data connection has been setup
in a correct manner.
To open the TrackID™ application
•
From the Homescreen, find and tap TrackID™.
To search for track information
1
When the TrackID™ application is open, tap Record.
2
Hold the phone towards the music source. The results are shown in the result screen.
30
This is an Internet version of this publication. © Print only for private use.
Page 31

Radio
You could browse and listen to FM radio programs and save them as “My Favorites”. You
could listen to the radio with portable handsfree, Headphone or speaker of the mobile
phone. Portable handsfree or headphone must be connected, since they are used as the
antenna of the FM radio. When you open the FM radio, the channels that you could listen
to will be displayed automatically. If there were RDS information on certain channel, the
information will be displayed several seconds after you start listening.
Do not listen to the radio in areas where the use of mobile phone is forbidden.
To turn on the radio
•
Find and tap FM Radio in the Home screen.
The portable handsfree or headphone which work as antenna, must be connected. When it is
used for the first time, you will be asked if you want to search for the channels automatically.
To search the channels automatically
1
Tap to display the control list in the interface where the radio is played.
2
Tap Auto Search and Save.
To save the channel
1
Tap to display the control list in the interface where the radio is played.
2
Tap Save channel.
Channel management
1
Tap
2
Tap to show menu.
To fine tune the frequency
•
Tap
a 0.1Mhz step.
To search channel
•
Tap the or in the interface where the radio is played.
To change the output mode
•
Tap > Headset/Speaker in the interface where the radio is played.
To setup the sleeping mode
•
Press > Setting > Sleep.
To minimize the radio
•
•Tap .
To return to the radio
•
Find and tap FM Radio in the Home screen.
> Channel List
or in the interface where the radio is played, and change the frequency in
To turn off the radio
•
Press > Turn off.
31
This is an Internet version of this publication. © Print only for private use.
Page 32

Recording
You could record a voice memo or a call. The recorded sound could also be set as a ringing
tone.
The laws in some countries/regions or provinces demand the permission of the other party if you
want to record the call.
To record a sound
1
Find and tap Recorder from the Home screen.
2
Tap .
3
Tap to stop recording.
To record a call
•
Tap Record during the call.
To listen to the recording
1
Tap
2
Tap , then you could listen to the sound you have just recorded.
during the recording process.
32
This is an Internet version of this publication. © Print only for private use.
Page 33

My Favorites
In My favourites, you can view and manage all media files saved on your storage card.
Videos
To play a video
1
From the Home screen, find and tap My favourites.
2
Tap Videos and select a video clip.
Pictures
You can view and manage all photos and pictures saved on your storage card.
To browse pictures by category
1
From the Home screen, find and tap My favourites > Pictures.
2
Pictures display on screen by category. Tap any category to browse pictures.
To view pictures
1
From the Home screen, find and tap My favourites.
2
Tap Pictures and select a folder. Scroll up or down to browse your pictures.
3
Tap one picture to view it and slide right or left to view other pictures.
To share a picture
1
When viewing a picture, press
2
In the toolbar at the bottom of the screen, select Share.
3
Select one of the available transfer methods.
To edit a picture
1
When viewing a picture, press to display the controls.
2
Select an option.
to display the controls.
All files
You can find and manage all files saved on your storage card.
To find a file
1
From the Home screen, find and tap My favourites > All files.
2
Browse by folder to find your file.
G+ Game
You can use the G+ Game application to browse the Internet and play or download games.
To find games online
1
From the Home screen, find and tap My favourites > G+ Game .
2
Browse the Internet to find the games you want.
33
This is an Internet version of this publication. © Print only for private use.
Page 34

Camera
2 1
3
4
5
6
7
8
9
10
12
13
14
11
You can take a photo or record a video by pressing the camera key. Before taking a photo,
you can improve it by using the Scenes feature. You can share a photo or a video with
friends, or upload your photos and videos to a web service. From the viewfinder, you can
view an album containing all photos and videos that you have taken using the camera.
Viewfinder and camera keys
1 Camera key. Activate the camera/Take photos/Record video clips
2 Zoom in or out
3 Settings
4 Capture mode
5 Exposure
6 Zoom
7 View recently taken photos
8 Switch to video camera
9 Take a photo
10 Settings
11 Exposure
12 Play recently recorded video clips
13 Switch to still camera
14 Record a video clip
To activate the camera
•
Press and hold down the camera key.
To switch between still camera and the video mode
1
Press the camera key to activate the camera.
2
Tap
or in the viewfinder.
To switch off the camera
•
Press .
This is an Internet version of this publication. © Print only for private use.
34
Page 35

Using the still camera
To take a photo
1
Press the camera key to activate the camera.
2
Point the camera at the target.
3
Press the camera key.
To view the photos you have taken
1
Press the camera key to activate the camera.
2
In the viewfinder of the camera, tap to browse your photo or video.
To delete photos
1
Press the camera key to activate the camera.
2
View recently taken photos and browse to the photo you want to delete.
3
Tap the screen, and then tap Menu.
4
Tap Delete.
To share photos
1
Press the camera key to activate the camera.
2
View recently taken photos and browse to the photo you want to share.
3
Tap the screen, and then tap Menu.
4
Tap Share.
5
Choose the picture sharing mode.
Using the video mode
To record a video
1
Press the camera key to activate the camera.
2
If the video mode is not activated, tap
3
Tap .
4
Tap
To view the video you have recorded
1
Press the camera key to activate the camera.
2
Tap on the bottom right corner of the viewfinder to browse the photos or videos.
to stop recording.
.
35
This is an Internet version of this publication. © Print only for private use.
Page 36

CMCC services
CMCC e100
e100 is a one-stop self-service offering to China Mobile customers that includes the
following:
1
Online business shop: call 10086 to access the self-service voice system and get
information on various services and the latest discount offers, or check your voice
calls bill, take out a subscription, and check out our Monternet services.
2
10086 hotline: by calling 10086 self-service voice system, you could go on with
service consultation, find the latest discount information, check your voice traffic bill,
carry out service subscription and check the Monternet services;
3
SMS business shop: send a text message to “10086” to get information on the
latest discount offers, check your voice calls bill, or take out a service subscription.
4
Mobile business shop: log on to the Monternet home page – your premier WAP
business shop link – and get access to the WAP Service Room and a range of roundthe-clock services without having to input your number or password.
5
Self-service terminal: this fully automated service helps you make payments, check
and print bills and other information, and offers various other information and
services, including subscription services.
Fetion
Offered by China Mobile, Fetion is an integrated communications service that lets you send
text and voice messages from both your mobile phone and computer. For example, you
can log in to Fetion on your mobile phone and send messages or start conversations with
friends who have logged in to Fetion on their PCs. For the PC users, this is a convenient,
fast and cost effective method. You can download and install Fetion PC client to your
computer from: www.fetion.com.cn.
MM (Mobile Application Market)
You can use the Mobile Application Market application to try, download and subscribe to
various music, games and software.
My PIM
Do you find it hard to keep your ever-expanding lists of contacts backed up and in one
place? China Mobile has come up with an innovative way to make your contact data
available anytime you want. With Phonebook Manager you can back up your phonebook
contacts on a dedicated server. Then you can manage and recall particular data using your
computer, mobile phone or fixed line phone whenever you want.
Navigation
The Mobile Navigation service transforms your mobile phone into a GPS navigator!
Combining the advantages of a mobile phone (which comes with navigation software preinstalled) with location positioning technology, you can enjoy voice guidance and 3D map
views without even buying a map. And the service doesn't take up any storage space on
your phone. With one device only, you can manage both your communication and
navigation needs, and save yourself the trouble of asking the way!
Sony Ericsson does not warrant the accuracy of any location services, including but not limited
to navigational services.
36
This is an Internet version of this publication. © Print only for private use.
Page 37

Mobile Music
With Mobile Music you can listen to the latest pop songs as soon as they hit the charts.
VIP members of the Wireless Music Club can listen to almost 10,000 pop songs free of
charge. The application also supports the synchronised display of lyrics on your phone
screen, and the songs are constantly updated!
Mobile TV
Subscribers to Mobile TV can view the latest movies, TV programmes, news broadcasts
and live events. Experience the joy of online video with your mobile phone.
To activate mobile TV
•
Find and tap Mobile TV in the Home screen.
To watch TV programs
1
Activate Mobile TV, and display full channel list.
2
Tap the channel you want to watch in the channel list, and enter into the watch view
of mobile TV.
To use the full screen mode
1
When you are watching the TV program, you could enter into horizontal screen
interface if you put the mobile phone horizontally.
2
In the horizontal play interface, tap
3
In the full screen mode interface, tap to play with modes other than the full screen
mode.
To manage your Mobile TV settings
Please make sure the mobile phone has a valid SIM card and is in a valid network before using
mobile TV. Please drag out the TV antenna on the mobile phone before using.
Make sure you pull out the Mobile TV antenna before watching mobile TV programmes.
to enter into the full screen mode.
37
This is an Internet version of this publication. © Print only for private use.
Page 38

1
From the Home screen, find and tap Mobile TV. A list of available channels appears.
2
Tap in the channel list and choose from the following options:
•
ESG – View a detailed programme list, select and play a channel, and switch
between channels.
•
Package subscription management – Subscribe to local packages or check
details of the package you are already subscribed to.
•
Programme Search – Input keywords to search for your desired programmes.
•
Refresh– Refresh the channel list.
•
Settings – Set general settings and MBBMS (Mobile Broadcast Business
Management System) settings.
•
Help or Exit – Tap Help or Exit from the menu.
•
Emergent Broadcast – Tap Emergent Broadcast from the menu.
During the play of the mobile TV programs, the on the top left corner of the screen will show
the signal strength of the program you are watching.
38
This is an Internet version of this publication. © Print only for private use.
Page 39

Search
You can search various content, such as contacts, messages and applications in your
phone or you can search online for various information.
To perform a search in your phone
1
From the Home screen, tap Search, then tap and choose the content you want
to search..
2
Enter your search text in the search field.
39
This is an Internet version of this publication. © Print only for private use.
Page 40

WLAN
Using WLAN you can access the Internet wirelessly with your phone.
To turn on WLAN
1
From the Home screen, tap the applications bar.
2
Tap Settings , then tap Wireless & networks,
3
Mark the WLAN checkbox.
It may take a few seconds before the WLAN connection is enabled.
40
This is an Internet version of this publication. © Print only for private use.
Page 41

Bluetooth™ wireless technology
The Bluetooth™ function creates a wireless connection to other Bluetooth™ devices, for
example, handsfree devices. A range within 10 metres (33 feet), with no solid objects in
between, is recommended. You must turn on the Bluetooth™ function to communicate
with other devices. You may also have to pair your phone with other Bluetooth™ devices.
To turn on the Bluetooth™ function and make your phone visible
1
From the Home screen, find and tap Settings, then tap Wireless & networks.
2
Mark the Bluetooth checkbox. appears in the status bar.
3
Tap Bluetooth settings.
4
Mark the Discoverable checkbox. The phone will now be visible to other devices
(for 120 seconds).
To pair the phone with another Bluetooth™ device
1
From the Home screen, find and tap Settings > Wireless & networks > Bluetooth
settings.
2
Tap Scan for devices. The Bluetooth™ devices found will be listed under Bluetooth
devices.
3
Tap the Bluetooth™ device that you want to pair with your phone.
4
Enter a passcode, if required.
5
You can now start using the paired Bluetooth™ device. The status of the pairing and
connection is shown below the name of the Bluetooth™ device in the Bluetooth
devices list.
Make sure that the device you want to pair your phone with has the Bluetooth™ function activated
and Bluetooth™ visibility turned on.
41
This is an Internet version of this publication. © Print only for private use.
Page 42

Updating your phone
You can update your phone to the most recent software for optimal performance and to
get the latest enhancements. Updates can be downloaded wirelessly directly from your
phone via the Internet by using a 2G/3G mobile data connection, or by using a WLAN
network connection.
When you are using a 2G/3G mobile data connection to connect to the Internet from your phone,
data transmission charges may apply. Contact your network operator for more information.
Make sure you back up and save all data contained in your phone before you start updating the
phone.
To download software updates wirelessly
1
From the Home screen, tap DM Service.
2
Tap Software update and follow the on-screen instructions to update your phone.
42
This is an Internet version of this publication. © Print only for private use.
Page 43

Synchronising with the desk suite
You can synchronise data such as contacts, calendar items, text messages and emails
using the desk suite. First, you need to install the application on your PC.
To install the desk suite
1
Insert the CD supplied into the PC.
2
Run the OPhone desk suite installation file that corresponds to your PC operating
system.
3
Finish the installation according to the on-screen instructions.
4
Restart the PC.
To synchronize your contacts
1
Using the USB cable, connect the mobile phone to the PC.
2
Phone: Select Sync mode in the menu that appears on the screen.
3
PC: Run the mobile phone package suite on the PC.
4
PC: Click the Sync option to synchronize contacts saved on your mobile phone with
contacts saved in the desktop suite application.
43
This is an Internet version of this publication. © Print only for private use.
Page 44

Compass
To activate the compass
•
Find and tap Compass in the Home screen.
When the compass signal is weak, the mobile phone will give a “Make Calibration” notification.
In order to get better compass signal, you need to turn you mobile phone to different directions,
otherwise the data on the compass will not be accurate.
Keep you mobile phone parallel to the ground, use the needle-shaped base line as your direction
in relation to the mobile phone. The dial of the compass will rotate automatically, and N will point
to the north.
44
This is an Internet version of this publication. © Print only for private use.
Page 45

IMEI
To view your IMEI number
•
You can find the IMEI number under the battery.
45
This is an Internet version of this publication. © Print only for private use.
Page 46

Troubleshooting
Common questions
My phone is not working as expected
If you experience problems with your phone, check these tips before you try anything else:
•
Restart your phone.
•
Remove and re-insert the battery and SIM card. Then restart your phone.
•
Update your phone. Whether or not you have the latest software version, running the Sony
Ericsson Update Service can improve software stability and solve problems. Updating your
phone will also make sure you get an optimal performance and the latest enhancements.
See Updating your phone on page 42 for more information.
•
Reset your phone.
Be patient while restarting or resetting your phone. Removing the battery during a reboot or reset
procedure may damage the phone permanently.
Resetting the phone
Resetting the phone deletes all data, including downloaded applications, and resets the
phone back to its initial state, the state before you turned on the phone for the first time.
Make sure to back up important data you have on the phone before you reset the phone.
To reset the phone
•
From the Home screen, tap Settings > Security > Master clear .
I cannot charge the phone or battery capacity is low
The charger is not properly connected or the battery connection is poor. Remove the
battery and clean the connectors.
The battery is worn out and needs to be replaced. See Charging the battery on page 7.
No battery charging icon appears when I start charging the phone
It may take a few minutes before the battery icon appears on the screen.
I cannot synchronise or transfer content between my phone and the
computer when using a USB cable
The software or the USB drivers have not been properly installed. Go to
www.sonyericsson.com/support for more detailed installation instructions and
troubleshooting sections.
I cannot use Internet-based services
Make sure your subscription includes data download capacity, and that the Internet settings
in your phone are correct.
See Settings for calling, messaging and the Internet on page 10 for more information on
Internet settings.
46
This is an Internet version of this publication. © Print only for private use.
Page 47

Error messages
No network coverage
•
Your phone is in flight mode.
•
Your phone is not receiving any network signal, or the received signal is too weak. Contact
your network operator and make sure that the network has coverage where you are.
•
The SIM card might not be working properly. Insert your SIM card in another phone. If the
SIM card works, then it is probably your phone that is causing the problem. In this case,
contact the nearest Sony Ericsson service centre.
Emergency calls only
You are within range of a network, but you are not allowed to use it. However, in an
emergency, some network operators allow you to call the international emergency number,
112.
SIM card is locked
You have entered your PIN incorrectly.
SIM card is PUK locked
You have entered your PUK (Personal Unblocking Key) incorrectly.
47
This is an Internet version of this publication. © Print only for private use.
Page 48

Legal information
Sony Ericsson WT18i
This User guide is published by Sony Ericsson Mobile Communications AB or its local affiliated company, without any
warranty. Improvements and changes to this User guide necessitated by typographical errors, inaccuracies of current
information, or improvements to programs and/or equipment, may be made by Sony Ericsson Mobile Communications
AB at any time and without notice. Such changes will, however, be incorporated into new editions of this User guide.
All rights reserved.
©Sony Ericsson Mobile Communications AB, 2010
Publication number: 1248-6213.4
Based on Android 2.2/OMS 2.5, your mobile phone has the capability to download, store and forward additional
content, e.g. ringtones. The use of such content may be restricted or prohibited by rights of third parties, including
but not limited to restriction under applicable copyright laws. You, and not Sony Ericsson, are entirely responsible for
additional content that you download to or forward from your mobile phone. Prior to your use of any additional content,
please verify that your intended use is properly licensed or is otherwise authorized. Sony Ericsson does not guarantee
the accuracy, integrity or quality of any additional content or any other third party content. Under no circumstances
will Sony Ericsson be liable in any way for your improper use of additional content or other third party content.
This User guide may reference services or applications provided by third parties. Use of such programming or services
may require separate registration with the third party provider and may be subject to additional terms of use. For
applications accessed on or through a third-party website, please review such websites’ terms of use and applicable
privacy policy in advance. Sony Ericsson does not warrant or guarantee the availability or performance of any thirdparty websites or offered services.
Remove the battery to see regulatory information such as the CE mark.
The Liquid Identity logo and WT18i are trademarks or registered trademarks of Sony Ericsson Mobile Communications
AB.
Sony and "make.believe" are trademarks or registered trademarks of Sony Corporation.
Ericsson is a trademark or registered trademark of Telefonaktiebolaget LM Ericsson.
Bluetooth is a trademark or registered trademark of Bluetooth SIG and any such use by Sony Ericsson is under license.
China Mobile, Fetion and 139Mail are trademarks or registered trademarks of China Mobile Communications
Corporation.
Microsoft, Windows, Outlook, Windows Vista, Windows Server and ActiveSync are registered trademarks or
trademarks of Microsoft Corporation in the United States and/or other countries/regions.
This product is protected by certain intellectual property rights of Microsoft. Use or distribution of such technology
outside of this product is prohibited without a license from Microsoft.
Other product and company names mentioned herein may be the trademarks of their respective owners. Any rights
not expressly granted herein are reserved.
All illustrations are for illustration only and may not accurately depict the actual phone.
Note: Sony Ericsson advises users to backup their personal data information.
To use some pre-loaded applications you need first activate data service. Using data services (GPRS or 3G services)
may incur data traffic fee. Please contact your network operator for expense details.
Visit www.sonyericsson.com/cn to get the latest version of this User Guide.
48
This is an Internet version of this publication. © Print only for private use.
Page 49

Index
A
adjusting volume .....................................................28
all files ......................................................................33
animated wallpaper .................................................21
audio
adjusting volume .............................................28
B
backing up ...............................................................36
battery .......................................................................7
Bluetooth™ .............................................................41
pairing ..............................................................41
visibility ............................................................41
C
Calendar ..................................................................27
calls .........................................................................23
muting the ringtone .........................................23
options ............................................................23
to other countries ............................................23
video calls .......................................................23
volume .............................................................23
camera .....................................................................34
keys .................................................................34
overview ..........................................................34
taking photos ..................................................34
video ................................................................35
viewfinder ........................................................34
caps lock .................................................................22
changing tracks .......................................................28
charging .....................................................................7
troubleshooting ...............................................46
compass ..................................................................44
contacts ...................................................................24
adding a contact .............................................24
backing up contacts ........................................24
calling a contact ..............................................24
deleting contacts .............................................24
searching for a contact ...................................24
D
Data connection setting ..........................................12
Date & time settings ................................................13
deleting
tracks ...............................................................28
desk suite ................................................................43
directions
getting directions .............................................36
E
e100 .........................................................................36
email ........................................................................26
account ...........................................................26
receiving an email message ............................26
sending an email message ..............................26
entering text ............................................................22
copying ............................................................22
input method ...................................................22
pasting .............................................................22
extensions ...............................................................20
F
Fetion .......................................................................36
finding a file .............................................................33
G
G+ Game .................................................................33
games ......................................................................33
GPS .........................................................................36
H
Home screen ...........................................................20
changing ..........................................................20
I
IMEI .........................................................................45
international calls .....................................................23
Internet settings .......................................................10
L
live wallpaper ...........................................................21
locks
IMEI .................................................................45
PIN ...................................................................47
PUK .................................................................47
screen ................................................................8
M
maps ........................................................................36
marking options .......................................................18
media .......................................................................33
messages
multimedia .......................................................25
picture .............................................................25
receiving a message ........................................25
sending a message .........................................25
settings ............................................................10
text ..................................................................25
MM ..........................................................................36
MMS ........................................................................25
Mobile Music ...........................................................37
Mobile network setting ............................................12
mobile TV ................................................................37
Mobile TV ................................................................37
multimedia messages ..............................................25
music .......................................................................28
adjusting volume .............................................28
changing tracks ...............................................28
deleting ............................................................28
pausing a track ................................................28
Walkman™ player ...........................................28
my favourites ...........................................................33
My PIM ....................................................................36
N
navigation ................................................................18
P
pausing a track ........................................................28
photos .....................................................................33
picture messages ....................................................25
pictures ....................................................................33
category ..........................................................33
editing ..............................................................33
sharing .............................................................33
viewing ............................................................33
power ........................................................................8
R
Radio .......................................................................31
Recording ................................................................32
reset .........................................................................46
S
screen lock ................................................................8
search ......................................................................39
local search .....................................................39
Security ...................................................................14
49
This is an Internet version of this publication. © Print only for private use.
Page 50

settings
Internet ............................................................10
messaging .......................................................10
WLAN ..............................................................10
Settings .....................................................................9
SIM card
inserting .............................................................7
SMS .........................................................................25
Sound settings ........................................................13
status bar ................................................................18
symbols ...................................................................22
synchronising contacts ...........................................43
T
text
entry ................................................................22
input method ...................................................22
messages ........................................................25
TrackID ....................................................................30
troubleshooting .......................................................46
turning off the phone ...........................................8, 35
turning on the phone .................................................8
TV ............................................................................37
U
unlocking the screen .................................................8
updating the phone .................................................42
V
video calls ................................................................23
videos ......................................................................33
W
wallpaper .................................................................21
widgets ....................................................................20
WLAN ......................................................................40
50
This is an Internet version of this publication. © Print only for private use.
 Loading...