

Page 1

Contents
General Information 5
Phone Information ............. 5
Documentation................... 7
Information and
Communications Suite CD 8
Preparing for Use 9
Checklist ............................. 9
Operational Modes ............. 9
SIM Card ......................... 10
Battery .............................. 11
Turning on the Phone ...... 14
Initial Settings................... 15
Flip Closed Display........... 22
Flip Open Display ............ 23
Interface and Navigation27
Flip Closed ....................... 27
Flip Open ......................... 33
Voice Memo..................... 38
Making and Receiving Calls
39
Making Calls .................... 39
Receiving Calls.................. 46
When a Call is in Progress 47
Fax and Data Calls............ 53
Calling Card Calls ............ 53
Conference Calls............... 57
After Calls......................... 62
Entering Information 65
On-screen Keyboards ........ 65
Handwriting Recognition. 68
Security 75
Keypad Lock ..................... 75
SIM Card Lock ................. 75
Phone Lock....................... 77
Settings 79
Customizing Settings ........ 79
Phone................................ 80
Settings ............................. 83
System .............................. 94
Phone 113
Phone Menu ................... 113
Flip Open Functionality.. 115
Office Handsfree ............. 120
Contacts 123
Personal Details............... 124
Contents List .................. 125
New Contact................... 132
Find ................................ 132
Messaging 135
Inbox .............................. 137
New E-mail..................... 153
New SMS........................ 158
Find ................................ 159
Generate Password .......... 160
Calendar 163
Month View.................... 164
Week View...................... 165
Day View ........................ 166
New Calendar Events...... 167
Contents 1
Page 2

WAP Services 173
Browser........................... 174
Bookmarks...................... 177
Open Location................ 179
History ........................... 180
Browsing Secure Sites ..... 180
Getting started with
E-mail and WAP 183
E-mail Set Up ................. 183
Sending an E-mail
for the First Time ........... 188
WAP............................... 190
Locating Settings in
Windows 95 or 98 .......... 195
Extras 199
Notepad.......................... 199
Clock .............................. 201
Calculator ....................... 208
Game.............................. 209
System ............................ 210
R380
Communications Suite 215
Synchronization .............. 215
Connecting your R380 to
your Computer ............... 216
Future Synchronizations . 220
Backing up your R380 .... 221
Restoring your R380....... 222
Using Your R380
as a Modem .................... 222
Changing the
Language in your R380... 223
Getting Help .................. 224
Important Information 229
Safe and Efficient Use ..... 229
Technical Data................ 239
Limited Warranty ........... 240
Copyright........................ 243
License Agreement .......... 245
Regulatory Information... 248
Declaration of
Conformity ..................... 249
Index 251
Troubleshooting 225
2 Contents
Page 3

Sony Ericsson R380
User’s manual
Third edition (December 2001)
This manual is published by
Sony Ericsson Mobile
Communications AB,
without any warranty.
Your new product is
manufactured for, by or under
license from Ericsson Mobile
Communications AB and/or
Sony Ericsson Mobile
Communications AB. All
Ericsson trademarks and
copyright remain the property
of Telefonaktiebolaget LM
Ericsson and are used with
permission by Sony Ericsson
Mobile Communications AB.
All other trademarks and
copyright remain the property
of their respective owners and
are used under license or with
permission.
Improvements and changes to
this manual necessitated by
typographical errors, or
inaccuracies of current
information, or improvements
to programs and/or equipment,
may be made by Sony Ericsson
Mobile Communications AB
at any time and without notice.
Such changes will, however, be
incorporated into new editions
of this manual.
All rights reserved.
©Sony Ericsson Mobile
Communications AB, 2001
Publication numbers:
Printed User’s Guide
AE/LZT 123 886 R2B
User’s Manual PDF
AE/LZT 123 887 R2B
INNOVATRON PATENTS
Note:
Some of the services in
this manual are not supported by
all networks. This also applies to
the GSM International
Emergency Number 112. Please
contact your network operator or
service provider if your are in
doubt whether you can use a
particular service or not.
European Union Standards
The Πsymbol on our products
signifies that they have been
certified according to the EMC
directive 89/336/EEC, the
Telecommunications directive
91/263/EEC, and the Low
voltage directive 73/23/EEC
when applicable. The products
fulfil the requirements
according to the following
standards:
Cellular Phones and Accessories
in Combination:
ETS 300 342-1 EMC for
European digital cellular
telecommunications.
3
Page 4

Accessories Without Direct
Connection to a Cellular Phone:
• EN 50081 Electromagnetic
compatibility, Generic
Emission Standard,
EN 50082 Electromagnetic
•
compatibility, Generic
Immunity Standard.
4
Page 5

General Information
Congratulations and thank you for buying the Ericsson R380
Smartphone, the ultimate mobile phone and personal digital
assistant. This is an advanced, yet easy to use, product with a
wide range of features, designed to make everyday life much
easier.
Your R380 gives you the freedom to communicate wherever you
are and whenever you want. Along with a host of mobile phone
functions, your R380 can send and receive e-mail and SMS
messages, browse the Internet via a WAP
much, much more.
The advanced software in your R380 introduces a new era in
mobile communications. Welcome to our wireless world!
Phone Information
Operators and Subscription
To be able to use your phone, you need to have a subscription to
a network. This is obtained from the network operator.
services browser and
The services included in your subscription depend on your
choice of operator and/ or subscription. Therefore, some of the
services and functions described in this manual may not be
accessible to you. If you want a complete list of the services
included in your subscription, please contact your network
operator.
General Information 5
Page 6

GSM 900/1900 Dual Band
The Ericsson R380 is a dual band phone, which means that you
can use your phone in two different kinds of networks - the
GSM 900 and GSM 1900 systems.
The GSM 1900 system is used primarily in the US and other
parts of the Americas, and the GSM 900 system is used primarily
in Europe, the Asia/Pacific region and in some parts of Africa.
This means that you can used your R380 on six continents.
Switching between the two systems is done automatically, which
means that you can use your phone without ever having to
consider which system is being used. This is taken care of by the
networks. However, you should note that the functions offered
and the network coverage differ depending on your choice of
operator and/or subscription.
SIM and PIN
You will obtain a SIM (Subscriber Identity Module) card with
your subscription. The SIM card contains a computer chip that
keeps track of your phone number, the services you have ordered
from your network operator and your Phone Book information,
among other things.
Your SIM card is supplied with a security code or PIN (Personal
Identity Number), which you need in order to gain access to the
network. Your PIN may also be required when you want to
change settings in your ph one. Furthermore, some operators may
have services that require a second PIN, your PIN2. You will find
your PIN (and PIN2) in the information from your operator.
If you have set certain security options in your phone, when you
turn on your phone, it prompts you to enter your PIN. If the
PIN is entered incorrectly three times in a row, the SIM card will
be blocked. If this happens you can unlock it by using your PUK
(Personal Un-blocking Key code), which you also get from your
operator. You should be careful with your PIN, since it is your
protection against unauthorized use of your phone and
subscription.
6 General Information
Page 7

Mobile Internet
When you are on the move and in need of communication and
information, Mobile Internet is the answer. Mobile Internet is a
service supplied by Sony Ericsson to facilitate easy
communications and rapid information retrieval, wherever you
are. It gives you access to on-line customer services, on-line user
manuals, and useful information when you are out travelling. It
allows you to download various communication software which
will ensure you achieve optimum results from your Sony
Ericsson products. If you run into any problems, there are help
texts connected to the different Mobile Internet pages. The
Internet address to Mobile Internet is
http://wap.sonyericssonmobile.com
To get full access to the service you need to register, follow the
links on the website for more details.
Documentat ion
Documentation is designed to enhance your understanding of
the capabilities of the R380 by providing you with both a quick
reference and a more comprehensive description of the many
functions within your R380.
Descriptions follow the two main operational functions which
are flip closed and flip open .
The term phone is equivalent to mobile or cellular phone.
Quick Guide
The Quick Guide is a printed document providing a quick
reference on how to get started with your R380. Technical
instructions are kept to a minimum.
User’s Guide
The User’s Guide is a printed document containing a
comprehensive description of all the functions in your R380.
General Information 7
Page 8

Note:
found in the User’s Manual, which is an electronic document on the
enclosed CD as well as on the Mobile Internet.
Insert the CD into your PC’s CD-ROM drive and the main
menu should appear automatically.
From the main menu you can start:
•
The information contained in this document can also be
Informa tion and C ommu nic ations Su ite CD
A multimedia presentation, R380 Product Information,
which is an on-screen description of the functions of the
R380.
• The installation of the Sony Ericsson R380
Communications Suite, for PC synchronization, backup
and restore of R380 data.
Note:
the CD sleeve for more information if the CD-browser does
not appear when the CD is inserted into your PC’s CD-ROM.
Change Language in R380, when synchronized.
•
See “R380 Communications Suite” on page 215 or
• The R380 User’s Manual, which is an electronic document
containing a comprehensive description of all your R380
functions in portable document format (pdf).
Note:
on your PC to read the R380 User’s Manual.
Adobe Acrobat Reader version 4.0 should be installed
• The installation of Adobe Acrobat Reader version 4.0.
Note:
exactly the same as the printed R380 User’s Guide. The names
are different so that the printed document and the electronic
document can easily be recognised.
R380 User’s Manual information on the CD is
• The installation of Lotus Organizer version 5.0. See
“Checklist” on page 9 for more information.
8 General Information
Page 9

Preparing for Use
Checklist
The following items should be in the box when you unpack it:
R380 unit
•
• R380 battery with touch screen stylus
• Charger with power plug and phone cable
• User’s Guides (**including the Quick Guide leaflets)
• CD-ROM; Ericsson Mobile Communications and
Information Suite which contains a multimedia presentation,
Communications Suite software and the User’s Manual (pdf)
• RS-232 cable for R380 to PC connectivity
• Desk stand
• 3 extra touchscreen styluses
• Battery leaflet
• Sony Ericsson Service and Support leaflet
• Accessory leaflet
** The Quick Guide provides an overview on how to get started.
Operational Modes
Unlike other mobile phones, the R380 has added features
available with the flip open. Tasks that you can perform with the
phone can be started with the flip closed and, if required,
continued in the more comprehensive flip open mode.
Although the manual covers both modes of operation in detail, it
is very important to remember that many functions described are
dependent on your subscription as well as your operator and
internet service provider. Please consult your network operator
and internet service provider for more information about the
services that are available to you.
Flip open and flip closed modes are illustrated in the following
diagrams:
Preparing for Use 9
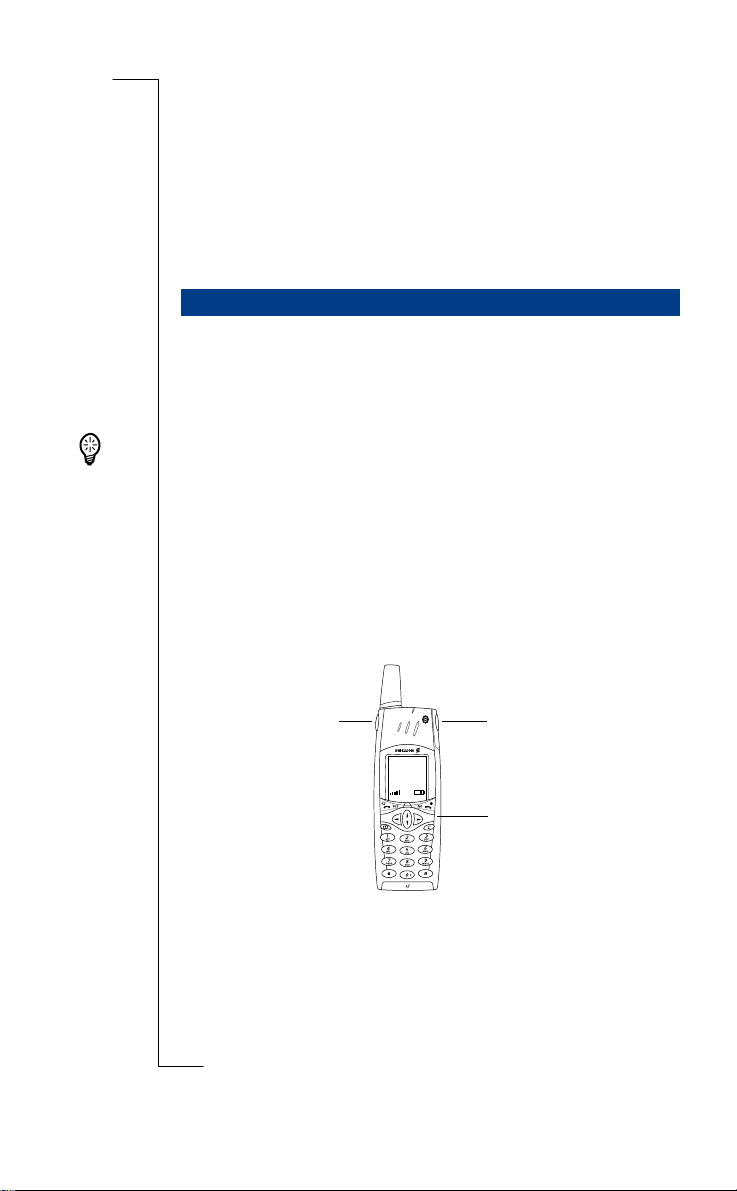
Page 10
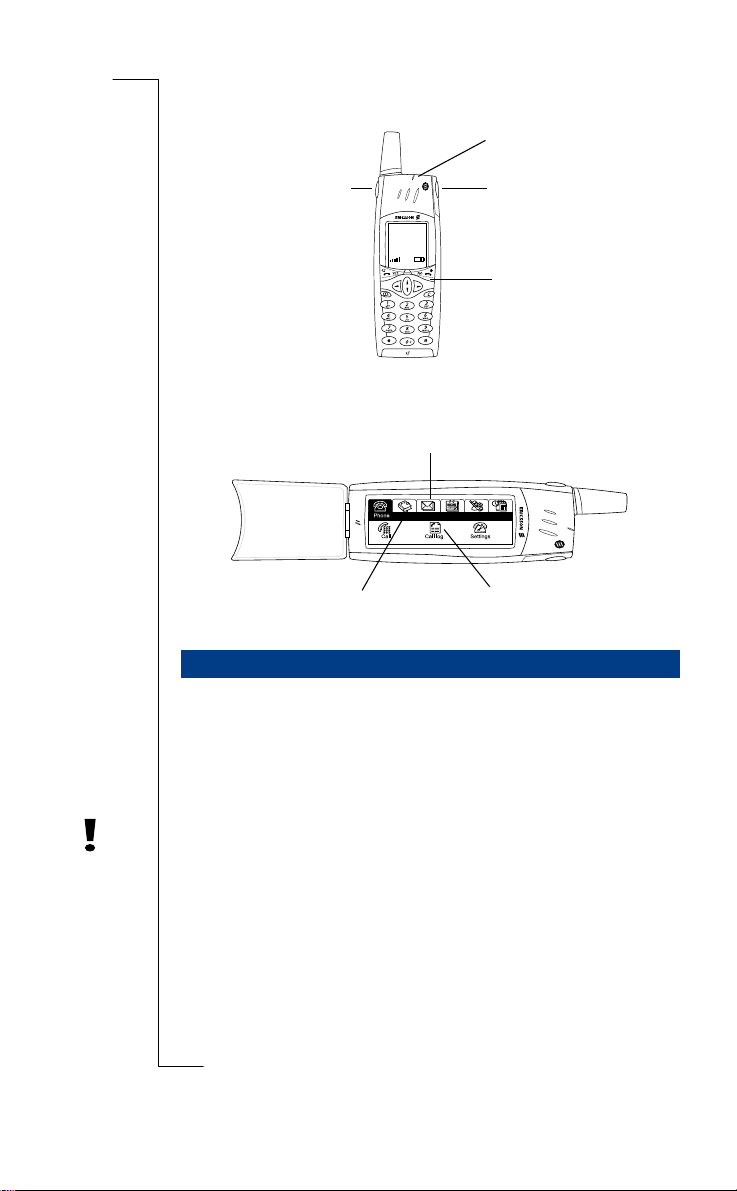
Flip closed.
Status indicator
Volume slider key
NETWORK
18-05-00
12:00
Voice memo key
Power on/off key
Flip opened.
Program tabs
Title bar Program icons
SIM C ard
When you become a subscriber to a mobile network operator,
you are issued a SIM card with a security code or PIN, Personal
Identification Number. The SIM card contains your personal
subscriber data and must be inserted into your R380. The holder
for the SIM card is located underneath the battery.
Warning!
your phone before inserting and removing your SIM card.
To insert the SIM card:
Ensure that your R380 is turned off and the flip is closed.
1.
Remove the battery.
2.
10 Preparing for Use
Always disconnect the charger and other accessories from
Page 11
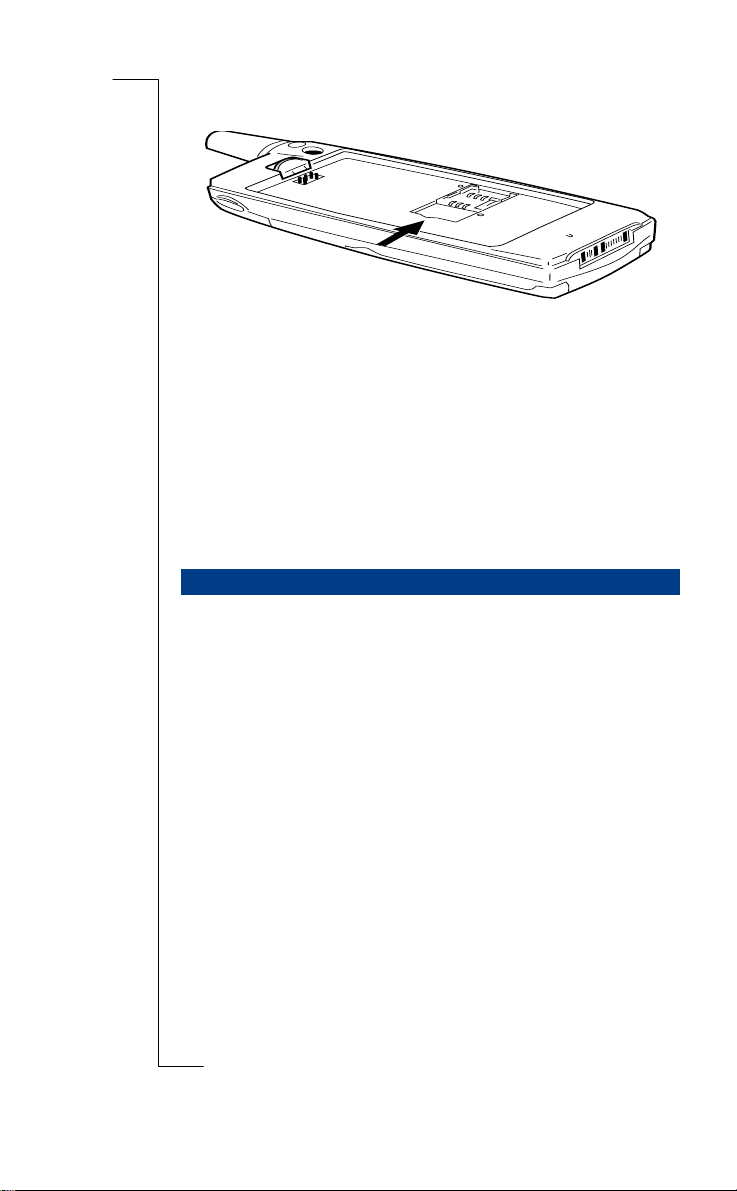
Slide the SIM card into the SIM card holder.
3.
Replace the battery.
4.
Note:
If you already have a SIM card that contains phone
book entries then this information can be imported to your
R380. See “SIM Card Phone Book Import” on page 20.
To remove the SIM card:
Ensure that the R380 is turned off and the flip is closed.
1.
Remove the battery.
2.
Slide the SIM card out of the SIM card holder.
3.
Battery
The battery that comes with your R380 is a lithium ion (Li-Ion)
battery. The battery is not fully charged when you buy your
phone but there may be enough power to turn it on. We
recommend that you charge the battery for four hours before you
use the R380 for the first time.
The first time you charge a new battery, or a battery that has
been completely discharged, it may take a few minutes before
you get any indication that the battery is being charged (the
Status indicator does not light up and the battery meter does not
display).
Note:
You cannot turn on the R380 before the Status indicator
lights up and the battery meter displays.
A battery that has not been used for a long period needs to be
completely discharged and then recharged 2-3 times before
reaching full capacity. Should you need to discharge the battery,
simply use your R380 as usual until the battery runs low.
Preparing for Use 11
Page 12

When to Charge the Battery
Charging is indicated by:
• Battery meter on the display pulses continuously.
• Battery low message displays.
• Status indicator on top of the R380 shows a steady red light
(or green, if the R380 is switched on).
The battery can also be charged whenever you wish without
affecting the R380’s performance.
Normal operation is possible during charging. However, this
Tip!
lengthens the charging time.
Note:
The R380 automatically switches off if the voltage is too
low.
Charging
Charge the battery by using the charger supplied with your
R380. You can use some battery chargers that have been supplied
with other Ericsson mobile phones using the same connector
plug, for example the T28 or the R320s.
Note:
For optimal talk and standy time, we recommend that you
only use Ericsson original batteries with your R380. Non-Ericsson
batteries charge slowly for safety reasons.
When the battery is fully charged, the battery meter displays full
and the Status indicator on top of the R380 shows a steady green
light.
For best performance we recommend charging for an extra half
an hour after the battery meter on the display is shown as full.
Note:
Always close the flip and turn off your R380 before
removing the battery.
Warning!
Do not keep a battery in a sunny or warm place.
Extremely high temperatures reduce the capacity of the battery
permanently. Avoid recharging a full or almost full battery.
12 Preparing for Use
Page 13
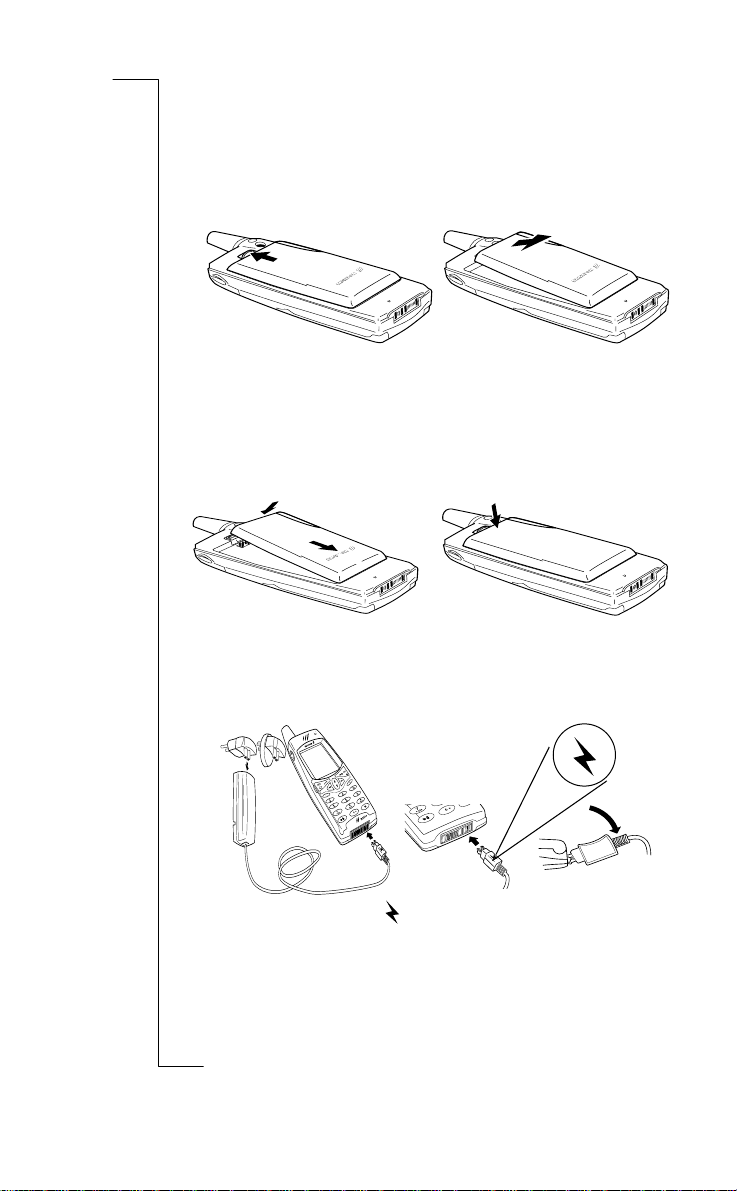
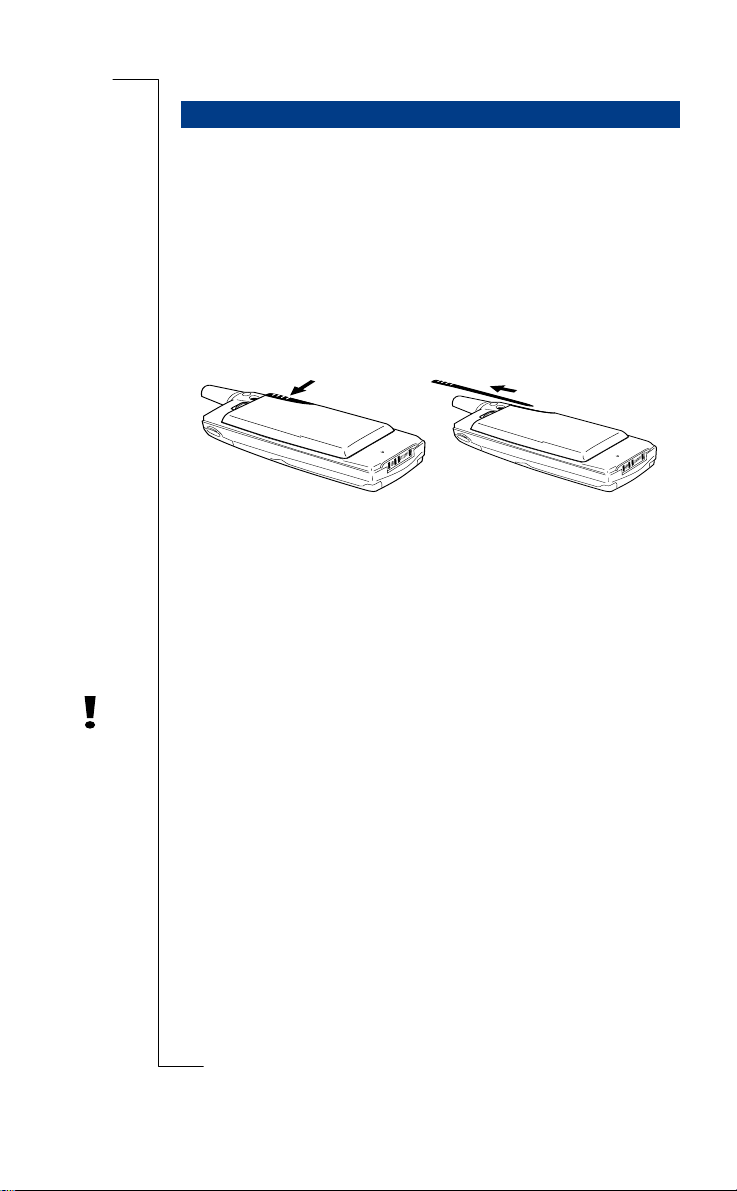
Battery Removal and Insertion
To remove the battery:
Ensure that the flip is closed and the R380 is off.
1.
Push up the release catch at the top of the battery and lift
2.
the battery away from your R380.
To insert the battery:
Ensure that the flip is closed.
1.
Place the bottom of the battery into position and then push
2.
down on the upper section of the battery until it clicks into
place.
➋
➊
➌
To charge the battery using the charger:
Make sure the battery is attached to your R380.
1.
Connect the charger to your R380 as follows:
2.
• The flash symbol on the R380 plug must face
upward toward the keyboard.
• Locate the flash symbol by the R380 connector.
• Tilt the R380 plug contacts slightly downward when
inserting into the R380 connector.
Preparing for Use 13
Page 14
Move the R380 plug downward so that it fits securely
•
with the R380 connector.
Plug the charger into the electrical outlet.
3.
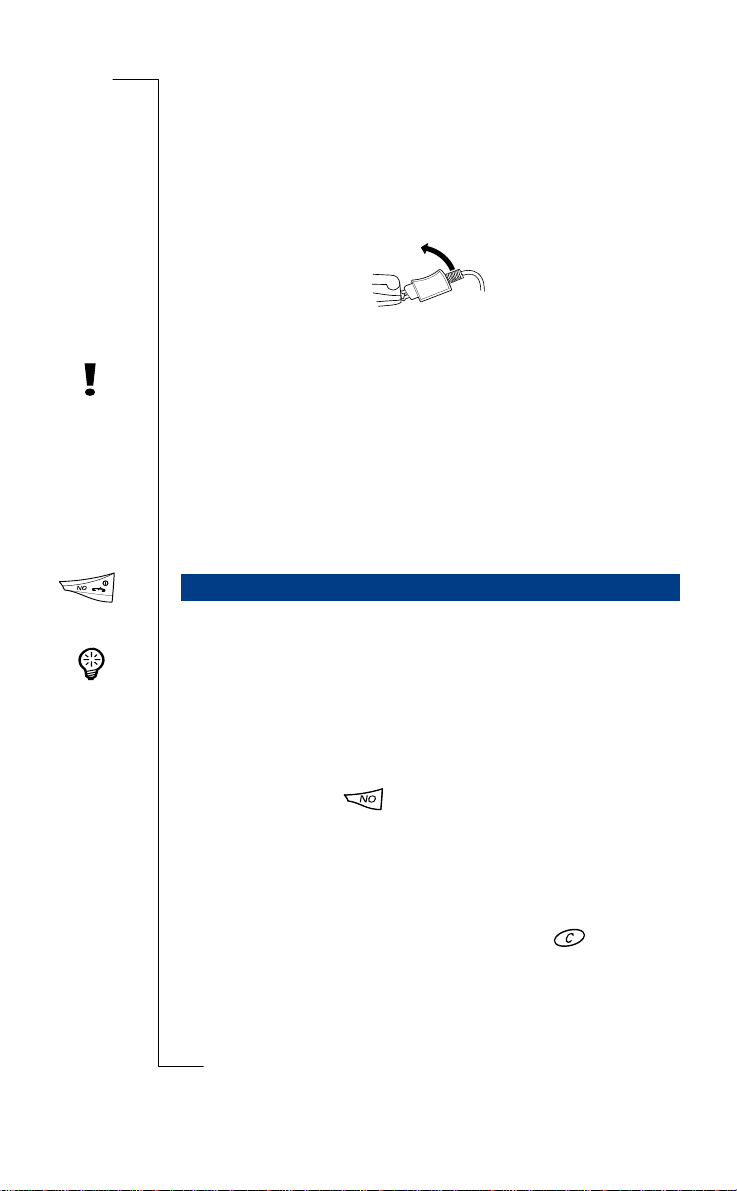
To remove the plug:
Tilt the plug upward and pull it away from the R380 connector.
Warning!
The power supply plug may look different depending on
the electrical socket in your country. Do not connect the AC-plug-in
unit to any other item than your Ericsson Travel Charger CTR-10.
Do not separate it from the charger when plugged into the wall
socket.
Note:
See “BATTERY INFORMATION” on page 238 for more
information about battery safety.
Turning on the P hon e
The
Tip!
button on your keypad turns your R380 on or off.
NO
The term press and hold is equivalent to a key press time of
approximately 2 seconds.
To turn your R380 on:
Ensure that your SIM card is in your R380, the battery is
1.
charged and the flip is closed.
Press and hold until you hear a tone and the display
2.
turns on.
The Sony Ericsson logo displays.
3.
If
Enter PIN:
appears:
Enter your PIN. If you make a mistake while entering your
PIN, erase the wrong number by pressing clear. The
code you enter appears as asterisks (*), unless 1 or 9 is
entered as the first digit. (For example, if you were calling
an emergency number.)
14 Preparing for Use
Page 15
SIM card locked
Enter PIN:
****
Press
4.
YES
.
On finding a network, the name given by your network
operator or a supporting associate operator network
appears.
Note:
If you enter your PIN incorrectly three times in a row,
the SIM card is blocked. You can unblock it by using your
PIN Unblocking code (PUK). See “Unblocking PUK Code”
on page 76 for more information.
Note:
If
Enter code
appears in the ‘Phone locked’ message
display, enter your phone lock code. See “Security” on page 75
for more information.
To turn your R380 off:
In standby mode, press and hold until you hear a tone.
Setting Display Language
After turning on your R380 for the first time, you are asked to
select your preferred language.
To s e l e c t a l a n g u a g e :
Scroll with to find and highlight your choice.
1.
Press to confirm your selection.
2.
Turn your R380 off, wait for the phone to completely
3.
power down, and then turn back on again to activate the
language.
Initial Settings
For effective use of your R380, some initial settings and
preferences need to be set up. In general, most settings can only
be set up with the flip open. This includes and covers most flip
closed functions.
Time and Date
Messaging and Calendar programs are dependent on correct
time and date settings, which can be set using the Clock
program.
Preparing for Use 15
Page 16
Timezones
12
To select the current and destination time zone:
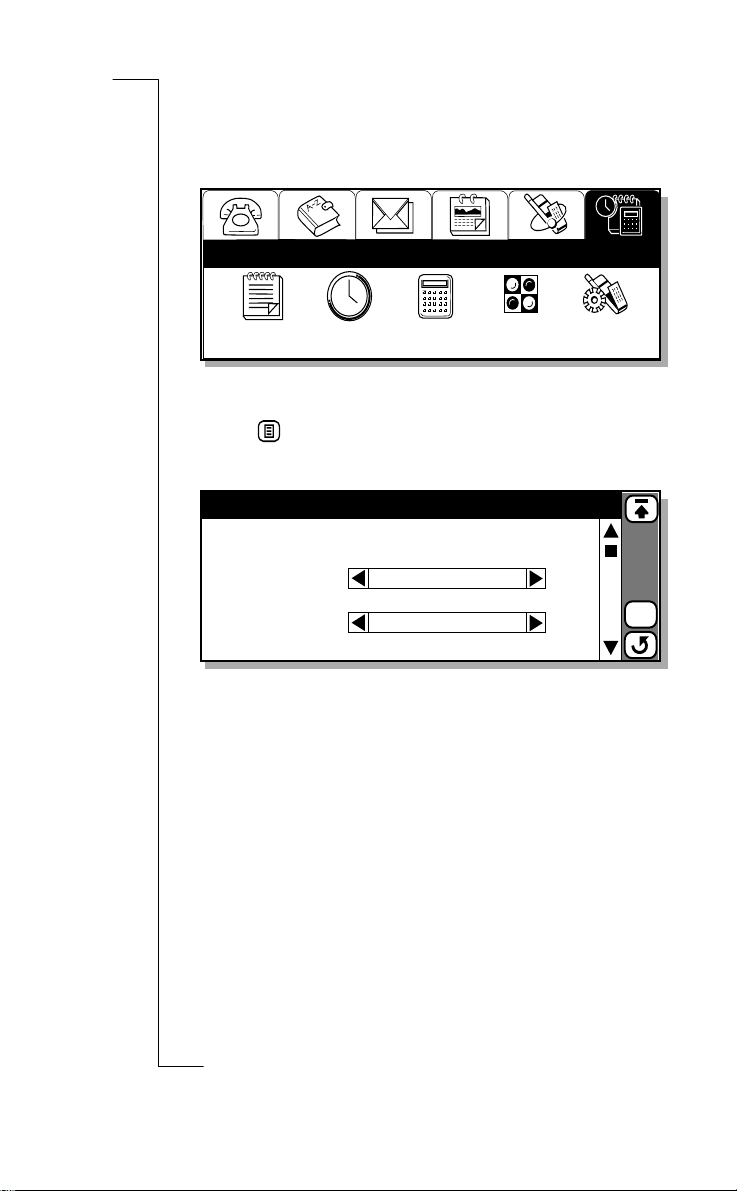
From the
1.
Notepad Clock Calculator
Extras
tab, tap the
12
9
3
6
Clock
icon
Game
The time and date displays.
Extras
System
Ta p an d se l e c t
2.
Timezones
.
The Timezones view displays.
Timezones
Auto timezone:
Timezone display:
Home zone:
Daylight saving:
Destination zone:
Daylight saving:
Enter the desired settings by clicking on the field. The
3.
<On>
<UTC + Offset>
UTC+0
<Off>
UTC+0
<Off>
following is a description of the various settings.
•
Auto timezone
Allows you to specify whether or not the
destination clock is to use network time.
or
On
A pop-up menu allows you to select
a network time update is received and the
to
On,
following message appears “
Select
Note:
•
Timezone Display:
Zone name.
For example:
.
OK
Network time is not supported by all networks.
Allows you to select
UTC+offset:
Time has been updated
Coordinated Universal Time
Off
UTC+offset
(UTC) + number of hours of offset.
OK
. If it is set
”.
or
16 Preparing for Use
Page 17
Zone name
: CET Central European Time (+1 (number of
hours of offset from UTC)).
•
Home zone:
Use the left and right scroll arrows to select
the required time zone.
•
Destination zone:
Use the left and right scroll arrows to
select the required time zone.
•
Daylight saving:
select
On
Tap to accept and save any changes you have made to
4.
OK
or
Off
Select either
.
Home
or
Destination
the time zones. The display returns to the Clock view.
, and
Note:
If at any time during the above operation you decide
to cancel, select . The display returns to Clock view.
Setting the time
To s e t t i m e :
From the Extras tab, tap the
1.
Clock
icon.
The time and date displays.
Ta p a n d s e le c t
2.
Use the up and down scroll arrows to set the time or tap the
3.
Set time
. The Set time view appears.
clock face and move the Hour and Minute hands to set the
time.
Tap to accept the new time. The display returns to the
4.
OK
Clock view.
Note:
to cancel, select the
If at any time during the above operation you decide
button. The display returns to
Cancel
Clock view.
Setting the date
To set the date:
From the
1.
Ta p a n d se l e c t
2.
Extras
tab, tap the
Set date
.
Clock
icon
The Set date view displays.
Use the left and right scroll arrows to select the month and
3.
year and select the day by tapping the respective day on the
calendar.
Tap to accept the new date.
4.
OK
Preparing for Use 17
Page 18
The Clock view appears.
Note:
to cancel, select the
If at any time during the above operation you decide
button. The display returns to
Cancel
Clock view. See “Global Settings” on page 93 for more
information.
Personal Details
Owner information is essential for the safe return of your R380
if it is misplaced, lost or stolen. You can also send your personal
details through infrared to another device or attach them to an email when establishing new contacts.
Warning!
The information stored within your R380 may cause a
security risk if lost or stolen with items such as keys or credit cards.
Therefore, you are advised to keep these items separate.
To enter your personal details:
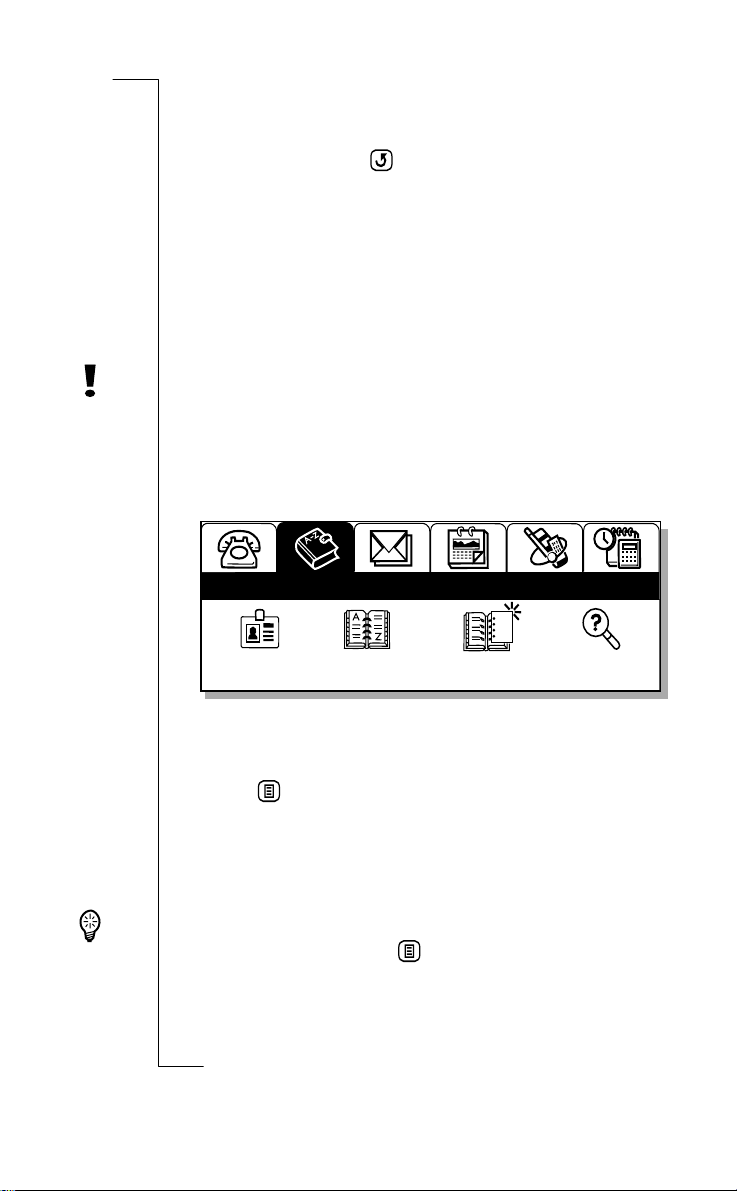
From the desktop, tap the
1.
Contacts
Personal
details
Contents
list
Contacts
tab.
New
contact
Find
Ta p
Personal details.
2.
The Personal Details view appears.
Ta p a n d
3.
To enter the details for a particular field, tap the area beside
the field name. For example: to enter your first name tap
<Enter first name>
type the appropriate information.
Tip!
enter information. Tap and select
recognition screen appears. See “Using Handwriting
Recognition” on page 72.
18 Preparing for Use
to enter your personal details.
Edit
. An edit view displays allowing you to
You can also use the handwriting recognition feature to
The handwriting
Write.
Page 19
Continue entering by tapping the next field icon . A
4.
previous field icon appears if you wish to go back.
Note:
If you select the type of phone number and then
Other
this displays the label as a blank space and not the word
Other.
Tap to display all your entered personal details.
5.
Do one of the following:
6.
• Tap to save the information and return to the
OK
Personal Details display.
or
• Tap .
Cancel view displays. Tap
if you want to return to the Personal Details view.
or
No
or
to cancel without saving
Yes
• Ta p .
Save view displays before returning to the main Personal
to save the information or No to
Details display. Tap
exit without saving.
Note:
last name>
At least one name field,
or
<Enter company name>
before you can save the new entry in the database.Otherwise, a
Warning message appears in the display.
Touch screen Calibration
The screen is calibrated to factory settings. However, this may
not agree with how you use the stylus. For example, you may
tend to tap quickly and slightly off-center to the right.
Yes
<Enter first name>, <Enter
, must contain text
,
To re-calibrate the stylus:
With the flip open, select the
1.
2.
3.
Ta p
Ta p
.
System
Touchscreen calibration
tab.
Extras
. The screen setting displays.
Preparing for Use 19
Page 20

Tap once at the center of each of the three calibration
4.
points in numerical order.
After touching the third calibration point, a ‘
5.
complete
’ message appears. Tap
to accept and save the
Yes
Calibration
new settings. The display now reacts accordingly. You are
also returned automatically to the system functions display.
Tap to return to the desktop.
6.
SIM Card Phone Book Import
If you have names and numbers stored in a phone book on a
SIM card, then these phone book entries can be imported from
the SIM card to your R380.
To import SIM card phone book entries:
With the flip open, select the
1.
Ta p
Contents List
2.
Ta p a n d se l e c t
3.
.
Import from SIM card
Contacts
tab.
.
The Import from SIM card view displays.
Import from SIM card
1.
Anderson Alex
2.
Bernard Fernando
3.
Dahlberg Suzie
4.
Hasan Nasrin
5.
Hinde Martin
6.
Olsson Niki
+46 33 555 2525
+55 51 555 8900
+1 514 555 0234
+1 514 555 2324
0161 555 3490
+358 9 555 9001
Do one of the following:
4.
• To import one phone number, scroll to the entry you
want to import and select it. A pop-up menu displays
20 Preparing for Use
Page 21

providing you with the following options:
name, Import as last name, Import as company name
Import as first
.
Select the option you want.
or
• To import all phone numbers, tap and select on
Import all as first name, Import all as last name
all as company name
.
The selection is then imported into your Contacts database
and an information view displays confirming that the
import has been successful.
or
Import
Note:
The newly created record(s) have the imported phone
number from the SIM card phone list entered as a Mobile
phone number as default. You will need to re-assign the phone
number to its correct label, for instance, work, home, etc. If
you try to send an SMS message to an imported number that is
not a mobile number, your message will not be sent.
Voi ce Mail Number
You can easily call a predefined voicemail number and listen to
your voicemail messages.
To enter or edit a voicemail number:
With the flip open, in the Phone program tab, tap
1.
Scroll to and tap
2.
Voicemail
in the Settings directory. The
Settings
Voicemail view appears.
To enter or edit a voice-mail number, select the
3.
number:
Tap to implement and save the new settings.
4.
field and enter or edit the number.
OK
Voicemail
The Settings list view displays.
Note:
The number to your Voicemail service may be
different if you are calling from a network that is not your
home network. For more information about your Voicemail
service, please refer to the information provided by your
network operator.
.
Preparing for Use 21
Page 22
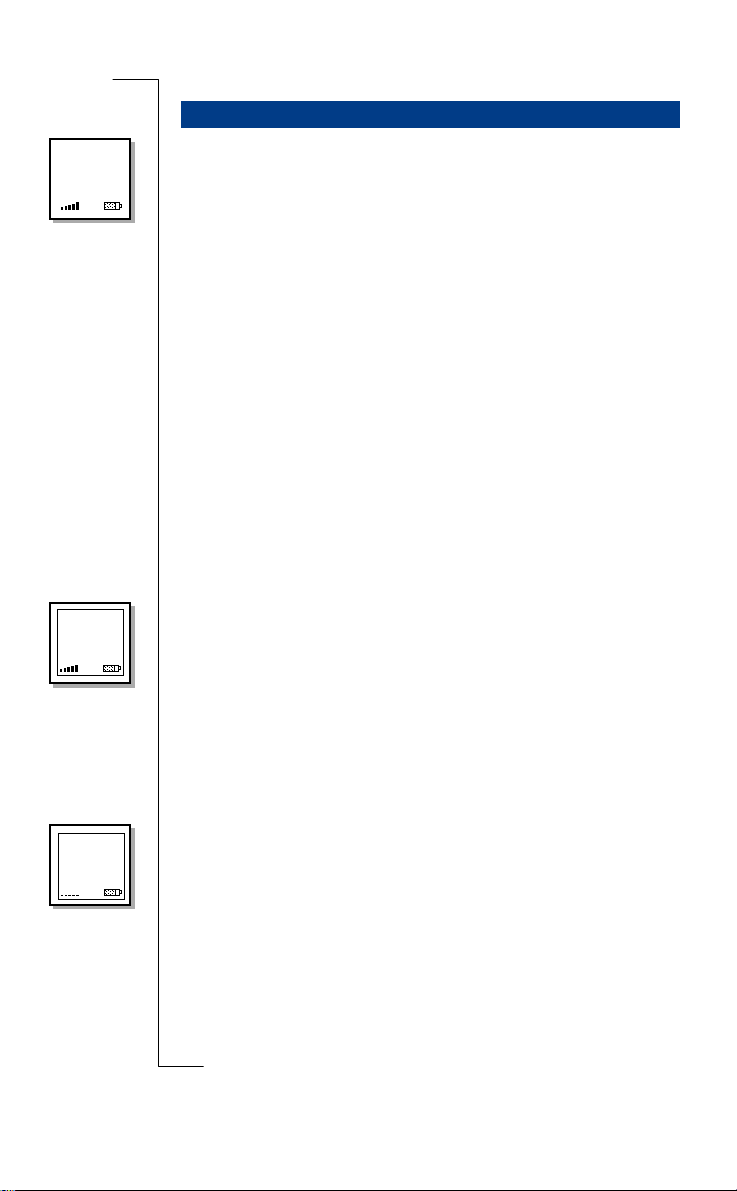
NETWORK
18-05-2000
12:00
Flip Closed Displ ay
Standby Mode
After you have turned on the R380 (and entered your PIN), the
R380 searches for a network.
When a network is found, the R380 beeps three times, Status
indicator light on top of the R380 flashes green once every
second, and your network operator’s name (in most cases
abbreviated) appears.
Emergency
calls only
12:00
No network
18-05-2000
12:00
Note:
See “Troubleshooting” on page 225 if you do not reach
standby mode.
When in the ‘Standby mode’ you can make and receive calls, use
the Phone book to make a call, view e-mail and SMS messages,
view the current day’s events, appointments and to-dos and
activate/deactivate a limited number of settings.
Other Modes
If the name of a network does not display it may be due to one of
the following reasons:
Emergency calls only
If ‘
Emergency calls only
’ displays, you are within coverage of a
network but you are not allowed to use that network. However,
in an emergency, you can call the international emergency
number used in that country . Furthermore, the light Status
indicator on top of the R380 does not flash.
Note:
This service is network dependent, not all networks allow
you to make an emergency call.
No network
If ‘
No network
’ displays, there is no network coverage within
range, or the received signal is too weak, in which case you will
have to move to obtain a sufficiently strong signal. Notice that
the network strength indicator, at the bottom to the left of the
display, becomes a dashed line. Furthermore the light Status
indicator on top of the R380 does not flash.
22 Preparing for Use
Page 23
Flip Op en D isplay
On opening the flip, the desktop displays. It contains program
tabs, icons and functions. Use the stylus provided to operate the
software by gently tapping the touch sensitive screen for
selection.
Using the Stylus
The stylus is located in the holder on the battery, at the back.
Gently press down on the stylus as you slide it up. To replace it,
push it back in until it clicks into place.
Locating and removing the stylus from the holder
Note:
Selection using the stylus
The stylus is only used with the flip open touchscreen.
To make your selection, tap the icon on the screen lightly with
the stylus. You can also use your fingers to tap the screen, though
it is best to use the stylus to avoid fingerprints or smudges on the
screen and to make precise selections.
Warning!
Do not allow children to play with your R380 as they
could hurt themselves or damage the unit. Always make sure the
stylus is in the holder when the flip is closed.
Dragging the stylus
You can highlight some of the lists that display in your R380 by
dragging the stylus across the entries. For example, deleting a
number of messages within your Inbox.
If, while an entry is highlighted, you drag the stylus (without
lifting it) over another entry (or entries), the previous entry
remains highlighted and the newly selected entries also highlight.
If you then drag the stylus back toward the line at which you
started, the lines that have just become highlighted, now become
Preparing for Use 23
Page 24
un-highlighted as the stylus moves past them. Any lines, that
were highlighted from a previous tap and drag movement stay
highlighted.
The Desktop
On opening the flip, your R380 shows the equivalent or nearest
function that was active with the flip closed. For example, if a
contact within the Phone book is displayed and the flip is
opened, the contact’s full record within Contacts displays.
Note:
A desktop view is shown for functions that have no nearest
equivalent between flip closed and flip opened.
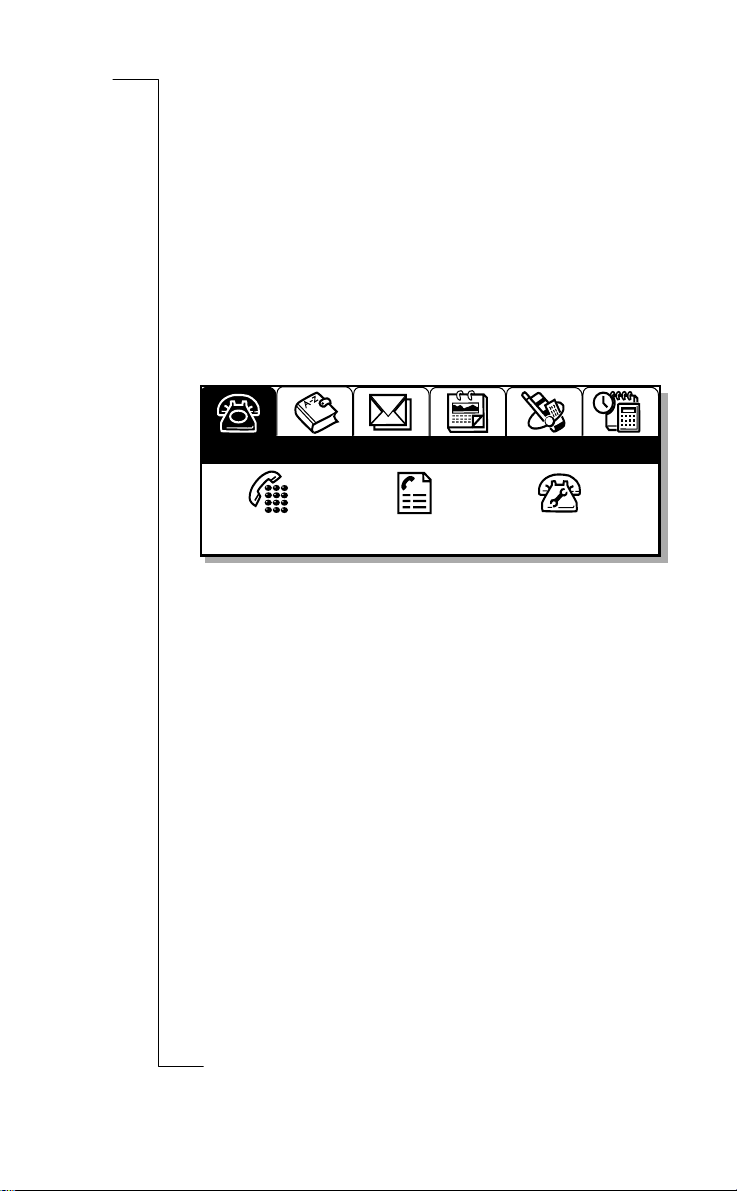
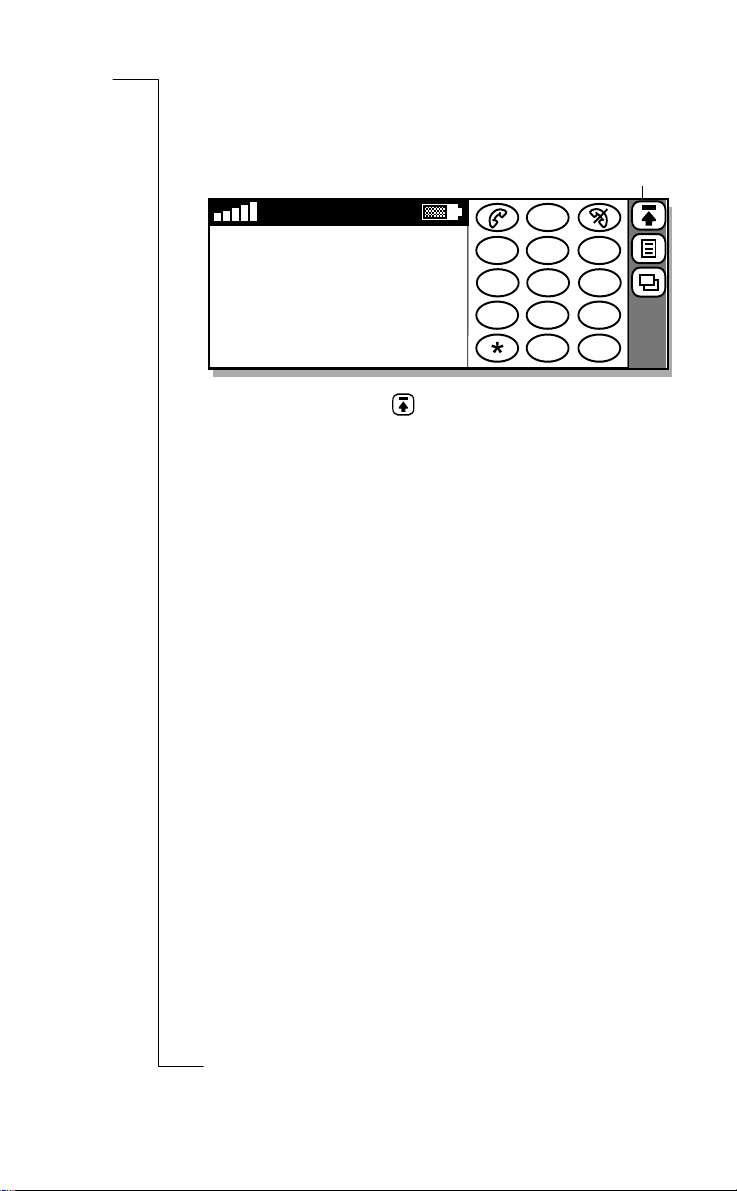
Program tabs
Phone
Title bar
Call Call log Settings
Program icons
The desktop can be divided into three graphical areas:
Program tabs: Represent the six program or
•
application groups. It is located in the upper section of
the screen.
Title bar : Indicates the active program. It is located
•
directly under the tab.
Program icons: Start the different functions available
•
within each program tab. These are located in the lower
section of the screen. Each Program tab only contains
the Program icons relating to that specific program.
Selection Guidelines
This is a general guideline about how to work with flip open
tasks.
To select a specific function:
Remove the stylus from the holder on the battery.
1.
Open the flip.
2.
Tap the desired program tab on the desktop.
3.
24 Preparing for Use
Page 25
Tap the desired program icon.
Deskt
n
4.
The selected program or function displays.
Tap the program function and carry out your task.
5.
op Ico
NETWORK
C
123
18-05-2000
12:00
Tap the desktop icon to return to the desktop.
6.
Note:
When returning to the desktop from a particular
4
5
78
0
+
6
9
#
program, its title bar and icons display along with all the other
tabs.
Entering Information
With the flip open there are two different input methods which
can be used when entering information. These methods are:
• An on-screen keyboard which can be used to type
information, which is then displayed in the relevant entry
section.
• Character recognition, which can be used to write on the
screen with the stylus. The information is then recognized
and displayed in the relevant entry section.
See “Entering Information” on page 65 for more
information.
Preparing for Use 25
Page 26

26 Preparing for Use
Page 27
Interface and Navigation
This chapter describes the different interface features for both
the flip closed and flip open operating modes.
Flip Closed
This section of the manual describes what functions and settings
are available with the flip closed. Operation of the various menus
is achieved by directly pressing key combinations. Menu
selections show in the display.
It is recommended that you familiarize yourself with the flip
Tip!
closed functions and settings, as you would with any other mobile
phone. Most general settings, which cover both the flip closed and flip
open modes, are managed with the flip open. See the respective flip
open program chapters, Phone, Contacts, Messaging, Calendar,
WAP services and Extras for more information.
See “Turning on the Phone” on page 14 for information on how to
start your R380.
Volume slider
Phone Keys
NETWORK
18-05-00
12:00
Voice memo
Keypad
Keys on the upper section of your R380 are the volume slider
and voice memo keys. They each have one or more distinctive
functions associated with them.
Interface and Navigation 27
Page 28
Use the volume slider key to:
Increase or decrease the volume of the earpiece. Move
•
upward to increase or downward to decrease the volume.
• Start voice activation, when dialing, by sliding and
holding the key.
• Switch on, confirm and switch off the office handsfree
mode. See “Office Handsfree” on page 120 for more
information.
Turn on the backlight. Slide the button up and then
•
down key, or vice versa.
Note:
For more information on changing volume during a
call, see “Changing the Volume” on page 47.
Use the voice memo key to:
• Start recording a voice memo, press and hold
(approximately 2 seconds until you hear a beep).
• Stop the memo.
• Play the recorded memo.
Note:
feature, see “Voice Memo” on page 38.
Keypad Functions
The following is a description of the functions that the keys on
the keypad have.
The term press and hold is equivalent to a key press time of
Tip!
approximately 2 seconds.
For more information on how to use the voice memo
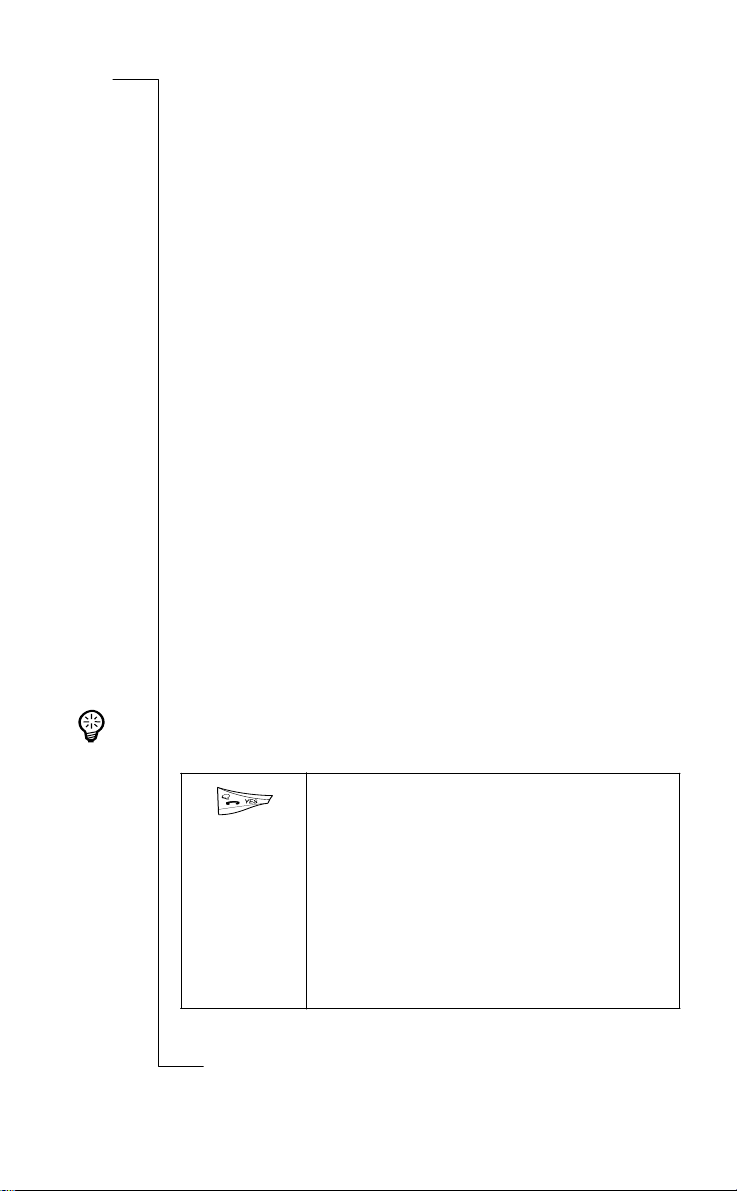
YES
• Make a call.
• Answer an incoming call.
• Select a highlighted item in a menu, sub-menu or
setting.
• Display the last dialed number list.
• Put the active call on hold.
• Activate voice dialing by pressing and holding
down the button.
• Retrieve held calls.
28 Interface and Navigation
Page 29
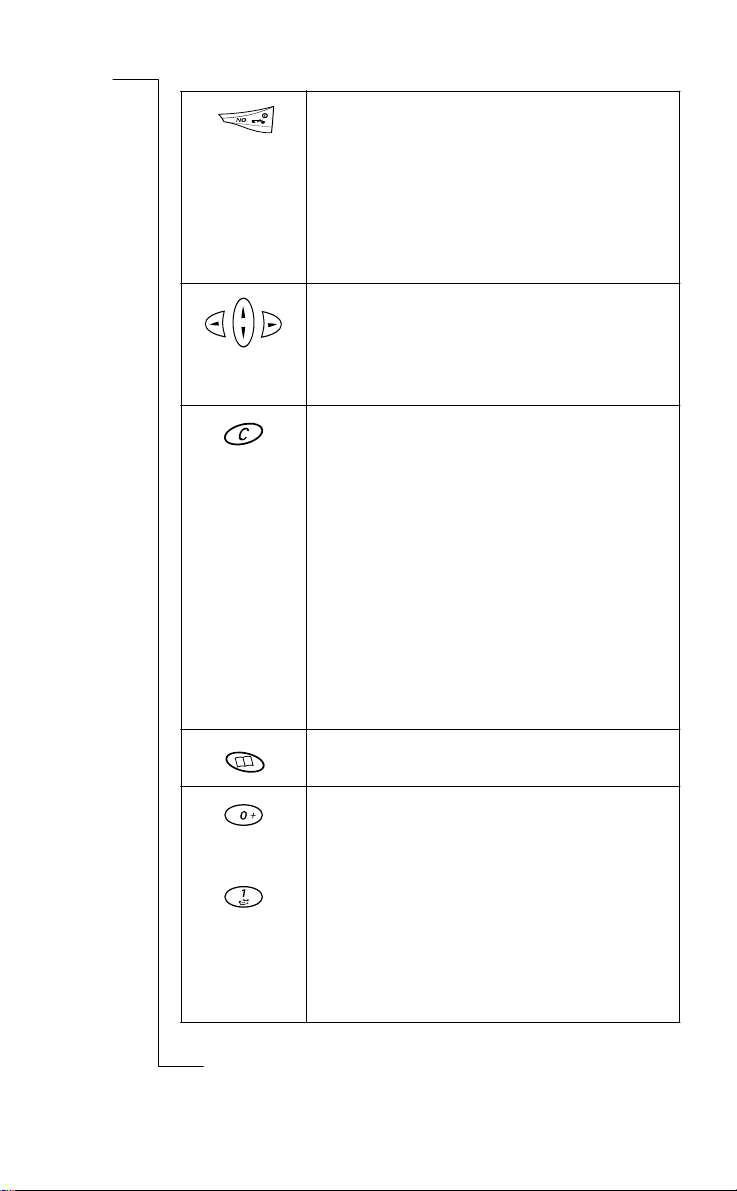
NO
• Press and hold to turn your R380 on and off.
• End the active call.
• Reject an incoming call and send a busy tone.
• Press and hold to return to standby mode from a
menu.
• Go back one level in the menus, exit a setting or
leave a setting unchanged.
LEFT
and
RIGHT
arrow keys
• Select the top-level menus.
• Move between the menu tabs.
UP
and
DOWN
arrow keys
• Scroll within a menu or list.
CLEAR
• Erase entered characters/digits from the display
one by one.
• Press and hold to erase an entire row of entered
characters/digits.
• Disconnect the microphone (mute function)
when a call is in progress, press and hold.
• Mute the ring signal during an incoming call.
• Press and hold to put the R380 into silent mode,
when in the standby mode.
• Press during an active call to mute. Mute is active
as long as button is being pressed.
• After reading a message in the Inbox, press and
hold to delete. When
Erase?
appears, press
YES
• Enter the phone book directly.
• Enter the digits 0 to 9.
• Enter associated characters or perform an
associated function, for example:
• Press and hold the 0 key to enter the
international character '+'
• Press and hold the 1 key to dial your voice mail.
(The numbered dialed must be entered in the
Telephony Settings dialog.)
• Enter a short-cut to a Phone book entry, press
and hold.
.
Interface and Navigation 29
Page 30
NETWORK
18-05-2000
12:00
asterisk (*)
• Enter the character *.
•Enter a p (pause) character if held down.
Hash or Pound (3.)
• Enter the character #.
• Terminate the input of pin and security codes.
• Recall a phone number from the SIM card phone
book (enter the number of the memory position
and then press
).
#
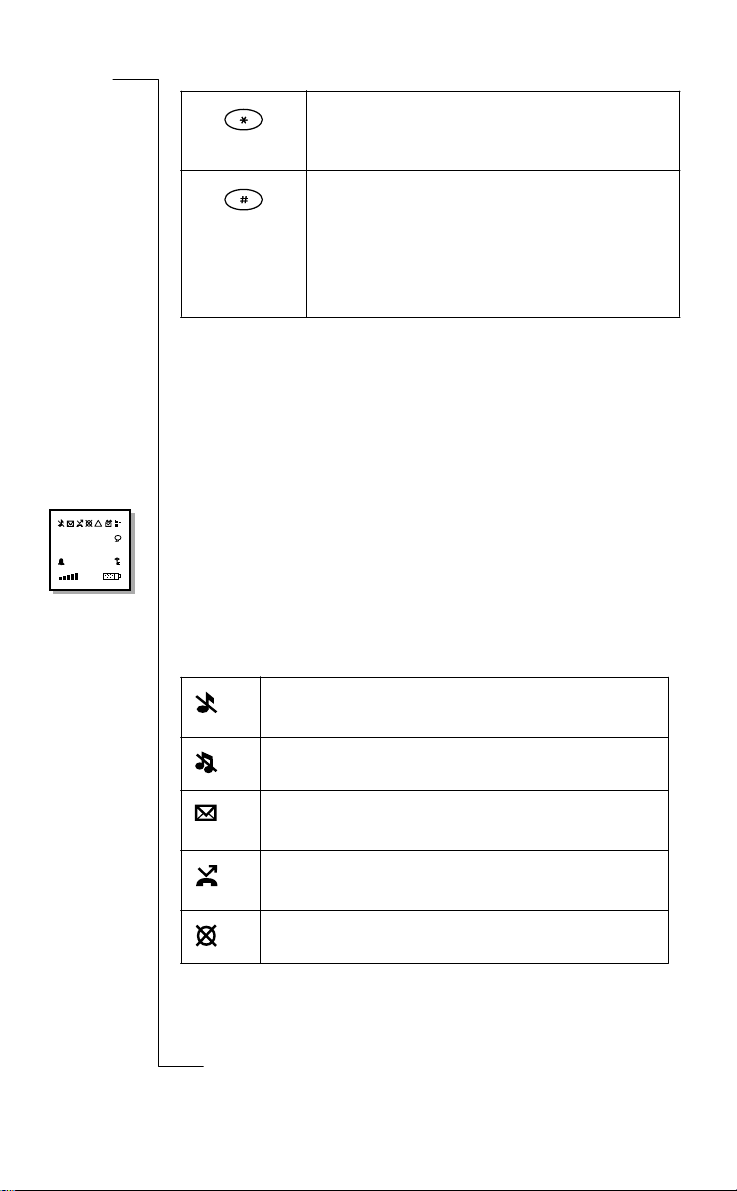
Display Indicators
When you successfully connect the R380 to your network
operator, the ‘Standby’ display is shown. On the display a
number of different indicators can be shown if activated.
The Standby display has the following sections:
• Status indicators in the upper and middle sections of the
!
display.
• Text and digit indicators in the middle section.
• Connection signal strength and battery power indicators
in the lower section.
Indicators
• Ring volume set to 0. The ringing volume is turned
off.
• Silent mode. All audible signals are turned off.
• Text message received. A message has been
received.
• Divert calls. All incoming calls (unconditional) are
diverted to a defined number.
• Mute. The microphone is muted.
30 Interface and Navigation
Page 31

!
• Deciphering. The present call is no longer being
encrypted and may not be private. This function is
accompanied by an alarm warning. The indicator
appears in the display until ciphering resumes, or the
call ends (whichever is first).
Text and digits
NETWORK
18-05-2000
12:00
Note:
Ciphering is a network feature that scrambles
your calls and messages to provide additional privacy.
• Vo ice m ai l. An incoming voice mail notification has
been received.
• Infrared. The infrared port is activated.
• Voice control active. Voice dialing appears in the
display, if active, when dialing or answering a call.
• Alarm. The clock alarm is set and activated.
• Keylock. The keypad is locked to prevent accidental
operation.
• Network. The current network is displayed.
• Date. Displays the current date in local-specific
format.
• Time . Displays the current time in local-specific
format.
Interface and Navigation 31
Page 32

Signal and power
Other indicators
• Network signal strength meter. The more
bars shown, the stronger the signal strength, 0-5
units.
• Battery meter. The fuller the icon, the more
charge the battery holds, 0-4 units.
•
SMS memory overflow.
R380
message
memory is full and no SMS messages can
be received. See “Delete messages” on page
145 for information on how to delete
stored SMS messages from your
R380
.
00:01
+4355545678
• Call timer. Total call time information from
start to finish.
• Conference. Indicates a multi-party call is in
progress.
• Connection number. The number of the
active connection, either an incoming or
outgoing call.
Note:
It is not always possible to show an
incoming call number due to restrictions where
Ericsson John
Calling
Menu Navigation
unknown
• Connection name. The name of the of the
• Connection progress. Cal l statu s in formati on
or
withheld
person you are speaking to displays if there is a
number tag associated with it in the Phone book
or SIM card Phone book.
of the active call, for example
Connecting or User busy.
display instead.
Calling
,
When the flip is closed a limited number of functions are made
available to you through a main menu. Press
or from the
standby screen to display the main menu options.
32 Interface and Navigation
Page 33

Four options are available through the tabs at the top of the
screen.
The main menus are:
Phone menu - activating and deactivating
settings.
Calendar - viewing appointments, to-dos and
events.
Inbox - viewing messages you have received.
Phone book - viewing and making calls to
your contacts.
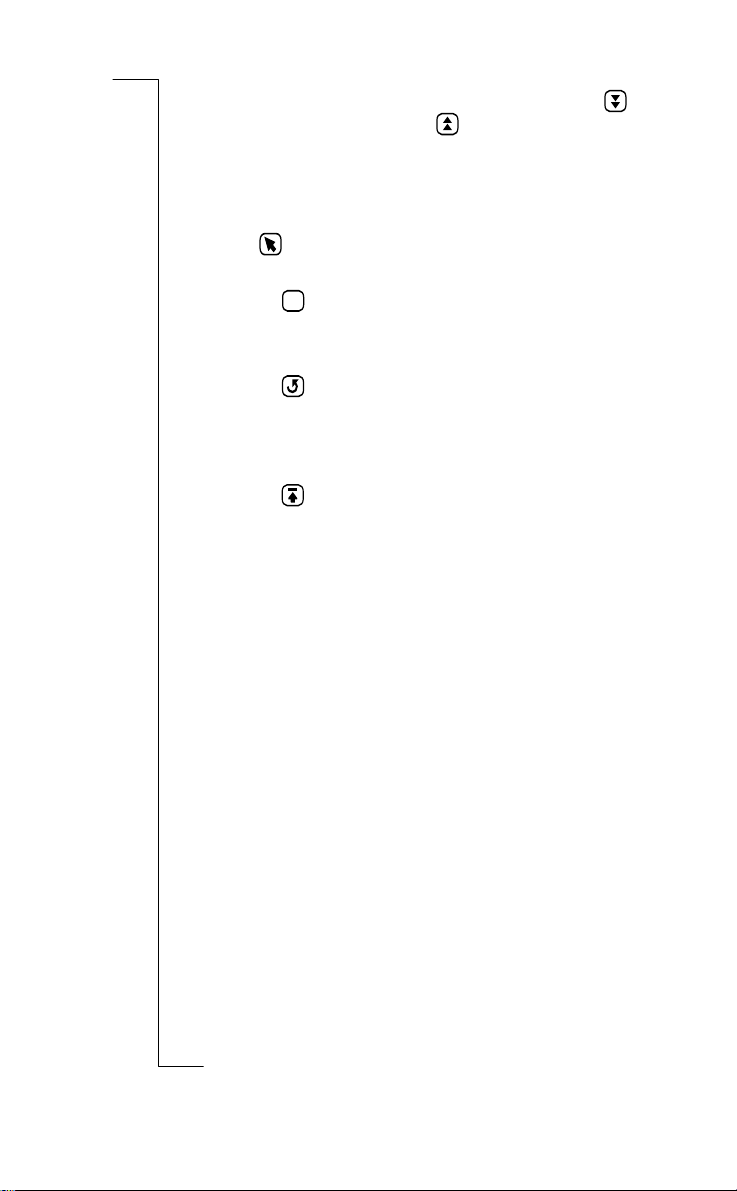
Select and move through the menus by using the following:
• The
or for scrolling across the menu tabs.
• The or for scrolling menu options of a selected tab.
• Press to make a selection.
• Press to return you to the previous display.
When accessing menus you can press to return to the
Tip!
Standby.
Flip Open
Operation of the various programs with the flip open is achieved
by directly tapping the touch screen with the stylus. The stylus is
located in the holder on the battery. For information on how to
start your R380, see “Turning on the Phone” on page 14.
The stylus selection technique is generally described with the use
of the word ‘tap’. Select is also used when there are a number of
choices, for example in a list. For an introduction on how to use
the flip open programs, see “Flip Open Display” on page 23.
R380 Flip Open Set Up
See “Initial Settings” on page 15 for basic setup.
See “System” on page 210 for general and program setup.
See “Security” on page 75 for phone security setup.
Interface and Navigation 33
Page 34

The Desktop
When you open the flip, the desktop most closely related to the
action you were performing with the flip closed displays. For
instance, if you were in the Calendar menu, when opening the
flip, the Calendar desktop displays.
Program tabs
Phone
Title bar
Call Call log Settings
Program icons
The desktop has three sections:
• Program tabs in the upper section.
• The title bar directly under the tabs.
• Program icons in the lower section.
Program tabs
Program tabs contain six functions and settings grouped in an
indexed card format. When you tap the individual index tabs the
display changes to the selected desktop.
The program tabs are:
34 Interface and Navigation
• Phone - telephone functions and settings.
• Contacts - address book functions.
• Messaging - e-mail and text message functions.
• Calendar - agenda functions.
• WA P S e r v i c e s - Internet functions.
• Extras - additional tool functions, settings and a
game.
Page 35

Title bar
The title bar displays directly under the program tabs and
indicates which program tab is currently selected.
Program icons
Program icons start functions or enter settings that are shown in
the lower section under the program tabs and title bar. Once a
program icon has been tapped and started, a new display usually
appears where toolbar icons are used to manage the program and
navigation.
The toolbar
When a program icon is selected a toolbar appears to the right of
the display. The toolbar can consist of up to five icons depending
on the program you are in. Some toolbar icons are common to
all programs, while others will only appear in specific programs.
Tapping and holding a button, displays a popup containing the
Tip!
button’s name.
Common toolbar icons in most programs are:
Desktop - returns the display to the desktop.
Ta sk - displays a tasks pop-up menu. This allows you to
perform a number of tasks on selection.
View - displays a view pop-up menu. This allows you to
go to other views within the program.
Other useful toolbar icons:
Find - displays a view to enter and search information.
OK
Save - saves and returns to the previously displayed level.
Interface and Navigation 35
Page 36

Cancel - returns to the previously displayed level. A cancel
view displays when you choose to cancel or return to the
previous screen. It gives you the option to cancel and
return to the previous view.
Back - returns to the previous view.
Next - tabs down or forward to the following input field.
Previous - tabs up or back to a preceding input field.
Some useful program specific icons:
To d ay - displays the view around the current date in
Calendar.
New - displays a view for creating a new entry.
abc
abc - displays the text entry keyboard.
123
123 - displays the number entry keyboard.
aeo
àëó - displays the special characters entry keyboard.
Call Waiting - appears when you have chosen Ignore
from the Call Offering/Waiting view (flip open). The
button returns you to the Call Offering/Waiting view.
Voice Dialing - appears if voice activated dialing is on.
The button initiates speech recognition and prompts you
to speak a voice command.
Back - returns you to the previous WAP services page
(only available when more than one page has been visited).
Stop - allows you to stop downloading a WAP services
page (only available when downloading).
±12 - adds or removes 12 hours to change the clock
function to a 12 hour or 24 hour clock.
Alarm on - switches the alarm on.
36 Interface and Navigation
Page 37

Alarm off - switches the alarm off.
Play - plays ring signal melodies.
Home - opens the Cingular home page
Note:
The list of program icons shown is not a complete list, but
only a representation of icons that you may find useful. Other icons
that appear in the toolbar are mainly program specific icons and are
described in the relevant sections within this manual.
Navigation
When moving between different desktop program tabs, the title
bar and program icons change according to the respective
program tab that is selected.
When working with different programs by tapping their icons,
lower level menu functions or settings display. To return to the
highest desktop level, tap the desktop icon from within the
program. Sometimes a combination of tapping (save) or
OK
(cancel) or (back) and then (desktop) may be required in
order to return to the desktop. This is depends on the current
menu level.
Warnings
With the flip open, warnings display slightly different than with
the flip closed.
Low battery warning
The warning displays if the battery is running low and a ‘
Battery. Please replace your battery or connect a charger
message appears. Tap
to accept and dismiss the warning.
OK
Low
’
Insufficient storage space warning
This warning displays if there is insufficient storage space.
‘
Insufficient storage space to store new data. Please remove
unwanted messages and clean up your calendar entries
appears. The current store operation is cancelled. Tap
.’ message
OK
accept and dismiss the warning.
Interface and Navigation 37
to
Page 38

V oice Memo
The R380 has a Voice Memo feature allowing you to record
short audio messages. You can use voice memos to temporarily
store phone numbers, addresses, reminders or other into
temporarily store phone numbers. Voice Memo can be accessed
with the flip open or closed. You may also record or replay an
voice memo using Ericsson handsfree equipment.
Warning!
When a call is initiated or there is an incoming call, the
recording or replay action terminates.
To record a voice memo:
Press and hold (approximately 2 seconds) until a beep
1.
sounds then release the button.
The short tone indicates the start of the recording.
Speak into the phone microphone.
2.
To stop the recording, press then release the Voice Memo
3.
button.
A short tone indicates the end of the recording.
The length of a voice memo is limited to the available
Tip!
memory in your R380.
Note:
A new recording always replaces an existing voice
memo held in memory.
To replay a voice memo:
• Press then release the Voice Memo button.
• The voice memo replays. There is no alert that the play
has started or stopped.
38 Interface and Navigation
Page 39

Making and Receiving
Calls
This chapter describes all of the phone calling functionality.
Functionality that can be accessed when the flip is open or closed
is noted.
Where the activity can be completed in either flip open or flip
Tip!
closed modes, both sets of instructions are provided. They are marked
with graphical representations of the mode for easy recognition.
Flip Open
Flip Closed
See “Turning on the Phone” on page 14 for information on how to
start your R380.
Making C alls
When making and receiving calls, the instructions in this section
assume that your R380 is in the standby mode.
NETWORK
18-05-2000
12:00
Emergency
calls only
12:00
To obtain standby mode requires the following:
• your R380 is turned on
• your R380 is within coverage of a network
• your SIM card is inserted and PIN entry has been successful
Note:
that your home network operator has entered into agreements
allowing you to use other operator networks. Some operators also
require that you specifically request international service. See your
network operator for more information.
Emergency Calls
Provided a network is within range, the international emergency
number of the country you are calling from can normally be
called even if there is no SIM card in your R380.
When abroad, other networks may be used on the condition
Making and Re cei ving Calls 39
Page 40

+4355545678
Note:
Some networks may require that a SIM card is inserted, the
PIN be entered and/or you are in an authorized network. Contact
your operator for more information.
To make an emergency call:
Enter the international emergency number.
1.
Press to make the call.
2.
To end the call, press .
3.
To make an emergency call:
Tap the Call icon
1.
The Call interface displays.
Tap out the international emergency number on the
2.
keypad.
Tap to make the call.
3.
To end the call, tap .
4.
Domestic Calls
To make a domestic call:
Enter the area code and the phone number on the keypad.
1.
The network, time and date disappear and the number
dialed displays.
Press
2.
displays (outgoing call initiated), followed by
Calling
Connecting
(a line has been allocated). When the call is
answered it is deemed as active. A call time meter starts,
showing the elapsed time in minutes and seconds.
To end the call, press .
3.
To make a domestic call:
Enter the area code and the phone number using the stylus.
1.
The network, time and date disappear and the number
dialed displays.
Note:
To erase a single digit, press . To erase all digits,
press and hold until the digits disappear.
Ta p .
2.
displays (outgoing call initiated), followed by
Calling
Connecting
40 Making and Receiving Calls
(a line has been allocated). When the call is
Page 41

answered it is deemed as active. A call time meter starts,
showing the elapsed time in minutes and seconds.
To end the call, tap .
3.
If the call is unanswered, the number is busy or no
connection is available, press . The number is stored
in a short term memory buffer so that it can be easily
recalled.
Note:
If the number dialed is busy, User busy - Retry
messages displays allowing you to retry the number. See
“Automatic re-dialed function” on page 44.
When entering numbers into the phone book, enter the
Tip!
country code, area code (excluding the leading zero) and the
phone number when saving. The numbers can then be easily
used when home or abroad.
Note:
The timer shows the elapsed time of the call in
hours:minutes:seconds. The hour section does not appear until
you have been connected for more than an hour.
Calling from the Phone Book and Contacts
With the flip open, you can access advanced Phone book
functions in your R380 allowing you to easily access and
communicate with business contacts and friends.
The entries in your Phone book (accessed through the Phone
book menu) are the same as those stored in Contacts with the
flip open. When viewing entries in the Phone book you can only
access and initiate a call to the phone and mobile numbers or
send DTMF numbers that are stored in the contacts record. See
“Contacts” on page 123 for more information on how to create
entries and manage your phone book with the flip open by using
the Contacts program.
Note:
To see the entries stored on your SIM card, you have to first
transfer the information stored on your SIM to your R380. See “SIM
Card” on page 130.
To make a call using the phone book:
Press to enter the
1.
Phone book
.
The first name in the Phone book is highlighted. If there is
Making and Receiving Calls 41
Page 42

more than one name in the Phone book, scroll to
highlight a name in the list.
Note:
If there are no entries in the Phone book this view
cannot be selected.
Press to select the name. The contact’s details display.
2.
Scroll to highlight a number in the list.
3.
Press to make the call.
4.
To end the call, press .
Pressing and holding a digit key displays the Phone book
Tip!
view allowing you to scroll to other contact names.
Opening the flip when accessing the Phone book provides
Tip!
you with a more detailed view.
To make a call using Contacts:
From the desktop, select the
1.
Ta p
Contents list
2.
Tap the divider tab corresponding to the first letter of the
3.
.
Contacts
program tab.
name of the person you are trying to call.
Scroll to the required name and select it.
4.
Select the Contact method by tapping one of the phone
5.
numbers. The Phone view appears providing you with
information regarding the phone number and contact’s
name, whether or not the connection has been successful
and an indication of the length of time you have been
connected.
To end the call, tap .
6.
Speed Dial
You can call the phone numbers that you store in the positions 1-
in the SIM card memory. For instance, you may want to store
9
your work voicemail number in position 2. To call your
voicemail you would press the
Note:
The Speed Dial feature only applies to the SIM phonebook
entries and not those in the Contacts application.
You should save the numbers you call most frequently in these
positions.
42 Making and Receiving Calls
button.
2
Page 43

Making a call using speed dial:
Press the number corresponding to the position of the
1.
contact you want to call.
Press to initiate the call.
2.
Making a call using speed dial:
Tap the number corresponding to the position of the
1.
contact you want to call. The contact stored in that
position displays.
Tap to initiate the call.
2.
Tip!
Re-dialed Numbers
To re-dial the last number or a previous number you called:
Press or
1.
and .
The display shows the last dialed numbers list with the last
dialed number highlighted. Use the up and down
scroll arrows to scroll and select a number from the list.
Press again to call the highlighted number.
2.
To end the call, press .
3.
To re-dial the last number or a previous number you called:
Do one of the following:
1.
• Ta p
or
•
and
or
• tap and
select
Last dialed numbers
.
The display shows the last dialed numbers list with the last
dialed number highlighted. Use the up and down scroll
arrows to scroll and select a number from the list.
Tap the entry in the last dialed numbers list to initiate the
2.
call.
You can also scroll down the list, using the scroll bar, to
any other number and then tap to call that number.
Tap to end the call.
3.
Making and Receiving Calls 43
Page 44

User busy
+465551234578
Ericsson John
Retry?
Automatic re-dialed function
If the connection of a call fails or is busy and the receiver's
network acknowledges this,
displays for 20 seconds or
Retry?
until any other function is selected.
appears in the display:
Retry?
When
Press if you want to re-dial the number, or if you do
not.
If you press , the number is re-dialed automatically at
frequent intervals until the call is answered or the maximum
number of retry attempts have been reached. The type of
connection failure (such as,
user busy, no answer
) determines
the number of retry attempts.
If you press any key, or receive a call while the Retry? function is
active, then the automatic re-dialing stops.
If the re-dial is successful, the R380 sounds a single ring tone.
Phone menu
Lock keypad
Missed calls
Silent mode
Ring volume
The calls that you have missed are stored in the phone’s memory.
You can display this list from the Phone menu (flip closed) or by
tapping the Task icon (flip open). The list appears in
chronological order with the last missed call in the first position.
To dial a missed call:
Missed Calls
Press to access the Phone menu then scroll to
1.
highlight
Scroll to a missed call in the list and then press . The
2.
Missed calls
number dials automatically.
When you have finished the call, press . The R380
3.
returns to the standby mode.
If you have pressed without initiating a call, the
R380 remains in Phone menu standby mode with ‘
’ highlighted.
calls
To dial a missed call:
Accessing the Missed Calls list when the flip is open, provides
access to the complete Call Log feature. See “Call Log” on page
117.
44 Making and Receiving Calls
and press .
Missed
Page 45

From the
1.
Ta p .
2.
Phone
tab, tap the
Call
icon.
The Call Log displays.
Tap on the desired date category to expand.
3.
Tap the number you want to dial.
4.
Details of the missed call display.
Tap and select Call.
5.
The number is dialed.
International Calls
When making an international call, the international dialed
prefix is required followed by the destination area code and
number.
Note:
Do not include the leading zero for European and some
other area codes when making an international call.
To make an international call:
Press and hold the 0 key until the international character +
1.
appears in the display. It is automatically replaced by the
international dialing prefix for the country you are calling
from.
Enter the country code, the area code (excluding the
2.
leading zero) and the phone number.
Press to make the call.
3.
To make an international call:
Tap and hold until the international character +
1.
appears in the display. It is automatically replaced by the
international dialing prefix for the country you are calling
from.
Enter the country code, the area code (excluding the
2.
leading zero) and the phone number.
Tap to make the call.
3.
Note:
As a security measure, some network operators do not
allow international dialing unless you specifically request it. If
you are experiencing trouble dialing international numbers,
consult your network operator to ensure it is available on your
subscription.
Making and Receiving Calls 45
Page 46

Incoming call
+465554567890
Ericsson John
Answer?
Service Numbers
If a list of service numbers is stored on your SIM card, you can
initiate calls to these numbers. You may not edit or add to the
list.
To make a call to a service number:
Press to access the Phone menu then scroll to
1.
the Service numbers option.
Press to make the call.
2.
To make a call to a service number:
Tap and select
1.
Service numbers
. The Service numbers
view appears.
Select the service you want to call.
2.
Receiving Calls
Answering a Call
When you receive a call, the R380 rings, the indicator light on
the top blinks green rapidly, and/or the phone vibrates and
Answer?
displays. Incoming call notification depends on how
you have set the Ring control settings.
To answer a call:
Press to answer the call.
1.
When the call is finished, press .
2.
To answer the call:
Ta p
1.
When the call is finished, tap .
2.
Rejecting a Call
to answer the call.
Yes
There are several actions you can take if you do not want to
accept an incoming call.
•
- this option is available in both the flip open and flip
Reject
closed modes. The caller hears a busy tone if this is supported
by the caller’s subscription. If
call diverts to the number you have specified. See “Call
Forward” on page 87.
46 Making and Receiving Calls
Forward when Busy
is on, the
Page 47

•
- this option is only available in the flip open mode.
Ignore
The call notification continues and the telephone button
displays in the toolbar until the call times-out.
To reject a call:
Press when the R380 rings. The call is rejected and a busy
tone is sent to the caller. All calls can be rejected in this way.
Busy tone sent
displays.
To reject the call:
• Ta p
•
.
No
The call is rejected and a busy tone is sent to the caller.
To ignore the call:
When there is an incoming call, the Incoming call dialog
1.
displays.
Select
2.
When a Ca ll is in P rogress
Changing the Volume
Ignore
.
During a call the volume can be adjusted with the slider on the
side of the R380. Slide up to increase the volume and down to
decrease the volume.
Muting the Microphone
To disconnect the microphone during a call:
• Press and hold down .
• Release to resume the conversation.
To disconnect the microphone during a call:
• Do one of the following:
Tap and hold to mute the microphone. When
released the microphone is re-connected.
or
select
Ta p a n d
Mute microphone
• To reconnect to the call, tap and
to resume the conversation.
Making and Receiving Calls 47
appears.
select
Turn off mute
Page 48

Using the Display Notepad
To use the Notepad feature:
Enter a phone number or DTMF tone in the display using the
keypad. When you have finished the call, the number remains in
the display. To call the number press .
To note a number during a call:
Tap in the number on the keypad.
1.
The number displays.
123
Use , which appears below as you make a note on
2.
the keypad, to toggle between the active call and the note.
This note can be used after the call.
Using DTMF Tones
You can use your R380 to send DTMF (Dual Tone Multi
Frequency) tones. This feature may be used for a variety of
purposes, such as telephone banking or controlling an answering
machine.
Sending DTMF tones
To send a DTMF number during a call:
During a call enter your DTMF code with the keypad. The
characters
to 9, * and # are used as DTMF tones by pressing
0
the corresponding keys.
You can send codes using the pause function. For example when
using your personal access number for your voicemail, it is
necessary to use the pause function.
To send a code when making a call:
Enter the desired phone number.
1.
Press and hold . The letter p appears in the display.
2.
Enter the code you want to send. The code can be any
3.
combination of the digits
pause.
Press to make the call.
4.
When the call has been connected, the phone number
disappears from the display. After a delay of 3 seconds, the
code is sent, character by character. While the code is being
48 Making and Receiving Calls
to 9 and the characters * for
0
Page 49

sent, the message ‘
You can enter a number of pauses, for example:
Tip!
PHONE NO p CODE1 p CODE2 p CODE3
Sending
’ displays.
00:01
Ericsson John
Note:
During a pause you can press to send the
DTMF tones immediately.
It is also possible to access DTMF numbers stored in the Phone
book (flip closed) or Contacts (flip open) and to send the digits
as DTMF tones during a call. See “New Contact” on page 132 for
how to store a number.
Switching DTMF tones on and off
During a call, DTMF tones can be turned off in the Phone
menu for the benefit of the remote party during a call.
To turn DTMF tones on or off:
While on a call, scroll to
1.
DTMF tones
in the
Phone menu
using or , then press . The current setting is
highlighted.
Scroll to the desired setting and press .
2.
Note:
Some Phone menu options, such as DTMF tones, are
only available during an active call.
To turn DTMF tones on or off:
While on a call, in the Call application, tap and select
1.
DTMF tones
Select On or
2.
Call Holding
.
Off
.
An active call is indicated in the display with the phone handset
symbol tilted up next to the connected name or number.
An active call can be placed on hold before setting up another
call or when answering a waiting call.
To put the active call on hold:
• Press .
or
• Scroll to
Hold
in the
Phone menu
using or , then press
.
Making and Receiving Calls 49
Page 50

The active call is now greyed out in the display and the
telephone handset icon faces downwards.
To resume a call on hold:
Press .
To put a call on hold:
Tap the number of the call that is in progress, and tap
•
and select
Hold call
.
or
• Tap to put the active call on hold. The On hold
icon appears.
To resume a call:
• Tap the number of the call that is on hold, tap and
select
Retrieve.
or
• Tap to retrieve the held call.
If you tap to end an active call when there is a call on
Note:
hold a ‘Call on hold’ message appears asking ‘Retrieve held call?’. If
or No within five seconds the call is
you do not select
automatically ended.
Call Waiting
If supported by your network, this feature allows you to receive a
second call while another call is in progress. When
displays, there are a number of ways in which you can manage
the incoming call.
Yes
Call waiting
Note:
You must first activate the Call Waiting service. See “Call
Waiting” on page 86.
To place the active call on hold and answer an incoming call:
Press .
To end the active call and answer an incoming call:
Press and then .
To end the active call and send a busy tone to an incoming call:
Press and then .
50 Making and Receiving Calls
Page 51

To end the active call and answer an incoming call:
Press and then .
Incoming call
Ericsson John
Release &
answer?
To manage an incoming call with one active and one on hold:
Press to answer the incoming call and terminate the
1.
active call.
Press to send a busy tone to the incoming call. If call
2.
divert is enabled, then the call will be forwarded to the
designated phone.
See “When a Call is in Progress” on page 47 for how to
manage ongoing calls with menu options.
To place the active call on hold and answer an incoming call:
in the “Incoming call:” view that appears.
Yes
Ta p
To send a busy tone to the incoming call:
in the “Incoming call:” view that appears.
No
Ta p
To ignore the incoming call
in the “Incoming call:” view that appears in the
Ignore
Ta p
display. The call notification continues and the telephone
button appears in the toolbar until the call is timed-out.
Note:
The Answer message may be redisplayed by tapping the
Telephone button on the toolbar.
Call Switching
You can switch between an active call and a call on hold.
To switch between an active and a held call:
From the
Phone menu
, scroll to highlight
Switch calls
and
press . The active call is put on hold and the held call is
made active.
or
Using or .
Making and Receiving Calls 51
Page 52

You can switch between calls when you have two calls displayed
in the view.
NETWORK
+46 555 1234
Ericsson John
+1 555 3456
Gonzalez Pamela
C
123
4
78
6
5
123
9
0
#
+
The split screen displays the active call on the top screen and
the on hold call on the lower screen.
Note:
The
active call
always displays in the top section of the split
screen.
To switch between an active and held call:
• Tap the number of the active call and select
Switch call
from the pop-up menu. The active call is put on hold
and the held call is made active.
or
• Tap the number of the held call and select
Switch call
from the pop-up menu. The held call is made active and
the active call is put on hold.
Call Transfer
You can transfer an active call to a call that is on hold, while
disconnecting yourself from both calls.
To transfer an active call to a held call:
With an active call in progress and a call on hold, scroll
1.
to highlight
Press .
2.
Transfer calls
The active call is transferred to the held call and you are
released from both calls.
To transfer an active call to a held call:
With an active call in progress, and one call on hold, tap
1.
the call on hold.
Select Transfer calls from the options.
2.
52 Making and Receiving Calls
in the
Phone menu
.
Page 53

The active call is transferred to the held call and you are
disconnected.
Note:
Call transfer is not supported by all networks. Check
your subscription or contact your network operator to see if it is
available in your area.
Call Forward
Incoming calls can be diverted to another number. See “Call
Forward” on page 87 for more information.
Fax and Data Ca lls
Fax Calls
Fax and Data calls are not received in the same way that a voice
call is. Fax calls are not supported, however they can be
forwarded to another number such as the office fax number, so it
is important that you set the fax divert calls setting. See “Call
Forward” on page 87 for more information.
Data Calls
A data call cannot be answered as a voice call. Data information
must be downloaded to a data compatible machine or service.
in the
The “Incoming call:” view reflects this and displays
message and asks you if you want to “
Calling Card Calls
Send busy tone?
data
”.
When making international or long distance calls, you may not
want your operator to charge you or these calls on your normal
account. If you have a credit card or a calling card, you may want
to redirect the charges to one of those accounts instead. Your
R380 is all set to make this procedure as easy as possible.
You can store two separate card numbers in your phone. These
numbers are protected by a four- to eight-digit Phone lock code
that you choose yourself. The default code is 0000. The Phone
lock code must be active to enable calling card calls, see “Phone
Lock” on page 77 of the User’s Guide.
Making and Receiving Calls 53
Page 54

Setting up Credit or Calling Card Calling
Storing a credit or calling card number
Before you can use the calling card feature you have to store the
information in your R380.
To store credit or calling card numbers:
With the flip open and in the Phone tab, tap the
1.
Settings
icon.
The Phone Settings menu displays.
Tap the
2.
Edit Calling Cards
Calling Cards
menu item to expand it then select
.
You are prompted for your Phone Lock code.
Enter your Phone Lock code and tap .
3.
The Edit Calling Cards dialog displays and with the calling
card entries listed.
Edit calling cards
Create new card
Create new card
Tap one of the card entries.
4.
The detailed view of the entry displays. Each entry consists
of:
Calling card 1 (active)
Name: <Calling card 1>
Access Number: <0129384575622>
Verification code: <1234>
Sending order: <Number then code>
•
A descriptive name for the stored card
Name:
information. The maximum length is 18 characters.
54 Making and Receiving Calls
Page 55

•
Access Number:
This is the access number to the calling
card server. The maximum number is 80 characters.
•
Verification Code:
This is card number and PIN to
which the call is charged to. This is dependant on the
calling card.The maximum length is 20 characters.
•
Send Order:
This is the order in which the phone
number you are calling and the Verification Code is
dialed. The options are
.
Number
Enter the required information.
5.
Ta p OK.
6.
Number then Code
You are asked if you want to use this calling card.
Calling card 1
Make this card active?
or
Code then
Do one of the following:
7.
• Ta p
if you want this to be the active calling card.
Yes
Yes
No
or
• Ta p
if you do not want this to be the active calling
No
card.
Note:
If you need to enter menu options before sending the
calling card information, you can use a <p> pause in the
Verification Code field and enter the menu option. For
instance, if after the access number is dialed you have to enter
a 1 for calls outside the country you are in, or a 2 for calls
within the country, the verification field might look like this:
1-xxxxxxxxx. (The "x" being the Verification Code.)
Selecting an active card
You can change the card that you want to use by default for
calling card calls.
Making and Receiving Calls 55
Page 56

To select an active credit or calling card:
With the flip open and in the Phone desktop, tap the
1.
Settings
icon.
The Phone Settings menu displays.
Tap the
2.
Select Calling Card
Calling Cards
menu item to expand it then select
.
You are prompted for your Phone Lock code.
Enter your Phone Lock code and tap OK.
3.
The Select Calling Card dialog displays.
Note:
dialog displays asking,
card?
If you have not entered any card information, a
Would you like to create a calling
If you answer yes, the Edit Calling Cards dialog appears
allowing you to create a calling card entry. See steps 4-7 of
“Storing a credit or calling card number” on page 54.
Otherwise continue with the following steps.
In the Active field choice list, select the card name that you
4.
want to use.
The selected card becomes the active card and is used on
5.
subsequent credit or calling card calls.
Making a Credit or Calling Card Call
You can make a credit or calling card call in all the same methods
you can place direct calls except for using voice commands. The
following are instructions for using the calling card feature in the
different calling methods.
To make a credit card call:
Enter or select the number you wish to dial.
1.
• You may select a number from the Last Dialed
number list, Missed call list, Phonebook and also using
the Speed Dial function.
• You may select a number from the Last Dialed
number list, Missed call list, Contacts, or the Call Log.
Note:
For information on accessing one of the optional
calling methods, refer to the instructions beginning with
"Making Calls" in the User Manual.
56 Making and Receiving Calls
Page 57

To set up the call as a Credit/Calling Card Call, press or tap
2.
and hold
/.
The access number of the calling card server is called and
during the connecting phase, you are prompted to send the
called number (the number or the person you want to call)
and the verification code, in the order chosen by you (see
above). To send the called number and the verification
code during the connecting phase, press or tap /
, or wait a few seconds
when the display shows
Send
and your R380 sends them automatically.
Note:
The Hide/Show ID functionality (see “Hide and
Show Identity” on page 81 of the User’s Guide) can not be
activated for a Calling or Credit Card call. If you enter the
hide/show id prefix (*31# or #31#) directly before the dialed
number and then try to activate a calling card call by using a
long press or tap, the prefix is delivered as part of the dialed
number as DTMF tones to the calling card server.
Conference Cal ls
A conference occurs whenever you join two or more calls
together so that individuals can communicate with each other at
the same time, such as join an active call to a held call. An
individual call can be ‘joined’ into a conference and ‘extracted’
from a conference. You can join up to five separate calls to form a
conference.
Note:
Not all networks support the Conference call feature. See
your network operator for more information.
Starting a Conference Call
To start a conference:
Using the instructions on making a call, place a call to the
1.
first party.
Press .
2.
The active call is put on hold (greyed out in the display
and the telephone handset icon faces downwards.)
Place a call to another party.
3.
Making and Receiving Calls 57
Page 58

With an active call in progress and a call on hold, press
4.
to enter the phone menu then scroll to highlight
and press .
calls
Join
Note:
Conference
shows in the display. You can now use
to enter the Phone menu for more call handling
options.
To start a conference:
With the flip open, using the instructions on making a call,
1.
place a call to the first party.
Place the active call on hold by tapping . The active
2.
call is greyed out and the telephone handset faces
downward.
Place a call to another party.
3.
Do one of the following things:
4.
• Tap the number of the active call and select
Join calls
from the pop-up menu.
03:46
1. John Ericsson
2. Pamela Gonzalez
3. Steven Mutelezi
4. Hank Cheong
5. Jose Blanco
The view changes to display the
C
123
4
78
Conference
6
5
9
0
#
+
icon and
conference members are prefixed by a single digit. The
conference members are identified as follows:
123
• By name if there is a matching entry in the contacts
database.
• By telephone number (if known).
• By call ID number.
Note:
to that member. For example: Release, Extract, etc. Tapping
anywhere else in the area displays options which affect the call
as a whole, for instance Release, Hold call, Retrieve.
58 Making and Receiving Calls
Tapping a conference member displays options specific
Page 59

Adding Participants
To add a participant to a conference:
Press to enter the
1.
Hold calls
Enter the number of the person you want to include in the
2.
and press to put the conference on hold.
Phone menu
, scroll to highlight
conference and press . The active call now displays
above the held conference call.
Press to return to the
3.
Scroll to highlight
4.
Phone menu
Join calls
.
and press .
The conference is once again active with the new
participant added to it.
To add a new participant to the conference:
Tap the conference and select
1.
Hold call
from the pop-up
menu.
Enter the number of the person you want to include in the
2.
conference and tap . The split screen displays the
active call on the top screen and the conference call
on the lower screen.
NETWORK
+46 555 1234
Ericsson John
1. Steven Mutelezi
2. Hank Cheong
3.+1 555 3456
Tap the number of the active call or tap the conference and
3.
select
Join calls
from the pop-up menu.
C
123
4
78
6
5
123
9
0
#
+
The conference is once again active and the new
participant is shown in the conference display.
Extracting or Releasing a Call
You can extract or release a participant during a conference
without doing so to other participants. The other participants
are placed on hold.
Making and Receiving Calls 59
Page 60

•
- To pull one participant out of the conference to talk
Extract
to them privately. The participant can be joined back into the
conference call when you choose to.
•
Release
- To terminate a connection to a participant without
ending the entire conference call.
To extract or release a participant from the conference:
Press to enter the
1.
•
Extract x:
where
•
Release x:
where
•
Parties in conference:
Highlight the desired option and press .
2.
Extracts a participant from the conference
is the number of the party in the conference.
X
Releases a participant from the conference
is the number of the party in the conference.
X
• If you selected
Phone menu
Lists the parties in the conference.
Extract x
, scroll to highlight:
or
Release x
the parties in the
conference are listed. Select the party you want to
Extract or Release and press .
The selected party is extracted or released from the
conference so that you can hold a private conversation
with the remain party.
If you extracted the call you may rejoin the conference
from the
Phone menu
• If you selected
by selecting
Parties in conference
Join calls
, a list of all the
.
parties in the conference displays.
To extract or release a participant from the conference:
With the flip open, tap that call that you want to release
1.
from the Conference.
A pop up menu displays providing you two options;
and
Extract
Release
03:46
1. John Ericsson
2. Pamela Gonzalez
3. Steven Mutelezi
4. Hank Cheong
5. Jose Blanco
60 Making and Receiving Calls
.
Release
Extract
C
123
4
78
6
5
123
9
0
#
+
Page 61

Tap the desired option.
2.
The call is extracted or released from the conference. To
rejoin the extracted call to the conference, select the
participant to rejoin and select
Join calls
from the pop-up
menu.
Managing a Conference Call
Switching between calls
To put the conference on hold and make a new call:
From the
1.
Phone menu
, scroll to highlight
Hold call
and
press . The conference is put on hold.
Enter the number of the person you want to call and press
2.
. The display shows the active call with the on hold
conference call below it.
To switch between the new call and the conference:
From the
Phone menu
, scroll to highlight
Switch calls
and
press . The new call is put on hold and the conference is
made active.
To switch back to the new call from the conference:
From the
Phone menu
, scroll to highlight
Switch calls
and
press . The conference is put on hold and the new call is
made active.
Switch between the new call and the conference:
• Tap the number of the new call and select
Hold call
the pop-up menu. The new call is put on hold and the
conference is made active.
or
• Tap the conference and from the pop-up menu select
Retrieve
is put on hold.
To make a new call during a conference:
Tap the conference and select
1.
menu
The split screen displays the active call on the top
screen and the conference call on the lower screen.
. The conference is made active and the new call
Hold call
to put the conference on hold.
Making and Receiving Calls 61
from the pop-up
from
Page 62

00:01
Conference
Enter the number of the person you want to call and tap
2.
.
Ending a call
To end the new call and return to the conference:
• Make sure the new call is the active call and press
to disconnect the new call.
or
• Make sure the new call is the active call, scroll to
highlight
Release active
. The call is ended.
To end a call and return to the conference:
From the
1.
Phone menu
option and press . A list of all parties engaged in the
conference appears in the display.
Select the party to be released and press . The call is
2.
ended.
To end the new call and return to the conference:
Tap the number of the new call and select
up menu. The new call is ended.
To en d a c on fe re nc e:
From the
Phone menu
, scroll to highlight
press . The conference call is ended.
in the
Phone menu
, scroll to highlight the release
Release
from the pop-
Release active
and press
and
To en d a co nfe re n ce :
Select the conference by tapping the display anywhere in the
surrounding area of the individual members (not the members)
from the pop-up menu. The conference is
and select
Release
ended.
After Calls
01:00
Last call
Last Call Information
When all calls are ended, a call summary appears in the display
for three seconds before returning to the default standby mode.
62 Making and Receiving Calls
Page 63

Using Area Information
Area information is an impersonal text message that is sent
simultaneously to all subscribers in a certain cell of a network.
The information may be a local road report or a local taxi phone
number, depending on your network area and your list of
predefined channels. The information appears in the display
automatically when broadcast.
To activate area information or edit your list of predefined
channels, see “Area info” on page 97.
Note:
Voi ce Mail
Area information is dependent on your subscription.
If you subscribe to a Voice mail service, callers can leave a voice
message when you cannot answer your calls. Depending on your
network operator, you are informed that you have received a
voice message in different ways (for instance, SMS message or an
audible notification).
When a voice mail number has been configured in your R380,
you can make a call to your voice mail service. See “Voicemail” on
page 86 for more information on storing a voice mail number.
To make a call to your voice mail number:
Press and hold .
or
To make a call to your voice mail number:
Tap and hold
A call initiates to your voice mail number. If no voice mail
number is stored, a ‘
No Voicemail number stored
’ message
displays.
Note:
This service depends on your subscription and network
operator. Further information about your Voice mail service can be
found in the operating instructions supplied by your network
operator.
Making and Receiving Calls 63
Page 64

64 Making and Receiving Calls
Page 65

Entering Information
There are two different ways to enter information with the flip
open:
• On-screen keyboards for text characters and digits, which can
be used to tap out information which is then displayed.
Handwriting recognition, which is used to write in the display
•
with the stylus and the information is then displayed.
On-screen Keyboards
The on-screen keyboard consists of a text, numeric, and special
characters keyboards, as well as a phone number, security access
and a number entry keypad. These work in a similar way to
traditional hardware keyboards.
The entry keypads cover the lower part of the screen and editing
functions are available in the tasks pop-up menu on the
toolbar. Information entered appears on the top half of the
screen directly under the entry section label.
Remember to first tap the Shift key to capitalize one letter or
Tip!
the Caps key to capitalize all letters.
abc
Text Keyboard
Enter first name:
Emma
q w e t y u
caps
a f g h j
z c v , . ?
" \
r i p - =
s d k l ; : ’
x b n
m
o
/
( )
&
Entering Information 65
abc
123
aeo
@
!
Page 66

Numeric Keyboard
123
Enter street:
59
1 2 3 4 5 6 7 8 9 0
! " £ $ % ^ &
@
?
’\
{ }
‹ ‘
aeo
Special Characters Keyboard
Enter last name:
Agren
a a a a e e e ea a a e e
caps
<
<
To enter information:
1.
2.
3.
o
c o o o o
o n u u u y
<
<
Tap out the required information with the stylus.
Switch between keyboards by tapping the text,
numbers or special characters icons.
Tap to enter more information in the next field
or
back to view all entered information.
OK
Tap to save the information.
, . ; :
n
aeo
*
/
u
( )
#
[ ]
y
?
- =
_
+
_
x
:
~
<
_
+
>
oo
!
+
abc 123
abc
123
..
aeo
abc
123
aeo
66 Entering Information
Page 67

Phone Number Keyboard
Enter work phone number:
+44 555 1234
UK
Uruguay
USA
+44
+598
+1
1 2 3
4 5 6
7 8 9
0 #
To enter a phone number:
Use the scroll bar to display the required country then tap
1.
it.
The international dialing code for the country
automatically displays.
Tap out the required phone number with the stylus.
2.
Tap to enter more information in the next field
3.
or
back to view all entered information.
OK
Tap to save the information.
4.
Number Keypads
Enter number:
7890
7 8 9
4 5 6
1 2 3
.
0
+
space
P
This keyboard is used for real numbers and IP address numbers.
The integer keyboard is very similar, the only exception being
that there is no decimal point key.
Security Access Keyboard
Security access uses the standard keyboards as shown. However,
when the data is entered it is shown as asterisks (*).
Entering Information 67
Page 68

Handwrit ing Rec ogn ition
Handwriting recognition is a unique user interface allowing
convenient and natural handwritten input using the stylus.
By writing in certain areas of the screen, handwriting recognition
software turns the stylus strokes into characters or numbers.
Recognition of characters - uppercase letters, lowercase letters,
numbers, symbols, gestures and extended characters - occur
according to where you write them. The mode mark at the
bottom center of the display divides the screen into the different
writing areas.
abc 123
ABC
Enter last name:
• Stylus strokes written in the left of the display are recognized
as lowercase.
• Stylus strokes written in the center of the display are
recognized as uppercase.
• Stylus strokes written in the right of the display are recognized
as numbers.
Note:
dashes in the number writing area allowing you to write birthdays,
social security numbers, and telephone numbers on the right side of
the display.
• Most characters are written with a single stroke.
• Write accented (Western European) letters by writing an
You can enter the same character shape to write an upper and a
lowercase letter, depending on where you write on the screen.
Handwriting recognition accepts parentheses, slashes, and
upper or lowercase letter, then writing the accent mark to the
right of the display.
68 Entering Information
Page 69

Natural Character Set
The character set in handwriting recognition is a “natural”
combination of upper- and lowercase letters in addition to
numbers, symbols, gestures and extended characters.
The following tables illustrate how to write upper and lowercase
letters.
Note:
Where necessary, a dot indicates where to begin a stroke and
numbers indicate the order of the strokes.
a
b
c
d
e
f
g
h
i
j
k
l
m
Note:
1
2
Tapping the display repositions the cursor at the point of
n
o
p
q
r
s
t
u
v
w
1
x
2
y
period
comma
apostrophe
question
exclamation
ampersand
at
double quote
tab
space
backspace
carriage return
1
2
1
2
z
contact. Tapping and holding momentarily, establishes text selection
by dragging the stylus.
Entering Information 69
Page 70

Note:
Periods are not entered by a sigle tap, they are entered by a
single stroke as shown in the previous table.
Write numbers and the following symbols to the right of the
display, as shown.
0
1
2
3
4
5
6
7
8
9
2
1
+
1
*
2
/
2
1
\
(
=
period
comma
dash
tilde
backspace
tab
)
Write accent marks to the right of the display after writing an
upper- or lowercase letter.
abc 123
ABC
Enter last name:
Handwriting recognition allows you to enter any of the
following accent marks.
à
áãå
Extended Character Set
The extended character set consists of characters that require
additional time to write before recognition occurs. For example,
the hash mark or pound sign (#) and the percent symbol (%).
The extended character gesture, (a stylus stroke from bottom
70 Entering Information
âä
Page 71

to top) must be written to enter extended mode, signified by the
disappearance of the letterws at the top of the display and the
mode marker. You can then write an extended character
anywhere on the display.
abc
ABC
123
New note:
#
To leave extended mode, write the extended character gestur e
or wait until the mode mark reappears.
@
Æ
.
,
'
-
_
~
<
>
(
)
[
]
}
[
æ
1
ç
ç
2
1
2
ª
º
Þ
Ð
1
ð
1
Ø
ø
2
1
2
ß
µ
¥
1
2
|
!
?
1
2
1
2
$
%
/
\
"
+
:
;
1
2
=
#
º
«
»
¨
¯
·
¬
`
´
¦
&
¹
²
1
2
³
±
x
Entering Information 71
Page 72

,
¿
¡
þ
®
©
>
§
>
1
2
1
2
Using Handwriting Recognition
*
£
¶
¤
-
_
^
32
÷
¼
½
¾
~
As an alternative to tap typing with the on-screen keyboard,
handwriting recognition with the stylus can be chosen from
the tasks menu on the toolbar.
To select handwriting recognition:
When entering information, tap tasks on the toolbar.
1.
Select
2.
The display changes to the handwriting recognition screen.
3.
to activate handwriting recognition.
Write
Note:
appears in the tasks menu allowing you to change back to
keyboard entry.
Write the information in the required section of the screen,
4.
one character or number at a time.
Note:
lowercase letters to the left, uppercase letters in the middle and
numbers or digits to the right. Once the character is written it
disappears from the screen and the software’s interpretation
appears.
If you have difficulty in writing a particular letter, try
Tip!
writing it in the alternate case area. For example: to write an
uppercase D, write a lowercase d in the uppercase area.
72 Entering Information
After selecting
, the alternative
Write
Type
now
Make sure to write in the correct screen area;
Page 73

To select a complete line of interpreted text, tap and drag
Tip!
the stylus down at the far right of the input display (opposite
the line of text). The text becomes highlighted.
Tap to enter more information in the next field
5.
or
back to view all entered information.
OK
Tap to save the information.
6.
Note:
You can select handwriting recognition as the default
method of entering information into your R380. See “Input
settings” on page 94 for more information.
Handwriting Recognition Editing Tasks
While in the write mode, there are several tasks that become
available to you:
Cut: Allows you to remove selected text.
•
Copy: Allows you to copy selected text.
•
Paste: Allows you to place cut or copied text in a
•
specified location.
Select all: Al lows yo u to select all of the text in a field or
•
dialog.
Clear all: Allows you to erase all text in a field or dialog.
•
To use select text for cutting or copying:
Highlight the text by dragging the stylus across it.
1.
Tap the tasks button then select
2.
Cut
or
Copy
.
The selected text is stored in clipboard memory. It can now
be pasted into another location.
To paste cut or copied text:
Using the stylus, tap the screen where you want to insert
1.
the text.
Tap the tasks button then select
2.
The text is placed in the specified location.
3.
Paste
.
Entering Information 73
Page 74

74 Entering Information
Page 75

Security
There are several features on your R380 that protect against
unauthorized or accidental use of your phone as well as your
information. There are two methods in which you can protect
your phone:
• Keypad lock
SIM card lock
•
• Phone lock
Keypad Lock
To protect your R380 from accidental key presses you can lock
your keypad. This is especially useful when carrying the R380
when it is on.
To lock the keypad:
Press .
1.
A list of phone menu options displays.
Scroll to highlight
2.
The keypad lock icon displays.
To unlock the keypad:
Pressing any key on the keypad when it is locked, displays
prompts instructing you how to deactivate the lock.
Press followed by .
SIM Ca rd L oc k
The SIM card lock only protects your subscription from
unauthorized use. The phone is not protected. The PIN
provided to you by your operator unlocks the SIM card for use.
Lock keypad
and press .
Security 75
Page 76

Personal Identification Number (PIN)
The Personal Identification Number (PIN) is used authenticate
the user of your R380. The PIN is usually requested when you
turn on your R380. To change your PIN, see “Locks” on page 90
for more information.
You should be careful with your PIN since it is your protection
Tip!
against unauthorized use.
To unblock the SIM card:
Enter the unblocking key, usually eight to sixteen digits,
1.
and press .
Note:
The digits are not displayed and are shown as asterisks
(*) for security protection. A maximum of three attempts are
usually allowed. Contact your network operator if
unsuccessful. Emergency calls are still available in this state.
If the unblocking key is accepted, a new PIN entry display
2.
is shown. Enter your PIN and then press .
Unblocking PUK Code
After three unsuccessful PIN entry attempts, the SIM card
becomes blocked. The SIM card can only be unblocked by
entering a Personal Unblocking Key (PUK), which is provided in
your network operator subscription information.
Warning!
After 10 unsuccessful attempts of entering the PUK, the
SIM will not be usable. Contact your network operator if this
happens.
PIN 2
Some operators may have services that require a second PIN,
your PIN2. See the information you received from your operator
to see if you have a PIN2.
76 Security
Page 77

Phone Lock
The Phone lock activates an identification number to
authenticate and protect the usage of your R380 if it is stolen
and the SIM card is exchanged. It is not activated when you buy
the phone. You can change the phone lock code (default is 0000)
to any three to eight-digit personal code. The Phone lock has
three possible settings:
, no Phone lock is activated.
•
Off
•
Automatic
, the Phone lock is activated when the SIM card is
changed.
•
, the Phone lock is activated and entry is required when
On
turning the phone on.
See “Locks” on page 90 for information about changing the
Phone lock settings.
Security 77
Page 78

78 Security
Page 79

Settings
The R380 has a number of different settings that you can adjust
to customize the unit to your specific needs and uses. Depending
on what setting you want to adjust, you will go to one of three
places:
• Phone menu (flip closed)
Settings program icon in the Phone tab (flip open)
•
• System icon in the Extras tab (flip open).
Note:
configuration options. For a list of what customizing options you can
find in Phone:Settings see “Settings” on page 83. For a list of what
customizing options you can find in Extras: System see “System” on
page 94.
The steps for changing a setting are the same no matter what you
are changing. The following are general guidelines illustrating
the steps to take when changing a setting during flip closed and
flip open use.
Note:
descriptions.
The Settings and System icons display different
Customizi ng Sett ings
Differences in the instructions are noted with their
To change a setting with the flip closed:
Press .
1.
A list of phone menu options displays.
Press to scroll to the setting that you want to change.
2.
Press to enter the setting.
3.
Depending on what setting you choose a different list of
options display.
Use to scroll to the desired option.
4.
Press to confirm.
5.
The Phone menu list displays.
Settings 79
Page 80

When accessing the phone menus press to return to
Tip!
the main menus or press and hold (2 seconds) to return
to the standby mode.
To change a setting with the flip open:
Enter one of the Setting views.
1.
• Ta p t h e
program tab, then tap the
Phone
Settings
or
icon.
• Ta p t h e
Tap the function that you want to change.
2.
Use the scroll bar to move up and down the list to see
Tip!
program tab, then tap the
Extras
System
icon.
settings that might not be visible.
Tap the setting (inside the brackets < >).
3.
Depending on the field, a method for entering the
required option appears.
Enter the setting you want to apply.
4.
The setting becomes active and displays between the
brackets < >.
Tap to accept the settings.
5.
OK
The main settings view displays. To return to the desktop,
tap .
Phone
This section defines all of the settings that can be customized
from the Phone menu (flip closed). It provides you with a
number of functions that can be selected, for instance, Lock
keypad, Forward calls, and more; different sets of functions
become available when the first digit of a phone number is
entered or if an active call is in progress.
Some
Note:
settings are
network and
operator
dependent.
80 Settings
Lock Keypad
Selecting this option activates the keylock and returns you to the
standby screen with the keylock icon displayed. This is useful
when carrying or transporting your activated R380 so that
accidental key presses do not start a function or a call.
Page 81

To lock the keypad:
From the
Phone menu
, scroll to highlight
Lock keypad
press .
To unlock the keypad:
Pressing any key on the keypad when it is locked, displays
prompts instructing you how to deactivate the lock.
Press followed by .
and
Phone menu
Lock keypad
Missed calls
Silent mode
Ring volume
Ring volume
For
Tip!
general
instructions on
changing
settings, see
“Customizing
Settings” on
page 79.
Note:
To see more information on security settings see, “Security”
on page 75.
Missed Calls
A list of calls that you have missed displays in chronological
order with the last missed call in first position. To make a call
using the missed calls feature see “Missed Calls” on page 44.
Silent Mode
All sounds can be silenced without changing individual settings.
When you have the Silent mode activated, you can choose to
activate the vibrating alert feature to be notified of incoming
calls. See “Ring controls” on page 84.
You can also activate and deactivate Silent mode by pressing
Tip!
and holding (2 seconds) . The (Silent Mode Indicator)
displays.
Ring Volume
Ring volume is represented as a six-level sliding scale. The arrow
keys are used for adjustment; or to increase the volume
and or to decrease the volume. When using
or
the ring volume is adjusted silently. When using or the
ring volume is heard when increasing and decreasing the volume.
Note:
The ring volume is represented as a six-level sliding scale,
with the lowest value O being equivalent to turning the ringer off.
Note:
When receiving an incoming call the ring volume setting
can be adjusted silently using the volume slider key.
Settings 81
Page 82

Increasing Ring
The increasing ring consists of two ring sequences at each ring
volume level, starting at level 1 (two clicks) and going up to the
maximum level (6). When turned off, the ring volume returns to
the level that was set before the increasing ring function was
activated.
Call Forwarding
Call Forwarding for all calls can be switched on or off. The
current status is initially highlighted when selected. The number
to which calls are diverted will depend on the call diversion
criteria set with the flip opened. See “Call Forward” on page 89.
Infrared Port
The infrared port is used for data communication by infrared
with compatible devices such as a PC or another R380. When
selecting infrared port, a message displays indicating its status.
When you got to this menu option and press you are
asked to confirm activation of the Infrared port. Press
again.
Some
Note:
settings are
network and
operator
dependent.
82 Settings
Note:
Maximum recommended distance between infrared ports is
20 centimeters or 8 inches and they must also be at an angle of 30
degrees or less.
Next Incoming
If you have different numbers for voice and data calls, this is
referred to as multi numbering and means that you can have
two phone numbers in your network subscription. If you only
have one number for all call types, this is referred to as single
numbering and means that your SIM card does not support
separate voice and data numbers, (your R380 does not recognize
what kind of a call you are receiving).
Next incoming allows you to change the setting so that you can
receive a voice or data call. When you have set your phone for a
specific incoming call, it stays like this until you change it. The
. When expecting a data incoming call
normal setting is
you must therefore select
Voice
data
.
Page 83

Service Numbers
If selected a list of network service numbers appear in the display,
as provided by your network operator. Calls can be made to these
numbers but you cannot edit or add numbers to the list.
Hide and Show Identity
Your number identity can be hidden or shown for the next call,
depending on your subscription. Phone menu options only
become available a phone number has been entered.
For
Tip!
general
instructions on
changing
settings, see
“Customizing
Settings” on
page 79.
Note:
By default, your number is shown to the party you are
calling.
To hide number identity:
Enter the phone number you want to call.
1.
From the
2.
number
Phone menu
and press .
, scroll to highlight
Hide my
The R380 returns to the standby mode and initiates the
call to the previously entered number.
To show number identity:
Enter the phone number you want to call.
1.
From the
2.
number
Phone menu
and press .
, scroll to highlight
Show my
The R380 returns to the standby mode and initiates the
call to the previously entered number.
Settings
The majority of the phone feature settings can be found in the
Settings program icon in the Phone tab (flip open).
• Sounds and Alerts
• Voice Control
• Networks
• User Greeting
• My Numbers
• Locks
• Handsfree Equipment
• Last Dialed Numbers List
Settings 83
Page 84

To access the Settings program:
With the flip open, tap on the
1.
The Phone desktop appears.
Phone
tab.
Tap the
2.
Settings
icon.
The Settings list displays.
Sounds and Alerts
This settings allows you to customize how your R380 notifies
you of incoming calls. The following list describes what can be
modified in the Sounds and Alerts section.
Ring controls
•
Ring Volume
- Determines the volume at which the phone
rings when there is an incoming call. The settings range from
to 6. Use the arrow keys to set the volume.
OFF
•
Increasing ring
two ring sequences at each level, starting at the lowest level (
and going up to the maximum level (
or
On
Off
•
Vibrating alert
volume is set to
- When On, the ring volume increases after
).The settings is either
6
.
- If
On when silent
or the R380 is in Silent mode, then the
Off
is selected and the Ring
1
R380 will vibrate on all incoming calls or messages
•
Silent mode
individual settings. You can set Silent mode to
Ring signals
- All sounds can be silenced without changing
of
Off
.
On
This setting lets you change what melody is used to signal you of
incoming voice and data calls. There are several different
melodies to chose from including four melodies that you can
create yourself.
)
Some
Note:
settings are
network and
operator
dependent.
84 Settings
Minute minder
The Minute minder is an audible signal notifying of you that a
minute has passed since you connected to the active call. This is a
convenient way to be reminded of how long you have been on a
or
call. The options for this settings are either
Edit melodies
On
Off
.
There are four melody positions that you can edit. When you
select which melody to edit a keyboard displays. The following is
a description of how the keys are used to create your melody.
Page 85

The P key allows you to add a short pause in the melody.
•
• Use the left arrow key to delete the last note in the
melody, or all notes in the melody by pressing and
holding the key.
• Press and hold a melody key to produce a long note.
To listen to the melody you have edited, tap the
•
button on the toolbar.
Play
Note:
If Silent mode is activated you will not be able to hear the
melody. Furthermore, if no melody exists the Play button is not
active.
Vo ice Control
Voice control allows you to answer and dial using your own voice
commands. You can configure a maximum of ten voice
commands and two answering commands (busy and answer).
Options
This options turns the Voice Controls on or off.
Voice control options
Voice answering:
Voice dialing:
Voice commands
<On>
<On>
The setting allows you to edit and create voice commands.
For
Tip!
general
instructions on
changing
settings, see
“Customizing
Settings” on
page 79.
Settings 85
Page 86

To create a voice command for
Ta p
Voice commands
1.
in the Telephony - Settings directory.
Answer
and
Busy
:
The Voice commands view displays.
Voice commands
Answer
Busy
To record a voice command for answering a call, or for
2.
when you are busy, select
“
Speak after beep
Speak the command that you want to use.
3.
”.
Answer
or
. You are asked to
Busy
If speech is detected, your recording is played back in the
earpiece and you are asked “
4.
Select
to save the command.
Yes
Is voice command OK
?”.
Some
Note:
settings are
network and
operator
dependent.
86 Settings
Note:
Busy
It is not possible to have only one of the
commands stored and the other undefined. If the phone
has neither of the commands stored and you initiate the
recording sequence for one of them, then after successful
completion of the first command, the second recording
sequence is initiated.
Note:
recording of one of the
cause the deletion of both
If a recording sequence is canceled during the
Answer
Answer
or
commands, this will
Busy
and
Busy
commands.
To create or edit a voice command:
Ta p
Voice commands
1.
in the Telephony - Settings directory.
The Voice commands view displays.
To record a new voice command, tap and select
2.
The New voice command view displays.
Note:
Alternatively, you can edit an existing voice
command, scroll and select the voice command you want to
edit. The Edit voice command view displays.
Answer
or
New
.
Page 87

Enter the name of the command and number by tapping
3.
<Enter name>
Another way to enter the phone number is to tap
Tip!
and select
and
<Enter number>
Lookup from contacts
. The Select contact view
appears in the display. Use the left and right Alphabet scroll
arrows and the up and down scroll arrows to select a contact
and tap .
OK
For
Tip!
general
instructions on
changing
settings, see
“Customizing
Settings” on
page 79.
Tap then tap
4.
OK
Note:
If you have chosen to edit a voice command, you are
to record a voice command.
Yes
warned that a voice command already exists and you are asked
the question “
Overwrite?
”. Select
to proceed with
Yes
recording a new voice command.
You are asked to “
Speak the command that you want to use for the contact.
5.
Speak after beep
”.
If speech is detected, your recording is played back in the
earpiece and you are asked “
6.
Select
to save the command.
Yes
If no speech is detected, a “
displays asking you to try again. Select
Tap to implement and save the new settings.
7.
OK
Is voice command OK?
Speech not detected
OK.
”.
” message
• If no phone number has been entered, you are prompted
to enter a phone number. Select
number.
and enter a phone
OK
• If no voice command has been recorded, a message
displays stating “
asking “
Record now
record a voice command. If
Voice command not recorded
?”. Select
and repeat step 5 to
Yes
is selected or all fields
No
contain an entry, the display returns to the Voice
commands view.
Note:
New voice command entries cannot be saved until a
telephone number has been entered.
” and
Settings 87
Page 88

To play a voice command:
Ta p
Voice commands
1.
in the Telephony - Settings directory.
The Voice commands view displays.
Select the voice command you want to play, tap and
2.
select
Play
When finished, tap to return to the Voice commands
3.
OK
view.
To delete a voice command:
Ta p
Voice commands
1.
in the Telephony - Settings directory.
The Voice commands view displays.
Select the voice command you want to delete, tap and
2.
select
Delete whole entry
. The display returns to the Voice
commands view.
Some
Note:
settings are
network and
operator
dependent.
Note:
voice command you want to delete, tap and select
voice command
Tap to implement and save the new settings. The
3.
To delete only the voice command, scroll and select the
Delete
.
OK
display returns to the Voice commands view.
Voicemail
You can easily call a predefined voicemail number and listen to
your voicemail messages.
Note:
The number to your Voicemail service may be different if
you are calling from a network that is not your home network. For
more information about your Voicemail service, please refer to the
information provided by your network operator.
Call Waiting
Call waiting allows you to receive a second call during an active
call.
Note:
Call waiting is a network setting that requires access to your
network. It is operator dependent.
Restrict Calls
Restrict calls allows you to bar different types of outgoing and
incoming calls. You might find this useful to protect your phone
against unauthorized long distance calls which in turns help save
you money on your long distance bill.
88 Settings
Page 89

•
All outgoing
•
Outgoing internationa
•
Outgoing international roaming
- restricts all outgoing calls.
l - bars all outgoing international calls
- bars all outgoing
international calls that would utilize roaming
•
All incoming
•
Incoming when roaming
- bars all incoming calls
- bars all incoming calls when you are
roaming
You can also change the password that is used to protect these
settings. Simply tap , select
Change password
and follow the
screen prompts.
For
Tip!
general
instructions on
changing
settings, see
“Customizing
Settings” on
page 79.
Note:
Restrict calls is a network setting that requires access to your
network.
Call Forward
When you are unable to answer calls, you can use the Call
Forward settings to specify a number to have your incoming calls
forwarded to. You can specify to have your voice, data, and fax
calls diverted.
Note:
The R380 does not support fax calls. They must be diverted
to another number such as an office fax number.
•
All Calls
-Allows you to specify a single telephone number for
each of the voice, data and fax calls.
•
Conditional
- Allows you to specify a number to divert voice
calls in different conditions:
•
When busy:
•
No reply:
If you are on the phone.
If you do not answer within a specified time
(operator dependent).
•
Unreachable:
If your R380 is turned off or if you are
unable to be reached.
Note:
Divert calls is a network setting that requires access to
your network.
Networks
These function allows you to adjust different network settings.
Settings 89
Page 90

Select network
Allows you to choose from a list of available networks within
range.
•
- The currently registered network
Current
(highlighted).
•
•
- The default network specified by your SIM.
Home
Preferred
- Networks that are available and are included
in a preferred list on your SIM.
•
Available
- Networks that are available but are not
included in the preferred list on your SIM.
•
Forbidden
- Networks that are available but you are not
permitted to use them.
Search mode
Allows you to specify how your phone searches for a network.
You can select either
•
Automatic
- your R380, when switched on, searches for
Automatic
or
for the search mode.
Manual
the last network you accessed. If this is not available, it
automatically starts searching for a network according to
the preferred list of networks stored on your SIM card.
•
- your R380, when switched on, searches for the
Manual
last accessed network. If this is not available, you are
then presented with a message asking ‘
search
?’. Tap
to display a list of networks, tap the
Yes
Perform new
network you want to use.
Note:
Forbidden networks are stored on your SIM card. If such a
forbidden network is within range it is omitted when the phone
searches for a network. If your home network and a forbidden
network come to an agreement that allows you to use the forbidden
network, you can select this network even though
Forbidden
displays.
Some
Note:
settings are
network and
operator
dependent.
90 Settings
Edit preferred list
Allows you to create or edit a list that defines in which order your
phone selects a network during automatic network selection
when your home network is not within range.
Page 91

•
Add network by name
. An Add network by name view
displays a list of known networks which are not
currently in the list.
•
Add network using codes
view displays. Select
network code:
and enter the relevant codes.
. An Add network using codes
Mobile country code:
and
Mobile
For
Tip!
general
instructions on
changing
settings, see
“Customizing
Settings” on
page 79.
Note:
You can get additional codes from your network
operator.
To change the position of a network in the list:
Select the network.
1.
A view with the network name as its title displays.
2.
Select
Position:
and use the left and right scroll arrows to
select a new position for the network to appear in the list.
Ta p .
3.
OK
The Edit preferred list view displays with the network in its
new position on the list.
To delete a network from the list:
Select the network.
1.
The network view displays.
Ta p a n d s e le c t
2.
Delete
.
The network is deleted and the Edit preferred list view
displays with an updated network list.
User Greeting
User greetings allows you to select whether a default or
personalized greeting displays when you turn on your phone.
•
Greeting
displays),
- you can select
(No greeting displays) or
Off
Standard
(Sony Ericsson logo
Custom text
(the Text
defined in the Custom text: field displays).
•
Custom Text:
enter text to display when phone is turned on. A
maximum of 24 characters can be entered.
Keypad Position
Keypad position allows you to select the orientation in which the
keypad in the
Phone: Call
application appears when the flip is
open.
Settings 91
Page 92

My Numbers
My numbers allows you to read/store your own voice, data and
fax numbers on your SIM card. If this is not possible, then the
numbers are read/stored in your R380.
Locks
Locks provides you with access to functions allowing you to
protect your R380 from unauthorized use. For more information
on phone security see the chapter titled “Security” on page 75.
SIM card lock
The SIM card lock only protects your subscription from
unauthorized use. The phone is not protected. This option
allows you to turn the SIM card lock on or off.
Phone lock
The Phone lock protects the phone against unauthorized use if it
is stolen or lost. It is not on when you buy the phone. This
option allows you to set the Phone lock to:
•
, no Phone lock is activated.
Off
•
Automatic
, the Phone lock is activated when the SIM card is
changed.
•
, the Phone lock is activated and entry is required when
On
turning the phone on.
Change phone lock code
Allows you to change the Phone lock code. Follow the screen
prompts to change the code.
Some
Note:
settings are
network and
operator
dependent.
92 Settings
Change PIN
This PIN provides access to your locked SIM card. This option
allows you to change your PIN (Personal Identification
Number). You will find your PIN in the information from your
operator. Follow the screen prompts to change the code.
Change PIN 2
Some operators may have services that require a second PIN,
your PIN2. This options allows you to change your PIN2.
Follow the screen prompts to change the code.
Page 93

Warning!
Remember your different security codes. After three
unsuccessful PIN entry attempts, the SIM card becomes blocked. The
SIM card can only be unblocked by entering a Personal Unblocking
Key (PUK), which is provided in your network operator subscription
information. See “Security” on page 75.
Handsfree Equipment
Handsfree equipment settings allow you to select the way in
which your R380 handles handsfree speech (calls utilizing
handsfree equipment such as the HPB-10, HCA-10, or the
onboard office handsfree) and the mode in which the R380
answers when handsfree equipment is attached. You can select
one of the following answering modes:
•
•
- you have to answer calls with the
Normal
Any key
- you can answer an incoming call by pressing any
button or key.
Yes
key, except the key.
•
Automatic
- an incoming call is answered automatically after
one ring signal.
To change the way in which your R380 can handle handsfree
speech, select
Basic
Handsfree type
and select
Basic
or
Full
.
The R380 handles the call in semi-duplex mode. This means you
cannot speak at the same time as the person at the other end of
the line. Use this alternative only if Full handsfree does not work
properly.
Full
The R380 handles the call in full-duplex mode. This means the
quality of speech is increased considerably and is much clearer,
since you do not have to wait until it is your turn to speak.
For Full handsfree to work properly, your phone adapts to the
sound environment around the handsfree equipment. This
adaptation might take a few calls. During this learning phase, the
person you are talking to might hear an echo of his or her own
voice (because the sound goes from the speaker into the
microphone again). However, this disappears as the other person
speaks. If the echo lasts longer than the first few calls, try Basic
handsfree instead.
Settings 93
Page 94

Set the handsfree type to ‘Full’ first. If speech quality is poor, set
12
Tip!
to ‘Basic’ type instead.
Last Dialed Numbers List
Last dialed numbers list allows you to turn the storing of
previously dialed numbers on or off. When the list is turned off,
the contents are deleted.
System
The System allows you to change the settings having to do with
the phone’s functionality. It is here you can also learn about the
memory you have used as well as the phone and software
versions you are using.
To enter the System program:
With the flip open, tap the
1.
Extras
tab.
The Extras desktop appears.
Extras
12
9
3
6
Notepad Clock Calculator
Game
System
Some
Note:
settings are
network and
operator
dependent.
94 Settings
Tap the
2.
System
icon.
The System view appears.
Page 95

Preferences
This view provides you with a scrolling list of features whose
settings can be changed to customize the R380 to meet your
requirements.
Preferences
Global
Contacts
Calendar
Messaging
WAP services
Service providers
You can change the following settings:
Global
•
Contacts
•
Calendar
•
Messaging
•
WAP services
•
Service providers
•
Port
•
Calculator
•
Reset language
•
Master reset
•
Global Settings
For
Tip!
general
instructions on
changing
settings, see
“Customizing
Settings” on
page 79.
Global
Backlight settings
Display settings
Input settings
Local settings
Data connection settings
Miscellaneous settings
Backlight settings
This option allows you to configure when the phone’s backlight
comes on. There are three different settings:
On
•
Off
•
Settings 95
Page 96

•
Automatic
- back light is illuminated in an event (for instance,
an alert sound, message to be acknowledged, etc.), a key
pressed, at power on or the volume slider is pressed up and
down or vice versa. The illumination is turned off after 10
seconds of inactivity or 1 minute if the volume slider was
used.
Display settings
This option allows you to configure the settings related to the
screen on your R380.
Some
Note:
settings are
network and
operator
dependent.
•
Contrast
- allows you to set the contrast of the LCD. Use the
left and right scroll arrows to select the required contrast level;
corresponds to the lightest contrast and 9 to the darkest.
1
The default level is
•
Screen orientation
.
5
- allows you to specify the orientation of
the screen when you open the flip.
•
Screen saver hand held
- allows you to configure whether the
screen saver comes on when using as a hand held. If set to
Automatic
, the LCD and backlight (if on) turns off after two
minutes of inactivity.
•
Screen saver hands free
- allows you to configure whether the
screen saver comes on when using in conjunction with
handsfree equipment. If set to
Automatic
, the LCD and
backlight (if on) turns off after two minutes of inactivity.
Input settings
This options allows you to configure settings having to do with
the input methods on your R380.
•
Default input method
- set which input method you would like
to use as default. The options are either the on-screen
keyboards or handwriting recognition. The factory setting is
the Soft-keyboard. See “Entering Information” on page 65 for
more information on the input methods.
•
Keypad lock
- allows you to set whether you lock the keypad
manually or if it locks automatically after 25 seconds.
•
Key sound
keys make when you press them. There are three options:
Click
- allows you to configure the type of sound the
, and
Tone
.
Off
,
96 Settings
Page 97

•
Touch screen sound
- allows you to set whether or not the
touch screen makes a sound when you tap it.
Note:
When the R380 is in Silent mode, Key and Touchscreen
sound settings are overridden.
Local settings
This option allows you to configure settings having to do with
your location.
•
Language
•
Time formats
•
Date formats
Note:
- set the default system language.
- set the format in which the time displays.
- set the format in which the date displays.
After changing the local settings, restart your R380 in order
to implement the changes.
Data connection settings
These settings allow you to configure the idle time before
disconnecting you from your data connection. The time is
specified in minutes.
Miscellaneous settings
This options allows you to configure:
•
Cancel confirmation
- set whether or not you are presented
with a confirmation view when cancelling an operation.
•
Save on exit confirmation
- set whether or not you are
presented with a confirmation view asking you to confirm
that you want to save the current data before exiting the
program.
•
Delete confirmation
- set whether or not you are presented
with a confirmation view when deleting data.
For
Tip!
general
instructions on
changing
settings, see
“Customizing
Settings” on
page 79.
Contacts Settings
These settings have to do with how contact information displays
in your Contacts program.
Default view
Set the default view of the Contacts list to be either a
Detail
.
Settings 97
or
Summary
Page 98

Default sorting entries
Set how the contacts list is sorted (either by
).
name
Calendar
First name
or
These settings have to do with how the Calendar displays.
Default to do view
Set whether the default To Do view is
Default Day view
Set whether the default Day view is
Week start
Summary
Summary
or
or
Detail
Detail
.
.
Set the day that you want your Calendar to start on (either
Sunday
or
Monday
).
Last
Some
Note:
settings are
network and
operator
dependent.
Note:
The Detail view displays more information than that of the
Summary view. By choosing to view the items in the Summary view,
more items display on the screen at one time.
Messaging
This option allows you to configure settings regarding messaging
functions. You can adjust settings in the following areas:
View
Change the default views of the Inbox, Outbox, Drafts, Sent
items, and Remote email views. The options are
.
Detail
E-mail
Summary
or
Here you can change whether or not original text is quoted in a
reply message, which character set is used, and which email
account you want to be default. The following are the available
character sets:
•
US ASCII
- a character set covering the English alphabet:
A to Z without accents.
•
ISO8859-x
areas of the world, where
- a number of character sets (10) for different
relates to the local version of
x
the character set, such as ISO8859-5 for Cyrillic.
•
- a character set that covers all world characters.
UTF-8
98 Settings
Page 99

SMS
Here you can change the settings having to do with your SMS
service.
•
SMS center no:
The access number of the SMS Service
Center.
•
Email via SMS no:
This is the number used to receive your
email through SMS. This number is provided by your
network operator.
•
Request reply:
is selected the
show
Yes
Turn on or off the Request reply feature. If
Request reply
field in your SMS message will
(the recipient is requested to reply to your SMS
Yes
message) as the default.
•
Validity period:
Options are:
•
Concatenate SMS:
Set the validity period for each SMS message.
1 hour, 12 hours, 1 day, 1 week
, or
Maximum
Turn on or off the linking of SMS
.
messages. If Concatenate SMS is turned on, you are able to
send longer SMS messages (sent as multiple messages).
•
Message alert:
Turn on or off the alert that sounds when you
receive an SMS message.
Area info
Area Information is a type of text message which is sent to all
subscribers in a certain network area. The information may be a
)
local road report or a phone number to a local taxi. If off (
No
then no cell broadcasts are accepted.
Area info channels
Each type of Area Information message is identified by a threedigit code. The list below shows examples of the Area
information codes that exist today.
For
Tip!
general
instructions on
changing
settings, see
“Customizing
Settings” on
page 79.
Code: AI Message Type: Code: AI Message Type:
000 Index 054 Operator services
010 Newsflashes 056 Directory enquiries
(national)
020 Hospitals 057 Directory enquiries
(international)
022 Doctors 058 Customer care (national)
Settings 99
Page 100

Code: AI Message Type: Code: AI Message Type:
024 Pharmacies 059 Customer care
(international)
030 Long-distance road reports 040 Weather
032 Local road reports 050 District cell information
034 Taxis 052 Network information
Some
Note:
settings are
network and
operator
dependent.
Note:
These codes are operator dependent. For information about
the area information services that you can use, please refer to the
information supplied by your network operator. This feature may not
be available on all networks.
To edit an area information channel setting:
From within the
1.
Ta p
Messaging
2.
Scroll and select the channel.
3.
tab, tap
Extras
then select
Preferences
Area info channels
.
.
The Edit channel view appears.
Do one of the following:
4.
• To edit the three digit channel code, select
and edit the code.
code:
• To turn the channel code on or off, select
and then select
Tap to implement and save the new settings. The Area
5.
OK
Inactive, Active
or
Auto-store
Channel
Subscription:
.
info channels view displays.
To create a new area info channel:
From within the
1.
Ta p
Messaging
2.
Ta p a n d se l e c t
3.
tab, tap
Extras
then select
New channel
Preferences
Area info channels
.
.
.
The New channel view displays.
Do one of the following:
4.
• Select
Channel code:
and enter the three digit channel
code.
or
• Select
Tap to implement and save the new settings.
5.
Subscription:
Auto-store
OK
.
and then select
Inactive, Active
or
100 Settings
 Loading...