

Page 1

Contents
o
C
r
o
Ericsson R320s
Second edition (December 1999)
This User’s Guide is published by
Ericsson Mobile Communications AB,
without any warranty. Improvements and
changes to this User’s Guide necessitated
by typographical errors, inaccuracies of
current information, or improvements to
programs and/or equipment,may be made
by Ericsson Mobile Communications AB
at any time and without notice. Such
changes will, however, be incorporated into
©Ericsson Mobile Communications AB,
Publication number: EN/LZT 108 2754 R2A
N
new editions of this
All rights reserved.
INNOVATRON PATENTS
i
f
t
o
o
User’s Guide.
s
s
1999
c
o
M
n
r
m
m
e
l
i
b
at a Glance
Getting Started 5
Preparing Your Phone for Use 6
Turning Your Phone On and Off 11
Display Information and Key Functions 13
Making and Receiving Calls 15
During a Call 18
e
s
U
Functions and Settings 21
R320 Features 23
Using the Menus 24
Your Personal Phone Book 30
Using the Call List 39
Your Voice Mail Service 41
Personalizing Your Phone 43
e
Sending andReceiving Text Messages (SMS) 52
Communicating via the Built-in Modem 62
Sending and Receiving Fax, Data and E-mail 67
Business Card Exchange 70
Diverting Incoming Calls 73
Security for Your Phone and Subscription 75
Handling More than One Call Simultaneously 83
C
Setting Network Preferences 88
Knowing the Call Time and Call Cost 91
Using Two Voice Lines 94
Using the WAP™ Browser 95
Calendar 104
Voice Memo 109
Voice Control 112
Code Memo 115
Calling Card Calls 118
Extras 121
The Profile Concept 125
Accessories 128
Online Services 135
r
i
c
m
o
l
a
m
n
u
c
i
t
a
o
i
n
B
A
s
E
Page 2

t
o
f
r
o
C
o
m
m
e
l
i
b
Additional Information 139
Quick Keys 140
Troubleshooting 142
Ericsson Mobile Internet 144
The Online Version of this User´s Guide 145
Technical Data 146
Glossary 147
Guidelines for Safe and Efficient Use 152
Warranty 158
Declaration of Conformity 160
Index 161
l
a
i
c
r
s
U
u
e
i
n
a
c
t
o
i
A
s
n
e
m
m
o
C
B
r
E
o
N
s
c
i
M
n
o
s
Page 3

Please note!
Some of the services in this manual are not supported by all
networks. This also applies to the GSM International Emergency
Number 112.
Please contactyour network operator orservice provider if youare
in doubt whether you can use a particular service or not.
Note! You should read the Guidelines for Safe and Efficient Use
and the Warranty chapters before using your mobile phone.
e
s
U
l
n
u
c
i
r
i
c
a
t
a
o
i
n
e
m
m
m
m
WAP™, W@P ™ and WAPForum™ are registered trademarks of the
WAP Forum, LTD., a registered company in the United Kingdom.
o
o
C
C
The symbol on our products signifies that they have been
certified according to the EMC directive 89/336/EEC, the
Telecommunications directive 91/263/EEC, and the Low Voltage
directive 73/23/EEC when applicable. The products fulfil the
requirements according to the following standards:
Cellular Phones and Accessories in Combination:
ETS 300 342-1 EMC for European digital cellular
telecommunications.
Accessories Without Direct Connection to a Cellular Phone:
EN 50081 Electromagnetic compatibility, Generic Emission
Standard, and EN 50082 Electromagnetic compatibility, Generic
Immunity Standard.
o
N
s
r
o
f
t
M
n
o
s
b
o
i
e
l
c
i
r
B
A
s
E
Page 4

s
B
A
t
o
f
r
o
C
o
m
m
e
l
i
b
r
e
C
i
c
m
o
l
a
m
s
U
u
e
i
n
a
c
t
o
i
n
r
E
o
N
s
c
i
M
n
o
s
Page 5

B
A
Getting Started
e
l
s
U
u
i
n
i
t
a
c
Preparing Your Phone for Use 6
Turning Your Phone On and Off 11
Display Information and Key Functions 13
a
Making and Receiving Calls 15
i
c
During a Call 18
r
e
m
m
m
m
o
o
C
C
e
b
o
i
l
r
o
f
t
s
n
o
r
E
o
N
s
c
i
M
n
o
s
Page 6

Preparing Your Phone
A
for Use
Overview
Front
Voic e Memo butt on
C
r
Back
o
Connector for external antenna
f
t
o
M
Volume key
Display
m
Keypad
m
Microphone
o
l
i
b
o
e
r
e
C
i
c
m
o
s
U
l
a
u
m
Battery release catch
e
ntenna
Indicator light
a
c
i
Earpiece
n
Infrared eye
Power On/Off
Navigation keys
Battery
t
o
i
B
A
s
n
N
n
Hole for belt clip screw
o
s
s
c
i
6 Preparing Your Phone for Use
r
E
Handsfree
connector
Charging connector
Page 7

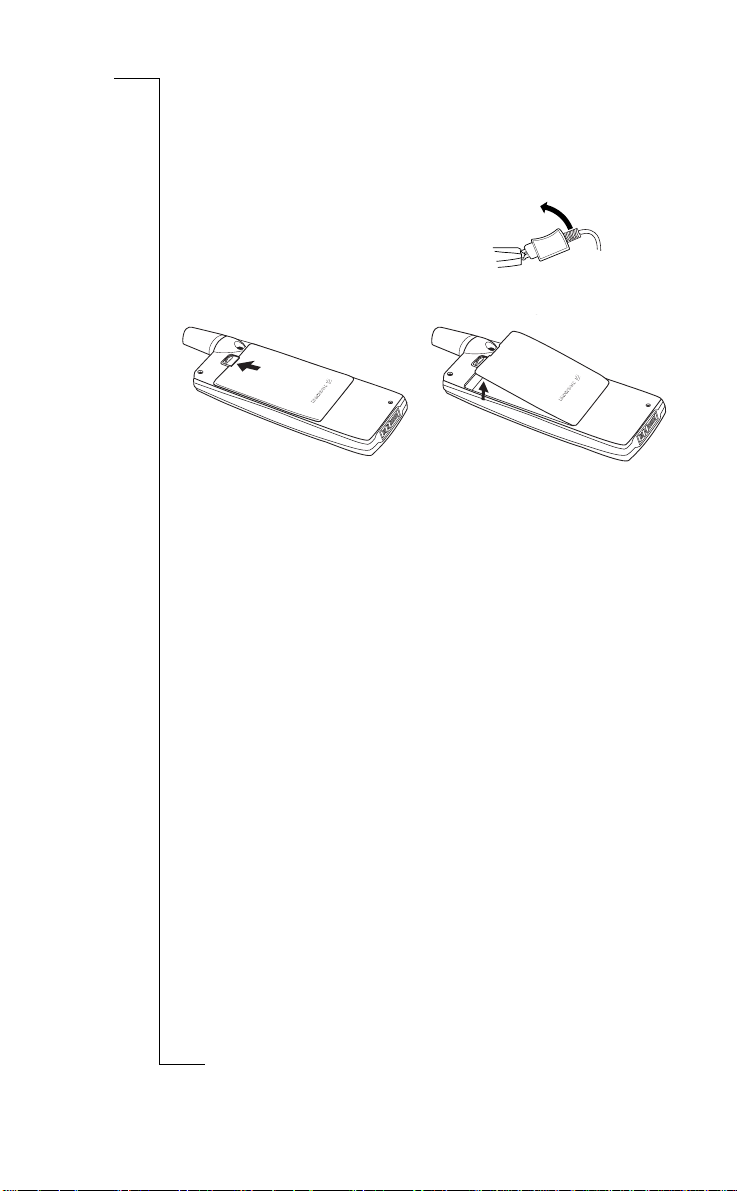
Assembly
You need to do the following to use your phone:
• insert the SIM card
• attach the battery to the phone
• charge the battery
B
A
r
E
The SIM Card
When you register as a subscriber with a network operator, you get a SIM
(Subscriber Identity Module) card. The SIM card contains a computer chip
that keeps track of yourphone number, the services included in your
subscription, and your Phone Book information, among other things.
SIM cards come in two sizes. One is the size of a credit card and the other is
smaller. Your phone uses the smaller card. Many credit card-sized SIM cards
have a perforated smaller card that you can take out easily. Before you can use
your phone, you must insert the SIM card as shown below.
Inserting and Removing the SIM Card
i
c
l
a
r
s
U
u
e
i
n
i
t
a
c
e
m
m
m
m
r
M
o
C
o
i
b
l
1. Remove the battery if attached. Slide the SIM card into the slot, under the
silvery holders, with the golden connectorsfacing down and the cut corner
to the right.
2. Raise the edge of the SIM card and slide it out.
The PIN
o
f
Most SIM cards are supplied with a security code, also known as PIN
(Personal Identity Number), which you needto access the network. Every
t
time you turn on your phone, you are asked to enter your PIN. You will find
o
your PIN in the information from your operator.
Some operators may have services that require a second PIN, your PIN2.
N
o
C
e
n
You should be careful with your PIN, since it is your protection against
o
unauthorized use of your subscription.
s
s
c
i
Preparing Your Phone for U se 7
s
n
o
Page 8

If your PIN is entered incorrectly three times in a row, the SIM card is
blocked. If this happens, you can unlock it by using your PUK (Personal
Unblocking Key code), which you also get from your operator.
The Battery
Your phonecomes with a lithium battery.The batteryis not charged when you
buy your phone, but there may be enough power to switch the phone on.
Note! We recommend that you charge the battery for up to three hours before
you use the phone for the first time.
Attaching the Battery to your Phone
• Place the battery on the back of the phone and push until you hear a click
When to Charge the Battery
The battery that comes with your phone can be charged wheneveryou wish
without affecting its performance. You can also charge the battery when the
phone is off.
m
m
o
Toremindyouthatyouwillsoonneedtochargethebatteryorreplaceitwith
a charged one:
• an alarm signal (a shortbeep) sounds and the message
• the indicator light on top of the phone starts flashing red.
If you have an Ericsson-approved battery, you can check the remaining talk
and standby times in the Status menu by sliding the volum e key upwards or
t
downwards in standby mode. The total remaining standby and talk time
o
depends on the typeof battery you use a nd your position in the network.
Please note that these times are approximate and you may have 20% less time
N
thanisshowninthedisplay.
Note! The phone turns itself off when the battery can no longer power it
satisfactorily.
s
C
r
appears in the display.
o
f
i
b
o
M
n
o
e
l
s
c
i
8 Preparing Your Phone for Use
r
E
r
e
C
i
c
m
o
l
a
m
s
U
u
e
i
n
o
i
t
a
c
Attention! Battery low
B
A
s
n
Page 9

Charging the Battery
B
A
s
r
E
e
s
U
1. Make sure that the batteryis
attached to the phone.
2. Connect the charger to the mains.
Note! The mains plug may look different depending on the mains socket in
your country. Do not connect it to any other item than your Ericsson Travel
Charger CTR-10. It must not be separated from the charger when plugged
into the mains socket.
To indicate charging:
• the battery meter in the display pulses continuously
• the indicator on top of the phone shows a steady red light (or green, if the
phone is switched on)
• the message
Ericsson-approved battery)
Note! If you charge a new battery that is empty, or a battery thathas not been
r
used for a long time,it may take several minutes until you getan indication of
charging in the display. Only then can you switch on and use your phone.
o
f
When the battery is fully charged, the battery meter in the display is full and
t
the indicator on top of the phone shows a steady green light.
o
Tip! You can use the phone while the battery is being charged. However, this
lengthens the charging time.
N
n
An Ericsson-approved battery is indicated by
start charging thebattery. For the best charging, talk and standby times in the
o
long run, werecommend that you use only Ericsson-approve d batteries with
s
your phone.
m
o
OptimizedCharging
C
b
o
M
m
e
l
i
r
e
C
3. Connect the charger to the phone
as shown in the picture. The flash
l
symbol on the plug must face
upwards.
a
i
c
n
u
m
m
o
is sh own briefly in the display (with an
Optimized Charging
c
i
i
t
a
s
c
i
Preparing Your Phone for U se 9
n
o
each time you
Page 10
Note! Batteries that are not Ericsson-approved are charged slowly for safety
reasons. These areindicated by the message ‘Alien battery - Slowcharging’ in
the display during the charging process.
Disconnecting the Charger
• Move the plug connected to the phone
upwards to remove it, as shown in the
picture.
A
s
B
Removing the Battery
1. Slide the release catch upwards.
c
r
e
m
m
o
o
C
C
e
b
o
i
l
r
o
f
t
e
a
i
s
U
l
c
i
i
t
a
n
2. Lift the battery away from the
u
phone.
m
m
n
o
o
M
N
n
o
s
s
c
i
10 Preparing Your Phone for Use
r
E
Page 11

Turning Your Phone On
r
E
and Off
s
U
u
m
e
t
a
PIN:
appears in the display
c
i
n
i
Turning Your Phone On
• Press and hold the NO keyuntil you hear a tone.
If “PIN:” Appears in the Display
Some SIM cards are protected with a PIN code. If
after you have turned on the phone:
1. Enter your PIN. If you make a mistake while enteringyour PIN, erase the
wrong number by pressing the
2. Press
YES.
i
C key.
c
l
a
r
Note! If your PIN is entered incorrectly three times in a row, the SIM card is
blocked. You can unblock it by using your PUK. See “The SIM Card Lock”on
page 75.
e
m
If ‘Phone locked’ appears in the display, enter your phone lock code. See
“The Phone Lock” on page 76.
Network Search
After you have turned on the phone (and entered your PIN), the phone
searches for a network.
When a network is found, the phone beeps three times. The indicator light on
r
top of thephone flashes green once every second and yournetworkoperator’s
o
name (in most cases abbreviated) appears in the display.
f
This is called standby mode. You can now make and receive calls.
t
Note! See “Error Messages” on page 142, if you do not reach standby.
o
Initial Settings
N
n
The first time you turn on your phone, youmay want to choose the ring signal
type and set the clock and date. For more information about these and other
o
settings, see “Personalizing Your Phone” on page 43.
s
o
C
o
M
m
e
l
i
b
m
o
C
s
c
i
Turning Your Phone On and Off 11
B
A
s
n
o
Page 12

Display Language
Most modern SIM cards automatically set the displaylanguage to the
Automatic
o
i
). If thisis
A
s
n
language of the country where you bought your SIM card, (
English
not the case, the presetlanguageis
“Display Language and Input Method” on page 48.
If yourphone shows a language that you donot understand, you can change it
Automatic
,or
English
to
To change the display language to Automatic
1. If not in standby mode, press and hold the
2. Press
3. Enter 8888.
4. Press
1. If not in standby mode, press and hold the
2. Press
3. Enter 0000.
4. Press
• In standby mode, press and hold the
l.
r.
To change the display language to English
l.
r.
Turning Your Phone Off
, in the following ways:
r
e
m
. Tochangethe display language,see
e
NO keytogotostandby.
s
U
a
c
i
NO keytogotostandby.
n
i
c
l
a
u
m
NO key until you hear a tone.
t
m
m
o
o
C
C
e
b
o
i
l
r
o
f
t
B
o
M
N
n
o
s
s
c
i
12 TurningYour Phone On and Off
r
E
Page 13

Display Information and
r
E
Key Functions
In standby mode, the display shows the name of your operator, the time,the
signal strength and the battery power.
Other icons appear if you receive any messages, divert all your incoming
calls, set the alarm clock and so on. In thischapter, you will also learn about
the key functions.
Display Information
The table below shows and explains each icon which may appear in standby.
Icon Name Explanation
Signal strength
e
meter
Battery meter Tells you the status of the battery.
m
Missed call
indicator
Divert indicator
m
AcceptSome/None
indicator
o
N
t
o
f
o
C
r
b
o
M
n
C
Ring signal off
indicator
e
Alarm indicator The alarm clock has been setand is
l
i
Silent indicator All audible signals are turned off,
SMS indicator You have received a text message.
Voice mail indicator You have received a voice message,
Line 1 indicator Line 1 is in use for outgoing calls - if
Line 2 indicator Line2 is inuse - if you subscribe to the
r
i
c
m
o
l
a
o
s
Infrared modem The built-in infrared modem is
e
s
U
t
a
c
i
n
u
Tells you thestrength of the network
signal.
m
Youhavemissedanincomingcall.
All incomingcalls will be diverted to a
defined number.
No calls or only certain calls from
numbers in a list are received.
No sound can be heard when you
receive a call.
on.
exceptthealarmandtimer.
depending on your subscription.
you subscribe to the Two Line Service
Two Line Service.
activated.
s
c
i
Display Information and Key Functions 13
o
i
B
A
s
n
Page 14

Ciphering indicator Ciphering is currently not being
Keylock indicator Indicates that the keypadis locked.
Note! Each menu has got its own symbol. See “Menu Graphics” on page 24.
Key Functions
The table below explains the key functions.
Key Use
YES
NO
u, land r
C (Clear)
Number keys Toenter the digits 0-9.
C
r
*
o
f
# (Hash)
Volume key
t
upwards and
downwards
o
M
N
n
Note! For information about the menus, see “Movingthrough the Menus”on
o
page 26.
To makecalls and answer calls.
To voice dial,press and holdthe key.
To enterthe Call List fromstandby.
To choose a menu, sub-menu or setting.
To turn the phone on or off, press and hold thekey from
standby.
To end a call.
To reject a call.
To go back one levelin the menus, to exita setting or to
leave a settingunchanged.
To getback to standby mode, pressand hold the key.
To enter themenu system.
To move(scroll) through menus, lists andtext.
To erase numbers and letters from the display.
To mute the microphone duringa call, press and hold down
the key.
m
To setthe phone silent, press and hold the key from
standby.
To deletean item from a list.
m
The 0 key enters the international prefix (+) if held down.
o
To callyour Voice Mail, press and hold the 1 key.
To enter the phone book, press and hold any of the
numbers 2-9.
To movethrough menus using shortcuts.
l
To enter letters, for example when writing an SMS.
i
To enter
To shift between capital and lower-case letters.
b
To enter #.
o
To increase or decrease the volumeof the earpiece or
handsfree loudspeaker during a call.
To reject an incoming call, slide the key twice.
To voice dial, slide andhold the key.
To move through the menus.
To enter theStatusmenu.
c
r
e
o
C
e
*.
s
s
c
i
14 Display Information and Key Functions
r
E
provided by the network.
e
s
U
l
a
i
i
n
u
m
m
a
c
t
o
i
B
A
s
n
Page 15
Making and Receiving Calls
In this chapter, we assume that you have turned on your phone and that you
are within rangeof a network.If you are abroad, you may use other networks,
provided your home network has an agreement that allowsyou to do this. See
“Setting Network Preferences” on page 88.
r
i
c
l
a
Making a Call
. Enter the area code and
phone number.
. Press YES.
s
U
u
e
i
n
i
t
a
c
e
m
m
m
m
o
Note! Some countries m ay not use area codes.
While a callis in progress, a time counter automatically starts and you can see
how long you have been on the phone. If your network and subscription
supports it, you see the price of the call in the display. See “Knowing the Call
Time and Call Cost” on page 91.
t
Ending a Call
• Press
o
Re-dialling a Previously Called Number
N
In the Call List you find numbers that you have dialled, answered or missed.
C
r
o
f
NO to end the call.
M
n
b
o
i
l
o
C
e
B
A
s
n
o
r
E
o
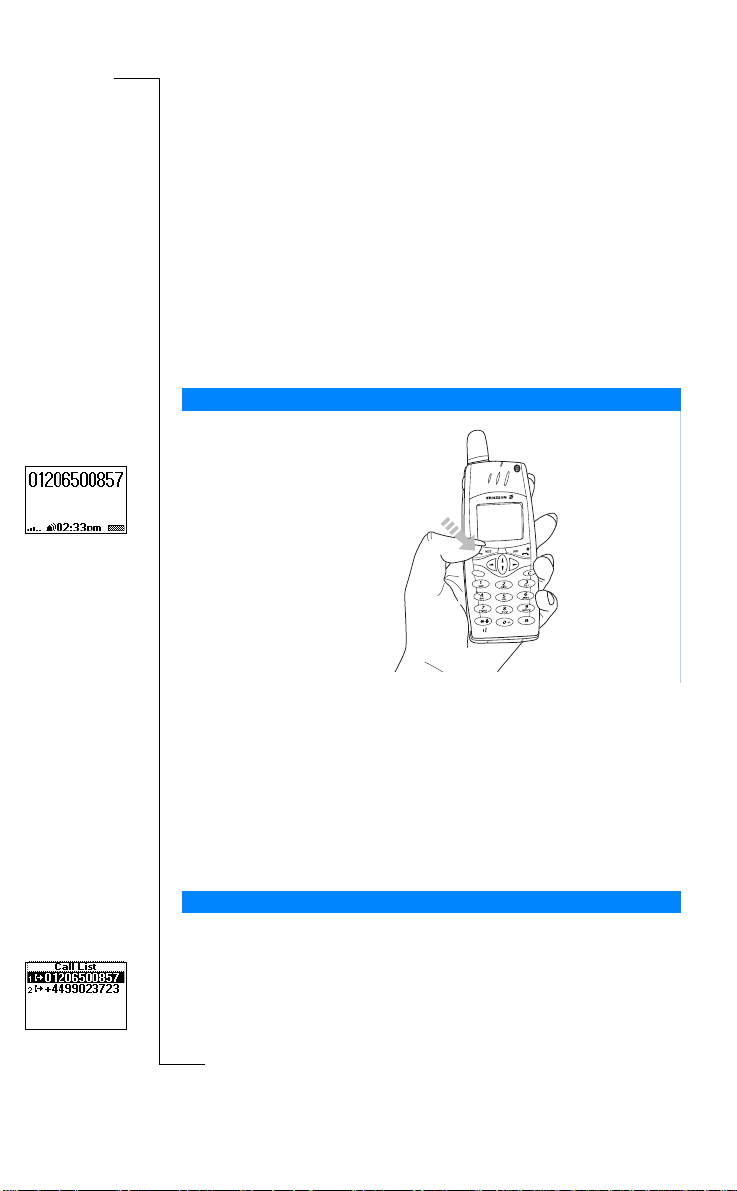
To re-dial a previously called number
1. Press
s
2. Scroll through the list with
s
3. Press
YES to enter the Call List.
YES to make the call.
c
i
u and select the number you want to call.
Making and Receiving Calls 15
Page 16

User busy
Retry?
Answer?
For more information, see “Using the Call List” on page 39.
Automatic Re-Dialling
If the connection failed when you first called, the display shows
can now re-dial the number by pressing
dials (up to 10 times)
• until the call is answered.When the call is successfully connected, you
hear a ring signal.
• until you press a key or receive a call.
Note! Automatic re-dialling is not available for fax and data calls.
Making Internatio nal Calls
1. Press and hold the 0 key until a + sign appears.
The + replaces the international prefix number of the country from which
you are calling.
2. Enter the country code, area code (without the leading zero) and phone
number.
3. Press
1. Enter 112 (the international emergency number).
2. Press
The international emergency number 112 can normallybe used in any country,
with or without a SIM card inserted, if a GSM network is within range.
Note! Some network operators may require thata SIM card is inserted, and in
some cases that the PIN code has been entered as well.
Some networks may not usethe international emergency number 112.
When you receive a call, the phone rings and the display shows
If yoursubscription includes the Calling Line Identification (CLI) service and
the caller’s network sends the number, you see thecaller’s number in the
t
display. If the caller’s number and name are stored in the phone book, the
o
caller’sname is displayed instead.
N
If the incomingcall is a restricted number, the displayshows
YES.
Making Emergency Calls
YES.
r
e
m
m
o
C
C
e
r
Receivin g a Ca ll
o
f
i
b
l
o
M
n
YES. Your phone automatically re-
e
s
U
i
c
l
a
i
n
a
c
u
m
m
o
i
t
Retry?
n
o
Answer?
Private.
.You
s
B
A
o
s
s
c
i
16 Making and Receiving Calls
r
E
Page 17
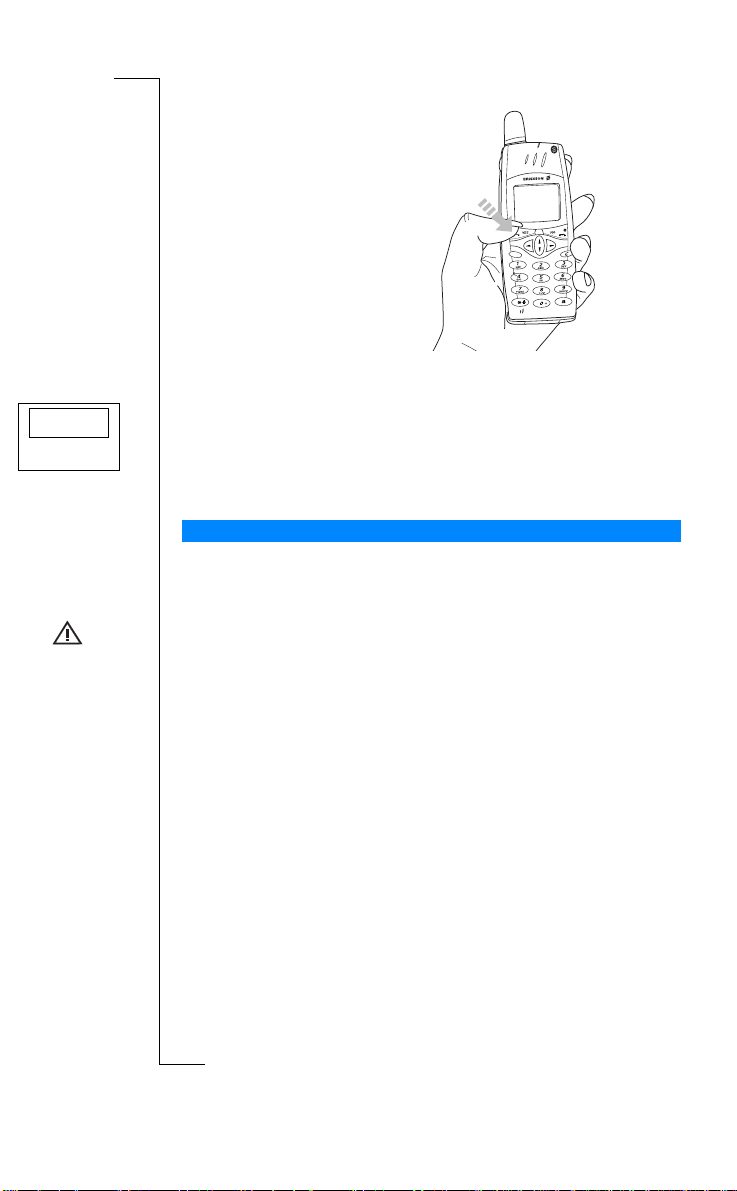
Answering a Call
Busy tone
• Press YES to answer the
call.
A
s
t
a
o
i
n
e
s
l
a
i
m
m
U
u
i
n
c
Rejecting a Call
• Slide the volume key on the side of the phone twice.
The display shows
ported by the caller’s subscription.If Divert Calls When Busy is on, the
call is diverted tothe number you have specified.See “DivertingIncoming
Calls” on page 73.
Ciphering
Ciphering is a built-in feature that scrambles your calls and messages to
provide additional privacy.
Anexclamationmarkisshowninthedisplayduringacall,toindicatethat
ciphering is currently not being provided by the network.
m
o
Busy tone
. The caller hears a busy tone if this is sup-
c
r
e
m
o
C
C
e
b
o
i
l
r
o
f
t
B
r
E
o
N
s
c
i
M
n
o
s
Making and Receiving Calls 17
Page 18

During a Call
B
A
Your phonehas several functions,which you might find helpful whilea call is
in progress.
Changing the Listening Volume
You can easily change the listening volume during a call by sliding the
volume key on theside of the phone.
To change the listening volume during a call
• Slide upwards to increase the volume.
• Slide downwards to decrease the volume.
Muting the Microphone
If you wish, you may turn the microphone off during a call.
To turn th e microphone off temporarily during a call
Muted
Callheld
1. Press and hold down the
Muted
2. To c ontinue your conversation, release the
Tip! Instead of pressing and holding the
T oput a call on hold
1. Press
Call held
2. To c ontinue your conversation, press
o
Sending Tone Signals
f
To use telephone banking services or to control an answering machine, you
t
need to use codes. These codes are sent as tone signals (alsoknown as DTMF
tones or touch tones). With your mobile phone, you may use these codes
o
during a call. If you press 0-9, * and # during a call, these numbers and
charactersare sent as tone signals.
N
Tip! You can also save codes only or codes together with a phone number in
o
your Phone Book.See “Telephone Banking Services” on page 36. However,it
may be a risk to save your codes in the phone in case it is stolen. In order to
s
safely store your codes in the phone, see “Code Memo” on page 115.
s
c
i
18 During a Call
r
E
appears in the display.
m
o
YES.
C
appears in the display.
r
i
b
o
M
n
e
C key.
m
C
e
l
r
e
s
U
i
c
l
a
i
n
a
c
u
m
m
o
C key.
C key, you can put the call on hold.
YES again.
t
o
i
s
n
Page 19

The Notepad
If you want to make a note of a phone number during a call, you can use your
phone display as a notepad.
B
Note! You c an also record either yourself or the person you talk to during a
call. See “Voice Memo” on page 109.
To use the notepad during a call
• Use the number keys to enter the number.
When you end the call, the number remains in the display or, if
On
, you will be asked to save the number in your phone book. You can also
find the numberin
Phone Book” on page 30.
When you enter the number, the person you are talking to will hear the tones.
If youwish, you may turn the tones off duringa call. See “Turn OffTones” on
page 48.
Add Number
in the
Phone Book
l
a
i
c
Checking the Duration or Cost of the Call
During a call, the display normally shows the duration in minutes and
seconds. Depending on your subscription, you may see the call cost displayed
instead.
Note! This depends on yournetwork and SIM subscription. See “Knowing the
Call Time and Call Cost” on page 91.
Minute Minder
If you turn on the minute minder, you hear a beep once every minute during a
call as a reminder of the duration of the ongoing call. See “Minute Minder”on
page 47.
r
o
More than One Call Simultaneously
f
Your phoneis capableof handlingmore than one call simultaneously. You can
put the current call on hold and then make or answer a second call. You can
t
also set up a conference call with up to five people. See “Handling More than
o
One Call Simultaneously” on page 83.
m
o
C
b
o
M
m
e
l
i
r
e
m
o
C
e
s
menu. See “Your Personal
U
a
c
i
n
u
m
i
t
N
n
n
Ask to Save
o
A
s
is
r
E
o
s
s
c
i
During a Call 19
Page 20

s
B
A
t
o
f
r
o
C
o
m
m
e
l
i
b
r
e
C
i
c
m
o
l
a
m
s
U
u
e
i
n
a
c
t
o
i
n
o
N
n
o
s
s
c
i
20 During a Call
r
E
M
Page 21

B
A
Functions and Settings
e
U
l
u
m
s
n
c
i
i
t
a
83
R320 Features 23
Using the Menus 24
Your Personal Phone Book 30
a
Using the Call List 39
Your Voice Mail Service 41
Personalizing Your Phone 43
Sending and Receiving
m
Text Messages (SMS) 52
Communicating via the Built-in Modem 62
Sending and Receiving Fax,
m
o
C
b
o
i
e
l
Business Card Exchange 70
r
o
Diverting Incoming Calls 73
f
Security for Your Phone and Subscription 75
t
Handling More than One Call
o
M
i
c
r
e
m
o
C
Data and E-mail 67
Simultaneously
N
n
Setting Network Preferences 88
Knowing the Call Time and Call Cost 91
o
s
s
Using Two V oice Lines 94
c
i
r
s
n
o
E
Page 22

Using the WAP™ Browser 95
t
o
f
r
Calendar 104
Voice Memo 109
Voice Control 112
Code Memo 115
Calling Card Calls 118
The Profile Concept 125
U
l
Accessories 128
a
i
Online Services 135
c
r
e
m
m
m
m
o
o
C
C
e
l
i
b
o
e
s
Extras 121
i
t
a
c
i
n
u
B
A
s
n
o
r
E
o
N
s
c
i
M
n
o
s
Page 23

R320 Features
B
A
r
E
Your R320 is a new generation phone: a Dual Band phone with a lithium
battery; a phone of modern design and advanced technology. It contains a
whole new set of functionality helping you to be more efficient and
productive, no matter where you are.
Use the WAP micro-browser the same way you use an ordinary Internet
browser; to access a whole world of useful information services. Let the
Calendar keep track of all your meetings and remindyou in advance.Relieve
your memory by using the Voice Memo to record yourself or another person,
and store your credit card codes, your PC-password and more in the Code
Memo.
Or why not use the Voice Control and say ‘Answer’ to answer a call or
‘Busy’ifyouwishtorejectthecall.Youcanalsocallapersonbysimply
saying the name.
The R320 has a Profile feature which makes it possible for you to change a
few settings by just choosinga certain profile, since each profile includes a
group of settings preset to suit a certain environment. For example, when you
go to a meeting, you can just choose the ‘Meeting’ profile and a number of
settings that suit a meeting are then set.
The profiles are alsorelated to intelligent accessories such as a desktop
charger, a portable or vehicle handsfree. For example, you may place the
R320 in a vehicle handsfree kit and the ‘In Car’ profile is chosen
o
automatically.
f
In the display of the R320 you can seea mixture of text and symbols, which
t
makes it easier for you to move through the menus when you want to change a
o
certain setting, turn on the VibratingAlert, send a message, save a number
andsoon.
N
An extra feature is the numbered shortcuts, which takes you to a certain
setting quickly and easily. You may also create your own favourite menu,
o
My Shortcuts, by includingthe settings you use most often. If you should
s
need help using the menus, the R320 is equipped with help text to guide you.
o
C
r
o
M
n
m
m
e
l
i
b
e
C
r
i
c
m
o
l
a
s
U
u
m
e
i
n
i
t
a
c
s
c
i
R320 Features 23
s
n
o
Page 24
Using the Menus
B
A
You can find all your phone functions in the menus. You use the menus every
time you want to change a setting in your phone, such as the ring signal. You
also use the menus to get the most out of your phone: to set the alarm clock,
send text messages, save importantphone numbers, etc.
The menus are arranged in a loop, which you enter and move (scroll) through
l and r keys or by using shortcuts. Each menu contains a list of
with the
options. Some menus have sub-menus with additional options.
Menu Graph ics
You enter the menus by pressing
icons symbolizing each menu. Besides these, there are symbols within the
sub-menus indicating missed calls, help texts, voice labels etc.
The table below illustrates and explains each menu icon and symbol.
Symbol Name Description
C
r
o
f
t
o
M
N
n
o
s
s
c
i
24 Using the Menus
r
E
t
a
o
i
n
e
s
U
l
n
u
c
i
a
i
l or r. At the top of the display there are
c
r
e
m
m
o
C
m
Handling of ongoing calls, call time
and call cost information.
clock and other extras.
Gives you accessto Internet.
used functions.
Youhave an ongoing call.
Indicates a missed call in the call list.
Indicates an answered call in the call
list.
Indicates a dialled number in the call
list.
Phone Book menu Your personal phone book
m
Messages menu Handling of text and voicemessages.
o
Ongoing Call menu/
Call Info menu
Settings menu Personal settings and profiles.
e
l
Extras menu Calendar, voice memo, games, alarm
i
b
WAP Services
menu
o
My Shortcuts menu A selection of your most frequently
Ongoing call
indicator
Missed calls
indicator
Answered call
indicator
Dialled number
indicator
s
Page 25

t
o
f
r
Phone memory
indicator
Group indicator Indicates that a phonebook entry is a
Unread SMS
indicator
Unchecked voice
Mail
Phone book
look up indicator
SIM card memory
indicator
Voicelabel in phone
indicator
Voice labelin car
indicator
Voicelabel in phone
and in car indicator
m
e
l
i
r
e
C
Preferred network
indicator
Forbiddennetwork
indicator
Home network
indicator
Help text indicator Indicates a help text.
m
Lock indicator Indicates that the card lockor phone
o
Key Lock indicator Indicatesthat the keypad is locked
C
Indicates that a phonebook entry is
saved in the phone memory.
group.
Indicates that a text message has not
been read.
Indicates that a voice message has
not been checked.
Indicates thatyou can enter the phone
book by pressing
e
Indicates that an SMS is saved in the
SIM card memory.
s
Indicates that a voice label has been
recorded for an entryin the phone
U
only.
Indicates that a voice label has been
l
recorded for an entryin the car
handsfree kit.
a
i
Indicates that a voice label has been
recorded foran entry in the phone and
c
inthecarhandsfreekit.
u
Indicates that a network is preferred
and can be used.
Indicates that a network is forbidden
m
and cannot be used.
Indicates that your network is within
m
range and can be used.
i
n
a
c
o
lock is on.
b
o
l.
t
o
i
B
A
s
n
r
E
o
N
s
c
i
M
n
o
s
Using the Menus 25
Page 26

Moving through the Menus
There are two ways of moving through the menus:
• scrolling by using
• using shortcuts
Scrolling by Using
Press... to...
U
l or r
YES
NO
C
Note! For information about how to enter letters, see “Entering Letters” on
page 31.
Tip! Once in the menu system, you can press and hold the
hold the volume key until you reach the sub-menu that you want instead of
pressing the
Using Shortcuts
A quicker way to move through the menusis to use the shortcuts. You simply
enter the number of the menu or submenu to which you want to go, but you
first need to enter the menusby pressing
press and hold
Tip! A quicker way to enter the ‘Find and Call’ menu is to press and hold
A quicker way to enter the first sub-menu in the ‘My Shortcuts’ menu is to
press and hold
t
Note! Your phone may not have all the menu alternatives described in this
o
manual since many of them are network- and subscription dependent. Because
of this, theshortcut numbers may vary between phones.
N
C
r
o
f
M
n
How to Interpret the Instructions
o
In the instructions in this manual we use the scrolling keys
s
describe the functions and settings, since the shortcut numbers may vary
between phones due to your subscription and network.
s
c
i
26 Using the Menus
r
E
u, l and r.
U, l and r
scroll up or down through menus or functions.
switch between menus orfunctions.
select a menu,sub-menu or setting.
go back one level in the menusystem, exit a setting or
leave a setting unchanged.
go back to standby mode by pressing and holding the
key.
delete an item from a list.
a
i
l
c
r
s
U
u
e
i
n
t
a
c
e
m
u keyor slide and
m
u key repeatedly.
m
o
e
NO as normal.
l
i
m
o
C
l or r. To getback to standby,you
b
l.
o
n
o
i
ul r
B
A
s
r.
to
Page 27
r
E
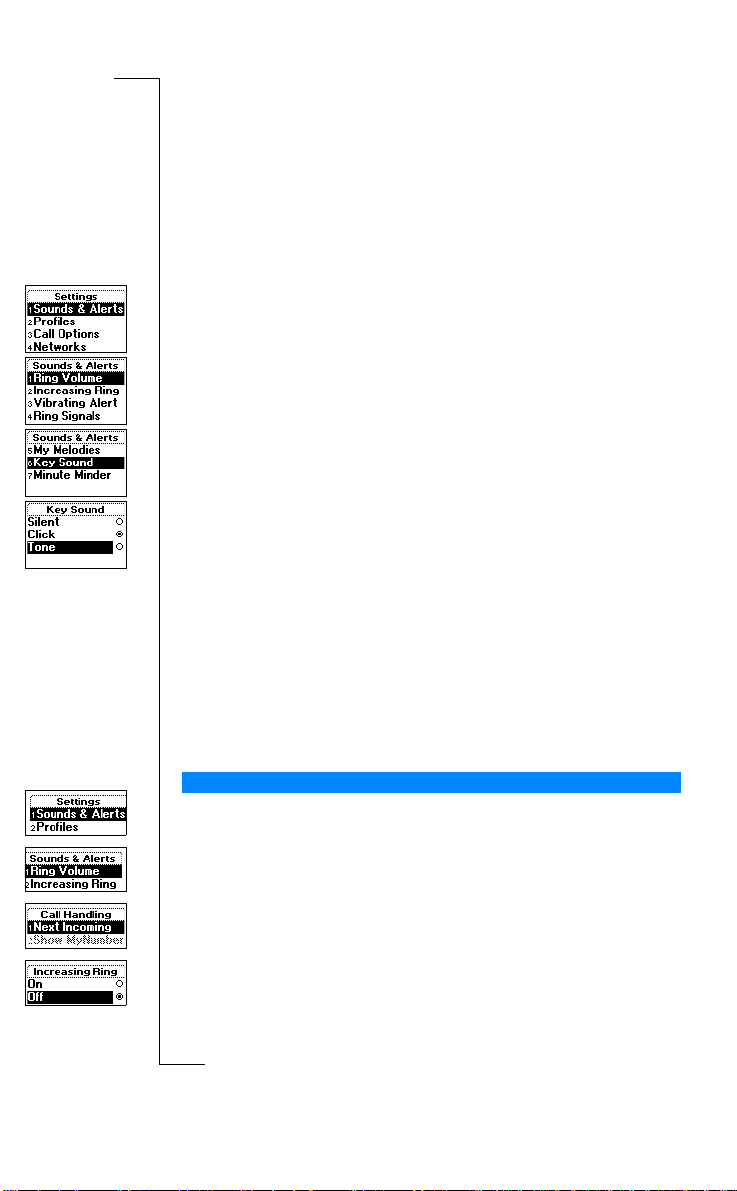
In this instruction we are going to set the key sound to ‘Tone’.
To set the key sound
Settings
, YES,
).
Tone
m
Sounds & Alerts
Sounds & Alerts
Key Sound
.
r
Tone
e
1. Scroll to
Tone
2. Select
Interpret the instruction as follows:
1. From the standby mode, use
2. Press
Now you are in the Settings menu.
The name of the menu that you have chosen is shown at the top of the
display (
3. Press
(Y oudo not need to scroll with the arrow keys since this is the first
sub-menu in the main menu
4. Use
Press
5. Use
Press
Now you have set the key sound to ‘Tone’.
To go back to standby mode, press and hold the
This is how to interpret the same instruction as above when using shortcuts:
.
YES to select the menu.
Settings
YES to select the
u to scroll to the
YES to select the sub-menu.
u to scroll to
YES to select the
, YES,
Key Sound
l or r to scroll to the
e
s
sub-menu.
U
l
Settings
).
a
sub-menu.
i
c
alternative.
m
n
u
c
i
NO key.
, YES.
Settings
i
t
a
m
To set the key sound
1. Press
2. Press 4 to select the
3. Press 1 to select the
4. Press 8 to select the
5. Select
r
o
Display Text
f
When you move throughthe menu system, the display changes.The following
hints can help you:
t
• Black text within a frame at the top indicates the menu you have chosen.
o
• Inverted text on a black layer indicates your position in the menu system.
N
If you pre ss
• Grey text indicates a function that is temporarily unavailable, for example
n
due to your subscription or due to a certain settingwhich is not set to on.
• Textmarked with a tick indicates the current settingor settings selected.
o
• Textmarked with a filled button indicatesthe currentsetting selected.
m
l or r to enter the menu system.
o
C
Tone
.
l
i
o
Settings
menu.
C
Sounds & Alerts
Key Sound
e
sub-menu.
sub-menu.
b
o
M
YES you enter this menu or select this setting.
s
s
c
i
Using the Menus 27
menu.
n
o
B
A
s
Page 28

My Shortcuts
You can place your favourite settings in the menu My Shortcuts.In this way,
you can reach the settings you use most, quickly and easily.
B
When you buy your phone, My Shortcuts contains a few settings which you
can remove if you wish. You can also add a setting from another menu to
My Shortcuts.
To add a setting to My Shortcuts
1. Scroll to
2. Select a setting from the list by pressing *.
3. Enter the position number you want for your setting in this menu.
4. Press
5. Press
Tip! A quicker way to enter the first sub-menu in the‘My Shortcuts’ menu is
to press and hold
Depending on whether a call is ongoing or not, the menus Call Info and
Ongoing Call will replace each other:
• During an ongoingcall: The menu Ongoing Call is active with its sub-
• During standby mode: The menu Call Info is active with its sub-menu
When the
bottom of the
To help you use the functions and settings of the menus, your phone includes
pop-up help texts that explain the sub-menus.
t
These help texts are set to
o
them off at any time.
N
1. Scroll to
2. Select
YES.
If you want to add another setting, repeat steps 2 and 3.
To remove a setting from My Shortcuts, repeat steps 1 and 2.
YES to exit the list.
The Dynamic Call Info/Ongoing Call Menu
menu options, e.g. Hold Call, Switch Calls.
options, e.g. Last Call,Total Time.
C
Ongoing Call
r
Help Texts
o
f
M
To turn the help texts on o r off
n
o
OnorOff
s
s
c
i
28 Using the Menus
r
E
My Shortcuts
, YES,
Edit Shortcuts
c
l.
r
e
m
m
o
menu is active, you can find the
Ongoing Call
l
i
e
menu.
o
C
b
o
On
when you buy your phone, but you may turn
Settings
, YES,
Display
, YES,
.
l
a
i
m
m
Menu Help
, YES.
s
U
u
e
i
n
.
a
c
CallInfo
o
i
t
menu at the
A
s
n
Page 29
B
Infrared Port
Ring Volume
Select Profile
Edit Shortcuts
Switch to Line 1
A
s
t
a
depends on whether a call is ongoing or not.
o
i
n
Please note that this image displays all the possible
menu alternatives in your phone. Many of the
alternatives are network and subscription dependent.
Homepage
Resume
Bookmarks
WAP Profiles
WAP Settings
Enter Address
e
s
U
r
Games
Calculator
i
c
Locks
Time andDate
l
Voice Memo
a
VoiceControl
m
Accessories
Handsfree
u
Master Reset
i
The Call Info menu and Ongoing Call menu are
n
c
merged into one dynamicmenu. Which one is active
Timer
Calendar
Sounds & Alerts
Stopwatch
Code Memo
Alarm Clock
Infrared Port
e
Display
Profiles
Networks
Language
Call Options
m
m
04:22pm
My network
r
o
f
t
o
Turn on/off Tones*
C
Missed Calls
o
m
Hold Call*
Switch Calls*
Release Active*
e
l
i
Call List
Call Costs
Call Timers
b
C
Retrieve Call*
Next Call
o
Join Calls*
TransferCall*
Options
Call Info*
Release All*
Extract Part*
Release Part*
Parties in Conf*
* Only available during a call
r
E
o
N
s
c
i
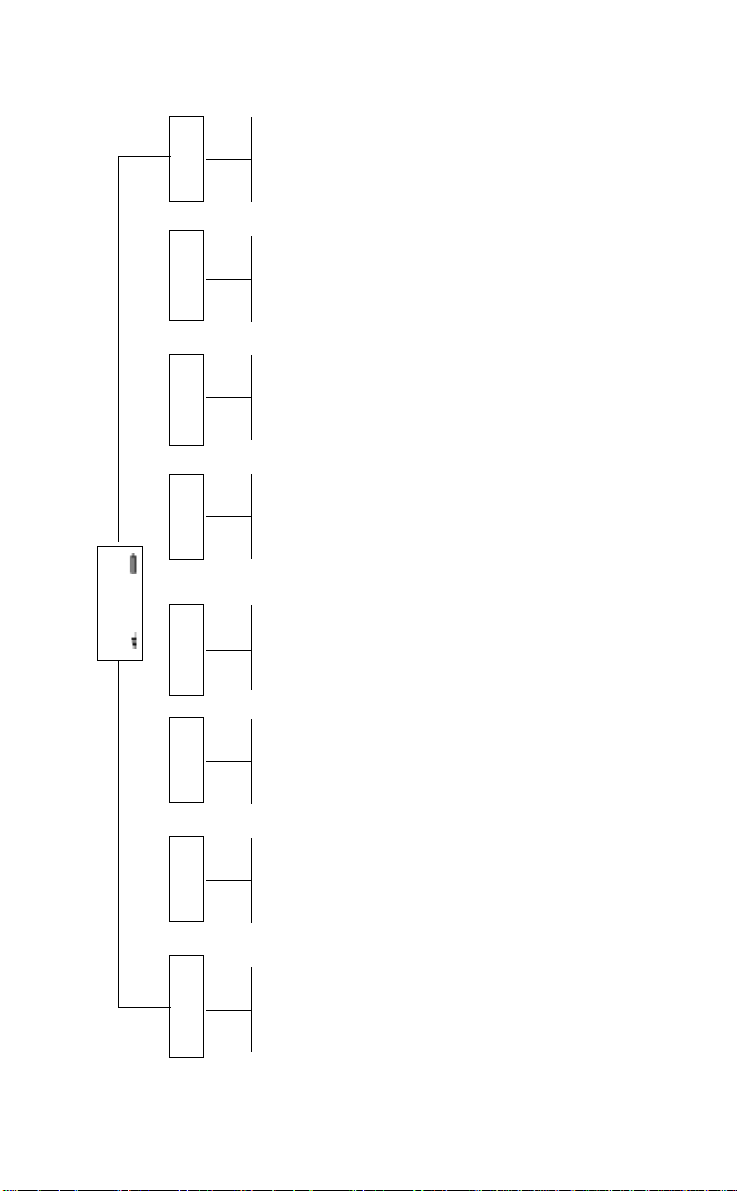
Messages Call Info Ongoing Call Settings ExtrasPhone Book My ShortcutsWAP Services
o
s
n
M
Call Voice Mail
Find and Call
Inbox
Unsent
Send New
*
Add Number
Find and Send
Options
Templates
Sent Items
Groups
VoiceLabels
Find and Edit
Business Cards
Options
Calling Cards
Email Addresses
Info Numbers
Memory Status
Fixed Numbers
ServiceNumbers
Using the Menus 29
Page 30

Your Personal
Phone Book
You can create a personal phone book by saving phone numbers and
accompanyingnames (an entry). An easy way to make calls is by recalling the
phone numbers or names saved in your phone book.
Creating a Personal Phone Book
Before youstart creatingyour personalphone book,there area few things you
need to know. Youneed to learn about thememories, how to save the numbers
with the international (+) sign and how to enter letters.
Phone Book Memories
You can save phone numbers and names in:
• thecardmemoryontheSIMcard
• the phone memory
Your entries are first saved in the positions on your SIMcard. The actual
number of memory positions available depends on your SIM card.
Saving your numbers in the card memory allows you to use the numbers
saved on the SIM card even when you change phones, i.e. when you insert
your SIM card into another phone.
By saving your numbers in the phone memory, they are always available to
r
you in your phone, even if you change SIM cards. The phone memory holds
99 positions in which your entries are saved when all SIM positions are
o
f
occupied.
t
International Numbers
If you intend to use your phone both athome and abroad, it is a good idea to
o
save all phone numbers as international phone numbers, i.e. with the (+) sign,
(which automatically replaces the international dialling prefix for the country
N
n
you are calling from) followed by the country code, the area code and the
phone number.
o
To enter an international phone number
s
• Press and hold 0 to enterthe + sign.
s
Excludetheleadingzerointheareacode.
m
o
C
i
b
o
M
c
i
30 Your Personal Phone Book
r
E
e
m
C
e
l
c
r
o
l
a
i
m
m
s
U
u
e
i
n
a
c
t
o
i
B
A
s
n
Page 31

r
E
Entering Letters
You can enter letters when you are using the phone book and when you are
composing a short message (SMS). See “Sending and Receiving Text
Messages (SMS)” on page52.
Press the appropriate key,1–9, 0 or #, repeatedlyuntil the character you want
appears in the display.
Press… to get…
1 Space-?!‚.:;"’<=>()_1
2 ABCЕДЖаЗ2Γ
3DEFèÉ3∆ Φ
4GHIì4
5JKL5Λ
6 MNOÑÖØò6
7PQRSß7Π Σ
8TUVÜù8
9 WXYZ9
0 +&@/¤%$£¥§¿¡0Θ Ξ Ψ Ω
##*↵
Example:
• To enter an ‘A’, press 2 once.
• To enter a ‘B’, press 2 twice quickly.
• Toenter lower-case letters, enter the letter, for example an ‘A’andthen
press *.An‘a’ appears. Lower-case letters now appear until you press *
again.
• To enter numbers, press and hold any numeric key.
• Todelete letters and numbers, press the
You may also use the volume key as a shortcut to certain letters:
• To enter a ‘B’, slide the volume key upwards and press 2.
o
f
• To enter a ‘C’, slide the volume key downwards and press 2.
If you use the input method called
t
slightly. Then the ~ sign is added to the number 1 key. Also, the signs
o
moved to the left in the row. See “Display Language and Input Method” on
page 48.
N
Tip! You can choose another alphabet by pressing and holding #. You can
o
also decide what alphabets you want to choose from, see “Display Language
and Input Method” on page 48.
s
o
C
r
o
M
n
m
m
e
l
i
b
e
C
c
r
o
l
a
i
m
WAP Address
e
s
U
a
c
i
n
u
m
C key.
, the table above changes
i
t
s
c
i
Your Personal Phone Book 31
n
o
s
._:
B
A
are
Page 32

Saving a Number Together with a Name
Every phone number that you save includes a position number. You can save
the phone numbers together with a name to make it easier for you to keep
track of your phone numbers.
To save a numbertogether with a name
1. Scroll to
2. Select
3. Enter a phone number that you wish to save (including the + sign and the
4. Enter a name that you want to associate with the phone number and press
5. Younow have three options:
If you have turned the Voice Dialling on, you are asked if you want to add a
voice label to your phone book entry. See “Voice Control”on page 112.
Ask to Save
If you wish to be asked to saveany dialled or answered number that isnot
already saved in your phone book, you can turn on the
1. Scroll to
f
2. Select Off. Press
t
Note! Your subscription must support the Calling Line Identification service.
o
Calling a Number Saved In the Phone Book
N
You can either call a number by using the name saved with it or you can call
the number by using the memory position that it wa s saved in.
o
The order of searching for names and numbers depends on the sort order you
s
have chosen, i.e. by name or by position.
Phone Book
A list of numbers used but not saved may appear.
Add new?
or any of the numbers from the list by pressing YES.
country code).
YES.
• Tosave the number in the suggested first empty position, press
• Tosave the number in another position, press the
position number, enter a new position number and press
• Tosave the number in the phone memory, you need to know how many
positions you have got on your SIM card. You can check this in Memory Status in the Phone Book menu. If you, forexample, have 200
positions on your SIM,you can enter position number 201 to save a
number in the phone memory.
m
o
C
r
ToturnAsktoSavefunctiononoroff
o
b
Phone Book
o
i
YES.
M
n
s
c
i
32 Your Personal Phone Book
r
E
, YES,
e
m
C
e
l
, YES,
AddNumber
a
i
c
r
m
o
Options
, YES,
, YES.
U
l
u
m
Ask to Save
e
s
n
i
t
a
c
i
C keytoerasethe
Askto Save
.
B
A
s
n
o
YES.
YES.
option.
Page 33

r
E
To choose a sort order
1. Scroll to
2. Select a sort order.
1. Scroll to
2. Enter the position number or the name (or the first few letters of the name)
3. Press
4. Press
Tip! A quicker way to enter the ‘Find and Call’ menu is to press and hold
Shortcutsto Phone Book Entries
When in standby, you can findan entry by:
• entering the position number followed by#.
• pressing and holdingone of the keys 2-9 to find an entry beginning with a
Once you are in the list of phone book entries you can use
through the positions, or enter a position number or a letter to go to a certain
entry.
Speed Dialling
You can call the phone numbers that you have saved in positions 1–9 in the
memory by entering the position numberand then pressing
Phone Book
To call a number saved in the phone book
Phone Book
associated with the number that you want to call.
YES.
If the name displayed is not the one you want, press
correct name and number.
YES to make the call.
specific letter.
For example, pressing and holding2 takes you to the first entry beginning
with the letter A (or closest following).
C
r
Example:
o
1. Enter the number 3.
f
2. Press
YES to make the call.
t
Keeping the Phone Book Up to Date
o
You may need to change thenames and numbers in the phone book from time
to time. You may also want to change the position number for the entry.
N
Editing a Phone Number In the Phone Book
Youneedtofindthephonebookentrythatyouwishtoedit.Youcanuse
either the stored position or the name. See “Calling a Number Saved In the
s
Phone Book” on page 32.
s
M
n
o
m
o
b
o
, YES,
, YES,
m
e
l
i
Options
Find and Call
c
r
e
o
C
, YES,
, YES.
l
a
i
m
m
Sort Order
s
U
u
, YES.
e
u until you find the
a
c
i
n
i
t
u to scroll
YES.
c
i
Your Personal Phone Book 33
B
A
s
n
o
r.
Page 34

To edit an entry
1. Scroll to
2. Enter the position number or the nam e for the entry that you wish to edit.
3. Press
4. Select
5. Edit the number and press
6. Edit the name and press
7. Edit the position number and press
Copying From One SIM Card to Another
If you want to change SIM cards, you do not need to save all the entries in
your phone book once again. Instead, you can copy the entries from one SIM
card to another, via the phone’s memory.
Note! Tomakesureyoudonoteraseentriesthatyouwanttokeep,itis
important that you check your phone memory and your two SIM card
memories before you start copying, see “Checking the Status of the Memory”
on page 38.
If your Phone Memory contains phone book entries that you wish to copy to
the new SIM card,you first need to copy these entriesfrom the phone memory
to the new SIM card. Otherwise, you can start copying from your old SIM
card to your new SIM card straight away. See “To copy from one SIM card to
another” on page 35.
1. Insert the new SIM card.
2. Scroll to
f
3. Enter the position number of the SIM card where you want to start saving
t
o
N
4. Press
5. Wait until the display shows
o
6. Continue under the heading "To copy phone book entries from one SIM
s
s
Phone book
YES.
Press
If the name displayed is not the one you want, press
correct name and number.
YES to select the entry.
Edit
.
l and r to move the cursor. Use the C key to delete.
Use
m
o
C
r
To copy from the phone memory to the new SIM card
o
your phone memory entries. Press YES.
For example, if the SIM card you want to copy to contains 10 entries that
M
you wish to keep, you should select position number 11.
YES again to start copying.
n
number of copied entries.
card to another" below.
b
Phone Book
o
i
c
i
34 Your Personal Phone Book
r
E
, YES,
YES.
e
m
C
e
l
, YES,
Find and Edit
YES.
, YES.
s
YES.
U
l
a
i
c
r
u
m
m
o
Options
, YES,
Copy
Phone book entries copied
u until you find the
e
a
c
i
n
, YES,
Copy to Card
together with the
t
o
i
B
A
s
n
, YES.
Page 35

r
E
To copy from one SIM card to another
1. Make sure your old SIM cardis inserted into your phone.
2. Scroll to
3. Enter the position numberfrom which you want to start copyingand press
4. Press
5. Wait until the display shows
6. Switch off your phone, enter the new SIM card and switch on the phone.
7. Scroll to
8. EnterthepositionnumberonthenewSIMcardtowhichyouwanttostart
9. Press
10.Wait until the display shows
Note! The phone can only copy 99 entriesat a time. If yourSIM cardcontains
more than 99 entries, you need to start copying from position 100 the next
time you start copying, and so on.
Overwrite Protection
If you try to save a phone number in a position which already contains a
phone number,the message
that position. You now have two options:
• Press
1. Press
2. Enter the new position number.
3. Press
f
When the Card M emory Is Full
t
When all SIM card positions are full, an icon appears next to the position
o
number, see margin. From now on your entries are stored in the phone
memory.
N
If all positions, including the phone memory are full, you have to deletean old
o
number by entering a position that is already occupied and press
Phone Book
YES.
YES again to start copying.
number of copied entries.
Phone Book
saving and press
YES again to start copying.
number of copied entries.
To save the number in the selected position
YES to replace the number with the new one.
C
To save the number in a different position
NO.
r
o
YES to save the number in the n ew position.
M
n
m
o
b
o
, YES,
, YES,
YES.
m
e
l
i
Options
, YES,
Phone book entries copied
Options
, YES,
l
Phone book entries copied
a
i
c
r
e
m
m
Overwrite?
appears together with the name saved in
o
C
Copy
Copy
s
U
u
, YES,
e
, YES,
i
n
c
Copy from card
together with the
Copy to card
i
t
a
together with the
s
s
c
i
Your Personal Phone Book 35
n
o
, YES.
B
A
s
, YES.
YES.
Page 36

To delete an entry from the memory
Phone Book
delete and press
position.)
YES.
Delete
.
YES to confirm your choice.
To delete all entries from the phone memory
Phone Book
Delete all in phone memory?
YES.
Press
yourself).
All entries in the phone memory are deleted.
o
C
r
To save a phone number with an account number and security code
Phone Book
o
p
character
appears in the display.
o
M
YES to save.
n
YES.
and press
If you want to save the number in a different position than the one
suggested. See “Saving a Number Together with a Name” on page 32.
Delete all in
phone memory?
1. Scroll to
2. Enter the position number or the name of the number that you want to
3. Press
4. Select
5. Press
1. Scroll to
2. The question
3. Enter the phone lock code (
Telephone Banking Services
If you use telephone bankingservices, you can save the phone number of your
bank together with your personal codes and account numbers. You only need
to add pauses between the phone number, account number and security code.
You insert a pause by pressing and holding the * key. Talk to your bank about
the correctflow of the phone number, codes and the number of pauses thatare
required.
Note! However, itmay be a risk to save your codes in the phone in case it is
stolen. In order to safely store your codes in the phone, see “Code Memo” on
page 115.
1. Scroll to
2. After entering the phone number, press and hold the * key until the pause
f
t
3. Enter the code, if needed enter another pause, another code and so on.
4. Enter the namethat you want to associatewith the phone number and code
o
N
5. Press
o
s
To make a call with tone signal codes, proceed as described in “Calling a
Number Saved In the Phone Book” on page 32. When you make the call, the
s
c
i
36 Your Personal Phone Book
r
E
, YES,
Find and Edit
YES. (This depends on the sort order, i.e. by name or by
, YES.
s
t
a
o
i
n
, YES,
e
Delete All
, YES.
s
appears.
U
0000
or another one thatyou have chosen
r
i
c
l
a
n
u
c
i
e
m
m
m
m
o
C
e
l
i
, YES,
AddNumber
, YES.
b
B
A
Page 37

phone dials the number, waits until the call is answered and then sends the
code. If you insert another pause and another code, it pauses again, sends the
next code and so on.
Groups
The phone also allows you to create groups of phonebook entries. In this way
you can send a text message to severalrecipients at the same time.
See “Sending and Receiving Text Messages (SMS)” on page 52.
Add group?
s
YES.
U
Add member?
u
m
e
i
n
, YES.
a
.
c
t
i
C.
o
To create a new group
1. Scroll to
2. Enter a name for the group and press
3. Scroll to
4. Select an entry in your phone book.
5. To add the next member, press
1. Scroll to
2. Select the group that you want to edit.
3. Scroll to
4. Select an entry in your phone book.
1. Scroll to
2. Select the group that you want to edit.
3. Select
4. Scroll to the member that you want to delete and press
5. Press
1. Scroll to
2. Select the group that you want to delete.
f
3. Select
4. Press
t
Phone Book
Add member?
To add a new member to an existing group
Phone Book
Edit
To delete a member from a group
Phone Book
Edit
YES to confirm your choice.
C
To delete a group
r
Phone Book
o
Delete
YES to confirm your choice.
, YES,
.
o
.
o
, YES,
, YES.
, YES,
Add member?
m
, YES,
m
e
l
i
, YES,
b
Groups
Groups
r
e
Groups
C
Groups
YES at
i
c
, YES.
m
o
, YES,
l
a
, YES.
, YES.
, YES.
A
s
n
B
r
E
o
E-mail Addr esses
M
You can save e-mail addresses to be used when you want to send a text
N
message as an e-mail. You can save 10 e-mail addresses consisting of 60
n
characterseach.
o
See “Sending and Receiving Text Messages (SMS)” on page 52.
s
s
c
i
Your Personal Phone Book 37
Page 38

To save an e-mail address
1. Scroll to
2. Enter an e-mail address andpress
3. Enter a name and press
Tip! The @ sign is accessed by pressingthe 0 keythree times.
Phone Book
, YES,
Email Addresses
YES.
YES.
, YES,
Add new?
, YES.
B
A
To edit an e-mailaddress
1. Scroll to
2. Select the entry that you want to edit.
3. Select
4. Edit the e-mail address and press
5. Edit the name and press
1. Scroll to
2. Select the entry that you want to delete.
3. Select
4. Press
Checking the Status of the Memory
The Memory Status function in your phone book lets you check how many
memory positions you have left in your memories.
• Scroll to
Phone Book
, YES,
Email Addresses
, YES.
e
Edit
.
YES.
To delete an e-mail address
Phone Book
Delete
YES to confirm your choice.
, YES,
.
Email Addresses
a
i
c
r
YES.
l
s
U
, YES.
u
i
n
t
a
c
e
m
m
o
C
m
MemoryStatus
, YES.
To check the status of your different phone book memories
m
Phone Book
, YES, Options, YES,
o
o
i
s
n
C
e
b
o
i
l
r
o
f
t
o
M
N
n
o
s
s
c
i
38 Your Personal Phone Book
r
E
Page 39

Using the Call List
B
A
r
E
The Call List is a phone number log that saves information (time, date, phone
number and name) about thelast 30 incoming and outgoing calls. Once your
list exceeds 30 calls, the oldest one is deleted.
Note! Depending on whether a call is ongoing or not, the menus ‘Call Info’
and ‘Ongoing Call’ will replace each other. See “The Dynamic Call Info/
Ongoing Call Menu” on page 28 for more information.
c
r
o
a
i
m
, YES.
l
What Calls Are Saved?
The numbers that you have dialled are always saved. If your subscription
includes the Calling Line Identification(CLI) service and the caller’s network
sends the number, you will also find the numbers (together with a name if
saved in your phone book) of answered and missed calls in the Call List.If
the incomingcall is a restricted number, the display shows
any of the numbers in the Call List.
The Call List saves:
e
m
Dialled numbers
m
Answered calls
o
C
r
All the calls are saved together in chronological order. The last call you have
made is saved in the first position. If the same number is called more than
o
once, the latest call replaces earlier ones. If you check a call within 24 hours,
f
the time of the call is displayed. Otherwise, the time is replaced by the date.
t
Note! If you change SIM cards or turn the Call List off, the list is cleared.
o
Called numbers may remain in the SIM card memory though.
N
Tocall a number from the call list
n
1. Scroll to
o
2. Scroll to the number that you want to call and press
s
Tip! Press
s
list.
b
o
M
Call Info
YES when the phone is in standby mode to go directly to the call
Missed calls
e
l
i
, YES,
C
Call List
s
U
u
m
e
i
n
i
t
a
c
Private
YES.
c
i
Using the Call List 39
s
n
o
. You can call
Page 40

To delete a number from the call list
1. Scroll to
2. Scroll to the number you want to delete and press
The question
3. Press
To clear the call list
1. Scroll to
Call list
Reset?
Missedcalls:1
The question
2. Press
To turn the call list on or off
1. Scroll to
2. Select
If you select
3. Press
Missed Calls
If you have missed a call, the message
where the number
1. Press
2. If you wish to call a n umber from the list of missed calls, press
number you want to call.
Note! You can also see the Missed Calls List in the ‘Call Info’ menu. Missed
calls are also saved in the Call List.
Showing And Hiding Your Number
Some operators offer subscriptions where your phone number is normally
hidden. You can choose to show or hide your numberfor a particular call, if
r
Calling Line Identification Restriction service (CLIR) is supported by your
o
subscription.
f
To hide your phone number for a particular call
t
1. Enter the phone number you wish to call.
2. Scroll to
o
3. Press YES to make the call.
N
n
To show your phone number for a particular call
1. Enter the phone number you wish to call.
o
2. Scroll to
s
3. Press YES to make the call.
s
c
i
40 Using the Call List
r
E
Call Info
, YES,
Call List
, YES.
Delete?
appears in the display.
YES to delete the number.
Call Info
, YES,
Options
, YES,
Call List Clear?
YES to clear the call list.
Call Info
, YES,
OnorOff
.
Off
the question
YES to clear the call list.
1
indicates the number of missed calls.
YES to display the missed calls.
appears in the display.
Options
, YES,
CallList Clear?
a
i
c
Missed Calls: 1
r
e
m
m
m
o
o
C
C
e
l
i
b
o
Call Info
, YES,
Next Call
Next Call
, YES,
, YES,
M
Call Info
, YES,
ClearCall List
, YES.
e
s
Set Call List
l
, YES.
U
appears in the display.
c
i
n
appears in standby mode,
u
m
HideMy Number,
Show MyNumber,
C.
a
YES
t
YES
o
i
.
.
B
A
s
n
YES at the
Page 41

Your Voice Mail Service
B
A
r
E
This service depends on your subscription and operator.
Theansweringserviceofyournetworkallowscallerstoleaveavoice
message when you cannot answer your calls. Depending on your network
operator, you will be informed that you have received a voice message in
different ways.
Some operators inform you by sending a specific Voice Mail indication. If
this is the case, the voice mail icon appears in the display.
Most operators, however, inform you by sending a text message, (i.e. an
SMS), for example asking you to call your Voice Mail Service.
Note! For more informationabout your VoiceMail Service, please refer to the
information provided by your network operator.
Communicating With Your Voice Mail Service
If you want your phone to easily interact with your Voice Mail Service,you
can store the number to your Voice Mail Service. You will get the number in
the information provided by your network operator.
To store your Voice Mail number
1. Scroll to
2. Enter your VoiceMail number and press
Note! The number to your Voice Mail Service may be different ifyou are
o
calling from a network that is not your home network.
f
Calling Your Voice Mail
t
When you receive a voice mail, an alert signal sounds and the message
o
New voicemail
indication). If you want to check your voice mail now, press
N
Voice Mail Service.
If youpress
o
to your recorded messages.
s
o
Messages
C
r
o
appearsin thedisplay (only if you receivethe specific voice mail
M
n
NO, you can call your Voice MailService at a later time to listen
m
m
, YES,
e
l
i
b
e
C
Options
c
r
o
l
a
i
m
, YES,
s
U
u
m
Voice Mail No.,
YES.
e
i
n
i
t
a
c
YES.
s
c
i
Your Voice Mail Service 41
s
n
o
YES to call your
Page 42

Tocall your Voice Mail Service
Messages
, YES,
, YES,
, YES,
Call Voicemail
Options
Options
r
e
• Scroll to
Tip! You can also call your Voice Mail Service by pressing and holding 1
from standby.
Changing Num ber and Signal
To change your Voice Mail number
1. Scroll to
2. Press and hold
3. Enter your new Voice Mail number and press
1. Scroll to
2. Select the signal you want.
Tip! If you subscribe to the Two Line Service, you may have different Voice
Mail numbers for your two lines. Youmay also setdifferent options for the two
lines.Forexample,youcansetallincomingcallsonLine1tobedivertedto
your Voice Mail and let all incoming calls on Line 2 be connected.
Further information about your Voice Mail Service canbefoundinthe
operating instructions supplied by your network operator.
Messages
C to delete the existing number.
To change the message alert signal
Messages
, YES,
, YES,
i
c
, YES.
l
a
m
Voice Mail No.,
e
YES.
s
U
MessageAlert
i
n
u
YES.
, YES.
a
c
t
o
i
A
s
n
m
m
m
o
o
C
C
e
b
o
i
l
r
o
f
t
B
o
M
N
n
o
s
s
c
i
42 Your Voice Mail Service
r
E
Page 43

Personalizing Your Phone
s
t
a
.
, YES.
o
i
n
s
U
Turn off Silent
u
m
, YES,
e
c
i
n
Ring Volume
Silent
You can choose to set your phone completely silent so that all signals except
the alarm and timer signals are turned off.
To set the phone silent
1. From standby, press and hold
2. Select
You can set the volume in six steps. The first step means that two clicks are
heard when you receive a call. You can also turn the ring signal off (0). An
icon then appears in standby.
1. Scroll to
2. Use
3. Press
Tip! Use the volume key on the side of the phone to change the volume.
Increasing Ring
t
Youcanchoosearingsignalthatrisesinstepsfromthesoftestvolumetothe
o
loudest, Increasing Ring.
TurnonSilent
An icon appears in standby.
Tocancel, repeat step 1 and press
Ring Signal Volume
To set the ring signal volume
The level of the ring volume appears in the display.
u to increase or decrease the volume.
C
The phone rings once with the actual setting as you increase the volume.
r
YES to save the setting.
o
f
M
Settings
o
o
.
m
m
, YES,
e
l
i
b
e
Sounds & Alerts
C
c
r
o
C.
a
i
YES at
m
l
B
A
r
E
N
To set the ring signal to Increasing Ring
n
1. Scroll to
2. Select
o
s
The Increasing Ring must be Off for the ring signal volume to apply.
s
Note! If the phone is set to silent, the increasing ring signal is not heard.
On
.
Settings
, YES,
Sounds & Alerts
, YES,
IncreasingRing
c
i
PersonalizingYour Phone 43
, YES.
Page 44

Ring Signal Type
You can choose aring signal from a list ofdifferentsoundsand melodies. You
can also compose up to four melodies of your own by entering notes with the
keypad. See “Composing and Editing Your Own Ring Signals” on page 45.
To choose one of the existing ring signals
Settings
o
C
o
M
Settings
, YES,
m
b
, YES,
YES
1. Scroll to
YES.
u, select the ring signal type that you want and press YES. When
2. With
scrolling through the list, the melody currently stored in the highlighted
position is played.
Tip! If you do not wish to disturb other people,use the volume key on the side
of the phone to scroll silently.
Different Ring Signals for Line 1 and Line 2
If you subscribe to the Two Line Service, you canset different ring signals for
the two lines. Line 1 and Li ne 2 are displayed instead of Voice.
Different Ring Signals for Voice, Data and Fax Calls
Provided your SIM subscription supports Fax and Data calls, you can set
different ring signals for voice, fax and data calls respectively.
Specific Ring Signals for Personal Calls
If your subscription includes the Calling LineIdentification(CLI) service,
youcanassignapersonalringsignaltouptotencallers.Youcan,for
example, have one ring signal for your friend and another one for your
colleague.
If the lastseven digits of a caller’snumber correspond to a number you have
r
specified, then that caller’s ring signal is used.
o
You can include question marks (?) in a phone number. For example,
f
012345??? means that calls from phone numbers between 012345000 and
t
012345999 will have the same personal ring signal. You get a question mark
by pressing and hol ding #.
o
N
To specify a caller’s number and the accompanying ring signal
n
1. Scroll to
YES,
Add new?,
o
2. Enter the caller’s number and press YES.
s
You can alsorecall it from the Phone Book by pressing
3. Select the ring signal type you want and press
s
c
i
44 Personalizing Your Phone
r
E
m
e
l
i
Sounds & Alerts
.
Sounds & Alerts
a
i
c
r
e
m
o
C
, YES,
U
l
u
m
, YES,
Ring Signals
e
s
c
i
n
Ring Signals
YES.
, YES,
t
a
, YES,
n
o
i
Personal Rings
l.
A
Voice Calls
s
B
,
,
Page 45

To delete a caller’s number
Settings
, YES,
1. Scroll to
YES.
2. Scroll to the number you wish to delete and press
Delete
3. Select
Composing and Editing Your Own Ring Signals
You can compose four different ring signals.
To compose a ring signal
1. Scroll to
2. Select
3. Press
4. The keypad now works as a keyboard (see figure in margin above).
Use the keypad to enter notes:
• Press and hold a key to enter a long note.
• Press 0 to raise the note one octave.
B
• Press # once to raise the note one semitone.
• Press # twice to lower the note onesemitone.
5. To listen to your melody,press
6. Press
Toedit a ring signal
1. Scroll to
2. Scroll to either
YES.
3. Select
The notes are displayed and you can edit the melody notes with the keys.
Press
Note! You can also compose your own and download existing ring melodies
o
from the Ericsson Mobile Internet:
f
http://mobileinternet.ericsson.com
t
and press YES.
Settings
My Melody 1,My Melody 2,My Melody3orMy Melody 4
C to clear the display.
YES again to save it or press NO to continue editing.
Settings
o
Edit
.
C
YES to play it.
r
o
Sounds & Alerts
, YES,
Sounds & Alerts
r
e
m
, YES,
Sounds & Alerts
m
My Melody 1,My Melody 2,My Melody 3orMy Melody 4
C
e
l
i
b
i
c
YES.
m
o
, YES,
l
a
m
, YES,
U
u
, YES,
Ring Signals
e
My Melodies
s
c
i
n
My Melodies
YES.
a
, YES,
, YES.
o
i
.
t
, YES.
Personal Rings
A
s
n
and press
,
B
r
E
o
Sending and Receiving Ri ng Melodies
M
You can use the built-in modem in your phone to send your ring melodies to
N
and another similar phone or a handheld PC/PDA. You can receive melodies
n
from another similar phone, a handheldPC/PDA or a PC.
o
In order to send ring melodies, your phone uses a standard called‘IrDA-Ultra’
s
and to receive, it can use both ‘IrDA-Ultra’ and ‘Standard IR’.
s
c
i
PersonalizingYour Phone 45
Page 46

Note! It is only possible to send a melody to another similar phone or a
handheld PC/PDA, and you can receive melodies from another similar phone
and certain PCs and handheld PCs/PDAs. Also, the minimum distance
between your phone and another phone, a PC or a handheld PC/PDA can
vary. If you do not know whether your PC or handheld PC/PDA supports the
transfer of calendar appointments, or how far away you can place the phone
from it, please consult the User’sGuide of your PC or handheld PC/PDA or
contact the local retailer.
To send a melody
Settings
1. Scroll to
2. Scroll to the melody that you want to send. Press
3. Position the infrared eye next to the
infrared eye on the phone or handheld
PC/PDA to which you wantto send the
melody. Be sure to remain connected
during the whole transfer.
4. Select
When the transmission has succeeded, the
display shows
To receive a melody
1. Activate the phone’s infrared eye by scrolling to
YES,
10minutes
mobile phone is facing the infrared eye on your phone.
2. When your phone has received the melody, you hear a short tone and see
the text
3. If you want to hear the melodybefore youstore it, press
r
question
4. Press
5. Select in which position in the melody list you want to store the new
t
o
6. Press
N
Note! You cannot select ‘Infrared Port’ from the Extras menu if you are using
the WAP browser, or if you use a cable for the communication between your
phone and the computer.
s
YES when you see the text
o
f
melody.Theoldmelodystoredinthatpositionwillbeerased.When
scrolling through the list, the melody currently stored in the highlighted
position is played.
YES to store the melody.
n
o
, YES,
Beam
and press YES.
Melodybeamed
m
, YES. Also,make sure that the infrared eye on the senders'
o
New melody received
C
Play?
. Otherwise press NO.
b
o
M
s
c
i
46 Personalizing Your Phone
r
E
m
e
l
i
Sounds & Alerts
a
i
c
r
e
.
m
o
C
.
Save melody?
, YES,
U
l
u
m
e
My Melodies,
s
c
i
n
Extras
.
o
YES.
i
YES.
t
a
, YES,
YES to answer the
s
n
InfraredPort
B
A
,
Page 47

r
E
Vibrating Alert
You can choose to be notified of an incoming call by the buzzing of the
Vibrating Alert. You can set the phone’s Vibrating Alert to one of the
following:
• On (all the time)
• On If Silent (on when the ring volume is turned off orwhen you have set
the phone to silent)
• Off (all the time)
s
U
, YES,
u
m
, YES,
, YES,
, YES,
YES.
e
a
VibratingAlert
c
i
n
MessageAlert
Alarm Signal
Key Sound
, YES.
i
t
, YES.
, YES.
, YES.
Note! When yourphone is placed in a desktop charger or a handsfree car kit,
the Vibrating Alert is turned off automatically.
To set the Vibrating Alert
Settings
, YES,
, YES,
m
m
, YES,
e
l
i
b
, YES,
Sounds & Alerts
YES.
a
i
c
r
e
Sounds & Alerts
YES.
m
o
C
Sounds & Alerts
YES.
Sounds & Alerts
l
1. Scroll to
2. Select the setting you want. Press
Message S ignal
You can choose whether to hear clicks, tones or nothing (silent) when you
receive a voice or text message (SMS).
To set the message signal
1. Scroll to
2. Select the signal you want. Press
You can also find the Message Alert in Options in the Messagesmenu.
Alarm Signal
1. Scroll to
2. Select the signal you want. Press
Key Sound
You can choose whether to hear clicks, tones or nothing (silent) when you
f
press the keys.
t
o
1. Scroll to
2. Select the key sound you want. Press
N
Settings
o
To change the alarm signal for the alarm clock
C
Settings
r
o
o
To set the key sound
M
Settings
n
Minute Minder
o
If you turn on the minute minder, you hear a beep once every minute during a
s
call.
s
c
i
PersonalizingYour Phone 47
B
A
s
n
o
Page 48

To turn theminute minder on or off
Call Info
1. Scroll to
2. Select
Turn Off Tones
If you make a note of a number during a call, you use the display as a notepad,
see “The Notepad” on page 19. The person you are talking to will hear the
tone signals as you press the keys. If you wi sh to, you may turn the tone
signals off.
Note! You can only turn the tones on or off during a call.
To turn thetone signals off during a call
1. Scroll to
2. Select
To turn th e tone signals on during a call
1. Scroll to
2. Select
Display Light
You can set the display light to automatic, off or on. In automatic mode, the
display light is turned off automatically a few seconds after you have pressed
the last key.It comes on again when you press a key or when you receive a
call or message.
To set the display light
1. Scroll to
2. Select the display light setting you want. Press
r
Display Language and Input Method
Most modern SIM cards automatically set the displaylanguage to the
o
language of the country where you bought your SIM card, Automatic. If this
f
is not the case, the preset language is English.
t
You can also select which input methods for text you can choose from when
o
using the phone book and when writing text messages.
N
To change the display language
n
1. Scroll to
o
2. Select the language you want. Press
s
Tip! You can always choose English by pressing
You can always choose Automatic by pressing
s
, YES,
OnorOff
.PressYES.
Ongoing Call
Turn off Tones
Ongoing Call
Turn on Tones
m
o
Settings
, YES,
C
b
o
M
Settings
, YES,
c
i
48 Personalizing Your Phone
r
E
Call Timers
, YES.
.PressYES.
, YES.
.PressYES.
e
m
C
Display
e
l
i
Language
c
r
o
, YES,
a
i
m
, YES,
, YES,
Minute Mi nder
e
s
U
l
c
i
n
u
m
Light
, YES.
YES.
Menus
, YES.
YES.
l, 0000, r in standby.
l, 8888, rin standby.
, YES.
t
a
o
i
B
A
s
n
Page 49

r
E
To select input methods to choose from
Settings
, YES,
Language
, YES,
Input
1. Scroll to
2. Use * to select or deselect the input methods you want to choose from
when using the phone book and when writing text messages.
The input method called
pages. Besides the ordinary characters found in the input method
sign is added to the number 1 key. Also, the signs
therow.See“EnteringLetters”onpage31.
WAP Address
, YES.
is used for entering addresses to WAP
._:
are moved to the left in
e
When you enter or edit a phone book entry or compose a message, you can
alter between these input methods by pressing and holding #.
Greeting Text
Display
e
m
Display
C
ERICSSON
i
c
, YES,
r
m
o
, YES,
a
When youturn onyour phone,
you can write your own greeting.
To write a new greeting
1. Scroll to
2. Select
3. Write your new greeting, using the number keys. For information on how
4. Press
1. Scroll to
2. Select
Settings
, YES,
Custom
.PressYES.
to enter letters, see “Entering Letters” o n page 31.
Y oumay also edit your existing greeting.
YES to confirm your setting.
Settings
o
Standard
m
, YES,
.PressYES.
To set th e standard greeting
s
U
l
appearsin the display.Insteadof this,
c
i
i
t
a
n
User Greeting
, YES.
u
m
User Greeting
, YES.
C
To turn the greeting off
r
1. Scroll to
2. Select
f
Phone Number Display
t
My Numbersallows you to check your phone number(s). If your phone
number cannot be retrieved from your SIM card, you can enter it yourself.
o
N
1. Scroll to
2. Enter the number and then press
o
Tip! You can also enter your fax and/or data number and your different
s
numbers for Line1 and Line 2, if these are supported by your subscription.
Settings
Off
.PressYES.
o
M
To enter your phone number
Settings
n
b
o
l
, YES,
i
, YES,
e
Display
Display
, YES,
, YES,
YES.
User Greeting
My Numbers
, YES.
, YES,
Voice
s
c
i
PersonalizingYour Phone 49
n
o
, YES.
abc...
s
B
A
,the~
Page 50

Time
The time is always displayed when the phone is in standby mode.
To set the time format
Settings
Settings
Settings
Off
.PressYES.
, YES,
, YES,
, YES,
1. Scroll to
2. Select the 24-hour or 12-hour (am/pm) clock. Press
To set the clock
1. Scroll to
2. Enter the time in hours and minutes, and press
Move from number to number by pressing
If you select the 12-hour clock, you can alternate between am and pm by
pressing #.
Automatic Time Zon e
With the Automatic Time Zone function, you will be asked whether to
update the clock when you enter a new time zone. You can choose to turn the
function off, if you like.
To turn theAutomatic Time Zone off
1. Scroll to
2. Select
Note! This service depends on the network.
m
Date
When the phone is in standby mode, you can slide the volume key upwards or
downwards to see today’s date in the Status menu.
To set the date format
1. Scroll to
o
2. Select the date format you want. Press
f
To set the date
t
1. Scroll to
2. Enter the year (two digits), month and day and then press
o
If you have chosen another date format you must enterthe date differently.
r
M
o
C
Settings
o
Settings
, YES,
b
, YES,
N
n
Master Reset
You can reset the phone’s settingsto theway theywere whenyou bought your
o
phone.
s
s
c
i
50 Personalizing Your Phone
r
E
m
e
l
i
Timeand Date
Timeand Date
i
c
r
e
Timeand Date
m
o
C
Timeand Date
Timeand Date
, YES,
, YES,
l
a
, YES,
m
, YES,
, YES,
Time Format
Set Time
e
s
l or r.
U
n
u
Auto Time Zone
Date Format
YES.
Set Date,
, YES.
YES.
c
i
, YES.
YES.
a
, YES.
YES.
i
t
, YES.
B
A
s
n
o
YES.
Page 51

To reset the phone
Settings
, YES,
1. Scroll to
2. Enter the phone lock code (
The phone lock code may be another one, in case you have changed it.
MasterReset
, YES.
0000
) and press YES.
B
A
s
t
o
f
r
o
C
o
m
m
e
l
i
b
r
e
C
i
c
m
o
l
a
m
s
U
u
e
i
n
a
c
t
o
i
n
r
E
o
N
s
c
i
M
n
o
s
PersonalizingYour Phone 51
Page 52

Sending and Receiving Text Messages (SMS)
TheShortMessageService(SMS)allowsyoutosendandreceivetext
messages consisting of up to 160 characters.
A useful feature in your phone is that you can send text messages to a group
which you have defined in your phone book. See “Groups” on page 37.
Instead of calling orsending a text message to the members of that group one
at a tim e, you can simply send a single group SMS.
If your SIM card does not contain the phone number to your network service
centre, you must specify the number yourself. Otherwise you cannot reply to
received messages or send your own messages. See “Enable the Phone to
Send SMS” below.
Note! The Short Message Service may notbe available on all networks. Some
network operators may onl y allow SMS to be sent within their own network.
e
m
r
i
c
l
a
m
m
Enable the Phone to Send SMS
If you want to send or reply to a message, you need to make sure that your
network operator’s Service centre number is set. Most modern SIM cards
already contain this information at the time of purchase. You can obtain the
service centre number from your network operator.
r
To activate a service centre number found in the list
o
1. Scroll to
f
2. Scroll to the number you want and press
3. Select
t
If no number is found in the list, you have to set the number yourself.
o
N
To enter the phonenumber to your service centre
n
1. Scroll to
2. Enter the number, including the international (+)sign and country code
o
and press
o
C
Messages
o
Activate
M
Messages
YES.
m
l
i
, YES,
b
.
, YES,
e
o
C
Options
Options
, YES,
, YES,
s
s
c
i
52 Sending and Receiving Text Messages (SMS)
r
E
e
s
U
c
i
n
u
ServiceCentres
YES.
ServiceCentres
t
a
, YES.
, YES,
o
i
Add new?
B
A
s
n
, YES.
Page 53

Composing a Text Message
For more i nformation on how to enter text and the letters, see “Entering
Letters” on page 31.
B
r
E
Example:
• To enter an ‘A’, press 2 once.
• To enter a ‘B’, press 2 twice quickly.
• Toenter lower-case letters, enter the letter, for example an ‘A’andthen
press *.An‘a’ appears. Lower-case letters now appear until you press *
again.
• To enter numbers, press and hold the numeric keys.
, YES,
m
e
l
i
, YES,
C key.
c
Send New
r
e
o
C
Unsent
a
i
, YES.
YES.
m
, YES
l
• Todelete letters, press the
You may also use the volume key as a shortcut to certain letters:
• To enter a ‘B’, slide the volume key upwards and press 2.
• To enter a ‘C’, slide the volume key downwards and press 2.
Sending a New Text Message
1. Scroll to
2. Enter your message and press
3. Enter the recipient’s phone number or recall it from the phone book by
4. Press
5.
Note! If you have turned on any of the “Set On Send” options(Message Type,
Validity Period, Reply Request), you need to make these choices before
entering the phone number. See “Customizing YourText Messages” on page
54.
Storing the Message for Later Use
If you do not want to send the message now, you ca n save it in the phone
memory and send it later:
f
• Press
t
o
1. Scroll to
N
2. Select the message you want to send.
o
3. Press
4. Select
s
s
Messages
l.
pressing
YES to send the message.
Sendingmessage
appears in the display followed by
m
o
C
r
o
now be recalled from the Unsent list in the
To send th e message later
n
The message appears in the display.
If you wish, you may now edit your message.
b
NO when you are asked to enter a phone number. The message can
o
M
Messages
YES.
Send
.
s
U
u
m
e
t
a
c
i
n
Messagehas been sent
Messages
menu.
i
c
i
Sending and Receiving Text Messages (SMS) 53
A
s
n
o
.
Page 54

5. Press YES and proceed from step 3 as described in “Sending a New Text
Message” above.
Note! The same procedure is used with all types of messages, for example e-
mail, fax messages etc. Check with your network operator to find out which
message types you can use.
Sending Text Messages to a Group
With your phone you can send text messages to a pre-definedgroup. You need
to specify a group and save it in your phone book before you can send text
messages to a group. For more information on how t o create groups, see
“Groups” on page 37.
Tosendatextmessagetoagroup
r
l
, YES.
YES.
a
i
c
YES to send the message.
m
Messages
, YES,
1. Scroll to
2. Enter your message and press
3. Press
4. Scroll to
5. Select the group you want and pre ss
Note! When you send text messages to a group, you will be charged for each
member included in that group.
l to enter the Phone Book menu.
Groups
Send New
and press YES.
e
m
Customizing Your Text Messages
Before you send your message, you can set thetype of message, the validity
period and if you want the recipientof your messageto reply to your message.
m
o
Message Type
Your phone can send different types of messages. Your network operator’s
service centre may offerthe facility of converting a text message into a format
(e-mail,fax,etc.) that suits the equipmentthat is going toreceivethe message.
Please con tactyour networkoperator tofind out which messagetypes youcan
use and how.
t
You can set a standard messagetype that you want to use oryou can turn on a
Set on Send option,whichmeansthatyouareaskedtoselectwhichmessage
o
type you want to send, before sending it.
N
1. Scroll to
2. Select the message type you want.
s
C
e
r
o
f
i
b
l
o
M
To set a standard message type
n
Messages
o
The selected message type is now standard until you change it.
, YES,
o
C
Options,
m
YES
, Message Type
s
c
i
54 Sending and Receiving Text Messages (SMS)
r
E
s
U
u
e
i
n
a
c
, YES,
o
i
t
Set Default
B
A
s
n
, YES.
Page 55

r
E
To turn theSet on Send function on or off
Messages
, YES,
Options,
YES
1. Scroll to
OnorOff
2. Select
Validity Period
If your message cannot be delivered because the recipient has turned off the
phone, your service centre can save the message to send it later. If the service
centre has not been able to reach the recipient within a certain time, the
message will bedeleted.
.
, Message Type
, YES,
e
You can seta validity period as your standard or you can turn on a Set on
Send option, which means that you are asked to set the validity period before
sending the message.
To set a validity period as your standard
Messages
, YES,
Options
1. Scroll to
2. Select the validity period you want.
The selected validity period is nowyour standard until you change it.
To turn theSet on Send function on or off
Messages
.
m
o
Messages
.
b
o
, YES,
m
e
, YES,
l
i
1. Scroll to
2. Select
Reply to Messages
If you want the recipient of your message to reply, you can turn on the
Request Reply option. When this function is on, you are asked to choose if
you wantthe recipient toreply or not before your messageis sent.If youwant
the recipient to reply, select
1. Scroll to
2. Select
Note! Not all netw ork operators support these functions.
t
If you have one or more standard messages that you use often, you can save
o
these as templates to be reused whenever you want. Youcan save up to 5
N
templates whichcan consistof 30 characters each.Your templates are saved in
the phone memory.
OnorOff
C
To turn the Request Reply function on or off
r
OnorOff
o
f
Templates
M
n
, YES,
i
c
r
Options
YES,
e
m
o
C
On
and press YES.
Options
, YES,
a
s
U
l
Validity Period
u
ValidityPeriod
m
Reply Request,
i
n
a
c
, YES,
, YES,
i
t
YES.
o
s
s
c
i
Sending and Receiving Text Messages (SMS) 55
Set on Send,
s
n
o
Set Default
Set on Send
YES.
B
A
, YES.
, YES.
Page 56

To save a template
Messages
, YES,
Templates
YES.
Templates
c
r
Templates
o
C
, YES,
, YES.
a
i
, YES.
m
New message
Read now?
1. Scroll to
2. Enter the message and press
For more information on how to enter text, See “Composing a Text
Message” on page 53.
3. Ifyouwanttosendthemessagenow,press
appears in the display, and proceed as described in “Sending a New Text
Message” on page 53. The message is saved in the list of templates.
4. If you do not want to send the message now, press
saved as a template for later use.
To send a template
Messages
Messages
Delete?
m
, YES,
e
, YES,
m
appears in the display.
1. Scroll to
2. Select the template you want to send.
You may edit the message before sending it. See “Sending a New Text
Message” on page 53.
3. When you have completed the message, press
4. Enter the recipient’s phone number.
5. Press
1. Scroll to
2. Select the message you want to delete and then press
3. Press
YES to send the template.
To delete a template
The message
YES to delete the message.
o
Receiving a Message
When you receive a message, you hear a sound, the indicator light on the top
of the phone rapidly flashes green and the message
appears in the display.
1. Press
t
o
N
2. Scroll through the message usingthe arrow keys.
s
3. At the end of the message, whenthe arrow in the display disappears, press
s
C
e
b
o
i
l
r
o
To read the message now
f
YES when you see the question
The display shows when the messagewas received and from what number
it was sent, if your networksupports theCalling Line Identification service
M
(CLI). If you have saved the number together with a name in the phone
book, the name is shown instead.
n
o
ltakes you backwardsthrough themessage. An arrow at the bottom right
corner of the displayindicates that there is more text in the message.
YES. A new menu with different options appears:
c
i
56 Sending and Receiving Text Messages (SMS)
r
E
Add new?
, YES.
YES when
NO. The message is
e
s
U
i
YES.
n
a
c
l
u
m
New message Read now?
New message Read now?
rtakes you forwardand
Send message now?
s
n
o
i
t
C.
.
B
A
Page 57

r
E
• Delete
• Reply
• Forward
• Save
• Call
• Read Next
The options are described on the following pages.
Note! If the sender of the message wants you to reply, the message ‘Reply
requested Reply?’appears in the display when you press
is supported by your network operator. If you do not want to reply, press
Toread the message later
• Press
Calling a Phone Number Found in a Message
1. Select the phone number, e.g.
2. Press
Calling the Sender of the Message
1. When you have read the message, press
2. Select
Replying to a Message
1. When you have read the message, press
2. Select
3. Select what message you want t o send as a reply (send a new message or
t
4. Enter your message and press
o
Note! If the sender of the message wants you to reply, the message ‘Reply
N
requested Reply?’ appears in the display, if this function is supported by your
network operator, when you press
again to reply. If you do not want to reply, press NO.
NO when you see the question
The message is now saved in the phone memory and an envelope icon
appears at the top of the display. The envelope icon disappears as soon as
you have read the message. If you want to read the message later you can
retrieve it from theInbox menu (see below).
i
c
l
a
r
Call 0990237237
YES when the number is highlighted.
e
m
m
Call
in the option list.
If you have saved the number together witha name in the phone book, the
name of the person who sent the message appears together with
o
m
o
C
C
e
r
Reply
o
Your display now looks like the picture in the margin.
f
include this message when se nding a message in return).
l
in the option list.
i
b
o
YES to send the message.
M
n
YES at the end of the message. Press YES
o
e
YES, if this function
s
U
New message Read now?
c
i
a
n
u
.
m
YES.
YES.
i
t
s
s
c
i
Sending and Receiving Text Messages (SMS) 57
n
o
.
s
Call
B
A
NO.
.
Page 58

Forwarding a Message
1. When you have read the message, press
Forward
2. Select
You may edit your message before sending it.
3. When you have completed your message, press
4. Enter the recipient’s phone number.
5. Press
Deleting a Message
1. When you have read the message, press
2. Select
Tip! You can also delete a message by pressing
message
You can delete a message from thelist of messagesin the Inboxmenu without
having to open it.
To delete a message from the list in the Inbox menu
1. Scroll to
2. Select the message you want to delete and press
The message
3. Press
in the option list.
YES to send the message.
Delete
in the option list.
Delete?
appears in the display. Press YES to delete the message.
a
i
l
c
r
Messages
, YES,
Inbox
, YES.
e
Delete?
appears in the display.
YES to delete the message.
m
m
m
Saving Incoming Messages
If you do not want to read an incoming message at once, it is automatically
saved in the phonememory. This allows you to read it later. If there are any
unread messages in this memory, the envelope icon appears at the top of the
standby display.
r
The phone memory can hold up to 15 messages. When all memory positions
o
are full, the oldestread message is overwritten when a new message is
f
received.
t
If the phonememory becomes full of unread messages, new messages are
automatically saved on the SIM card.
o
Messages remain in the phone memory until you delete them, until you insert
N
n
a different SIM card or until the phone needs the memory space to save new
messages.
o
The SIM Card Memory
s
You can save important messages on your SIM card. Messages thatare saved
s
on the SIM card remain there until you delete them, i.e. they will not be
o
C
o
M
m
e
l
i
b
o
C
c
i
58 Sending and Receiving Text Messages (SMS)
r
E
YES.
YES.
e
YES.
s
U
C while reading it. The
a
c
i
n
u
C.
t
o
i
B
A
s
n
Page 59

overwritten if you receive any new messages. The maximum number of
messages that you can savedepends on your SIM card.
Saved on card
3 (15)?
r
E
Tosave a received message in the SIM card memory
l
a
i
m
m
, YES,
YES.
e
s
U
i
t
a
c
i
n
u
YES at the end of the message.
Area Info
, YES,
Reception
1. When you have read the message, press
Save
2. Select
The message automatically moves from the phone memory to the SIM
card memory. The display shows the position of the message and the
number of saved messages, for example the third message of fifteen that
can be saved on the SIM card.
Note! If you save your messages on the SIM card, you can reach them if you
should use your SIM card with another phone.
Reading a Saved Message
1. Scroll to
2. Select the message you want to read.
3. Read the message as described in “Receiving a Message” on page 56.
4. If you want to read the next message, press
5. Select
Area Information
The ordinary Short Message Service is a personal service that carries your
private messages.The AreaInformation is another type of text messagewhich
is sent to all subscribers in a certain network area.
The information may be a local road report or a phone number to a local taxi.
Note! This feature may not be available on all networks.
o
f
To turn Area Information on or off
t
1. Scroll to
2. Select
o
Area Information Message Types
N
Each type of Area Information message is identified by a three-digit code.The
list below s hows examples of the Area information codes that exist today.
o
Code: AI Message Type:
s
000 Index
s
010 Newsflashes
in the option list.
Messages
, YES,
Inbox
, YES.
means an unread message.
means that the message is saved on the SIM card.
c
r
e
Read Next
m
in the option list.
m
o
o
C
C
e
r
i
l
b
o
Messages
, YES,
Options
OnorOff
.
M
n
c
i
Sending and Receiving Text Messages (SMS) 59
B
A
s
n
o
.
Page 60

Code: AI Message Type:
020 Hospitals
022 Doctors
024 Pharmacies
030 Long-distance road reports
032 Local road reports
034 Taxis
040 Weather
050 District cell information
052 Network information
054 Operator services
056 Directory enquiries (national)
057 Directory enquiries (international)
058 Customer care (national)
059 Customer care (international)
Note! These codes are operator dependent. For information about the area
informationservices that you canuse, please refer to the information supplied
by your network operator.
Area Information Message List
You can decide which types of areainformationmessagesyouwishto receive.
The number of Area Info codes that can be saved depends on your SIM card.
To insert an Area Information code
1. Scroll to
2. Enter the new code and press
1. Scroll to
2. Scroll to the code you want to d elete and press C.
f
t
3. Press
o
Receiving an Area Message
When you receive an Area Information message, the message automatically
N
appearsinthedisplay.Youreadthemessageinthesamewayasyoureadan
ordinary text message, see “Receiving a Message” on page 56.When you
o
have read the message, press
Messages
Add new?
o
, YES.
C
To delete the code
r
Messages
o
The message
Erase?
o
YES to delete the code.
M
n
e
m
m
, YES,
Options
C
e
l
i
, YES,
Options
b
appears in the display.
YES. T he messag e is deleted.
c
r
o
a
i
m
, YES,
YES.
, YES,
l
m
s
s
c
i
60 Sending and Receiving Text Messages (SMS)
r
E
s
U
u
Area Info
Area Info
e
i
n
, YES,
, YES,
a
c
i
t
Edit List
Edit List
B
A
s
n
o
, YES,
, YES.
Page 61

Cell Information
The Cellinformation channel(see “Area Information Message List” on page
60) is used by network operators for sending messages to their subscribers
within a certain network area. For example, the operator may inform you that
you are within your home network area and that youcan now make calls at a
lower rate.
Note! This feature may not be supported by your network operator.
To turn Cell Information on or off
Messages
1. Scroll to
2. Select
OnorOff
, YES,
.
Options
c
r
, YES,
a
i
l
e
s
Cell Information
U
c
i
n
u
, YES,
t
a
o
i
A
s
n
e
m
m
m
m
o
o
C
C
e
b
o
i
l
r
o
f
t
B
r
E
o
N
s
c
i
M
n
o
s
Sending and Receiving Text Messages (SMS) 61
Page 62

Communicating via the Built-in Modem
A veryconvenient feature of your mobilephone is the built-in modem (which
equates to a PC Card modem).With the modem, you canconnect your mobile
phone to another similar mobile phone, a handheld PC/PDA or a PC.By
doing this you can send and receive business cards, calendar appointments
andringmelodies.
In order to use the modem with a handheld PC or PDA (EPOC, Windows CE
or Palm OS), please go to http://mobileinternet.ericsson.com forthe latest
information and software.
Also, afte r having installed the modem on a PC or handheld PC/PDA, you can
send and receive fax and e-mail messages, browse the Internet and much
more. See “Using the Modem with a PC” o n page 63.
m
o
b
o
m
l
i
Off
.
Note! In order for you to use variouscommunicationsservices,you need the
appropriate software, for example a fax program, an e-mail program or an
Internet browser. In order to use the modemtogether with the WAP browser in
your mobile phone, you also need a mobile phone subscription that supports
this. See “Using the WAP™ Browser” on page 95.
Activating an d Deactivating the Infrared Modem
You canchoose to activate the built-in infrared modem either automatically or
manually.
The built-in modem has three settings:
•
t
o
•
•
N
When the infrared modem has been activated, an icon appears in the display.
Your selected settingremains until you selectanother setting, even if you turn
your phone off.
s
C
r
o
f
On
.The modem will continuesearchingfor other infrared devices until you
turn the modem
Off
. The modem is inactive.
M
10minutes
.The modem will automatically disconnect itself 10 minutesafter
the latest connection was ended. This in order to save battery power.
n
o
c
r
e
o
C
e
s
c
i
62 Communicating via the Built-in Modem
r
E
l
a
i
m
m
s
U
u
e
i
n
a
c
t
o
i
B
A
s
n
Page 63

To set the modem to On
Extras
, YES,
, YES,
, YES,
m
m
e
l
i
b
InfraredPort
InfraredPort
InfraredPort
• Scroll to
To set the modem to Off
• Scroll to
• Scroll to
Note! The ‘Infrared Port’ f unction can also be found in My Shortcuts. See
“My Shortcuts” on page 28.
Using the Modem with a PC
In order to use the built-in modem together with a PC, you have to install the
modem on the PC.
The following requirements has to be fulfilled in order for you touse the builtin modem with a PC:
• IR-equipped computer with Windows® 95/98/NT 4.0, which is configured
1. Insert the CDin your CDdrive. The CD shouldstart automatically, but if it
2. From the main menu, click
3. Click
4. Follow the Installation Wizard. Place your mobile phone next to the
f
Note! Do NOT connect your mobile phone to the computer until the
t
installation program tells you to. This way the installation will run more
o
smoothly.
Extras
To set the modem to 10 minutes of activity
Extras
for infrared communication (unless you are using a cable). The computer
also needs a Pentium® processor, 30 MB of free hard drive space and a
CD-ROM drive.
To installthe built-inmodem on the PC
does not, you can start it manually by choosing Run from the Start menu,
and typing d:\start.exe (change the D drive if your CD drive is named
differently). You can alsofind the files necessary for installingthe built-in
modem on: http://mobileinternet.ericsson.com
o
C
Softwareinstallation
r
infrared eye on the computer (or connect it to the cable) when the Wizard
o
instructs you to.
o
M
, YES,On, YES.
, YES,
, YES,
a
i
c
r
e
m
o
C
Select language
andthenclick
Off
, YES.
10 minutes
s
U
l
n
u
m
and then clickOK.
Install now!
, YES
e
i
.
a
c
t
o
i
s
n
B
A
r
E
N
Connecting to the PC Using the Built-in Infrared Eye
n
1. Place your mobile phone according to the picture below. The infrared eye
o
on the phone shouldface the infrared eye on the computer. Make sure the
phone is switched on and that the built-in infrared eye is activated, see
s
“Activating and Deactivating the Infrared Modem” on page 62.
s
2. Your PC now establishes contact with your mobile phone.
c
i
Communicating via the Built-in Modem 63
Page 64

1 m
3' 3"
B
A
30°
s
t
a
o
i
n
e
Connecting to a PC Using a Cable
Toestablish communication between your computer and your phone,you can
also use an RS232 cable.
s
U
l
Note! The RS232 cable is an accessory and is not included in the mobile
phone kit. If you want to use a cable, be sure to ask for an Ericsson RS232
cable that can be used with your phone.
To connect using a cable
1. Make sure you have installed the modem as described in “To install the
built-in modem on the PC” on page 63.
2. Connectthe cable according to the picture below. When you connect the
cable to your mobile phone, you may have to press hard to attach it
properly.
m
m
o
r
e
C
i
c
m
o
a
m
n
u
c
i
C
e
b
o
i
l
r
o
f
t
o
3. Your PC will now establish contact with your phone.
N
Note! The Ericsson RS232 cable supports the following five signals in the
RS232 standard: Tx, Rx, CTS, RTS, GND. If youexperience any problem with
your connection, please go to Ericsson Mobile Internet on
s
http://mobileinternet.ericsson. com for further information and support.
M
n
o
s
c
i
64 Communicating via the Built-in Modem
r
E
Page 65

r
E
Switching Betwee n Infrared Communication and C able
Communication
You can alternatebetween using infraredcommunicationor an external
RS232 cable when communicating with your PC. Every time you want to
change between infrared and cable communication, you need to start the
Setup Assistant.
To switch communicationmode
1. Make sure you have gone through all the steps in “To install the built-in
modem on the PC” on page 63.
2. Double-click the file Troubleshooter for R320.bat
on yourcomputer under C:/Programfiles/Ericsson/CommunicationsSuite.
3. When the Setup Assistant isstarted, it asks you to select a connection t ype:
Infrared or Cable. Choose the one you want to changeto.
4. The Setup Assistant then helps you make the correct settings (and helps
you install any missing components if necessary).
a
i
l
c
m
e
l
i
r
e
m
o
C
Solving Connection Problems After the Installation
If you have connection problems between your mobile phone and your
computer despite proper installation, you can start the Setup Assistant.
This is the program that analyzes your computer, and helps you install any
missing components.
To start the Setup Assistant
Double-click the file Troubleshooter for R320.bat,which you can find on
your computer under:
C:/Program files/Ericsson/Communications Suite/Troubleshooter for
R320.bat
m
o
C
r
Tips on Using the Built-in Modem
o
To make sure you get the most out of your built-in modem, follow these
f
guidelines:
t
• You can break infrared communication between your mobile phone and
computer for a shortwhile (approximately 15-20 seconds) without
o
interrupting the connection. You can configure your computer to make a
N
warning sound when the mobile phone is removed from its reach. Make
sure you place your mobile phone back in position within the time limit in
n
order to remain connected.
• Strong sunlight can interfere with the infrared light. Toensure a stable
o
connection, keep the connecting devices away from sunlight.
s
b
o
M
s
U
u
m
e
, which you can find
a
c
i
n
i
t
s
c
i
Communicating via the Built-in Modem 65
B
A
s
n
o
Page 66

The Content of the CD
Among other things, the CD that comes with yourmobile phone contains this
User’s Guide in .pdf format,various useful information and software.
B
Trademark Information
Microsoft, Windows, Windows CE and Windows NT are registered
trademarksor trademarks of Microsoft Corporation.
Pentium is a registered trademark or trademark of Intel.
Psion, EPOC, EPOC32, Series 5 and other names of Psion products or
products of Psion Group companiesreferenced herein are trademarks or
registered trademarks of Psion plc or the Psion Group.
a
i
l
3Com, Palm, PalmPilotand Palm O S are trademarks or registered trademarks
of 3Com Corporation or its subsidiaries.
c
r
s
U
u
e
i
n
a
c
t
o
i
A
s
n
e
m
m
m
m
o
o
C
C
e
b
o
i
l
r
o
f
t
o
M
N
n
o
s
s
c
i
66 Communicating via the Built-in Modem
r
E
Page 67

Sending and Receiving
r
E
Fax, Data and E-mail
Tobe able to use different communications services you need the appropriate
software such as a fax program, an e-mail program or an Internet browser.
You also need a phone subscription that supports fax and/or data transmission.
This is not included in the phone kit. For detailed information, please consult
the User’s Guides or your network operator.
Sending Fax and D ata Calls
All fax anddata calls areinitiated from the appropriate computer software. To
send fax and data calls you need to connect your phone to a computer via an
infrared communication link or a cable and then start the appropriate program.
m
m
e
l
i
b
e
C
Receiving Fax and Data Calls
The procedure for receiving fax and data calls depends on your network and
subscription. If you have different numbers for voice, fax and data calls, this is
referred to as multi numbering. This means that you can haveup to three
numbers in your subscription. If you only have one number for all call types,
this is referred to as single numbering.
Receiving Fax and Data Calls– Multi Numbering
If your network and subscription support multi numbering, the display shows
what kind of a call you are receiving. There are two possible calls apart from
voice calls:
o
• Fax calls
f
• Data calls
t
Toreceiveafaxordatacall
1. Connectyour computer to the phone.
o
2. Answer the call from within the program (if it is not answered
N
automatically).
Note! You cannot answer an incoming fax or data callby pressing the
o
key on thephone, but you can reject the call by pressing NO.
o
C
r
o
M
n
c
r
o
l
a
i
m
s
U
u
m
e
i
n
i
t
a
c
s
s
c
i
Sending and Receiving Fax, Data and E-mail 67
B
A
s
n
o
YES
Page 68

Receiving Fax and Data Calls– Single Numbering
If you have a SIM card that does not support separate fax and data numbers,
the phone does not recognize what kind of a call you are receiving.
Next Incoming Call Type
If you want to receive a fax or data call you have to set the phone to one of
these options in the Next Incoming sub-menu. Youonly see this menu ifyour
phone detects that you do not have separate numbers for data, fax and voice.
Once you have set your phone for a specific incoming call, it stays like this
until you change it. The normal setting is Voice.
Note! Depending on whether a call is ongoing or not, the menus ‘Call Info’
and ‘Ongoing Call’ replace eachother.See “The Dynamic Call Info/Ongoing
Call Menu” on page 28 for more information.
To set the next incoming call type
Call Info
, YES,
m
m
e
l
i
b
Next Call
e
C
1. Scroll to
2. Select the call type you want (
3. Press
If you use fax class 1 and have problems faxing from one mobile phone to
another, it is probably due to long delays over the GSM network.
1. Click Start and point to Settings. A sub-menu appears.
2. Click Control Panel.
3. Double-click the Mail and Fax icon (it may be called Mail).
4. In the dialog box that appears, select Microsoft fax.ClickPr operties.
5. Select the Modem tab.
6. Select Ericsson R320.ClickProperties.
7. In the dialog box that appears, click Advanced.
8. Select the box Use class 2 if available.
9. Click OK.
t
10.Restart Microsoft fax for the changes to take effect.
o
If you want to use other fax programs or operating systems, please consult
N
your User’s Guides.
YES to confirm your choice.
Changing the fax class
To change the fax class if you are using Microsoft® fax on Windows 95
o
C
r
o
f
o
M
n
l
a
, YES,
i
Voice,DataorFax
c
r
m
o
s
U
NextIncoming
n
u
m
e
i
).
i
t
a
c
, YES.
B
A
s
n
o
o
s
s
c
i
68 Sendingand Receiving Fax, Data and E-mail
r
E
Page 69

Sending and Receiving E-m ail
You can use the phone’s built-in modem and a computer to send or receive
e-mail.
B
To send an e-mail
1. In the Dial-Up Networkingservice on yourcomputer, choose the Ericsson
R320asthemodemyouwishtouse.
2. Place your mobile phone next to your computer and make sure it is
s
U
u
m
e
i
n
a
c
t
o
i
connected properly,i.e. within 1 metre and 30 degrees of the other infrared
eye.
3. Start your e-mail program and write a message.
4. Send your e-mail message.
c
r
o
l
a
i
m
Receiving an e-mail
1. In the Dial-Up Networkingservice on yourcomputer, choose the Ericsson
R320asthemodemyouwishtouse.
2. Place your mobile phone next to your computer and make sure it is
connected properly.
3. Start your e-mail program and open your inbox to read your new e-mail
messages.
Note! The steps above are only shown as examples. For detailed information
on how to use your e-mail program, fax program and Internet browser as well
as how to set up the programs properly, ple ase consult the appropriate User’s
Guides or your service provider.
o
e
m
m
C
A
s
n
C
e
b
o
i
l
r
o
f
t
r
E
o
N
s
c
i
M
n
o
s
Sending and Receiving Fax, Data and E-mail 69
Page 70

Business Card Exchange
An electronic business card consists of a name and a phone number and your
phone allows you to send and receive the people in your phone book as
business cards. You can also create, edit and send your own business card.
The business cards can be sentfrom your mobile phone to another similar
phone and certainhandheld PCs/PDAs. The phone canreceive business cards
from another similar phone, a handheldPC/PDA or a PC.
In order to send business cards, your phone uses a standard called
‘IrDA-Ultra’ and to receive, it can use both‘IrDA-Ultra’ and ‘StandardIR’. If
you encounter problems, this can be due to the fact that your PC, handheld
PC/PDA cannot handle these standards.
Note! If you do not know whether your PC, handheld PC/PDA can handle the
transfer of electronic business cards, please consult its User’s Guide or
contact either the manufacturer or the local retailer of the PC, handheld PC/
PDA.
Before you start sending and receiving
with the built-in modem, make sure that
the infrared eye on the mobile phone,
handheld PC/PDA or PC is no more than
r
a metre away andat an angle of 30
o
degrees or less from your phone.
f
t
Sending Business Cards
o
To send your own business card
1. Scroll to
N
n
2. Position the phone’s infrared eye next to the infrared eye of thephone,
computer or handheld PC/PDA to which you want to send the business
o
card.
s
3. Select
If you have not created your personal business card yet, you are asked if
s
m
o
C
b
o
M
Phone Book
Beam My Card
c
i
70 BusinessCard Exchange
r
E
m
e
l
i
, YES,
.
c
r
e
o
C
Business Card
l
a
i
m
m
s
U
u
, YES.
e
i
n
3' 3"
a
c
1 m
t
o
i
B
A
s
n
30°
Page 71

you want to create one
Wait until the display shows
Business card beamed
.
r
E
To send someone else's business card
1. Scroll to
2. Start a search in your mobile phone’s phone book by entering the first
3. Position your phone’s infrared eye next tothe infrared eyeon the phone to
4. Press
Editing Your Own Business Card
1. Scroll to
2. Edit your own phone number, press
Phone Book
letter of the person whose business card you want to send.
If you have chosen to sort the names in yourphone book by position, you
start a search in the phonebook by enteringa position numberinstead of a
name. See “Tochoose a sort order” on page 33.
which you want t o send the business card.
YES.
Wait until the display shows
Phone Book
again.
, YES,
, YES,
BusinessCard
, YES,
U
Business card beamed
l
a
i
BusinessCard
c
r
, YES,
YES, edit your name and press YES
s
n
u
Find & Beam
e
a
.
c
i
Edit My Card
, YES.
i
t
, YES.
e
Receiving a Business Card
The infrared eye on your phone has to be activated if you want to receive
business cards.
1. Activate the infrared eye by scrolling to
minutes
, YES. You can also reach this function by placing it in My
Shortcuts, see “My Shortcuts” on page 28.
2. Position the infrared eye on your phone
3. When your phone has received the
t
o
N
4. Press
s
C
next to the infrared eye on the phone,
handheld PC/PDA or computer from
r
which you want to receive the business
o
card.
f
business card, you will hear a short tone
and see the incoming business card
M
together with the text
card?
in the display.
n
YES to store the new business card in yourphone and wait until the
display shows
o
If you see the message
you want to overwrite a position in the phone book.
m
o
b
o
Saved
m
C
e
l
i
Save received business
.
Phonebook memory full
m
o
m
Extras
, YES,
InfraredPort
in the display,you are asked if
s
c
i
Business Card Exchange 71
n
o
s
, YES,
B
A
10
Page 72

Note! You cannot select ‘Infrared Port’ from the Extras menu if you are using
the WAP browser or if you use a cable for the communication between your
phone and the computer.
Trademark Information
The IrDA Feature Trademark is owned by the Infrared Data Association and
is used under license there from.
A
s
B
t
o
f
r
o
C
o
m
m
e
l
i
b
r
e
C
i
c
m
o
l
a
m
s
U
u
e
i
n
a
c
t
o
i
n
o
M
N
n
o
s
s
c
i
72 BusinessCard Exchange
r
E
Page 73

Diverting Incoming Calls
B
A
r
E
If you want to make certain that your incoming calls are correctly handled
when you are unable to answer them, you can use the Divert Calls service to
divert them to another phone number.
Note! The Divert Calls service may not be available on all networks.
The Divert Calls service lets you divert your voice, fax and data calls
respectively - provided your subscription supports fax and data calls.
For voice calls,you may choose between the following divert alternatives:
• All Voice Calls - divert all voice calls.
• When Busy - divertcalls if you are already on the phone
• No Reply -divert calls that y ou do not answer withina specified time limit
(operator dependent)
• Not Reachable - divert calls if your phone is turned off or if you are
unreachable.
Note! These alternatives are only valid for voice calls.
If you subscribe to the Two Line Service, you may set different Divert Calls
for your two voice lines, i.e. Line 1 and Line 2. You will then have an
additional divert alternative, i.e. All Line 2 Calls.
Tip! If you place your phone in a specific Ericsson Desktop Charger, your
calls may be diverted automatically. See “DesktopCharger” on page 128.
When you are making a phone call and the phone call is diverted to another
number, this is indicated in your display, if supported by your subscription.
o
f
Similarly, when receiving an incoming phone call which has been diverted
from another number, this is indicated in your display,if supported by your
t
subscription.
o
Activating Diver t Calls
N
To turn on the Divert Calls function
1. Scroll to
o
2. Scroll to the divert you want to turn on (
Reachable, Fax Calls
s
3. Select
s
r
n
o
C
o
M
Settings
Activate
.
m
m
e
l
i
b
, YES,
or
Data Calls
e
C
Call Options
l
a
i
c
r
m
o
, YES,
) and press YES.
e
s
U
i
t
a
c
i
n
u
m
DivertCalls
, YES.
All Voice Calls,When Busy,NoReply,Not
c
i
Diverting Incoming Calls 73
s
n
o
Page 74

4. A phone numberrecently used for the divert function or a number recently
present in the display will be suggested as a divert number. Enter the
phone number, includingthe area code, to which youwant your callsto be
diverted and then press
Tip! If the phone number is stored in the phone book, you do not need to enter
l and then recall the number.
it. Press
WhenyouturnontheAll Voice Calls divert, an icon is shown in standby.
Note! When the Restricted Calls function is on, some Divert Calls options
cannot be activated. See “Security for Your Phone and Subscription” on page
75.
Cancelling Di vert Calls
Tocancel a certain Divert Calls
1. Scroll to
2. Scroll to the divert you want to cancel and press
3. Select
Settings
Cancel
.
The message
that the Divert Calls has been cancelled.
Pleasewait
YES. If you need to deletenumbers, press C.
e
s
U
l
r
i
c
a
, YES,
DivertCalls,
n
u
, YES,
CallOptions
appears,followedby a messagewhichinformsyou
c
i
YES.
i
t
a
YES.
e
A
s
n
o
m
Checking th e Divert Status
To check t he status of a certain Divert Cal ls
1. Scroll to
2. Scroll to the divert you want to check and press
3. Select
• Scroll to
Settings
Get Status
The message
C
whether the Divert Calls is on or not.
r
To check the status of all Divert Calls
Settings
o
f
t
, YES,
m
o
.
Pleasewait
, YES,
b
o
m
m
Call Options
appears,followedby a messagewhichinformsyou
e
l
i
Call Options
o
C
, YES,
, YES,
DivertCalls
DivertCalls
, YES.
YES.
, YES,
Check All
, YES.
B
o
M
N
n
o
s
s
c
i
74 DivertingIncoming Calls
r
E
Page 75

Security for Your Phone
r
E
and Subscription
There are several ways to protectyour phone and subscription from
unauthorized use. Anything from a SIM card lock to full phone number
control.
The SIM Card Lock
c
r
o
, YES,
l
a
i
m
Card Lock
YES.
The SIM card lock only protects your subscription and not your phone itself
from unauthorized use. If you change SIM cards, the phone still work s with
the new SIM card.
Most SIMcards are loc kedat the time of purchase. If the SIM card lockis on,
you have to enter the PIN (Personal IdentityNumber) every time you turn on
m
m
e
l
i
b
, YES,
e
C
Locks
your phone. If you enter your PIN incorrectly three times in a row, the SIM
card is blocked. This is indicated by the message
you need to unblock it to access yoursubscription.
To unblock your SIM card
PIN blocked
1.
2. EnteryourPUK(orPUK2)whichyouwillfindintheinformation
supplied by your network operator.
3. Press
4. Enter a new four-to eight-digit PIN (or PIN2).
5. Press
o
6. Re-enter the new PIN (or PIN2) to confirm.
f
7. Press
t
Note! If you enter thewrong PUKten times in a row, your card is permanently
blocked. If this happens, you should contact your network operator.
o
N
To change your PIN code
1. Scroll to
2. Enter your old (current) PIN and press
o
3. EnteryournewPINandpress
s
ThephoneasksyoutorepeatthePIN.
YES.
r
YES.
YES.
n
appears.
o
C
o
M
Settings
s
U
u
m
YES.
e
c
i
n
PIN blocked
, YES,
i
t
a
. If this happens
Change PIN
s
c
i
Security for Your Phone and Subscription 75
B
A
s
n
o
, YES.
Page 76

4. EnteryournewPINasecondtimeandpressYES.
The PIN has now been changed.
Note! If the message ‘Codes do not match’ appears, this means you entered
the new PIN incorrectly. If the message ‘WrongPIN’ appears, followed by
‘Old PIN:’, you entered your old PIN incorrectly.
To change your PIN 2
Settings
, YES,
Locks
1. Scroll to
2. Follow the same procedure as described in ‘To change your PIN code’
above.
To turn offthe SIM card lock
Settings
1. Scroll to
YES.
2. EnteryourPINandpress
The message
Note! This only worksif your SIM card allows you to cancel the card lock.
, YES,
Unlocked
, YES,
Locks
, YES,
YES.
confirms that the card lock has now been turned off.
a
i
c
r
To turn on the SIM card lock
1. Scroll to
2. EnteryourPINandpress
The Phone Lock
The phone lock protects the phone against unauthorized use if it is stolen and
the SIM card is exchanged. It is not on when you buy the phone. You can
change the phone lock code (0000) to any four- to eight-digit personal code.
The phone lock can be On, Automatic or Off.
PhoneLockOn
f
If the phone lock is On, the message
t
time you turn on the phone. You have to enter your code followed by
use your phone.
o
Automatic
N
If the phone lock is set to Automatic, you do not need to enter your phone
lock code until a different SIM card is inserted in the phone. After the phone
o
lock code has been entered correctly, the phone can be used with the new SIM
s
card. You are not asked to enter the phone lock code again until the original
SIM card or a different SIM card is inserted.
s
Settings
YES.
The message
C
r
o
M
n
Locked
o
o
e
, YES,
Locks
, YES,
m
YES.
confirms that the card lock is now on.
m
m
o
C
e
l
i
b
Phone locked Phone lock code:
c
i
76 Security for Your Phone and Subscription
r
E
Card Lock
U
Card Lock
l
u
Card Lock
m
, YES,
e
s
, YES,
n
, YES,
Change PIN2
Protection
c
i
Protection
t
a
, YES.
n
o
i
, YES,
, YES,On,
appears each
s
Off
YES to
B
A
,
Page 77

Changing the phone lock code
Settings
, YES,
Locks
, YES,
1. Scroll to
2. Follow the steps described in “To change your PIN code” on page 75.
Note! It is importantthat you remember your new code. If you should forget it,
you have to hand in your phone to your local Ericsson retailer.
Phone Lock
, YES,
Change Code
, YES.
A
B
r
E
To set the phone lock to on, automatic or off
Settings
, YES,
Locks
, YES,
i
c
Phone Lock
l
a
1. Scroll to
2. Select
3. Enter the phone lock code and press
The keypad lock feature helps you to avoid accidental dialling, which can
happen if you keep your phone in your pocket. You can choose between
manual and automatic keylock.
On,AutomaticorOff
the list.
The new lock statusis shown.
The Keypad Lock
. The current selected settingis not available in
r
An icon in the shape of a key in the display informs you that the keypad is
locked.
Note! Calls to the internationalemergency number 112can be made when the
keypad is locked. If the phone alarm rings, you can turn itoff by pressing any
key.
The keypad remains locked until you:
• answer an incoming call,
• replace the battery,
• unlock the keypad.
The Manual Keylock
o
T olock the keypad manually
f
• Press C until the
t
on
o
To unlock the keypad
• Press C andthenpress*or
N
The Automatic Keylock
Automatic keylock means that if no keys are pressed in 25 seconds, the
o
keypad will be locked.
o
C
r
o
and press YES.
M
n
m
m
e
l
i
b
Standby menu
e
m
o
C
appears and then press *, or scroll to
YES to answer the question
s
YES.
U
u
m
, YES,
e
i
n
Protection
i
t
a
c
Turnoff Keylock?
s
s
c
i
Security for Your Phone and Subscription 77
, YES.
n
o
s
Keylock
.
Page 78

To set the automatic keylock
Settings
, YES,
Locks
, YES,
1. Scroll to
On
2. Select
Note! The keypad lock is always disabled if the phone is connected to vehicle
handsfree equipment.
and press YES.
AutoKeylock
, YES.
A
B
Restrict Calls
The Restrict Calls service allowsyou to restrict certain typesof callsto be
made and received.
Note! This service may not be available on all networks or may require a
separate subscription.
The following calls can be restricted:
Settings
o
o
Settings
Pleasewait
All Outgoing
All Incoming
a
Outgoing Intl
i
c
r
e
m
m
m
, YES,
i
l
Call Options
.
e
o
C
, YES,
YES.
b
, YES,
Call Options
appears, followed by a message confirming that all
, YES,
YES.
• all outgoing calls,
• all outgoing international calls,
• all outgoing international calls except to your home country,
• all incoming calls,
• all incoming calls when you are abroad (when roaming),
Tomake sure that a call restriction is not changedby someoneelse, you need a
password, which comes with your subscription, to turn on or cancel a call
restriction. Youcan change the password as often as you like.
To turn a call restrictionon or off
1. Scroll to
2. Scroll to the option you want and press
3. Select
4. Enter your password and press
Note! If you divert incoming calls you cannot activatesome RestrictCalls
options. Likewise, if you restrict calls, you cannot activate some Divert Calls
t
options. See “Diverting Incoming Calls” on page 73.
o
1. Scroll to
N
2. Enter your password and press
ActivateorCancel
C
The message Please wait appears, followed by a message which informs
r
you whether the call restriction is on or not.
o
f
To cancel all restricted calls
M
n
The message
o
call restrictions have been cancelled.
s
s
c
i
78 Security for Your Phone and Subscription
r
E
U
l
u
m
Restrict Calls
YES.
Restrict Calls
e
s
n
c
i
t
a
, YES.
, YES,
s
n
o
i
OutgIntlRoam
Inc when Roam
Cancel All
, YES.
Page 79

r
E
To check the status of a call restriction
Settings
, YES,
1. Scroll to
2. Scroll to the option you want and press
3. Select
1. Scroll to
2. Enter the old (current) password and press
3. Enter the new password and press
4. Enter the new password a second time and press
Fixed Dialling is a way of restricting outgoing calls. It requires a SIM card
that allows fixed numbers to be saved. The fixed numbers are normally
protected by your PIN2. How many fixed numbers you can save depends on
your SIM card.
The Fixed Dialling function allows calls to be made only to certain numbers
saved on the SIM card. If an attempt is made to call other numbers, the
message
It is possible to save partial numbers, for example an area code, or an area
code followed by the first digits common to several numbers. Storing
0123456 allows calls to be made to all numbers starting with 0123456.
Numbers beginning with the international (+) sign and country code can also
be saved, allowing you to make calls abroad.
Numbers which include question marks canbe saved.A questionmark should
t
be read as a wild card, i.e. it can represent any number (0-9). To enter a
questionmarkpressandhold#.
o
Note! The Fixed Dialling service does not prohibit calls to the international
N
emergency number 112.
1. Scroll to
s
2. Enter your PIN2 and press
s
3. Select
Get Status
The message
whether the call restriction is on or not.
To change the password
YES.
The message
password has been changed.
Fixed Dialling
Pleasewait
Settings
Please wait
Number not permitted
o
C
r
o
f
o
M
n
o
Toturn the Fixed Dialling service on or off
Phone Book
OnorOff
Call Options
.
appears,followedby a messagewhichinformsyou
, YES,
Call Options
appears, followedby a message confirmingthat the
e
m
m
e
l
i
b
, YES,
.
, YES,
Restrict Calls
YES.
, YES,
Restrict Calls
YES.
s
YES.
U
l
a
i
c
r
n
u
m
m
o
appears in the display.
C
Options
, YES,
Fixed Dialling,
YES.
e
i
, YES.
, YES,
YES.
a
c
i
t
YES.
c
i
Security for Your Phone and Subscription 79
s
Change Passwd
n
o
B
A
,
Page 80

To save fixed n umbers
1. Scroll to
2. Enter your PIN2 and press
3. Enter the fixed number and press
4. Enter the name you want to associate with the numberand press
1. Scroll to
2. Scroll to the fixed number that you want to edit and press
3. Select Edit.
4. Enter your PIN2 and press
5. Edit the fixed number and press
6. Edit the name and press
7. Enter the position number and press
1. Scroll to
2. Scroll to the fixed number that you want to delete and press
3. Select
4. Enter your PIN2 and press
Closed User Groups
The Closed User Group (CUG) function is another way of lowering call
costs. It depends entirely on your operator and subscription. Not all networks
support this function.
Your network operator can place certain numbers in groups. On some
networks it is cheaper to make calls within a call group. Youcan have a
maximum of 10 groups.
f
1. Scroll to
2. Scroll to
t
3. Enter the name of the user group and press
o
4. Enter the index number of the group and press
N
Note! The index numbers are provided by your network operator.
o
1. Scroll to
s
2. Scroll to the group you want and press
3. Select
s
Phone Book
To edit a saved fixed number
Phone Book
To delete a fixed number
Phone Book
Delete
The fixed number is deleted.
C
r
o
ToaddaClosedUserGroup
Settings
Add new?
M
n
To activate a Closed User Group
Settings
Activate
.
m
o
b
o
.
, YES,
, YES,
, YES,
Fixed Numbers
YES.
, YES,
Fixed Numbers
YES.
YES.
, YES,
Fixed Numbers
c
r
YES.
e
m
o
C
e
l
i
Call Options
and press YES.
Call Options
YES.
YES.
a
i
m
, YES,
, YES,
c
i
80 Security for Your Phone and Subscription
r
E
, YES,
, YES,
U
YES.
l
, YES.
u
m
Closed Groups
Closed Groups
YES.
e
s
n
YES.
Add new?
Edit
, YES.
a
c
i
YES.
, YES.
i
t
, YES,
, YES,
YES.
n
o
YES.
Edit List
Edit List
YES.
s
, YES.
, YES.
B
A
Page 81

r
E
Calls can only be made within the selected user group.
To call outside Closed User Groups
You can decide whether outgoing calls to a non Closed User Group number
are allowed.
Settings
, YES,
1. Scroll to
YES.
On
2. Select
1. Scroll to
2. Scroll to the group that you want to edit and press
3. Select
4. Enter a new name and press
1. Scroll to
2. Scroll to the group that you want to delete and press
3. Select
Accept Calls
With the Accept Calls service, you can choose to receivecalls only from
certain numbers. Other calls are automatically rejected by a busy tone. You
have to store the numbers that you want to receive in an Accepted List.The
rejected calls are saved in the Call List in the Call Info menu.When you buy
your phone, the setting for the Accept Calls service is set to From All,i.e.
you receive calls as normal.
1. Scroll to
2. Scroll to
f
3. Select a number.
t
o
N
1. Scroll to
o
2. Scroll to the number you want to delete and press
s
3. Press
s
.
To edit a name in the Closed User Group List
Settings
Edit
.
To delete a group from the Closed User Group List
Settings
Delete
.
o
C
To add numbers to the Accepted CallersList
Settings
r
YES.
o
Add new?
To add more participants in the Accepted Callers List, repeatsteps 2 to 3
above. It is possibleto choose a number within a group in your phone
book.
To delete numbers from the Accepted Callers List
YES.
o
M
n
Settings
YES to confirm your choice.
Call Options
, YES,
Call Options
, YES,
Call Options
e
m
m
e
, YES,
Call Options
l
i
, YES. This takes you to your phone book.
b
, YES,
Call Options
YES.
c
r
o
C
, YES,
, YES,
l
a
, YES,
i
m
m
, YES,
, YES,
Closed Groups
e
Closed Groups
s
U
Closed Groups
n
u
AcceptCalls
AcceptCalls
c
i
, YES
, YES,
YES.
a
, YES,
YES.
, YES,
, YES,
C.
i
t
c
i
Security for Your Phone and Subscription 81
,OpenCalls
s
n
Edit List
o
Edit List
AcceptedList
AcceptedList
A
,
, YES.
, YES.
,
,
B
Page 82

To check the Accepted Callers List
Settings
, YES,
, YES,
.
, YES,
, YES,
.
m
Call Options
Call Options
Call Options
Call Options
e
1. Scroll to
YES.
To turn on the From List function
1. Scroll to
2. Select
1. Scroll to
2. Select
1. Scroll to
2. Select
Settings
YES.
From List
Now you will only receive calls from the participants in the Accepted
Callers List. An icon is shown in standby.
To turn on the From No One function
Settings
YES.
From No One
All incoming calls will now be rejected. The callerhears a busy tone and
you get no indication of incoming calls. An icon is shown in standby.
To turn on the From All function
Settings
YES.
From All
.
Youwill now receive all calls as normal.
r
i
c
, YES,
, YES,
, YES,
l
a
, YES,
m
AcceptCalls
AcceptCalls
s
AcceptCalls
U
n
u
AcceptCalls
e
i
, YES,
, YES,
, YES,
a
c
, YES,
AcceptedList
Accept Options,
n
o
i
t
Accept Options,
Accept Options,
m
Tocheck the Accepted Calls function
• Scroll to
YES.
The Accepted Calls alternativethatisonismarkedwithafilledbutton.
Settings
o
m
, YES,
o
Call Options
C
, YES,
AcceptCalls
, YES,
Accept Options,
C
e
b
o
i
l
r
o
f
t
,
B
A
s
o
M
N
n
o
s
s
c
i
82 Security for Your Phone and Subscription
r
E
Page 83

Handling More than One
r
E
Call Simultaneously
Your phone allows you to handle more than one call simultaneously. This
means that you can puta call that is in progress on hold, while you make or
answer a second call, and then switch between the two calls.
You may also set up a Conference Call to have ajoint conversation withup to
five people. You may put an individual or a group of conference members on
hold while you add other people to the conference call. You may also put
conference members on hold while you talk to someone privately. See
“Conference Calls” on page 85.
Note! Depending on whether a call is ongoing or not, the menus ‘Call Info’
and ‘Ongoing Call’ will replace each other. See “The Dynamic Call Info/
Ongoing Call Menu” on page 28 for more information.
The Call Waiting Service
If you wish to be able to receive a second call, while another call is in
progress, you must turn on the Call Waiting service.
r
n
o
C
Settings
Pleasewait
o
M
Settings
Settings
Note! The Call Waiting service may not be available on all networks.If you
are engaged in a fax or a data call, you will not hear any incoming calls.
Incoming calls arerejected.
To turn on the Call Waiting service
o
• Scroll to
f
There may be a short delay beforethe network responds.In the meantime,
the message
t
WaitingActivated
o
To cancel the Call Waiting service
• Scroll to
N
To check whether the Call Waitingservice is on or not
• Scroll to
o
e
m
m
C
e
l
i
, YES,
Call Options
b
is d isplayed. This is followed by the message
.
, YES,
Call Options
, YES,
Call Options
c
r
o
l
a
i
m
, YES,
, YES,
, YES,
s
U
u
m
Call Waiting
Call Waiting
Call Waiting
e
i
n
i
t
a
c
, YES,
, YES,
, YES,
s
s
c
i
Handling More than One Call Simultaneously 83
n
o
Activate
Cancel
, YES.
Get Status
B
A
s
, YES.
Call
, YES.
Page 84

Call held
Making a Second Call
1. Put the current call on hold by pressing YES.
2. Enter the number you wish to call and press
You may also retrieve the number from your phone book by pressing and
l.
holding
YES.
B
A
Note! You can only put one call on hold.
Receiving a Second Call
If the Call Waitingserviceis on,you hear a tone in the earpiece if you receive
a second call. The number or name of the caller is normally shown at the top
of the display togetherwith a list of the alternatives
Release&Answer
Private
You can do one of the following:
Put the current call on hold and answer the waiting call
• Press
The current call is now put on hold.
Your held call ismarked in grey in the display and the activecall is marked
in black.
Continue the current calland reject the waiting call
• Select
The w aiting call is rejected. If the caller’s network supports it, the caller
hears a busy tone.
Note! If ’Divert When Busy’ is on, the waiting call is diverted to the number
you have specified.
End the current call and answer the waiting call
• Select
f
One Active Call and One Call On Hold
t
When you have one active call and one call on hold, you can do one of the
o
following:
N
Switch between the two calls
• Press
o
End the active call and return to the call on hold
1. Press
s
2. Press
s
If you pre ss
. If the incoming call is a restricted number, the display shows
.
a
i
l
c
YES to answer the waiting call.
r
e
m
m
m
Busy
.
m
o
o
C
C
e
r
o
Release&Answer
i
b
l
.
o
M
n
YES.
NO.Thequestion
YES.
NO, also the call on hold will be ended.
Retrieve call?
appears.
c
i
84 Handling More than One Call Simultaneously
r
E
s
U
u
e
Answer,Busy
c
i
n
t
a
o
i
s
n
and
Page 85

Endbothcalls
• Scroll to
• Scroll to
Note! The Call Transfer service may notbe available on all networks.
Ongoing Call
Connect the two calls (CallTransfer)
Ongoing Call
The two calls are nowconnected to each other, and you are disconnected
from both calls.
, YES,
, YES,
ReleaseAll
Transfer Call
, YES.
, YES.
s
B
A
r
E
Join the two calls into a Conference Call
• Scroll to
Receiving a Third Cal l
If the Call Waiting service is on, you may receive a third call when you have
one active call and a second call on hold. From now on, you cannot answer
any more calls without disconnecting one, if you do not want to create a
conference call. You hear a tone in the earpiece and
appear in the display.
You can do one of the following:
• Select
• Select
• See below
f
Conference Calls
A conference call is a call with more than two participants. As in an ordinary
t
conference, all participants can hear each other at the same time. You may
o
include up to five participants in a conference call.
N
Note! The Conference Call service may not be available on all networks.
Creating a Conference Call
o
To create a conference call, you must have one active call and one call on
s
hold.
Ongoing Call
See ‘Conference Calls’ below.
End the current call and accept the waiting call
Release&Answer
The waiting call becomes active and the call on hold remains on hold.
Reject the waiting call
Busy
The third call is rejected. Provided the caller’s network supports this
C
function, the caller hears a busy tone.
Create a conference call
r
o
M
n
.
o
o
, YES,
m
.
m
e
l
i
b
JoinCalls
r
e
C
i
c
m
o
, YES.
l
a
s
U
u
m
e
i
n
a
c
Busy
i
t
and
s
c
i
Handling More than One Call Simultaneously 85
n
o
Release&Answer
Page 86

To join the two calls into a conference call
• Scroll to
Ongoing Call
You have now createda conference call (with yourself, the former active
and held calls as participants).
, YES,
JoinCalls
, YES.
B
Adding New Participants to the Conference Group
You may put the conference group on hold and then add new participants.
To add a new participant
1. Press
2. Call the next person you wish to include in the conference group.
3. Scroll to
YES to put the conference group on hold.
Ongoing Call
You can include up to five participants in the conference group by
repeatingsteps1to3above.
, YES,
JoinCalls
, YES.
l
To check the participants in the conferencegroup
1. Scroll to
2. Scroll with
Ongoing Call
The first participant’s phone number is displayed, if available. If the
participant’s number and name are stored in your phone book, the name is
displayed instead. Otherwise the display shows part 1, 2 etc.
, YES,
d to check the other participants.
Parties in Conf
c
r
e
a
i
m
Having a Private Conversation with One of the Participants
If you wish to have a private conversation with one of the participants, you
may extract that participantfrom the conferenceand put the other participants
on hold.
To extract a participant
1. Scroll to
2. Select the participant that you want to extract. Press
Ongoing Call
C
r
T orejoin the participant to the conference group
o
• Scroll to
f
Releasing Participants from the Conference Group
t
You can releaseparticipantsfrom the conference group one by one or all at
once.
o
N
1. Scroll to
2. Select the participant that you want to release. Press
o
s
• Scroll to
s
Ongoing Call
M
To release a certainparticipant
Ongoing Call
n
To release all participants
Ongoing Call
m
o
b
o
m
, YES,
e
l
i
, YES,
, YES,
, YES,
o
C
ExtractPart
JoinCalls
ReleasePart
ReleaseAll
m
, YES.
, YES.
, YES.
c
i
86 Handling More than One Call Simultaneously
r
E
U
, YES.
u
, YES.
e
s
n
c
i
t
a
YES.
YES.
o
i
A
s
n
Page 87

Making a Call while a Conference Call Is in Progress
You can put the conference group on hold andmake another call. Youcanthen
switch between the new call and the conference call.
Toputtheconferencegrouponholdandmakeanewcall
1. Press
2. Enter the number you wish to call and press
• Press
• Press
Ending the Conference Call
• Press
YES.
YES.
To switch between the new call and the conference group
YES.
To end thenew call and return to the conference group
NO and then YES.
e
s
U
r
i
c
l
a
i
n
u
NO.
a
c
t
o
i
A
s
n
e
m
m
m
m
o
o
C
C
e
b
o
i
l
r
o
f
t
B
r
E
o
N
s
c
i
M
n
o
s
Handling More than One Call Simultaneously 87
Page 88

Setting Network Preferences
Searching for Networks
When you turn on the phone, it searches for the last accessed network. If this
is not within range, you may use another network, provided your home
network has an agreement thatallows you to do so. This is called roaming.
The order of preference in which the phone chooses a network is determined
by a list of preferred networks on your SIM card. Your phone includes a
number of functionsthat let you determine how it searches for a network. You
may also choose a network yourself from those within range.
Toselect a network
Settings
Settings
o
C
o
M
, YES,
m
YES to select it.
m
, YES,
l
i
b
1. Scroll to
2. If there is more than onenetwork within range, scroll to the network you
want and press
To start an automat ic network search
• Scroll to
The phone automatically starts searching for a network according to the
list of preferred networks stored on your SIM card.
Display Information
r
The currently used network is marked with a filled button. Together with the
networkname,youalsogetthefollowinginformationinthedisplay:
o
f
The display shows... meaning...
t
o
N
n
o
s
s
c
i
88 Setting Network Preferences
r
E
t
a
o
i
n
c
r
e
Networks
a
i
, YES,
s
U
l
u
Select Network
m
e
i
n
c
, YES.
m
o
Networks
, YES,
New Search
, YES.
C
e
Your home networkis within range.You can use it.
The name of the network is included in a list of
preferred networks on your SIM card.Youcan use
this network.
The name of the network is included in a list of
forbidden networks on your SIM card. You may not
be allowed to use this network, except for
emergency calls.
B
A
s
Page 89

All other networks without any icons are available, i.e. they are not included
in the preferred or forbidden list on your SIM card but they may be used.
r
E
Forbidden Networks
The names of the forbidden networks are stored on your SIM card. If such a
forbidden network is within range, it is left out when the phone searches for a
network (automatic search mode).
If your home network and a forbidden network come to an agreement that
s
U
u
m
PreferredNets
PreferredNets
PreferredNets
e
i
n
i
t
a
c
, YES.
, YES.
, YES,
YES.
allows you to use the forbidden network,you can select this network even
Forbidden
m
e
l
i
YES.
is displayed.
c
r
e
Networks
o
C
Networks
YES.
Networks
l
a
i
m
, YES,
, YES,
, YES,
YES.
though the message
List of Preferred N etworks
You can create and edit a list that defines in which order your phone will
select a network during automaticnetwork selection, when your home
network is not within range.
The number of networks that can be stored in the list depends on your SIM
card.
You can review the network list and rearrange the order of the networks.
You can also add new networks to the list and delete networks from it.
To review the list of networks
Settings
o
C
Settings
Full Name
Settings
o
M
, YES,
m
, YES,
.
b
, YES,
1. Scroll to
The name of the first network is displayed.
u to scroll through the networks in the list.
Use
To see a network’s full name
1. Scroll to
2. Scroll to a network and press
r
3. Select
o
f
To add a network to the list
1. Scroll to
t
2. Scroll to the network that you want to add and press
o
If the networkyou want does not appearin the list,scroll to
N
YES. Enter the three-digit country number and the two-digit network
number and press
n
3. Enter a position number and press
o
Note! All lower prioritized networks will be shifted one step down in the list.
s
s
c
i
Setting Network Preferences 89
n
o
Add new?
Other
B
A
s
, YES.
and press
Page 90

To delete a network from the list
Settings
, YES,
Networks
, YES,
, YES,
a
i
m
, YES,
, YES,
PreferredNets
PreferredNets
U
l
m
Search Mode
Search Mode
1. Scroll to
2. Scroll to the network that you want to delete and press
Delete
3. Select
To rearrange the list
1. Scroll to
2. Scroll to the network that you want to move and press
3. Select
4. Enter the new position within the list and press
Search Modes
When you turn on your phone, it searches for a network. This can be done in
two different ways, depending on the search mode that is on. When you buy
your phone it is set to automatic search mode.
Automatic searchmode means that your phone searches for the last accessed
network first. If thisis not available, it automatically searches for another
available network within range.
Manual search mode means that your phone searches for the last accessed
network first. Ifthis is not available, the question Select net? appears. You
then need to choose a network as described in “Searching for Networks” on
page 88.
To turn on the automatic search mode
• Scroll to
To turn on the manual search mode
• Scroll to
o
f
t
.
Settings
Change Priority
Settings,
o
C
Settings
r
o
, YES,
.
m
m
YES
, YES,
e
l
i
b
Networks
r
e
o
,Networks
C
Networks
c
s
n
u
e
YES.
i
, YES,
, YES.
, YES.
a
c
, YES,
YES.
YES.
o
i
t
Automatic
Manual
A
s
n
, YES.
, YES.
B
o
M
N
n
o
s
s
c
i
90 Setting Network Preferences
r
E
Page 91

Knowing the Call Time
Total Time
Reset?
r
E
and Call Cost
During a call, the duration of the call is shown in the display. When you end
the call, the call duration information is shown for another three seconds. If
you subscribe to cost information, the call cost (or the number of call units) is
displayed instead of the call duration.
Note! Depending on whether a call is ongoing or not, the menus ‘Call Info’
and ‘Ongoing Call’ will replace each other. See “The Dynamic Call Info/
Ongoing Call Menu” on page 28 for more information.
TotalCallTimeorCallCost
The Call Info menu allows you to check the total time or cost of your calls.
, YES,
m
m
, YES,
e
l
, YES,
i
b
, YES,
, YES,
, YES,
e
Call Timers
Call Costs
C
Call Timers
Call Timers
Call Costs
Call Timers
o
N
To check theduration of the last call
• Scroll to
• Scroll to
• Scroll to
f
• Scroll to
t
• Scroll to
1. Scroll to
2. Select
o
3. Press
Call Info
Now you can check the duration of the last call.
To check the cost of the last call
Call Info
Now you can check the cost (if you subscribe to cost information) of the
last call.
To check the time of your outgoing calls
o
To check the total call time
To check the total call cost
Toresetthetotalcalltime
o
C
r
Call Info
Call Info
o
Call Info
M
Call Info
n
Total TimeorOutgoing time
YES to confirm your choice.
c
r
o
l
a
i
, YES,
m
, YES,
, YES,
, YES,
, YES,
, YES,
.
s
U
u
m
LastCall
Last Call
Outgoing Time
TotalTime,
Total Cost
ClearTimers
e
i
n
, YES.
, YES.
, YES.
i
t
a
c
, YES.
YES.
, YES.
s
s
c
i
Knowing the Call Time and Call Cost 91
B
A
s
n
o
Page 92

Toresetthetotalcallcost
Call Info
, YES,
Call Costs
, YES,
1. Scroll to
2. Press
Note! If yousubscribe to cost information, you must enter your PIN2 to clear
thecostortimecounter.
YES to confirm your choice.
ClearTotal Cost
, YES.
A
B
Determining the Call Cost
The Tariff function lets you enterand specify the price per callunit. Theprice
s
U
Set Tariff
u
m
Set Tariff
e
i
, YES.
n
, YES.
t
a
c
enteredisstoredonyourSIMcard.
Note! This service m ust be supported by your subscription and your network.
If youdo not specify a price per call unit, the numberof call units is displayed
during a call,and in ‘Last call’ and ‘Total cost’ in the ‘Call Info’ menu.
YES.
c
r
o
YES.
l
a
, YES,
i
m
, YES,
T oenter the price per call unit
Call Info
, YES
.
m
m
, YES
Call Costs
e
YES.
Call Costs
C
1. Scroll to
2. Enter your PIN2 and press
3. Select
4. Enter the code for the currency you want, for example GBP for Pound
5. Enter the price per call unit, for example 0.75, and press
1. Scroll to
2. Enter your PIN2 and press
3. Select
Change Tariff
Sterling, and then press
decimal point, press #.
To revert to call units
Call Info
o
Units
.
s
n
o
i
YES. To enterthe
C
b
o
i
e
l
Credit Limit for Ca ll s
r
If both your network and SIM card support this feature, you can enter a total
amount ofmoney that can be used for makingcalls. Thiscould be useful when
o
f
you lend your phone to someone and do not want their call costs to exceed a
certain amount which you can d ecide. After a call is made, the cost is
t
deductedfrom this amount. When the amount reaches zero, no morecalls can
o
be made.
M
Note! As the price of a call may vary due to where you are calling from, at
N
n
what time of the day you are calling and so on, the credit limit is only an
estimated value.
o
s
s
c
i
92 Knowing the Call Time and Call Cost
r
E
Page 93

To set a specific credit limit
Call Info
, YES,
Call Costs
, YES,
Set Credit
Set Credit
s
U
u
, YES.
, YES.
e
i
n
a
c
t
YES.
o
i
A
s
n
1. Scroll to
.
YES.
Call Costs
YES.
, YES,
2. Enter your PIN2 and press
3. Select
4. Enter the amount, for example 30 pounds, and then press
1. Scroll to
2. Enter your PIN2 and press
3. Select
Note! If you set the credit to Unlimited, the cost counter starts from zero and
increases.
Change Credit
Toset unlimited credit
Call Info
, YES,
Unlimited
.
l
a
i
c
r
e
m
m
m
m
o
o
C
C
e
b
o
i
l
r
o
f
t
B
r
E
o
N
s
c
i
M
n
o
s
Knowing the Call Time and Call Cost 93
Page 94

Using Two Voice Lines
B
A
If your subscription supports the TwoLine Service, your phone will have two
voice lines with different phone numbers, separate bills and perhaps different
subscription services. This isuseful for example if yo u want to keep business
calls and private calls on separate lines.
When you buy your phone, the names of the lines are normally Line 1 and
Line 2, but you can change their names. You can only send text messages
(SMS) on Line 1. An icon indicates the line currently chosen for outgoing
calls.
To change the name of a line
1. Scroll to
2. Select a line.
3. Enter a new name and press
Changing Phone Lines
When you want to make a call, you need to choose which line to use.
Note! Incomingcalls can be received on both lines, irrespective of the line
currently chosen.
1. Scroll to
2. Select
Note! Depending on whether a call is ongoing or not, the menus ‘Call Info’
f
and ‘Ongoing Call’ will replace each other. See “The Dynamic Call Info/
t
Ongoing Call Menu” on page 28 for more information.
o
Different Settings for E ach Line
You may have different settings for each line,for example the ring signalor
N
divert calls.
o
Tip! You may also have separate Voice Mail numbers for each phone line, if
s
supported by your subscription.
Some operators may show thecall time or call cost for each line respectively.
s
Settings
o
To change phone lines
C
Call Info
Switch to Line 1orSwitch to Line 2
r
From now on, alloutgoing calls are made on this line.
o
o
M
n
c
i
94 Using Two VoiceLines
r
E
, YES,
m
m
, YES,
e
l
i
b
Display
r
e
o
C
Next Call
i
c
, YES,
YES.
m
, YES.
U
l
a
Edit Line Tags
m
.
s
n
u
e
i
, YES.
a
c
t
o
i
s
n
Page 95

Using the WAP™ Browser
A
B
r
E
During the last couple of years we have grown accustomed to browsing the
Internet via our computers. This has proven to be a simpleand effective w ay
to find allkinds of information.
Thanks to a new technology called WAP (Wireless Application Protocol), a
new dimensionof mobility has been addedto the Internet. Now you can find a
lot of useful information by using the micro browser in your mobile phone,
instead of using your computer. WAP is a standard specifically created for
mobile communications devices and gives fast and easy access to Internet
informationand services.
Examples of WAP services you will be able to find are:
• EricssonMobile Internet, a portal offering you onlineaccess to customer
services, user guides and useful information when you are travelling.
• Reservationservices.
• News, sports and weather.
• Restaurants, c i nemas, games etc.
• Banking and stock exchange quotations.
• Voice mail, e-mail and fax mail.
You can reach the Ericsson Mobile Internet at:
mobileinternet.ericsson.com
Using WAP Profiles to Simplify your Browsing
In order to simplify your browsing, the browser in your mobile phone can
contain up to five different WAP profiles. A WAP profile consists of a group
o
of network settings, which you only need to enter once into your phone. After
f
having entered them, you simply switch between the different WAPprofiles,
t
without having to re-enter the settings every time you want to change your
network connection.
o
For instance, one profile can be connected to your network operator, another
N
can be connected to your bank and a third one can be connected to your
company’s intranet etc.
o
Note! Make sure that the WAP settings in your phone are correctly set. Please
s
contact your network operator to make sure your WAP settings are correct
o
C
r
o
M
n
m
m
e
l
i
b
e
C
c
r
o
l
a
i
m
s
U
u
m
e
i
n
i
t
a
c
s
c
i
Using the WAP™ Browser 95
s
n
o
Page 96

and that your subscription supports WAP browsing. See “Changing the WAP
Profile Settings” on page 100.
WheneveryouworkwithyourWAPprofiles,youneedtoremembertwo
things:
• You can useup to five different homepages. Each of your WAP profiles
can have its own homepage. This way you can use up to five different
homepages. For instance: You have entered a network operator WAP
profile and an intranet WAP profile. Whenever you switch between these
WAP profiles,the homepage in your browsercan changeto different WAP
addresses chosen by you. See “Opening and Changing A Home Page” on
page 96.
• A saved bookmark might notwork with all your WAP profiles.
Whenever you bookmarka WAP page,that bookmarkmight get tied to the
network settings you have stored in the WAP profile you are using just
then. Consequently, if you cannot access a bookmark, you might solve the
problem by switching to another WAP profile and then accessing the
bookmark again. See “Working with Bookmarks” on page 97.
T oswitch between WAP profiles
1. Scroll to
2. Scroll to the WAP profile you want to use and press
Viewing a WAP Page
Below is described the three different ways in which you can go to a WAP
page:
• By opening a home page
• By going to a stored bookmark
• By going to a WAP page by entering its address
Opening and Changing A Home Page
Each of your WAPprofiles can store its own homepage. Therefore, whenever
you switch from one WAP profile to another, you c an also change your
f
homepage automatically. See “Using WAP Profiles to Simplify your
Browsing”on page 95.
t
WAP Services
This WA P profile will be used until you switch to another profile.
o
C
r
o
o
m
m
e
l
i
b
, YES,
e
C
a
i
c
r
WAP Profiles
m
o
l
s
U
, YES.
u
m
e
i
n
a
c
t
YES.
o
i
A
s
n
B
o
When you buy your mobile phone, Ericsson Mobile Internet is set to be your
home page in all your five WAP profiles. When you go to a homepage, you
N
might be askedto select an accesstype. See “ChoosingWhich Access Type to
Use When Browsing” on page 102.
M
n
o
s
s
c
i
96 Using the WAP™ Browser
r
E
Page 97

r
E
To go to a homepage
1. Scroll to
2. Select the top menu item and press
1. Scroll to
2. Scroll to the WAP profile whose homepage you wish to edit. Press
3. Select
4. Press
1. Start the browser in one of the ways described in this chapter.
2. Go to the WAP page that you want to use as the homepage for the WAP
3. When the WAP page is displayedin the browser, press andhold
4. Select
5. The question
Working with Bookmarks
You use WAP bookmarks in your mobile phone just as you do in an ordinary
Internet browser. They provide you with a way back to a certain WAP page
that is important to you or that you expect to visit often. You can store a
maximum of 25 bookmarks.
WAP Services
The name of this menu item depends on what you have chosen to call it.
See “Editing the Homepage of a WAP profile” on page 101. The default
names for your five homepages are Home 1, Home 2, Home 3, etc.
T oedit your home page
WAP Services
Edit Homepage
to use as your home page for this WAP profile, for instance:
mobileinternet.ericsson.com
YES.
To turn the WAP page you are browsing into a homepage
profile you are currently using.
Options menu
the
New homepage
o
C
r
The Importance o f WAP Profiles When Accessing Bookmarks
o
When you bookmark a WAP page, that bookmark might get tied to the
f
network settings in the WAPprofile you are using just then. Thismeans that a
t
saved bookmark might not work with all your WAP profiles.
o
For instance, you browse your corporate intranet and bookmark a page there.
The next time you enter the browser,youswitch to theWAP profile that istied
N
to your network operator. In this case you might not reach the intranet
bookmark, because the settings in the network operator’s WAP profile are
o
different from the setting in the intranet WAPprofile.
o
M
n
, YES.
YES.
, YES,
WAP Settings
, YES.
e
and enter the addressof the WAP page that you want
.
a
i
c
r
e
appears.
and press YES.
m
Change Homepage?
m
appears. Press YES to confirm your choice.
m
o
U
l
u
m
s
n
c
i
i
t
a
C
e
l
i
b
s
s
c
i
Using the WAP™ Browser 97
B
A
s
n
YES.
o
YES until
Page 98

In order to reach the intranet bookmark again, you therefore need toswitch to
the intranet WAP profile and then accessthe bookmark once gain.See “Using
WAP Profiles to Simplify your Browsing” on page 9 5.
T oadd a bookmark
1. Scroll to
2. Start your browsing, either by selecting
3. When you have found the WAP page that you want to bookmark, press
4. Scroll to the sub-menu
5. Your new bookmark has been saved when you see the text
1. Scroll to
2. Scroll to the bookmark you want to go to and press
3. Scroll to
1. Scroll to
2. Select the bookmark you wish to delete and press C.
3. Press
1. Scroll to
2. Scroll to the bookmark you wish to edit and press
3. Scroll to
4. Enter the name of the bookmark and then press
5. Enter the WAP address and then press
f
t
1. When you are browsing,press and hold
2. Select
o
3. In the
N
4. Scroll to the bookmark that you wish to go to and press
5. Select
o
s
1. Scroll to
2. Scroll to the bookmark you wish to send and press
s
WAP Services
menu or by going to a homepage.
Read more about how to use these menus in the rest of this chapter.
YES until the
and hold
If your bookmark list isfull, you have to delete another bookmark before
you can save the new one.
T ogo to a bookmark
WAP Services
Go to
and press YES.
T odelete a bookmark
WAP Services
m
YES againwhenthedisplayshows
r
Suspend
M
WAP Services
n
Go to
o
WAP Services
C
Edit
and press YES.
b
o
.
.
WAP Services
T oedit a bookmark
o
T oreach your bookmarks when you are browsing
To send a bookmark to another person via SMS
c
i
98 Using the WAP™ Browser
r
E
, YES.
Options menu
Add bookmark
c
, YES,
Bookmarks
r
e
m
, YES,
Bookmarks
o
C
, YES,
Bookmarks
e
l
i
menu, scroll to
, YES,
Bookmarks
BookmarksorEnter Address
appears.
s
and press YES.
U
l
a
i
n
, YES.
u
m
, YES.
m
Delete?
, YES.
YES.
YES until the
Bookmarks
and press YES.
, YES.
e
i
.
YES.
a
c
YES.
YES.
YES.
n
o
i
t
Bookmark stored
Options menu
YES.
B
A
from the
s
.
appears.
Page 99

3. Select
4. Enter your message and press
5. Press
Send as link
Enter the recipient’s phone number or retrieve it from the phone book by
pressing
YES to send the message.
.
YES.
l.
A
Tip! Tosend the bookmark you are currentlyvisiting in the browser: open the
Options menu by pressing and holding
YES and then select ‘Send as link’.
s
B
r
E
Going to a WAP Page by E ntering its Address
1. Scroll to
2. Enter the address of the WAP page you want to go to, for instance:
3. Press
WAP Services
mobileinternet.ericsson.com
YES.
, YES,
Enter Address
l
If you arealready browsing, the browser goes directlyto your chosen address.
Otherwise, you may have to choose which access type to use in order to
access WAPpages. See “Choosing Which Access Type to Use When
Browsing”on page 102.
Note! When you enter a WAP address, you do not need to enter the prefix
http://.You onlyneedto enter a prefix if you wantto use another protocolthan
http, such as ftp. In that case you use the prefix ftp://.
Your Options While Browsing
You can onlyreach the
bit different depending on which page you are looking at. For example, it can
contain special features. It always, however, contains the options below:
• Suspend. Go back to the WAP Services menu where you can access your
• Reload. Get the latest version of the WAP page by refreshing its content.
• Add bookmark. Add thepage you are currently browsing to your list of
• Send as link. Send the current page as a bookmark to another phone via
t
• New homepage. Set the current WAP page as your homepage.
o
• Exit the browser.
N
• No matter where you are browsing, press and hold
C
bookmarks among other things.
r
o
bookmarks.
f
SMS.
M
To reach the Options menu
n
menu
appears.
o
m
o
b
o
m
Options menu
e
l
i
a
i
c
r
e
m
o
when you are browsing, and it may look a
C
, YES.
s
U
u
m
e
i
n
i
t
a
c
YES until the
s
s
c
i
Using the WAP™ Browser 99
n
o
Options
Page 100

Returning to the B rowser after Accessing the Menu s
If you have selected
Services menu, you can easily return to the WAP page that you visited when
you left the browser. You might, however, not enter the WAP page exactly
where yo u left it.
Suspend
from the
Options menu
, in order to go to the WAP
A
B
To return to the browser
• Scroll to
Changing the WAP Profile Settings
Before youstart using the WAPbrowser, it is importantthat you make sure the
WAP profile settings in your phone are correctly set. For each WAP profile,
you need to fill in your user ID, gatewayaddress and access type, amongother
things.
There are three ways in which WAP profile settings can be entered into your
phone:
• When you buythe phone together with a WAP subscription. In this
• Over the airvia an SMS.In this case your network operator sends youan
• Manually by yourself. In this case your network operator, the company
f
Changing the WAP Profile Settings Manually
All theWAP settings in your phoneare connected toWAP profiles.Each time
t
you enter a WAP setting, you therefore need to specify in which WAP profile
o
you want t o enter the setting. See “Using WAP Profiles to Simplify your
Browsing”on page 95.
N
Note! Please contact your network operator before you start changing the
settings manually. Thisway you can be sure the entered settings are correct.
o
WAP Services
case the network operator has already entered the settings you need.
SMS which contains all the necessary WAP settings for a WAP profile.
When this happens, you will be asked if you want to install the settings,
and to select in which WAP profile you want to enter thereceived settings.
Note! Before you accept to install the new settings, it is very important
that you are sure who thesender of the settings is. If you are unsure,
answer
who sent the WAP settings, ask them to send the SMS again.
m
NO to the question and call your network operator. If it was they
o
C
you work for, your bank, etc. provide you with thecorrect WAP settings.
r
Y outhen enter the settings yourself manually into the WAP profile you
wish to use.
o
b
o
M
n
s
s
c
i
100 Using the WAP™ Browser
r
E
, YES,
m
e
l
i
r
e
C
Resume
i
c
m
o
, YES.
l
a
m
s
U
u
e
i
n
a
c
t
o
i
s
n
 Loading...