

Page 1

User guide
R306c
This is the Internet version of the User's guide. © Print only for private use.
Page 2
Congratulations on your purchase of the Sony Ericsson
R306c. For additional phone content, go to
www.sonyericsson.com/fun. Register now to get free online storage
and special offers at www.sonyericsson.com/myphone. For product
support, go to www.sonyericsson.com/support.
Instruction symbols
The following instruction symbols appear in this User guide:
> Use the navigation key to scroll and select.
Press the navigation key centre.
Press the navigation key up.
Press the navigation key down.
Press the navigation key to the left.
Press the navigation key to the right.
Note
Tip
Warning
Indicates that a service or function is network- or
subscription-dependent. All menus or functions may not be
available in your phone. Consult your network operator for
more information.
2
This is the Internet version of the User's guide. © Print only for private use.
Page 3
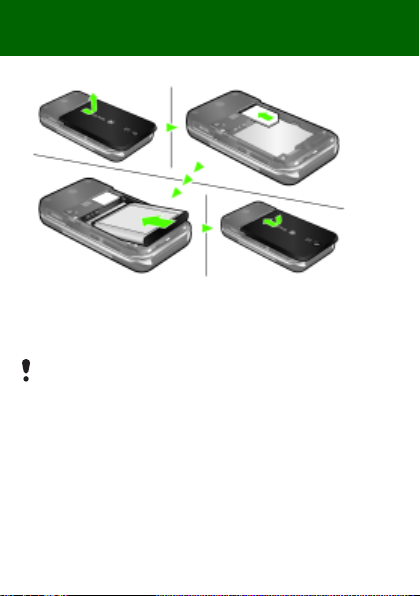
Preparing the phone
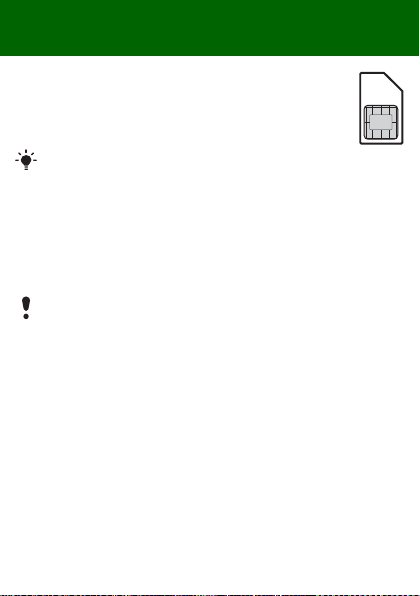
To insert the SIM card and battery
1 Remove the battery cover.
2 Slide the SIM card into its holder with the contacts facing down.
3 Insert the battery with the label side up and the connectors facing
each other.
4 Replace the battery cover.
Do not force the battery cover into place. Slide the battery cover
carefully onto the phone and close it.
3
This is the Internet version of the User's guide. © Print only for private use.
Page 4
Charge the battery
Your phone battery is partly charged when you buy it.
It may take 30 minutes for the battery icon to appear on the screen.
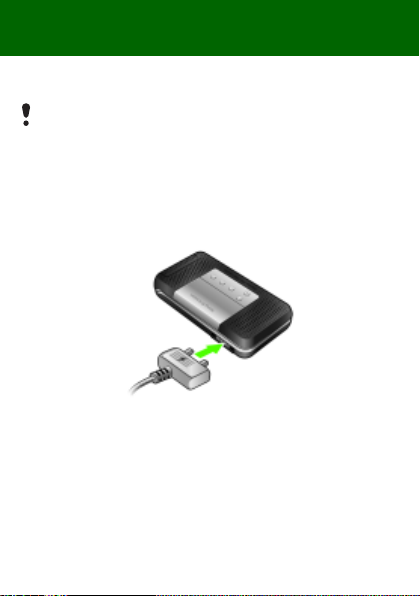
Using the USB charger
To connect the charger and charge the battery (The illustrations are
for guidance only and may not accurately depict the actual phone)
1 Connect the USB cable (you can get instruction for three conditions from
Note) plug to the AC adapter USB socket, as shown in the above
illustration. The USB cable is supplied with your phone.
2 Connect the USB cable connector to your phone. Press a key to view
the charging status on the screen. It takes approximately 2.5 hours to
fully cha rge the battery.
4
This is the Internet version of the User's guide. © Print only for private use.
Page 5
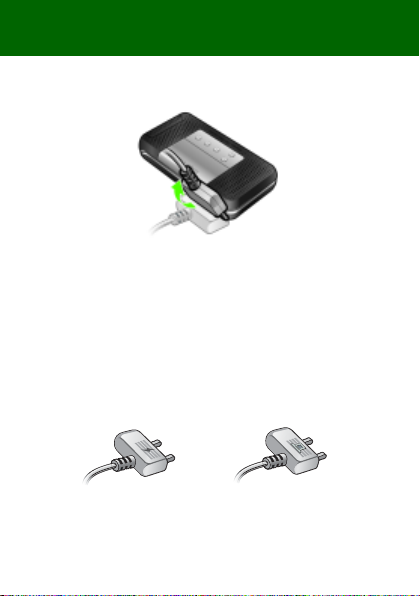
To remove the charger
1 Charge your battery until the battery icon indicates a full charge.
2 Tilt the USB charger connector upwards to remove it.
Note:
1 If there are two USB cables in the kit (USB cable for charging and USB
cable for data transferring. See the illustrations as below), then the
USB cable for charging is only intended for charging your phone.
Do not use it for transferring data.
The USB cable for the USB charger is only intended for connection
to the AC adapter to charge your phone. It must not be used for
connection to a PC. It can only be used for charging your phone.
Never use it for charging accessories.
USB cable for charging
USB cable for tran sferring
5
This is the Internet version of the User's guide. © Print only for private use.
Page 6
2 If there is only one USB cable in the kit, it is intended for charging your
phone as well as transferring data.
3 If there is only one USB cable for the USB charger in the phone kit,
this USB cable is only intended for charging your phone.
4 Sony Ericsson strongly recommends that you use only Sony Ericsson
branded orig inal batter ies, the part of power supply device in
accordance with YD/T 15 91-2006 specificatio ns of Communication s
Industry Standards of P. R. China and the USB cable supplied with
your phone to charge the phone. The use of th ird-part y products may
decrease the performance of your phone and/or pose a risk to your
health or safety.
You can charge the battery for more or less than 2. 5 hours. Interrupted
charging will not damage the ba ttery .
Performance depends on temperatures, signal strenth, usage
patterns, features selected and voice or data transmissions. The
stand-by time for this battery is up to xxx hours.
Use only Sony Ericsson branded original batteries intended for use
with your mobile phone. If you use other batteries you may not be
able to charge your phone.
6
This is the Internet version of the User's guide. © Print only for private use.
Page 7
Turning on the phone
To turn on the phone
1 Press and hold down .
2 Enter your PIN if requested. To correct mistakes, press .
3 Select OK.
4 Select a language.
5 Enter the time and date and select Save.
To turn off the phone
• Press and hold down .
Standby
After you have turned the phone on and
entered your PIN, the name of your operator appears on the screen.
This is called standby. You can now make and receive calls.
7
This is the Internet version of the User's guide. © Print only for private use.
Page 8
SIM and PIN
SIM card
The SIM (Subscriber Identity Module) card, which you get
from your network operator, contains information about your
subscription. Always turn off your phone and detach the
charger before you insert or remove the SIM card.
You can save contacts on the SIM card before removing it from
your phone. Contacts may also be saved in the phone memory.
See Contacts on page 16.
PIN code
You may need a PIN (Personal Identification Number) to activate the
services in your phone. Your PIN is supplied by your network operator.
Each PIN digit appears as *, unless it starts with emergency number
digits, for example, 112 or 911. You can call an emergency number
without entering a PIN.
If you enter the wrong PIN three times in a row, this message
displayes, PIN blocked. To unblock, enter your PUK code provided
by your network operator. To unblock it, you need to enter your
PUK (Personal Unblocking Key).
8
This is the Internet version of the User's guide. © Print only for private use.
Page 9
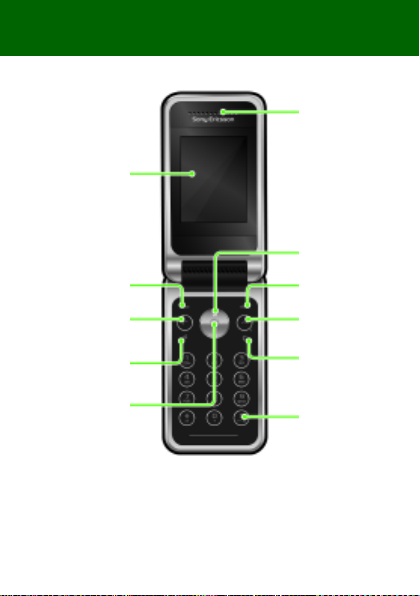
Phone overview
Screen
Selection key
Call key
Shortcut key
Ear speaker
Radio shortcut
key
Selection key
On/off key,
End key
C key
Centre navigation
key
Silent key
9
This is the Internet version of the User's guide. © Print only for private use.
Page 10
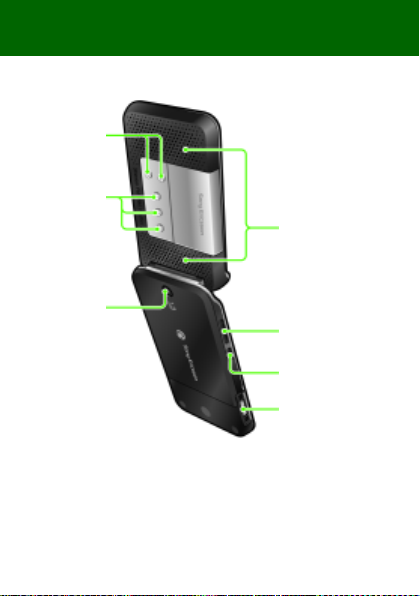
Channel up &
down keys
Radio preset
keys
Camera
Stereo Speakers
Volume keys
Audio enhancer key
Connector for charger,
handsfree and USB
cable
10
This is the Internet version of the User's guide. © Print only for private use.
Page 11
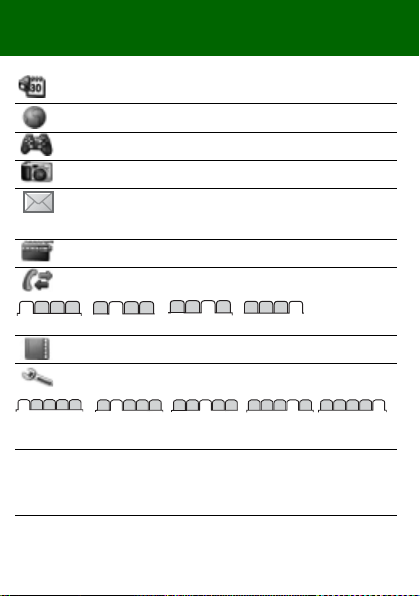
Menu overview
Organizer
File manager, Alarm, Calendar, Tasks,
Notes, Timer, Stopwatch, Calculator
Monternet
Entertainment
Camera
Messaging
Radio
Calls
*
All
General Sounds &
Some menus and icons in this document may vary depending
on operator, network or subscription.
* You can use the navigation key to scroll between tabs in sub
menus.
Answered
Contacts
Settings*
alerts
Games, TrackID™, Record sound
Write new, Inbox, Drafts, Outbox, Sent
messages, Saved msgs, Call voicemail,
Templates, Settings
Dialled
Myself, New contact
Display Calls Connectivity
Missed
11
This is the Internet version of the User's guide. © Print only for private use.
Page 12
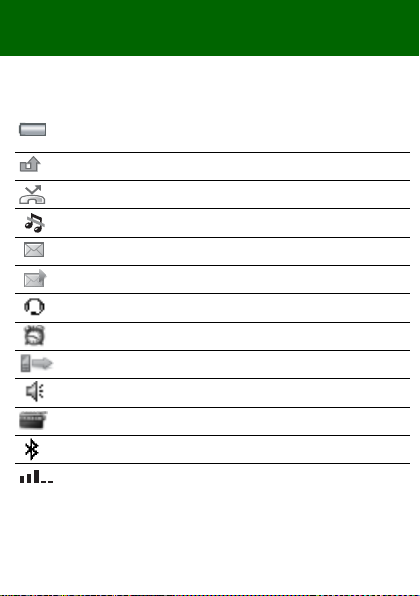
Screen icons
These icons may appear on the screen.
Icon Description
Battery icon. A completely green icon means that the battery
is fully charged
You have missed a call
Divert calls is activated
The phone is set to silent
You have received a new text message
You have received a new picture message
The handsfree is connected
An alarm is activated
Ongoing call
The loudspeaker is on
The radio is playing
The Bluetooth function is activated
Average network coverage. Five bars means the phone
is receiving a full signal
12
This is the Internet version of the User's guide. © Print only for private use.
Page 13
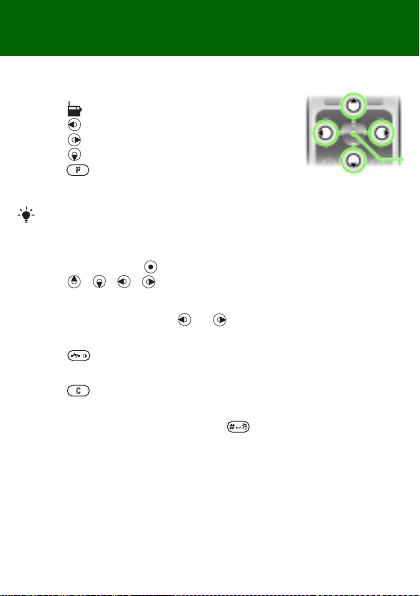
Shortcuts
The main menus are shown as icons. Some submenus include tabs.
To use navigation key shortcuts
• Press to play the radio.
• Press to write a new message.
• Press to take a picture.
• Press to open Contacts.
• Press to Add, Delete, Move or use
a shortcut.
To change a standby shortcut, go to Menu > Settings > General
> Shortcuts.
To navigate the menus
1 From standby press to select Menu.
2 Press , , , to move through the menu.
To scroll between the tabs
• Scroll to a tab by pressing or .
To return to standby
• Press .
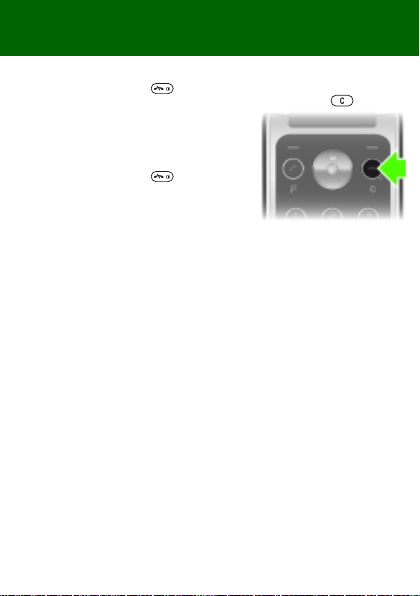
To delete items
• Press .
To set the phone to silent
• From standby press and hold down .
13
This is the Internet version of the User's guide. © Print only for private use.
Page 14

Calling
You must turn on the phone and be within range of a network.
To make a call
1 From standby enter the area code and phone number.
2 Press .
To end a call
• Press .
To answer a call
• Press .
To reject a call
• Press .
To change the ear speaker volume during a call
• On the left side of the phone, press the volume keys up or down.
To turn off the ringtone when receiving a call
• Press or volume key to turn off the ringtone without answering
the call.
To turn the loudspeaker on during a call
• Press SpkrOn.
Do not hold the phone to your ear when using the loudspeaker.
This could damage your hearing.
14
This is the Internet version of the User's guide. © Print only for private use.
Page 15

To make international calls
1 From standby press and hold down until a + sign appears on the
screen.
2 Enter the country/region code, area code (without the first zero) and
phone num ber.
3 Press .
To view a missed call
• When Missed calls: is displayed, select Yes to view. To call back,
scroll to the number and press .
Call list
You can view information about recent calls.
To call a number from the call list
1 From standby press .
2 Scroll to the name or number and press .
To clear the call list
1 From standby press .
2 Scroll to the All tab and select Options > Delete all.
To make an emergency call
• From standby enter 112 (the international emergency number) and
press .
15
This is the Internet version of the User's guide. © Print only for private use.
Page 16

Contacts
You can save contacts in the phone memory or on the SIM card.
You can copy contacts from the phone memory to the SIM card or
from the SIM card to the phone memory.
See Entering text on page 27.
To add a contact
1 From standby press .
2 Scroll to New contact and select Add.
3 Select Add to enter the name and select OK.
4 Scroll to New number: and select Add .
5 Enter the number and select OK.
6 Scroll to the type of the number and select Select.
7 Scroll between tabs and select the fields to add information.
You can enter the + sign and co untry/region code with all phonebook
numbers. They can then be used abroad or at home. See To make
international calls on page 15.
To call a phone contact
When Chinese has been selected as the phone language
To call a contact written in Chinese characters
1 Menu > Contacts. Press and hold down to switch the search
language to Chinese. Then enter the entire multi-letter name, pure
initial or mixed initial pinyin of Chinese contacts you want to call.
2 When the contact is highlighted, press or to select a number
and press .
To call a contact written in Latin characters
1 Menu > Contacts. Press and hold down to switch the search
language to English. Then enter the first letters or all letters of the
contact you want to call (a maximum of 10 letters).
2 When the contact is highlighted, press or to select a number
and press .
16
This is the Internet version of the User's guide. © Print only for private use.
Page 17

When English has been selected as the phone language
To call a contact written in Chinese characters
1 Menu > Contacts. Scroll to the contact you want to call.
2 When the contact is highlighted, press or to select a number
and press .
To call a contact written in Latin characters
1 Menu > Contacts. Scroll to, or enter the first letters or all letters of the
contact you want to call (a maximum of 10 letters).
2 When the contact is highlighted, press or to select a number
and press .
To edit a contact
1 From standby press .
2 Scroll to the contact and select Options > Edit contact.
3 Scroll between the tabs, edit information and select Save.
To delete a contact
1 From standby press .
2 Scroll to the contact and press .
To copy all contacts to the SIM card
1 From standby press .
2 Scroll to New contact and select to Options > Advanced
> Copy to SIM > Copy all.
To edit or view your own phone number
1 From standby press .
2 Scroll to New contact and select Options > Special numbers
> My numbers.
3 Select to edit or view My mobile.
4 Select Save.
17
This is the Internet version of the User's guide. © Print only for private use.
Page 18

Radio
Your phone has a radio and the
handsfree works as an antenna.
To listen to the radio
1 Connect the handsfree to the
phone.
2 From standby press .
To turn on the stereo speakers
• When the radio is playing, select
Options > Turn on spkr.
Do not use your phone as a radio in places where this is prohibited.
Audio enhancer
The audio enhancer produces sound effects when playing the radio
through the stereo speakers.
To use concert sound
1 When the radio is playing, press and hold .
2 To deactivate Concert sound and switch to Normal effect, press
again.
To turn on the speaker
1 When the radio is playing, select Options > Turn on spkr.
2 To activate Volume boost press and hold , to switch to Concert
sound press again.
3 To deactivate Volume boost and switch to Normal effect, press
again.
To switch to AM
• When the radio is playing, select Options > Turn on AM.
When you listen to AM or FM radio, you must use the handsfree
included in the phone kit.
18
This is the Internet version of the User's guide. © Print only for private use.
Page 19

To change the volume
• When the radio is playing, press the volume keys on the left side of the
phone up or down.
Adjust the volume cautiously when using volume key to avoid volume
levels that could damage your hearing.
Searching for channels
To automatically search for channels
• When the radio is playing, press .
To manually search for channels
• When the radio is playing, press or .
To switch between preset channels
• When the radio is playing, press or .
Saving channels
You can save up to 20 preset channels.
To save a radio channel to the list of channels
1 When you have found a radio channel, select Options > Channels
> Save.
2 Select Insert.
To select saved channels
1 From standby press .
2 Select Options > Channels > Channel list.
3 Select a radio channel.
To save a radio channel to a radio preset key
1 When you have found a radio channel, select Options > Settings
> Set radio key > Insert.
2 Select a radio channel in the list to add the channel to the list of channels.
To select a radio channel saved to a radio preset key
• Press any of the radio preset keys , or .
• Press or to switch between preset radio channels.
19
This is the Internet version of the User's guide. © Print only for private use.
Page 20

Press and hold any preset key to turn on or turn off the radio.
To turn the radio off when minimized
• From standby press and select .
To record from the radio
1 When the radio is playing, select Options > Record radio to start.
2 Select Save to save the recording.
3 The radio recording can be accessed by Options > My radio recs.
Select Options > Settings > Record quality and select between
Normal quality or High quality.
This service is not available in all countries/regions. Where available,
you may only use this service for playback at a more convenient
point in time.
To play a radio clip
• From standby select Menu > Organizer > File manager > Music
> My radio recs > Open.
To set the radio as alarm signal
1 From standby select Menu > Organizer > Alarm.
2 Scroll to an alarm and select Edit.
3 Scroll to the tab.
4 Scroll to the Alarm signal: > Edit.
5 Select Radio.
6 Select Save.
Keep the handsfree inserted when you select radio as alarm signal.
The radio alarm signal will sound through the loudspeaker.
To minimize the radio on the screen
1 Select Options > Minimize.
2 To restore the radio on the screen, from standby press .
20
This is the Internet version of the User's guide. © Print only for private use.
Page 21

Messaging
Text messages (SMS)
You must have a service centre number, which is supplied by
your service provider and saved on the SIM card. You may have
to enter the number yourself.
To set service centre number
1 From standby select Menu > Messaging > Settings > Text message
> Service centre. The number is shown if it is saved on the SIM card.
2 If there is no number shown, enter the service centre number,
including the international “+” sign and country/region code.
3 Select Save.
See Entering text on page 27.
To write and send a text message
1 From standby press .
2 Select Text message. Write the message and select Cont.
3 Select a receipient through Enter phone no. or Contacts look-up and
select Send.
To view a received text message
1 Text message received appears. Select Yes.
2 Scroll to the unread message and select View.
21
This is the Internet version of the User's guide. © Print only for private use.
Page 22

Picture messages (MMS)
Picture messages can contain text, pictures, sound recordings
and attachments.
You must set an MMS profile and the address of your message
server. If no MMS profile or message server exists, you can receive
all the settings automatically from your network operator or at
www.sonyericsson.com/support.
To create and send a picture message
1 From standby press .
2 Select Picture msg.
3 Enter text. To add items to the message, press , scroll , and
select an item.
4 Enter text. To add items to the message, press Cont.
5 Select an receipient (Enter email addr. Enter phone no.
Contacts look-up) and selet Send.
Sending and receiving phones must have subscriptions that support
picture messaging.
22
This is the Internet version of the User's guide. © Print only for private use.
Page 23

Camera
You can take pictures and record video clip to view and save. You can
send pictures taken with the camera. They are saved in Menu > Organizer
> File manager > Camera album. The format is JPEG.
Pictures downloaded using picture messages, Internet or Bluetooth™
wireless technology are saved in Pictures.
To start the camera and take a picture
1 From standby press .
2 Scroll to .
3 Select TakePic to take a picture.
4 The picture is automatically saved in Camera album.
Zoom is only possible in VGA mode.
To delete a saved picture
1 From standby select Menu > Organizer > File manager > Camera
album.
2 Scroll to a picture and press .
To send a saved camera picture as picture message
1
From standby select
2 Scroll to a picture and select Options > Send > As picture msg.
3 Select Cont.
4 Select a recipient through Enter email addr., Enter phone no.
or Contacts look-up and select Send.
See To send a camera picture using Bluetooth on page 27.
To record a video clip
1 From standby press and scroll to .
2 Press Record to start recording.
To stop recording
• Press Stop to automatically save the video clip.
To view video clips
1 From standby select Menu > Organizer > File manager > Videos.
2 Select a video clip to Play.
This is the Internet version of the User's guide. © Print only for private use.
Menu
>
Organizer
>
File manag er
>
Camera album
23
.
Page 24

More functions
TrackID™
TrackID™ is a free music recognition service. Search for song titles,
artists and album names. You must have the required settings in your
phone. See Internet on page 24.
For cost information contact your service provider.
To search for song information
• When you hear a song through a loudspeaker, from standby select
Menu > Entertainment > TrackID™.
To record a sound
• From standby select Menu > Entertainment > Record sound.
To listen to a recording
1 From standby select Menu > Organizer > File manager.
2 Scroll to Music and select Open.
3 Scroll to a recording and select Play.
Internet
You need the correct settings in your phone. If settings are not in your
phone, you can:
• Get them in a text message (SMS) from the network operator.
• On a co mputer, go to www.sonyericsson.com/support and request
a text message with the settings.
To select an Internet profile
• From standby select Menu > Settings > the Connectivity tab > Internet
settings > Connect using:. Select a profile.
To start browsing
1 From standby select Menu > Monternet.
2 Select Options > Go to.
3 Select an option.
24
This is the Internet version of the User's guide. © Print only for private use.
Page 25

File manager
You can use the file manager to handle files saved in the phone memory.
To view information about files
1 From standby select Menu > Organizer > File manager.
2 Find a file and select Options > Information.
To move a file in the file manager
1 From standby select Menu > Organizer > File manager.
2 Find a file and select Options > Manage files > Move.
3 Select an option.
To delete a file from the file manager
1 From standby select Menu > Organizer > File manager.
2 Find the file and press .
To view a memory status of folders
• From standby select Menu > Organizer > File manager
> Options > Memory status.
25
This is the Internet version of the User's guide. © Print only for private use.
Page 26

Bluetooth™ wireless technology
Bluetooth™ wireless technology makes wireless connections to other
Bluetooth devices, for example, a Bluetooth headset, possible. You can:
• Connect to several devices at the same time.
• Exchange items.
The recommended maximum distance between two Bluetooth
devices is 10 metres (33 feet), with no solid objects in between.
To turn the Bluetooth function on
• From standby select Menu > Settings > the Connectivity tab
> Bluetooth > Turn on.
Please check if local laws or regulations restrict the use of Bluetooth
wireless technology. If it is not allowed, you must ensure that the
Bluetooth function is turned off.
To show or hide your phone
• From standby select Menu > Settings > the Connectivity tab
> Bluetooth > Visibility > Show phone or Hide phone.
If set to hide, other devices will not be able to identify your phone
using Bluetooth wireless te chnology.
To pair a device with your phone
1 From standby select Menu > Settings > the Connectivity tab
> Bluetooth > My devices > New device to search for available
devices.
2 Select a device from the list. Enter a passcode, if required.
26
This is the Internet version of the User's guide. © Print only for private use.
Page 27

To pair your phone with a Bluetooth handsfree
1 From standby select Menu > Settings > the Connectivity tab
> Bluetooth > Handsfree.
2 Select Yes if you are adding a Bluetooth handsfree for the first time or
select Handsfree > My handsfree > New handsfree if you are pairing
with another Bluetooth handsfree. Make sure that your handsfree is
ready to be paired.
To receive an item
1 From standby select Menu > Settings > the Connectivity tab
> Bluetooth > Visibility > Show phone.
2 When you receive an item follow the instructions that appear.
To send a camera picture using Bluetooth
1 From standby select Menu > Organizer > File manager > Camera
album.
2 Scroll to a picture and select Options > Send > Via Bluetooth.
Entering text
There are two methods you can use to enter text: multitap or predictive
text input.
By using predictive text input you only have to press each key once.
Continue writing a word even if it appears to be wrong. The phone
uses the dictionar y to recognize the word when all letters are entered.
To enter text using multitap
• Press – until the letter appears.
• Press to add a space.
• Press to enter punctuation marks.
Multitap input only applies when Latin characters are selected as
input language.
27
This is the Internet version of the User's guide. © Print only for private use.
Page 28

To enter text using predictive text input
• For example, if you want to write the word “Land”, press , ,
, .
• If the word or punctuation mark is the one you want, press to
accept and add a space. To accept a word without adding a space,
press .
• If the word or punctuation mark is not the one you want, press
or repeatedly to view alternative words.
To add a word to the dictionary
1 When you write the message, select Options > Spell word.
2 Enter the word using multitap and select Insert.
How to use the keys
• To change the input method, press and hold down .
• To shift between upper case and lower case letters, press .
• To change the writing language, press and hold down.
• To delete characters, press .
• To delete a whole word, press and hold down .
• Press and hold down – to enter numbers.
Chinese input
This mobile phone has different input methods for entering Chinese characters:
• Stroke input
• Pinyin input
You can use these methods, for example, to enter Chinese names and
Chinese short messages.
Switching between Chinese input methods
In the Chinese editing mode, you can select and switch quickly to another
input method by pressing and holding .
General instructions
Regardless of which inpu t method you choose, your phone has a funct ion
to speed up the entry of Chinese characters. Whenever you en ter a s troke
or a Pinyin letter, a candidate row of the most frequently used characters
containing that stroke or relating to that letter appears at the bottom of
the scre en.
28
This is the Internet version of the User's guide. © Print only for private use.
Page 29

If the character you want is not displayed in the candidate row, press
to present another candidate row. Continue pressing until the character
you want is displayed. Alternatively, you can enter the next stroke o r Pinyin
letter and a new set of characters will immediately be displayed in the
candidate row. To go back to th e previous row, press . To select a
character in the candidate row, press the navigation key or press and
hold the key corresponding to the number above the character you want
to enter.
Stroke input
A Chinese character is built up of strokes. There are more than 30 basic
strokes, which are grouped into 5 stroke categories. Each category is
represented on the keypad by one of the keys – . The Wild
Card key , is used when you are not sure of which stroke to use.
Stroke categories
The 5 stroke categories are defined in the table below:
Number
Key
Stroke
Category
Basic
Stroke
Stroke
Name
Over
Lift
Down
Down-Hook
Short
Slope Down
Long
Left Slope
Over Slope
Short
left Slope
Dot
Right Slope
Character
王 十 在 七 天
海 红 牡 状 习
中 业 上 门 丑
小 水 打 子 承
直 真 质 草
八 九 丹 风 片
香 千 匕 后 丢
而 页 面 学 殷
六 学 雷 心 性
人 火 又 送 林
29
This is the Internet version of the User's guide. © Print only for private use.
Page 30

Number
Key
Stroke
Category
Basic
Stroke
Stroke
Name
Down-CurvedOver
Down-Over
Left Slope-
Over
Left Slope-Dot
Down-Lift
Right Slope-
Hook
Down-Over-
Hook
Down-Over-
Curved-Hook
Down-Over-
Left Slope
Down-Over-
Down-Hook
Down-Over-
Down
Over-Hook
Over-Down
Over-Down-
Hook
Over-
Left Slope
Over-Down-
OverLeft Slope
Character
西四 酉 酸
山 巨 屯 母 凶
么 去 公 约 能
女 要 好 巡 巢
衣 以 饭 收 长
我 或 民 成 伐
心 必 思 忘
电 也 毛 兄 孔
专 传 转
马 与 张 号 费
鼎
鼐
写 字 皮 通 免
口 已 户 书 骨
力 习 也 同 永
又 之 登 多 社
及 极 廷 建
30
This is the Internet version of the User's guide. © Print only for private use.
Page 31

Number
Key
Stroke
Category
Basic
Stroke
Stroke
Name
OverLeft SlopeCurved-Hook
Over-DownOver-Hook
Over-DownOver-Down
Curved-Hook
Over-Down-
Curved-Hook
Over-Down-
Over
Over-Down-Lift
Character
阿 队 陈 那 部
乃 透 鼐 隽 杨
凸
狗 豹 家 逐 狂
乙 九 瓦 飞 风
投 沿 船 凹
话 计 认 讯
? (Wild card key)
Components
The basic building units of Chinese characters are components that are
made up of strokes. After entering the first two strokes of the desired
character, the component and character candidates that started with that
stroke are displayed in the candidate row.
Using components is a fast method for entering complex characters.
The smaller candidates surrounded by dotted frames are components,
and the bigger candidates without dotted frames are characters.
For example, to enter “信息”
1 Enter “ ”, “ ” and “ ”.
2 Move the cursor to “ 信 ”, press .
3 Move the cursor to “ 息 ”, press again to select “ 息 ”.
31
This is the Internet version of the User's guide. © Print only for private use.
Page 32

Example of using the wild card key
The wild card key , is used to supplement unclear strokes in entering
characters. If you want to enter “互”, but you only know that “一” is the first
and the last stroke of the character and that the total number of strokes is
four, enter , , , . The character is displayed in the
candidate row.
Pinyin input
Press the keys containing the required Pinyin letters, and the phone will
make various proposals on the screen, according to the pronunciation
rules of Mandarin.
Below is the key mapping of Pinyin letters on the keypad.
Number Key Pinyin Letter
a b c
d e f
g h i
j k l
m n o
p q r s
t u ü
w x y z
On the keypad, the letter ü is replaced by v.
For example, to enter “信息”
1 Press , , .
2 When “xin” is highlighted, press or and select “ 信”, then press
.(If you want to enter any of the other suggested Pinyin combinations,
scroll up or down to the desired combi nation, then p ress ).
3 Press again to select “ 息 ”, when “ 息 ” is highlighted.
32
This is the Internet version of the User's guide. © Print only for private use.
Page 33

Input punctuation, symbols and smilies
Under any Chinese input mode, press , to see the table of punc tuation
marks, symbols and smilies. Use the navigation key to make a selection.
Press to enter a space into the text.
Alarms
You can set a sound or the radio as an alarm signal. The alarm sounds
even if the phone is turned off.
To set the alarm
1 From standby select Menu > Organizer > Alarm.
2 Scroll to an alarm and select Edit.
3 Scroll to Ti me: and select Edit.
4 Enter a time and select OK > Save.
To set the alarm signal
1 From standby select Menu > Organizer > Alarms.
2 Scroll to an alarm and select Edit.
3 Scroll to the tab.
4 Scroll to Alarm signal: and select Edit.
5 Find and select an alarm signal. Select Save.
To silence the alarm
• When the alarm sounds, press any key.
• To repeat the alarm, select Snooze.
To turn off the alarm
• When the alarm sounds, select Turn off.
Emergency calls
Your phone supports international emergency numbers, for example, 112
and 911. These numbers can normally be used to make emergency calls
in any country/region, with or without the SIM card inserted, if a GSM
network is within range.
33
This is the Internet version of the User's guide. © Print only for private use.
Page 34

To make an emergency call
• From standby enter 112 (the international emergency number) and
press .
To view your local emergency numbers
• From standby select Menu > Contacts.
• Scroll to New contact > Options > Special numbers > Emergency nos.
Ringtones and themes
Themes are used to change the appearance of the screen.
To select a ringtone
• From standby select Menu > Settings > the Sounds & alert s tab
> Ringtone and select a ringtone.
To set the vibrating alert
• From standby select Menu > Settings > the Sounds & alert s tab
> Vibrating alert and select an option.
To select a key sound
• From standby select Menu > Settings > the Sounds & alert s tab
> Key sound and select an option.
To select a theme
• From standby select Menu > Settings > the Display tab
> Themes and select a theme.
To use a picture taken with camera as wallpaper
1 From standby select Menu > Organizer > File manager > Camera
album.
2 Scroll to a picture and select Options > Use as > Wallpaper.
To use recorded radio clip as ringtone
• From standby select Menu > Organizer > File manager
> Music > My radio recs.
34
This is the Internet version of the User's guide. © Print only for private use.
Page 35

Locks
SIM card lock
The SIM card lock protects your subscription, but not your phone itself,
from unauthorized use. If you change SIM cards, the phone still works
with the new SIM card. Mo st SIM cards are locked at the time of purchase.
If the SIM card lock is on, you have to enter a PIN (Personal Identity
Number) every time you turn on your phone. If you enter your PIN incorrectly
three times in a row, the SIM card is blocked. This is indicated by the
message PIN blocked. To unblock, enter your PUK code provided by
your net work oper ator. To unblock it, enter your PUK (Personal Unblocking
Key). Your PIN and PUK are supplied by your network operator.
If the message Wrong code. Attempts remaining: appears when you
edit your PIN, you entered the PIN or PIN2 incorrectly.
To unblock your SIM card
1 When PIN blocked. To unblock, enter your PUK code provided by
your network operator. is displayed, enter your PUK and select OK.
2 Enter a new PIN and select OK.
3 Re-enter the new PIN to confirm and select OK.
To turn the SIM card lock on
1 From standby select Menu > Settings > the General tab > Security
> Locks > SIM protection > Protection > On.
2 Enter your PIN and select OK.
To edit your PIN
1 From standby select Menu > Settings > the General tab > Security
> Locks > SIM protection > Change PIN.
2 Enter your PIN and select OK.
3 Enter a new PIN and select OK.
4 Re-enter the new PIN to confirm and select OK.
35
This is the Internet version of the User's guide. © Print only for private use.
Page 36

To edit your PIN2
1 From standby select Menu > Settings > the General tab > Security
> Locks > SIM protection > Change PIN2.
2 Enter your PIN2 and select OK.
3 Enter a new PIN2 and select OK.
4 Re-enter the new PIN2 to confirm and select OK.
Phone lock
The phone lock protects the phone against unauthorized use if it is stolen
and the SIM card is exchanged. You can change the phone lock code
(which is 0000 by default) to any four-digit personal code. If the phone
lock is set to Automatic, you do not need to enter your phone lock code
until a different SIM card is inserted in the phone.
To turn on the phone lock
1 From standby select Menu > Settings > the General tab > Security
> Locks > Phone protection > Protection > On.
2 Enter the phone lock code and select OK.
To edit your phone lock code
1 From standby select Menu > Settings > the General tab > Security
> Locks > Phone protection > Change code.
2 Enter the current code and select OK.
3 Enter a new code and select OK.
4 Re-enter the new code to confirm and select OK.
If you forget your new code, you have to take your phone to your
local Sony Ericsson retailer.
To unlock the phone
1 From standby select Menu > Settings > the General tab > Security
> Locks > Phone protection > Protection > Off.
2 Enter your phone lock code and select OK.
36
This is the Internet version of the User's guide. © Print only for private use.
Page 37

Troubleshooting
Some problems require that you call your service provider, but you can
correct most problems yourself. Remove the SI M card befo re handing
your phone in for repair.
Go to www.sonyericsson.com/support for more information.
Memory capacity and speed
If you have not restarted the phone for a while, you may experience
problems with its memory capacity and speed. You can restart the phone
to improve its capacity.
1 Turn the phone off and remove the battery cover.
2 Remove the phone battery and then put it back in place.
3 Replace the battery cover and turn the phone on.
Master reset
If you experience problems with your phone such as screen flickering
or freezing and navigation problems you should reset the phone.
• From standby select Menu > Settings > the General tab > Mast er
reset > Reset settings and select an option.
Reset settings will reset all changes that you have made in your
phone to default.
Reset all will delete all user data as contacts, messages, pictures
and sounds in your phone.
37
This is the Internet version of the User's guide. © Print only for private use.
Page 38

I cannot turn the phone on, what should I do?
Try charging the phone until it has finished charging. Attach the charger
(make sure the power icon on the charger is facing upwards) and charge
the phone for 2.5 hours. The battery icon on the screen may not appear
until the phone has charged for 30 minutes.
What is my phone lock code?
A phone lock protects your phone against unauthorized use. If a different
SIM card is inserted in the phone, the phone lock code has to be entered.
The default phone lock code is 0000.
What do these error messages mean?
PIN blocked
You have entered the wrong PIN code three times. Your SIM is now
locked. Unlock your SIM with your PUK code, which is provided together
with your PIN code by your network operator.
1 Enter your PUK code and select OK.
2 Enter a new PIN and select OK.
3 Re-enter the new PIN to confirm and select OK.
Insert SIM
Your SIM card is not inserted correctly or may be damaged or dirty.
Try one or more of the following:
• Remove the SIM card and insert it correctly.
• Clean the connectors on the SIM card and phone with a soft brush,
a cloth or a cotton bud.
• Check if the SIM card is damaged.
• Contact your network operator to get a new SIM card.
38
This is the Internet version of the User's guide. © Print only for private use.
Page 39

Declaration of conformity for R306c
We, Sony Ericsson Mobile C ommunications AB of Nya Vattento rnet
SE-221 88 Lund, Swe den
declare under our s ole responsibility th at our product
Sony Ericsson type AA B-1022161-BV
and in combination with our accessorie s, to which this dec laration relates
is in conformity with the appropriate standards EN 301 511:V9.0.2,
EN 300 328:V1.7 .1, EN 301 489-7:V1.3 .1, EN 301 489-17:V 1.2.1 and
EN 60950-1:2006 , following the provis ions of, Radio Equipm ent and
Telecommunica tion Terminal Equip ment Directive 19 99/5/EC.
Lund, March 2008
Shoji Nemoto, Head of Product Business Group GSM/UMTS
We fulfil the re quirements of the R&TTE Directive
(1999/5/EC).
FCC Statement
This device compli es with Part 15 of the FC C rules. Operat ion is
subject to the following cond itions:
(1) This device may not cause harmful interference, and
(2) This device must accept any interference received, including
interference that may cause undesired operation. Any change or
modification not expressly approved by Sony Ericsson may void the user’s
authority to operate the equipment.
This equipment has been tested and found to comply with the limits for a Class B
digital device, pursuant to Part 15 of the FCC Rules. These limits are designed to
provide reasonable protection against harmful interference in a residential
installation.This equipment generates, uses and can radiate radio frequency
energy and, if not installed and used in accordance with the instructions, may
cause harmful interference to radio communications.
However, there is no guarantee that interference will not occur in a particular
installat ion.
If this equipment does cause harmful interference to radio or television reception,
which can be de termined by turnin g the equipmen t off and on, the u ser is
encouraged to try to correct the interference by one or more of the following
measures:
39
This is the Internet version of the User's guide. © Print only for private use.
Page 40

- Reorient or relo cate the receivin g antenna.
- Increase the separation between the equipment and receiver.
- Connect the equipment into an outlet on a circuit different from that to which
the receiver is connected.
- Consult the de aler or an experien ced radio/TV technician for help .
Industry Canada Statement
This device complies with RSS-210 of Industry Canada. Operation is subject to
the following tw o conditions: (1 ) this device may no t cause interferen ce, and (2)
this device must accept any interference, including interference that may cause
undesired o peration of the device.
This Class B digital apparatus complies with Canadian ICES-003.
Cet appareil numérique de la classe B est conforme à la norme NMB-003
du Canada.
Sony Ericsson R306c
GSM 900/1800/ 1900
This User guide is publish ed by Sony Ericsson M obile Communication s AB or
its local affiliat ed company, wi thout any warran ty. Improve ments and chan ges
to this User guide necessitated by typographical errors, inaccuracies of current
information, or improvements to programs and/or equipment, may be made by
Sony Ericsson Mobile Communications AB at any time and without notice. Such
changes will, however, be incorporated into new editions of this User guide.
All rights reserved.
© Sony Ericsson Mobile Com munications AB, 2008
Publication number: 1211-5522.1
Please note: Som e of the services in this User guide ar e not supported by all
networks. This also applies to the GSM International Emergency Number 112.
Please contact your network operator or service provider if you are in doubt
whether you can use a particular service or not. Please read the Important
information bef ore you use your mob ile phone.
All illustrations ar e for illustration onl y and may not accurat ely depict the act ual
phone.
Your mobile phone has the capability to download, store and forward additional
content, e.g. ringtones. Th e use of such content may b e restricted or prohibit ed by
rights of third part ies, including b ut not limited to re striction unde r appl icable
copyright laws . You, and not Sony E ricsson, are entir ely responsible for
additional co ntent that you d ownload to or fo rward from you r mobile phone .
Prior to your use of any additio nal content, ple ase verify that your intended use is
properly licensed or is otherwise authorized. Sony Ericsson does not guaran tee
the a ccuracy, inte grity or qual ity of any ad ditional content or any oth er third party
content. Under no circumstances will Sony Eric sson be liabl e in any wa y for your
improper use of additional content or oth er third party content.
40
This is the Internet version of the User's guide. © Print only for private use.
Page 41

Sony is a trademark or registered trademark of Sony Corporatio n. Ericsson is
a trademark or registered trademark of Telefonaktiebolaget LM Ericsso n. The
Predictive Text Technology is used under license from Zi Corporation. The
Bluetooth word mark and logos a re owned by the Bluetooth SIG, Inc. and any
use of such marks by Sony Ericsson is unde r license. The Liquid I dentity logo
and TrackID are trademarks or registered trademarks of Sony Ericsson Mobile
Communications AB. TrackID™ music is powered by Gracenote Mobile. This
product is protec ted by certain intellectual property rights of Microsoft. Use or
distribution of such technology outside of this product is prohibited without a
license from Microsoft. Java™ and all Java-based trademarks and logos are
trademarks or registered trademarks of Sun Microsystems, Inc. in the United
States and other countries/regions.
1. Restrictions: Softw are is confidential cop yrighted informa tion of Sun and title
to all copies is retained by Sun and/or its licensors. Customer shall not modify,
decompile, disassemble, decrypt, extract, or otherwise reverse engineer Software.
Software may not be leased, assigned, or sublicensed, in whole or in part.
2. Export Regula tions: Software, in cluding technic al data, is subject t o U.S.
export control law s, including the U.S. Export Administra tion Act and its
associated regulations, an d may be subject to export or import regu lations in
other countries/regions. Customer agrees to comply strictly with all such
regulations and acknowledges t hat it has the r esponsibility to ob tain licenses to
export, reexport, or import Software. Software may not be downloaded, or
otherwise exported or re-ex ported (i) into, or to a national or reside nt of, Cuba,
Iraq, Iran, North Korea, Libya, Sudan, Syria (as such listing may be revised from
time t o time ) or an y coun try/re gion to which the U.S. has embargoe d goods; or (ii)
to anyone on the U.S. Treasury Departmen t's list of Spe cially Design ated Nations
or the U.S. Commerce Department's Table of Denial Orders. Restricted Rights:
Use, duplicat ion or disclosure by the United States gove rnment is subject to the
restri ctions as set forth in the Rights in Te chnical Dat a and Compute r Software
Clauses in DFARS 252.227-7013(c) (1) (ii) and FAR 52.227-19(c) (2) as applicable.
All other tradema rks and copyr ights are the prop erty of their resp ective owners.
Any rights not expressly granted herein are reserved.
Note: Sony Ericsson advises users to backup their personal data information.
All illustrations ar e for illustration onl y and may not accurat ely depict the act ual
phone.
Some products may display a 17-digit number when you press *#06#. The first
15 digits are the IMEI number, and the last 2 digits are software update number.
Performance depends on temperatures, signal strength, usage patterns,
features selected and voice or data transmissions. The stand-by time for this
battery is up to 330 hou rs.
41
This is the Internet version of the User's guide. © Print only for private use.
Page 42

www.sonyericsson.com/cn
Sony Ericsson Mobile Communications AB
SE-221 88 Lund, Sweden
1211-5522.1
Printed in country/region
This is the Internet version of the User's guide. © Print only for private use.
 Loading...