

Page 1
Help Guide
Interchangeable Lens Digital Camera
ILCE-9M2 α9II
Use this manual if you encounter any problems, or have any questions about your product.
Auto Switch Media
If you use two memory-card slots, you can automatically switch to recording with the other memory
card when the memory card in use becomes full.
How to tag the location information on the images
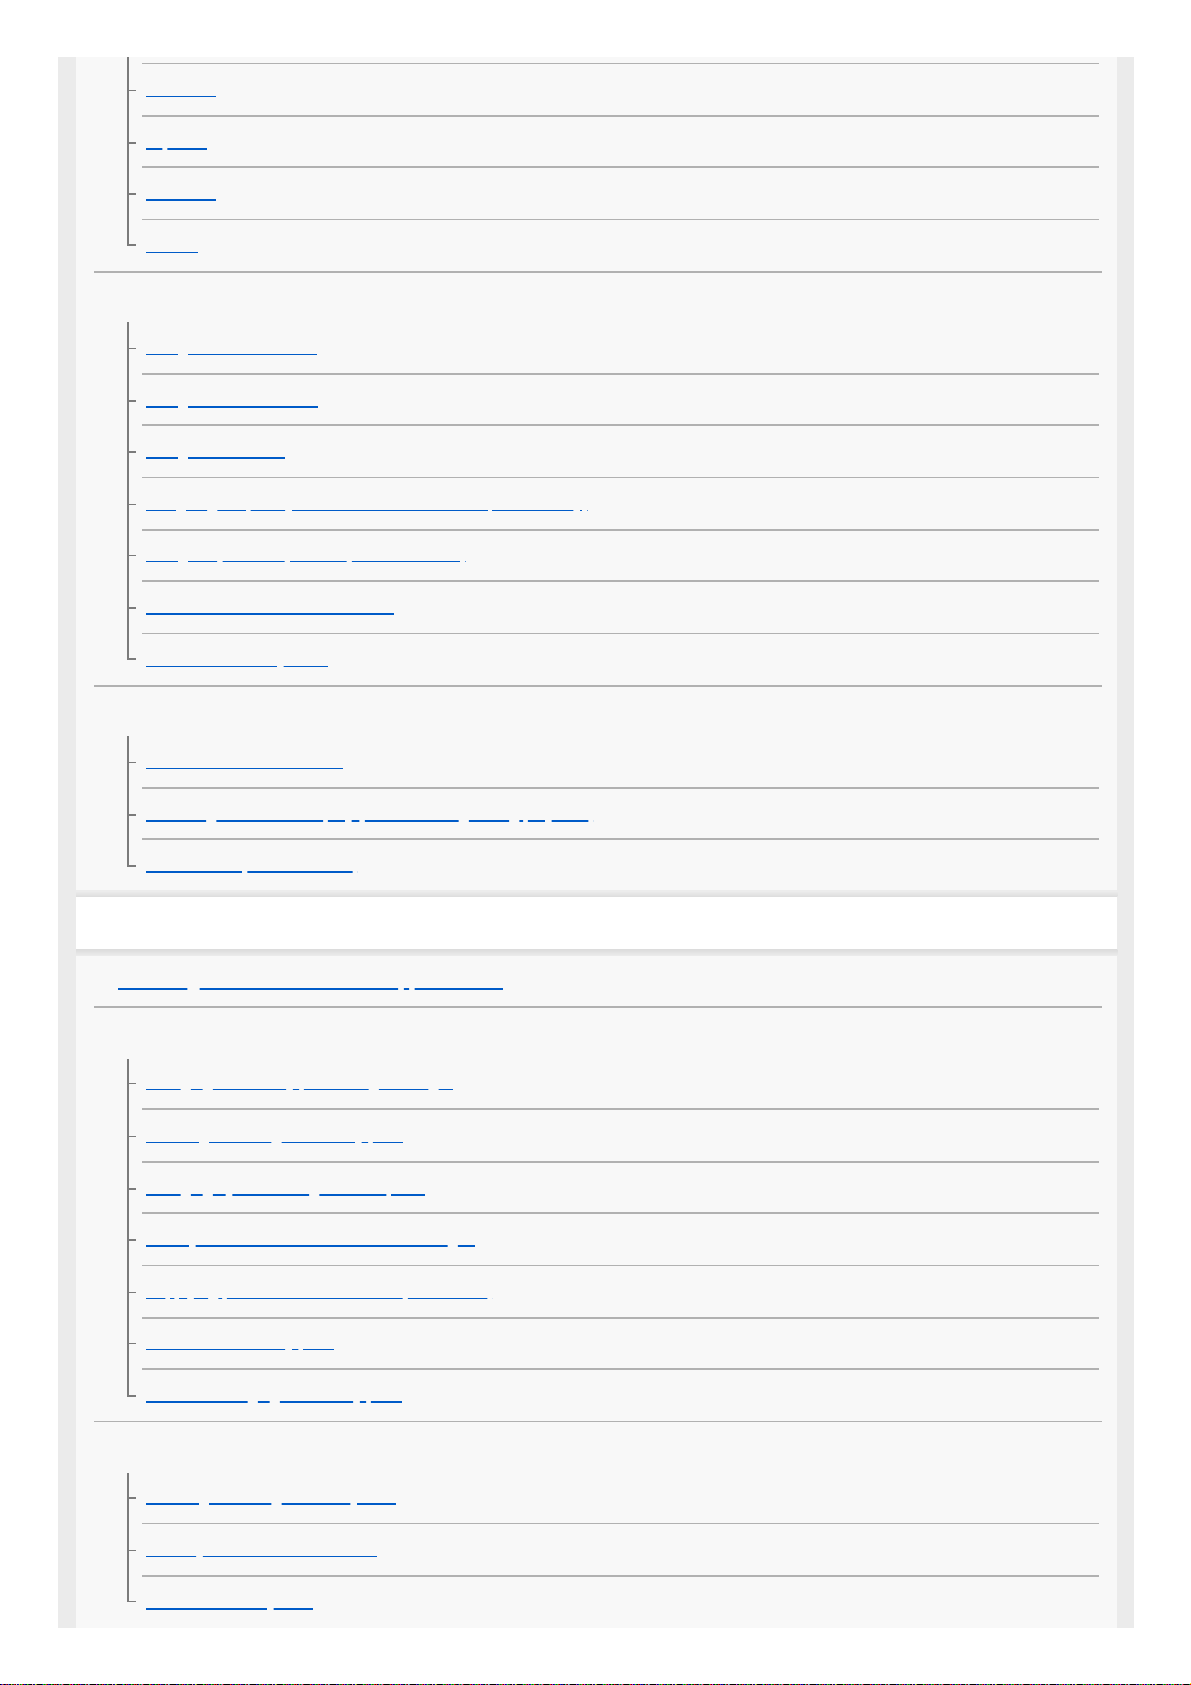
You can record the location information on the images. The location information can be acquired via
a smartphone.
ILCE-9M2 support information
This website provides basic information about the camera and information regarding compatible
lenses and accessories. (Another window will open.)
Names of parts/Icons and indicators
Names of parts
Front side
1
Page 2
Rear side
Top side
Side view
Bottom
Basic operations
Using the control wheel
Using the multi-selector
Using MENU items
Assigning frequently used functions to buttons (Custom Key)
Using Fn (Function) button (Function menu)
How to use the Quick Navi screen
How to use the keyboard
Icons and indicators
List of icons on the monitor
Switching the screen display (while shooting/during playback)
DISP Button (Monitor/Finder)
Preparing the camera
Checking the camera and the supplied items
Charging the battery pack
Charging the battery pack using a charger
Inserting/removing the battery pack
Charging by connecting to a computer
Battery life and number of recordable images
Supplying power from a wall outlet (wall socket)
Notes on the battery pack
Notes on charging the battery pack
Inserting a memory card (sold separately)
Inserting/removing a memory card
Memory cards that can be used
Notes on memory card
2
Page 3
Attaching a lens
Attaching/removing a lens
Attaching the lens hood
Attaching accessories
Mount Adaptor
LA-EA1/LA-EA3 Mount Adaptor
LA-EA2/LA-EA4 Mount Adaptor
Continuous shooting using a Mount Adaptor
Vertical grip
Multi Battery Adaptor Kit
Setting language, date and time
In-Camera Guide
Shooting
Shooting still images
Focusing
Focus Mode
Auto focus
Focus Area
Focus Area Limit
Phase detection AF
Focus Standard
Focus Settings
Adjusting the focus area settings to the camera’s orientation (horizontal/vertical) (Switch V/H AF Area)
AF/MF control
AF w/ shutter (still image)
AF On
Focusing on eyes (Face/Eye AF Set.)
AF in Focus Mag. (still image)
Tracking subject (Tracking function)
Focus Hold
3
Page 4
Registering the current focus area (AF Area Registration) (still image)
Deleting a registered AF Area (Del. Regist. AF Area)
Focus Frame Color
Pre-AF (still image)
Eye-Start AF (still image)
AF Tracking Sens. (still image)
Priority Set in AF-S
Priority Set in AF-C
AF Illuminator (still image)
AF Area Auto Clear
Disp. cont. AF area
Phase Detect. Area
Circ. of Focus Point
AF Micro Adj.
Aperture Drive in AF (still image)
Manual focus
Manual Focus
Direct manual focus (DMF)
Focus Magnifier
MF Assist (still image)
Focus Magnif. Time
Initial Focus Mag. (still image)
Peaking Setting
Selecting a drive mode (Continuous shooting/Self-timer)
Drive Mode
Cont. Shooting
Displaying continuous shooting remaining time indicator (Cont. Shoot. Length)
Self-timer
Self-timer(Cont)
Self-timer Type
4
Page 5
Cont. Bracket
Single Bracket
Indicator during bracket shooting
WB bracket
DRO Bracket
Bracket Settings
Interval shooting
Interval Shoot Func.
Using touch functions
Touch Operation
Touch Panel/Pad
Func. of Touch Operation: Touch Focus
Func. of Touch Operation: Touch Tracking
Touch Pad Settings
Selecting still image size/image quality
File Format (still image)
RAW File Type (still image)
JPEG Quality (still image)
JPEG Image Size (still image)
Aspect Ratio (still image)
APS-C/Super 35mm
Angle of view
Selecting a shooting mode
List of mode dial function
Intelligent Auto
About Scene Recognition
Program Auto
Aperture Priority
Shutter Priority
Manual Exposure
5
Page 6
Bulb shooting
Recall (Camera Settings1/Camera Settings2)
Movie: Exposure Mode
S&Q Motion: Exposure Mode
Controlling the exposure/metering modes
Exposure Comp.
Reset EV Comp.
Dial Ev Comp
Exposure Set. Guide
Exposure step
Metering Mode
Face Priority in Multi Metering
Spot Metering Point
AE lock
AEL w/ shutter (still image)
Exposure Std. Adjust
Exp.comp.set
Zebra Setting
Correcting brightness and contrast automatically
D-Range Optimizer (DRO)
Auto HDR
Selecting the ISO sensitivity
ISO Setting: ISO
ISO Setting: ISO Range Limit
ISO Setting: ISO AUTO Min. SS
Using the zoom
The zoom features available with this product
Clear Image Zoom/Digital Zoom (Zoom)
Zoom Setting
About zoom scale
6
Page 7
Zoom Ring Rotate
White balance
White Balance
Priority Set in AWB
Capturing a standard white color to set the white balance (custom white balance)
Shutter AWB Lock (still image)
Setting how to process images
Creative Style
Picture Effect
Color Space (still image)
Shutter settings
Shutter Type (still image)
Using the electronic shutter
Displaying the release timing (Shoot. Timing Disp.)
Shoot. Start Disp.
Anti-flicker Shoot. (still image)
Release w/o Lens
Release w/o Card
e-Front Curtain Shutter
Reducing blur
SteadyShot
SteadyShot Settings
Lens compensation
Lens Comp.
Noise reduction
Long Exposure NR (still image)
High ISO NR (still image)
Face detection
Regist. Faces Priority
Face Registration (New Registration)
7
Page 8
Face Registration (Order Exchanging)
Face Registration (Delete)
Using the flash
Using flash (sold separately)
Red Eye Reduction
Flash Mode
Flash Comp.
FEL lock
Wireless Flash
Using a flash with a sync terminal cord
Recording movies
Shooting movies
Movie w/ shutter
Movie recording formats
File Format (movie)
Record Setting (movie)
S&Q Settings
Proxy Recording
Audio Recording
Audio Level Display
Audio Rec Level
Audio Out Timing
Wind Noise Reduct.
Auto Slow Shutter (movie)
Initial Focus Mag. (movie)
AF drive speed (movie)
AF Tracking Sens. (movie)
TC/UB Settings
TC/UB Disp. Switch
MOVIE Button
8
Page 9
Marker Display (movie)
Marker Settings (movie)
4K Output Select (movie)
Video Light Mode
Viewing
Viewing images
Playing back still images
Enlarging an image being played back (Enlarge Image)
Rotating recorded images automatically (Display Rotation)
Rotating an image (Rotate)
Enlarge Initial Mag.
Enlarge Initial Position
Playing back movies
Volume Settings
Photo Capture
Playing back images on the image index screen (Image Index)
Setting the method for jumping between images (Image Jump Setting)
Switching between still images and movies (View Mode)
Display as Group
Cont. PB for Interval
PB Speed for Interval
Selecting which memory card to play back (Select Playback Media)
Copying images from one memory card to another (Copy)
Playing back images using slideshow (Slide Show)
Protecting data
Protecting images (Protect)
Setting Rating function
Rating
Rating Set(Custom Key)
Designating images for printing (DPOF)
9
Page 10
Specifying images to be printed (Specify Printing)
Attaching voice memos to images
Attaching audio files to images (Voice Memo)
Voice Memo PB Volume
Deleting images
Deleting a displayed image
Deleting multiple selected images (Delete)
Delete confirm.
Viewing images on a TV
Viewing images on a TV using an HDMI cable
Customizing the camera
Customization features of the camera
Registering frequently used functions
Memory (Camera Settings1/Camera Settings2)
Select Media (Memory recall)
Registering shooting settings to a custom key (Reg. Custom Shoot Set)
Customizing the functions of the ring/dial
Changing the function of the dial temporarily (My Dial Settings)
Dial Setup
Av/Tv Rotate
Lock Operation Parts
Function Ring(Lens)
Customizing MENU (My Menu)
Add Item
Sort Item
Delete Item
Delete Page
Delete All
Display From My Menu
Checking images before/after recording
10
Page 11
Auto Review
Aperture Preview
Shot. Result Preview
Live View Display
Monitor/viewfinder settings
Grid Line
FINDER/MONITOR
Monitor Brightness
Viewfinder Bright.
Finder Color Temp.
Finder Frame Rate (still image)
Bright Monitoring
Memory card settings
Format
Select REC Folder
New Folder
File/Folder Settings (still image)
File Settings (movie)
Display Media Info.
Rec. Media Settings: Prioritize Rec. Media
Rec. Media Settings: Recording Mode
Rec. Media Settings: Auto Switch Media
Recover Image DB
Camera settings
Audio signals
Power Save Start Time
Auto Power OFF Temp.
IR Remote Ctrl
NTSC/PAL Selector
HDMI Settings: HDMI Resolution
11
Page 12
HDMI Settings: 24p/60p Output (movie) (Only for 1080 60i compatible models)
HDMI Settings: HDMI Info. Display
HDMI Settings: TC Output (movie)
HDMI Settings: REC Control (movie)
HDMI Settings: CTRL FOR HDMI
USB Connection
USB LUN Setting
USB Power Supply
Save/Load Settings
Language
Date/Time Setup
Area Setting
Copyright Info
Version
IPTC Information
Write Serial Number
Demo Mode
Initializing the camera
Setting Reset
Using network functions
Connecting this product and a Smartphone
Imaging Edge Mobile
Ctrl w/ Smartphone
Controlling the camera using a smartphone (NFC One-touch remote)
Controlling the camera using an Android smartphone (QR Code)
Controlling the camera using an Android smartphone (SSID)
Controlling the camera using an iPhone or iPad (QR Code)
Controlling the camera using an iPhone or iPad (SSID)
Transferring images to a Smartphone
Send to Smartphone Func.: Send to Smartphone
12
Page 13
Send to Smartphone Func.: Sending Target (proxy movies)
Send to Smartphone Func.: Cnct. during Power OFF
Sending images to a smartphone (NFC One-touch Sharing)
Reading location information from a smartphone
Location Info. Link Set.
Using a remote commander with Bluetooth communication
Bluetooth Rmt Ctrl
Transferring images to a TV
View on TV
Changing the network settings
Airplane Mode
Wi-Fi Settings: WPS Push
Wi-Fi Settings: Access Point Set.
Wi-Fi Settings: Frequency Band (models supporting 5 GHz)
Wi-Fi Settings: Display Wi-Fi Info.
Wi-Fi Settings: SSID/PW Reset
Bluetooth Settings
Wired LAN Setting
Edit Device Name
Importing root certification to the camera (Import Root Certificate)
Security(IPsec)
Reset Network Set.
Using a computer
Recommended computer environment
Importing images for use on a computer
PlayMemories Home
Installing PlayMemories Home
Connecting to a computer
Importing images to the computer without using PlayMemories Home
Disconnecting the camera from the computer
13
Page 14
Operating the camera from a computer
Operating the camera from a computer (PC Remote Function)
Transferring images to a computer
Send to Computer
FTP Transfer Func.
Developing RAW images/Remote shooting (Imaging Edge)
Imaging Edge
Remote shooting with a wired LAN (Remote Camera Tool)
Remote Camera Tool
Creating a movie disc
Selecting a disc to be created
Creating Blu-ray Discs from high-definition image quality movies
Creating DVD discs (AVCHD recording discs) from high-definition image quality movies
Creating DVD discs from standard image quality movies
List of MENU items
Using MENU items
Camera Settings1
File Format (still image)
RAW File Type (still image)
JPEG Quality (still image)
JPEG Image Size (still image)
Aspect Ratio (still image)
APS-C/Super 35mm
Long Exposure NR (still image)
High ISO NR (still image)
Color Space (still image)
Lens Comp.
Self-timer Type
Bracket Settings
Interval Shoot Func.
14
Page 15
Recall (Camera Settings1/Camera Settings2)
Memory (Camera Settings1/Camera Settings2)
Select Media (Memory recall)
Registering shooting settings to a custom key (Reg. Custom Shoot Set)
Priority Set in AF-S
Priority Set in AF-C
Focus Area
Focus Settings
Focus Area Limit
Adjusting the focus area settings to the camera’s orientation (horizontal/vertical) (Switch V/H AF Area)
AF Illuminator (still image)
Focusing on eyes (Face/Eye AF Set.)
AF Tracking Sens. (still image)
Aperture Drive in AF (still image)
AF w/ shutter (still image)
Pre-AF (still image)
Eye-Start AF (still image)
Registering the current focus area (AF Area Registration) (still image)
Deleting a registered AF Area (Del. Regist. AF Area)
Focus Frame Color
AF Area Auto Clear
Disp. cont. AF area
Phase Detect. Area
Circ. of Focus Point
AF Micro Adj.
Exposure Comp.
Reset EV Comp.
ISO Setting: ISO
ISO Setting: ISO Range Limit
ISO Setting: ISO AUTO Min. SS
15
Page 16
Metering Mode
Face Priority in Multi Metering
Spot Metering Point
Exposure step
AEL w/ shutter (still image)
Exposure Std. Adjust
Flash Mode
Flash Comp.
Exp.comp.set
Wireless Flash
Red Eye Reduction
White Balance
Priority Set in AWB
D-Range Optimizer (DRO)
Auto HDR
Creative Style
Picture Effect
Shutter AWB Lock (still image)
Focus Magnifier
Focus Magnif. Time
Initial Focus Mag. (still image)
AF in Focus Mag. (still image)
MF Assist (still image)
Peaking Setting
Anti-flicker Shoot. (still image)
Face Registration (New Registration)
Face Registration (Order Exchanging)
Face Registration (Delete)
Regist. Faces Priority
Camera Settings2
16
Page 17
Movie:
Exposure Mode
S&Q Motion: Exposure Mode
File Format (movie)
Record Setting (movie)
S&Q Settings
Proxy Recording
AF drive speed (movie)
AF Tracking Sens. (movie)
Auto Slow Shutter (movie)
Initial Focus Mag. (movie)
Audio Recording
Audio Rec Level
Audio Level Display
Audio Out Timing
Wind Noise Reduct.
Marker Display (movie)
Marker Settings (movie)
Video Light Mode
Movie w/ shutter
Shutter Type (still image)
e-Front Curtain Shutter
Release w/o Lens
Release w/o Card
SteadyShot
SteadyShot Settings
Clear Image Zoom/Digital Zoom (Zoom)
Zoom Setting
Zoom Ring Rotate
DISP Button (Monitor/Finder)
FINDER/MONITOR
17
Page 18
Finder Frame Rate (still image)
Zebra Setting
Grid Line
Exposure Set. Guide
Live View Display
Shoot. Start Disp.
Displaying the release timing (Shoot. Timing Disp.)
Displaying continuous shooting remaining time indicator (Cont. Shoot. Length)
Auto Review
Assigning frequently used functions to buttons (Custom Key)
Using Fn (Function) button (Function menu)
Changing the function of the dial temporarily (My Dial Settings)
Dial Setup
Av/Tv Rotate
Dial Ev Comp
Function Ring(Lens)
Func. of Touch Operation: Touch Focus
Func. of Touch Operation: Touch Tracking
MOVIE Button
Lock Operation Parts
Audio signals
Network
Send to Smartphone Func.: Send to Smartphone
Send to Smartphone Func.: Sending Target (proxy movies)
Send to Smartphone Func.: Cnct. during Power OFF
Send to Computer
FTP Transfer Func.
View on TV
Ctrl w/ Smartphone
Operating the camera from a computer (PC Remote Function)
18
Page 19
Airplane Mode
Wi-Fi Settings: WPS Push
Wi-Fi Settings: Access Point Set.
Wi-Fi Settings: Frequency Band (models supporting 5 GHz)
Wi-Fi Settings: Display Wi-Fi Info.
Wi-Fi Settings: SSID/PW Reset
Bluetooth Settings
Location Info. Link Set.
Bluetooth Rmt Ctrl
Wired LAN Setting
Edit Device Name
Importing root certification to the camera (Import Root Certificate)
Security(IPsec)
Reset Network Set.
Playback
Protecting images (Protect)
Rotating an image (Rotate)
Deleting multiple selected images (Delete)
Rating
Rating Set(Custom Key)
Specifying images to be printed (Specify Printing)
Attaching audio files to images (Voice Memo)
Voice Memo PB Volume
Copying images from one memory card to another (Copy)
Photo Capture
Enlarging an image being played back (Enlarge Image)
Enlarge Initial Mag.
Enlarge Initial Position
Cont. PB for Interval
PB Speed for Interval
19
Page 20
Playing back images using slideshow (Slide Show)
Selecting which memory card to play back (Select Playback Media)
Switching between still images and movies (View Mode)
Playing back images on the image index screen (Image Index)
Display as Group
Rotating recorded images automatically (Display Rotation)
Setting the method for jumping between images (Image Jump Setting)
Setup
Monitor Brightness
Viewfinder Bright.
Finder Color Temp.
Volume Settings
Delete confirm.
Power Save Start Time
Auto Power OFF Temp.
NTSC/PAL Selector
Cleaning Mode
Touch Operation
Touch Panel/Pad
Touch Pad Settings
Demo Mode
TC/UB Settings
IR Remote Ctrl
HDMI Settings: HDMI Resolution
HDMI Settings: 24p/60p Output (movie) (Only for 1080 60i compatible models)
HDMI Settings: HDMI Info. Display
HDMI Settings: TC Output (movie)
HDMI Settings: REC Control (movie)
HDMI Settings: CTRL FOR HDMI
4K Output Select (movie)
20
Page 21
USB Connection
USB LUN Setting
USB Power Supply
Language
Date/Time Setup
Area Setting
IPTC Information
Copyright Info
Write Serial Number
Format
Rec. Media Settings: Prioritize Rec. Media
Rec. Media Settings: Recording Mode
Rec. Media Settings: Auto Switch Media
Select REC Folder
New Folder
File/Folder Settings (still image)
File Settings (movie)
Recover Image DB
Display Media Info.
Version
Save/Load Settings
Setting Reset
My Menu
Add Item
Sort Item
Delete Item
Delete Page
Delete All
Display From My Menu
Precautions/This product
21
Page 22
5-010-476-11(1) Copyright 2019 Sony Corporation
Precautions
On cleaning
Cleaning the image sensor
Cleaning Mode
Number of recordable images
Recordable movie times
Using the battery charger abroad
AVCHD format
License
Specifications
Trademarks
List of default setting values
If you have problems
Troubleshooting
Warning messages
22
Page 23
Help Guide
Interchangeable Lens Digital Camera
ILCE-9M2 α9II
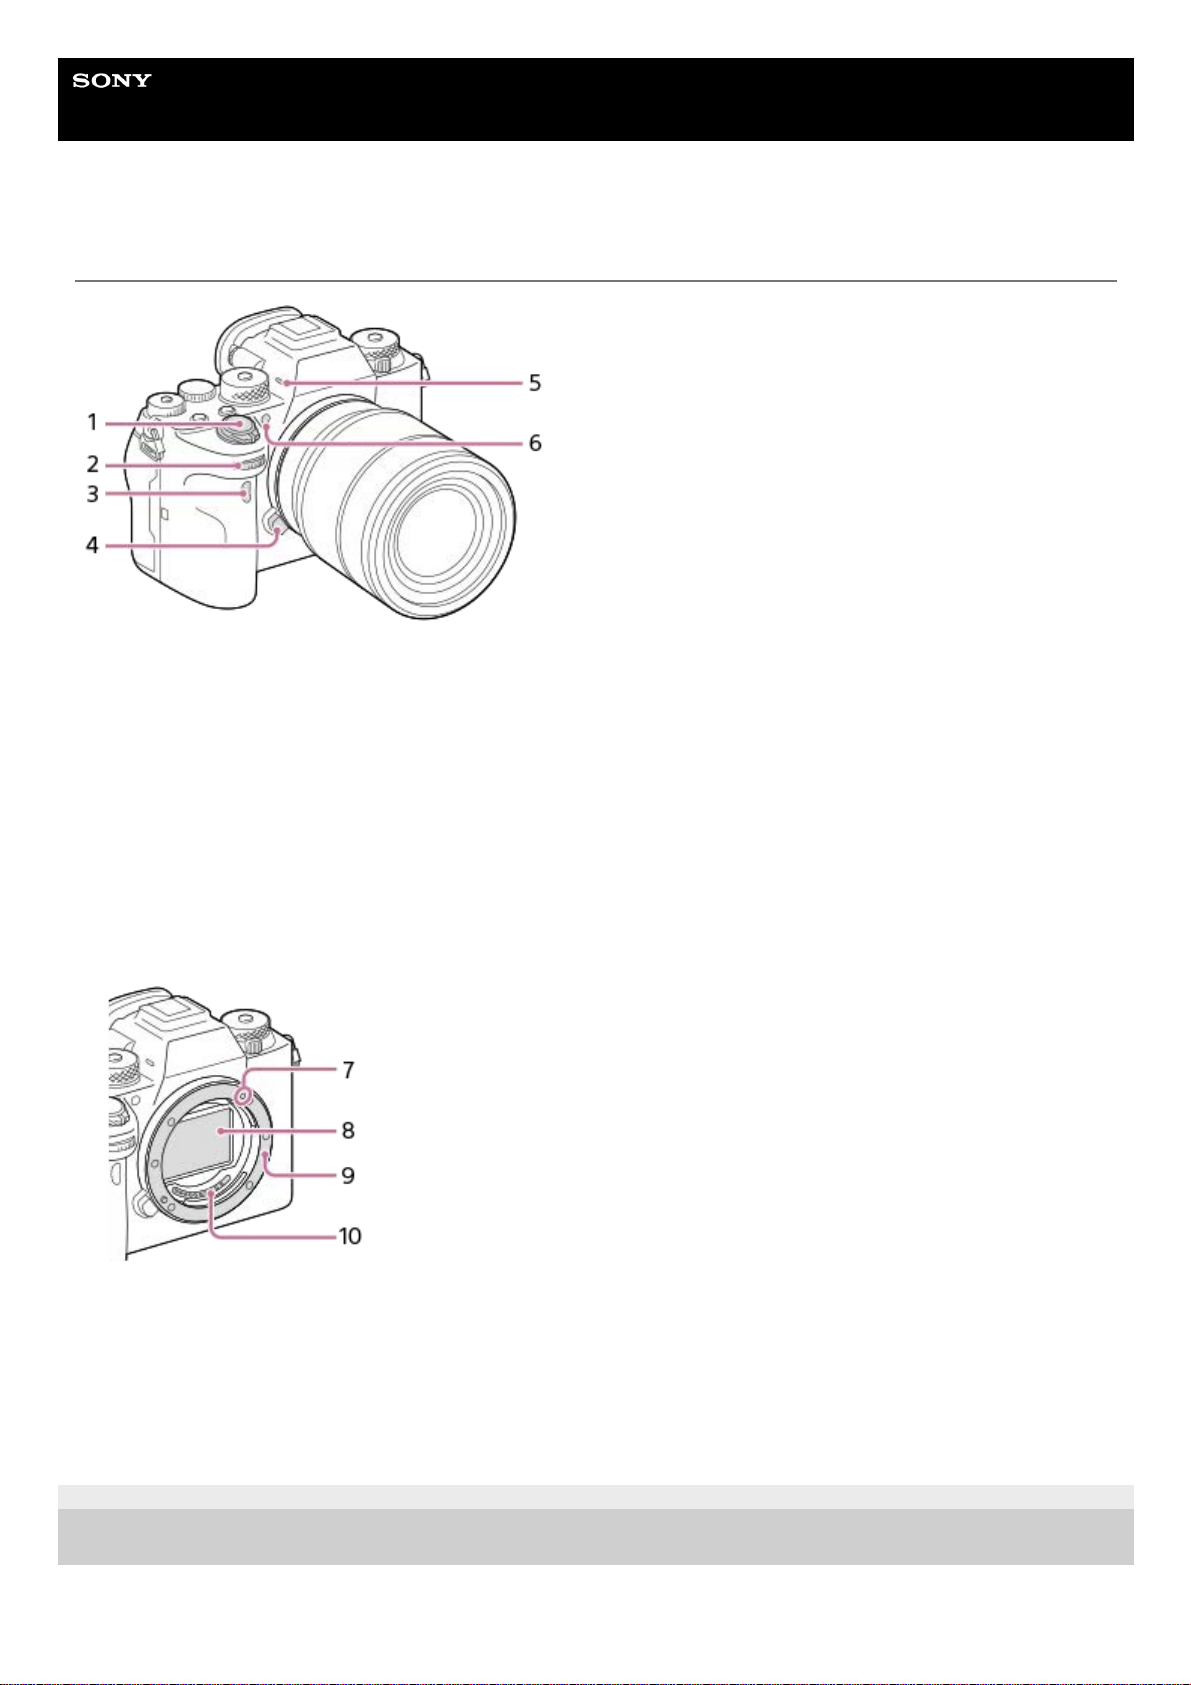
Front side
5-010-476-11(1) Copyright 2019 Sony Corporation
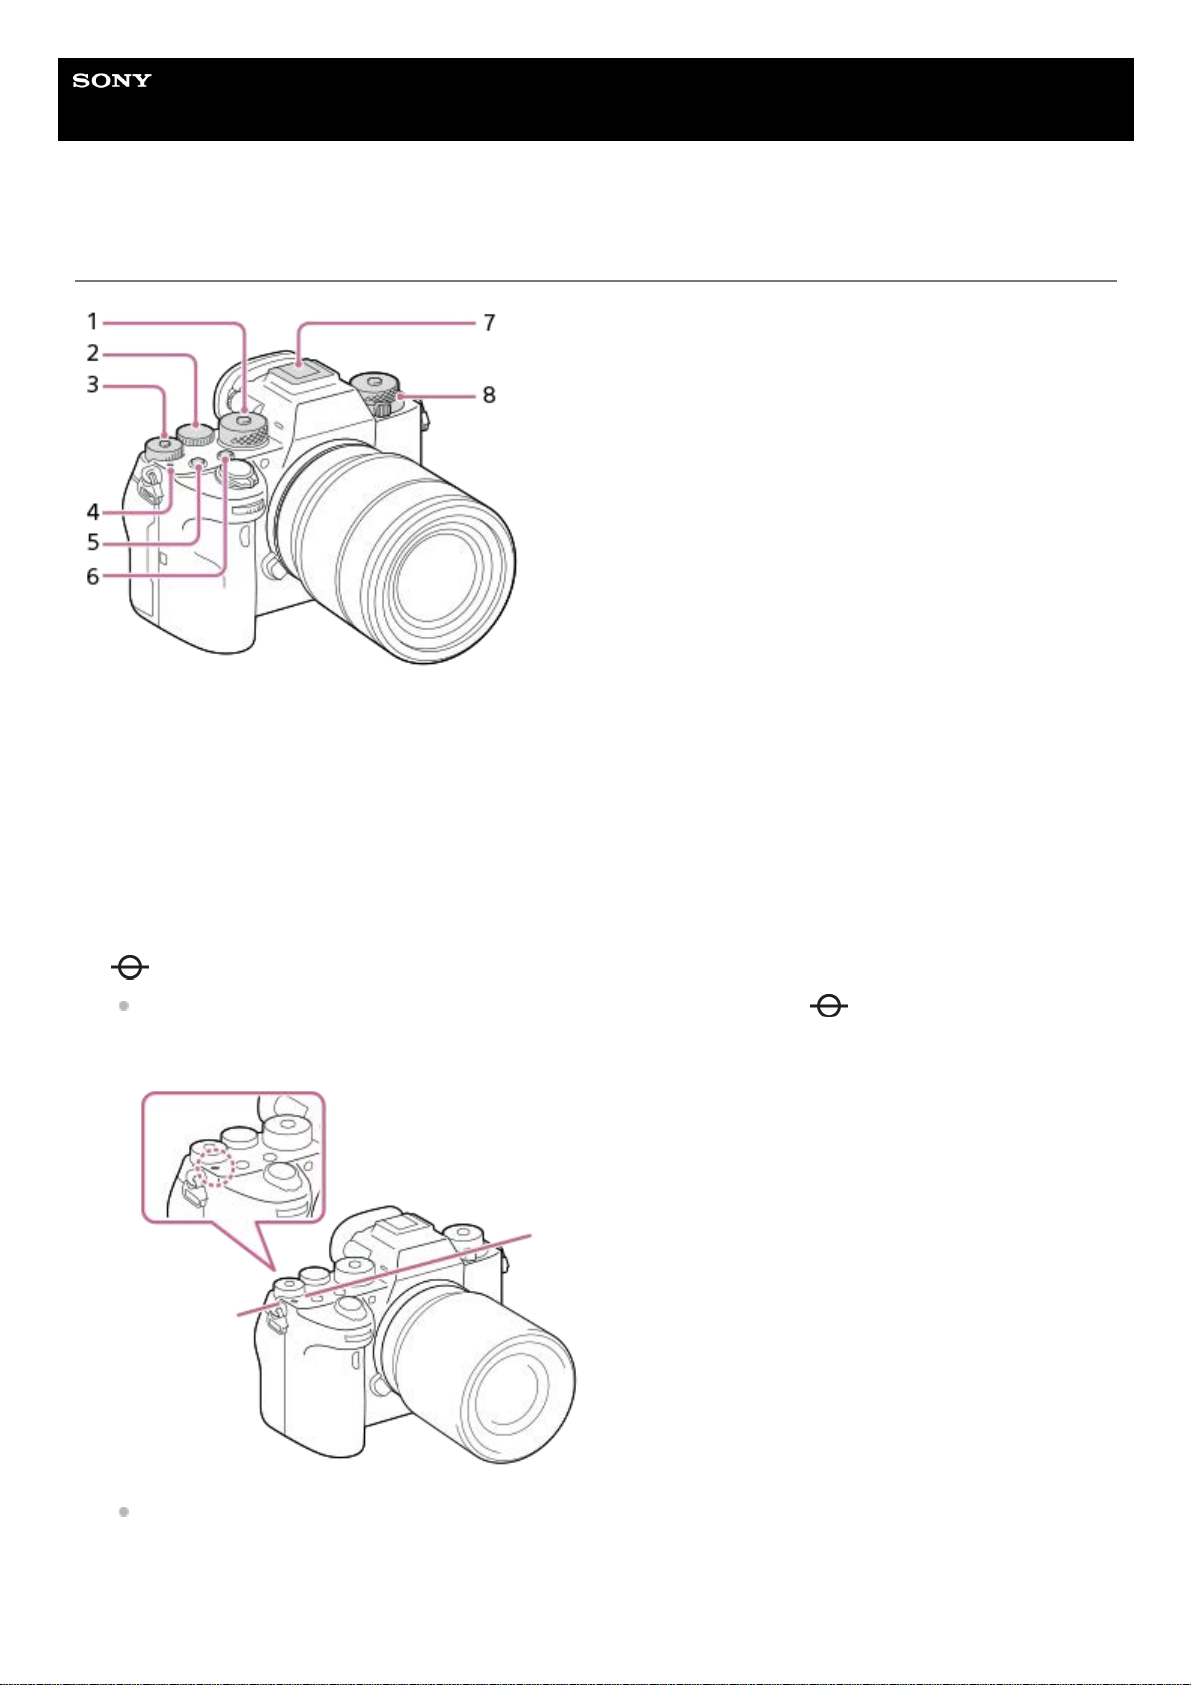
ON/OFF (Power) switch/Shutter button1.
Front dial
You can quickly adjust the settings for each shooting mode.
2.
Infrared remote sensor3.
Lens release button4.
Microphone
Do not cover this part during movie recording. Doing so may cause noise or lower the volume.
5.
AF illuminator/Self-timer lamp
When the lens is removed
6.
Mounting index7.
Image sensor*8.
Mount9.
Lens contacts*10.
Do not directly touch these parts.
*
23
Page 24
Help Guide
Interchangeable Lens Digital Camera
ILCE-9M2 α9II
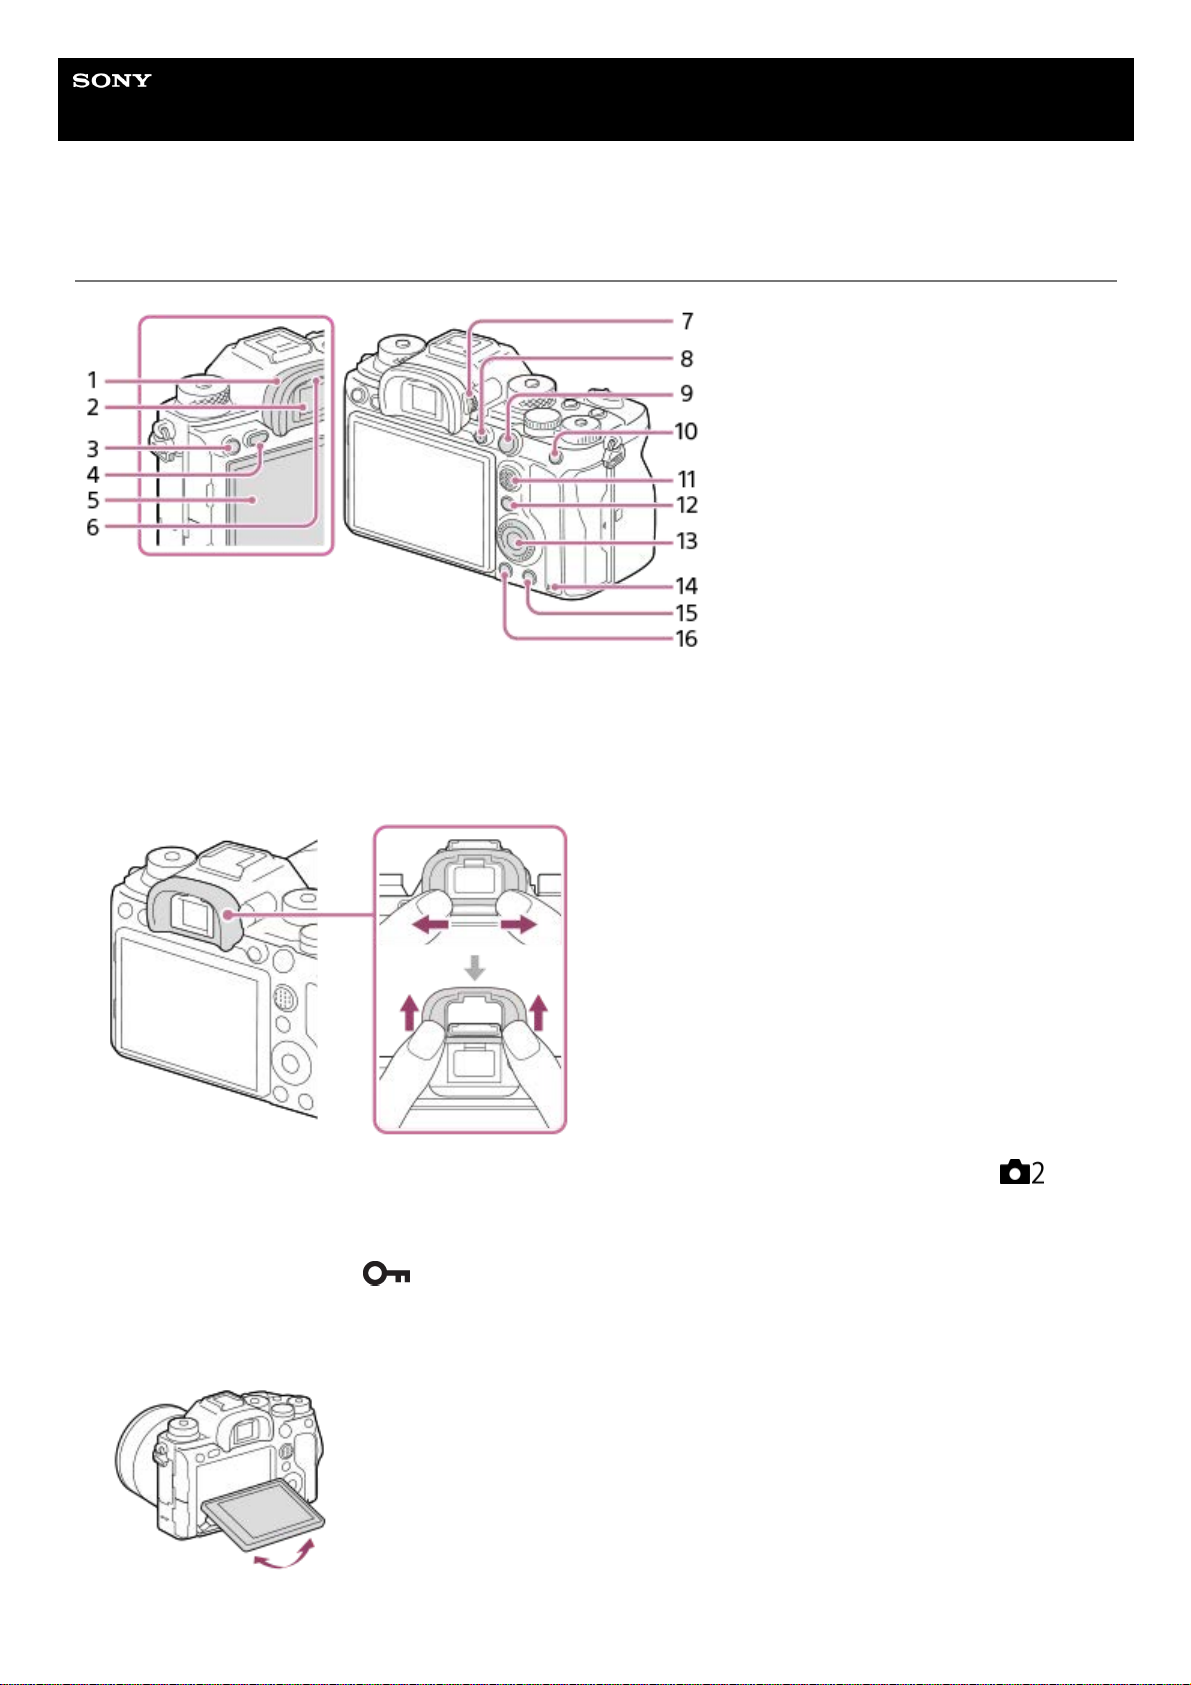
Rear side
Eyepiece Cup
To remove the eyepiece cup
Push the grips at the bottom of the eyepiece cup to the left and right and lift up the cup.
Remove the eyepiece cup when attaching an angle viewfinder (sold separately). Also, select MENU →
(Camera Settings2) → [FINDER/MONITOR], and then switch [Viewfinder(Manual)] and [Monitor(Manual)].
1.
Viewfinder2.
C3 button (Custom button 3)/
(Protect) button3.
MENU button4.
Monitor (For touch operation: Touch panel/Touch pad)
You can adjust the monitor to an easily viewable angle and shoot from any position.
5.
Eye sensor6.
24
Page 25
5-010-476-11(1) Copyright 2019 Sony Corporation
Diopter-adjustment dial
Adjust the diopter-adjustment dial according to your eyesight until the display appears clearly in the viewfinder. If it is
hard to operate the diopter-adjustment dial, remove the eyepiece cup before operating the dial.
7.
MOVIE (Movie) button8.
For shooting: AF-ON (AF On) button
For viewing:
(Enlarge) button
9.
For shooting: AEL button
For viewing:
(Image index) button
10.
Multi-selector11.
For shooting: Fn (Function) button
For viewing:
(Send to Smartphone) button
You can display the screen for [Send to Smartphone] by pressing this button.
12.
Control wheel13.
Access lamp14.
For shooting: C4 button (Custom button 4)
For viewing:
(Delete) button
15.
(Playback) button16.
25
Page 26
Help Guide
Interchangeable Lens Digital Camera
ILCE-9M2 α9II
Top side
Mode dial
The mode dial is unlocked while you hold down the unlock button at the center.
1.
Rear dial
You can quickly adjust the settings for each shooting mode.
2.
Exposure compensation dial
Pressing the lock button at the center switches the exposure compensation dial between the locked and unlocked
status. The dial is unlocked when the lock button is popped up and the white line is visible.
3.
Image sensor position mark
The image sensor is the sensor that converts light into an electric signal. The
mark shows the location of
the image sensor. When you measure the exact distance between the camera and the subject, refer to the
position of the horizontal line.
If the subject is closer than the minimum shooting distance of the lens, the focus cannot be confirmed. Make sure
you put enough distance between the subject and the camera.
4.
C1 button (Custom button 1)5.
C2 button (Custom button 2)6.
26
Page 27

5-010-476-11(1) Copyright 2019 Sony Corporation
Multi Interface Shoe*
Some accessories may not go in all the way and protrude backward from the Multi interface shoe. However, when
the accessory reaches the front end of the shoe, the connection is completed.
7.
Upper: Drive mode dial
The drive mode dial is unlocked while the unlock button at the center is being pressed.
Lower: Focus mode dial
The focus mode dial is unlocked while the unlock button at the front is being pressed.
8.
For details on compatible accessories for the multi interface shoe, visit the Sony website, or consult your Sony dealer or local authorized Sony
service facility. Accessories for the Accessory Shoe can also be used. Operations with other manufactures’ accessories are not guaranteed.
*
27
Page 28
Help Guide
Interchangeable Lens Digital Camera
ILCE-9M2 α9II
Side view
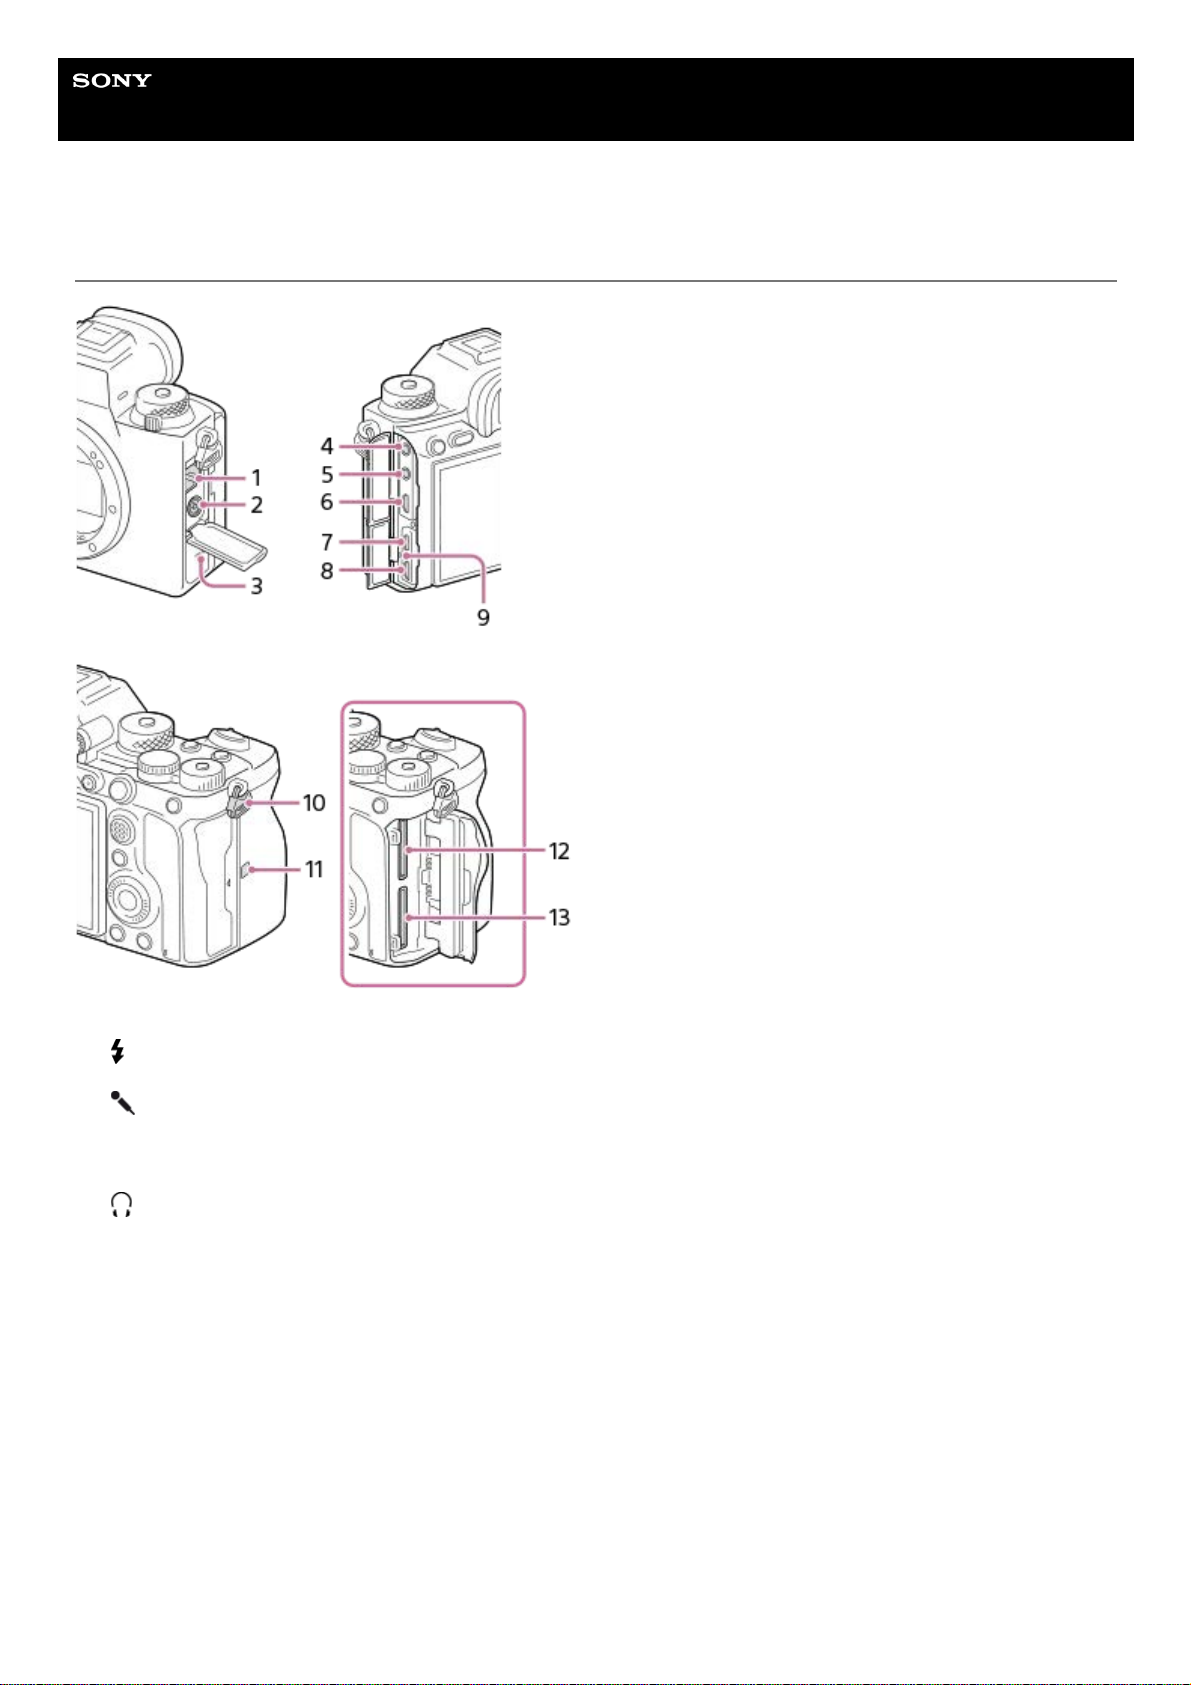
LAN terminal1.
(Flash sync) terminal2.
Speaker3.
(Microphone) jack
When an external microphone is connected, the built-in microphone turns off automatically. When the external
microphone is a plugin-power type, the power of the microphone is supplied by the camera.
4.
(Headphones) jack5.
HDMI micro jack6.
USB Type-C terminal7.
Multi/Micro USB Terminal*
This terminal supports Micro USB-compatible devices.
8.
Charge lamp9.
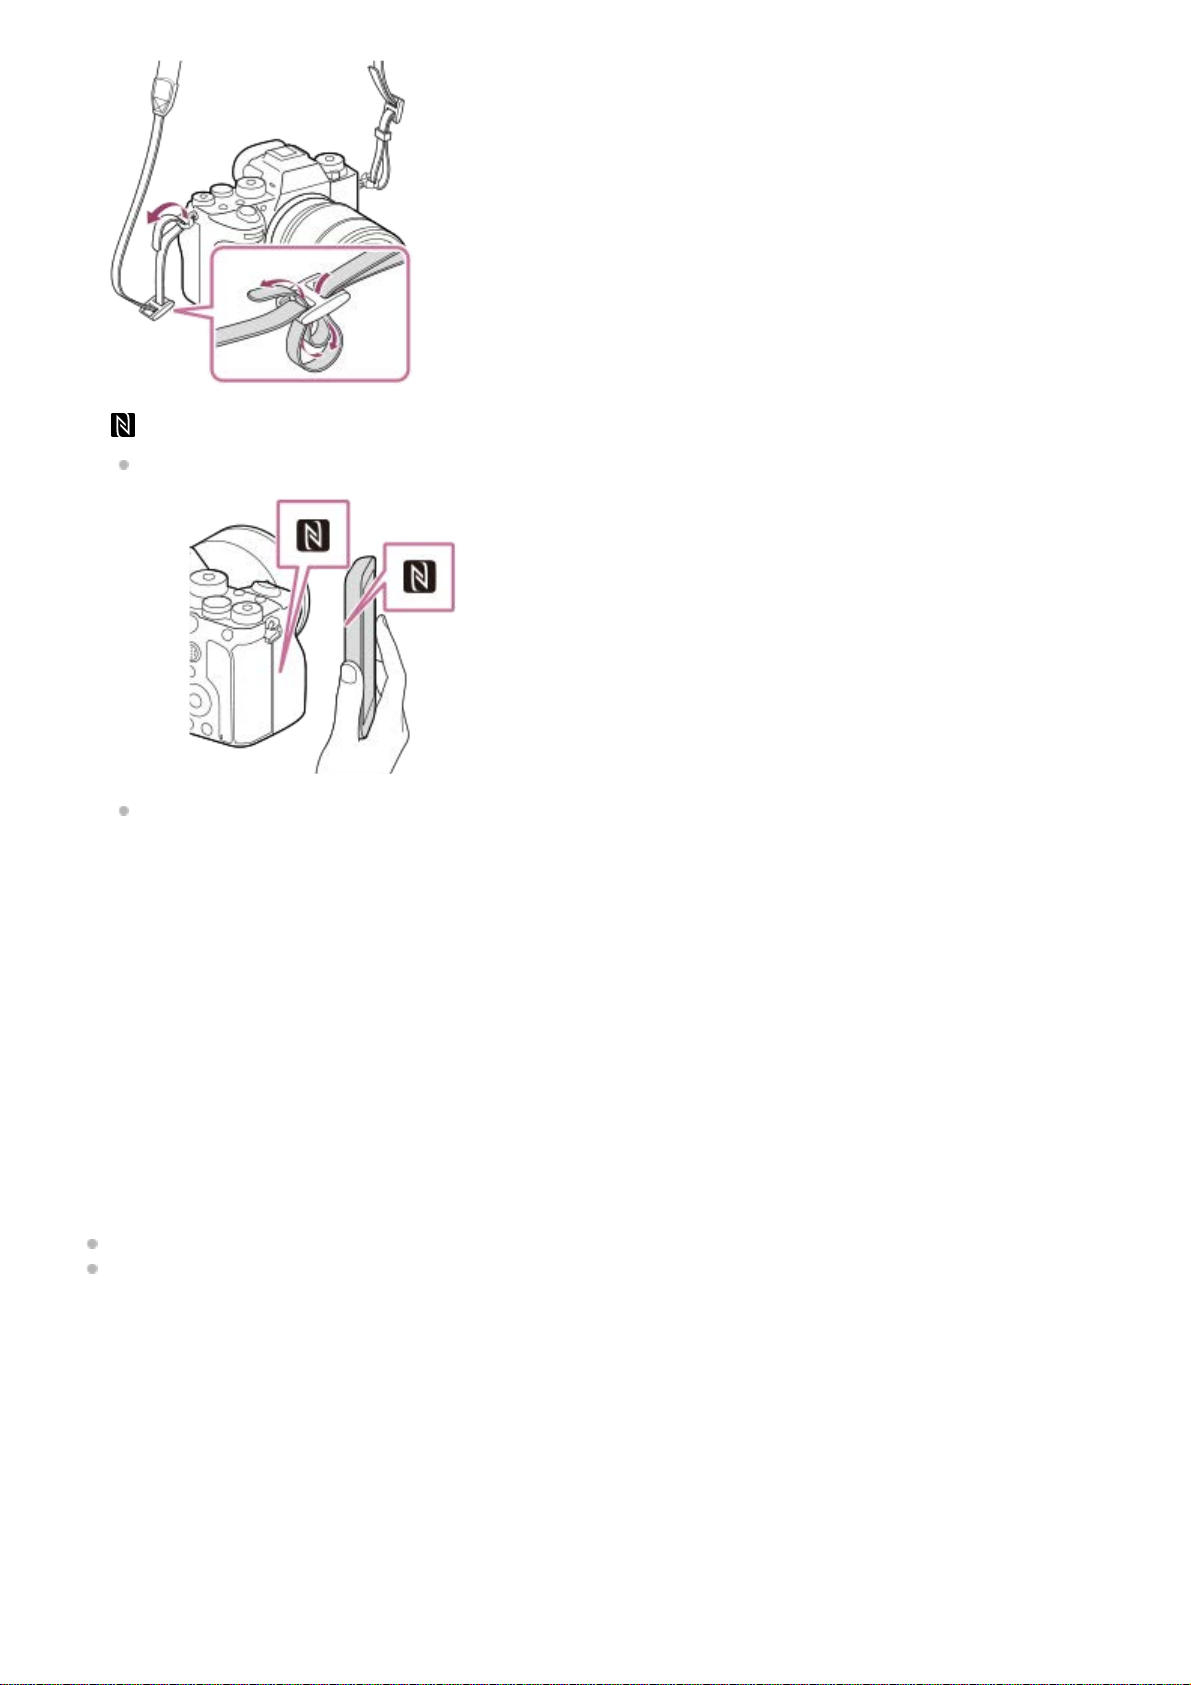
Hooks for shoulder strap
Attach both ends of the strap onto the camera.
10.
28
Page 29
Notes on USB terminals
You can use either the USB Type-C terminal or the Multi/Micro USB Terminal for supplying power, charging the battery,
and USB communications. However, you cannot conduct these operations with both terminals simultaneously.
The battery charging time does not change according to the terminal you use.
You can use accessories for the Multi/Micro USB Terminal, such as a remote commander (sold separately), while
supplying power or performing PC Remote shooting using the USB Type-C terminal.
Notes on the terminal cover
Ensure that the terminal cover is closed before use.
Notes on the cable protector
Use the cable protector to prevent a cable from being disconnected when shooting images with the cable connected.
To attach the cable protector
(N-Mark)
This mark indicates the touch point for connecting the camera and an NFC-enabled Smartphone.
NFC (Near Field Communication) is an international standard of short-range wireless communication technology.
11.
SLOT 1 (Memory card slot 1)
Supports SD cards only (compatible with UHS-I and UHS-II)
12.
SLOT 2 (Memory card slot 2)
Supports SD cards only (compatible with UHS-I and UHS-II)
13.
For details on compatible accessories for the Multi/Micro USB Terminal, visit the Sony website, or consult your Sony dealer or local authorized
Sony service facility.
*
29
Page 30
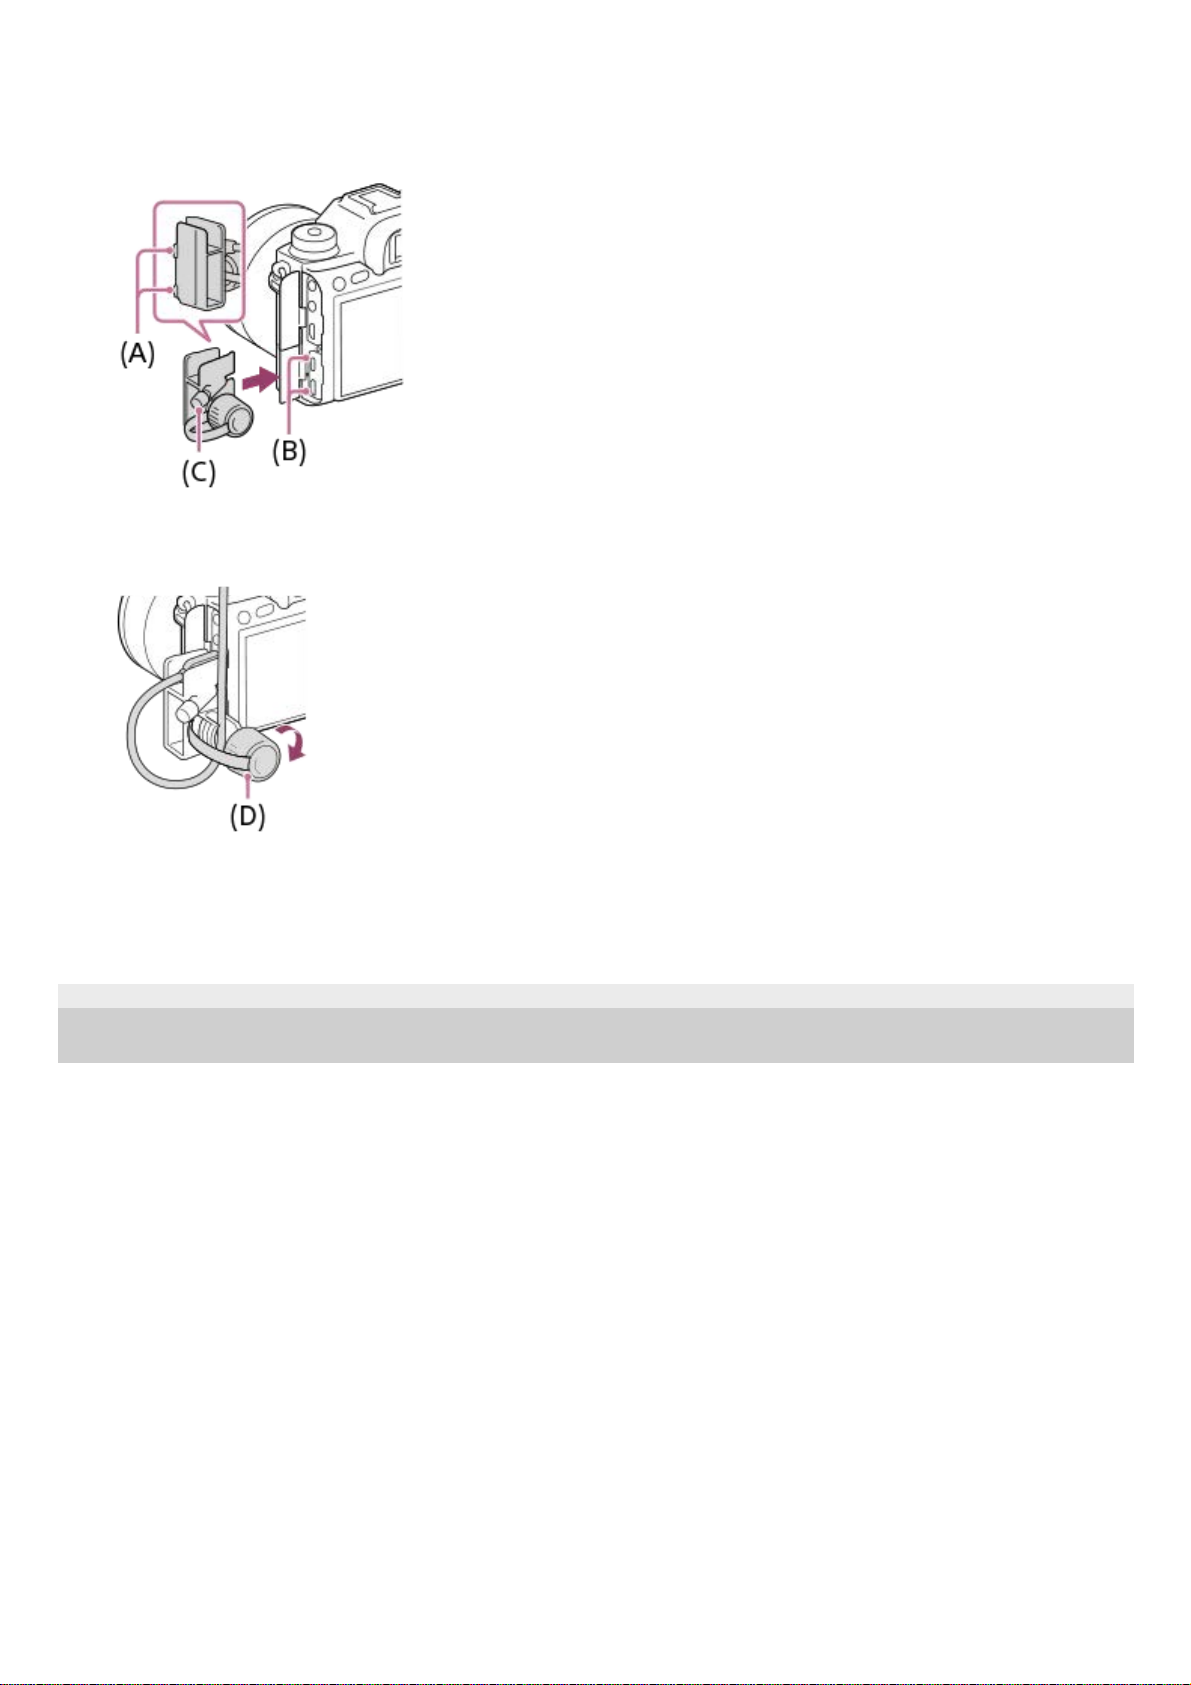
To remove the cable protector
Loosen the attachment screw, and then remove the cable protector.
5-010-476-11(1) Copyright 2019 Sony Corporation
Open both of the jack covers on the monitor side.1.
Fit the two hooks (A) on the rear side of the cable protector into the two notches (B) to the left of the USB Type-C
terminal and Multi/Micro USB Terminal, and then align the cable protector with the terminal part of the camera.
2.
Push the attachment screw (C) in and turn it to secure the cable protector.
3.
Insert the cable into one of the jacks.4.
Insert the cable into the holding part and then secure the cable with the fixing dial (D).
5.
30
Page 31

Help Guide
Interchangeable Lens Digital Camera
ILCE-9M2 α9II
Bottom
Lock lever1.
Battery insertion slot2.
Battery cover
When attaching an accessory such as a vertical grip (sold separately), remove the battery cover.
To remove the battery cover
Pull the battery cover release lever (A) in the direction of the arrow, and then remove the battery cover.
To attach the battery cover
Insert the shaft on one side of the battery cover into the attachment site, and then push in the battery cover by
attaching the shaft on the opposite side.
3.
31
Page 32

5-010-476-11(1) Copyright 2019 Sony Corporation
Tripod socket hole
Use a tripod with a screw less than 5.5 mm (7/32 inches) long. Otherwise, you cannot firmly secure the camera, and
damage to the camera may occur.
4.
32
Page 33

Help Guide
Interchangeable Lens Digital Camera
ILCE-9M2 α9II
Using the control wheel
You can select setting items by turning or pressing the top/bottom/left/right side of the control wheel. Your selection is
determined when you press the center of the control wheel.
The DISP (Display Setting) and ISO (ISO) functions are assigned to the top/right side of the control wheel. In
addition, you can assign selected functions to the left/right/bottom side and the center of the control wheel, and to the
rotation of the control wheel.
During playback, you can display the next/previous image by pressing the right/left side of the control wheel or by
turning the control wheel.
Related Topic
Focus Standard
Assigning frequently used functions to buttons (Custom Key)
Changing the function of the dial temporarily (My Dial Settings)
5-010-476-11(1) Copyright 2019 Sony Corporation
33
Page 34

Help Guide
Interchangeable Lens Digital Camera
ILCE-9M2 α9II
Using the multi-selector
Put your finger right on top of the multi-selector to manipulate it more precisely.
When [Focus Area] is set to [Zone], [Flexible Spot], [Expand Flexible Spot], [Tracking: Zone], [Tracking: Flexible
Spot] or [Tracking: Expand Flexible Spot], you can move the focus area by pressing the multi-selector
up/down/left/right.
The [Focus Standard] function is assigned to the center of the multi-selector in the default settings.
Related Topic
Focus Area
Focus Standard
5-010-476-11(1) Copyright 2019 Sony Corporation
34
Page 35

Help Guide
Interchangeable Lens Digital Camera
ILCE-9M2 α9II
Using MENU items
You can change settings related to all the camera operations including shooting, playback, and operating method. You
can also execute camera functions from the MENU.
Hint
You can display the menu screen by assigning the [MENU] function to a custom key using [
Custom Key] or [ Custom
Key], and then pressing that key.
Related Topic
Add Item
Press the MENU button to display the menu screen.
1
Select the desired setting you want to adjust using the top/bottom/left/right sides of the control wheel or by
turning the control wheel, and then press the center of the control wheel.
Select a MENU tab (A) at the top of the screen, and press the left/right side of the control wheel to move to
another MENU tab.
You can move to another MENU tab by turning the front dial.
You can move to the next MENU tab by pressing the Fn button.
You can go back to the previous screen by pressing the MENU button.
2
Select the desired setting value, and press the center to confirm your selection.
3
35
Page 36

Display From My Menu
5-010-476-11(1) Copyright 2019 Sony Corporation
36
Page 37

Help Guide
Interchangeable Lens Digital Camera
ILCE-9M2 α9II
Assigning frequently used functions to buttons (Custom Key)
You can use the custom key function to assign the functions you use most frequently to easily operable keys. This lets
you skip the process of selecting items from MENU, so you can recall the functions more quickly. You can also assign
[Not set] to easily operable keys to prevent accidental operation.
You can separately assign functions to custom keys for the still image shooting mode (
Custom Key), movie
shooting mode (
Custom Key), and playback mode ( Custom Key).
Assignable functions vary depending on the keys.
You can assign functions to the following keys.
For examples of custom key settings, refer to the following URL:
https://support.d-imaging.sony.co.jp/support/tutorial/ilc/l/ilce-9m2/custom.php
Hint
You can recall functions more quickly by using the Function menu to configure each setting directly from the Fn button, along with
the custom keys. Refer to the related functions under “Related Topic” at the bottom of this page.
The following is the procedure for assigning the [Eye AF] function to the AEL button.
AF-ON Button1.
Custom Button 32.
Custom Button 23.
Custom Button 14.
AEL Button5.
Center Button6.
Control Wheel /Left Button/Right Button/Down Button7.
Custom Button 48.
Multi-Slc Center Btn9.
Fn/
Button10.
MENU → (Camera Settings2) → [ Custom Key].
If you want to assign a function to recall while shooting movies, select [
Custom Key]. If you want to assign
a function to recall while playing back images, select [
Custom Key].
1
37
Page 38

Note
You can also assign shooting functions to the focus hold button on the lens. However, some lenses do not have a focus hold
button.
If you assign [Follow Custom (
)] to a custom key using [ Custom Key], but the function is one that is unavailable in the
movie shooting mode such as [
JPEG Quality] or [Flash Mode], the function will not be recalled when you press the key in the
movie shooting mode.
If you assign [Follow Custom (
/ )] to a custom key using [ Custom Key], the camera will switch to the shooting mode
and recall the assigned function when you press the key in the playback mode.
Related Topic
Using Fn (Function) button (Function menu)
Changing the function of the dial temporarily (My Dial Settings)
5-010-476-11(1) Copyright 2019 Sony Corporation
Move to the [Rear1] screen using the left/right side of the control wheel. Then, select [AEL Button] and
press the center of the control wheel.
2
Press the left/right side of the control wheel until [Eye AF] is displayed. Select [Eye AF], and then press the
center.
If you press the AEL button in the still image shooting mode and eyes are detected, [Eye AF] will activate, and
the camera will focus on the eyes. Shoot images while holding down the AEL button.
3
38
Page 39

Help Guide
Interchangeable Lens Digital Camera
ILCE-9M2 α9II
Using Fn (Function) button (Function menu)
The Function menu is a menu of 12 functions that is displayed at the bottom of the screen when you press the Fn
(Function) button in the shooting mode. You can access frequently used functions more quickly by registering them to
the function menu.
For details on functions that can be registered to the function menu, refer to the following URL:
https://support.d-imaging.sony.co.jp/support/tutorial/ilc/l/ilce-9m2/function.php
Hint
You can register twelve functions to the Function menus for still image shooting and movie shooting, respectively.
You can recall functions more quickly by using the custom key function to assign frequently used functions to desired keys, along
with the function menu. Refer to the related functions under “Related Topic” at the bottom of this page.
Press the DISP on the control wheel repeatedly to display a screen mode other than [For viewfinder], and
then press the Fn (Function) button.
1
Select the desired function by pressing the top/bottom/left/right side of the control wheel.
2
39
Page 40

To adjust settings from the dedicated setting screens
Select the desired function in step 2, then press the center of the control wheel. The dedicated setting screen for the
function will appear. Follow the operating guide (A) to adjust settings.
To change the functions in the function menu (Function Menu Set.)
The following is the procedure for changing [Drive Mode] in the still image function menu to [Grid Line].
To change the movie function menu, select a movie function menu item in Step 2.
Related Topic
Assigning frequently used functions to buttons (Custom Key)
5-010-476-11(1) Copyright 2019 Sony Corporation
Select the desired setting by turning the front dial, and press the center of the control wheel.
Some functions can be fine-tuned using the rear dial.
3
MENU →
(Camera Settings2) → [Function Menu Set.].1.
Select
(Drive Mode) from among the twelve still image function menu items using the top/bottom/left/right
side of the control wheel, and then press the center.
2.
Move to the [Display/Auto Review] screen using the left/right side of the control wheel. Then, select [Grid Line] and
press the center of the control wheel.
(Grid Line) will be displayed in the former location of (Drive Mode) in the function menu.
3.
40
Page 41

Help Guide
Interchangeable Lens Digital Camera
ILCE-9M2 α9II
How to use the Quick Navi screen
The Quick Navi screen is a function optimized for shooting with the viewfinder, that lets you control settings directly.
To adjust settings from the dedicated setting screens
Select the desired function in step 5, then press the center of the control wheel. The dedicated setting screen for the
function will appear. Follow the operating guide (A) to adjust settings.
MENU →
(Camera Settings2) → [DISP Button] → [Monitor].
1
Place a
mark on [For viewfinder] and then select [Enter].
2
Press the DISP on the control wheel to set the screen mode to [For viewfinder].
3
Press the Fn button to switch to the Quick Navi screen.
The displayed contents and their positions in the illustrations are just guidelines, and may differ from the actual
displays.
Auto mode
P/A/S/M mode
4
Select the desired function by pressing the top/bottom/left/right side of the control wheel.
5
Select the desired setting by turning the front dial.
Some functions can be fine-tuned using the rear dial.
6
41
Page 42

Note
Items that are gray on the Quick Navi screen are not adjustable.
When using [Creative Style], etc., some of the setup tasks can only be accomplished on a dedicated screen.
Related Topic
Switching the screen display (while shooting/during playback)
5-010-476-11(1) Copyright 2019 Sony Corporation
42
Page 43

Help Guide
Interchangeable Lens Digital Camera
ILCE-9M2 α9II
How to use the keyboard
When manual character entry is required, a keyboard is displayed on the screen.
Move the cursor on desired key using the control wheel, then press the center to enter.
To cancel input, select [Cancel].
5-010-476-11(1) Copyright 2019 Sony Corporation
Input box
The characters you entered are displayed.
1.
Switch character types
Each time you press this key, the character type will switch between alphabet letters, numerals and symbols.
2.
Keyboard
Each time you press this key, the characters corresponding to that key will be displayed one-by-one in order.
For example: If you want to enter “abd”
Press the key for “abc” once to display “a” → select “
”((5) Move cursor) and press the key for “abc” twice to
display “b” → press the key for “def” once to display “d.”
3.
Finalize
Finalizes the entered characters.
4.
Move cursor
Moves the cursor in the input box to the right or left.
5.
Delete
Deletes the character preceding the cursor.
6.
Switches the next character to a capital or lowercase letter.
7.
Enters a space.
8.
43
Page 44

Help Guide
Interchangeable Lens Digital Camera
ILCE-9M2 α9II
List of icons on the monitor
The displayed contents and their positions in the illustrations are just guidelines, and may differ from the actual displays.
Descriptions are given below the indications of the icons.
Icons on the shooting screen
Monitor mode
Viewfinder mode
Shooting mode/Scene recognition
P P* A S M
Shooting mode
Register number
Scene Recognition icons
1.
Camera settings
NO CARD
Memory card status
100/1 h 30 m
Remaining number of recordable images/Recordable time of movies
Writing data / Number of images left to write
Aspect ratio of still images
24M / 21M / 20M / 16M / 10M / 9.2M / 8.7M / 6.9M / 6.0M / 5.3M / 5.1M / 4.0M / 2.6M / 2.3M / 2.2M / 1.7M
2.
44
Page 45

Image size of still images
RAW
RAW recording (compressed/uncompressed)
X.FINE FINE STD
JPEG Quality
XAVC S 4K XAVC S HD AVCHD
File format of movies
Record setting of movies
120p 60p 60i 30p 24p 100p 50p 50i 25p
Frame rate of movies
Proxy Recording
120fps 60fps 30fps 15fps 8fps 4fps 100fps 50fps 25fps 12fps 6fps 3fps 2fps 1fps
Frame rate for slow/quick motion shooting
APS-C/Super 35mm
Flash charge in progress
Setting Effect OFF
AF Illuminator
Flickering detected
SteadyShot off/on, Camera shake warning
SteadyS. Focal Len. / Camera shake warning
Smart Zoom/ Clear Image Zoom/Digital Zoom
PC remote
Bright Monitoring
Shooting without shutter sound
Remote control
No audio recording of movies
Wind Noise Reduct.
Copyright information writing on
IPTC information writing on
Focus Cancel
Tracking Cancel
Spot Focus
Performing [Spot Focus]
45
Page 46

NFC active
Bluetooth connection available / Bluetooth connection unavailable
Connected to smartphone / Not connected to smartphone
Obtaining location information / Location information cannot be obtained
Airplane Mode
Overheating warning
Database file full / Database file error
Battery
Remaining battery
Remaining battery warning
USB power supply
3.
Shooting settings
Drive Mode
Flash Mode /Wireless Flash/Red Eye Reduction
±0.0
Flash Comp.
Focus Mode
Focus Area
File Format
Metering Mode
7500K A5 G5
White Balance (Auto, Preset, Underwater Auto, Custom, Color temperature, Color filter)
D-Range Optimizer /Auto HDR
+3 +3 +3
Creative Style /Contrast, saturation, and sharpness
Picture Effect
Face/Eye Priority in AF
Shutter Type
Prioritize Rec. Media
4.
Focus indicator/exposure settings
Focus indicator
1/250
Shutter speed
5.
46
Page 47

Icons on the playback screen
Single-image playback
F3.5
Aperture value
Exposure compensation/Metered Manual
ISO400
ISO AUTO
ISO400
ISO sensitivity
AE lock/FEL lock/AWB lock
Guides/other
Tracking Cancel
Guide display for tracking
Focus Cancel
Guide display for canceling focusing
Control wheel function
Guide display for My Dial
Bracket indicator
Spot metering area
Exposure Setting Guide
Shutter speed indicator
Aperture indicator
Histogram
Digital level gauge
STBY REC
Movie recording standby/Movie recording in progress
1:00:12
Actual movie recording time (hours: minutes: seconds)
Audio Level Display
REC Control
00:00:00:00
Time code (hours: minutes: seconds: frames)
00 00 00 00
User Bit
6.
47
Page 48

Histogram display
Basic information
Playback media
View Mode
IPTC Information
Rating
Protect
DPOF
DPOF set
3/7
File number/Number of images in the view mode
NFC active
Remaining battery
Display as Group
Proxy movie included
A Voice Memo is attached.
1.
Camera settings
Refer to “Icons on the shooting screen.”
2.
Shooting settings
Picture Effect error
Auto HDR error
3.
48
Page 49

5-010-476-11(1) Copyright 2019 Sony Corporation
35mm
Lens focal length
Refer to “Icons on the shooting screen” for other icons displayed in this area.
Image information
Latitude/longitude information
Copyright information exists for image
2019 -1-1 10:37PM
Date of recording
100-0003
Folder number - file number
C0003
File name of movie
Histogram (Luminance/R/G/B)
4.
49
Page 50

Help Guide
Interchangeable Lens Digital Camera
ILCE-9M2 α9II
Switching the screen display (while shooting/during playback)
You can change the display contents on the screen.
Press the DISP (Display Setting) button.
To switch the information displayed on the viewfinder, press the DISP button while looking into the viewfinder.
Each time you press the DISP button, the screen display changes.
The displayed contents and their position are just a guideline, and may differ from the actual display.
During shooting (Monitor)
Display All Info. → No Disp. Info. → Histogram → Level → For viewfinder → Display All Info.
During shooting (Viewfinder)
Level → No Disp. Info. → Histogram → Level
During playback (Monitor/Viewfinder)
Display Info. → Histogram → No Disp. Info. → Display Info.
1
50
Page 51

Histogram display
A histogram shows the luminance distribution, displaying how many pixels there are by luminance. It shows darker
toward the left and brighter toward the right.
The histogram changes depending on the exposure compensation.
A peak at the right or left end of the histogram indicates that the image has an overexposed or underexposed area,
respectively. You cannot correct such defects using a computer after shooting. Perform exposure compensation before
shooting as necessary.
(A): Pixel count
(B): Brightness
Note
The viewfinder display and the monitor display for shooting can be set separately. Look through the viewfinder to set the display
settings for the viewfinder.
The information in the histogram display does not indicate the final photograph. It is information about image displayed on the
screen. The final result depends on the aperture value, etc.
The histogram display is extremely different between shooting and playback in the following cases:
When the flash is used
When shooting a low luminance subject such as a night scene
In movie mode, [For viewfinder] cannot be displayed.
Hint
The following are not displayed in the default settings.
Graphic Display
Monitor Off
Display All Info. (when using the viewfinder)
To change the display modes that are switched when you press the DISP button, select MENU →
(Camera Settings2) →
[DISP Button] and change the setting.
Related Topic
If the image has an overexposed or underexposed area, the corresponding section will blink on the histogram
display (overexposed/underexposed warning).
The settings for playback are also applied in [Auto Review].
51
Page 52

DISP Button (Monitor/Finder)
5-010-476-11(1) Copyright 2019 Sony Corporation
52
Page 53

Help Guide
Interchangeable Lens Digital Camera
ILCE-9M2 α9II
DISP Button (Monitor/Finder)
Allows you to set the screen display modes that can be selected using DISP (Display Setting) in shooting mode.
Menu item details
Graphic Display :
Shows basic shooting information. Graphically shows the shutter speed and aperture value.
Display All Info. :
Shows recording information.
No Disp. Info. :
Does not show recording information.
Histogram :
Displays the luminance distribution graphically.
Level :
Indicates whether the product is level in both the front-back (A) and horizontal (B) directions. When the product is level in
either direction, the indicator turns to green.
For viewfinder*:
Displays only shooting information on the monitor, not the subject. This setting is a display setting for shooting with the
viewfinder.
Monitor Off*:
Always turns the monitor off when shooting images. You can use the monitor when playing back images or operating
MENU. This setting is a display setting for shooting with the viewfinder.
Note
If you tilt the product forward or backward by a large degree, the level error will be great.
The product may have a margin of error of almost ±1° even when the inclination is corrected by the level.
MENU →
(Camera Settings2) → [DISP Button] → [Monitor] or [Finder] → desired setting → [Enter].
The items marked with
are available.
1
These screen modes are available only in the setting for [Monitor].
*
53
Page 54

Related Topic
Switching the screen display (while shooting/during playback)
5-010-476-11(1) Copyright 2019 Sony Corporation
54
Page 55

Help Guide
Interchangeable Lens Digital Camera
ILCE-9M2 α9II
Checking the camera and the supplied items
The number in parentheses indicates the number of pieces.
Camera (1)
Battery Charger (1)
Power cord (mains lead) (1)*
NP-FZ100 Rechargeable Battery Pack (1)
USB Type-C™ cable (1)
Shoulder Strap (1)
Body Cap (1) (Attached to the camera)
Cable Protector (1)
Multiple power cords may be supplied with your camera. Use the appropriate one that matches your country/region.
*
55
Page 56

Shoe Cap (1) (Attached to the camera)
Eyepiece Cup (1) (Attached to the camera)
Instruction Manual (1)
Reference Guide (1)
5-010-476-11(1) Copyright 2019 Sony Corporation
56
Page 57

Help Guide
Interchangeable Lens Digital Camera
ILCE-9M2 α9II
Charging the battery pack using a charger
Insert the battery pack into the battery charger.
Place the battery pack on the battery charger aligning the direction of
mark.
Slide the battery pack to the end towards the arrow.
1
Connect the power cord (supplied) to the battery charger, and connect the battery charger to the wall outlet
(wall socket).
When charging starts, the CHARGE lamp (A) lights up in orange. The CHARGE lamp turns off when the
charging level reaches approximately 90%.
You can check the approximate charging status with the charging status indicator lamp (B) as shown in the
following table. (The orange color indicates the lighting of the lamp.) The charging status indicator lamp turns off
when charging is finished.
2
Charging status CHARGE lamp/Charging status indicator lamp
Immediately after attaching the battery pack - 30%
30% - 60%
60% - 90%
90% - Fully charged
Full charging completed
57
Page 58

Note
We recommend charging the battery pack in an ambient temperature of between 10°C and 30°C (50°F and 86°F). You may not
be able to efficiently charge the battery pack outside this temperature range.
Use a nearby wall outlet (wall socket) when using the AC Adaptor/Battery Charger. If any malfunction occurs, disconnect the plug
from the wall outlet (wall socket) immediately to disconnect from the power source.
If you use the product with a charge lamp, note that the product is not disconnected from the power source even when the lamp
turns off.
When you use a completely new battery pack or a battery pack that has not been used for a long time, the CHARGE lamp may
flash quickly when the battery is charged. If this happens, remove the battery pack and then re-insert it to recharge.
Do not continuously or repeatedly charge the battery pack without using it if it is already fully charged or close to fully charged.
Doing so may cause a deterioration in battery performance.
Be sure to use only genuine Sony brand battery packs.
Related Topic
Notes on the battery pack
5-010-476-11(1) Copyright 2019 Sony Corporation
The charge level shown by the charging status indicator lamp and the percentages in the above table are rough
guides.
The actual status may differ depending on the ambient temperature and the condition of the battery pack.
Charging time (Full charge): The charging time is approximately 150 min.
The above charging time applies when charging a fully depleted battery pack at a temperature of 25°C (77°F).
Charging may take longer depending on conditions of use and circumstances.
When the CHARGE lamp and charging status indicator lamp light up and then immediately turn off, the battery
pack is fully charged.
58
Page 59

Help Guide
Interchangeable Lens Digital Camera
ILCE-9M2 α9II
Inserting/removing the battery pack
To charge the battery pack while it is inserted into the camera
Turn the camera off, and then connect the camera to a computer, etc. using a USB cable.
If the camera is turned on, you will be able to use the camera with power supplied from the computer, etc., but the
battery pack will not charge.
Use the supplied USB Type-C cable or a cable that is compliant with the USB specification.
To remove the battery pack
Make sure that the access lamp is not lit, and turn off the camera. Then, slide the lock lever (A) and remove the battery
pack. Be careful not to drop the battery pack.
Open the battery cover.
1
Insert the battery pack while pressing the lock lever (A) with the tip of the battery until the battery locks into
place.
2
Close the cover.
3
59
Page 60

5-010-476-11(1) Copyright 2019 Sony Corporation
60
Page 61

Help Guide
Interchangeable Lens Digital Camera
ILCE-9M2 α9II
Charging by connecting to a computer
The battery pack can be charged by connecting the camera to a computer using a USB cable.
Note
If the product is connected to a laptop computer that is not connected to a power source, the laptop battery level decreases. Do
not leave the product connected to a laptop computer for an extended period of time.
Do not turn on/off or restart the computer, or wake the computer from sleep mode when a USB connection has been established
between the computer and the camera. Doing so may cause a malfunction. Before turning on/off or restarting the computer, or
waking the computer from sleep mode, disconnect the camera from the computer.
Proper operation cannot be guaranteed on all types of computers.
Charging cannot be guaranteed with a custom-built computer, modified computer, or a computer connected through a USB hub.
The camera may not operate correctly when other USB devices are used at the same time.
Related Topic
Notes on the battery pack
Notes on charging the battery pack
5-010-476-11(1) Copyright 2019 Sony Corporation
Turn off the product, and connect to the USB terminal of the computer.
1
61
Page 62

Help Guide
Interchangeable Lens Digital Camera
ILCE-9M2 α9II
Battery life and number of recordable images
The above estimates for battery life and number of recordable images apply when the battery pack has been fully
charged. The battery life and number of images may decrease depending on the conditions of use.
The battery life and number of recordable images are estimates based on shooting with the default settings under the
following conditions:
Using the battery pack at an ambient temperature of 25°C (77°F).
Using a Sony SDXC memory card (U3) (sold separately)
Using a FE 28-70mm F3.5-5.6 OSS lens (sold separately)
The numbers for “Shooting (still images)” are based on the CIPA standard and shooting under the following
conditions:
(CIPA: Camera & Imaging Products Association)
One picture is taken every 30 seconds.
The power is turned on and off once every ten times.
The number of minutes for movie shooting is based on the CIPA standard and shooting under the following
conditions:
The image quality is set to XAVC S HD 60p 50M /50p 50M.
Actual shooting (movies): Battery life based on repeated shooting, zooming, shooting stand-by, turning on/off, etc.
Continuous shooting (movies): No operations other than starting and ending shooting are performed.
5-010-476-11(1) Copyright 2019 Sony Corporation
Battery life Number of images
Shooting (still images)
Screen mode — Approx. 690
Viewfinder mode — Approx. 500
Actual shooting (movies)
Screen mode Approx. 120 min. —
Viewfinder mode Approx. 110 min. —
Continuous shooting (movies)
Screen mode Approx. 200 min. —
Viewfinder mode Approx. 195 min. —
62
Page 63

Help Guide
Interchangeable Lens Digital Camera
ILCE-9M2 α9II
Supplying power from a wall outlet (wall socket)
Use an AC adaptor, etc. to shoot and play back images while power is supplied from a wall outlet (wall socket). This
conserves the camera's battery power.
Note
The camera will not activate if there is no remaining battery. Insert a sufficiently charged battery pack into the camera.
If you use the camera while power is being supplied from a wall outlet (wall socket), make sure that the icon that shows that
powering via USB is in progress (
) is displayed on the monitor.
Do not remove the battery pack while power is supplied from a wall outlet (wall socket). If you remove the battery pack, the
camera will be turned off.
Do not remove the battery pack while the access lamp is lit. The data in the memory card may be damaged.
As long as the power is on, the battery pack will not be charged even if the camera is connected to the AC Adaptor, etc.
Under certain conditions, power may be supplied from the battery pack supplementarily even if you are using the AC adaptor, etc.
Do not remove the USB cable while power is supplied from a wall outlet (wall socket). Before you remove the USB cable, turn off
the camera.
Depending on the camera and battery temperature, the continuous recording time may be shortened while power is supplied from
a wall outlet (wall socket).
When using a mobile charger as a power source, confirm that it is fully charged before use. Also, be careful of the remaining
power on the mobile charger during use.
5-010-476-11(1) Copyright 2019 Sony Corporation
Insert the battery pack into the camera.
1
Connect the camera to the wall outlet (wall socket) with a USB cable and an AC adaptor, etc.
2
63
Page 64

Help Guide
Interchangeable Lens Digital Camera
ILCE-9M2 α9II
Notes on the battery pack
Notes on using the battery pack
Be sure to use only battery packs specified for this product.
The correct remaining battery indicator may not be displayed under some operating or environmental conditions.
Do not expose the battery pack to water. The battery pack is not water-resistant.
Do not leave the battery pack in extremely hot places, such as in a car or under direct sunlight.
Charging the battery pack
Charge the battery pack (supplied) before using the product for the first time.
The charged battery pack will discharge little by little even if you do not use it. Charge the battery pack each time
before you use the product so that you do not miss any opportunities to shoot images.
Do not charge battery packs except battery packs specified for this product. Doing so can result in leaks,
overheating, explosions, electric shocks, burns, or injuries.
If the charge lamp flashes when the battery pack is not fully charged, remove the battery pack or disconnect the USB
cable from the camera and the charger and then reinsert it to recharge.
We recommend charging the battery pack in an ambient temperature of between 10 °C and 30 °C (50 °F and 86 °F).
The battery pack may not be effectively charged in temperatures outside this range.
When you connect this product and a laptop computer that is not connected to a power source, the laptop’s battery
charge may decrease. Do not charge this product using the laptop computer for too long.
Do not turn on/restart a computer, wake a computer from sleep mode, or turn off a computer while this product is
connected to the computer via USB cable. Doing so may cause a malfunction of this product. Disconnect the product
and the computer before performing the above operations.
We do not guarantee charging if you are using a self-built or modified computer.
After charging is finished, disconnect the charger from the wall outlet (wall socket) if charging with a charger, or
disconnect the USB cable from the camera if charging the battery pack while it is inserted into the camera. Not doing
so may result in a shorter battery life.
Remaining battery indicator
The remaining battery indicator appears on the screen.
A: Battery level high
B: Battery exhausted
It takes about one minute for the correct remaining battery indicator to appear.
The correct remaining battery indicator may not be displayed under some operating or environmental conditions.
If the remaining battery indicator does not appear on the screen, press the DISP (Display Setting) button to display it.
Charging time (Full charge)
The charging time is approximately 150 minutes using the battery charger (supplied).
The above charging time applies when charging a fully depleted battery pack at a temperature of 25 °C (77 °F). Charging
may take longer depending on conditions of use and circumstances.
Effective use of the battery pack
64
Page 65

Battery performance decreases in low temperature environments. So in cold places, the operational time of the
battery pack is shorter. To ensure longer battery pack use, we recommend putting the battery pack in your pocket
close to your body to warm it up, and insert it in the product immediately before you start shooting. If there are any
metal objects such as keys in your pocket, be careful of causing a short-circuit.
The battery pack will run down quickly if you use the flash or continuous shooting function frequently, turn the power
on/off frequently, or set the monitor very bright.
We recommend preparing spare battery packs and taking trial shots before taking the actual shots.
If the battery terminal is dirty, you may not be able to turn on the product or the battery pack may not be properly
charged. In that case, clean the battery by lightly wiping off any dust using a soft cloth or a cotton swab.
How to store the battery pack
To maintain the battery pack’s function, charge the battery pack and then fully discharge it in the camera at least once a
year before storing it. Store the battery in a cool, dry place after removing it from the camera.
On battery life
The battery life is limited. If you use the same battery repeatedly, or use the same battery for a long period, the
battery capacity decreases gradually. If the available time of the battery is shortened significantly, it is probably time
to replace the battery pack with a new one.
The battery life varies according to how the battery pack is stored and the operating conditions and environment in
which each battery pack is used.
5-010-476-11(1) Copyright 2019 Sony Corporation
65
Page 66

Help Guide
Interchangeable Lens Digital Camera
ILCE-9M2 α9II
Notes on charging the battery pack
If the product's charge lamp flashes while charging, remove the battery pack being charged, and then insert the
same battery pack firmly back into the product. If the charge lamp flashes again, this may indicate a faulty battery or
that a battery pack other than the specified type has been inserted. Check that the battery pack is the specified type.
If the battery pack is the specified type, remove the battery pack, replace it with a new or different one and check that
the newly inserted battery is charging correctly. If the newly inserted battery is charging correctly, the previously
inserted battery may be faulty.
5-010-476-11(1) Copyright 2019 Sony Corporation
66
Page 67

Help Guide
Interchangeable Lens Digital Camera
ILCE-9M2 α9II
Inserting/removing a memory card
Explains how to insert a memory card (sold separately) to the product.
Hint
Open the memory card cover.
1
Insert the SD card into the slot 1.
When using two memory cards, insert the second one into the slot 2.
Insert the memory card with the terminal side facing toward you, until it clicks into place.
Memory card types that can be inserted into the memory card slots
Both the slot 1 (upper) and the slot 2 (lower) only support SD memory cards (compatible with UHS-II).
This camera does not support Memory Stick media.
2
Close the cover.
3
67
Page 68

When you use a memory card with the camera for the first time, it is recommended that you format the card on the camera for
more stable performance of the memory card.
You can change the memory card slot for recording by selecting MENU →
(Setup) → [Rec. Media Settings] → [Prioritize
Rec. Media].
To record the same image on two memory cards at the same time or to sort recorded images onto two memory card slots by the
image type (still image/movie), select MENU →
(Setup) → [Rec. Media Settings] → [Recording Mode].
To remove the memory card
Open the memory card cover and make sure that the access lamp (A) is not lit, then push in the memory card lightly
once to remove it.
Related Topic
Memory cards that can be used
Notes on memory card
Format
Rec. Media Settings: Prioritize Rec. Media
Selecting which memory card to play back (Select Playback Media)
Rec. Media Settings: Recording Mode
5-010-476-11(1) Copyright 2019 Sony Corporation
68
Page 69

Help Guide
Interchangeable Lens Digital Camera
ILCE-9M2 α9II
Memory cards that can be used
This camera only supports SD memory cards (UHS-II compatible). When using microSD memory cards with this camera,
be sure to use the appropriate adaptor.
Note
When an SDHC memory card is used to record an XAVC S movie over extended periods of time, the recorded movies will be
divided into files 4 GB in size. The divided files can be handled as a single file by importing them to a computer using
PlayMemories Home.
When recording a movie on memory cards in both the slot 1 and the slot 2 with following camera settings, insert two memory
cards with the same file system. XAVC S movies cannot be recorded simultaneously when using a combination of the exFAT file
system and FAT32 file system.
[
File Format] is set to [XAVC S 4K] or [XAVC S HD].
[Recording Mode] under [Rec. Media Settings] is set to [Simult. (
)] or [Simult. ( / )].
Fully charge the battery pack before attempting to recover the database files on the memory card.
Related Topic
Notes on memory card
Number of recordable images
Recordable movie times
Rec. Media Settings: Recording Mode
5-010-476-11(1) Copyright 2019 Sony Corporation
Recording format Supported memory card
Still image SD/SDHC/SDXC card
AVCHD SD/SDHC/SDXC card (Class 4 or faster, or U1 or faster)
XAVC S
4K 60Mbps*
HD 50Mbps or lower*
HD 60Mbps
SDHC/SDXC card (Class 10, or U1 or faster)
4K 100Mbps*
HD 100Mbps
SDHC/SDXC card (U3)
Including when recording proxy movies at the same time
*
Memory card File system
SDXC memory card exFAT
SDHC memory card FAT32
69
Page 70

Help Guide
Interchangeable Lens Digital Camera
ILCE-9M2 α9II
Notes on memory card
If you repeatedly shoot and delete images for a long time, fragmentation of data in a file in the memory card may
occur, and movie recording may be interrupted in the middle of shooting. If this happens, save your images to a
computer or other storage location, then execute [Format] using this camera.
Do not remove the battery pack or the memory card, disconnect the USB cable, or turn the camera off while the
access lamp is lit up. This may cause the data on the memory card to become damaged.
Be sure to back up the data for protection.
Not all memory cards are guaranteed to operate correctly.
Images recorded on an SDXC memory card cannot be imported to or played on computers or AV devices that are
not compatible with exFAT when connected using a USB cable. Make sure that the device is compatible with exFAT
before connecting it to the camera. If you connect your camera to an incompatible device, you may be prompted to
format the card. Never format the card in response to this prompt, as doing so will erase all data on the card. (exFAT
is the file system used on SDXC memory cards.)
Do not expose the memory card to water.
Do not strike, bend or drop the memory card.
Do not use or store the memory card under the following conditions:
High temperature locations such as in a car parked under the sun
Locations exposed to direct sunlight
Humid locations or locations with corrosive substances present
If the memory card is used near areas with strong magnetization, or used in locations subject to static electricity or
electrical noise, the data on the memory card may become damaged.
Do not touch the terminal section of the memory card with your hand or a metal object.
Do not leave the memory card within the reach of small children. They might accidentally swallow it.
Do not disassemble or modify the memory card.
The memory card may be hot just after it has been used for a long time. Be careful when you handle it.
Memory card formatted with a computer is not guaranteed to operate with the product. Format the memory card
using this product.
Data read/write speeds differ depending on the combination of the memory card and the equipment used.
Do not press down hard when writing in the memo space on the memory card.
Do not attach a label on the memory card itself nor on a memory card adaptor.
If the write-protect switch or delete-protect switch of a memory card is set to the LOCK position, you cannot record or
delete images. In this case, set the switch to the record position.
To use a microSD memory card with this product:
Be sure to insert the memory card into a dedicated adaptor. If you insert a memory card into the product without a
memory card adaptor, you might not be able to remove it from the product.
When inserting a memory card into a memory card adaptor, be sure that the memory card is inserted in the
correct direction and then insert it as far as it will go. If the card is not inserted properly, it may result in a
malfunction.
5-010-476-11(1) Copyright 2019 Sony Corporation
70
Page 71

Help Guide
Interchangeable Lens Digital Camera
ILCE-9M2 α9II
Attaching/removing a lens
Turn off the camera before attaching or removing the lens.
Remove the body cap (A) from the camera and the rear lens cap (B) from the rear of the lens.
It is recommended that you attach the front lens cap when you have done shooting.
1
Mount the lens by aligning the two white index marks (mounting indexes) on the lens and camera.
Hold the camera with the lens mount facing down to prevent dust and debris from entering the camera.
2
While pushing the lens lightly toward the camera, turn the lens slowly in the direction of the arrow until it
clicks into the locked position.
3
71
Page 72

To remove the lens
Keep pressing the lens release button (A) and turn the lens in the direction of the arrow until it stops.
After removing the lens, attach the body cap to the camera and the lens caps to the front and rear of the lens to prevent
dust and debris from entering the camera and lens.
Note
When attaching/removing the lens, work quickly in a dust-free location.
Do not press the lens release button when attaching a lens.
Do not use force when attaching a lens.
A Mount Adaptor (sold separately) is required to use an A-mount lens (sold separately). When using the Mount Adaptor, refer to
the operating manual supplied with the Mount Adaptor.
If you want to shoot full-frame images, use a full-frame size compatible lens.
When you use a lens with a tripod socket, attach a tripod to the tripod socket of the lens to help balance the weight of the lens.
When carrying the camera with a lens attached, hold both the camera and the lens firmly.
Do not hold the part of the lens that is extended for zoom or focus adjustment.
Related Topic
Attaching the lens hood
5-010-476-11(1) Copyright 2019 Sony Corporation
Be sure to hold the lens straight when attaching it.
72
Page 73

Help Guide
Interchangeable Lens Digital Camera
ILCE-9M2 α9II
Attaching the lens hood
We recommend that you use the lens hood to prevent light outside the shooting frame from affecting the image.
Note
Attach the lens hood properly. Otherwise, the lens hood may not have any effect or may be partially reflected in the image.
When the lens hood is attached properly, the lens hood index (red line) matches the red index mark on the hood. (There may be
no lens hood index on some lenses.)
Remove the lens hood when using the flash as the lens hood blocks the flash light and may appear as a shadow on the image.
To store the lens hood after shooting, attach the lens hood to the lens backward.
Related Topic
Attaching/removing a lens
5-010-476-11(1) Copyright 2019 Sony Corporation
Match the shape of the lens hood mounting part and lens head, and turn the lens hood clockwise until it
clicks.
1
73
Page 74

Help Guide
Interchangeable Lens Digital Camera
ILCE-9M2 α9II
Mount Adaptor
Using a Mount Adaptor (sold separately), you can attach an A-mount lens (sold separately) to this product.
For details, refer to the operating instructions supplied with the Mount Adaptor.
Note
You may not be able to use the Mount Adaptor or auto-focus with certain lenses. Consult your Sony dealer or local authorized
Sony service facility on compatible lenses.
The LA-EA2 or LA-EA4 Mount Adaptor (sold separately) and the vertical grip (sold separately) are not designed to be attached at
the same time. If you attach them at the same time, the space between the Mount Adaptor and the vertical grip will become
narrow, making the camera difficult to hold.
You cannot use the AF illuminator when using an A-mount lens.
The sound of the lens and the product in operation may be recorded during movie recording.
You can turn the sound off by selecting MENU →
(Camera Settings2) → [Audio Recording] → [Off].
It may take a long time or may be difficult for the product to focus, depending on the lens used or the subject.
Related Topic
LA-EA1/LA-EA3 Mount Adaptor
LA-EA2/LA-EA4 Mount Adaptor
5-010-476-11(1) Copyright 2019 Sony Corporation
74
Page 75

Help Guide
Interchangeable Lens Digital Camera
ILCE-9M2 α9II
LA-EA1/LA-EA3 Mount Adaptor
If you use the LA-EA1 Mount Adaptor (sold separately) or LA-EA3 Mount Adaptor (sold separately), the following
functions are available.
Full frame shooting:
LA-EA1: Not available
LA-EA3: Available with full frame shooting-compatible lenses only
Autofocus:
Available with SAM/SSM lens only
AF system:
Phase Detection AF
AF/MF select:
Can be changed using the operating switch on the lens.
Focus Mode:
Single-shot AF/Continuous AF
When using a Mount Adaptor in the movie mode, adjust the aperture value and the focus manually.
Available focus area:
[Wide]/[Zone] [Center]/[Flexible Spot]/[Expand Flexible Spot]/[Tracking]
SteadyShot:
In-body
Related Topic
Focus Area
5-010-476-11(1) Copyright 2019 Sony Corporation
75
Page 76

Help Guide
Interchangeable Lens Digital Camera
ILCE-9M2 α9II
LA-EA2/LA-EA4 Mount Adaptor
If you use the LA-EA2 Mount Adaptor (sold separately) or LA-EA4 Mount Adaptor (sold separately), the following
functions are available.
Full frame shooting:
LA-EA2: Not available
LA-EA4: Available with full frame shooting-compatible lenses only
Autofocus:
Available
AF system:
Phase Detection AF, which is controlled by the dedicated AF sensor inside the Mount Adaptor
AF/MF select:
Lenses that do not support DMF (with a focus mode switch): Can be changed using the focus mode switch on the lens.
Lenses that support DMF (with a focus mode switch): Can be changed using the focus mode switch on the lens. When
the focus mode switch on the lens is set to AF, you can change the focusing method by operating the camera.
Other lenses (without a focus mode switch): Can be changed by operating the camera.
Focus Mode:
Single-shot AF/Continuous AF/DMF*
Even if [Priority Set in AF-S] is set to [Balanced Emphasis], it will temporarily switch to [AF].
Even if [Priority Set in AF-C] is set to [Balanced Emphasis], it will temporarily switch to [Release].
Available focus area:
Wide/Center/Flexible Spot/Tracking
SteadyShot:
In-body
Related Topic
Focus Area
5-010-476-11(1) Copyright 2019 Sony Corporation
Only available when using lenses that support Direct Manual Focus.
*
76
Page 77

Help Guide
Interchangeable Lens Digital Camera
ILCE-9M2 α9II
Continuous shooting using a Mount Adaptor
When a Mount Adaptor is attached to the camera, the auto-focusing method during continuous shooting varies
depending on the settings for [Cont. Shooting] and [
Shutter Type].
When using the LA-EA1 Mount Adaptor (sold separately), LA-EA2 Mount Adaptor (sold separately)
or LA-EA4 Mount Adaptor (sold separately)
When using the LA-EA3 Mount Adaptor (sold separately)
Update the firmware of the Mount Adaptor to the latest version in advance.
Note
When you are using a Mount Adaptor, you cannot perform blackout-free continuous shooting in [Continuous Shooting: Lo] mode.
Related Topic
Using the electronic shutter
5-010-476-11(1) Copyright 2019 Sony Corporation
Shutter Type
Mechanical Shutter Auto/Electronic Shutter
Continuous Shooting: Hi
The focus is locked to the setting in the first shot.
Continuous Shooting: Mid
Continuous Shooting: Lo The focus continuously tracks the subjects.
Shutter Type
Mechanical Shutter Auto/Electronic Shutter
Continuous Shooting:
Hi
The focus continuously tracks the
subjects.
*1
The focus continuously tracks the
subjects.*1
*2
Continuous Shooting:
Mid
The focus continuously tracks the subjects.
*1
Continuous Shooting:
Lo
The focus continuously tracks the subjects.
When the F-value is greater than F16, the focus does not track the subjects. The focus is locked to the setting in the first shot.
*1
The continuous shooting speed varies depending on the [Focus Mode] setting.
[Single-shot AF]/[DMF]/[Manual Focus]: Maximum of 20 images per second (the focus is locked to the setting in the first shot).
[Continuous AF]: Maximum of 10 images per second
*2
77
Page 78

Help Guide
Interchangeable Lens Digital Camera
ILCE-9M2 α9II
Vertical grip
You can attach a vertical grip (sold separately) to this product and record vertically oriented images. When attaching the
vertical grip, remove the battery cover in advance.
For details, refer to the operating instructions for the vertical grip.
To remove the battery cover
Pull the battery cover release lever (A) in the direction of the arrow, and then remove the battery cover.
To attach the battery cover
Insert the shaft on one side of the battery cover into the attachment site, and then push in the battery cover by attaching
the shaft on the opposite side.
You can attach the removed battery cover to the vertical grip so that you do not lose it.
When a vertical grip is attached to this product, the battery remaining is displayed as
.
Hint
The battery pack inside the vertical grip can be charged while the vertical grip is attached to the camera.
Turn the camera off and connect it to a device such as a computer using the USB cable.
Use the USB Type-C cable (supplied) or a USB-standard cable.
Note
The LA-EA2/LA-EA4 Mount Adaptor (sold separately) and the vertical grip are not designed to be attached at the same time. If
you attach them at the same time, the space between the Mount Adaptor and the vertical grip will become narrow, making the
camera difficult to hold.
5-010-476-11(1) Copyright 2019 Sony Corporation
78
Page 79

Help Guide
Interchangeable Lens Digital Camera
ILCE-9M2 α9II
Multi Battery Adaptor Kit
You can use the Multi Battery Adaptor Kit (sold separately) with this camera to shoot for long periods. When using the
Multi Battery Adaptor Kit, remove the camera's battery cover.
For details, refer also to the operating instructions supplied with the Multi Battery Adaptor Kit.
To remove the battery cover
Pull the battery cover release lever (A) in the direction of the arrow, and then remove the battery cover.
To attach the battery cover
Insert the shaft on one side of the battery cover into the attachment site, and then push in the battery cover by attaching
the shaft on the opposite side.
Note
While the plug-in plate of the Multi Battery Adaptor Kit is inserted in the camera, do not slide the battery lock lever of the camera.
The plug-in plate will be ejected from the camera if you do so.
5-010-476-11(1) Copyright 2019 Sony Corporation
79
Page 80

Help Guide
Interchangeable Lens Digital Camera
ILCE-9M2 α9II
Setting language, date and time
The setting screen for language, date and time is displayed automatically when you turn on this product for the first time,
initialize this product or when the internal rechargeable backup battery has discharged.
On maintaining the date and time
This camera has an internal rechargeable battery for maintaining the date and time and other settings regardless of
whether the power is on or off, or whether the battery pack is charged or discharged.
To charge the internal rechargeable backup battery, insert a charged battery pack into the camera, and leave the product
for 24 hours or more with the power off.
If the clock resets every time the battery pack is charged, the internal rechargeable backup battery may be worn out.
Consult your service facility.
Hint
To set the date and time or geographic location again after the date and time setting is finished, select MENU →
(Setup) →
[Date/Time Setup] or [Area Setting].
Note
If the date and time setting is canceled halfway, the setting screen for the date and time appears every time you turn on the
camera.
This camera does not have a function for inserting the date on images. You can insert the date on images and then save and
print them using PlayMemories Home (for Windows only).
Turn on the camera.
The language setting screen will appear and then setting screen for date and time will appear.
1
Select your language, and then press the center of the control wheel.
2
Check that [Enter] is selected on the screen, then press the center.
3
Select your desired geographic location, and then press the center.
4
Select a setting item using the top/bottom side of the control wheel or by turning the control wheel, then
press the center.
5
Set [Daylight Savings], [Date/Time], and [Date Format] using the top/bottom/left/right sides, then press the
center.
Midnight is indicated as 12:00 AM, and noon as 12:00 PM when you set [Date/Time].
Change the values using the top/bottom when you set [Date/Time].
6
Repeat Steps 5 and 6 to set other items, then select [Enter] and press the center.
7
80
Page 81

Related Topic
Date/Time Setup
Area Setting
Using the control wheel
5-010-476-11(1) Copyright 2019 Sony Corporation
81
Page 82

Help Guide
Interchangeable Lens Digital Camera
ILCE-9M2 α9II
In-Camera Guide
The [In-Camera Guide] displays descriptions of MENU items, Fn (Function) items, and settings.
5-010-476-11(1) Copyright 2019 Sony Corporation
Select the MENU or Fn item for which you want to see a description, and then press the
(Delete) button
(A).
The descriptions of the item are displayed.
1
82
Page 83

Help Guide
Interchangeable Lens Digital Camera
ILCE-9M2 α9II
Shooting still images
To shoot images with the focus locked on the desired subject (Focus-lock)
Shoots images with the focus locked on the desired subject in auto focus mode.
Select the desired shooting mode by turning the mode dial.
Turn the mode dial while pressing the mode dial lock release button in the center of the mode dial.
1
Adjust the monitor angle, and hold the camera. Or look through the viewfinder and hold the camera.
2
When a zoom lens is mounted, enlarge images by rotating the zoom ring.
3
Press the shutter button halfway down to focus.
When the image is in focus, a beep sounds and the indicator (such as
) lights up.
4
Press the shutter button fully down.
5
Turn the focus mode dial to select AF-S (Single-shot AF).
Turn the focus mode dial while holding down the focus mode dial lock release button.
1.
Place the subject within the AF area and press the shutter button halfway down.2.
83
Page 84

Hint
When the product cannot focus automatically, the focus indicator flashes and the beep does not sound. Either recompose the
shot or change the focus setting. In [Continuous AF] mode,
lights up and the beep indicating that the focus has been
achieved does not sound.
An icon indicating that data is being written is displayed after shooting. Do not remove the memory card while the icon is
displayed.
Related Topic
List of mode dial function
Clear Image Zoom/Digital Zoom (Zoom)
Playing back still images
Auto Review
Focus Mode
Focus Area
5-010-476-11(1) Copyright 2019 Sony Corporation
The focus is locked.
If it is difficult to focus on the desired subject, set [Focus Area] to [Center] or [Flexible Spot].
Keep pressing the shutter button halfway down, and place the subject back in the original position to re-compose the
shot.
3.
Press the shutter button down fully to take the picture.4.
84
Page 85

Help Guide
Interchangeable Lens Digital Camera
ILCE-9M2 α9II
Focus Mode
Selects the focus method to suit the movement of the subject.
Setting details
AF-S (Single-shot AF):
The product locks the focus once focusing is complete. Use this when the subject is motionless.
AF-C (Continuous AF):
The product continues to focus while the shutter button is pressed and held halfway down. Use this when the subject is
in motion. In [Continuous AF] mode, there is no beep when the camera focuses.
DMF (DMF):
You can make fine adjustments manually after performing auto focusing, letting you focus on a subject more quickly than
when using the manual focus from the beginning. This is convenient in situations such as macro shooting.
MF (Manual Focus):
Adjusts the focus manually. If you cannot focus on the intended subject using auto focus, use manual focus.
Focus indicator
(lit):
The subject is in focus and the focus is locked.
(flashing):
The subject is not in focus.
(lit):
The subject is in focus. The focus will be adjusted continuously according to the movements of the subject.
(lit):
Focusing is in progress.
Subjects on which it is difficult to focus using auto focus
Dark and distant subjects
Subjects with poor contrast
Subjects seen through glass
Fast-moving subjects
Reflective light or shiny surfaces
Flashing light
Back-lit subjects
Turn the focus mode dial (B) while pressing the focus mode dial lock release button (A) and select the
desired mode.
1
85
Page 86

Continuously repetitive patterns, such as the facades of buildings
Subjects in the focusing area with different focal distances
Hint
In [Continuous AF] mode, you can lock the focus by pressing and holding the button that has been assigned the [Focus Hold]
function.
When you set the focus to infinity in the manual focus mode or the direct manual focus mode, make sure that the focus is on a
sufficiently distant subject by checking the monitor or the viewfinder.
Note
When [Continuous AF] is set, the angle of view may change little by little while focusing. This does not affect the actual recorded
images.
Even if the focus mode dial is set to AF-S or DMF, the focus mode will switch to [Continuous AF] when shooting movies or when
the mode dial is set to
.
Related Topic
Direct manual focus (DMF)
Manual Focus
MF Assist (still image)
Phase detection AF
5-010-476-11(1) Copyright 2019 Sony Corporation
86
Page 87

Help Guide
Interchangeable Lens Digital Camera
ILCE-9M2 α9II
Focus Area
Selects the focusing area. Use this function when it is difficult to focus properly in the auto focus mode.
Menu item details
Wide :
Focuses on a subject covering the whole range of the screen automatically. When you press the shutter button halfway
down in the still image shooting mode, a green frame is displayed around the area that is in focus.
Zone :
Select a zone on the monitor on which to focus, and the product will automatically select a focus area.
Center :
Focuses automatically on a subject in the center of the image. Use together with the focus-lock function to create the
composition you want.
Flexible Spot :
Allows you to move the focusing frame to a desired point on the screen and focus on an extremely small subject in a
narrow area.
Expand Flexible Spot :
If the product cannot focus on a single selected point, it uses focus points around the flexible spot as a secondary priority
area for focusing.
Tracking:
When the shutter button is pressed and held halfway down, the product tracks the subject within the selected autofocus
area. This setting is available only when the [Focus Mode] is set to [Continuous AF]. Point the cursor at [Tracking] on the
[Focus Area] setting screen, and then select the desired area to start tracking using the left/right sides of the control
wheel. You can also move the tracking start area to the desired point by designating the area as a zone, flexible spot or
expand flexible spot.
Examples of the focusing frame display
The focusing frame differs as follows.
When focusing on a larger area
When focusing on a smaller area
MENU →
(Camera Settings1) → [Focus Area] → desired setting.
1
87
Page 88

When [Focus Area] is set to [Wide] or [Zone], the focusing frame may switch between “When focusing on a larger
area” and “When focusing on a smaller area” depending on the subject or situation.
When you attach an A-mount lens with a Mount Adaptor (LA-EA1 or LA-EA3) (sold separately), the focusing frame
for “When focusing on a smaller area” may be displayed.
When focus is achieved automatically based on the whole range of the monitor
When you use a zoom function other than the optical zoom, the [Focus Area] setting is disabled and the focusing
frame is shown by the dotted line. The AF operates with priority on and around the center area.
To move the focus area
You can move the focus area in [Flexible Spot], [Expand Flexible Spot], [Zone], [Tracking: Flexible Spot], [Tracking:
Expand Flexible Spot] or [Tracking: Zone] by operating the multi-selector. If you assign [Focus Standard] to the
center of the multi-selector beforehand, you can move the focusing frame back to the center of the monitor by
pressing the center of the multi-selector.
You can move the focusing frame quickly by touching and dragging it on the monitor. Set [Touch Operation] to [On],
and set [Func. of Touch Operation] to [Touch Focus] beforehand.
To track the subject temporarily (Tracking On)
You can temporarily change the setting for [Focus Area] to [Tracking] while you press and hold down the custom key to
which you have assigned [Tracking On] in advance. The [Focus Area] setting before you activated [Tracking On] will
switch to the equivalent [Tracking] setting.
For example:
Hint
In the default settings, [Focus Area] is assigned to the C2 button.
[Focus Area] before you activate [Tracking On] [Focus Area] while [Tracking On] is active
[Wide] [Tracking: Wide]
[Flexible Spot: S] [Tracking: Flexible Spot S]
[Expand Flexible Spot] [Tracking: Expand Flexible Spot]
88
Page 89

Note
[Focus Area] is locked to [Wide] in the following situations:
[Intelligent Auto]
The focus area may not light up during continuous shooting or when the shutter button is pressed all the way down at once.
When the mode dial is set to
(Movie) or or during movie shooting, [Tracking] cannot be selected as the [Focus Area].
Related Topic
Touch Operation
Adjusting the focus area settings to the camera’s orientation (horizontal/vertical) (Switch V/H AF Area)
Registering the current focus area (AF Area Registration) (still image)
5-010-476-11(1) Copyright 2019 Sony Corporation
89
Page 90

Help Guide
Interchangeable Lens Digital Camera
ILCE-9M2 α9II
Focus Area Limit
By limiting the types of available focus area settings in advance, you can more quickly select settings for [Focus Area].
Hint
When you assign [Switch Focus Area] to a desired key by selecting MENU →
(Camera Settings2) → [ Custom Key] or
[
Custom Key], the focus area changes every time you press the assigned key. By limiting the types of selectable focus areas
with [Focus Area Limit] in advance, you can more quickly select the focus area setting you want.
If you assign [Switch Focus Area] to a custom key, it is recommended that you limit the types of focus areas with [Focus Area
Limit].
Note
Types of focus areas that do not have a check mark cannot be selected using MENU or the Fn (function) menu. To select one,
add a check mark using [Focus Area Limit].
If you remove the check mark for a focus area registered with [
Switch V/H AF Area] or [ AF Area Registration], the
registered settings will change.
Related Topic
Focus Area
Assigning frequently used functions to buttons (Custom Key)
5-010-476-11(1) Copyright 2019 Sony Corporation
MENU →
(Camera Settings1) → [Focus Area Limit] → Add check marks to the focus areas that you
want to use, and then select [OK].
The types of focus areas marked with
will be available as settings.
1
90
Page 91

Help Guide
Interchangeable Lens Digital Camera
ILCE-9M2 α9II
Phase detection AF
When there are phase detection AF points within the auto focus area, the product uses the combined autofocus of the
phase detection AF and contrast AF.
Note
Phase detection AF is available only when an applicable lens is attached. If you use a lens that does not support phase detection
AF, you cannot use [
AF Tracking Sens.], [ AF Tracking Sens.] or [ AF drive speed]. Also, even if you use a previously
purchased applicable lens, the phase detection AF might not function unless you update the lens. For details on compatible
lenses, visit the Sony web site in your area, or consult your Sony dealer or local authorized Sony service facility.
5-010-476-11(1) Copyright 2019 Sony Corporation
91
Page 92

Help Guide
Interchangeable Lens Digital Camera
ILCE-9M2 α9II
Focus Standard
If you assign [Focus Standard] to the desired custom key, you can recall useful functions such as focusing on a subject
in the center of the screen automatically in accordance with the focus area settings.
When [Focus Area] is set to [Zone], [Flexible Spot], [Expand Flexible Spot], [Tracking: Zone], [Tracking: Flexible
Spot] or [Tracking: Expand Flexible Spot]:
Pressing the key moves the focusing frame back to the center.
When [Focus Area] is set to [Wide], [Center], [Tracking: Wide] or [Tracking: Center]:
The camera focuses on the center of the screen when you press the key.
Note
You cannot set the [Focus Standard] function to [Left Button], [Right Button] or [Down Button].
Related Topic
Assigning frequently used functions to buttons (Custom Key)
Focus Area
5-010-476-11(1) Copyright 2019 Sony Corporation
MENU → (Camera Settings2) → [ Custom Key] → desired key, then assign the [Focus Standard]
function to the key.
To use the [Focus Standard] function while shooting movies, select MENU →
(Camera Settings2) → [
Custom Key] → the desired button, and then assign [Focus Standard] to the key.
1
Press the key to which [Focus Standard] is assigned.
What you can do by pressing the key varies depending on the setting for [Focus Area].
2
92
Page 93

Help Guide
Interchangeable Lens Digital Camera
ILCE-9M2 α9II
Focus Settings
Configures the focus functions using the front dial/rear dial or the control wheel.
When the focus mode is set to auto focus or Direct Manual Focus
You can adjust the focus area settings and the position of the focusing frame. The focusing frame can be moved only
when the [Focus Area] is set to the following:
[Zone]
[Flexible Spot]
[Expand Flexible Spot]
[Tracking: Zone]
[Tracking: Flexible Spot]
[Tracking: Expand Flexible Spot]
Front dial: Moves the focusing frame up/down.
Rear dial: Moves the focusing frame right/left.
Control wheel: Selects the focus area.
When the focus mode is set to Manual Focus
You can set the area to be magnified when focusing manually.
Front dial: Moves the area to be magnified up/down.
Rear dial: Moves the area to be magnified right/left.
Control wheel: Moves the area to be magnified up/down.
5-010-476-11(1) Copyright 2019 Sony Corporation
MENU →
(Camera Settings1) → [Focus Settings].
1
Perform settings using the front/rear dial or control wheel.
2
93
Page 94

Help Guide
Interchangeable Lens Digital Camera
ILCE-9M2 α9II
Adjusting the focus area settings to the camera’s orientation (horizontal/vertical)
(Switch V/H AF Area)
You can set whether to switch the [Focus Area] and the position of the focusing frame according to the orientation of the
camera (horizontal/vertical). This function is useful when shooting scenes for which you have to change the camera
position frequently, such as portraits or sports scenes.
Menu item details
Off:
Does not switch the [Focus Area] and the position of the focusing frame according to the orientation of the camera
(horizontal/vertical).
AF Point Only:
Switches the position of the focusing frame according to the orientation of the camera (horizontal/vertical). The [Focus
Area] is fixed.
AF Point + AF Area:
Switches both the [Focus Area] and the position of the focusing frame according to the orientation of the camera
(horizontal/vertical).
An example when [AF Point + AF Area] is selected
(A) Vertical: [Flexible Spot] (Upper left corner)
(B) Horizontal: [Flexible Spot] (Upper right corner)
(C) Vertical: [Zone] (Lower left corner)
Three camera orientations are detected: horizontal, vertical with the side of the shutter button facing up, and vertical
with the side of the shutter button facing down.
Note
If the setting for [
Switch V/H AF Area] is changed, the focus settings for each camera orientation will not be retained.
The [Focus Area] and the position of the focusing frame will not change even when [
Switch V/H AF Area] is set to [AF Point
+ AF Area] or [AF Point Only] in the following situations:
When the shooting mode is set to [Intelligent Auto], [Movie], or [S&Q Motion]
While the shutter button is pressed halfway down
During movie shooting
While using the digital zoom function
While the auto-focusing is activated
When [Focus Settings] are activated
During continuous shooting
During the countdown for the self-timer
When [Focus Magnifier] is activated
MENU →
(Camera Settings1) → [ Switch V/H AF Area] → desired setting.
1
94
Page 95

When you shoot images right after the power is turned on and the camera is vertical, the first shot is taken with the horizontal
focus setting or with the last focus setting.
The orientation of the camera cannot be detected when the lens is facing up or down.
Related Topic
Focus Area
5-010-476-11(1) Copyright 2019 Sony Corporation
95
Page 96

Help Guide
Interchangeable Lens Digital Camera
ILCE-9M2 α9II
AF/MF control
You can easily switch the focusing mode from auto to manual and vice versa while shooting without changing your
holding position.
Menu item details
AF/MF Control Hold :
Switches the focusing mode while the button is held down.
AF/MF Ctrl Toggle :
Switches the focusing mode until the button is pressed again.
Note
You cannot set the [AF/MF Control Hold] function to [Left Button], [Right Button] or [Down Button] of the control wheel.
Related Topic
Assigning frequently used functions to buttons (Custom Key)
5-010-476-11(1) Copyright 2019 Sony Corporation
MENU →
(Camera Settings2) → [ Custom Key] or [ Custom Key] → desired button → [AF/MF
Control Hold] or [AF/MF Ctrl Toggle].
1
96
Page 97

Help Guide
Interchangeable Lens Digital Camera
ILCE-9M2 α9II
AF w/ shutter (still image)
Selects whether to focus automatically when you press the shutter button halfway down. Select [Off] to adjust the focus
and the exposure separately.
Menu item details
On:
The auto focus operates when you press the shutter button halfway down.
Off:
The auto focus does not operate even if you press the shutter button halfway down.
Useful method to micro-adjust the focus
When an A-mount lens is attached, activating the auto focus function with a button other than the shutter button lets you
focus more precisely in combination with manual focusing.
Related Topic
AF On
Eye-Start AF (still image)
Pre-AF (still image)
Focus Magnifier
5-010-476-11(1) Copyright 2019 Sony Corporation
MENU →
(Camera Settings1) → [ AF w/ shutter] → desired setting.
1
Set [
AF w/ shutter] to [Off].1.
MENU →
(Camera Settings2) → [ Custom Key] or [ Custom Key] → assign the [Focus Magnifier]
functions to the desired keys.
2.
Set [
Eye-Start AF] to [Off] to avoid auto focusing when you look through the viewfinder.3.
Press the AF-ON button to focus.4.
Press the key to which the [Focus Magnifier] function is assigned, and then rotate the focus ring for microadjustments of the focus.
5.
Press the shutter button fully down to shoot the image.6.
97
Page 98

Help Guide
Interchangeable Lens Digital Camera
ILCE-9M2 α9II
AF On
You can focus without pressing the shutter button halfway down. The settings for the focus mode dial will be applied.
Hint
Set [
AF w/ shutter] to [Off] when you do not want to perform auto focusing using the shutter button.
Set [
AF w/ shutter], [ Pre-AF], and [ Eye-Start AF] to [Off] to focus at a specific shooting distance predicting the
position of the subject.
Related Topic
AF w/ shutter (still image)
Pre-AF (still image)
Eye-Start AF (still image)
5-010-476-11(1) Copyright 2019 Sony Corporation
Press the AF-ON (AF On) button while shooting in autofocus mode.
1
98
Page 99

Help Guide
Interchangeable Lens Digital Camera
ILCE-9M2 α9II
Focusing on eyes (Face/Eye AF Set.)
[Face/Eye AF Set.] is used to determine whether or not the camera focuses with priority on faces/eyes.
There are two methods for performing [Eye AF], with some differences between their specifications. Select the
appropriate method according to your purpose.
[Eye AF] via [Face/Eye AF Set.]
[Eye AF] via a custom key
Details can be found here.
Subject detection
The camera will detect faces/eyes with greater
priority.
The camera will detect faces/eyes
exclusively.
Advance
preparation
Select [Face/Eye AF Set.] → [Face/Eye Priority in
AF] → [On].
Assign [Eye AF] to the desired key using [
Custom Key] or [ Custom Key].
How to perform
[Eye AF]
Press the shutter button halfway down.
Press the key to which you have assigned
the [Eye AF] function*.
Specifications
When the camera detects a face or eye inside
or around the designated focus area, it
focuses on the face or eye with greater
priority.
If the camera does not detect any faces or
eyes inside or around the designated focus
area, it will focus on another detectable
subject.
The camera focuses exclusively on
faces or eyes anywhere on the screen,
regardless of the setting for [Focus
Area].
The camera will not automatically focus
on another subject if no face or eye is
detected anywhere on the screen.
Focus mode Follows the setting designated with [Focus Mode]
Follows the setting designated with [Focus
Mode]
Focus area Follows the setting designated with [Focus Area]
The focus area temporarily becomes the
entire screen, regardless of the setting for
[Focus Area].
How the following
functions under
[Face/Eye AF Set.]
work
Subject
Detection
Right/Left Eye
Select
Face/Eye
Frame Display
Animal Eye
Display
Follows the setting designated with each menu
item
Follows the setting designated with each
menu item
Regardless of whether [Face/Eye Priority in AF] under [Face/Eye AF Set.] is set to [On] or [Off], you can use [Eye AF] via a custom key while
you are pressing the custom key to which you have assigned [Eye AF].
*
99
Page 100

Hint
Maintaining focus on a moving eye or face (Eye AF + Tracking)
If you use the [Tracking] function under [Focus Area], you can maintain focus on a moving eye or face. For details, refer to the
following URL:
https://support.d-imaging.sony.co.jp/support/ilc/autofocus/ilce9m2/l/eyeaf.php
Menu item details
Face/Eye Priority in AF :
Sets whether or not to detect faces or eyes inside the focusing area and focus on the eyes (Eye AF) when autofocus is
activated. ([On]/[Off])
(Note: The camera operations are different when using the custom key to execute [Eye AF].)
Subject Detection :
Selects the target to be detected.
[Human]: Detects human faces/eyes.
[Animal]: Detects animal eyes. Animal faces are not detected.
Right/Left Eye Select :
Specifies the eye to be detected when [Subject Detection] is set to [Human]. If [Right Eye] or [Left Eye] is selected, only
the selected eye is detected. When [Subject Detection] is set to [Animal], [Right/Left Eye Select] cannot be used.
[Auto]: The camera detects eyes automatically.
[Right Eye]: The right eye of the subject (the eye on the left side from the photographer’s perspective) is detected.
[Left Eye]: The left eye of the subject (the eye on the right side from the photographer’s perspective) is detected.
Face/Eye Frame Display :
Sets whether or not to display the face/eye detection frame when a human face or eyes are detected. ([On]/[Off])
Animal Eye Display :
Sets whether or not to display the eye detection frame when the eye of an animal is detected. ([On]/[Off])
Face detection frame
When the product detects a face, the gray face detection frame appears. When the product determines that autofocus is
enabled, the face detection frame turns white.
In case you have registered the priority order for each face using [Face Registration], the product automatically selects
the first prioritized face and the face detection frame over that face turns white. The face detection frames of other
registered faces turn reddish-purple.
Eye detection frame
A white eye detection frame appears when an eye is detected and the camera determines that autofocusing is possible,
depending on the settings.
The eye detection frame is displayed as follows when [Subject Detection] is set to [Animal].
MENU →
(Camera Settings1) → [Face/Eye AF Set.] → desired setting item.
1
100
 Loading...