

Page 1
3-861-445-21(1)
Personal MiniDisc
System
Operating Instructions page 2
Manual de instrucciones página 2
GB
GB
ES
ES
ZS-M7
1998 by Sony Corporation
Page 2
Warning
To prevent fire or shock hazard, do
not expose the player to rain or
moisture.
To avoid electrical shock, do not open
the cabinet. Refer servicing to
qualified personnel only.
Information
This Compact Disc/MiniDisc player is
classified as a CLASS 1 LASER product.
The CLASS 1 LASER PRODUCT label is
located at the rear.
Warning
Do not install the appliance in a confined
space, such as a bookcase or built-in cabinet.
Notice for customers in the United
Kingdom
A moulded plug complying with BS 1363 is
fitted to this equipment for your safety and
convenience.
CAUTION
When you use this player for the first
time, or when you have not used it
for a long time, leave it connected to
a wall outlet for about one hour to
charge the built-in backup battery for
the clock, timer, preset radio stations,
etc. You can use the player during
charging.
When you disconnect the AC power
cord after charging, be sure to turn
off the power of the player first. Once
fully charged, the back up battery will
last for about 30 minutes without
being connected to the AC power
source.
If the stored data are erased, reenter
them when you use the player again.
Should the fuse in the plug supplied need to
be replaced, same rating fuse approved by
ASTA or BSI to BS 1362, (i.e. marked with
or mark) must be used.
If the plug supplied with this equipment has
a detachable fuse cover, be sure to attach the
fuse cover after you change the fuse. Never
use the plug without the fuse cover. If you
should lose the fuse cover, please contact
your nearest Sony service station.
GB
Introduction2
Page 3

Table of contents
Basic Operations
4 Playing a CD
6 Recording a whole CD (Synchronized recording)
8 Playing an MD
10 Listening to the radio
Basic Operations
The CD Player•The MD
Player
12 Using the display
15 Locating a specific track
16 Playing tracks repeatedly
(Repeat Play)
17 Creating your own program
(Program Play)
19 Playing tracks in random order
(Shuffle Play)
The Radio
20 Presetting radio stations
22 Playing preset radio stations
Recording
23 Recording the track you are
listening to
(Synchronized recording of a
single track – REC IT Function)
24 Recording the tracks you
programmed
(Synchronized recording of the
tracks you programmed)
26 Recording from the radio or a CD
28 Recording on a recorded MD
Editing recorded tracks on
the MD
29 Before editing
31 Erasing recordings
(Erase Function)
34 Dividing recorded tracks
(Divide Function)
36 Combining recorded tracks
(Combine Function)
38 Moving recorded tracks
(Move Function)
39 Labeling recordings
(Name Function)
The Timer
42 Setting the clock
44 Waking up to music
46 Timer-recording radio programs
48 Falling asleep to music
Setting Up
49 Preparing the system
52 Connecting optional components
54 Adjusting the audio emphasis
Additional Information
55 Precautions
57 System limitations of the MD
59 Getting to know the MD
61 Troubleshooting
64 Error messages
65 Specifications
66 Index
GB
Introduction
GB
3
Page 4
Basic Operations
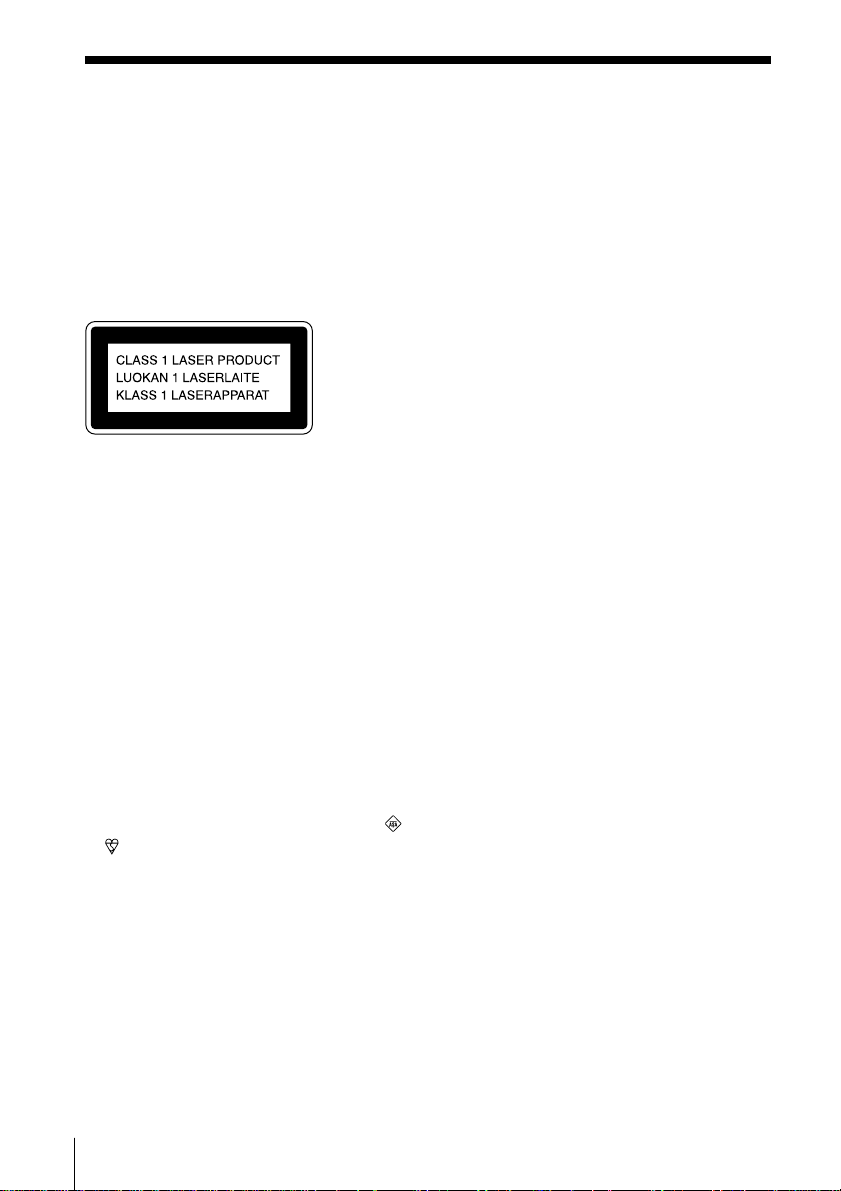
Playing a CD
Connect the mains lead (see page 49).
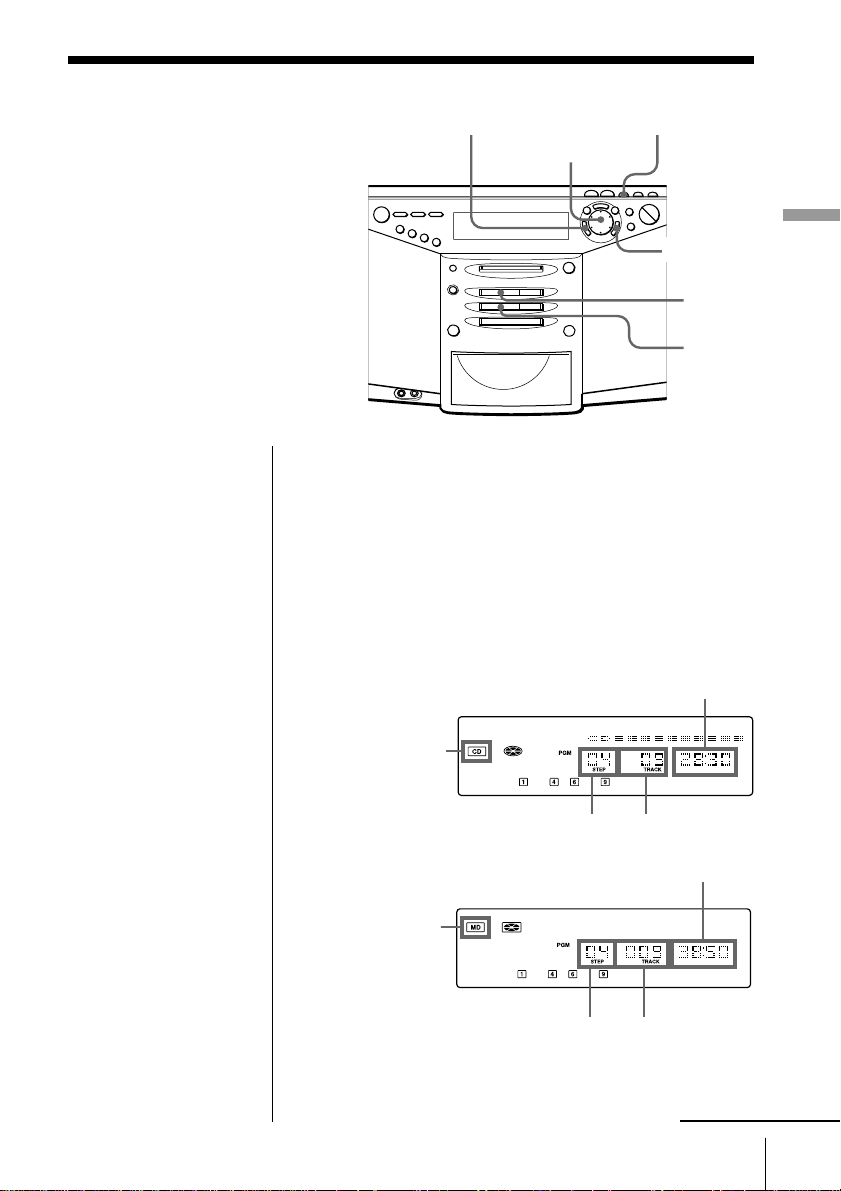
1 Press 6 CD OPEN/CLOSE
(direct power-on) and place the
CD on the CD tray until it clicks
into place.
12
2 Press CD ^.
The CD tray closes and the player
plays all the tracks once.
GB
Basic Operations4
With the label side up
Display
Position
pointer
Track
number
Playing
time
Page 5

Use these buttons for additional operations
Tips
• Next time you want to
listen to a CD, just press
CD ^. The player
turns on automatically
and starts playing the
CD.
• What is the position
pointer in the display?
It shows about where on
the CD track the player
is playing.
OPERATE
To Do this
adjust the volume Press VOLUME +, –
stop playback Press CD p.
pause playback Press CD ^ (CD P on the
go to the next track Turn the jog dial clockwise.
go back to the previous track Turn the jog dial
remove the CD Press 6 CD OPEN/
turn on/off the player Press OPERATE.
CD ^
CD p
VOLUME –, +
Jog dial
6 CD OPEN/
CLOSE
(VOL +, – on the remote).
remote).
Press the button again to
resume play after pause.
(On the remote, press +.)
counterclockwise.
(On the remote, press =.)
CLOSE.
Basic Operations
Basic Operations
GB
5
Page 6
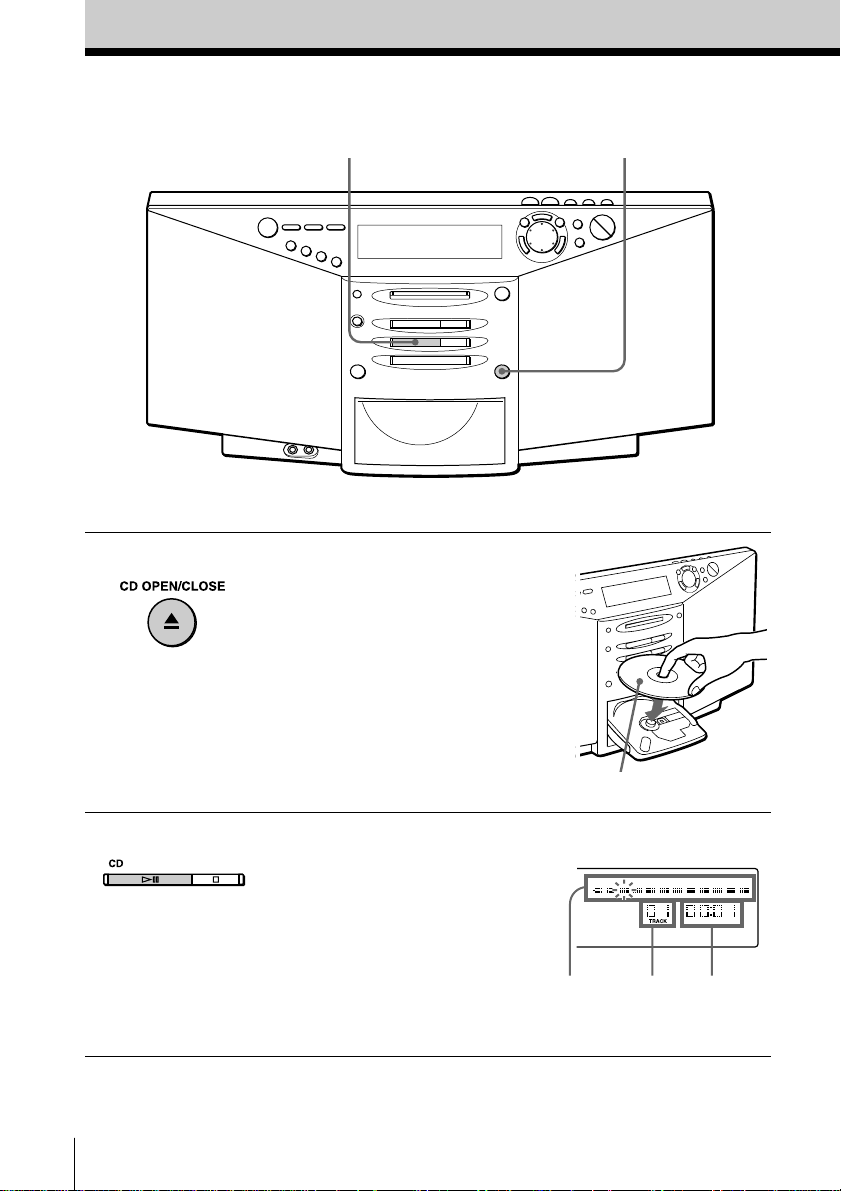
Recording a whole CD
(Synchronized recording)
Connect the mains lead (see page 49).
341 2
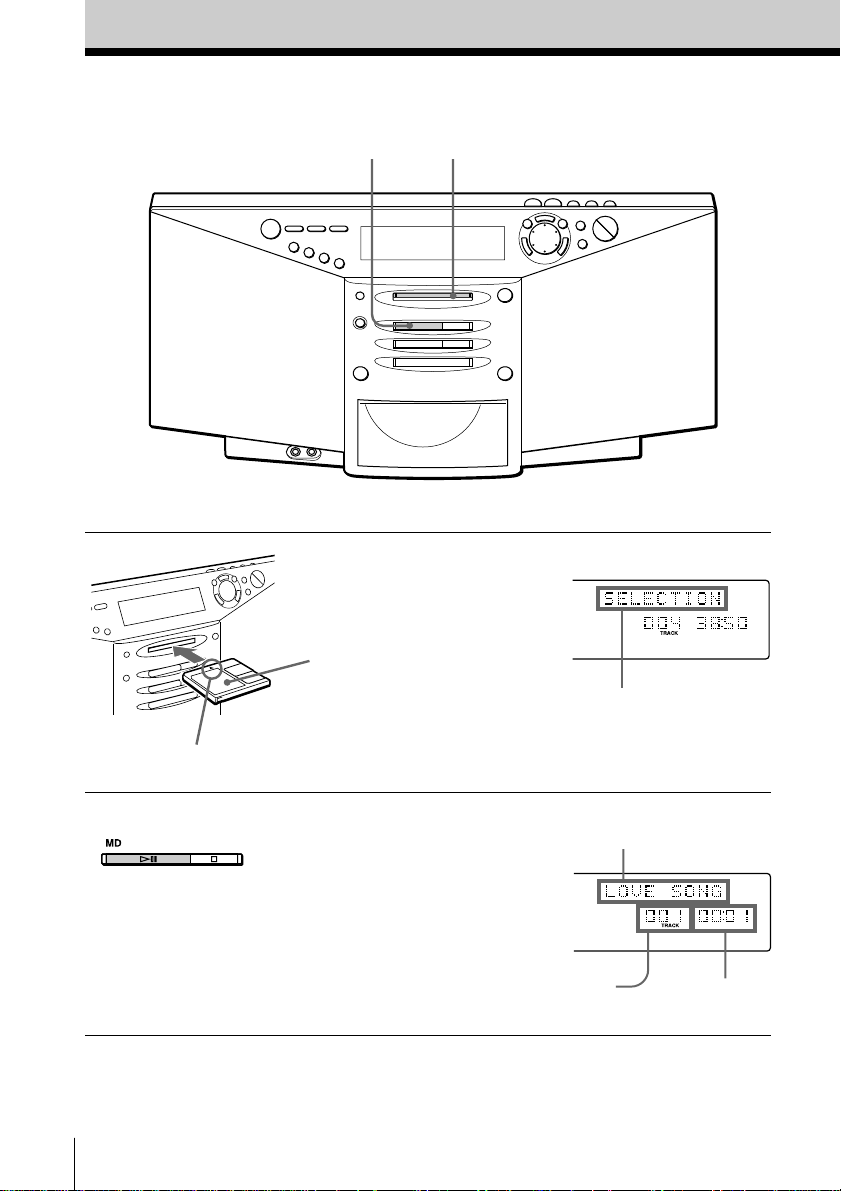
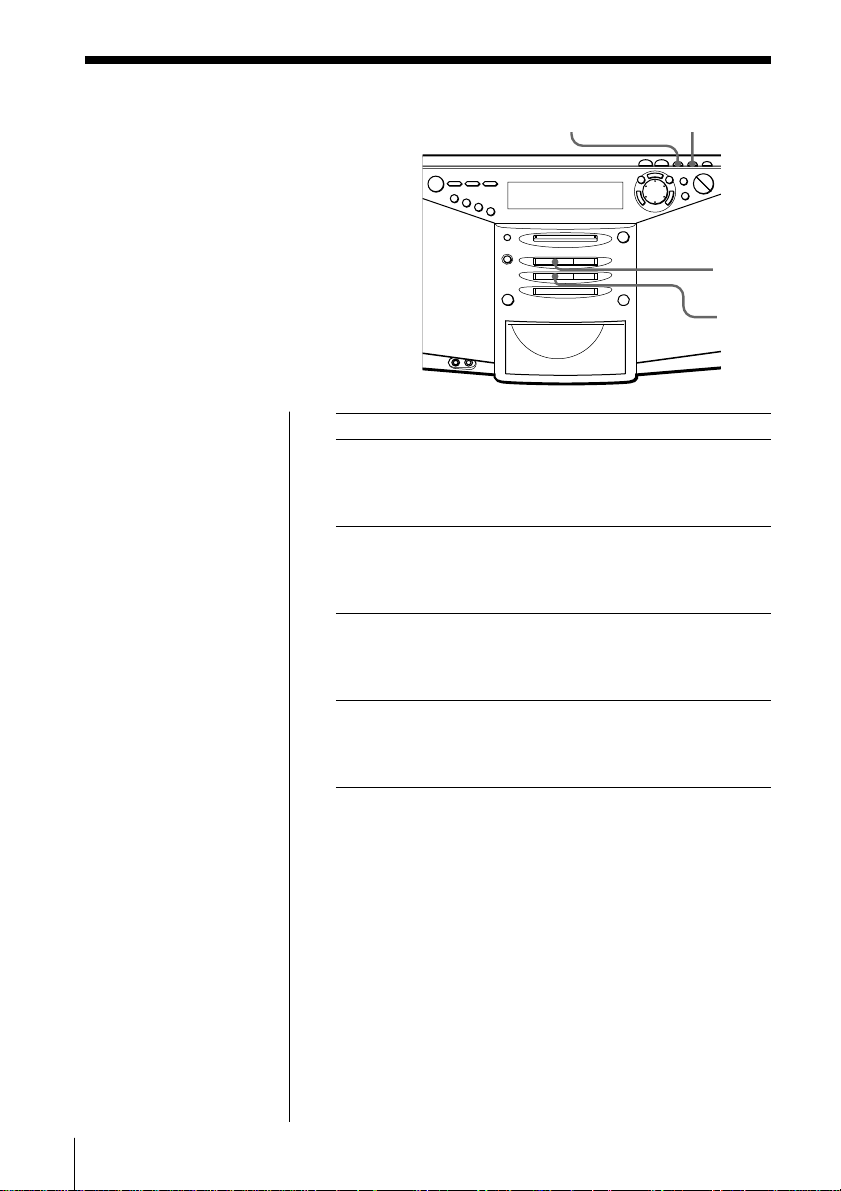
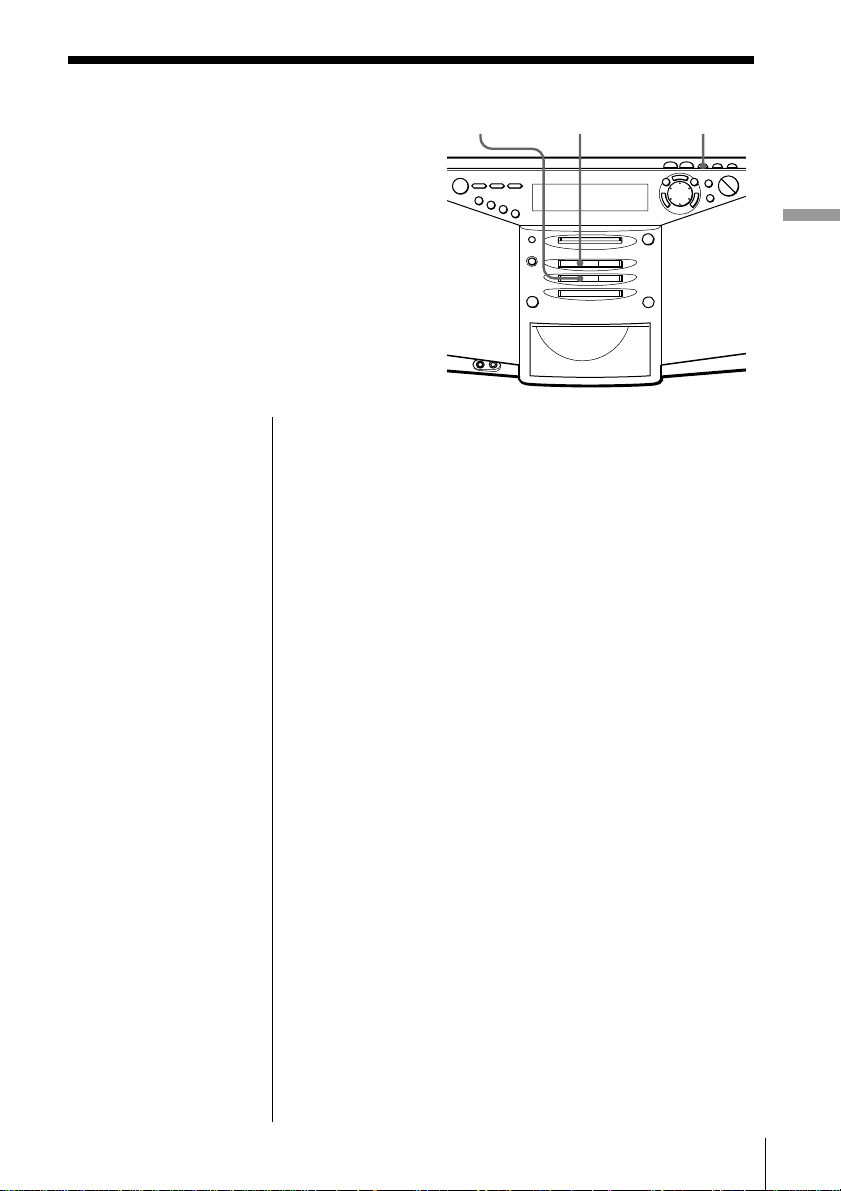
1 Insert a recordable MD (direct
power-on).
With the label
side up
Insert in the direction of
the arrow
2 Press 6 CD OPEN/CLOSE and
place the CD on the CD tray until
it clicks into place.
Press 6 CD OPEN/CLOSE again
to close the CD tray.
3 Press CD p.
Display
After “TOC Reading” is
displayed, the disc name
will be displayed if it is
labeled.
With the label side up
GB
Basic Operations6
Page 7
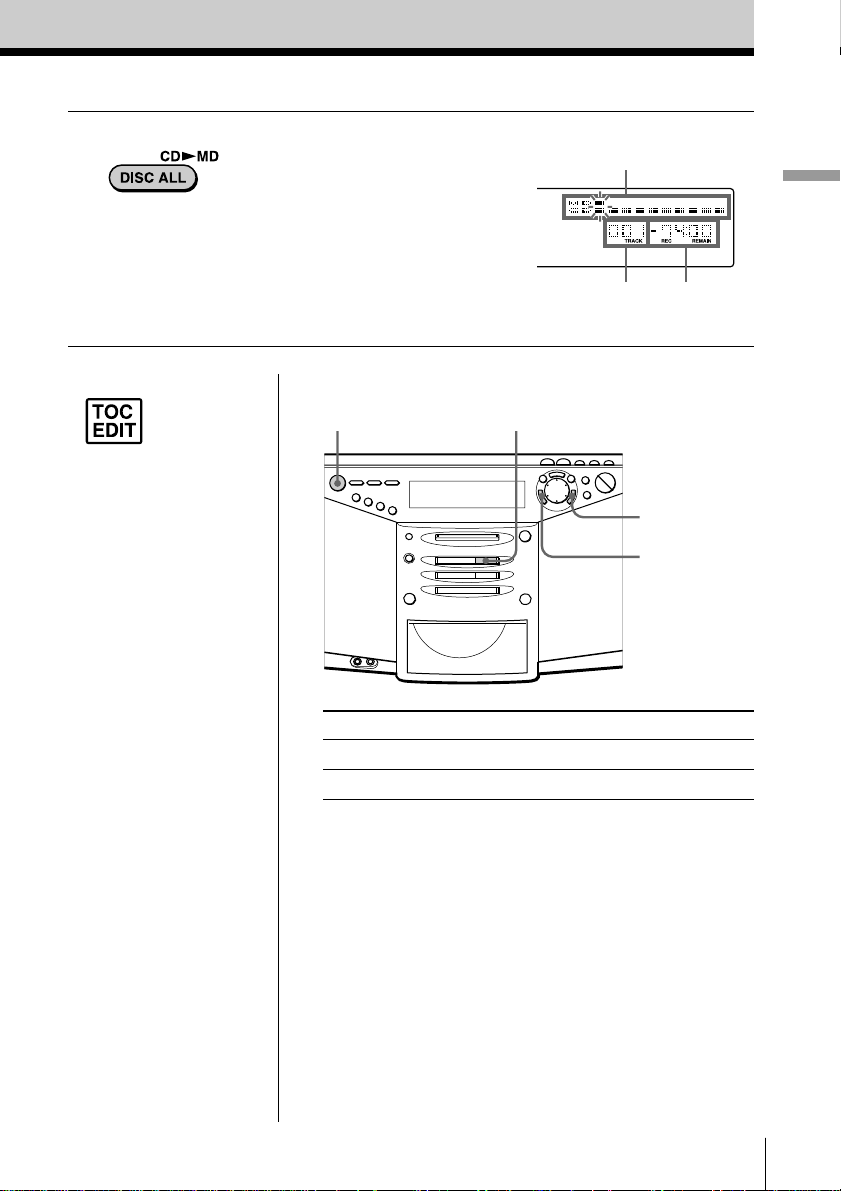
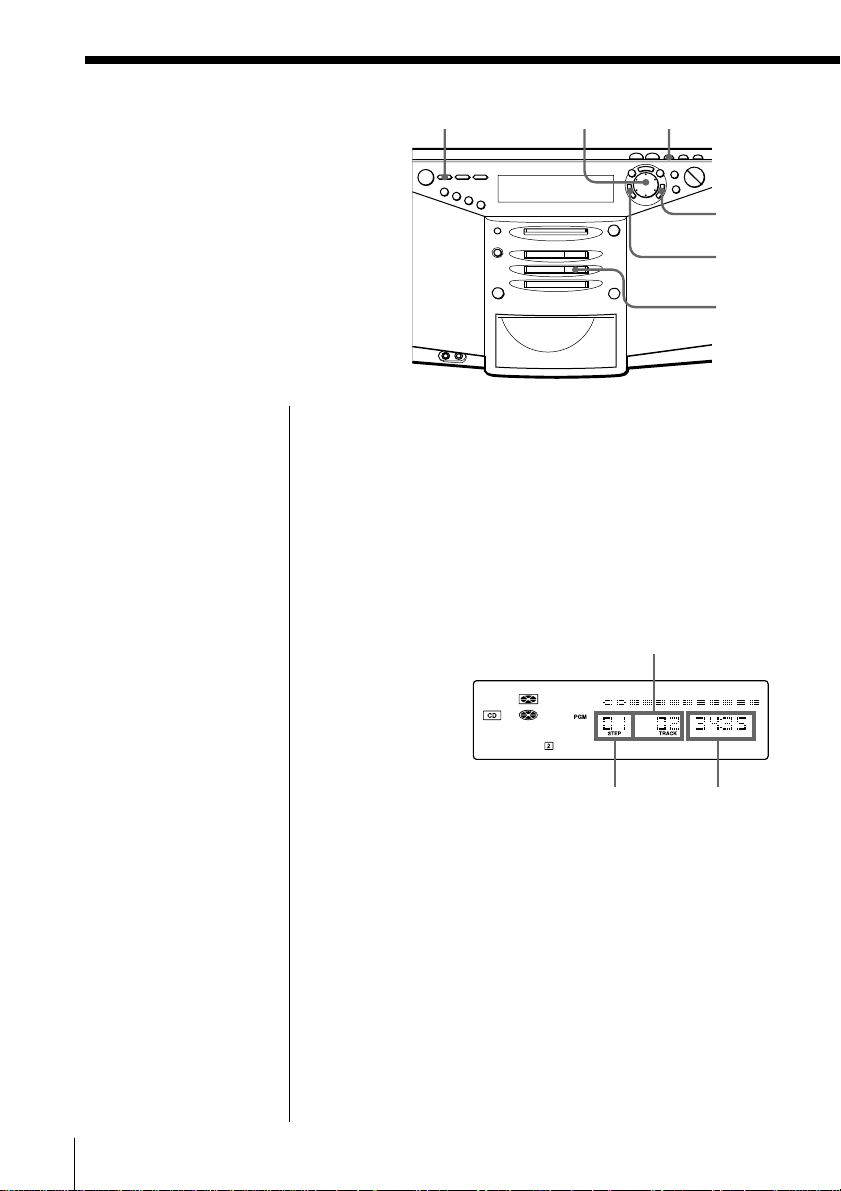
4 Press DISC ALL.
The player starts recording
automatically.
If the MD has any previous
recording, recording will be made
from the last recorded position.
Position pointer (showing
playing position on the CD and
recording position on the MD)
Track number
of MD
Remaining
recording time
of MD
Basic Operations
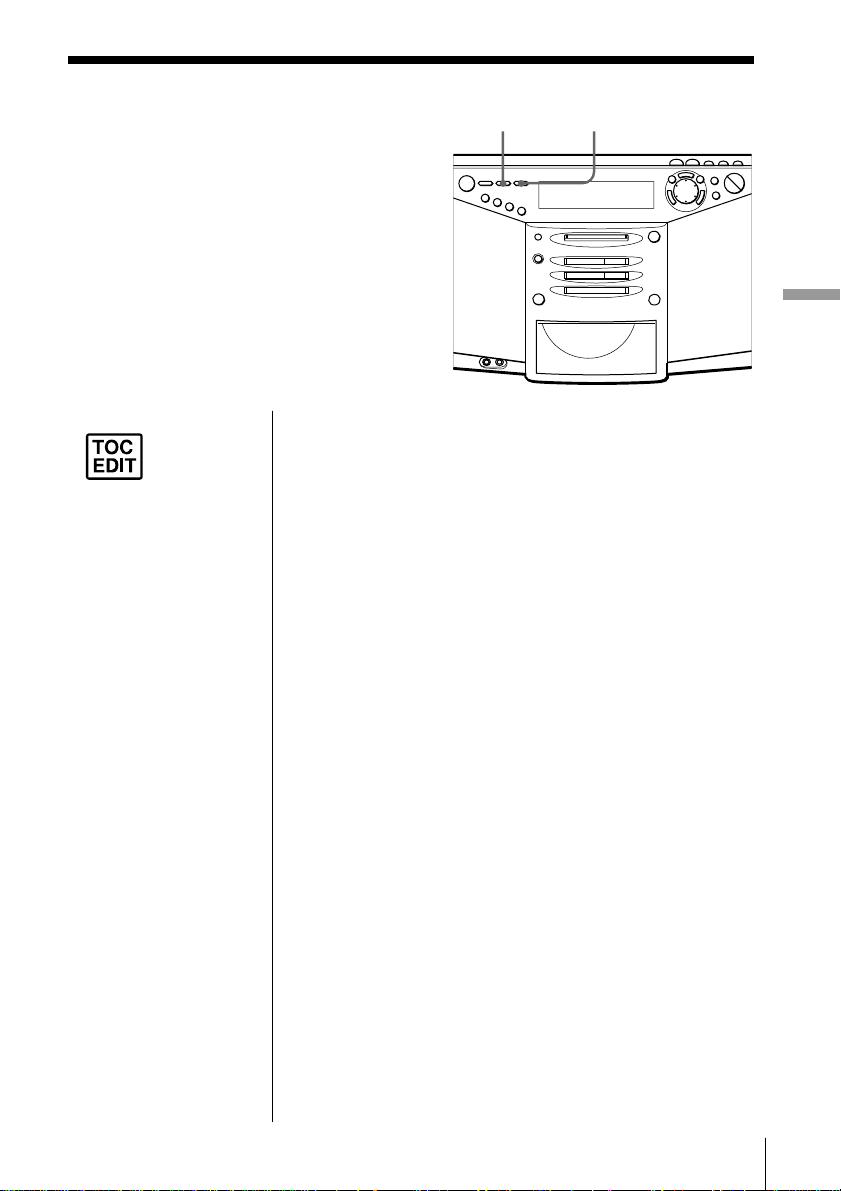
Notes
• After you
stop
recording, do
not disconnect the AC
power cord or move
the player while “TOC
EDIT” is flashing in the
display. If you do so,
recording may not be
done properly.
• When you record a
whole CD, you cannot
pause recording.
Tips
• Adjusting the volume or
the audio emphasis
(page 54) will not affect
the recording level.
Keep the volume at a
moderate level so as to
prevent the sound from
skipping.
• To record over the
previous recording, see
page 28.
• Once the clock is set, the
recording date and time
are stamped
automatically (page 42).
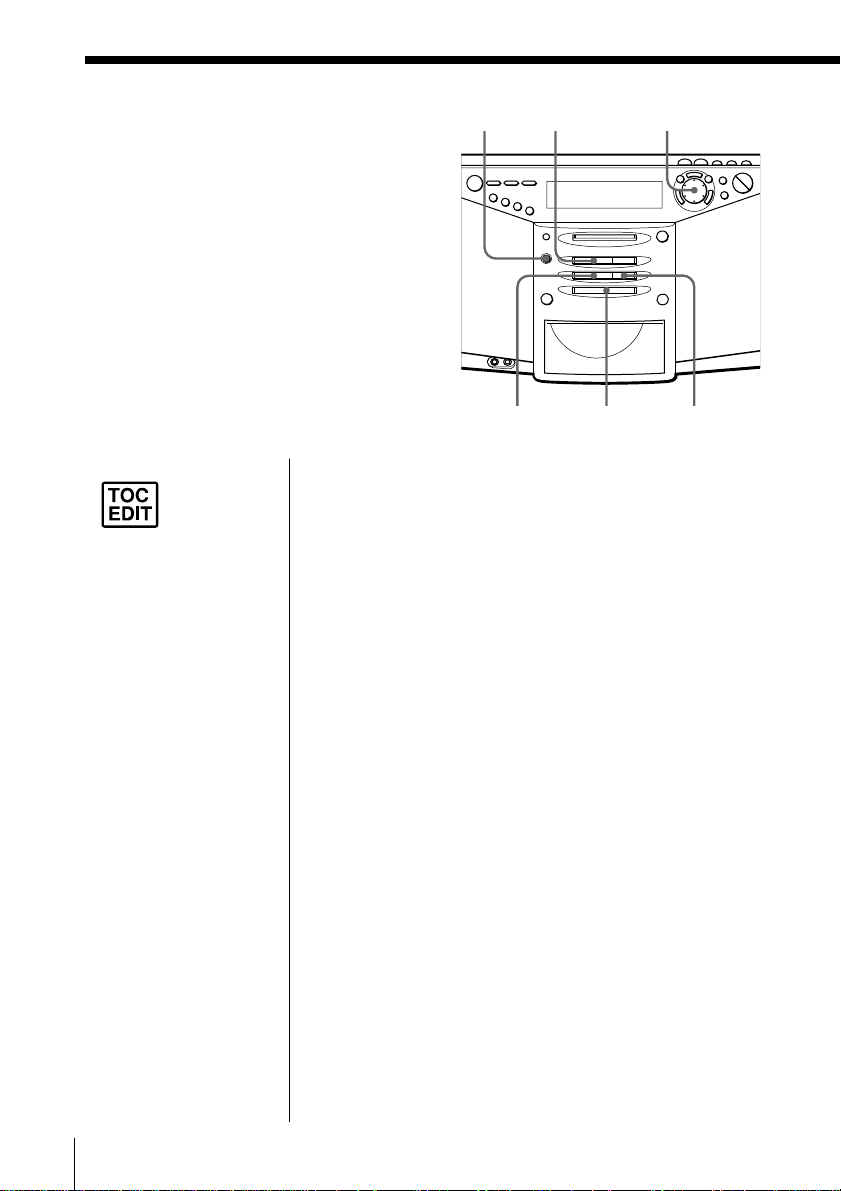
Use these buttons for additional operations
OPERATE
To Press
stop recording MD p or CD p
turn on/off the player OPERATE
If “CD>MD OK?” alternates with time dislay
There is not enough space on the MD to record the whole
CD.
If it is all right to record as much as possible and cancel
recording of some tracks, press ENTER•YES. To stop
recording, press CANCEL•NO.
If any other messages are displayed, see page 64.
MD p
ENTER•YES
CANCEL•NO
Basic Operations
GB
7
Page 8
Playing an MD
Connect the mains lead (see page 49).
12
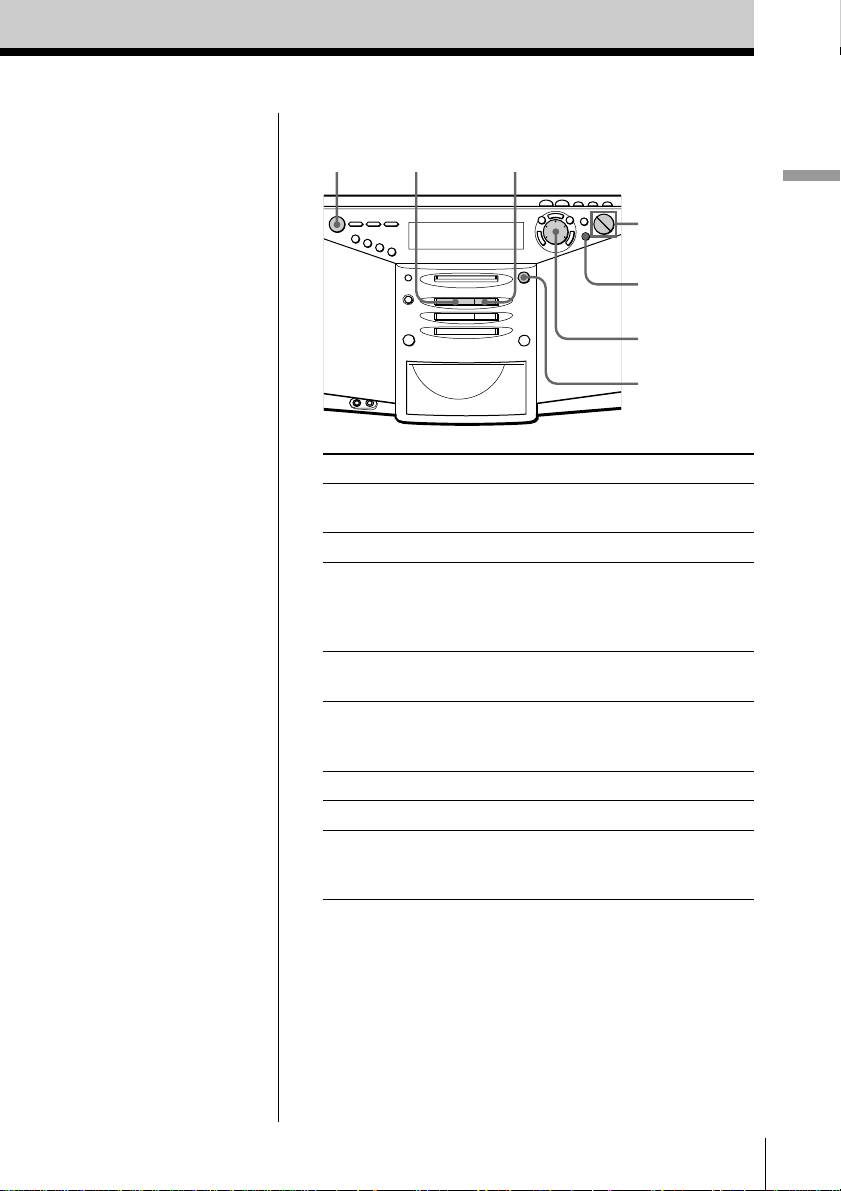
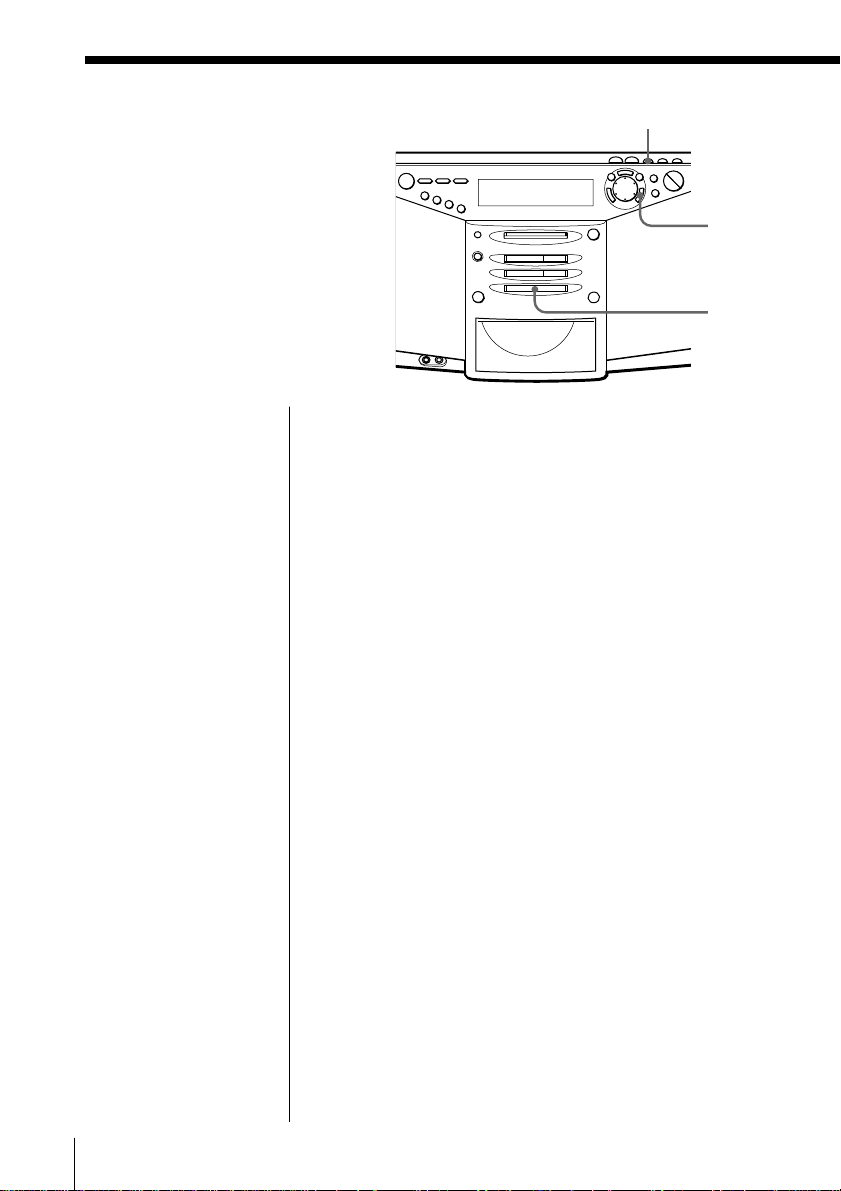
1 Insert the MD (direct power-on).
With the label
side up
Insert in the direction of
the arrow
2 Press MD ^.
The player plays all the tracks
once.
GB
Basic Operations8
Display
After “TOC Reading” is
displayed, the disc name
will be displayed if it is
labeled.
Track name is displayed
if it is labeled.
Track number
Playing time
Page 9
Use these buttons for additional operations
Tip
Next time you want to
listen to a MD, just press
MD ^. The player
turns on automatically
and starts playing the
MD.
OPERATE
To Do this
adjust the volume Press VOLUME +, –
stop playback Press MD p.
pause playback Press MD ^ (MD P on the
go to the next track Turn the jog dial clockwise.
go back to the previous track Turn the jog dial
remove the MD Press 6 MD EJECT.
turn on/off the player Press OPERATE.
check the playing position Press DISPLAY.
in the display using the
position pointer
MD ^
MD p
VOLUME –, +
DISPLAY
Jog dial
6 MD EJECT
(VOL +, – on the remote).
remote).
Press the button again to
resume play after pause.
(On the remote, press +.)
counterclockwise.
(On the remote, press =.)
Basic Operations
Basic Operations
GB
9
Page 10
Listening to the radio
12
Connect the mains lead (see page 49).
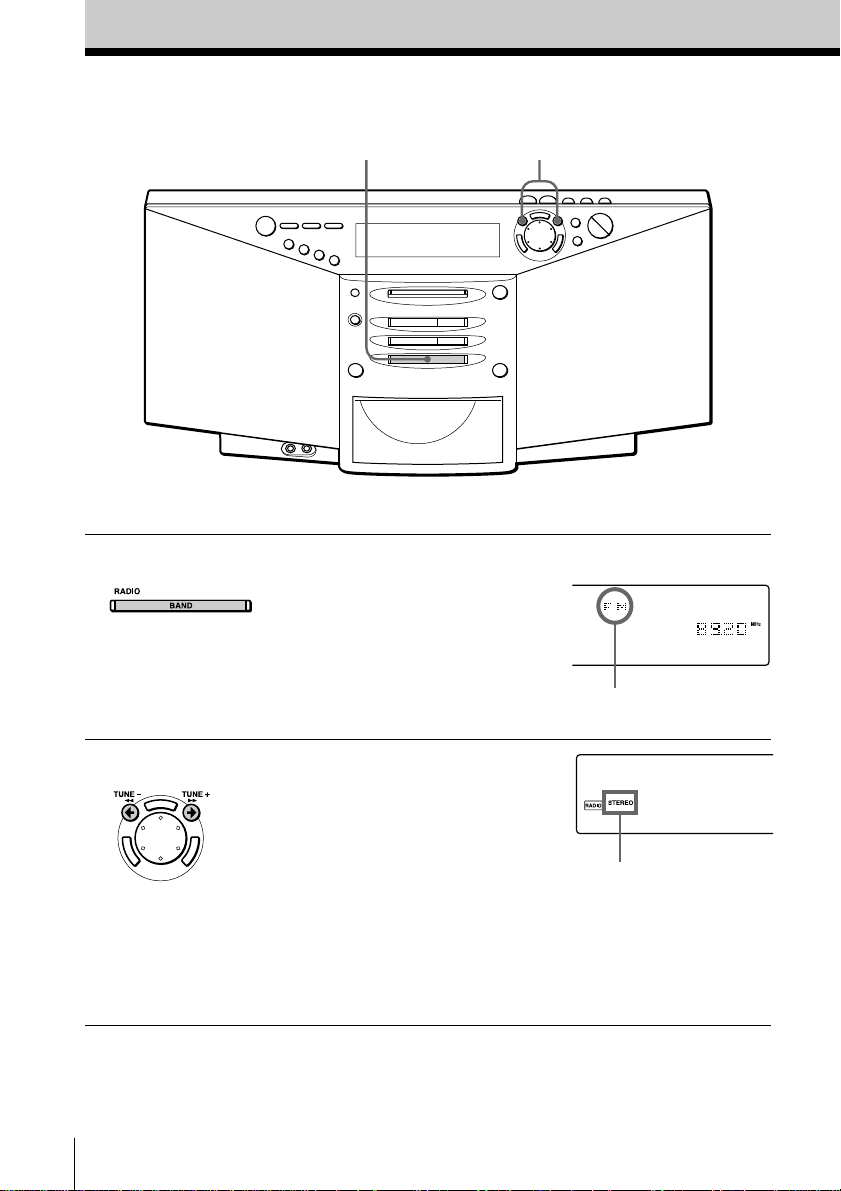
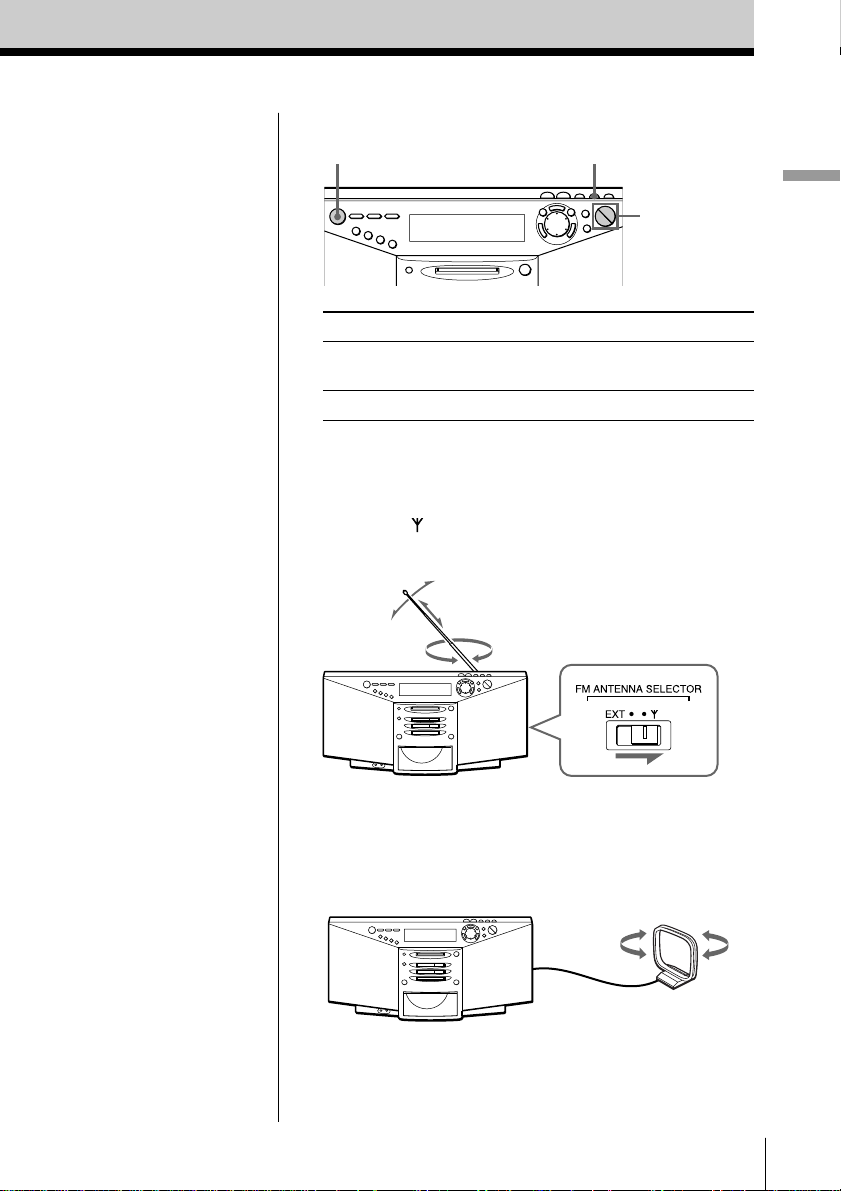
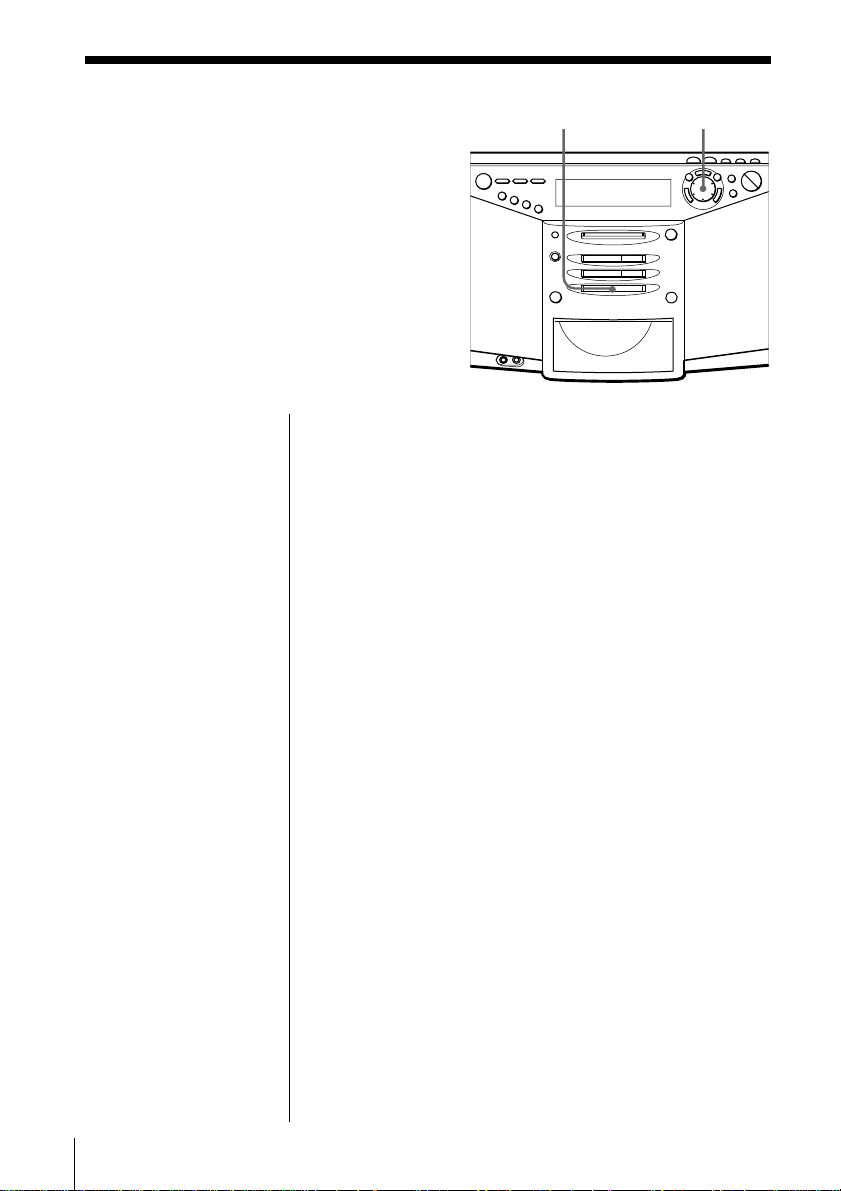
1 Press BAND until the band you
want appears in the display
(direct power-on).
2 Hold down TUNE + or TUNE –
until the frequency digits begin to
change in the display.
The player automatically scans
the radio frequencies and stops
when it finds a clear station.
If you can’t tune in a station,
press TUNE + or TUNE –
repeatedly until you tune in the
station you want.
GB
Basic Operations10
Display
“FM”, “MW” or “LW”
appears
Indicates an FM stereo
broadcast
Page 11
Use these buttons for additional operations
MONO/STOPERATE
VOLUME –, +
Basic Operations
Tips
• If the FM broadcast is
noisy, press MONO/ST
(MODE on the remote)
until “MONO” appears
in the display and radio
will play in monaural.
• Next time you want to
listen to the radio, just
press BAND. The player
turns on automatically
and starts playing the
previous station.
To Press
adjust the volume VOLUME +, –
turn on/off the radio OPERATE
(VOL +, – on the remote)
To improve broadcast reception
FM:
Set the FM ANTENNA SELECTOR at the rear of the
player to “
” (telescopic aerial).
Reorient the aerial for FM.
MW/LW:
Keep the MW/LW loop aerial as far as possible from
the player and reorient it.
If the broad cast is still noisy, connect the external
aerial (page 50).
Basic Operations
11
GB
Page 12
The CD Player•The MD Player
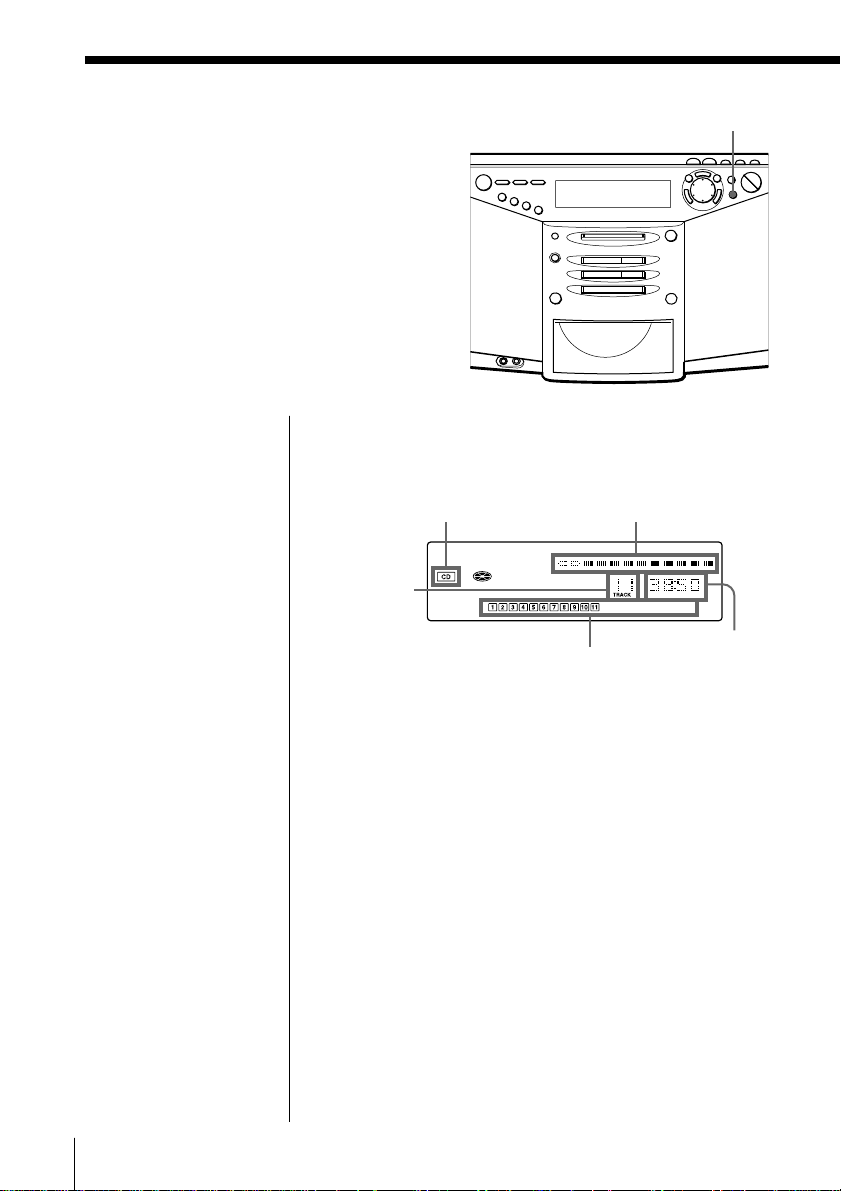
Using the display
You can check information about the CD
and MD using the display.
During stop (CD)
The total track number and playing time are
displayed.
DISPLAY
CD indication
Total track
number
Music calendar
Position pointer
Total playing time
If the CD has more than 20 tracks, “OVER 20” appears
in the display.
During play (CD)
The current track number and playing time are
displayed. The track numbers in the music calendar
disappear after they are played.
GB
The CD Player•The MD Player12
Page 13
Note
During repeat play
(page 16), program
play (page 17) and
shuffle play (page 19),
the number of tracks
left and remaining time
on the CD will not be
displayed.
To check the remaining time
Press DISPLAY.
To display
the current track number and once
remaining time on the current
track
the number of tracks left and twice
remaining time on the CD
the current track number three times
and playing time
Press DISPLAY
The CD Player•The MD Player
Tip
The disc name is
displayed only with the
MDs that have been
electronically labeled.
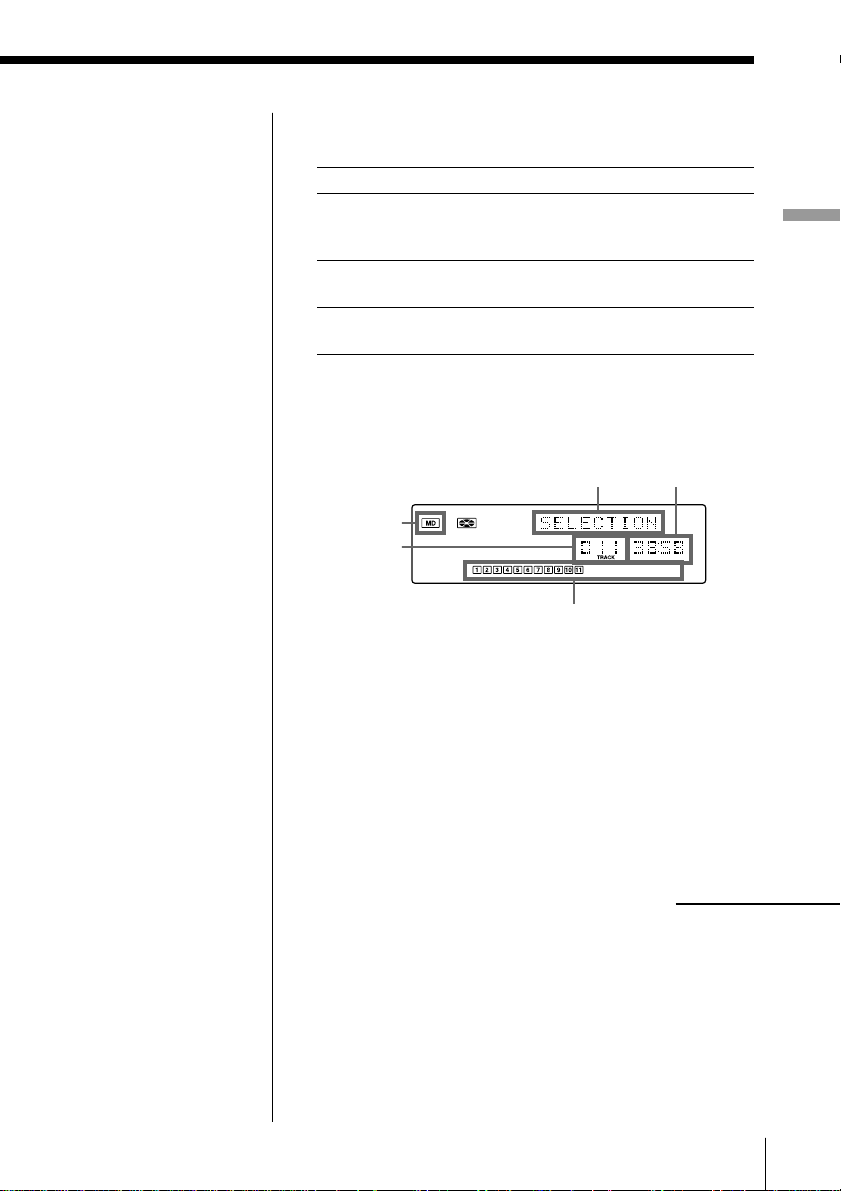
During stop (MD)
The total track number and playing time are
displayed.
Disc name
MD
indication
Total track
number
Music calendar
If the MD has more than 20 tracks, “OVER 20”
appears in the display.
To check the remaining recording time on the MD
Press DISPLAY.
The position pointer also appears in the display.
Total playing time
continued
The CD Player•The MD Player 13
GB
Page 14

Using the display (continued)
Note
During repeat play
(page 16), program play
(page 17) and shuffle
play (page 19), the
number of tracks left
and remaining time on
the MD will not be
displayed.
During play (MD)
The current track number, playing time and the track
name are displayed. The track numbers in the music
calendar disappear after they are played.
To check the remaining time, recording date and
time, etc.
Press DISPLAY.
To display
the current track number, once
remaining time on the current
track and position pointer
the number of tracks left, twice
remaining time on the MD
and the disc name
recording date and time* three times
the current track number, four times
playing time and the track
name
* Once the clock is set, the recording date and time are
stamped automatically (page 42).
Press DISPLAY
GB
The CD Player•The MD Player14
Page 15

Locating a specific
track
You can quickly locate any track on a CD
or an MD using the number buttons. You
can also find a specific point in a track
while playing a CD or an MD.
Note
You cannot locate a
specific track if
“REPEAT PGM”,
“REPEAT SHUFFLE”,
“PGM” or “SHUFFLE”
is lit in the display.
Turn off the indication
by pressing p.
Tips
• To locate a track
numbered over 10,
press >10 first, then the
corresponding number
buttons.
Example:
To play the track
number 23, press >10
first, then 2 and 3.
To play the track
number 10, you can use
the 0/10 button as well
as >10, 1 and 0.
• To select a track on an
MD numbered 100 or
more, press >10 twice,
then the corresponding
number buttons.
To locate Press
a specific track directly the number button of the track.
a point while listening to + (forward) or = (backward)
the sound while playing and hold down
a point while observing + (forward) or = (backward)
the display in pause and hold down until
Number
buttons
=, +
until you find the point.
(On the player, use ) or 0.)
you find the point.
(On the player, use ) or 0.)
The CD Player•The MD Player
The CD Player•The MD Player 15
GB
Page 16
Playing tracks
repeatedly
(Repeat Play)
You can play tracks repeatedly in
normal, shuffle or program play
modes (page 17).
SHUF/PGM REPEAT
MD ^
CD ^
On the remote
• During play, press
MODE repeatedly until
“REPEAT 1” or
“REPEAT” appears in
the display. During
play, you cannot select
“REPEAT SHUFFLE” or
“REPEAT PGM”.
• You can also select the
repeat play during stop.
Press MODE repeatedly
until “REPEAT 1”,
“REPEAT”, “REPEAT
SHUFFLE” or “REPEAT
PGM” appears in the
display. Then, play the
CD or the MD.
To repeat Do this
a single track 1 Play the track you want.
2 Press REPEAT repeatedly until
“REPEAT 1” appears in the
display.
all the tracks 1 Start normal play.
2 Press REPEAT repeatedly until
“REPEAT” appears in the
display.
tracks in random 1 Start shuffle play (page 19).
order 2 Press REPEAT repeatedly until
“REPEAT SHUFFLE” appears in
the display.
programed tracks 1 Start program play (page 17).
2 Press REPEAT repeatedly until
“REPEAT PGM” appears in the
display.
To cancel Repeat Play
Stop play first. Then, press REPEAT until “REPEAT”
disappears from the display.
GB
The CD Player•The MD Player16
Page 17
Creating your
own program
(Program Play)
CANCEL•NO SHUF/PGM
Jog dial
You can arrange the playing order
of up to 20 tracks on a CD or an MD.
On the remote
Press MODE until
“PGM” appears in the
display, then press the
number button to select
the track.
Tip
If you made a mistake,
press CANCEL•NO
and re-enter the track
number by turning the
jog dial and press
ENTER•YES.
Before you begin, make sure that the CD or MD player
is in stop mode.
1 Press SHUF/PGM until “PGM” appears in the
2 Turn the jog dial to select the track you want to
ENTER•YES
MD ^
CD ^
display.
program, and press ENTER•YES.
Repeat this step.
Programed tracks appear in the music calendar.
(In case of CD)
CD
indication
Total programed time
The CD Player•The MD Player
Track numberPlaying order
(In case of MD)
MD
indication
Playing order
Total programed time
Track number
3 Press CD ^ ( or MD ^) to start program play.
continued
The CD Player•The MD Player 17
GB
Page 18

Creating your own program (Program Play) (continued)
Tips
• If the program play is
finished, the program
is saved. You can play
the same program
again by pressing ^.
• If you open the CD
tray, the program is
erased.
• If you take out the MD,
the program is erased.
• During play, total
programed time cannot
be displayed.
To cancel Program Play
Stop play first. Then, press SHUF/PGM until “PGM”
disappears from the display.
To check the order of tracks before play
Before starting the program play, press ENTER•YES.
“PGM Check” appears in the display. Every time you
press ENTER•YES, the track number appears in the
programed order.
To change the current program
Change before starting the program play.
To Do this
erase the last track in 1 Press CANCEL•NO.
the program The track programed last is erased.
2 Re-enter the track numbers by
turning the jog dial and pressing
ENTER•YES.
change the whole 1 Press p to erase the whole
program completely program.
2 Create a new program
following the programing
procedure.
GB
The CD Player•The MD Player18
Page 19
Playing tracks
in random
order
(Shuffle Play)
You can play tracks in random
order.
SHUF/PGMMD ^CD ^
The CD Player•The MD Player
Tip
During shuffle play,
you cannot select the
previous track by
turning the jog dial (or
by pressing = on the
remote).
On the remote
Press MODE until
“SHUFFLE” appears in
the display.
Before you begin, make sure that the CD or MD player
is in stop mode.
1 Press SHUF/PGM until “SHUFFLE” appears in
the display.
2 Press CD ^ (or MD ^) to start shuffle play.
To cancel Shuffle Play
Stop play first. Then, press SHUF/PGM until
“SHUFFLE” disappears from the display.
The CD Player•The MD Player 19
GB
Page 20
The Radio
Presetting radio
stations
You can store radio stations into the
player’s memory. You can preset
up to 36 stations, 12 for each band in
any order.
1 Press BAND until the band you want appears in
2 Hold down AUTO PRESET until “AUTO PRESET”
AUTO PRESET
ENTER•
YES
BAND
the display.
flashes in the display.
The stations are stored in memory from the lower
frequencies (from the preset number 1, in
numerical order) as long as the station has a signal
strong enough.
When you’ve done presetting, the station stored in
the preset number 1 will be tuned in automatically.
On the remote
1 Press BAND until the
band you want
appears in the
display.
2 Press TUNE + or –
until you tune in the
station you want.
3 Hold down the
number button that
you want to preset
the new station on
for 2 seconds.
To select the preset
number 11 or 12,
press >10 first, then
press 1 or 2.
GB
The Radio20
If a station cannot be preset automatically
You need to preset a station with a weak signal
manually. Also, when you want to replace preset
stations with a new one, proceed as follows:
1 Press BAND until the band you want appears in
the display.
2 Press TUNE + or – repeatedly until you tune in the
station you want, and then, hold down
ENTER•YES for 2 seconds.
3 Select the preset number you want to preset the
new station on by turning the jog dial.
4 Press ENTER•YES.
The new station replaces the old one.
Page 21

To label the station
1 According to the procedure on page 22, tune in the
station you want to label.
2 Press EDIT for 2 seconds.
3 Input the name of the station (up to 9 characters).
For details , see steps 4 - 8 on pages 39 and 40.
To Do this
move the cursor Press ¿ or ÷.
select the characters Turn the jog dial.
erase the characters Press DELETE.
insert the characters Use INSERT.
4 Press ENTER•YES.
The Radio
The Radio 21
GB
Page 22
Playing preset
radio stations
Once you’ve preset the stations, use the
jog dial on the player or the number
buttons on the remote to tune in your
favorite stations.
Jog dialBAND
On the remote
To display the preset
number you want in
step 2, use the number
buttons.
To select the preset
number 10:
Press 0/10.
To select the preset
number 11 or 12:
Press >10 first, then
press 1 or 2.
1 Press BAND until the band you want appears in
the display.
2 Turn the jog dial to display the preset number of
the station you want.
GB
The Radio22
Page 23
Recording
Recording the
track you are
listening to
(Synchronized recording of a
single track – REC IT Function)
TO TOP TO END
You can record the track you are
listening to from its beginning using the
TO TOP or TO END button.
Notes
• After you
stop
recording,
do not disconnect the
AC power cord or
move the player while
“TOC EDIT” is flashing
in the display. If you
do so, recording may
not be done properly.
• If you turn up the
volume too high, sound
skipping may occur.
Tips
• To record over the
previous recording, see
page 28.
• Once the clock is set,
the recording date and
time are stamped
automatically (page 42).
1 Insert a recordable MD.
2 Insert the CD and play the track you want to
record.
3 Press TO TOP or TO END.
The player goes back to the beginning of the track
you are listening to, and starts recording.
When you use a recorded MD:
To record before the previous recording, press
TO TOP.
To record after the previous recording, press
TO END.
When you use a new MD:
Press either TO TOP or TO END.
When recording is finished, MD player will stop
operation automatically but CD player will
continue play.
Recording
You can label the track during recording
1 Press EDIT.
2 Press DISPLAY repeatedly to select the type of
characters.
3 Turn the jog dial to display the character you want
and press ÷.
4 Repeat steps 2 and 3 to complete the entire name.
5 Press ENTER•YES.
For details, see pages 39 - 41.
Recording 23
GB
Page 24
Recording the
tracks you
programmed
(Synchronized recording of
the tracks you programmed)
You can record the tracks you
programmed.
1 Insert a recordable MD.
2 Insert the CD you want to record and press CD p.
3 Press SHUF/PGM until “PGM” appears in the
display.
Tip
If you made a mistake,
press CANCEL•NO
and re-enter the track
number using the jog
dial and ENTER•YES.
4 Turn the jog dial to select the track you want to
program, and press ENTER•YES.
Repeat this step.
Programmed tracks appear in the music calendar.
DISC ALL
Jog dial SHUF/PGM
ENTER•
YES
CANCEL•
NO
CD p
Programed track
Playing
order
Total programmed
time
5 Press DISC ALL.
The player starts recording automatically.
If the MD has any previous recording, recording
will be made from the last recorded position.
GB
Recording24
Page 25

Notes
• After you
stop
recording,
do not disconnect the
AC power cord or
move the player
while “TOC EDIT” is
flashing in the
display. If you do so,
recording may not be
done properly.
• If you turn up the
volume too high,
sound skipping may
occur.
Tips
• To record over the
previous recording, see
page 28.
• Once the clock is set,
the recording date and
time are stamped
automatically (page
42).
If “CD>MD OK?” alternates with time dislay
There is not enough space on the MD to record the
whole program.
If it is all right to record as much as possible and
cancel recording of some tracks, press ENTER•YES.
To stop recording, press CANCEL•NO.
If any other messages are displayed, see page 64.
Recording
Recording 25
GB
Page 26
Recording from
the radio or a CD
You can record from the radio or a CD
to an MD using the REC button. You can
start or stop recording at any point you
want. You can also pause recording.
REC
MD ^
Jog dial
Notes
• After you
stop
recording,
do not disconnect the
AC power cord or
move the player
while “TOC EDIT” is
flashing in the
display. If you do so,
recording may not be
done properly.
• While recording from
radio, you cannot
change the station.
• If you turn up the
volume too high,
sound skipping may
occur.
Tips
• To add track marks
during recording, press
REC where you want to
add track marks.
• To record over the
previous recording, see
page 28.
• To add track marks
after recording, see
“Dividing recorded
tracks” on page 34.
CD ^
BAND
CD p
Recording from the radio
When receiving conditions are good, track marks are
added on the MD automatically:
– when there is no sound input during recording for
more than 2 seconds.
– when a soft sound like pianissimo continues during
recording.
– when you pause recording.
If unnecessary track marks are added, erase them after
recording (see “Combining recorded tracks” on page
36).
1 Tune in the station you want to record from.
2 Insert a recordable MD.
3 Press REC (r on the remote).
Recording does not start (recording standby
mode).
4 Press MD ^ (MD ( or MD P on the remote).
Recording will be made from the last recorded
position.
To stop recording
Press MD p.
GB
Recording26
Page 27
Tip
When you record a
program of a station
whose name is labeled
on this player, the
station name is
recorded automatically
as the track name (page
21).
Notes
• After you
stop
recording,
do not disconnect the
AC power cord or
move the player
while “TOC EDIT” is
flashing in the
display. If you do so,
recording may not be
done properly.
• If you turn up the
volume too high,
sound skipping may
occur.
Tips
• To add track marks
during recording, press
REC where you want
to add track marks.
• To record over the
previous recording, see
page 28.
• To add track marks
after recording, see
“Dividing recorded
tracks” on page 34.
To pause recording
Press MD ^. Press the button again to resume
recording. (On the remote, use MD P instead of MD
^.)
Recording from a CD
Track marks on the source CD are recorded on the
same positions on the MD. Track marks are also added
automatically on the MD when you pause recording.
If unnecessary track marks are added, erase them after
recording (see ”Combining recorded tracks” on page
36).
1 Insert a CD.
2 Press CD p to activate the CD player.
3 Insert a recordable MD.
4 Press REC (r on the remote).
Recording does not start (recording standby
mode).
5 Press MD ^ (MD ( or MD P on the remote).
Recording will be made from the last recorded
position.
6 Press CD ^.
To stop recording
Press MD p.
To pause recording
Press MD ^. Press the button again to resume
recording. (On the remote, use MD P instead of MD
^.)
Recording
Recording 27
GB
Page 28

Recording on a recorded MD
There are two ways of recording on a
recorded MD.
• To add to the previous recording.
The previous recording will remain.
• To record over the previous
recording. The previous recording
will be erased.
Adding recording (the previous
recording will remain)
Insert a recorded MD, and start
recording (pages 6, 26 and 27).
Recording will be made from the last
recorded position.
If there is not enough space on the
MD to record
When recording a whole CD, “CD>MD
OK?” appears in the display (page 7).
When recording from the radio or a
CD, press DISPLAY to check the
recording remaining time on the MD.
Recording over the previous
recording (the previous recording
will be erased)
To record over from the beginning of
the MD after erasing all tracks on the
MD
First, erase all tracks on an MD (page
32). You can use the MD the same as a
new one. Then, record on the MD as
usual.
To record over from a specific point
on the MD
1 Play the MD and press MD ^ to
pause play at the point you want to
start recording.
2 Press REC to make the player in
standby mode.
3 Play the sound source.
4 Press MD ^ to start recording.
Note
When recording over from a specific point
on the MD:
If the new recording is shorter than the
previous recording, a part of the previous
recording will remain after the recording.
As you repeat this type of recording,
many fragments of recording will remain
on the MD. We recommend that you erase
all tracks on the MD (page 32) if you no
longer need to keep the recording. Then,
start recording on the blank MD.
GB
Recording28
Page 29

Editing recorded tracks on the MD
Before editing
On the MD, track marks are inserted
between the tracks. You can find the
beginning of the tracks quickly using
the track marks. You can change the
positions of the track marks. For
instance, you can divide a certain track
into several tracks by adding track
marks. You can also combine some
tracks into a new longer track by
erasing some track marks.
The position of the track marks to
be added are different depending
on the type of recording or
recording conditions
The type of The position of the
recording track marks to be
added
Recording The same positions on
a whole CD the source CD
(page 6)
Recording •The same positions on
from a CD the source CD
using REC •The position where
button you pause recording
(page 27) •The position where
you press REC
Recording •When there is no
from the radio sound input or a soft
or other sound continues
equipment during recording for
connected to more than two
the player seconds
(pages 26 and •The positions where
52) you pause recording
•The positions where
you press REC
You can add or erase track marks after
recording. When you record, for
instance, from a radio or other
equipment connected to the player,
track marks may be added to the
positions you do not want. If that
happens, change the positions of the
track marks to those you want.
Editing recorded tracks on the MD
Change the track marks correctly
• To erase a track mark n
“Combining recorded tracks
(Combine Function)” (page 36): You
can combine two tracks into a single
one by erasing the track mark
betrween the two tracks.
• To add a track mark n “Dividing
recorded tracks (Divide Function)”
(page 34): You can divide one track
into two tracks by adding a track
mark.
continued
Editing recorded tracks on the MD 29
GB
Page 30

Before editing (continued)
You can also use the following
functions
• Erasing a single track n “Erasing
recordings (Erase Function)” (page
31)
• Erasing all tracks on an MD n
“Erasing recordings (Erase
Function)” (page 32)
• Changing the order of the tracks n
“Moving recorded tracks (Move
Function)” (page 38)
• Locating any point in the track
quickly n “Dividing recorded
tracks (Divide Function)” (page 34)
• Combining several independently
recorded portions into a single track
n “Erasing recordings (Erase
Function)” (page 31) and
“Combining recorded tracks
(Combine Function)” (page 36)
Note
After you stop recording, do
not disconnect the AC power
while “TOC EDIT” is flashing in the
display. If you do so, recording may not
be done properly.
GB
Editing recorded tracks on the MD30
cord or move the player
Page 31

Erasing recordings
(Erase Function)
You can quickly erase the recorded tracks
or unnecessary portion in the track. Unlike
a cassette-corder, blank portion will not
remain after erasure.
Here are three options to erase recordings:
• Erasing a single track
• Erasing all tracks on an MD
• Erasing a portion of a track
EDIT ENTER•YES
Editing recorded tracks on the MD
Notes
• If “Protected” appears
in the display, the tab
on the MD is in the
record-protect position
(page 56).
• After you
stop
recording,
do not disconnect the
AC power cord or
move the player
while “TOC EDIT” is
flashing in the
display. If you do so,
recording may not be
done properly.
Erasing a single track
You can erase a whole track quickly. When you erase
a track, the total number of tracks on the MD
decreases by one and all tracks following the erased
one are renumbered.
1 Play the track you want to erase.
2 Press EDIT repeatedly until “Track Erase” appears
in the display.
3 Press ENTER•YES.
“Erase OK?” appears in the display, and one-track
repeat play starts. Once you have erased a track,
you cannot recover it. Be sure to check the contents
of the track you are trying to erase.
If you want to cancel the erase function at this
point:
Press CANCEL•NO or MD p.
4 Press ENTER•YES.
“Complete” appears in the display for a few
seconds, and the current track will be erased.
continued
Editing recorded tracks on the MD 31
GB
Page 32

Erasing recordings (Erase Function) (continued)
Note
After you
stop
recording,
do not disconnect the
AC power cord or
move the player
while “TOC EDIT” is
flashing in the
display. If you do so,
recording may not be
done properly.
Erasing all tracks on an MD
You can erase the disc name, all recorded tracks and
their names at the same time. After you have erased
all tracks on the MD, you can use it as a new MD.
1 While the player is stopped, press EDIT repeatedly
until “All Erase” appears in the display.
2 Press ENTER•YES.
“Erase OK?” appears in the display. Once you
have erased a track, you cannot recover it. Be sure
to check the contents of the track you are trying to
erase.
If you want to cancel the erase function at this
point:
Press CANCEL•NO or MD p.
3 Press ENTER•YES.
After “TOC EDIT” disappears from the display,
“Blank Disc” appears in the display, and all
contents on the MD are erased.
GB
32
Editing recorded tracks on the MD
Page 33

Note
After you
stop
recording,
do not disconnect the
AC power cord or
move the player
while “TOC EDIT” is
flashing in the
display. If you do so,
recording may not be
done properly.
Erasing a portion of a track
By using the Divide (page 34), Erase (page 31) and
Combine (page 36) functions, you can erase specific
portions of a track.
Example: Erasing a portion of track A
Track
numbern
Portion to be
erased
1
A
2
3
BC
1 Divide A into three parts (page 34).
1
A#1
2
A#2
3
A#3
B
54
2 Erase A#2 (page 31).
4321
A#1
A#3 B C
3 Combine A#1 and A#3 (page 36).
1
A(#1+#3) B C
2
3
Editing recorded tracks on the MD
C
Editing recorded tracks on the MD 33
GB
Page 34

Dividing recor ded
tracks
(Divide Function)
When recording from the radio, etc.,
track marks may not be added correctly.
A number of tracks may be included in a
single track. You can divide these tracks
into separate tracks, and add a new
track mark to each track. All tracks
following the divided tracks are
renumbered.
EDIT ENTER•YESMD ^
Tips
• To put the divided
tracks together, see
“Combining recorded
tracks” on page 36.
• To divide a track
during recording, press
REC at the point where
you want to add the
track mark.
Note
If “Sorry” appears in
the display, you cannot
divide the track.
If you repeat editing on
the MD, you may not
be able to divide a
track. This is due to the
system limitations of
the MD (page 57), but
not caused by malfunction.
Example: Dividing track 1 into three tracks
Track
number
Dividing
1
ABC D
Track 1 is divided, and the track marks 2 and
3 are added.
123
B
A
C
2
4
D
1 While playing the MD, press MD ^ at the point
where you want to create a new track.
The player pauses.
2 Press EDIT repeatedly until “Divide” appears in
the display.
3 Press ENTER•YES.
“Divide OK?” appears in the display.
If you want to cancel the divide function at this
point:
Press CANCEL•NO or MD p.
GB
34
Editing recorded tracks on the MD
Page 35

Note
After you
stop
recording,
do not disconnect the
AC power cord or
move the player
while “TOC EDIT” is
flashing in the
display. If you do so,
recording may not be
done properly.
4 Press ENTER•YES.
“Complete” appears in the display for a few
seconds after the track is divided. The original
track only has the track name, while the new track
has no name (this happens only when the track
you divided had its track name). One track is
added to the music calendar.
Editing recorded tracks on the MD
Editing recorded tracks on the MD 35
GB
Page 36

Combining
recorded tracks
(Combine Function)
You can combine two adjacent tracks
into a single one. Using the combine
function, you can combine a number of
fragmented recordings or delete the
unnecessary track marks. All tracks
following the combined track are
renumbered.
EDIT ENTER•YES
Notes
• If “Sorry” appears in
the display, you cannot
combine the tracks.
If you repeat editing on
the MD, you may not
be able to combine the
tracks. This is due to
the system limitations
of the MD (page 57),
but not caused by malfunction.
• If “Cannot Edit”
appears in the display,
you may be trying to
combine the tracks on
the first track. You
cannot use the combine
function on the first
track.
Example: Combine the tracks B and C
Track
number
Combining
B and C are combined into one track.
12
2
1
A
AD
3
B
B
C
C
4
D
3
1 Play the track you want to combine.
Example: To combine tracks B and C, play the
track C.
2 Press EDIT repeatedly until “Combine” appears in
the display.
3 Press ENTER•YES.
“Combine OK?” appears in the display; the player
enters the playback pause mode.
If you want to cancel the combine function at
this point:
Press CANCEL•NO or MD p.
GB
36
Editing recorded tracks on the MD
Page 37

Note
After you
stop
recording,
do not disconnect the
AC power cord or
move the player
while “TOC EDIT” is
flashing in the
display. If you do so,
recording may not be
done properly.
4 Press ENTER•YES.
“Complete” appears in the display for a few
seconds after the tracks are combined. If both of
the combined tracks had track names, the name of
the latter track is erased. The total number of tracks
in the music calendar decreases by one.
Editing recorded tracks on the MD
Editing recorded tracks on the MD 37
GB
Page 38

Moving recorded
tracks
(Move Function)
You can change the order of the tracks.
After you move the track, the track
numbers are renumbered automatically.
Jog dial
EDIT ENTER•YES
Note
After you
stop
recording,
do not disconnect the
AC power cord or
move the player
while “TOC EDIT” is
flashing in the
display. If you do so,
recording may not be
done properly.
Example: Moving C to the position of track 1
Track
number
Moving
1
Track number of the C changes to 1
1
2
3
AD
B
2
C
C
3
4
4
D
BA
1 Play the track you want to move.
2 Press EDIT repeatedly until “Track Move” appears
in the display.
3 Press ENTER•YES.
“nTrack 003?” appears in the display, and onetrack repeat play starts.
4 Turn the jog dial to select the new track position.
If you want to cancel the move function at this
point:
Press CANCEL•NO or MD p.
5 Press ENTER•YES.
“Complete” appears in the display for a few
seconds after the track is moved.
GB
38
Editing recorded tracks on the MD
Page 39

Labeling
recordings
(Name Function)
You can label the MDs and the tracks
you have recorded with letters, numbers
and symbols. Each label can be made up
of up to 100 characters. You can input up
to about 1,700 characters into each MD.
Labeling an MD
1 Insert the MD you want to label, and stop the MD
play.
2 Press EDIT repeatedly until “Disc Name” appears
in the display.
3 Press ENTER•YES.
If the disc name has been already labeled, the disc
name appears in the display.
4 Press DISPLAY repeatedly to select the type of
characters.
Each time you press DISPLAY, the character
changes as follows: Uppercase letters n
Lowercase letters n Numbers and symbols.
You can use the following characters:
The type of characters Characters (symbols)
Uppercase letters ABCD.....WXYZ’,/:
Lowercase letters abcd.....wxyz’,/:
Numbers and symbols 0123456789!"#$%&()*.;<=>?
CANCEL•NO
Jog dial
(space)
(space)
@_`+ –’,/: (space)
¿
ENTER•YES
EDIT
÷
Editing recorded tracks on the MD
continued
Editing recorded tracks on the MD 39
GB
Page 40

Labeling recordings (Name function) (continued)
5 Turn the jog dial counterclockwise or clockwise to
select the characters.
6 Press ÷.
The cursor shifts
rightward and waits for
the input of the next
character.
7 Repeat steps 4 through 6 to complete the entire
Note
After you
stop
recording,
do not disconnect the
AC power cord or
move the player
while “TOC EDIT” is
flashing in the
display. If you do so,
recording may not be
done properly.
name.
8 Press ENTER•YES.
The name has been labeled on the MD.
Labeling a track
1 Play the track you want to label.
2 Press EDIT repeatedly until “Track Name”
appears in the display.
3 Press ENTER•YES.
One-track repeat play starts. If the track name has
been already labeled, the track name appears in
the display.
4 Input the characters according to steps 4 through 8
of “Labeling an MD.”
The name has been labeled on the track.
Display
Cursor
GB
40
Editing recorded tracks on the MD
Page 41

To change the characters
• To add characters after the existing characters
1 Move the cursor to the right of the last character
using ÷.
2 Turn the jog dial to select the character.
3 Press ENTER•YES.
• To change the characters
1 Move the cursor to the character you want to
change using ÷.
2 Turn the jog dial to select the character.
3 Press ENTER•YES.
• To delete the character
1 Move the cursor to the character you want to
delete using ÷.
2 Press DELETE. If you press DELETE repeatedly,
the characters will be deleted one after another.
3 Press ENTER•YES.
• To insert a character
1 Move the cursor to the place you want to add a
character using ÷.
2 Press INSERT to make a space between the
characters.
3 Turn the jog dial to select the character.
4 Press ENTER•YES.
Editing recorded tracks on the MD
Editing recorded tracks on the MD 41
GB
Page 42

The Timer
Setting the clock
“- -y - -m - -d” and “- -:- -” indications
appear in the display until you set the
clock.
Once the clock is set, the recording date
and time are stamped automatically
(pages 7, 23 and 25).
CLOCK
ENTER•YESJog dial
Tips
• The time display
system of this player is
the 24-hour system.
• You can set the clock of
this player any time, no
matter whether power
is on or off.
1 Press and hold CLOCK
until the year digits flash.
2 Set the date.
1 Turn the jog dial to set
the year and press
ENTER•YES.
.
2 Turn the jog dial to set
the month and press
ENTER•YES.
.
3 Turn the jog dial to set
the day and press
ENTER•YES.
3 Set the time.
1 Turn the jog dial to set the hour and press
ENTER•YES.
2 Turn the jog dial to set the minutes and press
ENTER•YES.
GB
The Timer42
Page 43

4 Press ENTER•YES.
The clock starts from 00
seconds.
To display the time
Press CLOCK. To go back to the previous display,
press CLOCK again. As long as the power is turned
off, the time indication is displayed.
The Timer
The Timer 43
GB
Page 44

Waking up to
music
You can wake up to music or a radio
program at a preset time.
Make sure you have set the clock (see
“Setting the clock” on page 42).
STANDBY
TIMER
ENTER•YES
Jog dial
Note
You cannot preset
waking up timer and
recording timer (page
46) at the same time.
Before you begin, make sure “TIMER PLAY” or
“TIMER REC” is not displayed. If either one is
displayed, press STANDBY.
1 Prepare the music source you want to play.
Source Do this
CD Insert a CD.
MD Insert an MD.
RADIO Tune in the station.
LINE Turn on the equipment connected to
LINE IN.
2 Press TIMER.
“TIMER PLAY” or
“TIMER REC” flashes in
the display.
Make the following settings by checking the
indications in the display.
3 Turn the jog dial until “TIMER PLAY” flashes in
the display, and press ENTER•YES.
“MD”, “CD”, “RADIO” or “LINE” flashes in the
display.
4 Turn the jog dial until the music source you want
to play (“MD”, “CD”, “RADIO” or “LINE”)
appears in the display, and press ENTER•YES.
GB
The Timer44
Page 45

Tip
If you made a mistake,
press CANCEL•NO.
The setting entered last
will be cleared. Reenter it.
5 Set the timer to the hour and the minutes you want
the music to go on.
1 Turn the jog dial to
set the hour and
press ENTER•YES.
2 Turn the jog dial to set the minutes and press
ENTER•YES.
6 Set the timer to the hour and the minutes you want
the music to go off (Do as step 5.).
7 Turn the jog dial to set
the volume you want,
and press ENTER•YES.
The Timer
Tips
• To exit the standby
mode, press STANDBY
to make either “TIMER
PLAY” or ”TIMER
REC” disappear from
the display.
• The preset settings
remain until you reset
them.
• As long as the t
indication appears in
the display, the player
is in timer mode.
8 Press STANDBY.
“TIMER PLAY” lights up; the player enters the
standby mode.
At the preset time, the power will go on and music
will play. Then the power will go off at the preset
time, and the player will enter the standby mode
again.
To check/change the waking up timer settings
Press TIMER, then press ENTER•YES. Each time you
press ENTER•YES, a stored setting is displayed in the
set order. To change the setting, display the setting
you want to change and re-enter it.
To use the player before a timer playback starts
If you turn on the player, you can use it as usual ( in
case of the radio, if you listen to the station which is
different from the one you tuned in step 1 on page 44,
you will hear that station at the preset time.) Turn off
the player before the preset time.
To stop play
Turn off the power.
The Timer 45
GB
Page 46

Timer-recor ding
radio programs
You can set timer to record the radio at a
certain time. You can also record from
the component connected to the LINE
IN jack of the player.
Make sure you have set the clock (see
“Setting the clock” on page 42).
STANDBY
TIMER
ENTER•YES
Jog dial
Notes
• You cannot preset
recording timer and
waking up timer (page
44) at the same time.
• When recording from
the component
connected to the LINE
IN jack of the player,
refer to the operating
instructions of the
component.
Tip
If you made a mistake,
press CANCEL•NO.
The setting entered last
will be cleared. Reenter it.
Before you begin, make sure “TIMER PLAY” or
“TIMER REC” is not displayed. If either one is
displayed, press STANDBY.
1 Tune in the radio station and insert an MD.
2 Press TIMER.
“TIMER PLAY” or
“TIMER REC” flashes in
the display.
Make the following settings by checking the
indications in the display.
3 Turn the jog dial until “TIMER REC” flashes in the
display, and press ENTER•YES.
4 Turn the jog dial until “RADIO” flashes in the
display, and press ENTER•YES.
When recording from the component connected to
the LINE IN jack of the player, turn the jog dial
until “LINE” flashes in the display, and press
ENTER•YES.
5 Set the timer to the hour and the minutes you want
to start recording.
1 Turn the jog dial to
set the hour and
press ENTER•YES.
2 Turn the jog dial to set the minutes, and press
ENTER•YES.
GB
The Timer46
Page 47

6 Set the timer to the hour and the minutes you want
to stop recording. (Do as step 5.)
7 Turn the jog dial to set
the volume you want,
and press ENTER•YES.
Tips
• To exit the standby
mode, press STANDBY
to make either “TIMER
REC” or ”TIMER
PLAY” disappear from
the display.
• The preset settings
remain until you reset
them.
• As long as the t
indication appears in
the display, the player
is in timer mode.
8 Press STANDBY.
“TIMER REC” is displayed, and the player enters
the standby mode.
At the preset time, the power will go on and the
recording will start. Then the power will go off at
the preset time, and the player will enter the
standby mode again.
To check/change the recording timer settings
Press TIMER, then press ENTER•YES. Each time you
press ENTER•YES, a stored setting is displayed in the
set order. To change the setting, display the setting
you want to change and re-enter it.
To use the player before a timer-recording starts
If you turn on the player, you can use it as usual ( in
case of the radio, if you listen to the station which is
different from the one you tuned in step 1 on page 46,
you will hear that station at the preset time.) Turn off
the player before the preset time.
To stop timer-recording
Turn off the power.
The Timer
The Timer 47
GB
Page 48

Falling asleep to
music
You can set the player to turn off
automatically after 10, 20, 30, 60, 90 and
120 minutes, allowing you to fall asleep
while listening to music.
SLEEP
On the remote
Press SLEEP
repeatedly to select the
minutes for the
sleeping timer.
Tips
• You can combine the
waking up timer with
the sleeping timer. Set
the waking up timer
first (page 44), turn on
the player, and then set
the sleeping timer.
• You can prepare the
different music for the
waking up timer and
the sleeping timer.
However, you cannot
store different radio
stations.
• You can set different
volume for the waking
up timer and the
sleeping timer. For
instance, you can sleep
at lower volume and
wake up at higher
volume.
1 Play the music source you want.
2 Press SLEEP until “SLEEP” appears in the display.
3 Press SLEEP to select the minutes for the sleeping
timer.
Each time you press
the button, the
indication changes as
follows: “10” n “20”
n “30” n “60” n
“90” n “120” n no
indication.
If 4 seconds have passed after you pressed SLEEP,
the minutes in the display are entered.
The preset time has passed, the player goes off
automatically.
To cancel the sleep function
Press SLEEP to make “SLEEP” disappear from the
display.
To change the preset time
Do the steps 2 and 3 again.
GB
The Timer48
Page 49

Setting Up
Preparing the
system
According to the illustrations,
connect the cords firmly.
Wrong connections cause malfunctions. Connect the mains
lead last.
MW/LW loop
aerial
Note
Keep the MW/LW loop
aerial away as far as
possible from the
player. If you do not,
noise may be heard.
Tip
This unit is supplied
with a different color
speaker net. If you wish
to change the color of
your speaker, pull each
corner of the speaker
net toward yourself to
remove the net. Then
exchange it with the
extra net.
1 Aerial terminals
FM EXT ANTENNA
(external antenna)
socket
FM ANTENNA SELECTOR
2 to the mains
1 Hooking up the aerial
MW/LW loop aerial*
(supplied)
*Reorient the aerial to improve broadcast reception
Setting up the MW/LW loop aerial
Setting Up
2 Connecting the mains lead
Connect the mains lead to the mains.
continued
Setting Up 49
GB
Page 50

Preparing the system (continued)
Tips
• This player has two 2
(headphones) jacks so
that two persons listen
to the same music
together.
When using the 2 jack
marked with ••, you
can also listen to the
sound through the
speakers. You can
enjoy the surround
sound using optional
cordless stereo
headphones system
such as MDR-IF520RK
and transmitter.
• The sound quality may
be changed depending
on the polarity of the
plug. Change the
direction of inserting
the plug and check the
sound quality.
3 Inserting batteries into the remote
Insert two R6 (size AA) batteries (not supplied)
Replacing batteries
With normal use, the batteries should last for about six
months. When the remote no longer operates the
player, replace all the batteries with new ones.
To improve the FM reception
1 Connect the FM outdoor aerial (not supplied). If
you use a distributor, you can also use the TV
aerial.
FM outdoor
aerial (not
supplied)
IEC standard socket
connector (not supplied)
2 Set the FM ANTENNA SELECTOR at the rear to
“EXT”.
GB
Setting Up50
Page 51

Important
When you use an
outdoor aerial, be sure
to connect the y
terminal to earth
against lightning. To
prevent a gas
explosion, do not
connect the ground
wire to a gas pipe.
To improve the MW/LW reception
Connect a 6- to 15-meter (20- to 50 feet) (not supplied)
insulated wire to the MW/LW ANTENNA terminal.
Keep the wire as horizontal as possible near the
window or outdoor. You do not need to disconnect
the supplied MW/LW loop aerial.
Insulated wire
(not supplied)
Earth
Setting Up
Setting Up 51
GB
Page 52

Connecting
optional
components
You can enjoy the sound from a TV or
VCR through the speakers of this player.
Be sure to turn off the power of each
component before making connections.
For details, refer to the instructions of the
component to be connected.
LINE IN
(rear)
Note
Connect the cords
firmly to avoid any
malfunction.
Connecting a TV or a VCR
RK-G129 (not
supplied), etc.
TV, VCR, etc.
to line out jack
RK-G136 (not
supplied), etc.
TV, VCR, etc.
to headphones jack
After finishing the connections, turn on the player,
and press LINE on the front panel to display
“LINE”.
Rear panel of this
player
to LINE
IN
GB
Setting Up52
Page 53

Tip
If there is no sound
input for more than 2
seconds during
recording, a track mark
is stamped
automatically.
Recording the sound from the connected
components
1 Insert a recordable MD.
2 Press LINE on the front panel to display “LINE”.
3 Press REC.
Recording does not start (recording standby
mode).
4 Press MD ^.
5 Play the optional component connected to the
LINE IN jack of the player.
Setting Up
If the volume of the component connected to the
LINE IN jack is too high
Press LINE LEVEL to display “Level: High” or reduce
the volume of the connected component.
LINE LEVEL
Setting Up 53
GB
Page 54

Adjusting the
audio emphasis
You can adjust the audio emphasis of the
bass sound or the bass/treble sound you
are listening to.
¿, ÷À MEGA BASS
BASS/TREBLE
Note
When the volume is
too high, the sound
adjustments may not
be effective.
Reinforcing the bass sound
Press MEGA BASS until “MEGABASS On” appears in
the display.
Display
Adjusting the bass/treble sound
1 Press BASS/TREBLE to select “BASS” or “TRE”
(treble).
2 Adjust the bass or treble sound using ¿ or ÷.À
Each time you press ¿ or ÷,
the cursor moves left or right.
As the cursor moves rightward,
the level will be turned up. As
the cursor moves leftward, the
level will be turned down.
GB
Setting Up54
Page 55

Additional Information
Precautions
On safety
• As the laser beam used in the CD and
MD player section is harmful to the
eyes, do not attempt to disassemble
the casing. Refer servicing to qualified
personnel only.
• Should any solid object or liquid fall
into the player, unplug the player, and
have it checked by qualified personnel
before operating it any further.
On power sources
• The player is not disconnected from
the AC power source (mains) as long
as it is connected to the wall outlet,
even if the player itself has been
turned off.
• When the batteries are not to be used,
remove them to avoid damage that
can be caused by battery leakage or
corrosion.
• The nameplate indicating operating
voltage, power consumption, etc. is
located at the rear.
• If the player is left in a car parked in
the sun, be sure to choose a location in
the car where the player will not be
subjected to the direct rays of the sun.
• Since a strong magnet is used for the
speakers, keep personal credit cards
using magnetic coding or springwound watches away from the player
to prevent possible damage from the
magnet.
On operation
• If the player is brought directly from a
cold to a warm location, or is placed in
a very damp room, moisture may
condense on the lenses inside the CD
and MD player section. Should this
occur, the player will not operate
properly. In this case, remove the CD
or MD and wait about an hour for the
moisture to evaporate.
If you have any questions or problems
concerning your player, please consult
your nearest Sony dealer.
On placement
• Do not leave the player in a location
near heat sources, or in a place subject
to direct sunlight, excessive dust or
mechanical shock.
• Do not place anything within 10 mm
of the side of the cabinet. The
ventilation holes must be
unobstructed for the player to operate
properly and prolong the life of its
components.
continued
Additional Information
55
GB
Page 56

Precautions (continued)
Notes on CDs
• Before playing, clean the CD with a
cleaning cloth. Wipe the CD from the
centre out.
• Do not use solvents such as benzine,
thinner, commercially available
cleaners or anti-static spray intended
for vinyl LPs.
• Do not expose the CD to direct
sunlight or heat sources such as hot
air ducts, nor leave it in a car parked
in direct sunlight as there can be a
considerable rise in temperature
inside the car.
• After playing, store the CD in its case.
If there is a scratch, dirt or fingerprints
on the CD, it may cause tracking error.
Cleaning the cabinet
Clean the cabinet, panel and controls
with a soft cloth slightly moistened with
a mild detergent solution. Do not use
any type of abrasive pad, scouring
powder, or solvent, such as alcohol or
benzene.
Notes on MDs
• Do not open the shutter to expose the
MD. Close the shutter immediately if
the shutter opens.
Shutter
Cartridge
• Wipe the disc cartridge with a dry
cloth to remove dirt.
Protecting a recorded MD
To record-protect an MD, slide open the
tab at the side of the MD (so the tab is
concealed).
In this position, the MD cannot be
recorded. To record on the MD, slide
close the tab.
Slide open the tab
GB
Additional Information56
Page 57

System limitations of the MD
The recording system in your MiniDisc
recorder is radically different from those
used in cassette and DAT decks and the
system has limitations described below.
Note, however, that these limitations are
due to the inherent nature of the MD
recording system itself and not to
mechanical causes.
”Disc Full” appears in the display even
before the MD has reached the
maximum recording time (60 or 74
minutes)
When 254 tracks have been recorded on
the MD, ”Disc Full” appears regardless
of the total recorded time. More than
254 tracks cannot be recorded on the
MD. To continue recording, erase
unnecessary tracks.
”Disc Full” appears in the display
even before the MD has reached the
maximum track number or recording
time.
Repeated recording and erasing may
cause fragmentation and scattering of
data. Although those scattered data can
be read, each fragment is counted as a
track. In this case, the number of tracks
may reach 254 and further recording is
not possible. To continue recording,
erase unnecessary tracks.
Some tracks cannot be combined
with others
Track combination may become
impossible when tracks are under 12
seconds long.
The total recorded time and the
remaining time on the MD may not
reach the maximum recording time
(60 or 74 minutes)
Recording is done in minimum units of
2 seconds each, no matter how short the
material. The contents recorded may
thus be shorter than the maximum
recording capacity. Disc space may also
be further reduced by scratches.
The sound may dropout while fastfowarding or rewinding the edited
tracks.
Tracks created through editing may
exhibit sound dropout during fastforwarding or rewinding because highspeed playback takes time to search for
the position on the disc when the tracks
are scattered on the disc.
continued
The remaining recording time does
not increase even after erasing
numerous short tracks
Tracks under 12 seconds long are not
counted, so erasing them may not
increase the recording time.
Additional Information
57
GB
Page 58

System limitations of the MD (continued)
Guide to the serial copy
management system
Digital audio equipment such as CDs,
MDs, DATs, etc., copy music easily with
high quality, for these products process
music as a digital signal. The Serial
Copy Management System allows you
to make only a single copy of a recorded
digital source through digital-to-digital
connections because music programmes
may be copyrighted.
This system is applied to this player.
You can make only a firstgeneration copy* through a
digital-to-digital connection.
That is :
1 You can make a copy of a digital
sound programme on the market such
as CDs, MDs, etc., but you cannot
make a second copy from the firstgeneration copy.
2 You can make a copy of a digital
signal from a digitally-recorded
analog sound programme on the
market such as an analog record,
music cassette tape, etc., or from
digital satellite broadcasts, but you
cannot make a second copy.
Note
No restrictions apply when a digital signal is
recorded as an analog signal (that is, when a
digital signal is recorded throgh analog-toanalog connection.)
* A first-generation copy is a digital
recording of a digital signal made on
digital audio equipment through a digitalto-digital connection.
During recording, “DIGITAL REC”
appears in the display on this player.
GB
Additional Information58
Page 59

Getting to know the MD
Structure
The 2.5-inch MiniDisc (MD) is compact
and easy to handle requiring less care as
it is encased in a plastic cartridge that
looks like a 3.5-inch diskette (see
illustrations below).
Parts making up a MiniDisc
Plastic cartridge
Disc
Shutter
Disc variation
MDs come in two types: pre-mastered
(pre-recorded) and recordable (blank).
Pre-mastered MDs cannot be recorded
on or over like cassette tapes. To record,
you must use a “recordable MD.”
Pre-mastered MDs
Pre-mastered MDs are recorded and
played like regular CDs. A laser beam
focus on the pits on the surface of the
MD and reflects the information back to
the lens in the recorder. The recorder
then decodes the signals and plays them
back as music.
Recordable MDs
Recordable MDs, which use magnetooptical (MO) technology, can be
recorded again and again. The laser
inside the recorder applies heat to the
MD, demagnetizing the magnetic layer
of the MD. The recorder then applies a
magnetic field to the layer. This
magnetic field corresponds exactly to
the audio signals generated by the
connected source. (The north and south
polarities equate to digital “1” and “0.”)
The demagnetised MD adopts the
polarity of the magnetic field, resulting
in a recorded MD.
continued
Additional Information
59
GB
Page 60

Getting to know the MD (continued)
Features
Long recording
The MD uses a new digital audio
compression technology called Adaptive
TRansform Acoustic Coding (ATRAC).
To store more sound in less space,
ATRAC extracts and encodes only those
frequency components actually audible
to the human ear.
Quick random access
Like CDs, MDs offer instantaneous
random access to the beginning of any
music track. Pre-mastered MDs are
recorded with location addresses
corresponding to each music track.
Shock-resistant memory
One major drawback of optical read
systems is that they skip or mute the
sound when subject to vibration. The
MD system resolves this problem by
using a buffer memory that stores audio
data.
GB
Additional Information60
Page 61

Troubleshooting
Symptom
There is no audio.
General
The picture of your TV becomes
unstable.
The CD does not play/“No Disc“
lights in the display even when a
CD is in place.
The sound drops out.
CD Player
An incompletely inserted MD
cannot be pulled out.
"Disc Error" lights in the display
and the player does not operate.
The MD does not play.
MD Player
Remedy
• Press OPERATE to turn on the player.
• Connect the mains lead securely.
• Adjust the volume.
• Unplug the headphones from the 2 jack
marked with • when listening through
speakers.
• Wait until “TOC Reading” disappears from the
display.
• Move the player away from the TV.
• Make sure that the CD tray is closed.
• Place the CD with the label surface up.
• Clean the CD.
• Take out the CD and leave the CD tray open for
about an hour to dry moisture condensation.
• Reduce the volume.
• Clean the CD, or replace it if the CD is badly
damaged.
• Place the player in a location free from
vibration.
• The MD player’s self-lock system has gripped
the MD. Insert the MD completely, then press
6 MD EJECT.
• Take the MD out and insert it again. If "Disc
Error" remains, replace the MD. Try erasing all
tracks on the MD (page 32).
• Take out the MD and leave the player in a warm
place for several hours until the moisture
evaporates.
• The MD is inserted in the wrong direction.
Slide the MD into the disc compartment with
the label side up and the arrow pointing
towards the opening until the player grips it.
• The MD may be blank (the music calendar does
not appear). Replace the disc with one that has
been recorded.
continued
Additional Information
61
GB
Page 62

Troubleshooting (continued)
Symptom
The MD does not record.
MD Player
The recorded sound drops out.
A stereo program cannot be
received in stereo.
The audio is weak or has poor
quality.
The timer does not operate.
Timer Radio
Remedy
• The MD is record-protected ("Protected"
appears). Close the record-protect slot.
• The track has been protected using another MD
recorder ("Trk Protect" appears). Release the
track-protect on the same MD recorder that
protected the track.
• The player is not connected properly to the
sound source. Make connections properly to
the sound source.
• A pre-mastered MD is inserted. Replace it with
a recordable MD.
• There is not enough space left on the MD.
Replace it with another recordable MD with
enough space, or erase unnecessary tracks.
• There has been a power failure or the mains
lead has been disconnected. Data recorded to
that point may be lost. Repeat the recording
procedure.
• The sound was recorded at high volume.
Record again at lower volume.
• Press MONO/ST until "STEREO" appears in the
display (page 11).
• The FM stereo broadcast may be noisy (page
11).
• Move the player away from the TV.
• If you are using the remote while listening to an
MW/LW radio, noise may be heard. This is
unavoidable.
• Move the MW/LW loop aerial away from the
player.
• Make sure the time on the clock is correct.
• Check to see if the AC power had been cut off.
• Make sure "TIMER REC" or "TIMER PLAY"
appears in the display.
• Check and change the preset start/stop time if
both times are set to the same time.
GB
Additional Information62
Page 63

Symptom
The remote does not function.
Remote
Operation may become unstable depending on the power supply or other causes because this
player employs a microcomputer to link each operation. If other troubles not described above
occur, disconnect the AC power cord from the wall outlet, then connect it again after
about 20 seconds. If the problem still occurs, press the RESET button at the rear of the
player with a pointed object (in this case, clock set, timer or preset radio stations are reset to
the initial settings. Set these items again if you need). If the problem persists, please consult
your nearest Sony dealer.
Remedy
• Replace all the batteries in the remote with new
ones if they are weak (page 50).
• Make sure that you are pointing the remote at
the remote sensor on the player.
• Remove any obstacles in the path of the remote
and the player.
• Make sure the remote sensor is not exposed to
strong light such as direct sunlight or
fluorescent lamp light.
• Move closer to the player when using the
remote.
RESET
Additional Information
63
GB
Page 64

Error messages
If the player cannot perform an MD or a CD operation, one of the following error
messages may flash in the display window.
This message will flash If
Blank Disc you try to play an MD with no recording on it.
Cannot Edit you try to use the combine function on the first track of the MD.
Disc Error the player cannot read the MD (it is scratched or dirty).
Disc Full there is no more space for recording or editing on the MD. (See
“System limitations of the MD” on page 57.)
Name Full the labeling capacity of the MD has reached its limit. Each label
can be made up of up to 100 characters. You can input up to
about, 1,700 characters into each MD.
No Disc you try to play or record with no CD or MD in the player.
No MD you try to play or record with no MD in the player (in case of
synchronized recording, etc.)
PB Disc you try to record or edit on a pre-mastered MD (PB means
playback).
Protected you try to record or edit on an MD with the tab in the record-
protect position.
Sorry you try to edit, ignoring the system limitations of the MD.
Trk Protect you try to record or edit a track that has been already protected
using other MD recorders
GB
Additional Information64
Page 65

Specifications
CD player section
System
Compact disc digital audio system
Laser diode properties
Material: GaAlAs
Wave length: 785 nm
Emission duration: Continuous
Laser output: Less than 44.6µW
(This output is the value measured at a distance of
about 200 mm from the objetive lens surface on the
optical pick-up block with 7 mm aperture.)
Spindle speed
200 r/min (rpm) to 500 r/min (rpm) (CLV)
Number of programme positions
2
Frequency response
20 - 20,000 Hz +1/–2 dB
Wow and flutter
Below measurable limit
Radio section
Frequency range
FM: 87.6 - 107 MHz
MW: 531 - 1,602 kHz
LW: 153 - 279 kHz
IF FM: 10.7MHz
MW/LW: 450kHz
Aerials
FM: Telescopic aerial
External aerial terminal
MW/LW: External aerial terminals
MD player section
System
Minidisc digital audio system
Disc
MiniDisc
Laser diode properties
Material: GaAlAs
Wave length: 785 nm
Emission duration: Continuous
Laser output: Less than 44.6µW
(This output is the value measured at a distance of
about 200 mm from the objetive lens surface on the
optical pick-up block with 7 mm aperture.)
Recording/playback time
Maximum 74 minutes (with MDW-74)
Revolutions
400 rpm to 900 rpm (CLV)
Error correction
Advanced Cross Interleave Reed Solomon Code
(ACIRC)
Sampling frequency
44.1 kHz
Coding
Adaptive TRansform Acoustic Coding (ATRAC)
Modulation system
EFM (Eight-to-Fourteen Modulation)
Number of programme positions
2 stereo programme positions
Frequency response
20 - 20,000 Hz +1/–2 dB
Signal-to-noise ratio
Over 80 dB (during playback)
Wow and flutter
Below measurable limit
General
Speaker
Full-range : 8 cm (3 in.) dia., 4 ohms cone type (2)
Inputs
LINE IN (stereo minijack): Sensitivity 436 mV/
691 mV
Outputs
Headphones jack (stereo minijack) (2):
For 32 ohms impedance headphones
Maximum power output
7 W + 7 W
Power requirements
For personal minidisc system:
230 V AC, 50 Hz
For remote commander:
3 V DC, 2 R6 (size AA) batteries
Power consumption
30 W
Dimensions (incl.projecting parts)
approx. 528 × 275 × 139 mm (w/h/d)
7
(20
⁄8 × 10 7⁄8 × 5 1⁄2 inches )
Mass
approx. 6.4 kg (14 lb. 2 oz)
Supplied accessories
Remote commander (1)
MW/LW loop aerial (1)
Speaker nets (2)
Optional accessories
Sony MDR headphone series
U.S. and foreign patents licensed from Dolby
Laboratories Licensing Corporation.
Design and specifications are subject to change without
notice.
Additional Information
65
GB
Page 66

Index
A
Adjusting
bass 54
treble 54
volume 5, 9, 11
ATRAC 59
AUTO PRESET 20
B
Batteries
for the remote
commander 50
C
CD player 12
Checking playing time
a CD 12
an MD 13
Cleaning 56
Clock 42
Combine function 36
Connection
aerial 50, 51
mains lead 49
optional components 52
Creating your own
program 17
D
Display 12-14
Divide function 34
E, F
Editing 29
Erase function 31
Error message 64
G
Getting to know the MD 59
H
Hookups. See Connection
I, J, K
Improving broadcast
reception 11
L
Listening to the radio 10
Locating a specific point on
a track 15
Locating a specific track
15
M
MD player 12
MEGA BASS 54
Move function 38
N, O
Name function 39
P, Q
Playing
a CD 4
an MD 8
preset radio stations 22
tracks repeatedly 16
Power sources 49
Presetting radio stations
20
Program Play 17
R
Radio stations
playing 10
presetting 20
Recording
a CD 6, 27
on an MD 6, 27, 28
Repeat Play 16
S
Serial copy management
system 58
Setting up 49
Shuffle play 19
System limitations 57
T
Timer
playback 44
recording 46
Troubleshooting 61
U, V, W, X, Y, Z
Using
the display 12-14
GB
Additional Information66
Page 67

Additional Information
67
GB
Page 68

Advertencia
Para evitar el riesgo de incendios o
electrocución, no exponga el
reproductor a la lluvia ni a la
humedad.
Para evitar descargas eléctricas, no
abra el aparato. Solicite asistencia
técnica sólo a personal especializado.
Información
Este reproductor de discos compactos y
minidiscos está clasificado como producto
láser de Clase 1.
La etiqueta CLASS 1 LASER PRODUCT está
situada en la parte posterior.
Advertencia
No instale el aparato en un espacio cerrado,
como una estantería para libros o un armario
empotrado.
PRECAUCIÓN
Cuando utilice este reproductor por
primera vez, o si no lo ha utilizado
durante mucho tiempo, déjelo
conectado a la toma mural durante
una hora aproximadamente para que
se cargue la pila de protección
incorporada para el reloj,
temporizador, emisoras de radio
memorizadas, etc. Es posible utilizar
el reproductor durante la carga.
Cuando desconecte el cable de
alimentación de CA después de la
carga, asegúrese de desactivar la
alimentación del reproductor primero.
Una vez cargada por completo, la
duración de la pila de protección será
de unos 30 minutos sin conectar la
unidad a la fuente de alimentación de
CA.
Si los datos almacenados se borran,
vuelva a introducirlos cuando utilice
el reproductor de nuevo.
ES
Introducción2
Page 69

Índice
Operaciones básicas
4 Reproducción de CD
6 Grabación de un CD completo (Grabación sincronizada)
8 Reproducción de MD
10 Recepción de la radio
Operaciones básicas
Reproductor de
CD•Reproductor de MD
12 Uso del visor
15 Localización de temas específicos
16 Reproducción repetida de temas
(Reproducción repetida)
17 Creación de su propio programa
(Reproducción de programa)
19 Reproducción de temas en orden
aleatorio
(Reproducción aleatoria)
Radio
20 Memorización de emisoras de
radio
22 Sintonización de emisoras de radio
memorizadas
Grabación
23 Grabación de los temas que
escuche
(Grabación sincronizada de un
solo tema – Función REC IT)
24 Grabación de temas programados
(Grabación sincronizada de los
temas programados)
26 Grabación de la radio o de un CD
28 Grabación en un MD grabado
Edición de temas grabados
en el MD
29 Antes de editar
31 Borrado de grabaciones
(Función de borrado)
34 División de temas grabados
(Función de división)
36 Combinación de temas grabados
(Función de combinación)
38 Desplazamiento de temas
grabados
(Función de desplazamiento)
39 Etiquetado de grabaciones
(Función de nombre)
Temporizador
42 Ajuste del reloj
44 Activación automática de la
unidad
46 Grabación de programas de radio
con temporizador
48 Desactivación automática de la
unidad
Instalación
49 Preparación del sistema
52 Conexión de componentes
opcionales
54 Ajuste del énfasis de sonido
Información
complementaria
55 Precauciones
57 Limitaciones del sistema de MD
59 Descripción de los minidiscos
61 Solución de problemas
64 Mensajes de error
65 Especificaciones
Contraportada
Índice alfabético
ES
Introducción
ES
3
Page 70

Operaciones básicas
Reproducción de CD
Conecte el cable de alimentación (consulte la página 49).
1 Pulse 6 CD OPEN/CLOSE
(activación directa) y coloque el
CD en la bandeja de CD hasta que
quede encajado en su sitio.
12
2 Pulse CD ^.
La bandeja de CD se cierra y el
reproductor reproduce todos los
temas una vez.
ES
Operaciones básicas4
Con el lado de la etiqueta hacia arriba
Visor
Puntero de
posición
Número
de tema
Tiempo de
reproducción
Page 71

Utilice estos botones para realizar operaciones
adicionales
Consejos
• La próxima vez que
desee escuchar un CD,
bastará con pulsar CD
^. El reproductor se
encenderá
automáticamente e
iniciará la reproducción
del CD.
• ¿Qué es el puntero de
posición del visor?
Muestra el punto del
tema del CD que el
reproductor está
reproduciendo.
OPERATE
Para
ajustar el volumen
detener la reproducción
introducir una pausa
durante la reproducción
pasar al tema siguiente
retroceder al tema anterior
extraer el CD
encender/apagar el
reproductor
CD ^
CD p
VOLUME –, +
Dial de avance
6 CD OPEN/
CLOSE
Realice lo siguiente
Pulse VOLUME +, –
(VOL +, – en el mando a
distancia).
Pulse CD p.
Pulse CD ^ (CD P en el
mando a distancia).
Vuelva a pulsar el botón para
reanudar la reproducción
después de la pausa.
Gire el dial de avance en el
sentido de las agujas del reloj.
(En el mando a distancia, pulse
+.)
Gire el dial de avance en
sentido contrario a las agujas
del reloj. (En el mando a
distancia, pulse =.)
Pulse 6 CD OPEN/CLOSE.
Pulse OPERATE.
Operaciones básicas
Operaciones básicas
ES
5
Page 72

Grabación de un CD completo
(Grabación sincronizada)
341 2
Conecte el cable de alimentación (consulte la página 49).
1 Inserte un MD grabable
(activación directa).
Con el lado de
la etiqueta
hacia arriba
Inserte en la dirección
de la flecha
2 Pulse 6 CD OPEN/CLOSE y
coloque el CD en la bandeja de
CD hasta que quede encajado en
su sitio.
Vuelva a pulsar 6 CD OPEN/
CLOSE para cerrar la bandeja de
CD.
3 Pulse CD p.
ES
Operaciones básicas6
Visor
Una vez mostrado “TOC
Reading”, el nombre del
disco aparecerá si se ha
etiquetado.
Con el lado de la
etiqueta hacia arriba
Page 73

4 Pulse DISC ALL.
El reproductor inicia la
grabación automáticamente.
Si el MD contiene grabaciones
anteriores, la grabación se
realizará a partir de la última
posición grabada.
Puntero de posición (muestra la
posición de reproducción en el
CD y la de grabación en el MD)
Número
de tema
del MD
Tiempo de
grabación
restante del
MD
Operaciones básicas
Notas
• Después de
detener la
grabación, no
desconecte el cable de
alimentación de CA ni
mueva el reproductor
mientras “TOC EDIT”
parpadee en el visor. Si
lo hace, es posible que la
grabación no se realice
correctamente.
• Al grabar un CD
completo, no es posible
realizar pausas durante
la grabación.
Consejos
• El ajuste del volumen o
del énfasis de sonido
(página 54) no afecta al
nivel de grabación.
Mantenga el volumen a
un nivel moderado para
evitar que se produzcan
saltos de sonido.
• Para grabar sobre
grabaciones anteriores,
consulte la página 28.
• Una vez ajustado el
reloj, se registrarán
automáticamente la
fecha y hora de
grabación (página 42).
Utilice estos botones para realizar operaciones
adicionales
OPERATE
Para Pulse
detener la grabación MD p o CD p
encender/apagar el reproductor OPERATE
Si “CD>MD OK?” se alterna con la indicación de hora
Significa que no hay espacio suficiente en el MD para grabar
el CD completo.
Si desea grabar el máximo posible y cancelar la grabación de
algunos temas, pulse ENTER•YES. Para detener la
grabación, pulse CANCEL•NO.
Si aparecen otros mensajes, consulte la página 64.
MD p
ENTER•YES
CANCEL•NO
Operaciones básicas
ES
7
Page 74

Reproducción de MD
Connecte el cable de alimentación (consulte la página 49).
12
1 Inserte el MD (activación directa).
Con el lado de
la etiqueta
hacia arriba
Inserte en la dirección
de la flecha
2 Pulse MD ^.
El reproductor reproduce todos
los temas una vez.
ES
Operaciones básicas8
Visor
Una vez aparezca “TOC
Reading”, aparecerá el
nombre del disco si se ha
etiquetado.
El nombre del tema
aparecerá si se ha
etiquetado.
Número del tema
Tiempo de
reproducción
Page 75

Utilice estos botones para realizar operaciones
adicionales
Consejo
La próxima vez que
desee escuchar un MD,
bastará con pulsar MD
^. El reproductor se
encenderá
automáticamente e
iniciará la reproducción
del MD.
OPERATE
Para
ajustar el volumen
detener la reproducción
introducir pausas durante
la reproducción
pasar al tema siguiente
retroceder al tema anterior
extraer el MD
encender/apagar el
reproductor
comprobar la posición de
reproducción en el visor
mediante el puntero de
posición
MD ^
MD p
VOLUME –, +
DISPLAY
Dial de avance
6 MD EJECT
Realice lo siguiente
Pulse VOLUME +, – (VOL +, –
en el mando a distancia).
Pulse MD p.
Pulse MD ^ (MD P en el
mando a distancia).
Pulse el botón de nuevo para
reanudar la reproducción
después de la pausa.
Gire el dial de avance en el
sentido de las agujas del reloj.
(En el mando a distancia, pulse
+.)
Gire el dial de avance en
sentido contrario a las agujas
del reloj. (En el mando a
distancia, pulse =.)
Pulse 6 MD EJECT.
Pulse OPERATE.
Pulse DISPLAY.
Operaciones básicas
Operaciones básicas
ES
9
Page 76

Recepción de la radio
12
Conecte el cable de alimentación (consulte la página 49).
1 Pulse BAND hasta que el visor
muestre la banda que desee
(activación directa).
2 Mantenga pulsado TUNE + o
TUNE – hasta que los dígitos de
frecuencia comiencen a cambiar
en el visor.
El reproductor explora
automáticamente las frecuencias
de radio y se detiene al encontrar
una emisora con nitidez.
Si no puede sintonizar una
emisora, pulse TUNE + o TUNE –
varias veces hasta sintonizar la
emisora deseada.
ES
Operaciones básicas10
Visor
Aparece “FM”, “MW”
o “LW”
Indica emisiones de
FM en estéreo
Page 77

Utilice estos botones para realizar operaciones
adicionales
Consejos
• Si la emisión en FM se
oye con ruido, pulse
MONO/ST (MODE en
el mando a distancia)
hasta que “MONO”
aparezca en el visor. La
emisión se oirá en
monofónico.
• La próxima vez que
desee escuchar la radio,
bastará con pulsar el
botón BAND. El
reproductor se
encenderá
automáticamente y
reproducirá la emisora
previamente
sintonizada.
MONO/STOPERATE
VOLUME –, +
Para Pulse
ajustar el volumen VOLUME +,–
(VOL +, – en el mando a
distancia)
encender/apagar la radio OPERATE
Para mejorar la recepción de la emisión
FM:
Ajuste el selector FM ANTENNA SELECTOR de la
parte posterior del reproductor en “
” (antena
telescópica).
Reoriente la antena para FM.
Operaciones básicas
MW/LW:
Mantenga la antena cerrada de MW/LW lo más
alejada posible del reproductor y reoriéntela.
Si la emisión aún se recibe con ruido, conecte la
antena externa (página 50).
Operaciones básicas
11
ES
Page 78

Reproductor de CD•Reproductor de MD
Uso del visor
Es posible comprobar información sobre
el CD y el MD mediante el visor.
Durante la parada (CD)
Aparecen el número de temas y el tiempo de
reproducción totales.
DISPLAY
Indicación de CD
Número
total de
temas
Calendario musical
Puntero de posición
Tiempo total de
reproducción
Si el CD contiene más de 20 temas, el visor mostrará
“OVER 20”.
Durante la reproducción (CD)
Aparecen el número del tema actual y el tiempo de
reproducción. Los números de los temas del
calendario musical desaparecen una vez reproducidos.
ES
Reproductor de CD•Reproductor de MD12
Page 79

Nota
Durante la
reproducción repetida
(página 16), de
programa (página 17) y
aleatoria (página 19), el
número de temas
restantes y tiempo
restante del CD no
aparecerán.
Para comprobar el tiempo restante
Pulse DISPLAY.
Para mostrar Pulse DISPLAY
el número del tema actual y una vez
el tiempo restante del mismo
el tiempo y número de temas dos veces
restantes del CD
el tiempo de reproducción y tres veces
número del tema actual
The CD Player•The MD Player
Consejo
El nombre del disco
aparece sólo con
minidiscos etiquetados
electrónicamente.
Durante la parada (MD)
Aparecen el número de temas y tiempo de
reproducción totales.
Nombre del disco
Indicación
de MD
Número
total de
temas
Calendario musical
Si el MD contiene más de 20 temas, “OVER 20”
aparecerá en el visor.
Para comprobar el tiempo de grabación restante
del MD
Pulse DISPLAY.
El puntero de posición también aparece en el visor.
Tiempo total de
reproducción
continúa
Reproductor de CD•Reproductor de MD 13
ES
Page 80

Uso del visor (continuación)
Nota
Durante la
reproducción repetida
(página 16), de
programa (página 17) y
aleatoria (página 19), el
número de temas
restantes y tiempo
restante del MD no
aparecerán.
Durante la reproducción (MD)
Aparecen el número del tema actual, el tiempo de
reproducción y el nombre del tema. Los números de
tema del calendario musical desaparecen una vez
reproducidos.
Para comprobar el tiempo restante, fecha y hora de
grabación, etc.
Pulse DISPLAY.
Para mostrar Pulse DISPLAY
el número del tema actual, una vez
tiempo restante del mismo y
puntero de posición
el tiempo y número de temas dos veces
restantes del MD y nombre
del disco
fecha y hora de grabación* tres veces
el número del tema actual, cuatro veces
tiempo de reproducción y
nombre del tema
* Una vez ajustado el reloj, la fecha y hora de grabación
quedarán registradas automáticamente (página 42).
ES
Reproductor de CD•Reproductor de MD14
Page 81

Localización de
temas específicos
Es posible localizar rápidamente
cualquier tema de un CD o de un MD
mediante los botones numéricos.
También es posible localizar un punto
específico de un tema mientras se
reproduce un CD o un MD.
Nota
No es posible localizar
un tema específico si
“REPEAT PGM”,
“REPEAT SHUFFLE”,
“PGM” o “SHUFFLE”
está iluminado en el
visor. Desactive la
indicación pulsando p.
Consejos
• Para localizar un tema
de número superior a
10, pulse >10 primero
y, a continuación, los
botones numéricos
correspondientes.
Ejemplo:
Para reproducir el tema
número 23, pulse >10
primero y, a
continuación, 2 y 3.
Para reproducir el tema
número 10, puede
utilizar el botón 0/10,
así como >10, 1 y 0.
• Para seleccionar un
tema de un MD de
número 100 o superior,
pulse >10 dos veces y, a
continuación, los
botones numéricos
correspondientes.
Para localizar
un tema específico
directamente
un punto mientras escucha
el sonido
un punto mientras observa
el visor
Botones
numéricos
=, +
Pulse
el botón numérico del tema.
+ (hacia delante) o =
(hacia atrás) durante la
reproducción y manténgalo
pulsado hasta que encuentre el
punto.
(En el reproductor, utilice ) o
0.)
+ (hacia delante) o =
(hacia atrás) en el modo de
pausa y manténgalo pulsado
hasta que encuentre el punto.
(En el reproductor, utilice ) o
0.)
The CD Player•The MD Player
Reproductor de CD•Reproductor de MD 15
ES
Page 82

Reproducción
repetida de
temas
(Reproducción repetida)
SHUF/PGM REPEAT
Es posible reproducir temas de forma
repetida en los modos de
reproducción normal, aleatoria o de
programa (página 17).
En el mando a distancia
• Durante la
reproducción, pulse
MODE varias veces
hasta que “REPEAT 1”
o “REPEAT” aparezca
en el visor. Durante la
reproducción, no es
posible seleccionar
“REPEAT SHUFFLE” o
“REPEAT PGM”.
• También es posible
seleccionar la
reproducción repetida
durante la parada.
Pulse MODE varias
veces hasta que
“REPEAT 1”,
“REPEAT”, “REPEAT
SHUFFLE” o “REPEAT
PGM” aparezca en el
visor. Después,
reproduzca el CD o el
MD.
Para repetir
un solo tema
todos los temas
temas en orden
aleatorio
temas programados
MD ^
CD ^
Realice lo siguiente
1 Reproduzca el tema que desee.
2 Pulse REPEAT varias veces hasta
que “REPEAT 1” aparezca en el
visor.
1 Inicie la reproducción normal.
2 Pulse REPEAT varias veces hasta
que “REPEAT” aparezca en el
visor.
1 Inicie la reproducción aleatoria
(página 19).
2 Pulse REPEAT varias veces hasta
que “REPEAT SHUFFLE”
aparezca en el visor.
1 Inicie la reproducción de
programa (página 17).
2 Pulse REPEAT varias veces hasta
que “REPEAT PGM” aparezca en
el visor.
Para cancelar la reproducción repetida
Primero detenga la reproducción. Después, pulse
REPEAT hasta que “REPEAT” desaparezca del visor.
ES
Reproductor de CD•Reproductor de MD16
Page 83

Creación de su
propio programa
(Reproducción de programa)
CANCEL•NO SHUF/PGM
Dial de
avance
Es posible establecer el orden de
reproducción de un máximo de 20
temas de un CD o de un MD.
En el mando a distancia
Pulse MODE hasta que
“PGM” aparezca en el
visor, y después pulse
el botón numérico para
seleccionar el tema.
Consejo
Si comete un error,
pulse CANCEL•NO y
vuelva a introducir el
número de tema
girando el dial de
avance, y pulse
ENTER•YES.
Antes de comenzar, compruebe que el reproductor de
CD o de MD se encuentre en el modo de parada.
1 Pulse SHUF/PGM hasta que “PGM” aparezca en
2 Gire el dial de avance para seleccionar el tema que
The CD Player•The MD Player
ENTER•YES
MD ^
CD ^
el visor.
desee programar, y pulse ENTER•YES.
Repita este paso.
Los temas programados aparecen en el calendario
musical.
(En el caso de CD)
Tiempo total programado
Indicación
de CD
(En el caso de MD)
Indicación
de MD
Reproductor de CD•Reproductor de MD 17
Orden de
reproducción
Tiempo total programado
Orden de
reproducción
Número de tema
Número de tema
continúa
ES
Page 84

Creación de su propio programa (Reproducción de programa)
(continuación)
Consejos
• Al finalizar la
reproducción de
programa, éste se
almacena. Es posible
volver a reproducir el
mismo programa
pulsando ^.
• Si abre la bandeja de
CD, el programa se
borrará.
• Si extrae el MD, el
programa se borrará.
• Durante la
reproducción, no es
posible mostrar el
tiempo total
programado.
3 Pulse CD ^ ( o MD ^) para iniciar la
reproducción de programa.
Para cancelar la reproducción de programa
Primero detenga la reproducción. Después, pulse
SHUF/PGM hasta que “PGM” desaparezca del visor.
Para comprobar el orden de los temas antes de la
reproducción
Antes de iniciar la reproducción de programa, pulse
ENTER•YES.
“PGM Check” aparece en el visor. Cada vez que pulse
ENTER•YES, aparecerá el número de tema en el
orden programado.
Para cambiar el programa actual
Cámbielo antes de iniciar la reproducción de
programa.
Para
borrar el último tema
del programa
cambiar todo el
programa por
completo
Realice lo siguiente
1 Pulse CANCEL•NO. Se borrará
el último tema programado.
2 Vuelva a introducir los números
de tema girando el dial de avance
y pulsando ENTER•YES.
1 Pulse p para borrar el programa
completo.
2 Cree un programa nuevo
siguiendo el procedimiento de
programación.
ES
Reproductor de CD•Reproductor de MD18
Page 85

Reproducción
de temas en
orden aleatorio
(Reproducción aleatoria)
Es posible reproducir temas en
orden aleatorio.
SHUF/PGMMD ^CD ^
The CD Player•The MD Player
Consejo
Durante la
reproducción aleatoria,
no es posible
seleccionar el tema
anterior girando el dial
de avance (o pulsando
= en el mando a
distancia).
En el mando a distancia
Pulse MODE hasta que
“SHUFFLE” aparezca
en el visor.
Antes de comenzar, compruebe que el reproductor de
CD o de MD se encuentre en el modo de parada.
1 Pulse SHUF/PGM hasta que “SHUFFLE” aparezca
en el visor.
2 Pulse CD ^ ( o MD ^) para iniciar la
reproducción aleatoria.
Para cancelar la reproducción aleatoria
Primero detenga la reproducción. Después, pulse
SHUF/PGM hasta que “SHUFFLE” desaparezca del
visor.
Reproductor de CD•Reproductor de MD 19
ES
Page 86

Radio
Memorización de
emisoras de radio
Es posible almacenar un máximo de 36
emisoras de radio en la memoria del
reproductor (12 para cada banda) en
cualquier orden.
1 Pulse BAND hasta que el visor muestre la banda
que desee.
2 Mantenga pulsado AUTO PRESET hasta que
“AUTO PRESET” parpadee en el visor.
Las emisoras se almacenan en la memoria a partir
de las frecuencias inferiores (a partir del número
de memorización 1, en orden numérico), siempre
que la emisora tenga una señal suficientemente
intensa.
Cuando finalice el proceso de memorización, la
emisora almacenada en el número de
memorización 1 se sintonizará automáticamente.
AUTO PRESET
ENTER•
YES
BAND
En el mando a distancia
1 Pulse BAND hasta
que el visor muestre
la banda que desee.
2 Pulse TUNE + o –
hasta sintonizar la
emisora que desee.
3 Mantenga pulsado
durante 2 segundos
el botón numérico en
el que desee
almacenar la nueva
emisora.
Para seleccionar el
número de
memorización 11 o
12, pulse primero
>10 y, a
continuación, 1 o 2.
ES
Radio20
Si no es posible memorizar alguna emisora
automáticamente
Será necesario memorizar manualmente las emisoras
de señal débil. Igualmente, si desea sustituir una
emisora memorizada con otra nueva, realice lo
siguiente:
1 Pulse BAND hasta que la banda que desee
aparezca en el visor.
2 Pulse TUNE + o – varias veces hasta sintonizar la
emisora que desee y, a continuación, mantenga
pulsado ENTER•YES durante 2 segundos.
3 Seleccione el número de memorización en el que
desee almacenar la nueva emisora; para ello, gire
el dial de avance.
4 Pulse ENTER•YES.
La nueva emisora sustituye a la anterior.
Page 87

Para asignar nombre a la emisora
1 De acuerdo con el procedimiento de la página 22,
sintonice la emisora a la que desee asignar nombre.
2 Pulse EDIT durante 2 segundos.
3 Introduzca el nombre de la emisora (máximo de 9
caracteres).
Para más información, consulte los pasos 4 a 8 de
las páginas 39 y 40.
Para Realice lo siguiente
desplazar el cursor Pulse ¿ o ÷.
seleccionar los caracteres Gire el dial de avance.
borrar caracteres Pulse DELETE.
insertar caracteres Utilice INSERT.
4 Pulse ENTER•YES.
Radio
Radio 21
ES
Page 88

Sintonización de
emisoras de radio
memorizadas
Una vez memorizadas las emisoras,
emplee los botones numéricos del
mando a distancia o el dial de avance del
reproductor para sintonizar sus emisoras
preferidas.
Dial de avanceBAND
En el mando a distancia
Para mostrar el número
de memorización
deseado en el paso 2,
utilice los botones
numéricos.
Para seleccionar el
número de
memorización 10:
Pulse 0/10.
Para seleccionar el
número de
memorización 11 o 12:
Pulse >10 primero y, a
continuación, 1 o 2.
1 Pulse BAND hasta que el visor muestre la banda
que desee.
2 Gire el dial de avance para mostrar el número de
memorización de la emisora deseada.
ES
Radio22
Page 89

Edición de temas grabados en el MD
Antes de editar
En el MD, las marcas de temas se
insertan entre los temas. Es posible
encontrar el principio de éstos
rápidamente mediante dichas marcas.
Puede cambiar las posiciones de las
marcas de tema. Por ejemplo, puede
dividir un determinado tema en varios
mediante la adición de marcas.
También es posible combinar varios
temas para obtener otro nuevo más
extenso mediante la eliminación de
varias marcas de temas.
La posición de las marcas de tema
que se añaden es diferente en
función del tipo de grabación o de
las condiciones de ésta
Tipo de
grabación
Grabación de un
CD completo
(página 6)
Grabación de un
CD mediante el
botón REC
(página 27)
Grabación de la
radio o de otro
equipo conectado
al reproductor
(páginas 26 y 52)
Posición de las marcas
de tema que se
añaden
Las mismas posiciones
en el CD fuente
•Las mismas
posiciones en el CD
fuente
•La posición en la que
introduzca pausas
durante la grabación
•La posición donde
pulse REC
•Cuando no se
introduce sonido o un
sonido suave
continúa durante más
de dos segundos
mientras graba
•Las posiciones en las
que introduzca
pausas durante la
grabación
•Las posiciones donde
pulse REC
Es posible añadir o borrar marcas de
tema después de la grabación. Al
grabar, por ejemplo, de la radio o de
otro equipo conectado al reproductor,
es posible que se añadan marcas de
tema en posiciones que no desee. Si
esto ocurre, cambie las posiciones de
las marcas a las que desee.
Cambie las marcas de tema
correctamente
• Para borrar una marca de tema n
“Combinación de temas grabados
(Función de combinación)” (página
36): Es posible combinar dos temas
en uno solo borrando la marca
existente entre los dos temas.
• Para añadir una marca de tema n
“División de temas grabados
(Función de división)” (página 34):
Es posible dividir un tema en dos
temas añadiendo una marca de
tema.
continúa
Edición de temas grabados en el MD 29
Edición de temas grabados en el MD
ES
Page 90

Antes de editar (continuación)
También es posible utilizar las
siguientes funciones
• Borrado de un solo tema n
“Borrado de grabaciones (Función
de borrado)” (página 31)
• Borrado de todos los temas de un
MD n “Borrado de grabaciones
(Función de borrado)” (página 32)
• Cambio del orden de los temas n
“Desplazamiento de temas grabados
(Función de desplazamiento)”
(página 38)
• Localización de un punto del tema
rápidamente n “División de temas
grabados (Función de división)”
(página 34)
• Combinación de varias partes
grabadas independientemente en un
solo tema n “Borrado de
grabaciones (Función de borrado)”
(página 31) y “Combinación de
temas grabados (Función de
combinación)” (página 36)
Nota
Después de detener la
grabación, no desconecte el
ni mueva el reproductor mientras
“TOC EDIT” parpadea en el visor. Si lo
hace, es posible que la grabación no se
realice correctamente.
ES
Edición de temas grabados en el MD30
cable de alimentación de CA
Page 91

Borrado de
grabaciones
(Función de borrado)
Es posible borrar rápidamente los temas
grabados o partes innecesarias del tema. Al
contrario de lo que ocurre con las grabadoras
de cassettes, las partes en blanco no se
conservan después del borrado.
A continuación, se ofrecen tres opciones para
borrar grabaciones:
• Borrado de un solo tema
• Borrado de todos los temas de un MD
• Borrado de una parte de un tema
EDIT ENTER•YES
Edición de temas grabados en el MD
Notas
• Si “Protected” aparece
en el visor, significa
que la lengüeta del MD
se encuentra en la
posición de protección
contra grabación
(página 56).
• Después de
detener la
grabación,
no desconecte el
cable de alimentación
de CA ni mueva el
reproductor mientras
“TOC EDIT” parpadea
en el visor. Si lo hace,
es posible que la
grabación no se realice
correctamente.
Borrado de un solo tema
Es posible borrar rápidamente un tema completo. Al
borrarlo, el número total de temas del MD disminuye
en uno y todos los temas a continuación del borrado se
renumeran.
1 Reproduzca el tema que desee borrar.
2 Pulse EDIT varias veces hasta que “Track Erase”
aparezca en el visor.
3 Pulse ENTER•YES.
“Erase OK?” aparece en el visor, y se inicia la
reproducción repetida de un solo tema. Una vez
borrado el tema, no es posible recuperarlo.
Asegúrese de comprobar el contenido del tema que
vaya a borrar.
Si desea cancelar la función de borrado en este
punto:
Pulse CANCEL•NO o MD p.
4 Pulse ENTER•YES.
“Complete” aparece en el visor durante unos
segundos, y el tema actual se borrará.
continúa
Edición de temas grabados en el MD 31
ES
Page 92

Borrado de grabaciones (Función de borrado) (continuación)
Nota
Después de
detener la
grabación,
no desconecte el cable
de alimentación de CA
ni mueva el
reproductor mientras
“TOC EDIT” parpadea
en el visor. Si lo hace,
es posible que la
grabación no se realice
correctamente.
Borrado de todos los temas de un MD
Es posible borrar simultáneamente el nombre del
disco, todos los temas grabados y sus nombres. Una
vez borrados todos los temas del MD, puede utilizarlo
como un MD nuevo.
1 Con el reproductor parado, pulse EDIT varias
veces hasta que “All Erase” aparezca en el visor.
2 Pulse ENTER•YES.
“Erase OK?” aparece en el visor. Una vez borrado
el tema, no es posible recuperarlo. Asegúrese de
comprobar el contenido del tema que vaya a
borrar.
Si desea cancelar la función de borrado en este
punto:
Pulse CANCEL•NO o MD p.
3 Pulse ENTER•YES.
Cuando “TOC EDIT” desaparezca del visor,
aparecerá “Blank Disc”, y todo el contenido del
MD se borrará.
ES
32
Edición de temas grabados en el MD
Page 93

Nota
Después de
detener la
grabación,
no desconecte el
cable de alimentación
de CA ni mueva el
reproductor mientras
“TOC EDIT” parpadea
en el visor. Si lo hace,
es posible que la
grabación no se realice
correctamente.
Borrado de una parte de un tema
Mediante el empleo de las funciones de división
(página 34), borrado (página 31) y combinación
(página 36), es posible borrar partes específicas de un
tema.
Ejemplo: Borrado de una parte del tema A
Número de
teman
Parte que
desea borrar
1
A
2
3
BC
1 Divida A en tres partes (página 34).
Edición de temas grabados en el MD
1
A#1
2
A#2
3
A#3
2 Borre A#2 (página 31).
A#1
A#3 B C
3 Combine A#1 y A#3 (página 36).
1
A(#1+#3) B C
2
54
B
4321
3
C
Edición de temas grabados en el MD 33
ES
Page 94

División de temas
grabados
(Función de división)
Al grabar de la radio, etc., es posible que
las marcas de tema no se añadan
correctamente, y que varios temas se
incluyan en un solo tema. Es posible
dividir dichos temas en temas
independientes, y añadir una marca de
tema nueva en cada uno de éstos. Todos
los temas a continuación de los temas
divididos se renumeran.
EDIT ENTER•YESMD ^
Consejos
• Para poner juntos los
temas divididos,
consulte “Combinación
de temas grabados” en
la página 36.
• Para dividir un tema
durante la grabación,
pulse REC en el punto
donde desee añadir la
marca de tema.
Nota
Si “Sorry” aparece en el
visor, no será posible
dividir el tema.
Si repite la edición en el
MD, es posible que no
pueda dividir temas.
Esto se debe a las
limitaciones del sistema
de MD (página 57), y
no a un fallo de
funcionamiento.
Ejemplo: División del tema 1 en tres temas
Número
de tema 1
División
El tema 1 se divide, y se añaden las marcas de
tema 2 y 3.
123
ABC D
B
A
C
2
4
D
1 Mientras se reproduce el MD, pulse MD ^ en el
punto donde desee crear un tema nuevo.
El reproductor entra en el modo de pausa.
2 Pulse EDIT varias veces hasta que “Divide”
aparezca en el visor.
3 Pulse ENTER•YES.
“Divide OK?” aparece en el visor.
Si desea cancelar la función de división en este
punto:
Pulse CANCEL•NO o MD p.
ES
34
Edición de temas grabados en el MD
Page 95

Nota
Después de
detener la
grabación,
no desconecte el
cable de alimentación
de CA ni mueva el
reproductor mientras
“TOC EDIT” parpadea
en el visor. Si lo hace,
es posible que la
grabación no se realice
correctamente.
4 Pulse ENTER•YES.
“Complete” aparece en el visor durante unos
segundos después de dividirse el tema. El tema
original tiene el nombre de tema, mientras que el
nuevo no tiene nombre (esto ocurre sólo si el tema
dividido tiene nombre). Se añade un tema al
calendario musical.
Edición de temas grabados en el MD
Edición de temas grabados en el MD 35
ES
Page 96

Combinación de
temas grabados
(Función de combinación)
Es posible combinar dos temas
adyacentes en uno solo. Mediante la
función de combinación, es posible
combinar varias grabaciones
fragmentadas o eliminar las marcas de
tema innecesarias. Todos los temas a
continuación del combinado se
renumeran.
EDIT ENTER•YES
Notas
• Si “Sorry” aparece en el
visor, significa que no
es posible combinar los
temas.
Si repite la edición en el
MD, es posible que no
pueda combinar los
temas. Esto se debe a
las limitaciones del
sistema de MD (página
57), y no a un fallo de
funcionamiento.
• Si “Cannot Edit”
aparece en el visor, es
posible que esté
intentando combinar
los temas en el primero
de ellos. No es posible
utilizar la función de
combinación en el
primer tema.
Ejemplo: Combine los temas B y C
Número
de tema
Combinación
B y C se combinan en un tema.
12
2
1
A
AD
3
B
B
C
C
4
D
3
1 Reproduzca el tema que desee combinar.
Ejemplo: Para combinar los temas B y C,
reproduzca el tema C.
2 Pulse EDIT varias veces hasta que “Combine”
aparezca en el visor.
3 Pulse ENTER•YES.
“Combine OK?” aparece en el visor, y el
reproductor entra en el modo de pausa de
reproducción.
Si desea cancelar la función de combinación en
este punto:
Pulse CANCEL•NO o MD p.
ES
36
Edición de temas grabados en el MD
Page 97

Nota
Después de
detener la
grabación,
no desconecte el
cable de alimentación
de CA ni mueva el
reproductor mientras
“TOC EDIT” parpadea
en el visor. Si lo hace,
es posible que la
grabación no se realice
correctamente.
4 Pulse ENTER•YES.
“Complete” aparece en el visor durante unos
segundos después de combinarse los temas. Si los
dos temas combinados tienen nombre, se borrará el
nombre del tema posterior. El número total de
temas del calendario musical disminuye en uno.
Edición de temas grabados en el MD
Edición de temas grabados en el MD 37
ES
Page 98

Desplazamiento
de temas
grabados
(Función de desplazamiento)
Es posible cambiar el orden de los
temas. Después de desplazar el tema, los
números de tema se renumeran
automáticamente.
Dial de avance
EDIT ENTER•YES
Nota
Después de
detener la
grabación,
no desconecte el cable
de alimentación de CA
ni mueva el
reproductor mientras
“TOC EDIT” parpadea
en el visor. Si lo hace,
es posible que la
grabación no se realice
correctamente.
Ejemplo: Desplazamiento de C a la posición del tema 1
Número
de tema
Desplazamiento
1
El número de tema de C cambia a 1
1
2
3
AD
B
2
C
C
3
4
4
BA
D
1 Reproduzca el tema que desee desplazar.
2 Pulse EDIT varias veces hasta que “Track Move”
aparezca en el visor.
3 Pulse ENTER•YES.
“nTrack 003?” aparece en el visor, y se inicia la
reproducción repetida de un solo tema.
4 Gire el dial de avance para seleccionar la nueva
posición de tema.
Si desea cancelar la función de desplazamiento
en este punto:
Pulse CANCEL•NO o MD p.
5 Pulse ENTER•YES.
“Complete” aparece en el visor durante unos
segundos después de desplazarse el tema.
ES
38
Edición de temas grabados en el MD
Page 99

Etiquetado de
grabaciones
(Función de nombre)
Es posible etiquetar con letras, números
y símbolos los minidiscos y los temas
grabados. Cada etiqueta puede
componerse de un máximo de 100
caracteres. Es posible introducir hasta
1.700 caracteres aproximadamente en
cada MD.
Etiquetado de minidiscos
1 Inserte el MD que desee etiquetar, y detenga la
reproducción de MD.
2 Pulse EDIT varias veces hasta que “Disc Name”
aparezca en el visor.
3 Pulse ENTER•YES.
Si ya se ha etiquetado el nombre del disco, éste
aparecerá en el visor.
4 Pulse DISPLAY varias veces para seleccionar el
tipo de caracteres.
Cada vez que pulse DISPLAY, el carácter cambia
de la siguiente forma: Mayúsculas n Minúsculas
n Números y símbolos.
Es posible utilizar los siguientes caracteres:
Tipo de caracteres Caracteres (símbolos)
Mayúsculas ABCD.....WXYZ’,/:
Minúsculas abcd.....wxyz’,/:
Números y símbolos 0123456789!”#$%&()*.;<=>?
Dial de avance
CANCEL•NO
¿
(espacio)
(espacio)
@_`+ –’,/: (espacio)
ENTER•YES
EDIT
÷
Edición de temas grabados en el MD
continúa
Edición de temas grabados en el MD 39
ES
Page 100

Etiquetado de grabaciones (Función de nombre) (continuación)
5 Gire el dial de avance en el sentido de las agujas
del reloj o en el contrario para seleccionar los
caracteres.
6 Pulse ÷.
El cursor se desplaza
hacia la derecha y
espera a que introduzca
el siguiente carácter.
Visor
Cursor
7 Repita los pasos 4 a 6 para completar el nombre.
Nota
Después de
detener la
grabación,
no desconecte el cable
de alimentación de CA
ni mueva el
reproductor mientras
“TOC EDIT” parpadea
en el visor. Si lo hace,
es posible que la
grabación no se realice
correctamente.
8 Pulse ENTER•YES.
El nombre se ha registrado en el MD.
Etiquetado de temas
1 Reproduzca el tema que desee etiquetar.
2 Pulse EDIT varias veces hasta que “Track Name”
aparezca en el visor.
3 Pulse ENTER•YES.
Se inicia la reproducción repetida de un solo tema.
Si ya se ha registrado el nombre del tema, éste
aparecerá en el visor.
4 Introduzca los caracteres de acuerdo con los pasos
4 a 8 de “Etiquetado de minidiscos”.
El nombre se ha registrado en el tema.
ES
40
Edición de temas grabados en el MD
 Loading...