

- mechanical
-
Troubleshooting Guide
Xperia™ Z5
1300-8384
Sony Mobile Communications AB – Company Internal
Rev 2
Premium
E6853
Xperia™ Z5
Premium Dual
E6833,E6883

Company Internal
Troubleshooting Guide (mech)
CONTENTS
1 Problem Areas ................................................................................ 5
1.1 Power .................................................................................................... 5
1.1.1 Will not power on or will switch off randomly ........................................... 5
1.2 Keys ...................................................................................................... 7
1.2.1 Back, Menu, Home and Multitask Keys ..................................................... 7
1.2.2 Volume Key .................................................................................................. 7
1.2.3 On/Off Key .................................................................................................... 8
1.2.4 Camera Key ................................................................................................ 10
1.3 Touch Screen ..................................................................................... 12
1.3.1 Touch Screen malfunction ........................................................................ 12
1.4 Display ................................................................................................ 13
1.4.1 Graphics & Illumination ............................................................................ 13
1.5 LED/Illumination ................................................................................. 14
1.5.1 LED/Illumination ........................................................................................ 14
1.6 Speaker ............................................................................................... 15
1.6.1 Speaker Bottom ......................................................................................... 15
1.7 Earphone ............................................................................................ 18
1.7.1 Speaker Top ............................................................................................... 18
1.8 Microphone ......................................................................................... 19
1.8.1 Primary Microphone .................................................................................. 19
1.8.2 Secondary Microphone ............................................................................. 20
1.9 Vibrator ............................................................................................... 21
1.9.1 Vibrator not generating alerts .................................................................. 21
1.10 Camera ................................................................................................ 22
1.10.1 Main Camera .............................................................................................. 22
1.10.2 Video Call Camera defects ........................................................................ 23
1.11 Flash LED ........................................................................................... 24
1.11.1 Flash LED not flashing .............................................................................. 24
1.12 Bluetooth and WLAN Main ................................................................ 25
1.12.1 Bluetooth or WLAN Main connection failure ........................................... 25
1.13 WLAN Sub .......................................................................................... 27
1.13.1 WLAN Sub connection failure .................................................................. 27
1.14 NFC ..................................................................................................... 29
1.14.1 NFC malfunctions ...................................................................................... 29
1.15 GPS ..................................................................................................... 30
1.15.1 GPS malfunctions ...................................................................................... 30
1.16 Compass ............................................................................................. 31
1.16.1 Compass fails ............................................................................................ 31
1.17 Accelerometer .................................................................................... 32
1.17.1 Accelerometer test fails ............................................................................ 32
1.18 Gyroscope .......................................................................................... 33
1.18.1 Gyroscope test fails .................................................................................. 33
1300-8384
Sony Mobile Communications AB –
Rev 2
2(65)

Company Internal
Troubleshooting Guide (mech)
1.19 Ambient Light Sensor ........................................................................ 34
1.19.1 Light Sensor malfunctions ....................................................................... 34
1.20 Proximity Switch ................................................................................ 35
1.20.1 Proximity switch malfunctions ................................................................. 35
1.21 Pressure Sensor ................................................................................. 36
1.21.1 Pressure Sensor test fails ......................................................................... 36
1.22 Water Resistance ............................................................................... 37
1.22.1 Water Resistance fails............................................................................... 37
1.23 Real Time Clock ................................................................................. 42
1.23.1 Real time clock test fails ........................................................................... 42
1.24 Total call time ..................................................................................... 43
1.24.1 Total call time fails .................................................................................... 43
1.25 External Memory (E6853) ................................................................... 44
1.25.1 Memory Card not detected ....................................................................... 44
1.26 External Memory (E6833/E6883) ....................................................... 45
1.26.1 Memory Card not detected ....................................................................... 45
1.27 Security ............................................................................................... 46
1.27.1 Security fails .............................................................................................. 46
1.28 FM Radio ............................................................................................. 47
1.28.1 No/Poor FM Radio reception .................................................................... 47
1.29 Verify Certificates ............................................................................... 48
1.29.1 Verify Certificates fails .............................................................................. 48
1.30 IrDA Test ............................................................................................. 49
1.30.1 IrDA test fails ............................................................................................. 49
1.31 TV-Out Test ......................................................................................... 50
1.31.1 TV-Out test fails ......................................................................................... 50
1.32 Network & Signal ................................................................................ 51
1.32.1 No/Poor signal ........................................................................................... 51
1.33 SIM (E6853) ......................................................................................... 57
1.33.1 SIM not detected ........................................................................................ 57
1.33.2 Incorrect Nano SIM indicated ................................................................... 57
1.34 SIM (E6833/E6883) .............................................................................. 58
1.34.1 SIM not detected ........................................................................................ 58
1.34.2 Incorrect Nano SIM indicated ................................................................... 58
1.35 Charging ............................................................................................. 59
1.35.1 Battery will not charge by USB connector .............................................. 59
1.36 Audio Jack test ................................................................................... 61
1.36.1 Connection to headset fails ...................................................................... 61
1.37 Finger Print Sensor test ..................................................................... 62
1.37.1 Finger Print Sensor test fails .................................................................... 62
1.38 Data Communication ......................................................................... 64
1.38.1 Data transfer via System Connector fails ................................................ 64
2 Revision History ........................................................................... 65
1300-8384
Sony Mobile Communications AB –
Rev 2
3(65)

Company Internal
Troubleshooting Guide (mech)
Always firstly disconnect the Battery FPC BtB connector to cut off power supply when the Panel
Rear Sub Assy is disassembled.
Always finally connect the Battery FPC BtB connector before the Panel Rear Sub Assy is
reassembled.
Note: Proximity Calibration always must be performed when Display Frame Assy and Main PBA
reassembly, or Display Frame Assy replacement, or Board Swap, or proximity malfunctions;
1289-2983 Sony Mobile Repair Application-mechanical.
Note: Noise Cancelling Calibration always must be performed when FPC Jack Module
replacement or Board Swap; 1289-2983 Sony Mobile Repair Application-mechanical.
Note: Gyroscope and Accelerometer Calibration always must be performed when Main PBA
reassembly, or Board Swap, or wrong Gyroscope or Accelerometer readouts; 1289-2983 Sony
Mobile Repair Application-mechanical.
Note: Color ID Flashing always must be performed when Board Swap; 1289-2983 Sony Mobile
Repair Application-mechanical.
If there are no special indications of ‘E6853’, ‘E6833’ or ‘E6883’, E6853, E6833 and E6883 share
the same trouble shooting guide as common sections, whose pictures are used with E6853.
‘E6833’ or ‘E6883’ chapters or sections use E6833 pictures.
1300-8384
Sony Mobile Communications AB –
Rev 2
4(65)
Company Internal
1 Problem Areas
1.1 Power
1.1.1 Will not power on or will switch
off randomly
Check:
Check whether the Notification LED blinks by pressing the
on/off key.
Action:
If NO Notification LED blink is detected, perform a force shut
down, press power key and volume up key for 10 seconds
and then power on the unit again.
Check:
Check whether the phone vibrates by pressing the on/off
key.
Action:
1. If activation of the vibrator is detected, refer to section 1.4
‘Display’.
Troubleshooting Guide (mech)
2. If NO activation of the Vibrator is detected and the
Notification LED blinks by pressing the on/off key, check that
the battery is charging when connected to a charger.
Follow Test Instruction - mechanical chapter 2.4.5
(Charging via Charger or Computer), Diagnostic Battery
/ Charging status.
Check:
Inspect the on/off key.
Action:
Refer to section 1.2.3 ‘On/Off Key’.
1300-8384
Sony Mobile Communications AB –
Rev 2
5(65)
Company Internal
Problem Areas: Power
Check:
Inspect the BtB connector of the Battery to Main PBA.
Action:
1. If not properly connected – disconnect and reconnect it.
2. If dirty or oxidized – clean the both sides of the BtB
connector.
Troubleshooting Guide (mech)
3. If the BtB connector, the FPC or the Battery is damaged –
replace the Battery.
4. Replace Main PBA.
1300-8384
Sony Mobile Communications AB –
Rev 2
6(65)
Company Internal
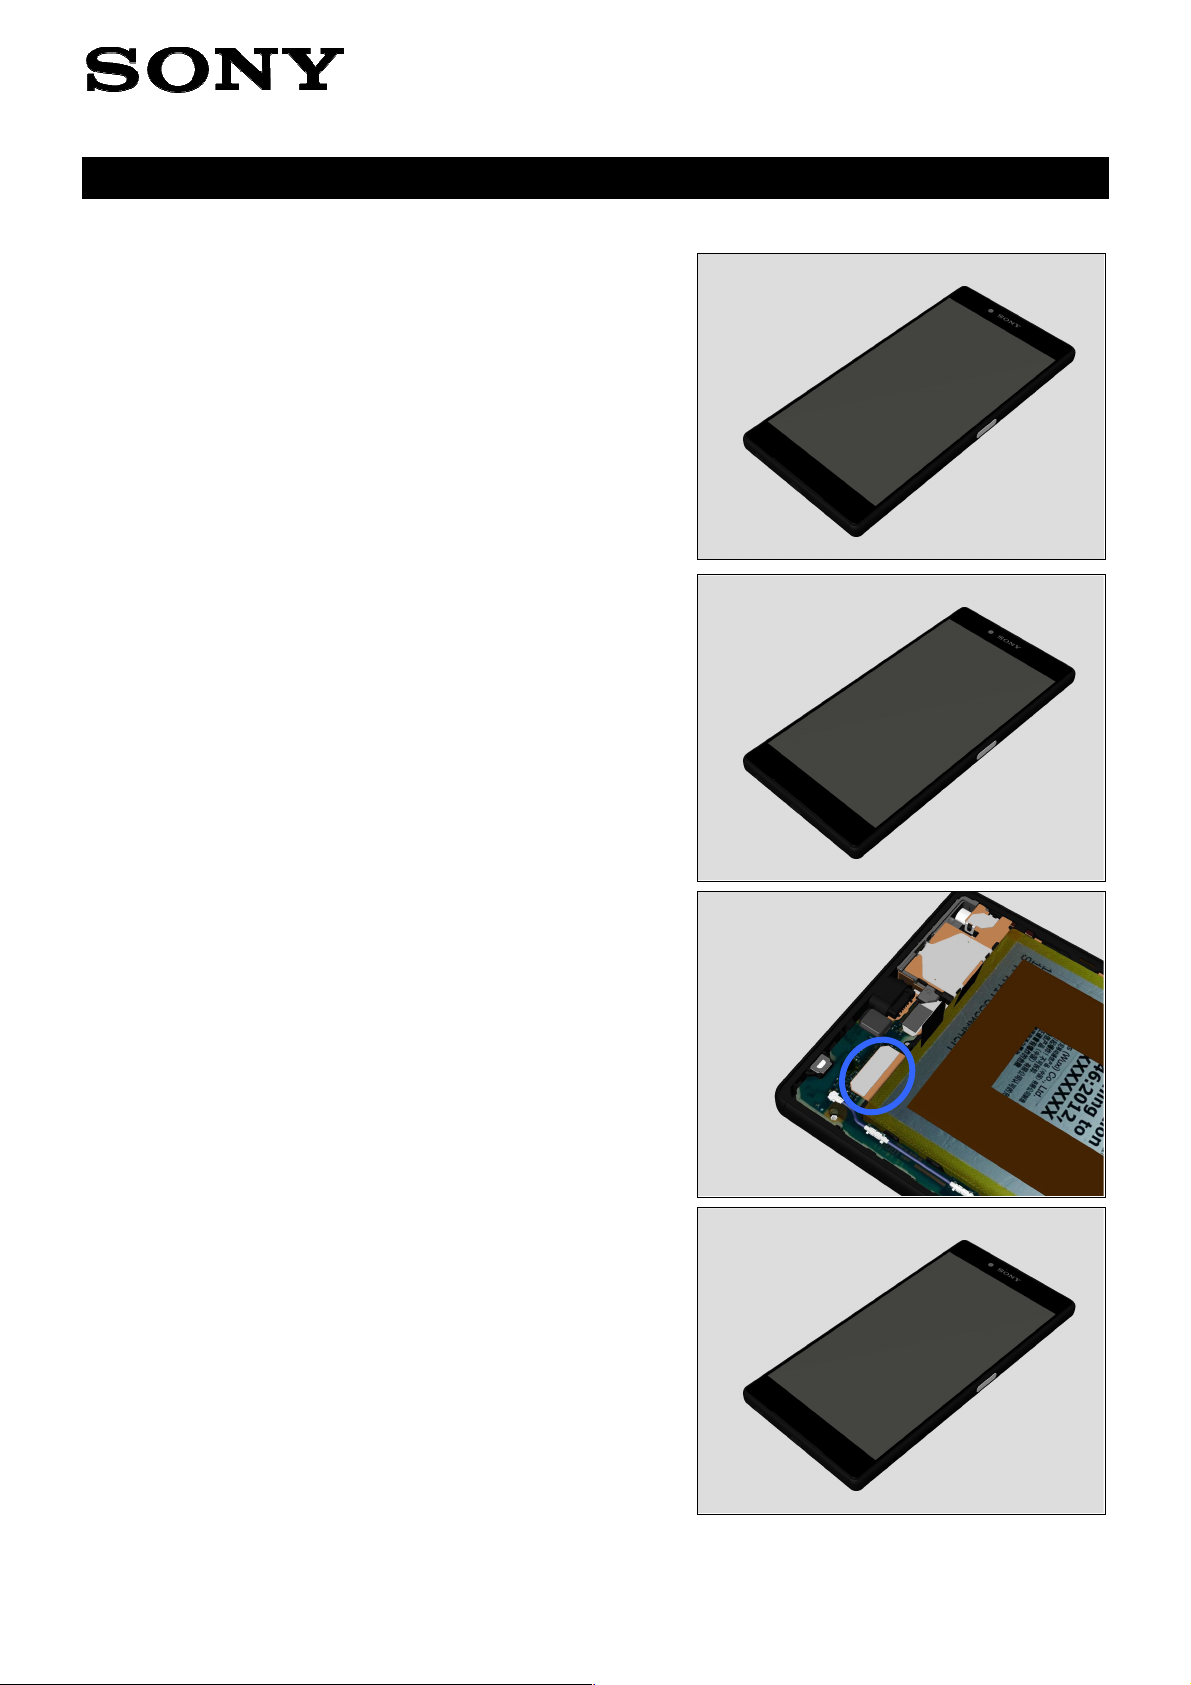
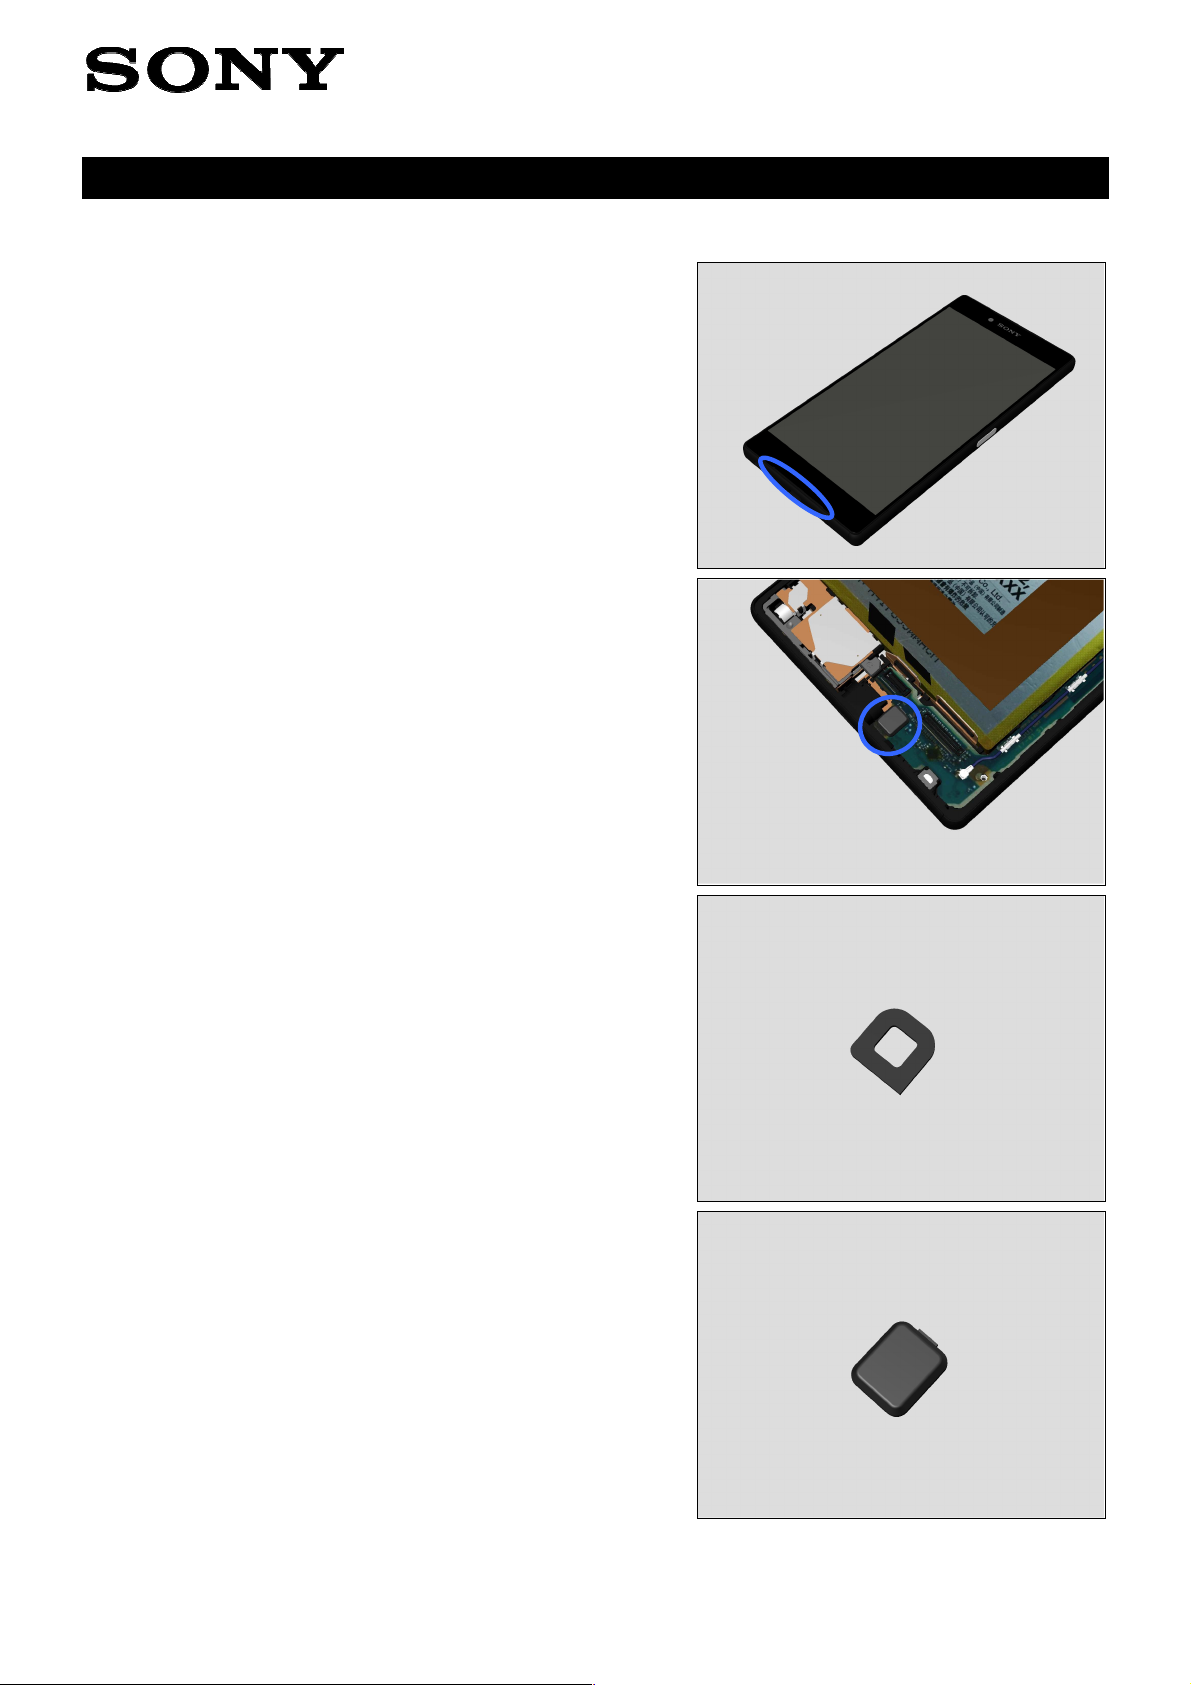
Problem Areas
1.2 Keys
1.2.1 Back, Menu, Home and
Multitask Keys
Action:
1. Refer to section 1.3 ‘Touch Screen’.
2. Replace Main PBA.
1.2.2 Volume Key
Check:
Inspect the external area of the Volume Key.
Action:
1. If dirty – clean it.
2. If damaged – replace the Display Frame Assy.
Troubleshooting Guide (mech)
Check:
Inspect the BtB connector of FPC Key Module to Main PBA.
Action:
1. If not properly connected – disconnect and reconnect it.
2. If dirty or oxidized – clean it.
3. If the FPC Key Module is damaged – replace it.
4. Replace Main PBA.
1300-8384
Sony Mobile Communications AB –
Rev 2
7(65)
Company Internal
Problem Areas: Keys
Check:
Inspect the condition of Volume Key rubber (a) and Volume
Key switch (b).
Action:
1. If dirty – clean them.
Troubleshooting Guide (mech)
2. If the Volume Key or its rubber is damaged – replace the
Display Frame Assy.
3. If the volume key switch is damaged – replace the FPC
Key Module.
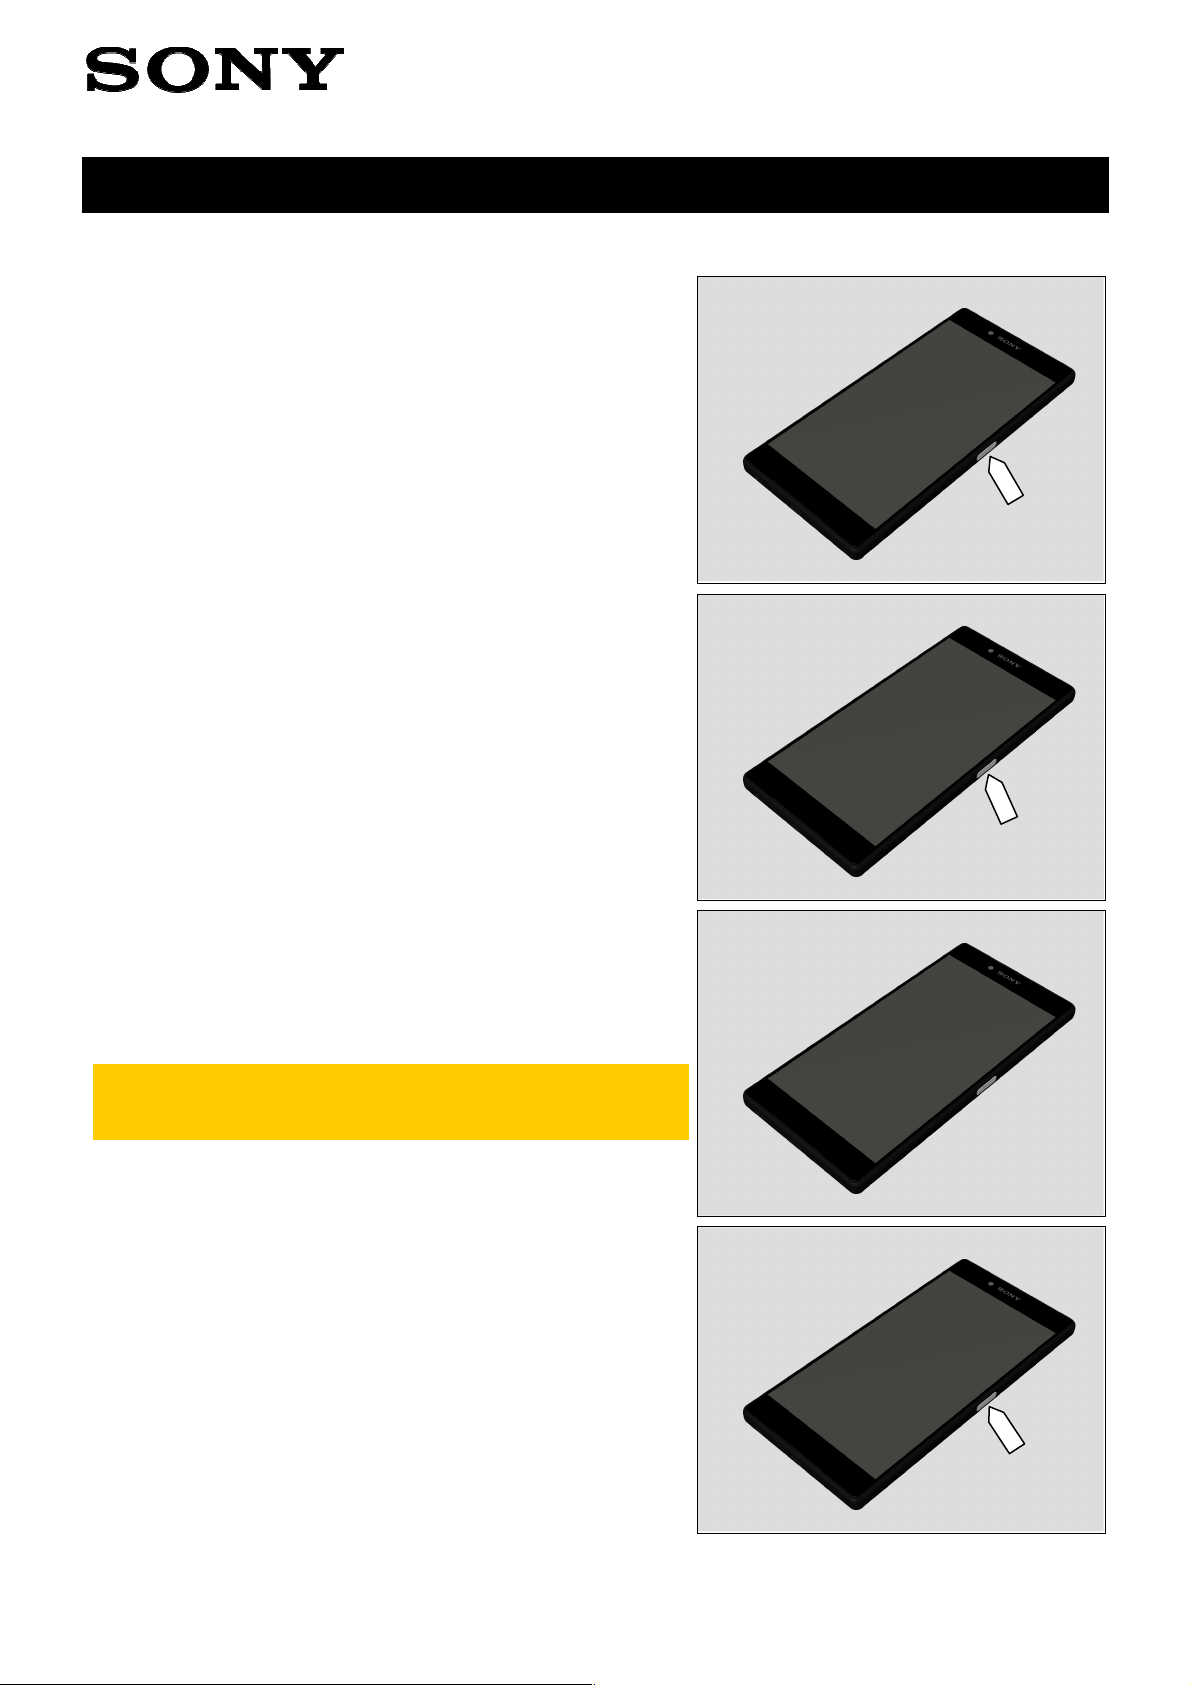
1.2.3 On/Off Key
Check:
Inspect the external area of the On/Off Key.
Action:
1. If dirty – clean it.
2. If damaged – replace the Fingerprint Sensor Module.
1300-8384
Sony Mobile Communications AB –
Rev 2
8(65)
Company Internal
Problem Areas: Keys
Check:
Inspect the BtB connector of FPC Key Module to Main PBA.
Action:
1. If not properly connected – disconnect and reconnect it.
2. If dirty or oxidized – clean it.
Troubleshooting Guide (mech)
3. If the FPC Key Module is damaged – replace it.
4. Replace Main PBA.
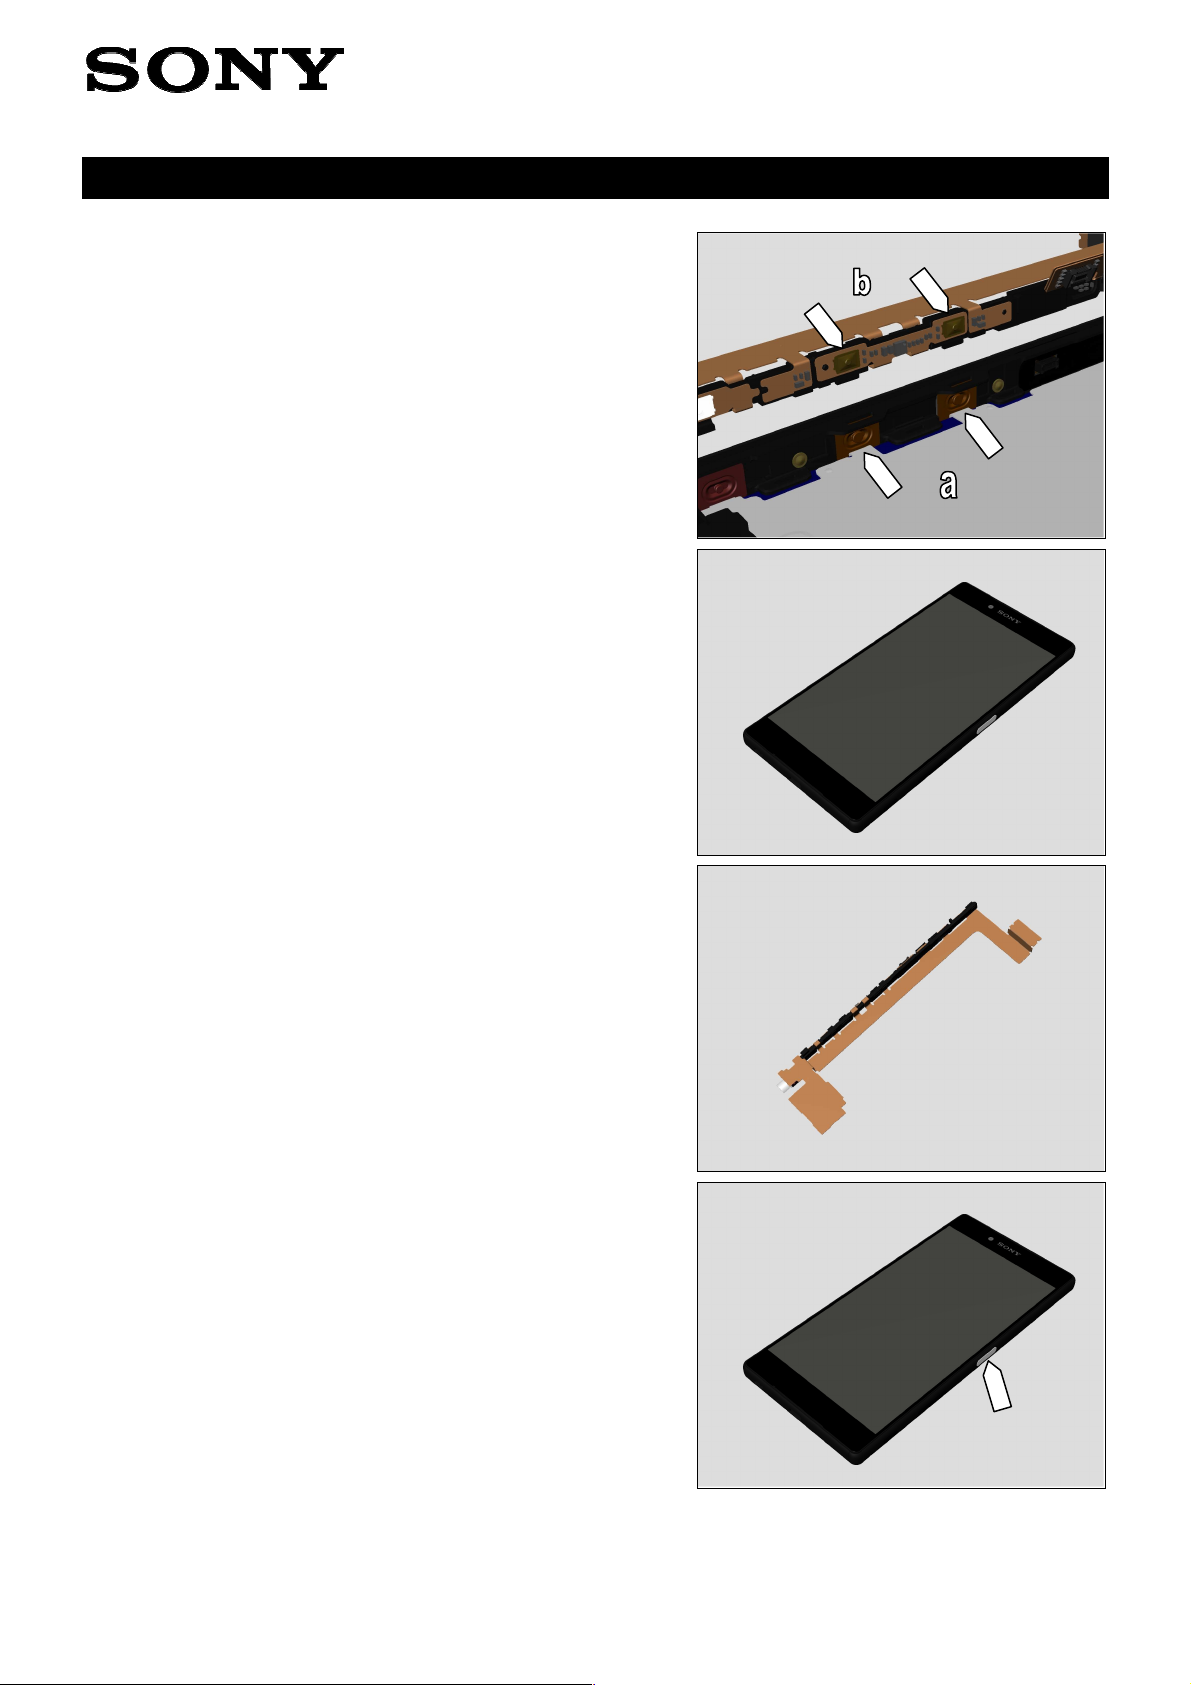
Check:
Inspect the condition of the On/Off Key rubber (a) and
On/Off Key switch (b).
Action:
1. If dirty – clean them.
2. If the On/Off Key or its rubber is damaged – replace the
Fingerprint Sensor Module.
1300-8384
Sony Mobile Communications AB –
Rev 2
9(65)
Company Internal
Problem Areas: Keys
3. If the On/Off key switch is damaged – replace the FPC
Key Module.
1.2.4 Camera Key
Check:
Inspect the external area of the Camera Key.
Action:
1. If dirty – clean it.
2. If damaged – replace the Display Frame Assy.
Troubleshooting Guide (mech)
Check:
Inspect the BtB connector of FPC Key Module to Main PBA.
Action:
1. If not properly connected – disconnect and reconnect it.
2. If dirty or oxidized – clean it.
3. If the FPC Key Module is damaged – replace it.
4. Replace Main PBA.
1300-8384
Sony Mobile Communications AB –
Rev 2
10(65)
Company Internal
Problem Areas: Keys
Check:
Inspect the condition of the Camera Key rubber (a) and
Camera Key switch (b).
Action:
1. If dirty – clean them.
Troubleshooting Guide (mech)
2. If the Camera Key or its rubber is damaged – replace the
Display Frame Assy.
3. If the On/Off key switch is damaged – replace the FPC
Key Module.
1300-8384
Sony Mobile Communications AB –
Rev 2
11(65)
Company Internal
Problem Areas
1.3 Touch Screen
1.3.1 Touch Screen malfunction
Check:
Inspect the touch screen of the Display Frame Assy.
Action:
1. If dirty – clean it.
Troubleshooting Guide (mech)
2. If scratched or damaged – replace the Display Frame
Assy.
Check:
Inspect the BtB connector of Display FPC to Main PBA.
Action:
1. If not properly connected – disconnect and reconnect it.
2. If dirty or oxidized – clean it.
3. If the Display FPC is damaged – replace Display Frame
Assy.
4. Replace Main PBA.
1300-8384
Sony Mobile Communications AB –
Rev 2
12(65)
Company Internal
Problem Areas
1.4 Display
1.4.1 Graphics & Illumination
Check:
Check whether the phone vibrates after the on/off key has
been pressed.
Action:
1. If the activation described above is not detected, refer to
section 1.1 ‘Power’.
Troubleshooting Guide (mech)
2. If the Display Frame Assy is damaged – replace it.
Check:
Inspect the BtB connector of Display FPC to Main PBA.
Action:
1. If not properly connected – disconnect and reconnect it.
2. If dirty or oxidized – clean it.
3. If the Display FPC is damaged – replace Display Frame
Assy.
4. Replace Main PBA.
1300-8384
Sony Mobile Communications AB –
Rev 2
13(65)
Company Internal
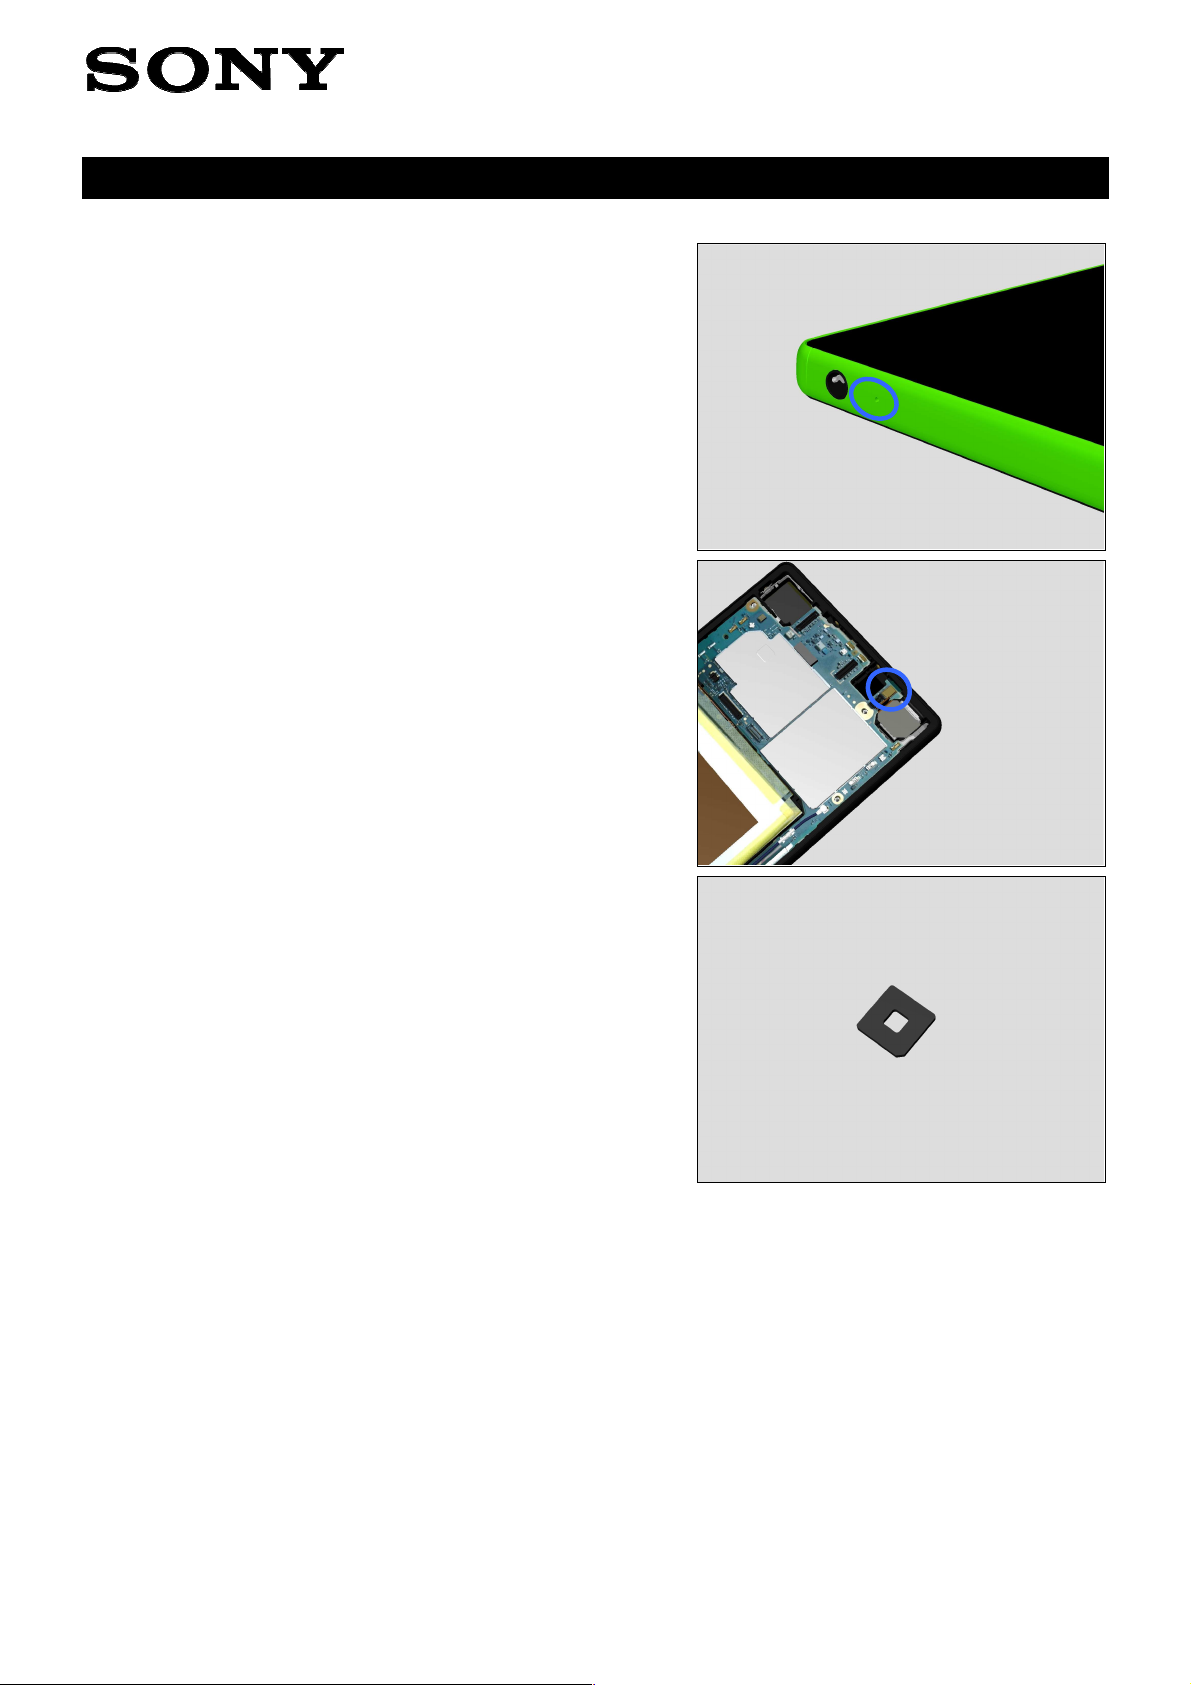
Problem Areas
1.5 LED/Illumination
1.5.1 LED/Illumination
Check:
Inspect external window area of Notification LED on the
Display Frame Assy.
Action:
1. If dirty – clean it.
Troubleshooting Guide (mech)
Check:
Inspect the Light Guide.
Action:
1. If dirty – clean it.
3. If damaged – replace Display Frame Assy.
Check:
Inspect the LED on Main PBA.
Action:
1. If dirty or oxidized – clean it.
2. Replace Main PBA
1300-8384
Sony Mobile Communications AB –
Rev 2
14(65)

Company Internal
Problem Areas
1.6 Speaker
1.6.1 Speaker Bottom
Check:
Inspect the Speaker Bottom external port on the Display
Frame Assy.
Action:
1. If clogged – clean it.
Troubleshooting Guide (mech)
2. If damaged – replace the Display Frame Assy.
Check:
Inspect the speaker FPC is assembled well or not.
Action:
1. If not assembled well – reassemble it.
Check:
Inspect the contact pads on the FPC Key Module and the
contact pins on the Speaker Bottom.
Action:
1. If dirty – clean them.
1300-8384
Sony Mobile Communications AB –
Rev 2
15(65)

Company Internal
Problem Areas: Speaker
2. If contact pins on the Speaker Bottom are damaged –
replace the Adhesive WR Speaker and Speaker Bottom.
Troubleshooting Guide (mech)
3. If the contact pads on the FPC Key Module are damaged
- replace the FPC Key Module.
Check:
Inspect if the Speaker bottom is assembled well onto its
cavity.
Action:
1. If not assembled well – replace the Adhesive WR Speaker
and Speaker Bottom.
1300-8384
Sony Mobile Communications AB –
Rev 2
16(65)

Company Internal
Problem Areas: Speaker
Check:
Inspect the BtB connector of FPC Key Module to Main PBA.
Action:
1. If not properly connected – disconnect and reconnect it.
2. If dirty or oxidized – clean it.
Troubleshooting Guide (mech)
3. If the FPC Key Module is damaged – replace it.
4. Replace Main PBA.
1300-8384
Sony Mobile Communications AB –
Rev 2
17(65)
Company Internal
Problem Areas
1.7 Earphone
1.7.1 Speaker Top
Check:
Inspect the external port of Speaker Top on the Display
Frame Assy.
Action:
1. If clogged – clean it.
Check:
Inspect the contact pads on the Main PBA and the contact
pins on the Speaker Top.
Action:
1. If dirty – clean them.
Troubleshooting Guide (mech)
2. If the contact pins of the Speaker Top or the Top Speaker
are damaged – replace Speaker Top, Adhesive WR
Speaker and Cushion Aco.
3. Replace Main PBA.
1300-8384
Sony Mobile Communications AB –
Rev 2
18(65)
Company Internal
Problem Areas
1.8 Microphone
1.8.1 Primary Microphone
Check:
Inspect the Primary Microphone’s external port on the
Display Frame Assy.
Action:
1. If clogged – clean it.
Troubleshooting Guide (mech)
Check:
Inspect if the Cap 1st Mic Sub Assy or 1st Mic part of the
Main PBA is assembled well or not.
Action:
1. If not assembled well – replace the Adhesive 1st Mic and
reassemble it.
2. If the Cap 1st Mic Sub Assy is not assembled well or
damaged – replace the Cap 1st Mic Sub Assy and Adhesive
1st Mic and then reassemble it.
3. Replace the Main PBA.
1300-8384
Sony Mobile Communications AB –
Rev 2
19(65)
Company Internal
Problem Areas: Microphone
1.8.2 Secondary Microphone
Check:
Inspect the external port of secondary microphone on the
Display Frame Assy.
Action:
1. If clogged – clean it.
Check:
Inspect the 2nd Mic part of the Main PBA is assembled well
or not.
Troubleshooting Guide (mech)
Action:
1. If not assembled well – replace the Adhesive 2nd Mic
and reassemble it.
2. Replace Main PBA.
1300-8384
Sony Mobile Communications AB –
Rev 2
20(65)

Company Internal
Problem Areas
1.9 Vibrator
1.9.1 Vibrator not generating alerts
Check:
Inspect the BtB connector of FPC Key Module to Main PBA.
Action:
1. If not properly connected – disconnect and reconnect it.
2. If dirty or oxidized – clean it.
Troubleshooting Guide (mech)
3. If the FPC Key Module is damaged – replace it.
4. Replace Main PBA.
Check:
Inspect the Vibrator on the FPC Key Module.
Action:
1. If damaged – replace the FPC Key Module.
1300-8384
Sony Mobile Communications AB –
Rev 2
21(65)

Company Internal
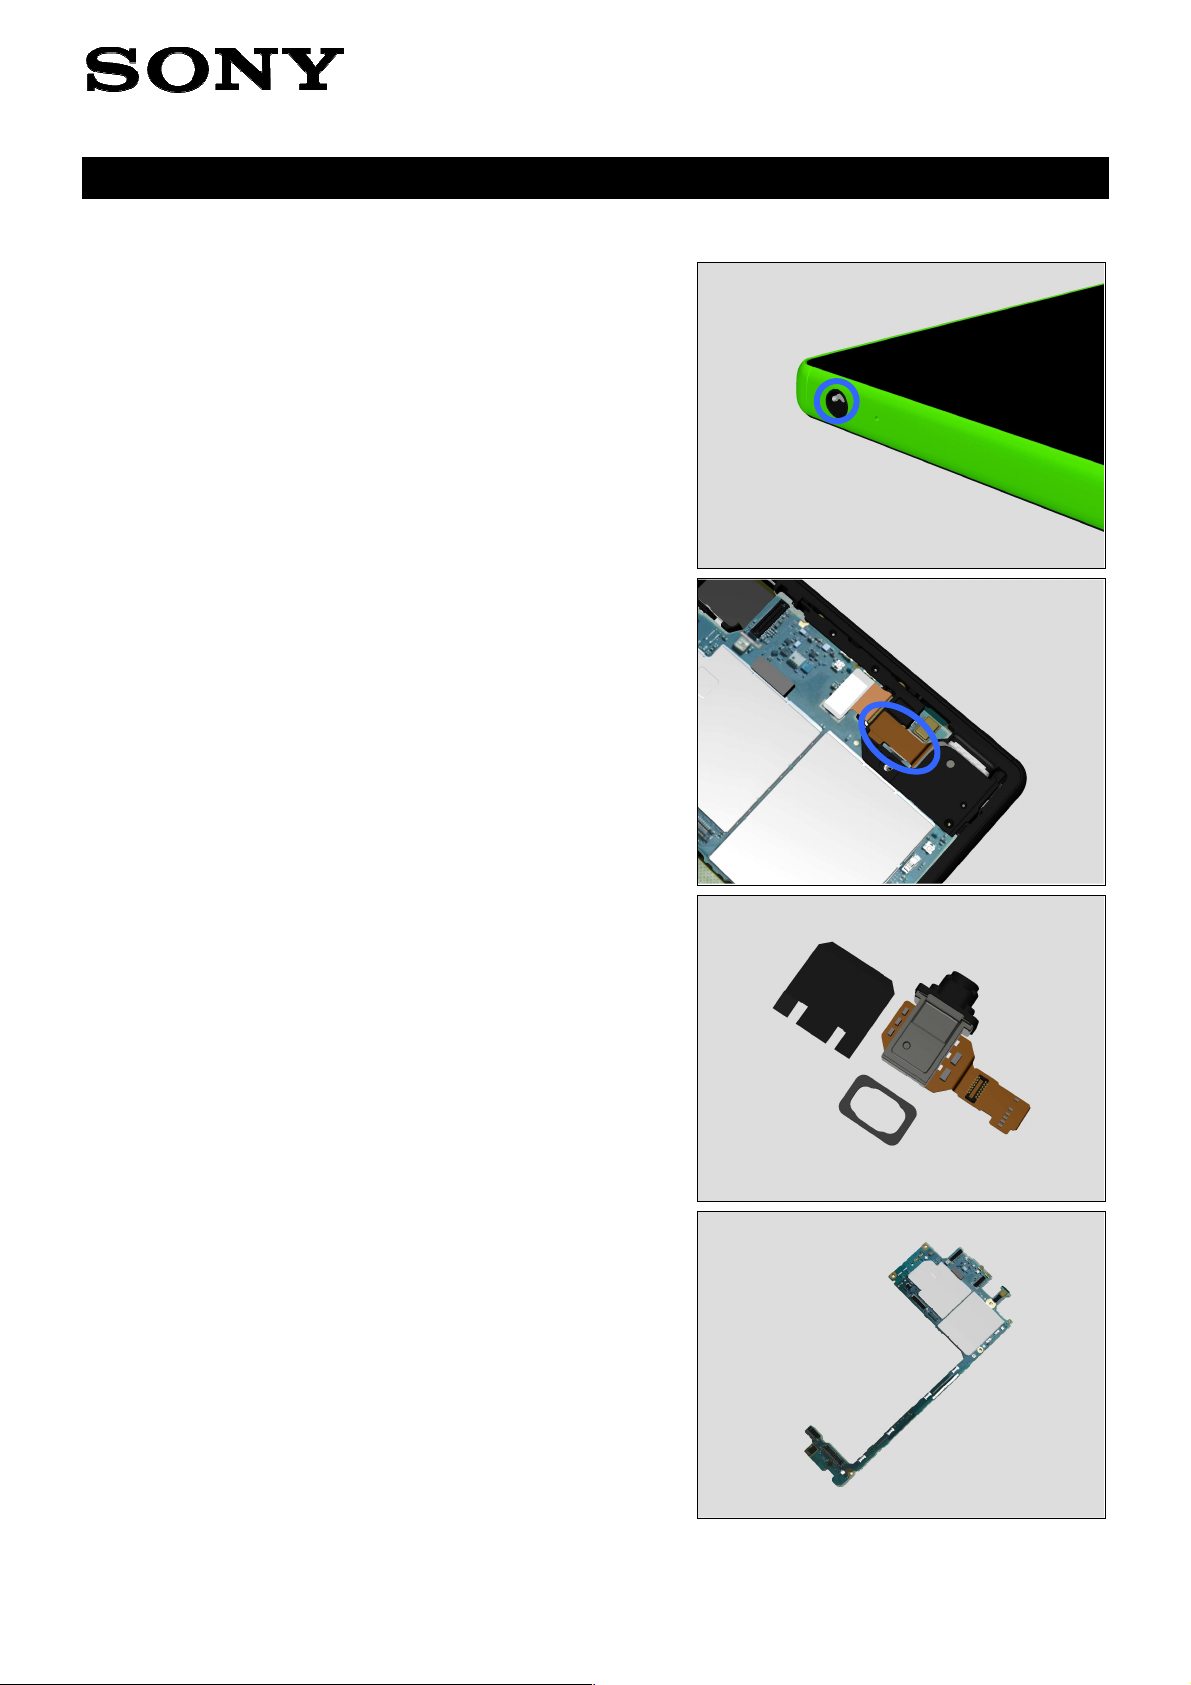
Problem Areas
1.10 Camera
1.10.1 Main Camera
Check:
Inspect the external area of camera window.
Action:
1. If dirty – clean it.
Troubleshooting Guide (mech)
2. If scratched or damaged – replace the Panel Rear Sub
Assy.
Check:
Inspect the BtB connector of Main Camera to Main PBA.
Action:
1. If not properly connected – disconnect and reconnect it.
2. If dirty or oxidized – clean it.
3. If the BtB connector or the Main Camera is damaged –
replace the Main Camera.
4. Replace Main PBA.
1300-8384
Sony Mobile Communications AB –
Rev 2
22(65)

Company Internal
Problem Areas: Camera
1.10.2 Video Call Camera defects
Check:
Inspect the external area of the chat camera window.
Action:
1. If dirty – clean it.
Troubleshooting Guide (mech)
2. If scratched or damaged – replace the Display Frame
Assy.
Check:
Inspect the BtB connector of Chat Camera to Main PBA.
Action:
1. If not properly connected – disconnect and reconnect it.
2. If dirty or oxidized – clean it.
3. If the Chat Camera is damaged – replace the Chat
Camera.
4. Replace Main PBA.
1300-8384
Sony Mobile Communications AB –
Rev 2
23(65)

Company Internal
Problem Areas
1.11 Flash LED
1.11.1 Flash LED not flashing
Check:
Inspect the external area of the flash LED.
Action:
1. If dirty – clean it.
Troubleshooting Guide (mech)
2. If scratched or damaged – replace the Panel Rear Sub
Assy.
Check:
Inspect the Flash LED on Main PBA.
Action:
1. If dirty – clean it.
2. Replace Main PBA.
1300-8384
Sony Mobile Communications AB –
Rev 2
24(65)

Company Internal
Problem Areas
1.12 Bluetooth and WLAN Main
1.12.1 Bluetooth or WLAN Main
connection failure
Check:
Inspect the Bluetooth and WLAN contact pads on Ant WLAN
and the contact pins on main PBA.
These 2 contacts are signal feed point.
Action:
1. If dirty or oxidized – clean the pads and pins.
Troubleshooting Guide (mech)
2. If the contact pads on Ant WLAN are damaged – replace
the Ant WLAN.
3. If the contact pins on Main PBA is damaged – replace
Main PBA.
Check:
Inspect these contacts to ground for Bluetooth and WLAN is
good or not.
Action:
1. If dirty or oxidized – clean the them.
2. If the Shield Camera or/and Gasket Shield Cam are
damaged – replace them.
1300-8384
Sony Mobile Communications AB –
Rev 2
25(65)

Company Internal
Problem Areas: Bluetooth and WLAN Main
3. If the Display Frame Assy are damaged – replace it.
4. Replace Main PBA.
Check:
Inspect the contact pins on the Display Frame Assy and and
contact pads on the FPC Key Module.
Action:
1. If not properly contacted – reassemble the FPC Key
Module.
2. If dirty or oxidized – clean them
Troubleshooting Guide (mech)
3. If the contact pads on the FPC Key Module are damaged
– replace FPC Key Module.
4. If the contact pins on the Display Frame Assy are
damaged – replace Display Frame Assy.
1300-8384
Sony Mobile Communications AB –
Rev 2
26(65)

Company Internal
Problem Areas
1.13 WLAN Sub
1.13.1 WLAN Sub connection failure
Check:
Inspect the WLAN contact pad on Ant Cellular Sub and the
contact pin on main PBA (1).
Inspect the WLAN contact pad on Ant Cellular Sub and the
contact pad on main PBA (2).
Only the contact marked with 1 are signal feed point.
Action:
1. If dirty or oxidized – clean the pads and pins.
Troubleshooting Guide (mech)
2. If the contact pads on Ant Cellular Sub are damaged –
replace the on Ant Cellular Sub.
3. Replace Main PBA.
Check:
Inspect the contact pad on Display Frame Assy and the
contact pin on main PBA.
Action:
1. If dirty or oxidized – clean the pad and pin.
1300-8384
Sony Mobile Communications AB –
Rev 2
27(65)

Company Internal
Problem Areas: WLAN Sub
2. If the contact pin is damaged – replace the Main PBA
Troubleshooting Guide (mech)
3. If the contact pad is damaged – replace the Display
Frame Assy.
1300-8384
Sony Mobile Communications AB –
Rev 2
28(65)

Company Internal
Problem Areas
1.14 NFC
1.14.1 NFC malfunctions
Check:
Inspect the Antenna NFC contact pads and the contact pins
on Main PBA.
Action:
1. If dirty or oxidized – clean the pads and pins.
Troubleshooting Guide (mech)
2. If the Antenna NFC contact pads are damaged – replace
the Antenna NFC.
3. If the contact pins on main PBA are damaged – replace
Main PBA.
1300-8384
Sony Mobile Communications AB –
Rev 2
29(65)

Company Internal
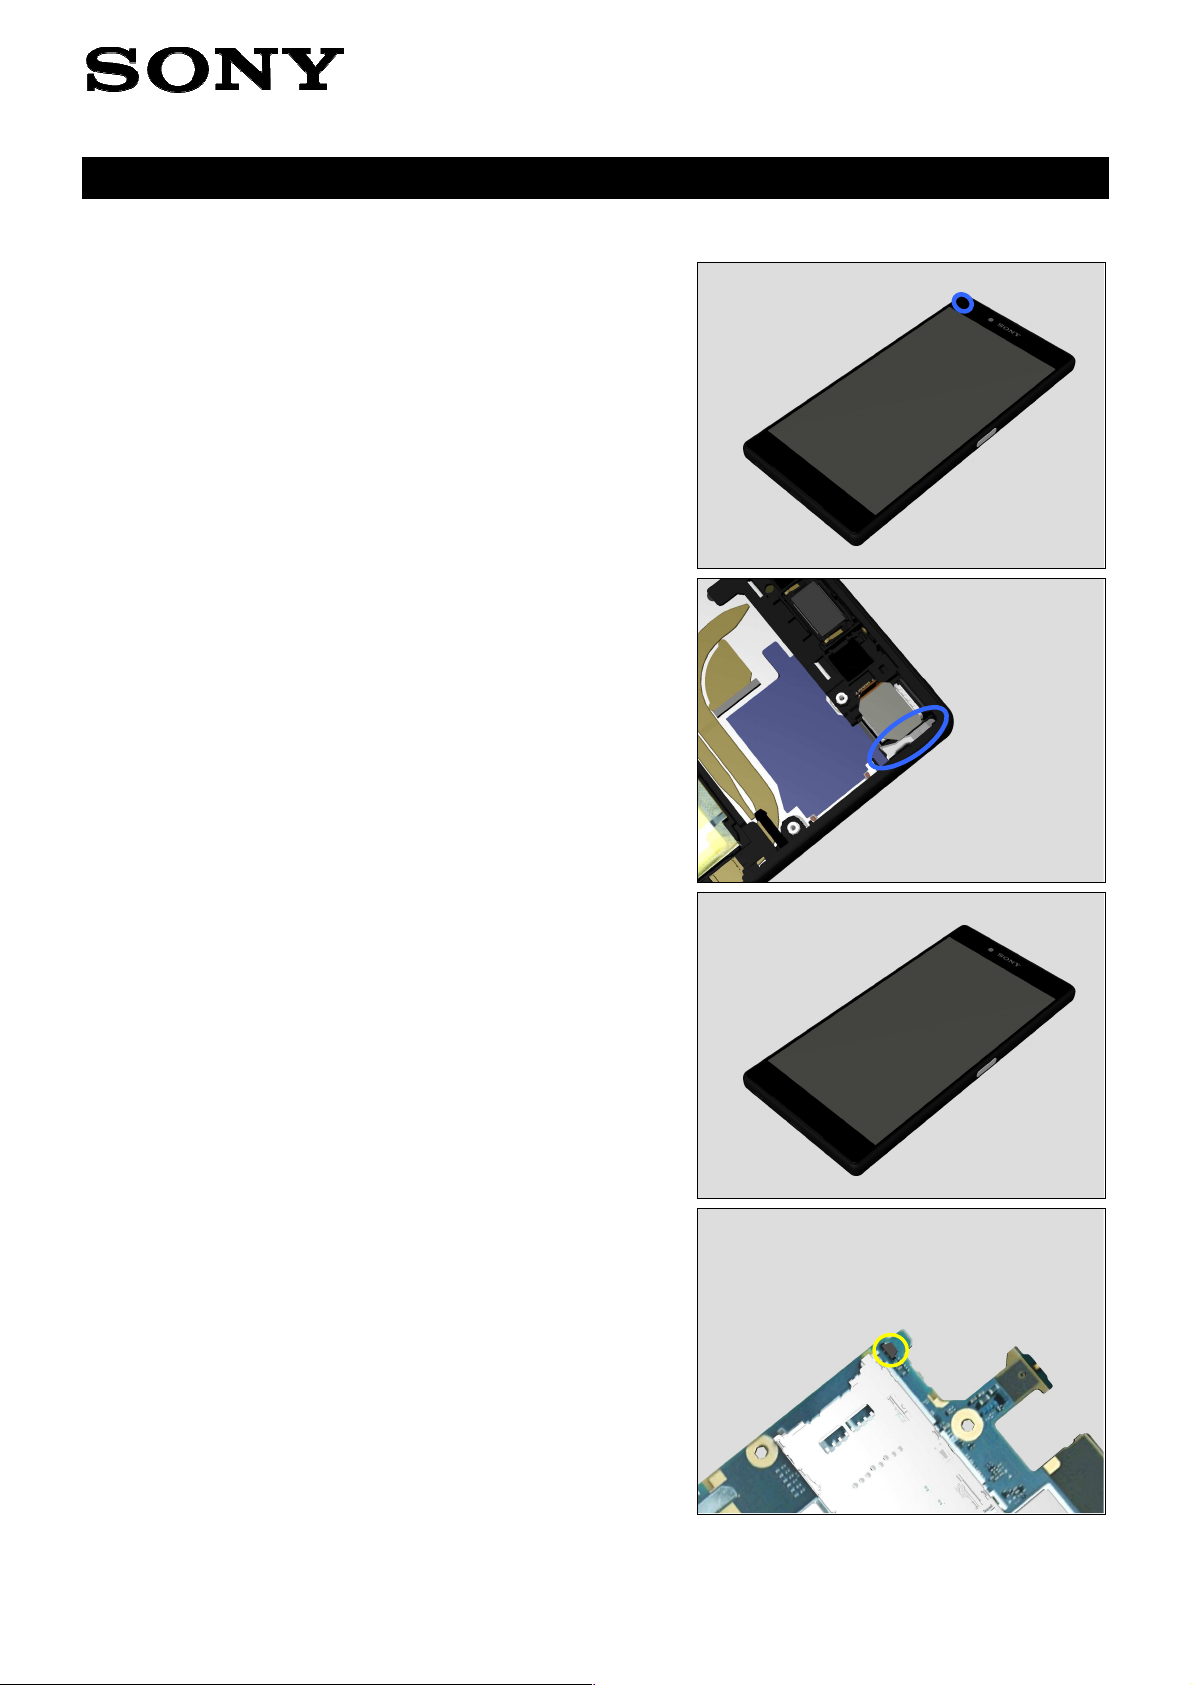
Problem Areas
1.15 GPS
1.15.1 GPS malfunctions
Check:
Inspect the Ant Cellular Sub contact pads and the contact
pins on main PBA(1).
Inspect the Ant Cellular Sub contact pads and the contact
pins on Display Frame Assy(2).
Only the contact marked with 1 is signal fedd point.
Action:
1. If dirty or oxidized – clean the pads and pins.
Troubleshooting Guide (mech)
2. If the Ant Cellular Sub contact pads are damaged –
replace the Ant Cellular Sub.
3. If the Display Frame Assy contact pins are damaged –
replace the Display Frame Assy.
4. If the contact pins on main PBA are damaged – replace
Main PBA.
1300-8384
Sony Mobile Communications AB –
Rev 2
30(65)

Company Internal
Problem Areas
1.16 Compass
1.16.1 Compass fails
Check:
Inspect the BtB connector of FPC Key Module to Main PBA.
Action:
1. If not properly connected – disconnect and reconnect it.
2. If dirty or oxidized – clean it.
Troubleshooting Guide (mech)
3. If the FPC Key Module is damaged – replace it.
4. Replace Main PBA.
Check:
Inspect the compass chipset on the FPC Key Module.
Action:
1. If the compass chipset is damaged – replace the FPC Key
Module.
1300-8384
Sony Mobile Communications AB –
Rev 2
31(65)

Company Internal
Problem Areas
1.17 Accelerometer
1.17.1 Accelerometer test fails
Action:
1. Follow the 1289-2983 Sony Mobile Repair Application –
mechanical to run the Accelerometer Calibration.
2. Replace Main PBA.
Troubleshooting Guide (mech)
1300-8384
Sony Mobile Communications AB –
Rev 2
32(65)

Company Internal
Problem Areas
1.18 Gyroscope
1.18.1 Gyroscope test fails
Action:
1. Follow the 1289-2983 Sony Mobile Repair Application –
mechanical to run the Gyroscope Calibration.
2. Replace Main PBA.
Troubleshooting Guide (mech)
1300-8384
Sony Mobile Communications AB –
Rev 2
33(65)

Company Internal
Problem Areas
1.19 Ambient Light Sensor
1.19.1 Light Sensor malfunctions
Check:
Inspect the external window area of light sensor on the
Display Frame Assy.
Action:
1. If dirty – clean it.
Troubleshooting Guide (mech)
2. If scratched or damaged – replace the Display Frame
Assy.
Check:
Inspect the light sensor on the Main PBA.
Action:
1. If dirty or oxidized – clean it.
2. Replace Main PBA.
1300-8384
Sony Mobile Communications AB –
Rev 2
34(65)

Company Internal
Problem Areas
1.20 Proximity Switch
1.20.1 Proximity switch malfunctions
Check:
Inspect the external window area of proximity switch.
Action:
1. If dirty – clean it.
Troubleshooting Guide (mech)
2. If scratched or damaged – replace the Display Frame
Assy.
Check:
Inspect the proximity switch on the Main PBA.
Action:
1. If dirty or oxidized – clean it.
2. Replace Main PBA.
1300-8384
Sony Mobile Communications AB –
Rev 2
35(65)

Company Internal
Problem Areas
1.21 Pressure Sensor
1.21.1 Pressure Sensor test fails
Replace Main PBA.
Troubleshooting Guide (mech)
1300-8384
Sony Mobile Communications AB –
Rev 2
36(65)

Company Internal
Problem Areas
1.22 Water Resistance
1.22.1 Water Resistance fails
Check:
Inspect the Cap Combo Sub Assy.
Action:
1. If dirty – clean it.
2. If not properly assembled – disassemble and reassemble.
Troubleshooting Guide (mech)
3. If the Cap Combo Sub Assy is damaged – replace it.
Run the Water Resistance Test again!
Check:
Inspect the Audio Jack hole.
Action:
1. If not assembled well – replace the Adhesive WP Audio
Jack to reassemble FPC Jack Module.
2. If damaged – replace the Sheet Shade Audio Jack,
Adhesive WP Audio Jack and FPC Jack Module.
Run the Water Resistance Test again!
1300-8384
Sony Mobile Communications AB –
Rev 2
37(65)

Company Internal
Problem Areas: Water Resistance
Check:
Inspect the USB connector.
Action:
1. If FPC USB Module is not properly assembled –
reassemble it
2. If FPC USB Module is damaged – replace it.
Run the Water Resistance Test again!
Troubleshooting Guide (mech)
Check:
Inspect the secondary microphone port.
Action:
If damaged – replace the Display Frame Assy.
Run the Water Resistance Test again!
1300-8384
Sony Mobile Communications AB –
Rev 2
38(65)

Company Internal
Problem Areas: Water Resistance
Check:
Inspect the Fingerprint Sensor Module.
Action:
1. If Fingerprint Sensor Module is not properly assembled –
reassemble it
2. If Fingerprint Sensor Module is damaged – replace it.
Run the Water Resistance Test again!
Troubleshooting Guide (mech)
Check:
Inspect the edge of Display for damage and gap.
Action:
1. If the edge of Display Frame Assy has gap – replace
Display Frame Assy.
2. If the Display Frame Assy is damaged – replace Display
Frame Assy.
Run the Water Resistance Test again!
1300-8384
Sony Mobile Communications AB –
Rev 2
39(65)

Company Internal
Problem Areas: Water Resistance
Check:
Inspect the edge of Panel Rear Sub Assy for damage and
gap and Inspect the main camera window.
Action:
1. If the edge of Panel Rear Sub Assy has gap – reassemble
Panel Rear Sub Assy.
2. If Panel Rear Sub Assy is damaged or main camera
window has gap – replace Panel Rear Sub Assy and
Antenna NFC.
Run the Water Resistance Test again!
Troubleshooting Guide (mech)
Check:
Inspect the Speaker Top.
Action:
If not assembled well or damaged – replace the Cushion
ACO, Speaker Top and Adhesive WR Speaker.
Run the Water Resistance Test again!
1300-8384
Sony Mobile Communications AB –
Rev 2
40(65)

Company Internal
Problem Areas: Water Resistance
Check:
Inspect assembly of Speaker Bottom.
Action:
If not assembled well or damaged – replace the Speaker
Bottom and Adhesive WR Speaker.
Run the Water Resistance Test again!
Troubleshooting Guide (mech)
1300-8384
Sony Mobile Communications AB –
Rev 2
41(65)

Company Internal
Problem Areas
1.23 Real Time Clock
1.23.1 Real time clock test fails
Action:
Replace Main PBA.
Troubleshooting Guide (mech)
1300-8384
Sony Mobile Communications AB –
Rev 2
42(65)

Company Internal
Problem Areas
1.24 Total call time
1.24.1 Total call time fails
Action:
Replace Main PBA.
Troubleshooting Guide (mech)
1300-8384
Sony Mobile Communications AB –
Rev 2
43(65)

Company Internal
Problem Areas
1.25 External Memory (E6853)
1.25.1 Memory Card not detected
Check:
Inspect that if a memory card is properly inserted.
Action:
If not properly inserted – insert the memory card correctly.
Check:
Inspect the memory card holder.
Action:
1. If dirty or clogged – clean the Tray Combo SS.
2. Replace Tray Combo SS.
Troubleshooting Guide (mech)
Check:
Inspect the SIM/SD card holder on Main PBA.
Action:
1. If dirty or clogged – clean the holder.
2. Replace Main PBA.
1300-8384
Sony Mobile Communications AB –
Rev 2
44(65)

Company Internal
Problem Areas
1.26 External Memory (E6833/E6883)
1.26.1 Memory Card not detected
Check:
Inspect that if a memory card is properly inserted.
Action:
If not properly inserted – insert the memory card correctly.
Check:
Inspect the SD card holder on Main PBA.
Action:
1. If dirty or clogged – clean the holder.
2. Replace Main PBA.
Troubleshooting Guide (mech)
1300-8384
Sony Mobile Communications AB –
Rev 2
45(65)

Company Internal
Problem Areas
1.27 Security
1.27.1 Security fails
Action:
Replace Main PBA.
Troubleshooting Guide (mech)
1300-8384
Sony Mobile Communications AB –
Rev 2
46(65)
Company Internal
Problem Areas
1.28 FM Radio
1.28.1 No/Poor FM Radio reception
Check:
Inspect the external port of the Audio Jack.
Action:
1. If dirty or oxidized – clean it.
Check:
Inspect the BtB connector of FPC Jack Module to Main PBA.
Action:
1. If not properly connected – disconnect and reconnect it.
2. If dirty or oxidized – clean it.
Troubleshooting Guide (mech)
3. If the BtB connector or FPC Jack Module is damaged –
replace the Sheet Shade Audio Jack, Adhesive WP Audio
Jack and FPC Jack Module.
4. Replace Main PBA.
1300-8384
Sony Mobile Communications AB –
Rev 2
47(65)

Company Internal
Problem Areas
1.29 Verify Certificates
1.29.1 Verify Certificates fails
Action:
N/A.
Troubleshooting Guide (mech)
1300-8384
Sony Mobile Communications AB –
Rev 2
48(65)

Company Internal
Problem Areas
1.30 IrDA Test
1.30.1 IrDA test fails
N/A. No IrDA functionality in the phone.
Troubleshooting Guide (mech)
1300-8384
Sony Mobile Communications AB –
Rev 2
49(65)

Company Internal
Problem Areas
1.31 TV-Out Test
1.31.1 TV-Out test fails
Check:
Inspect the USB connector.
Action:
1. If dirty or oxidized – clean the connector.
Troubleshooting Guide (mech)
2. If USB connector damaged – replace FPC USB Module.
Check:
Inspect the BtB connector of FPC USB Module to Main PBA.
Action:
1. If not properly connected – disconnect and reconnect it.
2. If dirty or oxidized – clean it.
3. If FPC USB Module is damaged – replace it.
4. Replace Main PBA.
1300-8384
Sony Mobile Communications AB –
Rev 2
50(65)

Company Internal
Problem Areas
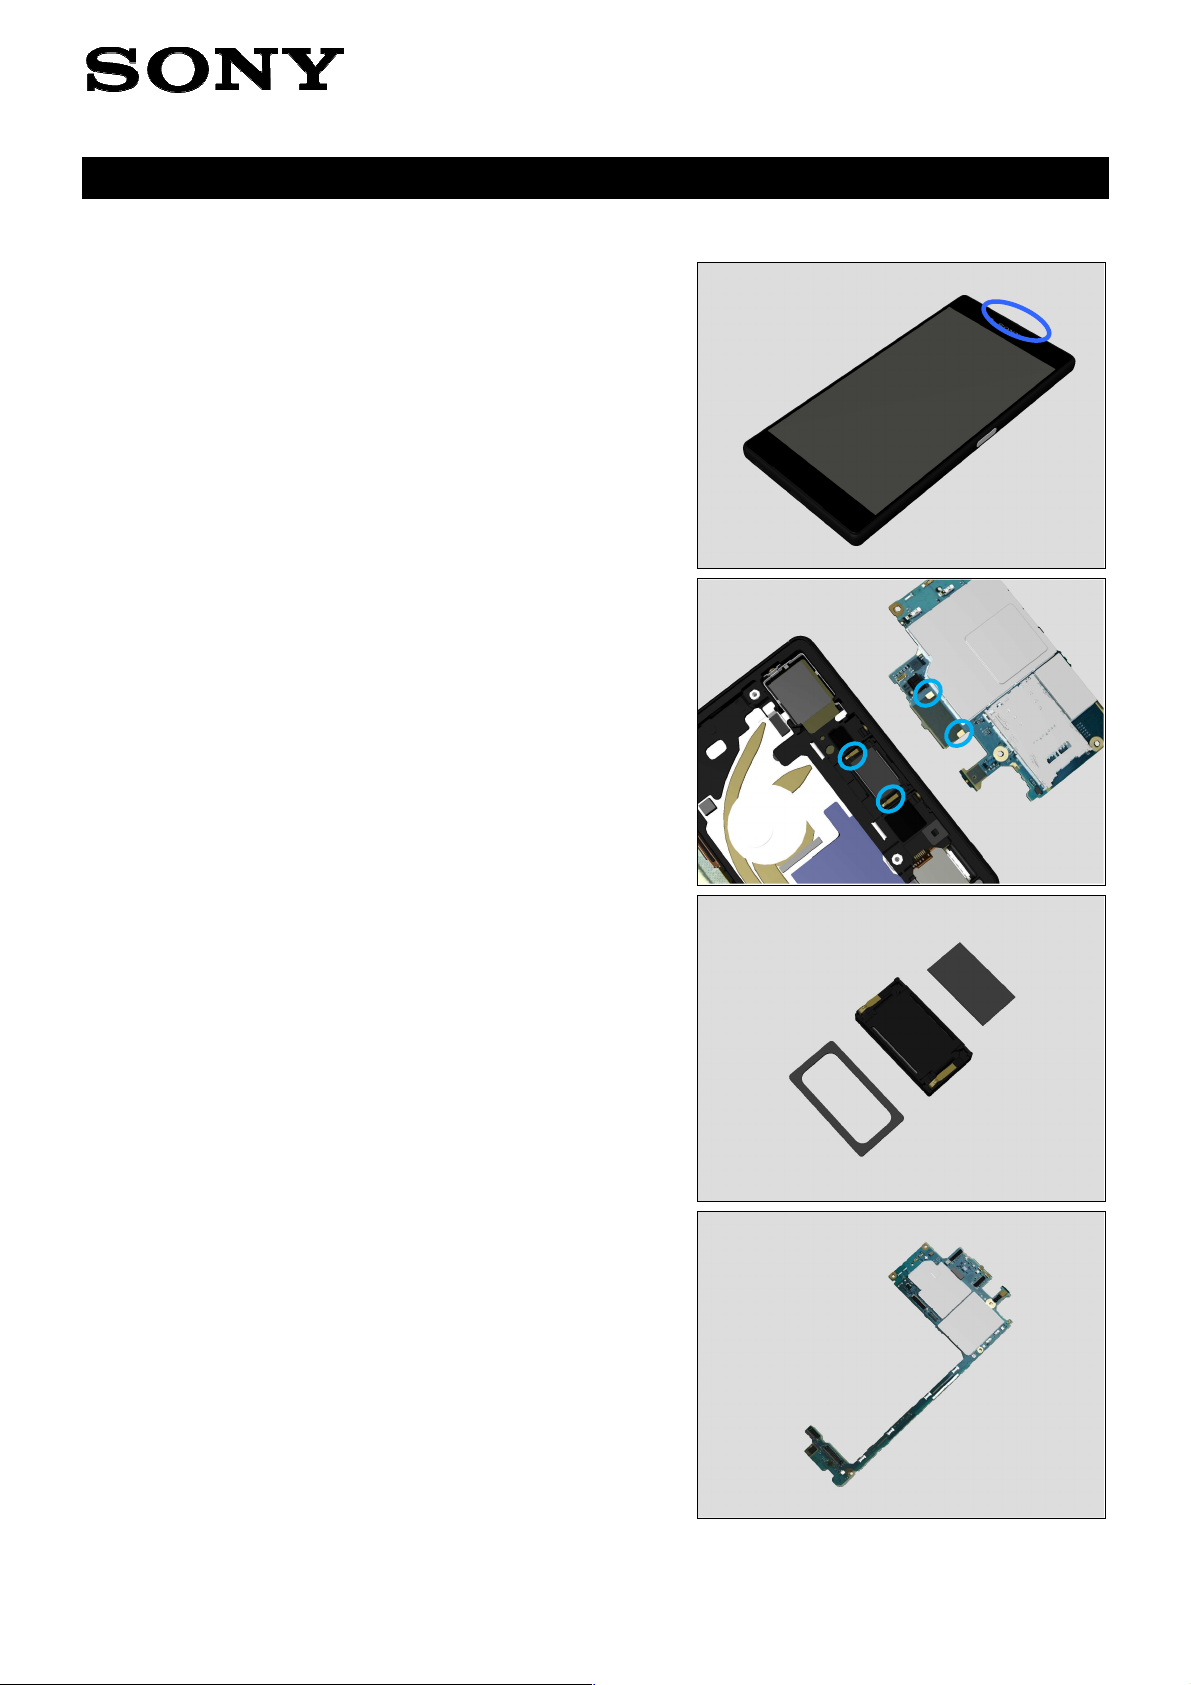
1.32 Network & Signal
1.32.1 No/Poor signal
Check:
Inspect the RF connector of RF Cable to the Main PBA.
Action:
1. If not properly connected – disconnect and reconnect it.
2. If dirty or oxidized – clean it.
Troubleshooting Guide (mech)
3. If the RF cable is damaged – replace the RF cable.
4. If the connector on the main PBA is damaged – replace
Main PBA.
Check:
Inspect if the RF Cable is mounted into its clips.
Action:
If not properly assembled – reassemble it.
1300-8384
Sony Mobile Communications AB –
Rev 2
51(65)

Company Internal
Problem Areas: Network & Signal
Check:
Inspect the RF connector of RF Cable to the Main PBA.
Action:
1. If not properly connected – disconnect and reconnect it.
2. If dirty or oxidized – clean it.
Troubleshooting Guide (mech)
3. If the RF cable is damaged – replace the RF cable.
4. If the connector on the Main PBA is damaged – replace
Main PBA.
Check:
Inspect the contact pins on the Main PBA and contact pads
on the Display Frame Assy.
Only the contacts marked with 1 and 2 are signal feed
point.
1300-8384
Sony Mobile Communications AB –
Rev 2
52(65)

Company Internal
Problem Areas: Network & Signal
Check:
Inspect the contact pins on the Main PBA and contact pads
on the Display Frame Assy.
Action:
1. If not properly contacted – reassemble the Main PBA.
2. If dirty or oxidized – clean them
Troubleshooting Guide (mech)
3. If the contact pins are damaged – replace the Main PBA.
4. If the contact pads are damaged – replace the Display
Frame Assy.
Check:
Inspect if the contact pins on the Display Frame Assy,
contact pins and pads on the Ant Cellular Main and contact
pad of the Plate USB GND.
Action:
1. If not properly contacted – reassemble them.
2. If dirty or oxidized – clean them
1300-8384
Sony Mobile Communications AB –
Rev 2
53(65)

Company Internal
Problem Areas: Network & Signal
3. If the contact pins and pads on the Ant Cellular Main is
damaged – replace Ant Cellular Main.
Troubleshooting Guide (mech)
4. If the contact pins on the Display Frame Assy is damaged
– replace Display Frame Assy.
5. If the Plate USB GND is damaged – replace it.
Check:
Inspect the contact pin on the Display Frame Assy and and
contact pad on the FPC Key Module.
Action:
1. If not properly contacted – reassemble the FPC Key
Module.
2. If dirty or oxidized – clean them
1300-8384
Sony Mobile Communications AB –
Rev 2
54(65)

Company Internal
Problem Areas: Network & Signal
3. If the contact pad on the FPC Key Module is damaged –
replace FPC Key Module.
Troubleshooting Guide (mech)
4. If the contact pin on the Display Frame Assy is damaged
– replace Display Frame Assy.
Check:
Inspect the Ant Cellular Sub contact pads and the contact
pins on main PBA(1).
Inspect the Ant Cellular Sub contact pads and the contact
pins on Display Frame Assy(2).
Only the contact marked with 1 is signal feed point.
Action:
1. If dirty or oxidized – clean the pads and pins.
2. If the Ant Cellular Sub contact pads are damaged –
replace the Ant Cellular Sub.
1300-8384
Sony Mobile Communications AB –
Rev 2
55(65)

Company Internal
Problem Areas: Network & Signal
3. If the Display Frame Assy contact pins are damaged –
replace the Display Frame Assy.
Troubleshooting Guide (mech)
4. If the contact pins on main PBA are damaged – replace
Main PBA.
1300-8384
Sony Mobile Communications AB –
Rev 2
56(65)

Company Internal
Problem Areas
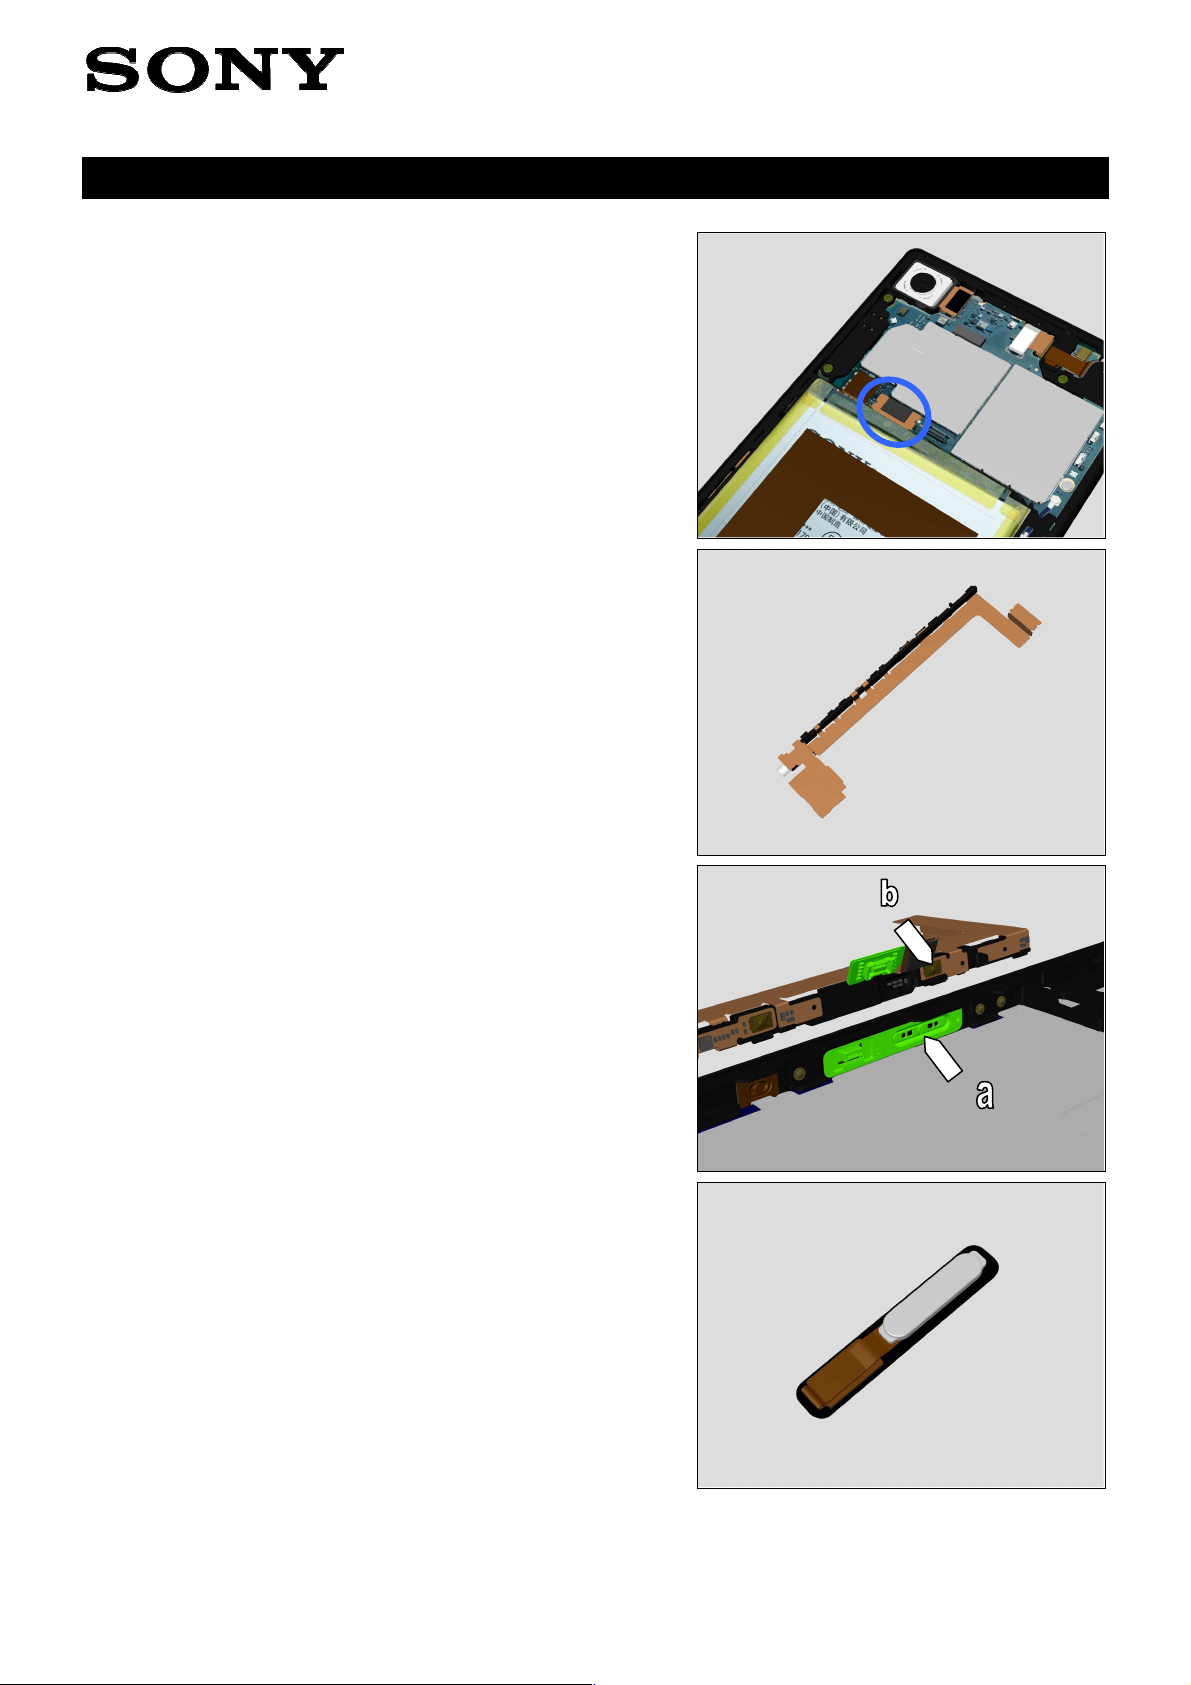
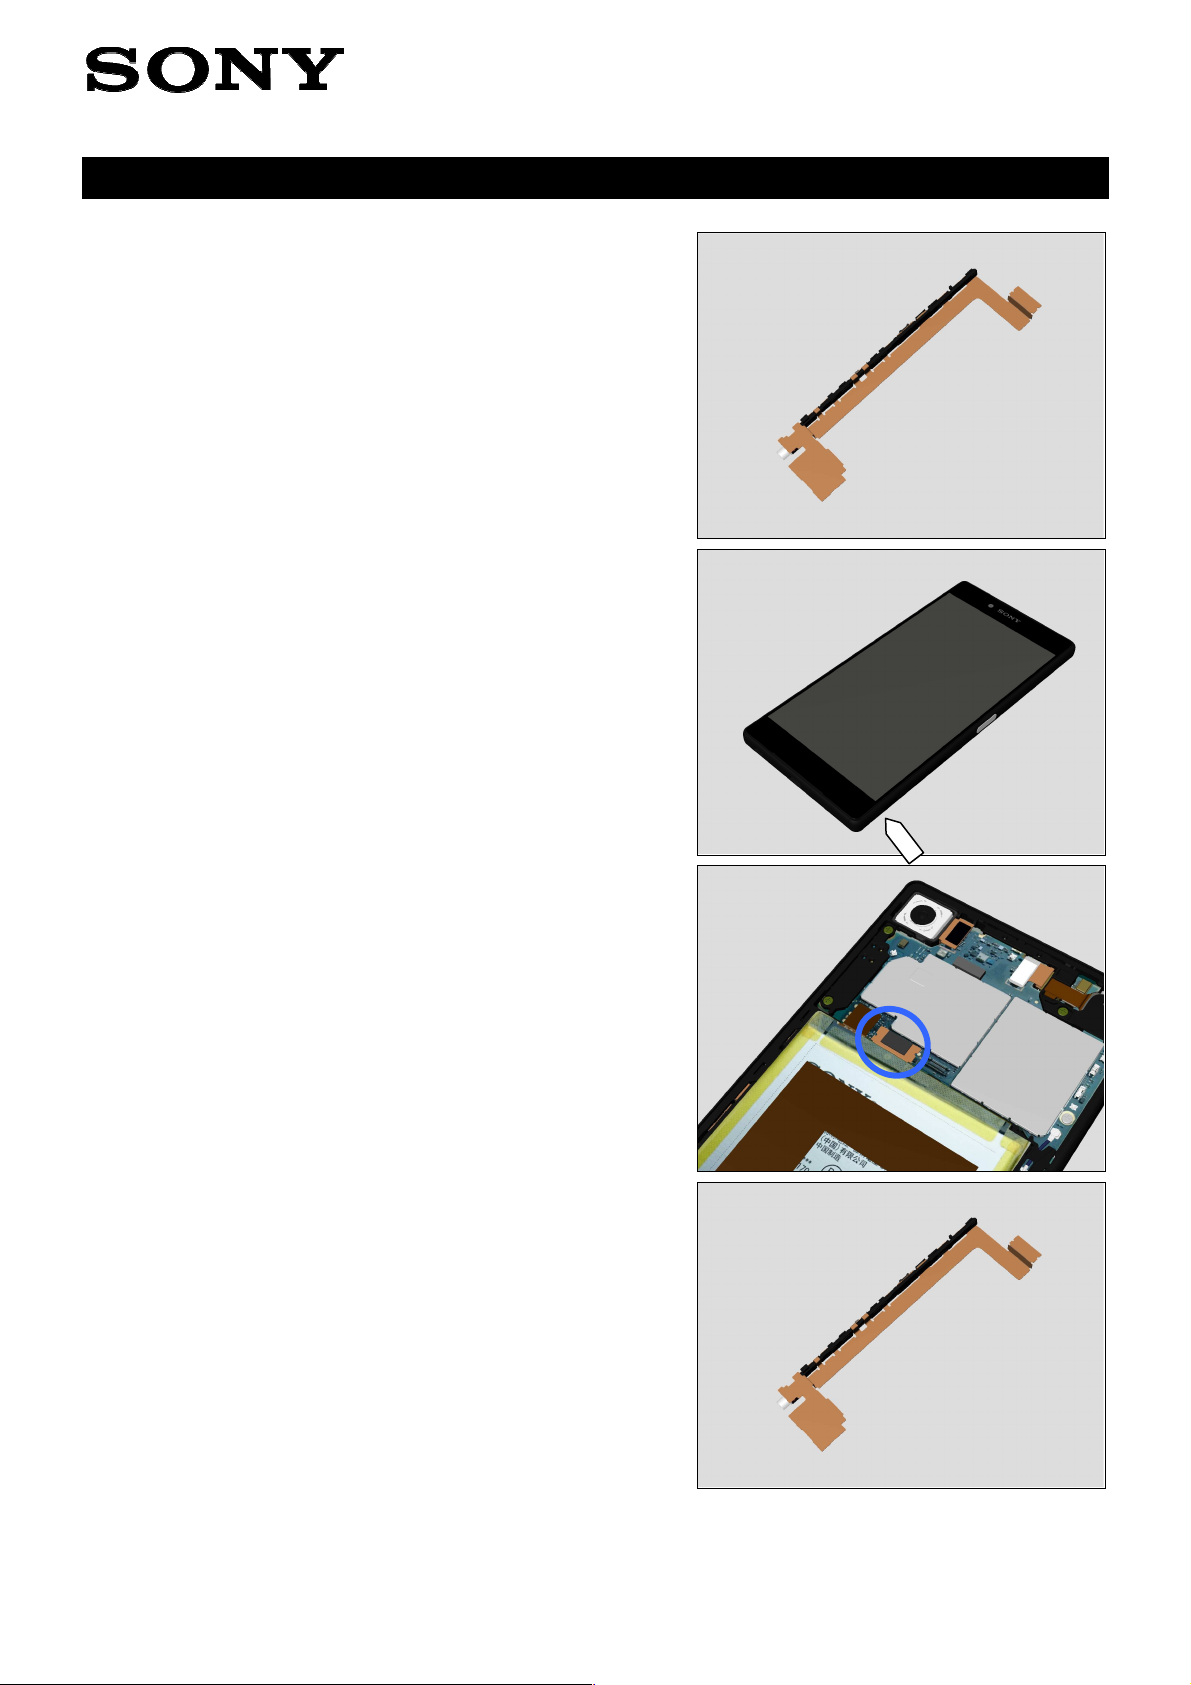
1.33 SIM (E6853)
1.33.1 SIM not detected
Check:
Inspect the external port of the SIM/SD card holder.
Action:
If dirty or clogged – clean the external port.
Check:
Check if Nano SIM is properly mounted into the Tray Combo
DS and if a Tray Combo DS can be properly inserted and
inspect the Tray Combo DS.
Action:
1. If not properly assembled – reassemble it.
2. If damaged – Replace Tray Combo DS.
Troubleshooting Guide (mech)
Check:
Inspect the SIM/SD card holder on Main PBA.
Action:
1. If dirty or clogged – clean the holder.
2. Replace Main PBA.
Note: only Single SIM illustration shown!
1.33.2 Incorrect Nano SIM indicated
Check:
Check whether the phone is locked to a particular operator
and whether the correct operator Nano SIM is being used.
Action:
1. Use a proper operator Nano SIM or test Nano SIM.
2. Replace Main PBA.
1300-8384
Sony Mobile Communications AB –
Rev 2
57(65)

Company Internal
Problem Areas
1.34 SIM (E6833/E6883)
1.34.1 SIM not detected
Check:
Inspect the external port of the SIM/SD card holder.
Action:
If dirty or clogged – clean the external port.
Check:
Check if Nano SIM is properly mounted into the Tray Combo
DS and if a Tray Combo DS can be properly inserted and
inspect the Tray Combo DS.
Action:
1. If not properly assembled – reassemble it.
2. If damaged – Replace Tray Combo DS.
Troubleshooting Guide (mech)
Check:
Inspect the SIM card holder on Main PBA.
Action:
1. If dirty or clogged – clean the holder.
2. Replace Main PBA.
1.34.2 Incorrect Nano SIM indicated
Check:
Check whether the phone is locked to a particular operator
and whether the correct operator Nano SIM is being used.
Action:
1. Use a proper operator Nano SIM or test Nano SIM.
2. Replace Main PBA.
1300-8384
Sony Mobile Communications AB –
Rev 2
58(65)

Company Internal
Problem Areas
1.35 Charging
1.35.1 Battery will not charge by USB
connector
Check:
Inspect the USB connector.
Action:
1. If dirty or oxidized – clean the connector.
Troubleshooting Guide (mech)
2. If USB connector is damaged – replace FPC USB
Module.
Check:
Inspect the BtB connector of FPC USB Module to Main PBA.
Action:
1. If not properly connected – disconnect and reconnect it.
2. If dirty or oxidized – clean it.
3. If FPC USB Module is damaged – replace it.
1300-8384
Sony Mobile Communications AB –
Rev 2
59(65)

Company Internal
Problem Areas: Charging
Check:
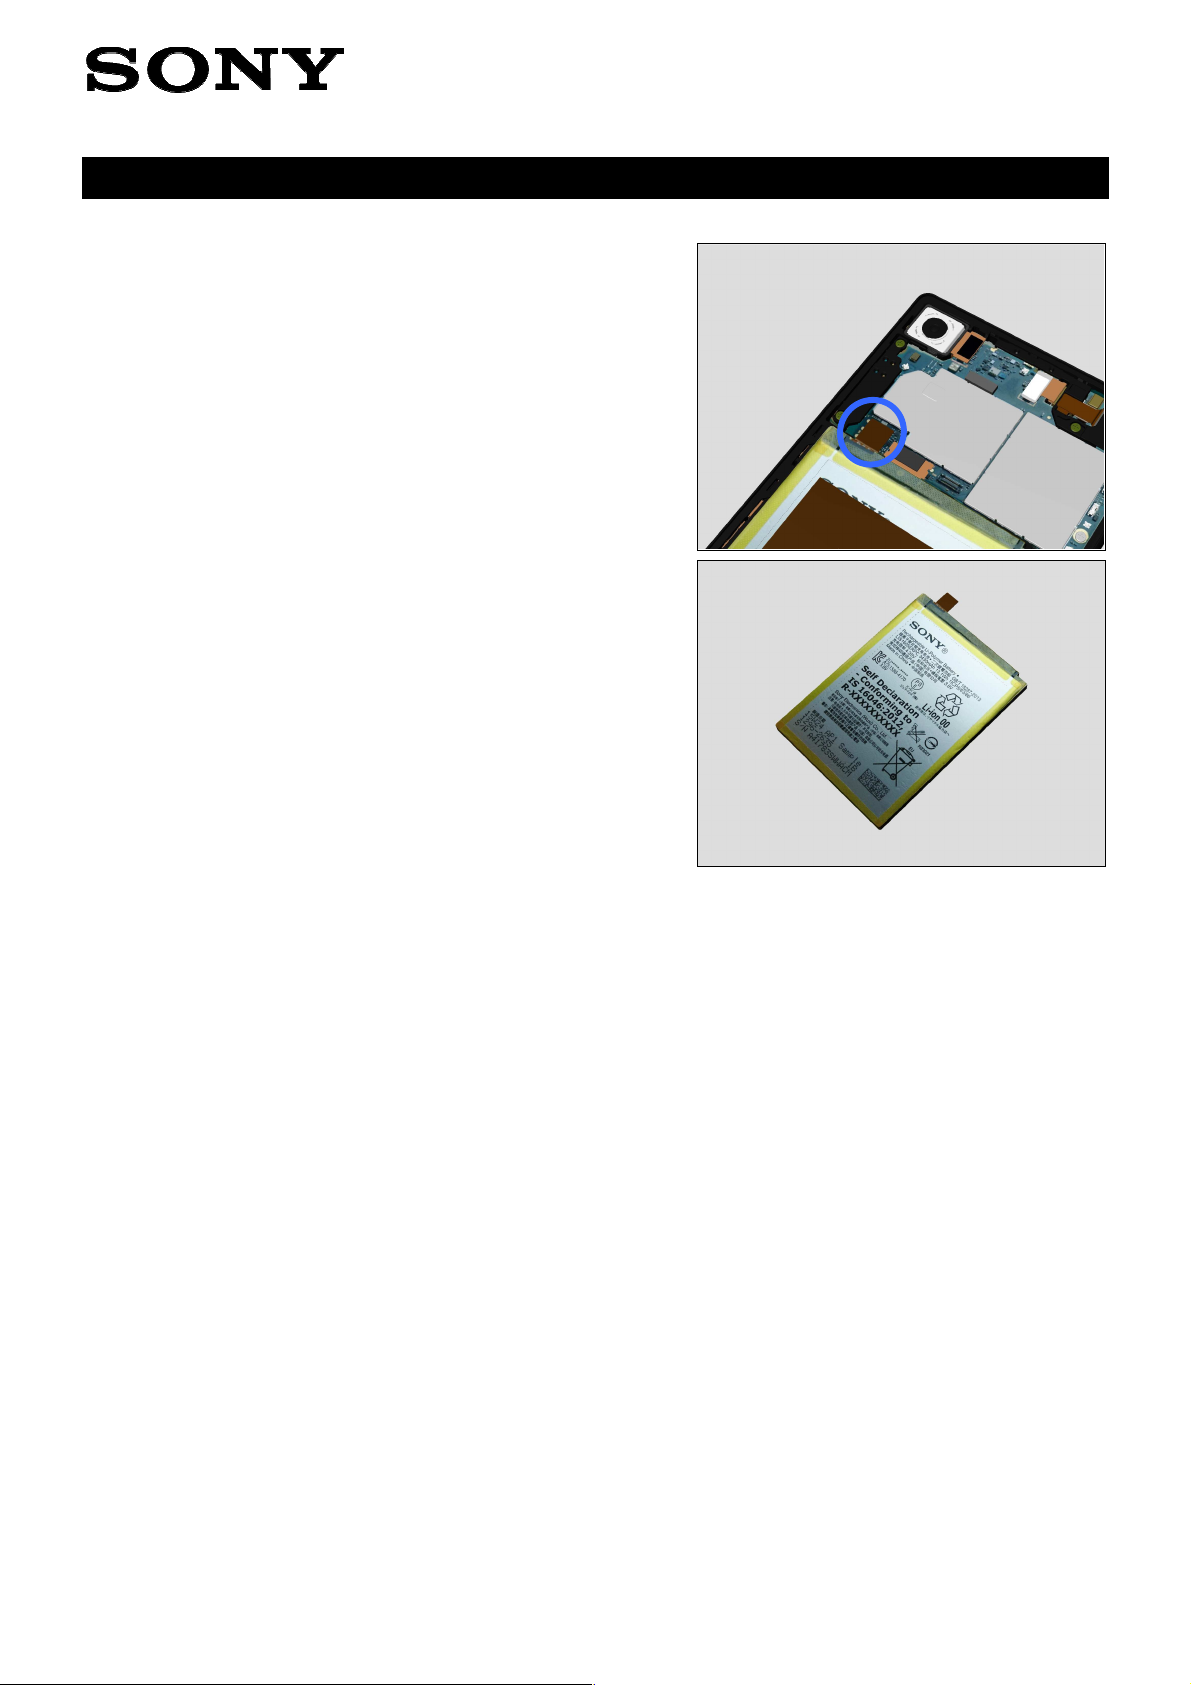
Inspect the BtB connector of the Battery to Main PBA.
Action:
1. If not properly connected – disconnect and reconnect it.
2. If dirty or oxidized – clean the both sides of the BtB
connector.
Troubleshooting Guide (mech)
3. If the BtB connector, the FPC or the Battery is damaged –
replace the Battery.
4. Replace Main PBA.
1300-8384
Sony Mobile Communications AB –
Rev 2
60(65)

Company Internal
Problem Areas
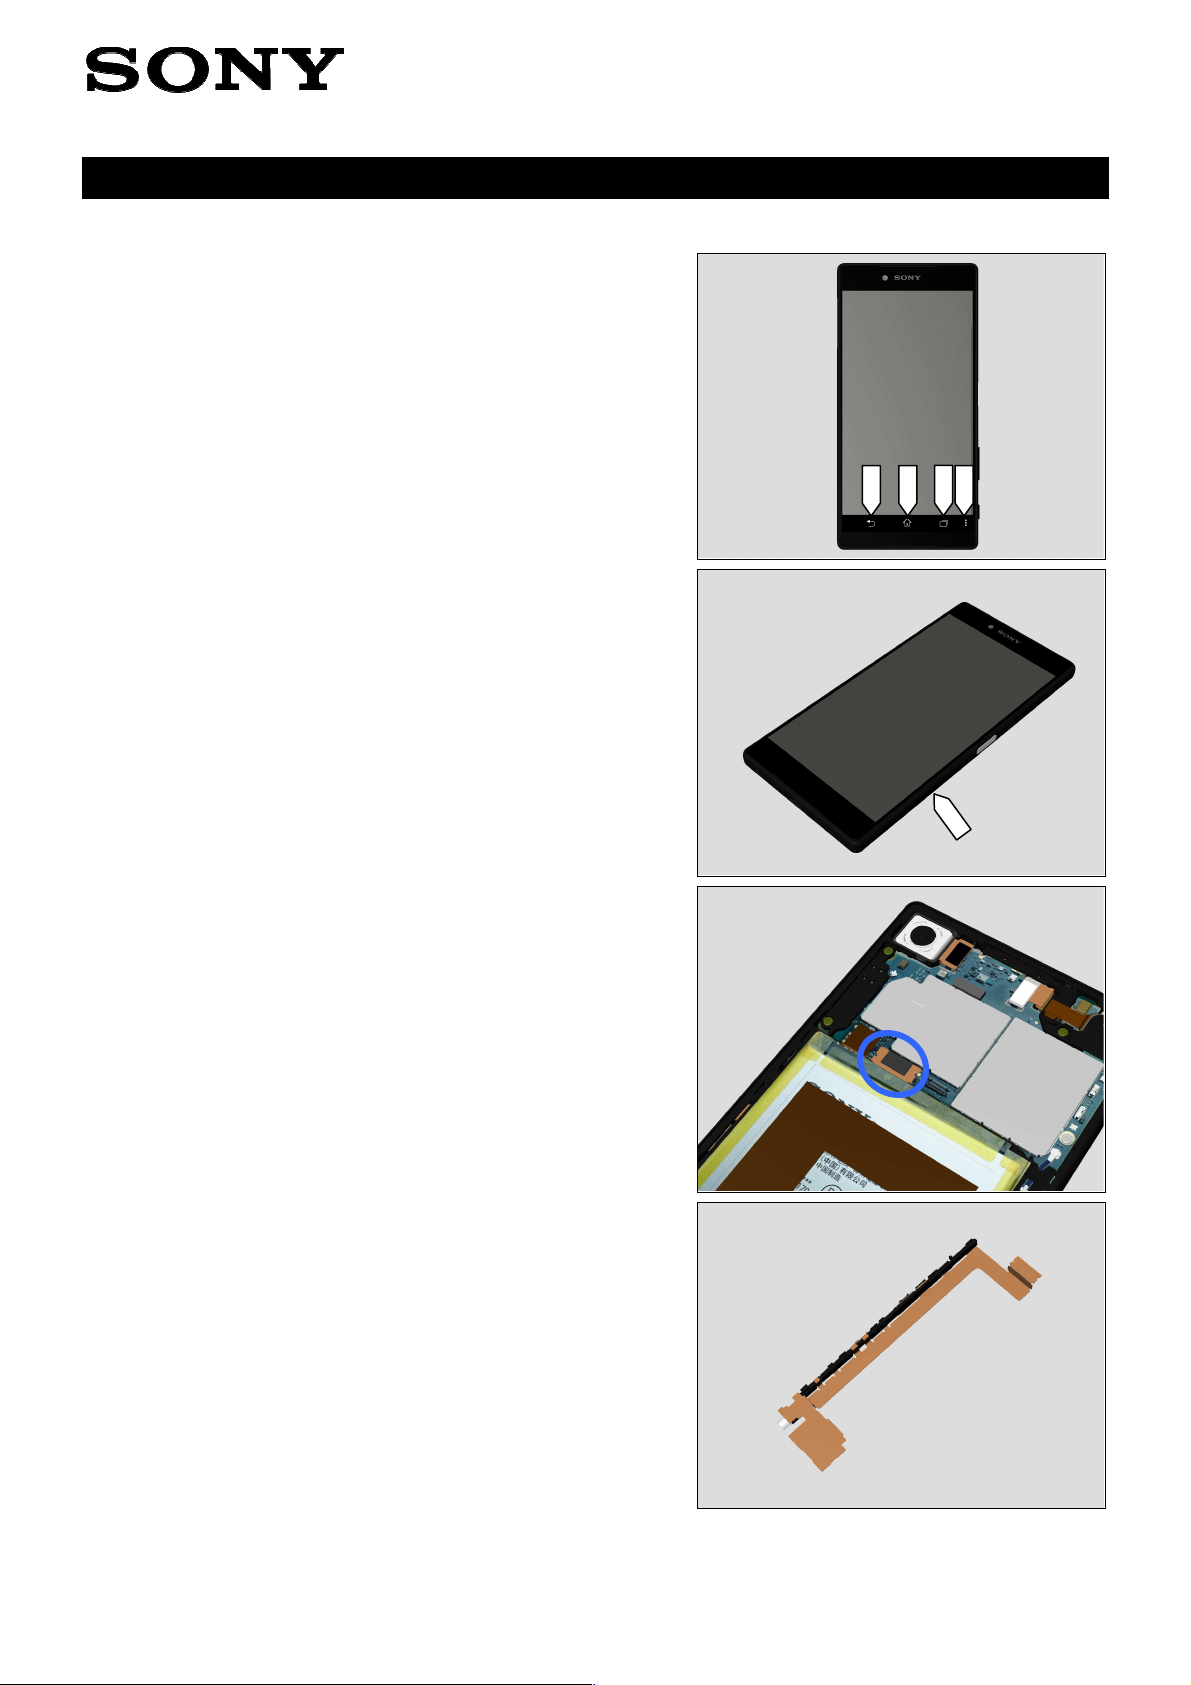
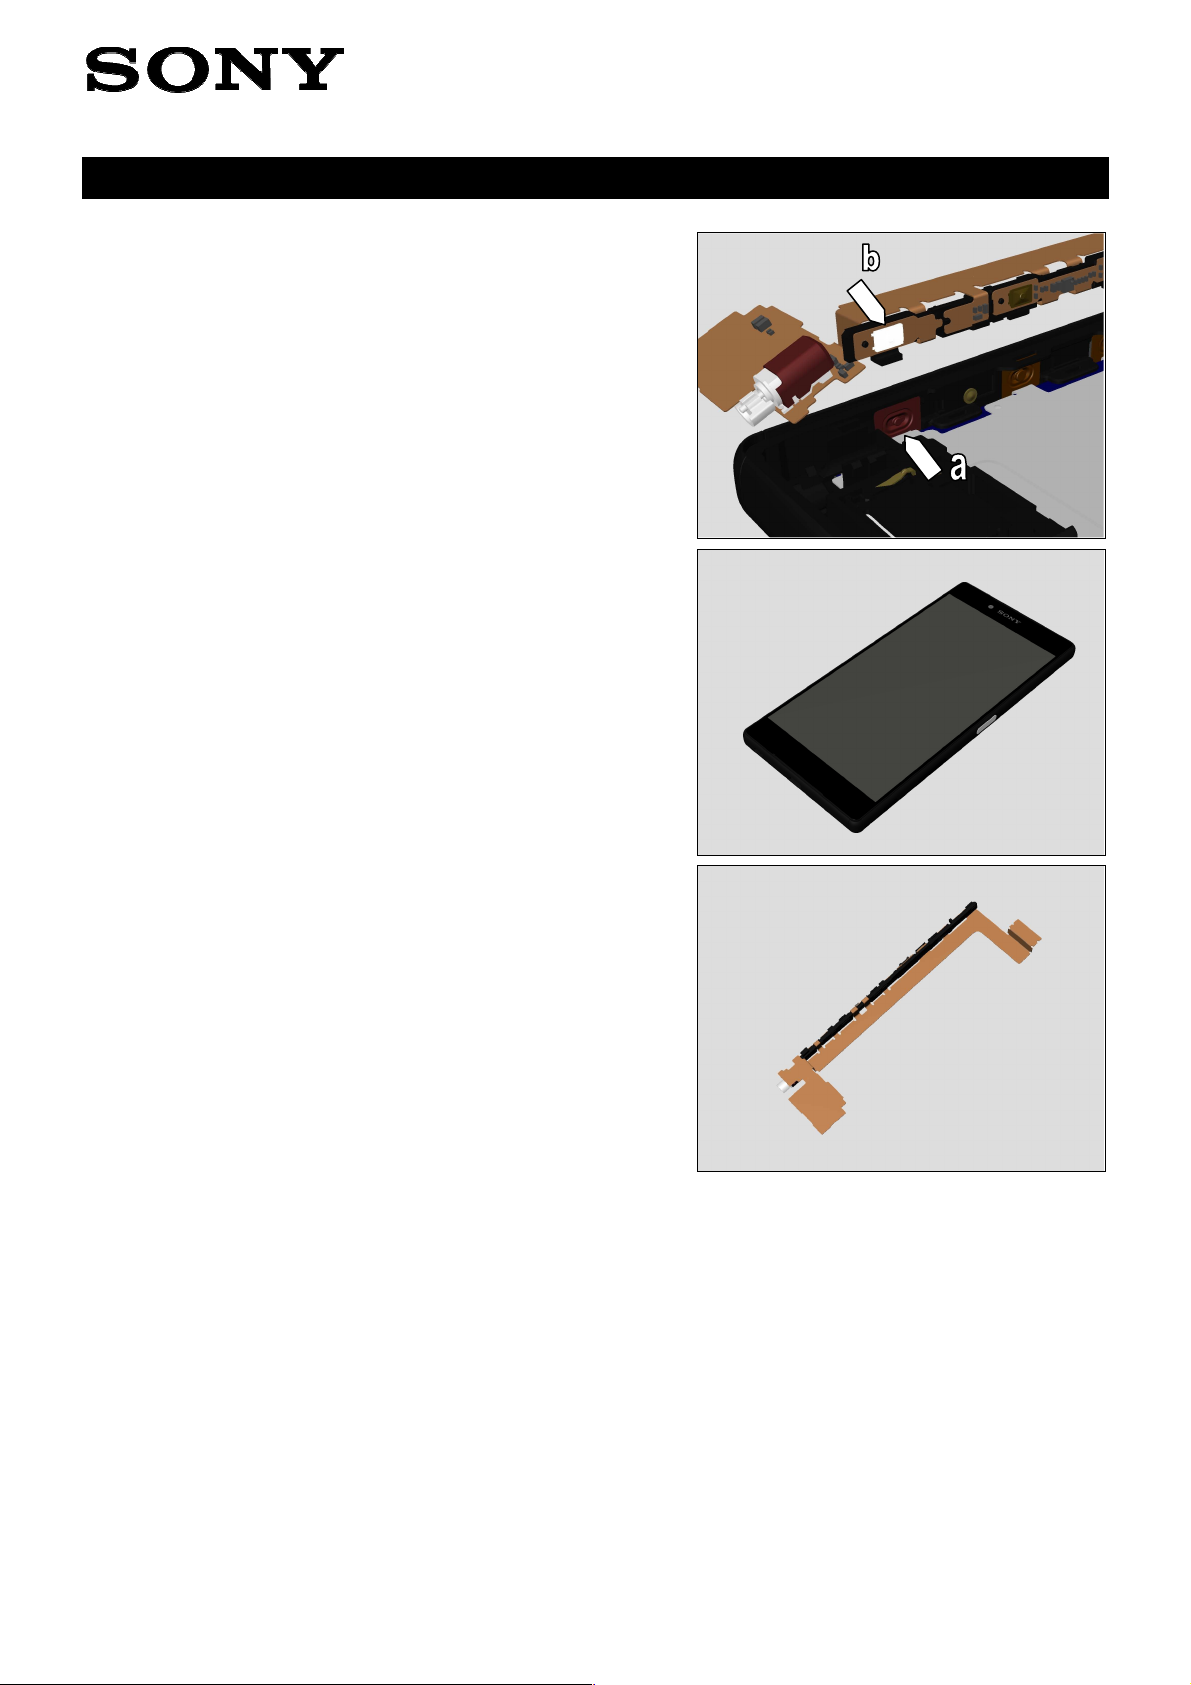
1.36 Audio Jack test
1.36.1 Connection to headset fails
Check:
Inspect the external port of the Audio Jack.
Action:
1. If dirty or oxidized – clean it.
Check:
Inspect the BtB connector of FPC Jack Module to Main PBA.
Action:
1. If not properly connected – disconnect and reconnect it.
2. If dirty or oxidized – clean it.
Troubleshooting Guide (mech)
3. If the BtB connector or FPC Jack Module is damaged –
replace the Sheet Shade Audio Jack, Adhesive WP Audio
Jack and FPC Jack Module.
4. Replace Main PBA.
1300-8384
Sony Mobile Communications AB –
Rev 2
61(65)

Company Internal
Problem Areas
1.37 Finger Print Sensor test
1.37.1 Finger Print Sensor test fails
Check:
Inspect the Fingerprint Sensor Module.
Action:
1. If dirty or oxidized – clean it.
2. If the Fingerprint Sensor Module is damaged – replace
the Fingerprint Sensor Module.
Check:
Inspect the BtB connector of FPC Key Module to Main PBA.
Action:
1. If not properly connected – disconnect and reconnect it.
2. If dirty or oxidized – clean it.
Troubleshooting Guide (mech)
3. If the BtB connector or FPC Key Module is damaged –
replace the FPC Key Module.
4. Replace Main PBA.
Check:
Inspect the BtB connector of Fingerprint Sensor Module to
FPC Key Module.
Action:
1. If not properly connected – disconnect and reconnect it.
2. If dirty or oxidized – clean it.
1300-8384
Sony Mobile Communications AB –
Rev 2
62(65)

Company Internal
Problem Areas: Finger Print Sensor test
3. If the BtB connector or FPC Key Module is damaged –
replace the FPC Key Module.
Troubleshooting Guide (mech)
4. If the BtB connector of Fingerprint Sensor Module is
damaged – replace the Fingerprint Sensor Module.
1300-8384
Sony Mobile Communications AB –
Rev 2
63(65)

Company Internal
Problem Areas
1.38 Data Communication
1.38.1 Data transfer via System
Connector fails
Check:
Inspect the USB connector.
Action:
1. If dirty or oxidized – clean the connector.
Troubleshooting Guide (mech)
2. If USB connector is damaged – replace FPC USB
Module.
Check:
Inspect the BtB connector of FPC USB Module to Main PBA.
Action:
1. If not properly connected – disconnect and reconnect it.
2. If dirty or oxidized – clean it.
3. If FPC USB Module is damaged – replace it.
4. Replace Main PBA.
1300-8384
Sony Mobile Communications AB –
Rev 2
64(65)

Company Internal
Rev.
Date
Changes / Comments
Troubleshooting Guide (mech)
2 Revision History
1 2015-Otc-18 Initial release
2 2015-Nov-02 Updated chapter 1.12, 1.13 and 1.32 about signal contact pins and pads.
1300-8384
Sony Mobile Communications AB –
Rev 2
65(65)
 Loading...